Embed Size (px)
Citation preview
StarWind iSCSI SAN & NAS:
HA Maintenance and Configuration Changes April 2013
StarWind iSCSI SAN & NAS: HA Maintenance and Configuration Changes
Page | 2
TRADEMARKS
“StarWind”, “StarWind Software” and the StarWind and the StarWind Software logos are trademarks of
StarWind Software which may be registered in some jurisdictions. All other trademarks are owned by their
respective owners.
CHANGES
The material in this document is for information only and is subject to change without notice. While
reasonable efforts have been made in the preparation of this document to assure its accuracy, StarWind
Software assumes no liability resulting from errors or omissions in this document, or from the use of the
information contained herein. StarWind Software reserves the right to make changes in the product design
without reservation and without notification to its users.
TECHNICAL SUPPORT AND SERVICES
If you have questions about installing or using this software, check this and other documents first - you will
find answers to most of your questions on the Technical Papers webpage or in StarWind Forum. If you need
further assistance, please contact us.
Copyright ©2009-2013 StarWind Software Inc.
No part of this publication may be reproduced, stored in a retrieval system, or transmitted in any form or
by any means, electronic, mechanical, photocopying, recording or otherwise, without the prior written
consent of StarWind Software.
StarWind iSCSI SAN & NAS: HA Maintenance and Configuration Changes
Page | 3
CONTENTS
CHANGING AN HA PARTNER NODE .................................................................................................... 4
MANUAL SYNCHRONIZATION ............................................................................................................ 9
PREPARING AN HA DEVICE FOR PROLONGED DOWNTIME ................................................................ 10
RESTORING A STARWIND SERVER AFTER DOWNTIME ...................................................................... 16
CHANGING SYNCHRONIZATION AND HEARTBEAT CHANNELS ........................................................... 22
CONFIGURING CHAP FOR AN НА DEVICE .......................................................................................... 28
CONTACTS....................................................................................................................................... 33
StarWind iSCSI SAN & NAS: HA Maintenance and Configuration Changes
Page | 4
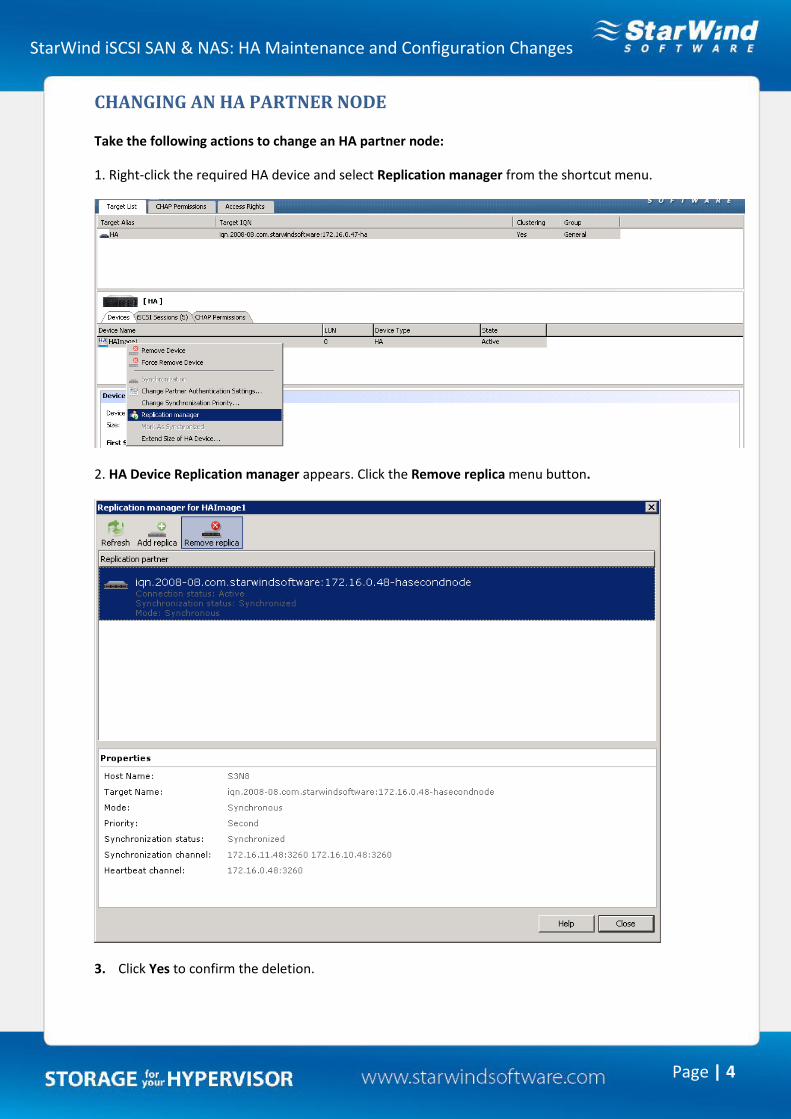
CHANGING AN HA PARTNER NODE
Take the following actions to change an HA partner node:
1. Right-click the required HA device and select Replication manager from the shortcut menu.
2. HA Device Replication manager appears. Click the Remove replica menu button.
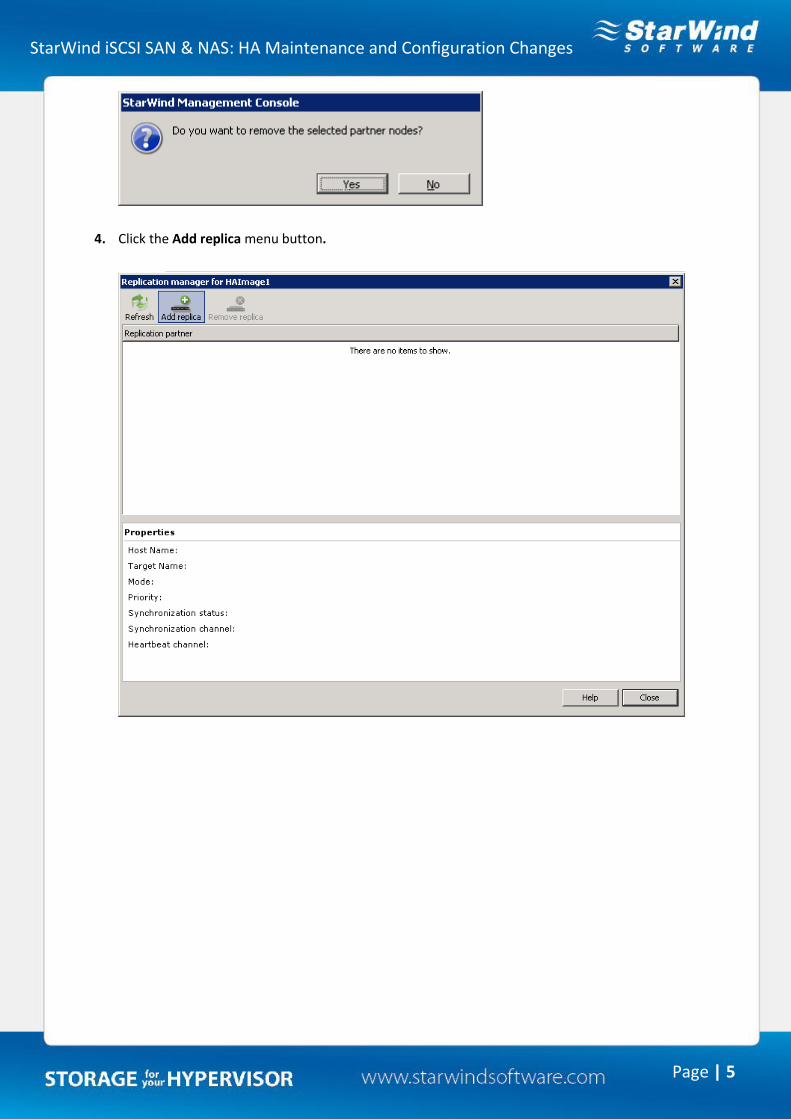
3. Click Yes to confirm the deletion.
StarWind iSCSI SAN & NAS: HA Maintenance and Configuration Changes
Page | 5
4. Click the Add replica menu button.
StarWind iSCSI SAN & NAS: HA Maintenance and Configuration Changes
Page | 6
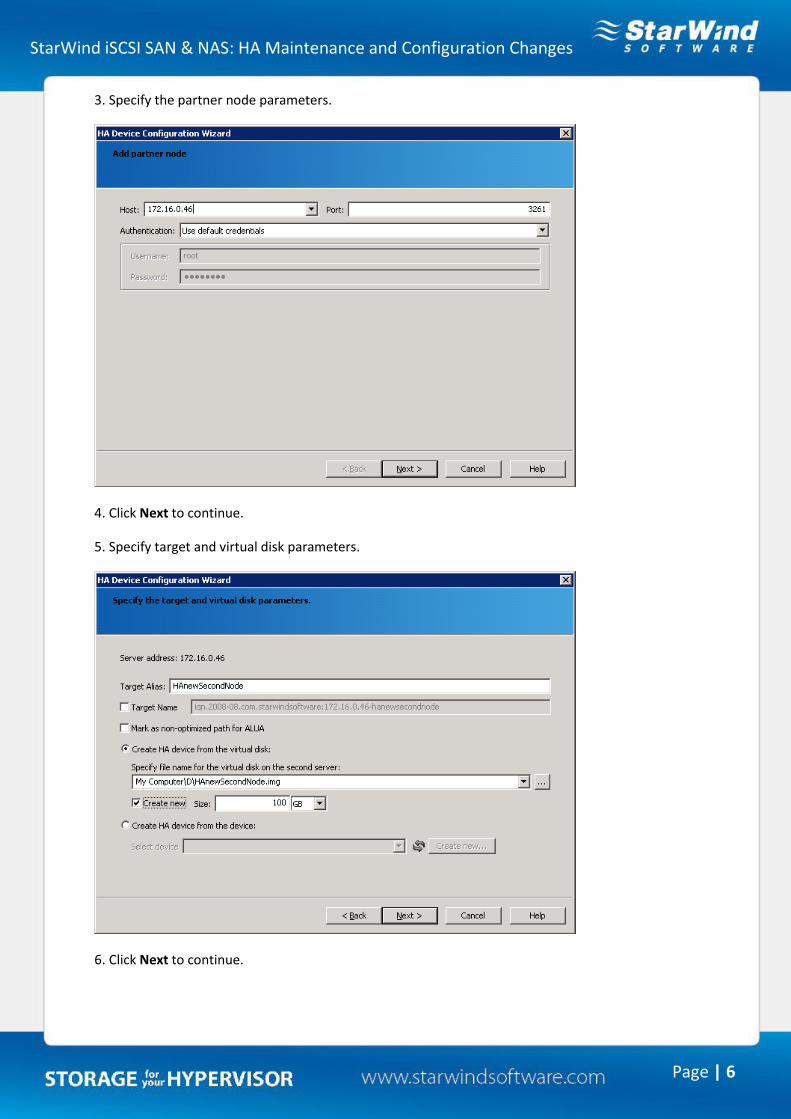
3. Specify the partner node parameters.
4. Click Next to continue.
5. Specify target and virtual disk parameters.
6. Click Next to continue.
StarWind iSCSI SAN & NAS: HA Maintenance and Configuration Changes
Page | 7
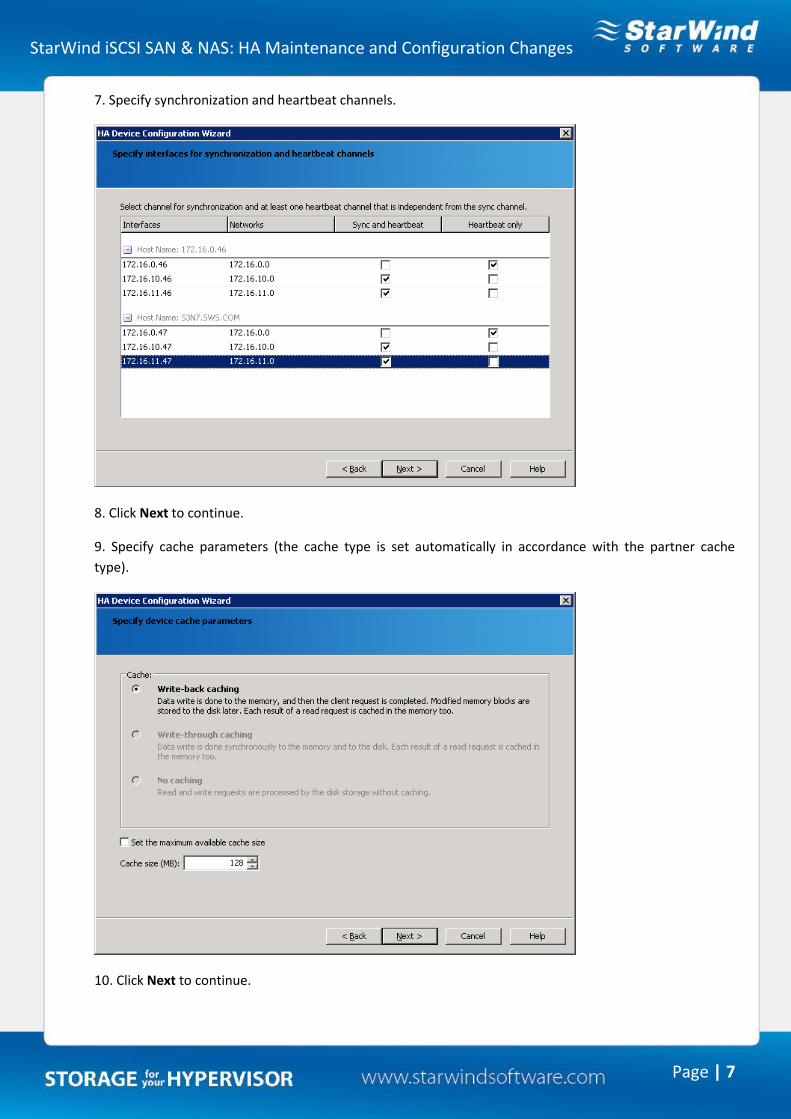
7. Specify synchronization and heartbeat channels.
8. Click Next to continue.
9. Specify cache parameters (the cache type is set automatically in accordance with the partner cache
type).
10. Click Next to continue.
StarWind iSCSI SAN & NAS: HA Maintenance and Configuration Changes
Page | 8
11. Confirm the settings of a new HA partner target and click Next to continue.
12. Click Finish to close the wizard.
StarWind iSCSI SAN & NAS: HA Maintenance and Configuration Changes
Page | 9
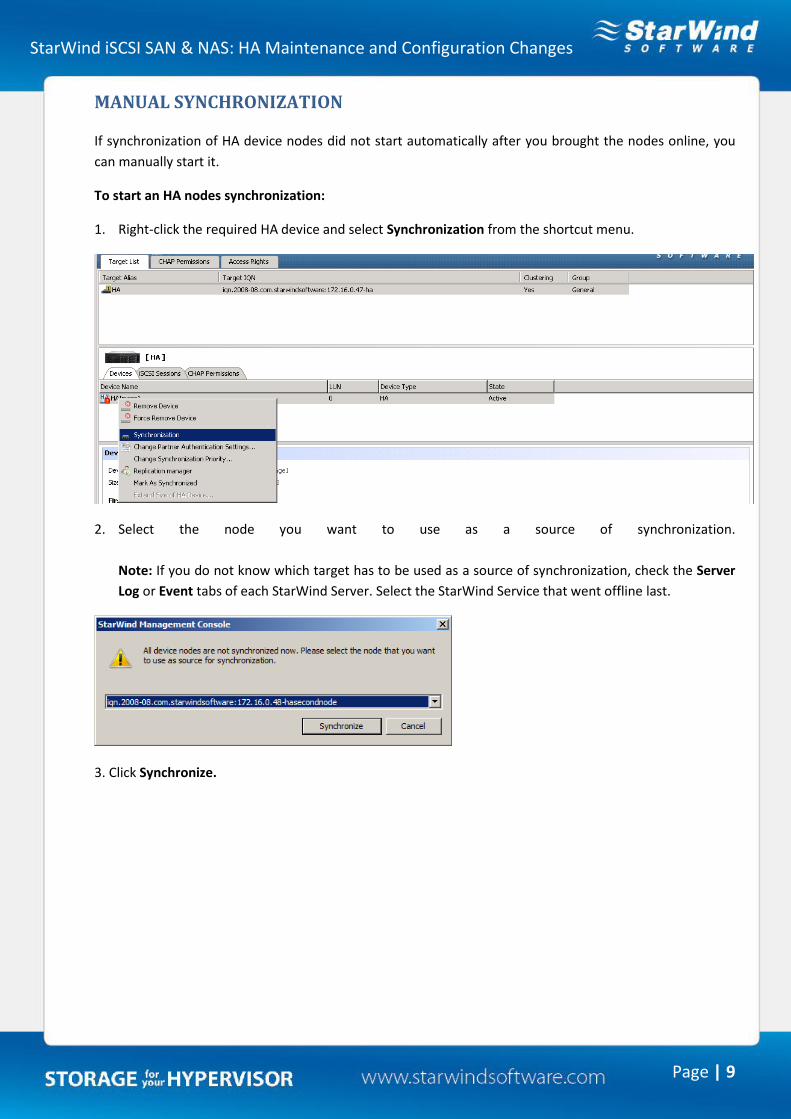
MANUAL SYNCHRONIZATION
If synchronization of HA device nodes did not start automatically after you brought the nodes online, you
can manually start it.
To start an HA nodes synchronization:
1. Right-click the required HA device and select Synchronization from the shortcut menu.
2. Select the node you want to use as a source of synchronization.
Note: If you do not know which target has to be used as a source of synchronization, check the Server
Log or Event tabs of each StarWind Server. Select the StarWind Service that went offline last.
3. Click Synchronize.
StarWind iSCSI SAN & NAS: HA Maintenance and Configuration Changes
Page | 10
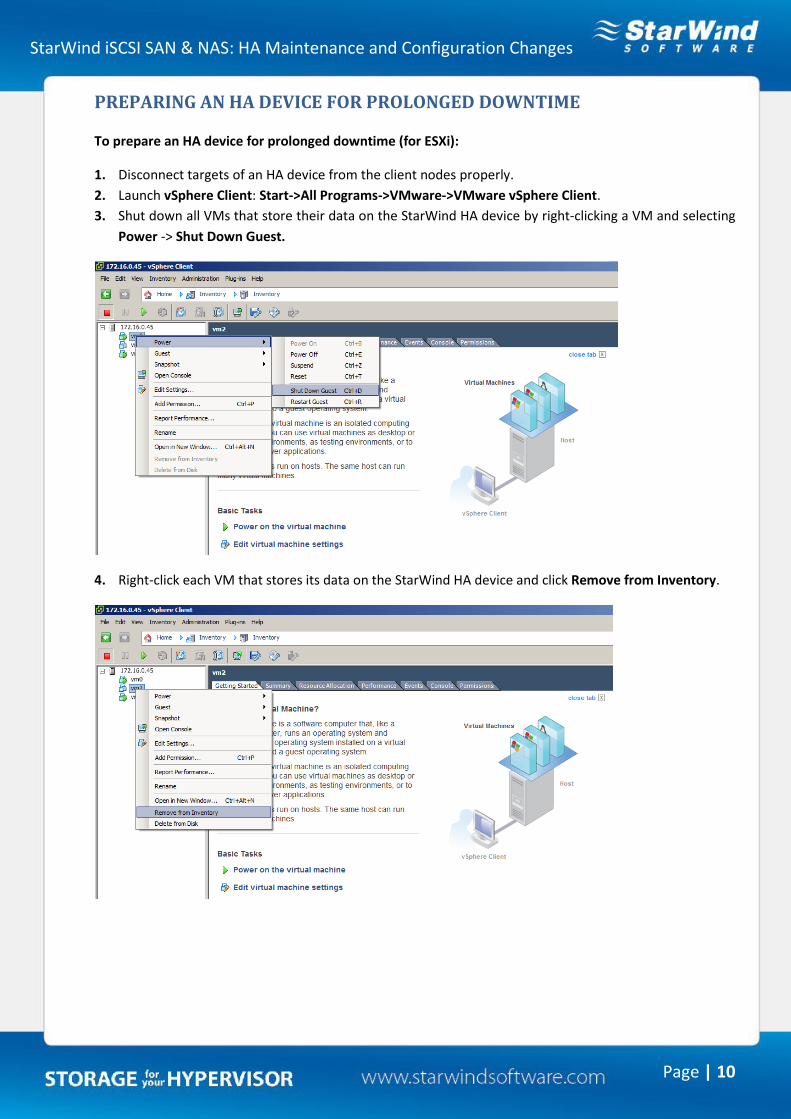
PREPARING AN HA DEVICE FOR PROLONGED DOWNTIME
To prepare an HA device for prolonged downtime (for ESXi):
1. Disconnect targets of an HA device from the client nodes properly.
2. Launch vSphere Client: Start->All Programs->VMware->VMware vSphere Client.
3. Shut down all VMs that store their data on the StarWind HA device by right-clicking a VM and selecting
Power -> Shut Down Guest.
4. Right-click each VM that stores its data on the StarWind HA device and click Remove from Inventory.
StarWind iSCSI SAN & NAS: HA Maintenance and Configuration Changes
Page | 11
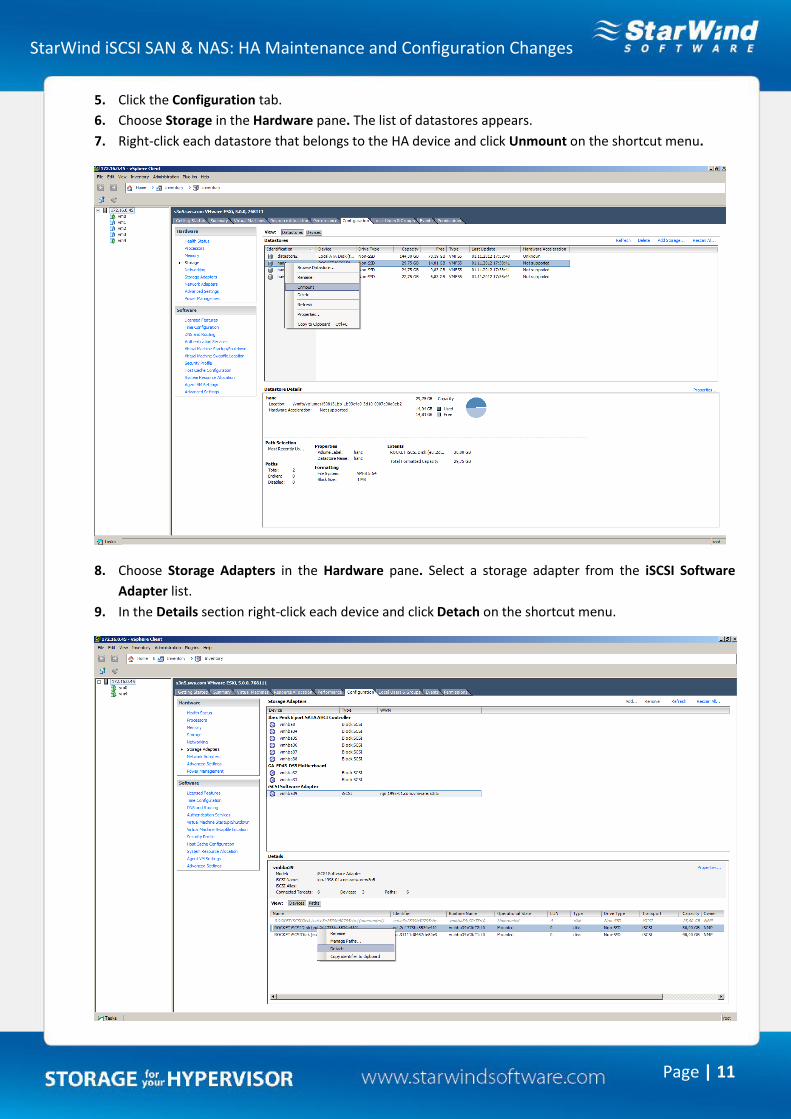
5. Click the Configuration tab.
6. Choose Storage in the Hardware pane. The list of datastores appears.
7. Right-click each datastore that belongs to the HA device and click Unmount on the shortcut menu.
8. Choose Storage Adapters in the Hardware pane. Select a storage adapter from the iSCSI Software
Adapter list.
9. In the Details section right-click each device and click Detach on the shortcut menu.
StarWind iSCSI SAN & NAS: HA Maintenance and Configuration Changes
Page | 12
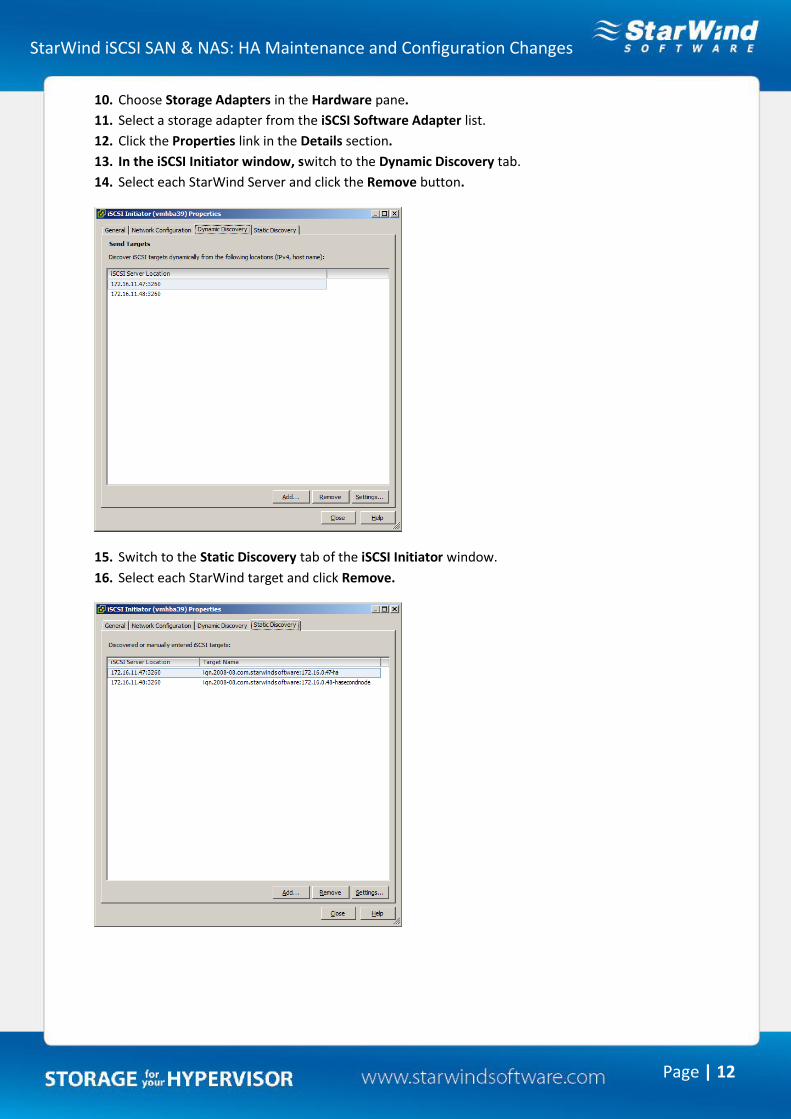
10. Choose Storage Adapters in the Hardware pane.
11. Select a storage adapter from the iSCSI Software Adapter list.
12. Click the Properties link in the Details section.
13. In the iSCSI Initiator window, switch to the Dynamic Discovery tab.
14. Select each StarWind Server and click the Remove button.
15. Switch to the Static Discovery tab of the iSCSI Initiator window.
16. Select each StarWind target and click Remove.
StarWind iSCSI SAN & NAS: HA Maintenance and Configuration Changes
Page | 13
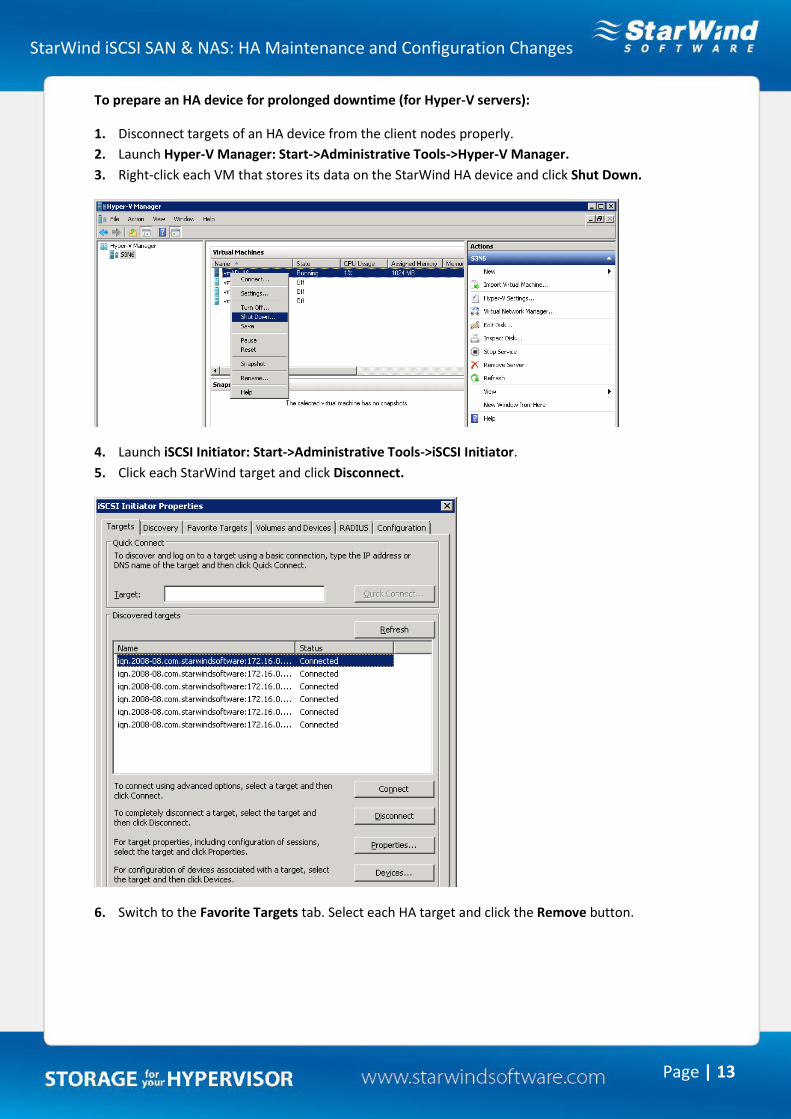
To prepare an HA device for prolonged downtime (for Hyper-V servers):
1. Disconnect targets of an HA device from the client nodes properly.
2. Launch Hyper-V Manager: Start->Administrative Tools->Hyper-V Manager.
3. Right-click each VM that stores its data on the StarWind HA device and click Shut Down.
4. Launch iSCSI Initiator: Start->Administrative Tools->iSCSI Initiator.
5. Click each StarWind target and click Disconnect.
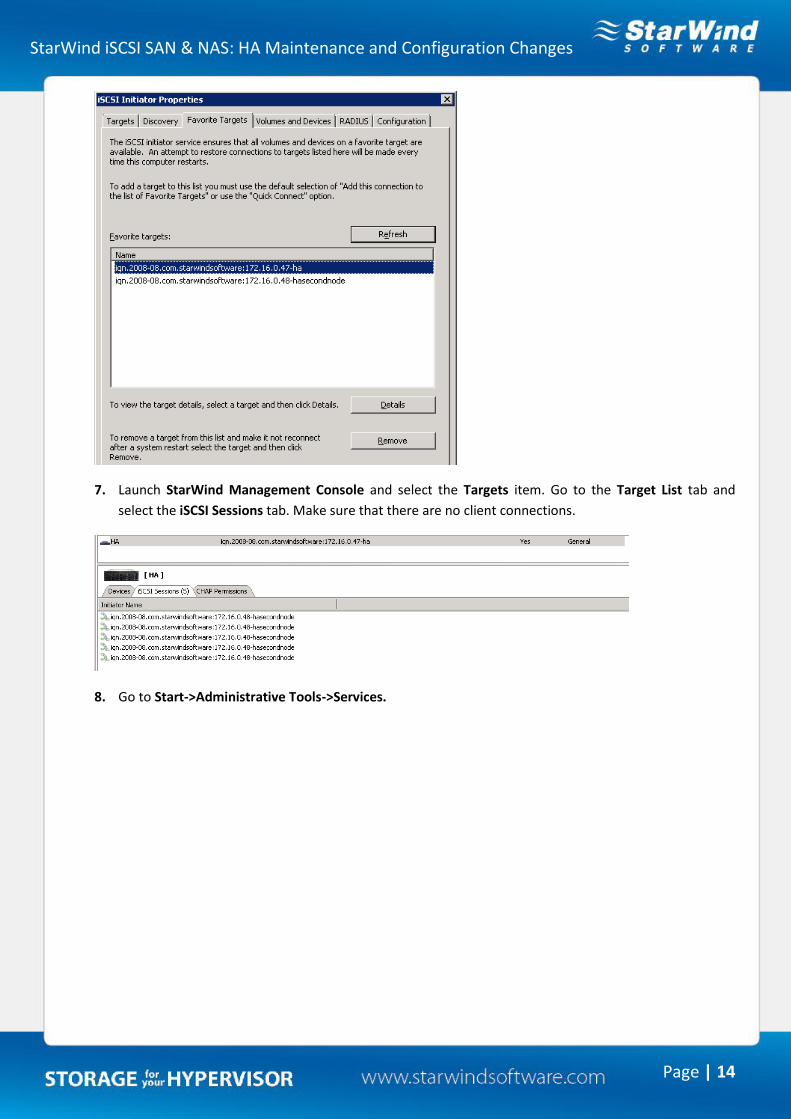
6. Switch to the Favorite Targets tab. Select each HA target and click the Remove button.
StarWind iSCSI SAN & NAS: HA Maintenance and Configuration Changes
Page | 14
7. Launch StarWind Management Console and select the Targets item. Go to the Target List tab and
select the iSCSI Sessions tab. Make sure that there are no client connections.
8. Go to Start->Administrative Tools->Services.
StarWind iSCSI SAN & NAS: HA Maintenance and Configuration Changes
Page | 15
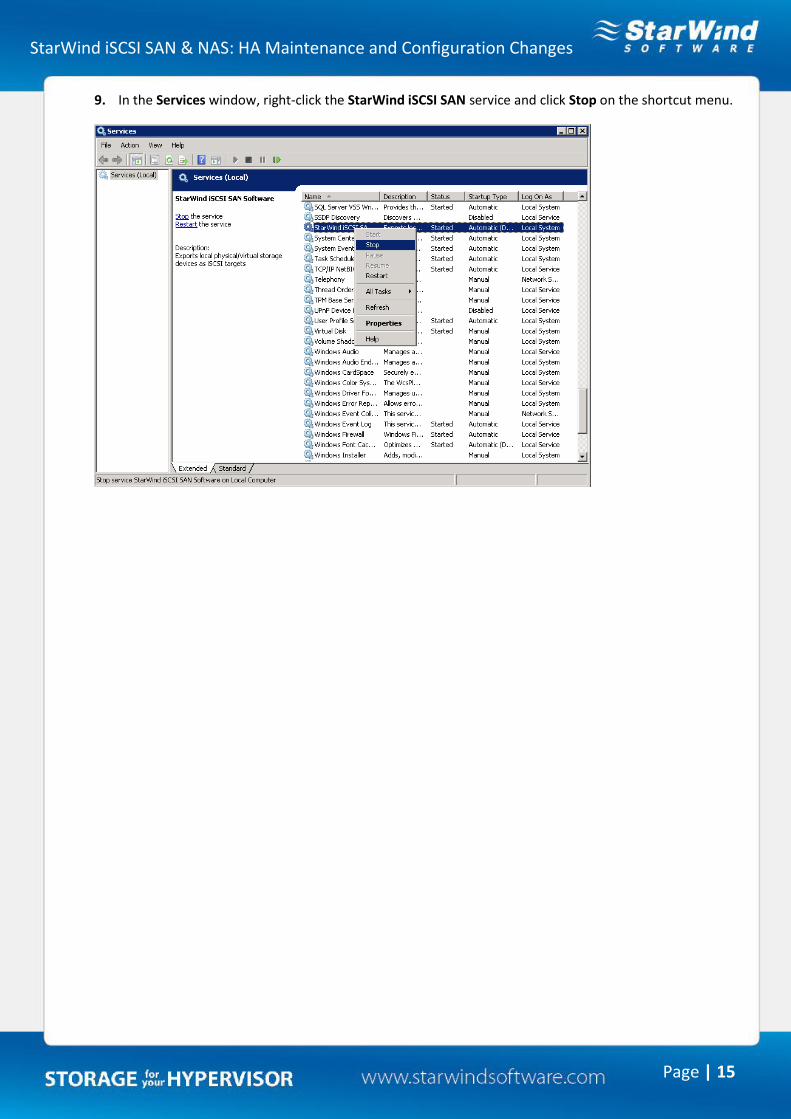
9. In the Services window, right-click the StarWind iSCSI SAN service and click Stop on the shortcut menu.
StarWind iSCSI SAN & NAS: HA Maintenance and Configuration Changes
Page | 16
RESTORING A STARWIND SERVER AFTER DOWNTIME
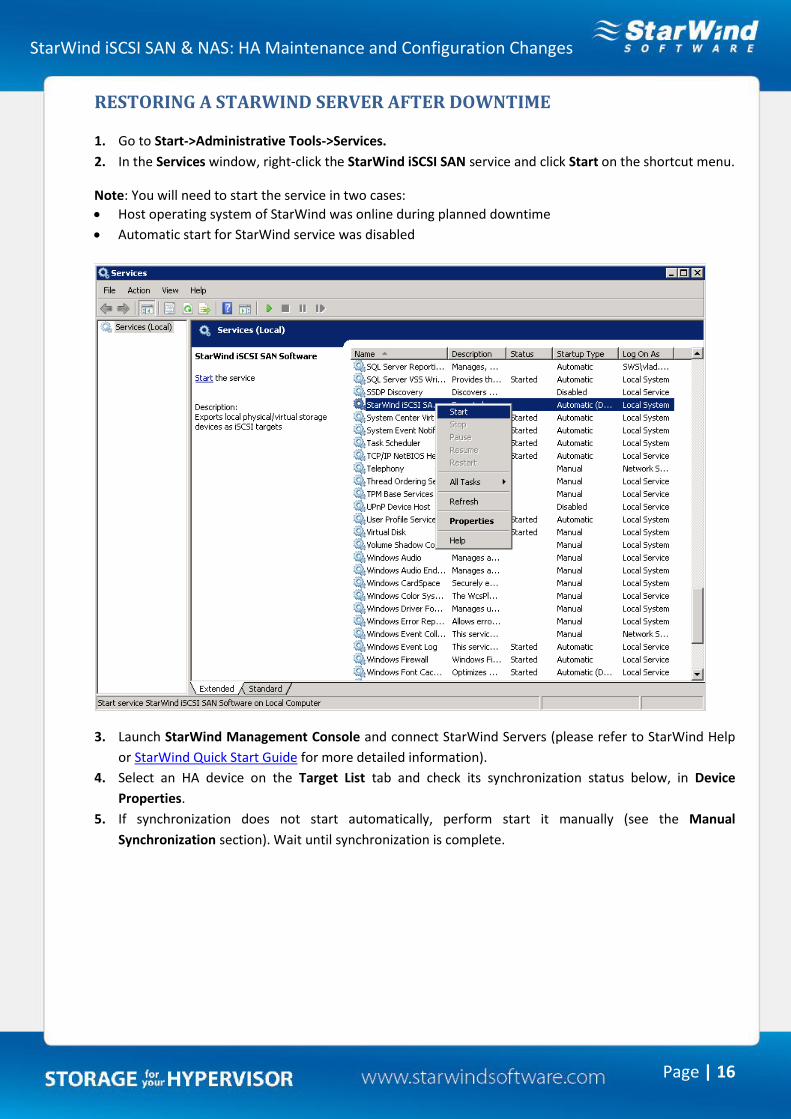
1. Go to Start->Administrative Tools->Services.
2. In the Services window, right-click the StarWind iSCSI SAN service and click Start on the shortcut menu.
Note: You will need to start the service in two cases:
Host operating system of StarWind was online during planned downtime
Automatic start for StarWind service was disabled
3. Launch StarWind Management Console and сonnect StarWind Servers (please refer to StarWind Help
or StarWind Quick Start Guide for more detailed information).
4. Select an HA device on the Target List tab and check its synchronization status below, in Device
Properties.
5. If synchronization does not start automatically, perform start it manually (see the Manual
Synchronization section). Wait until synchronization is complete.
StarWind iSCSI SAN & NAS: HA Maintenance and Configuration Changes
Page | 17
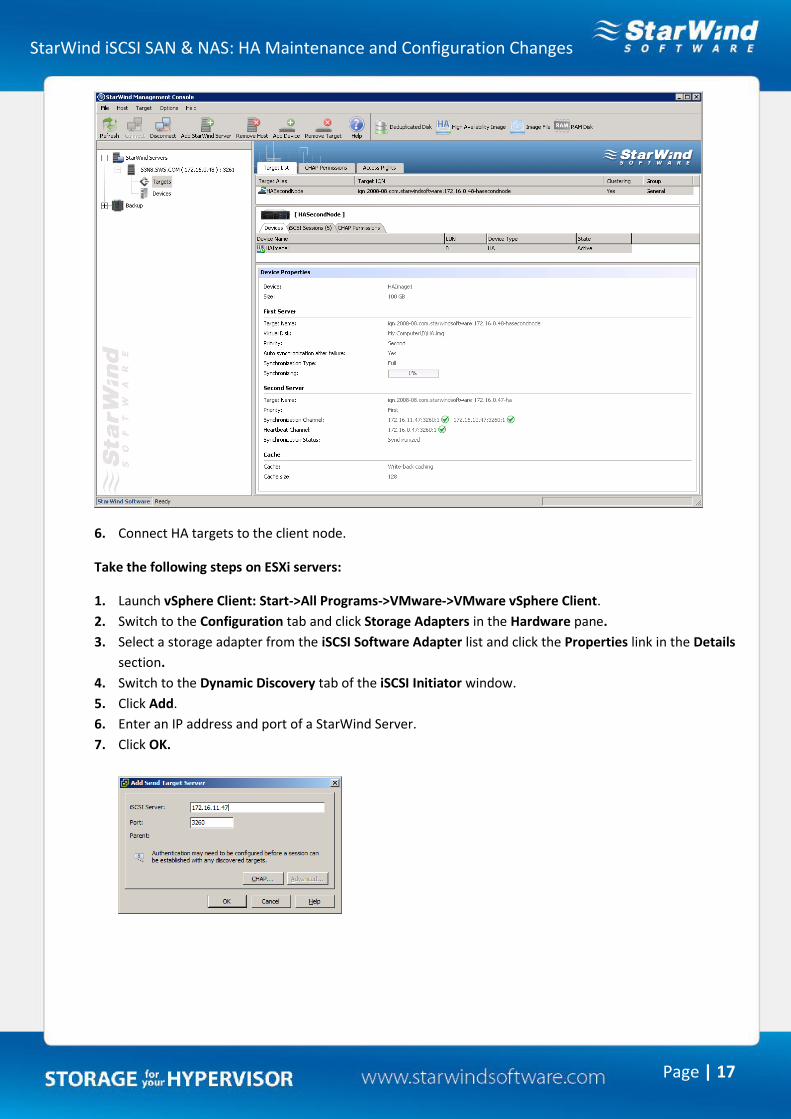
6. Connect HA targets to the client node.
Take the following steps on ESXi servers:
1. Launch vSphere Client: Start->All Programs->VMware->VMware vSphere Client.
2. Switch to the Configuration tab and click Storage Adapters in the Hardware pane.
3. Select a storage adapter from the iSCSI Software Adapter list and click the Properties link in the Details
section.
4. Switch to the Dynamic Discovery tab of the iSCSI Initiator window.
5. Click Add.
6. Enter an IP address and port of a StarWind Server.
7. Click OK.
StarWind iSCSI SAN & NAS: HA Maintenance and Configuration Changes
Page | 18
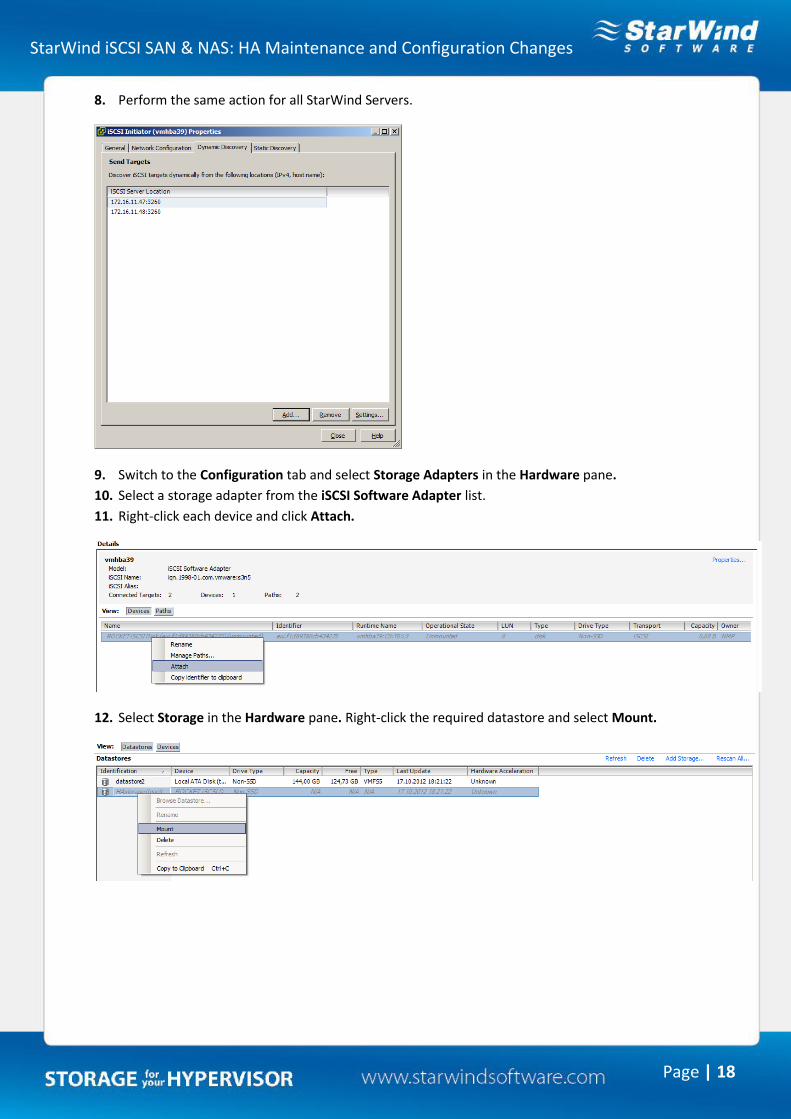
8. Perform the same action for all StarWind Servers.
9. Switch to the Configuration tab and select Storage Adapters in the Hardware pane.
10. Select a storage adapter from the iSCSI Software Adapter list.
11. Right-click each device and click Attach.
12. Select Storage in the Hardware pane. Right-click the required datastore and select Mount.
StarWind iSCSI SAN & NAS: HA Maintenance and Configuration Changes
Page | 19
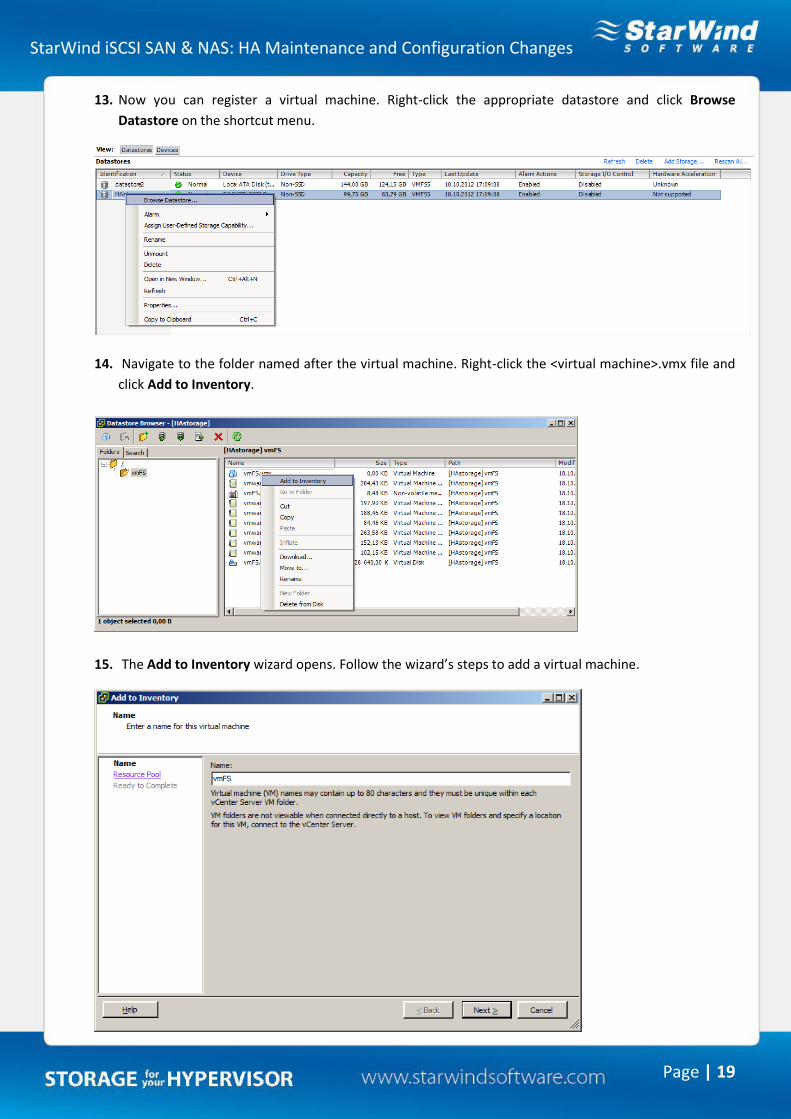
13. Now you can register a virtual machine. Right-click the appropriate datastore and click Browse
Datastore on the shortcut menu.
14. Navigate to the folder named after the virtual machine. Right-click the <virtual machine>.vmx file and
click Add to Inventory.
15. The Add to Inventory wizard opens. Follow the wizard’s steps to add a virtual machine.
StarWind iSCSI SAN & NAS: HA Maintenance and Configuration Changes
Page | 20
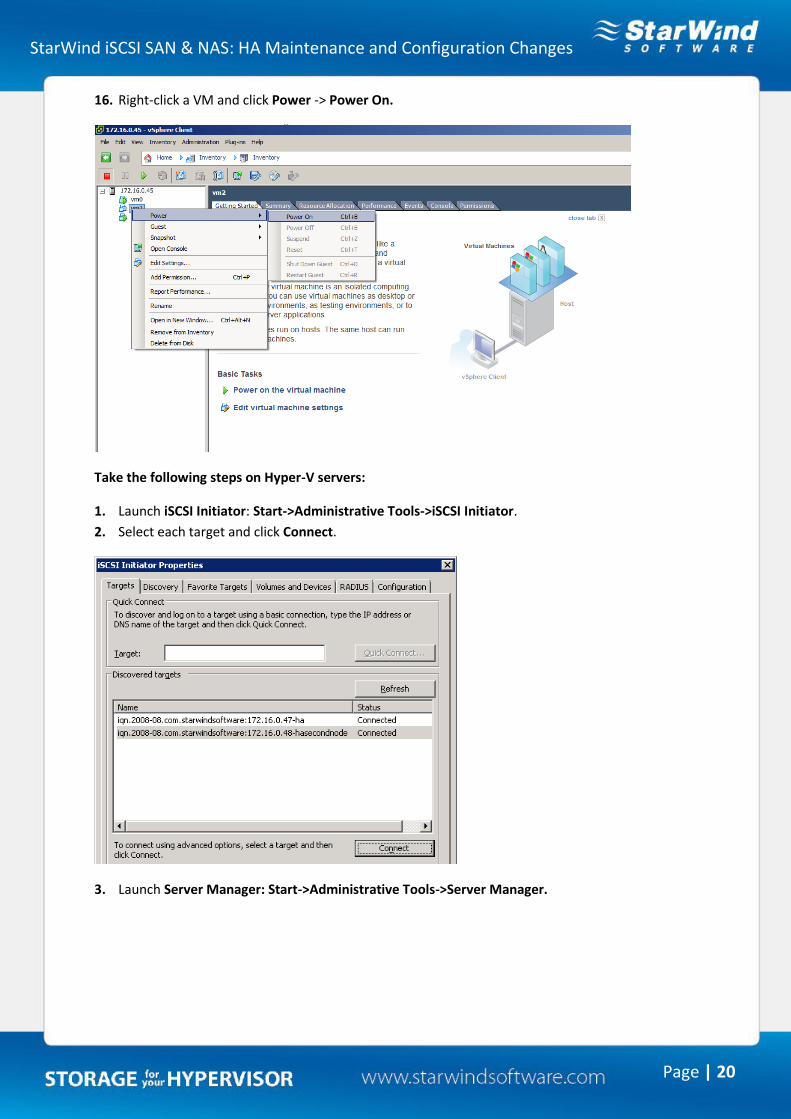
16. Right-click a VM and click Power -> Power On.
Take the following steps on Hyper-V servers:
1. Launch iSCSI Initiator: Start->Administrative Tools->iSCSI Initiator.
2. Select each target and click Connect.
3. Launch Server Manager: Start->Administrative Tools->Server Manager.
StarWind iSCSI SAN & NAS: HA Maintenance and Configuration Changes
Page | 21
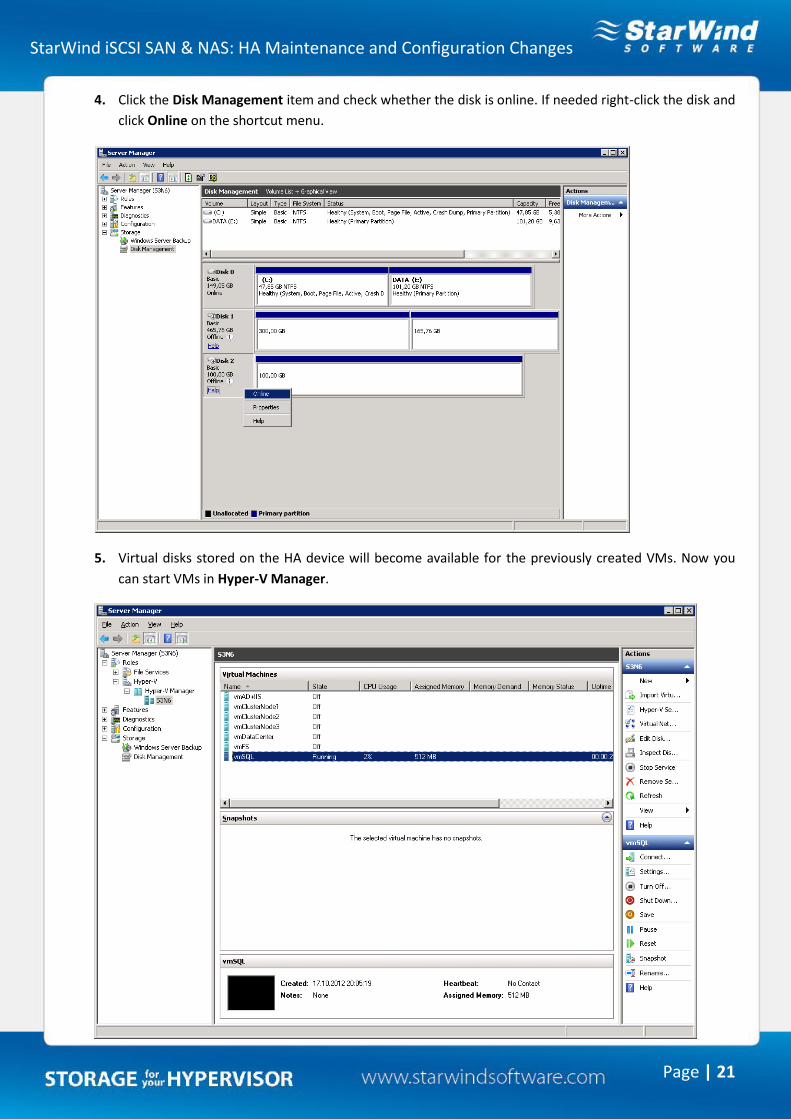
4. Click the Disk Management item and check whether the disk is online. If needed right-click the disk and
click Online on the shortcut menu.
5. Virtual disks stored on the HA device will become available for the previously created VMs. Now you
can start VMs in Hyper-V Manager.
StarWind iSCSI SAN & NAS: HA Maintenance and Configuration Changes
Page | 22
CHANGING SYNCHRONIZATION AND HEARTBEAT CHANNELS
To change synchronization or heartbeat channels or replace a NIC:
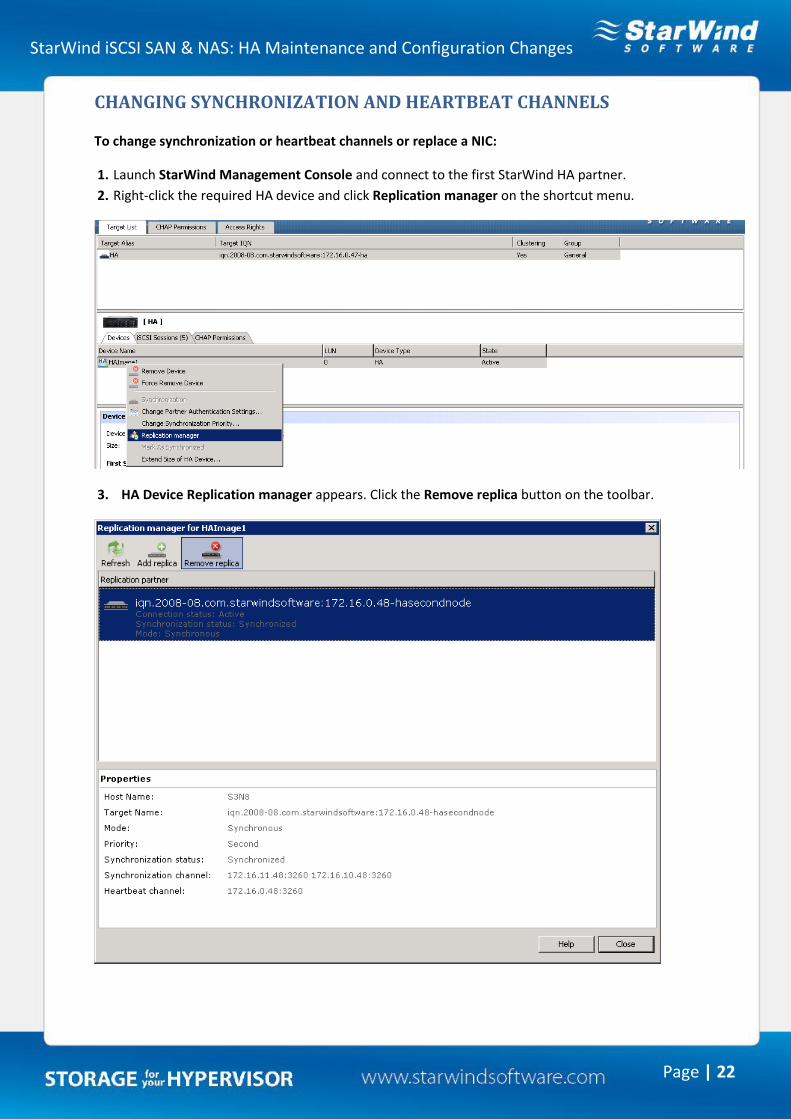
1. Launch StarWind Management Console and connect to the first StarWind HA partner.
2. Right-click the required HA device and click Replication manager on the shortcut menu.
3. HA Device Replication manager appears. Click the Remove replica button on the toolbar.
StarWind iSCSI SAN & NAS: HA Maintenance and Configuration Changes
Page | 23
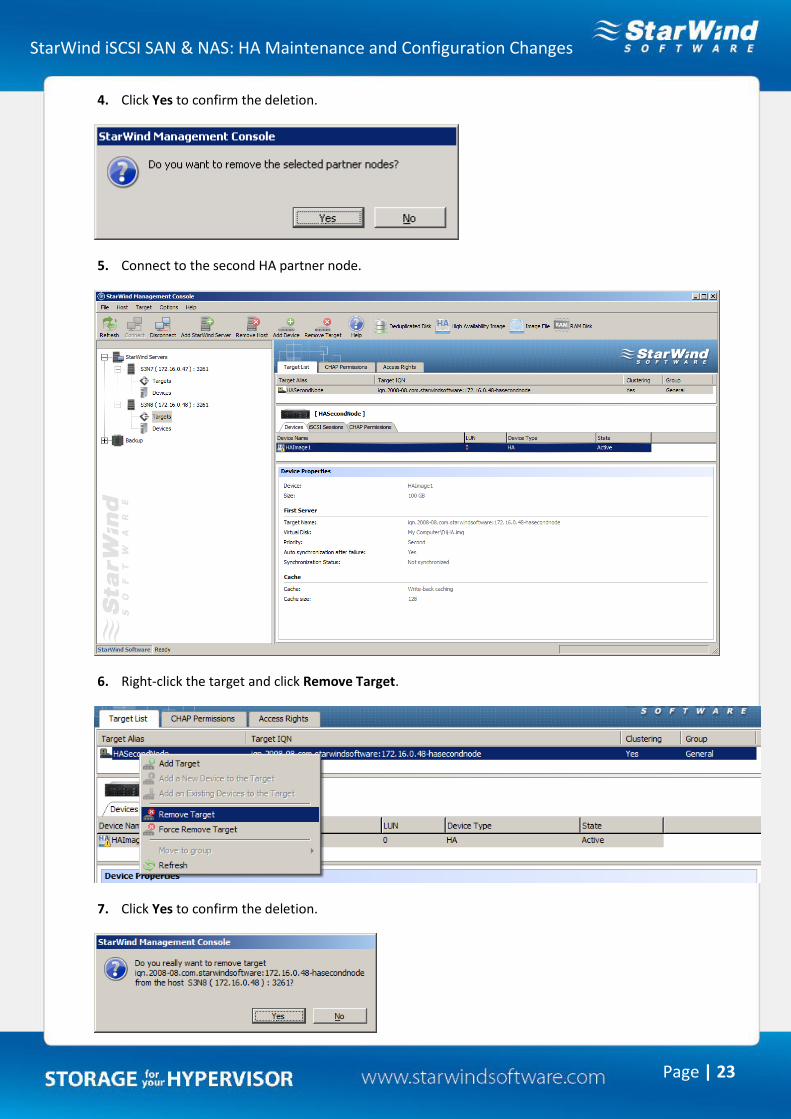
4. Click Yes to confirm the deletion.
5. Connect to the second HA partner node.
6. Right-click the target and click Remove Target.
7. Click Yes to confirm the deletion.
StarWind iSCSI SAN & NAS: HA Maintenance and Configuration Changes
Page | 24
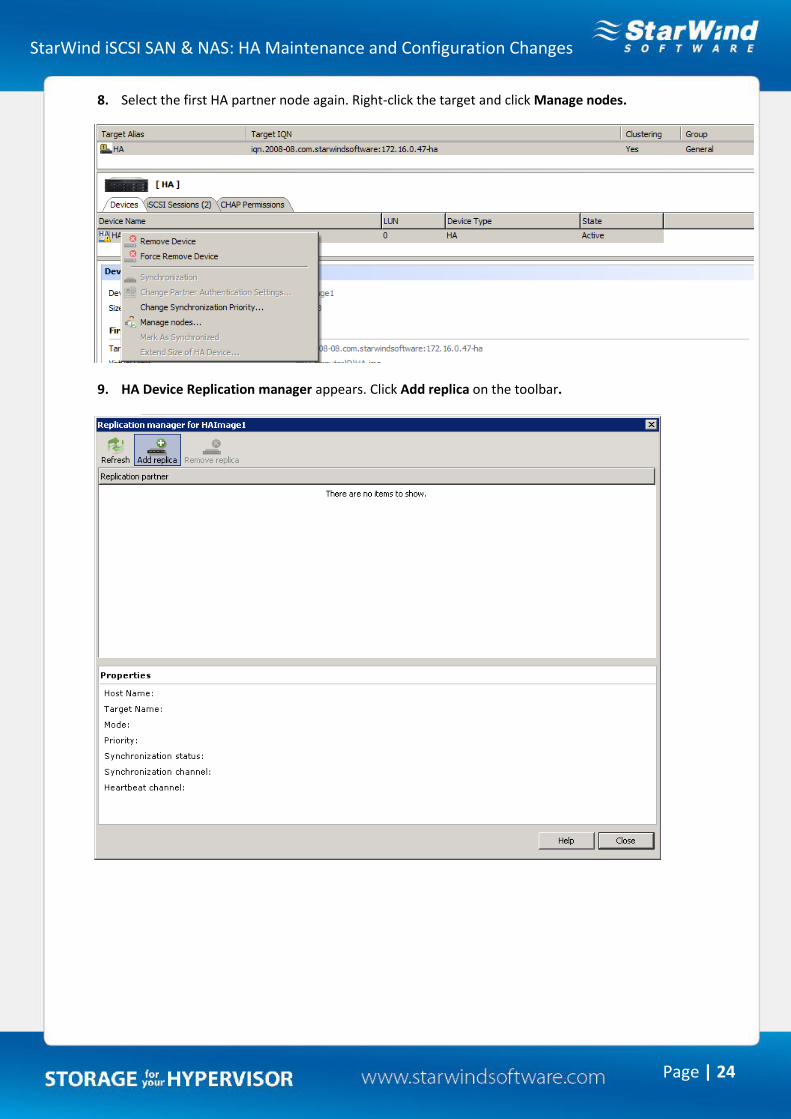
8. Select the first HA partner node again. Right-click the target and click Manage nodes.
9. HA Device Replication manager appears. Click Add replica on the toolbar.
StarWind iSCSI SAN & NAS: HA Maintenance and Configuration Changes
Page | 25
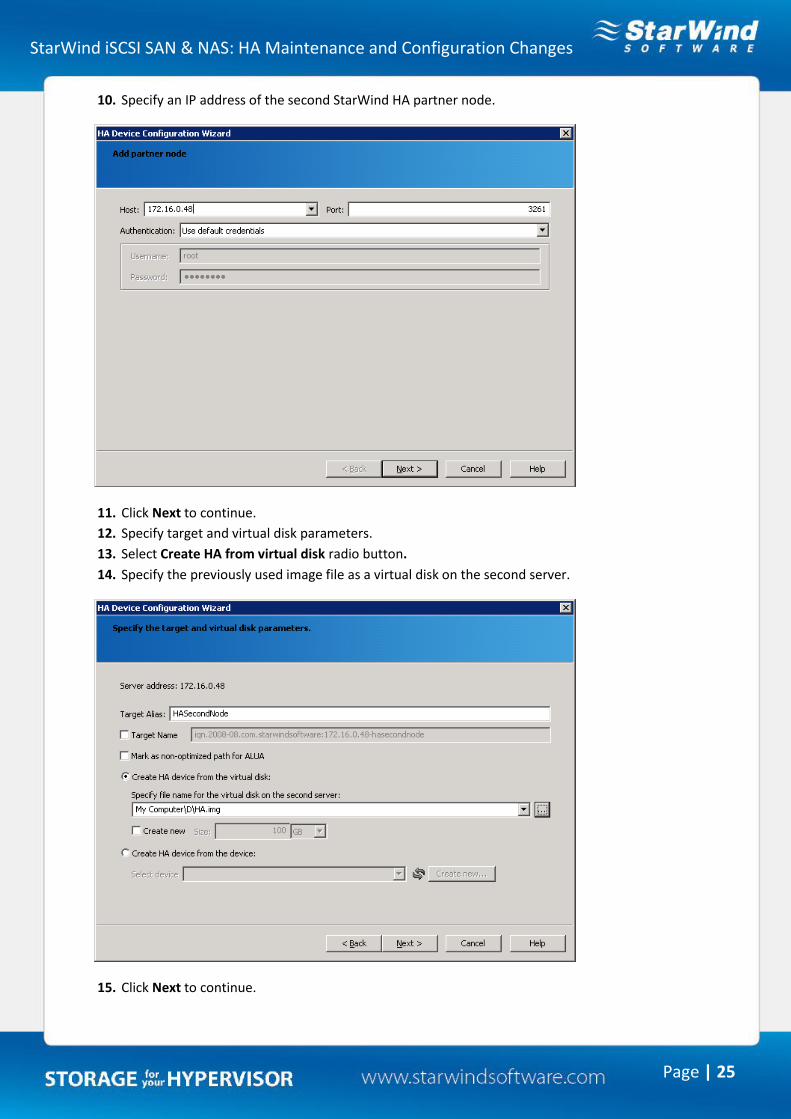
10. Specify an IP address of the second StarWind HA partner node.
11. Click Next to continue.
12. Specify target and virtual disk parameters.
13. Select Create HA from virtual disk radio button.
14. Specify the previously used image file as a virtual disk on the second server.
15. Click Next to continue.
StarWind iSCSI SAN & NAS: HA Maintenance and Configuration Changes
Page | 26
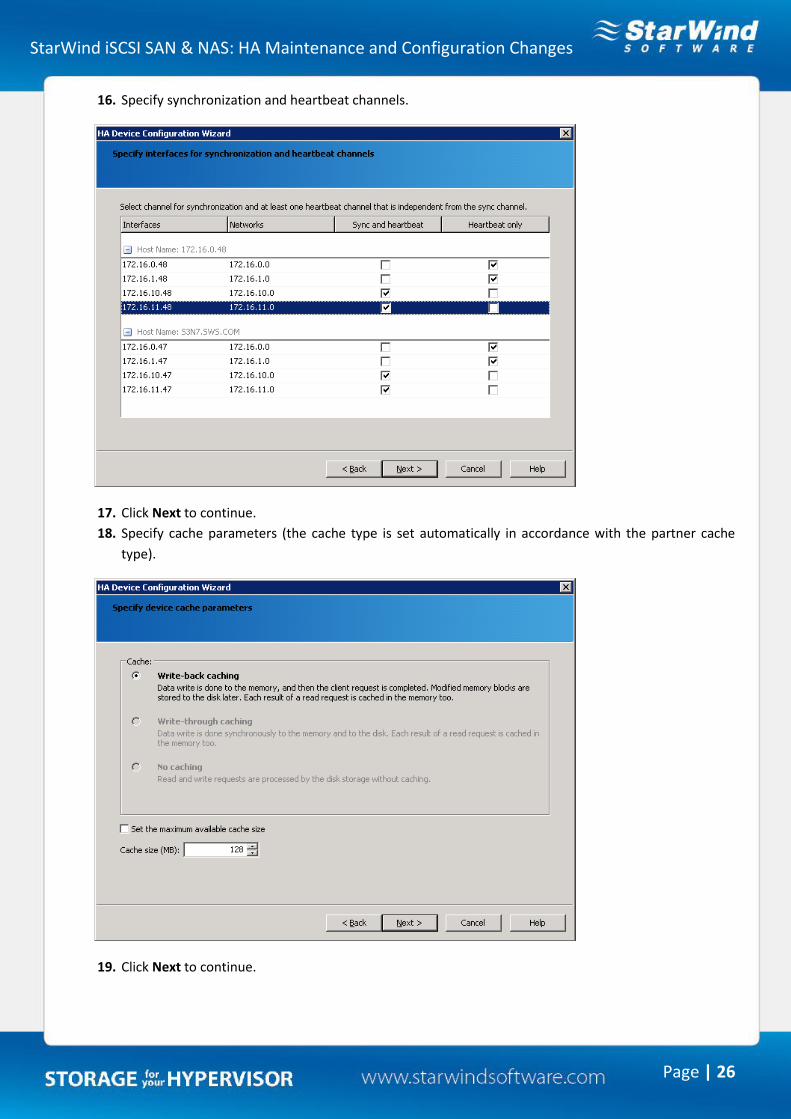
16. Specify synchronization and heartbeat channels.
17. Click Next to continue.
18. Specify cache parameters (the cache type is set automatically in accordance with the partner cache
type).
19. Click Next to continue.
StarWind iSCSI SAN & NAS: HA Maintenance and Configuration Changes
Page | 27
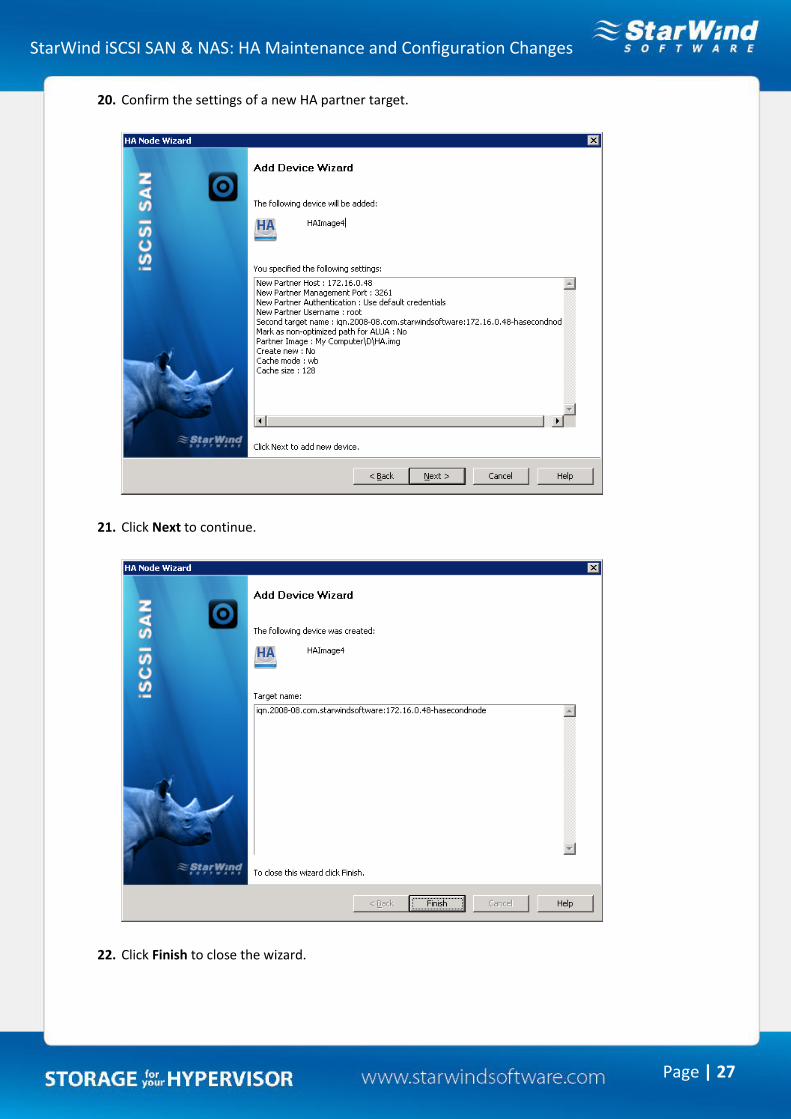
20. Confirm the settings of a new HA partner target.
21. Click Next to continue.
22. Click Finish to close the wizard.
StarWind iSCSI SAN & NAS: HA Maintenance and Configuration Changes
Page | 28
CONFIGURING CHAP FOR AN НА DEVICE
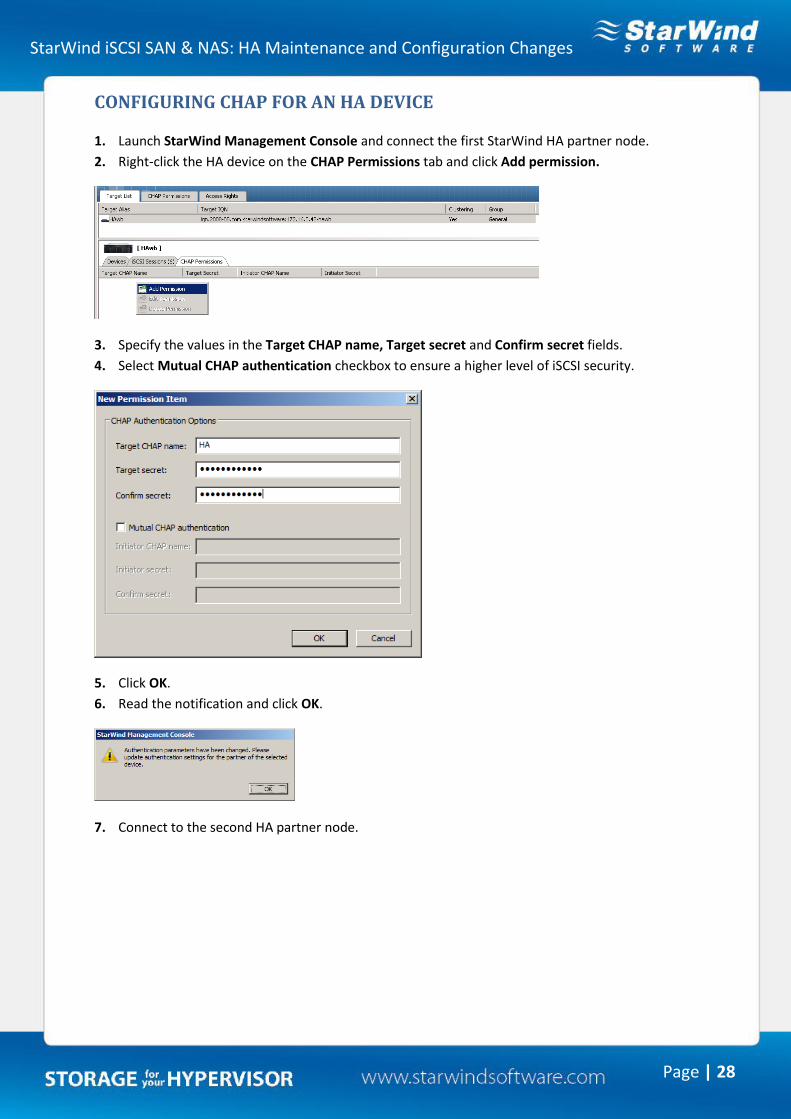
1. Launch StarWind Management Console and connect the first StarWind HA partner node.
2. Right-click the HA device on the CHAP Permissions tab and click Add permission.
3. Specify the values in the Target CHAP name, Target secret and Confirm secret fields.
4. Select Mutual CHAP authentication checkbox to ensure a higher level of iSCSI security.
5. Click OK.
6. Read the notification and click OK.
7. Connect to the second HA partner node.
StarWind iSCSI SAN & NAS: HA Maintenance and Configuration Changes
Page | 29
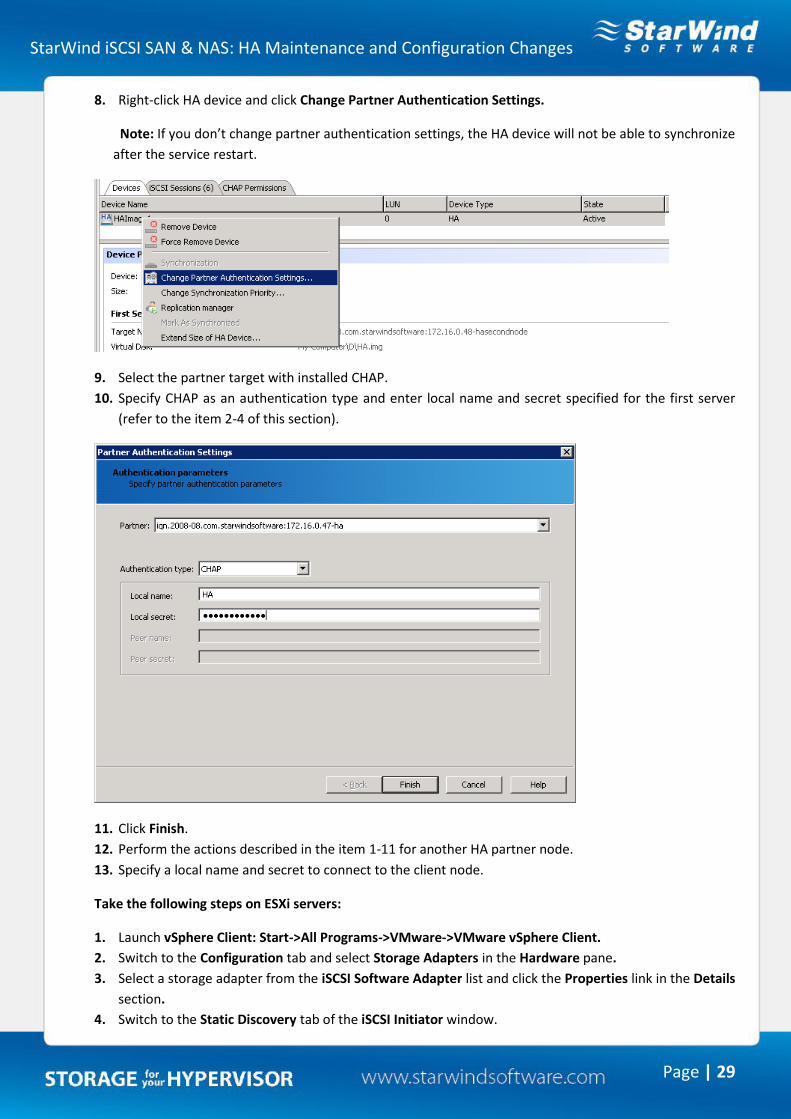
8. Right-click HA device and click Change Partner Authentication Settings.
Note: If you don’t change partner authentication settings, the HA device will not be able to synchronize
after the service restart.
9. Select the partner target with installed CHAP.
10. Specify CHAP as an authentication type and enter local name and secret specified for the first server
(refer to the item 2-4 of this section).
11. Click Finish.
12. Perform the actions described in the item 1-11 for another HA partner node.
13. Specify a local name and secret to connect to the client node.
Take the following steps on ESXi servers:
1. Launch vSphere Client: Start->All Programs->VMware->VMware vSphere Client.
2. Switch to the Configuration tab and select Storage Adapters in the Hardware pane.
3. Select a storage adapter from the iSCSI Software Adapter list and click the Properties link in the Details
section.
4. Switch to the Static Discovery tab of the iSCSI Initiator window.
StarWind iSCSI SAN & NAS: HA Maintenance and Configuration Changes
Page | 30
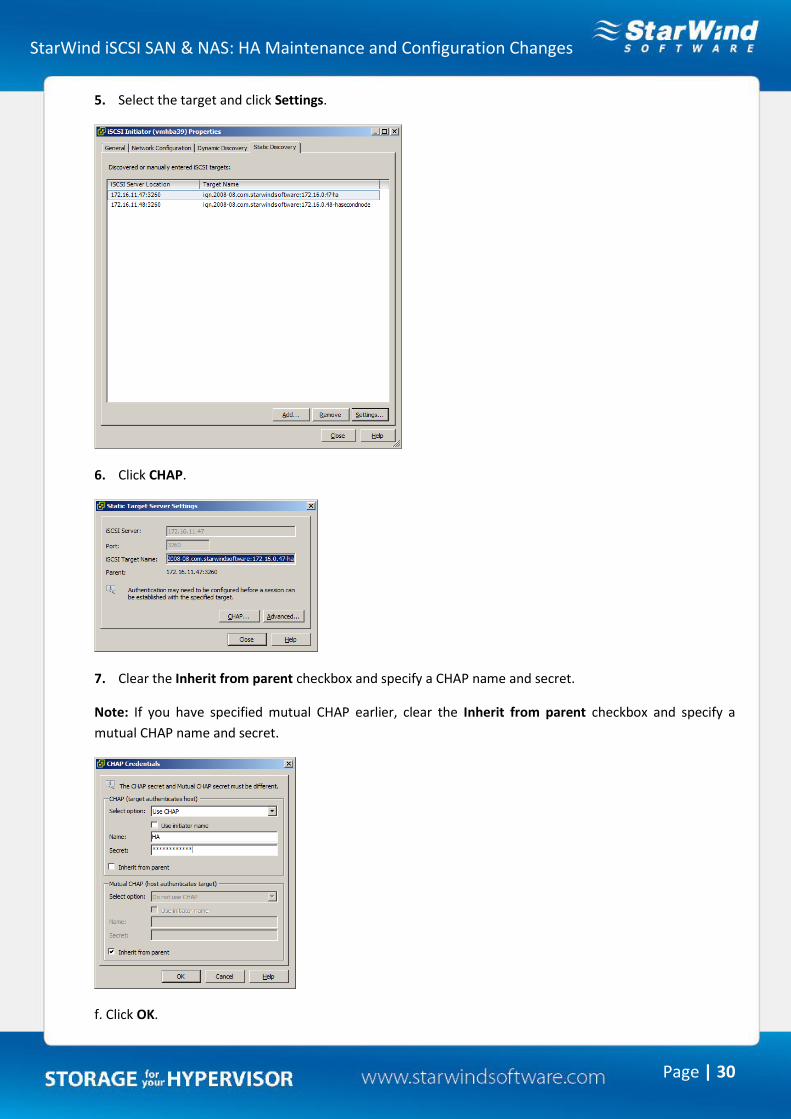
5. Select the target and click Settings.
6. Click CHAP.
7. Clear the Inherit from parent checkbox and specify a CHAP name and secret.
Note: If you have specified mutual CHAP earlier, clear the Inherit from parent checkbox and specify a
mutual CHAP name and secret.
f. Click OK.
StarWind iSCSI SAN & NAS: HA Maintenance and Configuration Changes
Page | 31
Take the following steps on Hyper-V servers:
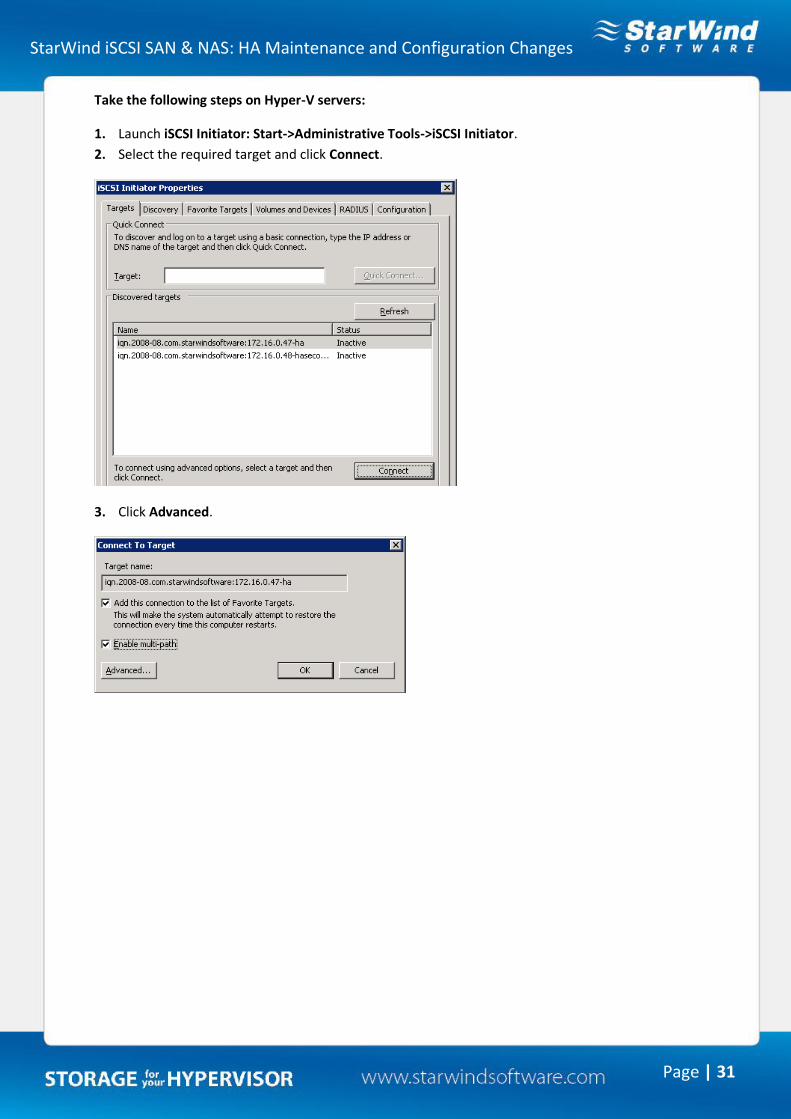
1. Launch iSCSI Initiator: Start->Administrative Tools->iSCSI Initiator.
2. Select the required target and click Connect.
3. Click Advanced.
StarWind iSCSI SAN & NAS: HA Maintenance and Configuration Changes
Page | 32
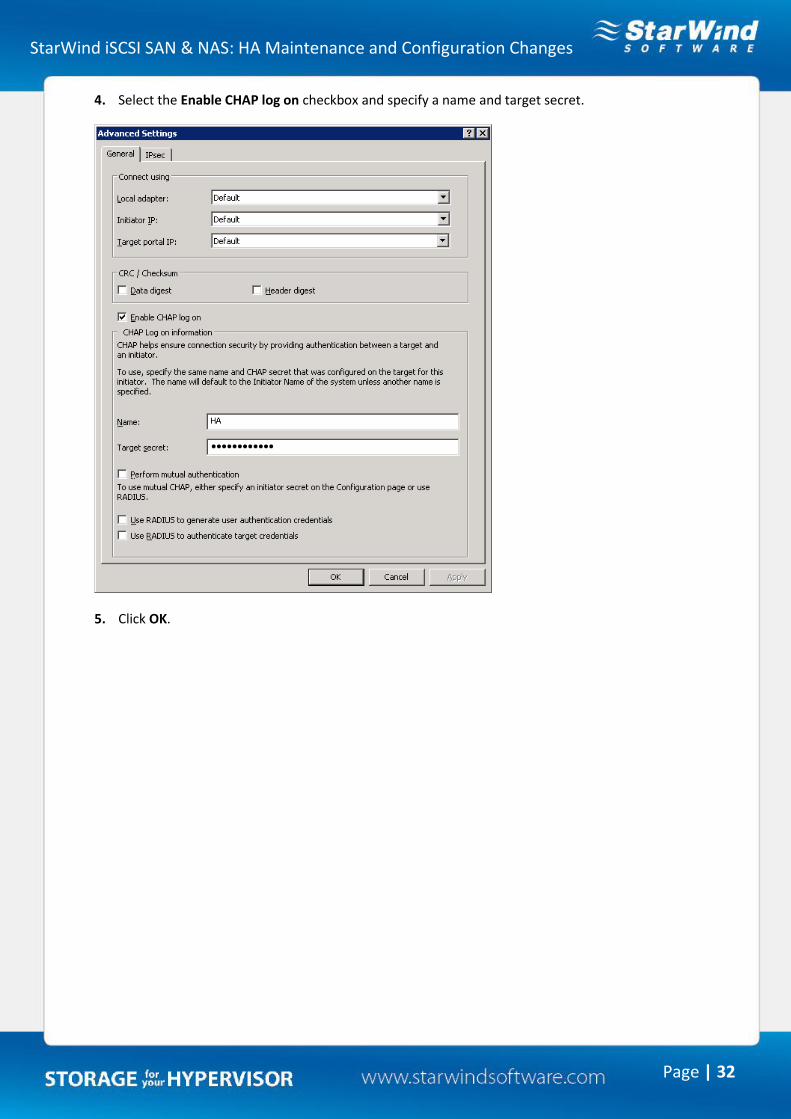
4. Select the Enable CHAP log on checkbox and specify a name and target secret.
5. Click OK.
StarWind iSCSI SAN & NAS: HA Maintenance and Configuration Changes
Page | 33
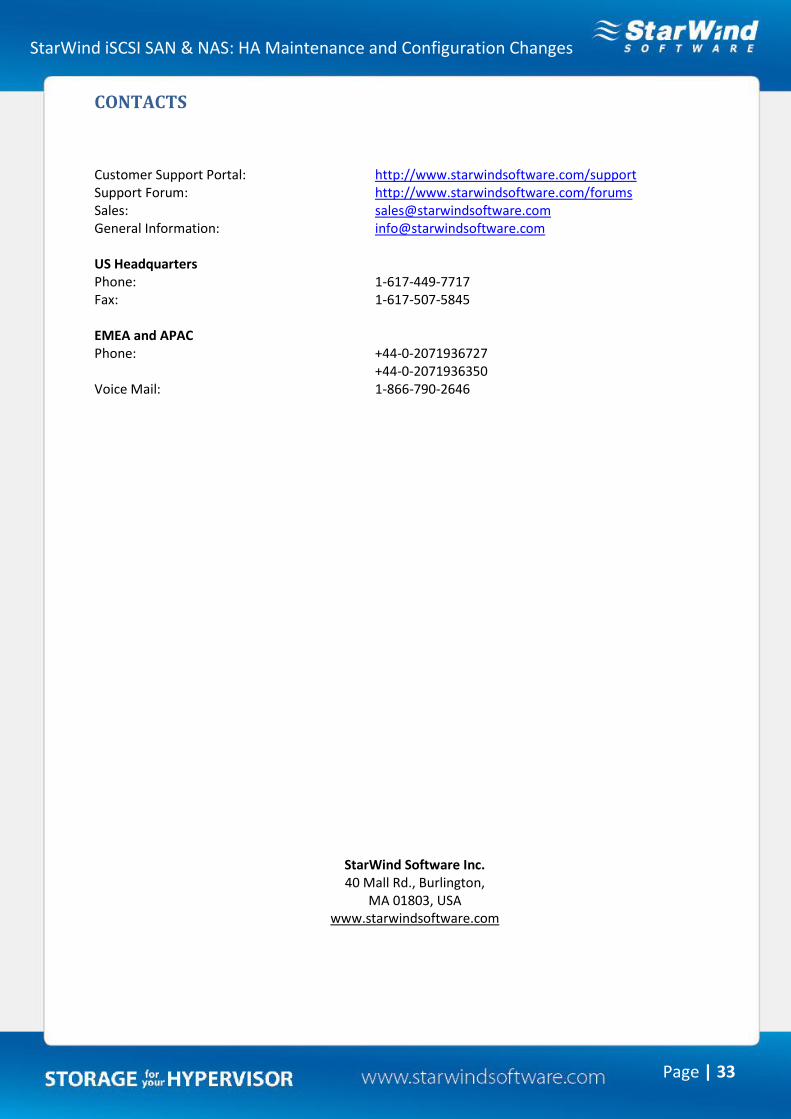
CONTACTS
Customer Support Portal: http://www.starwindsoftware.com/support Support Forum: http://www.starwindsoftware.com/forums Sales: [email protected] General Information: [email protected] US Headquarters Phone: 1-617-449-7717 Fax: 1-617-507-5845 EMEA and APAC Phone: +44-0-2071936727
+44-0-2071936350 Voice Mail: 1-866-790-2646
StarWind Software Inc. 40 Mall Rd., Burlington,
MA 01803, USA www.starwindsoftware.com