Embed Size (px)
Citation preview

Key StepsGYNECARE TVT ABBREVO® Continence System
The goal is to keep the point of the needle as close to the bone as possible using the “Stop`, pop, stop, drop, rotate, and hug the bone” Key Steps.
STEP 1: Position Patient and Mark Reference Points
• Place patient in dorsal lithotomy with hips hyperflexed with the coccyx flush to the edge of the table. Note: This positioning ensures there is adequate space to allow the handle to drop.
• If desired, locate the reference points first by tracing a horizontal line at the level of the urethral meatus, and then trace a second line parallel and 2 cm above the first line. Mark the reference points on this second line, 2 cm lateral to the folds of the thigh. Note: Do not make an incision at this point in the procedure.
STEP 2: Make Vaginal Incision and Dissect
• Using Allis clamps for traction, make a 1 cm midline vaginal incision at the point of the mid-urethra.
• Initiate using sharp dissection.• With the scissors oriented on the horizontal plane, dissect from
the vaginal incision using a “push-spread” technique to the inferior pubic ramus.
• Continue dissection just past the ischio-pubic ramus and into the obturator internus muscle, but do not perforate the obturator membrane. Note: The aim of the dissection is to create a channel that is just wide enough for insertion of the Winged Guide without perforating the obturator membrane.
STEP 3: Insert the Winged Guide and Helical Passer
• Insert the Winged Guide into the dissected tract posterior and in contact with the ischio-pubic ramus and into the obturator internus muscle, but STOP upon reaching the obturator membrane without perforating it. Note: The Insertion Zone on the Winged Guide should remain visible throughout the procedure.
• The POP: Insert the Helical Passer inward along the Winged Guide until you perforate the obturator membrane (determined by a palpable pop), which confirms that the membrane has been penetrated. STOP again.
• Once in this position, remove the Winged Guide.
STEP 4: DROP the Handle towards Midline
• Take care not to advance the needle tip yet.• Reposition the handle of the Helical Passer by DROPPING it towards
the midline until the handle is nearly vertical to the floor.
STEP 5: ROTATE the Helical Passer
• ROTATE the Helical Passer, HUGGING THE BONE (ischio-pubic ramus), until the skin is tented. Note: Hugging the ischio-pubic ramus will help the Helical Passer exit inferior and medial to the reference points defined in Step 1.
STEP 6: Pass through Skin
• Stabilize the skin. Note: The tip of the Helical Passer may exit medially to the previously marked points.
• If desired, make skin incision at the point where the tip of the Helical Passer tents the skin.
• Fully rotate the Helical Passer until the tip of the Helical Passer Sheath appears at the skin.
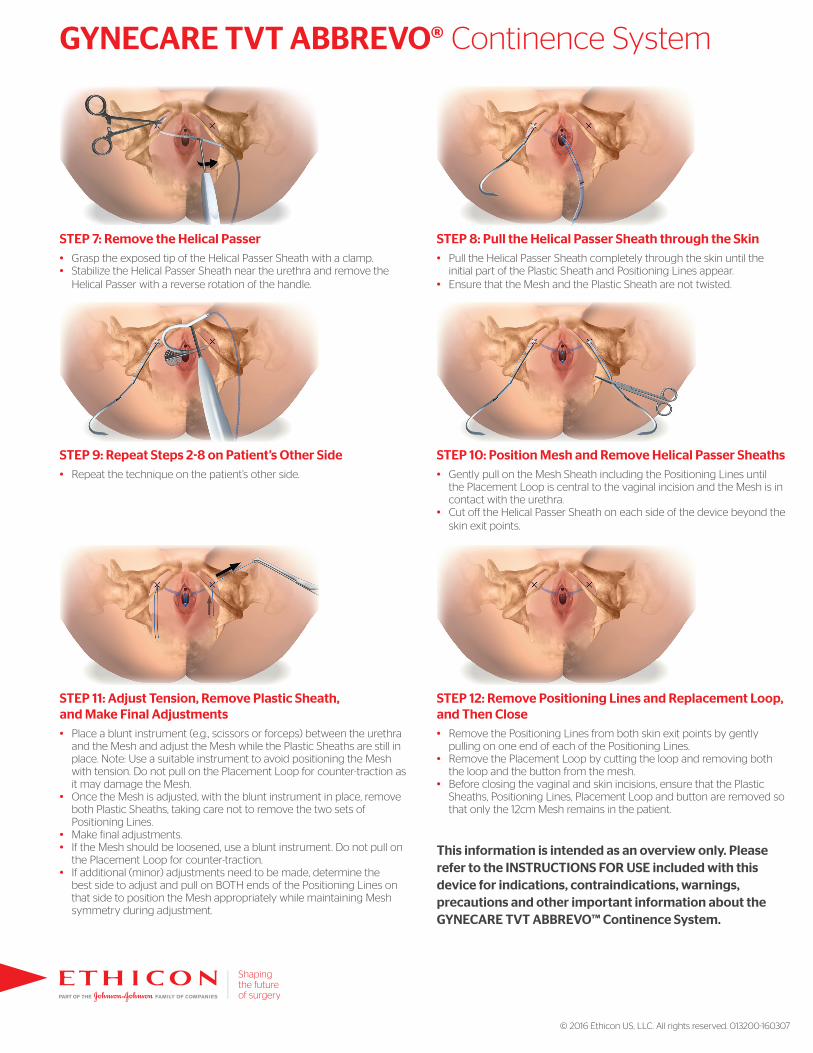
STEP 7: Remove the Helical Passer• Grasp the exposed tip of the Helical Passer Sheath with a clamp.• Stabilize the Helical Passer Sheath near the urethra and remove the
Helical Passer with a reverse rotation of the handle.
STEP 8: Pull the Helical Passer Sheath through the Skin• Pull the Helical Passer Sheath completely through the skin until the
initial part of the Plastic Sheath and Positioning Lines appear.• Ensure that the Mesh and the Plastic Sheath are not twisted.
STEP 9: Repeat Steps 2-8 on Patient’s Other Side• Repeat the technique on the patient’s other side.
STEP 10: Position Mesh and Remove Helical Passer Sheaths• Gently pull on the Mesh Sheath including the Positioning Lines until
the Placement Loop is central to the vaginal incision and the Mesh is in contact with the urethra.
• Cut off the Helical Passer Sheath on each side of the device beyond the skin exit points.
STEP 11: Adjust Tension, Remove Plastic Sheath, and Make Final Adjustments• Place a blunt instrument (e.g., scissors or forceps) between the urethra
and the Mesh and adjust the Mesh while the Plastic Sheaths are still in place. Note: Use a suitable instrument to avoid positioning the Mesh with tension. Do not pull on the Placement Loop for counter-traction as it may damage the Mesh.
• Once the Mesh is adjusted, with the blunt instrument in place, remove both Plastic Sheaths, taking care not to remove the two sets of Positioning Lines.
• Make final adjustments.• If the Mesh should be loosened, use a blunt instrument. Do not pull on
the Placement Loop for counter-traction.• If additional (minor) adjustments need to be made, determine the
best side to adjust and pull on BOTH ends of the Positioning Lines on that side to position the Mesh appropriately while maintaining Mesh symmetry during adjustment.
STEP 12: Remove Positioning Lines and Replacement Loop, and Then Close• Remove the Positioning Lines from both skin exit points by gently
pulling on one end of each of the Positioning Lines.• Remove the Placement Loop by cutting the loop and removing both
the loop and the button from the mesh.• Before closing the vaginal and skin incisions, ensure that the Plastic
Sheaths, Positioning Lines, Placement Loop and button are removed so that only the 12cm Mesh remains in the patient.
This information is intended as an overview only. Please refer to the INSTRUCTIONS FOR USE included with this device for indications, contraindications, warnings, precautions and other important information about the GYNECARE TVT ABBREVO™ Continence System.
© 2016 Ethicon US, LLC. All rights reserved. 013200-160307
GYNECARE TVT ABBREVO® Continence System