Embed Size (px)
Citation preview
Gun Locks and Firearms Storage
How you secure your firearms is a personal choice based on the unique
circumstances in your home, business or vehicle. Any choice you make
about securing your firearms will present advantages and disadvantages.
It is up to you to weigh those advantages and disadvantages and choose
what is best for you and those around you.
WARNING: Never lock a loaded firearm. Unlocking a loaded firearm
makes it more difficult to maintain trigger discipline and to keep the
muzzle pointed in a safe direction. If you use the cable lock provided, this
will not be an issue since the bolt will be open and the magazine out of
the rifle.
WARNING: Securing your firearm may inhibit access to it in a defensive
situation and result in injury or death.
WARNING: Failure to secure a firearm may result in injury or death. Properly
securing a firearm means storing your firearm unloaded, de-cocked and
securely locked, with ammunition in a separate location.
Gun Safety and
Instruction Manual
WHEN PRECISION COUNTS

SAFETY FIRST: Read and follow all instructions and
warnings before use.
WARNING!
Keep your finger off the trigger until you are ready to
fire.
Keep the muzzle pointed in a safe direction.
Never trust any safety mechanism.
Failure to do any of these three things can result in death or
serious bodily injury.
If you maintain good trigger discipline, it is extremely unlikely the
firearm will discharge. Even if the firearm discharges, if the muzzle is
pointed in a safe direction, no one will be injured. If you adopt the
attitude that you will not trust any safety mechanism, you will be
vigilant about keeping your finger off the trigger and keeping the
muzzle pointed in a safe direction.
WARNING!
When a firearm discharges, the bullet can strike a
person resulting in death or serious bodily injury.
Pg. 2
Troubleshooting Cont.
Problem Check For What to do Won’t Extract Froze extractor. Remove and clean.
Restricted buffer assembly.
Remove and clean.
Restricted movement of bolt carrier group.
Remove, clean, and lube. Make sure gas tube fits into carrier key and that the carrier moves freely before replacing.
Short Recoil Correct alignment of gaps in bolt rings.
“Gaps” in the gas rings should be staggered 120 around the bolt body for maximum effectiveness.
Carbon or dirt in carrier key, or on outside of gas tube.
Clean carrier key, or around area of gas tube.
Q-tip or pipe cleaner pieces stuck inside carrier key.
Clean out if possible or have rifle checked by a qualified gunsmith.
Bolt Fails to Lock After Last Round
Dirty or corroded bolt latch.
Clean out if possible or have rifle checked by a qualified gunsmith.
Faulty magazine. Replace.
Selector Lever Binds Needs oil. Lubricate with oil.
Dirt or sand under trigger.
Clean.
Bolt Carrier “Hung Up” Round jammed between bolt and charging handle and/or double feed. Warning: Keep clear of muzzle. Caution: After round is removed, bolt is under tension.
1. Remove magazine. 2. Point muzzle in safe direction. Engage safety if possible by pushing out takedown pin and manually cocking hammer. Close receivers. 3. While pulling down on the charging handle, bang the rifle butt on the ground. Round should eject.
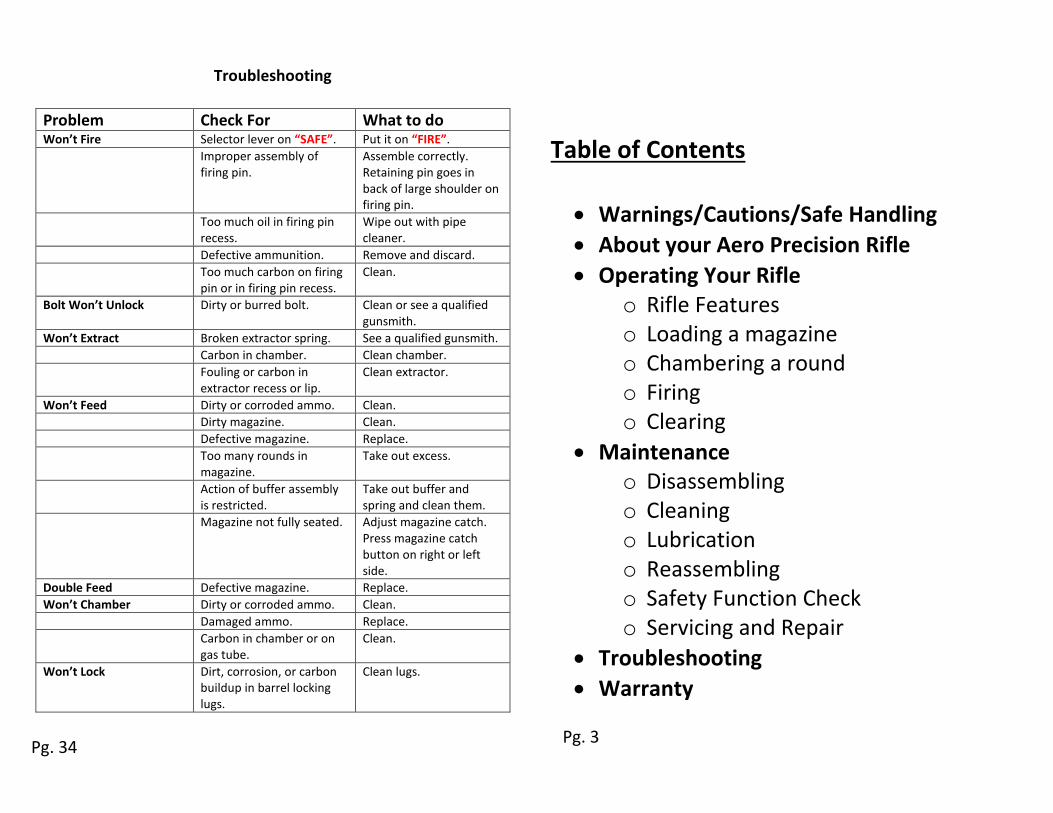
Troubleshooting
Problem Check For What to do Won’t Fire Selector lever on “SAFE”. Put it on “FIRE”.
Improper assembly of firing pin.
Assemble correctly. Retaining pin goes in back of large shoulder on firing pin.
Too much oil in firing pin recess.
Wipe out with pipe cleaner.
Defective ammunition. Remove and discard.
Too much carbon on firing pin or in firing pin recess.
Clean.
Bolt Won’t Unlock Dirty or burred bolt. Clean or see a qualified gunsmith.
Won’t Extract Broken extractor spring. See a qualified gunsmith.
Carbon in chamber. Clean chamber.
Fouling or carbon in extractor recess or lip.
Clean extractor.
Won’t Feed Dirty or corroded ammo. Clean.
Dirty magazine. Clean.
Defective magazine. Replace.
Too many rounds in magazine.
Take out excess.
Action of buffer assembly is restricted.
Take out buffer and spring and clean them.
Magazine not fully seated. Adjust magazine catch. Press magazine catch button on right or left side.
Double Feed Defective magazine. Replace.
Won’t Chamber Dirty or corroded ammo. Clean.
Damaged ammo. Replace.
Carbon in chamber or on gas tube.
Clean.
Won’t Lock Dirt, corrosion, or carbon buildup in barrel locking lugs.
Clean lugs.
Pg. 34
Table of Contents
Warnings/Cautions/Safe Handling
About your Aero Precision Rifle
Operating Your Rifle o Rifle Features o Loading a magazine o Chambering a round o Firing o Clearing
Maintenance o Disassembling o Cleaning o Lubrication o Reassembling o Safety Function Check o Servicing and Repair
Troubleshooting
Warranty
Pg. 3
NOTICE: Aero Precision shall not be held responsible for injury, death, or damage to property resulting from either intentional or accidental discharge of this firearm, or from its function when used for purposes or subjected to treatment for which it was not designed. Aero Precision will not honor claims involving this firearm which result from carless or improper handling, unauthorized adjustment or parts replacement, corrosion, neglect, or the use of wrong caliber ammunition, or the use of ammunition other than original high quality commercially manufactured ammunition in good condition, or any combination thereof. Aero Precision will not honor claims involving this firearm for any reason or cause when such claims are made by the second or subsequent owner.
Pg. 4
TROUBLESHOOTING
If your rifle stops firing 1. Slap upward on magazine to make sure it’s seated properly 2. Pull charging handle all the way back to observe ejection of case
or cartridge. Check chamber for any obstruction Warning: Do not load with a hot chamber. A round may “cook off”,
meaning it may fire from the heat of the chamber. 3. If cartridge or case is ejected or chamber is clear, release the
charging handle to feed a new round. 4. Tap forward assist. 5. Now fire. If the rifle won’t fire, look for trouble and apply
remedial action.
Remedial Action Warning: If the rifle stops firing with a live round in the chamber of a
hot barrel (a misfire), remove the round quickly. If the round cannot be removed within 10 seconds, point the rifle in a safe direction and wait 15 minutes. This is to avoid being injured by a possible ammunition cook-off (the round detonating from the heat of the barrel). Always keep your face away from the ejection port while clearing a hot chamber.
If your rifle still fails to fire after performing steps 1 through 5 above, check again for a jammed cartridge case.
If your rifle still fails to fire, check the troubleshooting section in this manual, or take the rifle to a qualified gunsmith.
Bullet stuck in bore
DANGER: If an audible “POP” or reduced recoil is experienced during firing, IMMEDIATELY CEASE FIRE!
1. Remove the magazine. 2. Lock the bolt to the rear. 3. Put selector lever on the “SAFE” position. 4. Check for a bullet in the bore with a cleaning rod.
Do not apply the immediate actions described in the previous section. If a bullet is stuck in the barrel of the weapon, do not try to remove it. Take the rifle to a qualified gunsmith.
Pg. 33
Servicing and Repair
Should your firearm require adjustment or repair, make sure it is NOT LOADED and call Aero Precision for specific instructions. For spare parts, seek advice from your dealer, who should have up to date information on how to obtain Aero Precision parts, or visit our website at www.aeroprecisionusa.com.
IMPORTANT: If you make unauthorized adjustments or use unauthorized parts, Aero Precision will not assume responsibility for the functioning of this rifle.
NOTE: THIS FIREARM IS MANUFACTURED TO PERFORM PROPERLY WITH THE ORIGINAL PARTS AS DESIGNED. IT IS YOUR DUTY TO MAKE SURE ANY PARTS YOU BUY ARE INSTALLED CORRECTLY AND THAT NEITHER REPLACEMENTS NOR ORIGINALS ARE ALTERED OR CHANGED. THIS IS WHY SENDING IT BACK TO THE MANUFACTURER IS HIGHLY RECOMMENDED. YOUR FIREARM IS A COMPLEX TOOL WITH MANY PARTS THAT MUST RELATE CORRECTLY TO OTHER PARTS. PUTTING A FIREARM TOGETHER INCORRECTLY OR WITH MODIFIED PARTS CAN RESULT IN A DAMAGED FIREARM, AND DANGER, INJURY, OR DEATH TO YOU AND OTHERS THROUGH MALFUNCTION. ALWAYS LET A QUALIFIED GUNSMITH WORK ON YOUR FIREARM AND CHECK ANY WORK YOU THINK WAS NOT PERFORMED BY A GUNSMITH.
Storage Always unload your firearm for storage and store ammunition
separately.
Store your firearm and ammunition securely locked in separate locations out of the reach and sight of children. Children are naturally curious and do not always believe or understand the real danger and responsibilities of firarms.
Do not store your firearm in an air tight container and do not seal or attempt to seal the barrel to exclude dust, as an internal steel surface is more likely to corrode.
Always make sure your firearm is not loaded before cleaning and storing so that it cannot be fired when it is unsafe to do so.
Pg. 32
IMPORTANT: Before this firearm left our facility, it was tested, carefully inspected, and packaged. Aero Precision cannot control product handling after it leaves our facility; therefore, please examine this firearm carefully at the time of purchase to ensure that it is unloaded and undamaged. If uncertain, take this firearm to a qualified gunsmith.
This instruction manual should always accompany this firearm. When you lend, give or sell this firearm, be sure this manual goes with it. The firearms in this manual are classified as “semi-automatic assault weapons”. Be sure to comply with all federal and local regulations governing their possession and use.
CAUTION: Prior to loading and firing, carefully read this instruction manual which gives basic advice on the proper handling and functioning of this Aero Precision firearm. Your safety and the safety of others (including your family) depend on your compliance with that advice, and your adoption, development and constant employment of safe practices. If unfamiliar with firearms, seek further advice through safe handling courses run by your local gun clubs, NRA approved instructors, or other qualified organizations.
Pg. 5
WARNINGS If this firearm is carelessly or improperly handled, unintentional discharge could result and could cause injury, death or damage to property.
This weapon could chamber a round if it is dropped or jarred with a loaded magazine in place and with the bolt carrier assembly locked to the rear.
Be sure cam pin is installed in the bolt group. If it isn’t, the rifle can still fire and will explode.
If there is water in the barrel, do not fire the rifle. It could explode.
This firearm may discharge accidentally when a round is fed into the chamber, if it is dropped or if it receives a blow to the muzzle or front of the firearm. (This can happen regardless of the position of the hammer or any of the various safety devices.) The use of extra care and strict adherence to these instructions are mandatory to minimize the risk of accidents.
When you squeeze the trigger, you must expect the firearm to fire, and you must take full responsibility for firing it. Your care can avoid accidental discharge, and you will thereby avoid accidental injury and death.
Pg. 6
Safety Function Check
Remove the magazine if installed. Pull the charging handle assembly to rear. Check that the chamber is clear. Let bolt and bolt carrier close. DO NOT PULL TRIGGER. Leave hammer in cocked position.
Warning: If the firearm fails any of the following tests, continued use could result in injury to, or death of, personnel.
Place Selector Lever in “SAFE” position. Pull the trigger. The hammer should not fall.
Place Selector Lever in “FIRE” position. Pull the trigger. The hammer should fall.
For the purpose of the next check, “SLOW” is defined as one fourth to one half the normal rate of trigger release.
Hold trigger to the rear, pull charging handle to the rear and release charging handle. Let off pressure on the trigger with a slow, smooth motion, without hesitations or stops, until the trigger is fully forward. An audible click should be heard. The hammer should not fall.
Repeat the “FIRE” position test five times. The rifle must not malfunction during any of these five tests. If the rifle malfunctions during any of these five tests, have the rifle checked by a qualified gunsmith.
Pg. 31

Reassembling the firearm Insert the buffer/action spring and buffer into the receiver
extension/buffer tube on the rear of the lower receiver. The buffer retaining pin should prevent any forward movement of the buffer/action spring.
Install the buttstock onto the lower receiver. Pull the release lever down and push the buttstock forward on the receiver extension/buffer tube.
Insert the bolt into the bolt carrier. Take care to ensure that the chamfered edge of the bolt body where the cam pin sits is facing downwards. The cam pin should be inserted from the opposite side of the chamfered edge. Another way to ensure proper bolt installation is to ensure that the extractor is oriented to the right side of the bolt carrier.
Insert the cam pin into the bolt and bolt carrier.
Rotate the cam pin 90 to allow the firing pin to fully seat into the bolt.
Insert the firing pin.
Insert the firing pin retaining pin from the left to right of the bolt carrier.
Install the charging handle into the upper receiver by pushing it forward approximately 1 inch into the keyway and then up into the upper receiver. You will not insert the charging handle all of the way until it latches.
With the bolt fully extended forward, install bolt carrier group into the upper receiver. Orient the gas key so that it fits into the charging handle and slide entire bolt carrier group forward and latch the charging handle into the upper receiver.
Attach the upper and lower receivers together by orienting the front upper receiver pivot pin lug into the corresponding recess in the lower receiver. Push the pivot pin from the right to left until fully seated.
Pivot the rear end of the receivers together and push the rear takedown pin from right to left until fully seated.
Pg. 30
CAUTIONS Use only clean, dry, high quality commercially manufactured ammunition which is the appropriate caliber of your firearm. The use of remanufactured or hand loaded ammunition is not recommended as it may severely damage your rifle.
If the rifle stops firing with a live round in the chamber of a hot barrel (a misfire), remove the round quickly. If the round cannot be removed within 10 seconds, point the rifle in a safe direction and wait 15 minutes. This is to avoid being injured by a possible ammunition cook-off (the round detonating from the heat of the barrel). Always keep your face away from the ejection port while clearing a hot chamber.
If your firearm fails to fire, hold it, keeping it pointed towards the target and wait 30 seconds. If a hangfire (slow ignition) has occurred, the round will fire within 30 seconds. If the round does not fire, remove the magazine, eject the round and examine the primer. If the firing pin indent on the primer is light, misaligned or nonexistent, have your firearm examined by a qualified gunsmith.
If your bolt fails to unlock and you try to free it by banging the buttstock on the ground, keep clear of the muzzle.
Always handle your firearm as if it were loaded to avoid firing accidentally when you think it is unloaded.
Never point your firearm at anything you do not intend to shoot. This will avoid injury, death, or damage to property if it accidentally fires.
Pg. 7
Safe Handling Precautions Never drink alcoholic beverages or take drugs before or during shooting. Always wear ear and eye protection when shooting. Never indulge in horseplay when holding your firearm to avoid accidentally firing. Never leave a loaded firearm unattended. Dispose of misfired rounds in accordance with ammunition manufacturer’s instructions. Always be absolutely sure of your target and the area behind and beyond it before you squeeze the trigger. A bullet can travel through or past your target up to 3 miles. If you are at all in doubt about what is behind or beyond your target, do not shoot. Never shoot at a hard surface such as rock, or a liquid surface such as water. A bullet may ricochet and travel in any direction to strike you, others around you, or even an object you cannot see, causing injury, death, or damage to property.
Pg. 8
Cleaning and Lubricating Cont. 10. Check that flannel or brush bristles have not become
lodged in any part of the firearm, then lightly lubricate the following parts. a. Upper Receiver
i. Lightly lubricate 1. The inside of the upper receiver, the bore and
chamber (using the cleaning rod and a patch), the outer surfaces of barrel, front sight, and surfaces under the handguard.
2. Be sure you lube in and around all the locking lugs. Depress the front sight detent and apply 2-3 drops of oil. Depress the detent several times to work the lubricant into the spring.
3. The firing pin and the firing pin recess in the bolt. 4. The charging handle, the inner and outer surfaces
of the bolt carrier, the extractor and its pin. The inside of the carrier key should be dried with a pipe cleaner, then place one drop of oil inside.
ii. Generously lubricate 1. The slide and cam pin area of the bolt carrier, the
bolt, and the bolt gas rings. b. Lower Receiver
i. Lightly lubricate 1. Inside the lower receiver extension (buffer tube),
buffer and the action spring. ii. Generously lubricate
1. All moving lower receiver parts and their various pins and detents. Don’t forget the takedown and pivot pins and detents.
11. Remove any gun cleaning solution, oil and finger prints from the outside surfaces of the firearm. Finger moisture, if left, could start a corrosion process.
12. Reassemble the firearm
Pg. 29
Cleaning and Lubricating Cont. 3. Visually inspect the barrel. If it is clean,
proceed to step 8. If it is still dirty, continue with step 4. (Steps 4 and 5 should only be necessary after firing.)
4. Attach brass wire bristle bore cleaning brush to cleaning rod and dip the brush in the firearm cleaning solution. Thoroughly scrub out the barrel, passing the brush all the way through the barrel before reversing the movement. If you try to change direction with the brush in the barrel, the brush will stick.
5. Attach the larger, chamber cleaning brush to the cleaning rod. Dip the brush in the bore cleaning solution and clean the chamber. Use a minimum of five plunge strokes and three
360 clockwise, rotational strokes. 6. Repeat steps 2 and 3. 7. Use bore cleaning brush, still wet with firearm
cleaning solution, and clean all carbon and powder residue from around the gas tube in the upper receiver, bolt locking lugs, bolt rings, firing pin, bolt cam pin, lip of the extractor, and inside the bolt carrier group.
Pg. 28
Pg 9 OPERATING YOUR RIFLE
Caution: Always check that ammunition is clean and undamaged and that the chamber is free of obstruction before using the forward assist. Forcing damaged ammunition into the chamber could result in personal injury or death to you and others and damage your rifle and property. The use of reloaded, hand-loaded or high pressure ammunition can be dangerous and will void the warranty.
To load a magazine
Use only ammunition that is suitable for your firearm.
With front of magazine forward, place a round between the lips of the magazine with the bullet tip forward. Push the round down until it is held by the magazine lips. Place next round on top of previous round and repeat steps until desired amount of rounds are loaded into the magazine.
WARNING:
Make sure the rifle is pointed in a safe direction and the safety is engaged at all times while loading the rifle.
Never allow your fingers or other objects to contact the trigger while loading or unloading the rifle.
Do NOT disengage the safety until you are ready to fire and have the rifle pointed safely downrange.
To minimize risk of unintentional damage, load live ammunition into your firearm only when you are about to shoot.
Pg. 9
To Load the Rifle Remove empty magazine by depressing magazine catch,
which is located on the right side of the lower receiver, and extract magazine from the magazine well.
Press in on bottom of thumb piece of bolt catch while grasping and pulling back on the charging handle, to cock the hammer and leave bolt and carrier latched open to the rear.
Return charging handle fully forward until it locks and remove finger from bolt catch.
Set selector to “SAFE” position.
With the bullet pointing forward, insert the loaded magazine into the magazine well and push it in until it stops and is locked by the magazine catch. When the magazine is inserted, pull down on the magazine to ensure it is fully seated in the magazine well.
Keeping fingers away from the ejection port and the rifle pointed in a safe direction, press in on the top of the bolt catch. This will release the bolt carrier group to move forward and feed a round into the chamber. The rifle is now loaded with a round in the chamber and the hammer is cocked.
You may now close the ejection port dust cover if you wish; it is located on the right side of the upper receiver and will open automatically when the first round is fired.
Caution: Never leave your firearm cocked and loaded, ready to fire without the safety selector lever being set to “SAFE”, as this is the fire condition and is extremely dangerous. Firearms can easily be accidentally discharged, causing injury, death or damage to property.
Pg. 10
Caution: Do not use a wire brush on
aluminum surfaces such as the upper and lower receivers and the handguards. If cleaning is necessary, avoid scratching by using a small nylon brush or flannel patch.
8. Wipe all components clean and dry and inspect them for excessive wear, corrosion or mechanical damage. If any of these conditions appear, have them corrected before firing again.
9. Lightly dampen a flannel patch with gun oil and pass it once through the barrel, leaving a thin film of oil on the inside surface. Leave this film of oil on the surface if firearm is to be stored. If it is not being stored, or if it is being removed from storage for use, pass a dry patch through the barrel and chamber to remove as much oil as possible.
Pg. 27
Cleaning and lubricating the firearm
Materials Needed: Cleaning rod, cleaning patches (cut to fit snugly into the bore), a small nylon brush, good quality light gun oil, gun cleaning solution, a brass wire bristle bore cleaning brush, and a chamber cleaning brush.
NOTICE: Before firing, make sure the barrel and the
chamber are clean and dry. After firing, clean your firearm as soon as
possible to avoid corrosion. If your firearm gets wet, clean it as soon as
possible. If you carry a loaded firearm, unload it and clean
it when necessary and at least once a month. When your firearm has not been fired, you
should clean it at least once or twice a year if you live in a temperate climate, or as often as once a week in a tropical climate.
1. Disassemble your firearm. 2. Attach a cotton flannel patch to end of the
cleaning rod, insert it into the chamber and pass the rod and patch down through the barrel. Repeat, changing patches with each pass through the barrel, until the patch comes out clean.
To Unload the Rifle Caution: Always unload your firearm immediately after use and prior to cleaning and storage to minimize the risk of accidental discharge. Keep your firearm pointing in a safe direction. Do not touch the trigger and keep hands away from the ejection port.
Set the selector to the “SAFE” position.
Press the magazine catch button and remove the magazine.
Pull the charging handle to rear and push in lower portion of bolt catch. If a round had been in the chamber it should have been ejected. If the last round in the magazine had been fired and if the magazine was in place, the bolt carrier group should already be held to the rear.
Pg. 26 Pg. 11
Firing the Rifle WARNING:
Keep your firearm pointed in a safe direction. Before firing, practice your stance, aim, and breathing for steady
aim with your firearm unloaded. Practice firing on a range before using your firearm for any other
type of shooting.
Load the firearm as previously directed.
Grasp the firearm with one hand on the handguard and the other hand on the pistol grip with your trigger finger resting along the side of the trigger guard. Raise the firearm and pull buttstock firmly into shoulder.
Aim by aligning target with the front and rear sights.
Move safety selector level to “FIRE”.
Keeping steady aim, place index finger on trigger and squeeze gently until trigger releases hammer. Don’t jerk the trigger as you will disturb your aim and ruin your accuracy. To fire the second round and subsequent rounds, all that is necessary is to release the trigger and squeeze it again after every shot until you have finished firing or you have emptied the magazine.
This is a semi-automatic firearm and is immediately loaded and ready to fire after each shot until the magazine is empty.
Release trigger, remove finger from trigger, and set selector lever to “SAFE”. If you have fired the last round from the magazine, the bolt will be held to the rear so that the firearm can quickly be reloaded by replacing the magazine, or the chamber can be inspected to make sure it is empty.
Caution: While firing, if you notice a difference in sound or recoil, stop firing. A bullet could be stuck in the barrel. If you fire again before clearing the blockage, the barrel may bulge or bust and cause injury. If this occurs, retract the bolt slowly to remove and identify the fired cartridge case. Clear the firearm and make sure the bore is clear. Any unburned propellant or obstruction in the bore must be removed before firing again to prevent risk of damage and injury.
Pg. 12
Important: Do not strip your
firearm further than previously
described. If additional
maintenance is required, see the
“Service and Repair” section.
Reassemble your firearm by
reversing the stripping procedure
already described and make sure
that the cam pin is properly
installed.
If you attempt to fire without the bolt cam pin installed, damage or injury may result.
Pg. 25
Handguard Maintenance If dirt or debris has
accumulated in or around the handguard, use compressed air to remove it.
Apply lubrication as needed.
Removal is not necessary unless dirt has accumulated in or around the handguard.
If removal of handguard is deemed necessary, please take rifle to a qualified gunsmith.
Pg. 24
MAINTENANCE
Your Aero Precision rifle will perform better and last longer when it is properly maintained. Follow these instructions to keep your firearm in good working condition
Disassembling the firearm WARNING: Make sure that the magazine is removed and the firearm
is unloaded so it cannot be fired.
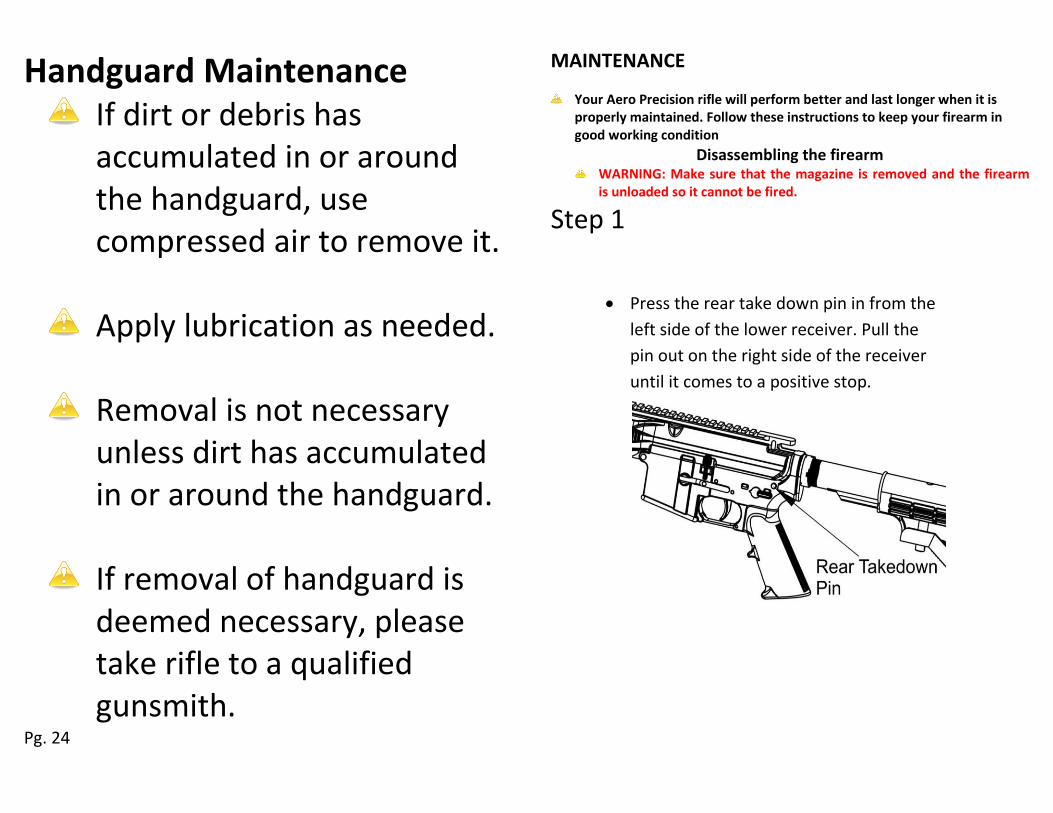
Step 1
Press the rear take down pin in from the
left side of the lower receiver. Pull the
pin out on the right side of the receiver
until it comes to a positive stop.
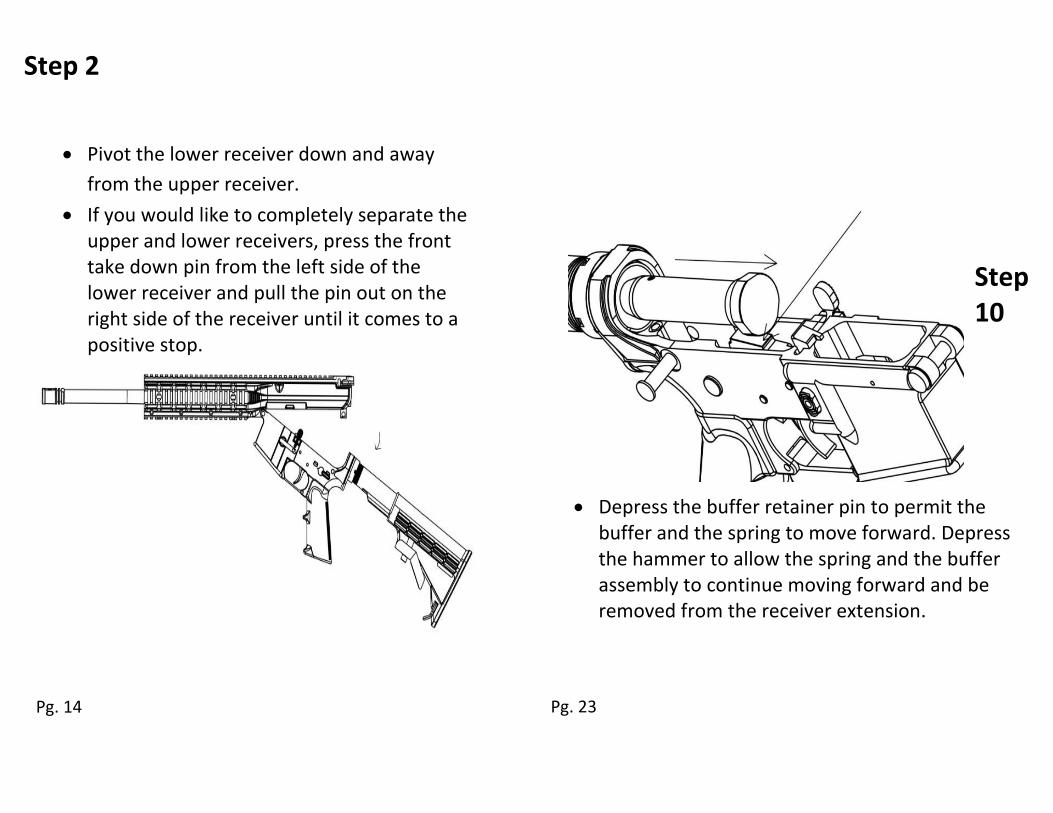
Step 2
Pg. 14
Step 10
Depress the buffer retainer pin to permit the buffer and the spring to move forward. Depress the hammer to allow the spring and the buffer assembly to continue moving forward and be removed from the receiver extension.
Pg. 23
Pivot the lower receiver down and away
from the upper receiver.
If you would like to completely separate the upper and lower receivers, press the front take down pin from the left side of the lower receiver and pull the pin out on the right side of the receiver until it comes to a positive stop.
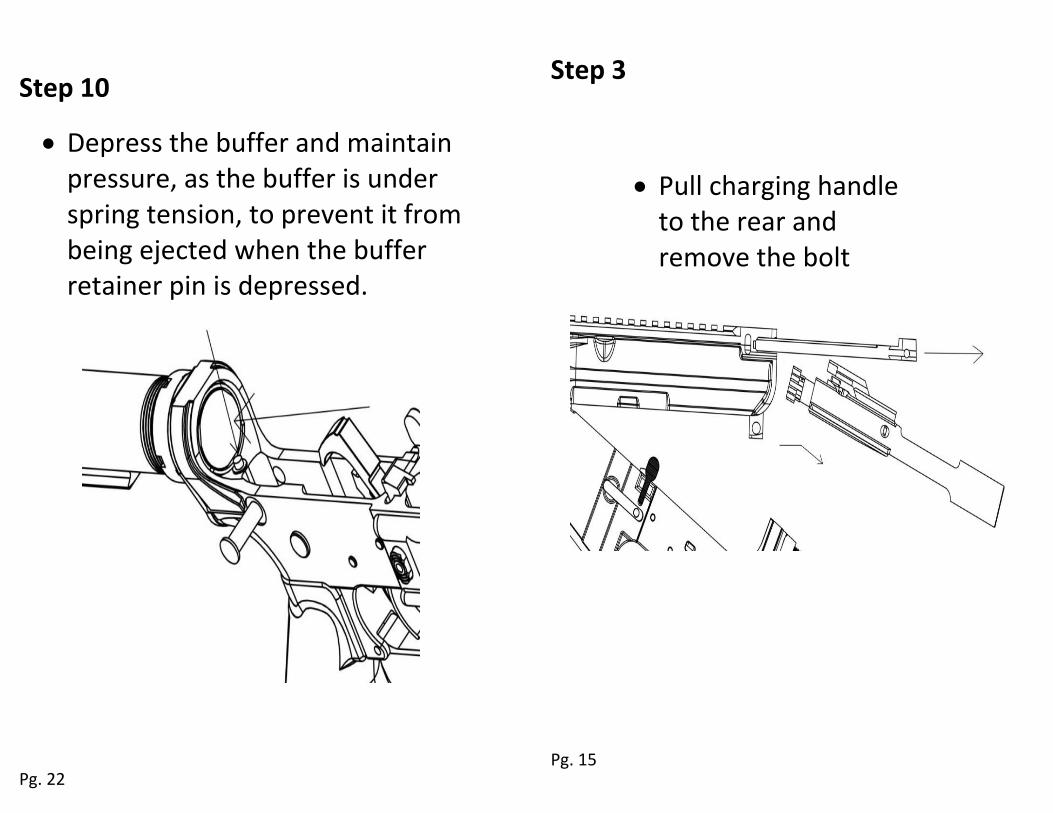
Step 10
Depress the buffer and maintain pressure, as the buffer is under spring tension, to prevent it from being ejected when the buffer retainer pin is depressed.
Pg. 22
Step 3
Pg. 15
Pull charging handle to the rear and remove the bolt carrier group.
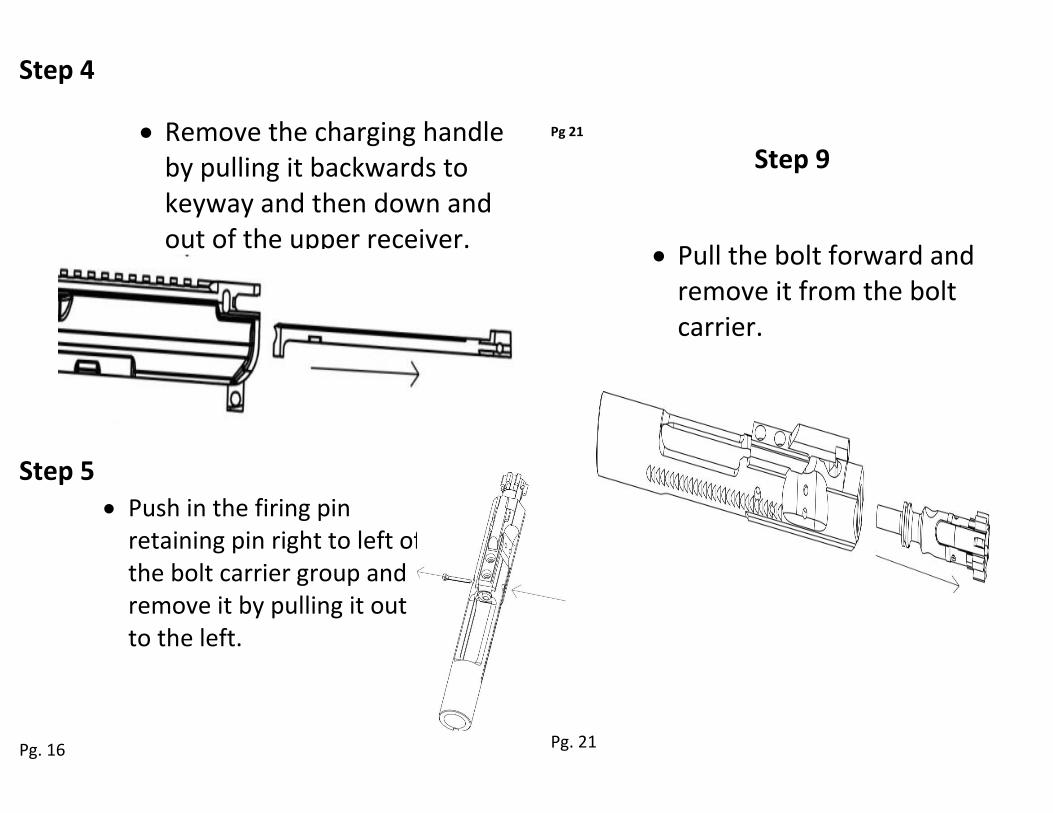
Step 4
Step 5 Pg. 16
Pg 21
Step 9
Pg. 21
Remove the charging handle by pulling it backwards to keyway and then down and out of the upper receiver.
Push in the firing pin retaining pin right to left of the bolt carrier group and remove it by pulling it out to the left.
Pull the bolt forward and remove it from the bolt carrier.
Step 8
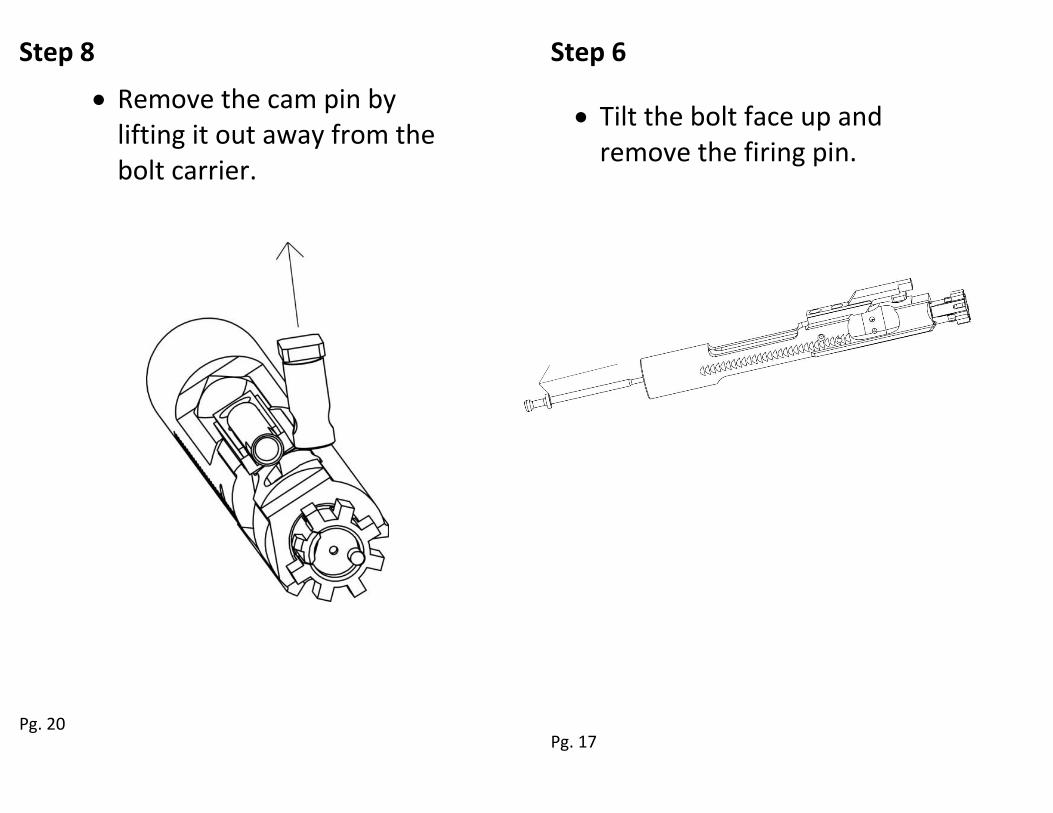
Pg. 20
Step 6
Pg. 17
Tilt the bolt face up and remove the firing pin.
Remove the cam pin by lifting it out away from the bolt carrier.
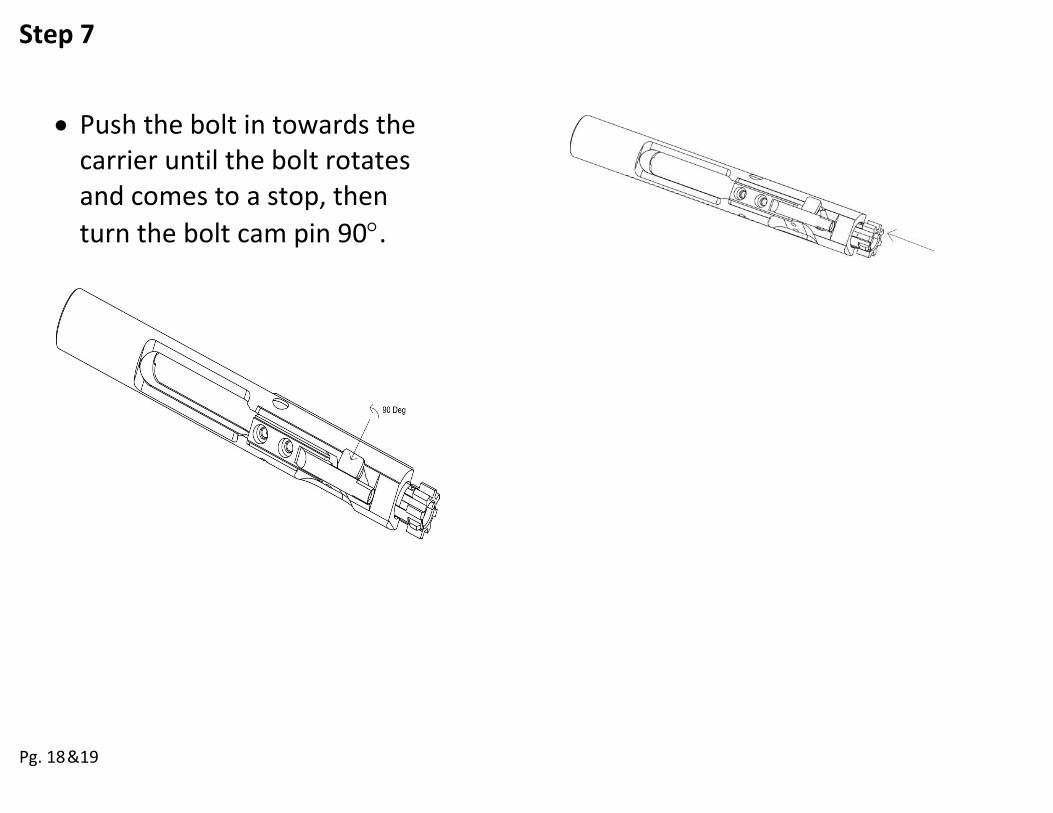
Step 7
Pg. 18 &19
Push the bolt in towards the carrier until the bolt rotates and comes to a stop, then
turn the bolt cam pin 90.


![IEC 61508 and ISO 13849 Assessment - Precision Sensors · 2020. 2. 7. · IEC 61508 Site Audit Report, Precision Sensors [R3] Precision Sensors Final Safety Case IEC 61508 SafetyCaseDB](https://img.pdfslide.us/doc/110x75/60b0c617d7840d54fe30fb1a/iec-61508-and-iso-13849-assessment-precision-2020-2-7-iec-61508-site-audit.jpg)