Embed Size (px)
Citation preview

Guitar amp Selector
Radial Engineering Ltd.1588 Kebet Way, Port Coquitlam BC V3C 5M5Tel: 604-942-1001 • Fax: 604-942-1010 • Email: [email protected]


Radial Engineering Ltd. Headlight™ User Guide1
tonebone HeadliGHtGuitar amp Selector
Introduction ....................................................................................... 1Features ........................................................................................ 2-3Making Connections ...................................................................... 4-5Connecting a Tuner .......................................................................... 6All Amps On ...................................................................................... 7Lifting the Ground ............................................................................. 8Adjusting the Phase.......................................................................... 9Setups ....................................................................................... 10-11Specifications ................................................................................. 12Block Diagram ................................................................................ 13Radial Limited Warranty ...................................................Back Cover
The Tonebone Headlight™ is a compact amp selector that lets you connect your guitar and send the signal out to as many as four amps at once. The cool thing here is that unlike other switchers that employ dedicated footswitches to turn on or off amps, the Headlight features a single footswitch that sequentially rotates through the outputs depending on how many amps are connected. This allows the Headlight to be used as a typical ABY with two outputs, as a 3-output ABC switcher for clean rhythm and lead amps or switch between four amps to find the ultimate tone in the studio.
The second footswitch features two modes whereby it can be used to mute all of the outputs for quiet on-stage tuning or it can be used to turn all of the amps on at once. This opens the door to greater creative uses on stage and in the studio alike.
9VDCMade in Canada
INPU
TTU
NER
OU
T-2
OU
T-1
OU
T-4
OU
T-3
MUTE
TMHEADLIGHT
LIFT
GND POL
180º
OUT 4 OUT 3 OUT 2 OUT 1
DRAGMUTE
ALL ON
OUT 3-4 OUT 1-2 IN / TUNER
LIFT
GND POL
180º LIFT
GND POL
180º
SELECTMUTE
MIN MAX
9VDC
Radial Engineering Ltd. Headlight™ User Guide2
FEATURES
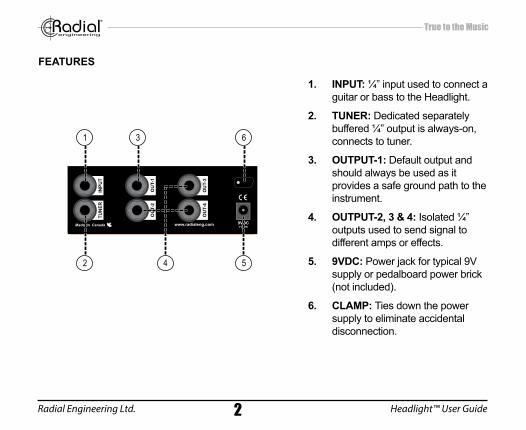
1. INPUT: ¼” input used to connect a guitar or bass to the Headlight.
2. TUNER: Dedicated separately buffered ¼” output is always-on, connects to tuner.
3. OUTPUT-1: Default output and should always be used as it provides a safe ground path to the instrument.
4. OUTPUT-2, 3 & 4: Isolated ¼” outputs used to send signal to different amps or effects.
5. 9vdc: Power jack for typical 9V supply or pedalboard power brick (not included).
6. clAmP: Ties down the power supply to eliminate accidental disconnection.
1 3 6
2 4 5
9VDCMade in CanadaIN
PUT
TUN
ER
OU
T-2
OU
T-1
OU
T-4
OU
T-3
MUTE
TMHEADLIGHT
LIFT
GND POL
180º
OUT 4 OUT 3 OUT 2 OUT 1
DRAGMUTE
ALL ON
OUT 3-4 OUT 1-2 IN / TUNER
LIFT
GND POL
180º LIFT
GND POL
180º
SELECTMUTE
MIN MAX
9VDC
Radial Engineering Ltd. Headlight™ User Guide3
FEATURES
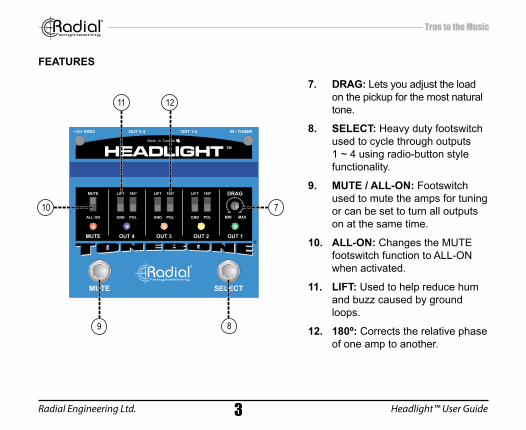
7. dRAG: Lets you adjust the load on the pickup for the most natural tone.
8. SElEcT: Heavy duty footswitch used to cycle through outputs 1 ~ 4 using radio-button style functionality.
9. mUTE / All-ON: Footswitch used to mute the amps for tuning or can be set to turn all outputs on at the same time.
10. All-ON: Changes the MUTE footswitch function to ALL-ON when activated.
11. lIFT: Used to help reduce hum and buzz caused by ground loops.
12. 180º: Corrects the relative phase of one amp to another.
8
11 12
7
9
10
Radial Engineering Ltd. Headlight™ User Guide4
mAKING cONNEcTIONS
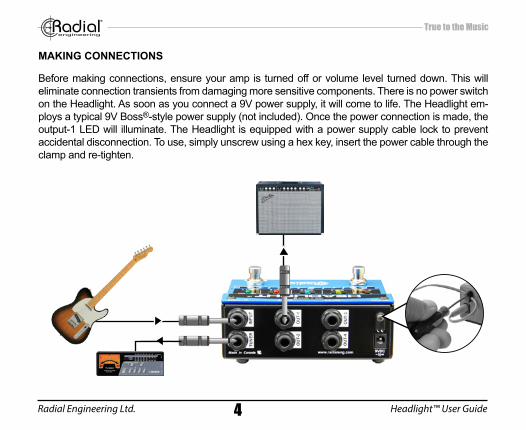
Before making connections, ensure your amp is turned off or volume level turned down. This will eliminate connection transients from damaging more sensitive components. There is no power switch on the Headlight. As soon as you connect a 9V power supply, it will come to life. The Headlight em-ploys a typical 9V Boss®-style power supply (not included). Once the power connection is made, the output-1 LED will illuminate. The Headlight is equipped with a power supply cable lock to prevent accidental disconnection. To use, simply unscrew using a hex key, insert the power cable through the clamp and re-tighten.
Radial Engineering Ltd. Headlight™ User Guide5
9VDCMade in Canada
INPU
TTU
NER
OU
T-2
OU
T-1
OU
T-4
OU
T-3
MUTE
TMHEADLIGHT
LIFT
GND POL
180º
OUT 4 OUT 3 OUT 2 OUT 1
DRAGMUTE
ALL ON
OUT 3-4 OUT 1-2 IN / TUNER
LIFT
GND POL
180º LIFT
GND POL
180º
SELECTMUTE
MIN MAX
9VDC
9VDCMade in Canada
INPU
TTU
NER
OU
T-2
OU
T-1
OU
T-4
OU
T-3
MUTE
TMHEADLIGHT
LIFT
GND POL
180º
OUT 4 OUT 3 OUT 2 OUT 1
DRAGMUTE
ALL ON
OUT 3-4 OUT 1-2 IN / TUNER
LIFT
GND POL
180º LIFT
GND POL
180º
SELECTMUTE
MIN MAX
9VDC
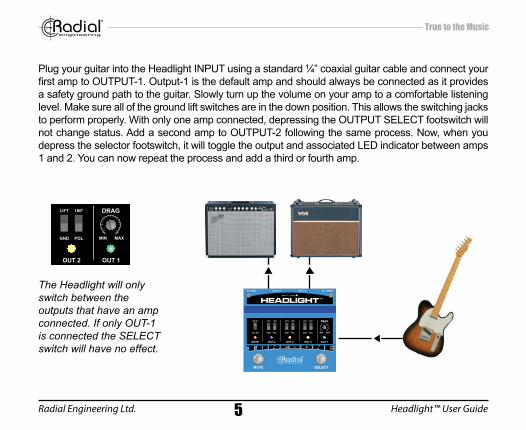
Plug your guitar into the Headlight INPUT using a standard ¼” coaxial guitar cable and connect your first amp to OUTPUT-1. Output-1 is the default amp and should always be connected as it provides a safety ground path to the guitar. Slowly turn up the volume on your amp to a comfortable listening level. Make sure all of the ground lift switches are in the down position. This allows the switching jacks to perform properly. With only one amp connected, depressing the OUTPUT SELECT footswitch will not change status. Add a second amp to OUTPUT-2 following the same process. Now, when you depress the selector footswitch, it will toggle the output and associated LED indicator between amps 1 and 2. You can now repeat the process and add a third or fourth amp.
The Headlight will only switch between the outputs that have an amp connected. If only OUT-1 is connected the SELECT switch will have no effect.
Radial Engineering Ltd. Headlight™ User Guide6
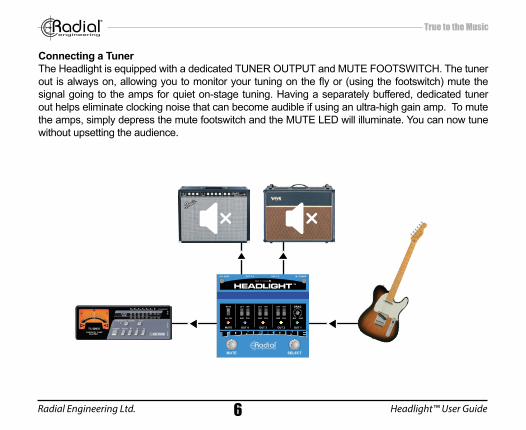
connecting a TunerThe Headlight is equipped with a dedicated TUNER OUTPUT and MUTE FOOTSWITCH. The tuner out is always on, allowing you to monitor your tuning on the fly or (using the footswitch) mute the signal going to the amps for quiet on-stage tuning. Having a separately buffered, dedicated tuner out helps eliminate clocking noise that can become audible if using an ultra-high gain amp. To mute the amps, simply depress the mute footswitch and the MUTE LED will illuminate. You can now tune without upsetting the audience.
9VDCMade in Canada
INPU
TTU
NER
OU
T-2
OU
T-1
OU
T-4
OU
T-3
MUTE
TMHEADLIGHT
LIFT
GND POL
180º
OUT 4 OUT 3 OUT 2 OUT 1
DRAGMUTE
ALL ON
OUT 3-4 OUT 1-2 IN / TUNER
LIFT
GND POL
180º LIFT
GND POL
180º
SELECTMUTE
MIN MAX
9VDC
Radial Engineering Ltd. Headlight™ User Guide7
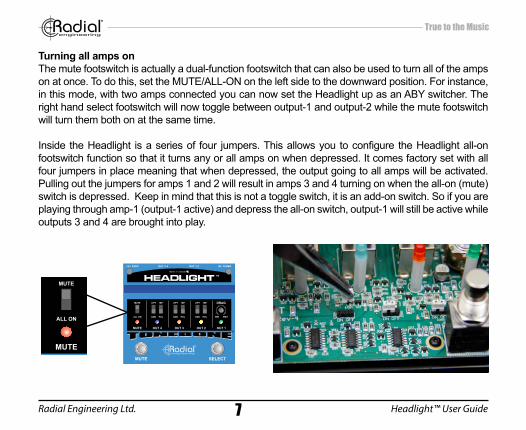
Turning all amps onThe mute footswitch is actually a dual-function footswitch that can also be used to turn all of the amps on at once. To do this, set the MUTE/ALL-ON on the left side to the downward position. For instance, in this mode, with two amps connected you can now set the Headlight up as an ABY switcher. The right hand select footswitch will now toggle between output-1 and output-2 while the mute footswitch will turn them both on at the same time.
Inside the Headlight is a series of four jumpers. This allows you to configure the Headlight all-on footswitch function so that it turns any or all amps on when depressed. It comes factory set with all four jumpers in place meaning that when depressed, the output going to all amps will be activated. Pulling out the jumpers for amps 1 and 2 will result in amps 3 and 4 turning on when the all-on (mute) switch is depressed. Keep in mind that this is not a toggle switch, it is an add-on switch. So if you are playing through amp-1 (output-1 active) and depress the all-on switch, output-1 will still be active while outputs 3 and 4 are brought into play.
9VDCMade in Canada
INPU
TTU
NER
OU
T-2
OU
T-1
OU
T-4
OU
T-3
MUTE
TMHEADLIGHT
LIFT
GND POL
180º
OUT 4 OUT 3 OUT 2 OUT 1
DRAGMUTE
ALL ON
OUT 3-4 OUT 1-2 IN / TUNER
LIFT
GND POL
180º LIFT
GND POL
180º
SELECTMUTE
MIN MAX
9VDC
9VDCMade in Canada
INPU
TTU
NER
OU
T-2
OU
T-1
OU
T-4
OU
T-3
MUTE
TMHEADLIGHT
LIFT
GND POL
180º
OUT 4 OUT 3 OUT 2 OUT 1
DRAGMUTE
ALL ON
OUT 3-4 OUT 1-2 IN / TUNER
LIFT
GND POL
180º LIFT
GND POL
180º
SELECTMUTE
MIN MAX
9VDC
Radial Engineering Ltd. Headlight™ User Guide8
lIFTING THE GROUNd
When more than one amp is connected, you can sometimes encounter excessive noise, commonly referred to as a ground loop. The best way to prevent hum and buzz in your system is to connect all of your amps and pedals into a single power bar. This helps prevent problems due to improper household electrical wiring from causing problems. You do, however have to keep in mind that most electrical power circuits are limited in the available current. Exceeding the current demand may cause the breaker to blow. Driving three or four 100 watt amps at the same time along with a bunch of pedals may exceed the limit– so you may need to connect to two circuits if playing loud.
To help eliminate noise, the Headlight is equipped with isolation transformers and ground lift switches. Output-1 is the default amp and should always be connected to an amplifier that is equipped with a proper U-ground. The other 3 outputs are transformer isolated to block stray DC voltage and are very effective at reducing noise. These 3 outputs are also equipped with ground lift switches that lift the audio ground without affecting the safety of the electrical ground. Never cut or disconnect the electri-cal safety ground from your amplifier as this is there to protect you.
IMPORTANT SAFETY NOTICE: As you are the sole user of the Headlight, you are entirely responsible for using ampli-fiers, power supplies and effects that are electrically approved by your local authority and are safe for use. If you are unsure of the status of your equipment, please contact the manufacturer or dealer for details. As Radial Engineering Ltd is unable to control what is being connected to the Headlight, you agree to take full responsibility for its safe use and agree that Radial Engineering Ltd. along with its staff and directors shall not be held responsible in any way for damages of any kind other than those clearly detailed in the Radial Warranty. Should you for any reason feel uncomfortable with the above statement, you should return the Headlight, before use, to the dealer in the original packaging for full credit within 7 days of purchase.
Radial Engineering Ltd. Headlight™ User Guide9
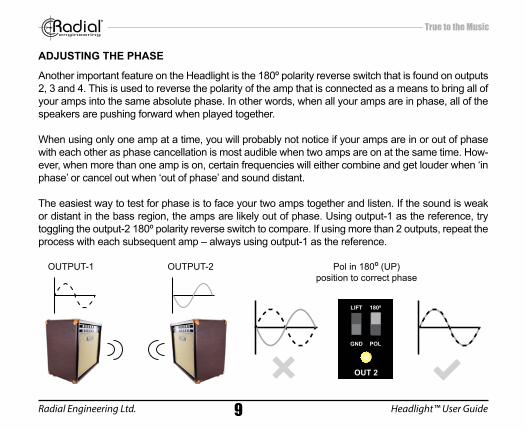
AdJUSTING THE PHASE
Another important feature on the Headlight is the 180º polarity reverse switch that is found on outputs 2, 3 and 4. This is used to reverse the polarity of the amp that is connected as a means to bring all of your amps into the same absolute phase. In other words, when all your amps are in phase, all of the speakers are pushing forward when played together.
When using only one amp at a time, you will probably not notice if your amps are in or out of phase with each other as phase cancellation is most audible when two amps are on at the same time. How-ever, when more than one amp is on, certain frequencies will either combine and get louder when ‘in phase’ or cancel out when ‘out of phase’ and sound distant.
The easiest way to test for phase is to face your two amps together and listen. If the sound is weak or distant in the bass region, the amps are likely out of phase. Using output-1 as the reference, try toggling the output-2 180º polarity reverse switch to compare. If using more than 2 outputs, repeat the process with each subsequent amp – always using output-1 as the reference.
OUTPUT-1 OUTPUT-2 Pol in 180º (UP)position to correct phase
9VDCMade in Canada
INPU
TTU
NER
OU
T-2
OU
T-1
OU
T-4
OU
T-3
MUTE
TMHEADLIGHT
LIFT
GND POL
180º
OUT 4 OUT 3 OUT 2 OUT 1
DRAGMUTE
ALL ON
OUT 3-4 OUT 1-2 IN / TUNER
LIFT
GND POL
180º LIFT
GND POL
180º
SELECTMUTE
MIN MAX
9VDC
Radial Engineering Ltd. Headlight™ User Guide10
SETUPS
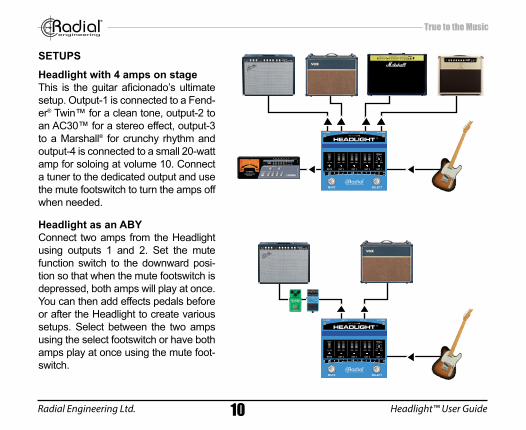
Headlight with 4 amps on stageThis is the guitar aficionado’s ultimate setup. Output-1 is connected to a Fend-er® Twin™ for a clean tone, output-2 to an AC30™ for a stereo effect, output-3 to a Marshall® for crunchy rhythm and output-4 is connected to a small 20-watt amp for soloing at volume 10. Connect a tuner to the dedicated output and use the mute footswitch to turn the amps off when needed.
Headlight as an ABYConnect two amps from the Headlight using outputs 1 and 2. Set the mute function switch to the downward posi-tion so that when the mute footswitch is depressed, both amps will play at once. You can then add effects pedals before or after the Headlight to create various setups. Select between the two amps using the select footswitch or have both amps play at once using the mute foot-switch.
9VDCMade in Canada
INPU
TTU
NER
OU
T-2
OU
T-1
OU
T-4
OU
T-3
MUTE
TMHEADLIGHT
LIFT
GND POL
180º
OUT 4 OUT 3 OUT 2 OUT 1
DRAGMUTE
ALL ON
OUT 3-4 OUT 1-2 IN / TUNER
LIFT
GND POL
180º LIFT
GND POL
180º
SELECTMUTE
MIN MAX
9VDC
9VDCMade in Canada
INPU
TTU
NER
OU
T-2
OU
T-1
OU
T-4
OU
T-3
MUTE
TMHEADLIGHT
LIFT
GND POL
180º
OUT 4 OUT 3 OUT 2 OUT 1
DRAGMUTE
ALL ON
OUT 3-4 OUT 1-2 IN / TUNER
LIFT
GND POL
180º LIFT
GND POL
180º
SELECTMUTE
MIN MAX
9VDC
Radial Engineering Ltd. Headlight™ User Guide11
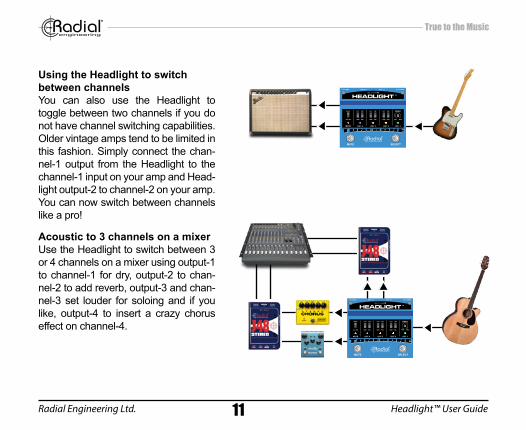
Using the Headlight to switch between channelsYou can also use the Headlight to toggle between two channels if you do not have channel switching capabilities. Older vintage amps tend to be limited in this fashion. Simply connect the chan-nel-1 output from the Headlight to the channel-1 input on your amp and Head-light output-2 to channel-2 on your amp. You can now switch between channels like a pro!
Acoustic to 3 channels on a mixerUse the Headlight to switch between 3 or 4 channels on a mixer using output-1 to channel-1 for dry, output-2 to chan-nel-2 to add reverb, output-3 and chan-nel-3 set louder for soloing and if you like, output-4 to insert a crazy chorus effect on channel-4.
9VDCMade in Canada
INPU
TTU
NER
OU
T-2
OU
T-1
OU
T-4
OU
T-3
MUTE
TMHEADLIGHT
LIFT
GND POL
180º
OUT 4 OUT 3 OUT 2 OUT 1
DRAGMUTE
ALL ON
OUT 3-4 OUT 1-2 IN / TUNER
LIFT
GND POL
180º LIFT
GND POL
180º
SELECTMUTE
MIN MAX
9VDC
9VDCMade in Canada
INPU
TTU
NER
OU
T-2
OU
T-1
OU
T-4
OU
T-3
MUTE
TMHEADLIGHT
LIFT
GND POL
180º
OUT 4 OUT 3 OUT 2 OUT 1
DRAGMUTE
ALL ON
OUT 3-4 OUT 1-2 IN / TUNER
LIFT
GND POL
180º LIFT
GND POL
180º
SELECTMUTE
MIN MAX
9VDC
Radial Engineering Ltd. Headlight™ User Guide12
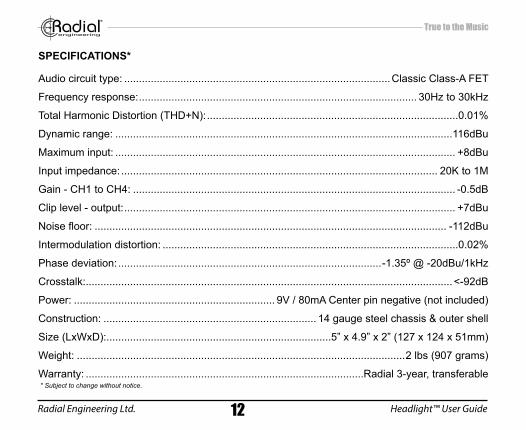
SPEcIFIcATIONS*
Audio circuit type: ..........................................................................................Classic Class-A FET
Frequency response: .............................................................................................. 30Hz to 30kHz
Total Harmonic Distortion (THD+N): .....................................................................................0.01%
Dynamic range: ..................................................................................................................116dBu
Maximum input: ................................................................................................................... +8dBu
Input impedance: ........................................................................................................... 20K to 1M
Gain - CH1 to CH4: ............................................................................................................. -0.5dB
Clip level - output: ................................................................................................................ +7dBu
Noise floor: ....................................................................................................................... -112dBu
Intermodulation distortion: ....................................................................................................0.02%
Phase deviation: .........................................................................................-1.35º @ -20dBu/1kHz
Crosstalk:............................................................................................................................ <-92dB
Power: .................................................................... 9V / 80mA Center pin negative (not included)
Construction: ........................................................................ 14 gauge steel chassis & outer shell
Size (LxWxD): ............................................................................5” x 4.9” x 2” (127 x 124 x 51mm)
Weight: ...............................................................................................................2 lbs (907 grams)
Warranty: ..............................................................................................Radial 3-year, transferable* Subject to change without notice.

Radial Engineering Ltd. Headlight™ User Guide13
TUNER
INPUTBUFFER
DRAG
SELECT SWITCHOUTPUT
PHASE REV
GND LIFT
OUT 4
PHASE REV
GND LIFT
OUT 2
PHASE REV
GND LIFT
OUT 3
OUT 1
ON
ON
ON
ON
MUTE / ALL ON
ALL ON
MUTE
* Subject to change without notice.
BlOcK dIAGRAm*

Radial Engineering Ltd.1588 Kebet Way, Port Coquitlam BC V3C 5M5Tel: 604-942-1001 • Fax: 604-942-1010 • Email: [email protected]
RADIAL ENGINEERING LTD. (“Radial”) warrants this product to be free from defects in material and workmanship and will remedy any such defects free of charge according to the terms of this warranty. Radial will repair or replace (at its option) any defective component(s) of this product (excluding finish and wear and tear on components under normal use) for a period of three (3) years from the original date of purchase. In the event that a particular product is no longer avail-able, Radial reserves the right to replace the product with a similar product of equal or greater value. In the unlikely event that a defect is uncovered, please call 604-942-1001 or email [email protected] to obtain an RA number (Return Authorization number) before the 3 year warranty period expires. The product must be returned prepaid in the original shipping container (or equivalent) to Radial or to an authorized Radial repair center and you must assume the risk of loss or damage. A copy of the original invoice showing date of purchase and the dealer name must accompany any request for work to be performed under this limited and transferable warranty. This warranty shall not apply if the product has been damaged due to abuse, misuse, misapplication, accident or as a result of service or modification by any other than an authorized Radial repair center.
THERE ARE NO EXPRESSED WARRANTIES OTHER THAN THOSE ON THE FACE HEREOF AND DESCRIBED ABOVE. NO WARRANTIES WHETHER EXPRESSED OR IMPLIED, INCLUDING BUT NOT LIMITED TO, ANY IMPLIED WARRANTIES OF MERCHANTABILITY OR FITNESS FOR A PARTICULAR PURPOSE SHALL EXTEND BEYOND THE RESPECTIVE WARRANTY PERIOD DESCRIBED ABOVE OF THREE YEARS. RADIAL SHALL NOT BE RESPONSIBLE OR LIABLE FOR ANY SPECIAL, INCIDENTAL OR CONSEQUENTIAL DAMAGES OR LOSS ARISING FROM THE USE OF THIS PRODUCT. THIS WARRANTY GIVES YOU SPECIFIC LEGAL RIGHTS, AND YOU MAY ALSO HAVE OTHER RIGHTS, WHICH MAY VARY DEPENDING ON WHERE YOU LIVE AND WHERE THE PRODUCT WAS PURCHASED.
RAdIAl ENGINEERING3 YEAR TRANSFERABlE WARRANTY
Headlight™ User Guide - Part #: R870 1023 00 Copyright © 2016, all rights reserved.Appearance and specifications subject to change without notice.