Embed Size (px)
Citation preview

Guidelines To Create a Sansar Custom Avatar In 3DS Max
First of all you need to set up properly your 3ds max scene.
Upon start up of 3ds max max make sure to have the right units set up:
1. go to Main Menu > Customize > Units SetUp2. Set the System Unit SetUp to 1 unit= 1.0 Meters3. Display Unit Scale: Metrics, and drop down menu to Meters4. Click “OK”
Now that you have set up your blank scene properly you can import the Sansar fbx file of the BaseMale Skeleton or the Base Female Skeleton. In case you plan on re using the fbx from Sansar, it should import with a different system unit (just accept the automatic fbx importer settings).
See this web page: https://help.sansar.com/hc/en-us/articles/360001174526-Sansar-skeleton-and-skinning-details
Or you can use the 3DS max scene already set up for you (for now this is just the Base Male Skeleton) Upon opening of SansarBaseSkeleton.max make sure to Adopt the File's Unit Scale, in case you forgot to set up your system units before.
Here is what the scene looks like :
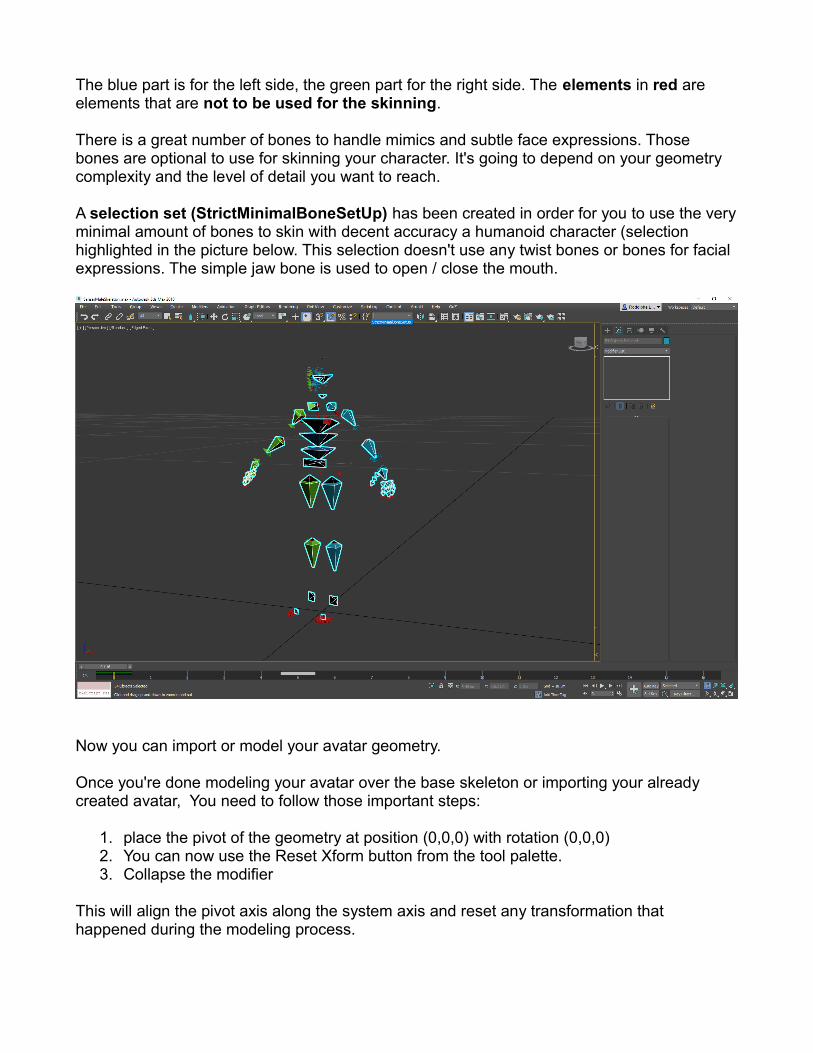
The blue part is for the left side, the green part for the right side. The elements in red are elements that are not to be used for the skinning.
There is a great number of bones to handle mimics and subtle face expressions. Those bones are optional to use for skinning your character. It's going to depend on your geometry complexity and the level of detail you want to reach.
A selection set (StrictMinimalBoneSetUp) has been created in order for you to use the veryminimal amount of bones to skin with decent accuracy a humanoid character (selection highlighted in the picture below. This selection doesn't use any twist bones or bones for facial expressions. The simple jaw bone is used to open / close the mouth.
Now you can import or model your avatar geometry.
Once you're done modeling your avatar over the base skeleton or importing your already created avatar, You need to follow those important steps:
1. place the pivot of the geometry at position (0,0,0) with rotation (0,0,0)2. You can now use the Reset Xform button from the tool palette.3. Collapse the modifier
This will align the pivot axis along the system axis and reset any transformation that happened during the modeling process.

The main issue is that the axis are different from 3Ds Max to Sansar (3DS max Z axis is up when Sansar Y axis is up...)
There is a simple trick to avoid that problem. Just follow those few steps :
1. rotate geometry -90 on X Axis2. Reset Xform the model and Collapse that modifier3. Rotate Back the model +90 on X Axis

Step 1: rotate geometry -90 on X Axis
Step 2: Reset Xform the model and Collapse that modifier

Step 3: Rotate Back the model +90 on X Axis
As you can see now the Local geometry Y axis is Up. (Don't try to rotate the pivot otherwise this will result in an AABB extend error upon import in Sansar)
You can now Skin you model the way you usually do. For the skinning, first stick to using the minimal amount of bones you need from the Sansar Skeleton. This will depend on your modelcomplexity and the level of detail you want to reach.
The selection we set up is a pretty good starting point for skinning an avatar.
Once you're satisfied with your skinning, add all the rest of the bones from the Sansar skeleton. Those added bones will need to have a zero influence on the geometry).
Now the final step is to export the model to Sansar. In order to do this, you just need to follow those simple steps:
1. Select the entire Base Skeleton and the skinned geometry2. Export selected to fbx3. Make sure that the export settings have Y-Up and that the advanced options have the
scale factor set to 1.0 with the scene units converted to meters


You can now open Sansar, and select the lookbook. Click on ADD AVATAR, locate the avatar fbx file you just exported and click import. Depending on the amount of triangles and the resolution / size of the textures it will take from a few seconds up to a minute to convert and upload the avatar to Sansar. Once this is done you can close the ADD AVATAR window and select your avatar from he list.