Embed Size (px)
Citation preview

Guidelines for Renovations and Additions to Historic Buildings
Building on Hartford’s Historic Heritage
City of Hartford, Connecticut
Eddie A. Perez, Mayor

The City of Hartford wishes to thank the many towns in Connecticut and other New England states whose previous publication of documents such as this provided text, illustrations
and inspiration used in the creation of these Guidelines.
“Clapboards-Illustration,” “Corbel-Illustration,” “Cresting-Illustration,” “Dentil-Illustration,” “Double-Hung Window-Illustration,” “Gingerbread-Illustration,” “Half-timbered construction-
Illustration,” “Lintel(a)-Illustration,” “Mansard Roof-Illustration,” “Rusticated Stone-Illustration,” “Cornice-Illustration,” “Pediment-Illustration,” from AMERICAN ARCHITECTURE:
AN ILLUSTRATED ENCYCLOPEDIA by Cyril M. Harris. Copyright © 1998 by Cyril Manton Harris. Used by permission of W.W. Norton & Company, Inc.
Front Cover: Park Terrace overlooking Pope Park Back Cover: Main Street, South Green Published in 2006
OFFICE OF THE MAYOREddie A. Perez, MayorLee Erdmann, Chief Operating OfficerMatthew Hennessy, Chief of Staff
DEPARTMENT OF DEVELOPMENT SERVICESJohn F. Palmieri, Director, Development Services DepartmentRoger J. O’Brien, Director of Planning, PhD, AICPKenneth Schwartz, Chief Staff Planner, AIA, AICP
CONSULTANTSJames Vance & Associates, Architects
James Vance, AIAJohn Wilcox, AIA
Graphic Design, Laura Augustine
MEMBERS OF THE HARTFORD CITY COUNCILVeronica Airey-WilsonJohn BazzanoJames BoucherElizabeth Horton-SheffKenneth H. Kennedy, Jr. Hernan LaFontaineRobert PainterCalixto TorresRosezina Winch
MEMBERS OF THEHISTORIC PRESERVATION COMMISSIONAllen Ambrose, AIAJonathan E. ClarkCatherine ConnorDavid RansomLynn FerrariGreg Secord, Chairman
MEMBERS OF THE ADVISORY COMMITTEE ON HISTORICAL PRESERVATION GUIDELINESGilbert AddoSandra BobowskiRobert GulianoChris HartleyJohn HarrisJoseph HewesBill JordanSally KatzTai Soo KimLaura Knott-TwineCatherine MacKinnonTony MattaCarlos MoutaRafie PodolskyRomulo Samaniego
Acknowledgments


iv
Introduction
The City of Hartford has a rich architectural heritage. The historic significance of ourneighborhoods and our downtown were chronicled by the Hartford ArchitectureConservancy more than 30 years ago.
There are more than 4,000 buildings within our city that contribute to our rich heritage.
In 2005, a special Historic Preservation Ordinance Task Force worked to bring aboutour Historic Preservation Ordinance. The guidelines included in this booklet are intendedto assist residents in meeting the requirements of that ordinance as well as to guideoverall design of developments in historic districts.
At the same time, the guidelines will serve to assist residents and City officials in buildinga better Hartford together. The acknowledgement page lists all those who have participated in this effort.
For forms and procedures relating to renovations and alterations to historic buildings,new or existing buildings in historic districts or any proposed demolition of a historicbuilding or any building in a historic district, please contact the City Planning Division, 250 Constitution Plaza, Hartford, CT 06103-1822, 860-757-9040,www.hartford.gov/development/planning

1B u i l d i n g o n H a r t f o r d ’s H i s t o r i c H e r i t a g e
Table of Contents
Introduction ivWhy Preservation? Why Preservation Guidelines? 2A Summary of The Secretary of the Interior’s Standards 3Steps to Achieving the Standards 4Defining “Visible From The Street” 5Hartford Styles 7
■ Greek and Gothic Revivals 8■ Italian Villa and Italianate 9■ Second Empire and Queen Anne 10■ Neo-Classical Revival and the “Perfect 6” 11■ Tudor Revival and Bungalow 12■ Colonial and Georgian Revivals 13■ Commercial, Apartment, Cultural and
Landmark Buildings 14Repairing, Preserving and Replacing Your Building’s Exterior Elements 15
■ Masonry and Stone 1 16■ Masonry and Stone 2 17■ Siding and Trim 18■ Windows and Doors 19■ Wood Decorative Elements 20■ Roofing 21■ Entrances and Porches 22
Designing for Missing Elements 23■ Siding 24■ Ornamentation and Trim 25■ Windows and Doors 26
Designing Alterations and Additions 27■ Massing and Location 28■ Scale and Solid/Void 29■ Design Examples 30
Alterations to Commercial Buildings 31■ Mixed-Use and Reuse 32■ Mixed-Use Residential Over Commercial 33
New Construction and Alterations, Downtown 35■ Infill Buildings 36■ Façades 37■ Storefronts 38
Designing New Buildings in Historic Districts 39■ Massing and Height 40■ Setback and Relationship to the Street 41■ Roof Forms and Materials 42■ Retail Big Box Stores 43■ Retail Small Box Stores 45
Appendix 47■ Technical Guidance for Homeowners 48■ Glossary 58

2
Why Preservation?■ To protect and enhance the attractiveness of the City
■ To protect and enhance neighborhood character
■ To stabilize and increase property values
Why Preservation Guidelines? ■ To promote responsible preservation practices
■ To create a mechanism to identify, preserve and enhance historic buildings
■ To provide a resource of information and expertise for educational purposes
■ To foster appropriate use and wider public knowledge and appreciation of areas, sites, structures and features
Detail of The Richardson Building on Main Street

3B u i l d i n g o n H a r t f o r d ’s H i s t o r i c H e r i t a g e
■ Preserve the distinguishing character of your property. Removalor alteration of historical materials or architectural features should be avoided.
■ Repair rather than replace deteriorated architectural featureswhenever possible.
■ Duplicate original features by matching them in composition,design, color, texture and other visual qualities whenever replace-ment is necessary.
■ Honor the proportions, scale, color, texture and quality of theoriginal when new materials are introduced.
■ Treat with sensitivity distinguishing stylistic features and examplesof skilled craftsmanship, which are scarce today.
■ Provide a use for your building compatible with the original useso that minimal alteration to the building and its environment isnecessary.
■ Give careful consideration before removing additions and alter-ations made after your building was built. They may have value aspart of the history of the building.
■ Recognize your building as a product of its time. Alterations tocreate earlier appearances, for example adding colonial windowsto Victorian houses, is inappropriate.
■ Preserve the essential form and integrity of the original buildingwhen making new additions and alterations.
■ Design new additions to be compatible in size, scale, color andmaterial, but not to mimic previous styles.
Summary of the Secretary of the Interior’s Standards for Rehabilitation
The Linden Building on Main Street

4
Steps to Achieving the Standards
■ Identify the style of your building, if you can (pages 7–14).
■ Identify parts of the building that will be visible from the street and that are significant, such as porches, windows, surface materials and the shape of the roofline (page 5).
■ Repair, protect and maintain the historic features and materials. Replace missing character-defining features with elements and materials which match the original as closely as possible (pages 15–22).
■ Design and construct your alterations and additions to complement and enhance your existing building (pages 27–30).
A Tudor Revival house on Prospect Avenue

5B u i l d i n g o n H a r t f o r d ’s H i s t o r i c H e r i t a g e
CORNER PROPERTY MID-BLOCK PROPERTY
The shaded areas are considered visible from the street(s) and are therefore subject to these guidelines.
Street Street
Stre
et
Defining “Visible from the Street”


7
Introduction to Hartford Styles
A Bungalow on Ridgefield Street
An 1896 Duplex on Imlay Street The Linden on Main Street

8
Introduction to Hartford Styles
GREEK REVIVAL 1820 TO 1860
■ Larger vertical window panes — 2/2, 2/1
■ Symmetrical placement of windows
■ Gables facing street, triangular pediments
■ Columned porticos, recessed entries
■ Supporting pilasters at corners
■ Wide entablatures and moldings
GOTHIC REVIVAL 1830 TO 1860
■ Tall narrow windows, vertical panes
■ Asymmetrical plan, bay windows
■ Steeply pitched roofs, tall dormers
■ Pointed arch porticos
■ Decorative woodwork
■ Jigsaw gingerbread
■ Variety of shingle/clapboard/brick patterns
* Italicized words are defined in the glossary on pages 58–61
Alden Street Allen Place

9Introduct ion to Hartford Styles
ITALIAN VILLA 1830 TO 1880
■ Style based on Italian country villas
■ Windows often have lintels or woodwindow hoods.
■ Shallow roofs — eaves and gables have brackets.
■ First floors have taller windows, attics have short windows below eaves.
■ L-shaped single family plan
■ Arched porticoes with classical details
■ Central towers or widow’s walks
ITALIANATE 1840 TO 1880
■ Compact, rectangular plan, often stacked multi-family, 2 to 6 units
■ Windows have arched or flat lintels or woodwindow hoods.
■ Shallow pitched roofs with large overhangsand brackets
■ First floors have taller windows, attics have shortwindows below eaves.
■ Arched porticoes with classical details
Hartford Styles
Wethersfield Avenue Wethersfield Avenue

10
SECOND EMPIRE 1860 TO 1890 QUEEN ANNE 1875 TO 1915
■ Double pitched mansard roofs pierced with dormers
■ Tall, low-arch windows, central towers
■ Shallow roofs above mansard with eave brackets
■ French scroll ornamentation
■ Molded window caps
■ Ornate cast iron and wrought iron railingsor cresting
■ Variety of forms, textures, materials, colors
■ Asymmetrical, complex plans
■ Projections, bay windows, towers
■ 12/12 pitched roofs, dormers
■ Encircling porches, leaded stained glass
■ Decorative woodwork, brickwork, terra cotta, rusticated foundations
Hartford Styles
Fairfield Avenue Wethersfield Avenue

11Introduct ion to Hartford Styles
NEO-CLASSICAL REVIVAL 1875 TO 1915 “PERFECT 6” 1880 TO 1920
■ Variation on Queen Anne with classical detailing
■ Triangular pediments, classical columns, Palladian windows
■ Third story pediment overhangs over bay windows are common.
■ Wide front porches with low slope roofs
■ Piers at ends of balustrades are common.
■ Six units stacked 3 high and 2 wide.
■ Typical wide, ornamental cornice, double baywindows and central front balconies
■ Rear wood exit stair and balcony
■ Typically running bond brick façade
Hartford Styles
Kenyon Street Park Terrace

12
TUDOR REVIVAL 1890 TO 1920 BUNGALOW (ARTS AND CRAFTS) 1890 TO 1940
■ Brick or stone first story common with top stories of half timber and stucco
■ Tall molded chimneys
■ Large windows with leaded glass
■ Heavy buttresses
■ Arched doorways, multiple gabled roofs
■ Contrasting sills and lintels
■ Low pitched hip or gable hip roofs withsurrounding verandas
■ Roof may have eyebrow windows.
■ Exterior materials include field stone andrough sawn shingles.
■ Vertical windows, typically arranged around chimneys or doors
■ Broad eave overhangs with exposed rafters underneath
Hartford Styles
Prospect Avenue Fairfield Avenue

13Introduct ion to Hartford Styles
COLONIAL REVIVAL 1900 TO 1930 GEORGIAN REVIVAL 1900 TO 1930
■ Rectangular plan, two or three story
■ Symmetrical façade, balanced windows anddormers, center entry
■ Hip or gabled roofs parallel to the street
■ A few well chosen classical details —Doric columns, entablatures, Palladian windows
■ Flemish or American bond brickwork
■ Doorways with sidelights and porticos
■ Small window panes — 9/9 or 12/12
■ Windows aligned symmetrically in columns and rows
■ Decorative dentil* moldings
■ Paneled doors with pilasters and transoms
■ Side gabled roofs
Hartford Styles
Kenyon Street Westerly Terrace

14
CULTURAL, HISTORICDOWNTOWN COMMERCIAL BUILDINGS AND ARCHITECTURAL LANDMARKS
■ Three or more stories; often mixed use with pedestrian related functions at street level
■ Styles vary. Typically architect-designed, typically masonry or stone exterior walls, flat or shallow pitched roofs
■ Significant structures may be individually listed on National or State register.
■ Fifty or more years old
■ Individually listed on the Historic Register
■ Styles vary. Typically architect designed
■ Historic landmarks are designated by the National Park Service.
Hartford Styles
G. Fox & Company, Main Street The Richardson, Main Street

15
Repairing, Preserving and ReplacingYour Building’s Exterior Elements

16
Repairing, Preserving and Replacing YourBuilding’s Exterior ElementsMASONRY WALLS (Brick, Stone,Tile and Concrete)
Although masonry and stone are durable materials, they can be damaged easily byimproper cleaning. Always clean masonrywith the gentlest effective means.
Graffiti removal without damaging themasonry can be difficult, sometimes requiring expert advice. One source ofsuch expertise is Unique Industries ofWheat Ridge, Colorado. They publish afree manual containing recipes and techniques for cleaning graffiti and otherstains from all types of masonry surfaces.To request a free copy of the manual call (800) 274-4121.
MASONRY DAMAGED BY POWER WASHING
MASONRY DAMAGED BY SANDBLASTING
PROPER MASONRY GRAFFITI REMOVAL USING ABSORPTIVE PASTE CONSISTING OF PAPER PULPMIXED WITH A SOLVENT. IT LITERALLY ABSORBS THE GRAFFITI OFF THE WALL.
GRAFFITI REMOVAL WITH IMPROPER SOLVENTS CAN LEAVE A PERMANENT STAIN.

17Repair ing, Preserving and Replacing Your Bui lding’s Exter ior Elements
Masonry absorbs water. Abrasive cleaningand some waterproofing products changethe rate of absorption. This may allowmoisture to penetrate the stone or brickand cause it to deteriorate duringfreeze/thaw cycles.
MASONRY AND WATER DAMAGE
■ Most masonry damage is caused by water. Repair flashings and drains first.
■ Avoid the use of water repellents to repair water penetration problems. Find the source of the water.
■ Repair masonry with recognized preservation patching materials such as Jahn 70 (polymer modified resurfacing grout).
■ Replace units that cannot be repaired.
MASONRY REPLACEMENT
Replace units with materials as close to theoriginal as possible. Masonry walls shouldbe constructed using masonry units andmortar of consistent strength throughoutto avoid cracking. Used brick is not necessarily better than new brick as thehardness of the brick may be unknown and inconsistent with the original.
MASONRY REPOINTING
■ Rake joints by hand to avoid damaging adjacent masonry edges.
■ Repoint with mortar of similar strength to original recipe and of similar color and tooling.
MASONRY DAMAGED BY WATER
MASONRY WALLS
MASONRY WALL IN NEED OF REPOINTING

18
WOOD SIDING AND TRIM
RECOMMENDEDRepairing wood shingles and siding
■ Retains the richness and detailing of the original design
■ Maintains the ventilation of the siding surface, which preserves wood framing within the walls
■ May be less expensive and require no more maintenance with today’s quality paints than aluminum or vinyl siding
APPROPRIATE MATERIALS■ Stucco■ Brick■ Stone■ Wood clapboards■ Wood shingles■ Fiber cement clapboards or shingles
NOT RECOMMENDEDEnclosing existing wood siding in vinyl or aluminum siding
■ Covers historical detail
■ Traps water vapor in old walls encouraging rot and mold
■ Requires replacement to renew the look each 20 years or so
■ Is difficult to repair if dented or cracked
■ If vinyl siding is used, try to avoid covering wood detail and be sure to vent behind vinyl or aluminum siding.
INAPPROPRIATE MATERIALS■ Asbestos shingles■ Imitation brick or stone■ Metal siding■ Vinyl siding■ Concrete block■ Plywood or masonite siding■ Liquid vinyl siding■ EIFS (Exterior Insulation and
Finish System)
RESIDED BUILDING USING APPROPRIATE MATERIALS.
INAPPROPRIATE USE OF ALUMINUM SIDING.

19Repair ing, Preserving and Replacing Your Bui lding’s Exter ior Elements
WINDOWS AND DOORS
RECOMMENDED
■ Survey the condition of windows and doors including sash, glazing, wood stiles and rails, moldings, panels and trim.
■ Identify your style of doors and windows.
■ Consider repair and restoration first. Replace only when repair is not possible.
APPROPRIATE WINDOW STYLES
TYPICAL DOOR STYLES
■ Replace to match as closely as possible the dimensions and profiles of existing components such as stiles, rails, muntins,glazing bars (interior and exterior) and area of glass. Applied muntin frames may be acceptable. These guidelines apply regardless of the material of the new windows.
NOT RECOMMENDED
■ Changing size or location of window or door openings
■ Covering window trim with metal or vinyl cladding
■ Replacing easily repairable wood windows and doors with metal or vinyl windows and doors
INAPPROPRIATE WINDOW STYLES
Greek Revival doorwith transom and
sidelights
Italianate doorway Craftsman or bungalow door
with casing
Typical Craftsmandoor
Double french doors
1700-1840 1840-1870 1870-1900 1900-1930 1880-1910 1900—

20
WOOD DECORATIVE ELEMENTS
RECOMMENDED
Repairing wood ornaments and trim
■ Retains the richness and detailing of the original design
■ Protects adjacent and underlying structures
■ Maintains your building’s historic character and value
■ Is easier to do today due to complete line of available preservation products
RECOMMENDED
Carefully removing paint and patchingexisting wood elements
■ Hand scrape heavily painted wood trim and siding. Do not use harsh strippers orsandblasting, which will damage the surface of the wood.
■ Sand by hand or with a vibrating sander so as not to leave circular marks on wood.
■ Repair only damaged wood. Do not remove and completely replace wood elements unless they cannot be repaired.
■ Evaluate all painted surfaces for lead paint prior to sanding and hire licensed abatement contractors if lead paint is found. Lead paint identification kits canbe found at your local hardware store.
NOT RECOMMENDED
Radically changing wood ornaments and trim
UNDERSIDE OF EAVE SHOWING MOISTURE DAMAGE CAREFUL PAINT REMOVAL AND REPLACEMENT OF SIDING

21Repair ing, Preserving and Replacing Your Bui lding’s Exter ior Elements
ROOFING
RECOMMENDED
Repairing and protecting your existing roof
■ Clean gutters and downspouts and replace deteriorated flashings.
■ Replace roofing only with matching materials.
■ Check underlying sheathing and attic for proper ventilation and detailing. Overheating is a prime cause of roof deterioration.
■ Check regularly for missing or deteriorated fasteners and flashings.
■ Reuse durable existing materials such as slate or tile whenever possible.
NOT RECOMMENDED
Removing or replacing roofing or roof elements which can be repaired
■ Do not remove or replace cupolas, chimneys or dormers. Repair with similar materials wherever possible.
■ Do not install modern elements, such as skylights, antennae or equipment where visible from the street.
ROOF ELEMENT WHICH CAN BE REPAIRED
A WELL MAINTAINED ROOF (FOREST STREET)

22
ENTRANCES AND PORCHES
RECOMMENDED
■ Retain and repair porches.
■ Replace missing porch features.
■ If necessary to enclose porches, enclose behind columns and railings and use divided glass to fill the original open area.
NOT RECOMMENDED
■ Applying inappropriate new materials
■ Enclosing open porch areas that were not originally enclosed, creating an opaque façade
NOT RECOMMENDED
■ Removing porches and not replacing them.
APPROPRIATE PORCH ENCLOSURE (TREMONT STREET) INAPPROPRIATE NEW MATERIALS PORCH ROOF REMOVED AND NOT REPLACED.

23
Designing for Missing Elements
RECOMMENDEDIf you have evidence of what missingelements looked like (such as identicalelements elsewhere on the building orphotographs of the building before theelements were lost), try to match themas closely as possible.
ACCEPTABLEIf you do not know what elementslooked like, replace them with elementsthat are compatible in scale, color, sizeand material with typical detailing usedin the historical style of the building.Simplified or abstracted forms arepreferable if no evidence of the actual detail exists.
NOT RECOMMENDEDReplacing missing elements with elements not compatible with the style of the building, or creating fakereproductions that are not consistentwith the character of the building.

24
Designing for Missing ElementsSIDING
APPROPRIATE SIDING & STYLE
■ Try to identify your style.
■ Look for old photographs, if available, and any physical evidence left on the building.
■ Replace siding in original material or, if no evidence is available, use material and style compatible to your building’s architectural character.
INAPPROPRIATE SIDING
■ Modern styles or incompatible modern materials imitating historical styles such as vinyl or aluminum siding, thin veneers of stone or brick, and EIFS
■ Inaccurate historical materials or patterns
■ Rustic rough sawn or split shingles or siding not authentic to your style
3” –4” HORIZONTAL WOOD SHINGLESCLAPBOARD
VERTICAL SIDING ARTIFICIAL STONE
WIDE VINYL OR ALUMINUM STAGGERED BUTT SHINGLES
CORNER TREATMENT
ClapboardCorner BoardSill BoardFoundation
CORNER TREATMENT
Corner Board too small,no Sill Board
Corner and Sill Boards missing
GRAINED VINYL

25Designing for Miss ing Elements
APPROPRIATE ORNAMENTATION
■ Try to identify your style.
■ Look for old photographs and any physical evidence left on the building.
■ Replace ornamentation in original material and style.
WHEN ORIGINAL APPEARANCE CAN NOT BE VERIFIED
■ Replacing missing elements with simplified elements compatible with original style is preferable to misrepresenting historical detail.
Original cornice with bracket and dentils
Simplified cornice compatible in size, scale,
rhythm, and material
TYPICAL ORNAMENTATION: CORNICE AND EAVES TYPICAL ORNAMENTATION: PORCHES AND RAILINGS
TYPICAL ORNAMENTATION: ENTRANCES AND SIDING
Original porch with sawn and turned details
PORCH FEATURES REPLACED
Appropriate Simplification Inappropriate
ORNAMENTATION AND TRIM

26
INAPPROPRIATE DOORS INAPPROPRIATE WINDOWS
WINDOWS AND DOORS
APPROPRIATE DOORS
APPROPRIATE WINDOWS
Greek Revival door with transom and
sidelights
Italianate doorway Typical Craftsman or bungalow door
with casing
Typical Craftsman door Double french doors
Victorian bay window
Typical Victorian two over two
window
Typical Victorianpaired one pane
over one
Bungalow-style window
Typical Craftsmanwindow—ninepanes over one
Steel casementwindow

27
Designing Alterations and Additions
RECOMMENDEDAlterations and additions which are incharacter with the style, detail and massing of the existing building
ACCEPTABLEAlterations and minor additions mayreproduce historical style. Larger additions may be contemporary in style and detail, as long as they are compatible in materials, massing andscale to the original.
NOT RECOMMENDEDStylistic alterations to the original materials or design. Use of modernelements or materials not compatiblewith original. Covering or destroyinghistorical elements.

28
Designing Alterations and AdditionsMASSING AND LOCATION
MASSING
Avoid single massive forms which are not compatible with the original building’s massing. Try to relate the addition to the type and variety of original forms and their composition.
LOCATION
Avoid additions which obscure and/or damage the original building’s features. Try to locate the additions on non-character defining sides, set back from the building, or out of view from the street.
NO YES
NO YES

29Designing Alterat ions and Addit ions
SCALE
Out-of-scale additions can detract from the original building. Try to match the original building’s size and proportion.
SOLID/VOID
Avoid a change in rhythm between the addition and the original building. Rhythm is affected by dramatic changes in wall planes, window and door placement, size, shape, symmetry, and overall composition of solids and voids.
SCALE AND SOLID/VOID
NO YES
NO YES

30 D e s i g n i n g A l t e r a t i o n s a n d A d d i t i o n s
EXISTING STRUCTURE INAPPROPRIATE DESIGN
■ Installing modern style windows and doors
■ Removal of trim details
■ Changing exterior material
MORE APPROPRIATE DESIGN
■ Replace wood windows with simulated small pane wood windows.
■ Repair dentil work and entry door trim.
■ Replace damaged wood clapboard siding.
■ Replace roof to match existing.
■ Repoint existing masonry chimney.
DESIGN EXAMPLES
ADDITION COMPATIBLE IN SIZE AND MATERIAL. EXISTING STRUCTURE RESTORED

31
Alterations to Commercial Buildings

32
Alterations to Commercial Buildings
RECOMMENDED
■ Good neighborhood commercial use maintains the integrity of the building’s materials and details; integrates two or more shops into one façade.
■ It respects the street line, maintains sidewalks and locates parking and loading areas behind or beside the building.
RECOMMENDED
■ This mid 60’s warehouse in a historic neighborhood was reused as retail space.Building was refaced with brick, and cornice, overhang and detail trim were added.
■ Parking was moved behind the store, all shop façades are unified.
MIXED-USE RESIDENTIAL OVER COMMERCIAL
REUSE — INDUSTRIAL TO RETAIL
MIXED AND REUSE

33Alterat ions to Commercial Bui ldings
MIXED USE RESIDENTIAL OVER COMMERCIAL
NOT RECOMMENDED
■ Retail addition set ahead of face of original building. One story retail add-on inconsistent with building.
■ Inappropriate materials and detailing.
RESIDENTIAL OVER COMMERCIAL
RESIDENTIAL OVER COMMERCIAL
First floor of residential building converted to commercial use


35
New Construction and Alterations, Downtown
New construction in the DowntownBusiness District should be harmoniouswith the scale and character of the exist-ing streetscape. Materials should conveya sense of substance and permanence,and the architecture should reinforcethe impression of stateliness and dignityappropriate to Hartford’s urban center.
Harmonious infill on Main Street

36
New infill buildings should be designed to harmonize with the existing character ofthe street or area.
■ SIZEA new building should fill the space defined by the adjacent buildings.
■ HEIGHTA new building should respect the continuous roofline formed by neighboring buildings.
■ MATERIALSMaterials such as concrete, steel, brick and stone convey a sense of dignity and permanence. Materials such as vinyl, EIFS and other materials of limited durability should be avoided.
■ FAÇADE RHYTHMAlong the street, the repetition from building to building of similarly positioned door and window openings creates a rhythm which should be repeatedon the face of the new building.
■ FAÇADE OPENINGSThe combined area of openings on the new façade should not exceed about 1/3 of the total façade area.
■ STREET LEVEL USESSmall scale retail spaces with pedestrian oriented façades can be used at street level to screen larger buildings which arenot pedestrian oriented, such as parking garages or storage facilities.
These guidelines do not preclude developing a contemporary design for new buildings. In fact, it is rarely advisable to design a new building to look like an older one.
INFILL BUILDINGS
BUILDING SIZE
New building should fill volume and respect the roof lines definedby the adjacent buildings.
FAÇADE RHYTHM
Each floor level is expressed.Each bay is expressed.
INFILL BUILDINGS
Downtown Guidelines
Contemporary infill in historic downtown
FAÇADE OPENINGS
Typical vertical window openingsVertical bay proportions
Openings not more than 33% of façade
FAÇADE

37Downtown Redevelopment
The same basic rules which govern homerenovations also apply to commercial build-ing improvements:
■ Any change or addition should be compatible with the original design of the building.
■ Whenever possible, retain original detailsand materials. If it becomes necessary to introduce new elements, or to mix old and new parts, they should harmonize with what already exists.
■ Don’t try to make a building look older or newer than it really is by using details from other periods. The result will always look somewhat artificial.
On appropriately renovated buildings theoriginal details, materials and scale havebeen retained.
The addition of inappropriate details andmaterials can erode the original characterof the building.
Attractive storefronts are always designedas part of the building which containsthem. By relating to the style and detailingof the upper floors. the storefront becomesan integral part of the total building andactually makes a bolder, more cohesivestatement.
Variety of window treatments divides look of building.Signs should not disturb continuous line of the lintel.
Closing in storefront detracts from building.
FAÇADE WITH ORIGINAL FEATURES
Changing and enlarging windows, covering brick with metal siding,aluminum door and windows inappropriate.
Huge lintel sign out of scale.
CONFLICTING TREATMENTS DISRUPT FAÇADE CHARACTERLESS MODERNIZATION OF FAÇADE
FAÇADES

38
STOREFRONTS
A storefront design should clearly projectthe product or service being offered inside.This communication is accomplished bymeans of signs, logos, symbols, displaysand the use of exterior surface materialsand colors.
The storefront’s original design is the bestblueprint for a renovation project. Originaldetails and materials should be retainedwhen possible. Decorative features such ascolumns or brackets which are oftenrepeated across the face of a building giveunity and character to the storefront. If it
is impossible to preserve these or other features, try to approximate the originaldesign with different materials.
When planning a storefront renovation,remember that the storefront is a part of alarger structure and its design shouldrelate to the building’s overall character,the nature of the business and the identityof the owner. This can be accomplished bythe introduction of small elements such assigns, awnings and window boxes.
APPROPRIATE CONTEMPORARY STOREFRONTSIMPLIFIED TRADITIONAL STOREFRONT
Simple painted wooden frameRecessed entry with wood and glass doors in original style
Window boxes reflect panels of older building
Wood or anodized aluminum frames with simple glass doorsRecessed transom windows add interest and reflect original style
Windows below sill replace the wood panels of the original
ORIGINAL STOREFRONT
Three part division of storefront relates to design of building aboveMasonry piers carried down from upper floors
Cast-iron or wood window frames; paneled wood and glass doorsWood or cast-iron panels

39
Designing New Buildings in Historic Districts
RECOMMENDEDNew buildings which are a product oftheir own time, which are in characterwith the style, detail and massing of theexisting neighborhood
NOT RECOMMENDEDReproductions of historical styles notsupported by direct photographic orphysical evidence
NOT RECOMMENDEDBuildings designed in conflict with thecharacter, size, setbacks, forms or materials of the neighborhood

40
Designing New Buildings in Historic DistrictsMASSING AND HEIGHT
MASSING
■ Shaded building is not compatible.
■ Outlined buildings are more appropriate
HEIGHT
■ Shaded building is too low; style is not compatible with existing structures.
■ Outlined building is more appropriate for the height of the existing buildings.
EXISTING BUILDING NEW INFILL STRUCTURE (SHADED) EXISTING BUILDING NOT APPROPRIATE FOR NEIGHBORHOOD
LINE OF HEIGHT TO BE MAINTAINED
NEW INFILL STRUCTURE (SHADED) NOT APPROPRIATE FOR NEIGHBORHOOD
NOTE: These illustrations show the buildings along the street as being identical. This is an exaggeration to makea point. New buildings in historic settings should fit harmoniously into their context without necessarily replicatingtheir neighbors.

41Designing New Buildings in Histor ic Distr ic ts
SETBACK
■ Building A is poorly sited. Building is too far back of common building plane.
■ Building B is too far forward of common building plane.
■ Building C is properly situated on building plane.
RELATIONSHIP TO STREET
■ Building D is not properly sited. Its relationship to the street is inconsistent with the streetscape.
■ Building E is not properly oriented. Building front and main entrance do not face the street.
SETBACK AND RELATIONSHIP TO THE STREET
COMMON PLANE OF FRONT BUILDING WALLSTO BE MAINTAINED
C
B
A
D
E
42
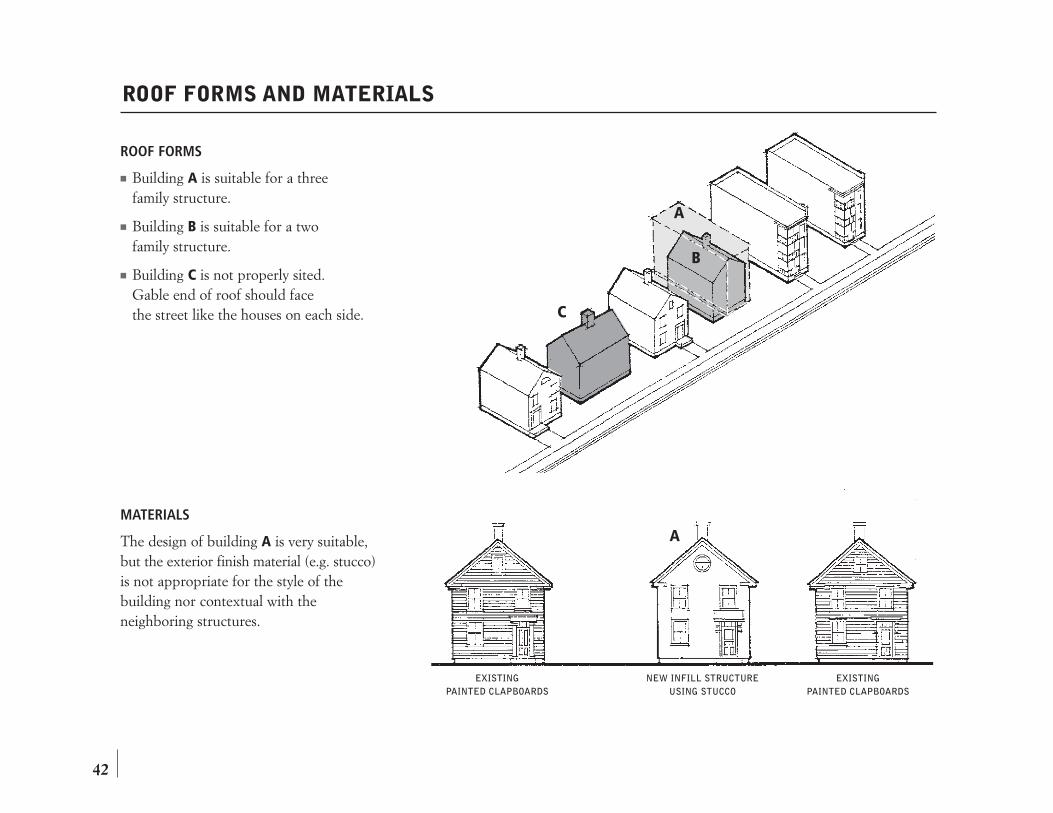
ROOF FORMS AND MATERIALS
ROOF FORMS
■ Building A is suitable for a three family structure.
■ Building B is suitable for a two family structure.
■ Building C is not properly sited. Gable end of roof should face the street like the houses on each side.
MATERIALS
The design of building A is very suitable,but the exterior finish material (e.g. stucco)is not appropriate for the style of thebuilding nor contextual with the neighboring structures.
EXISTINGPAINTED CLAPBOARDS
C
B
A
A
NEW INFILL STRUCTUREUSING STUCCO
EXISTINGPAINTED CLAPBOARDS

43Designing New Buildings in Histor ic Distr ic ts
RETAIL BIG BOX STORES
RECOMMENDED
■ Retail “Big Box” is hidden behind appropriately scaled roofs and façadeelements on all sides visible from a public way.
■ Building is constructed of high quality, traditional materials with multiple levels of detailing on all sides for pedestrian interest.
RECOMMENDED
■ Building respects existing building lines. Parking is located beside, behind and under the building to maximizestreet presence.
■ Primary street access is extended to the street with a covered walkway, preserving the traditional urban pedestrian entrance.
Note that these guidelines apply to sites outside of historic districts as well.

44
RETAIL BIG BOX STORES
NOT RECOMMENDED
■ Retail “Big Box” with nearly monolithic flat roof and over-scaled façade with no detail except over entry. Sides are blank and utilitarian.
■ Building is constructed of unattractive concrete block and limited durability EIFS. There are no human scaled details for pedestrian interest.
NOT RECOMMENDED
■ Building is set far behind the street line with a vast amount of typically empty parking places between the street and the entry.
■ Walkup traffic is not invited. Pedestrianshave to walk through a sea of parking to get to the entrance.

45I n t r o d u c t i o n t o H a r t f o r d S t y l e s
RETAIL SMALL BOX STORES
RECOMMENDED
■ Building respects existing building lines, and attractive landscaping is located between the building and the street.
■ Parking is located beside or behind the building to maximize street presence andencourage pedestrian access.
■ Building’s height and frontage are scaledto fit into the existing streetscape.
■ Façade is constructed of high quality, durable materials with multiple levels of detailing on all sides for pedestrian interest.
Note that these guidelines apply to sites outside of historic districts as well.

46
RETAIL SMALL BOX STORES
NOT RECOMMENDED
■ Parking is located between the building and the sidewalk, blocking the view of the façade and discouraging pedestrian access. There is no site landscaping.
■ The building’s form, scale and massing are not compatible with neighboring buildings in the streetscape.
■ The building’s façade is constructed withunattractive and easily damaged EIFS.The side facing the cross street is blank and featureless.

47
Appendix

48
GENERALWhether completely renovating an olderbuilding, or simply maintaining one, theinformation on the following pages willhelp you get started. Once your house isin good shape, adopt a strategy of preventive maintenance. Attending torepairs when needed and before deterioration occurs will always save you time and money.
Water, sunlight and air are the forces primarily responsible for building dam-age. Wood, when dampened, will rot asmicroorganisms feed on it. Stone andbrick mortar absorb water and then splitwhen the moisture freezes. Roofing, cornices, siding and foundations can allbe damaged by water erosion. Watervapor, ultra-violet rays from the sun andair pollutants cause paint to deteriorate.
To combat these forces here are threebasic rules to follow when renovating abuilding:
1) Use quality materials which are not easily damaged.
2) Seal materials (i.e., paint, caulk, flash)so water cannot easily reach them.
3) Shape materials so water will not seepin but will run off.
Some basic facts and helpful hints on thefollowing are included in this section: .
1) Siding Materials: pros and cons of various materials and some hints on maintenance.
2) Masonry: comparison of masonry cleaning techniques and facts on repointing and replacing bricks.
3) Painting: reasons for paint deterioration,hints on caulking, recommended types of paint and preparation techniques.
4) Roofing/Flashing/Gutters: facts on roofing deterioration and replacementand hints on flashing and gutters.
5) Details: ways of restoring or replacingtrim, hints on weather-stripping, and suggestions on storm windows and doors.
SIDING MATERIALSSiding functions as a protective skinenclosing the structure of a building andinsulating the interior from excesses ofheat, cold and moisture. The maintenanceof this “skin” or lack of it, not only signif-icantly affects the appearance of yourbuilding, but is one of the largest individualdecisions affecting the investment yourbuilding represents. Most property own-ers will sooner or later be faced with thetask of repair or replacement of sidings.
Clapboard
The most popular type of exterior coveringfor many of Hartford’s early buildingswas narrow wood clapboard sidingattached to a layer of wood sheathingwhich, in turn, was nailed to the frameworkof the building.
Though inexpensive and relativelydurable, clapboard siding requires regularinspection and maintenance to keep it inproper condition. But even if a wall ofclapboards seems deteriorated beyondrepair, the situation probably looks worsethan it actually is. Most clapboard sidingcan be rejuvenated with a few simpletechniques and a little patience.
Split clapboards can be repaired by pryingopen loose pieces with a putty knife andapplying strong wood glue along theedges of the crack. Press the sections
Technical Guidance for Homeowners

REPAIRING CLAPBOARDSCRACKED BOARD
CONVEX BOARD
CONCAVE BOARD
49Technical Guidance for Homeowners
back together and hold them in place withseveral finishing nails placed under and upinto the split areas. Allow the glue to hardenbefore removing any nails. Smooth the surface with putty or wood filler, let dryand then apply one or two coats of primer type paint.
With luck and persistence, a homeownercan sometimes coax warped clapboardsback into position. Convex bulges areremedied by drilling several holes alongthe center of the board and then insertingwood screws. The screws are graduallytightened causing the board to regain its original shape. To avoid splitting thewood, wet the board several times duringthis process.
Concave boards can sometimes be straight-ened by drilling two sets of holes along theboard. Finishing nails are driven into theseholes to unwarp the clapboard.
All screws and nails should be countersunk(recessed below surface level). Theserecesses are filled with putty to achieve a smooth surface.
Sections that appear especially ragged or rotten can be replaced. Locate the damaged section and make several verticalcuts through the board with a small saw.Next, remove all nails within the involvedportion and also the nails in the boardsdirectly above.
The damaged board or boards can now be taken out in pieces with a hammer andwood chisel. After all visible wood hasbeen removed, insert a few wedges underthe remaining upper board. Now pry outany additional left over pieces.
If tar paper is present between sheathingand siding, be sure to patch any holes andvisible tears with asphalt cement.
The final step involves cutting a length of matching clapboard to fit the gap.Remove the wedges, slip the new boardinto position and reinstall the nails. Puttyor wood filler should be applied over the new seams.
ShinglesLocally, wood shingles did not achievewide popularity as a siding material untilabout the middle of the 19th century,when builders of Queen Anne and otherstyle homes created inventive patterns onthe surface of the building, often using different shaped shingles. This special surface texture should be preserved as it is an irreplaceable element of the building’sstyle.
As with clapboard, deterioration of shinglesis seldom so severe as to require totalreplacement; single shingles can beremoved and replaced when necessary.
Vent
Metal Vents
Air flow
REPLACING PART OF A BOARD
Glue CrackNail
Screw Flat
Nail Flat
Remove NailsSaw
Wedges

50
Synthetic SidingDespite its current popularity and, whenproperly applied, its appropriate appearancefor older homes, it would be a mistake tounequivocally endorse synthetic siding.
The long term effects on the underlyingwooden structure are now becomingknown. Wooden siding “breathes,” allowingmoisture caused by temperature differenceson either side of the walls to escape gradu-ally to the outside before it can build upand condense within the wall. Vinyl or aluminum siding may not have this quality.Thus rot or deterioration of wooden mem-bers can become a problem. Furthermore,synthetic siding will hide such problemsuntil they become severe. If you do usesynthetic siding you must provide openingsto vent the walls or risk serious deterioration
Installing aluminum or vinyl sidingrequires a substantial initial investmentand once installed the homeowner cannotchange his mind without incurring consid-erable expense. The commonest rationalefor installing synthetic siding is to avoidthe task and expense of painting a building.However, it is important to note that thistype of siding may itself need paintingafter about 15 years. Further, the cost ofmaintaining synthetic siding, once painted,is not significantly less than that of woodclapboards. Remember too that you stillhave the annual maintenance chore ofchecking and recaulking where necessary
the sealant around the critical edges ofdoors, windows and cornices on yourbuilding.
Another objection to synthetic siding, asmentioned in the forgoing guidelines, isthe potential loss of architectural detailwhen it is carelessly applied. Applicationof synthetic siding may also add to theexpense of replacing roofing materials at a later date because it must be removed at the sides of dormer windows and aboveporch roofs to install new roof flashing.
Synthetic siding can create unsuspectedfire hazards. In a fire, aluminum siding will act like an oven wall, holding in andintensifying the heat. Vinyl siding doesmelt, allowing the heat to escape, and firefighters to get at the fire; however, there is evidence that vinyl emits noxious gassesas it burns. Synthetic siding can hide thepath and direction of fire as it travels within the walls, with fatal results. Thesefacts should be weighed carefully if you arecontemplating covering the original sidingof your home.
Energy conservation is an important issuetoday because of the ever increasing costof fossil fuels. Many people assume that itis more expensive to heat an older homethan a newer one. This need not be thecase. Installing insulation and making leaky windows and doors tight can make a substantial difference.
The greatest heat loss in any home (over80%) is through the roof, because warmair rises. It is unrealistic, therefore, tobelieve that the installation of aluminum orvinyl siding will substantially increase theheating efficiency of your home. While itwill help somewhat, the installation ofstandard insulation between wall studsand/or re-caulking of exterior clapboardswill be at least as effective, while theappearance of the building will be main-tained at a lower cost. Twelve inches ofinsulation placed beneath the roof or inthe attic floor will do more to save yourheating dollars, and will help keep yourhome cooler in the summer. You can easilyinstall such insulation yourself. Re-caulkingaluminum storm windows, weather strip-ping wood windows and doors, and re-puttying each pane of glass in window sashare also well worth doing.
Wood has been the most traditional sidingmaterial in Hartford. Wood is easilyworked, has natural insulating qualities, isadaptable, plentiful, relatively inexpensiveand resistant to denting. It can be patched,refinished, and repainted or stained. Andit has its own singular beauty. For all ofthese reasons every reasonable effortshould be spent to keep the original sidingon your home. If replacement is absolutelynecessary, new wood clapboards will lookbetter than any synthetic material and will,with care, last longer.

51Technical Guidance for Homeowners
If you are considering changing the sidingmaterial on your home from the original,compare available alternatives carefully.The following list summarizes the basics.
Wood Clapboards:■ Almost always historically appropriate—
can last over 100 years if kept up. ■ Require painting every 5–10 years and
minor periodic maintenance.
Wood Shingles (Not Shakes)■ Used originally on Shingle Style and
Queen Anne Style homes; conditionally appropriate on homes of other styles—should be used with original trim.
■ Can last to 100 years with maintenance.■ Require painting every 5–10 years and
minor upkeep.
Vinyl or Aluminum Siding:■ Conditionally appropriate if 4” horizontal
“boards” are used and original trim is retained.
■ Life expectancy may be longer than wood clapboards, but long-term effects on structure beneath can be serious.
■ May require periodic painting after 15 years; may dent or scratch; may crack when cold; potential rot problems in structure behind; potential fire hazards,
MASONRY
If properly maintained, buildings constructedof masonry can last for centuries. Water isthe primary cause of masonry deterioration
but air pollutants, bird droppings,climbingvines and rusted iron surface details alsocontribute to masonry decay. The best wayto fight these forces is to keep the surfaceof the building clean.
There are four basic methods of masonrycleaning: (1) water cleaning; (2) steam cleaning; (3) chemical cleaning; (4) abrasivecleaning. Before any technique is chosen,consult an expert (easy to find in the yellowpages) to determine the composition of yourmasonry and, if possible, to analyze the dirtpresent on the surface. This information willhelp in deciding which cleaning materialsand techniques are appropriate for yourbuilding. Next, we advise testing the cleaningmaterials and techniques on several patcheslocated in an inconspicuous area of thebuilding.
Water CleaningWater cleaning softens the dirt and rinsesit from the surface. Water is sprayed onthe building and the pressure is adjustedto suit the exterior surface. High pressurespraying (600-800 psi) should only bedone on extremely hard masonry surfaces(marble, granite) while low and moderatepressure washes (200-600 psi) should beapplied to softer wall surfaces (brick, lime-stone). When lower pressures are used, thesurface can also be hand scrubbed withbristle brushes. Never use wire brushesbecause they abrade the surface anddeposit shavings which may cause rusting.
IF USING SYNTHETICS, RETAIN ORIGINAL DETAILS
Cornice
Brackets
Synthetic clapboards resemble wooden clapboards
Window Hoods and Casings
Corner and Sill Boards
AVOID COVERING TRIM
Fascia detailing has been removed,so fascia looks too small
Window hoods,casings and sills are covered;windows lose importance.
Siding too wide
Corner and Sill Boards removed

52
Finally, do not apply a wash if there is anypossibility that the water will freeze beforethe saturated wall is completely dried.
Wash techniques require little equipmentand, if properly done, neither the buildingnor the environment is adversely affected.While problems can arise if water seepstoo far into the walls, overall this methodis recommended. The cost is relatively low,there are few negative side effects and theresults are generally good.
Steam CleaningAlthough once quite popular. steam cleaningis now used less and less. Steam is generatedin a flash boiler, then applied to the surfacethrough low pressure (10-30 psi) nozzle.While this technique minimizes the possi-bility of water damage, the equipment isexpensive and hazardous to operate andthe process is extremely slow.
Chemical CleaningChemical cleaning is a highly technicalprocedure which should not be undertakenwithout professional advice. The cleaningagents may be composed of a variety ofchemical compounds, but they are eitheracidic or alkaline. Acid solutions containinghydrofluoric, phosphoric or muriatic acidscan be used on granite, sandstone or brick.White alkaline cleansers such as sodium,potassium hydroxide or ammonia are for-mulated for use on acid-sensitive surfaceslike limestone or marble.
These cleansers are applied to the surfacewith brushes or a low pressure spray andafter a wait period they are rinsed awaywith water. While chemical cleaning canbe extremely effective in removing dirt, ifimproperly mixed or applied they can posea serious threat to the building’s surfaceand the surrounding environment.
Abrasive CleaningAbrasive cleaning should be avoidedbecause this method causes serious damageto masonry surfaces. The most widespreadabrasive cleaning technique is sand blasting.Typically, the process involves an aggregateof silica sand propelled by a high velocitystream of air at 20 to 100 psi against themasonry surface. The scrubbing action ofthe air/abrasive jet removes dirt but alsocauses erosion and pockmarking of themasonry surface. For brick, the loss of thehard outer surface formed by firing isextremely damaging since the exposed softinner core is more susceptible to deteriora-tion. Many soft stones also have a protectivecrust which is easily damaged by grit blasting.
While water cleaning is generally the rec-ommended procedure, consult an expertto analyze the masonry and dirt. The pertinent cleaning methods should then betested and the results reviewed. However,the visible results of test patches shouldonly be one factor in choosing the most appropriate cleaning method. A clear
understanding of the cleaning techniquesand a knowledge of possible harmful sideeffects are important considerations.Below is a checklist for comparing alternative cleaning methods:
■ effectiveness of cleaning method■ cost■ time■ possible damage to the building ■ potential health and safety hazards■ potential environmental damage
Although extremely durable, a masonrysurface can deteriorate considerably withweathering and lack of periodic mainte-nance. Repointing is a weather-proofingtechnique extremely important to masonrymaintenance. Lime mortar joints generallydeteriorate more rapidly than masonryunits. Periodically it is necessary to pointor repair these joints to ensure that abuilding remains sound and weatherproof.
Repointing begins with removal of old,loose mortar from the joints. Carbideblades and power chisels are sometimesused for this work, but there will be lesschance of damage if only hand tools—ahammer, cold chisel, or in the case of verysoft mortar, a hardwood chisel are used.The old mortar should be removed to adepth of 1” to 1 1/2”. Loose particlesshould then be flushed from the joint witha water spray to insure a proper bond toboth the masonry and the old mortar.

53Technical Guidance for Homeowners
There are three things to consider whenre-pointing:1) Mortar Composition—mortar is
composed of lime, cement and sand. Always consult an expert to determine proportions appropriate for your building.
2) Color—Always match the color of the old mortar composition. Early (1700-1850) mortars were rarely pigmented, but rather had a sandy color. Avoid the standard light grey cement and instead use a white cement in your mortar mixture if you own an early building. Mid-to late-nineteenth centurybuildings were often pointed with colored mortar. Sometimes these colorscan be reproduced by simply adding a little brick dust to the mortar.
3) Joints—Finishing or tooling the surfaceof the new mortar to match the originaljoints is also important when repointing.Generally mortar joints are either flushwith the building surface or slightly concave.
In some cases the bricks themselves andnot just the mortar are severely damagedand may need to be replaced. To matchold and new brickwork, keep in mindthese guidelines:
1) The new brick should match the old incolor, size and texture. Many manufac-turers offer water-struck bricks, while salvage yards are also good places to
look for replacement bricks. If you do use old bricks, always chip off any mortar and clean off any dirt or paint before laying them.
2) Bricks when laid are arranged in a pattern or bond. The most common bonding patterns are English, Flemish and Common Bond.
TRIM
Every effort should be made to retain thetrim and ornamental details that give special character to a building.
■ Loose trim may be refastened by carefully drilling a hole; countersinking, and screwing the trim back on. The countersunk hole can be filled in and painted.
■ Certain synthetic materials make it possible to preserve and recondition partially rotted wood details and ornaments.
■ Cracked doors can be removed and re-laminated, missing brackets can be molded, and balusters can be repaired and re-glued.
■ If trim is beyond repair or entirely missing, it can be duplicated closely with new lumber.
■ If you cannot or do not wish to attempt to re-work trim yourself, a local carpenter
REPOINTING BRICK
Deteriorated Joints
Mortar joints have crumbled and have washed away
Repointed
When repointing, match existing mortar in color,composition, size and tooling of joints.
REPLACING BRICK
Good match of old and new
Mortar, joints and bricks are matched in original andnew sections
Mismatched
Color of brick and of mortar andbonding pattern in new section do not match the original
ORI
GIN
AL
N
EW
ORI
GIN
AL
N
EW

54
or woodworking firm may be able to repair or duplicate it.
PAINTING
Once repaired. clapboard siding must beinspected and repaired on a routine basis.All surfaces should be patched as neededand painted about every five years. Whilepainting is a relatively easy job, it is surfacepreparation that requires time and effort.
Before repainting, everything must beclean and free of loose paint and dirt.Examine the present condition of all paint-ed surfaces as this will help to identifyproblem areas. The two most commonpaint problems are blistering and cracking.
Blistering indicates a presence of moistureunder the paint. As this dampness comesto the surface, the paint above it developssmall, irregular and loose flakes. Blisteringis often cured by ventilating the air-spacebetween outside and inside walls. Thehomeowner can insert small ventilatorplugs into paint-blistered areas of siding.The only work required is the drilling ofseveral holes large enough to accommo-date the ventilators. The louvered plugsare coated with waterproof cement and are simply pushed into the holes.
Sometimes moisture from a damp leakybasement penetrates wall cavities and caus-es paint blistering. If the basement is sus-pected, its walls and floors should berepaired and sealed.
Cracking is caused by insufficient paintadhesion. This condition generally occursfor one of two reasons: either incompatiblepaint types were used or paint was appliedto a dirty, greasy or previously cracked sur-face. Paint applied in cold or wet weatheris also susceptible to cracking. Such areasmust be scraped thoroughly, then sandedand wiped clean. Several coats of primingpaint should precede the finish coat.
Proper surface preparation usually involvesscraping and sanding. This is best donewith a straight bladed scraper and medi-um to coarse sandpaper. Scrape and sandthe existing paint down to a solid substrateand feather the edges of areas of paint toremain.
Before applying paint, other routine main-tenance is necessary. Loose clapboardsshould be re-nailed. Re-putty and sand nail holes and minor cracks.
Finally, it is necessary to caulk variousexterior joints. Caulking is very inexpen-sive insurance and provides added protectionfor it will prevent moisture penetration,reduce heating bills and improve a home’sappearance. Caulk is most widely availablein tube form, which is applied by using aninexpensive caulking gun.
Inject the caulk around window frames, atthe junction of siding and foundation, atthe corner boards and in general, at anyjoints which might he damaged by mois-ture penetration.
SIZE OF DETAILS
IN PROPORTION TOO SMALL
STUDY THE DETAIL
When replacing adetail, study the oldone or one from asimilar building.
FABRICATE A REPLACEMENT
It is more important to approximate the size andbulk of the original detail than to duplicate theoriginal design exactly.
Cornices can be made fromstock moldings and boards.
Brackets can be sawn witha jig saw from very thickboards.

55Technical Guidance for Homeowners
When all of this has been done, the build-ing is ready for new paint. A coat ofprimer paint will condition the surface andis recommended especially for older build-ings. Clapboard siding should be coveredwith a good grade of well-known exteriorhouse-paint. A paint dealer or hardwarestore can offer helpful advice. Take note ofany chronic problems so that these areconsidered when the paint is purchased.
Before you paint, follow these guidelinesfor the best results:
1) When you have determined what colorto paint, prepare your exterior surface carefully.
2) Always use an oil base paint over oilbase paint when repainting. The oil in the new paint “feeds” the old coat andhelps it to adhere. Applying latex (waterbase) paint on wood that has been painted with oil base for years will prove unsatisfactory in most cases. However, latex paint can be used over wood that is new or has been completelystripped or has been previously paintedwith latex.
3) If you have used latex paint over original oil base paint and it is peeling,scrape, sand, and repaint with a high quality oil paint.
4) For use on doors and porches, considerusing a polyurethane finish in place of varnish or shellac. Do not use any
other finish on top of the polyurethanewithout first roughing up the surface with sandpaper or a wire brush.
5) When cracking, peeling, and blisteringpaint surfaces are a recurring problem,consider using one of the solid-bodied opaque stains. These stains closely resemble the appearance of paint but often outperform the painted finish over which they are applied. The surfacemust be properly prepared (scraped. sanded, and primed as necessary) for the stain to be effective. Except in the case of very light colors being applied over very dark colors, one coat of opaque stain often completely covers the old paint.
If you choose to use a stain be sure to followthe manufacturer's instructions carefully.
ROOFING
As the feature which primarily protects thehouse from the elements, a roof is con-stantly exposed to deteriorating forces.Often roof leaks will not show until aftermuch internal damage has occurred.Therefore, it is always best to inspect yourroof periodically for missing or crackedpieces. When checking, pay particularattention to the southern exposure. Thissection of a roof tends to deteriorate thefastest because the hot sun breaks downthe asphalt composition causing cracks
which moisture can then penetrate.
Traditional roofing materials include woodshingles or shakes, sheet metal, and, dur-ing the Victorian era, slate tiles. In manycases the original roof is intact althoughindividual pieces may have cracked orblown off. Often it is possible to repair aroof using original materials. For instance,individual slate tiles found on Mansardbuildings can be repaired with asphaltcement or replaced if missing.
When the whole roof must be replaced,care should be taken to choose the propermaterials and color. Asphalt shingles (inap-propriate for walls) are acceptable formost pitched roofs as they are rot and fireresistant, inexpensive, and can be similarin their spacing, color and texture to woodshingles and slate.
When installing a new roof, be sure to pro-vide roof or gable vents. These will ensureproper ventilation and extend the life ofthe roofing surface. Without these vents, aroof tends to deteriorate prematurely asheat builds up beneath the surface.
Keep in mind that labor amounts to thebiggest part of the roofing costs, so it iswell worth using the best materials avail-able to extend the effective life of the roof.
The most vulnerable part of any roof is atthe edges where it meets vertical walls,chimneys, plumbing vents, cornices, etc.To protect these vulnerable areas it is nec-

56
FLASHING
Flashing is the term given to a procedurewhich involves placing thin strips of metal(generally aluminum, copper or stainlesssteel) around the vulnerable areas of aroof. Usually, these trouble spots are foundwhere vertical elements penetrate the sur-face of a roof, i.e., chimneys, dormers, ventpipes, and in places where the roof inter-sects with other parts of the building.
Several types of flashing are illustrated leftand below.
GUTTERS
The roof should be checked each springand the gutters cleaned of all dirt andleaves. Gutters direct rain off the roof andinto the downspouts. If clogged water willspill down the wall and soon stain anddeteriorate cornices and siding.
Hung below the eaves, gutters will becomeheavy when filled with ice, and should besupported every 30 inches to prevent sag-ging or collapse. Since metal will expandand shrink with changes in temperature,room must be left to allow them to expandfree of their supports. Gutters must slopedown about one inch for every 16 feet oflength to insure proper drainage. Be sureto install a screen at the downspout open-ing to keep leaves out. If aluminum guttersand downspouts are used, select a coloredanodized or baked enamel finish whichblends well with the colors of your house.
essary to install flashing and gutters whichredirect the flow of water away frompotential trouble spots.
DRAINAGE AT FOUNDATION
CORNICE FLASHING
RIDGE FLASHING
Shingles
Fascia
Screened Vent
Ridge Line
Chimney andAny Vents
Dormers
At Joint BetweenWall and Roofs of Door Hood and Bay Window
Chimney
Cap Flashing
Base Flashing
Roof
WHERE TO FLASH
VENTING A SLOPED ROOF
CHIMNEY FLASHING
Shingles
Flashing
Coping Width
Cap Flashing Formed By Cornice Flashing
Base Flashing
Built-Up Roof
Gutter and Slope Direct Water Away From Foundation
Water Seeps Into Basement
4” Minimum

57Technical Guidance for Homeowners
STORM WINDOWS AND DOORS
For purposes of energy conservation,storm windows are a natural considerationfor any home owner. Wood and aluminum-framed storm windows both have certainadvantages. However, wood frames can bebuilt to match the size and number of sashlights of the interior window. Wood framesalso provide better insulation when feltweather- stripping is applied on the insideface of the wood storm window. Ofcourse, wood framed storm windows mayhave to be removed and stored in summerto allow the primary window to be openedfor ventilation. Metal frames are usuallyconstructed with one over one sash whichis historically inappropriate for housesbuilt before 1850. They also tend to transmit the coldness of the outside air. If, however, aluminum storm windows areinstalled, use caulking on the inside of theframes. Triple track metal storm windowshave convenient self storing storm andscreen panels.
In choosing and applying storm windows,care should be taken to make them look asinconspicuous as possible. Storm windowsshould not have divisions which conflictwith the divisions of the interior sash.Have storm windows custom made to fitodd-shaped windows, such as arched win-dows. Don’t try to use a standard windowand cover the remainder of the windowopening with wood or metal. The color of
storm sashes and frames should match thatof the inner window muntins and casings.Raw aluminum frames should be avoidedexcept where trim color is light gray. Mostaluminum frames come pre-painted. If thecolor doesn't match, purchase unpaintedaluminum windows, prepare the surface,prime with an appropriate primer, andpaint.
When an original door is damaged or notworking properly, try to repair, refinishand reuse it. If this is not possible, try tobuy a new or used replacement in the orig-inal style.
For reasonable cost, modern weather strip-ping can be added to an old door or pairof doors to shut out winter winds, makingstorm doors unnecessary. If you do use astorm door, select a simple one. “DutchColonial” doors with scalloped edges arenot appropriate on older homes. Use thesame color paint on your storm and screendoors as on the main door to minimize dif-ferences in design. Zinc chromate primersfor use on aluminum doors and windowsprior to painting are available.
WEATHERSTRIPPING
STORM DOORS
APPROPRIATE INAPPROPRIATE

58
GlossaryBalusterRepetitive vertical element belowhandrail (also called banister) that is part of the railing system.Balusters are usually turned elements exhibiting a high level of detail and are reflective of thestyle of the building.
BargeboardSloped boards at the edge of aprojecting overhang on the gableends. Similar to Rake Board orRake Cornice.
BaseLower, usually molded, part of a column, pilaster or pier, widerthan the shaft, and often restingon a plain faced plinth or pedestal.
BayA regularly repeated subdivisionin a façade, particularly applied tohouses, for example, a three-bayhouse has three windows evenlyspaced across the upper floors.
Bay WindowA window or series ofwindows thatprotrudefrom a wall.
Board and Batten SidingSiding consisting of long verticalboards and thin strips or battens;the battens are used to cover thegaps between the siding boards.
BracketProjecting supports found undereaves or overhangs. A prominentfeature of the Italianate Style.
ButtressAn exterior mass of masonry setagainst, or built into an externalmasonry wall to strengthen or support it.
CapitalTop most member of a column.Capitals, like other classicaldetails, have multiple styles, themost common being Doric, Ionic,and Corinthian.
CasingFlat or molded boards that finishthe top, sides and bottom of awindow, door or other opening on an inside or outside wall.
Clapboard SidingSiding consisting of horizontalboards with a thin, wedge likecross section. Clapboard siding isgenerally described by the amountof board visible or “exposed” as in 4" exposure.
ColumnVertical architectural support,often highly detailed. A column is composed of a shaft, almostalways a capital (the top) andoften a base. Different details distinguish styles.
CorbelIn masonry, a projection or one of a series of projections, eachstepped progressively outwardwith increasingheight, and usuallyprojecting from awall or chimney;serves as a supportfor an overhangingmember or courseabove or as a purelydecorative element.
Corner BlockA square block used to trim thecorners of an interior door or window casing; often decoratedwith a milled bull’s eye.
Corner BoardAn exterior wood trim element,found at the outside corners, consist-ing typically of flat boards and servingas a stop for siding materials.
CorniceA built up composition of runningmolding and flat boards also oftendiscrete decorative elements likedentils. A cornice occurs at theClapboard Siding
Corbel Chimney
Cornice
Architrave
Bracket
Balusters
Bay Window
Frieze

59Glossary
top of a wall and on the exteriorforms the junction with the roof.
CrestingA decorative board or metal stripalong the ridge of a roof coping,cornice or parapet; generally high-ly ornamented, rhythmic and oftenhighly perforated. Found forexample, in the Queen Anne styleand Second Empire style.
Crown MoldingA molding forming a finishing ortop member of a structure. A rakemolding runs at an angle, as whenit follows the gable of a roof, whilea running molding is horizontal.
DentilsA band of small rectangular tooth-like blocks found in cornices andother moldings.
DormerA structure projecting from a slopingroof, usually containing a window.
Double-HungA type of window consisting oftwo sashes (individual framesholding panes of glass) both movableand often the same size. Referredto by the number of panes in eachsash, such as 6 over 6 as shown.
EavesThat part of a roof that projectsbeyond the exterior wall; usuallythe lower edge of a sloped roof.
EIFSExterior insulation and finish sys-tem. Synthetic stucco applied over
a styrofoam base comprising theexterior skin of a building; oftenused on strip malls and big boxstores. “Dryvit” is a popular brand.
EntablatureIn classical architecture and itsderivatives, an elaborate horizontalband and molding supported bycolumns.
Eyebrow WindowA bottom-hinged, inward-openingwindow with a curved top in theuppermost level of a house, usuallyunder the front eaves.
FaçadeThe exterior face of a buildingthat is considered to be the architectural front, sometimes distinguished from the other facesby more elaborate architecturaland/or ornamental details.
FasciaAny relatively narrow vertical sur-face that is projected or can-tilevered or supported on columnsor elements other than a wallbelow.
FlashingSheetmetal element in siding androofing that directs water that
might get behind surface materialsback to the outside. Flashings areparticularly important at chimneys,roof valleys, and over windows.
GableVertical, typically triangular, endof roof.
GingerbreadHighly decorative woodwork, usually turned on a lathe and/orfashioned on a jigsaw; characteris-tically elaborately embellished.
Dentils
DoublehungWindow
Gingerbread
EyebrowWindow
Cresting
Dormer
Gable

60
Half-timber ConstructionA term descriptive of a type oftimber-framed construction inwhich all supporting and bracingmembers consist of heavy timbers.Usually the structural timbers ofthe exterior walls are exposed.
Hipped RoofA roof comprising adjacent flatsurfaces that slope upward fromall sides of the perimeter of thebuilding.
Leaded Glass WindowA window having small diamond-shaped or rectangular panes ofglass set in grooved lead strips.
LintelA horizontal structural memberthat spans the top of an openingsuch as a window or door andsupports the weight of the walldirectly above it.
Mansard RoofA hipped roof usually having adouble slope or compound curveon all four sides of the roof, thelower slope often being muchsteeper than the upper slope;alternatively, the sides may have a concave or convex shape.
Masonry1. The craft of shaping, arranging,and uniting brick, blocks of stone,and concrete blocks, usually by amason. 2. The work constructedby a mason.
Palladian WindowA large window divided into threeparts: a central sash that is archedat the top and two sashes one eachside of it that are smaller than thecentralsash; thesmallersashes arerectangu-lar, usual-ly toppedwith flatlintels.
PedimentIn classical architecture and itsderivatives, a low triangular gableusually having a horizontal cornice.
PierA column, masonry support, orother structural member used tosupport a concentrated load, generally as a thickened sectionforming an integral part of a wall;usually set at intervals along thewall, which is thicker at thesepoints.
PilasterA flat vertical piece of architectualwall trim often having some featuresof a column and used visually similarly to a column.
PorticoA covered entrance having a roofsupported by a series of columnsor piers, commonly at the frontentrance of a building.
Running MoldingA shaped piece of horizontal continuous trim.
Rusticated stoneAny stone masonry having stronglyemphasized recessed joints; theexposed face of the masonry maybe smooth or roughly textured.The border of each masonry block may be beveled.
SashThe framework of a glazed window,either moveable or fixed; may slidein vertical plane (as a double-hungwindow), may move in horizontalplane (as a sliding sash), may pivotabout a vertical axis (a casementwindow), or may pivot about ahorizontal axis (as in an awningwindow).
Mansard Roof
Palladian Window
Rusticated Stone
Lintel
Half-timber
Hipped Roof
Pediment

61Glossary
SidelightA narrow window adjacent to awider door or window.
SkirtboardBottom trimboard on an exteriorwall or under a porch deck.
SoffitThe exposed, often flat, undersideof a roof or overhang.
Stile and Rail Door or WindowA door or window composed of a frame consisting of vertical stilesand horizontal rails with infill panels.
Terra-cottaClay that has been molded inshape and then burned in a kiln ata high temperature; it is typicallyreddish brown when unglazed;when glazed, it is usually coloredand used for ornamental work,such as floor or roof tile.
Tongue and GrooveA joint composed of a projectingrib (tongue) and a recess (groove).Typical profile for interior andexterior flooring.
TransomA small window or group of panesabove a door or window.
VerandaAn open porch or balcony, usuallycovered , that extends along theoutside of a building.
WeatherstrippingSmall gasket of brushes, metal orneoprene used to seal out draftsfrom movable elements like doors or window sash.
Widow’s WalkA flat roof deck or raised observa-tion platform, situated on a houseroof which is enclosed by a railing.
Wood ShingleA thin unit of wood, usually cutfrom green wood and then kiln-dried, and cut to stock lengths,widths, and thicknesses; used asan exterior covering on slopingroofs and on side walls andapplied in an overlapping fashion.
Yankee GutterA type of rain gutter built on topof or into a roof eave. Because it is built onto or into the roof, backups, ice buildups, or leaks inYankee Gutters can damage theroof and penetrate the building.
Stiles and Rails
Sidelights

62
Notes

Prepared by James Vance and Associates, Architects in collaboration with the Hartford Historic Preservation Commission
and the Department of Development Services, Planning Division, City of Hartford

City of Hartford / Planning Division250 Constitution Plaza / Hartford, CT 06103-1822
860-757-9040 / www.hartford.gov/development/planning