Embed Size (px)
Citation preview

1 User Guide Via 8.7 – Web Portal www.sviesolutions.com
Produced by
User guide Web Portal - Version 8.7

2 User Guide Via 8.7 – Web Portal
Content table
Preparation ................................................................................................................................ 3
Required configuration ....................................................................................................................................4
Peripheral devices ..............................................................................................................................................5
System and sound tests ...................................................................................................................................6
Audio troubleshooting .....................................................................................................................................7
Screen sharing installation ...............................................................................................................................8
Via Web Portal ........................................................................................................................................................9
Accessing Via ................................................................................................................................................... 10
My Via ................................................................................................................................................................ 11
My activities (Calendar) ................................................................................................................................. 12
New activity ...................................................................................................................................................... 14
Duplicate an activity ....................................................................................................................................... 18
Usage report per activity .............................................................................................................................. 19
Activity content management ..................................................................................................................... 20
My Contents ..................................................................................................................................................... 21
Creation of surveys ......................................................................................................................................... 23
My messages .................................................................................................................................................... 26
My profile .......................................................................................................................................................... 27
My configuration ............................................................................................................................................. 28
User Management .......................................................................................................................................... 29
User Group Management ............................................................................................................................ 32
Recordings ........................................................................................................................................................ 34
Note for mobile device users (electronic tablets and smartphones)................................................ 36
Via-compatible documents .......................................................................................................................... 37
––
3 User Guide Via 8.7 – Web Portal
Preparation
Required Configuration
Peripheral Devices
System and Sound Tests
Audio Troubleshooting
Screen Sharing Installation

4 User Guide Via 8.7 – Web Portal
Required configuration Via is designed to facilitate remote communications with an interactive and synchronous online presence for
various presentation purposes, where participants are provided with optimal conditions to efficiently master all
the tools and functionalities at their disposal. These conditions include controlling the computer environment
and bandwidth connectivity as well as managing the quality and full functionality of the peripheral devices
(headset, microphone, webcam) used during online collaborative sessions. These conditions increase the level of
the participant’s technological autonomy and support the adequacy of physical installations during activities. The
conditions may vary depending on platform utilization.
Required configuration
Browser
Microsoft Edge
Microsoft Internet Explorer (7.0+)
Mozilla FireFox (3.6+)
Safari (4.0+)
Chrome (7.0+)
System
Windows XP, Windows Vista, Windows 7 or 8 or
10, Linux or Mac OS 10.5 or later
Processor : 2 GHz or more
Memory: 1GB RAM (2 GB RAM or more
recommended)
Plug-in
Adobe Flash Player 10.3 (or later)
Via 8 : Adobe Flash Player 11.2* (or later)
Internet connection
Intermediate high speed (3 Mb/s) or faster. Please
note that the bandwidth requirements may vary
depending on the density of the multimedia activity.
However, it is strongly recommended to have a
standard high speed internet connexion to
appreciate the Via experience (5 Mb/s).
Please note that wireless, satellite, USB mobile and
cellular connections (3G, 4G or LTE) are not
recommended when using Via although they can
provide acceptable performance.
Computer environment
Via will only run if the computer environment meets the technical requirements listed in this
document. If your environment does not support these basic technical requirements, you may
experience difficulties connecting or interacting in an activity. Remember that your inability to
fully participate and/or interact in an activity will have a negative impact on the other participants’
experience.
It is in your best interest that your computer be equipped with an updated antivirus program to ensure an optimal
online experience.
To use version 6 of Via, you must have the Adobe Flash Player 10.3 extension (plug-in), or later, installed on
your station. For version 8 of Via, you must have the Adobe Flash Player 11.2* extension (plug-in), or later. If
you are at work, ask your company’s Technical Department to install it if you do not have the installation rights.
At home, simply download it (free of charge) at the following address: http://get.adobe.com/flashplayer.
You must ensure that the Adobe Flash Player extension is working properly before holding your first activity
because Via is based on this technology.
* Full screen display requires Flash Player 11.3 or later.

5 User Guide Via 8.7 – Web Portal
Peripheral devices
Headset and microphone The most comfortable headset integrating a microphone is undoubtedly the
one with a headband located on the back of the head, which is lighter and less
bulky. It is recommended that you use a
high quality headset, available at
specialized retailers. Several crackling
interference problems can occur when a
headset is not technically appropriate.
The microphone rod must be long
enough so that it can be placed in front of the lips, mid-mouth height.
Headsets with a USB connector work very well while a headset with an audio
and microphone connector are also adequate. One of the advantages of
the latter is that they leave the USB ports available for other peripheral
devices.
Make sure that you connect the headset properly. Ideally, for a desktop computer you should use
the ports located at the back of the tower instead of the front ones since they are not always
functional. A laptop computer will provide you with those same connectors on the side, back or
front. On most computers, the headset and microphone ports are represented by well identified
icons and/or colours
Webcam Almost all webcams available on the market provide an adequate video capture.
However, here are a few things to consider prior to making a choice:
The webcam must be freestanding and able to be fixed to a laptop: if you wish to
capture an image of a participant other than a close-up image, it must be possible
to place the webcam closer to or further away from the person. We recommend that the webcam be placed at a
higher angle than the participant’s head so it can broadcast a more flattering image.
Some webcams have sensors that automatically activate adequate lighting to ensure that a good image quality
is being broadcasted.
The webcam has a USB plug that can be connected to the front or rear of the station. However, since most
stations do not have many USB ports (2 or 3), it is possible to use a hub in order to connect several peripheral
devices at the same time: wireless mouse, removable memory, headset, microphone, printer and webcam.
However, the use of such peripheral devices may reduce performance.
To install the webcam, connect it to a USB port and then insert the installation CD-ROM. Follow the instructions
to allow your computer to “recognize” the new device. Some webcams will be recognized by the computer upon
connection and will not require installation. In a school or company, you may not have the rights required to
install peripheral devices: ask the IT technician to assist you.
Need more information?
If you are still having problems, you can find answers in the Via Help Center section and/or by contacting our
technical support.

6 User Guide Via 8.7 – Web Portal
System and sound tests As per the information provided on the
Via home page, it is important to make
sure that the peripheral devices are
working properly before accessing your
online collaborative activity. These
validations are performed by clicking on
the “Access the Setup Wizard” link at the
top of the home page in the management
interface or under “My Configuration”
section.
If you do not perform these verifications
prior to your activity, you may notice later
on that one of your devices is not working
properly: at which time you will be
deprived of your communication tools
and your “absence” may postpone the beginning of the activity for all the other participants.
That being said, whether you are a presenter, leader or participant, make sure that every user have access to a
telephone close to their station and that each person’s telephone number is identified and distributed prior to
the activity. That way, should a technical problem occur, the participant(s) can be reached in order to identify the
possible solutions.
Note
It is possible to complete a specific step by clicking the appropriate circle.
Audio configuration In order to be able to setup properly the audio on your computer, Via requires you to record a short sentence
that you can then listen to afterwards. To configure your audio device, use the Setup Wizard on the Via homepage
or the one available in the Audio-Video menu in the synchronous interface.
When you’re prompted to perform the microphone
test with the Setup Wizard, proceed as follows:
At step 1, select the microphone you wish
to use : a modulator (illustrated by green
lines on the left of the device name)
indicates that a sound signal is detected
for this peripheral device.
At step 2, adjust the microphone volume
using the control bar.
At step 3, click on Record and start
speaking into the microphone. While speaking, you should see in the volume bar (Step 2) a fluctuating
line (yellow-green-red) moving to the sound of your own voice.
Once you are done recording, click on Listen to hear your voice and make sure the volume of your
microphone is properly adjusted.
We recommend that you perform this operation each time you make changes to your computer's audio system,
such as when you use a new headset, for example.

7 User Guide Via 8.7 – Web Portal
Audio troubleshooting Access our online help at the following address: http://assistance.sviesolutions.com. It contains information on
the configuration and technical support related to the use of the Via platform.
Here are a few items to check to make sure your equipment is well configured:
When you are online and accessing an activity, you must first perform a sound test: even if the results of the test
are successful, it is possible that you may need to make some adjustments. If you cannot be heard correctly or
not at all, try the following corrective measures:
On your headset and microphone cord, there may be a button to activate or deactivate the microphone and also
to adjust the volume. In this case, make sure the microphone is set to the activated position and that the volume
level is high enough.
Make sure you have completed the Audio Setup Wizard or Via’s Setup Wizard so that your microphone is
properly configured. If you still cannot be heard, it is possible that your microphone is in “Playback” mode rather
than “Record” mode. Depending on your operating system, try one of these procedures.
Windows Vista, 7, 8 et 10
Open the “Control Panel” and double click on
“Sound”;
On the “Playback” tab, make sure that the
correct default output device is selected (green
checkmark);
Go to the “Record” tab, select your microphone
from the list and click on the “Set Default”
button and then on “OK”;
If the “Communications” tab is available, make sure the “Do nothing”
option is checked.
Mac OS
From the Apple menu, open the “System Preferences” and
then click on “Sound”;
Go to the “Output” tab and select the appropriate sound
device;
Then go to the “Input” tab and select the appropriate
microphone device;
Also, make sure the input volume is properly adjusted.

8 User Guide Via 8.7 – Web Portal
Screen sharing installation If you want to share your screen with other participants, Via will ask you to launch the ViaScreenSharing
extension (plug-in). The installer and documents are available in the Downloads section of the Via
portal.
You have three screen sharing options:
1. Screen sharing installer in application mode OPERATING SYSTEMS:
Windows XP and +
MAC 10.8 and +
LINUX (Kernel 2.6.16 and +, glibc 2.4 and +, NPTL 2.4 and +, X11)
Installing the screen sharing in this mode launches the screen sharing as an external application from the
standard functions of the collaboration tool. In this mode, the URL is linked to the application directly in the
operating system, which means that all browsers installed will support this operation mode.
Safari, Firefox, Chrome, Internet Explorer* and Edge are supported.
* Screen sharing can also be deployed and installed on your Windows workstation in ActiveX mode for
Internet Explorer. With this version, you use the screen sharing without going through Java or any external
application. The installer is available in the “Downloads” section of your Via portal.
2. Screen sharing with no installation with Java OPERATING SYSTEMS: (supporting Java 1.6 and +)
Windows XP + MAC 10.5 and + Linux
If Java is up to date on your workstation, the screen sharing will be
downloaded automatically; however, you will have to agree to run the
application. We recommend that you select the “Do not show this
message again for the editor’s applications...” checkbox.
Please note that you can validate and install the ViaScreenSharing
extension before starting your activity by going to the
“Downloads” section of your Via portal.
3. Screen sharing with no installation with the
temporary application If you have not installed the screen sharing and/or do not have the installation right on your computer and
Java is not accessible, a screen sharing version can be used in “temporary application” mode in the activity.
You can use the application for 24 hours and can share as many times as you need for this specific activity.
It cannot be re-used in another activity; you will have to download another temporary application.

9 User Guide Via 8.7 – Web Portal
Via Web Portal
Accessing Via
My Via
My activities (Calendar)
New activity*
Duplicate an activity*
Usage report per activity
Document Management*
My contents
My messages
My profile
My configuration
User Management
User Group Management
Recordings
Note for mobile device users (electronic tablets and smartphones)
Via-compatible documents

10 User Guide Via 8.7 – Web Portal
Accessing Via The first page allows you to access all of Via’s functionalities depending on your user’s rights. To access the
platform, enter your username and password. Once this information is entered, click on “Access”.
Your Web browser may ask you to save your login information, you may answer yes or no.
To access Via Upon reception of an invitation email, click on the link to automatically connect to Via.1
Otherwise, if you wish to access Via without using the invitation email:
Start your Web browser;
Enter the provided address to access Via;
Enter your username and password;
Click on “Access” or press the “Enter” key on your keyboard.
To retrieve a forgotten password or username Click on the link “Forgot your password?”;
On the next screen, enter your email address or your username;
Click on “Send”;
Your login information will be sent to you by email.
1 Other authentication modes are available via Shibboleth and the LDAP business connector or directly through the
modules designed by Moodle or Sakai.

11 User Guide Via 8.7 – Web Portal
My Via
Homepage Your homepage includes four (4) sections:
1. Main Menu (options may vary depending on your type of user):
2. My Shortcuts (according to your rights in the application2):
3. The third part of your homepage offers you a quick access to your current week activities including your
permanent and personal activities. Your complete activity calendar is available in the “My activities”
section.
You can access an online activity (synchronous application) by clicking on “Access” or “Recordings”. To view the
details of an activity, simply click on the title of the desired activity.
You can see the number of people currently connected versus the number of people registered to
the virtual meeting.
4. The fourth section of your page gives you access to your most recently received multimedia messages.
Users can use audio-video messaging in Via to communicate efficiently.
2 The Setup wizard, My profile and Technical support sections are available to all users. The Activity creation is
available to collaborators and + and Users and User groups are available to all coordinators and +.
The eMessenger installation may not be available to your organisation.

12 User Guide Via 8.7 – Web Portal
My activities (Calendar)
List of available activities This is where you can view all the information related to your activities.
To access an activity from this list, click on the “Access” button. This button may vary :
As a participant, if the activity is in progress or it is thirty minutes before the activity, it will display
the “Access” status;
If the activity is finished and has been recorded and you have access, you can view it by clicking on
“Recordings”;
If the activity is in the future and you have the right to prepare this activity, you will be able to
access it to insert documents and prepare your surveys and whiteboards in advance by clicking on
‘’Preparation”.
Activity details From this page, you can view all the information related to an activity: title, presentation message, documents
to download, presenter, type of activity, start date, end date, audio type (telephone or voice over the web ), audio
and video quality and access all recordings. In the case of a telephone activity, you will also find the information
required to access the activity. Below the information table are option buttons that allow you to:
Delete : To delete, after confirmation, an activity from the server (if you have the rights to do so);
Access or Preparation : To enter an activity, in preparation mode (in advance, for leaders and
animators only), in normal mode (during) and in playback mode (after);
Add a presentation message : To add a multimedia presentation message that can be viewed by
all participants, if you have the rights to do so. The text portion of the message will also appear in
the invitation email;
Open the presentation message : To view the multimedia presentation message of the activity.
Recordings section
This section is where the recordings available for viewing are shown. If you are in a permanent or personal activity,
all recordings are not necessarily shown. You have to select the time range by clicking on the dates, then click
on “Apply”.
Downloadable contents
The “Manage contents” option allows the presenter and animators to import and manage their documents from
the activity details.

13 User Guide Via 8.7 – Web Portal
Participants
Relevant information on each participant is provided in this section such as:
Received : Once the user clicks to open the invitation email, a « Yes » checkmark is added;
Available : Participants may confirm or not their attendance;
Telephone : User’s public phone number (A phone number must have been set to public in the
user’s profile to be displayed in this section);
Message : Lets you send a private message to one of the participants;
Configuration : User’s system information collected by the setup wizard;
Connection : The quality of the user’s internet connection according to the setup wizard. In case of
a red circle, the internet connection does not meet the minimal requirements. These results may be
influenced by various factors.
Participants section – Attendance management
When the attendance management is activated and the activity has ended, the facilitators and managers on the
portal see the attendance status and connection time of each user linked to the activity. They can then produce
PDF reports or export this data in .csv format to use it with a spreadsheet.
Activity management options (available with proper rights): Message to All : To send a multimedia message to all participants registered to the activity;
Send Invitations : To send an invitation email to a few or all participants with all the information
needed to access the activity;
You can select the language of the invitation email to send to users added as guests to the
meeting.
Add/Remove : To add or remove participants from the activity list and to manage their roles.

14 User Guide Via 8.7 – Web Portal
Attendance report: when the attendance option is available and activated, the attendance report is
available once the activity has ended. Attendance information from the list of activity users is not
visible to participants;
New activity For financial managers, administrators, coordinators or collaborators, it is possible to create a new activity using
the “Create an activity” button from My Activities page or from the shortcuts on the home page.
Title
This title is the one displayed in the list of activities and in the invitation email.
Date
Click on the date or the calendar to modify the date of the activity. The current date is displayed by default. Then
enter the begin time of the activity as well as the duration. Please note that the ‘’Access’’ button will be available
to participants thirty (30) minutes prior to the activity’s begin time.
Permanent activity
When the « Permanent » option is checked, it means your activity becomes available at anytime, it does not have
a precise date nor begin and end time. A waiting room is set by default to limit access to your participants
registered to your permanent activity.
Periodicity
If you check this option, you can specify the recurrence of the activity. This option is particularly useful when you
want to create a series of activities at a determined interval. One of the options lets you add a number at the end
of the activity titles. (i.e.: Activity #1, Activity #2, etc.)
Participants
Below the date is a section that allows you to manage users participating in your activity. Use the search option
to retrieve users and groups available.
Use the arrows or the drag and drop function to add the desired users or groups to the section on the right.
Validate the role that each user will have in the activity:
Host: The host/presenter has control of the rights and contents used in the meeting at all times. The
host can change at any time the role of a participant to establish the ladder as an animator and inversely.
Leader: He/she has the rights by default to activate their microphones or webcams and can also have
control over the presentation at any time. The leader can control the rights of the participants in the
meeting (right to annotate, to use a microphone and a webcam).
Participant: He/she can chat and must request the rights to annotate, use the webcam or microphone
to communicate.

15 User Guide Via 8.7 – Web Portal
Add a guest
A guest is a person you wish to invite but has no user
profile on the Via platform. You may register these
people simply by typing their email addresses.
Audio Mode Select the desired mode:
Voice over the Web : Use of the Via platform for the visual portion of
the activity with VoIP for the audio(with headsets);
Web and voice over the phone : Use of the Via platform for the visual
portion of the activity with a dedicated telephone conference bridge
for voice communications;
Phone conference only : The Via platform isn’t used for the visual portion of the activity. Use of a dedicated
telephone conference bridge for voice communications only.
Mixed: phone & Web: Allows you to combine usage of headsets and phones in the same activity. Please note
that the phone mode is selected by default. Each user has the possibility to change his audio access from the
phone to the web and vice versa at any moment during the meeting.
Voice over the phone (External bridge): Use of the Via platform for the visual portion of the activity with the use
of your own telephone conference bridge for voice communications; The activity organizer must complete the
telephone conference bridge information section inside his/her own user’s profile.
Activity access This section allows us to provide a direct
access link to your activities so that
participants can access them easily. The
name must not have been used for another
activity in the same field.
If a direct access hyperlink has been defined, you can activate public access using the scroll-down list.
Associated users: registered users to a specific activity can use the address to authenticate themselves
and be able to access the activity if they are invited.
Public: offers access to anyone who accesses the Web address. Any person can access it using his or
her first and last name only. Anyone will then be able to enter without a username/password and
without having received an encrypted hyperlink from the Via system.
P.S. The “Public” option keeps its
ability to authenticate someone
with his or her Via username and
password.

16 User Guide Via 8.7 – Web Portal
Password The “password” function allows you to define a specific password per meeting and recording to restrict access
to it while still allowing your participants to enjoy easy access in Public mode. By default, the defined password
for the room is replicated to limit access to the recordings. You can then specify it per recording.
Invitation
By checking the “Send Invitations Automatically to Participants”, when you press the “Save” button, you will be
asked if you wish to send the invitation immediately. In addition, by checking the next option, you can request a
confirmation of availability from each of the meeting’s participants. They will receive a request for confirmation
in their invitation email with a “Confirm” or “Not available” button. You will then be able to see their confirmation
status in the list of participants (Activity details page).
Confirmation request (invitations)
Furthermore, you can request an availability confirmation for each participant. He or she will then be asked to
confirm or refuse his or her presence using the “Confirm” and “Unavailable” buttons in the invitation email. You
will then be able to see his or her confirmation status in the “Participants” section of the activity details page.
Reminder
Allows you to set an automatic reminder according to a requested period. You can choose to send an automatic
reminder to all participants 1 or 2 hours in advance, 1 or 2 days in advance, or even 1 week before an activity.
They will receive a reminder by email similar to the invitation email.
Activity recording options If you want to activate the recording of your activities,
there are two options: “Unified” or “Multiple”. The unified
recording function will produce a unique recording
regardless of the number of recordings made during the
meeting while multiple recordings are separate and
totally independent recordings in the list. In addition to
the mode, you can also decide to start the recording
automatically upon access using the “Automatic” option.
Choose the “Manual” option if you do not want the recording to start automatically upon access. You will then
have to start the recording yourself by accessing the synchronous interface.
Default access rights for recordings
If you want to make all recordings available for viewing, select “Make all recordings public by default”. In case of
the contrary, no participant will be able to view the recordings unless he or she checkmarks them individually in
the list. Note that this option can be changed at any time, even when the activity has ended.
Associated participants: users can use the address to authenticate themselves and be able to access
the activity if they are invited.
Managers: reserves access to users with edition rights for this activity. Registered participants do not
have access to it.
Public: offers access to anyone who accesses the address. A person can access it using his or her first
and last name only. Anyone will then be able to enter without a username/password and without
having received an encrypted hyperlink from the Via system.
Public only : in this mode, the login menu isn’t offered. The only way to access is to use the hyperlink
to the recording without authenticating.

17 User Guide Via 8.7 – Web Portal
Expiration
Allows you to automatically preset the period during which the recordings will be made available for viewing by
the participants registered to the activity. The period can vary from 1 day, 1 week, 1 month and up to 1 year. You
can then change this value for each recording.
Advanced options
Type of activity
You can choose to create a “Standard” activity, in which all
participants are listed and can interact, according to their
respective rights. If you choose a “Seminar” activity, only
presenters or leaders can see the names of all the participants.
The only interaction available to participants is the chat section.
The latter type is best for activities with large audiences (more than 100 participants) or for confidentiality
purposes.
Waiting room
The option « Awaiting authorization » offers the possibility for the leader to allow or decline access to an activity
while the option « While leader is absent » is to ensure no users can join an activity as long as the leader is away.
This option is particularly useful for permanent activities.
Minimum required attendance time
Automated attendance allows you to set a minimum connection time, and Via will calculate the attendance status.
You then produce your attendance report in PDF format.
Multimedia profiles
Select the multimedia profile to be used during the activity for multimedia exchanges (webcam, microphone and
multimedia documents). This option can have a significant impact on the fluidity of the exchanges and the
necessary bandwidth for each participant. Usually, for a better experience or if you are not sure of your own or
your participants’ internet connection strength, it is better to use the lower quality to ensure exchange fluidity. It
is also possible to request customized multimedia profiles for specific needs (i.e.: larger video with higher image
resolution for local broadcasting). Please contact your Via representative for more details.
Activate the video mode for mobile devices
If you check the box, a less efficient video codec will be used and people on mobile devices will be able to view
the videos of participants. If the box is not checked, a more efficient video codec (H264) will be used and users
on mobile devices will not receive the videos of participants, but only the voice. They will still have access to a
series of other multimedia functions such as contents, annotations, screen share, etc.
The option can be changed at any time during the activity in the Options and Configuration menu, under the
Media parameters section of the Collaborative interface.
Category
Lets you associate an activity to a pre-established category. You will then be able to generate summaries by
categories. This function is useful to separate, divide and classify costs related to online activities. The creation
of categories is only available to the Via financial manager.
Secured activity
Check this option if you want the data exchanged to be secured (SSL encryption).
Use Via version 6
Check this option if you want to use the old version 6 of Via (available until August 2016)

18 User Guide Via 8.7 – Web Portal
Default options for new activities Administrators can also define the default settings of new activities by going to the “Activity Templates” section
under “Management” in the menu. Several options are available to create a new activity. Once the modifications
have been saved, all new activities created will use these default settings.
Duplicate an activity Financial managers, administrators, coordinators or collaborators can make a copy of an activity using the
“Duplicate” button in the activity details page.
Select the items you wish to include during the duplication:
Contents (duplicate all documents without annotations)
Whiteboards and surveys (without previous results)
Registered users

19 User Guide Via 8.7 – Web Portal
Usage report per activity When your user is a financial manager, administrator,
coordinator or collaborator, you can generate a usage report
for a specific activity using the “Report” button in the
activity details page.
Then, select the desired timeframe and click on Generate. A
usage report will be produced in a csv3 format. This format allows you to reuse the data using a spreadsheet
software such as Ms Excel for example.
Here is some of the relevant detailed information
contained in this report for each participant:
Connection date;
Connection start and end time;
Total connection duration per person;
Microphone and webcam activation
time;
Telephone bridge connection time;
Playback time per recording.
3 Usage reports may now be generated with a specific separator (Semicolon, Comma or Tabulation).

20 User Guide Via 8.7 – Web Portal
Activity content management Whether you are in the middle of an activity or
directly in the portal, you can always click on the
“Manage contents”4 button. The window
displayed allows you to manage the documents
and contents made available for downloading by
participants and those available for presentation
during your activity.
The following information and options are
available for all contents listed:
Icon for the type of document and title
of the document;
Name of file imported / URL;
Number of pages (if applicable);
Content options
Many content item options are available depending on the content type and your rights:
When the Public box is checked, it allows participants to download this document from the
management Web portal and/or inside the activity in the Options and configuration menu –
Downloadable files.
For any animators, the export button allows to download the content onto your computer even
if it is not available for downloading for participants. It also allows your participants to add this
content to their own content library (My Contents section) to reuse it in other activities;
When checked, this content will also be available in all workshops;
Lets you rearrange the order of your documents and sequence your content to facilitate its
presentation;
Lets you edit the title of the item;
Deletes the item from the contents available for your activity.
Note that any addition, removal or change will automatically refresh the list of documents in your activity’s
presentation panel.
N.B. Please note that the document management interface can vary depending on your activity version.
Add content There are two ways to add content to your activity:
The “Import from my computer“ button allows you to upload documents from your computer
to present them to other participants or make them available in preparation mode as
downloadable documents.
4 Users that were created under the « Participant » role have to be animators or hosts to access this functionality.
Even without being animators or hosts, users that were created under the « coordonator » role will still be able
to access an activity’s contents.

21 User Guide Via 8.7 – Web Portal
Tip
You can import several documents from your computer at once. To do this, use the multiple
selection keys of your operating system (CTRL and SHIFT).
The “Import from my Via contents” button allows you to assign a content that is already online
in your personal “My contents” library. This function is useful when you need to use the same
documents, whiteboards or surveys in various activities.
My Contents This section allows you to store your documents, surveys and whiteboards online to quickly re-use them in your
various activities. Users all have their own personal library. This
section is available in the main menu: “My contents”.
To add a folder The interface allows you to create several folders to classify your contents and find them quickly. To add folders,
use the “New folder” button and then name your file.

22 User Guide Via 8.7 – Web Portal
Add content The add options are displayed directly in the middle of empty files. Otherwise, they are displayed in the top right-
hand corner.
You can add one or more documents to your Via content. First, place your cursor on the folder in which you want
to import your documents and click on “Add documents”. The process is similar to the one used to import
documents into an activity.
Possible actions on your content Once your content is in your library, you can:
Download it to retrieve it on your workstation
Move it in another one of your folders
Change its name
Delete it
You can change the title of your folder or delete it using the buttons
available when you select your folder.
Use your documents and surveys in your activities Once in your “My Via contents” library, your document can be used as many times as you want in your online
activities without ever needing new downloads. Simply select the “Import my Via contents” option in the activity
document management to link a document already in your document library to your activity. This function is
useful when you use the same documents in different activities. The logic is similar for surveys.
Important notice: when you delete contents from your content library, they remain available and functional in the
activities to which they were linked.
Maximum size of the document library The space available appears at the bottom of the list of available documents. The maximum space can be
increased; check with your organization’s Via representative.
“Symbols” tab This tab allows you to manage images and animated GIFs that the annotation tool allows you to import. These
images can be used directly on your imported contents as annotation objects.

23 User Guide Via 8.7 – Web Portal
Creation of surveys Details concerning the creation of surveys, their management, the types of questions available and the export of
results are available in the Via Collaboration Interface guide.
Surveys available before and after your
activities Surveys can be sent and responded to directly on the portal outside of the synchronous activity ranges. To do
this, click on “Display surveys” in the activity’s Documents and surveys section.
You will then be redirected to the survey detail page on which you can make your survey available for a certain
period of time using the “Availability” section:
By clicking on the survey’s “Make available” option, the
availability parameters will be displayed:
If you activate the survey’s availability outside of the activity, your
participants will see it in the list of public documents and surveys
and will be invited to complete it.
You can limit their ability to see the overall results or not by
selecting the “Results available for participants” box.
Your participants will then be asked to complete the survey upon arriving on the page of your activity.

24 User Guide Via 8.7 – Web Portal
When the participant clicks on “Complete
survey”, the portal displays all survey
questions.
Consult and export survey and quiz results If you have the rights, you can access the list of activity surveys (in your
content library to extract the results reconciled through the various
activities) to view the results.
You can export your survey results from:
the detail of your activity to export the results for one single execution or all executions in this activity;
your personal My Via contents library to export the results of all executions for all activities in which
the survey is used.
The export can be in CSV format to help you manipulate the data or in PDF format to obtain graphical images
of the results.

25 User Guide Via 8.7 – Web Portal
View results on the portal
Without using the export functions, the results are available on the portal and compiled by question or by
participant. The tabs help you move from one view to the next.
In addition to the participant’s execution results, the participants view offers sociodemographic data such as the
first and last name, gender, time spent, time of completion and status of the survey for each respondent assigned.

26 User Guide Via 8.7 – Web Portal
My messages This section allows you to view your received and sent
messages as well as creating new ones
Sorting messages The default message view mode is set to receive
messages for a period of one month.
The message selection range can be modified to display
them by year, month, week or day.
The default sorting is by date but it can also be sorted
by selecting the column titles “Object” or “Date”.
Reading a received message Click on the message image to open it. Once opened,
you can view the recipients, the subject as well as the
message content.
If an audio-video message is attached, click on the
“Read the Audio-Video Message” button to start
playing the recording.
Replying to a sender You can reply to the sender of a current message by using the “Reply to Sender” button at the bottom of the
message. You can also reply to the sender and all other recipients by using the “Reply to All”.
Creating a new message
Click on the “New Message” button at the top of the messaging section or use the “Reply to Sender” or “Reply
to All“ buttons when you are inside a received message;
Enter the subject of the message;
Click on the “Click Here to Select the Recipients” button;
Drag and drop the users you wish to contact from left to right in the recipient list;
Click on the “Finished” button to confirm your list of recipients;
Then you can enter a text message and/or record an audio/video message;
To add an audio/video message, your computer must be equipped with audio and/or video capturing devices. If
several devices are available, it will be possible for you to select them;
Click on “Record” to start recording an audio/video message. The maximum recording time is 5 minutes;
When your recording is finished, click on the “End of Recording” button;
If the recording is suitable, click on “Use this Message”. Otherwise, erase the message and record it again by
clicking on the “Delete Recording” button;
When you are satisfied, send your message by clicking on “Send Message”.
Sending an alert by email When sending your multimedia message through Via, a notification by email is sent to the recipients (through
their regular email). They will need to click on the image of the email to be redirected to the Via platform in order
to be able to read the new message.

27 User Guide Via 8.7 – Web Portal
My profile This section allows you to view and modify your personal information as well as configure some options:
To no longer receive emails notifying the reception of a multimedia message in Via, uncheck the box “Receive
Email Notifications”.
In order to make a phone number available to other Via users, select the number from the dropdown list “Make
This Number Public”.
Adding Your Profile Picture
Under the image or picture on the top right corner, click
on the “Browse…” button;
Next, choose the desired source for importing your photo,
either an image already on your computer or an image to
capture with your webcam.
Once your photo is captured, or your image is selected,
you can crop the image if you need by moving around the
selection box around your photo.
Click “Save” to use the resulting image as your profile
picture.

28 User Guide Via 8.7 – Web Portal
My configuration In this section, you can view all your system information collected by the Setup Wizard and also launch the Setup
Wizard to ensure an optimal configuration. To access the Setup Wizard, simply click on the “Access Setup
Wizard” button.
The Wizard will guide you during the preparation and the configuration of your computer. For each step, just
follow the on-screen instructions. You can activate Screen Help at any time for additional information. The
information collected by the Wizard is indicative only but could also be helpful to ensure better technical

29 User Guide Via 8.7 – Web Portal
User Management The user creation and management interface is available to coordinators, administrators and financial
managers.
User Search Options You can search using the following combined criterias:
Last name, first name, username, email address and user type.
Users matching your search criteria(s) will be listed below. To consult or edit any user’s detailed information,
click on any of the fields related to the desired user. Detailed information and possible options will appear.
Gives you access to the user’s technical information.
Allows you to generate a detailed usage report for this user. Please refer to ‘’User User
Usage’’ section for further information.
Allows you to view and manage groups which the
user is associated to.
Gives you direct access to an activity
assigned to a specific user.

30 User Guide Via 8.7 – Web Portal
User Usage Report If you have sufficient rights as a financial manager, administrator or coordinator, you can generate a usage report
for one or more specific users. This report is accessible from the user details section. Click on the “Reports”
button.
In the search criteria, select the desired timeframe. Then, make sure to select the User usage in the summary type
field. In the right column (Associated users), add the users for which you want to generate a usage report for.
Click on Generate.
A usage report will be produced in .csv format with information such as the connection and recording viewing
time for each activity to which the users are registered to.
To access the complete list of reports available to administrators and financial managers, please refer to the
following guide : Via Platform Usage Reports.
31 User Guide Via 8.7 – Web Portal
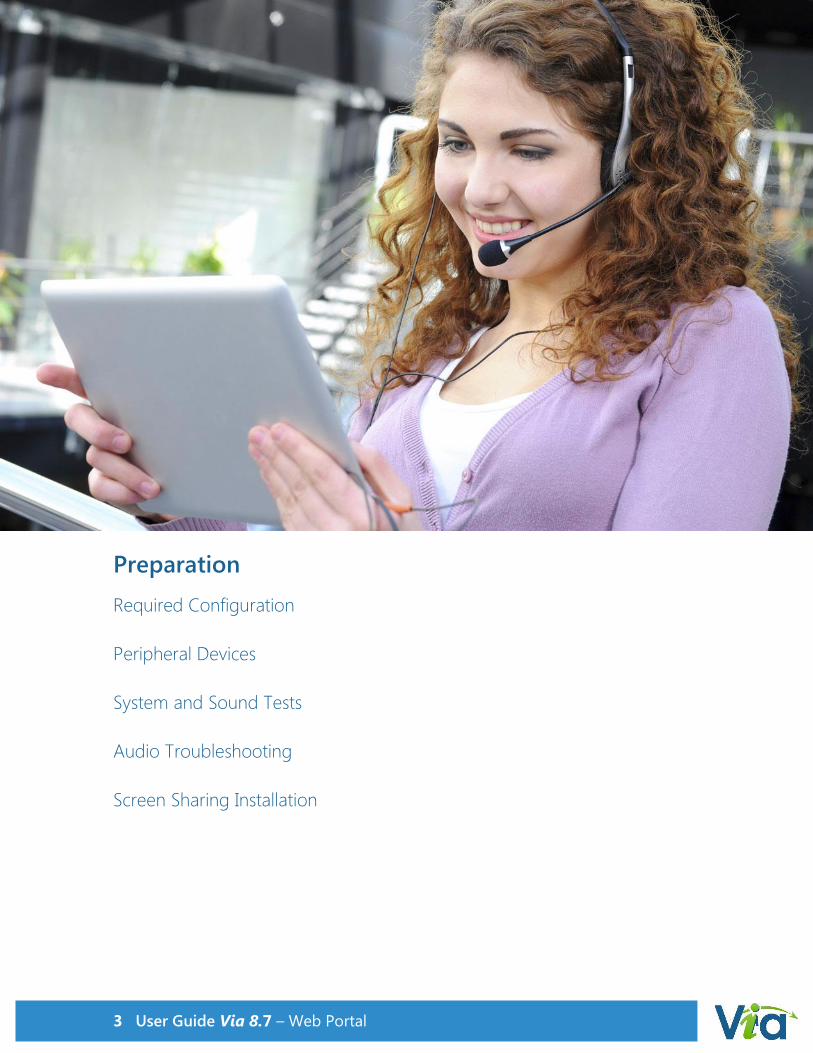
User Edition The user modification option gives you access to all of his or her information:
User Deletion (one or more users) To delete one or more users, check the box in front of the user(s) in order to make your selection, then click on
the “Delete” button above the user list.
NB. The usage data and statistics of the deleted user(s) will no longer be available. If you want to save these
information we recommend to change the user status to Unactivated instead of deleting user(s).

32 User Guide Via 8.7 – Web Portal
User Group Management The user groups section allows you to simplify the link between your users and the activities. Once linked to a
meeting, the group automatically synchronizes the users associated to.
By adding or removing users from the groups, all associated users will be added to meetings where the group is
registered to. You must be a coordinator or + to access this function.
User group edition Select the desired group from the list on the left, it will appear on the right section with edition controls. You can
then delete, associate or disassociate users to the selected group and save any changes made to the title.
Determine the role of each user inside the meetings Click on “Users selection” button to manage the list and roles for everyone.
Roles During the first synchronization of a group with an activity, the users
present in the group will be added with the role of animator or participant according to your preferences. You
must specify the role of each participant or assign the
same role for everyone by clicking on the headings.
It is important to know that you can modify the role
of each person directly in each meeting. If
you then modify this information in the
group, the role information will be
updated and will overwrite the values in
all of your activities where the group is
linked to.
For example, the user with the role of
participant in the group will be synchronized as a participant when a group is linked to an activity. If you
modify the role of this user in the group and make him or her an animator, the user will then be promoted as
an animator inside all activities where
the group is linked to.
If you want to make your role
assignment completely independent,
use the “Ungroup” function of a
specific activity. The roles will then be
independent from the group who will
no longer be linked to the activity.
Click on the header icon in order to assign
the same role to everyone in a specific
group

33 User Guide Via 8.7 – Web Portal
User Selection filter the list of available users (list on the left) using the search field and transfer the desired
users to the right column using the arrows
or use the drag and drop method.
Save your changes Changes made to the users in your group in edit mode will not be accounted for immediately. You can use the
back or cancel button to prevent the changes from being applied. Or press Save to apply the changes.
A warning message will appear
to remind you to save your
modifications.

34 User Guide Via 8.7 – Web Portal
Recordings You can view, edit, export or download your synchronous recordings in various formats. You may cut out
unnecessary portions of your online recordings or download and view a recording on your mobile device. You
will find a list of the recordings in the activity details page if the recording feature was activated during your
online activity.
List of recordings
Title: By default, your recordings are numbered as follows: “Recording #1”, “Recording #2”, etc.
You can, however, rename the recording by clicking on the ‘’Pen’’ icon in the “Edit” column.
Creation date: Date and beginning time of the recording.
Duration: The total duration of a recording (viewing duration). If you edit the reading range of the
recording by modifying the start and/or end times, the duration will be adjusted accordingly.
Expiration: Allows you to automatically manage accessibility of your recordings to all your
participants by setting a deadline. (1 day to 1 year)
Recording access: This option allows you to personalize the Web link to access your recordings so
that participants can access them directly and easily. The name must not have been used by
another activity in the same field.
If a direct access hyperlink has been defined, you can activate public access in the scroll-down list if
you have user rights.
Associated participants: only registered users to a specific activity can access and
view the recording.
Managers: registered users do not have access to the recording, unless they have
rights as coordinators and +5 in the Via portal.
Public: the recording is available to anyone accessing the direct Web link. A person
may access the recording only with his or her first and last name. Anyone will then
be able to enter without a username/password and without having received an
encrypted hyperlink from the Via system.
Download: Allows
participants to download the
recording in a standalone
audio/video format which
was previously exported by
coordinators and + in the Via
portal. Various download
formats are available.
5 Collaborators can also manage and view all recordings from their own activities.

35 User Guide Via 8.7 – Web Portal
Duplicate: Allows you to duplicate a recording. A new
identical copy of the recording will then be available.
Delete: Allows you to delete a recording.
Note that a deleted recording cannot be
recovered.
Edit: This option allows you to modify the
title, access hyperlink and access rights for
this recording. Access rights are described in
the Recording access section.
View/export: Allows you to view the streaming of the recording (if authorized) when connected to
the platform. The export option is only available to Via managers (collaborators or +). This option
allows you to edit and export the recording in large format (MP4), mobile format (MP4) or audio
only format (MP3).

36 User Guide Via 8.7 – Web Portal
Note for mobile device users (electronic tablets and smartphones) It is possible to access the Via Web Portal without connecting to the ViaMobile application. Most
of the functionalities are available in order to manage users, generate reports, send invitations to your
participants, create your activities or manage your recordings.
However, you may notice that some of the features are not actually available on the Via Web Portal on mobile
devices :
« My contents » section
« My Messages » section
Add a picture to your profile
« My Configuration » (no configuration required on mobile devices)
Please note that the activity ACCESS button as well as the RECORDS button will automatically
redirect to the ViaMobile application.
Available versions
There are two versions of ViaMobile available to download :
ViaMobile for Via 6
ViaMobile for Via 7 et +

37 User Guide Via 8.7 – Web Portal
Via-compatible documents
Images - JPG
- BMP
- PNG
- TIFF
- GIF
- PICT
Video sequences - FLV
- AVI
- MPG
- MPEG
- MOV
- WMV
- MP4
Audio sequences - MP3
- FLV
- OGG
- WMA
- WAV
Adobe PDF - PDF
Office - DOC
- DOCX
- XLS
- XLSX
- PPT
- PPTX
- PPS
- PPSX
OpenOffice - ODT
- ODS
- ODP
- ODG
Web
- HTML

38 User Guide Via 8.7 – Web Portal www.sviesolutions.com
Produced by
Everyday Tel.: 418 948-4848, ext. 1
Toll-free : 1 866 843-4848, ext. 1
http://assistance.sviesolutions.com
Technical support website
and multimedia help videos