Embed Size (px)
Citation preview
Toad™ for Oracle® 12.8Guide to Using Toad

Copyright© 2015 Dell Inc. All rights reserved.
This guide contains proprietary information protected by copyright. The software described inthis guide is furnished under a software license or nondisclosure agreement. This software may beused or copied only in accordance with the terms of the applicable agreement. No part of thisguide may be reproduced or transmitted in any form or by any means, electronic or mechanical,including photocopying and recording for any purpose other than the purchaser’s personal usewithout the written permission of Dell Software Inc.
The information in this document is provided in connection with Dell Software products. Nolicense, express or implied, by estoppel or otherwise, to any intellectual property right isgranted by this document or in connection with the sale of Dell Software products. EXCEPTAS SET FORTH IN DELL SOFTWARE’S TERMS AND CONDITIONS AS SPECIFIED INTHE LICENSE AGREEMENT FOR THIS PRODUCT, DELL SOFTWARE ASSUMES NOLIABILITY WHATSOEVER AND DISCLAIMS ANY EXPRESS, IMPLIED OR STATUTORYWARRANTY RELATING TO ITS PRODUCTS INCLUDING, BUT NOT LIMITED TO, THEIMPLIED WARRANTY OF MERCHANTABILITY, FITNESS FOR A PARTICULARPURPOSE, OR NON-INFRINGEMENT. IN NO EVENT SHALL DELL BE LIABLE FORANY DIRECT, INDIRECT, CONSEQUENTIAL, PUNITIVE, SPECIAL OR INCIDENTALDAMAGES (INCLUDING, WITHOUT LIMITATION, DAMAGES FOR LOSS OF PROFITS,BUSINESS INTERRUPTION OR LOSS OF INFORMATION) ARISING OUT OF THE USEOR INABILITY TO USE THIS DOCUMENT, EVEN IF DELL SOFTWARE HAS BEENADVISED OF THE POSSIBILITY OF SUCH DAMAGES. Dell Software makes norepresentations or warranties with respect to the accuracy or completeness of the contents of thisdocument and reserves the right to make changes to specifications and product descriptions atany time without notice. Dell Software does not make any commitment to update theinformation contained in this document.
If you have any questions regarding your potential use of this material, contact:
Dell Software Inc.Attn: LEGAL Dept5 Polaris WayAliso Viejo, CA 92656
Refer to our web site (www.software.dell.com) for regional and international office information.
Dell, the Dell logo, and Dell Knowledge Xpert, Dell vWorkSpace, Dell Toad, T.O.A.D., ToadWorld, Toad for Oracle, SQL Optimizer for Oracle, Code Tester for Oracle, Spotlight on Oracle,Benchmark Factory, and Dell Backup Reporter for Oracle are trademarks of Dell Inc. and/or itsaffiliates. Other trademarks and trade names may be used in this document to refer to either theentities claiming the marks and names or their products. Dell disclaims any proprietary interest inthe marks and names of others.

Toad for OracleInstallation GuideUpdated - August 2015Version - 12.8
Contents
Chapter 1: Getting Started 14
Welcome to Toad 14
About This Guide 15
Help and Resources 15
Toad Advisor 16
Jump Search 16
Additional Toad Resources 18
Customize Toad 19
Use Workspaces 19
Customize Schema Drop-Downs 20
Customize Toolbars and Menus 20
Reset Default Toolbars and Menus 23
Customize Shortcut Keys 23
Popular Shortcut Keys 24
Toad Insight Pick List Shortcuts 26
Print List of Shortcut Keys 27
Create and Manage Connections 28
About Database Connections 28
Create New Connections 29
Import/Export Connection Settings 32
Automatically Connect on Startup 33
Use Previous Connections 33
Change Active Connection in Window 34
Save Connection Passwords 34
Beginner's Guide to Using ToadTable of Contents
5
Commit or Rollback Changes 35
End Connections 35
Test Connections 36
Display Connection and Window Bars 36
Color Code the User Interface per Connection 37
Manage Oracle Homes 38
Work with the Editor 40
About the Editor 40
Important Editor Settings 41
Customize the Editor Layout 42
Split the Editor Layout 43
Work with Code 44
Execute Single Statements 44
Execute Scripts in the Editor 44
Execute Scripts with Toad Script Runner 45
Change Current Schema 46
Format Code 47
Auto-complete Names 47
Extract Procedures 48
Comment Out Code Block 48
Find Unused Variables 49
Rename Identifiers 49
Debug PL/SQL 49
Compile with Debug Information 50
Start Debugging 51
Beginner's Guide to Using ToadTable of Contents
6
View DBMS Output 52
Debug External Sessions 52
Work with Database Objects 54
About the Schema Browser 54
Customize the Schema Browser 55
Helpful Features 58
Automatically Refresh the Schema Browser Data Grid 60
Filter Schema Browser Content 60
Object Search 61
Use Query Templates 63
Work with Data Grids 64
Work with Editable Resultsets 64
Sort and Group Data 65
View a Single Record 65
Filter Data 66
Edit Data in Popup Editor 66
Use an External Editor 67
Access the Calculator 67
Perform Calculations on Grid Cells 67
Anchor Column in Data Grid 68
Preview Selected Column 68
Hide Columns 68
BLOB Editor 69
Date Editor 69
View BFILE data 70
Beginner's Guide to Using ToadTable of Contents
7
View Nested Table Data 70
View VARRAY Data 70
View Object Data 70
View CURSORs 71
Online Options 71
MyToad 71
Toad World Repository 72
Sync User Files 76
Chapter 2: Toad Without Code 77
Manage Objects 77
Create Objects 77
Copy Objects to Another Schema 78
Create new objects from existing ones 79
Drop (Delete) Objects 79
Flashback Tables (Recover Dropped Tables) 79
Rebuild Multiple Indexes, Tables, or LOB Segments 80
Rebuild an Index 82
Rebuild a Table 82
Copy Data to Another Schema 83
View and Modify Object Privileges 84
Configure Grantees 84
Use the Master Detail Browser 84
Master/Detail Browser 85
Generating XML Output 85
Selecting the Master Object 86
Beginner's Guide to Using ToadTable of Contents
8
Adding Detail Datasets 86
Defining a Master/Detail Relationship 87
Import and Export Data 88
Export Dataset 88
Export Data to Flat File 89
Export with Data Pump 90
Import with Data Pump 92
Data Pump Job Manager 93
Export DDL 93
Viewing an Export File 94
Finding Information in an Export File 94
Open Export File Window 95
DB Compare Mode Overview 96
Reading the Compare Grid 97
Freeze the Compare Grid 97
Copy DDL to Clipboard 98
Saving DDL as a File 98
Extracting DDL from Multiple Nodes 99
Export Utility Wizard 99
Data Subset Wizard 100
Import Table Data 103
Import Utility Wizard 104
Compare Data, Objects, and More 105
Data Duplicates 105
Compare Single Objects 106
Beginner's Guide to Using ToadTable of Contents
9
Compare Databases 107
Compare Schemas 109
Compare Multiple Schemas 110
Compare Data 113
Reviewing Differences 116
Compare Files and Objects 116
Viewing File Differences 117
File Comparison Rules 117
Difference Viewer Options 119
Automate Processes and Manage Projects 119
Automation Designer Overview 119
Add Apps/Actions to Toolbar 120
Search the Automation Designer 121
Create New Actions 121
Using Action Recall 122
Action Parameter Files 123
Sharing Actions 125
Run Actions from the Automation Designer 126
Schedule a Task 126
Schedule Actions and Apps 127
Execute Actions from the Command Line 128
Project Manager Overview 130
Configuring the Project Manager 131
Adding Objects to Project Manager 132
Working with Server Directories and Files 132
Beginner's Guide to Using ToadTable of Contents
10
Working with Local Files and Directories 133
Format Files 133
Checking Files for Syntax 134
File to FTP 134
Chapter 3: Toad and Your Code 135
Navigator 135
Navigator Options 136
Navigator options 136
Bookmarks 137
Moving Between Editor Tabs 138
Work with Statements and Scripts 138
Create and Manage Code Snippets 139
Code Templates Tab 140
Code Completion Templates 141
Auto Replace Substitutions 143
Code Folding 144
Wrap Utility 145
Results Grids 145
Describe (Parse) Selected Query 146
Strip Code Statement and Make Code Statement Functions 146
Creating Make Code Templates 148
Change Text to Upper or Lower Case 149
View Code Statistics 149
Swap This/Prev Lines 150
Find Closing Block 150
Beginner's Guide to Using ToadTable of Contents
11
Variables Window 150
Aliases 150
ALIASES.TXT file 151
Skip Aliases 152
Track Aliases 152
Save and Reuse SQL Statements 152
Save and Reuse SQL Statements 152
View Recently Executed SQL Statements 153
Import and Export Saved SQL 154
Work with Results 156
Auto Trace 156
Optimization 157
Row Numbers 157
Saving Toad Query Results 158
Time Values 159
Code Analysis 159
About Code Analysis 159
Analyze Code in the Editor 160
Perform Detailed Code Analysis 161
Create or Edit Rule Sets 163
Create, Clone, or Edit Code Analysis Rules 163
Archive Code Analysis Results for Reporting 165
Ignore Code Analysis Rules 165
Code Analysis Action 166
Work with PL/SQL 167

Beginner's Guide to Using ToadTable of Contents
12
Create New PL/SQL Object 167
Using Templates 169
Load Database Object 170
Reload Object 171
SQL Tuning 171
About the Profilers 172
Additional DBMS Profiler Requirements 173
Additional Hierarchical Profiler Requirements 173
Profile PL/SQL 173
View Profiler Results 174
Editor Profiler Tab 175
Query Builder 176
Query Builder Overview 177
Query Builder Options 178
Removing columns from the Tree 178
Use the Query Builder 178
Model Area 179
Viewing Joins 180
Populating the Where Clause 180
Populating the Having Clause 182
Creating a Subquery 183
Reverse Engineering a Query 184
Generated Query 185
Query Results 186
Beginner's Guide to Using ToadTable of Contents
13
About Dell 187
Contacting Dell 187
Technical support resources 187
Chapter 1: Getting StartedThis chapter introduces you to the basics of the Toad interface. Once you know your wayaround, you can more easily move on to use the many advanced features of Toad.
Welcome to Toad 14
About This Guide 15
Help and Resources 15
Customize Toad 19
Create and Manage Connections 28
Work with the Editor 40
Work with Code 44
Debug PL/SQL 49
Work with Database Objects 54
Work with Data Grids 64
Online Options 71
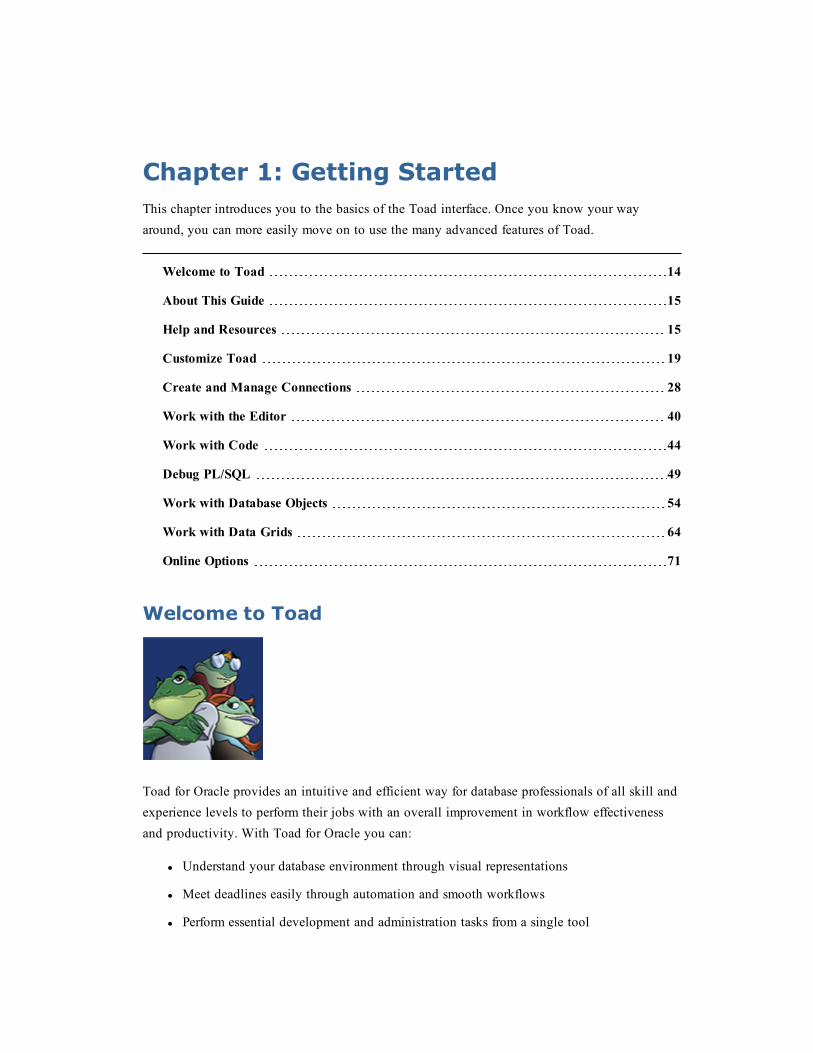
Welcome to Toad
Toad for Oracle provides an intuitive and efficient way for database professionals of all skill andexperience levels to perform their jobs with an overall improvement in workflow effectivenessand productivity. With Toad for Oracle you can:
l Understand your database environment through visual representations
l Meet deadlines easily through automation and smooth workflows
l Perform essential development and administration tasks from a single tool
Beginner's Guide to Using ToadChapter 1: Getting Started
15
l Deploy high-quality applications that meet user requirements; perform predictably andreliably in production
l Validate database code to ensure the best-possible performance and adherence to best-practice standards
l Manage and share projects, templates, scripts, and more with ease
The Toad for Oracle solutions are built for you, by you. Over 10 years of development andfeedback from various communities like Toad World have made it the most powerful andfunctional tool available. With an installed-base of over two million, Toad for Oracle continuesto be the “de-facto” standard tool for database development and administration.
About This GuideThis guide will help you to quickly start using Toad by learning basic features and tasks. Toad isa very diverse and powerful tool, hence there are features not covered. Refer to the online helpfor additional information about Toad, which you can access at any time by pressing F1.
Many Toad for Oracle users access data via Toad to work with it in another environment. Othersextensively use the deeply robust features of Toad more fully. Both groups will find their needsmet in the logical organization of this guide:
o Getting Started
o Toad Without Code
o Toad and Your Code.
The following topics are not included in the guide. They will be covered in other content:
o Using the Toad Report Manager
o SQL Optimizer.
Meanwhile, please refer to online help and to our award-winning Support team’s knowledge baseand to Toad World for instructions on using those features.
Help and ResourcesToad provides tools to help you find what you are looking for and get answers toyour questions.
Beginner's Guide to Using ToadChapter 1: Getting Started
16
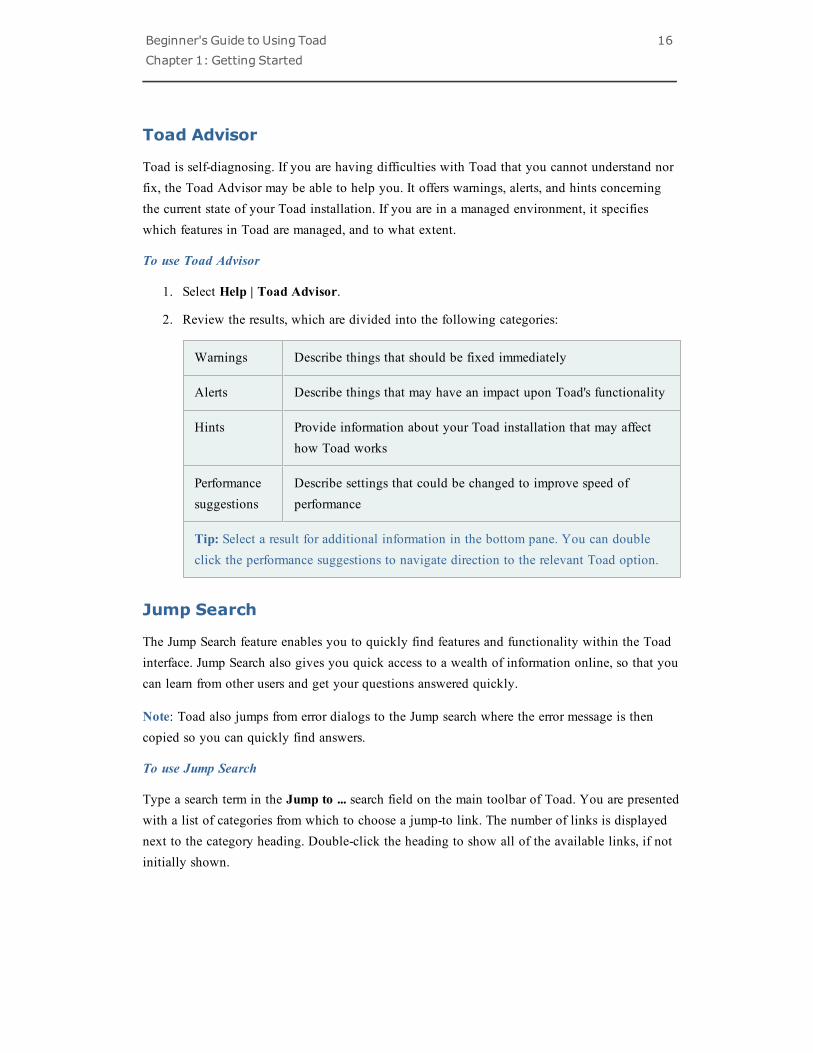
Toad Advisor
Toad is self-diagnosing. If you are having difficulties with Toad that you cannot understand norfix, the Toad Advisor may be able to help you. It offers warnings, alerts, and hints concerningthe current state of your Toad installation. If you are in a managed environment, it specifieswhich features in Toad are managed, and to what extent.
To use Toad Advisor
1. Select Help | Toad Advisor.
2. Review the results, which are divided into the following categories:
Warnings Describe things that should be fixed immediately
Alerts Describe things that may have an impact upon Toad's functionality
Hints Provide information about your Toad installation that may affecthow Toad works
Performancesuggestions
Describe settings that could be changed to improve speed ofperformance
Tip: Select a result for additional information in the bottom pane. You can doubleclick the performance suggestions to navigate direction to the relevant Toad option.
Jump Search
The Jump Search feature enables you to quickly find features and functionality within the Toadinterface. Jump Search also gives you quick access to a wealth of information online, so that youcan learn from other users and get your questions answered quickly.
Note: Toad also jumps from error dialogs to the Jump search where the error message is thencopied so you can quickly find answers.
To use Jump Search
Type a search term in the Jump to ... search field on the main toolbar of Toad. You are presentedwith a list of categories from which to choose a jump-to link. The number of links is displayednext to the category heading. Double-click the heading to show all of the available links, if notinitially shown.
Beginner's Guide to Using ToadChapter 1: Getting Started
17
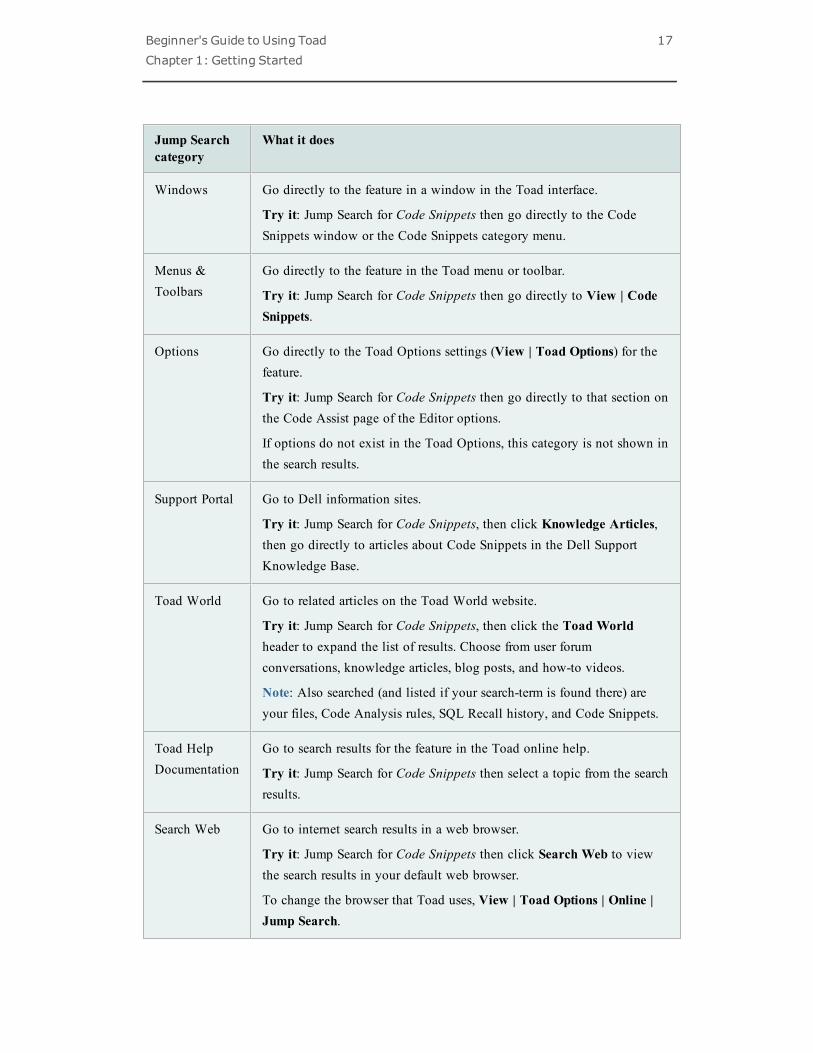
Jump Searchcategory
What it does
Windows Go directly to the feature in a window in the Toad interface.
Try it: Jump Search for Code Snippets then go directly to the CodeSnippets window or the Code Snippets category menu.
Menus &Toolbars
Go directly to the feature in the Toad menu or toolbar.
Try it: Jump Search for Code Snippets then go directly to View | CodeSnippets.
Options Go directly to the Toad Options settings (View | Toad Options) for thefeature.
Try it: Jump Search for Code Snippets then go directly to that section onthe Code Assist page of the Editor options.
If options do not exist in the Toad Options, this category is not shown inthe search results.
Support Portal Go to Dell information sites.
Try it: Jump Search for Code Snippets, then click Knowledge Articles,then go directly to articles about Code Snippets in the Dell SupportKnowledge Base.
Toad World Go to related articles on the Toad World website.
Try it: Jump Search for Code Snippets, then click the Toad Worldheader to expand the list of results. Choose from user forumconversations, knowledge articles, blog posts, and how-to videos.
Note: Also searched (and listed if your search-term is found there) areyour files, Code Analysis rules, SQL Recall history, and Code Snippets.
Toad HelpDocumentation
Go to search results for the feature in the Toad online help.
Try it: Jump Search for Code Snippets then select a topic from the searchresults.
Search Web Go to internet search results in a web browser.
Try it: Jump Search for Code Snippets then click Search Web to viewthe search results in your default web browser.
To change the browser that Toad uses, View | Toad Options | Online |Jump Search.

Beginner's Guide to Using ToadChapter 1: Getting Started
18
Additional Toad Resources
There are many resources for you to learn more about Toad.
Resource Description
Helpfile Provides step-by-step directions on how to use Toad. Press F1 in anyToad window to open the help system to the relevant topic.
KnowledgeXpert forOracle
An extensive Oracle technical resource with thousands of insightfultopics and working examples.
Oracledocumentation
Oracle's database documentation. Since Toad is a tool to help youmanage Oracle databases, the more you understand Oracle the moreintuitive Toad becomes.
toadworld.com The main website for all Toad products. Click Explore a Product | Toadfor Oracle to go to resources that relate specifically to Toad for Oracle.Alternatively, go to Help | Toad World from the Toad menu.
Here are just a few of those resources:
l Forums and Blogs—Connect with thousands of other Toad usersto get help and learn from the experts.
Tip: Customers often use common Toad acronyms in the forums.
l Idea Pond—Submit ideas to improve Toad and vote on ideassubmitted by other customers.
l Toad for Oracle Wiki—An open wiki where you can share yourknowledge of Toad.
l Media—Free learning videos and apps.
l Downloads—Download trial versions, beta trials, screen savers,ringtones, and more.
Follow forum threads
l To receive emails for all posts, | Forum | Email Subscribe toForum.
l To follow a thread, select Email Subscribe to Replies.
l To unfollow, select Email Unsubscribe to Replies.
Beginner's Guide to Using ToadChapter 1: Getting Started
19
Customize ToadToad provides many ways for you to arrange and customize the interface to help you work faster
Use Workspaces
You can save your current Toad windows and connections as a Workspace. This allows you toquickly resume work after restarting Toad. It also allows you to save different Toadconfigurations and then switch easily back and forth between them.
If you don’t see the Workspace toolbar, right-click in the main toolbar to select Workspaces, orselect Restore Defaults.
To create a Workspace
l Set up your current working layout in Toad.
l In the Workspace toolbar, click to name and save your Workspace.
Your open windows and connections are saved and will be reestablished the next time you openthis Workspace.
These components are saved:
Schema Browser - The currently active database objects (type and name)
Editor - The tab contents, the number of tabs, the last active tab, each tab's lineand caret position, and the split mode of the Editor
Other windows - All other MDI (multiple document interface) style windows, forexample the Automation Designer, are managed with Workspaces. Non-MDIwindows, that is, docked windows such as the Project Manager and Team Coding,are retained across Workspaces since they likely represent an overall workingdesktop state you may need across Workspaces.
To make changes to your Workspace configuration
1. Make the change in the workspace.
2. Click in the Workspace toolbar.
3. To keep the current name, reply Yes to the confirmation prompt. To save as a newworkspace, enter a name for the new workspace. Newly opened windows and connectionsare saved.
Beginner's Guide to Using ToadChapter 1: Getting Started
20
Customize Schema Drop-Downs
You can customize schema drop-downs by creating a list of favorites, hiding schemas, setting thedefault schema for connections, and other options. Changes apply to allow windows with theschema drop-down, such as the Editor and Schema Browser.
To set a default schema
» Right-click the schema in the schema drop-down and select Set <schema name> toDefault Schema.
To customize schema drop-downs
1. Right-click the schema drop-down and select Customize.
2. Select schemas to categorize and click the > button.
3. To hide schemas, select Hidden Schemas in the Category field for the schema.
4. To create a new category, enter the category name in the Category field for the schema.The new name becomes available in the Category drop-down.
5. To change when the schema is categorized, select the When to Categorize field for theschema and click .
Customize Toolbars and Menus
You can configure Toad menu bars to adjust automatically to the way you work with Toad. Youcan also customize menus and toolbars yourself. This lets you arrange Toad to best reflect howyou want to work.
Enable self-adjusting menus
When you enable self-adjusting menus, Toad collects data on your work habits and then adjustsits menus accordingly. Toad moves your most used commands to the top of the menu and hidesthe commands that you rarely use.
To have Toad menus configure themselves
1. Right click in the toolbar and select Customize.
2. On the Options tab of the Customize dialog, select Menus show recently usedcommands first.
Beginner's Guide to Using ToadChapter 1: Getting Started
21
Configure toolbars and menus
In Toad, you can hide, add, change, delete, move, and rename toolbars and menus. Any changescan be undone later as needed.
To show or hide toolbars
1. Right-click the toolbar area.
2. Select the toolbars you want to display, and clear the toolbars you want to hide.
To customize a toolbar or menu
1. Right click the toolbar or menu and select Customize.
2. Make any of the following changes:
Notes:
l To avoid accidental changes, customization can be done only if Customize is open.
l You can make any number of customizations while Customize is open.
l If Toad does not permit an object to be dragged to a location, an X is displayed on theitem being dragged.
l An I-bar pointer marks the location where a dragged item is dropped.
If you want to... Complete the following:
Create a customtoolbar
1. Click New.
2. Enter a name for your new toolbar. A blank toolbardisplays in the user interface below the existing toolbars.
Create a custom menu 1. Select the Commands tab.
2. Select New Menu in the Categories field.
3. Select New Menu in the Commands field and drag it tothe desired location on the menu bar.
Tip: You can create sub-menus by dragging a new menuinto an existing one.
Add a command to atoolbar or menu
1. Select the Commands tab in the Customize window.
2. Drag the command from the Commands field to the desiredlocation on the toolbar or menu. If you drag to a menu, itexpands to allow placement.

Beginner's Guide to Using ToadChapter 1: Getting Started
22
If you want to... Complete the following:
To view new commands that Dell added after an upgrade, select[New] from the Categories field on the Commands tab.
To view commands that you deleted, select [Unused] from theCategories field on the Commands tab.
Add a sub-menu Create a new menu, and then drag it onto an existing one.
Change the order ofcommands on a menuor toolbar
On the toolbar or menu itself in Toad (not in the Customizewindow), drag the item to the desired location.
Rename a toolbar,menu, or command
1. Right-click the icon or text on the item you want tochange.
2. Enter the new name in the Name field. If you want todefine a hotkey, include an ampersand (&) before the letteryou want to assign as the hotkey.
Note: These are not the same as Toad shortcut keys, butrather the underlined letter for keyboard navigation.
3. Press Enter to apply the name.
Remove a commandor menu
Right-click the item and select Delete.
Add menus to themain toolbar
1. Select the Commands tab.
2. Select Menus in the Categories field.
3. Under Commands, select the menu and drag it to thedesired location on the menu bar.
Notes:
l To prevent customizations of the toolbars, right click the toolbar area, then selectLock Toolbars.
l As of version 11.5, customizations are not imported when you upgrade to a newer versionof Toad. This allows you to see new Toad windows in your menus. To restore yourcustomizations and other user settings, go to Utilities | Copy User Settings.
Beginner's Guide to Using ToadChapter 1: Getting Started
23
Reset Default Toolbars and Menus
You can reset the menus and toolbars back to their defaults. This removes all customization andrestores Toad to its initial installed state.
To reset default toolbars and menus
» Right-click a toolbar and select Restore defaults.
Customize Shortcut Keys
Toad supports the use of hot keys to help you work faster.
Note: If you have customized your shortcut keys, you will not automatically be able to use newshortcuts added in future Toad upgrades. However, you can reset your shortcut keys to thedefault in order to gain access to all new shortcuts.
Menu Hot Keys
Menu hot keys are the keys that you access by pressing the ALT key and then the character inthe menu item that is underlined to open that menu or command. You can configure theunderlined character.
To change the hot key
1. Right-click the toolbar and select Customize.
2. Right-click the menu item you want to change.
3. Change the underlined character by changing the location of the ampersand in the Namefield. For example, &Tools underlines the T, while T&ools underlines the o.
Shortcut Keys
Toad supports the use of shortcut keys to execute the same commands that you execute throughthe interface.
To change shortcut keys
1. Click on the standard toolbar.
Tip: You can also select View | Toad Options.
2. Select Toolbars/Menus | Shortcuts.
3. Select the command for which you want to set or change the shortcut keys.
4. Type the keystrokes you want to use.
Beginner's Guide to Using ToadChapter 1: Getting Started
24
The shortcut key is changed as you type. If there is a conflict with another shortcutkey, an asterisk (*) displays in the Conflict column. You can then find the conflictand remove it.
Note: This option only allows you to use one keystroke after a control key (such asCTRL or ALT).
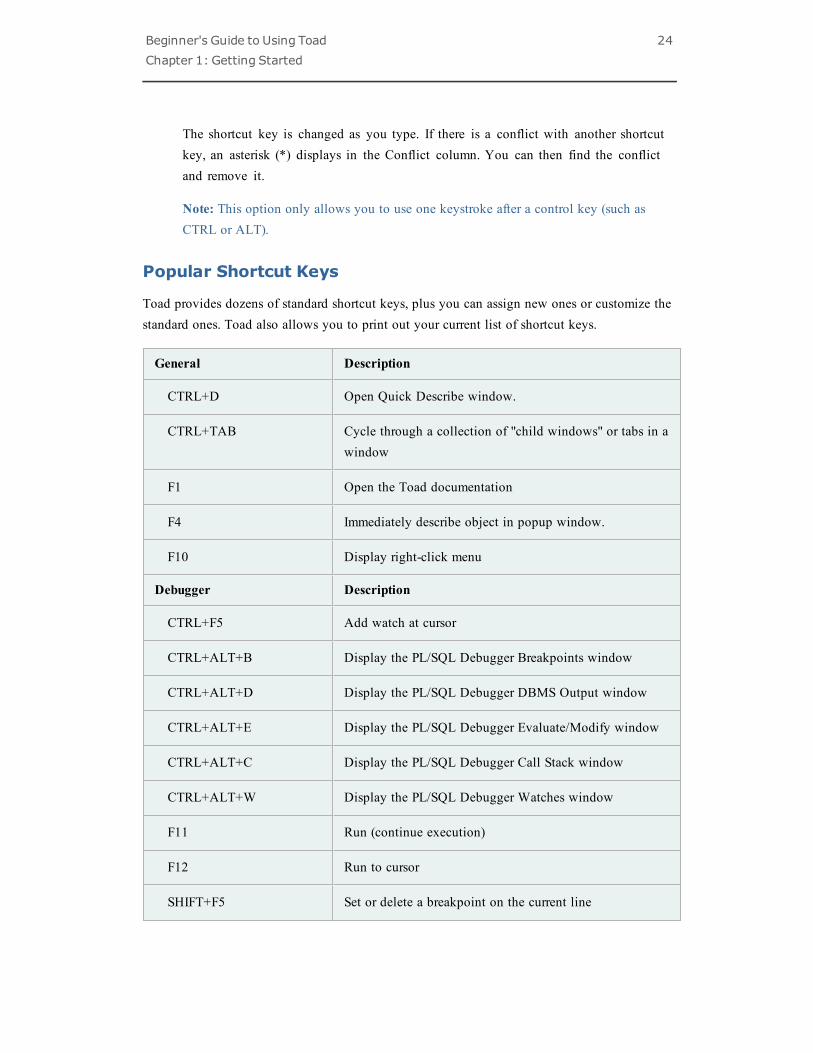
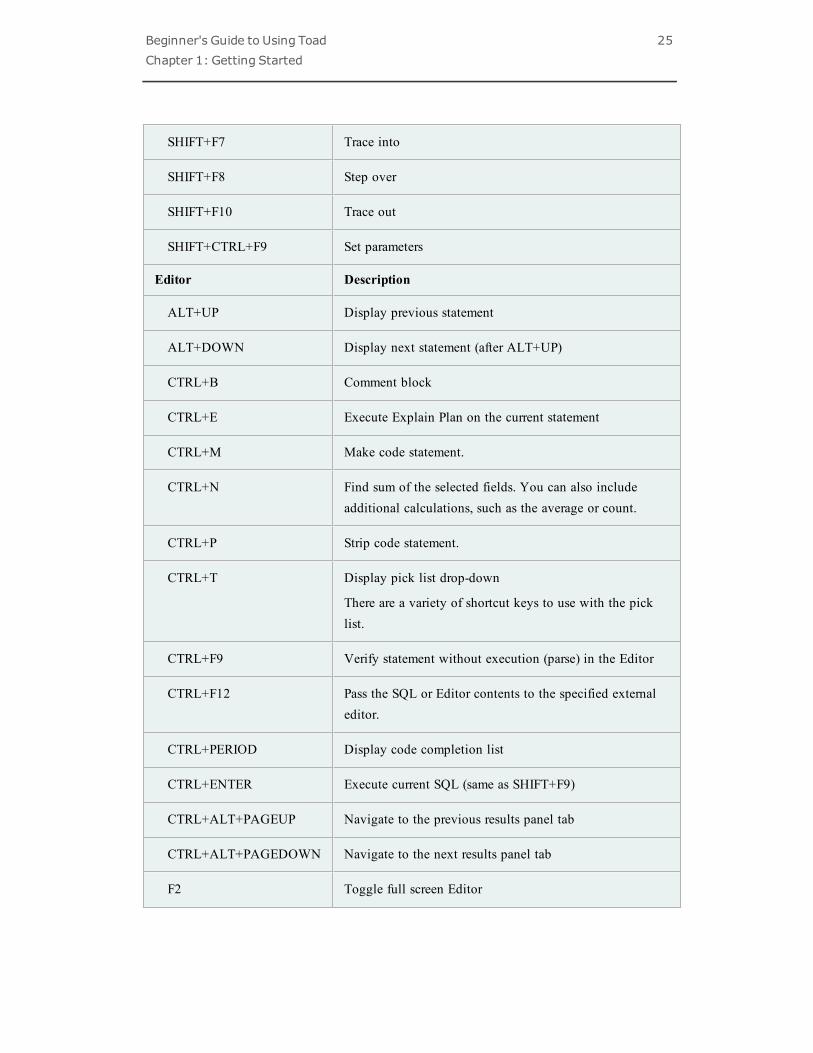
Popular Shortcut Keys
Toad provides dozens of standard shortcut keys, plus you can assign new ones or customize thestandard ones. Toad also allows you to print out your current list of shortcut keys.
General Description
CTRL+D Open Quick Describe window.
CTRL+TAB Cycle through a collection of "child windows" or tabs in awindow
F1 Open the Toad documentation
F4 Immediately describe object in popup window.
F10 Display right-click menu
Debugger Description
CTRL+F5 Add watch at cursor
CTRL+ALT+B Display the PL/SQL Debugger Breakpoints window
CTRL+ALT+D Display the PL/SQL Debugger DBMS Output window
CTRL+ALT+E Display the PL/SQL Debugger Evaluate/Modify window
CTRL+ALT+C Display the PL/SQL Debugger Call Stack window
CTRL+ALT+W Display the PL/SQL Debugger Watches window
F11 Run (continue execution)
F12 Run to cursor
SHIFT+F5 Set or delete a breakpoint on the current line
Beginner's Guide to Using ToadChapter 1: Getting Started
25
SHIFT+F7 Trace into
SHIFT+F8 Step over
SHIFT+F10 Trace out
SHIFT+CTRL+F9 Set parameters
Editor Description
ALT+UP Display previous statement
ALT+DOWN Display next statement (after ALT+UP)
CTRL+B Comment block
CTRL+E Execute Explain Plan on the current statement
CTRL+M Make code statement.
CTRL+N Find sum of the selected fields. You can also includeadditional calculations, such as the average or count.
CTRL+P Strip code statement.
CTRL+T Display pick list drop-down
There are a variety of shortcut keys to use with the picklist.
CTRL+F9 Verify statement without execution (parse) in the Editor
CTRL+F12 Pass the SQL or Editor contents to the specified externaleditor.
CTRL+PERIOD Display code completion list
CTRL+ENTER Execute current SQL (same as SHIFT+F9)
CTRL+ALT+PAGEUP Navigate to the previous results panel tab
CTRL+ALT+PAGEDOWN Navigate to the next results panel tab
F2 Toggle full screen Editor
Beginner's Guide to Using ToadChapter 1: Getting Started
26
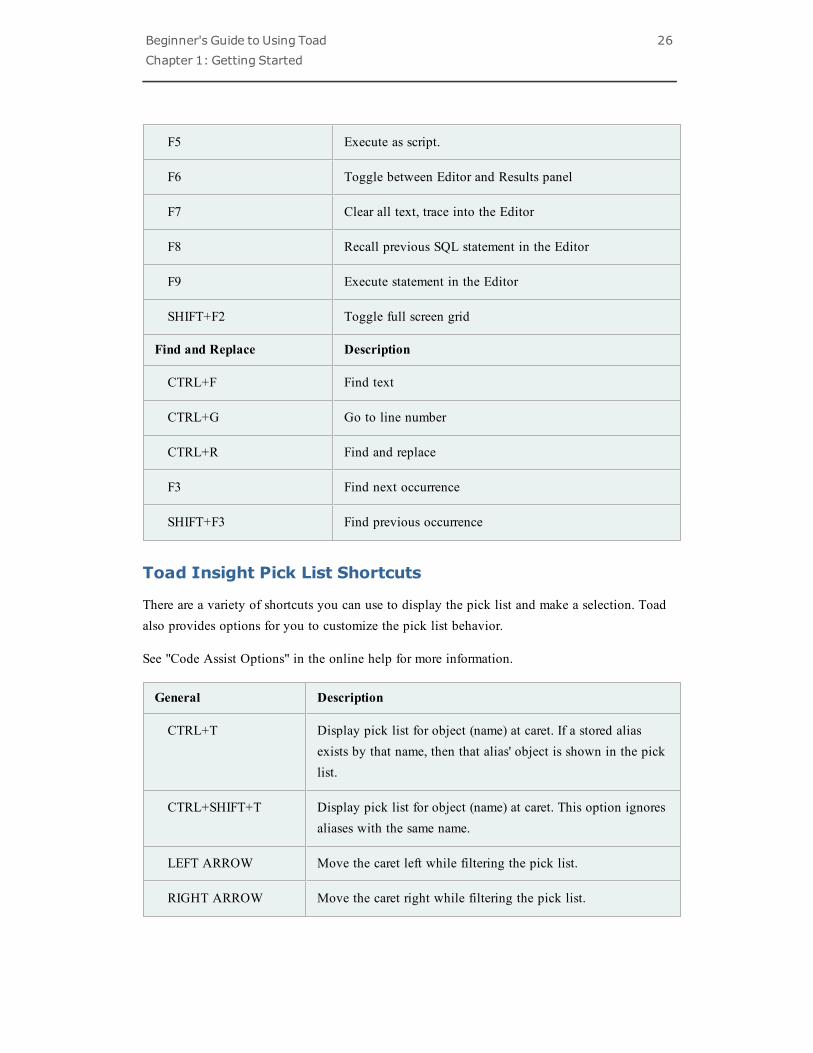
F5 Execute as script.
F6 Toggle between Editor and Results panel
F7 Clear all text, trace into the Editor
F8 Recall previous SQL statement in the Editor
F9 Execute statement in the Editor
SHIFT+F2 Toggle full screen grid
Find and Replace Description
CTRL+F Find text
CTRL+G Go to line number
CTRL+R Find and replace
F3 Find next occurrence
SHIFT+F3 Find previous occurrence
Toad Insight Pick List Shortcuts
There are a variety of shortcuts you can use to display the pick list and make a selection. Toadalso provides options for you to customize the pick list behavior.
See "Code Assist Options" in the online help for more information.
General Description
CTRL+T Display pick list for object (name) at caret. If a stored aliasexists by that name, then that alias' object is shown in the picklist.
CTRL+SHIFT+T Display pick list for object (name) at caret. This option ignoresaliases with the same name.
LEFT ARROW Move the caret left while filtering the pick list.
RIGHT ARROW Move the caret right while filtering the pick list.

Beginner's Guide to Using ToadChapter 1: Getting Started
27
Make Selection Description
Double-click theselection
Insert the selection and close the pick list.
ENTER Insert the selection and close the pick list.
PERIOD Insert the selection and a period after it. The pick list remainsopen and displays child objects, if there are any.
SPACE Insert the selection and a space after it.
TAB Insert the a partial selection if possible and leave the pick listopen; if a partial selection is not possible, insert the selectionand close the pick list.
TAB accepts as much as possible without changing the list ofdisplayed objects. For example, if the pick list displays a list ofcolumns that all start with MY_COL, Toad would insert MY_COL when you press TAB and leave the picklist open. If thecolumns did not have a common preface, Toad would insert theselected column and close the pick list.
(
OPEN PARENTHESIS
Insert the selection and "(" after it.
Close Pick List Description
Click outside the picklist
Close the pick list without making a selection.
ESC Close the pick list without making a selection.
Print List of Shortcut Keys
You can print your list of shortcut keys to use as a reference.
To print the list of shortcut keys
1. Click on the standard toolbar.
Tip: You can also select View | Toad Options.
2. Select Toolbars/Menus | Shortcuts.
Beginner's Guide to Using ToadChapter 1: Getting Started
28
3. Click the Category or Shortcut column to sort the list.
4. Click Print.
Create and Manage ConnectionsToad provides a robust interface for creating and managing connections to your Oracle databases.This is a very general overview of how Toad connects to Oracle databases. Please refer toOracle's documentation for more information on Oracle connections.
About Database Connections
To connect to a database server (referred to as "database"), Toad requires that you have adatabase client ("client") installed on your computer. A client is simply software that accesses thedatabase through a network.
You can have multiple Oracle clients installed on your computer. These client locations are alsoreferred to as Oracle homes, and you can select which one Toad currently uses. Connections aremanaged from the Database Login window.
To access the Database Login window
» Go to Session | New Connection.
See the Release Notes for a complete list of the client and database versions that Toad supports.
Important: It is recommended that your client version be of the same release (or later) as yourdatabase server. This is an Oracle recommendation to prevent performance issues.
Connection Files
The Oracle client installation generally includes connection configuration files that are used tofacilitate communication between your computer and the database. Toad uses the followingconnection configuration files, depending on the connection type you select:
ConnectionFile
Description
SQLNET.ora Specifies configuration details for Oracle's networking software, such astrace levels, the default domain, session characteristics, and theconnection methods that can be used to connect to a database (forexample, LDAP and TNSNAMES). If a method is not listed, you cannot
Beginner's Guide to Using ToadChapter 1: Getting Started
29
ConnectionFile
Description
use it.
Toad uses the SQLNET.ora file for all connection methods, andconsequently you must be able to access this file for any connectionmethod.
TNSNames.ora Defines database address aliases to establish connections to them. Toadmust be able to access the TNSNames.ora file for TNS connections.
Note: If you have multiple Oracle clients installed or want to use aTNSNames.ora file on a network, you may want to use the TNS_NAMESenvironment variable to simplify managing TNS connections.
LDAP.ora Defines directory access information using Lightweight Directory AccessProtocol (LDAP). Toad must be able to access the LDAP.ora file forLDAP connections.
Toad gives you direct access to these files from the Database Login window.
To access the connection file editors
1. From the Toad menu, select Session | New Connection.
2. On the right side, select the editor that you want to open.
3. Press F1 to open the online help for that editor to get more information and to learn aboutthe limitations of the TNSNames editor.
Note: It is recommended that you create a backup file before you make any changes. This assuresthat if something goes wrong you can restore the original settings.
» Click Create Backup File.
Create New Connections
You make and control connections from the Database Login window.
To create a new connection
1. Click in the standard toolbar, or select Session | New Connection, to open the
Database Login window.
Beginner's Guide to Using ToadChapter 1: Getting Started
30
2. Click on the Database Login toolbar. The Add Login Record window displays.
Note: Instead of creating the connection in the Add Login Record window, you candirectly enter the connection information in the Database Login window. However, thismethod forces you to connect to the database, and you cannot enter some of theadditional connection information until after you connect.
3. Complete the User/Schema and Password fields.
4. Select a connection method:
TNS Select a database in the Database field. Toad uses the listings inyour TNSNames.ora file to populate the list.
You can edit the TNSNames.ora file directly in Toad.
Note: If you have multiple Oracle clients installed or want to use aTNSNames.ora file on a network, you may want to use the TNS_NAMES environment variable to simplify managing TNSconnections.
See "Create a Variable for the TNSNames.ora File" in the onlinehelp for more information.
Direct Enter the Host, Port, and either the Service Name or SID of thedatabase to which you want to connect.
LDAP Select the LDAP descriptor in the LDAP Descriptor field. You canedit the LDAP.ora file directly in Toad.
Notes:
l Toad must be able to access the SQLNET.ora file to use any of the connectionmethods. Toad must also be able to access the LDAP.ora file for LDAPconnections and the TNSNames.ora file for TNS connections.
l If Toad cannot connect to one of these files, a red X displays beside the editorbutton for that file. For example, the following image indicates that Toadcannot access the LDAP.ora file. You would have to resolve the issue beforeyou could make an LDAP connection.
5. Complete the remaining fields as necessary.
Beginner's Guide to Using ToadChapter 1: Getting Started
31
Connect as Select the connection privilege level field.
Color Select a color to border windows that use the active connection.
Note: The color displays in all Toad user interface elements that usethe connection, which is very helpful when you have multiple activeconnections.
ConnectUsing
Select the Oracle home.
Note: You can only connect to one Oracle home at a time. This fieldis disabled if you are already connected to a database.
Alias Enter a description or Toad based alias or nickname for theconnection.
By default the alias only displays in the connections grid, but youcan have Toad display the alias instead of the database name. Toenable this option, select View | Toad Options | Windows and selectthe Use alias instead of database checkbox.
ExecuteActionuponConnection
Select to execute an action whenever Toad connects to the database.
Then, click by the Action field to select the action. See
"Automation Designer Overview" in the online help for moreinformation.
You can also select a parameter file.
Note: Toad only executes actions upon connection when you executethrough the user interface. Toad does not execute actions when it isexecuted through command line.
CustomColumns
Complete the custom fields, if you have defined any.
SavePassword
Select to have Toad remember the password for only this connection.
If Save passwords is selected in the Database Login window, thenthis field is selected by default.
AutoConnect
Select to have Toad automatically make the selected connection onstartup.
Favorite Select this checkbox to mark the connection as one of your favorites.You can have the Database Login window only display your
Beginner's Guide to Using ToadChapter 1: Getting Started
32
favorites by selecting Show favorites only at the bottom of thewindow.
Read Only Select this checkbox to make the connection read only, meaning thatyou cannot make any changes to the database. This option isespecially helpful when you want to access data for a productiondatabase but you do not want to accidentally make any changes.
6. Save the login record.
Review the following for additional information:
l To save the record without connecting to the database, click OK
l To save the record and connect to the database, select the Connect checkboxand click OK.
l To save the record and reuse the field values to quickly enter new connections,click Post.
7. Optional: Manage multiple connections.
Import LDAP connections
The Database Browser displays columns for Server, Database, Comments, and Last Connected.
To import from LDAP:
l In the Database Browser, click the folder icon.
l Select Add databases to tree.
Import/Export Connection Settings
You can export your connections settings and import them back into Toad.
This feature is especially helpful when you need to work on a different computer or share thesettings with another person. If you save your connection password, it is encrypted in theexported file.
Note: This feature was introduced in Toad 11, and consequently you can only import these fileswith Toad 11 and later versions.
Beginner's Guide to Using ToadChapter 1: Getting Started
33
To export connection settings
1. Click in the standard toolbar, or select Session | New Connection, to open the
Database Login window.
2. Click on the toolbar.
3. Enter a file name in the File Name field and click Save.
To import connection settings
1. Click on the toolbar.
2. Select the connection settings file and click Open.
The Database Browser displays columns for Server, Database, Comments, and Last Connected.
Note: This feature was introduced in Toad 12.5.
To import from LDAP
l In the Database Browser, click the folder icon.
l Select Add databases to tree.
Automatically Connect on Startup
You can set any saved connection to reconnect when Toad starts. You are notified if aconnection fails, and the status is displayed in the lower window.
To select connections to automatically make when Toad starts
1. Click in the standard toolbar, or select Session | New Connection, to open the
Database Login window.
2. In the connections grid, select the checkbox in the Auto Connect column.
Use Previous Connections
Toad saves your previous connections so you can easily connect to them again. You can alsochange the active connection in open windows.
Note: If your previous connections do not display in the Database Login window, ensure thatthe Show favorites only and Show selected home only fields in the bottom of the DatabaseLogin window are not selected.
Beginner's Guide to Using ToadChapter 1: Getting Started
34
To open a previous connection
» Select one of the following:
l Click in the standard toolbar to open the Database Login window, and
then double-click the previous connection from the grid.
l Click the arrow beside in the standard toolbar, and then select a
connection from the list.
Change Active Connection in Window
You can easily change the connection in an open window to a connection you currently haveopen or a connection that you have recently used.
To change the active connection in a window
» Click the arrow beside in the window toolbar and select an open or recent connection
from the drop-down.
Save Connection Passwords
You can have Toad save all passwords automatically or individually save passwords for selectedconnections. Passwords are saved in an encrypted file called connectionpwds.ini. The encryptionis tied to the currently logged in user profile, and it supports roaming profiles and Citrixinstallations.
Important: To save a connection password, you must connect to the database first, and then youcan save the password in the connections grid.
Note: If the Save Password field is disabled, your ability to save passwords may have beenremoved during installation. See the Toad for Oracle Installation Guide for more information.
To automatically save all passwords
1. Click in the standard toolbar, or select Session | New Connection, to open the
Database Login window.
2. Select the Save passwords checkbox in the bottom of the window.
Beginner's Guide to Using ToadChapter 1: Getting Started
35
To save passwords for individual connections
1. Click in the standard toolbar, or select Session | New Connection, to open the
Database Login window.
2. Clear the Save passwords checkbox in the bottom of the window, if it is selected.
3. Select the Save Pwd checkbox for the connection in the connection grid.
Note: If the connection is not listed in the connection grid, ensure that the Showfavorites only and Show selected home only fields are cleared. If it still does not display,connect to the database again.
4. Enter the password in the Password field on the right.
5. Click Connect.
Commit or Rollback Changes
You can commit or rollback recent changes to the database from the Session menu at any timewhile working with Toad.
Note: You can configure Toad to either automatically commit changes or prompt to commiton exit.
See "Oracle Transaction Options" in the online help for more information.
To commit or rollback your changes
» Select Session | Commit or Session | Rollback.
Tip: You can also right-click the connection in the Connection Bar, and selectCommit or Rollback.
End Connections
You can end single connections or all connections.
To end one connection
» Select Session | End Connection.
Or
Click in the standard toolbar to end the currently active session. You can also
click the arrow by the button to select a different open connection to end.

Beginner's Guide to Using ToadChapter 1: Getting Started
36
To end all connections
» Select Session | End All Connections.
Test Connections
You can easily test connections.
To test connections if the session has dropped
» Select Session | Test Connection (Reconnect) or Test All Connections (Reconnect)
To test connections in the Database Login window
» Select connections in the grid and click Toad opens a new session to test the
connection and lists any errors that occur.
Display Connection and Window Bars
You can use the Window and Connection bars to help you keep track of your open windowsand connections. The active window and connection are selected in the bars (they display with alighter color), which is helpful so you can always tell which connection you are using.
Notes:
l Toad provides a variety of features and options to help you manage multiple openconnections.
l You can rearrange the order of items in the Connection and Window bars. Right-click thebar and select Connection/Window Bar Button Order. Then, use the arrows to determinethe order for items to display. Toad remembers these settings. For example, if you listEditor first, then Editor windows always display in front of other windows (even if theEditor was opened last).
l You can customize the display settings, such as displaying connection strings or allowingthe bars to span multiple lines.
Connection Bar
The Connection bar lists all of the connections that you have open. Right-clicking one of theconnections in the Connections bar gives you helpful options, including:
l Opening a new Editor or Schema Browser window for the connection
l Ending the connection, which closes all windows that use the connection
l Rearranging the order of connections in the Connection bar
Beginner's Guide to Using ToadChapter 1: Getting Started
37
Tip: Select Show All to display connections that are not currently open.
l Committing or rolling back changes
l Viewing a list of all of the windows that use the connection, which you can click tobring the window to the front
To display the Connection bar
» Right-click the file menu area and select Connection Bar.
Window Bar
The Window bar lists all of the windows that you currently have open. Right-clicking one of thewindows in the Windows bar gives you helpful options, including:
l Rearranging the order of windows in the Window bar
Tip: Select Show All to display windows that are not currently open.
l Only displaying windows for the active connection, which can be very helpful when youhave numerous windows open for one connection
Note: To use this feature, right-click a blank area in the Window bar and select ShowButtons for Current Connection.
l Closing all open windows
To display the Window bar
» Right-click the file menu area and select Window Bar.
Color Code the User Interface per Connection
You can use connection colors to help you distinguish between open connections. The colorcoding displays prominently throughout Toad's user interface. For example, you may use red forall production databases and yellow for all test databases.
The color coding displays as follows:
l Any open window related to that connection
l Window and Connection bar buttons
l Status bars
Beginner's Guide to Using ToadChapter 1: Getting Started
38
To select a connection color
1. Click in the standard toolbar, or select Session | New Connection, to open the
Database Login window.
2. Select a color in the Color column in the connection grid.
Manage Oracle Homes
Toad provides much of the same functionality as the Oracle Home Selector.
Select an Oracle Home
Tip: If comparing results in SQL*Plus and Toad for Oracle, confirm they are pointing to thesame Oracle home.
Only one Oracle home can be in use at one time. This means that once a connection is made, allfuture connections will use the same Oracle home, regardless of default home listed for aconnection. If you want to use a different Oracle home for a new connection, you must close allopen connections first.
Default homes can be assigned for a connection or for Toad. When a default Oracle home isassigned to a particular connection, any time you make that connection from the connection grid,Toad automatically uses that Oracle home. When a default Oracle home is assigned to Toad,Toad automatically uses that Oracle home any time you create a connection to a new database.
Note:
l If you have multiple Oracle clients installed or want to use a TNSNames.ora file on anetwork, you may want to use the TNS_NAMES environment variable to simplifymanaging TNS connections.
To select an Oracle home
1. Click in the standard toolbar, or select Session | New Connection, to open the
Database Login window.
2. With no open connections, select an Oracle home in the Connect using field.
Note: To see more information about the home you have selected or change the SID,
NLS_LANG, or SQLPATH, click to open the Oracle Home Editor.
3. To set this as the default Oracle home for all connections, select Make this the Toaddefault home.
Beginner's Guide to Using ToadChapter 1: Getting Started
39
Edit the Oracle Home
You must restart Toad to have changes made here take effect.
To edit the Oracle home
1. Click beside the Connect using box on the Database Login window.
2. Select an Oracle home by clicking on its node. You can then:
l Click Clipboard. This will copy the selected information to the clipboard so youcan past it into an email, or another document.
l Click Advice. This will tell you if you have a proper Net8 installation for thishome, or suggest changes to your installation.
l Right-click and choose to edit one of the following:
l SID for the selected home
l NLS_LANG for the selected home
l SQLPATH for the selected home
Troubleshoot Connections
Problem Description and Possible Solution
Cannot connect toOracle
You must have a full install of a 32-bit version of Net8.Connecting by SQL*Plus is not verification that Net8 isinstalled.
Confirm that the registry setting specifies the correct folderwhere your TNSNames.ora file lives:HKEY_LOCAL_MACHINE\Software\Oracle\TNS_ADMIN
If you cannot connect to Oracle using Toad, your Oracle clientsoftware may not be installed correctly. Re-install the Net8client from the Oracle setup disks. Or, if you have installedOEM, NetAssist, Oracle Lite, or any other Oracle softwarerecently, remove that software and see if you can connect usingToad.
This issue can also be caused by an error in the TNSNames file.
Toad is connecting withthe wrong Oracle Home
The default home that Toad uses matches the one you havechosen in the Oracle Home Selector, unless you havepreviously selected the checkbox: Make this the Toad defaulthome.
Beginner's Guide to Using ToadChapter 1: Getting Started
40
Problem Description and Possible Solution
Only one Oracle home can be in use at one time. This meansthat once a connection is made, all future connections will usethe same Oracle home, regardless of default home listed for aconnection. If you want to use a different Oracle home for anew connection, you must close all open connections first.
Database Login Window
Problem Description and Possible Solution
There's an X besideTNSNames Editor orSQLNet Editor.
Toad can't find the TNSNames.ora file or the appropriateSQLNet file. Make sure they are in the appropriate directory,and that your path points to them.
All of my pastconnections are notvisible in the grid.
Clear the Show favorites only and Show selected home onlyfields in the bottom of the Database Login window.
Toad is/is not saving thepassword for aconnection.
Make sure the Save Password column is selected or cleared asappropriate in the row for that connection. If Toad is saving allpasswords and you do not want them saved, make sure theSave passwords checkbox beneath the grid is cleared.
Note: If the Save Password field is disabled, your ability tosave passwords may have been removed during installation. Seethe Toad for Oracle Installation Guide for more information.
Work with the EditorThe Toad Editor lets you edit many types of statements and code, and Toad provides manyoptions to customize the Editor's behavior.
About the Editor
The Editor attaches itself to the active connection in Toad, but if you do not have a connectionyou can still use it as a text editor. You can also change the schema to execute against from theCurrent Schema toolbar.
Beginner's Guide to Using ToadChapter 1: Getting Started
41
Tips:
l The Editor's right-click menu contains many options to help you work with code. Whenyou are trying to figure out how to do something, try right-clicking the Editor to see if itis available in the menu.
l Select an object and press F4 to display the object's properties.
l Select an object and press SHIFT+F4 to open the Action Console and select from thelisted Actions related to that object.
l If you press CTRL and click a PL/SQL object, the object opens in a new Editor tab. Ifyou press CTRL and click a non-PL/SQL object, the object opens in the DescribeObjects window.
The Editor is organized into the following areas:
Area Description
NavigatorPanel
The Navigator Panel is a desktop panel that displays an outline of the Editorcontents in the active tab. You can click on the items listed to navigate to thatstatement in the Editor. The Navigator Panel is displayed on the left-hand sideby default, but you can change where it is docked.
Editor The main Editor window displays code in separate tabs. You can create tabsfor different bits of code, or different types of code. SQL and PL/SQL can goin the same tab. Toad can tell where the cursor is located and compile PL/SQLor run SQL as required.
Note: If you have multiple statements in the Editor, you must trail them with avalid statement terminator such as a semi-colon.
DesktopPanels
The desktop panels contain many options for tab display, depending on whatkind of code you are working with and what you want to do with it. Inaddition, you can configure how these panels display to make Toad work foryou.
Important Editor Settings
Toad provides many options to let you customize the Editor's behavior. Editor settings arecontrolled from:
View | Toad Options | Editor. The following table describes these options:
Beginner's Guide to Using ToadChapter 1: Getting Started
42
Option Description Navigate
AutoReplace
Lets you set substitution text phrases that correspond toreplacement text. See Auto Replace Substitutions.
View | ToadOptions |Editor |AutoReplace
Codetemplates
Select code template settings. Code templates use a manualkeystroke (CTRL+SPACE) to perform substitutions.
See "Code Completion Templates" in the online help formore information.
View | ToadOptions |Editor |CodeTemplates
Commitafter everystatement
(missing or bad snippet)
Enabling this option makes it very easy to accidentallychange or delete data. It is recommended that you do notselect this option, and you should never have it enabledwhen you are working on a production database.
View | ToadOptions |Oracle |Transactions
Font andsyntaxhighlighting
Select the Editor display font and select syntaxhighlighting settings.
View | ToadOptions |Editor |Font andStyling
Tab stops (missing or bad snippet) View | ToadOptions |Editor |Behavior
Whenclosingconnections
(missing or bad snippet)Selecting Commit makes it very easy to accidentallychange or delete data. It is recommended that you selectPrompt.
View | ToadOptions |Oracle |Transactions
Customize the Editor Layout
You can easily configure which panels display on your Editor desktop and where they display.You can select panels to display one at a time or in groups. When you have configured it, youcan save the desktop with its own name, returning to it whenever the need arises. In addition,
Beginner's Guide to Using ToadChapter 1: Getting Started
43
you can turn on Auto-save current desktop, and however you have the desktop set when youchange tabs or close Toad will be how your desktop is defined the next time you open theEditor.
To display panels one at a time
1. Right-click the Editor and select Desktop.
2. Select the panel you want to display or hide.
To configure your desktop
1. Right-click the panel area near the bottom of the window.
2. Select Desktop | Configure Desktop Layout.
3. Select the panels you want to display in the Show column, and click the drop downmenus in the Dock Site column to change where the panel is docked. By default, allexcept the Navigator will be docked below the Editor.
To save your desktop
1. Click on the Desktops toolbar.
2. Enter the name you want to use for this desktop.
To use a saved desktop
» From the drop-down desktop menu, select the desktop you want to use.
To restore a desktop
» Click the drop-down arrow on and select Revert to Last Saved Desktop or Restore
Default Desktop.
Split the Editor Layout
You can split the Editor to easily compare code revisions.
Tip: To remove the split layout, right-click in the Editor and select Split Editor Layout| Not Split.
To split the Editor
1. Right-click the Editor and select Split Editor Layout.
2. Select Left-Right or Top-Bottom.
Beginner's Guide to Using ToadChapter 1: Getting Started
44
Work with CodeToad provides an intuitive and efficient way to write, run, and test your code. Toad supportsefficient code management for a single developer or a whole team of developers.
Execute Single Statements
You can easily execute a single statement in the Editor. Toad's parser identifies and executes thestatement or compiles the PL/SQL at the cursor.
Note: If you select code and execute, Toad ignores the parser results and executes theportion that is selected. This may cause errors, especially if you select more than onestatement. It is better to place your cursor in the statement you want to execute and letToad select the statement.
This method fetches matching records in batches to improve performance.
Notes:
l Executing a statement can produce editable data.
l Toad provides several options to execute a full script or multiple statements.
l You can easily execute a SQL statement embedded within PL/SQL.
To execute a statement in the Editor
» Place the cursor in the statement and click on the Execute toolbar (F9).
Note: To cancel the execution, click in the Execute toolbar.
Execute Scripts in the Editor
Toad's Execute as script command is generally the best method when you want to executemultiple statements or a script in the Editor. However, there are some important differencesbetween executing scripts and a single statement. For example, executing scripts:
l Does not support bind variables
l Cannot produce editable datasets
l Fetches all matching records at the same time, which may cause it to execute slower anduse more resources than executing a single statement
Beginner's Guide to Using ToadChapter 1: Getting Started
45
If you want to execute a script that may take a long time to run, executing with Toad ScriptRunner may be the best choice. Toad Script Runner is an external execution utility, whichallows you to keep working in Toad while the script executes in the background. See "ExecuteScripts with Toad Script Runner" (page 45) for more information.
Notes:
l Toad does not support all SQL*Plus commands. See "SQL*Plus Commands" in the onlinehelp for more information.
l Linesize in Toad defaults to 80, just as in SQL*Plus. If you want to change this to alonger amount, you can do it using the SET LINESIZE command in your script.
l To load and immediately execute a script file, select Editor | Load and Execute aScript File.
To execute the contents of the Editor as a script
» Click on the Execute toolbar (F5).
Caution: If any changes have been made, the script in the current window isautomatically saved, and then executed as a script.
Note: To cancel the execution, click in the Execute toolbar.
Execute Scripts with Toad Script Runner
Toad Script Runner (TSR) looks and operates the same way as the Toad Editor, but it onlyincludes a subset of the Editor's features. Toad Script Runner is a small script execution utilitythat can run in the background or from the command line. Toad Script Runner can be helpfulwhen you need to run long scripts and want to perform other tasks in Toad. In addition, severalinstances of Toad Script Runner can run at one time because of its small size.
The Toad Script Runner window is divided into the following regions:
l Editor (top)—Displays the script for you to review and edit. You can use the toolbar tosave the script, open a different one, search, manage your connection, and other options.
l Script output (bottom)—Displays the script output and variable settings. See "ScriptOutput Tabs" in the online help for more information.
Notes:
l Toad Script Runner is not completely SQL*Plus compatible; however, most DDL andDML scripts should be supported. See "SQL*Plus Commands" in the online help for more

Beginner's Guide to Using ToadChapter 1: Getting Started
46
information.
l If you change data in the script session, the changes will not reflect in Toad until youcommit the changes in the script session. Also, any session control statements executed inthe script session (such as ALTER SESSION) are not visible to the Toad session.
To execute scripts from Toad in Toad Script Runner
1. Open the script in the Toad Editor.
2. Select Editor | Execute SQL via TSR. Toad Script Runner opens using your currentconnection and executes the script.
Note: You can also click the drop-down beside the icon and select Execute in TSR.
To execute scripts within TSR
1. Open the script in the Toad Script Runner Editor.
2. Click on the Toad Script Runner toolbar.
Change Current Schema
The Current Schema drop-down lets you work with a schema other than the one to which youare connected. This can be useful if, for example, you have tested a SQL statement in your testschema and now want to execute it on several other schemas without disconnecting andreconnecting.
By default, the current schema is set to your current connection. When you use this drop-down,Toad issues an ALTER SESSION SET current_schema command. After you execute, Toadissues the ALTER SESSION SET current_schema command again to return to the originalconnection schema.
Notes:
o You must have the ALTER SESSION system privilege to use this feature. If you do nothave the privilege, the drop-down is disabled.
o Using this feature eliminates the need to prefix every table name with a schema name,and helps to eliminate ORA-00942 “table not found” errors.
To change the current schema
» Select a different schema in the Current Schema toolbar.
Beginner's Guide to Using ToadChapter 1: Getting Started
47
The Current Schema drop-down does not work with script execution or debugging commands.However, because Execute as Script is designed to mimic SQL*Plus, you can use a set schemacommand to change the schema.
To change the schema in scripts
» Include the following command at the beginning of your script:
ALTER SESSION SET current_schema = "USERNAME"
Format Code
You can have Toad format your code in the Editor. You can customize how Toad formats thecode, such as inserting spaces instead of tabs or changing the case for SQL commands.
See "Formatter Options" in the online help for more information.
Note: You can format multiple scripts at one time from the Project Manager. See "Format Files"in the online help for more information.
To format a statement
» Select the statement you want to format and click 'Format Code' on the Editor toolbar,
or select the drop-down arrow to select:.
o Format Case Only,
o Profile Code, or
o Formatter Options (opens the Options window).
To format an entire script
» Click on the Edit toolbar.
Auto-complete Names
The Toad Insight feature helps you write code by displaying a pick list with relevant object orcolumn names. For example, if you start typing SYS and invoke the pick list, the SYSTEM userwould be included in the pick list.
Toad provides options for you to customize Code Insight's behavior, such as adjusting the lengthof time before the pick list displays.
See "Code Assist Options" in the online help for more information.
Beginner's Guide to Using ToadChapter 1: Getting Started
48
To display the pick list
» Press CTRL+T, or begin typing a name and pause 1.5 seconds.
Note: There are additional shortcut keys you can use with Toad Insight.
Extract Procedures
You can extract a procedure from existing code into a new stored procedure or locally definedprocedure.
Creating the new procedure and call depend heavily on the parser to determine which identifiersin the text selection must be declared as parameters in the new procedure. If Toad cannot parsethe code, no extraction occurs.
To extract procedures
1. Select the code you want to extract in the Editor.
2. Right-click and select Refactor | Extract Procedure.
3. Select a procedure type.
Note: If you select stored procedure, you can choose to either include the "CREATE ORREPLACE" in the DDL instead of just "CREATE".
4. Enter the procedure name.
Tip: The new procedure and the resulting procedure call are created an inserted so thatthe code is syntactically correct, but no formatting is done to the code. You can haveToad format the code by pressing SHIFT+CTRL+F.
Comment Out Code Block
These commands add or remove comments from the selected block of text by adding or removing"--" from the beginning of each line.
To comment code
1. Select the code block.
2. Right-click and select Refactor | Comment Block.
Tip: You can also press CTRL+B.
Beginner's Guide to Using ToadChapter 1: Getting Started
49
To uncomment code
1. Select the code block.
2. Right-click and select Refactor | Uncomment Block.
Tip: You can also press SHIFT+CTRL+B.
Find Unused Variables
Toad can find unused variables and identifiers in PL/SQL with code refactoring. If Toad findsunused variables, it displays the variables and lets you jump to the occurrence in the Editor.
Notes:
l Toad only searches the object in the Editor, and does not evaluate other PL/SQL objectsthat may reference it. Be careful when removing unused variables from packagespecifications, because they may be referenced in other PL/SQL that is not searched.
To find unused variables
1. Right-click code in the Editor.
2. Select Refactor | Find Unused Variables.
Rename Identifiers
You can easily rename identifiers (variables, parameters, or PL/SQL calls) for PL/SQL in theEditor with code refactoring.
Notes: Toad only searches the PL/SQL object in the Editor. Be careful when renaming identifiersin package specifications, as they maybe be referenced in other PL/SQL that is not searched.
To rename identifiers
1. Right-click an identifier in the Editor and select Refactor | Rename Identifier.
2. Enter the new name in the Name field.
Debug PL/SQLYou can debug PL/SQL, SQL scripts, and Java in Toad.
Notes:

Beginner's Guide to Using ToadChapter 1: Getting Started
50
l There are minimum Oracle database requirements for using this feature.
l The debugger is not designed to work with word-wrapped lines, since the Editor willthen have a different set of line numbers than what is stored in Oracle. Toad provides awarning message about this if you open the procedure Editor while word-wrapping isenabled. To disable word-wrap, select View | Toad Options | Editor | Behavior andclearWord wrap.
l Toad's documentation includes tutorials on how to debug.
Debugging in Toad requires you to select one type of debugging at a time for all databaseinstances open per instance of Toad. For example, if you have three database connections inone instance of Toad, they must all be in the same debugging state. If you then openedanother instance of Toad, with the same or different connections, they could be in a differentdebugging state.
DBMSDebugger
Debugs PL/SQL. Using the Debugger, you can set breakpoints, watches, andsee call stacks. In addition, you can view DBMS output.
Note:When using the PL/SQL Debugger and connecting to a RAC instance,you must have the TNSNAMES entry for the instance with the server directedthe use connection or session here. Or, you must connect directly to aninstance of the cluster without letting the server assign an instance.
ScriptDebugger
Debugs SQL scripts. You can set breakpoints, run to cursor, step over, traceinto, and halt execution of your scripts.
AttachExternalSession
External debugging allows you to debug PL/SQL that is run from an externalsession, such as another Toad window, SQL*Plus, or any other developmenttool which calls Oracle stored procedures.
You can also use Toad's Auto Debugger, which automatically inserts DBMS_OUTPUT.PUT_LINE statements into the DDL. Once you compile the code and inspect the contents of theDBMS_OUTPUT buffer, you can remove all instances of DBMS_OUTPUT.PUT_LINE with theclick of a button. See "Automatically Insert DBMS_OUTPUT Statements (Auto Debugger)" inthe online help for more information.
Compile with Debug Information
To use the debugger fully with PL/SQL or Java packages, you need to compile your object withdebug information. If you have not compiled with debug information, in databases in versionsbefore 10g you can step into a unit, step over and so on, but you cannot see watches unless the
Beginner's Guide to Using ToadChapter 1: Getting Started
51
object is compiled with debug. In a 10g database you cannot step into code or step over unlessthe object was compiled with debug. You can only execute.
In addition, if you are debugging an object that has dependent objects, you cannot step into thedependents unless they, too, are compiled with debug information.
See "Dependencies and References" in the online help for more information.
To enable compile with debug
» Click on the main toolbar or select Session | Toggle Compiling with Debug.
Note: You can have Toad enable Toggle Compiling with Debug by default foreach new session.
See "Execute and Compile Options" in the online help for more information.
Start Debugging
You can debug PL/SQL objects in the Editor. When you open a complete package or type in theEditor, the spec and body open in separate tabs by default. However, Toad provides options tocontrol how objects are split, reassembled, and saved.
To start the Debugger
1. Open a PL/SQL object in the Editor.
2. Click on the main toolbar or select Session | Toggle Compiling with Debug. This
enables debugging.
3. Compile the object on the database.
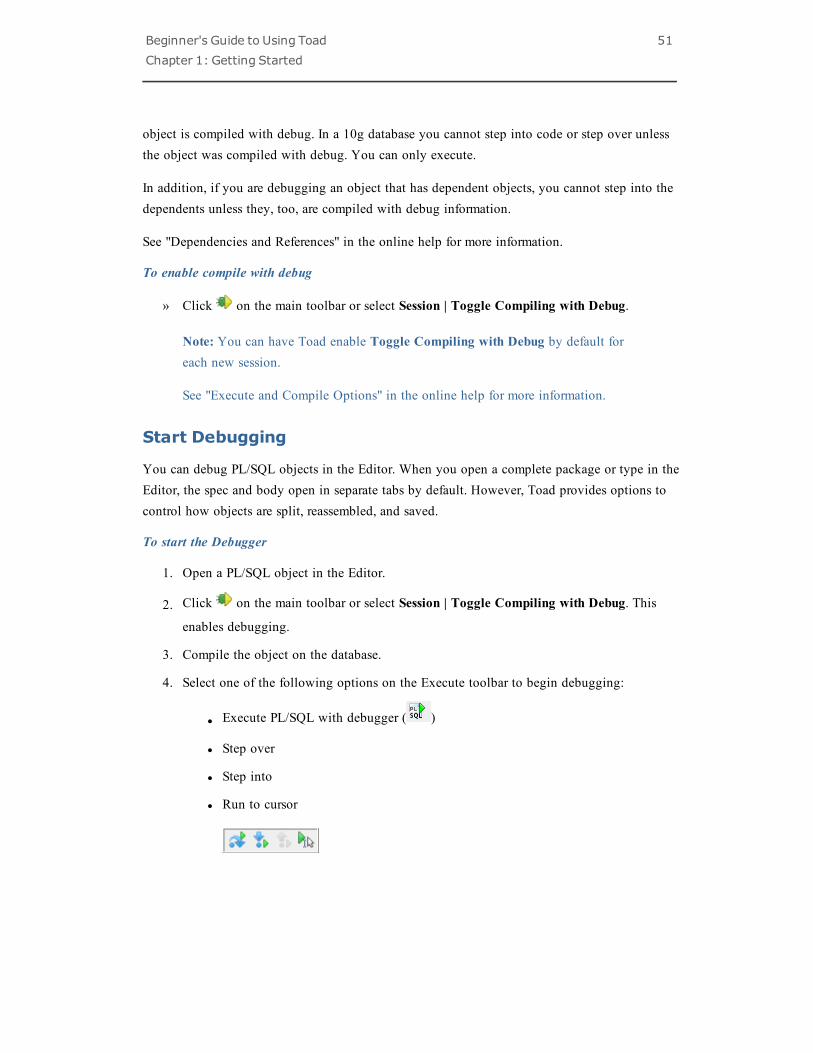
4. Select one of the following options on the Execute toolbar to begin debugging:
l Execute PL/SQL with debugger ( )
l Step over
l Step into
l Run to cursor
Beginner's Guide to Using ToadChapter 1: Getting Started
52
View DBMS Output
Oracle provides a specifically designed package called DBMS_OUTPUT with functions fordebugging PL/SQL code. It uses a buffer that your PL/SQL code writes into and then a separateprocess queries the buffer out and displays the contents.
You must enable DBMS Output before executing the PL/SQL. In Toad, output displays afterthe procedure has completed execution, not while you are stepping through the code. In nestedprocedure calls, all procedures must have run to completion before any DBMS Output contentis displayed.
Troubleshooting
If you do not see DBMS Output, try the following suggestions:
l Right-click the lower pane and select Desktop | DBMS Output.
l Make sure the Toggle Output On/Off button is on ( ) in the DBMS Output tab. Then, set
the interval in the Polling Frequency box. If the toggle is on, Toad periodically scans forand displays DBMS Output content.
l Contact your Oracle DBA to make sure the DBMS_OUTPUT package is enabled onyour database.
Debug External Sessions
This feature is extremely useful when the external session calls a stored procedure with complexparameters, such as cursors, that are not easily simulated from Toad. Rather than trying tosimulate the complex environment within Toad, you can simply connect to the externalapplication and then debug the code in its native environment.
To debug an external session
1. Prepare the external session:
a. Disable server output on the external session by executing the followingcommand:
set serveroutput off
Note: If server output capture is enabled, Oracle freezes on calls to the DBMS_OUTPUT package.
b. Execute the following command:
id = dbms_debug.initialize('TOAD')
Beginner's Guide to Using ToadChapter 1: Getting Started
53
dbms_debug.debug_on;
where TOAD can be replaced by any ID string.
c. Execute the PL/SQL.
2. Attach to the external session and begin debugging in Toad:
a. In the Editor, connect to the same database instance as the external application.
b. Compile the PL/SQL with debug enabled. See "Start Debugging" (page 51) formore information.
c. Select Debug | Attach External Session.
d. Enter the ID specified in the initialize statement (in step 1b) and click OK. Toadbegins debugging the procedure called from the external session.
Troubleshoot External Debugging
There may be cases where the debug ID is set incorrectly, or some other error may hang thedebugger. In this case it is necessary to clear out any open debug pipes from the database.
Pipes may be viewed in the V$DB_PIPES dynamic view, and removed with the followingprocedure when executed as SYS:
CREATE OR REPLACE PROCEDURE drop_pipe (p_pipename IN VARCHAR2)
AS
x NUMBER;
BEGIN
x := SYS.DBMS_PIPE.remove_pipe (p_pipename);
DBMS_OUTPUT.put_line (
'Drop Pipe ' || p_pipename || DECODE (x, 1, ' SUCCESS', ' FAILED'));
END;
/
Ensure that debugging in the external session has been disabled. After the external applicationfinishes execution, it should execute the command:
dbms_debug.debug_off
Otherwise, all subsequent PL/SQL that this application submits for execution will be run indebug mode. This causes the application to hang until Toad attaches to it again.
Beginner's Guide to Using ToadChapter 1: Getting Started
54
Work with Database ObjectsIn Toad you use the Schema Browser to work with database objects. For completeinformation about the Schema Browser, see the Toad online help. Press F1 to get contextinformation and help.
About the Schema Browser
The Schema Browser allows you to view, add, and modify database objects. It also displaysdetailed information about a selected object. For example, the detailed information for a tableincludes its subpartitions, columns, indexes, data, grants, and so on.
Notes:
l Some Schema Browser features may not be available unless you have the commercialversion of Toad with the DB Admin Module.
l You can set the Schema Browser to open automatically when a new connection is made.Select View | Toad Options | Windows and select the Auto Open checkbox of theSchema Browser row.
The Schema Browser is divided into two panes to help you review objects and their details:
Pane Description
List of objects(left-hand side)
The left-hand side of the Schema Browser provides a list of objects thatyou can view. In general, you select a schema and an object type, andthe list refreshes to display the relevant objects. You can filter the objectsand save your filters for future use. See About Schema Browser Filters formore information.
The list can display additional information about the objects, such as thetablespace and number of rows. To view additional information, right-click a column in the left-hand side and select additional columns todisplay. (This feature is unavailable with the tree view display.)
Tip: In drop-down mode, you can hide leading characters of objectnames in the left-hand side. Right click a column and select Hideleading characters of name. The display resets when you change theschema or connection.
Object details(right-hand
The right-hand side initially displays the same list of objects as the left-hand side. When you select an object on the left-hand side, Toad
Beginner's Guide to Using ToadChapter 1: Getting Started
55
Pane Description
side) displays its details in the right-hand side. This format makes it easy foryou to compare details between objects of the same type.
Note: You can use Toad's Describe Objects feature to display an object'sdetails in a new window. The Describe Objects window displays thesame information you would see in the right-hand side of the SchemaBrowser.
From the Schema Browser you can drop most objects, enable/disableapplicable objects, and disable triggers for a table or for an entire schema.You can recompile procedures, functions, packages, triggers, and views,or they can be extracted from the database and loaded into the clipboardor Editor.
Tips:
l To reset the right-hand side to mirror the list of objects on the left-hand side, click
in the toolbar or select multiple objects on the left-hand side.
l Many of the panes within the Schema Browser have icons to identify the objects. Toview an icon legend, click on the Schema Browser toolbar.
l Many of the objects and panes have enhanced right-click menus. Right-click anobject or its details to see what options are available.
Toad also provides dozens of options to further customize the display and behavior of theSchema Browser. Select View | Toad Options | Schema Browser to view the options.
Customize the Schema Browser
These customization features will help you work more efficiently.
Select the Left-Hand Side Display Style
You can customize how the Schema Browser displays to better suit the way you work. The mostcommon customization is to change how object types display in the left-hand side. Once youselect a basic display style, you can rename, hide, or rearrange the object types on the left-handside and detail tabs on the right-hand side.
Tips:
l To hide the right-hand side of the Schema Browser, press F12. You can press F12 again todisplay it again.
Beginner's Guide to Using ToadChapter 1: Getting Started
56
l To hide or display images and tips in the left-hand side, click in the Schema Browser
toolbar and select the appropriate option.
l In drop-down mode, you can hide leading characters of object names in the left-hand side.Right click a column and select Hide leading characters of name. The display resetswhen you change the schema or connection.
To select the left-hand side display style
1. Click in the Schema Browser toolbar.
2. Select one of the following options:
Drop-down Displays object types in an alphabetical drop-down field.
Tabbed(single row oftabs)
Displays object types as a single line of tabs. You must scrollthrough the tabs to view all object types.
Tabbed(multi linetabbed)
Displays multiple rows of tabs instead of the scroll bar.
Tree view Displays object types in a tree view.
Note: You may need to close any open instances of the Schema Browser for the newbrowser style to display.
Customize Schema Browser Tabs
The Schema Browser displays object types on the left-hand side and detail tabs on the right-handside. You can rename, rearrange, and hide the object types that display in the left-hand side orthe tabs on the right-hand side.
To customize tabs and object types
1. Click on the Schema Browser toolbar.
2. Select Configure LHS Object Types to customize the left-hand side, or select ConfigureRHS Tabs to customize the right-hand side.
3. Customize the display settings.
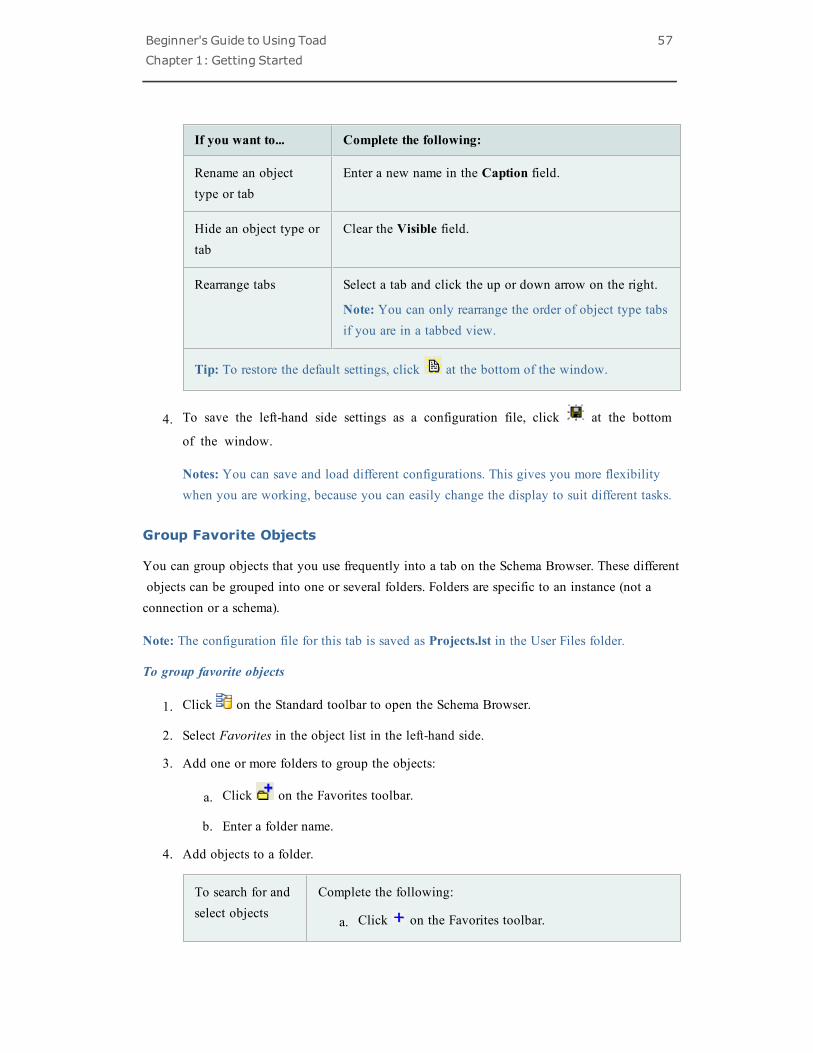
Beginner's Guide to Using ToadChapter 1: Getting Started
57
If you want to... Complete the following:
Rename an objecttype or tab
Enter a new name in the Caption field.
Hide an object type ortab
Clear the Visible field.
Rearrange tabs Select a tab and click the up or down arrow on the right.
Note: You can only rearrange the order of object type tabsif you are in a tabbed view.
Tip: To restore the default settings, click at the bottom of the window.
4. To save the left-hand side settings as a configuration file, click at the bottom
of the window.
Notes: You can save and load different configurations. This gives you more flexibilitywhen you are working, because you can easily change the display to suit different tasks.
Group Favorite Objects
You can group objects that you use frequently into a tab on the Schema Browser. These differentobjects can be grouped into one or several folders. Folders are specific to an instance (not aconnection or a schema).
Note: The configuration file for this tab is saved as Projects.lst in the User Files folder.
To group favorite objects
1. Click on the Standard toolbar to open the Schema Browser.
2. Select Favorites in the object list in the left-hand side.
3. Add one or more folders to group the objects:
a. Click on the Favorites toolbar.
b. Enter a folder name.
4. Add objects to a folder.
To search for andselect objects
Complete the following:
a. Click on the Favorites toolbar.
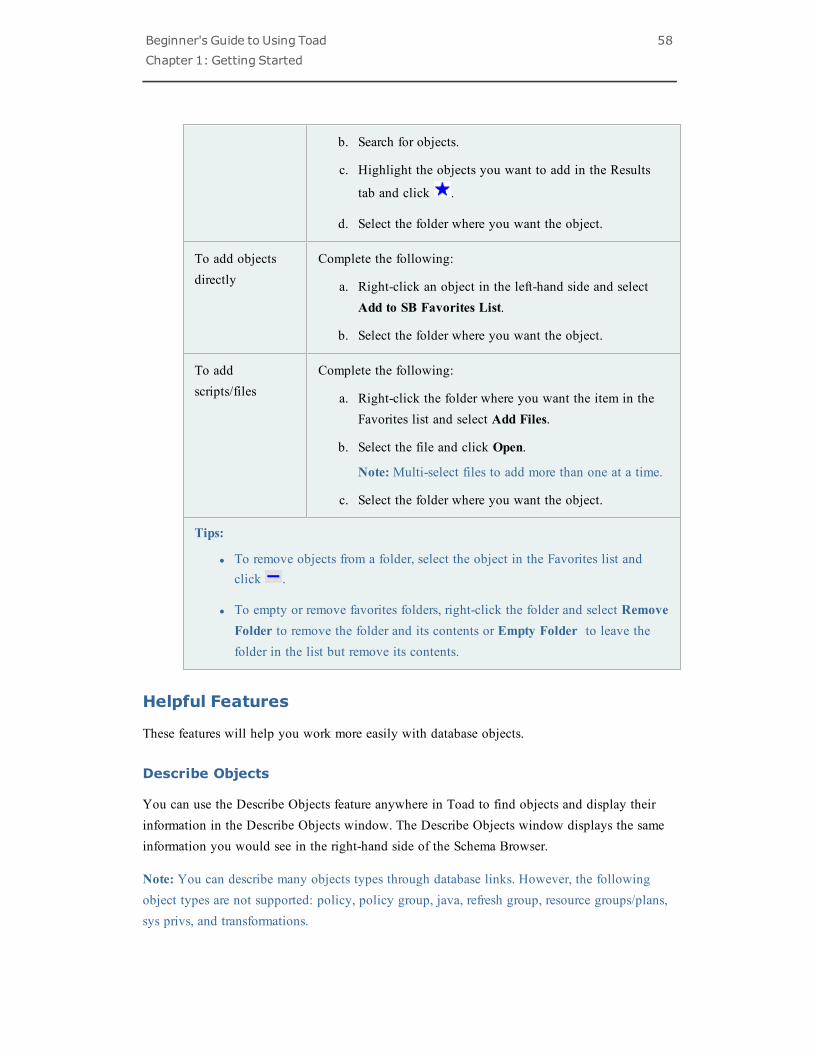
Beginner's Guide to Using ToadChapter 1: Getting Started
58
b. Search for objects.
c. Highlight the objects you want to add in the Results
tab and click .
d. Select the folder where you want the object.
To add objectsdirectly
Complete the following:
a. Right-click an object in the left-hand side and selectAdd to SB Favorites List.
b. Select the folder where you want the object.
To addscripts/files
Complete the following:
a. Right-click the folder where you want the item in theFavorites list and select Add Files.
b. Select the file and click Open.
Note: Multi-select files to add more than one at a time.
c. Select the folder where you want the object.
Tips:
l To remove objects from a folder, select the object in the Favorites list andclick .
l To empty or remove favorites folders, right-click the folder and select RemoveFolder to remove the folder and its contents or Empty Folder to leave thefolder in the list but remove its contents.
Helpful Features
These features will help you work more easily with database objects.
Describe Objects
You can use the Describe Objects feature anywhere in Toad to find objects and display theirinformation in the Describe Objects window. The Describe Objects window displays the sameinformation you would see in the right-hand side of the Schema Browser.
Note: You can describe many objects types through database links. However, the followingobject types are not supported: policy, policy group, java, refresh group, resource groups/plans,sys privs, and transformations.
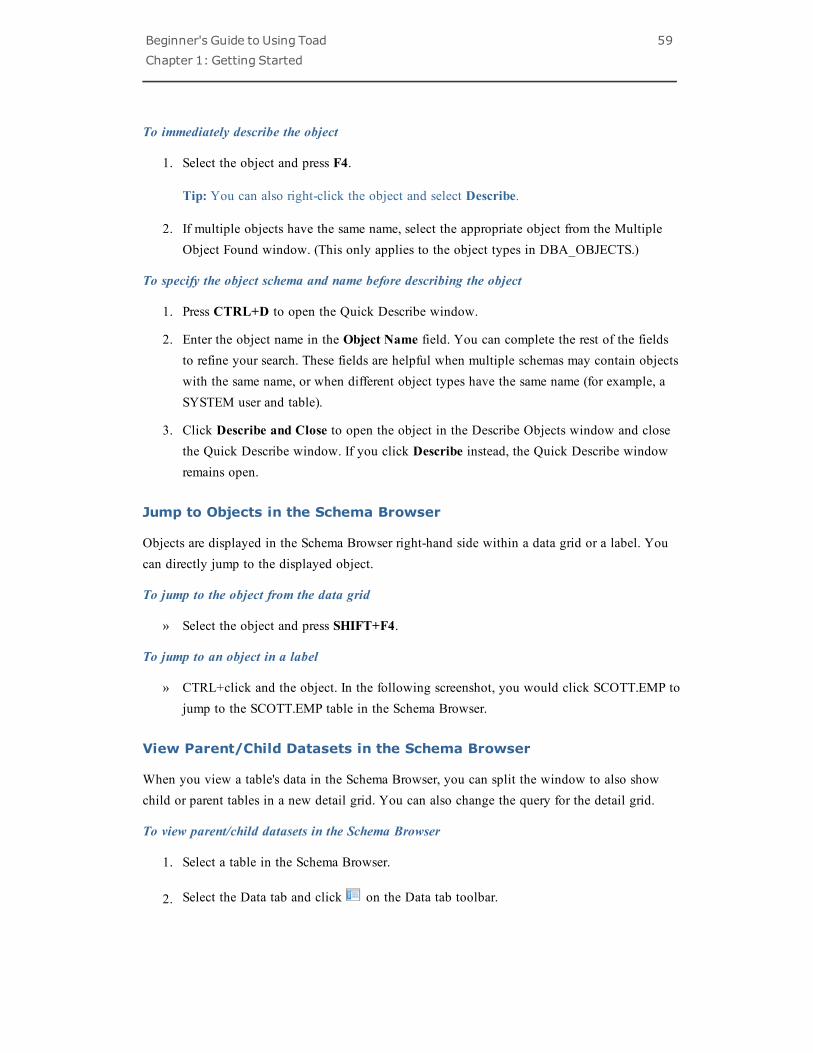
Beginner's Guide to Using ToadChapter 1: Getting Started
59
To immediately describe the object
1. Select the object and press F4.
Tip: You can also right-click the object and select Describe.
2. If multiple objects have the same name, select the appropriate object from the MultipleObject Found window. (This only applies to the object types in DBA_OBJECTS.)
To specify the object schema and name before describing the object
1. Press CTRL+D to open the Quick Describe window.
2. Enter the object name in the Object Name field. You can complete the rest of the fieldsto refine your search. These fields are helpful when multiple schemas may contain objectswith the same name, or when different object types have the same name (for example, aSYSTEM user and table).
3. Click Describe and Close to open the object in the Describe Objects window and closethe Quick Describe window. If you click Describe instead, the Quick Describe windowremains open.
Jump to Objects in the Schema Browser
Objects are displayed in the Schema Browser right-hand side within a data grid or a label. Youcan directly jump to the displayed object.
To jump to the object from the data grid
» Select the object and press SHIFT+F4.
To jump to an object in a label
» CTRL+click and the object. In the following screenshot, you would click SCOTT.EMP tojump to the SCOTT.EMP table in the Schema Browser.
View Parent/Child Datasets in the Schema Browser
When you view a table's data in the Schema Browser, you can split the window to also showchild or parent tables in a new detail grid. You can also change the query for the detail grid.
To view parent/child datasets in the Schema Browser
1. Select a table in the Schema Browser.
2. Select the Data tab and click on the Data tab toolbar.
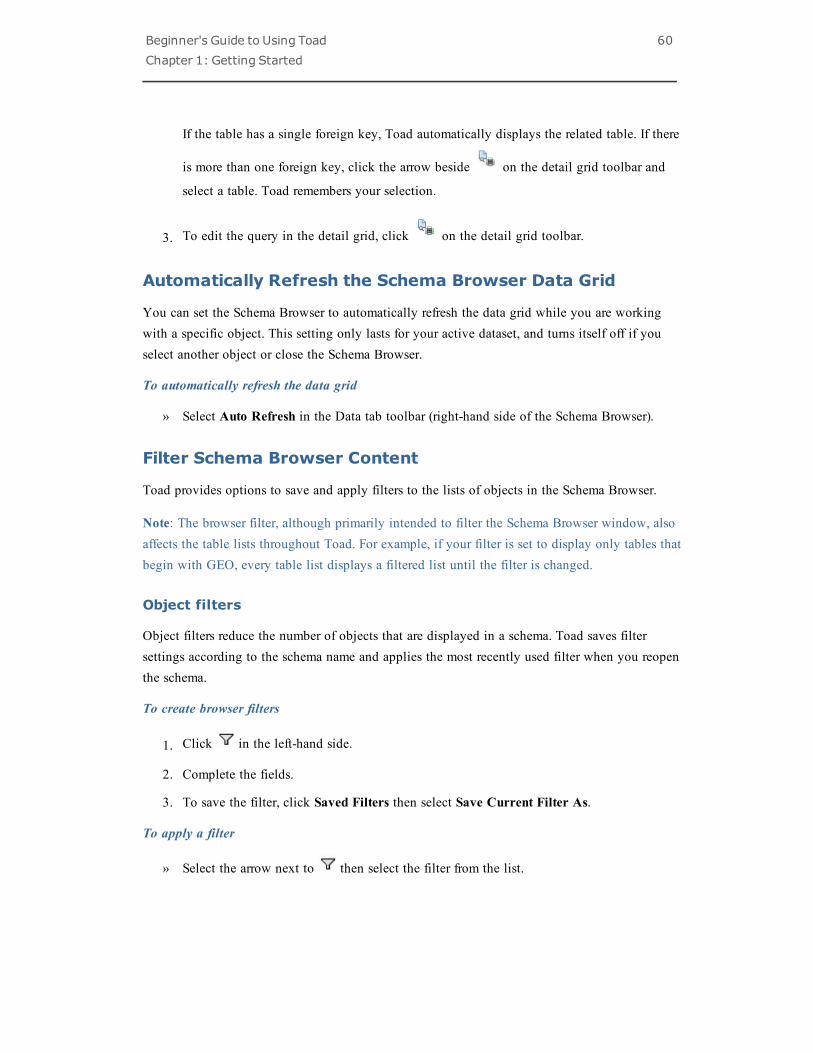
Beginner's Guide to Using ToadChapter 1: Getting Started
60
If the table has a single foreign key, Toad automatically displays the related table. If there
is more than one foreign key, click the arrow beside on the detail grid toolbar and
select a table. Toad remembers your selection.
3. To edit the query in the detail grid, click on the detail grid toolbar.
Automatically Refresh the Schema Browser Data Grid
You can set the Schema Browser to automatically refresh the data grid while you are workingwith a specific object. This setting only lasts for your active dataset, and turns itself off if youselect another object or close the Schema Browser.
To automatically refresh the data grid
» Select Auto Refresh in the Data tab toolbar (right-hand side of the Schema Browser).
Filter Schema Browser Content
Toad provides options to save and apply filters to the lists of objects in the Schema Browser.
Note: The browser filter, although primarily intended to filter the Schema Browser window, alsoaffects the table lists throughout Toad. For example, if your filter is set to display only tables thatbegin with GEO, every table list displays a filtered list until the filter is changed.
Object filters
Object filters reduce the number of objects that are displayed in a schema. Toad saves filtersettings according to the schema name and applies the most recently used filter when you reopenthe schema.
To create browser filters
1. Click in the left-hand side.
2. Complete the fields.
3. To save the filter, click Saved Filters then select Save Current Filter As.
To apply a filter
» Select the arrow next to then select the filter from the list.
Beginner's Guide to Using ToadChapter 1: Getting Started
61
Quick filter
The QuickFilter is a client-side filter, so it filters all Schema Browser object lists without re-querying the database. This filter works in conjunction with the existing browser filters.
To use QuickFilter
» On the left side of the Schema Browser, enter a filter string in the QuickFilter field (lookfor a field containing a single asterisk).
You can use wildcard characters at any point in your filter. You can use wildcard characters atany point in your filter. Use any of these wildcards:
Wildcard Purpose
* or% Multi-character substitutions
? and _ Single character substitutions
! Exclude any characters that follow this mark.
See the online help for more information on quick filtering.
Notes:
l You can use multiple filters by separating them with a semicolon. For example, A*;B*.
l Right-click the QuickFilter field to view and use up to 25 of your most recentQuickFilters.
Clear filters
Clearing a filter removes its effect on the current display of objects but does not deleteit from Toad.
To clear filters on the left-hand side
» Click the arrow beside then select Clear Filter and choose a filter action.
To clear data grid filters in the Schema Browser
» Click on the Schema Browser right-hand side.
Object Search
Object Search searches all database objects, table columns, index columns, constraint columns,trigger columns, and procedure source code for a user entered phrase. Each of the previously

Beginner's Guide to Using ToadChapter 1: Getting Started
62
listed items can be searched or excluded from the search by using options.
To access Object Search
» Do one of the following:
l From the main toolbar, click .
l From the Search menu, select Object Search
To create an object search action
» Cick on the Automation Designer, DBMisc tab.
Search Term
Specify your search term in the box. You can select to search for an exact match, starts with,occurs anywhere, and you can specify a case-sensitive search by selecting that box.
Object Status
If desired, you can limit your search to Valid or Invalid objects. The default choice is tosearch both.
Specifying your Search
The object search is an extremely powerful feature. You can search for almost anything orcombination of things you can conceive.
By default, Toad searches through all objects in the schema you specify to find the search termyou enter.
You can limit your search to:
l Schemas
l Object names
l Column Names
l Source
l Any combination of these
Schemas to Search
Select the schemas you want to search. You can right-click in this area to select all, invert yourselection, and otherwise control your selection options.
Beginner's Guide to Using ToadChapter 1: Getting Started
63
Search Object Names
When the search object names box is selected, you can select object types from the object list.You can right-click in this area to select all, invert your selection, and otherwise control yourselection options.
Note: Currently the DB Admin module is required to search the following objects: Contexts,Dimensions, Directories, Evaluation Context, Library, Operators, Policies, Policy Groups,Profiles, Refresh Groups, Resource Plans, Rules, Rule Sets, Scheduler Chains, Scheduler Jobs,Scheduler Job Classes, Scheduler Programs, Scheduler Schedules, Scheduler Windows, SchedulerWindow Groups, and Tablespaces.
Search Column Names
When the search column names box is selected, you can select object types with columns fromthe list. You can right-click in this area to select all, invert your selection, and otherwise controlyour selection options.
Source Search
The Search Source area of the window uses the Oracle INSTR function to determine if the searchterm exists in a given object's source. Because of this, when performing a Source Search, thesearch always searches as if the search team has specified Occurs anywhere, regardless of what isselected in the Search term area.
Use Query Templates
Toad has standard query templates, such as Show Dependent Objects or Column Counts,and you can also create your own custom query templates. When you use a query templatein the Schema Browser, Toad builds the query with the selected objects and opens thequery in the Editor.
To use a query template
1. Click on the Standard toolbar to open the Schema Browser.
2. Select the objects you want to use for the query on the left-hand side.
3. Right-click the objects and select Custom Queries | <Query Name>.
Custom queries are designed to select from the data dictionary about the tables you select, ratherthan making custom SELECT statements. For example, the following query is not valid as acustom query because there is no specific object stated:
select * from <ObjectOwner>.<ObjectList>>

Beginner's Guide to Using ToadChapter 1: Getting Started
64
However, this more specific query is valid:
select *
from dba_tables
where owner = <ObjectOwner>
and table_name in <ObjectList>
To create a new query template
1. Right-click in the left-hand side of the Schema Browser and select Custom Queries | EditCustom Queries.
2. Click above the query list.
3. Enter your new query name, and query.
4. Click to create the query and add it to the selection list.
Work with Data GridsThroughout Toad, information is presented in a grid format. Within grids, you can customize gridviews, filter result sets, print the grid contents, and other standard operations. Grids that providequery results have additional functionality. In most data grids you can edit data, performcalculations on grid cells, and sort and group data, among many other things.
Work with Editable Resultsets
A data grid is fully editable providing that the query itself returns a resultset that can be updated.Query statements must return the ROWID to be editable. For example:
Not Editable Editable
select * from employee select employee.*, rowid from employee
You can substitute EDIT for SELECT * FROM. Toad translates it into the editable version of thestatement. For example, edit employee returns the same result as select employee.*, rowid
from employee.
Note: If the resultset should be editable but remains read only, make sure the Use read-onlyqueries checkbox is not selected on the Data Grids | Data options page.
Beginner's Guide to Using ToadChapter 1: Getting Started
65
To post edited data
1. Make changes to an editable resultset in the data grid.
2. Click in the grid navigator.
To revert edited data
» Click in the grid navigator.
To insert a blank row
» Click on the data grid toolbar.
To copy an existing row
» Right-click the cell you want to copy and select Duplicate Row. If you have a sequenceset, then the sequence number advances when you finish editing.
To delete a row
» Click on the data grid toolbar.
Sort and Group Data
If the query does not contain an "Order By " command, you can sort the grid manually. You canalso group data by column header.
To sort by column
1. Click a grid column header.
2. Select the appropriate option, and click Apply.
To group by column
» Drag the column header into the area above the grid.
View a Single Record
You can view an individual record from a data grid. This feature presents the information in aformat that is easy to view and edit, which is very helpful when the record contains long orcomplicated information.
To view a single record
» Right-click the grid and select Single Record Viewer.
Beginner's Guide to Using ToadChapter 1: Getting Started
66
Tip: Click to edit the display options, such as the sorting order and alignment.
Filter Data
Filters reduce the amount of data displayed and let you display only what you want to see. Theywork by modifying the query used to fetch the data. If you frequently search for the same criteria,you can save the filter for reuse.
To filter data
1. Right-click the data grid and select Filter Data.
2. To change the grouping clause, click AND to select a different option.
3. Click press the button to add a new condition.
4. To change the column, click the listed column and select a new one. The first column inthe grid is selected by default.
5. To change the condition, click equals and select the appropriate condition (LIKE,EQUAL TO, LESS THAN, and so on).
6. Click <empty> and add your criteria.
7. To add additional conditions or groupings, click Filter and then select Add Conditionor Add Group.
Toad automatically uses Excel style filtering in its data grids.
To use Excel-style filtering
1. Hover over a column heading to display the drop-down arrow.
2. Click the arrow and select a filter.
3. If you selected (Custom), specify the filter criteria.
Edit Data in Popup Editor
You can view and edit data in a Popup Editor. This feature is helpful when there is too muchdata to view in the data grid.
Note: The dataset must be editable for you to make any changes.
To edit data in the Popup Editor
» Right-click a cell in the data grid and select Popup Editor.
Beginner's Guide to Using ToadChapter 1: Getting Started
67
Use an External Editor
You can use an external editor of your choice, and copy the text to the external editor, edit thetext, and bring the results back into Toad.
To set up your External Editor
1. Select View | Toad Options | Executables.
2. Navigate to and select the executable for the external editor in the Editor field.
To open text in External Editor
» Select Edit | Load in External Editor (CTRL+F12).
Note: If you have not saved the contents of the Toad Editor to a file, Toadprompts for a filename before launching the external editor.
To return to Toad from the External Editor
1. Save the file from the external editor and then close it.
2. Open Toad and load the file.
Note: Toad prompts you to reload the contents of the file only if the Prompt forreload on activation if timestamp has changed option is selected on the Editor |Open/Save page.
Access the Calculator
You can access a calculator within Toad data grids. To use the calculator, the table mustbe editable.
To access the calculator
1. Click in a numeric cell. A drop-down arrow displays.
2. Click the arrow to display the calculator.
Perform Calculations on Grid Cells
You can perform basic calculations on grid cells, such as finding the sum or average of theselected cells.
Note: This feature is not available if Row Select is enabled. To disable Row Select, right-clickthe grid and clear the Row Select option.
Beginner's Guide to Using ToadChapter 1: Getting Started
68
To perform calculations on grid cells
1. Select adjacent cells in the grid.
Note: Calculations on non-adjacent cells is not supported.
2. Click in the grid toolbar (CTRL+N). The calculations display in a new row
below the grid.
Tip: You can also right-click the grid and select Calculate Selected Cells.
3. To include additional types of calculations (such as the average or count), click the arrow
by and select the appropriate options.
Anchor Column in Data Grid
You can anchor a column on the left side of the data grid (also referred to as locking, fixing, orfreezing the column). This can make it easier to track information you must scroll through a largeamount of content.
Note: Row numbers automatically display as fixed columns. With the exception of row numbers,fixed columns remain editable.
To anchor a column
» Right-click a column and select Fix Column.
To remove the column anchor
» Drag it to the right of the bold fixed column divider bar.
Preview Selected Column
You can display or hide a full row below each data row that shows the value of theselected column.
To preview current column
» Right-click the column in the Data grid and select Preview Column.
Hide Columns
You can hide columns from the data grid after running a query.
Beginner's Guide to Using ToadChapter 1: Getting Started
69
To select columns to display
1. Click in the upper left corner of a data grid.
2. Clear the checkbox by the column name.
Tip: To sort the column list alphabetically, right-click the column list and select SortAlphabetically.
BLOB Editor
In the SQL Results panel, a BLOB or ORABLOB entered in a column field indicates that aBLOB resides in that field. If BLOB or ORABLOB is entirely in capital letters, it indicates thatthe field is not null. These words in initial caps (Blob; Orablob) indicate that the field may benull, or the BLOB not initialized. You can edit a BLOB in Toad.
To edit a BLOB
» Do one of the following:
l From the data grid of a table containing a LONG RAW or BLOB datatypecolumn, right-click the field and select the Popup Editor.
l From a create/alter table window, LONG RAW or BLOB datatype, click
in the LOB column of the grid.
Date Editor
You can use the date editor to change the date, select the date format, null the date, or null thetime. You can navigate through records as in the Text Editor, and post or cancel the edit.
To access the date editor
» Double-click in a data grid cell containing a date.
To change the date
» Click the drop-down beside the date and select the correct date from the popup calendar.
To change the date format
» Select or clear the Long date format checkbox.
To null the date or time
» Click beside the appropriate information.
Beginner's Guide to Using ToadChapter 1: Getting Started
70
To enter the SYSDATE
» Click SYSDATE.
View BFILE data
You can View BFILE data. A cell with BFILE information contains the word BFILE. Inaddition, another column is added to the grid to show the BFILE directory.
To view BFILE data
» Right-click a cell in the data grid and select Popup Editor.
View Nested Table Data
A cell in the results grid that contains nested data will display as "DATASET".
To view nested table data
» Right-click a cell in the data grid and select Popup Editor.
View VARRAY Data
You can View and edit VARRAY data. A cell with VARRAY information contains theword VARRAY.
Note: The memo editor displays the first 100 entries in the VARRAY.
To view VARRAY data
» Right-click a cell in the data grid and select Popup Editor.
View Object Data
You can view and edit object data. A cell containing object type data displays the data inparentheses, delimited by commas.
Note: You can edit nested object types, but you will not be able to edit attributes of certaintypes, such as a nested table, or a CLOB.
To view and edit object data
» Right-click a cell in the data grid and select Popup Editor.
Beginner's Guide to Using ToadChapter 1: Getting Started
71
View CURSORs
Queries that run with CURSORs display results in the data grids. The cell with the cursordisplays the word CURSOR.
To view CURSORs
» Right-click a cell in the data grid and select Popup Editor.
Note: Data can only be displayed once per cell each time the query is run. Oncethe data is displayed, it is lost until the query is run again.
Example
SELECT m.ename, CURSOR (SELECT e.ename
FROM scott.emp e
WHERE e.mgr = m.empno) employees
FROM scott.emp m
WHERE job = ‘MANAGER’
Online OptionsToad provides tools that help you access your data remotely, move more smoothly betweeninstances of Toad, and share your Oracle and Toad wisdom with others.
MyToad
MyToad is a Web application you can use to store files using your Dropbox account, view themvia the Web, and choose which ones to execute remotely. To execute scripts remotely, yourclient Toad does not have to be running, but MyToadMonitor.exe does. If you have multipleToad installations, you can select the machine to execute the scripts.
You can execute scripts using your mobile device, just as you would from your computer. Thesetup is the same for both.
Data is encrypted using 256-bit AES encryption.
To set up MyToad
1. Go to View | Toad Options| Online.
2. Check Enable MyToad then click OK. The Toad for Oracle Cloud Monitor icon isdisplayed on your taskbar.
Beginner's Guide to Using ToadChapter 1: Getting Started
72
3. Complete the Initial Setup steps. If you don't see the Initial Setup dialog, click theMyToad Monitor icon on your taskbar.
4. Register with Dropbox or sign in if you have an account and click Allow to let Toad forOracle connect with your Dropbox account.
5. Go to mytoad.toadworld.com and sign in.
6. Click Allow to let Toad for Oracle connect with your Dropbox account.
7. Complete the information for the script that you want to run.
l Enter or select database information.
l Select an uploaded script or enter an ad hoc query on the Query tab, such as:select * from all_users;
l Click Execute.
l View the results. (The number of scripts executed will display when complete.)Optionally, you can enter your email address and/or mobile phone number to benotified of results.
Note: The interface differs between a mobile device and a computer, but there are scriptexecution and results pages on both device types.
Proxy settings are available online from Toad World when you create a new account, or from theToad toolbar:
View | Toad Options | Online | Proxy Settings
or
Help | Toad World | Sign In or Register | Proxy Settings
Toad World Repository
You can use the Toad World Script Repository to share your scripts and see those of other Toadusers in this worldwide script library.
To access the Repository, port 3306 on your network must be open.
You can also set up a private script repository.
Note: You can toggle between the Private and Toad World Repositories in Options | Online |Script Repository.
Beginner's Guide to Using ToadChapter 1: Getting Started
73
To access scripts in the Toad World Script Repository:
1. Go to Options | Online and select Toad World under Script Repository. Click OK.
2. On the Editor toolbar, click the 'Open file' button and click Repository (Public).
3. Agree to the terms of use and then sign in or register in the Toad World Sign In dialog.
The Open dialog contains existing files.
4. Select a file and see related tabs for Details, Preview, and Comments.
5. Right-click a file to like or dislike (under Ratings), bookmark, mark it as inappropriate,and see user details.You can also:
o Search for files in the repository by author, contents, description, keywords,and tags
o Create collections to store frequently-used scripts. Add and remove files tocollections by right-clicking the files and selecting Add to Collection.
o Export repository scripts to your local machine: right-click and select Save files to.
6. Double-click an item or click Open to open the file in Toad's Editor.
To add your script to the Toad World Script Repository:
1. Open a script in your Editor.
2. Click the 'Save as' button on the Editor toolbar.
3. In the Save As dialog, click Repository (Public), and:
o Type your file name and description.
o Choose the Type (Script, Document, or Other).
o Select a Collection to add it to (or create a new one); optional.
o Click the ellipsis button next to File Tags to select related tagsand click OK.
o Enter a Description.
o Click Save to upload your file to the Toad World Script Repository.
To install a private repository:
1. Go to Options | Online and select Private under Script Repository.The set-up wizard opens.
Beginner's Guide to Using ToadChapter 1: Getting Started
74
o Select Connect to an existing private repository if one is already installed, enterthe password that was established and click OK.
o Or select Create a new private repository in <database name> and click Next.Note: You must be logged in as SYS.
o If you pass the checklist (see below), click Next.
o Complete the wizard - establish passwords for the specified schemas, and a "from"email address.
o Click Execute.The repository is now ready to use.
o Share the password for TOADCLOUD_USER and TNSNAMES information witheveryone who is to connect to the repository.
2. Reset your password as prompted after you receive the initial email.
To add your script to the Private Script Repository:
1. On the Editor toolbar, click the 'Save file' or 'Save as' button and clickRepository (Private).
2. You will be prompted to create a user the first time you access this repository.
To change the 'Save As' or 'Open File' selection
» To change the 'Save As' or 'Open File' selection to Repository (Public), go to Options |Online | Script Repository and select Toad World.
» To revert to the standard Windows-style Open and Save As dialogs, go to Options |Online | Script Repository and select Disabled.
Refer to these additional details.
Set-up wizardoption
Description
Change emailsettings...
Allows you to update email server settings.
Drop existingprivaterepository...
Completely removes the repository from the database.
The following You must pass these validations:
Beginner's Guide to Using ToadChapter 1: Getting Started
75
must be true... l Oracle version must be 10g or newer
o The repository makes use of dbms_crypto and some SQLconstructs that were not available until 10g.
l Must be logged in as SYS
o Installation of the repository will create:
o a profile
o a scheduler job
o a job class
o four schemas
o a variety of objects in some of those schemas
o It will also grant privileges on DBMS_CRYPTO andeither UTL_SMTP or UTL_MAIL (depending on Oracleversion) to some of these schemas.
l SYS.UTL_SMTP or SYS.UTL_MAIL must be installed
o The database will send emails containing temporarypasswords to users.
o For Oracle 10g and 10gR2, this is performed via UTL_SMTP. For Oracle 11g, UTL_MAIL is used instead.
l CTXSYS schema must be installed
o Toad can search for files in the repository that containcertain keywords.
o Files are stored as CLOBs in the repository. The use ofthe CTXSYS.CONTEXT index type makes these searchesmuch more efficient.
l Repository is not already installed
o This confirms a repository is not accidentally installedwhen one is already in place.
If a requirement is not met, Toad will indicate which one. Rectify thatitem and restart the set-up process.
Temporary andDefault
Specify default and temporary tablespaces for the four schemas installed,listed below.
Beginner's Guide to Using ToadChapter 1: Getting Started
76
tablespace
Schemas &passwords
Create passwords for the schemas that are created automatically:
l TOADCLOUD_BG_USER
o This schema has a scheduler job to check in theTOADCLOUD_DATA schema for emails that need to besent, and it sends them.
l TOADCLOUD_CODE
o This schema is locked
o It only has DML privileges on the tables in theTOADCLOUD_DATA schema.
l TOADCLOUD_DATA
o This schema is locked
l TOADCLOUD_USER
o This schema can do nothing more than connect to thedatabase and execute the procedures in theTOADCLOUD_CODE schema.
Email / SMTPServer
Toad sends emails with temporary passwords when users are created.
Sync User Files
You can sync files with a Dropbox account.
- Each copy of Toad you have can be set up to use a single set of application data files.
- Backup - Dropbox provides a secure, online storage mechanism.
- Versioning - Dropbox automatically versions every file stored in it. You can rollback to an earlier version of a data file.
To sync user files
Go to View | Toad Options | Online | Enable user files syncing
Beginner's Guide to Using ToadChapter 2: ToadWithout Code
77
Chapter 2: Toad Without CodeThere is an enormous amount of functionality that you can use in Toad without ever writing orusing a single line of SQL or PL/SQL. This chapter explains some basic features and functions.
Manage Objects 77
Use the Master Detail Browser 84
Import and Export Data 88
Compare Data, Objects, and More 105
Automate Processes and Manage Projects 119
Manage ObjectsToad provides an intuitive, feature-rich interface for managing database objects.
Create Objects
Toad lets you select Oracle object parameters and generate a DDL statement to create or alterobjects. It is generally a good idea to review the DDL statement before executing it. When youexecute the statement, Toad passes it to the database, and the object is created or altered.
The options to create or alter an object in Toad follow the parameters defined by Oracle. If youneed clarification on what an option means or how it should be used, see Oracle's documentationfor more information. Oracle provides detailed documentation about objects, including theirpurpose, properties, and restrictions.
Notes:
l Toad strictly adheres to the database security. Consult your DBA to learn whatprivileges you have.
l You can also find detailed information about parameters in Knowledge Xpert.Knowledge Xpert is an extensive Oracle technical resource which you can search in theJump search.
l You can use an existing object as a template when creating a new one.
Beginner's Guide to Using ToadChapter 2: ToadWithout Code
78
To create an object
1. Click on the Standard toolbar to open the Schema Browser.
2. Select the object type in the left-hand side and click .
Note: You can also create an object by selecting Database | Create | <Object type>.
3. Complete the fields as necessary.
4. To add the object to the Project Manager, select Add to PM.
5. To view the CREATE statement, click Show SQL or select the SQL tab.
6. Click OK or Execute to create the object immediately. You can also schedule the scriptto run later.
Note: To alter or edit an object, double-click it in the Schema Browser. You can alsopress F2 to rename an object (if it can be renamed).
Copy Objects to Another Schema
You can copy objects to another schema.
To copy objects to another schema
1. Click on the Standard toolbar to open the Schema Browser.
2. Right-click the object you want to copy in the left-hand side and select Create inanother schema.
3. Select export settings and click OK.
4. Enter the destination connection and destination schemas.
5. To review the script to create the objects, click the Script tab.
6. Click Execute.
Beginner's Guide to Using ToadChapter 2: ToadWithout Code
79
Create new objects from existing ones
You can use an existing object as a template for creating a new object. Toad loads the originalobject's properties in the Create window for you to edit as necessary and execute.
Note: This feature is not available for all object types.
To create an object based on an existing one
1. Click on the Standard toolbar to open the Schema Browser.
2. Right-click the object you want to use as a template in the left-hand side and selectCreate Like.
3. Complete the fields as necessary.
4. To view the CREATE statement, click Show SQL or select the SQL tab.
5. Click OK or Execute to create the object immediately. You can also schedule the scriptto run later.
Drop (Delete) Objects
Many objects can be dropped directly from the Schema Browser. Once you confirm the drop, itcannot be reversed.
Note: If you accidentally drop a table on Oracle 10g or later, you may be able to recover it fromthe recycle bin.
To drop objects
» Select an object in the left-hand side and click in the toolbar or press DELETE.
Tables have additional options:
CascadeConstraints
Deletes all foreign keys that reference the table.
Purge Bypasses the recycle bin and completely drops the table.Purged tables cannot be recovered.
Flashback Tables (Recover Dropped Tables)
In Oracle version 10g and later, a recycle bin is available to retrieve tables and associated objects(such as indexes, constraints, and triggers) you have dropped from the database. From the SchemaBrowser's Recycle Bin page you can access this bin and retrieve dropped tables if necessary.
Beginner's Guide to Using ToadChapter 2: ToadWithout Code
80
To flashback a table
1. Click on the Standard toolbar to open the Schema Browser.
2. Select the Recycle Bin in the left-hand side.
3. Select the table you want to recover from the list and click .
4. Restore the table with the original name or a new one.
Rebuild Multiple Indexes, Tables, or LOB Segments
The Rebuild Multiple Objects feature allows you to simultaneously rebuild multiple indexes,tables, or LOB segments.
To rebuild multiple objects
1. Select Database | Optimize | Rebuild Multiple Objects.
2. Select the Indexes, Tables, or LOB Segments tab.
3. Click the arrow beside to load objects.
4. To quickly eliminate objects that do not need to be rebuilt:
a. Select the Thresholds and Performance Options tab, and complete the Considerobjects for rebuild only if fields.
b. Select the tab where you the loaded objects.
c. Click the arrow beside and select Delete rows for items that fail consideration
thresholds.
5. To have Toad recommend indexes to rebuild:
a. Select the checkbox beside indexes you want to examine.
b. Select the Thresholds and Performance Options tab and complete the Markindexes for rebuild only if fields.
c. Select the Indexes tab and click .
Tip: You can click to automatically rebuild the recommended indexes, or click
to generate a rebuild script for the recommended indexes (the script is copied
to the clipboard and you can paste it into the Editor).
6. Complete the other tabs as necessary. Review the following for additional information:
Beginner's Guide to Using ToadChapter 2: ToadWithout Code
81
ThresholdsandPerformanceOptions
Use the following option to...
Use'Online'option
Have Toad rebuild or move the table or index while it is in use.
StorageClauseAdjustments -Extents Tab
Use the following option to...
ChangeExtentSizes to theFollowing
Change the extent sizes, which overrides any options set in the toppart of the window.
If you opt to use this feature, make sure you examine the indexbefore you use it. Because the percent used is a factor, this valuecan only be obtained by examining the indexes. Note that this isnot the PCTUSED storage parameter. This refers to the actualpercentage of allocated storage space for the index being used.
AdjustExtentSizes toMinimize #of Extents
Minimize the number of extents. When this option is selected, thenew extent size for each index is calculated as follows: workingsize equals the total size multiplied by the percent used.
This working size is then passed through the Make extent this sizeor Round All Extent Sizes to the Nearest Power of... algorithm, asselected. The resulting value is the new initial_extent size. It is alsothe new next_extent size. Pctincrease is set to zero.
Caution: If some indexed tables are used as large temporary tablesbut are usually empty, Toad may recommend that you rebuild thembecause they have zero percent used. If you use Adjust ExtentSizes during the rebuild, Toad would build the index with smallextents that may not hold all of your data later. Avoid this byeither using global temporary tables, or do not rebuild indexes witha percent used of zero.
StorageClause
Select options to move all objects to different tablespaces, orselectively dependent upon their size.
Beginner's Guide to Using ToadChapter 2: ToadWithout Code
82
Adjustments -TablespacesTab
l If you choose to move indexes to a tablespace based uponthe size of the index, and have chosen By Index Size on theExtents tab, size is based on the total size of the index.
l If you choose to move indexes to a tablespace based uponthe size of the index, and you have chosen By Extent Sizeon the Extents tab, then the size is based on the INITIALextent size, as opposed to the NEXT extent size.
EmailNotifications
Select whether to send email notifications after completion. Theemail is sent to the recipients defined on the Email Settings optionspage.
See "Email Settings" in the online help for more information.
7. Select the checkboxes for objects to rebuild and click to rebuild them immediately or
to create a rebuild script (the script is copied to the clipboard and you can paste it
into the Editor).
Rebuild an Index
This procedure explains how to rebuild a single index or table, but you can rebuild multipleindexes and tables at the same time.
To rebuild an index or table
1. Click on the Standard toolbar to open the Schema Browser.
2. Right-click the index in the left-hand side and select Rebuild Index.
3. Select parameters as necessary.
Note: The parameters in this window are defined by Oracle. See Oracle's documentationfor more information. You can also find detailed information about parameters inKnowledge Xpert. Knowledge Xpert is an extensive Oracle technical resource which youcan search in the Jump search.
4. To view the ALTER statement, select the SQL tab.
5. Click Execute.
Rebuild a Table
Use this function to rebuild a table, including dropping and renaming columns.
Notes:
Beginner's Guide to Using ToadChapter 2: ToadWithout Code
83
l You can simultaneously rebuild multiple tables with the Rebuild Multiple Objectsfeature.
l You must own the schema in order to rebuild a table from it.
To rebuild a table
1. Click on the Standard toolbar to open the Schema Browser.
2. Right-click the table in the left-hand side and select Rebuild Table.
Tip: You can also select Database | Optimize | Rebuild Table.
3. Select settings as necessary on the Options tab.
4. Select parameters as necessary on the Table Storage and Index Options tabs.
5. To drop a column, double-click a column on the Columns tab.
Note: To rename a column, click to select it, wait until after the mouse double-click time,then click it again. Enter the new name for the column.
6. To view the ALTER statement, select the SQL tab.
7. Click .
Copy Data to Another Schema
You can quickly copy data from one or multiple tables to the same table or tables in anotherschema or database. Toad builds insert statements that use array binding in the variables to copythe data. If you set the array size to 500, then 500 rows are inserted with a single insertstatement. The array size is adjustable.
Note: Toad copies data from one schema to another between tables that have the same tablename. The tables must exist prior to running this command.
To copy data to another schema
1. Select and right-click one or more tables in the Schema Browser.
2. Choose Copy data to another schema from the menu.
3. Click the Source/Dest and Options tab to select destination connection, schema,and options.
4. To add a WHERE clause, select the Where Clauses tab and define Where clauses.
Beginner's Guide to Using ToadChapter 2: ToadWithout Code
84
Tip: You can check your query by clicking Test Query.
5. Click to execute, or save or schedule the selections as a Toad action.
View and Modify Object Privileges
The Privileges window allows you to view, grant, and revoke privileges on a database object.You can view all users and their privileges. If you are not the object owner, you can only grantprivileges if you have been given the "grant option."
To access the Privileges window
1. Click on the Standard toolbar to open the Schema Browser.
2. Select a table, view, sequence, or procedure on the left-hand side.
3. Click on the left-hand side toolbar. Grants are highlighted in blue and admin
grants in yellow.
Tip: If you do not see all users, make sure Hide privileges granted by other users orHide users/roles with no privileges assigned is not selected.
Configure Grantees
From the System Privileges window you can grant or revoke selected privileges to/from aselected user. In addition, you can do the same to a selected role or roles.
To grant or revoke a privilege
1. Click on the Standard toolbar to open the Schema Browser.
2. Select a privilege (listed under Sys Privs) and click .
3. Check or clear the appropriate boxes to grant or revoke privileges to users or roles.
Use the Master Detail BrowserThe Master/Detail browser enables you to work with data from multiple tables, snapshots, viewsor queries that are linked by foreign keys or a user-defined master-detail relationship.
Beginner's Guide to Using ToadChapter 2: ToadWithout Code
85
Master/Detail Browser
Use the Master/Detail browser to view or edit data from multiple tables, snapshots, views orqueries linked by foreign keys or a user-defined master-detail relationship. This is typical of adatabase setup from an Entity/Relationship diagram, where one table's objects are related toanother table's objects by a linking field or fields.
For example, you could start with the DEPARTMENT table, and display details. Select adepartment record in the Master grid, and the detail grid will display employee records for thatdepartment only. If multiple tables are linked by foreign keys, you can add additional detailsbeneath the first.
To access the Master/Detail Browser
» From the Database menu, select Report | Master/Detail Browser.
Navigator
To the left of the Master Detail Browser is the Master Detail Navigator. As you add detail tables,they are added to the navigator under the original table. Using the navigator can make it mucheasier to control very detailed sets of master/details.
Within the navigator, you can hide or display the schema name and delete detail nodes.
You can use the navigator to find the grid for a specific detail table.
To find a detail
» In the Navigator, click on the node for the detail you want to view.
Note: In the Master Detail browser, the grid for that detail flashes in thelower grid pane.
Single Grid Mode
You can set Toad to display only one grid at a time by checking the Single Grid Mode box onthe Master/Detail toolbar. Use the navigator to select which grid you want to see.
Generating XML Output
You can generate XML output from a master-detail relationship. From the master-detail grids,you can send a query to the Editor that will generate the output. Output will be created in XMLForm, one XML document per row.
Beginner's Guide to Using ToadChapter 2: ToadWithout Code
86
This feature is available only in Oracle 9iR2 and newer, and when the Master-Detail relationshipconsists of one master and one detail.
To generate XML output
1. From the Master Detail browser, open or create a relationship that consists of one Masterand one detail.
2. Right-click on the master grid, and select Send XMLGEN Query to Editor.
3. Switch to the Editor window in Toad.
4. Execute the query to generate XML output.
Toad creates an XML document for each row in the master dataset, with each XMLdocument containing all corresponding detail rows.
To save XML output to disk
1. Right-click on the Editor grid and choose Export BLOBs (longs, raws).
2. Select the XMLDATA column from the Export this Column drop down.
3. Enter or select a directory where you want the files stored in the Export Path box.
4. Select the method of naming your files:
l Use sequentially numbered files
l Export to files named for the value in this column (select the column)
5. Click OK.
Selecting the Master Object
Before you can add details, you first need to select the master object for the relationship view.
To select a master object
1. From the Database | Report menu, select Master Detail Browser.
2. In the Type box, select the type of object you want to use.
3. In the owner box, select the schema that contains the object.
4. In the Name box, select the name of the object.
The grid populates with the contents of your selected object.
Adding Detail Datasets
You can easily add detail datasets to a master grid, or to a detail grid.
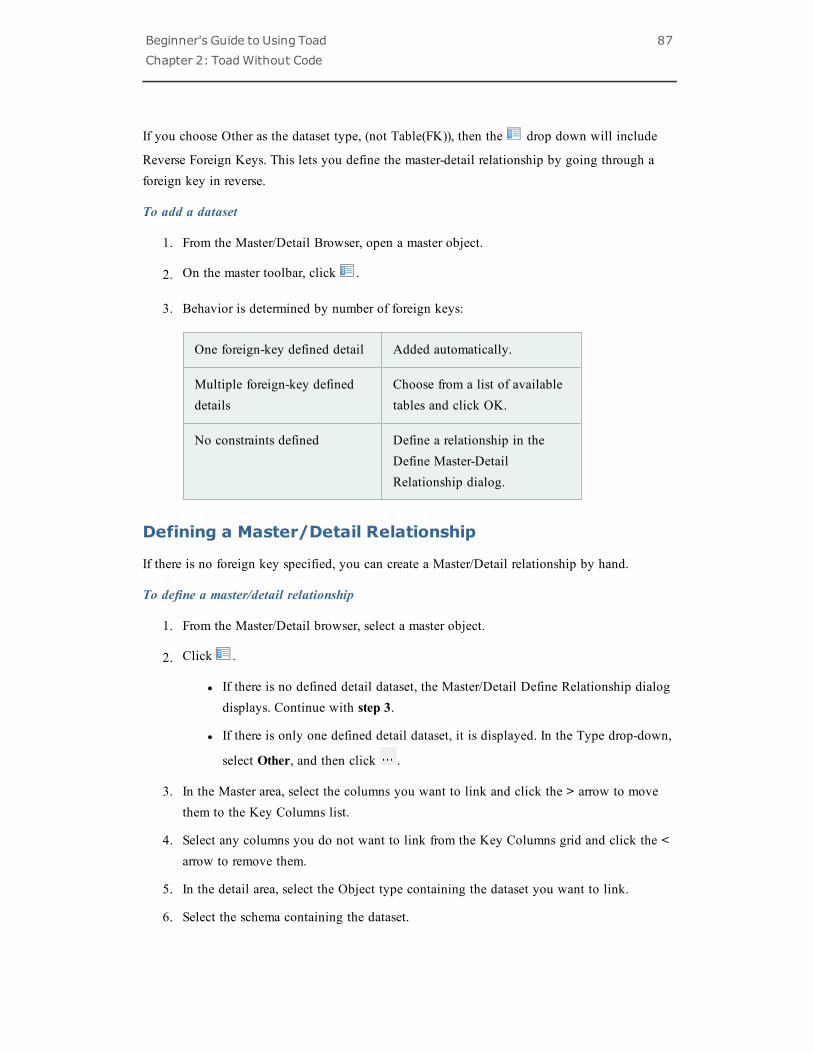
Beginner's Guide to Using ToadChapter 2: ToadWithout Code
87
If you choose Other as the dataset type, (not Table(FK)), then the drop down will include
Reverse Foreign Keys. This lets you define the master-detail relationship by going through aforeign key in reverse.
To add a dataset
1. From the Master/Detail Browser, open a master object.
2. On the master toolbar, click .
3. Behavior is determined by number of foreign keys:
One foreign-key defined detail Added automatically.
Multiple foreign-key defineddetails
Choose from a list of availabletables and click OK.
No constraints defined Define a relationship in theDefine Master-DetailRelationship dialog.
Defining a Master/Detail Relationship
If there is no foreign key specified, you can create a Master/Detail relationship by hand.
To define a master/detail relationship
1. From the Master/Detail browser, select a master object.
2. Click .
l If there is no defined detail dataset, the Master/Detail Define Relationship dialogdisplays. Continue with step 3.
l If there is only one defined detail dataset, it is displayed. In the Type drop-down,
select Other, and then click .
3. In the Master area, select the columns you want to link and click the > arrow to movethem to the Key Columns list.
4. Select any columns you do not want to link from the Key Columns grid and click the <arrow to remove them.
5. In the detail area, select the Object type containing the dataset you want to link.
6. Select the schema containing the dataset.
Beginner's Guide to Using ToadChapter 2: ToadWithout Code
88
7. Select the Object Name containing the dataset.
8. In the Available Columns grid, select the column you want to link to the selected columnin the Master Table.
Note: These must be in the same order as the Key columns in the Master area.
9. Click OK.
To close without making changes
» Click Cancel.
To delete the master-detail relationship
» Click Clear and Close.
Import and Export DataToad provides many ways to quickly import and export data to and from your workspace.
Export Dataset
You can export the dataset to the clipboard or a file. Toad preserves your sorting and filteringsettings in the exported file. In addition, you can set your choices here and then run the actualexport of the results from the command line later.
Notes:
l You can export to a flat file, which is a file that does not contain TAB or commacharacters between values.
l CLOBs and BLOBs are automatically excluded, but LONG columns are not excludedusing this method.
To export a dataset
1. Right-click the data grid and select Export Dataset.
2. Select in the output file format in the Export format field.
Notes:
l You can use a variable to create dynamic filenames, such as including a date or atimestamp (right-click in the File Name field in the Export Dataset window and
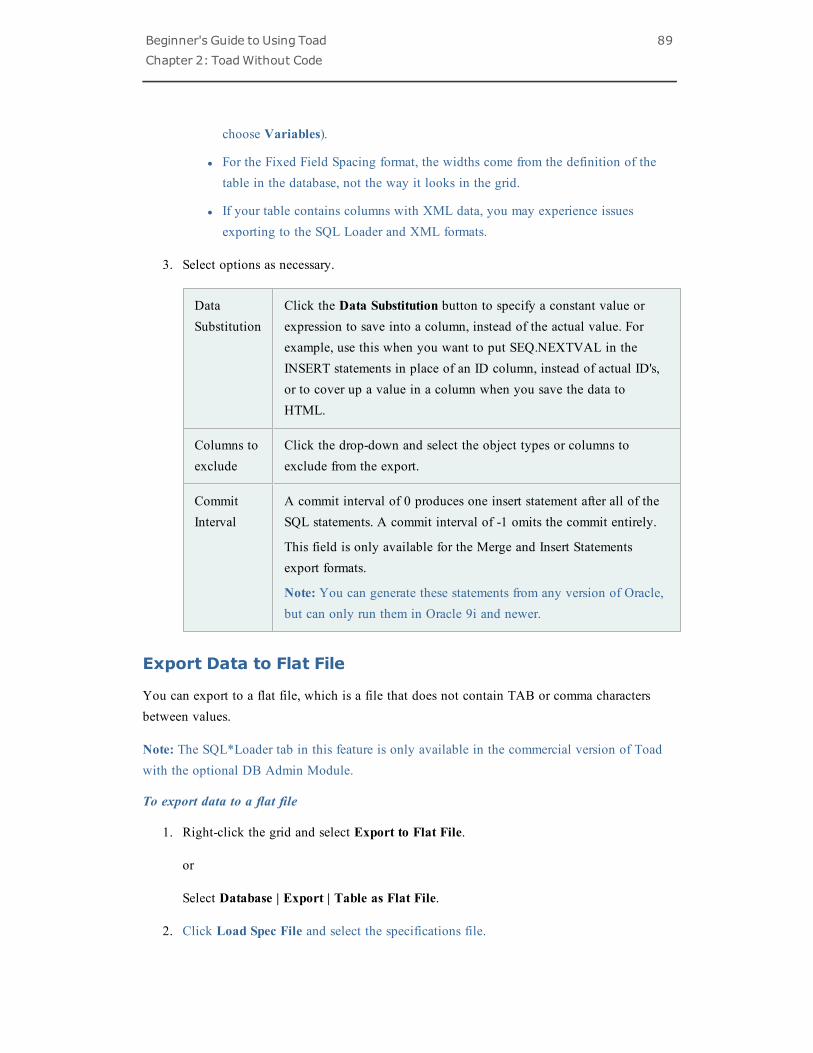
Beginner's Guide to Using ToadChapter 2: ToadWithout Code
89
choose Variables).
l For the Fixed Field Spacing format, the widths come from the definition of thetable in the database, not the way it looks in the grid.
l If your table contains columns with XML data, you may experience issuesexporting to the SQL Loader and XML formats.
3. Select options as necessary.
DataSubstitution
Click the Data Substitution button to specify a constant value orexpression to save into a column, instead of the actual value. Forexample, use this when you want to put SEQ.NEXTVAL in theINSERT statements in place of an ID column, instead of actual ID's,or to cover up a value in a column when you save the data toHTML.
Columns toexclude
Click the drop-down and select the object types or columns toexclude from the export.
CommitInterval
A commit interval of 0 produces one insert statement after all of theSQL statements. A commit interval of -1 omits the commit entirely.
This field is only available for the Merge and Insert Statementsexport formats.
Note: You can generate these statements from any version of Oracle,but can only run them in Oracle 9i and newer.
Export Data to Flat File
You can export to a flat file, which is a file that does not contain TAB or comma charactersbetween values.
Note: The SQL*Loader tab in this feature is only available in the commercial version of Toadwith the optional DB Admin Module.
To export data to a flat file
1. Right-click the grid and select Export to Flat File.
or
Select Database | Export | Table as Flat File.
2. Click Load Spec File and select the specifications file.
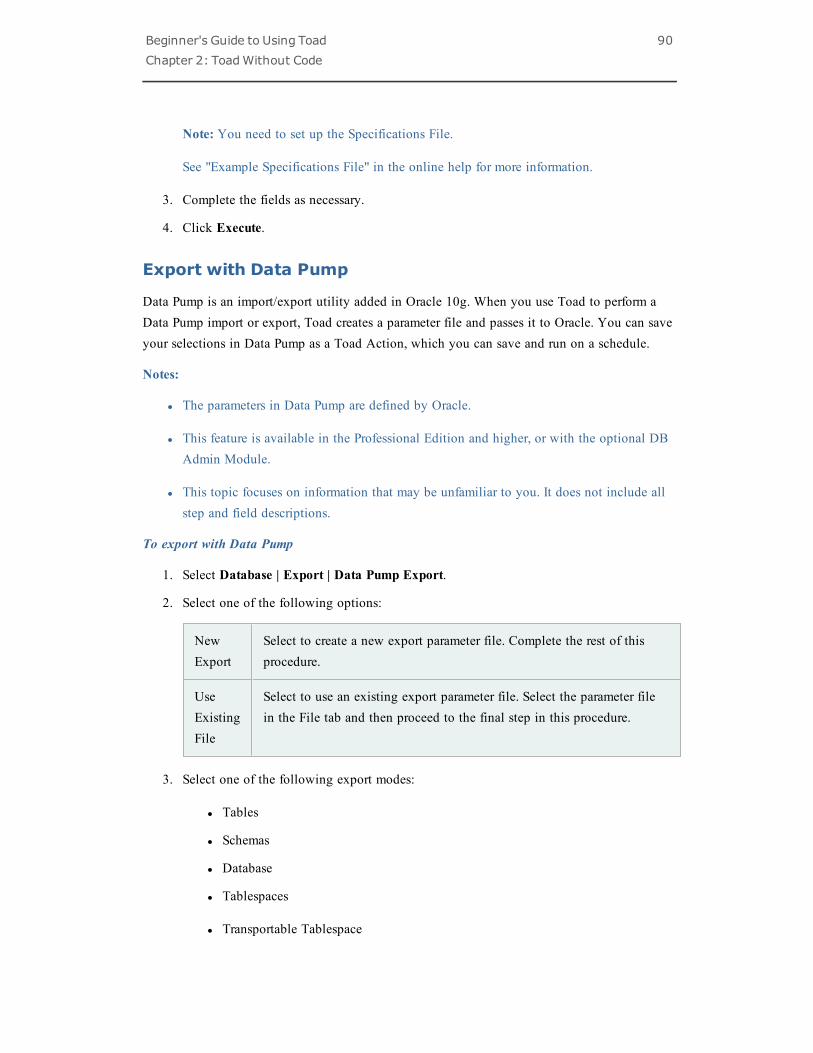
Beginner's Guide to Using ToadChapter 2: ToadWithout Code
90
Note: You need to set up the Specifications File.
See "Example Specifications File" in the online help for more information.
3. Complete the fields as necessary.
4. Click Execute.
Export with Data Pump
Data Pump is an import/export utility added in Oracle 10g. When you use Toad to perform aData Pump import or export, Toad creates a parameter file and passes it to Oracle. You can saveyour selections in Data Pump as a Toad Action, which you can save and run on a schedule.
Notes:
l The parameters in Data Pump are defined by Oracle.
l This feature is available in the Professional Edition and higher, or with the optional DBAdmin Module.
l This topic focuses on information that may be unfamiliar to you. It does not include allstep and field descriptions.
To export with Data Pump
1. Select Database | Export | Data Pump Export.
2. Select one of the following options:
NewExport
Select to create a new export parameter file. Complete the rest of thisprocedure.
UseExistingFile
Select to use an existing export parameter file. Select the parameter filein the File tab and then proceed to the final step in this procedure.
3. Select one of the following export modes:
l Tables
l Schemas
l Database
l Tablespaces
l Transportable Tablespace
Beginner's Guide to Using ToadChapter 2: ToadWithout Code
91
4. Complete the following tabs as necessary:
Items Select the items to export by listing them individually or through aquery. To list items individually, click Add and select the item inthe Object Search window.
Table queries must return at least two columns. The first columnmust be the schema name and the second column must be the tablename. If you are also exporting partitions, the partitions must be thethird column. For example: SELECT 'user', 'table', 'partition' FROM dual
Queries for schemas, tablespaces, or transportable tablespace modemust return at least one column. For example:SELECT tablespace FROM DBA_tablespaces
This tab is not available for databases.
Queries Enter queries to filter the data.
This tab is not available in transport tablespace mode.
Filters Add a filter to include or exclude specific objects types.
Files Use these fields to...
Parameterfile name
Enter a name for the parameter file that will be passed to the DataPump utility (expdp.exe).
Executionmode
Select one of the following options:
l Perform Export—Immediately perform the export when DataPump is run.
l Generate Parameter File Only—Generate the parameter file,but do not execute the Data Pump export. This option ishelpful if you want to review the parameter file beforeexecuting it or if you need to share it.
5. Click to execute, or save or schedule the selections as a Toad action.
Beginner's Guide to Using ToadChapter 2: ToadWithout Code
92
Import with Data Pump
To import with Data Pump
1. Select Database | Import | Data Pump Import.
2. Select one of the following options:
NewImport
Select to create a new import parameter file. Complete the rest of thisprocedure.
UseExistingFile
Select to use an existing import parameter file. Select the parameter filein the File tab and then proceed to the final step in this procedure.
3. Select one of the following import modes:
l Entire dump file
l Tables
l Schemas
l Tablespaces
l Transportable Tablespace
4. Complete the following tabs as necessary:
Items List items to import or select a file that contains the items to import.
Tip: If you save the import as a Toad Action, selecting a file can bea superior way of importing objects. Another Action or process cancreate the file prior to executing the import Action, thereby makingthe entire process dynamic.
This tab is not available if you are importing the entire dump file.
Queries Enter queries to filter the data.
This tab is not available with transportable tablespace mode.
Filters Add a filter to include or exclude specific objects types.
This tab is not available with transportable tablespace mode.
Remappings Select schemas, tablespaces, or datafiles to remap these objects todifferent names.
Beginner's Guide to Using ToadChapter 2: ToadWithout Code
93
Files Use these fields to...
Parameterfile name
Enter a name for the parameter file that will be passed to the DataPump utility (impdp.exe).
Executionmode
Select one of the following options:
l Perform Import—Immediately perform the import when DataPump is run.
l Generate Parameter File Only—Generate the parameter file,but do not execute the Data Pump import. This option ishelpful if you want to review the parameter file beforeexecuting it or if you need to share it.
l Generate SQL DDL File Only—Generate a SQL DDL file,but do not execute the Data Pump import.
5. Click to execute, or save or schedule the selections as a Toad action.
Data Pump Job Manager
The Data Pump Job Manager provides a way of tracking your Data Pump jobs. Because the DataPump is not limited to a connection, the windows can be closed after starting a job. The jobmanager gives you the ability to manage these jobs and start, stop, and kill them after the DataPump Watch window has been closed.
To open the Data Pump Job Manager
» Select Database | Import | Data Pump Job Manager.
Export DDL
Use this dialog box to export selected DDL to a file, the clipboard, or the Editor.
To export DDL
1. Select Database | Export | DDL.
2. Click Add on the Objects and Output tab to select objects to export.
See "Object Search" (page 61) for more information.
3. Set the output options in the bottom pane.
Beginner's Guide to Using ToadChapter 2: ToadWithout Code
94
4. Select the Script Options tab and set the script options. Review the following foradditional information:
Common Tab Description
Schema name Include the schema name in the DDL.
Drop statement Include a drop statement as well as the create statement.
Related Objects Select the related objects you want to include.
5. Click to execute, or save or schedule the selections as a Toad action.
Viewing an Export File
Use the Export File browser to view the contents of an export file before you import it.
Caution:While the scripts produced by the Export File Browser are very good for givingyou a glimpse into the objects contained in the export file, Oracle meant for these scripts torun only in the context of Oracle's IMP utility. Many extracted DDLs will run as standardSQL, and some will not. Please examine scripts produced by the Export File Browser verycarefully before running them.
To open an export file
1. From the Database menu, select Export | Export File Browser.
2. On the Export File Browser toolbar, click .
3. Select a file from the Open Export File window.
4. Click OK.
Note: If the file has not been parsed before, it may take a few minutes to process it.Processing progress will be displayed in the status area at the bottom of the window.
Finding Information in an Export File
Use the right hand side tree view of the Export File Browser to select a portion of the export fileto view. Nodes are organized by:
l Schema
l Storage
l Security
Beginner's Guide to Using ToadChapter 2: ToadWithout Code
95
l Code
l Tuning and Configuration
Object nodes are displayed with the number of objects of that type in parentheses beside it. Forexample, Schemas (6). If you expand the Schemas node, you will find six schemas beneath it.
In the left hand side, you can click the DDL tab to view the code. If the selected object has data,such as a table, click the Data tab to view the data within that object.
You can use the QuickFilter in the same way as it works in the Schema Browser.
To read the tree view
With NO filter applied (* in the QuickFilter box), you will see a node like Tables (42) if thereare 42 tables in a certain schema, for example.
If a filter is applied that only makes 10 of these tables visible, that node displays one of thefollowing: Tables (? of 42) or Tables (10 of 42).
l ? indicates that the you have not expanded the node yet, so how many pass the filter isnot known.
l (10 of 42) indicates that the node has been expanded (or is currently expanded)
You will never see Tables (0 of 42) because if all tables are filtered out, then theTables node is hidden too. Schema-level nodes are never hidden, even if everything underthem is hidden.
To find something quickly
1. Open the export file in the Export File Browser.
2. Type its name or an appropriate filter in the QuickFilter box.
3. Click the Expand All button.
Open Export File Window
The Export File Browser window is more than just a file selection screen. It provides you withinformation about the export files, including basic file information, who created them, andwhether or not they have been parsed.
To open an export file
» Click on the Export File Browser toolbar.
Beginner's Guide to Using ToadChapter 2: ToadWithout Code
96
The left hand side of the Open Export File window is the directory tree. Use this to find the fileyou want to open. It works in the same manner as the Windows Explorer.
When you have selected a directory the files are listed on the right hand side. By default Toaddisplays only the .dmp files in a directory.
To see all files in a directory
» Select All Files from the File Type box.
If you have selected all files, the info grid will be more sparsely populated for the files thatare not export (extension .dmp) files. Non-export files display only File Name, File Size, andFile Date.
Toad keeps track of files you have previously parsed by changing their color.
By default, all unparsed files are displayed in black. Parsed files are displayed in Green.
To change the color of parsed files
1. Click the Settings button in the lower left of the screen.
2. Select Set pre-parsed color.
3. Select the color you want to use and click OK.
To remove parsing information for the selected file
1. Click the Settings button in the lower left of the screen.
2. Select Remove pre-parsed information.
To remove parsing information entirely
» In the Toad Directory | ParsedExportFiles directory, remove all files.
DB Compare Mode Overview
You can use the Export File Browser to compare an export file with the objects in a database.This is a cursory compare and will not indicate deep, data-level differences.
To compare a file to a database
1. Open a data export file in the browser.
2. Click .
3. In the right hand side compare screen, select a connection from the connection drop downto compare to the file.
Beginner's Guide to Using ToadChapter 2: ToadWithout Code
97
Note: If the connection you want to use is not listed in the drop-down, you can either:
l Click the connection drill down and then click New and open a new connection.
l From the Session menu | New Connection, open a new connection.
4. In the left hand side, select one or more nodes to compare to the selected database.
Reading the Compare Grid
The compare mode grid in the Export File Browser provides basic information for both thedatabase and the selected nodes. You can print or export the compare grid from the ExportDataset menu item.
Because of the way Toad parses .dmp files, some items will be listed as in the database but notin the file. These include:
l Constraints that were created inline with the table DDL, as follows:
CREATE TABLE WK$DOC_RELEVANCE
(
URL_ID NUMBER NOT NULL ENABLE,
TERM VARCHAR2(500) NOT NULL ENABLE,
SCORE NUMBER NOT NULL ENABLE,
CONSTRAINT WK$DOC_RELEVANCE_PK PRIMARY KEY ("TERM", "URL_ID") ENABLE
);
l System named constraints.
l Indexes created by Oracle when a user created a constraint.
l Many objects in the SYS, MDSYS, etc, schemas. Certain objects are createdautomatically when you create a database do not go into export files even when you doa "full database export."
l System named hash partitions and subpartitions.
Freeze the Compare Grid
You can freeze the compare grid in the Export File browser so that you can view other itemswithout losing the data from the compare you are doing.
Beginner's Guide to Using ToadChapter 2: ToadWithout Code
98
This will hold the Compare Grid steady while you toggle Compare mode off, and view DDL ordata in Browser mode. When you return to Compare DB mode, the last compare you performedwill be active in the grid regardless of what is selected in the left hand side.
To freeze the compare grid
1. In the Export File Browser, compare a node or nodes to a database connection.
2. Select the Freeze Grid checkbox to freeze the grid.
Copy DDL to Clipboard
You can copy DDL from the right hand side of the Export File Browser to the clipboard andthen paste it wherever you need it, including other editors.
To copy DDL from the right hand side to the clipboard
1. Select an object from the left hand tree view and click the DDL tab on the righthand side.
2. Select any or all of the DDL.
3. Press CTRL+C.
Note: Scripts for a few objects will look wrong. The reason for this is that the exportfiles we are browsing were meant only to be used by Oracle's IMP utility. Things thatmay look wrong in script form because of this include:
l Materialized views and materialized view logs.
l Queue tables
l Any object that has storage (tables, indexes, etc) when the export was done in"Transportable tablespace" mode.
Saving DDL as a File
From the Export File Browser, you can save the DDL in the right hand side to a file for later use.
To save DDL from the right hand side to a file
1. Select an object from the left hand tree view of the Export File browser and click theDDL tab on the right hand side.
2. Right-click and select "Save to File."
3. Name the file and click Save.
Beginner's Guide to Using ToadChapter 2: ToadWithout Code
99
Note: This method saves all of the DDL for an object to a file. You cannot be selective as youcan with the copy method.
Extracting DDL from Multiple Nodes
You can extract DDL from multiple nodes of the Export File browser to the clipboard and thenpaste it wherever you need it, including other editors.
To extract DDL from multiple nodes
1. Select one or more nodes from the left hand tree view. These can be objects, orgroups of objects.
2. Right click on the tree and select "Extract DDL For Selected Nodes and SubNodes."
3. Select your options.
4. Click OK.
Export Utility Wizard
This wizard helps you to transfer data objects between databases using Oracle’s legacy exportutility. If you have Oracle 10g or later, it may be beneficial for you to use Data Pump instead.
To export data
1. Select Database | Export | Export Utility Wizard.
2. Review the following for additional information:
For allExports
Information
Objectstoexport
Triggers are only available if you have Oracle 8.1 or above.
WatchProgress
If you select Watch Progress (Feedback = 1000) on the last screen of thewizard, the Export Watch window displays and you can immediatelyview the results of the export. In addition, the Log tab on the Watcheswindow, will let you send the log directly to the printer.
3. Complete the wizard.
The Export Utility wizard is an interface to Oracle's utility, usually named Exp.exe, Exp73.exe,or Exp80.exe and located in your Oracle home's bin folder.
Beginner's Guide to Using ToadChapter 2: ToadWithout Code
100
If Toad cannot find this executable, the error "The Oracle Export Utility executable must bespecified" displays.
To specify the location of the Oracle Export Utility
1. Select View | Toad Options | Executables.
2. Enter the path in the Export box.
Note: If you do not know where this executable resides, or it is not on your computer,you may need to install the Database Utilities from the Oracle CD.
Data Subset Wizard
This window lets you copy a portion of data from one schema to another while maintainingreferential integrity, so that you can work with a smaller set of data.
The wizard creates a script that will copy a specified percentage of data beginning with allparent tables or from all tables with no constraints. You can specify a minimum number of rows.The wizard then continues with tables that have foreign key constraints, the rows copied arethose whose parent rows have been copied into the parent tables.
The data is then inserted into the destination tables with INSERT SELECT statements. Becauseof this, tables containing columns of datatype LONG will not be inserted.
If the destination schema is in a different database, the script is designed to run in the destinationdatabase. A database link must exist to the source schema, and there must be select privileges onthe source data through that link.
To use the Data Subset wizard
1. Select Database | Export | Data Subset Wizard.
2. Refer to the following for more information:
DefineSource andTargetDatabases
Information
TargetConnection
The target schema name will be included in the object DDL anddata inserts. The target connection will add a connection string atthe beginning of the script if the Include a Connect Commandoption is checked on .

Beginner's Guide to Using ToadChapter 2: ToadWithout Code
101
SelectObjects toCreate inthe Script
Information
Create theseobjects andcopy thedata
This option assumes the objects are not in the target schema, and thescript creates the selected objects and insert data.
In the Create Objects mode, clusters are excluded. If you want tosubset a schema containing clusters, you will have to create theobjects first, and then run the wizard with the Do not create anyobjects, Just truncate tables and copy data option selected.
Note: This feature is only available with the DB Admin Module,which is included in several Toad Editions or can be purchasedseparately. The DBA module is required because this creates aschema script with embedded insert statements.
How muchdata do youwant tocopy?
Information
Percentageof Data tomove totarget
The percentage or minimum number of rows will be accurate on theparent tables and tables with no foreign key relationships (except forsituations with long columns). Data integrity is preserved in thechild tables of foreign key relationships based on the rows whichwere inserted in the parent tables. So, the percentage of rows copiedin the child tables will vary based on the data distribution of theindividual tables.
Min # ofRows inLookupTables
Specify a minimum number of rows that you want moved to yourtarget in case the percentage selected yields a lower number than theminimum desired.
ControlOptions
Information
No Logging If checked, this option adds an ALTER TABLE statement before thedata inserts for each object, to specify No Logging.
If checked, the wizard will run faster, but the actions of the script(the insert statements) will be unrecoverable.
Beginner's Guide to Using ToadChapter 2: ToadWithout Code
102
Use ParallelDML
If checked, this option adds optimizer hints to the insert statements.It also adds an ALTER SESSION statement before the data insertsfor each object to enable Parallel DML.
If checked, the script produced by the wizard will run faster, but youmay end up with a few more extents.
ScriptOptions
Information
Include aSpoolcommand
If checked, the script includes a SPOOL command. A SET ECHOON command is issued after the SPOOL command. At the end of thescript a SPOOL OFF command is included.
Include aConnectcommand
If checked, adds a CONNECT command to the beginning of thescript and uses a connection string that is based on the targetconnection specified on the first wizard screen.
MakeindividualConstraintcommands
This option displays only if you have chosen to create Constraintson the Create Objects page. If checked, constraints are created asindividual alter table commands. This serves to circumvent an Oraclebug that can create the following error when constraints are notcreated individually: "ORA-01948 Identifiers name length exceedsmax."
Adjustmentsto ExtentsandTablespaces
Information
Extents tab The Extents tab lets you specify extents for objects created by thegenerated script. You can specify PCTINCREASE parameters, makeNext Extent=Initial Extent, and scale extent sizes to apply to allobjects created that allow storage parameters. The lower part of thescreen lets you change extent sizes using IF-THEN statements.
Note: The options in the Extents/Tablespaces tabs are enabled whenthe wizard is set to create objects (when you select the Create theseobjects and copy the data option in the Select Objects to create inthe script of the wizard).
Tablespacestab
The Tablespaces tab lets you specify the tablespaces to createindexes, tables, and their partitions. You can place all of an object

Beginner's Guide to Using ToadChapter 2: ToadWithout Code
103
type (tables. table partitions, indexes, index partitions) into onetablespace or distribute them across different tablespaces based ontheir size.
3. Complete the wizard.
Import Table Data
You can import table data without importing table structure. This must be imported into anexisting table, although you can use the Create Table feature to create a new table for the import.
In addition, you can import table data directly into a data grid from the clipboard. To do this thedata grid must be editable.
To import table data
1. Select Database | Import | Import Table Data.
2. Complete the wizard. Review the following for additional information:
SelectDestination
Description
Truncate table Click to truncate table before importing.
Enable/disableconstraintsand triggers
Click to disable or enable constraints before importing.
Click to disable or enable triggers before importing.
Preview Fileand Define Files
Description
AutoMap Instructs Toad to map columns from the source file to the tablein the database.
MappingManually
You can also map columns manually. Click on a column headerand then select the column where you want to map the columnof data to go.
FieldMappingDialog
If you are importing an XLS file, and have elected to begin onrow 2 in the previous screen, then Toad displays the FieldMapping dialog. Select one of the following options:

Beginner's Guide to Using ToadChapter 2: ToadWithout Code
104
l Map fields by matching field names—The default. Toadlooks in the first row of the spreadsheet to find thecolumn names, and uses those for the field names.
l Map fields sequentially—The columns of the spreadsheetare imported into the table in the same order as theydisplay. Column 1 maps to the first table column and soon.
Import Utility Wizard
This wizard helps you to transfer data objects between Oracle databases using Oracle’s legacyimport utility. If you have Oracle 10g or later, it may be beneficial for you to use DataPump instead.
Notes:
l You can set the utility's path from View | Toad Options | Executables.
l This topic focuses on information that may be unfamiliar to you. It does not include allstep and field descriptions.
To import data
1. Select Database | Import | Import Utility.
2. Complete the wizard. Review the following for additional information:
Import Tables Information
Select Show onlyusers who ownobjects to limit yourschema selection toschemas that haveobjects.
This will limit selections for both the from and to user areas.
File Record Length If left blank this value defaults to use the platform's BUFSIZvalue.
Import Users Information
Select Show only This will limit selections for both the from and to user areas.
Beginner's Guide to Using ToadChapter 2: ToadWithout Code
105
Import Tables Information
users who ownobjects to limit yourschema selection toschemas that haveobjects.
File Record Length If left blank this value defaults to use the platform's BUFSIZvalue.
Watching Progress If you select Watch Progress (Feedback = 1000) on the lastscreen of the wizard, the Import Watch window displays andyou can immediately view the results of the import. Inaddition, the Log tab on the Watches window, will let yousend the log directly to the printer.
Compare Data, Objects, and MoreToad enables you to view differences in objects, view duplicates, and make corrections. You cancompare objects, schemas, and entire databases.
Data Duplicates
Use this dialog box to view record duplicates based on user input.
To view record duplicates
1. Select Database | Compare | Data Duplicates
2. Select the Owner, Object Type and Object from the drop-down lists. A list of columns isdisplayed below. Now, you can either:
Find duplicates on all columns Check the Find duplicates on allcolumns option button.
Do not select any columns in the list.
Find duplicates on just selected columns Check the Find dupes of selectedcolumns option button.
Select one or more columns in the
Beginner's Guide to Using ToadChapter 2: ToadWithout Code
106
column list.
On the Duplicate Data tabs, an additional column called Occurences is added to theend of the grid to display the number of resulting duplicates.
To edit duplicate data
1. From the Table Data Duplicates window, select Owner and Table from the drop-down lists.
2. Click the Duplicate Data (Editable) tab.
3. Click the cell you want to edit and make your changes.
4. Click on the toolbar.
Compare Single Objects
You can compare single objects from the Schema Browser. All objects accessible from theSchema Browser can be compared.
To compare objects
1. In the Schema Browser, right-click on an object.
2. Select Compare with another object.
Note: Reference source information will be filled in for you.
3. Enter comparison source information (a text file or an object in a live schema).
Select options to apply:
Compare columns only Applies only to tables, views,and materialized views.
Alphabetical Arranges columnsalphabetically beforecomparing.
Format before comparing Formats both files consistentlyso that cosmetic differences donot impact your results.

Beginner's Guide to Using ToadChapter 2: ToadWithout Code
107
4. If you are using Toad with the optional DB Admin Module, you can choose to view yourresults in one of two ways:
Results as File Compare Use the Differences Viewer tocompare the two selectedobjects.
Results as Sync Script Only available if the objectschosen have the same name,and are in different schemas,this option the objects andcreates a sync script.
Compare Databases
You can compare database-level objects such as tablespaces, roles, users, and so on betweendatabases or Database Definition Files
This feature is only available with the DB Admin Module, which is included in several ToadEditions or can be purchased separately.
To compare databases
1. Select Database | Compare | Databases.
2. Complete the fields as necessary.
Databases Tab Description
ReferenceSource
Select a live database or database definition file to use as thebasis for comparison. If you execute the sync script, the targetdatabase is updated to match the reference source.
Tip: If you select Create Database Definition File, you canuse variables in the filename. By default, Toad includes the%DATEFILE% and %TIMEFILE% variables, which inserts thecurrent date and time into the filename when it creates thedefinition file.
Targets andOutput
Click in the Live Databases or Def Files field to add a
target database for comparison. You can repeat this step tocompare multiple target databases to the source.
Beginner's Guide to Using ToadChapter 2: ToadWithout Code
108
Tip: Right-click a target to edit it, delete it, or switch it withthe reference source.
Options Tab Description
DatabaseObject Types
Select the object types you want to compare. Reducing theobject types reduces the amount of time it takes to completethe comparison.
Tip: Right-click to select or clear all fields.
"Safe Drop" onusers,tablespaces,and profiles
Select to only drop a user or tablespace if it does not own anyobjects, or a profile if no users are assigned to it.
Object Set Tab Description
Specify ObjectSet
Select to determine specific object sets to compare. This letsyou limit your comparison even more than the Options tab.
Click to add an object set. If you already have objects
loaded, a confirmation dialog ask you if you want to clear thegrid before loading the new objects. Click Yes to start over, orNo to append the new objects into the grid.
3. Click to execute, or save or schedule the selections as a Toad action.
4. Review the differences on the Results tab. Review the following for additionalinformation:
If you want to... Complete the following:
Show the syncscript for selectedobjects.
Select the objects and click .
View thedifferences for oneobject
Select the objects and click .
View thedifferences for
Select the target in the Target Database field (onlyapplicable if you selected more than one target for
Beginner's Guide to Using ToadChapter 2: ToadWithout Code
109
If you want to... Complete the following:
another target comparison).
5. To sync the databases, select the Sync Script tab and click to execute immediately
from the Editor or to schedule its execution.
Caution: Review this script thoroughly before executing it to preventunintentional data loss.
Compare Schemas
Note: You can compare schemas in the Base Edition, but definition files and sync scripts areonly available with the DB Admin Module or Toad for Oracle Xpert Edition.
To compare schemas
1. Select Database | Compare | Schemas.
2. Complete the fields as necessary.
Schemas Tab Description
ReferenceSchema(Source)
Select a schema connection or schema definition file to use asthe basis for comparison. If you execute the sync script, thetarget schema is updated to match the reference source.
Tip: If you select Create Schema Definition File, you can usevariables in the filename. By default, Toad includes the%DATEFILE% and %TIMEFILE% variables, which inserts thecurrent date and time into the filename when it creates thedefinition file.
Targets andOutput
Click in the Live Schemas or Def Files field to add a
target schema for comparison. You can repeat this step tocompare multiple target schemas to the source.
Tip: Right-click a target to edit it, delete it, or switch it withthe reference source.
Options Tab Description
Object Typesto Compare
Select the object types you want to compare. Reducing theobject types reduces the amount of time it takes to complete
Beginner's Guide to Using ToadChapter 2: ToadWithout Code
110
the comparison.
Tip: Right-click to select or clear all fields.
Object Set Tab Description
Specify ObjectSet
Select to determine specific object sets to compare. This letsyou limit your comparison even more than the Options tab.
Click to add an object set. If you already have objects
loaded, a confirmation dialog ask you if you want to clear thegrid before loading the new objects. Click Yes to start over, orNo to append the new objects into the grid.
3. Click to execute, or save or schedule the selections as a Toad action.
4. Review the differences on the Results tab.
If you want to... Complete the following:
Show the sync scriptfor selected objects.
Select the objects and click .
View the differencesfor one object
Select the objects and click .
View the differencesfor another target
Select the target in the Target Schema field (onlyapplicable if you selected more than one target forcomparison).
5. To sync the schemas, select the Sync Script tab and click to execute immediately from
the Editor or to schedule its execution.
Caution: Review this script thoroughly before executing it to preventunintentional data loss.
Compare Multiple Schemas
You can quickly compare multiple schemas in one database to the same schemas inanother database.
Note: You can compare schemas in the Base Edition, but definition files and sync scripts areonly available with the DB Admin Module or Toad for Oracle Xpert Edition.
Beginner's Guide to Using ToadChapter 2: ToadWithout Code
111
Compare schema-level objects (tables, indexes, views, etc.) in every schema across two databases,without individually identifying each source and target schema.
To compare multiple schemas
1. Go to Database | Compare | Multiple Schemas.
2. Select your source and target databases (these can be the same database).
3. Click the Schemas tab and specify your selection criteria:See the table below for more detail.
4. Click Load. You can select/deselect listed schemas if you have chosen Manually... instep 3 above.
5. Click the Options tab; the options are the same as the basic schema compare window.
o Select the items you want to compare; you can right-click to check/uncheck all.
6. Click the Output tab to specify:
o Your output folder (files are named based on the schema name).
o Create difference summary files
o Create difference detail files
o Create sync script files
o Note: Sync script files are created in Toad's Base Editions; running them isavailable with the DBA Admin Module.
7. Click the run button, labeled 'Begin Comparison.'The Results tab appears, with your selected outputs displayed.
8. Review differences on the results tabs, depending on the outputs you selected instep 6 above.
Using the Schemas tab
In step 3 above, you can ask Toad to automatically match schema names, or manually specify thematching criteria.
When to matchup schemas:
Choose: Automatically, at time of comparison
l You cannot then select or deselect schemas listed afteryou click Load.
l Built-in schemas like SYS, SYSTEM, etc, areautomatically excluded, and this list of automatically
Beginner's Guide to Using ToadChapter 2: ToadWithout Code
112
excluded schemas is configurable
Choose: Manually, before comparison
l Click in the Target column to change the target schema.(A drop-down arrow appears.)
l Use alternately-named schemas, as described belowunderManipulate source schema....
How to matchup schemas:
Choose: Match schema names exactly
l Once listed, if Automatically... is selected as describedabove, you can select or deselect schemas to compare.
Choose: Manipulate source schema name to find targetschema name
l Prepend text - For instance, if your source and targetschema names are "Dev_Employees" and "Employees."
l Append text - For instance, if your source and targetschema names are "Employees_Test" and "Employees."
l Search for/Replace with - For instance, if you searchfor "Dev" and replace with "Prod" if your source andtarget schema names are "Dev_Employees" and "Prod_Employees."
On the Results tab, you can:
l Re-compare selected schemas
l Send selected or all sync scripts to the Editor (with the DB Admin Module or Toad forOracle Xpert Edition)
Depending on the outputs you selected in step 6 above, you can also view these tabs:
l Difference Details (tree view)
l Difference Summary
l Sync Script
The list of schemas that are automatically ignored is in Toad.ini.
If you want to adjust it, find this line and make your changes:
MultipleSchemasToIgnore='ANONYMOUS', 'APPQOSSYS', 'CTXSYS', 'DIP', 'DBSNMP','EXFSYS', 'FLOWS_FILES', 'MDDATA', 'MDSYS', 'MGMT_VIEW', 'OLAPSYS', 'ORACLE_
Beginner's Guide to Using ToadChapter 2: ToadWithout Code
113
OCM', 'ORDDATA', 'ORDPLUGINS', 'ORDSYS', 'OUTLN', 'OWBSYS', 'OWBSYS_AUDIT','SI_INFORMTN_SCHEMA', 'SPATIAL_CSW_ADMIN_USR', 'SPATIAL_WFS_ADMIN_USR','SYS', 'SYSMAN', 'SYSTEM', 'WMSYS', 'XDB', 'XS$NULL'
The APEX schemas are also automatically ignored. If you don’t want that, find this line andchange the ‘1’ to a ‘0’:
MultipleSchemasIgnoreApex=1
Compare Data
You can use Toad's Compare Data wizard to compare data between tables within differentschemas, or different databases. This can be useful for comparing the data in a production andtest environment, for example.
Note: This topic focuses on information that may be unfamiliar to you. It does not include allstep and field descriptions.
To access the Compare Data wizard
» From the Database menu, select Compare | Data.
Select DataSources page
Description
Use DB Link If your first data source is remote, select an existingDB Link.
If your first data source is local, leave this boxblank.
Object Type Tables, Views and Snapshots are supported.
PerformanceOptions Outputpage
Description
Sort Area Size This only affects queries going through a DatabaseLink.
When selected:
o The default area size is 10 MB
o You can select to set another sort area sizewhen the first window closes. The defaultfor this is also 10MB.
Beginner's Guide to Using ToadChapter 2: ToadWithout Code
114
Optimizer Hints -Use parallel hint
Default: Cleared
When selected, you can set the amount ofparallelism you want. The default amount whenselected is 4.
Select Columnspage
Description
Column colors Black - Columns display in both sources and canbe compared.
Red - Columns cannot be compared.
Purple - Columns display only in Source 1.
Teal - Columns display only in Source 2.
Specify columnsto uniquelyidentify eachrow...
Description
Columns andKey Columns
If a table has a primary key, Toad will find itautomatically and put the primary key columns inthe RHS.
If no primary key is found, you can specify thefield that can be used as a primary key.
With the primary key identified (automatically or manually), Toad willuse the primary columns to identify if a row is “in both tables but withdifferences.”
If no primary key is identified, Toad has no way of identifying a rowexcept by using all columns, so no ‘differences’ tab is shown, and rowsare either matches, or in one table, or the other.
(Final Step) Description
Page title Your page will be labeled with one of these titles:
o Server Side Data Comparison Using PrimaryKey
o Client Side Data Comparison Using PrimaryKey
Beginner's Guide to Using ToadChapter 2: ToadWithout Code
115
o Server Side Data Comparison Using AllFields (No Matching Primary or UniqueIndex is Available)
Caution: There is a risk that client-sidecomparisons for very large tables couldexceed memory capacity.
Source Only andTarget Only tabs
These tabs have the same format.
You can choose to migrate selected rows only:
o For the Source Only Rows tab, it means youinsert them into target
o For the Target Only Rows tab, it means youdelete them from the target
Differing Rowstab
You can choose to:
o Update from source to target
This tab displays:
o Rows from the source dataset in gray
o Rows from the Target dataset in white
o Column values that differ between sourceand target are highlighted in yellow.
When you click Perform Comparison, the row count is performed first.The number in parenthesis on each tab indicates how many rows are ineach grid. The + means Toad hasn't fetched all the rows yet.
Scroll down in the grid to update that number.
The Row Counts tab will either say “Row Counts Differ” or “RowCounts Match.”
DML:
If you choose to update via Array DML, every column has to be updated,even if the value didn’t change. It may also fire triggers that might nototherwise fire. The non-array DML option will update each row withonly the data that has changed.
Beginner's Guide to Using ToadChapter 2: ToadWithout Code
116
Reviewing Differences
From the last three windows of the Compare Data wizard you are now ready to view thedifferences between your data sources.
l The first window reviews rows in Source 1 that are not in Source 2.
l The second window reviews rows in Source 2 that are not in Source 1.
l The last window reviews all differences.
You must run the SQL code for each window as described below.
You can edit the dataset from within the grid. In some editions of Toad, you can delete rowsfrom one table, and insert them into the other directly in the grid.
To make dataset editable
» On the Review Differences page, select the Editable Dataset checkbox.
To review rows
1. Perform any desired optional steps:
l Click the View/Edit SQL button to view or edit the SQL used to comparedifferences. You can make changes in the Edit SQL dialog box.
l Click Check to verify that the query parses correctly.
l Click OK to apply changes to your query.
l Click Execute to find differences in the columns you want to compare.
To delete selected rows
1. Select the rows you want to delete.
2. Right-click and select Delete Selected Rows.
To delete all rows
» Right-click and select Delete All Rows.
Compare Files and Objects
You can use the File Differences Viewer to compare the contents of two files from a disk, or anobject to a file or to another object.
To compare tabs in the Editor
» Press and hold CTRL while dragging one tab onto the other tab.
Beginner's Guide to Using ToadChapter 2: ToadWithout Code
117
To compare two files on disk
1. From the Utilities menu, select Compare Files.
2. Select one or two files.
3. Click OK.
To compare objects in the Schema Browser
» From either the Procedures or Views page, right-click on an object and select Comparewith another object.
To compare differing objects from a schema compare
» From the Schemas | Results (Interactive) tab, right-click an object listed as differingbetween schemas and select Show Difference Details to compare the scripts of thetwo objects.
Viewing File Differences
When you have specified the objects you want to compare, whether they are files, databaseobjects, or scripts, you can use the Differences Viewer. The Differences Viewer lets you comparedatabase objects in a split window. Differences between the objects are highlighted and thetoolbar gives you access to controls for customizing the view and creating reports.
l The thumbnail view (to the left of the viewing window) is a visual summary ofdifferences.
l You can click the thumbnail view to position the viewer at that point in the documents.
l Colored lines show the relative position of line mismatches.
l A white rectangle represents the part of the text currently visible in the DifferencesViewer window.
File Comparison Rules
File Comparison Rules let you specify the way Toad displays the similarities and differencesbetween two files, or two versions of a file. This lets you quickly change sections of the file.
To access file comparison rules
» Click on the difference viewer toolbar.
General Tab Description

Beginner's Guide to Using ToadChapter 2: ToadWithout Code
118
SynchronizationSettings
Synchronization Settings control the comparison engine that reportsdifferences and similarities between files. Unless you are experiencedin manipulating comparison synchronization algorithms, you willprobably find that the default settings work well enough for mostsituations. In general, the following principles apply:
l Set the synchronization parameters low - Allows more efficientsearches for small differences.
l Set the synchronization parameters higher - Handle larger filesor files with large differences.
l Initial Match Requirement - The minimum number of lines thatneed to match in order for text synchronization to occur.
l Skew Tolerance - The number of lines the Differences Viewerwill search forward or backward when searching for matches.Smaller numbers improve performance.
l Suppress Recursion - Refers to the method used to scan formatches. Recursion improves the ability to match up larger aswell as smaller sections of text, but it can take longer.
MinorDifferences
Use the Ignore Minor Differences checkbox to activate or deactivatethe highlighting of minor differences in the Differences Viewerwindow. (As explained below, you specify what constitutes minordifferences in the Rules options under Define Minor Differences.)
Define Minor tab You can have the comparison engine either highlight or ignore minordifferences—such as comments, or spacing characters and tabs. Thisgives you the option of focusing only on significant differences, or,alternatively, reviewing even minor differences between versions.Place a checkmark next to the items that you want to classify asminor differences. Then, under the General category, you can select orclear the Ignore Minor Differences checkbox.
Line Weights tab The Line Weights tab lets you assign synchronization priorities to thelines that match. You can use the values listed in the tab, or you cancreate your own.
Miscellaneous tab Use the Miscellaneous tab to make choices about line termination.
You can also limit comparisons to specific columns by entering acolumn range in the comparison boxes.
Beginner's Guide to Using ToadChapter 2: ToadWithout Code
119
Difference Viewer Options
File Comparison Options let you set the colors and other visual characteristics used to highlightthe following elements in the Differences Viewer:
l Matching text
l Similar text
l Different text
l Missing text
l Horizontal lines between mismatches
You can also set Find Next difference to use position only (so as not to obscure color coding),or normal line selection.
To access options
» Click in the Differences Viewer.
Automate Processes and Manage ProjectsYou can use Toad's Automation Designer to schedule tasks and processes on a regular basis, sothe work occurs automatically.You can use the Project Manager to plan and accomplish yourwork involving components inside of and outside of Toad.
Automation Designer Overview
Use Automation Designer to automate and control processes you perform regularly. Connectioninformation, window settings, and queries can be saved, shared, scheduled, and run from thecommand line or batch files to simplify repetitive tasks.
Tip: You can easily re-execute actions from the Rerun menu. The menu displays windows thatwere recently executed via a Toad action. Select More on the menu to see all available actions.
The Automation Designer makes use of several categories to control Toad. These include:
l Action -The basic unit of a Toad App. It consists of the settings used to control onecommand, such as import table data, FTP a file, or ping a server.
l App -One or more actions designed to work together as a mini-Toad application.
Beginner's Guide to Using ToadChapter 2: ToadWithout Code
120
l Scheduled Item -An app or action that has been scheduled using the WindowsTask Manager.
l Execution Log - A log file containing the execution status of recently-run apps. It isautomatically generated as you run actions, and contains data up to 7MB. When itreaches 7MB, old data is trimmed back to 5MB, and then it continues accruing. In thisway it remains a current log of the most recent action execution.
The Automation Designer is the central location for running and creating Actions and Apps.While actions can be created from and loaded to many of the other windows within Toad, thepower of actions is located in the Automation Designer.
Within the Automation Designer you can:
l Create new actions
l Organize actions into sets (apps)
l Run actions and apps
l Store actions and apps
l Schedule actions and apps
l Copy actions and apps to and from the clipboard
Tip: You can add Toad apps and actions to the Project Manager.
In addition, as with SQL Recall, actions are saved automatically when you perform a task that isaction-enabled.
Recalling an app gives you the ability to perform a distinct operation or sequence of operationsin Toad on demand. Actions that can be used in the Automation Designer are listed in theAction Catalog.
Add Apps/Actions to Toolbar
You can add Toad Apps and actions to your toolbar so you can execute them with one click.
To add actions to the toolbar
1. Right-click on the main toolbar and select Customize.
2. Click the Actions tab.
3. Click on an app in the left hand side to display the actions contained in it.
4. Drag and drop the action on the toolbar.
Beginner's Guide to Using ToadChapter 2: ToadWithout Code
121
To add apps to the toolbar
1. Right-click on the main toolbar and select Customize.
2. Click the Actions tab.
3. Click [All Apps] in the left hand side.
4. Drag and drop the appropriate app onto the toolbar.
Search the Automation Designer
You can search the Automation Designer to find apps or actions that you have created. Thispanel supports both standard searches and regular expressions
To search the Automation Designer
1. In the Automation Designer's left hand panel, click Search panel.
2. In the Text to find box, enter the text you want to find.
3. To search with regular expressions, select the Regular expressions field.
1. Select or clear the Search for apps box as desired. Choose a filter from the Look In fieldif you want to limit the search to a specific folder.
2. Select or clear the Search for actions box as desired. Choose a filter from the Look Infield if you want to limit the search to a specific app.
3. Click Search.
Create New Actions
You can create new actions from many locations within Toad. You can create them directly fromthe feature you are using, or from the Automation Designer. Toad creates an action automaticallyfor you and stores it in the action recall area
Toad windows that support actions include a camera button in the status bar of
the window.
To create a new action from the Automation Designer
1. From the Utilities menu, select Automation Designer.
2. In the Navigation Tree, select Apps and then click the Toad App node where you wantto create the action.
3. Click the tab that contains the action button and then click the button for the action youwant to create.

Beginner's Guide to Using ToadChapter 2: ToadWithout Code
122
Click in the app where you want the action to reside.
For example, click the Import/Export tab, and then click and then click in the app
where you want the import table data action (this includes as a child node). A new actionis created at the location where you click.
4. Double-click the new action and set up required.
5. Click one of the following:
l Run - apply changes to properties and run the action
l Apply - apply changes to properties
l Cancel - cancel the changes to properties, but leave action in AutomationDesigner
6. Right-click the new action, select Rename, and enter a name for the action inthe Name box.
7. Run the action:
To create or load an action from a Toad window
1. In the status bar of the feature you want to make an action, click .
2. Select the appropriate option.
Using Action Recall
Toad automatically creates an action for you when you use a window that supports them. Toadstores these actions for you in the vault, so that when you need them they can be retrieved.
You can use the Action Recall node the same way you would use the other apps, except that itcannot be deleted. You can, however, clear it.
By default, Toad stores 10 actions per action type (for example, 10 export DDLs, 10 exportdataset actions, and so on). However, this number can be changed easily.
To change the default number of actions automatically created per action type
» Select Toad Options | General and change the number in the Toad Actions peraction type box.
You can easily clear out all the actions that have been saved in the vault so that it is easierto navigate.
Beginner's Guide to Using ToadChapter 2: ToadWithout Code
123
To clear the action recall node
1. Click the Action Recall node.
2. Select the actions you want to remove. (CTRL+A to select all.)
3. Right-click and select Delete.
4. Click Yes.
Action Parameter Files
Some actions can accept parameter files. These parameter files are saved in an INI format.
You can use the parameter file to override some settings in an action so that you can run variouspermutations without creating multiple actions.
An action parameter INI file contains property=value pairs for the settings that can beoverridden. When originally created, these will correspond to the properties saved withinthe actions.
To create an action parameter file
1. In the Automation Designer, right-click on an Action or an App and select CreateParameter file.
Note: If an action does not support a parameter file, then this option will not be availableon the popup menu.
2. Name the parameter file and save it to a folder. You do not need to save it in thedefault folder.
3. Modify the parameter file if necessary. You can save multiple versions of the same filewith slightly different names.
Example
The Execute Script action is enabled for parameter files. An ExecuteScript.ini file created as aparameter file might look like the following:
Content of ini File Line Meaning
[47] Internal identifier. There will be one of these identifiers foreach action within a selected App.
Name=Execute Script1 This is the name you have given the action so you can findit within a longer App file.
Beginner's Guide to Using ToadChapter 2: ToadWithout Code
124
Content of ini File Line Meaning
Type=Execute Script This is the type of action.
ItemCount=2 Number of items to execute.
Item0=c:\try1.sql First item to execute.
Item1=c:\try2.sql Second item to execute.
Output=1{1=SingleFile,2=SeparateFile,3=Clipboard, 4=Discard}
Output type.
Note: In some cases, explanatory information will beincluded in braces within the line itself.
Output Location=C:\somefolder\output.txt
Output destination.
Connection=user@database Connection associated with this action. When a connectionis specified in the parameters file, it will override the boundconnection of the Action. If this line is not included, thenthe bound connection is used.
Parameter files for Toad Apps will contain multiple [Key] sections: one for each action withinthe app. These can be removed as needed to use a particular action's default properties.
Parameter files can be used from within the Automation Designer or from the command line.
If connections are included in a parameter file and/or the command line, Toad will useconnections in the following order:
1. Connections specified on the command-line always override everything else.
2. If a connection is not present on the command line, then those specified in a parameter(ini) file are used.
3. If there are no connections on the command-line or defined from the AutomationDesigner's Run with connections option, then the connection bound to the action is used.
To run an action/parameter file set from the Automation Designer
1. In the Automation Designer, right-click on the action you want to run and select Runwith parameter file.
2. Select the parameter file you want to use and click OK.
Beginner's Guide to Using ToadChapter 2: ToadWithout Code
125
To run an action/parameter file set from the command line
» Enter the command line as you would normally, and then use a pipe to separate theAction/App name from the parameter filename. For example:
toad.exe -a "App->Execute Script1 | c:\datafiles\ExecuteScript1.ini"
Sharing Actions
One of the advantages to using actions and apps to manage your processes is that they can beshared easily with others.
To send an action from the clipboard
1. From the window you want to share (such as Export Dataset) click in the status bar.
2. Select Save to Clipboard.
3. In your email, select Paste.
4. Send your email.
To send an action from the Automation Designer
1. In the Automation Designer, select the action you want to send.
Note: If you want to send the entire Toad App, select all the actions in that App tab.
2. Right-click and select Copy (CTRL+C).
3. In the email body, press CTRL+V.
4. Complete and send the email.
To receive an action using the clipboard to Toad feature
1. From the email you receive, copy the action code to your clipboard.
2. Open the window where the settings reside (such as Export Dataset, or other)
3. Click the camera button in the status bar.
4. Select Load from Clipboard and click OK.
5. Settings are now loaded in your window and you can complete the action as you wouldnormally.
To receive an action using the clipboard to Automation Designer feature
1. From the email you receive, copy the action code to your clipboard.
2. If it is not already open, open the Automation Designer.
Beginner's Guide to Using ToadChapter 2: ToadWithout Code
126
3. Create a Toad App or click the tab for the App where you want the actions to reside.
4. Right-click in the Automation Designer and select Paste (CTRL+V).
5. Rename the pasted action to something descriptive.
6. Run the action at will.
Run Actions from the Automation Designer
You can run one or more actions from the same Toad App in the the Automation Designer.Multiple actions are run in the order they display in list view.
To run actions
1. Select the action you want to run or multi-select several actions within the sameToad App.
2. Right-click and select Run Selected Actions.
To run a series of actions (partial App)
1. Open the Toad App containing the series.
2. Select the first action you want to run.
3. On the toolbar, click .
To run an entire App
» Select the app you want to run and click .
Note: You can also right-click on the app you want to run and select Run.
To run actions with connections
Note: In this case, the connection you assigned to the action will not be used. The action will beexecuted once, for each connection you select, using that connection.
1. Select the actions you want to run.
2. Right-click and select Run with Connections.
3. Select the connections you want to use. These can be multi-selected usingSHIFT or CTRL.
4. Click OK.
Schedule a Task
You manage tasks through the Task Scheduler.
Beginner's Guide to Using ToadChapter 2: ToadWithout Code
127
To schedule a task
1. Go to Utilities | Task Scheduler.
2. Click the 'Add Task' button on the scheduler toolbar.
3. Complete the Scheduled Task Wizard.
To edit an existing task schedule
1. Go to Utilities | Task Scheduler.
2. Select the task you want to edit in the Task grid and click the 'View Properties' button onthe scheduler toolbar.
3. On the Action tab, select the specific Action and click Edit and make your changes.You can take those same steps on the Triggers tab.On the Conditions and Settings tabs, simply make your changes.
4. Click OK again to save your changes.
Schedule Actions and Apps
Use the Automation Designer to schedule actions using Toad's Task Scheduler. You canschedule actions or apps. In addition, you can use the scheduler button directly from someToad windows.
To schedule actions
1. In the Automation Designer, select the actions you want to schedule.
2. Right-click and select .
3. Complete the wizard.
To schedule a Toad App
1. In the Automation Designer, select the App you want to schedule.
2. Click .
3. Complete the wizard.
When you have finished scheduling an action in this way, you can view them from the TaskScheduler window, or the Scheduled Items area of the Automation Designer.
To schedule an action
1. In the status bar of the feature you want to make an action, click .
2. Complete the Schedule Action wizard.
Beginner's Guide to Using ToadChapter 2: ToadWithout Code
128
Execute Actions from the Command Line
You can run Toad Apps and actions from the command line with or without Toad active.
To execute actions from the command line
» Use the –a parameter and specify the action, the Toad App, or a series of both.
If you specify only the action, the action name must be unique across all Toad Apps. Otherwisean entry will be made in the Action Log about more than one action found, and the action willnot run.
If there may be more than one action with the same name, fully qualify an action within an ToadApp: use ActionSet->ActionName.
Separate more than one action or Toad App with a space and surround each item withdouble-quotes.
Parameters in Command Line Syntax
You can use the parameter file to override some settings in an action so that you can run variouspermutations without creating multiple actions.
An action parameter INI file contains property=value pairs for the settings that can beoverridden. When originally created, these will correspond to the properties saved withinthe actions.
Connections in the Command Line Syntax
Connection information is stored with the action, and passwords are retrieved from theconnectionpwds.ini file if you have selected the Save passwords option.
However, the connection information stored in an action is overridden if you use a connectionstring (-c schema/password@dbname) in the command line.
If connections are included in a parameter file and/or the command line, Toad will useconnections in the following order:
1. Connections specified on the command-line always override everything else.
2. If a connection is not present on the command line, then those specified in a parameter(ini) file are used.
3. If there are no connections on the command-line or defined from the AutomationDesigner's Run with connections option, then the connection bound to the action is used.
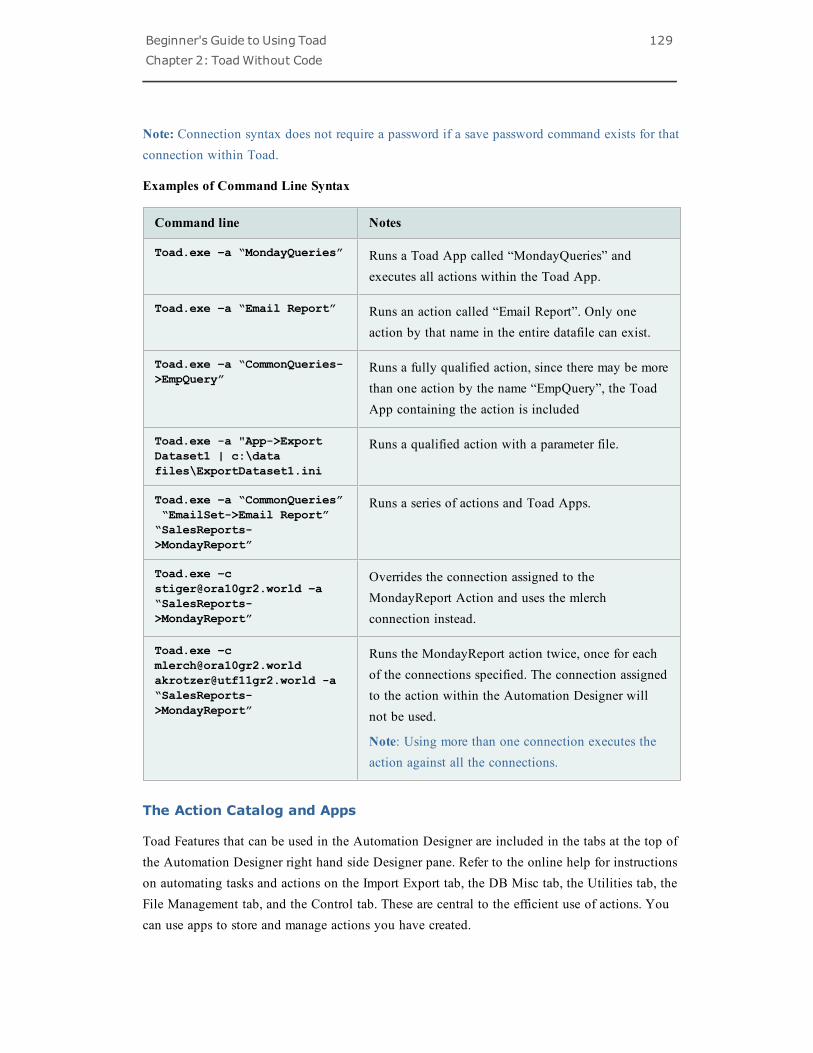
Beginner's Guide to Using ToadChapter 2: ToadWithout Code
129
Note: Connection syntax does not require a password if a save password command exists for thatconnection within Toad.
Examples of Command Line Syntax
Command line Notes
Toad.exe –a “MondayQueries” Runs a Toad App called “MondayQueries” andexecutes all actions within the Toad App.
Toad.exe –a “Email Report” Runs an action called “Email Report”. Only oneaction by that name in the entire datafile can exist.
Toad.exe –a “CommonQueries->EmpQuery”
Runs a fully qualified action, since there may be morethan one action by the name “EmpQuery”, the ToadApp containing the action is included
Toad.exe -a "App->ExportDataset1 | c:\datafiles\ExportDataset1.ini
Runs a qualified action with a parameter file.
Toad.exe –a “CommonQueries”“EmailSet->Email Report”“SalesReports->MondayReport”
Runs a series of actions and Toad Apps.
Toad.exe –[email protected] –a“SalesReports->MondayReport”
Overrides the connection assigned to theMondayReport Action and uses the mlerchconnection instead.
Toad.exe –[email protected]@utf11gr2.world -a“SalesReports->MondayReport”
Runs the MondayReport action twice, once for eachof the connections specified. The connection assignedto the action within the Automation Designer willnot be used.
Note: Using more than one connection executes theaction against all the connections.
The Action Catalog and Apps
Toad Features that can be used in the Automation Designer are included in the tabs at the top ofthe Automation Designer right hand side Designer pane. Refer to the online help for instructionson automating tasks and actions on the Import Export tab, the DB Misc tab, the Utilities tab, theFile Management tab, and the Control tab. These are central to the efficient use of actions. Youcan use apps to store and manage actions you have created.
Beginner's Guide to Using ToadChapter 2: ToadWithout Code
130
By ordering the actions within an app, you can run the actions in them from the command line,or use the Windows Scheduler to schedule them to run at a particular time. The order in whichthey are specified will be the order in which they are run.
Project Manager Overview
You can use the Project Manager to easily organize your work area. The window is organized ina tree structure, with every item in the tree being a node that points to a different object. TheProject Manager is highly configurable, letting you easily work with various objectssimultaneously. You can combine several different Oracle connections and FTP connections intoone project to make it easy to upload, download, and work with your databases. You can addsubproject folders to your projects to further organize your work.
If you have recently upgraded Toad and you want to view newly available Project Manageractions, such as right-click menus, select the Configuration screen.
Unless you have a highly configured Project Manager environment you may want to considerperforming a Reset all defaults to see all the new actions within the window itself.
To access the Project Manager
» From the View menu, select Project Manager.
The Project Manager has the following panes:
l Connections—The connection pane ( tab) is an area to work with various connections.
You can create new connections, end connections, run scripts from a particularconnection, and so on from this area.
l Projects—The Project Manager ( tab) uses the following types of nodes and tabs to let
you arrange your work:
Project Folder The overlaying organizational unit is the Project Folder tab. Thiscan contain other project folders, other types of folder, or othercontent. Multiple project folders can be created and arranged to suityour work style. The connections tab cannot be moved. The orderof tabs is preserved when you close and reopen the ProjectManager. Hovering your pointer over a project tab will display thefull path to the project file.
File Folder Use a File Folder node to represent a folder on a local or networkdisk.
Beginner's Guide to Using ToadChapter 2: ToadWithout Code
131
File Use a folder item node to represent a file on a local or networkdisk. These can include .sql files, .html files, .doc files, and so on.This node is located beneath a file folder node.
FTP Folder Use an FTP folder node to represent a folder on an external FTPserver. Contains FTP files.
FTP File Use an FTP file node to represent a file on an external FTP server.This node will always be beneath an FTP folder.
DB Schema You can add a Database Schema node to represent a connection toa schema on a database. Can contain database objects.
DB Object Within schema nodes, you can include database object nodes.These represent objects residing on a database. Must be containedin a DB Schema node.
Task Use the Project Manager to schedule tasks using the Windows TaskScheduler.
To Do List Represents an user-created checklist. To do items are added beneathit.
URL Represents an URL and can act like a shortcut to that site.
Configuring the Project Manager
The Project Manager can be configured to work in the way you work. You can specify thecommand Toad executes when you drag a file onto another file, or onto a node.
Double-clicking is also customizable, as are the menu items that display in the right-click(pop up) menu.
To configure the Project Manager
1. Click on the Project Manager toolbar.
2. Select or clear the options you want to configure.
Note: You can also choose to Reset all Defaults or Use defaults for a particular tab.
3. Click OK.
Clicking Reset all Defaults at the bottom of this dialog box will reset defaults on ALL tabs.
Beginner's Guide to Using ToadChapter 2: ToadWithout Code
132
Click the Use Defaults button on an individual tab to return to the default settings forthat tab only.
Adding Objects to Project Manager
You can add objects to your Project Manager simply by dragging them to the node where youwant them to reside. This way you can have your Project Manager set up however you like it,and the Nodes named by you.
You must drag the object to a node designed for it. (In other words, tables need to go to a tablesnode under the correct connection, and so on.) Toad will not let you drag an object to anunacceptable node.
To add objects by dragging and dropping
1. Select an object, or multi-select several objects in the Object list in the Schema Browser.
2. Drag to the node in the Project Manager where you want it to reside.
Using the right-click menu to add objects has both advantages and disadvantages. Chief amongits advantages is that you can create a new project on the fly.
All nodes beneath the new project are created and named for you.
To add objects using the menu
1. Select an object, or multi-select several objects in the Object list in the Schema Browser.
2. Right-click and select Add to Project Manager.
3. From the Select Project dialog box, either select a project name from the drop downmenu, or enter a new project name.
Working with Server Directories and Files
Another of the many strengths of the Project Manager is its ability to easily work with FTPserver directories and files.
After you have created an FTP folder and added server information to it you can createadditional nodes and servers quickly by using the copy nodes feature. You can also right-clickand select Rename to rename the node for a more logical representation of what the directorycontains, such as Toad UNIX Scheduler log files.
From here you can:
Beginner's Guide to Using ToadChapter 2: ToadWithout Code
133
l Select one or more server nodes, right-click and select Refresh server links. This buildsshortcuts to all the files underneath the selected server directories. Whenever you wantto get an updated list of the server directory contents simply select refresh to rebuildthe nodes.
l Drag-and-drop server file links to local directories to download the files.
l Drag-and-drop local file links to server directories to upload the files to the server.
l Drag files into the trash can to move them to the Recycle Bin.
Working with Local Files and Directories
Use Windows Explorer to drag-and-drop folders onto Projects to create links to local folders andfiles in the Project Manager. You can also right-click a Project and select Add | Folder andAdd | Folder Items.
Once you have shortcuts to local folders and files you can:
l Right-click folders and select Refresh folder links to automatically build a list ofshortcuts to all files in that folder
l Drag files onto one another to perform Toad’s file compare.
l Drag files and folders onto server directories to upload them. Dragging a folder onto aserver folder will upload all the underlying files.
l Drag files into the trash can to move them to the Recycle Bin.
Format Files
You can format your files from within the Project Manager, or as an Action in the ToadAutomation Designer. This lets you more easily convert scripts, procedures, functions, and so onto fit your company's formatting requirements.
The files are automatically formatted and the results of the formatting process are displayed inthe Output window, Formatting Results tab. If there are syntax errors within the code thatprevent proper formatting, Toad will list these as well.
Files to be formatted must be included in the Project Manager as nodes.
To format one file from the Project Manager
1. In the Project Manager, select the file you want to format.
2. Right-click and select Format Files.

Beginner's Guide to Using ToadChapter 2: ToadWithout Code
134
To format multiple files from the Project Manager
1. Do one of the following:
l In the Project Manager, select the files you want to format.
l Select the folder or project nodes that directly contain the files you want to format.
2. Right-click and select Format Files.
To create a Format Files action
1. From the Automation Designer, click the Utilities tab.
2. In the navigation panel, select the App where you want formatting to occur.
3. Click and then click in the app.
Checking Files for Syntax
You can check the syntax of your files from the Project Manager tree. You can check multiplefiles, or check them one at a time.
Results display in the Output window, on the Syntax Check Results tab.
To check files for syntax errors
1. Do one of the following:
l Select one or more files from the Project Manager tree.
l Select the folder or project nodes containing the files you want to check.
2. Right-click and select Check Syntax.
File to FTP
You can upload a file directly from the Editor to FTP using the Project Manager.
To move a file from Editor to FTP
» From the Editor, click and drag the tab of a loaded file from the Editor to an FTP node inthe Project Manager.
Beginner's Guide to Using ToadChapter 3: Toad and Your Code
135
Chapter 3: Toad and Your CodeToad is the premier Oracle tool for working with SQL and PL/SQL. This chapter is for the moreseasoned Oracle user and for the Toad user ready to learn more.
Navigator 135
Navigator Options 136
Bookmarks 137
Moving Between Editor Tabs 138
Work with Statements and Scripts 138
Save and Reuse SQL Statements 152
Work with Results 156
Code Analysis 159
Work with PL/SQL 167
SQL Tuning 171
Query Builder 176
NavigatorThe left pane of the Editor contains the Navigator, which lists statements, objects or packagecontents contained in the Editor.
To access or hide the Navigator
» Right-click the Editor and select Desktop | Navigator.
The list is displayed in a hierarchy, with each element broken out separately.
If you want to hide some of these elements, you can right-click the hierarchy and selectNavigator Options.
To display the entire statement
» Hover the pointer over an item in the Navigator. Information about it is displayed asa tooltip.
To jump to the statement
» Click on the statement in the Navigator and the cursor jumps to that point in the Editor.
Beginner's Guide to Using ToadChapter 3: Toad and Your Code
136
To refresh the navigator panel
» Do one of the following:
l Save the current file
l Click the Refresh button.
To sort statements
» Select Sort to sort the tree alphabetically.
Navigator OptionsIn the Editor, you can configure the Navigator panel to only display declarations that you wantto see. In addition, you can change certain aspects of the panel to suit the way you work. SeeNavigator for more information about the navigator panel.
To access the Configure Navigator Panel
» From the Navigation Panel, right-click and select Navigator Options.
Navigator options
Option Description
Showcomments
Show or hide comments in the code.
Showdatatypeforvariables,constraints,parameters,etc.
Show the datatype next to the declaration.
Showparameterdirection
Show the mode of a parameter (IN, OUT, or IN OUT) . Declarations displaydifferently if the parameter is an input or output parameter. If this option isselected, labels on the tree will take up a small amount of extra space.
Grouping Select one of these options to control how statements are grouped.
l Not grouped: Navigator nodes are created as root nodes for eachstatement. No group nodes are used.
Beginner's Guide to Using ToadChapter 3: Toad and Your Code
137
Option Description
l Group consecutive runs of similar statements: Preserve the order ofthe statements in the source code, but create a group node for eachstatement type as it occurs in the source. Group multiple consecutiveruns of a statement under one node. Group a single run of anystatement type under a node. For example, if the code contains threeconsecutive SELECTs, then one Anonymous Block, then oneSELECT, then one Anonymous Block, the tree will have aSelect node, followed by an Anonymous Block node, followed byanother Select node, and finally another Anonymous Block node.
l Group all similar statements: Use one node for each statement type.The order of the tree will not match the order of statements in thesource.
NodeExpansion
Control whether the Navigator hierarchy nodes are collapsed or expandedwhen the Navigator opens, or after the options dialog closes.
CharacterCase
Controls whether declarations display in uppercase, lowercase, initial caps(mixed case), or the default.
By default, the Navigator shows identifier names in the case as it exists inthe source. The Navigator shows the rest of the node text as it is stored byToad internally. For example, Toad uses initial caps for the word "Select."
Case control applies to unquoted identifiers only. Toad preserves the case ofidentifiers that are within double quotes, regardless of the Character Casesetting. For example, "MyStoredProcedure" is shown in the Navigator ininitial caps, even when the case is set to upper or lower case with theCharacter Case option.
Font Select the characteristics of the font that is used in the Navigator tree.
BookmarksUse bookmarks to help you manage files. They mark a position within the Editor so that you caneasily jump back to that line. You can set up to ten separate bookmarks within one Editor.
Note: All keystrokes assume you have not altered the default Editor keys.
Beginner's Guide to Using ToadChapter 3: Toad and Your Code
138
To set a bookmark
» Right-click and select Toggle Bookmark | Bookmark# (CTRL+SHIFT+# where # is anumber between 0 and 9).
The bookmark number displays in the Editor gutter.
To clear all bookmarks
» Right-click and select Clear All Bookmarks.
To clear one bookmark
» Right-click and select Toggle Bookmark | Bookmark# (CTRL+SHIFT+# where # is apreviously defined bookmark between 0 and 9).
To jump back to a bookmark
» Right-click and select Go to Bookmark (CTRL+# where # is a previously definedbookmark between 0 and 9).
Note: The # must be called from the number row on the keyboard. Using theNumber pad will not call the bookmark.
Moving Between Editor TabsThere are several ways to move between tabs in the Editor.
To move between tabs:
» Do one of the following:
l Click the tab you want to open.
l Press ALT+PageUp or ALT+PageDown to cycle through them.
l If you have opened them using the CTRL+Click functionality within theEditor, click the navigation buttons in the Editor toolbar and select eitherscroll forward and back through them in the order they were opened, orselect from a drop-down order.
Work with Statements and ScriptsToad provides many features for speeding up the creation and management of your statementsand scripts.
Beginner's Guide to Using ToadChapter 3: Toad and Your Code
139
Create and Manage Code Snippets
You can create and reuse code snippets in the Editor. The file associated with these items islocated in:
C:\"Program Files"\Dell\Toad for Oracle <version>\ClientFiles\User Files\CodeSnippets.dat
To use Code Snippets
1. From the View menu, select Code Snippets.
2. Select a category of code from the box at the top of the window.
3. Select the code from the list. You can:
4. View a description of the code in the area below the code list
5. Double-click the code to insert it into the active editor tab
6. Drag and drop code into the editor
To Edit Code Snippets
1. From the Toad Options window, select Editor | Code Assist.
2. In the Code Snippets area, select the category of snippets you want to edit and thenclick Edit.
3. Select the snippet you want to edit, and click Edit.
4. Edit the Oracle Function or the description and click OK.
To Add Code Snippets to an existing category
1. From the Toad Options window, select Editor | Code Assist.
2. In the Code Snippets area, select the category of snippets and then click Edit.
3. Click Add.
4. Enter the code in the Oracle function box.
5. Enter a description in the Description box.
6. Click OK.
To Add Code Snippets to a new category.
1. From the Toad Options window, select Editor | Code Assist.
2. In the Code Snippets area, click Add.
3. Enter a category name in the Category box.
4. Enter the code in the Oracle function box.
Beginner's Guide to Using ToadChapter 3: Toad and Your Code
140
5. Enter a description in the Description box.
6. Click OK.
To highlight a snippet
1. Place your code in the snippet you want to highlight.
2. From the Editor menu, select Highlight Snippet (CTRL+H).
Code Templates Tab
Within the Language Management options area, you can set up and delete code templates fromthis tab. Different code templates can be developed for different languages.
To add a template
1. From the Toad Options | Editor - Behavior page, select the language where you want toadd a code template and click Code Templates.
2. Click Add.
3. Enter a shortcut name and a description. Click OK.
4. Click in the Editor window below the template list and enter the text you want to beincluded. You can include substitution variables and cursor placement as described inCode Completion Templates.
5. Click OK.
To edit a template
1. From the Toad Options | Editor - Behavior page, select the language where you want toadd a code template and click Code Templates.
2. Select a completion template and then click Edit.
3. Change the shortcut name and a description. Click OK.
4. Click in the Editor window below the template list and edit the code template.
5. Click OK or Apply.
Toad offers advanced templates. An advanced template allows you to use pipe characters literallyin the code template. A simple (not advanced) template uses the pipe character to determinecaret placement when the template has been inserted into the Editor. An advanced template uses<caret> to determine where the caret will go. Advanced templates also support inserting datafrom clipboard. Clipboard data is inserted where <paste> displays.
Beginner's Guide to Using ToadChapter 3: Toad and Your Code
141
To use the advanced template
1. In the View | Toad Options | Editor - Behavior page, click Code Templates.
2. In the template grid, select the advanced checkbox beside the template you want to use inthe advanced mode.
Code Completion Templates
Code Completion Templates use a manual keystroke (CTRL+SPACE) to perform the substitution.Code templates are more than a single phrase and can contain line feeds, substitution variablesand a cursor position indicator.
You can edit the Code Completion templates directly in the Language Management, CodeTemplates tab. See "Code Templates Tab" (page 140) for more information.
Example
One of the code templates defined in Language Management is:
entire cursor block (crbl)
DECLARE
CURSOR c1 IS
SELECT | FROM WHERE;
c1rec IS c1%ROWTYPE;
BEGIN
OPEN c1;
LOOP
FETCH c1 INTO c1rec;
EXIT WHEN c1%NOTFOUND;
END LOOP;
CLOSE c1;
END;
Where:
l "crbl" is the macro for the template (the text YOU type)
l "entire cursor block" is the description of the template
l everything following until the next template is the body of the template
Beginner's Guide to Using ToadChapter 3: Toad and Your Code
142
Note: Do not leave spaces between the end of the template description and the final rightbracket! NT4.0 API calls to manage profile strings have a bug that will cause reading of thetemplates file to fail.
Keyboard Shortcuts
The default keyboard shortcut for Code Completion templates is CTRL+SPACE. Enter thetemplate name (such as crbl) and press the shortcut to expand it.
Using a Template
When you enter the name of a template and press the shortcut key, Toad follows the followingprocedures:
l If the name you have entered does not match any of the names on the code templatelist, a drop-down listing of available code templates displays so you can choose thecorrect template.
l A dialog box displays listing the substitution variables and prompting you toenter values.
l Expands the code and replaces variables.
l Removes the cursor placement marker, and places the cursor there.
To use the code template
» Type the macro (for example, crbl) and then press CTRL+SPACE to load the body ofthe template and place the cursor at the position of the vertical pipe character. If the wordor phrase under the cursor does not match an existing macro exactly, a drop-down list ofall macros is displayed.
Cursor Placement:
If Toad finds a single pipe ( | ) in the template body, then when the substitution of the templateis complete, the cursor is positioned at that point in the code. The pipe is removed, as it is usedonly as a marker for the cursor position. Only one pipe can be used this way in a code template.
Substitution Variables:
The Code Completion templates also support substitution variables. Enter the substitutionvariable in the form of an ampersand followed by a valid simple Oracle identifier. For example,&1 is not a substitution variable, but &a is.
When a template containing substitution variables is selected, you will be prompted to entervalues. Any occurrence of the substitution variable is then replaced with the entered value.

Beginner's Guide to Using ToadChapter 3: Toad and Your Code
143
Editing the Code Template List
Toad provides a list of default templates. As you use this feature, however, you will createtemplates that work better for your purposes, and you will want to edit the default templates.
You can edit and add templates to suit your needs in the Language Management window.
Auto Replace Substitutions
A substitution is a text phrase that corresponds to replacement text. For example:
l If you specify a substitution pair of ACT = ACTIVITY_CENTERS, when you type ACTand press space (or other word delimiters), ACT is automatically replaced byACTIVITY_CENTERS
l If you specify a substitution pair of NDF = NO_DATA_FOUND and you type NDF andpress a delimiter, NDF is automatically replaced by NO_DATA_FOUND
Auto Replace Substitutions are different from aliases in that you can use any group of charactersto define and complete the replacement. Aliases do not change the text in the SQL. They are amethod of referring to a table by a different name. Substitutions will actually change the textwithin your code to match the target keystrokes.
To edit Auto Replace entries
1. From the Toad Options | Editor - Behavior page, click Auto Replace.
2. Make changes in the Auto Replace grid.
Using Substitutions
When auto-replace is active, Toad uses several characters as auto replace activation keys. Toadwill automatically replace an activation key with the substitution value when it reaches aterminator, for example the space key. For example, "teh" is by default set to replace with "the"in the Editor. Or, you can enter "pack" and Toad will expand it to "package".
An activation key will cause a matched "replace" string immediately before the cursor to bereplaced by the "with" substitution value. For example, if you have dept = DEPARTMENT inyour auto replace file, you can enter the following:
dept[space] and the Editor will expand to DEPARTMENT .
Or, you can enter dept: and the Editor will expand to DEPARTMENT:.
Or you can enter dept; and the Editor will expand to DEPARTMENT;.
Note: The activation key is always included in the expanded substitution.
Beginner's Guide to Using ToadChapter 3: Toad and Your Code
144
You can edit this list of keys in the box if you have other needs.
Importing and Exporting Files
Also from the Editing options window, you can import and export auto substitution files.
Toad comes with a handful of substitution pairs. You can edit and add to the list from the AutoReplace dialog. You can then export the settings to a text file. Alternately, you can create or edita substitutions file manually and then import it.
Export: Saves the auto replace settings to a separate text file. If you make many changes to yourauto replace settings, it is recommended that you export them regularly for back up.
Note: If you do not export your settings to a file before you import a file, they will be lost.
Import: You can import a text file into Toad. This file can be created independently or byexporting the settings you have created in Toad.
Importing a file overwrites the current settings.
Editing a substitutions file
Because it can be tedious to add large amounts of information to the substitution file directlyfrom the interface, you may want to edit or create a text file directly.
Use the format of string=replacement string. For example:
aax=AAX_ACCESSGROUP_APPLICATION
aca=ACA_ACTIVITY_ACTION
acc=ACC_ACTIVITY_CATEGORY
acd=ACD_ACTION_DESCRIPTION
acp=ACP_ACTIVITY_CONTACT_PARTIC
Code Folding
Code folding lets you collapse portions of your code so that you can see more of the code youneed to see. Then you can expand it when you need to work with the folded code.
To enable code folding
» From View | Toad Options | Editor | Behavior, select Enabled under Folding.
The folding indicator is the icon in the code gutter that you click
Beginner's Guide to Using ToadChapter 3: Toad and Your Code
145
To fold and unfold code selection
» To fold a segment, click the minus sign (-) in the Editor gutter.
» To unfold a segment, click the plus sign (+) in the Editor gutter.
To set the appearance of the fold indicator
» To change the style of the fold indicator, go to View | Toad Options | Editor | Behavior,then select from the Style dropdown.
» To change the colors of the fold indicator, go to View | Toad Options | Editor | Font andStyling, then select Fold Indicator (appearance when a code block is expanded or FoldIndicator, Active (appearance when a code block is folded).
Wrap Utility
Toad's Wrap Utility provides an easy way to access Oracle’s Wrap Code utility. The utilityencrypts PL/SQL code. This window is connection independent so you do not need an opendatabase session to use it.
Note: You must use valid PL/SQL for the utility to wrap the code. If the contents of the InputText and Wrapped Text tabs are the same, there is probably an issue with your code.
To use Toad’s Wrap Utility interface, it must be able to find the Oracle Wrap Code utility. Toassure that Toad can find the utility, check to see that one of the following is true:
l The Wrap Utility is in a recognized Windows path.
l You have added the path to Toad’s list from the View | Toad Options |Executables page.
To use the Wrap Utility
1. Select Utilities | Wrap Utility.
2. Enter code in the Input Text tab or click to open a file.
3. Click .
4. Click to save the wrapped text or to send it to the Editor.
Results Grids
At the bottom of the Editor are tabs that display results of your actions within the edit window.
Depending on your Toad Edition, any of these may display results:
Beginner's Guide to Using ToadChapter 3: Toad and Your Code
146
l Data Grid
l DBMS Output area
l Script Output area
l Script Debugging area
The data grid displays fetched data. The results panel contains tabs for Data, Explain Plan, AutoTrace, DBMS Output, Code Statistics, and Script Output. If you have the debugger module, youmay also have the Script Debugger displayed.
A horizontal splitter between the Editor and results panel lets you size each component.
The data grid is user configurable. It includes:
l optional movable columns
l support for LONG and LONG RAW columns by popup windows
l support for exporting data to disk
l printing
l editing data
The grid also has a right click menu for quick access to grid configuration options. If theresulting dataset is editable, several of the buttons on the grid navigator will become enabled(insert, delete, post updates, and so on).
Describe (Parse) Selected Query
Use this function to see what columns would be returned IF the query were executed. This isuseful for tuning a LONG query before it is executed.
To describe a query
» Select Editor | Describe (Parse) Select Query (CTRL+F9).
Strip Code Statement and Make Code Statement Functions
The Editor window contains two functions that simplify copying SQL statements from Toad tocode development tools such as Delphi, VB, C++, Java, or Perl, and from those codedevelopment tools back to Toad. The following functions are available from the Editor menu:
l Strip Code Statement (CTRL+P)
l Make Code Statement (CTRL+M)
Beginner's Guide to Using ToadChapter 3: Toad and Your Code
147
Strip Code Statement
This function strips off the code development tool syntax from the SQL statement, ready toexecute in Toad. For example, taking this VB code from the VB development tool, copying it,pasting it into Toad, and running Strip Code Statement, changes the SQL statement from this:
Sql = " select count(*) as cnt"
Sql = Sql & " from all_tables"
Sql = Sql & " where owner = 'DEMO'"
Sql = Sql & " and table_name = 'EMPLOYEE'"
to this:
select count(*) as cnt
from all_tables
where owner = 'DEMO'
and table_name = 'EMPLOYEE'
Now the SQL is ready to execute in Toad.
If you have multiple SQL statements in the Editor, highlight the statement you want to stripbefore executing the Strip Code Statement function.
Make Code Statement
This function adds the code development tool syntax to the SQL statement in the Editor andmakes it ready to paste into the appropriate development tool.
When making code statements, rather than changing the code in the Editor window as the StripCode Statement function does, the Make Code Statement function takes the currently highlightedSQL statement, translates it into the code development tool syntax, and copies it to theclipboard. You can now switch to the code development tool and paste in the results. A messagedisplays in the status panel such as "VB statement was copied to the clipboard".
If you have multiple SQL statements in the Editor, highlight the statement you want to makebefore executing the Make Code Statement function.
Selecting the Code Development Tool
The default selection is VB. Click the arrow beside or on the Editor toolbar to change the
default selection.
Beginner's Guide to Using ToadChapter 3: Toad and Your Code
148
You can also select the code development tool in the View | Toad Options | Editor | CodeAssist | Make Code Format box.
The Make Code Format box lets you select a language syntax for Toad to convert a SQLstatement into (Make Code Statement function) and out of (Strip Code Statement function).Currently, Delphi, VB, C++, Java and Perl are supported. You can also create your own languagetemplates.
Creating Make Code Templates
You can create your own Make Code Templates.
To create a Make Code template
1. From the Toad Options window, select Editor | Code Assist.
2. In the Make Code area, click Add.
3. Use the following variables to create your own language template:
l %SqlVar% - this is the MakeCode variable entered in the Toad Options | Editor |Code Assist | MakeCodeVariable box. Using a variable here is optional.
l %SqlLength% - This will be replaced by the number of characters in all selectedSQL, on one or multiple lines.
l %SqlText% - This is replaced by the first line of SQL you have selected.
l %SqlTextNext% - This will be replaced by any subsequent lines of SQL you haveselected. This is cumulative and includes ALL subsequent lines of SQL.
Note: For the best output result, it is recommended that the %SqlTextNext% variable beincluded on a separate line. Use the left and right brace for comments.
Remarks (such as template name) should be included in brackets.
4. Click OK.
Examples
Using the following SQL:
Select *
from
Employees
and using the following code templates, you will get the results below.
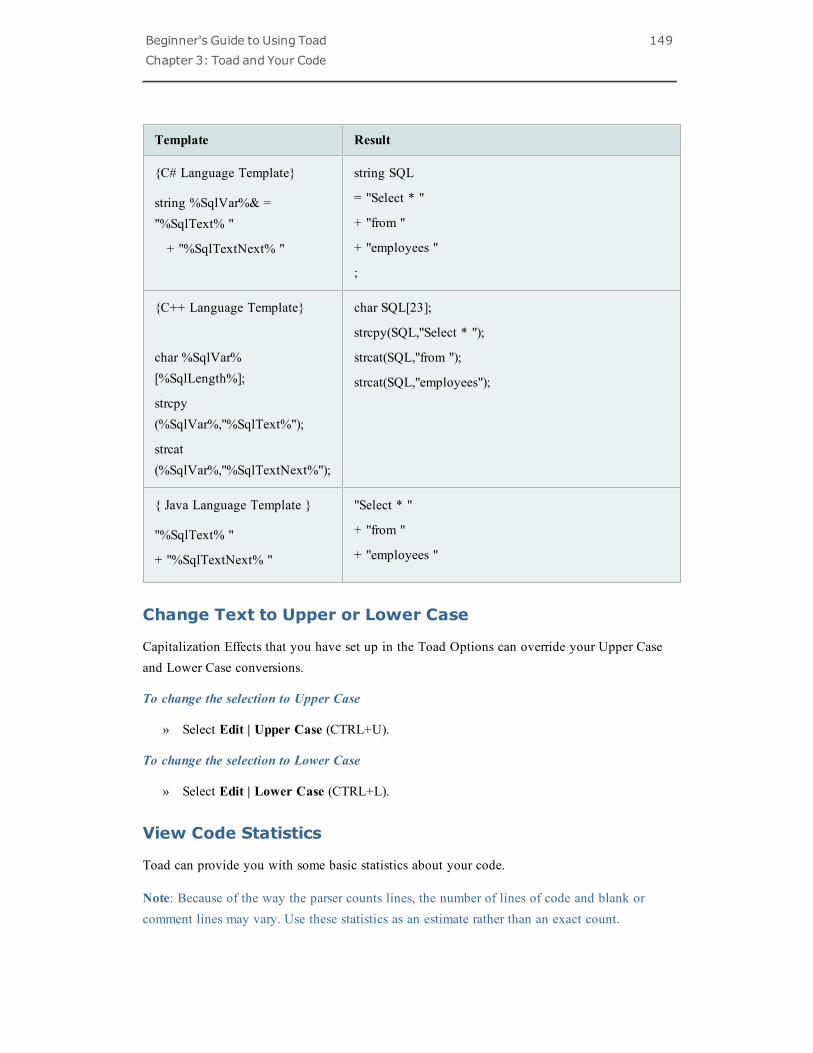
Beginner's Guide to Using ToadChapter 3: Toad and Your Code
149
Template Result
{C# Language Template}
string %SqlVar%& ="%SqlText% "
+ "%SqlTextNext% "
string SQL
= "Select * "
+ "from "
+ "employees "
;
{C++ Language Template}
char %SqlVar%[%SqlLength%];
strcpy(%SqlVar%,"%SqlText%");
strcat(%SqlVar%,"%SqlTextNext%");
char SQL[23];
strcpy(SQL,"Select * ");
strcat(SQL,"from ");
strcat(SQL,"employees");
{ Java Language Template }
"%SqlText% "
+ "%SqlTextNext% "
"Select * "
+ "from "
+ "employees "
Change Text to Upper or Lower Case
Capitalization Effects that you have set up in the Toad Options can override your Upper Caseand Lower Case conversions.
To change the selection to Upper Case
» Select Edit | Upper Case (CTRL+U).
To change the selection to Lower Case
» Select Edit | Lower Case (CTRL+L).
View Code Statistics
Toad can provide you with some basic statistics about your code.
Note: Because of the way the parser counts lines, the number of lines of code and blank orcomment lines may vary. Use these statistics as an estimate rather than an exact count.
Beginner's Guide to Using ToadChapter 3: Toad and Your Code
150
To view formatting statistics
1. Open the code in the Editor.
2. Right-click and select Formatting Tools | Profile Code.
Swap This/Prev Lines
The Edit | Swap This/Prev Lines menu item switches the line your cursor is on in the SQLscript with the previous line.
For example, if the cursor is on Line 8, then when you swap, what was on line 8 would now beon line 7 and what was on line 7 would now be on line 8.
Find Closing Block
Closing blocks are controlled by the Language Management options. You can turn the staples(brackets) on and off to mark them.
Variables Window
The Variables window displays when you execute a statement from the Editor window, if youhave specified parameters in your SQL query. For example, execute the following:
SELECT * FROM EMPLOYEE WHERE EMPLOYEE_ID =:EMPID
Select each bound variable, select the data type, and enter the value. Click OK to completerunning the resulting SQL statement.
Note: Bound parameter substitution is NOT supported in anonymous PL/SQL blocks.
To delete a bound variable
» Select it and click Delete.
To add a deleted bound variable
» Click Scan SQL. Toad re-scans the SQL and enters the variables.
Aliases
Setting up table aliases lets you create shortcuts to columns of a query. You can then use thealias in a SQL statement instead of a long column name or path.
Toad Table Aliases should not be confused with Oracle RDBMS table aliases. RDBMS tablealiases are used to qualify columns in a multi-table SQL statement.
Beginner's Guide to Using ToadChapter 3: Toad and Your Code
151
You can set up and edit Toad aliases with a text editor. Aliases are stored in the aliases.txt file.See "ALIASES.TXT file" (page 151) for more information.
No ini changes are required to use aliases. Use them in the Editor by entering the alias instead ofthe full table name, for example:
SELECT DEPT.
A column list will pop up for the correct Oracle table (in this case, DEPARTMENT).
If you set up these table aliases in ALIASES.TXT they will be presented on the Query Builderdialog box when you select that table to build your query.
To complete the SELECT SQL statement above, use Auto Replace Substitutions names similarlyto the table aliases.
These are accessible through the View | Editing Options | Auto Replace tab.
ALIASES.TXT file
Because aliases.txt is a text file, you can edit it manually using a text editor.
Caution: Do this when Toad is not running. Otherwise the file will be overwritten atshutdown, or whenever you save options.
You might want to manually edit the file to pre-build a list of aliases. Alternatively, you maywant to edit it manually to perform maintenance on it and remove extraneous or multiple entries.Currently there is no way to do this from within Toad.
The text file that controls the alias list is found in /Toad/User Files/aliases.txt. Theformat of aliases.txt is as follows:
table_name=alias
>for example:
AAX_ACCESSGROUP_APPLICATION=aax
ADD_ADDENDUM=add
ADT_ADDRESS_TYPE=adt
AFP_ACTIVITY_FIRM_PARTIC=afp
AGX_APPLICATION_GROUP_ITEM=agx
DEPARTMENT=dept
Beginner's Guide to Using ToadChapter 3: Toad and Your Code
152
Skip Aliases
There may be times when you have an object name that also happens to be an alias for anothertable. If you try to use the normal Columns Select methods, Toad returns the columns for thetable to which the Alias refers. You can skip the alias and open the columns list for the object,rather than the alias.
To skip an alias
» Select Edit | Picklist drop-down no alias (CTRL+SHIFT+T).
Track Aliases
Toad will keep track of aliases for you as you create them using SQL. Toad scans the FROMclause of a select statement to check for tables and aliases.
Note: Toad only finds the first FROM clause in any one statement. So extra tables and aliases incomplex statements such as unions or subqueries will not be found.
If a table alias is found in the FROM clause of a current SQL statement, Toad will dothe following:
l For aliases already on the list, you do not need an alias defined in the FROM clause forToad to use the columns drop-down feature.
l If an alias is identified in the SQL statement, and a Columns Select is used on the alias, itis automatically added to aliases.txt.
l If there is already an entry for that alias in aliases.txt, the pair defined in the currentFROM clause replaces the old entry.
Save and Reuse SQL StatementsThrough the SQL Recall feature, you can save SQL statements that you want to reuse and thenopen them in the Editor at any time.
Save and Reuse SQL Statements
Through the SQL Recall feature, you can save SQL statements that you want to reuse and thenopen them in the Editor at any time. All saved statements are shown on the Saved tab of theSQL Recall pane.
Beginner's Guide to Using ToadChapter 3: Toad and Your Code
153
To view the SQL Recall pane
» From the main Toad menu bar, select View | SQL Recall (F8).
The best way to save SQL statements is by giving them names through the Named SQL feature.When a statement has a name, you can easily access it in the Editor by selecting its name from alist. Additionally, when a meaningful name is assigned to a statement, you can more easilydetermine what it does, rather than having to read through the code. If you save a statementwithout a name, you still have access to it from the SQL Recall Pane.
You can specify a category in which to save a statement. Categories enable you to organize yourstatements, for example by application or type of data.
To save a statement
1. Make certain the tab that contains the statement is active in the Editor.
2. In the Toad toolbar, select Editor | Add to Saved SQLs.
3. Select a category or specify a new one. Optionally, assign a name and select a schemaand database. Note: The name is case sensitive. For example, you can save both "sql1"and "SQL1".
4. Click OK.
To use a saved statement in the Editor
1. Select one of the following options:
l Press CTRL+N in the Editor and select the statement from the pick list.
l Enter ^MyNamedSQL in the Editor, where MyNamedSQL is the name of yoursaved SQL statement. Toad replaces the SQL name with the saved statementat execution.
l Double-click or drag the statement from the SQL Recall pane.
View Recently Executed SQL Statements
Through the SQL Recall feature, Toad automatically collects SQL statements that are executed inthe Editor and retains a chronological record of them. You can view, open, and save thosestatements from the Recent tab of the SQL Recall pane.
To view the SQL Recall pane
» From the main Toad menu bar, select View | SQL Recall (F8).
Beginner's Guide to Using ToadChapter 3: Toad and Your Code
154
Save a recent statement
You can save any statement to your Toad environment so that it can be reused. If statements arenot saved, they are eventually discarded as new statements are executed and added to the list.You can specify a category in which to save a statement. Categories enable you to organize yourstatements, for example by application or type of data.
To save a statement
1. Select the statement or statements that you want to save.
2. Right click and then select Add to Saved.
3. Select a category or specify a new one, and then click OK. The statement is saved to thatcategory on the Saved tab.
4. To name the SQL, right-click the statement and then select Properties.
Edit a statement
You can edit a statement in the memo pane. You can only edit a saved statement (one on theSaved tab) and only one statement at a time. The changes update the saved statement. Statementson the Recent tab are read-only.
You can send a statement to the Editor to edit. Select one of the following options:
l Select the statement and then select an option from in the SQL Recall toolbar:
Append it to the code in the active tab, open it in a new tab, or replace the current code
in the active tab. Note: The most recently used option is the default for .
l Double-click the statement. The statement is displayed in a new tab of the Editor.
l Drag the statement from the SQL Recall pane to any location in the active tabof the Editor.
Note: To copy any part of a statement from the memo pane, select the code then right-click andselect Copy.
Import and Export Saved SQL
You can export your saved SQL from SQL Recall for use by others, and you can import savedSQL into your own Toad environment.
You can export your recent statements, your saved statements, or both, or you can select specificcategories or statements to export.
Beginner's Guide to Using ToadChapter 3: Toad and Your Code
155
Note: This feature was introduced in Toad 11, and consequently you can only import these fileswith Toad 11 and later versions.
To export saved SQL
1. Select View | SQL Recall (F8).
2. If you want to export specific statements, select them.
3. Click on the SQL Recall toolbar.
Tip: You may need to expand the SQL Recall pane to see the button.
4. Under Statements, select the types of statements to export*:
All: export all statements from Recent and Saved tabs.
Recent: export only the statements on the Recent tab.
Saved: export only the statements on the Saved tab.
Selected: export only the statements that you explicitly select.
5. Under Format, select the output format:
SQL Recall data file: Save as the file type used by Toad to store recent and savedstatements.
Single File: Save as a single text-based file.
Individual Files: One file for each Saved category and one for all Recent statements:Save one file for each Saved category and save all Recent statements in one file. (Whetherthese outputs will be present depends on what you selected under Statements.) If youselect this option, select an extension under File Extension.
*Note: Recently executed statements are always stored in one file. Saved statements are storedeither by category name or by a user-defined name, depending on how you specified the export.
To import saved SQL
1. Click on the SQL Recall toolbar.
Tip: You may need to expand the SQL Recall pane to see the button.
2. Select the saved SQL export file.
Beginner's Guide to Using ToadChapter 3: Toad and Your Code
156
3. Select Append mode to add the imported SQL to your existing library of recent or savedstatements, or select Replace to replace the existing library of recent or saved statementswith the contents of the imported file. Important! A Replace cannot be undone, and yourexisting statements will be permanently overwritten by the imported ones, including anycategory names.
4. Click OK.
Work with ResultsThe SQL Results Grid is found in the Data tab in the lower portion of the Editor, and the Datatab in the right hand detail panel of the Schema Browser. Results are displayed in the EditorData grid. There are many things you can do with the results of a query.
Auto Trace
Auto Trace is a mini version of SQL Trace that displays quick results directly on the client. InToad, the results are displayed beneath the Editor or the Query Builder window. From the AutoTrace results area you can sort columns, print the grid, and copy the results to the clipboard.
Auto Trace is one of many optimization features Toad provides.
Notes:
l Auto Trace forces a read of all data from the result of the query. This can take some time.If a query may return a large number of rows and time is a factor, you should not useAuto Trace.
l This feature requires access to some V$ tables.
To enable/disable Auto Trace and SQL Trace
» Right-click in the Editor and select the Auto Trace menu option. A checkmark indicatesit is enabled. Or, in the Editor results area, click the Trace tab and then the Auto Traceor SQL Trace tab and select or clear the Enabled checkbox.
To view Auto Trace results
» In the Editor results area, click the Trace tab. If the Trace tab is not visible, right-clickand then select Desktop | Trace.
Beginner's Guide to Using ToadChapter 3: Toad and Your Code
157
Optimization
Toad offers several features to help you optimize queries or view the performance statistics forthe server. Although Toad provides access to these statistics and/or Oracle utilities, this sectiondescribes only how to use the features within Toad, not how to interpret the results.
For an excellent guide on SQL tuning, we suggest Oracle SQL - High Performance Tuning byGuy Harrison available from Prentice Hall Press.
Feature Description
OptimizeCurrent SQL
Use Auto Optimize SQL to quickly optimize a single SQL statement.Toad searches for faster alternatives and allows you to compare them tothe original statement and each other.
SQL Optimizer If you have a Toad Edition that includes the SQL Optimizer package,you can use it to help you optimize your code.
Explain Plan Explain Plan shows the path and order in which Oracle will process yourstatement. By processing Explain Plan on variations of a statement, youcan see how the adjustments will affect the execution.
SQL Trace SQL Trace is a server-side trace utility that displays CPU, IOrequirements, and resource usage for a statement. SQL Trace is a muchmore complete utility than Auto Trace; however, viewing the results canbe difficult because the output file is created on the server.
Auto Trace Auto Trace is a mini version of SQL Trace that displays quick resultsdirectly on the client. In Toad, the results are displayed beneath theEditor window.
OptimizerMode
You can set the optimizer mode for the current session. This will affectall queries (including Toad's own) for the duration of the session oroptimizer setting.
Note: Optimizer mode is not available in Oracle 10g databases. ThereforeToad disables this option when it is connected to a 10g database.
Row Numbers
Toad will display row numbers in the Editor data grid if the option to do so is enabled.
Beginner's Guide to Using ToadChapter 3: Toad and Your Code
158
Make sure the View | Options | Data Grids tab | Show row numbers in all grids (applies todata grid on Browser also) checkbox is selected.
The total number of rows returned in the resultset will display in the status bar at the bottom ofthe window only after you have scrolled to the end of the resultset. This is because the resultsetis fetched only as required, to improve overall performance. When the last row is fetched, Toadwill display the total count.
To return the Oracle pseudo-column ROWNUM in the SQL Results grid, add "ROWNUM"to the query:
select rownum, emp.* from employee emp
Remember that rownum is an Oracle pseudo-column, not stored with the table definition or data,but derived when queried.
To return the ROWID in the query, specify the column and the datatype:
select rowidtochar(rowid), emp.* from employee emp
Note: You can also enable "Show ROWID in data grids" from View | Options | Data Grids tabby clicking in the checkbox. This will accomplish the same thing without resorting to coding.
Saving Toad Query Results
Any of Toad's window query results can be saved to the Windows Clipboard or to a file by theprocedure below. Some dialog boxes do NOT have a "Copy to Clipboard" or "Save to Disk"function. This duplicates that functionality.
To save query results
1. Turn on spooled output to disk file: Database | Spool SQL | Spool SQL To File.
2. Run the desired Toad window (for example, the Schema Differences window) select eachdesired tab.
3. From the User Files folder, open DEBUG.SQL.
4. Copy each SQL into the Editor window.
5. Run each SQL in the Editor window, substituting hard coded values for the bindparameter variables, or just enter them when prompted in the Variables dialog box.
6. Save the grid contents to clipboard or disk file, using right-click, Export Dataset.
Beginner's Guide to Using ToadChapter 3: Toad and Your Code
159
Time Values
When displaying times with dates, Delphi, and thus, Toad, will suppress the time values if theyare 12:00:00 AM (midnight). The time portion of the date fraction is zero, so Toad adds no valueto the display of the date.
Remember that Oracle stores dates as a big fraction number offset from January 1, 4712 B.C. It isthen converted to a complete date and time. It is also good well past Y2K.
Performing the query "Select sysdate from dual" will display the time, and similarly, queries ofDATE datatype columns will display the time if it is not midnight.
The time drop-down in View | Toad Options | Data Grids does not affect this output of time.
Code AnalysisCode Analysis enables you deploy an automated code review process in your environment thathelps you ensure the quality of your code.
About Code Analysis
Code Analysis is an automated code review and analysis tool. It enables individual developers,team leads, and managers to ensure that the quality, performance, maintainability, and reliabilityof their code meets and exceeds their best practice standards.
Code Analysis is available in the Editor, which ensures code quality from the beginning of thedevelopment cycle. In the Editor, Code Analysis evaluates how well a developer's code adheresto project coding standards and best practices by automatically highlighting errors andsuggesting smarter ways to build and test the code.
Toad also provides a dedicated Code Analysis window, where you can perform more detailedanalysis, evaluate multiple scripts at the same time, and view a detailed report of the analysis.
Notes:
l This feature is available in the Professional Edition and higher.
l This feature was named CodeXpert prior to Toad 11.
Rules and Rule Sets
Code Analysis compares code against a set of rules for best practices. These rules are storedin rule sets.
Beginner's Guide to Using ToadChapter 3: Toad and Your Code
160
The Code Analysis rules and rule sets can be adjusted to suit the requirements of differentprojects. Regardless of whether developers are responsible for their own code quality or if thisneeds to be managed centrally, Code Analysis can be adapted to fit either need.
Code Analysis Metrics
Code Analysis uses a variety of metrics to evaluate code, including the following:
l Computational Complexity (Halstead Volume)—Measures a program module's complexitydirectly from source code, with emphasis on computational complexity. The measureswere developed by the late Maurice Halstead as a means of determining a quantitativemeasure of complexity directly from the operators and operands in the module. Amongthe earliest software metrics, they are strong indicators of code complexity. Because theyare applied to code, they are most often used as a maintenance metric.
l Cyclomatic Complexity (McCabe's)—Cyclomatic complexity is the most widely usedmember of a class of static software metrics. It measures the number of linearly-independent paths through a program module. This measure provides a single ordinalnumber that can be compared to the complexity of other programs. It is independent oflanguage and language format.
l Maintainability Index (MI)—Quantitative measurement of an operational system'smaintainability is desirable both as an instantaneous measure and as a predictor ofmaintainability over time. This measurement helps reduce or reverse a system's tendencytoward "code entropy" or degraded integrity, and to indicate when it becomes cheaperand/or less risky to rewrite the code than to change it. Applying the MI measurementduring software development can help reduce lifecycle costs.
The Code Analysis Report includes detailed descriptions of the code metrics and how they work.
Analyze Code in the Editor
By default, Code Analysis automatically checks the code in the Editor for rule violations. Toadunderlines violations with a wavy blue line.
The default rule set is "Top 20," which is a key set of rules compiled by Steven Feuerstein andBert Scalzo, Toad experts and authors of Toad and Oracle-related books, articles, and blogs.
Note: To turn off automatic Code Analysis in the Editor, clear the Check Code Analysis rulesas you typefield in the Code Analysis options.
Beginner's Guide to Using ToadChapter 3: Toad and Your Code
161
To analyze code in the Editor
» Click in the Code Analysis toolbar, or right-click the Editor and select Analyze
| Analyze Code.
The Code Analysis Statistics window displays, and CRUD (create, read, updateand delete) information and rule violations display in the tabs below the Editor.
Note: You can also click in the Code Analysis toolbar send code to the Code
Analysis window.
To describe rule violations
1. To view a brief description of the violation, hover over the blue line.
2. To view a detailed description of the violation, right-click the blue line and select CodeAnalysis Violations | Explain Rule.
To change the rule set
» Select a different rule set in the Code Analysis toolbar.
Perform Detailed Code Analysis
The Code Analysis window provides detailed analysis, including a results dashboard, report, andtree view with violations and code properties. You can also simultaneously analyze multiplefiles from this window.
To perform detailed code analysis
1. Select Database | Diagnose | Code Analysis.
2. Load files or objects to analyze:
l Click to open files.
l Click to load objects from the database. You can click the drop-down arrow
beside this button to load all objects or choose a group of objects to load.
3. Select the rule set you want to use in the Code Analysis toolbar (the default is Top 20).
4. To evaluate statements' complexity and validity, select Run SQL Scan in the RunReview list on the Code Analysis toolbar.
Beginner's Guide to Using ToadChapter 3: Toad and Your Code
162
Note: SQL Scanning is a Dell™ SQL Optimizer for Oracle® feature which is included inCode Analysis. For more information on SQL Scanning, see SQL Optimizerdocumentation. This feature is available in the Xpert Edition and higher.
5. Select items to analyze in the grid. You can multi-select by pressing the SHIFTor CTRL key.
6. With Run Review selected, press F9, or click 'Analyze Code for all selected items' on thetoolbar , or to apply your selection to all items, press F5.
7. Review the Code Analysis results.
8. To send code back to the Editor, select a file or object in the grid and click in the
Code Analysis toolbar. Toad displays the Code Analysis errors and violations in the tabsbelow the Editor..
About the Code Analysis interface
Grid Dashboard - The right side of the grid displays a dashboard of violations and statistics.The dashboard includes the item's Toad Code Rating (TCR), which is a composite of severalrating criteria. The score ranges from 1 (best) to 4 (worst). It provides a quick reference for howyour code has performed in the analysis.
Result tab - The Results tab displays the analysis results in a tree view. Expand each node fordetails on the violations. If you select a violation in the tree view, the preview on the rightdisplays the corresponding code.
The Result tab displays the results for the item selected in the grid. If you analyzed multipleitems and select them in the grid, the tab displays the results for all of the selected items.
Report - The Reports tab summarizes the analysis results and includes rule definitions. Items inthe table of contents are hyperlinked so you can easily navigate the report.
Note: By default, the Report tab only displays the analysis for one item. However, you can selectDisplay all selected results on Report tab to include multiple items in the report.
To save the Result or Report tab. select the appropriate tab and click in the Code
Analysis toolbar.
Beginner's Guide to Using ToadChapter 3: Toad and Your Code
163
o Click to open the Reports Manager to Code Analysis Reports.
o Click to write results to the database while performing analyses, and then click .
Results are returned in a grid so you can filter and export the data.
Create or Edit Rule Sets
A rule set is a collection of rules that Code Analysis uses to evaluate code. You can create yourown rule set and determine which rules to include.
You can also import existing rule sets from outside Toad, and export user-defined rule sets.
Notes: You cannot edit Toad's standard rule sets.
To create or edit a rule set
1. Select Database | Diagnose | Code Analysis, and then click on the Code
Analysis toolbar.
Note: You can also select View | Toad Options | Code Analysis | General, and thenclick Edit Rule Sets.
2. Select one of the following options:
l Click to edit a rule set.
l Click to create a rule set.
l Select the rule set and click to use an existing rule set as your template.
3. Select the checkbox for rules to include in the rule set. To exclude a rule, clearthe checkbox.
Create, Clone, or Edit Code Analysis Rules
You can use existing Code Analysis rules or clone them and customize them to confirm yourcode meets your code review requirements.
To create or clone a rule
1. Select Database | Diagnose | Code Analysis, and then click on the Code
Analysis toolbar.
Beginner's Guide to Using ToadChapter 3: Toad and Your Code
164
Note: You can also select View | Toad Options | Code Analysis | General, and thenclick Edit Rules.
2. Click to create a new rule, or select a rule to clone and click .
The Code Analysis Rule Builder opens. Rule IDs are automatically generated sequentiallyfrom 7000 to 9000.
3. Enter the Description and specify the Rule Tip.
a. Specify Rule Severity, Rule Objective, and Rule Category.
b. Click to display the XML that Toad generates. This is helpful for use in an
external XPath parser such as SketchPath to refine the XPath expression.
c. Create the XPath Expression. To test the rule, click .
4. Click OK
Note: A checked box in the User Defined column will be displayed for the ruleyou created.
To edit a rule
1. Select Database | Diagnose | Code Analysis, and then click on the Code
Analysis toolbar.
2. Select a rule to edit.
3. Edit the fields as necessary. Review the following for additional information:
Code Preview Enter code to use for testing the rule.
XPath Expression Edit the XPath. If this field is blank, then you cannot editthe XPath for the rule.
To test the rule, click .
Note: To restore a rule or all rules, you can select the rule and click the 'RestoreOriginal Rule Value' button, or the double-arrow 'Restore All Original Rule Values'
button.
Beginner's Guide to Using ToadChapter 3: Toad and Your Code
165
Archive Code Analysis Results for Reporting
You can save all of your Code Analysis results to a database. This allows you to keep an archivewhich you can use for reports from the Reports Manager.
To archive Code Analysis results, you must install tables on the database first.
Note:
l This feature is available in the Professional Edition and higher.
l This topic focuses on information that may be unfamiliar to you. It does not include allstep and field descriptions.
To archive Code Analysis results
1. Select Database | Diagnose | Code Analysis.
2. Click 'Save results to DB' on the Code Analysis toolbar.
If the Code Analysis tables are not already installed, Toad prompts you to create them.Complete the wizard to install the tables.
Archiving is now enabled. Toad automatically saves all Code Analysis results tothe database.
3. To run reports on the Code Analysis results, use the Report Manager.
o Click 'Open Reports Manager to CA Reports' on the Code Analysis toolbar.
There are two additional ways to access Code Analysis Metrics History:
l On the Code Analysis toolbar, click 'Retrieve Metrics History from the DB.'
l On the main Toad toolbar, go to Database | Report | Code Analysis Metrics History.
Ignore Code Analysis Rules
If you are using Code Analysis, there may be certain times when you want to ignorespecific rules.
To ignore a rule
1. In the Editor, right-click on an underlined rule violation.
2. In the right-click menu, point to Code Analysis Violations and then point to the ruledescription.
3. Select the instances in which you want to ignore the rule.
Beginner's Guide to Using ToadChapter 3: Toad and Your Code
166
You can also access the "Ignore Rules" option by right-clicking on rule violations in theMessages tab at the bottom of the Editor window.
To return rules to full service
1. Go to View | Toad Options | Code Analysis | General
2. In the Rules section, click the new Ignored Rules button.In the Code Analysis Ignored Rules window:
3. Click a row to select it.
4. Click X on the toolbar or press DELETE on your keyboard.
Code Analysis Action
Notes:
l If you run a CodeXpert ini file on the command line, Toad automatically converts it to aCode Analysis action. Toad saves the action in the CXCommandLineConversion actionset, and it is named CX_CONVERSION_FILENAME.
l You can use a CodeXpert ini file in a Code Analysis action. Click on the Code
Analysis Action toolbar and select the ini file.
l This feature is available in the Professional Edition and higher.
To create a Code Analysis action
1. From the Automation Designer window (Utilities | Automation Designer), select the appyou want to contain the Code Analysis action.
2. Double-click on the DB Misc tab and then click in the app.
3. Double-click the new action to edit its settings.
The Code Analysis action options are generally the same as those in the CodeAnalysis window.
4. Load files or objects to analyze:
l Click to open files.
l Click to load objects from the database. You can click the drop-down arrow
beside this button to load all objects or choose a group of objects to load.
Beginner's Guide to Using ToadChapter 3: Toad and Your Code
167
5. Complete the fields as necessary. Review the following for additional information:
OutputDirectory
Enter or select the location to save the output.
Output FileNames
Enter a file name in these fields to output the following:
l HTML Report—Includes the content of the Report tab in themain Code Analysis window.
l XLS Summary—Retrieves Code Analysis results in an Excelfile.
l XMLReport—Includes the content of the Results tab in themain Code Analysis window.
l DB Inserts—Saves the Code Analysis results to the database.
l Metrics History XLS—(This becomes available when 'Save
results to DB' is checked. ) Retrieves the metrics history in
a spreadsheet, one object or file per worksheet.
HTML Report is populated by default.
6. Click Apply to save the action. Then, run or schedule it.
Work with PL/SQLToad makes writing and managing your PL/SQL easy with many features that enhanceproductivity and control.
Create New PL/SQL Object
Use this dialog box to use a template for your new procedure, function, package, or trigger.
To create a new PL/SQL Object in the Editor
1. Click on the Editor toolbar. (If this button does not display, you may need to add it.)
2. Select the type of object you want to create.
3. Enter the name of your new object in the New Object Name box, or leave this blank fornow and enter a name when you save the object.
4. Select a default template.
Beginner's Guide to Using ToadChapter 3: Toad and Your Code
168
To create a new PL/SQL Object from the Schema Browser
» From the schema browser object pane for the object type you want to create (package,procedure, function, and so on), click .
Default Templates
Default templates are read from the Toad for Oracle\User Files folder. If you want to use atemplate you have created other than the default, choose it from the drop down menu. Thefollowing default templates are located in the Toad for Oracle\User Files folder:
NEWPROC.SQL Create a Procedure
NEWFUNC.SQL Create a Function
NEWPackage.SQL Create a Package spec
NEWPackageBody.SQL Create a Package body
NEWType.SQL Create a Type spec
NEWTypeBody.SQL Create a Type body
NEWTrigger.SQL Create a Trigger spec
Note: In addition to the above templates, there are two others stored in the Toad/User Filesfolder and editable as described below. These are useable within a created package and includeboth Package Procedures and Package Functions.
Templates can be edited using any text editor, or select the file from the Toad Options |ProcTemplates page and click Edit.
Delete, change, or add new files as desired.
You can load new templates from any network path. Specify where the files are located whenyou add them to the list. To change the path, you will need to add the new path and delete theold entry.
Auto Replace Keywords
There are several keywords in the templates for which Toad will automatically substitute invalues when you open the templates. In addition to these, you can also specify custom keywordsfrom Proc Templates.
%YourObjectName% Object Name

Beginner's Guide to Using ToadChapter 3: Toad and Your Code
169
%SYSDATE% Workstation date, for example, mm/dd/yyyy
%DATETIME% Workstation date and time, for example, mm/dd/yyyy hh:mm:ss am
%DATE% Workstation date, for example, mm/dd/yyyy
%TIME% Workstation time, for example, hh:mm:ss am
%USERNAME% Username specified in Toad Options, Editor node
%TRIGGEROPTS% Trigger Options for triggers only, for example, "Before inserton, for each row"
Note:
l "*YourObjectName*" is also supported for backwards compatibility.
l The keywords ARE NOT case sensitive.
l The date and time formats come from the Windows Control Panel settings.
l This feature is only in the Commercial version of Toad, not the freeware Toad.
Using Templates
Toad provides templates to help you create packages and procedures quickly.
Template Options for Packages
There are two template types that you can use only within packages. These are Package Functionand Package Procedure. You can create and edit these templates from the Toad Options | Editor| Proc Templates page.
When you choose to create a package from the Create PL/SQL Object window, Toadautomatically creates the one procedure and one function to the body using the defaulttemplates. You can add additional procedures and functions fusing the following procedure:
To use a package function or package procedure template within an existing package
1. In the Editor, load a package spec or create a new one.
2. Enter a new declaration for a package procedure or function into the spec.
Press Ctrl+Shift+C. The default package procedure or package function template is usedto create a new procedure in the package body.
Note: If you have created multiple templates, the template you want to use MUST bedesignated the default. Any other template will not be used.
Beginner's Guide to Using ToadChapter 3: Toad and Your Code
170
Template Options for Procedures
Toad provides these template options for procedures:
ProcedureTemplateOptions
Use the following options to...
Templates Add, edit, or delete procedure templates. To edit a template, you musthave an external editor specified in Toad Options | Executables.
Templates must be created before you add them. Include the CREATEOR REPLACE statement. The macro %TriggerOpts% will receive thetrigger options you select when creating a new trigger.
Note: There are two template types that you can use only withinpackages: Package Function and Package Procedure.
Substitutionvariables
Add and remove template substitution variables. These variables are usedto populate the New Procedure templates with default values or values inaddition to the Toad variables (for example, %DATE%, %TIME%).
Value for%UserName%variable
Enter a value to use for %USERNAME% when new procedure templatesare opened in the Editor.
To set procedure template options
1. Click on the standard toolbar.
Tip: You can also select View | Toad Options.
2. Select Proc Templates.
3. Set the options.
Load Database Object
Use this dialog box to load an existing object into the Stored Edit/Compile window forfurther editing.
To load an object from the database
1. Click in the Editor window.
2. From the Schemas/Owners drop-down:
Beginner's Guide to Using ToadChapter 3: Toad and Your Code
171
l Enter the first letter of the schema to perform an incremental search of the list.
l Select the Schema/Owner of the object you want to load
l Select the type of object you want to load from the drop-down list.
l For databases with few objects, just select All.
l For databases with many objects, select a type of object and then filter toshow a manageable list in the left hand panel below.
3. From the left hand panel, you can do one of the following:
l Click an object to select it.
l Enter the first few letters of the object you want to perform an incremental search.
Note: You can turn the preview off by using the Show Source checkbox.
Reload Object
The reload object options give you an easy way to synch your PL/SQL source with objects alsoexisting on the database.
You can reload objects in one of several ways.
To reload an object from the Navigator
1. In the Navigator, select the object you want to reload.
2. Right-click and select Reload Object.
To reload all objects from the Navigator
1. In the Navigator, select the object you want to reload.
2. Right-click and select Reload All Objects.
To reload from the Toolbar
1. Place your cursor in the object in the Editor that you want to reload.
2. Click on the toolbar.
SQL TuningToad provide numerous tools to optimize your code. This section highlights these tools. Formore information, look for the "Optimize (Tune)" section in the Table of Contents in the Toadonline help.
Beginner's Guide to Using ToadChapter 3: Toad and Your Code
172
About the Profilers
You can use the DBMS Profiler with Oracle 8i and later, or the hierarchical profiler with Oracle11g and later.
Hierarchical Profiler
The PL/SQL hierarchical profiler organizes data by subprogram calls, and stores the results indatabase tables letting you create custom reports. See Oracle's documentation on this topic formore information.
DBMS Profiler
Oracle 8i provides a Probe Profiler API to profile existing PL/SQL applications and to identifyperformance bottlenecks. The collected profiler (performance) data can be used for performanceimprovement efforts or for determining code coverage for PL/SQL applications. Applicationdevelopers can use code coverage data to focus their incremental testing efforts.
The profiler API is implemented as a PL/SQL package, DBMS_PROFILER, that provides servicesfor collecting and persistently storing PL/SQL profiler data.
Improving application performance is an iterative process. Every iteration involves the following:
l Exercising the application with one or more benchmark tests, with profiler datacollection enabled.
l Analyzing the profiler data, and identifying performance problems.
l Fixing the problems.
To support this process, the PL/SQL profiler supports the notion of a run. A run involvesexecuting specified SQL commands through benchmark tests with profiler data collectionenabled. With the Probe Profiler API, you can generate profiling information for all namedlibrary units that are executed in a session. The profiler gathers information at the PL/SQL virtualmachine level that includes the total number of times each line has been executed, the totalamount of time that has been spent executing that line, and the minimum and maximum timesthat have been spent on a particular execution of that line.
This feature requires that certain objects exist on the server before you can use it. If they do not
already exist, Toad prompts you to create them when you click . You can use the DBMS
Profiler with Oracle 8i and later, or the hierarchical profiler with Oracle 11g and later.
Note: To remove the profiler objects, click the arrow by and select Remove Profiler.
Beginner's Guide to Using ToadChapter 3: Toad and Your Code
173
Additional DBMS Profiler Requirements
You must have the SYS.DBMS_PROFILER package to use the DBMS profiler.
To install the package
1. Login to an Oracle database through Toad as SYS.
2. Load the Oracle home>\RDBMS\ADMIN\PROFLOAD.SQL script into the Editor.
3. Click on the Execute toolbar (F5).
4. Make sure that GRANT EXECUTE on the DBMS_PROFILER package has beengranted to PUBLIC or to the users that will use the profiling feature.
Additional Hierarchical Profiler Requirements
To use the hierarchical profiler, you must enable it in the Toad options. Select View | ToadOptions | Execute/Compile and then select Use hierarchical profiler on Oracle 11g and newer.
You must also have the DBMS_HPROF package to use the hierarchical profiler, which isavailable in Oracle 11g and later.
To verify the package is installed
1. Login to Oracle through Toad as SYS.
2. Make sure that GRANT EXECUTE on the DBMS_HPROF package has been grantedto PUBLIC or to the users that will use the profiling feature.
Profile PL/SQL
You can use the DBMS Profiler with Oracle 8i and later, or the hierarchical profiler with Oracle11g and later.
Important: To use the hierarchical profiler, you must enable it in the Toad options. SelectView | Toad Options | Execute/Compile and then select Use hierarchical profiler on Oracle11g and newer.
To use the profiler
1. Click on the main Toad toolbar to turn on profiling.
Note: If the profiler is not set up, Toad notifies you.

Beginner's Guide to Using ToadChapter 3: Toad and Your Code
174
2. Open the procedure in the Editor and click on the Execute toolbar. The Set
Parameters and Execute window displays.
3. Complete the parameters and profiler settings.
Notes:
l The profiler options are described by Oracle.
l For the hierarchical profiler, you must select a directory on the Profiler tab. If youdo not, Toad displays an error. It is recommended that you consult your DBA onthe appropriate directory to select.
4. Click again to turn off profiling.
Note: Be careful to not leave the profiler toggled on when you switch to other Toadwindows. Otherwise, Toad collects profiler data from the queries performed to populatethose windows.
5. Review the profiler information. Select one of the following options:
l Select Database | Optimize | Profiler Analysis. The Profiler Analysiswindow displays.
l Click the Profiler tab beneath the Editor.
Notes:
l If the Profiler tab is not visible, you can display it by right-clicking in the tab areaand selecting Desktop Panels | Profiler.
l By default, anonymous blocks and lines not executed are not displayed. You candisplay them by right-clicking the tree-view and selecting them from the menu.
View Profiler Results
The Profiler Analysis window provides data on profiler runs that is consistent with the datadisplayed in the Profiler tab of the Editor. The top half of the window is a graph of the showingthe percent of time required to run each component of the procedure.
Note: If you can see the pie chart labels but not the pie chart itself, resize the windowhorizontally to give it more space to draw.
To access the Profiler Analysis window
» Select Database | Optimize | Profiler Analysis.

Beginner's Guide to Using ToadChapter 3: Toad and Your Code
175
To set Run Details
Opening a run: Selecting this displays the graph for all units within that run. Expanding a run inthe tree view will list the details of the run including Unit Type, Owner, Unit Name, and TotalTime to execute.
Opening a unit: You can also select a specific unit of the selected run.
When drilling down on a unit, we see the lines of code executed and profiled. The columnheaders include Line Number, Passes (how many times each line of code was executed), TotalTime to execute the line, Min Time, Max Time, and the line of Code itself. The graph changes todisplay the information within that unit.
Hiding Profiler Data:If you right-click the list, you can temporarily hide some data so that abetter analysis of the remaining data can be performed. For example, if a particular statementtakes 95% of the overall execution time, hide it, and the remaining statements, which were under1% each will blow up to a larger relative percentage on the graph.
Displaying in Editor:If you select a valid unit in the tree view, right-click and select display inEditor, the Editor displays the selected unit.
Editor Profiler Tab
Within the Editor, the Profiler tab displays profiler runs, as root nodes, and profiler units as childnodes. The latter are the actual code units that were executed during a profiler run. They caninclude anonymous blocks, procedures, functions, and packages executed while the profiler rundata was being collected. In the line item profiler, child nodes contain the actual line data. In thehierarchical profiler, child nodes contain sub program calls.
This tab provides an overview of the data, but does not offer the graphs that the Profiler Analysiswindow does.
Navigating the Editor Profiler
Selecting a line item within the nodes automatically opens the referenced SQL source anddisplays the line referenced by the profiler.
Note: Because each Editor tab is associated with a separate Profiler instance, navigating throughyour code this way may reset the node display in the Profiler tab.
To display the Profiler Analysis window for the current data
» Click Details.
Beginner's Guide to Using ToadChapter 3: Toad and Your Code
176
Executable Line Indicators
When you open a profiler run or unit into the Editor and have the option show executable lineindicators in gutters selected, executable line indicators display as follows:
Indicator Meaning
Blue dot with green square Line was executed
Blue dot with red circle Line was not executed
If Toad cannot determine when the unit was last executed, then the standard blue dot lineindicators will display.
Hierarchical Profiler Filters
You can filter the results of your hierarchical profiling session. This can be useful in making surethat you only see the results that are useful for you.
Toad will automatically filter out the system information that is added when the profiler isactive. You can manually turn these on if you want to see that information.
To create a filter
1. From the Profiler tab at the bottom of the Editor, right click the grid and select Filter.
Note: If you do not see the filter option, make sure you are actually using thehierarchical profiler.
2. Click Add to add a new filter to the filter grid. Enter the criteria you want to use to hidedata. You may use the % wildcard within the filter.
3. Enable or disable any filters desired by selecting or clearing the Enable box.
4. Repeat steps 2 and 3 if necessary.
5. Click OK.
Query BuilderThe Query Builder helps you to build SELECT and DML statements quickly.
Beginner's Guide to Using ToadChapter 3: Toad and Your Code
177
Query Builder Overview
The Query Builder window provides a fast means for creating the framework of a Select, Insert,Update, or Delete statement. You can select Tables, Views, or Synonyms, join columns, selectcolumns, and create the desired type of statement.
Note: The Query Builder supports the reverse engineering of queries. Although it was heavilytested throughout its development lifecycle, due to the vast array of possible queries there maybe some queries it can create but cannot reverse. Please contact the Toad development team ifyou discover any such queries at ToadforOracle.com.
To access the Query Builder
» Click on the main toolbar or select Database | Report | Query Builder.
Area Description
Query Builderworkspace tabs
Use the Query Builder workspace tabs (the Model Area) tographically lay out a query.
Tree View Current query in tree view.
Generated Query Automatically generated SQL as a result of the diagramdisplayed in the Query Builder workspace. The Query Resultstab displays the results of the created query. The Messages tabdisplays warnings regarding the query. Click on the error tohighlight the related object.
The Generated Query content is editable.
When the diagram and the generated query no longer match,these buttons become available on the Query Results toolbar:
- Update Diagram
- Update SQL
Text also indicates, "Diagram and SQL Code are NotSynchronized. Click Here or Press Ctrl +SHIFT +D toSynchronize.
To navigate the Query Builder
» Click on items or use the keyboard:
l Up and down arrow keys move you around in lists
l SPACE checks and clears boxes

Beginner's Guide to Using ToadChapter 3: Toad and Your Code
178
l TAB moves forward one area (table, menu, list, etc)
l SHIFT+TAB moves back one area.
Query Builder Options
Many Query Builder options can be set or changed in the Toad Options window. From thiswindow you can:
l Set general options, including color of join lines.
l Add or remove Functions usable in the Query Builder.
l Control behavior of the Query Builder.
To access Query Builder options
1. From the View menu, select Toad Options.
2. In the left hand side, click Query Builder.
3. Change options as desired, and then click OK.
Removing columns from the Tree
As you model your code, you may need to remove columns from the model.
To remove columns from the tree
» Drag the column you want to the trash can in the tree structure.
Use the Query Builder
Follow this procedure to quickly get started using the Query Builder.
To use the Query Builder
1. Drag-and-drop Tables, Views, or Synonyms from the Schema Browser, Project Manager,Object Palette, or the Object Search window to the Query Builder workspace tab.
Click in the checkbox by a column to add it or remove it from the active query'sSELECT clause.
2. Drag-and-drop columns from one table to another to create joins between the tables.
3. Add any WHERE, GROUP BY, HAVING, or ORDER BY clauses by right-clicking onthe column in the tree view node and selecting Include in n clause. Right-click andadjust properties for clauses where necessary.
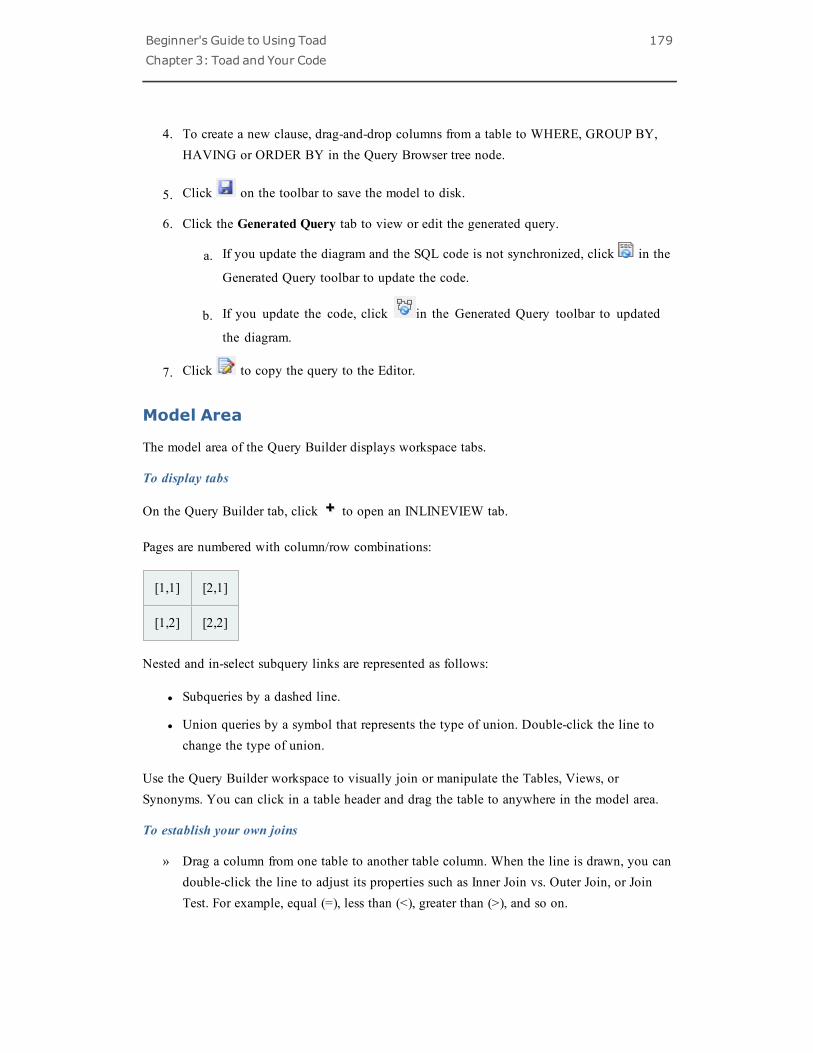
Beginner's Guide to Using ToadChapter 3: Toad and Your Code
179
4. To create a new clause, drag-and-drop columns from a table to WHERE, GROUP BY,HAVING or ORDER BY in the Query Browser tree node.
5. Click on the toolbar to save the model to disk.
6. Click the Generated Query tab to view or edit the generated query.
a. If you update the diagram and the SQL code is not synchronized, click in the
Generated Query toolbar to update the code.
b. If you update the code, click in the Generated Query toolbar to updated
the diagram.
7. Click to copy the query to the Editor.
Model Area
The model area of the Query Builder displays workspace tabs.
To display tabs
On the Query Builder tab, click to open an INLINEVIEW tab.
Pages are numbered with column/row combinations:
[1,1] [2,1]
[1,2] [2,2]
Nested and in-select subquery links are represented as follows:
l Subqueries by a dashed line.
l Union queries by a symbol that represents the type of union. Double-click the line tochange the type of union.
Use the Query Builder workspace to visually join or manipulate the Tables, Views, orSynonyms. You can click in a table header and drag the table to anywhere in the model area.
To establish your own joins
» Drag a column from one table to another table column. When the line is drawn, you candouble-click the line to adjust its properties such as Inner Join vs. Outer Join, or JoinTest. For example, equal (=), less than (<), greater than (>), and so on.

Beginner's Guide to Using ToadChapter 3: Toad and Your Code
180
To specify columns for the query
» Click in the checkbox for each desired column. A checkmark will be displayed in thebox. The selected column's information will display in the navigation tree, and thecolumn will be included in the query.
Note: If no table columns are selected, then all columns will be includedin the query.
To describe a selected table
» Use the F4 key to describe a selected table. If a table is not selected when you press F4,the last selected table will be described.
Viewing Joins
Toad makes it easy to view joins.
To view joins
» Click on the toolbar, or double-click a join line in the Modeler itself.
Populating the Where Clause
There are two ways to populate the WHERE clause in SQL generated by the Query Builder: asan individual WHERE, or as a global WHERE.
To populate the where clause
1. Do one of the following:
l Right-click on the column under the SELECT node and select Include inWhere Clause.
l Drag a column from the select node to the WHERE node.
Add conditions and select or clear any outer joins you want to apply.
Note: To build a more advanced query, click the Expert tab and enter your code bytyping it in the top box or double clicking on functions and data fields to enter them.
2. Click OK.
Repeat until all conditions are added.
Beginner's Guide to Using ToadChapter 3: Toad and Your Code
181
Note: When you add multiple columns to a WHERE clause, they areautomatically placed
3. If a condition should be an OR condition, rather than an AND, right-click on it andselect OR.
To create a global WHERE clause
1. Right-click in the Table Model area.
2. Select SQL | Global Where Clauses.
3. Click .
4. Enter or build your condition.
5. Click OK to close the definition window.
6. Click OK.
Example
To construct the following query:
SELECT DEPT.DEPTNO, DEPT.DNAME, DEPT.LOC
FROM DEPT
WHERE (((UPPER (RTRIM (DNAME)) = 'SALES') AND (DEPT.DEPTNO < 40)) AND((DEPT.LOC = 'CHICAGO')OR ((DEPT.LOC IS NULL = '')))
Do the following:
1. Open the Query Builder.
2. In the Object Palette, select the Scott schema and double-click the DEPT table to add itto the model.
3. Right-click DEPT and choose Select All.
4. Drag the DEPTNO column to the WHERE node.
5. Select < in the operator box, click Constant, and enter 40 in the condition box.
6. Click OK.
7. Drag the LOC column to the WHERE node.
8. In the WHERE definition dialog, click the Expert tab. Click OK to confirm.
9. Double-click IS NULL in the SQL Operators area and then click OK.
10. Drag the DEPTNO above LOC in the tree view.
11. Right-click the LOC column and select OR.

Beginner's Guide to Using ToadChapter 3: Toad and Your Code
182
12. Right-click on OR | LOC and select Properties. Select = in the operator box, clickConstant, and enter CHICAGO in the condition box.
13. Click OK.
14. In the table model area (the area around the table images), right-click and choose SQL |Global Where. Click .
15. In the top edit box, enter (UPPER (RTRIM (DNAME))) = 'SALES'.
16. Click OK and then click OK again.
View the generated query. It should display as described above.
Populating the Having Clause
You can automatically populate the Having clause in the SQL generated by the Query Builderin one of two ways.
Note: To create a HAVING clause, you must have added columns to the GROUP BY node.
HAVING entries should be in the form of <expression1> <operator> <expression2>.
To populate the HAVING clause
1. Do one of the following:
l Right-click the desired column in the tree, and then select Include inHaving Clause.
l Drag a column from a table in the Table Model area to the HAVING clause.
2. Enter or build the condition.
3. Click OK.
4. Repeat until complete.
In order to include a global HAVING clause, there must be a GROUP BY clause as well.
To create a global HAVING clause
1. Right-click in the Table Model area.
2. Select SQL | Global Having.
3. Click the Add button.
4. Enter or build your condition.
5. Click OK to close the definition window.
6. Click OK.
Beginner's Guide to Using ToadChapter 3: Toad and Your Code
183
Example
To construct the following query:
SELECT emp.empno, emp.ename, emp.job, emp.mgr, emp.sal,
emp.comm, emp.deptno
FROM emp
GROUP BY emp.deptno, emp.comm, emp.sal, emp.mgr, emp.job,
emp.ename, emp.empno
HAVING ((emp.sal + NVL (emp.comm, 0)> 4000))
Do the following:
1. Open the Query Builder.
2. In the Object Palette, select the Scott schema.
3. Double-click the EMP table to add it to the model.
4. Right-click EMP and choose Select All, then clear Hiredate.
5. Drag DEPTNO, COMM, SAL, MGR, JOB, ENAME and EMPNO to the Group by node.
6. Right-click in the Table model area and select SQL | Global Having. Click to add a
new Global Having clause.
Enter the Having clause to say:
EMP.SAL + NVL(EMP.COMM, 0) > 4000
7. Click OK twice.
View the generated query. It should display as described above. This query selects all theemployees whose salary plus commission is greater than 4000.
The NVL command substitutes a null value in the specified column with the specified value, inthis case, 0.
Creating a Subquery
You can easily create a subquery or nested subquery. Subqueries can be created from the FROMclause or the WHERE clause.
Columns must be dragged directly from the table area to be placed in subqueries, or from thecurrent statement.
Beginner's Guide to Using ToadChapter 3: Toad and Your Code
184
After initiating the subquery using one of the methods below, create the subquery as you woulda normal query.
To create a subquery in the WHERE clause
1. Drag a column into the WHERE node.
2. In the Condition dialog, use the simple or complex mode.
If you click Nested Subquery, the new subquery is created in the workspace.
To create an EXISTS subquery
1. Right-click the WHERE clause in the tree view.
2. Select Add EXISTS Subquery or Add NOT EXISTS Subquery.
To create a subquery in the FROM node
1. Right-click the FROM clause in the tree view.
2. Select Add | New Named Subquery (or New Inline View).
Reverse Engineering a Query
The Query Builder can reverse nested subqueries and calculated fields. You can reverse engineerqueries that were not created in the Query Builder.
To reverse engineer a query
Do one of the following:
» In the Query Builder, enter a query directly into the Generated Query tab and click in
the Generated Query toolbar to update the diagram in the workspace.
» From the Editor, right-click in the query and click Send to Query Builder.
The Query Builder supports these types of statements:
l SELECT
l INSERT
l UPDATE
l DELETE
There is complex support of SELECT and DELETE statements and limited support of INSERTand UPDATE statements:
Beginner's Guide to Using ToadChapter 3: Toad and Your Code
185
l Constant values cannot be used in a VALUES clause.
For example, INSERT INTO "TABLE" VALUES ('a', 'b') will be changed tobind variables when reversed, with the column names used as variable names, e.g.,INSERT INTO "TABLE" VALUES (:col1, :col2).
l INSERT statements with a subquery cannot be reversed.
For example, INSERT INTO "TABLE" SELECT * FROM "TABLE1".
Nor can UPDATE statements with a subquery in a SET clause.
For example, UPDATE "TABLE" SET COLUMN1 = (SELECT COLUMN1
FROM "TABLE1").
Generated Query
This tab lists the automatically generated SQL statement. Any changes made to the model orcolumn Criteria will automatically regenerate this SQL statement.
To copy the query to the clipboard
» Do one of the following:
l Select a query and press CTRL+C
l Click the Send text to clipboard button
l Select the query, right-click and select Copy
To send the query to the Editor
» Click in the Generated Query toolbar.
Generating ANSI Syntax
You can convert a SQL statement from the generated query tab, or you can set the Query Builderto create ANSI syntax automatically from Toad Options | Query Builder.
To convert a SQL statement in the Query Builder
» In the Generated Query tab, select the query to convert and click the ANSI joinsyntax button.
To tune the query
1. From the Generated Query tab, click the drop-down.
2. Select either:
Beginner's Guide to Using ToadChapter 3: Toad and Your Code
186
l SQL Optimizer
l Oracle Tuning Advisor
Query Results
The Query Results grid displays the results of executing the generated query. Insert, Update, andDelete queries can only be executed in the Editor window.
To access the Query Results grid
» From the Query Builder, click the Query Results tab.
Making changes to the Tables or Columns, then clicking on the Query Results tab will promptyou whether or not to requery the data.
Beginner's Guide to Using ToadAbout Dell
187
About DellDell listens to customers and delivers worldwide innovative technology, business solutions andservices they trust and value. For more information, visit www.software.dell.com.
Contacting DellFor sales or other inquiries, visit http://software.dell.com/company/contact-us.aspx or call 1-949-754-8000.
Technical support resourcesTechnical support is available to customers who have purchased Dell software with a validmaintenance contract and to customers who have trial versions. To access the Support Portal, goto http://support.software.dell.com.
The Support Portal provides self-help tools you can use to solve problems quickly andindependently, 24 hours a day, 365 days a year. In addition, the Support Portal provides directaccess to product support engineers through an online Service Request system.
The Support Portal enables you to:
l Create, update, and manage Service Requests (cases)
l View Knowledge Base articles
l Obtain product notifications
l Download software. For trial software, go to http://software.dell.com/trials.
l View how-to videos
l Engage in community discussions
l Chat with a support engineer