Embed Size (px)
Citation preview
Guide for using ELinOS on the demo server
Date: 06/09/2012
IntroductionThe intention of the ELinOS demo server is to provide you with a ready to use installation where you can evaluate ELinOS and test the results. You can create embedded Linux images, run them in a simulator, modify them, recreate and test your modifications without limitations.
To get a brief overview and a first impression of ELinOS we suggest to use this document as a guideline. This manual will guide you through various features of ELinOS. We will start with a simple demo project and extend it step by step.
1 Contents• Create a simple Linux system and run it in the QEMU simulator• Add a web server to your project and connect from the development PC• Develop an application• Debug your application• Add trace points to your application and analyze the application using the trace tool
2 Desktop IconsOn the desktop you will find the following icons:
• Codeo -> Starts the CODEO IDE• Browser -> A web browser• ELinOS Manual -> Open the ELinOS manual - PDF document• Quickstart Guide-> Open this guideline PDF document• Home -> Open the file-browser• xterm -> Console on the development host
3 Create your first ELinOS projectTo get an impression how quick and easy a Linux image for an embedded system can be created using ELinOS, simply follow the instructions in this section:
1 Create new Project:
At first, start the CODEO IDE by clicking the CODEO icon on the desktop (confirm preselected workspace directory). You will use this tool to build your first ELinOS project and debug or trace it later on:
1. In the menu select File->New->Project....2. Browse and select CODEO > ELinOS->ELinOS System Project. 3. Click Next.
© Copyright 2012 All rights reserved. 1/22 SYSGO AG
Guide for using ELinOS on the demo server
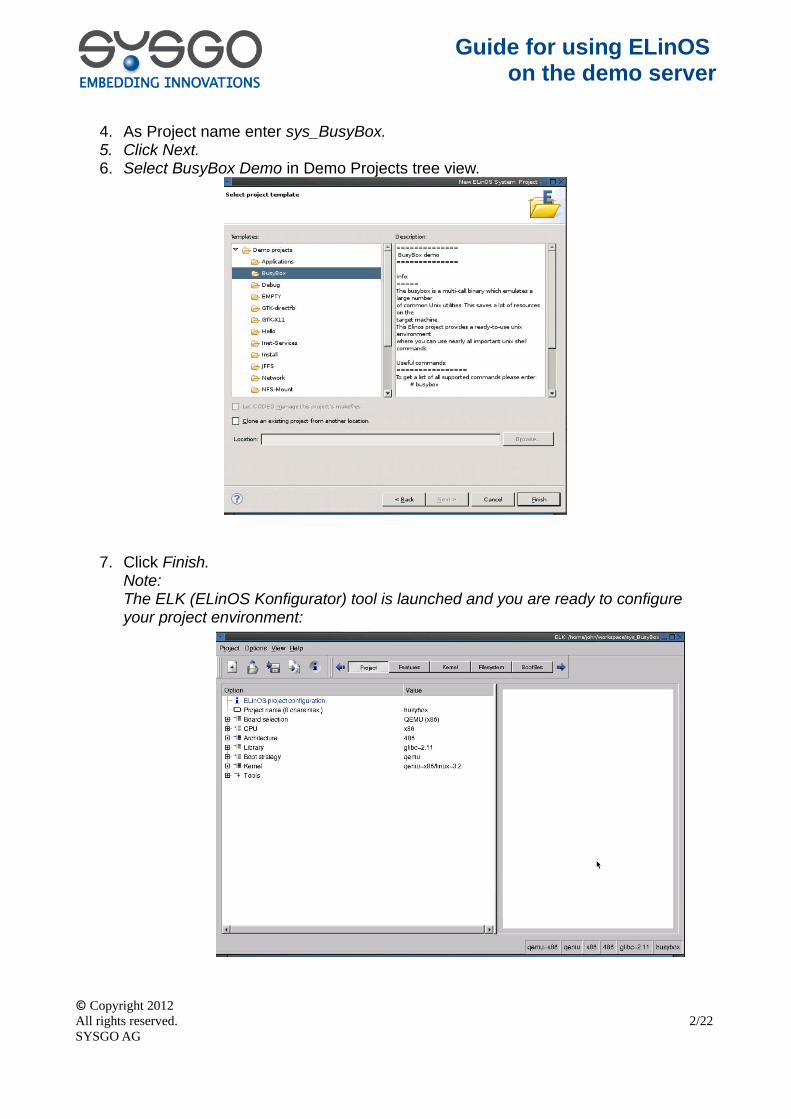
4. As Project name enter sys_BusyBox.5. Click Next.6. Select BusyBox Demo in Demo Projects tree view.
7. Click Finish.Note: The ELK (ELinOS Konfigurator) tool is launched and you are ready to configure your project environment:
© Copyright 2012 All rights reserved. 2/22 SYSGO AG
Guide for using ELinOS on the demo server
8. In the first Project Tab you may select your board, according boot strategy, library and kernel version:select Board QEMU (x86),Kernel qemu-x86/linux-3.2.
9. Save Configuration (Disk symbol).
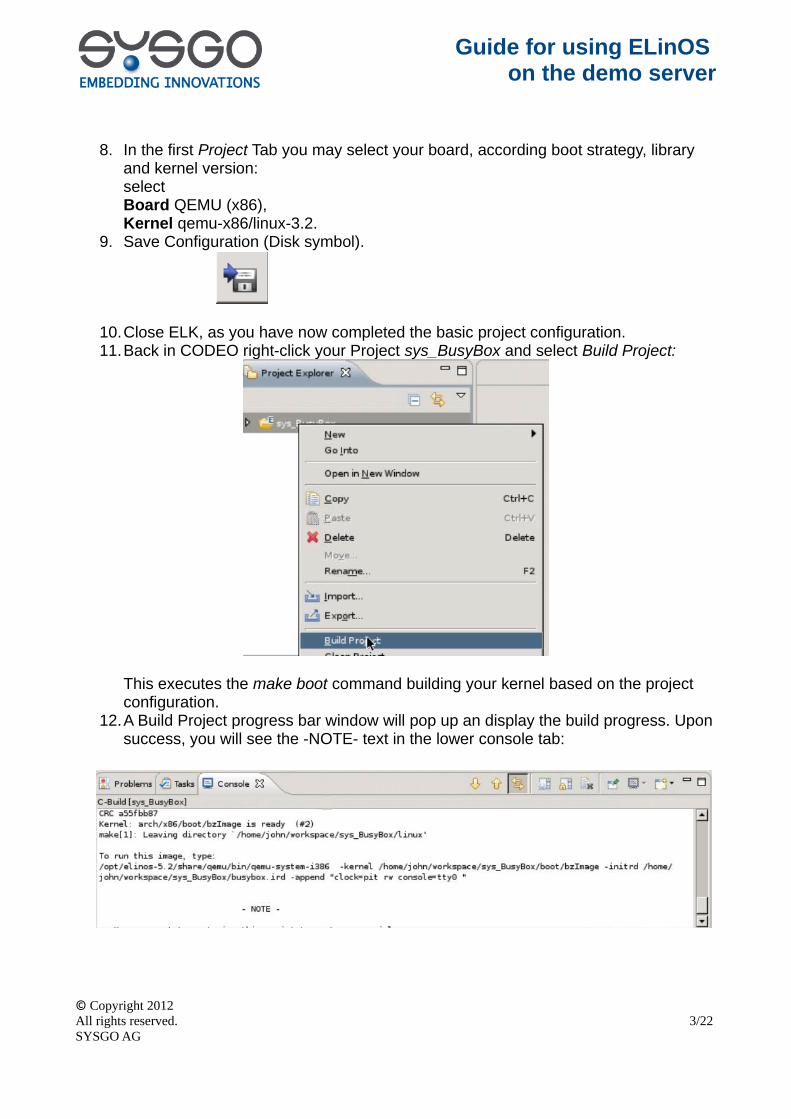
10.Close ELK, as you have now completed the basic project configuration.11.Back in CODEO right-click your Project sys_BusyBox and select Build Project:
This executes the make boot command building your kernel based on the project configuration.
12.A Build Project progress bar window will pop up an display the build progress. Upon success, you will see the -NOTE- text in the lower console tab:
© Copyright 2012 All rights reserved. 3/22 SYSGO AG
Guide for using ELinOS on the demo server
2 Run your first ELinOS Project using QEMU (CODEO Simulation Target):
Instead of using a real embedded system, you can work with a simulated target, CODEO uses QEMU for this purpose.
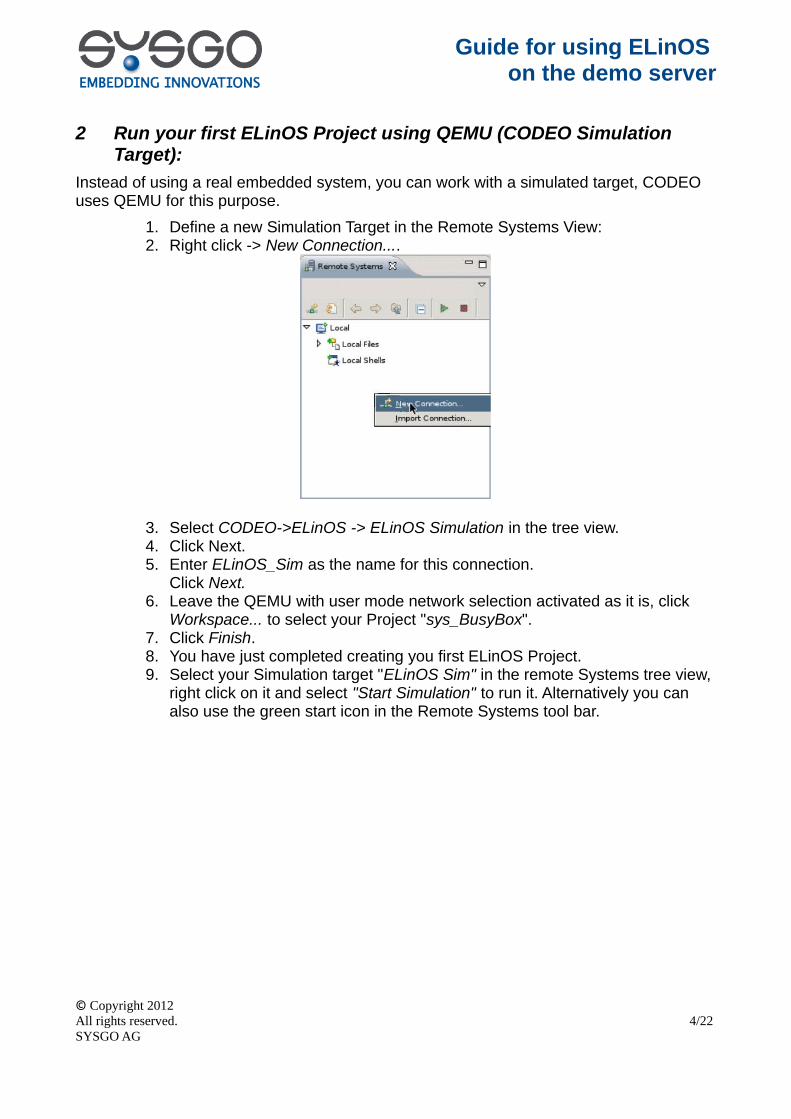
1. Define a new Simulation Target in the Remote Systems View:2. Right click -> New Connection....
3. Select CODEO->ELinOS -> ELinOS Simulation in the tree view.4. Click Next.5. Enter ELinOS_Sim as the name for this connection.
Click Next.6. Leave the QEMU with user mode network selection activated as it is, click
Workspace... to select your Project "sys_BusyBox".7. Click Finish.8. You have just completed creating you first ELinOS Project. 9. Select your Simulation target "ELinOS Sim" in the remote Systems tree view,
right click on it and select "Start Simulation" to run it. Alternatively you can also use the green start icon in the Remote Systems tool bar.
© Copyright 2012 All rights reserved. 4/22 SYSGO AG
Guide for using ELinOS on the demo server
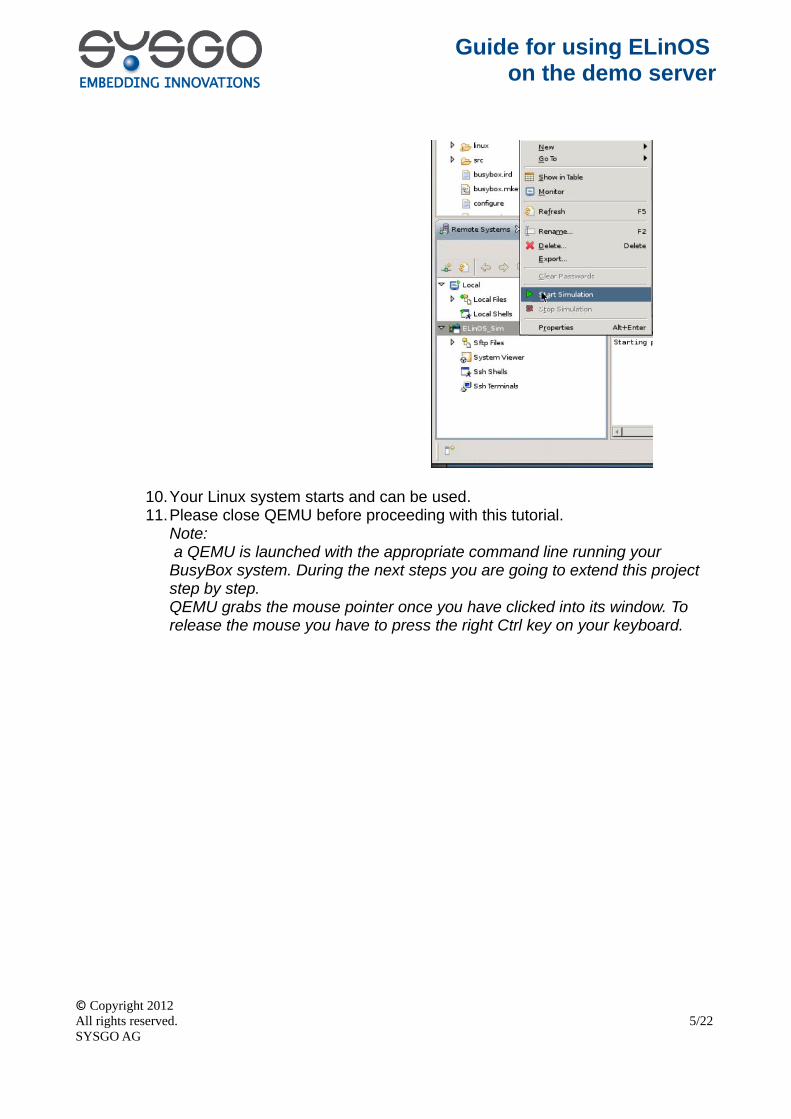
10.Your Linux system starts and can be used. 11.Please close QEMU before proceeding with this tutorial.
Note: a QEMU is launched with the appropriate command line running your BusyBox system. During the next steps you are going to extend this project step by step. QEMU grabs the mouse pointer once you have clicked into its window. To release the mouse you have to press the right Ctrl key on your keyboard.
© Copyright 2012 All rights reserved. 5/22 SYSGO AG
Guide for using ELinOS on the demo server
3 Activating network access, Target File System Editor:
In this section you will add network access to your target and use the Target File System Editor to transfer files to the target file system:
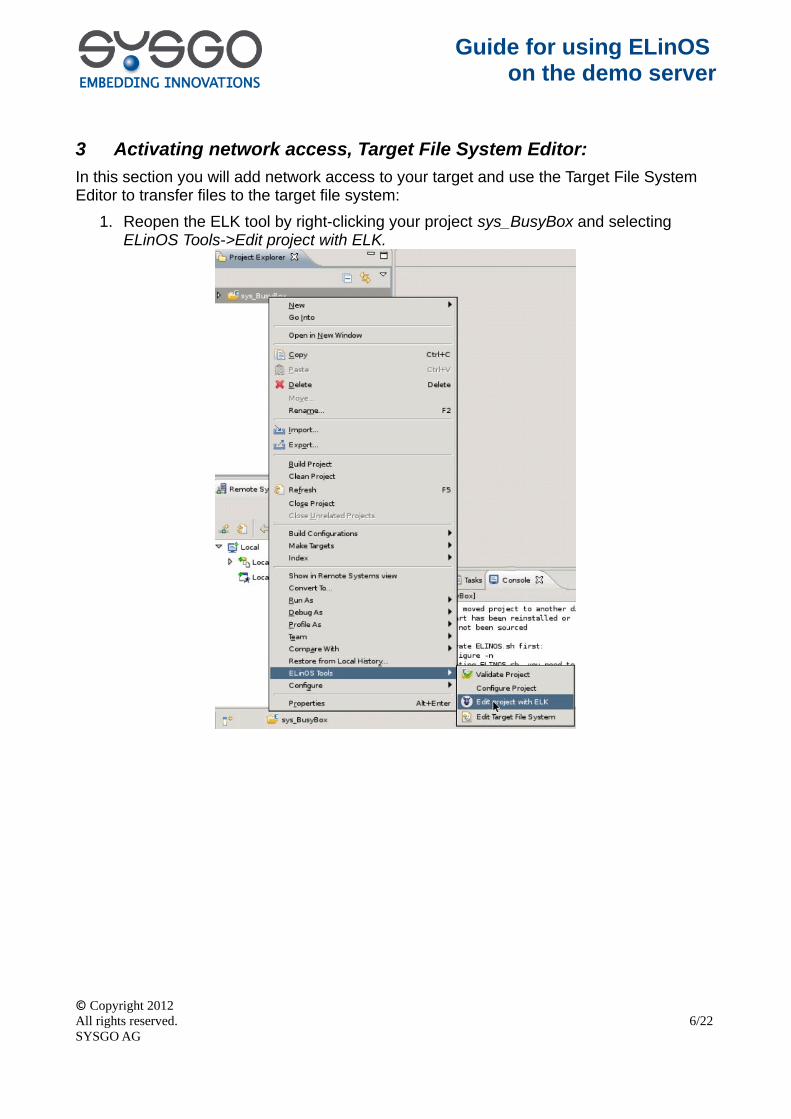
1. Reopen the ELK tool by right-clicking your project sys_BusyBox and selecting ELinOS Tools->Edit project with ELK.
© Copyright 2012 All rights reserved. 6/22 SYSGO AG
Guide for using ELinOS on the demo server
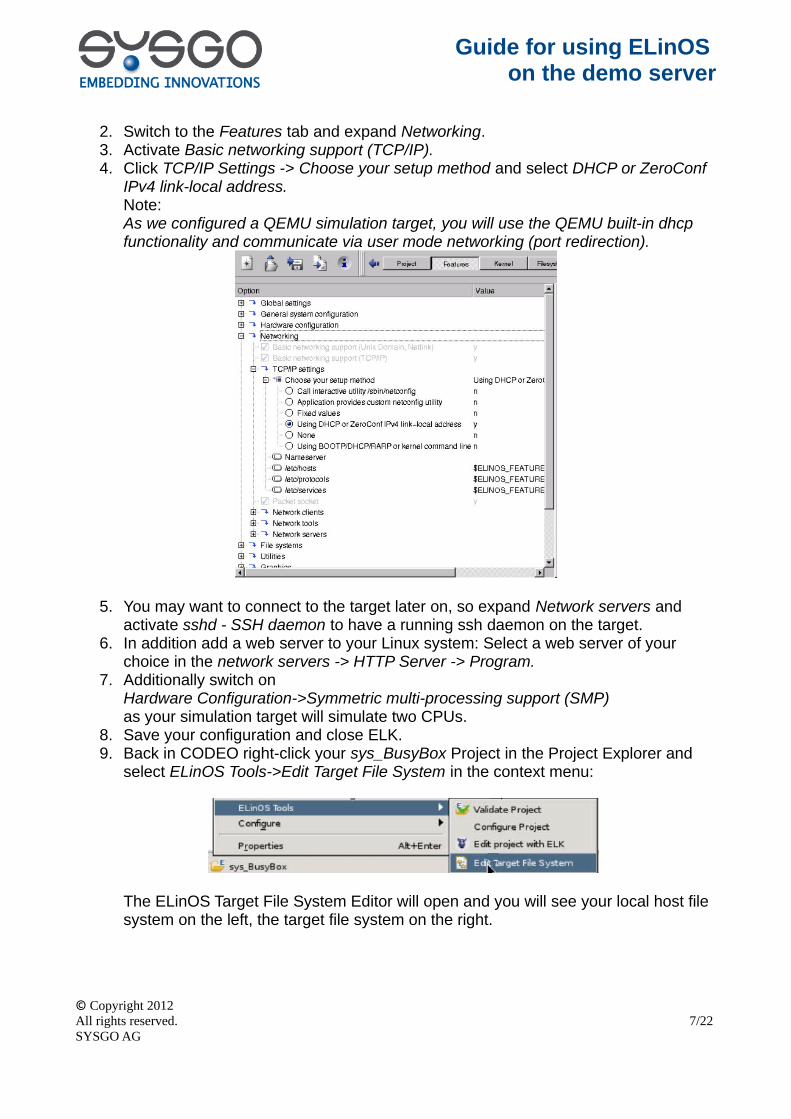
2. Switch to the Features tab and expand Networking.3. Activate Basic networking support (TCP/IP).4. Click TCP/IP Settings -> Choose your setup method and select DHCP or ZeroConf
IPv4 link-local address.Note:As we configured a QEMU simulation target, you will use the QEMU built-in dhcp functionality and communicate via user mode networking (port redirection).
5. You may want to connect to the target later on, so expand Network servers and activate sshd - SSH daemon to have a running ssh daemon on the target.
6. In addition add a web server to your Linux system: Select a web server of your choice in the network servers -> HTTP Server -> Program.
7. Additionally switch on Hardware Configuration->Symmetric multi-processing support (SMP) as your simulation target will simulate two CPUs.
8. Save your configuration and close ELK.9. Back in CODEO right-click your sys_BusyBox Project in the Project Explorer and
select ELinOS Tools->Edit Target File System in the context menu:
The ELinOS Target File System Editor will open and you will see your local host file system on the left, the target file system on the right.
© Copyright 2012 All rights reserved. 7/22 SYSGO AG
Guide for using ELinOS on the demo server
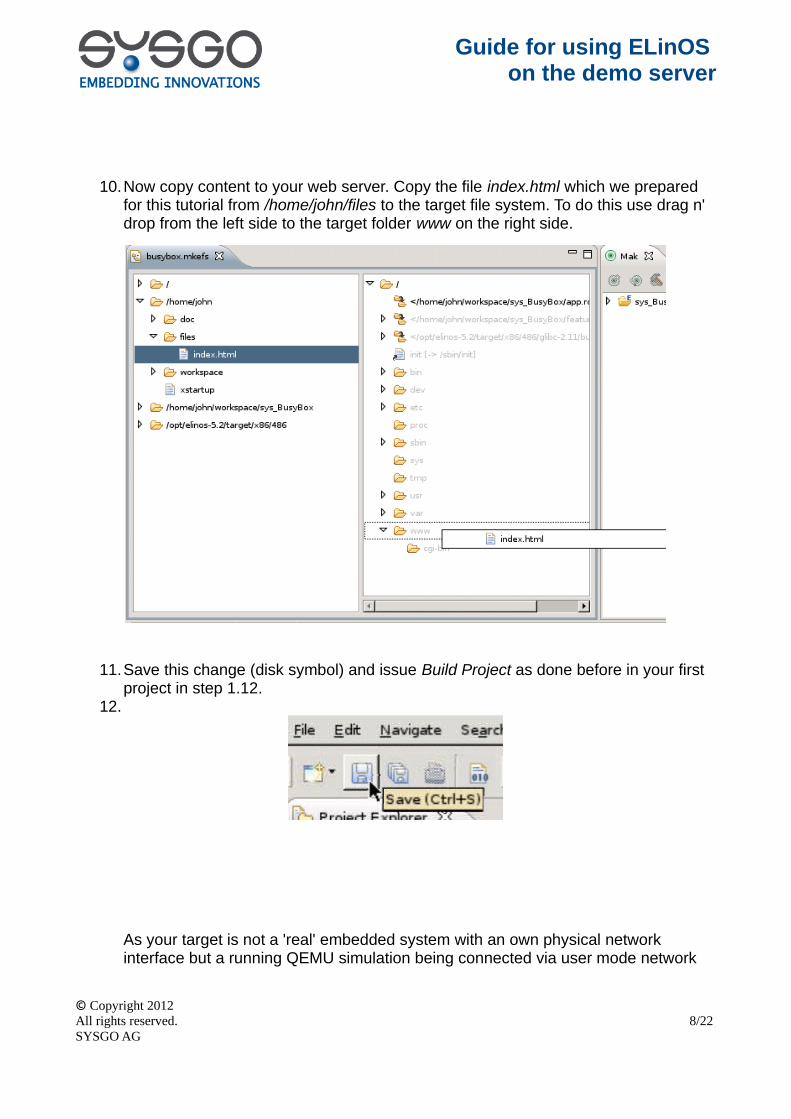
10.Now copy content to your web server. Copy the file index.html which we prepared for this tutorial from /home/john/files to the target file system. To do this use drag n' drop from the left side to the target folder www on the right side.
11.Save this change (disk symbol) and issue Build Project as done before in your first project in step 1.12.
12.
As your target is not a 'real' embedded system with an own physical network interface but a running QEMU simulation being connected via user mode network
© Copyright 2012 All rights reserved. 8/22 SYSGO AG
Guide for using ELinOS on the demo server
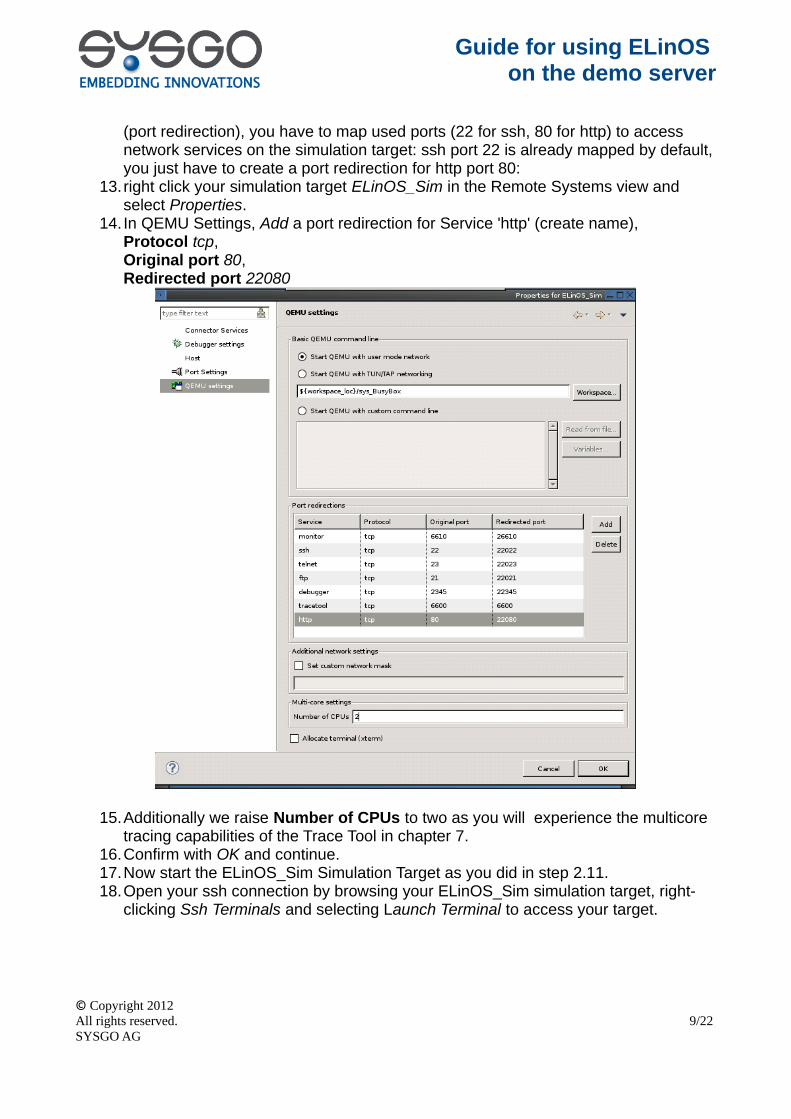
(port redirection), you have to map used ports (22 for ssh, 80 for http) to access network services on the simulation target: ssh port 22 is already mapped by default, you just have to create a port redirection for http port 80:
13.right click your simulation target ELinOS_Sim in the Remote Systems view and select Properties.
14. In QEMU Settings, Add a port redirection for Service 'http' (create name),Protocol tcp,Original port 80,Redirected port 22080
15.Additionally we raise Number of CPUs to two as you will experience the multicore tracing capabilities of the Trace Tool in chapter 7.
16.Confirm with OK and continue.17.Now start the ELinOS_Sim Simulation Target as you did in step 2.11.18.Open your ssh connection by browsing your ELinOS_Sim simulation target, right-
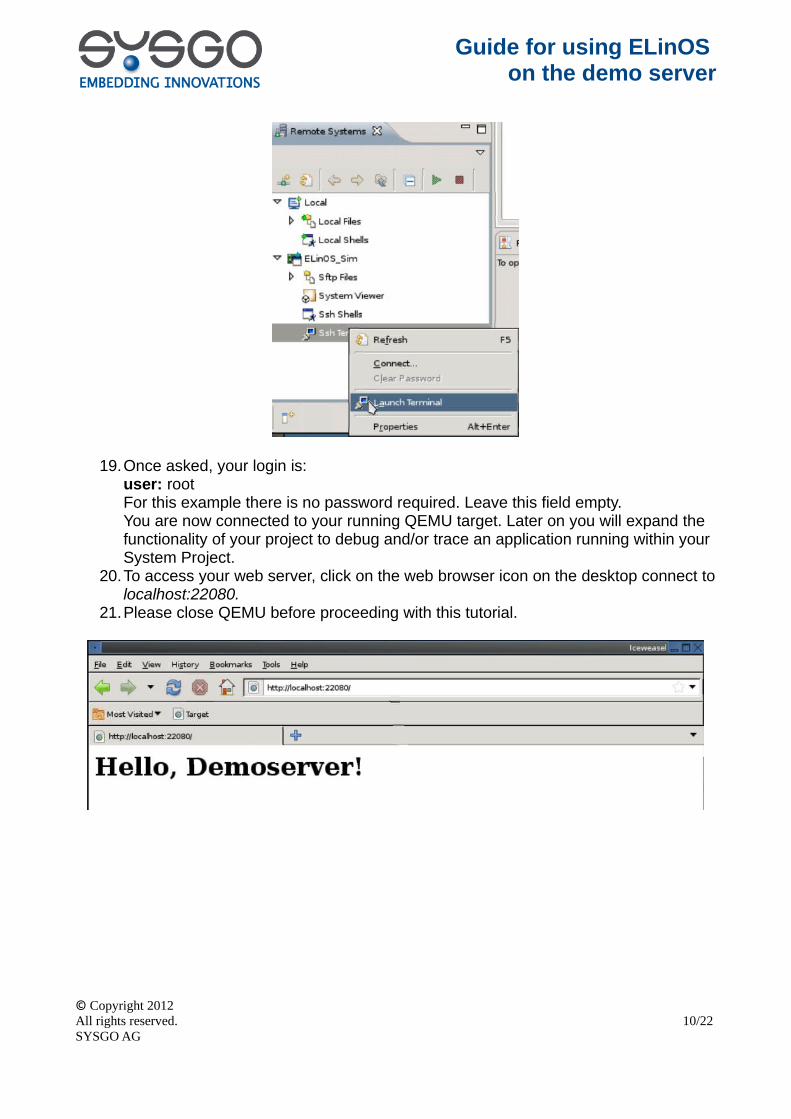
clicking Ssh Terminals and selecting Launch Terminal to access your target.
© Copyright 2012 All rights reserved. 9/22 SYSGO AG
Guide for using ELinOS on the demo server
19.Once asked, your login is:user: rootFor this example there is no password required. Leave this field empty.You are now connected to your running QEMU target. Later on you will expand the functionality of your project to debug and/or trace an application running within your System Project.
20.To access your web server, click on the web browser icon on the desktop connect to localhost:22080.
21.Please close QEMU before proceeding with this tutorial.
© Copyright 2012 All rights reserved. 10/22 SYSGO AG
Guide for using ELinOS on the demo server
4 Preparing your project for Tracing and Debugging within CODEO:
As your system project is quite simple and puristic, you can now activate additional features to try the CODEO debugging and tracing features:.
1. Reopen the ELK tool by right-clicking your project sys_BusyBox and selecting ELinOS Tools->Edit project with ELK.
2. Switch to the Features tab and edit your configuration by activating:CODEO Support->CODEO Development and Debugging SupportCODEO Support->CODEO Trace Tool Support
3. Save your project and close ELK.
5 Creating and adding an application project to your system project:
We now create an application that will be integrated into your Linux system (-project) for debugging.
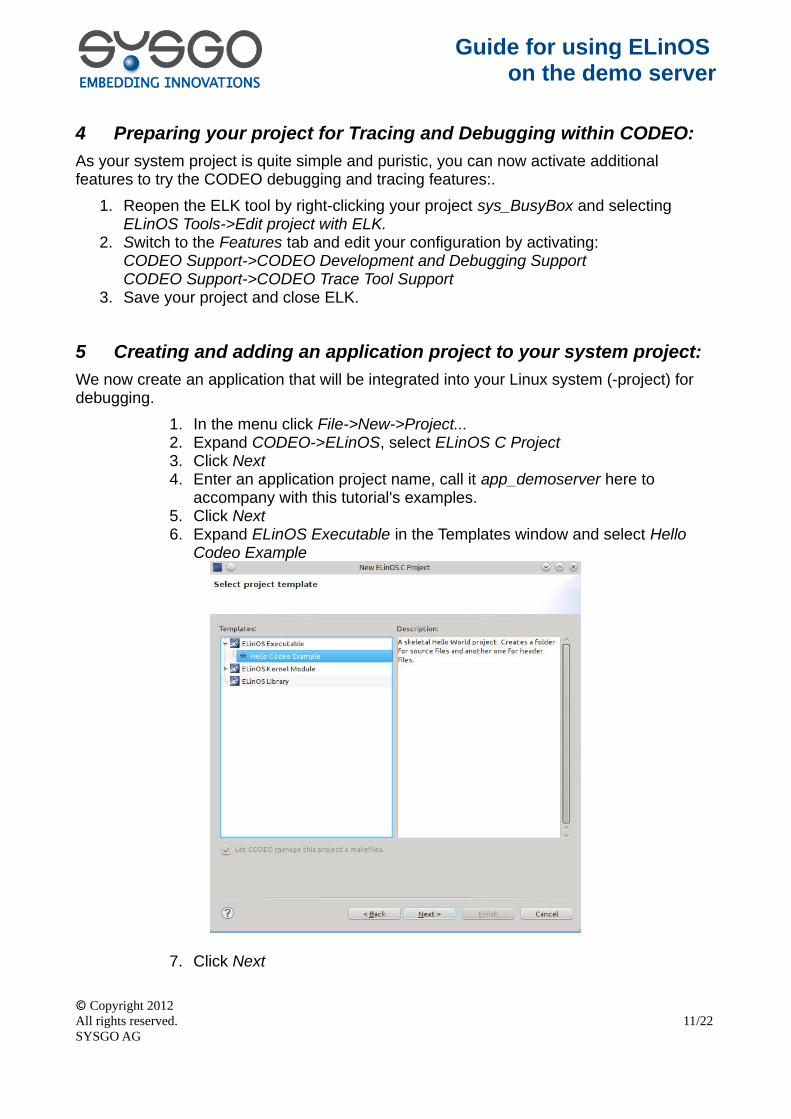
1. In the menu click File->New->Project...2. Expand CODEO->ELinOS, select ELinOS C Project3. Click Next4. Enter an application project name, call it app_demoserver here to
accompany with this tutorial's examples.5. Click Next6. Expand ELinOS Executable in the Templates window and select Hello
Codeo Example
7. Click Next
© Copyright 2012 All rights reserved. 11/22 SYSGO AG
Guide for using ELinOS on the demo server
8. Now select your ELinOS system project sys_BusyBox to include your application project by clicking "Workspace...". Your System Project environment is shown in the current settings field.
9. Click Finish (and acknowledge the change of the current perspective – you can switch it later on).
10.To build both projects, click Project->Build All in the Menu bar.11.Both projects are built.
6 Debugging your application project
Once you have set up and built your application project, you are able to debug your application. At first, you have to create a debug configuration for your Simulation Target:
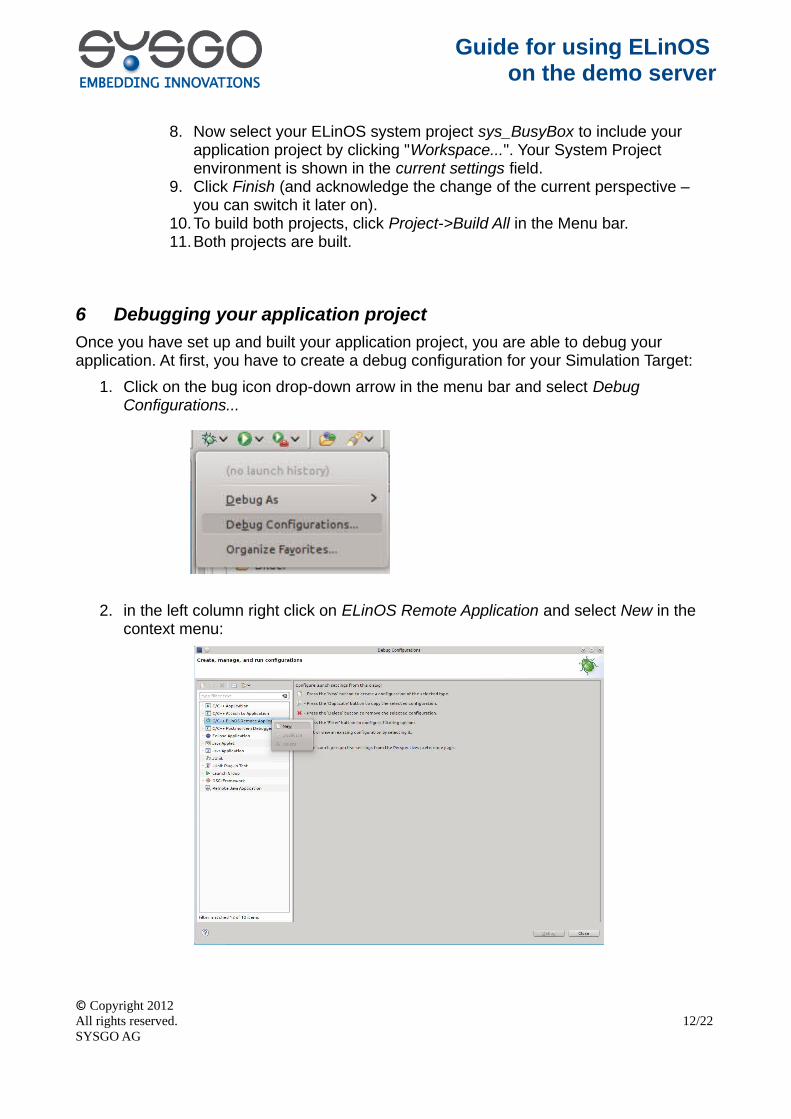
1. Click on the bug icon drop-down arrow in the menu bar and select Debug Configurations...
2. in the left column right click on ELinOS Remote Application and select New in the context menu:
© Copyright 2012 All rights reserved. 12/22 SYSGO AG
Guide for using ELinOS on the demo server
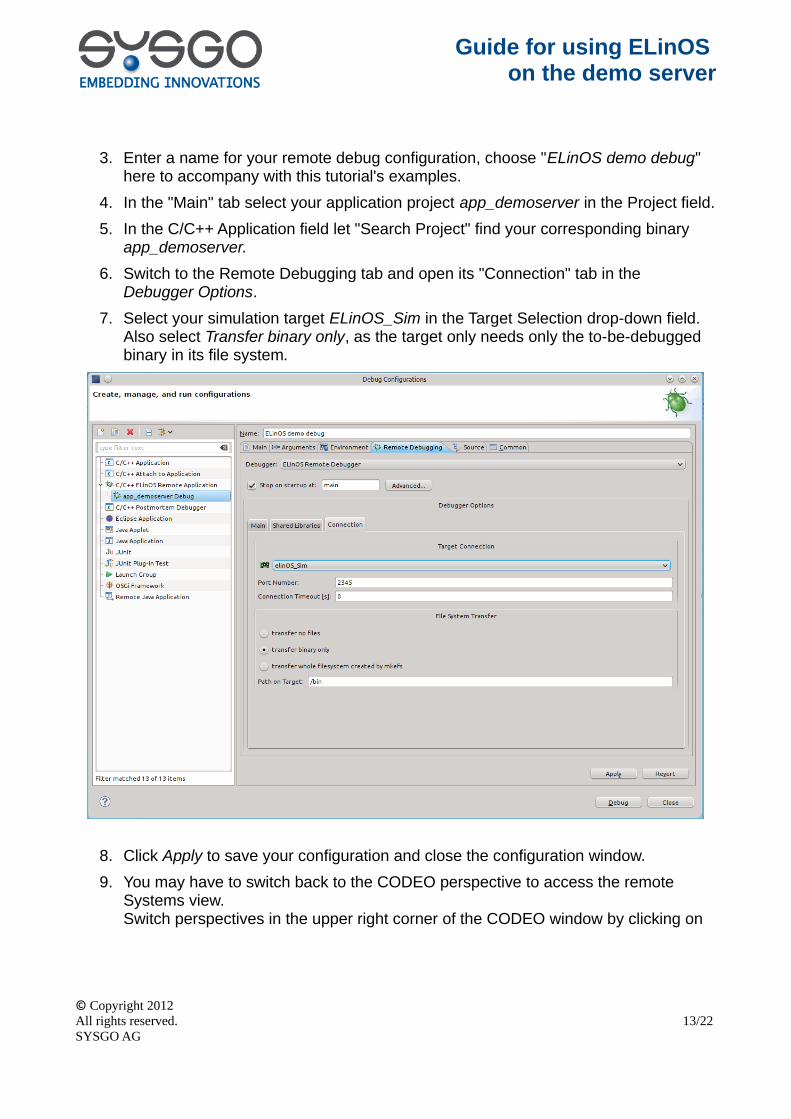
3. Enter a name for your remote debug configuration, choose "ELinOS demo debug" here to accompany with this tutorial's examples.
4. In the "Main" tab select your application project app_demoserver in the Project field.
5. In the C/C++ Application field let "Search Project" find your corresponding binary app_demoserver.
6. Switch to the Remote Debugging tab and open its "Connection" tab in the Debugger Options.
7. Select your simulation target ELinOS_Sim in the Target Selection drop-down field.Also select Transfer binary only, as the target only needs only the to-be-debugged binary in its file system.
8. Click Apply to save your configuration and close the configuration window.
9. You may have to switch back to the CODEO perspective to access the remote Systems view. Switch perspectives in the upper right corner of the CODEO window by clicking on
© Copyright 2012 All rights reserved. 13/22 SYSGO AG
Guide for using ELinOS on the demo server
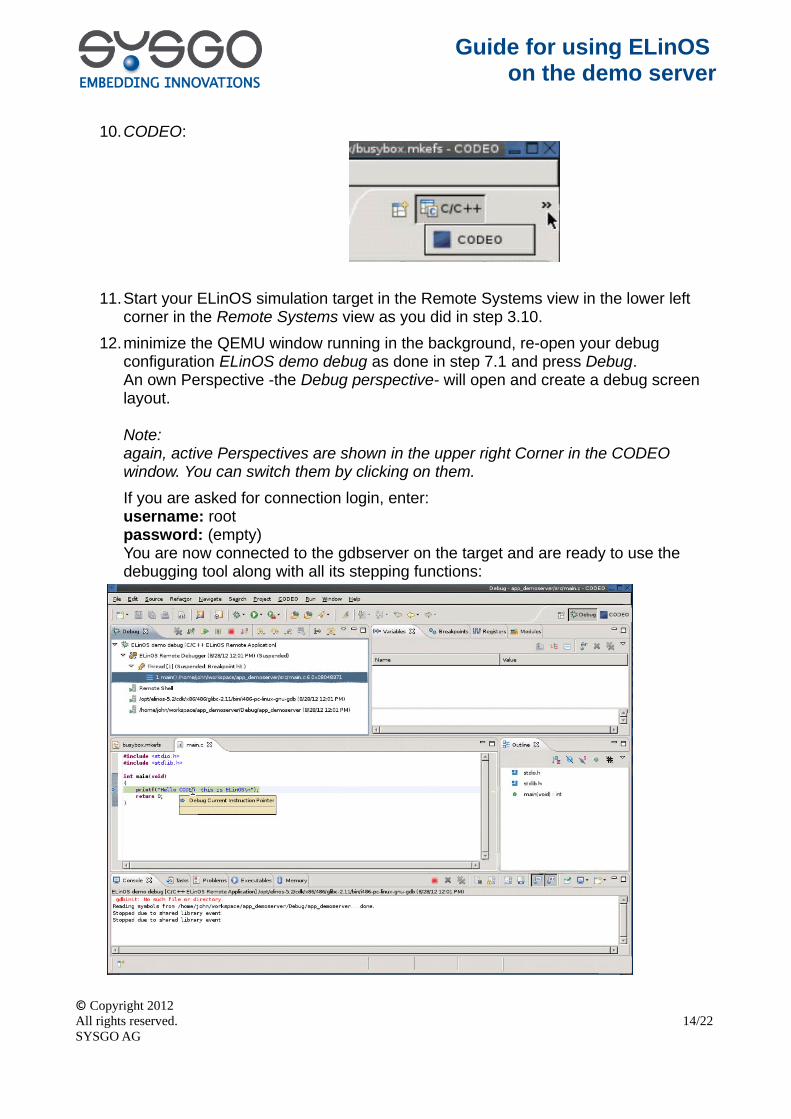
10.CODEO:
11.Start your ELinOS simulation target in the Remote Systems view in the lower left corner in the Remote Systems view as you did in step 3.10.
12.minimize the QEMU window running in the background, re-open your debug configuration ELinOS demo debug as done in step 7.1 and press Debug. An own Perspective -the Debug perspective- will open and create a debug screen layout.
Note:again, active Perspectives are shown in the upper right Corner in the CODEO window. You can switch them by clicking on them.
If you are asked for connection login, enter:username: rootpassword: (empty)You are now connected to the gdbserver on the target and are ready to use the debugging tool along with all its stepping functions:
© Copyright 2012 All rights reserved. 14/22 SYSGO AG
Guide for using ELinOS on the demo server
7 Tracing your application project
For tracing your first application, you will import lttng2 userspace tracing code from the local ELinOS debug demo into your application project you created earlier. The code adds userspace tracepoints and sets them in an endless loop.
Change and extend your application project app_demoserver:
1 Ensure you are in the CODEO perspective.
2 Expand the tree view of your app_demoserver in the Project Explorer window, highlight src/main.c and delete it by pressing the del key.
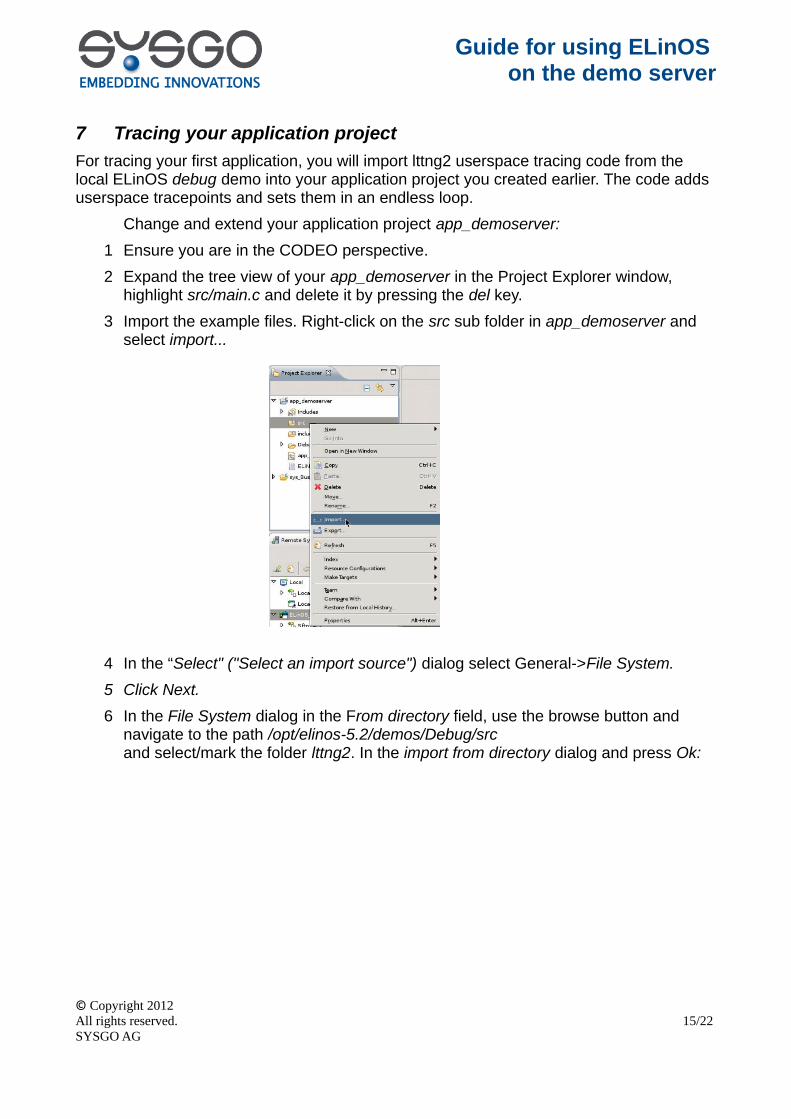
3 Import the example files. Right-click on the src sub folder in app_demoserver and select import...
4 In the “Select" ("Select an import source") dialog select General->File System.
5 Click Next.
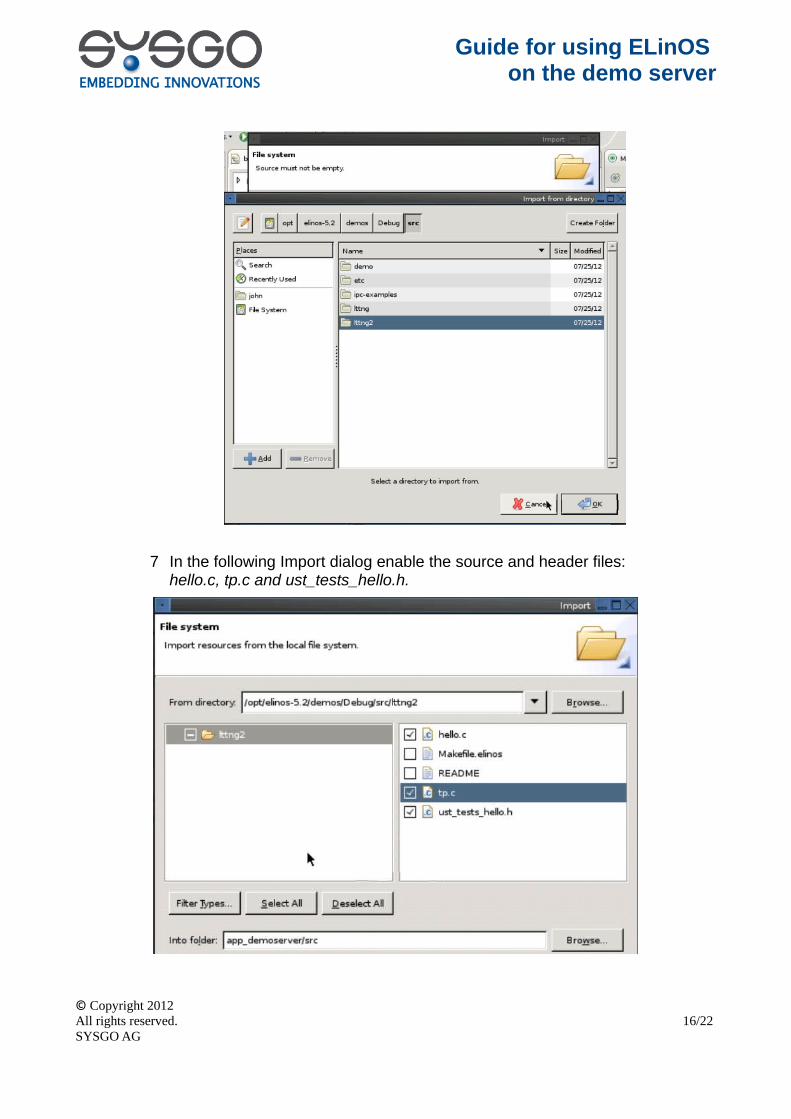
6 In the File System dialog in the From directory field, use the browse button and navigate to the path /opt/elinos-5.2/demos/Debug/srcand select/mark the folder lttng2. In the import from directory dialog and press Ok:
© Copyright 2012 All rights reserved. 15/22 SYSGO AG
Guide for using ELinOS on the demo server
7 In the following Import dialog enable the source and header files:hello.c, tp.c and ust_tests_hello.h.
© Copyright 2012 All rights reserved. 16/22 SYSGO AG
Guide for using ELinOS on the demo server
8 Click Finish.
9 Back in CODEO perspective, unflip the src directory in your app_demoserver project in the Project Explorer and drag the header file ust_tests_hello.h into the app_demoserver/include folder.
Note: The Files are now built within the automated build system, but you have to tell the linker to include all needed libraries by appending -llttng-ust to the linker:
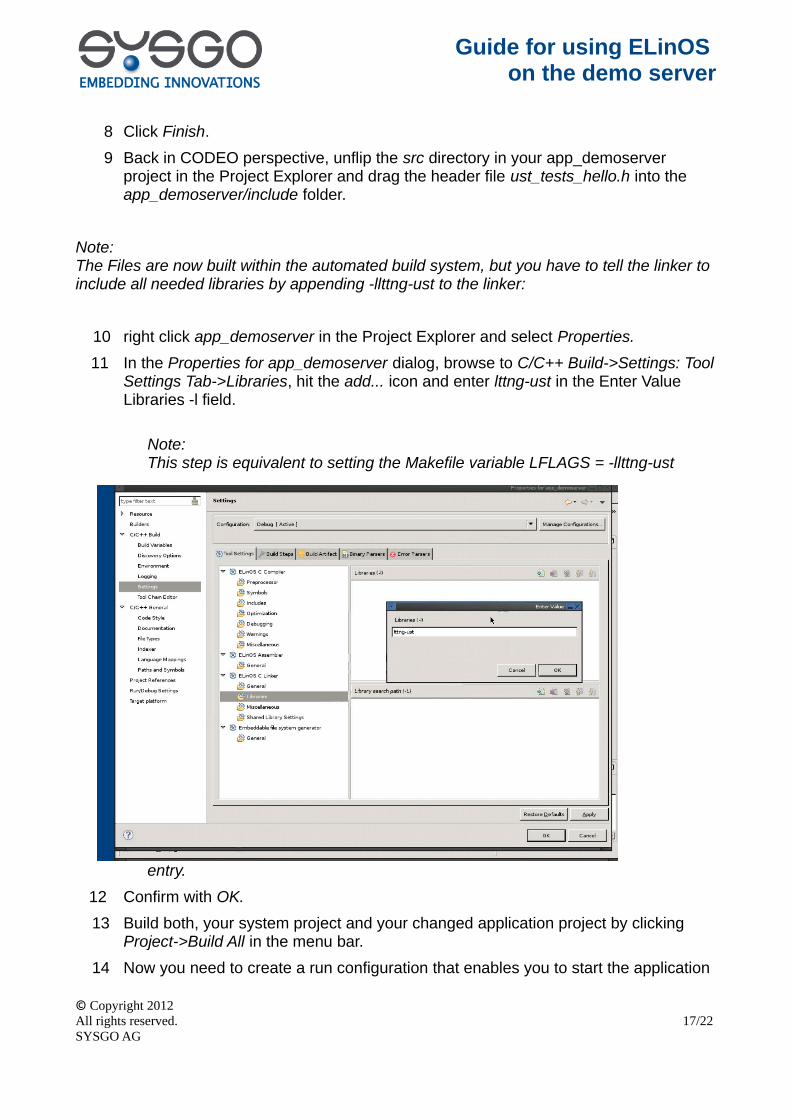
10 right click app_demoserver in the Project Explorer and select Properties.
11 In the Properties for app_demoserver dialog, browse to C/C++ Build->Settings: Tool Settings Tab->Libraries, hit the add... icon and enter lttng-ust in the Enter Value Libraries -l field.
Note: This step is equivalent to setting the Makefile variable LFLAGS = -llttng-ust
entry.
12 Confirm with OK.
13 Build both, your system project and your changed application project by clicking Project->Build All in the menu bar.
14 Now you need to create a run configuration that enables you to start the application
© Copyright 2012 All rights reserved. 17/22 SYSGO AG
Guide for using ELinOS on the demo server
binary on the target.Note:When used, CODEO copies the binary to the target and starts the application using a ssh connection.
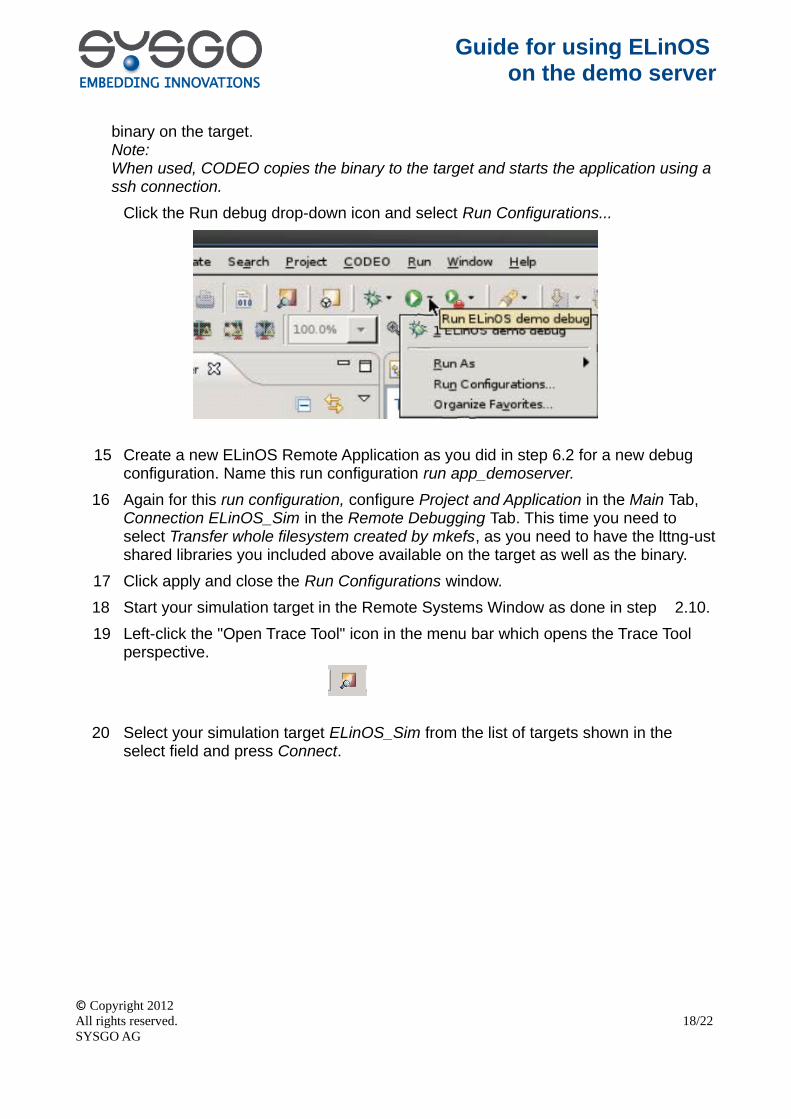
Click the Run debug drop-down icon and select Run Configurations...
15 Create a new ELinOS Remote Application as you did in step 6.2 for a new debug configuration. Name this run configuration run app_demoserver.
16 Again for this run configuration, configure Project and Application in the Main Tab, Connection ELinOS_Sim in the Remote Debugging Tab. This time you need to select Transfer whole filesystem created by mkefs, as you need to have the lttng-ust shared libraries you included above available on the target as well as the binary.
17 Click apply and close the Run Configurations window.
18 Start your simulation target in the Remote Systems Window as done in step 2.10.
19 Left-click the "Open Trace Tool" icon in the menu bar which opens the Trace Tool perspective.
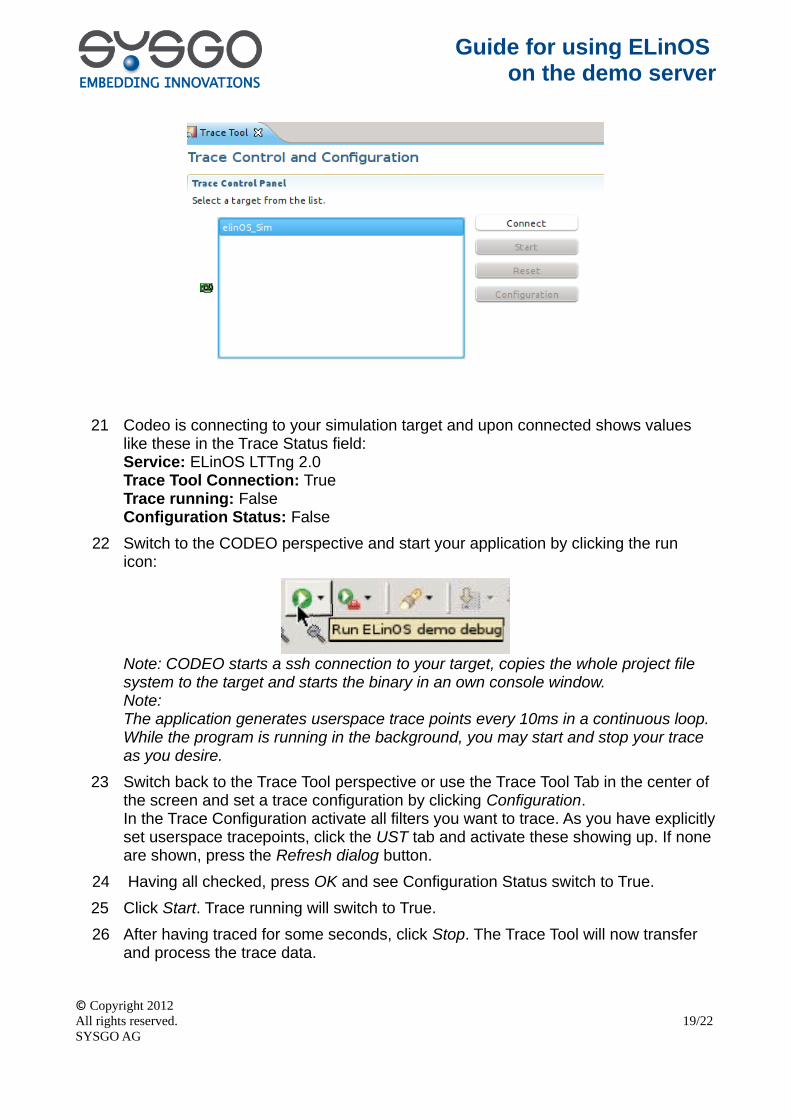
20 Select your simulation target ELinOS_Sim from the list of targets shown in the select field and press Connect.
© Copyright 2012 All rights reserved. 18/22 SYSGO AG
Guide for using ELinOS on the demo server
21 Codeo is connecting to your simulation target and upon connected shows values like these in the Trace Status field:Service: ELinOS LTTng 2.0Trace Tool Connection: TrueTrace running: False
Configuration Status: False
22 Switch to the CODEO perspective and start your application by clicking the run icon:
Note: CODEO starts a ssh connection to your target, copies the whole project file system to the target and starts the binary in an own console window.Note: The application generates userspace trace points every 10ms in a continuous loop. While the program is running in the background, you may start and stop your trace as you desire.
23 Switch back to the Trace Tool perspective or use the Trace Tool Tab in the center of the screen and set a trace configuration by clicking Configuration.In the Trace Configuration activate all filters you want to trace. As you have explicitly set userspace tracepoints, click the UST tab and activate these showing up. If none are shown, press the Refresh dialog button.
24 Having all checked, press OK and see Configuration Status switch to True.
25 Click Start. Trace running will switch to True.
26 After having traced for some seconds, click Stop. The Trace Tool will now transfer and process the trace data.
© Copyright 2012 All rights reserved. 19/22 SYSGO AG
Guide for using ELinOS on the demo server
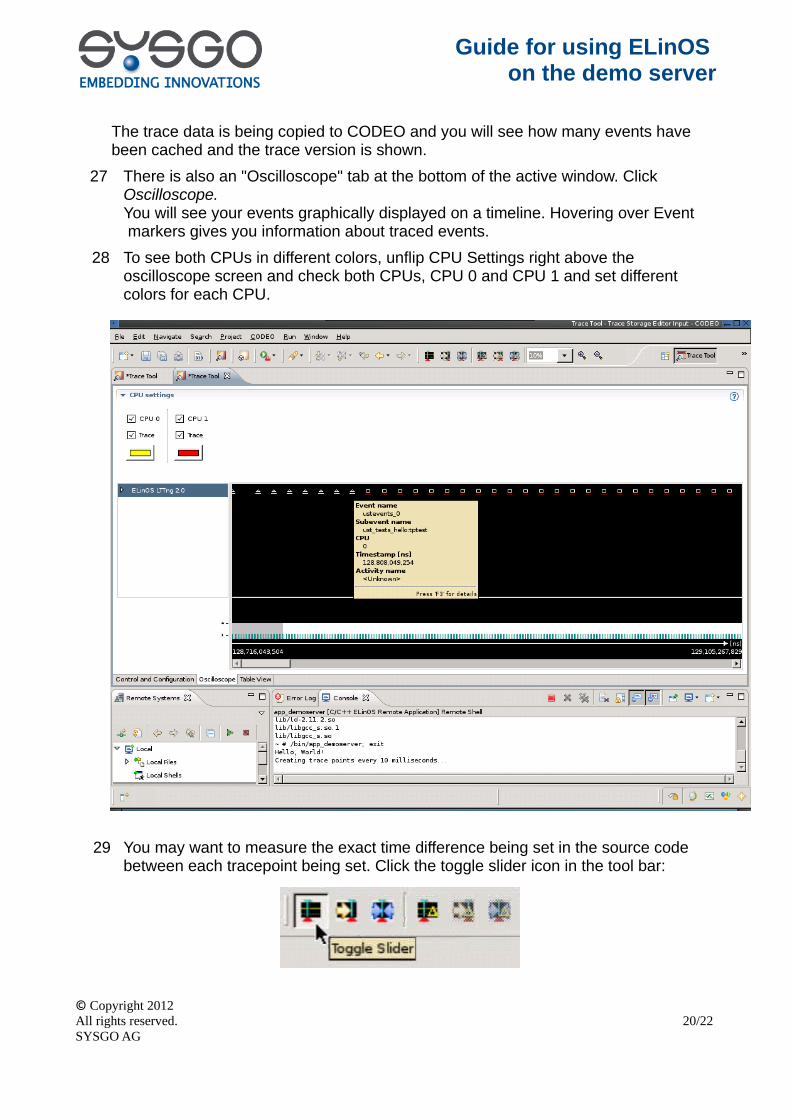
The trace data is being copied to CODEO and you will see how many events have been cached and the trace version is shown.
27 There is also an "Oscilloscope" tab at the bottom of the active window. Click Oscilloscope.
You will see your events graphically displayed on a timeline. Hovering over Event markers gives you information about traced events.
28 To see both CPUs in different colors, unflip CPU Settings right above the oscilloscope screen and check both CPUs, CPU 0 and CPU 1 and set different colors for each CPU.
29 You may want to measure the exact time difference being set in the source code between each tracepoint being set. Click the toggle slider icon in the tool bar:
© Copyright 2012 All rights reserved. 20/22 SYSGO AG

Guide for using ELinOS on the demo server
30 A slider appears on the oscilloscope. drag it with the red triangle and move it onto an event. You will see a time counter appear.
31 To calculate the time difference to the next event, toggle the time measurement slider and drag it over the next follow-up event. You will see the time difference beneath the time measurement slider, showing a value around 10ms.
Note: You may experience inaccurate values as QEMU simulation cannot guarantee timing accuracy and does depend on host-system load.
© Copyright 2012 All rights reserved. 21/22 SYSGO AG
Guide for using ELinOS on the demo server
4 EpilogueCongratulations! You have now seen many important features of ELinOS. We invite you to further explore ELinOS using the CODEO online help or by stepping through the ELinOS documentation.
© Copyright 2012 All rights reserved. 22/22 SYSGO AG