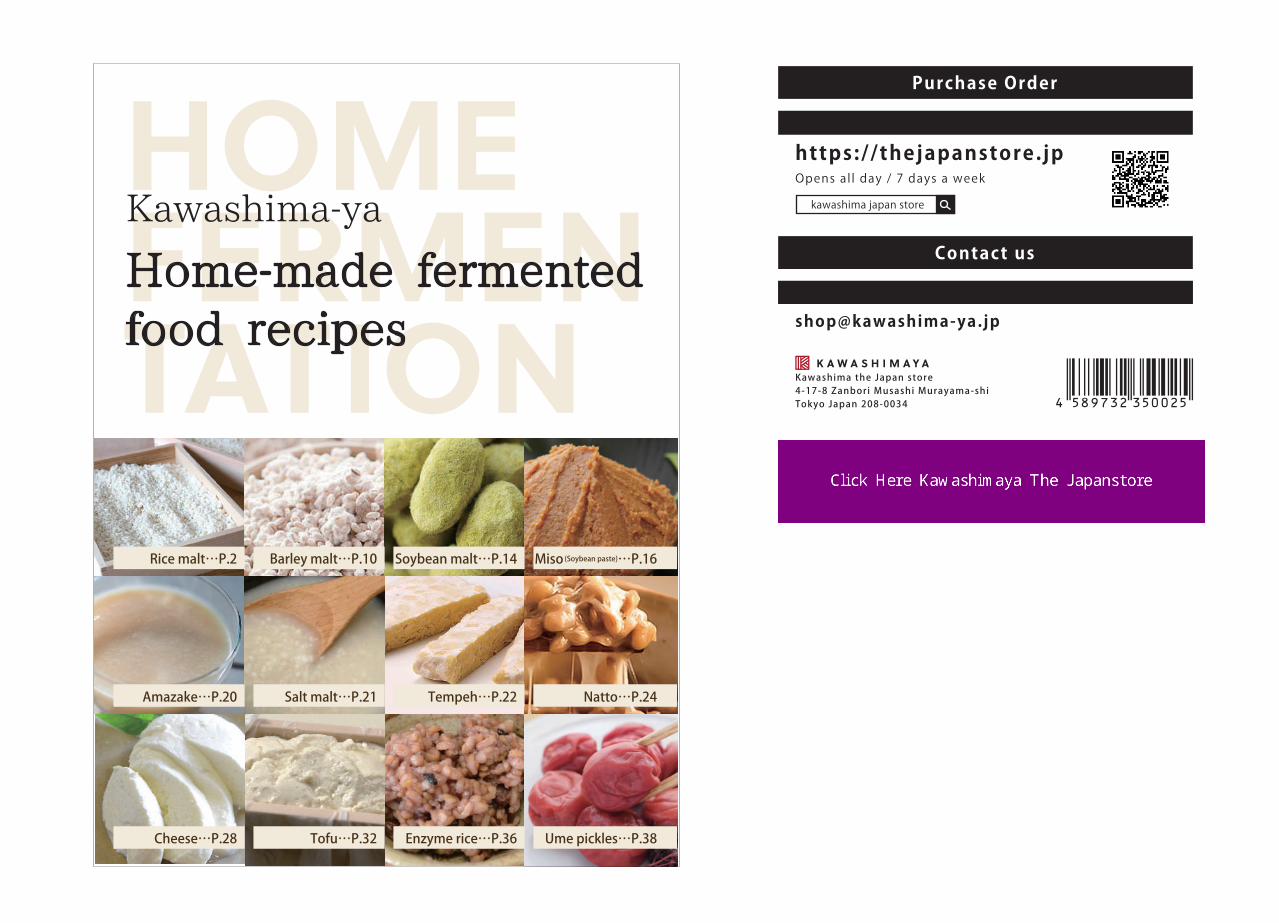
Embed Size (px)
Citation preview
2 3
Beautiful Japanese dishes can’t be done without rice malt
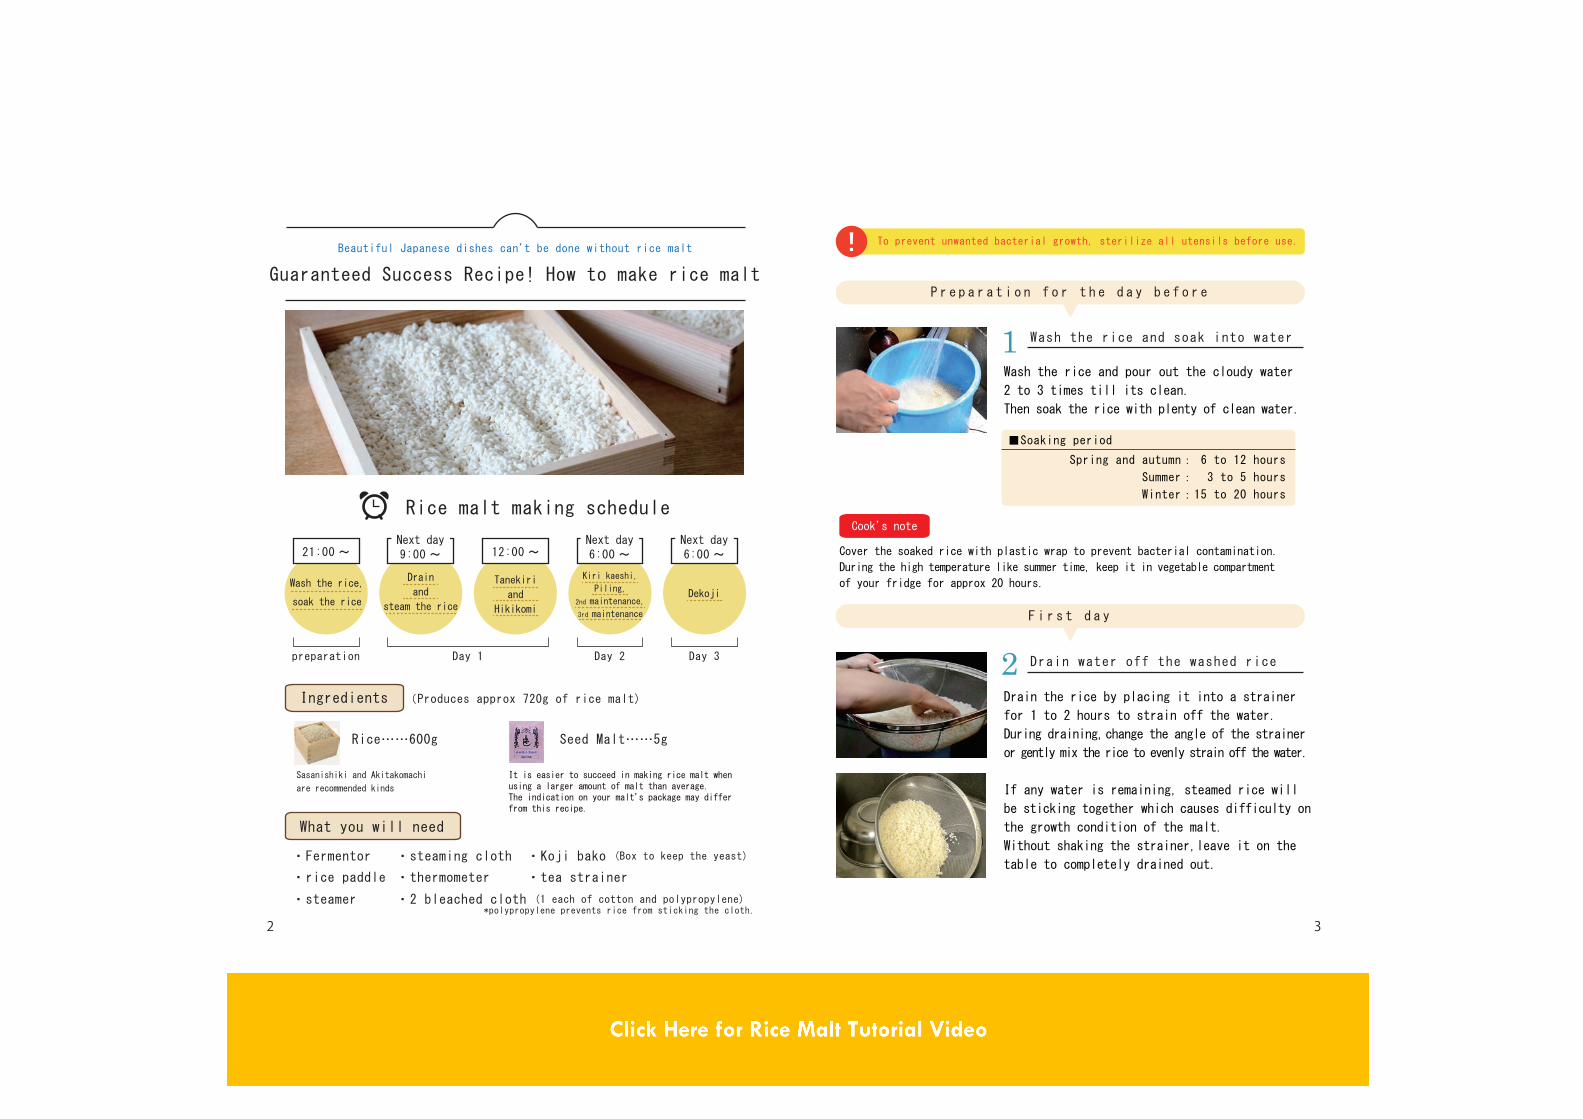
Guaranteed Success Recipe! How to make rice malt
21:00 ~
preparation Day 1 Day 2 Day 3
12:00 ~
Wash the rice,
soak the rice
Drain
and
steam the rice
Tanekiri
and
Hikikomi
Dekoji
Kiri kaeshi,
Piling,
2nd maintenance,
3rd maintenance
(Produces approx 720g of rice malt)Ingredients
What you will need
Rice……600g
・Fermentor
・rice paddle
・steaming cloth
・thermometer
・Koji bako (Box to keep the yeast)
・tea strainer
・steamer*polypropylene prevents rice from sticking the cloth.
Sasanishiki and Akitakomachi
are recommended kinds
It is easier to succeed in making rice malt whenusing a larger amount of malt than average.The indication on your malt’s package may differfrom this recipe.
Seed Malt……5g
To prevent unwanted bacterial growth, sterilize all utensils before use.!
P r e p a r a t i o n f o r t h e d a y b e f o r e
F i r s t d a y
Wash the rice and soak into water1
2 Drain water off the washed rice
Drain the rice by placing it into a strainer
for 1 to 2 hours to strain off the water.
During draining, change the angle of the strainer
or gently mix the rice to evenly strain off the water.
If any water is remaining, steamed rice will
be sticking together which causes difficulty on
the growth condition of the malt.
Without shaking the strainer,leave it on the
table to completely drained out.
Wash the rice and pour out the cloudy water
2 to 3 times till its clean.
Then soak the rice with plenty of clean water.
■Soaking period
Spring and autumn: 6 to 12 hours
Summer: 3 to 5 hours
Winter:15 to 20 hours
Rice malt making schedule
Cover the soaked rice with plastic wrap to prevent bacterial contamination.
During the high temperature like summer time, keep it in vegetable compartment
of your fridge for approx 20 hours.
Cook’s noteNext day9:00 ~
Next day6:00 ~
Next day6:00 ~
・2 bleached cloth (1 each of cotton and polypropylene)

4 5
Steam the rice (Approx 40mins)3Wrap the rice with steaming cloth and put it
into a steamer. Steaming time is approximately
40mins. Possibly steaming with the highest
temperature is the most ideal.
The steaming process here can vary the quality of malt.
Hikikomi (Wrap the rice and keep warm)5Gather the rice around the cloth and put thermometerin the middle to measure out the temperature.Then wrap it as tight as possible and fasten the edge ofthe cloth with a rubber band.
Then on top it, wrap it again with cotton clothto keep its moisture.The bleached cotton cloth will absorb excess mositure.
Steam like a Pro! Steam the rice using a bamboo steamer
1. Use a steaming cloth with a material called Tetron.
2. Steam 5 to 10mins without the lid on. Check if there is any vapor.
When the colour of vapor becomes partially clear, put the lid on.
Steaming time is approximately 40mins after covering with the lid.
Steaming with the posibly highest temperature is ideal.
3. Leave the bottom layer empty to prevent soggy rice.
4. If you are planning to steam with more than 2 layers,
swap the top and below layers during the steaming process.
Swapping layers minimizes unevenness of the steaming condition.
Cook’s note
1. Mix the seed malt in thoroughly. Don’t miss a spot!2. While the rice is too hot, spreading the seed malt can lead some of the yeast cells to die off. Use a thermometer to measure the rice temperature and cool it down to around 45 degrees.3. "Tanekiri" needs to be done promptly, especially in the winter in which the temperature drop quickly.4. Use greater amount of seed malt than average for a successful attempt. It helps to form good malt. In this recipe, 600g of rice and 5g of seed malt are used, which is approx 6 times more than the average. *Using 2 to 10 times more seed malt is most likely to succeed and does not effect the quality of final product.5. Do not re-use the steaming cloth as it has absorbed too much moisture.
Sings of good steamed rice
Take a grain of rice and squish it.If it
forms like a rice cake called“Hineri Mochi”,
then it's just about to be done.
It's best to cook rice as solid as possible
without having white core when you squish it.
*”Hineri Mochi”is a rice cake created by kneading a handful of freshly steamed rice with the hands.
At this point, preheat the fermentor up to 35 degrees.
Also, put some water on a tray to keep appropriate humidity.
Tane kiri(Sprinkling the seed malt on the steamed rice)4
Once the rice is steamed, sprinkle the seed maltover it. This process is called“Tane kiri”. Then spread the rice out on the clean tray or cloth.Use a rice paddle to separate the rice anddisperse the moisture and heat.Measure the temperature and try to cool it downto around 45 degrees.Using tea strainer would help spreading the seedmalt evenly. Mix well and break up the lumps of riceif there is any.
Cloth with a material called polypropylene to prevent the
rice sticking to the cloth.It also has a fine fabric texture,
that prevent the bacteria from escaping while conversely
allows the moisture to pass through. The Pro’s favorite item.
Check!
Recommended to use: Polypropylene cloth
Cooking the rice in a rice cooker can leave the rice with too much water content which
resulted with bad malt. Put the rice into the steamer to cook rice that contains the optimum
amount of water. Remember, "steaming" process needs to be carried out.
Troubleshooting
Check!
6 7
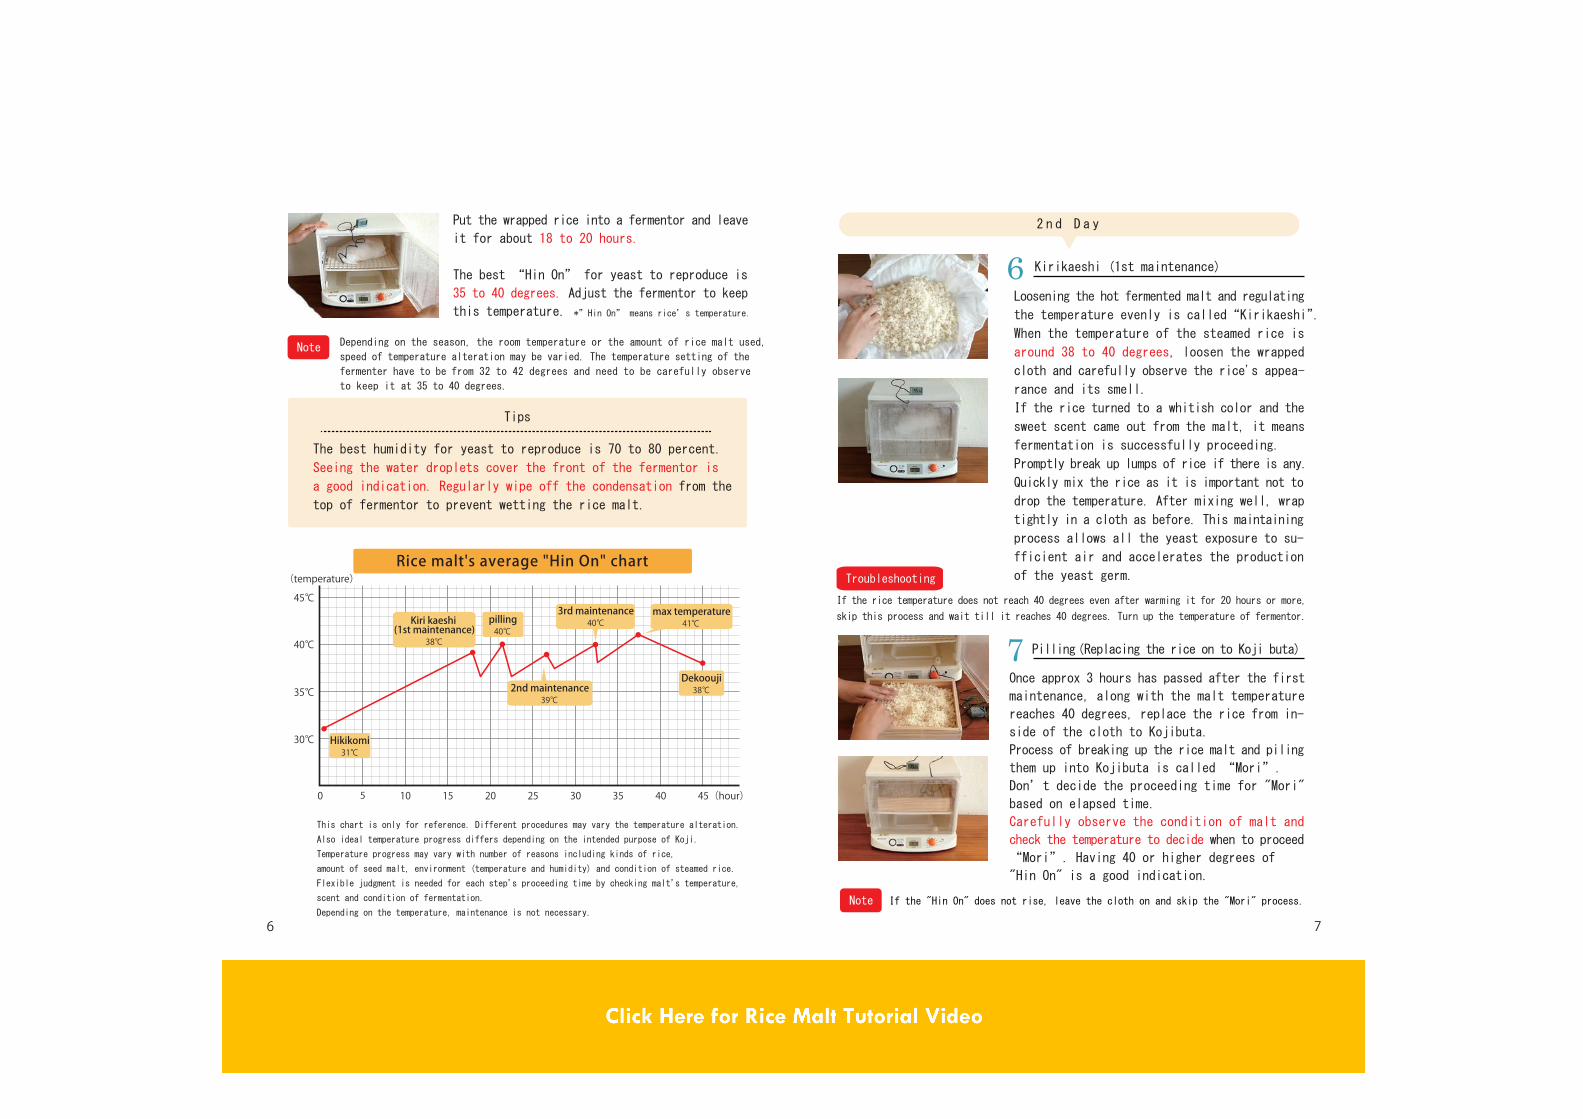
Put the wrapped rice into a fermentor and leave
it for about 18 to 20 hours.
The best “Hin On” for yeast to reproduce is
35 to 40 degrees. Adjust the fermentor to keep
this temperature.
Depending on the season, the room temperature or the amount of rice malt used,
speed of temperature alteration may be varied. The temperature setting of the
fermenter have to be from 32 to 42 degrees and need to be carefully observe
to keep it at 35 to 40 degrees.
*”Hin On” means rice’s temperature.
Kirikaeshi (1st maintenance)6Loosening the hot fermented malt and regulating
the temperature evenly is called“Kirikaeshi”.
When the temperature of the steamed rice is
around 38 to 40 degrees, loosen the wrapped
cloth and carefully observe the rice's appea-
rance and its smell.
If the rice turned to a whitish color and the
sweet scent came out from the malt, it means
fermentation is successfully proceeding.
Promptly break up lumps of rice if there is any.
Quickly mix the rice as it is important not to
drop the temperature. After mixing well, wrap
tightly in a cloth as before. This maintaining
process allows all the yeast exposure to su-
fficient air and accelerates the production
of the yeast germ.
If the rice temperature does not reach 40 degrees even after warming it for 20 hours or more,
skip this process and wait till it reaches 40 degrees. Turn up the temperature of fermentor.
Pilling (Replacing the rice on to Koji buta)7Once approx 3 hours has passed after the first
maintenance, along with the malt temperature
reaches 40 degrees, replace the rice from in-
side of the cloth to Kojibuta.
Process of breaking up the rice malt and piling
them up into Kojibuta is called “Mori”.
Don’t decide the proceeding time for "Mori"
based on elapsed time.
Carefully observe the condition of malt and
check the temperature to decide when to proceed
“Mori”. Having 40 or higher degrees of
"Hin On" is a good indication.
Tips
The best humidity for yeast to reproduce is 70 to 80 percent.
Seeing the water droplets cover the front of the fermentor is
a good indication. Regularly wipe off the condensation from the
top of fermentor to prevent wetting the rice malt.
Rice malt's average "Hin On" chart
0
30℃
35℃
40℃
45℃
(temperature)
5 10 15 20 25 30 35 40 45(hour)
31℃
38℃40℃
39℃
40℃ 41℃
38℃
Kiri kaeshi (1st maintenance)
pilling
2nd maintenance
3rd maintenance max temperature
Dekoouji
Hikikomi
This chart is only for reference. Different procedures may vary the temperature alteration.
Also ideal temperature progress differs depending on the intended purpose of Koji.
Temperature progress may vary with number of reasons including kinds of rice,
amount of seed malt, environment (temperature and humidity) and condition of steamed rice.
Flexible judgment is needed for each step’s proceeding time by checking malt’s temperature,
scent and condition of fermentation.
Depending on the temperature, maintenance is not necessary.If the "Hin On" does not rise, leave the cloth on and skip the "Mori" process.
2 n d D a y
Note
Troubleshooting
Note
8 9
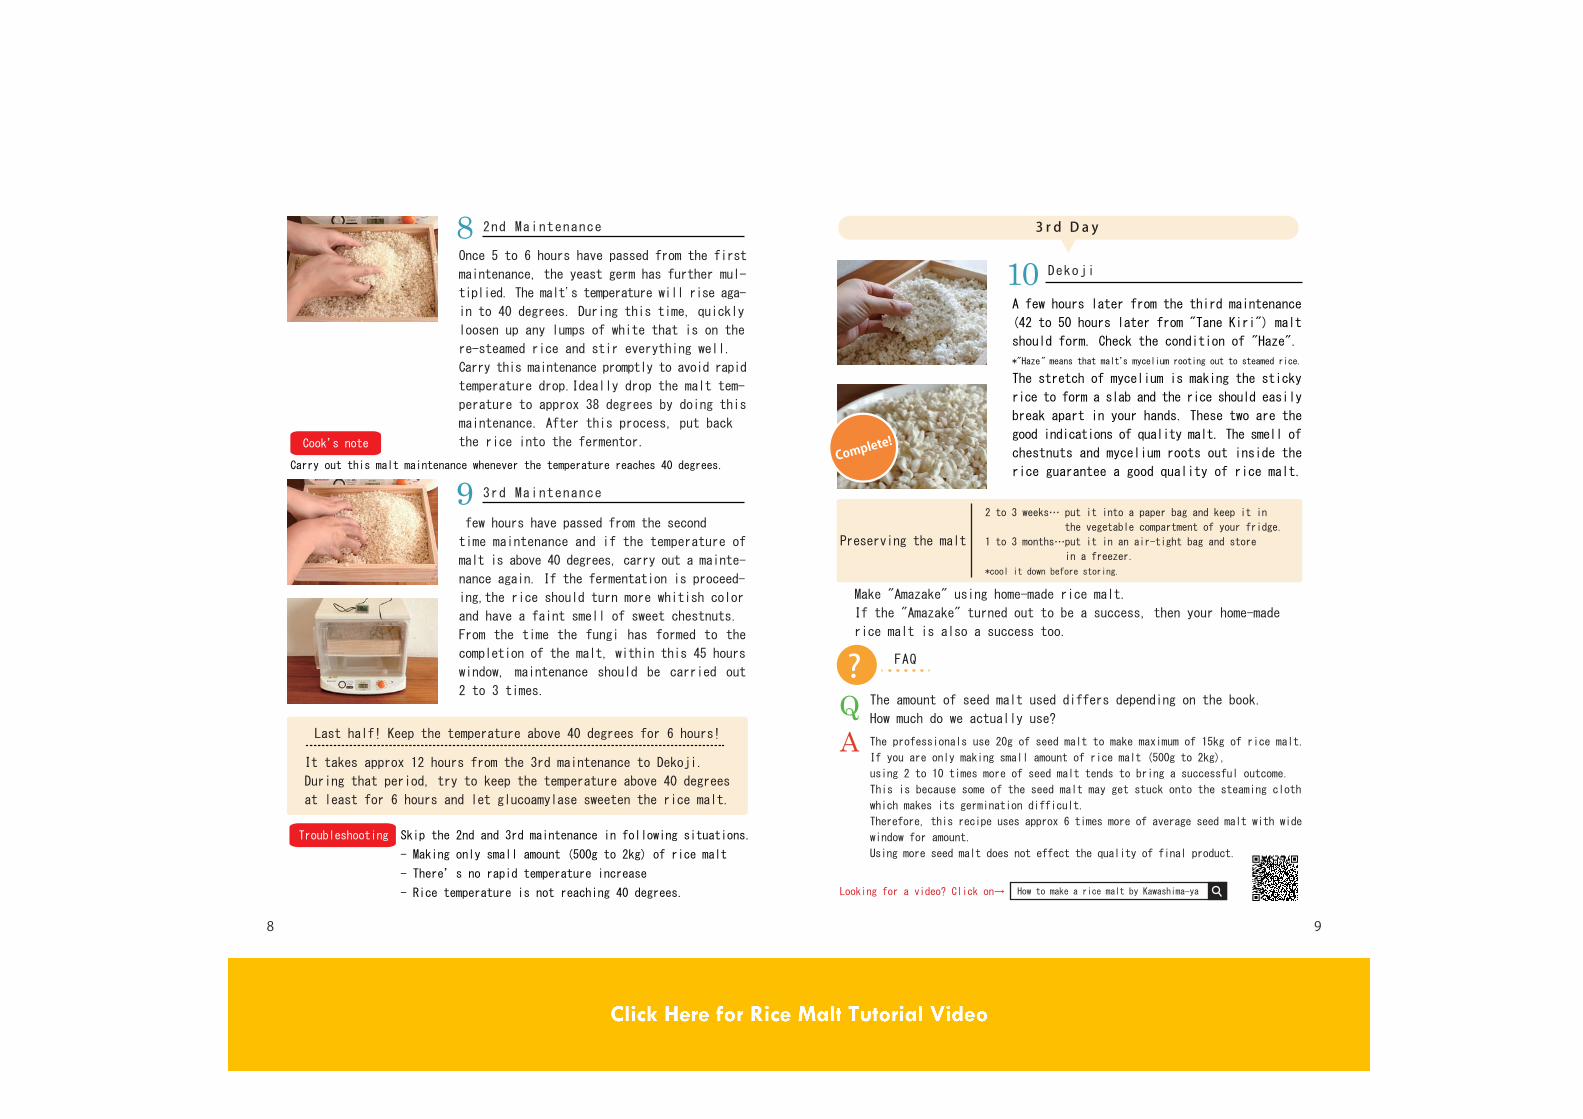
2nd Maintenance8Once 5 to 6 hours have passed from the first
maintenance, the yeast germ has further mul-
tiplied. The malt's temperature will rise aga-
in to 40 degrees. During this time, quickly
loosen up any lumps of white that is on the
re-steamed rice and stir everything well.
Carry this maintenance promptly to avoid rapid
temperature drop.Ideally drop the malt tem-
perature to approx 38 degrees by doing this
maintenance. After this process, put back
the rice into the fermentor.
Carry out this malt maintenance whenever the temperature reaches 40 degrees.
3rd Maintenance9
Dekoji10
QA
Preserving the malt
2 to 3 weeks… put it into a paper bag and keep it in
the vegetable compartment of your fridge.
1 to 3 months…put it in an air-tight bag and store
in a freezer.
*cool it down before storing.
The amount of seed malt used differs depending on the book.
How much do we actually use?
The professionals use 20g of seed malt to make maximum of 15kg of rice malt.
If you are only making small amount of rice malt (500g to 2kg),
using 2 to 10 times more of seed malt tends to bring a successful outcome.
This is because some of the seed malt may get stuck onto the steaming cloth
which makes its germination difficult.
Therefore, this recipe uses approx 6 times more of average seed malt with wide
window for amount.
Using more seed malt does not effect the quality of final product.
Looking for a video? Click on→
Make "Amazake" using home-made rice malt.
If the "Amazake" turned out to be a success, then your home-made
rice malt is also a success too.
Last half! Keep the temperature above 40 degrees for 6 hours!
It takes approx 12 hours from the 3rd maintenance to Dekoji.
During that period, try to keep the temperature above 40 degrees
at least for 6 hours and let glucoamylase sweeten the rice malt.
Skip the 2nd and 3rd maintenance in following situations.
- Making only small amount (500g to 2kg) of rice malt
- There’s no rapid temperature increase
- Rice temperature is not reaching 40 degrees.
3 r d D a y
Cook’s noteCompl
ete!
How to make a rice malt by Kawashima-ya
FAQ?
few hours have passed from the second
time maintenance and if the temperature of
malt is above 40 degrees, carry out a mainte-
nance again. If the fermentation is proceed-
ing,the rice should turn more whitish color
and have a faint smell of sweet chestnuts.
From the time the fungi has formed to the
completion of the malt, within this 45 hours
window, maintenance should be carried out
2 to 3 times.
Troubleshooting
A few hours later from the third maintenance
(42 to 50 hours later from "Tane Kiri") malt
should form. Check the condition of "Haze".
*"Haze " means that malt’s mycelium rooting out to steamed rice.
The stretch of mycelium is making the sticky
rice to form a slab and the rice should easily
break apart in your hands. These two are the
good indications of quality malt. The smell of
chestnuts and mycelium roots out inside the
rice guarantee a good quality of rice malt.
10 11
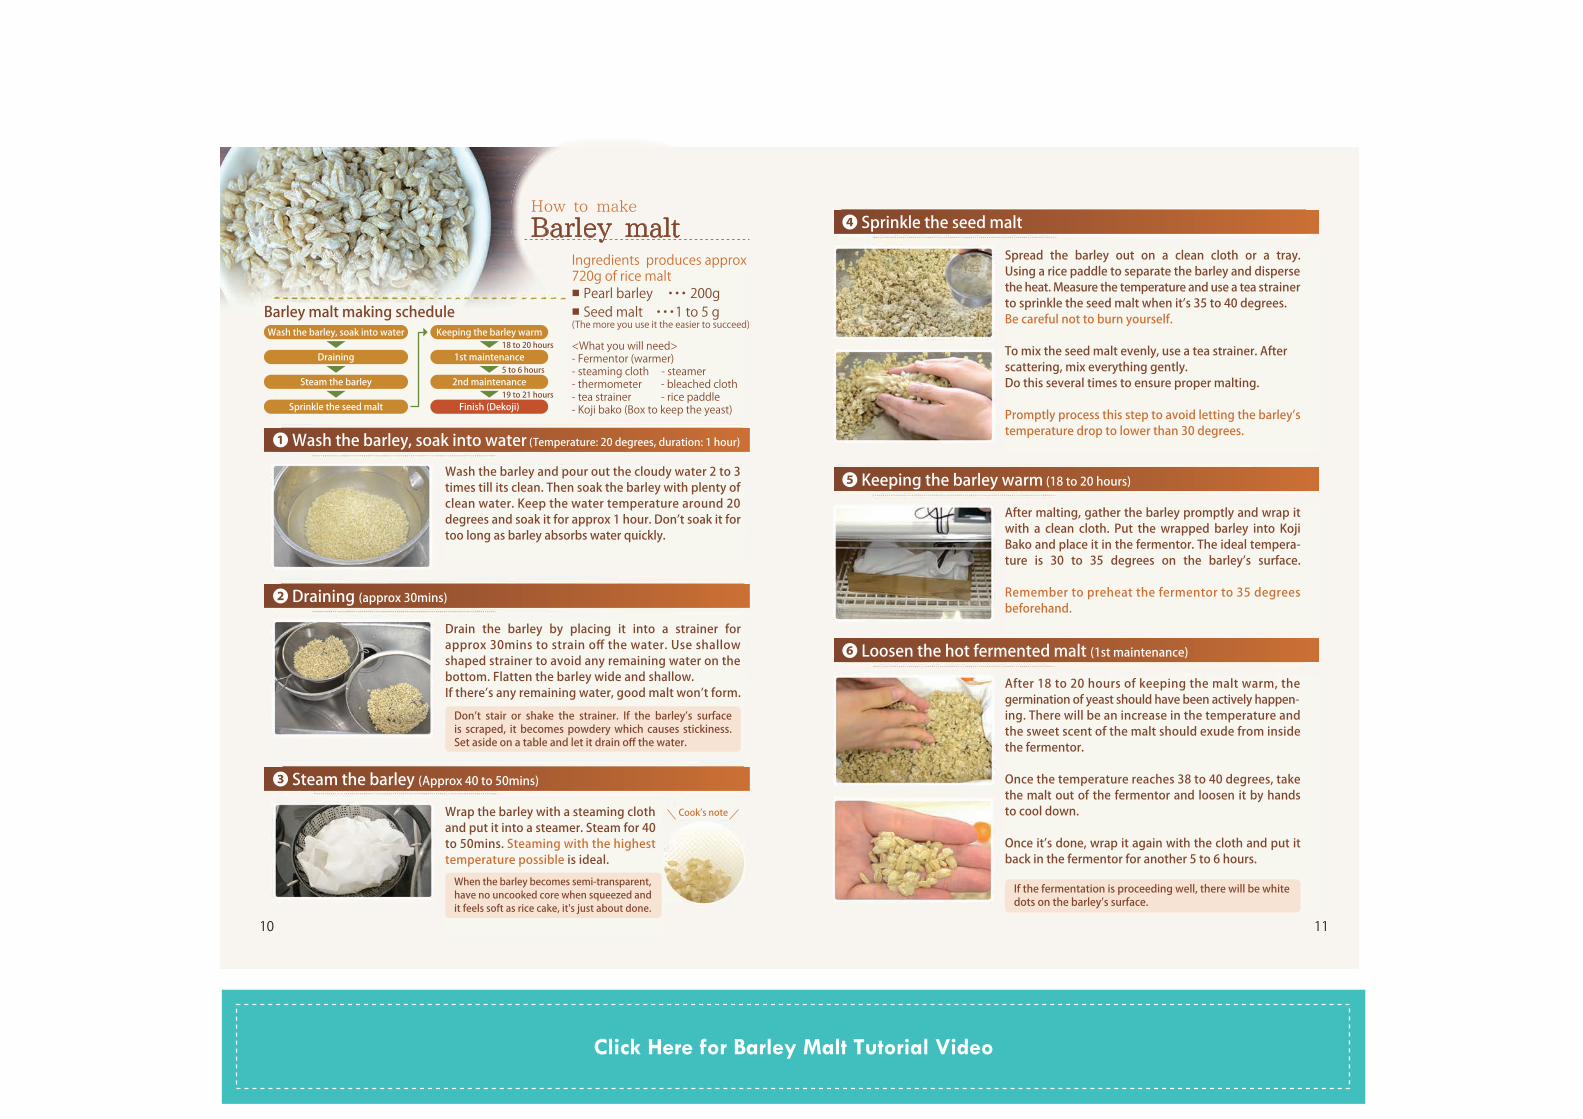
How to make
Barley maltIngredients produces approx720g of rice malt■ Pearl barley ・・・ 200g■ Seed malt ・・・1 to 5 g(The more you use it the easier to succeed)
<What you will need>- Fermentor (warmer) - steaming cloth - steamer - thermometer - bleached cloth - tea strainer - rice paddle- Koji bako (Box to keep the yeast)
Barley malt making scheduleWash the barley, soak into water Keeping the barley warm
❶ Wash the barley, soak into water (Temperature: 20 degrees, duration: 1 hour)
❷ Draining (approx 30mins)
❹ Sprinkle the seed malt
❺ Keeping the barley warm (18 to 20 hours)
❻ Loosen the hot fermented malt (1st maintenance)
❸ Steam the barley (Approx 40 to 50mins)
18 to 20 hours
5 to 6 hours
19 to 21 hours
1st maintenance
2nd maintenance
Finish (Dekoji)
Draining
Steam the barley
Sprinkle the seed malt
Wash the barley and pour out the cloudy water 2 to 3 times till its clean. Then soak the barley with plenty of clean water. Keep the water temperature around 20 degrees and soak it for approx 1 hour. Don’t soak it for too long as barley absorbs water quickly.
Drain the barley by placing it into a strainer forapprox 30mins to strain off the water. Use shallow shaped strainer to avoid any remaining water on the bottom. Flatten the barley wide and shallow. If there’s any remaining water, good malt won’t form.Don’t stair or shake the strainer. If the barley’s surfaceis scraped, it becomes powdery which causes stickiness. Set aside on a table and let it drain off the water.
If the fermentation is proceeding well, there will be white dots on the barley’s surface.
When the barley becomes semi-transparent, have no uncooked core when squeezed and it feels soft as rice cake, it's just about done.
Wrap the barley with a steaming cloth and put it into a steamer. Steam for 40 to 50mins. Steaming with the highest temperature possible is ideal.
Cook’s note
Spread the barley out on a clean cloth or a tray.Using a rice paddle to separate the barley and disperse the heat. Measure the temperature and use a tea strainer to sprinkle the seed malt when it’s 35 to 40 degrees. Be careful not to burn yourself.
To mix the seed malt evenly, use a tea strainer. After scattering, mix everything gently.Do this several times to ensure proper malting.
Promptly process this step to avoid letting the barley’s temperature drop to lower than 30 degrees.
After malting, gather the barley promptly and wrap it with a clean cloth. Put the wrapped barley into Koji Bako and place it in the fermentor. The ideal tempera-ture is 30 to 35 degrees on the barley’s surface.
Remember to preheat the fermentor to 35 degrees beforehand.
After 18 to 20 hours of keeping the malt warm, the germination of yeast should have been actively happen-ing. There will be an increase in the temperature and the sweet scent of the malt should exude from inside the fermentor.
Once the temperature reaches 38 to 40 degrees, take the malt out of the fermentor and loosen it by hands to cool down.
Once it’s done, wrap it again with the cloth and put itback in the fermentor for another 5 to 6 hours.
Click Here for Barley Malt Tutorial Video
12 13
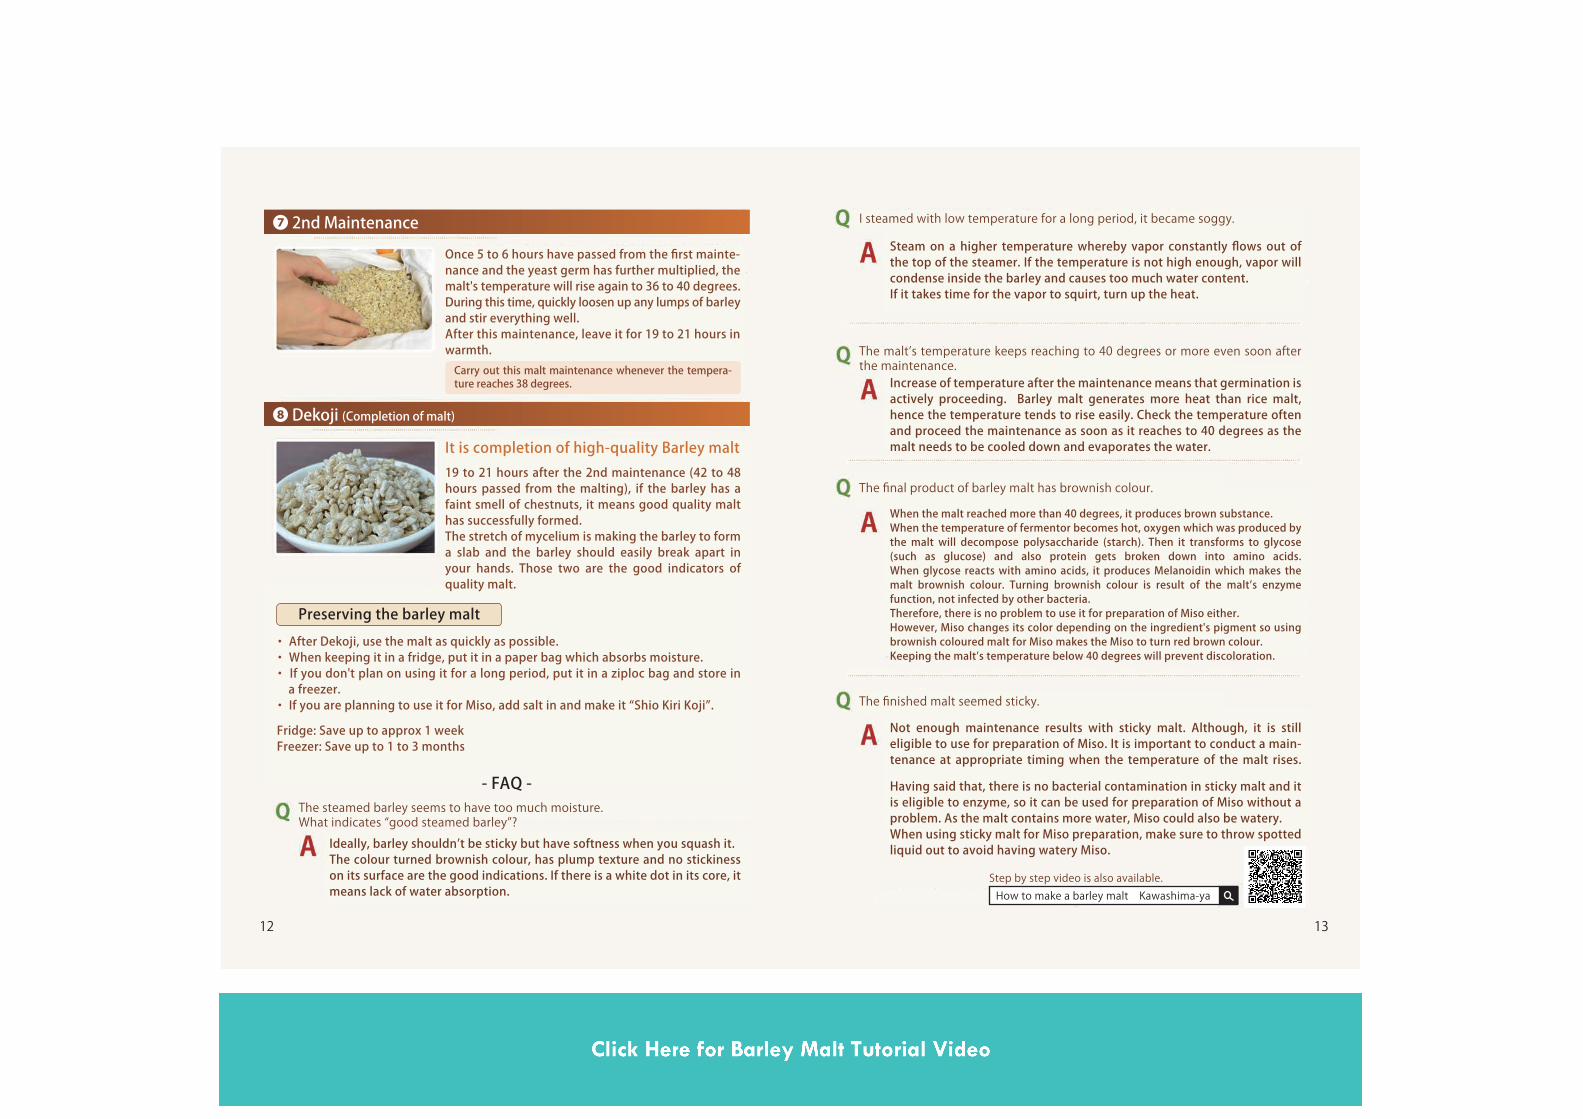
❼ 2nd Maintenance
❽ Dekoji (Completion of malt)
Carry out this malt maintenance whenever the tempera-ture reaches 38 degrees.
Once 5 to 6 hours have passed from the first mainte-nance and the yeast germ has further multiplied, the malt's temperature will rise again to 36 to 40 degrees. During this time, quickly loosen up any lumps of barley and stir everything well. After this maintenance, leave it for 19 to 21 hours in warmth.
・ After Dekoji, use the malt as quickly as possible.・ When keeping it in a fridge, put it in a paper bag which absorbs moisture.・ If you don't plan on using it for a long period, put it in a ziploc bag and store in a freezer.・ If you are planning to use it for Miso, add salt in and make it “Shio Kiri Koji”.
Fridge: Save up to approx 1 weekFreezer: Save up to 1 to 3 months
The steamed barley seems to have too much moisture. What indicates “good steamed barley”?
Ideally, barley shouldn’t be sticky but have softness when you squash it. The colour turned brownish colour, has plump texture and no stickiness on its surface are the good indications. If there is a white dot in its core, it means lack of water absorption.
It is completion of high-quality Barley malt19 to 21 hours after the 2nd maintenance (42 to 48 hours passed from the malting), if the barley has a faint smell of chestnuts, it means good quality malt has successfully formed. The stretch of mycelium is making the barley to form a slab and the barley should easily break apart in your hands. Those two are the good indicators of quality malt.
Preserving the barley malt
- FAQ -
I steamed with low temperature for a long period, it became soggy.
Steam on a higher temperature whereby vapor constantly flows out of the top of the steamer. If the temperature is not high enough, vapor will condense inside the barley and causes too much water content. If it takes time for the vapor to squirt, turn up the heat.
The final product of barley malt has brownish colour.
When the malt reached more than 40 degrees, it produces brown substance. When the temperature of fermentor becomes hot, oxygen which was produced by the malt will decompose polysaccharide (starch). Then it transforms to glycose (such as glucose) and also protein gets broken down into amino acids. When glycose reacts with amino acids, it produces Melanoidin which makes the malt brownish colour. Turning brownish colour is result of the malt’s enzyme function, not infected by other bacteria. Therefore, there is no problem to use it for preparation of Miso either. However, Miso changes its color depending on the ingredient's pigment so using brownish coloured malt for Miso makes the Miso to turn red brown colour. Keeping the malt’s temperature below 40 degrees will prevent discoloration.
The malt’s temperature keeps reaching to 40 degrees or more even soon after the maintenance.
Increase of temperature after the maintenance means that germination is actively proceeding. Barley malt generates more heat than rice malt, hence the temperature tends to rise easily. Check the temperature often and proceed the maintenance as soon as it reaches to 40 degrees as the malt needs to be cooled down and evaporates the water.
The finished malt seemed sticky.
Not enough maintenance results with sticky malt. Although, it is still eligible to use for preparation of Miso. It is important to conduct a main-tenance at appropriate timing when the temperature of the malt rises.
Having said that, there is no bacterial contamination in sticky malt and it is eligible to enzyme, so it can be used for preparation of Miso without a problem. As the malt contains more water, Miso could also be watery. When using sticky malt for Miso preparation, make sure to throw spotted liquid out to avoid having watery Miso.
Step by step video is also available.How to make a barley malt Kawashima-ya
14 15
❶ Wash the beans, soak into water (Temperature: 20 degrees, duration: approx 24hours)
❹ Keeping the soybean malt warm
❺ Loosen the hot fermented malt (1st maintenance)
❻ 2nd maintenance
❼ Dekoji (Completion of malt)
❷ Cook the soybeans (approx 2 to 3 hours)
❸ Sprinkle the seed malt
How to make
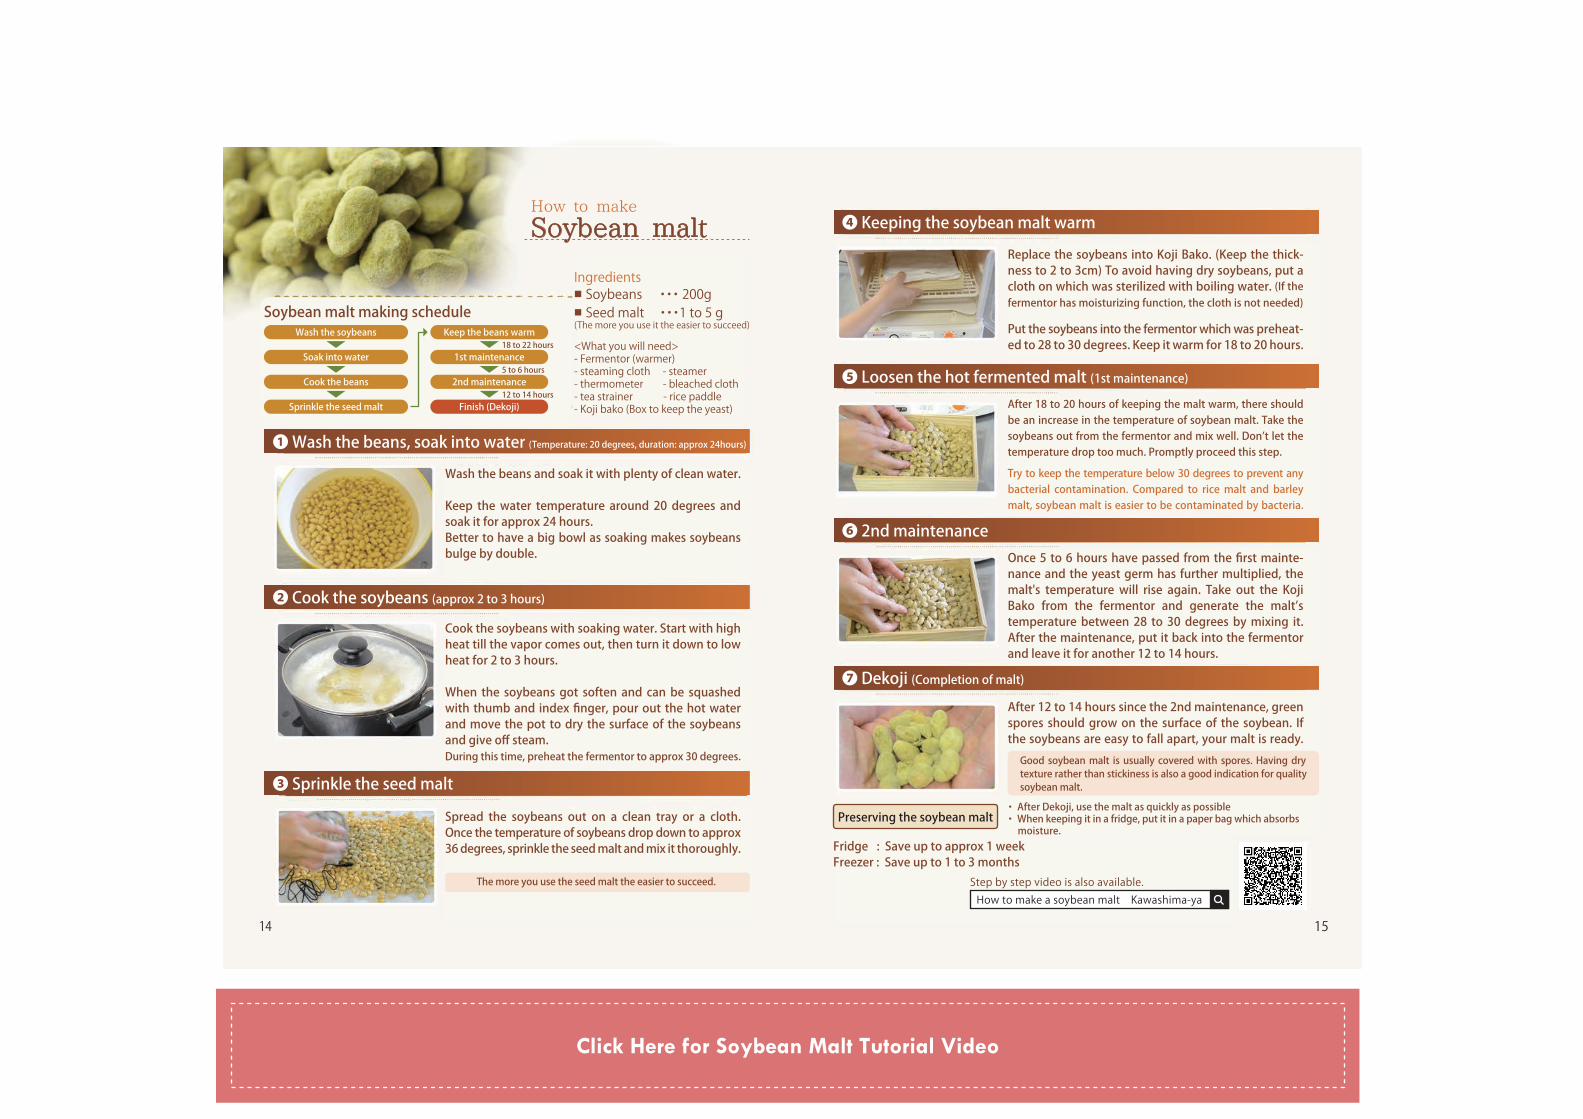
Soybean malt
Ingredients■ Soybeans ・・・ 200g■ Seed malt ・・・1 to 5 g(The more you use it the easier to succeed)
<What you will need>- Fermentor (warmer)- steaming cloth - steamer - thermometer - bleached cloth - tea strainer - rice paddle - Koji bako (Box to keep the yeast)
Soybean malt making scheduleWash the soybeans Keep the beans warm
18 to 22 hours
5 to 6 hours
12 to 14 hours
1st maintenance
2nd maintenance
Finish (Dekoji)
Soak into water
Cook the beans
Sprinkle the seed malt
Spread the soybeans out on a clean tray or a cloth. Once the temperature of soybeans drop down to approx 36 degrees, sprinkle the seed malt and mix it thoroughly.
Wash the beans and soak it with plenty of clean water.
Keep the water temperature around 20 degrees and soak it for approx 24 hours. Better to have a big bowl as soaking makes soybeans bulge by double.
Replace the soybeans into Koji Bako. (Keep the thick-ness to 2 to 3cm) To avoid having dry soybeans, put a cloth on which was sterilized with boiling water. (If the fermentor has moisturizing function, the cloth is not needed)
Put the soybeans into the fermentor which was preheat-ed to 28 to 30 degrees. Keep it warm for 18 to 20 hours.
Once 5 to 6 hours have passed from the first mainte-nance and the yeast germ has further multiplied, the malt's temperature will rise again. Take out the Koji Bako from the fermentor and generate the malt’s temperature between 28 to 30 degrees by mixing it. After the maintenance, put it back into the fermentor and leave it for another 12 to 14 hours.
After 12 to 14 hours since the 2nd maintenance, green spores should grow on the surface of the soybean. If the soybeans are easy to fall apart, your malt is ready.
Fridge : Save up to approx 1 weekFreezer : Save up to 1 to 3 months
・ After Dekoji, use the malt as quickly as possible・ When keeping it in a fridge, put it in a paper bag which absorbs moisture.
After 18 to 20 hours of keeping the malt warm, there should be an increase in the temperature of soybean malt. Take the soybeans out from the fermentor and mix well. Don’t let the temperature drop too much. Promptly proceed this step.
Try to keep the temperature below 30 degrees to prevent any bacterial contamination. Compared to rice malt and barley malt, soybean malt is easier to be contaminated by bacteria.
Cook the soybeans with soaking water. Start with high heat till the vapor comes out, then turn it down to low heat for 2 to 3 hours.
When the soybeans got soften and can be squashed with thumb and index finger, pour out the hot water and move the pot to dry the surface of the soybeans and give off steam.During this time, preheat the fermentor to approx 30 degrees.
The more you use the seed malt the easier to succeed.
Good soybean malt is usually covered with spores. Having dry texture rather than stickiness is also a good indication for quality soybean malt.
Preserving the soybean malt
Step by step video is also available.How to make a soybean malt Kawashima-ya
Click Here for Soybean Malt Tutorial Video
16 17
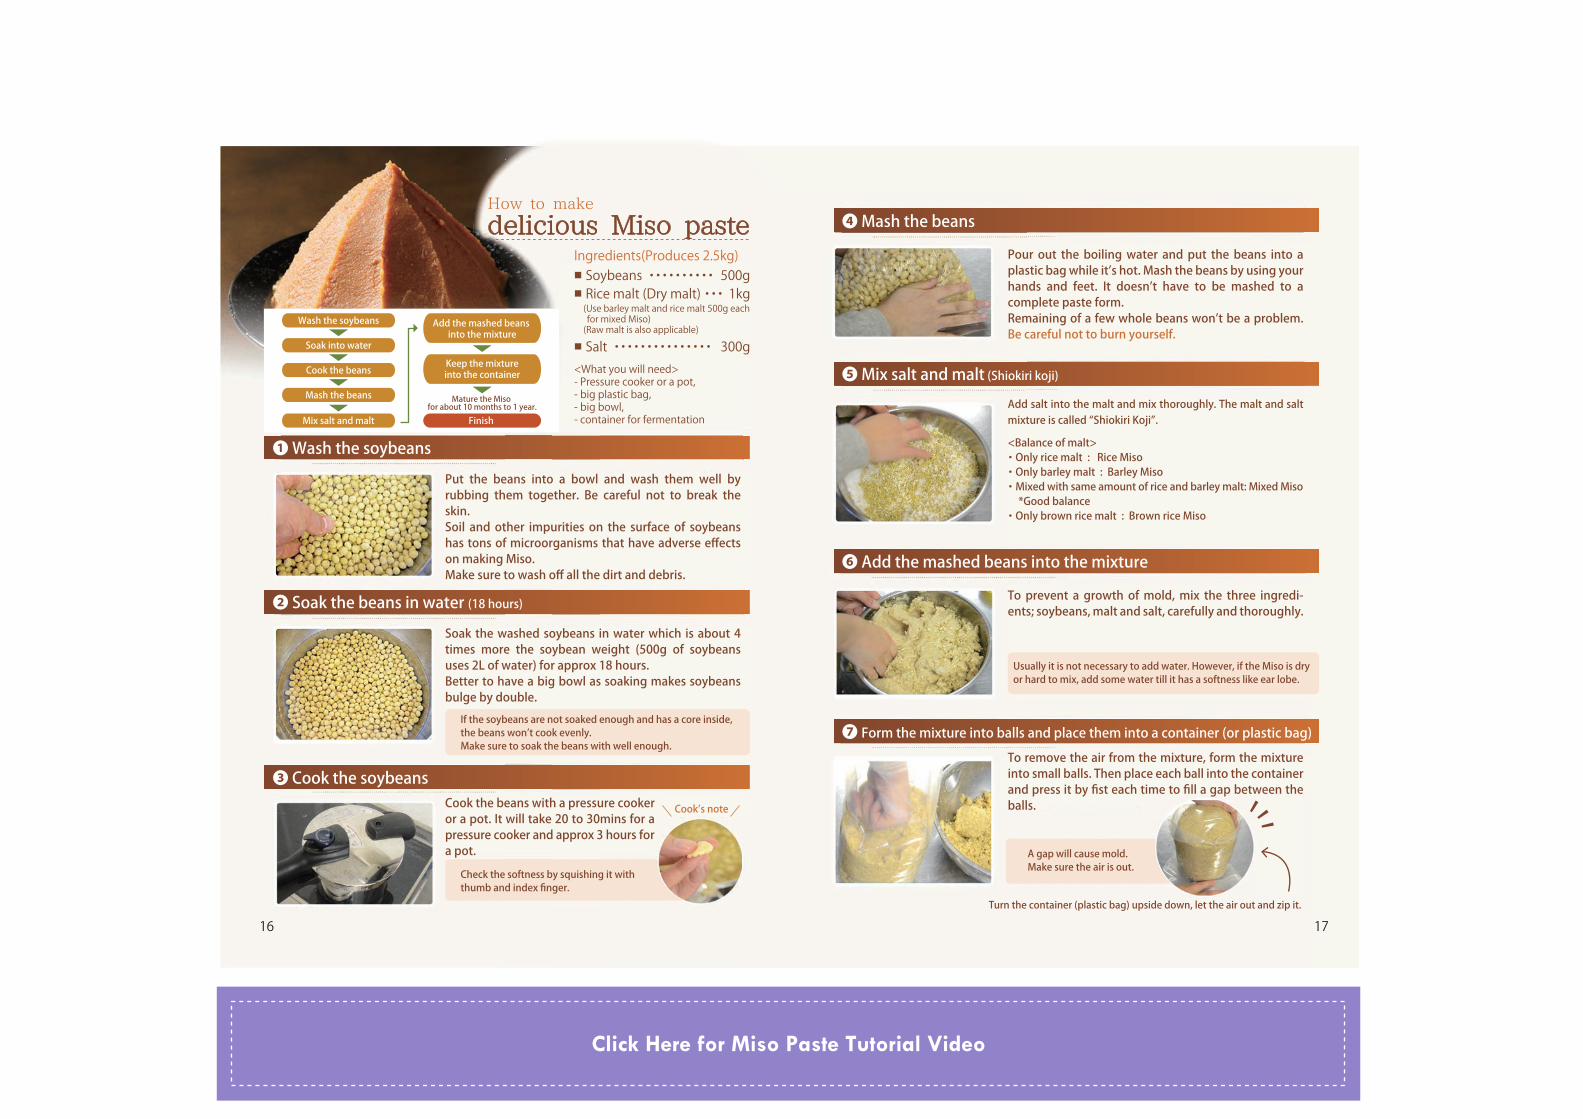
How to make
delicious Miso pasteIngredients(Produces 2.5kg)■ Soybeans ・・・・・・・・・・ 500g■ Rice malt (Dry malt) ・・・ 1kg (Use barley malt and rice malt 500g each for mixed Miso) (Raw malt is also applicable)
■ Salt ・・・・・・・・・・・・・・・ 300g<What you will need>- Pressure cooker or a pot, - big plastic bag, - big bowl, - container for fermentation
Wash the soybeans Add the mashed beans into the mixture
Mature the Miso for about 10 months to 1 year.
Keep the mixtureinto the container
Finish
Soak into water
Cook the beans
Mash the beans
Mix salt and malt
❶ Wash the soybeansPut the beans into a bowl and wash them well by rubbing them together. Be careful not to break the skin. Soil and other impurities on the surface of soybeans has tons of microorganisms that have adverse effects on making Miso. Make sure to wash off all the dirt and debris.
❷ Soak the beans in water (18 hours)
If the soybeans are not soaked enough and has a core inside, the beans won’t cook evenly. Make sure to soak the beans with well enough.
Soak the washed soybeans in water which is about 4 times more the soybean weight (500g of soybeans uses 2L of water) for approx 18 hours. Better to have a big bowl as soaking makes soybeans bulge by double.
❸ Cook the soybeans
Check the softness by squishing it with thumb and index finger.
A gap will cause mold. Make sure the air is out.
Cook the beans with a pressure cooker or a pot. It will take 20 to 30mins for a pressure cooker and approx 3 hours for a pot.
Cook’s note
❹ Mash the beans
❺ Mix salt and malt (Shiokiri koji)
❻ Add the mashed beans into the mixture
❼ Form the mixture into balls and place them into a container (or plastic bag)
Pour out the boiling water and put the beans into a plastic bag while it’s hot. Mash the beans by using your hands and feet. It doesn’t have to be mashed to a complete paste form. Remaining of a few whole beans won’t be a problem. Be careful not to burn yourself.
To prevent a growth of mold, mix the three ingredi-ents; soybeans, malt and salt, carefully and thoroughly.
To remove the air from the mixture, form the mixture into small balls. Then place each ball into the container and press it by fist each time to fill a gap between the balls.
Add salt into the malt and mix thoroughly. The malt and salt mixture is called “Shiokiri Koji”.
<Balance of malt>・ Only rice malt : Rice Miso・ Only barley malt : Barley Miso・ Mixed with same amount of rice and barley malt: Mixed Miso *Good balance・ Only brown rice malt : Brown rice Miso
Usually it is not necessary to add water. However, if the Miso is dry or hard to mix, add some water till it has a softness like ear lobe.
Turn the container (plastic bag) upside down, let the air out and zip it.
Click Here for Miso Paste Tutorial Video
18 19
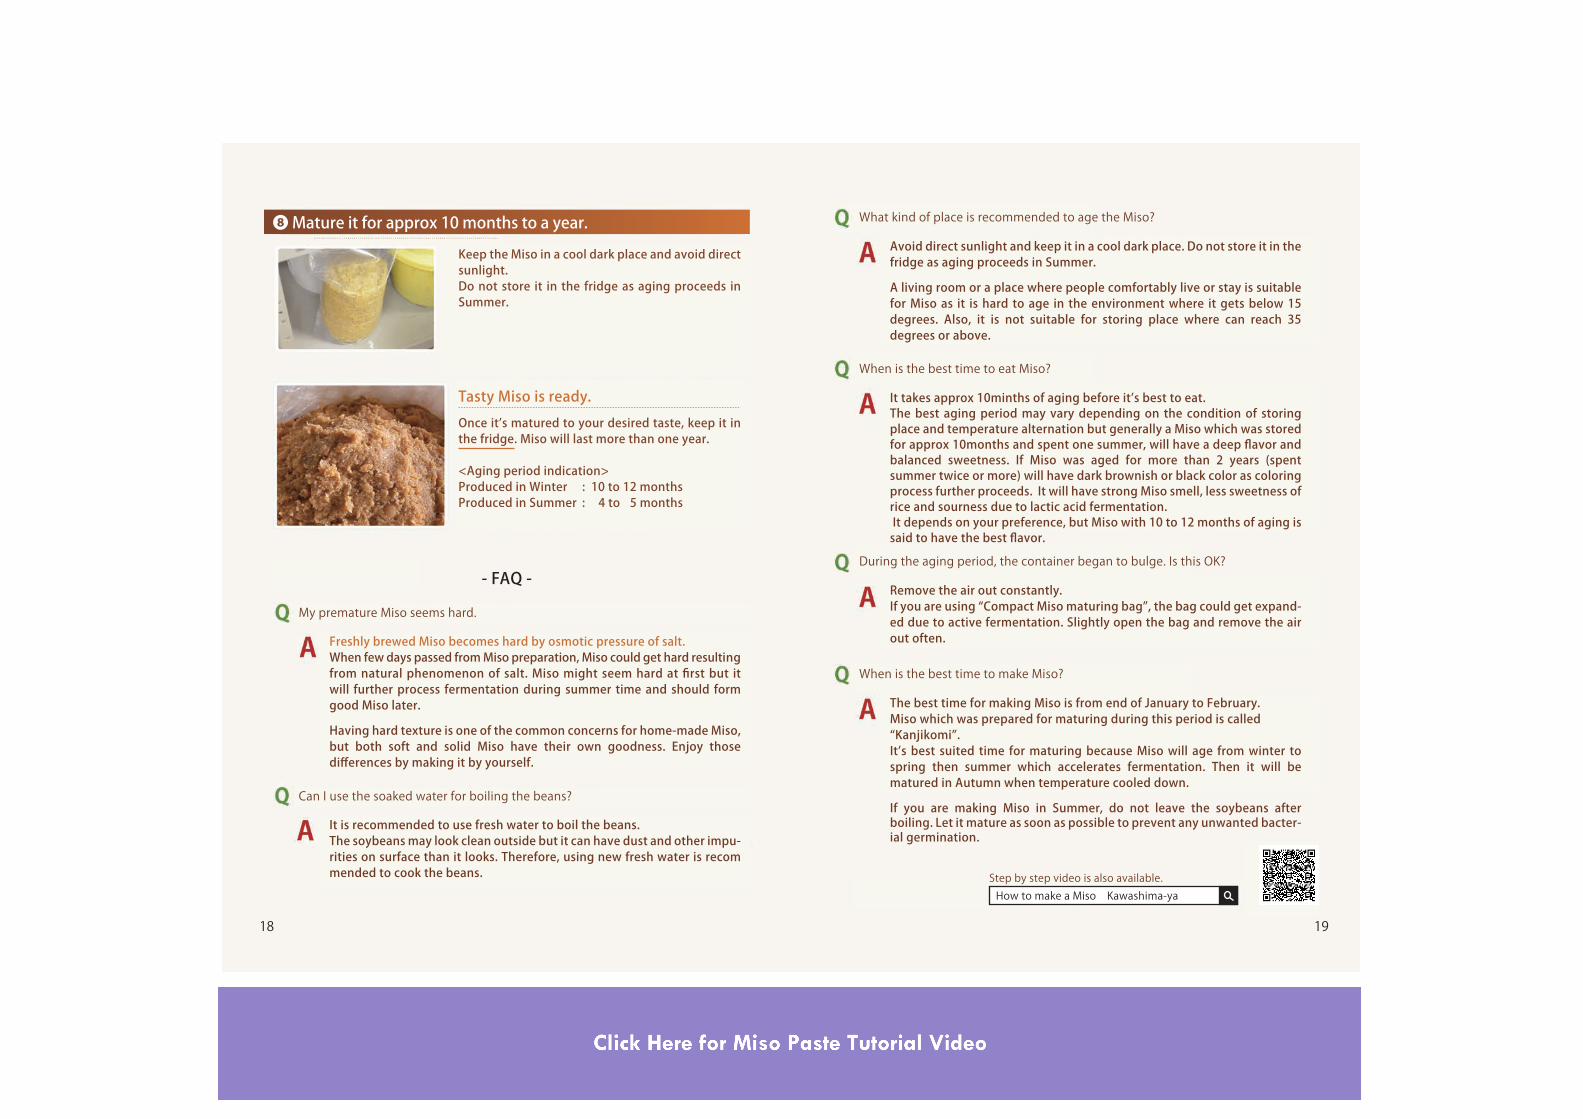
❽ Mature it for approx 10 months to a year.Keep the Miso in a cool dark place and avoid direct sunlight.Do not store it in the fridge as aging proceeds in Summer.
Once it’s matured to your desired taste, keep it in the fridge. Miso will last more than one year.
<Aging period indication>Produced in Winter : 10 to 12 monthsProduced in Summer : 4 to 5 months
Tasty Miso is ready.
My premature Miso seems hard.
Freshly brewed Miso becomes hard by osmotic pressure of salt. When few days passed from Miso preparation, Miso could get hard resulting from natural phenomenon of salt. Miso might seem hard at first but it will further process fermentation during summer time and should form good Miso later.
Having hard texture is one of the common concerns for home-made Miso, but both soft and solid Miso have their own goodness. Enjoy those differences by making it by yourself.
Can I use the soaked water for boiling the beans?
It is recommended to use fresh water to boil the beans.The soybeans may look clean outside but it can have dust and other impu-rities on surface than it looks. Therefore, using new fresh water is recommended to cook the beans.
- FAQ -
What kind of place is recommended to age the Miso?
Avoid direct sunlight and keep it in a cool dark place. Do not store it in the fridge as aging proceeds in Summer.
A living room or a place where people comfortably live or stay is suitable for Miso as it is hard to age in the environment where it gets below 15 degrees. Also, it is not suitable for storing place where can reach 35 degrees or above.
When is the best time to eat Miso?
It takes approx 10minths of aging before it’s best to eat.The best aging period may vary depending on the condition of storing place and temperature alternation but generally a Miso which was stored for approx 10months and spent one summer, will have a deep flavor and balanced sweetness. If Miso was aged for more than 2 years (spent summer twice or more) will have dark brownish or black color as coloring process further proceeds. It will have strong Miso smell, less sweetness of rice and sourness due to lactic acid fermentation. It depends on your preference, but Miso with 10 to 12 months of aging is said to have the best flavor.
During the aging period, the container began to bulge. Is this OK?
Remove the air out constantly. If you are using “Compact Miso maturing bag”, the bag could get expand-ed due to active fermentation. Slightly open the bag and remove the air out often.
When is the best time to make Miso?
The best time for making Miso is from end of January to February. Miso which was prepared for maturing during this period is called “Kanjikomi”. It’s best suited time for maturing because Miso will age from winter to spring then summer which accelerates fermentation. Then it will be matured in Autumn when temperature cooled down.
If you are making Miso in Summer, do not leave the soybeans after boiling. Let it mature as soon as possible to prevent any unwanted bacter-ial germination.
Step by step video is also available.How to make a Miso Kawashima-ya
20 21
❶ Pour warm water (55 to 60 degrees) into the rice malt and stir well
How to makeHow to make
delicious Amazakedelicious Amazakedelicious Amazakedelicious Amazakedelicious Amazakedelicious Amazakeusing only rice maltusing only rice maltusing only rice maltusing only rice maltusing only rice maltusing only rice maltusing only rice maltusing only rice maltusing only rice maltusing only rice maltusing only rice maltusing only rice maltusing only rice maltusing only rice maltusing only rice maltusing only rice maltusing only rice maltusing only rice maltusing only rice maltusing only rice maltusing only rice maltusing only rice maltusing only rice maltusing only rice maltusing only rice maltusing only rice maltusing only rice maltusing only rice malt
How to make
delicious Amazakeusing only rice malt
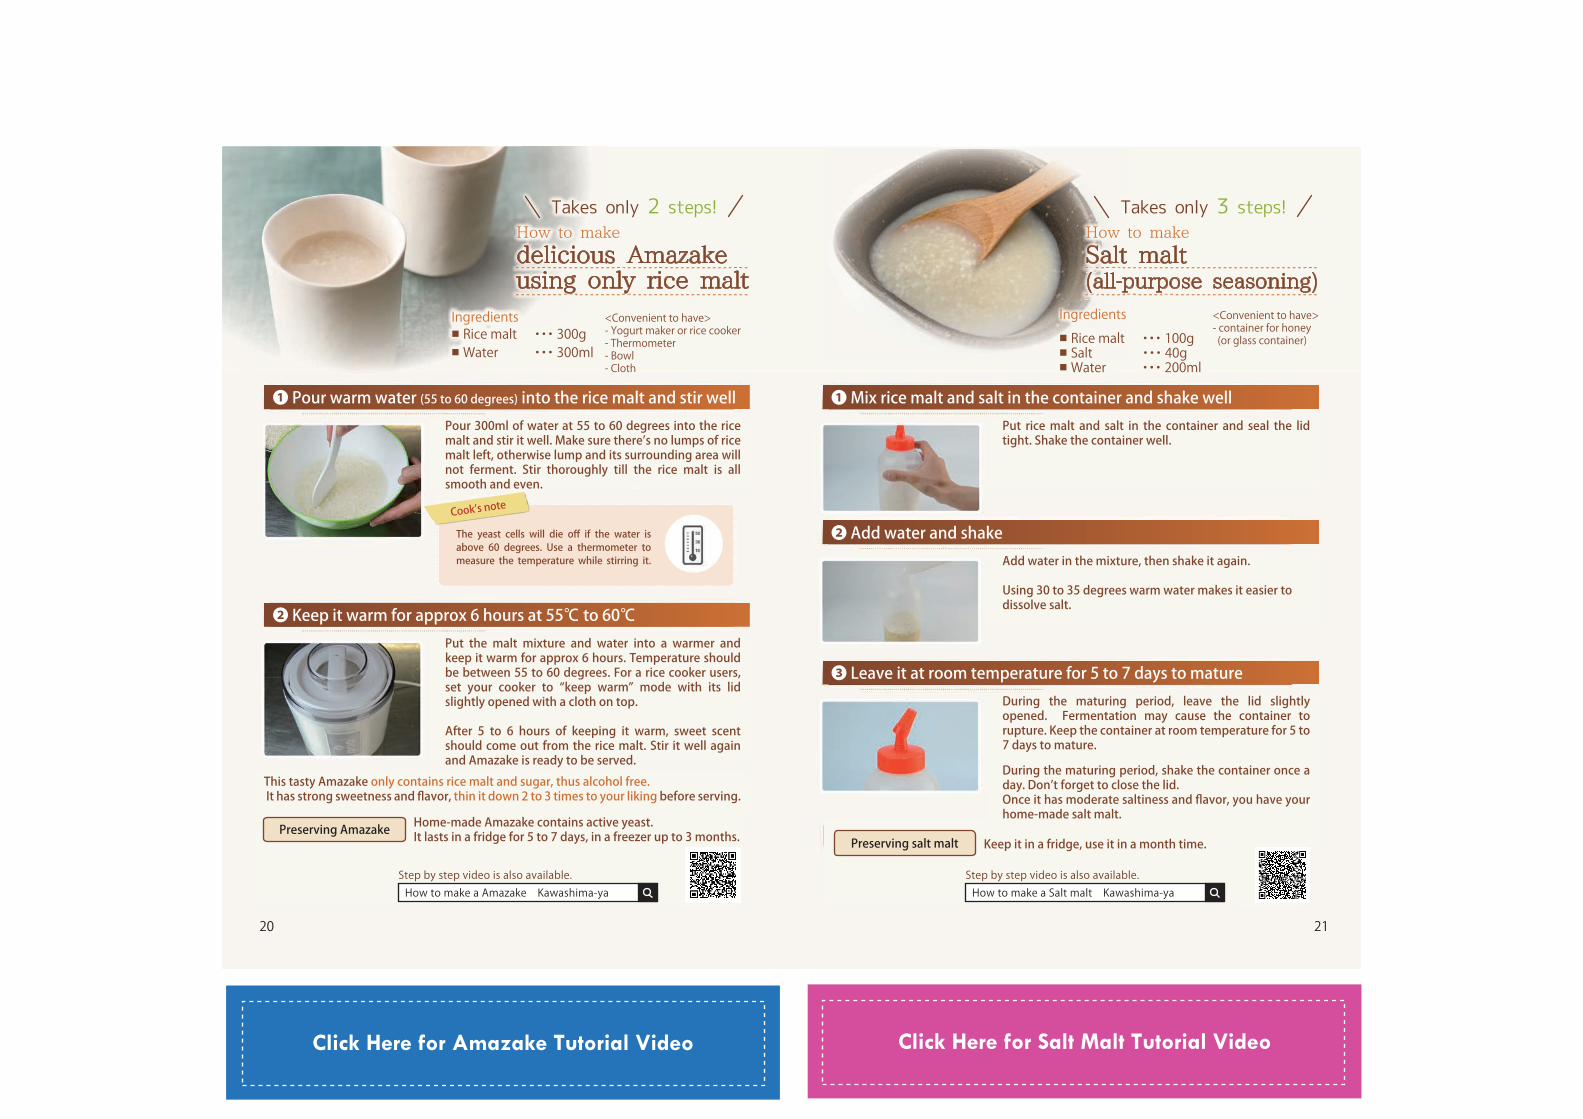
Pour 300ml of water at 55 to 60 degrees into the rice malt and stir it well. Make sure there’s no lumps of rice malt left, otherwise lump and its surrounding area will not ferment. Stir thoroughly till the rice malt is all smooth and even.
❷ Keep it warm for approx 6 hours at 55℃ to 60℃Put the malt mixture and water into a warmer and keep it warm for approx 6 hours. Temperature should be between 55 to 60 degrees. For a rice cooker users, set your cooker to “keep warm” mode with its lid slightly opened with a cloth on top.
After 5 to 6 hours of keeping it warm, sweet scent should come out from the rice malt. Stir it well again and Amazake is ready to be served.
This tasty Amazake only contains rice malt and sugar, thus alcohol free. It has strong sweetness and flavor, thin it down 2 to 3 times to your liking before serving.
The yeast cells will die off if the water is above 60 degrees. Use a thermometer to measure the temperature while stirring it.
Cook’s note
Preserving Amazake Home-made Amazake contains active yeast.It lasts in a fridge for 5 to 7 days, in a freezer up to 3 months.
Step by step video is also available.How to make a Amazake Kawashima-ya
Preserving salt malt Keep it in a fridge, use it in a month time.
Step by step video is also available.How to make a Salt malt Kawashima-ya
Rice malt ・・・ 300g・・・ 300gWater Water ・・・ 300ml
Ingredients■ Rice malt ・・・ 300g■ Water ・・・ 300ml
<Convenient to have>- Yogurt maker or rice cooker- Thermometer- Bowl- Cloth
Takes only Takes only Takes only Takes only Takes only 2 steps! steps!Takes only 2 steps!
❶ Mix rice malt and salt in the container and shake well
How to makeHow to make
Salt maltSalt maltSalt maltSalt malt(all-purpose seasoning)(all-purpose seasoning)(all-purpose seasoning)(all-purpose seasoning)(all-purpose seasoning)(all-purpose seasoning)(all-purpose seasoning)(all-purpose seasoning)(all-purpose seasoning)(all-purpose seasoning)(all-purpose seasoning)(all-purpose seasoning)(all-purpose seasoning)(all-purpose seasoning)(all-purpose seasoning)
How to make
Salt malt(all-purpose seasoning)
Put rice malt and salt in the container and seal the lid tight. Shake the container well.
❷ Add water and shakeAdd water in the mixture, then shake it again.
Using 30 to 35 degrees warm water makes it easier to dissolve salt.
❸ Leave it at room temperature for 5 to 7 days to matureDuring the maturing period, leave the lid slightly opened. Fermentation may cause the container to rupture. Keep the container at room temperature for 5 to 7 days to mature.
During the maturing period, shake the container once a day. Don’t forget to close the lid.Once it has moderate saltiness and flavor, you have your home-made salt malt.
Ingredients
Rice malt Rice malt ・・・ 100g ・・・ 40g
Water Water ・・・ 200ml・・・ 200ml・・・ 200ml・・・ 200ml
Ingredients■ Rice malt ・・・ 100g■ Salt ・・・ 40g■ Water ・・・ 200ml
<Convenient to have>- container for honey (or glass container)
Takes only Takes only Takes only 2 steps! steps!Takes only 3 steps!
Click Here for Amazake Tutorial Video Click Here for Salt Malt Tutorial Video
22 23
How to make
delicious TempehIngredients■ Soybeans ・・・ 200g to 1 kg■ Tempeh starter ・・・1g to 10g■ Vinegar (100ml for 200g of soybeans)<Tools and Equipments>- Warmer (ex: Fermentor)- Ziploc bag- Plastic bag- Toothpick- Starch
Tempeh making schedule
Preparation Sprinkle Tempeh starter
6 to 24 hours
24 hours later
Keeping warm
Finish
Dehulling the beans
Cooking the beans
❶ Wash the soybeansPut the beans into a bowl and wash them well by rubbing them together. Be careful not to break the skin. Soil and other impurities on the surface of soybeans has tons of microorganisms that have adverse effects on making Tempeh. Make sure to wash off all the dirt and debris.
❷ Soak the beans in the waterSoak the washed soybeans in water which is about 4 times more the soybean weight (500g of soybeans uses 2L of water). Also, adding 50ml of vinegar for every 1L of water will prevent the growth of unwanted bacteria.
❸ Dehull the beans
Knead the soaked beans to take the hulls off by using your hands.
If there’s any hull or thin skin is remaining, tempeh starter may not ferment well.
<Soaking period>In winter (water temperature 0 to 5 degrees): 24 hoursIn spring and autumn (water temperature 10 to 15 degrees): 15 hoursIn summer (water temperature 20 to 25 degrees): 6 hours
Add starch or non-glutinous rice powder, which has starch as principal ingredient, to multiply fungus 10 times or more. (Add 9g of starch for 1g of tempeh starter)
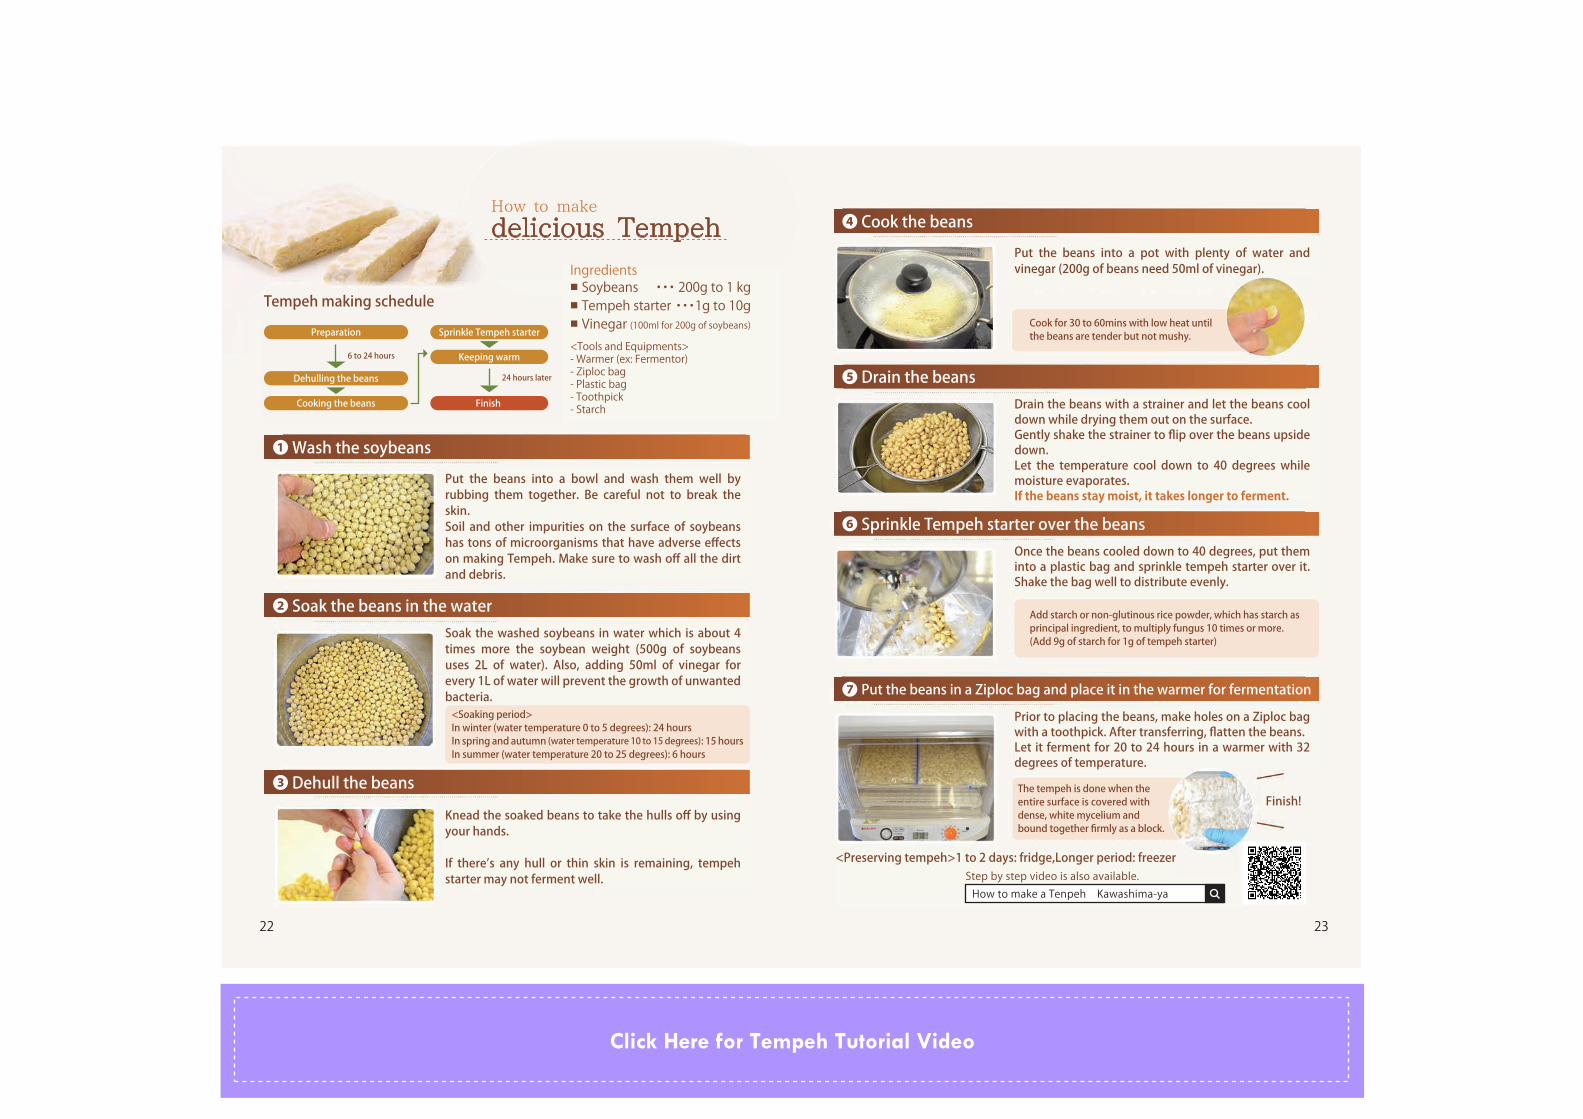
❹ Cook the beansPut the beans into a pot with plenty of water and vinegar (200g of beans need 50ml of vinegar).
❺ Drain the beansDrain the beans with a strainer and let the beans cool down while drying them out on the surface. Gently shake the strainer to flip over the beans upside down. Let the temperature cool down to 40 degrees while moisture evaporates. If the beans stay moist, it takes longer to ferment.
❻ Sprinkle Tempeh starter over the beansOnce the beans cooled down to 40 degrees, put them into a plastic bag and sprinkle tempeh starter over it. Shake the bag well to distribute evenly.
❼ Put the beans in a Ziploc bag and place it in the warmer for fermentationPrior to placing the beans, make holes on a Ziploc bag with a toothpick. After transferring, flatten the beans. Let it ferment for 20 to 24 hours in a warmer with 32 degrees of temperature.
Cook for 30 to 60mins with low heat until the beans are tender but not mushy.
The tempeh is done when the entire surface is covered with dense, white mycelium and bound together firmly as a block.
Step by step video is also available.How to make a Tenpeh Kawashima-ya
<Preserving tempeh>1 to 2 days: fridge,Longer period: freezer
Finish!
Click Here for Tempeh Tutorial Video

24 25
How to make
tasty NattoIngredients■ Soybeans ・・・ 100g■ Natto starter ・・・ 0.1g<What you will need>- Fermentor (ex. Yogurt maker) - Pot or pressure cooker
Natto making schedule
24 to 28 hours later6 to 24 hours
24 hours later
Keep warm
Refrigerate
Finish (Dekoji)
Soak the beans
Cook the beans
Sprinkle Natto starter
This recipe is a summary of Natto distributor’s advice that Kawashima-ya have collected. Feel free to use this as a reference to make Natto.
❶ Wash the beansPut the beans into a bowl and wash them well by rubbing them together. Be careful not to break the skin. Soil and other impurities on the surface of soybeans has tons of microorganisms that have adverse effects on making Natto. Make sure to wash off all the dirt and debris.
❸ Cook the beans
Cook it till it easily squashes by nipping with thumb and index finger. The beans will have slightly tighten texture when fermentation starts, so make sure to boil it to tender at this stage.
It takes approx 30mins for a pressure cooker to cook. (The result may vary depending on a cooker. Please refer to the instruction manual for the exact cooking time)
It takes 3 to 4 hours for an ordinal saucepan to cook.
❹ Dissolve Natto starter into water and make “Natto solution”
Pour 10cc of sterilized water (pre-boiled and then cooled water is fine too) in a cup and dissolve 0.1g of Natto starter (one fifth of small spoon) in it.
Use this Natto solution to ferment the beans.It is easier to succeed with more Natto solution. For the first timer, using greater amount than this recipe is recommended.
❺ Pour the Natto solution over the beans
Discard the boiled water then in no time pour the Natto solution and mix thoroughly.
❷ Soak the beans
Soak the washed soybeans in water which is about 4 times more the soybean weight (500g of soybeans uses 2L of water). It is better to use a big bowl since the soaking will make the soybean expand to twice its original volume.
<Soaking period>In winter (water temperature 0 to 5 degrees): 24 hoursIn spring and autumn (water temperature 10 to 15 degrees): 15 hoursIn summer (water temperature 20 to 25 degrees): 6 hours
When you use a pressure cooker
Boil till you can squash the beanswith thumb and index finger.
Don’ t let the temperature to drop, as it can lead unwanted bacterial contamination. Prepare to pour the Natto solution as soon as the beans are cooked.
Click Here for Natto Tutorial Video
26 27
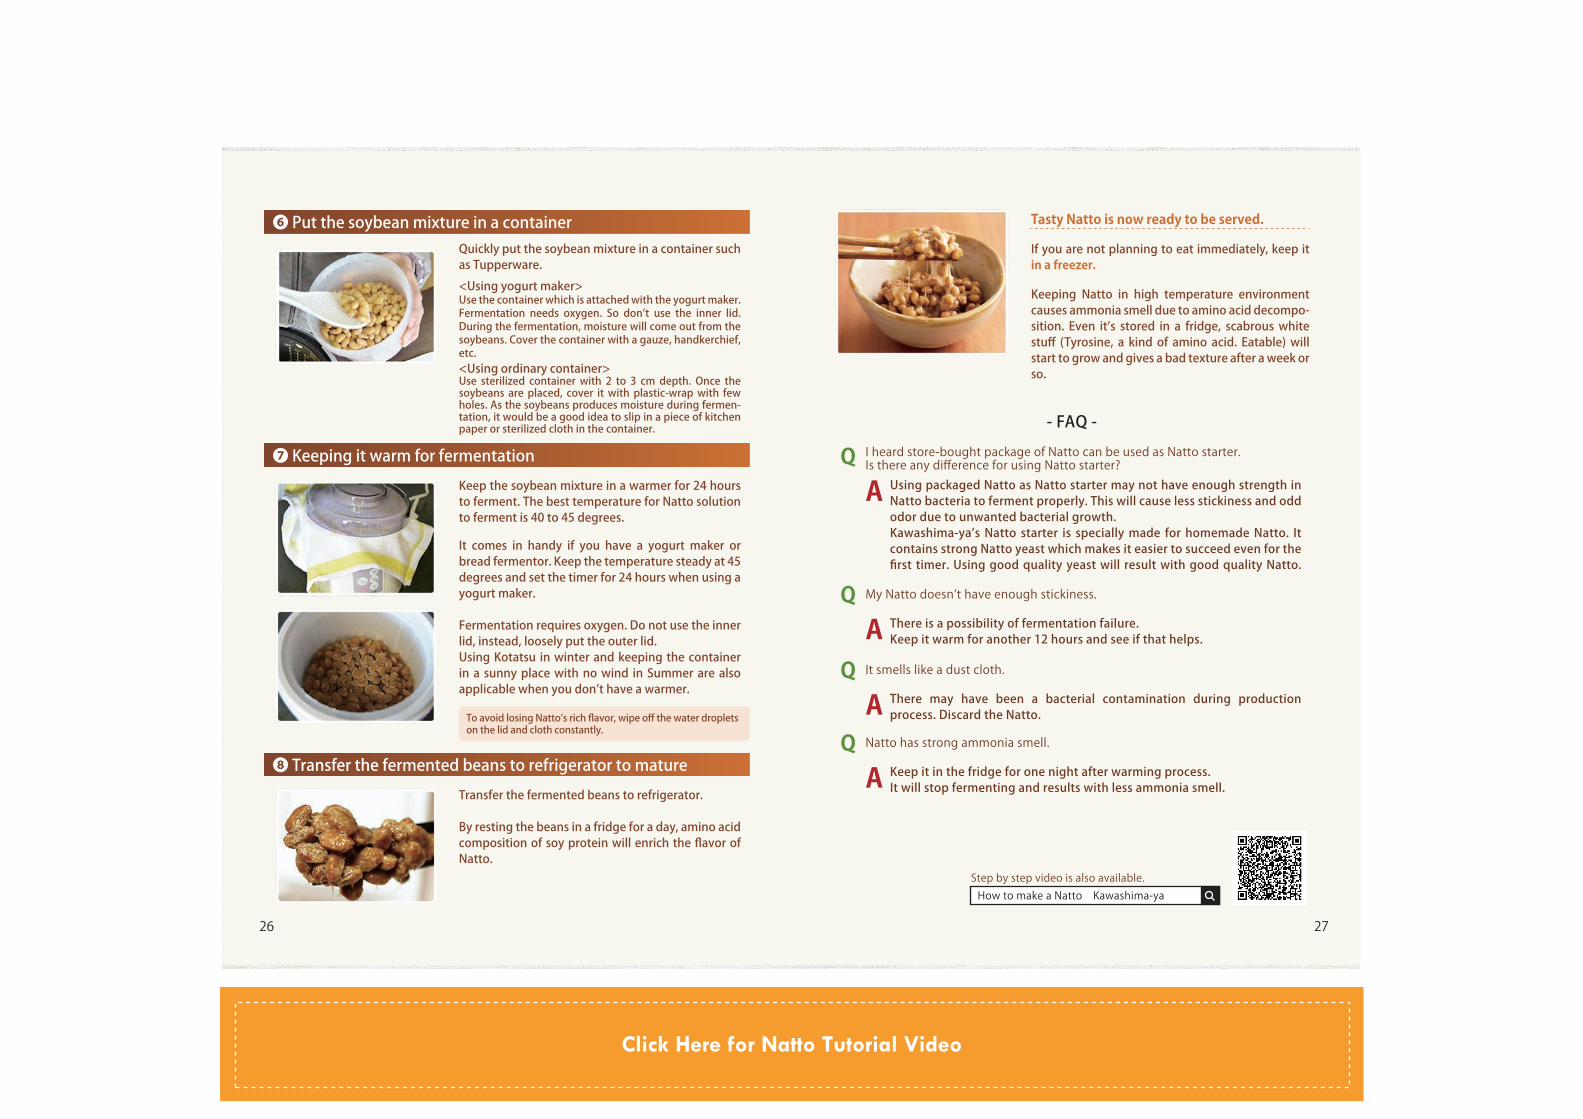
❻ Put the soybean mixture in a containerQuickly put the soybean mixture in a container such as Tupperware.<Using yogurt maker>Use the container which is attached with the yogurt maker. Fermentation needs oxygen. So don’t use the inner lid. During the fermentation, moisture will come out from the soybeans. Cover the container with a gauze, handkerchief, etc.<Using ordinary container>Use sterilized container with 2 to 3 cm depth. Once the soybeans are placed, cover it with plastic-wrap with few holes. As the soybeans produces moisture during fermen-tation, it would be a good idea to slip in a piece of kitchen paper or sterilized cloth in the container.
Tasty Natto is now ready to be served.
If you are not planning to eat immediately, keep it in a freezer.
Keeping Natto in high temperature environment causes ammonia smell due to amino acid decompo-sition. Even it’s stored in a fridge, scabrous white stuff (Tyrosine, a kind of amino acid. Eatable) will start to grow and gives a bad texture after a week or so.
❼ Keeping it warm for fermentationKeep the soybean mixture in a warmer for 24 hours to ferment. The best temperature for Natto solution to ferment is 40 to 45 degrees.
It comes in handy if you have a yogurt maker or bread fermentor. Keep the temperature steady at 45 degrees and set the timer for 24 hours when using a yogurt maker.
Fermentation requires oxygen. Do not use the inner lid, instead, loosely put the outer lid.Using Kotatsu in winter and keeping the container in a sunny place with no wind in Summer are also applicable when you don’t have a warmer.
❽ Transfer the fermented beans to refrigerator to matureTransfer the fermented beans to refrigerator.
By resting the beans in a fridge for a day, amino acid composition of soy protein will enrich the flavor of Natto.
To avoid losing Natto’s rich flavor, wipe off the water droplets on the lid and cloth constantly.
QA
- FAQ -I heard store-bought package of Natto can be used as Natto starter. Is there any difference for using Natto starter?
Using packaged Natto as Natto starter may not have enough strength in Natto bacteria to ferment properly. This will cause less stickiness and odd odor due to unwanted bacterial growth. Kawashima-ya’s Natto starter is specially made for homemade Natto. It contains strong Natto yeast which makes it easier to succeed even for the first timer. Using good quality yeast will result with good quality Natto.
QAMy Natto doesn’t have enough stickiness.
There is a possibility of fermentation failure.Keep it warm for another 12 hours and see if that helps.
QAIt smells like a dust cloth.
There may have been a bacterial contamination during production process. Discard the Natto.
QANatto has strong ammonia smell.
Keep it in the fridge for one night after warming process. It will stop fermenting and results with less ammonia smell.
Step by step video is also available.How to make a Natto Kawashima-ya
Click Here for Natto Tutorial Video
28 29
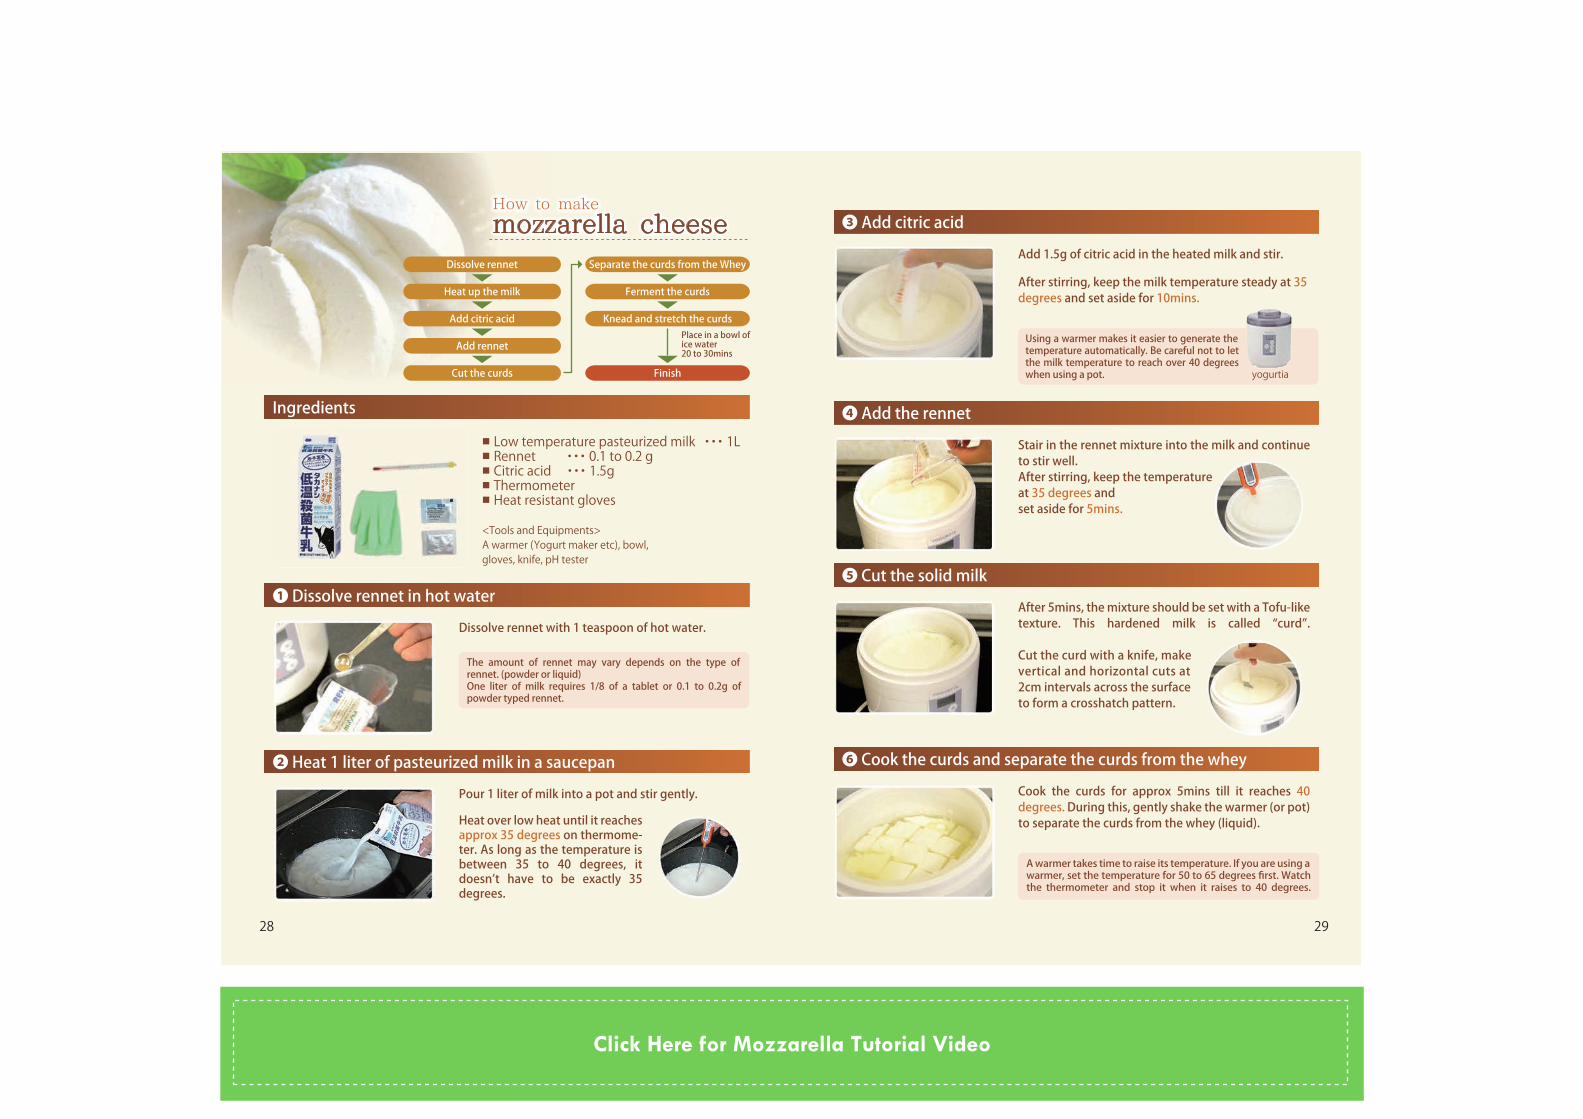
How to makeHow to make
mozzarella cheesemozzarella cheesemozzarella cheesemozzarella cheesemozzarella cheesemozzarella cheeseHow to make
mozzarella cheeseSeparate the curds from the Whey
Ferment the curds
Knead and stretch the curds
Dissolve rennet
Heat up the milk
Place in a bowl ofice water20 to 30mins
Finish
Add citric acid
Add rennet
Cut the curds
Ingredients
❶ Dissolve rennet in hot waterDissolve rennet with 1 teaspoon of hot water.
■ Low temperature pasteurized milk ・・・ 1L■ Rennet ・・・ 0.1 to 0.2 g■ Citric acid ・・・ 1.5g■ Thermometer■ Heat resistant gloves
<Tools and Equipments>A warmer (Yogurt maker etc), bowl, gloves, knife, pH tester
The amount of rennet may vary depends on the type of rennet. (powder or liquid)One liter of milk requires 1/8 of a tablet or 0.1 to 0.2g of powder typed rennet.
A warmer takes time to raise its temperature. If you are using a warmer, set the temperature for 50 to 65 degrees first. Watch the thermometer and stop it when it raises to 40 degrees.
❸ Add citric acid Add 1.5g of citric acid in the heated milk and stir.
After stirring, keep the milk temperature steady at 35 degrees and set aside for 10mins.
❹ Add the rennet Stair in the rennet mixture into the milk and continue to stir well.After stirring, keep the temperatureat 35 degrees andset aside for 5mins.
❺ Cut the solid milk After 5mins, the mixture should be set with a Tofu-like texture. This hardened milk is called “curd”.
Cut the curd with a knife, makevertical and horizontal cuts at2cm intervals across the surfaceto form a crosshatch pattern.
❻ Cook the curds and separate the curds from the wheyCook the curds for approx 5mins till it reaches 40 degrees. During this, gently shake the warmer (or pot) to separate the curds from the whey (liquid).
Using a warmer makes it easier to generate the temperature automatically. Be careful not to let the milk temperature to reach over 40 degrees when using a pot.
❷ Heat 1 liter of pasteurized milk in a saucepanPour 1 liter of milk into a pot and stir gently.
Heat over low heat until it reaches approx 35 degrees on thermome-ter. As long as the temperature is between 35 to 40 degrees, it doesn’t have to be exactly 35 degrees.
yogurtia
Click Here for Mozzarella Tutorial Video
30 31
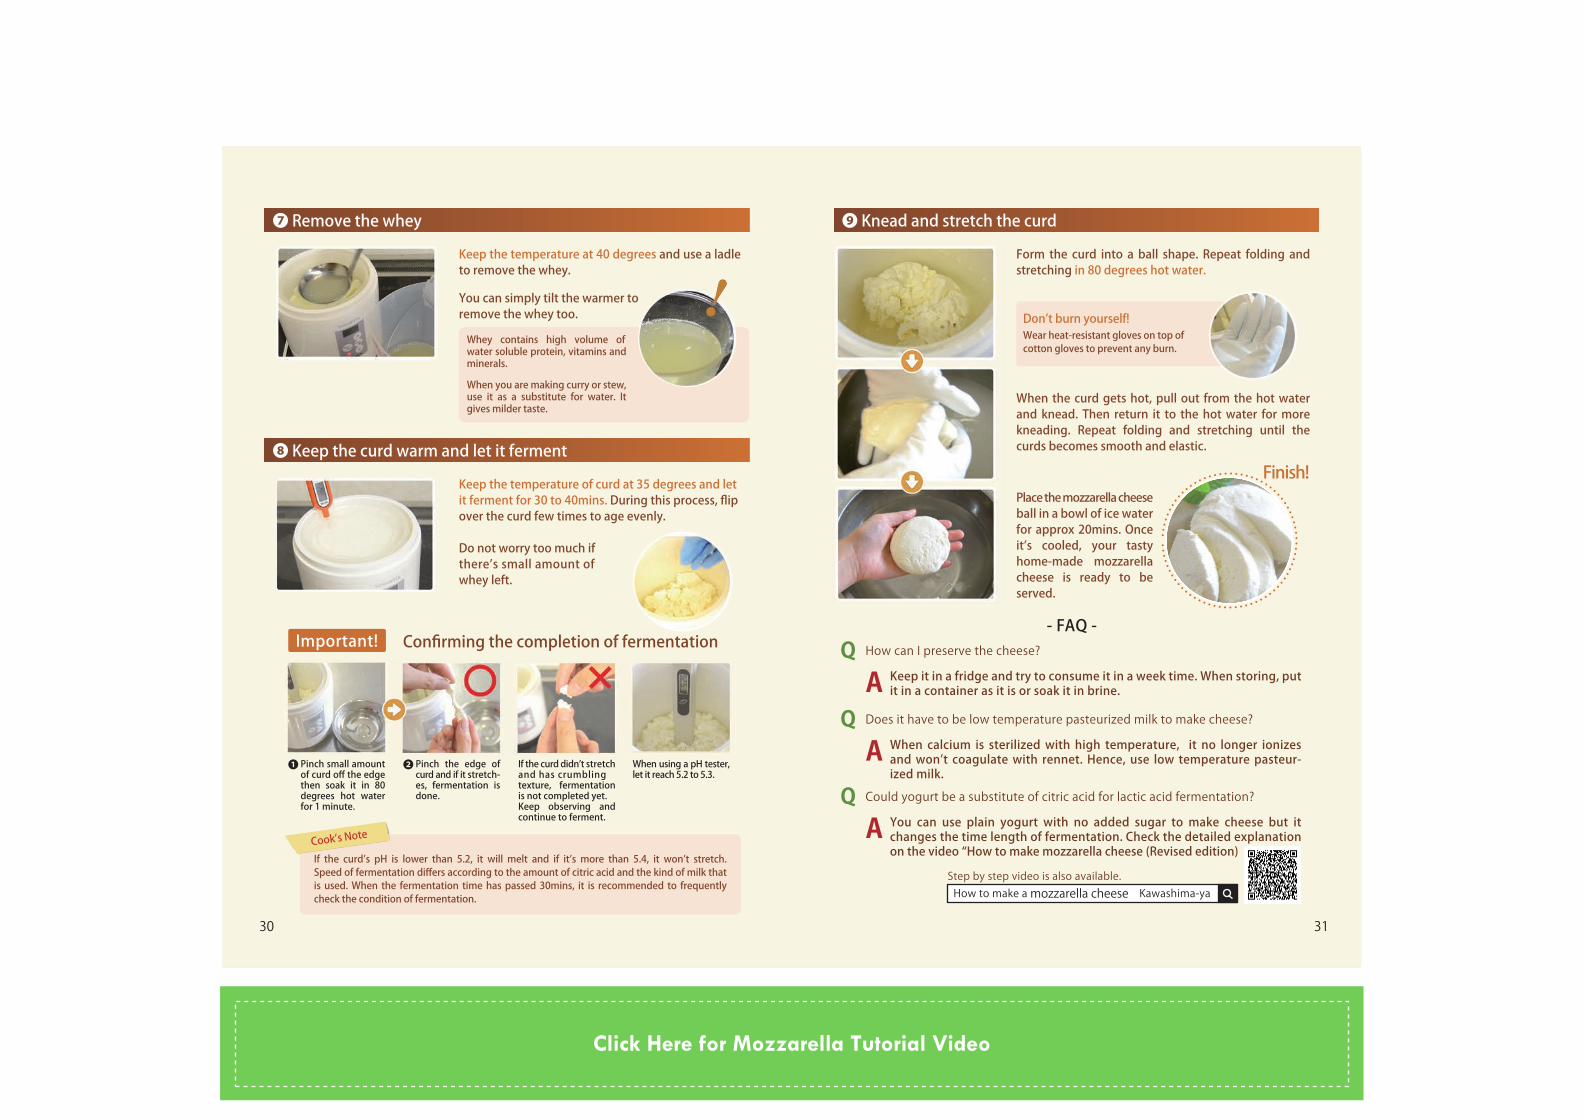
❼ Remove the whey
Keep the temperature at 40 degrees and use a ladle to remove the whey.
You can simply tilt the warmer toremove the whey too.
❾ Knead and stretch the curd
Form the curd into a ball shape. Repeat folding and stretching in 80 degrees hot water.
When the curd gets hot, pull out from the hot water and knead. Then return it to the hot water for more kneading. Repeat folding and stretching until the curds becomes smooth and elastic.
Place the mozzarella cheese ball in a bowl of ice water for approx 20mins. Once it’s cooled, your tasty home-made mozzarella cheese is ready to be served.
❽ Keep the curd warm and let it ferment
Keep the temperature of curd at 35 degrees and let it ferment for 30 to 40mins. During this process, flip over the curd few times to age evenly.
Do not worry too much if there’s small amount ofwhey left.
Whey contains high volume of water soluble protein, vitamins and minerals.
When you are making curry or stew, use it as a substitute for water. It gives milder taste.
Important! Confirming the completion of fermentation
Pinch small amount of curd off the edge then soak it in 80 degrees hot water for 1 minute.
❶ Pinch the edge of curd and if it stretch-es, fermentation is done.
❷ If the curd didn’t stretch and has crumbling texture, fermentation is not completed yet. Keep observing and continue to ferment.
When using a pH tester, let it reach 5.2 to 5.3.
If the curd’s pH is lower than 5.2, it will melt and if it’s more than 5.4, it won’t stretch. Speed of fermentation differs according to the amount of citric acid and the kind of milk that is used. When the fermentation time has passed 30mins, it is recommended to frequently check the condition of fermentation.
Don’t burn yourself!Wear heat-resistant gloves on top of cotton gloves to prevent any burn.
Cook’s Note
Finish!
QA
- FAQ -How can I preserve the cheese?
Keep it in a fridge and try to consume it in a week time. When storing, put it in a container as it is or soak it in brine.
QADoes it have to be low temperature pasteurized milk to make cheese?
When calcium is sterilized with high temperature, it no longer ionizes and won’t coagulate with rennet. Hence, use low temperature pasteur-ized milk.
QACould yogurt be a substitute of citric acid for lactic acid fermentation?
You can use plain yogurt with no added sugar to make cheese but it changes the time length of fermentation. Check the detailed explanation on the video “How to make mozzarella cheese (Revised edition)
Step by step video is also available.How to make a mozzarella cheese Kawashima-ya
Click Here for Mozzarella Tutorial Video
32 33
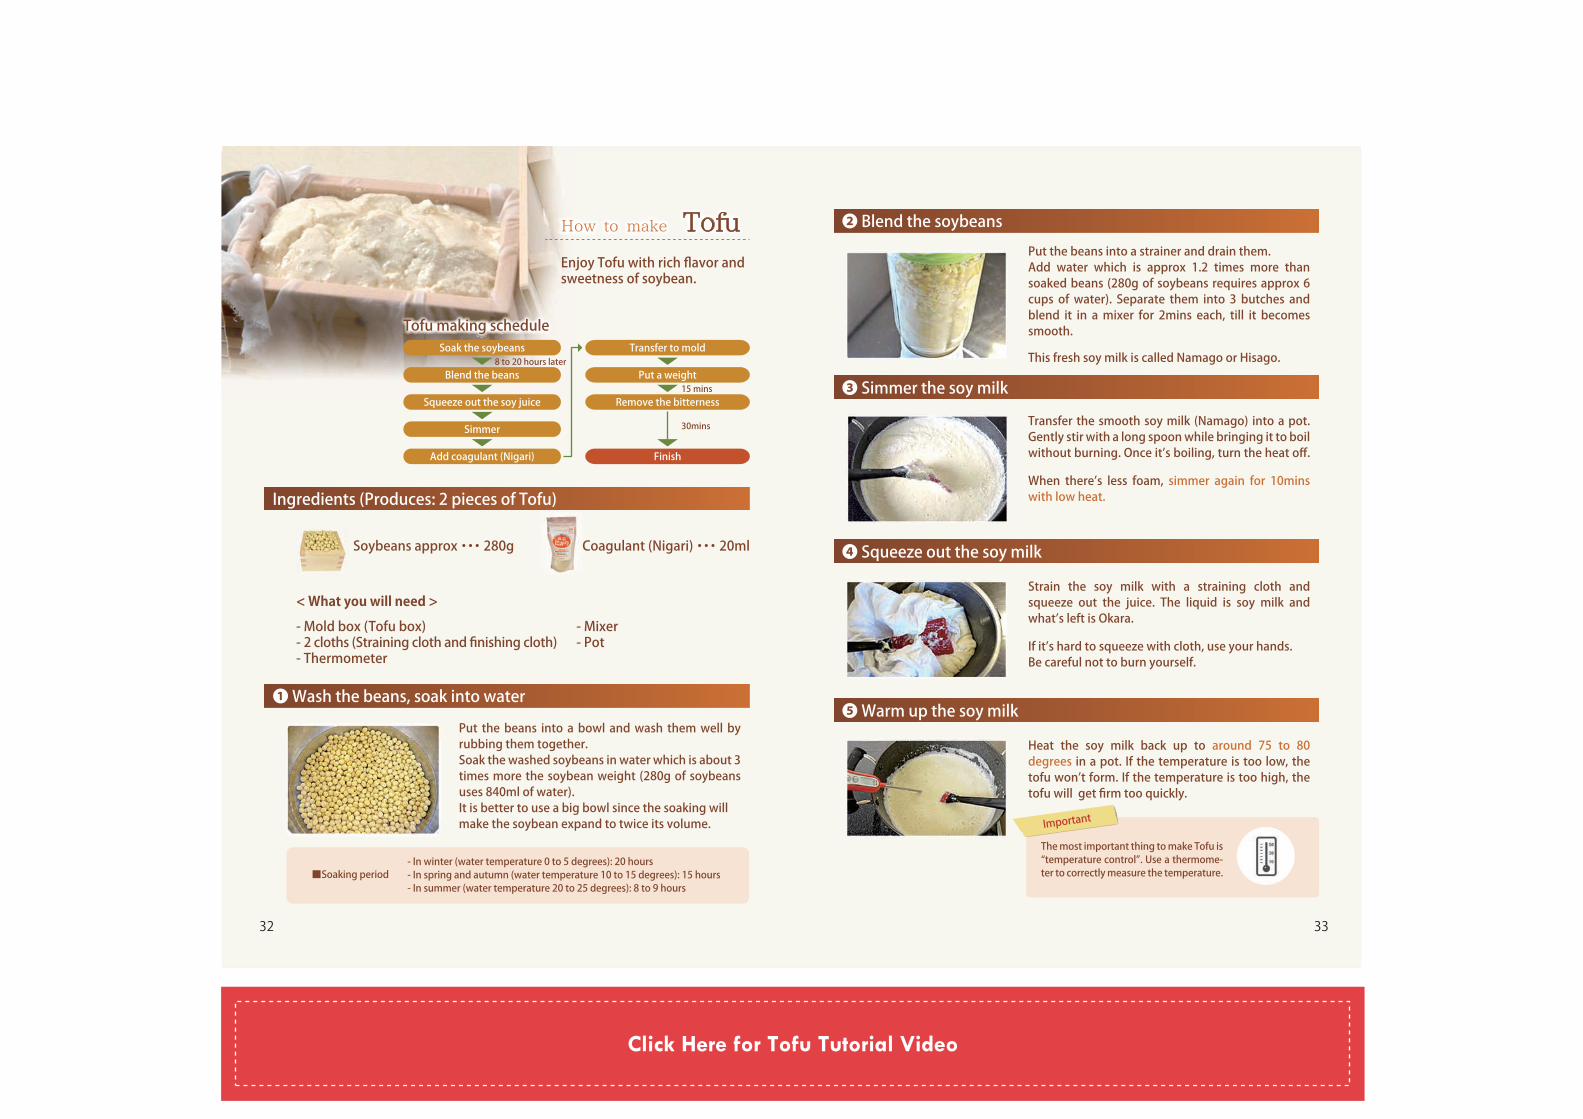
How to make TofuHow to make Tofu
Transfer to mold
Put a weight
Remove the bitterness
Soak the soybeans
Blend the beans
30mins
8 to 20 hours later
15 mins
Finish
Squeeze out the soy juice
Simmer
Add coagulant (Nigari)
Enjoy Tofu with rich flavor and sweetness of soybean.
❶ Wash the beans, soak into water
Ingredients (Produces: 2 pieces of Tofu)
Put the beans into a bowl and wash them well by rubbing them together. Soak the washed soybeans in water which is about 3 times more the soybean weight (280g of soybeans uses 840ml of water). It is better to use a big bowl since the soaking will make the soybean expand to twice its volume.
❷ Blend the soybeansPut the beans into a strainer and drain them. Add water which is approx 1.2 times more than soaked beans (280g of soybeans requires approx 6 cups of water). Separate them into 3 butches and blend it in a mixer for 2mins each, till it becomes smooth.
This fresh soy milk is called Namago or Hisago.
❸ Simmer the soy milk
Transfer the smooth soy milk (Namago) into a pot. Gently stir with a long spoon while bringing it to boil without burning. Once it’s boiling, turn the heat off.
When there’s less foam, simmer again for 10mins with low heat.
❹ Squeeze out the soy milk
Strain the soy milk with a straining cloth and squeeze out the juice. The liquid is soy milk and what’s left is Okara.
If it’s hard to squeeze with cloth, use your hands. Be careful not to burn yourself.
❺ Warm up the soy milk
Heat the soy milk back up to around 75 to 80 degrees in a pot. If the temperature is too low, the tofu won’t form. If the temperature is too high, the tofu will get firm too quickly.
Tofu making scheduleTofu making schedule
Soybeans approx ・・・ 280g
< What you will need >
Coagulant (Nigari) ・・・ 20ml
- Mold box (Tofu box)- 2 cloths (Straining cloth and finishing cloth)- Thermometer
- Mixer- Pot
- In winter (water temperature 0 to 5 degrees): 20 hours- In spring and autumn (water temperature 10 to 15 degrees): 15 hours- In summer (water temperature 20 to 25 degrees): 8 to 9 hours
■Soaking period
The most important thing to make Tofu is “temperature control”. Use a thermome-ter to correctly measure the temperature.
Important
Click Here for Tofu Tutorial Video
34 35
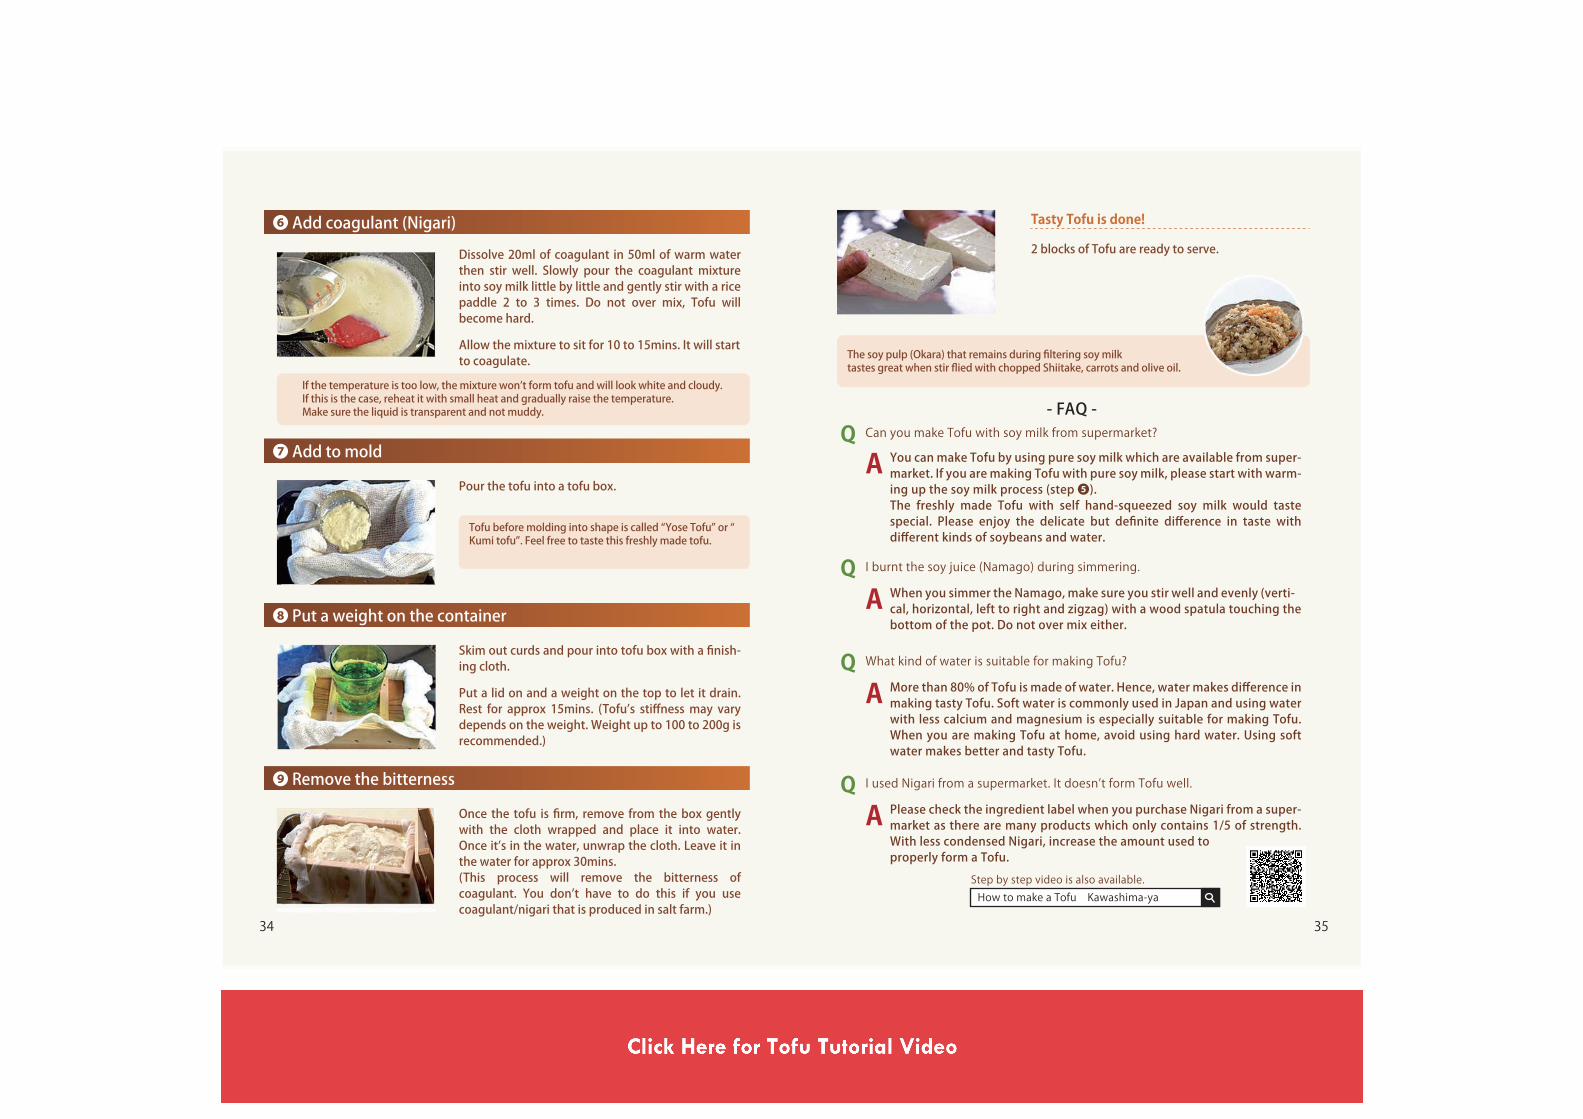
❻ Add coagulant (Nigari)Dissolve 20ml of coagulant in 50ml of warm water then stir well. Slowly pour the coagulant mixture into soy milk little by little and gently stir with a rice paddle 2 to 3 times. Do not over mix, Tofu will become hard.
Allow the mixture to sit for 10 to 15mins. It will start to coagulate.
If the temperature is too low, the mixture won’t form tofu and will look white and cloudy. If this is the case, reheat it with small heat and gradually raise the temperature. Make sure the liquid is transparent and not muddy.
The soy pulp (Okara) that remains during filtering soy milk tastes great when stir flied with chopped Shiitake, carrots and olive oil.
❼ Add to mold
Pour the tofu into a tofu box.
❽ Put a weight on the container
Skim out curds and pour into tofu box with a finish-ing cloth. Put a lid on and a weight on the top to let it drain. Rest for approx 15mins. (Tofu’s stiffness may vary depends on the weight. Weight up to 100 to 200g is recommended.)
❾ Remove the bitterness
Once the tofu is firm, remove from the box gently with the cloth wrapped and place it into water. Once it’s in the water, unwrap the cloth. Leave it in the water for approx 30mins. (This process will remove the bitterness of coagulant. You don’t have to do this if you use coagulant/nigari that is produced in salt farm.)
Tofu before molding into shape is called “Yose Tofu” or “Kumi tofu”. Feel free to taste this freshly made tofu.
Tasty Tofu is done!
2 blocks of Tofu are ready to serve.
QA
- FAQ -Can you make Tofu with soy milk from supermarket?
You can make Tofu by using pure soy milk which are available from super-market. If you are making Tofu with pure soy milk, please start with warm-ing up the soy milk process (step ❺).The freshly made Tofu with self hand-squeezed soy milk would taste special. Please enjoy the delicate but definite difference in taste with different kinds of soybeans and water.
QAI burnt the soy juice (Namago) during simmering.
When you simmer the Namago, make sure you stir well and evenly (verti-cal, horizontal, left to right and zigzag) with a wood spatula touching the bottom of the pot. Do not over mix either.
QAWhat kind of water is suitable for making Tofu?
More than 80% of Tofu is made of water. Hence, water makes difference in making tasty Tofu. Soft water is commonly used in Japan and using water with less calcium and magnesium is especially suitable for making Tofu. When you are making Tofu at home, avoid using hard water. Using soft water makes better and tasty Tofu.
QAI used Nigari from a supermarket. It doesn’t form Tofu well.
Please check the ingredient label when you purchase Nigari from a super-market as there are many products which only contains 1/5 of strength. With less condensed Nigari, increase the amount used toproperly form a Tofu.
Step by step video is also available.How to make a Tofu Kawashima-ya
36 37
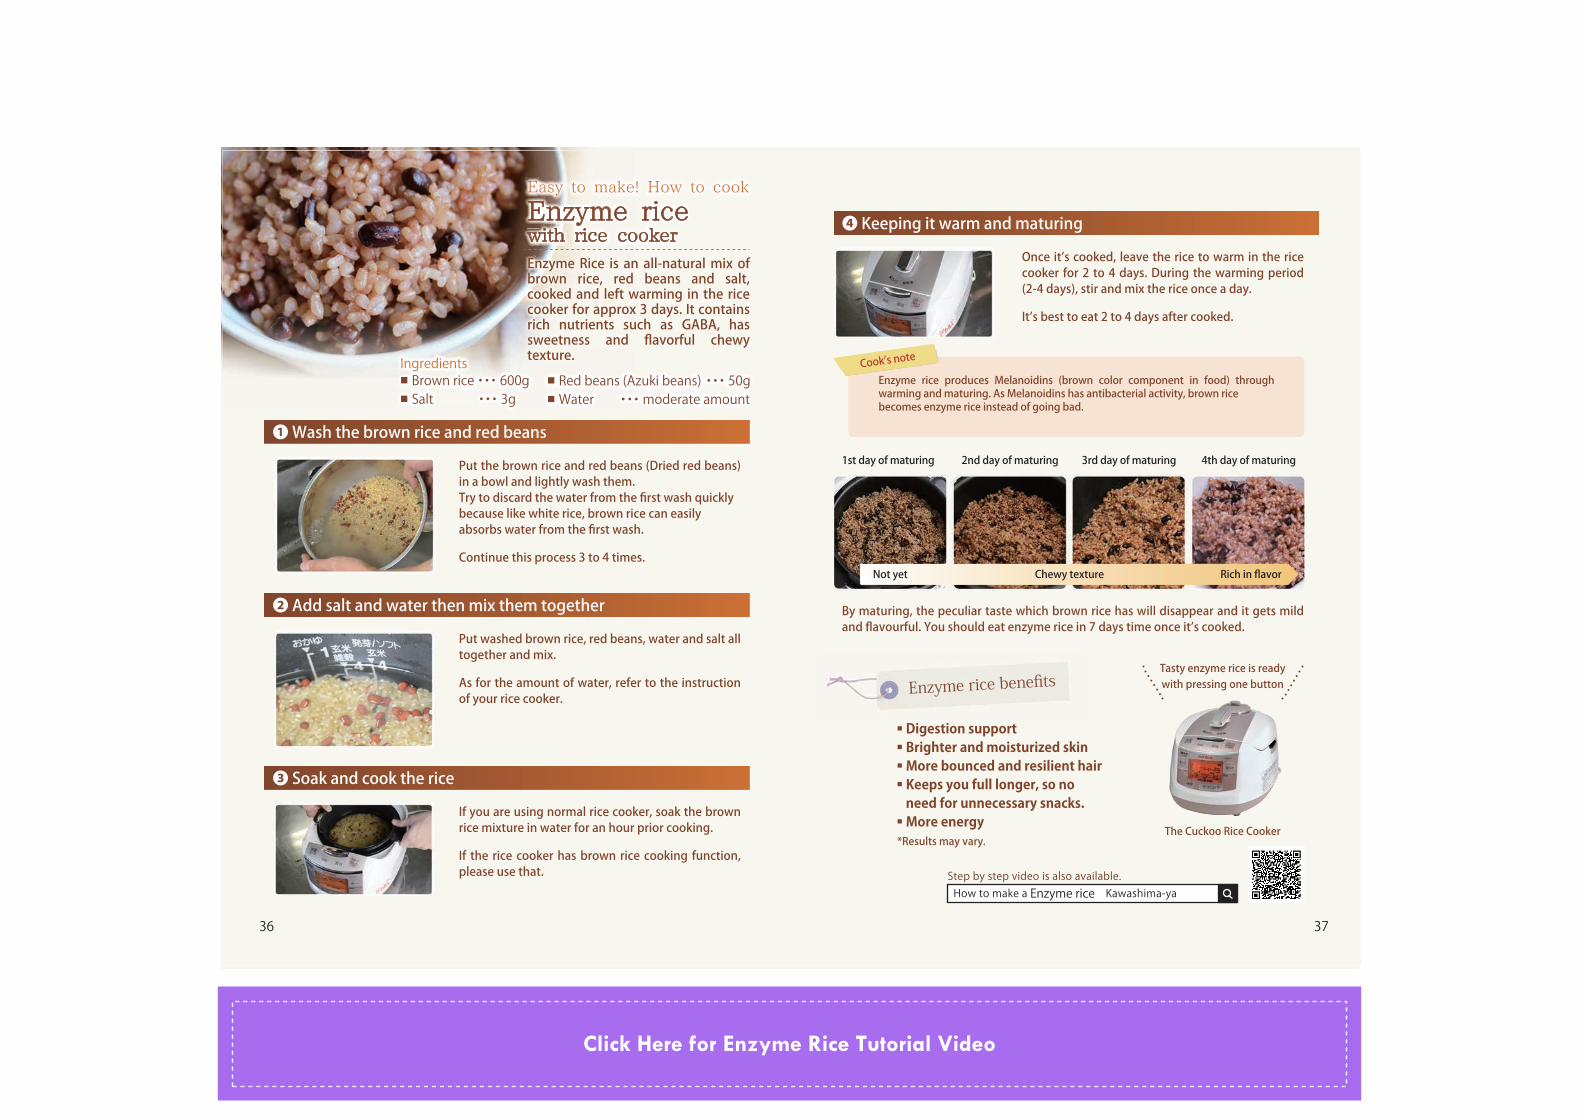
❶ Wash the brown rice and red beans
Put the brown rice and red beans (Dried red beans) in a bowl and lightly wash them. Try to discard the water from the first wash quickly because like white rice, brown rice can easily absorbs water from the first wash.
Continue this process 3 to 4 times.
❹ Keeping it warm and maturing
Once it’s cooked, leave the rice to warm in the rice cooker for 2 to 4 days. During the warming period (2-4 days), stir and mix the rice once a day.
It’s best to eat 2 to 4 days after cooked.
By maturing, the peculiar taste which brown rice has will disappear and it gets mild and flavourful. You should eat enzyme rice in 7 days time once it’s cooked.
■ Digestion support■ Brighter and moisturized skin■ More bounced and resilient hair■ Keeps you full longer, so no need for unnecessary snacks.■ More energy*Results may vary.
❷ Add salt and water then mix them together
Put washed brown rice, red beans, water and salt all together and mix.
As for the amount of water, refer to the instruction of your rice cooker.
❸ Soak and cook the rice
If you are using normal rice cooker, soak the brown rice mixture in water for an hour prior cooking.
If the rice cooker has brown rice cooking function, please use that.
Easy to make! How to cookEasy to make! How to cookEasy to make! How to cookEasy to make! How to cook
Enzyme riceEnzyme riceEnzyme riceEnzyme riceEnzyme ricewith rice cookerwith rice cookerwith rice cookerwith rice cooker
Easy to make! How to cook
Enzyme ricewith rice cookerEnzyme Rice is an all-natural mix of Enzyme Rice is an all-natural mix of Enzyme Rice is an all-natural mix of Enzyme Rice is an all-natural mix of brown rice, red beans and salt, brown rice, red beans and salt, brown rice, red beans and salt, brown rice, red beans and salt, brown rice, red beans and salt, cooked and left warming in the rice cooked and left warming in the rice cooked and left warming in the rice cooked and left warming in the rice cooked and left warming in the rice cooked and left warming in the rice cooked and left warming in the rice cooked and left warming in the rice cooker for approx 3 days. It contains cooker for approx 3 days. It contains cooker for approx 3 days. It contains cooker for approx 3 days. It contains cooker for approx 3 days. It contains cooker for approx 3 days. It contains cooker for approx 3 days. It contains cooker for approx 3 days. It contains cooker for approx 3 days. It contains cooker for approx 3 days. It contains cooker for approx 3 days. It contains rich nutrients such as GABA, has rich nutrients such as GABA, has rich nutrients such as GABA, has rich nutrients such as GABA, has rich nutrients such as GABA, has rich nutrients such as GABA, has rich nutrients such as GABA, has rich nutrients such as GABA, has rich nutrients such as GABA, has rich nutrients such as GABA, has sweetness and flavorful chewy sweetness and flavorful chewy sweetness and flavorful chewy sweetness and flavorful chewy sweetness and flavorful chewy texture.
Enzyme Rice is an all-natural mix of brown rice, red beans and salt, cooked and left warming in the rice cooker for approx 3 days. It contains rich nutrients such as GABA, has sweetness and flavorful chewy texture.Ingredients
Brown rice ・・・ 600gSalt ・・・ 3g
Red beans (Azuki beans)Red beans (Azuki beans) ・・・ 50g ・・・ 50g ・・・ moderate amount・・・ moderate amount・・・ moderate amount・・・ moderate amount・・・ moderate amount
Ingredients■ Brown rice ・・・ 600g■ Salt ・・・ 3g
■ Red beans (Azuki beans) ・・・ 50g■ Water ・・・ moderate amount
Enzyme rice produces Melanoidins (brown color component in food) through warming and maturing. As Melanoidins has antibacterial activity, brown rice becomes enzyme rice instead of going bad.
Cook’s note
1st day of maturing 2nd day of maturing 3rd day of maturing 4th day of maturing
Not yet Chewy texture Rich in flavor
Enzyme rice benefitsTasty enzyme rice is readywith pressing one button
The Cuckoo Rice Cooker
Step by step video is also available.How to make a Enzyme rice Kawashima-ya
Click Here for Enzyme Rice Tutorial Video

38 39
How to make a Umeboshi Kawashima-ya
Use Ume that is yellow, soft, and ripe.If Ume is still green, put them on a bamboo sieve and cover it with a piece of newspaper. Place it in a cool area for approx 3 days and let it ripe and have yellow color.
Cook’s note
How to makeHow to make
Ume picklesUme picklesUme picklesUme picklesUme picklesUme pickles(Umeboshi)(Umeboshi)(Umeboshi)(Umeboshi)(Umeboshi)(Umeboshi)(Umeboshi)(Umeboshi)(Umeboshi)June is Green Ume’s season.Enjoy the scent of Ume through Enjoy the scent of Ume through Enjoy the scent of Ume through Enjoy the scent of Ume through Enjoy the scent of Ume through making Umeboshi.making Umeboshi.making Umeboshi.
Ingredients(Produces 1kg of Ume pickles)Ripe Ume ・・・ 600g
(yellow colored and completely ripe)
Salt (Ocean salt) ・・・ 180 to 200g ・・・ 180 to 200g ・・・ 180 to 200g ・・・ 180 to 200g ・・・ 180 to 200g ・・・ 180 to 200g ・・・ 180 to 200g ・・・ 180 to 200g ・・・ 180 to 200g ・・・ 180 to 200gRed Shiso leaves・・・・・・・・・ 200 to 300g 200 to 300g 200 to 300g
<What you will need>
- Container
- Pickling bag
- Weight (Heavy stone)- Weight (Heavy stone)
- Strainer
- Container
- Pickling bag
- Weight (Heavy stone)- Weight (Heavy stone)
- Strainer
How to make
Ume pickles(Umeboshi)June is the peak of Green Ume season. Let’s enjoy the scent of Ume Through making Umeboshi!
Ingredients(Produces 1kg of Ume pickles)■ Ripe Ume ・・・ 600g (yellow colored and completely ripe)■ Salt (Ocean salt) ・・・ 180 to 200g■ Red Shiso leaves ・・・ 200 to 300g
<What you will need>
- Container
- Pickling bag
- Weight (Heavy stone)
- Strainer
Make it yellow!
Carefully remove the stems from the Ume, using a bamboo stick.
❶ Wash the Ume thoroughly with cold water.
❷ Gently wipe them dry with a clean towel. If moisture remains, it leads to mold. So make sure to dry them completely.
❸
Place the pickling bag in a container and put Ume and salt on top of one another. Shake the bag so that Ume and salt mix.
❹ Twist close the pickling bag and remove the air out.
❺ Place a weight on top. The weight should have the same or twice the weight of Ume.
❻
Cover the container with paper or lid and leave it in a cool dark and well ventilated place for approx 1 week.
❼ Umezu (Ume vinegar) is extracted from the Ume. If the Ume is soaked in the Umezu, they are well pickled.
❽ Place red Shiso leaves on top of Ume without leaving any gap. Place the inner lid of the pickle container and put a weight about half as heavy as the Ume. Leave it for approx 2 weeks.
❾
After the rainy season, generally middle of July, sun dry both the Ume and red Shiso leaves for 3 days and 3 nights. Make sure it is well ventilated under the sieve. Turn the Ume over at least once a day.
10 Dried Ume should have salt on its surface. If the weight of the Ume is about the half of the original weight before pickling, it is done.
11 12 Transfer the Ume into a container with Umezu and store it in a cool dark place. When the Ume haveabsorbed the Umezu, they are ready to eat.
The Process of Making UmeboshiRemove stems from the Ume
Wash Ume
Pat them dry
Mix Ume with salt
Place a weight and let it sit
Check the progress of Umezu (Ume vinegar)
Add Red Shiso leaves
Dry Ume in the sun1 week
2 week
Mature at yourpreference
Check the drying progress
Put Ume in Umezu
Finish
Click Here for Umeboshi Tutorial Video