Embed Size (px)
Citation preview
Hola soy Fluxy, teayudaré a instalar tu producto.
Instalación General
INSTALLATION GUIDE
1-02-1336-6
Hi I'm Fluxy, I'll help you to install your product.
/ General Installation
INSTALLATION GUIDE GUÍA DE INSTALACIÓN
1
(3,9”)
*Recommended Dimensions *Medidas Recomendadas
(2,2")
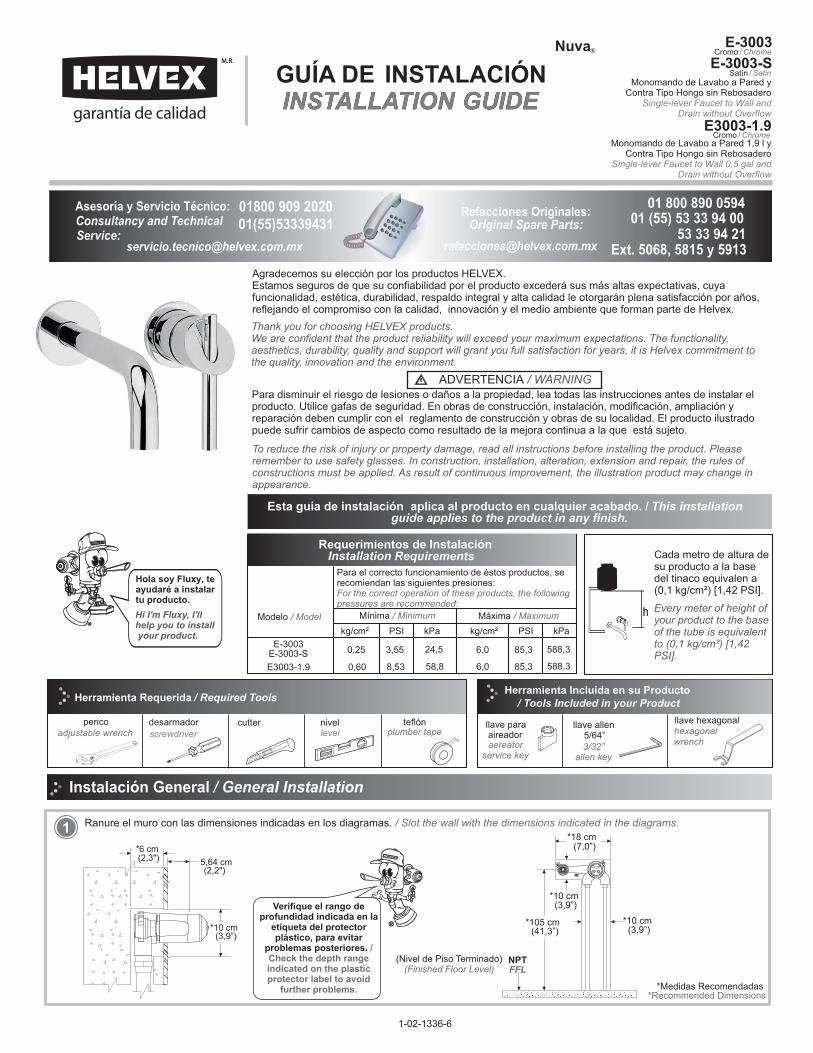
Ranure el muro con las dimensiones indicadas en los diagramas. / Slot the wall with the dimensions indicated in the diagrams.
*10 cm
*6 cm
5,64 cm(2,3")
*105 cm
*18 cm
*10 cm(3,9”)
(7,0”)
*10 cm(3,9”)
(41,3”)
Verifique el rango de profundidad indicada en la
etiqueta del protector plástico, para evitar
problemas posteriores. /Check the depth range indicated on the plastic protector label to avoid
further problems.
(Nivel de Piso Terminado)(Finished Floor Level)
NPTFFL
E-3003-SMonomando de Lavabo a Pared y
Contra Tipo Hongo sin RebosaderoSingle-lever Faucet to Wall and
Drain without Overflow
Nuva E-3003
E3003-1.9
Cromo / Chrome
Satín / Satin
Cromo / Chrome
Original Spare Parts:Consultancy and Technical 01(55)5333943101800 909 2020
01 (55) 53 33 94 00 Refacciones Originales:Asesoría y Servicio Técnico:
Ext. 5068, 5815 y 5913Service: 53 33 94 21
01 800 890 0594
Cada metro de altura de su producto a la base del tinaco equivalen a (0,1 kg/cm²) [1,42 PSI].
Every meter of height of your product to the base of the tube is equivalent to (0,1 kg/cm²) [1,42 PSI].
Para disminuir el riesgo de lesiones o daños a la propiedad, lea todas las instrucciones antes de instalar el producto. Utilice gafas de seguridad. En obras de construcción, instalación, modificación, ampliación y reparación deben cumplir con el reglamento de construcción y obras de su localidad. El producto ilustrado puede sufrir cambios de aspecto como resultado de la mejora continua a la que está sujeto.
Agradecemos su elección por los productos HELVEX. Estamos seguros de que su confiabilidad por el producto excederá sus más altas expectativas, cuya funcionalidad, estética, durabilidad, respaldo integral y alta calidad le otorgarán plena satisfacción por años, reflejando el compromiso con la calidad, innovación y el medio ambiente que forman parte de Helvex.
To reduce the risk of injury or property damage, read all instructions before installing the product. Please remember to use safety glasses. In construction, installation, alteration, extension and repair, the rules of constructions must be applied. As result of continuous improvement, the illustration product may change in appearance.
ADVERTENCIA / WARNING
Esta guía de instalación aplica al producto en cualquier acabado. / This installation guide applies to the product in any finish.
Thank you for choosing HELVEX products. We are confident that the product reliability will exceed your maximum expectations. The functionality, aesthetics, durability, quality and support will grant you full satisfaction for years, it is Helvex commitment to the quality, innovation and the environment.
Requerimientos de InstalaciónInstallation Requirements
E-30030,25 3,55 24,5
Requerimientos de InstalaciónInstallation Requirements
Modelo / Model Mínima / Minimum Máxima / Maximum
kg/cm² PSI kPa kg/cm² PSI kPa
6,0 85,3 588,3
Para el correcto funcionamiento de éstos productos, se recomiendan las siguientes presiones: For the correct operation of these products, the following pressures are recommended:
E-3003-S
E3003-1.9 6,0 85,3 588,30,60 8,53 58,8
nivellevel
teflónplumber tape
pericoadjustable wrench
aereator service key
llave para
3/32” allen key
llave allen 5/64”aireador
Herramienta Incluida en su Producto/ Tools Included in your Product
Herramienta Requerida / Required Tools
screwdriver
desarmador
Monomando de Lavabo a Pared 1,9 l y Contra Tipo Hongo sin Rebosadero
Single-lever Faucet to Wall 0,5 gal and Drain without Overflow
hexagonalllave hexagonal
wrench
cutter
8 9 10
2
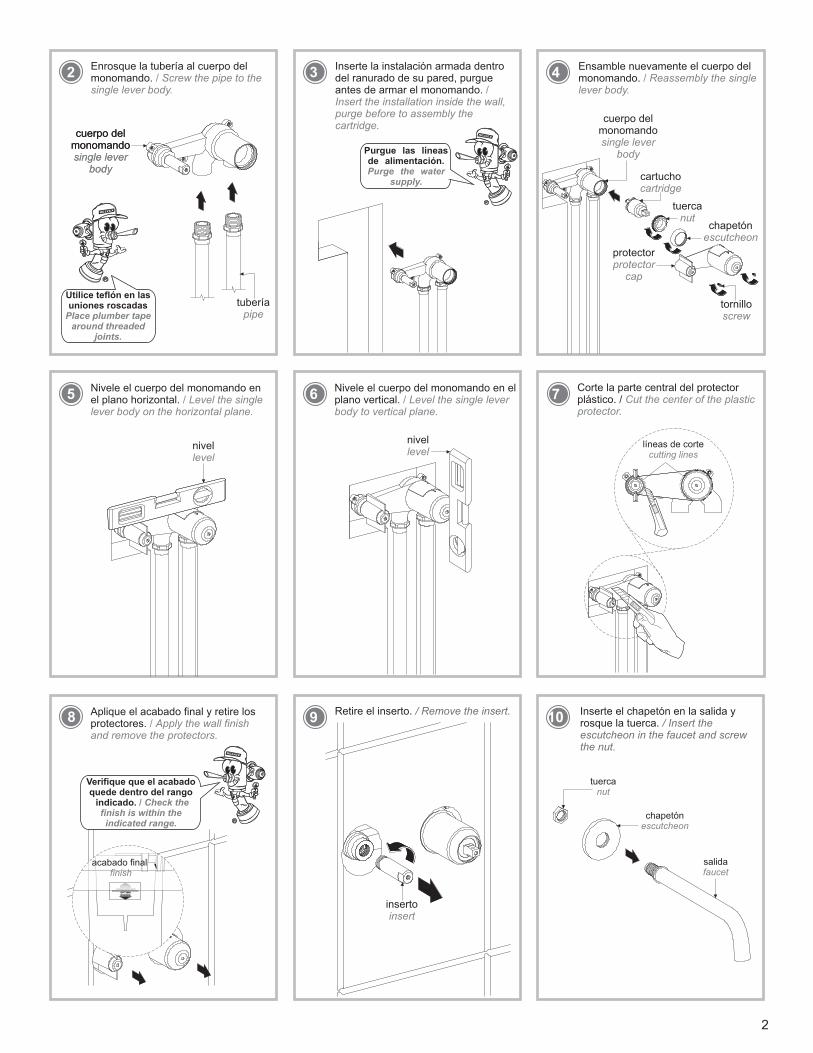
2 3 4Enrosque la tubería al cuerpo del monomando. / Screw the pipe to the single lever body.
Utilice teflón en las uniones roscadas
Place plumber tape around threaded
joints.
Inserte la instalación armada dentro del ranurado de su pared, purgue antes de armar el monomando. / Insert the installation inside the wall, purge before to assembly the cartridge.
Purgue las líneas de alimentación.Purge the water
supply.
Ensamble nuevamente el cuerpo del monomando. / Reassembly the single lever body.
cuerpo del monomandosingle lever
body
tubería pipe
cuerpo del monomandosingle lever
body
cuerpo del monomandosingle lever
body
cartuchocartridge
tuercanut
chapetónescutcheon
tornilloscrew
protector protector
cap
5 6 7Nivele el cuerpo del monomando en el plano horizontal. / Level the single lever body on the horizontal plane.
nivellevel
Nivele el cuerpo del monomando en el plano vertical. / Level the single lever body to vertical plane.
nivellevel
Corte la parte central del protector plástico. / Cut the center of the plastic protector.
líneas de cortecutting lines
Aplique el acabado final y retire los protectores. / Apply the wall finish and remove the protectors.
MAXIMAPROFUNDIDAD
OPTIMAMINIMA
acabado final finish
Verifique que el acabado quede dentro del rango indicado. / Check the
finish is within the indicated range.
Retire el inserto. / Remove the insert.
insertoinsert
Inserte el chapetón en la salida y rosque la tuerca. / Insert the escutcheon in the faucet and screw the nut.
chapetónescutcheon
tuercanut
salidafaucet
3
17 18 19
11 12 13
14
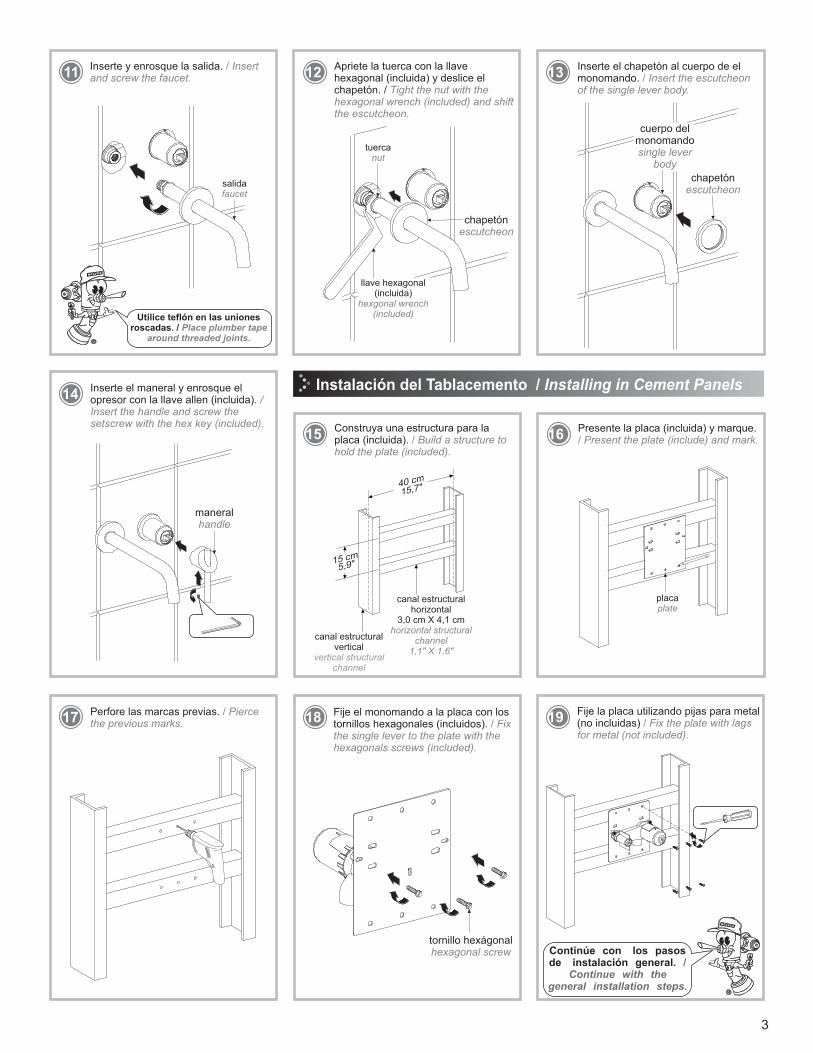
Inserte y enrosque la salida. / Insert and screw the faucet.
Utilice teflón en las uniones roscadas. / Place plumber tape
around threaded joints.
Apriete la tuerca con la llave hexagonal (incluida) y deslice el chapetón. / Tight the nut with the hexagonal wrench (included) and shift the escutcheon.
llave hexagonal (incluida)
hexgonal wrench(included)
tuercanut
Inserte el chapetón al cuerpo de el monomando. / Insert the escutcheon of the single lever body.
chapetónescutcheon
chapetónescutcheon
Inserte el maneral y enrosque el opresor con la llave allen (incluida). /Insert the handle and screw the setscrew with the hex key (included).
salidafaucet
cuerpo del monomandosingle lever
body
maneralhandle
Instalación del Tablacemento / Installing in Cement Panels
15 16Construya una estructura para la placa (incluida). / Build a structure to hold the plate (included).
15 cm
40 cm
canal estructuralhorizontal
3,0 cm X 4,1 cmhorizontal structural
channel1,1" X 1,6"
canal estructuralvertical
vertical structural channel
15,7"
5,9"
Presente la placa (incluida) y marque. / Present the plate (include) and mark.
placaplate
Perfore las marcas previas. / Pierce the previous marks.
Fije el monomando a la placa con los tornillos hexagonales (incluidos). / Fix the single lever to the plate with the hexagonals screws (included).
tornillo hexágonalhexagonal screw
Fije la placa utilizando pijas para metal (no incluidas) / Fix the plate with lags for metal (not included).
Continúe con los pasos de instalación general. /
Continue with the general installation steps.
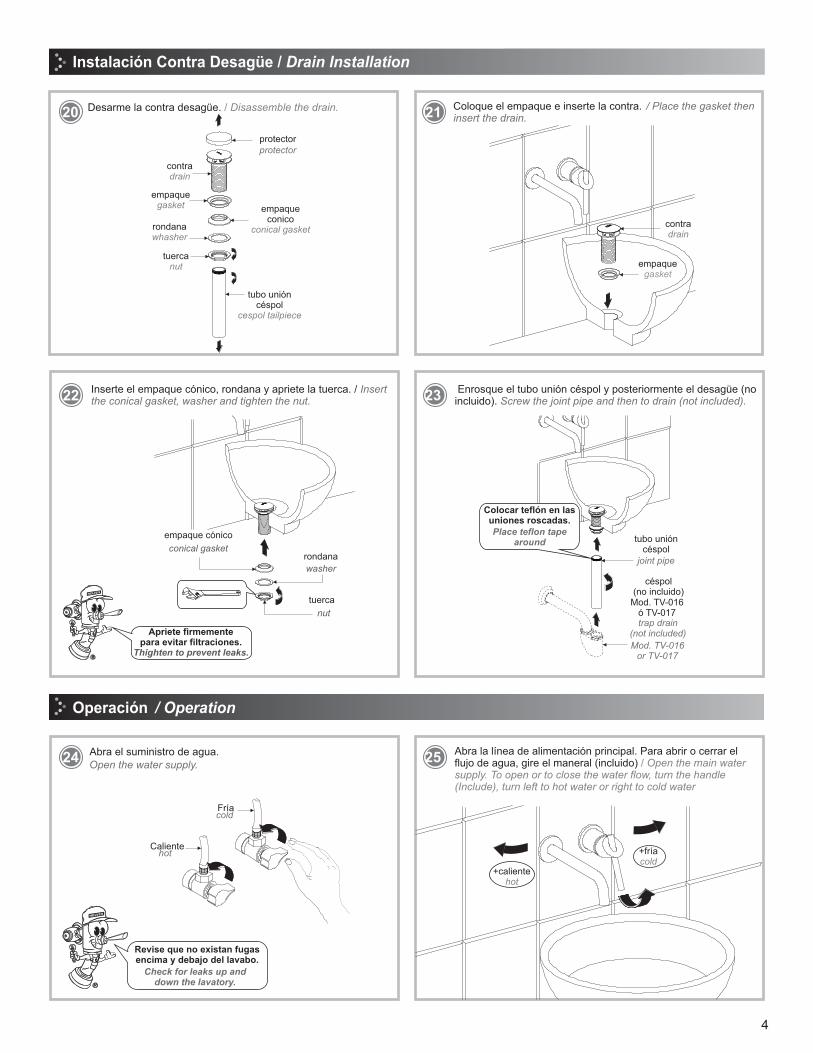
Instalación Contra Desagüe / Drain Installation
Desarme la contra desagüe. / Disassemble the drain.
protectorprotector
empaque conico
conical gasket
contradrain
tuercanut
tubo unión céspol
cespol tailpiece
rondanawhasher
Coloque el empaque e inserte la contra. / Place the gasket then insert the drain.
22 23
20 21
empaque cónico
conical gasketrondana
washer
nut
tuerca
24Open the water supply.Abra el suministro de agua. 25
Abra la línea de alimentación principal. Para abrir o cerrar el flujo de agua, gire el maneral (incluido) / Open the main water supply. To open or to close the water flow, turn the handle (Include), turn left to hot water or right to cold water
+fríacold
+calientehot
empaque gasket
contradrain
Inserte el empaque cónico, rondana y apriete la tuerca. / Insert the conical gasket, washer and tighten the nut.
Apriete firmementepara evitar filtraciones.
Thighten to prevent leaks.
Enrosque el tubo unión céspol y posteriormente el desagüe (no incluido). Screw the joint pipe and then to drain (not included).
Colocar teflón en las uniones roscadas.Place teflon tape
around tubo unióncéspol
joint pipe
céspol(no incluido)
trap drain(not included)
Mod. TV-016 or TV-017
Mod. TV-016 ó TV-017
Operación / Operation
Revise que no existan fugas encima y debajo del lavabo.
Check for leaks up and down the lavatory.
Calientehot
coldFría
4
empaque gasket
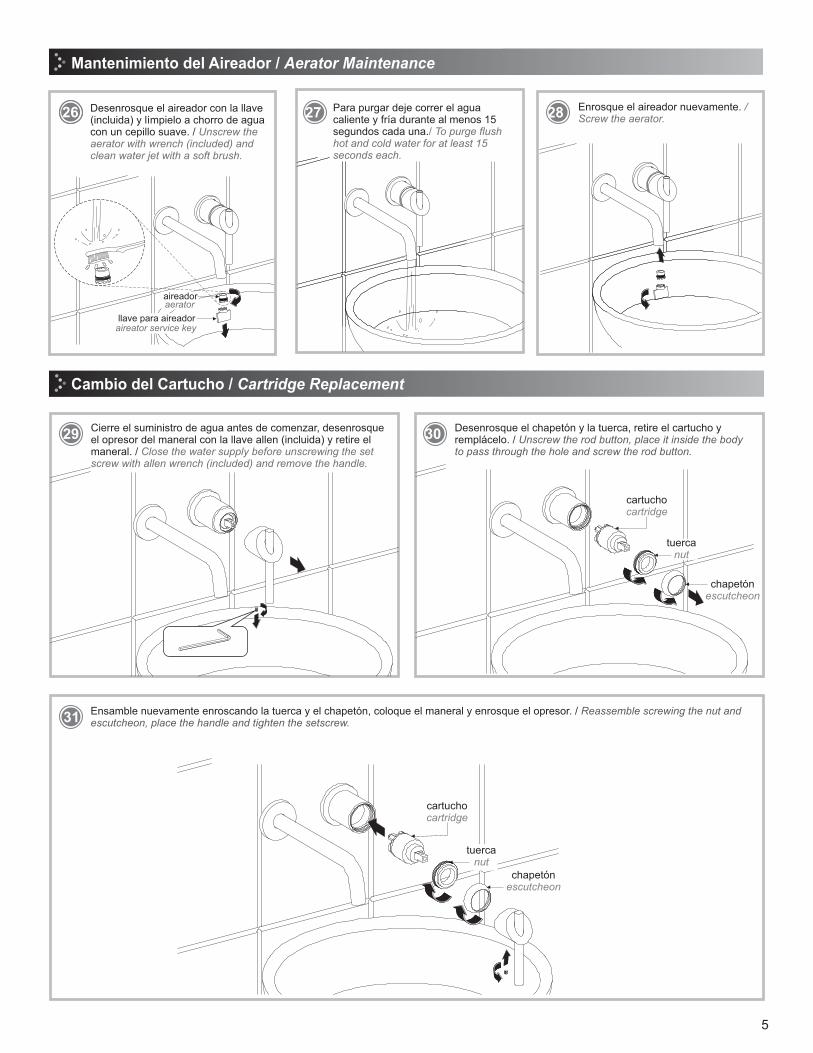
Instalación Salida / Faucet Installation Mantenimiento del Aireador / Aerator Maintenance
28
5
26 Desenrosque el aireador con la llave (incluida) y límpielo a chorro de agua con un cepillo suave. / Unscrew the aerator with wrench (included) and clean water jet with a soft brush.
aireadoraerator
aireator service keyllave para aireador
27 Para purgar deje correr el agua caliente y fría durante al menos 15 segundos cada una./ To purge flush hot and cold water for at least 15 seconds each.
Cierre el suministro de agua antes de comenzar, desenrosque el opresor del maneral con la llave allen (incluida) y retire el maneral. / Close the water supply before unscrewing the set screw with allen wrench (included) and remove the handle.
29Desenrosque el chapetón y la tuerca, retire el cartucho y remplácelo. / Unscrew the rod button, place it inside the body to pass through the hole and screw the rod button.
30
cartuchocartridge
chapetónescutcheon
tuercanut
Ensamble nuevamente enroscando la tuerca y el chapetón, coloque el maneral y enrosque el opresor. / Reassemble screwing the nut and escutcheon, place the handle and tighten the setscrew.31
chapetónescutcheon
tuercanut
cartuchocartridge
Enrosque el aireador nuevamente. / Screw the aerator.
Cambio del Cartucho / Cartridge Replacement
6
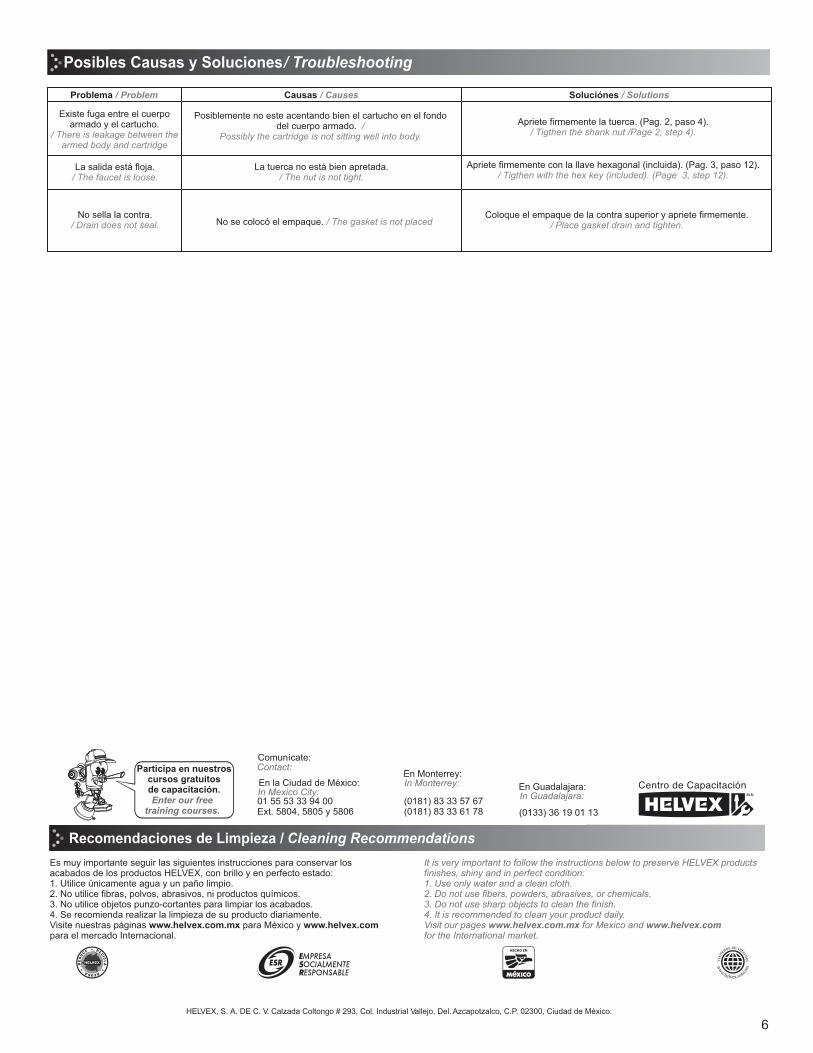
Posibles Causas y Soluciones / Troubleshooting
No se colocó el empaque. / The gasket is not placed
Problema / Problem Causas / Causes Soluciónes / Solutions
Posiblemente no este acentando bien el cartucho en el fondo del cuerpo armado. /
Possibly the cartridge is not sitting well into body.
La salida está floja. / The faucet is loose.
La tuerca no está bien apretada. / The nut is not tight.
Apriete firmemente la tuerca. (Pag. 2, paso 4). / Tigthen the shank nut /Page 2, step 4).
No sella la contra. / Drain does not seal.
Coloque el empaque de la contra superior y apriete firmemente. / Place gasket drain and tighten.
Existe fuga entre el cuerpo armado y el cartucho.
/ There is leakage between the armed body and cartridge
Apriete firmemente con la llave hexagonal (incluida). (Pag. 3, paso 12). / Tigthen with the hex key (included). (Page 3, step 12).
Recomendaciones de Limpieza / Cleaning Recommendations
In Guadalajara:
Contact:
Enter our free training courses.
In Monterrey:En la Ciudad de México: In Mexico City:
En Monterrey:
En Guadalajara: 01 55 53 33 94 00 Ext. 5804, 5805 y 5806 (0133) 36 19 01 13
Comunícate:Participa en nuestros
cursos gratuitosde capacitación.
(0181) 83 33 57 67(0181) 83 33 61 78
Es muy importante seguir las siguientes instrucciones para conservar los acabados de los productos HELVEX, con brillo y en perfecto estado:1. Utilice únicamente agua y un paño limpio.2. No utilice fibras, polvos, abrasivos, ni productos químicos.3. No utilice objetos punzo-cortantes para limpiar los acabados.4. Se recomienda realizar la limpieza de su producto diariamente.Visite nuestras páginas www.helvex.com.mx para México y www.helvex.com para el mercado Internacional.
It is very important to follow the instructions below to preserve HELVEX products finishes, shiny and in perfect condition:1. Use only water and a clean cloth.2. Do not use fibers, powders, abrasives, or chemicals.3. Do not use sharp objects to clean the finish.4. It is recommended to clean your product daily.Visit our pages www.helvex.com.mx for Mexico and www.helvex.com for the International market.
HELVEX, S. A. DE C. V. Calzada Coltongo # 293, Col. Industrial Vallejo, Del. Azcapotzalco, C.P. 02300, Ciudad de México.