Embed Size (px)
Citation preview
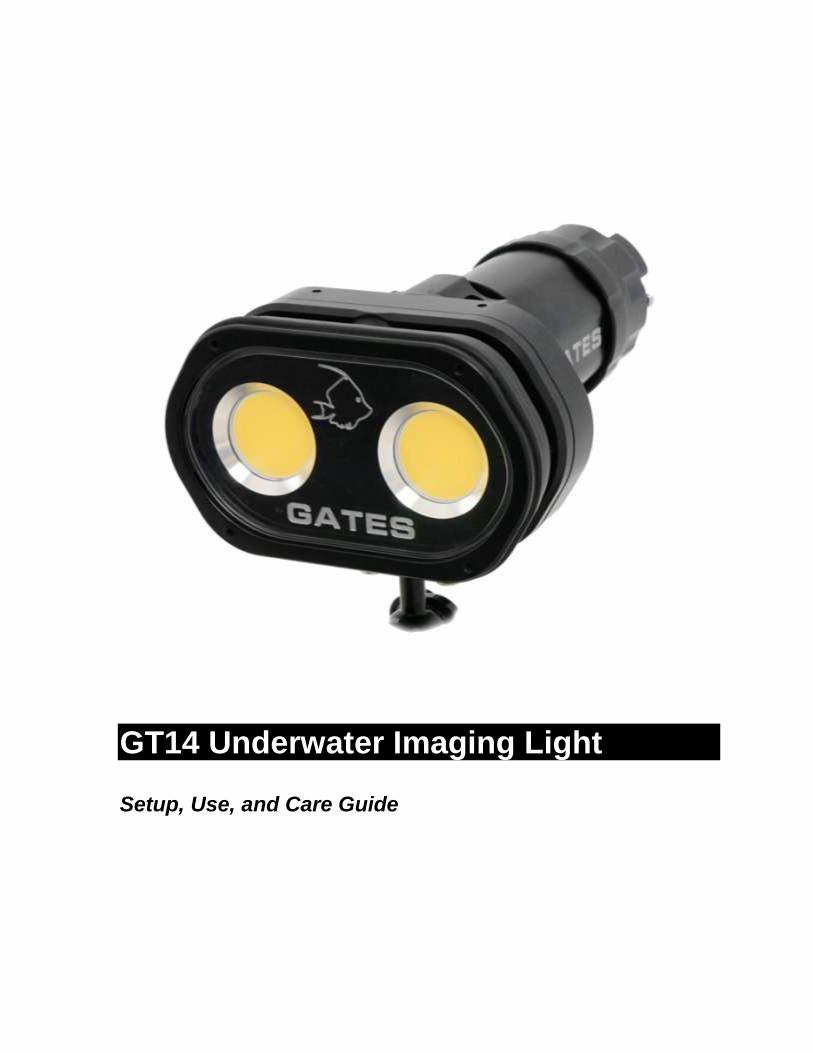
GT14 Underwater Imaging Light
Setup, Use, and Care Guide
Introduction Page 2
Copyright 2016, Gates Underwater Products, Inc.
Last document revision: 2-2016
This manual and current revision is available in 8.5 x 11 size and full color at
http://www.gateshousings.com/documentation.html
Gates Underwater Products, Inc.
13685 Stowe Drive Poway, California 92064 USA
Phone: 858.391.0052 Fax: 858.391.0053 Web: GatesHousings.com Facebook: https://www.facebook.com/gates.underwaterproducts

Introduction Page 3
Table of Contents
Setup, Use, and Care Guide ............................................. 1
1: Introduction ....................................................................... 4 Warranty Disclaimer ......................................................... 4 Unpacking the GT14 ......................................................... 4
2: Cautions ........................................................................... 5
3: Setup ................................................................................ 6 Charge the battery ............................................................ 6 Install the battery .............................................................. 6
4: Test .................................................................................. 7 Verify Operation ................................................................ 7 Seal Check ....................................................................... 7
5: Operation .......................................................................... 8 Power On / Levels / Run Time .......................................... 8 Indicators .......................................................................... 9 Safety Features .............................................................. 11 GT14 Flip Filter Accessory.............................................. 13 Tips for Shooting Video with the GT14’s ......................... 14
6: Safety Precautions ......................................................... 16 Batteries ......................................................................... 16 Travel ............................................................................. 16 In-Water Operation ......................................................... 16 Storage ........................................................................... 16
7: Specifications ................................................................. 17
8: Customer Support .......................................................... 18
Introduction Page 4
1: Introduction
Congratulations on owning a new Gates product: the GT14 Underwater Imaging Light. You’ve selected an underwater tool that will provide years of value and reliable service.
Please read through this entire guide to learn about the GT14 so you can get the most out of this imaging tool. In this section, we’ll introduce you to the features of the GT14 so you can get started.
Warranty Disclaimer
The GT14 Underwater Imaging Light (GT14) is a tool that, like any tool, requires knowledge and understanding to be effective.
Your responsibility is to learn the proper setup, use and care of the GT14.
We warrant the GT14 housing shell for two years. Electronics are warranted for one year. Batteries are warranted for 6 months. Gates does not warrant optical performance or image quality.
Full details of Gates Limited Warranties can be found online at http://www.gateshousings.com/gates-warranty/
If you have any questions, contact Gates directly. Details are in section 8.
Unpacking the GT14
The items included in your kit are listed below. If you discover any discrepancies, contact Gates or your dealer immediately for assistance.
Kit Components
GT14 Underwater Imaging Light
Charger
Battery
Silicone lubricant
Spare main seal o-ring
This instruction manual
Optional Components
Spare Battery
Seal Check Rear Cap
Carry Handle
Filter

Cautions Page 5
2: Cautions
INSTRUCTIONS. Read this manual. Keep this manual. Heed all CAUTIONS and WARNINGS. Follow all instructions.
SAFETY. The GT14 batteries contain Lithium Ion (Li-Ion) and should be handled, transported and operated in accordance with applicable laws and this guide. Use only the supplied charger for battery charging.
HEAT. This product should be kept away from heat sources such as heaters, stoves and radiators that produce heat.
USER RESPONSIBILITY. This Setup, Use and Care guide contains important detailed procedures for setup and use of the GT14 Underwater Imaging Light. It is the user’s responsibility to read, understand and employ these procedures. Failure to do so can result in poor or non-operation of the GT14 and may void your warranty.
SERVICING. Do not attempt to service this product by yourself as opening or removing covers may expose you to dangerous voltage or other hazards. Refer all servicing to qualified service personnel.
TRANSPORT. Follow all applicable laws and safety precautions when transporting this product. See section 6 Safety Precautions for more information.
IN-WATER OPERATION ONLY. Except for momentary verification of operation as noted in this manual, the GT14 is designed for in-water use only. Operation in air may result in overheating, damage and other hazards.

/Setup Page 6
3: Setup
Charge the battery
Plug the charger into a wall outlet.
Plug the charger into the battery as shown.
Charge time:
Full: 3 hours
80% : 75 minutes
40% : Approx 30 minutes (for storage)
Install the battery
Remove the rear cap by turning counterclockwise.
Install the battery as shown and fully seat into the GT14. Note that the battery is keyed and can only be inserted in the proper orientation.
Thread the rear cap onto the GT14 body until it stops. DO NOT overtighten.
Test Page 7
4: Test
Verify Operation
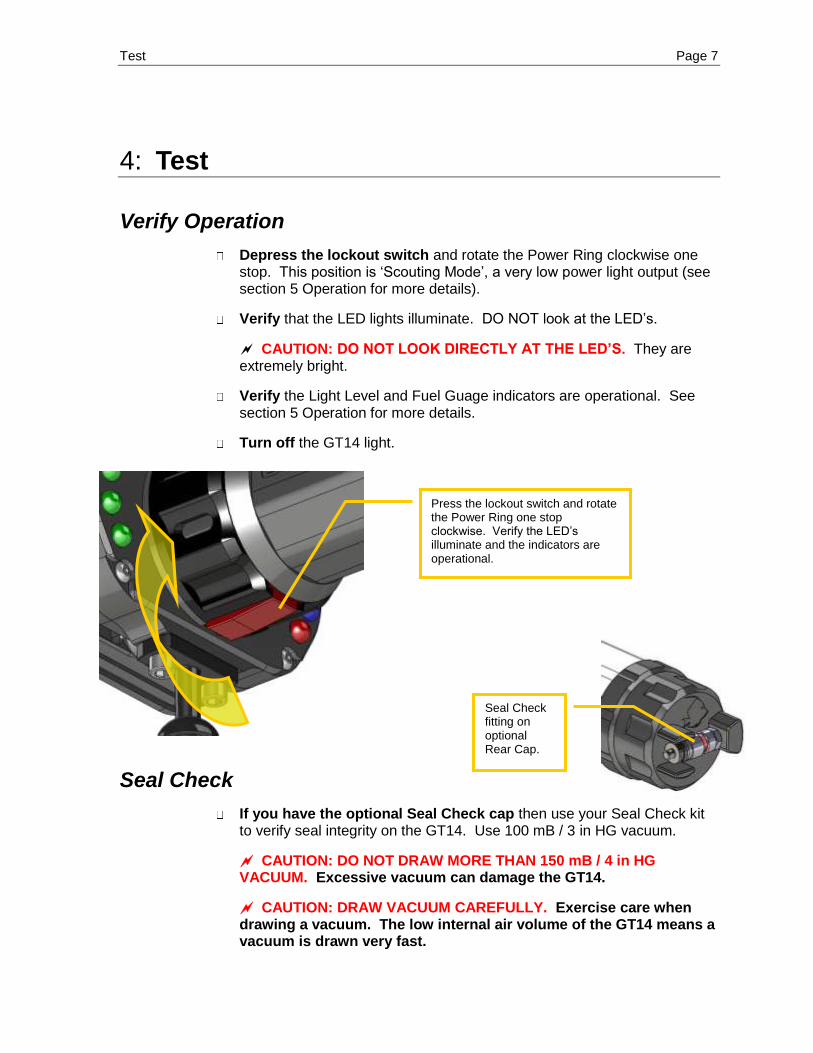
Depress the lockout switch and rotate the Power Ring clockwise one stop. This position is ‘Scouting Mode’, a very low power light output (see section 5 Operation for more details).
Verify that the LED lights illuminate. DO NOT look at the LED’s.
CAUTION: DO NOT LOOK DIRECTLY AT THE LED’S. They are extremely bright.
Verify the Light Level and Fuel Guage indicators are operational. See section 5 Operation for more details.
Turn off the GT14 light.
Seal Check
If you have the optional Seal Check cap then use your Seal Check kit to verify seal integrity on the GT14. Use 100 mB / 3 in HG vacuum.
CAUTION: DO NOT DRAW MORE THAN 150 mB / 4 in HG VACUUM. Excessive vacuum can damage the GT14.
CAUTION: DRAW VACUUM CAREFULLY. Exercise care when drawing a vacuum. The low internal air volume of the GT14 means a vacuum is drawn very fast.
Press the lockout switch and rotate the Power Ring one stop clockwise. Verify the LED’s illuminate and the indicators are operational.
Seal Check fitting on optional Rear Cap.
Operation Page 8
5: Operation
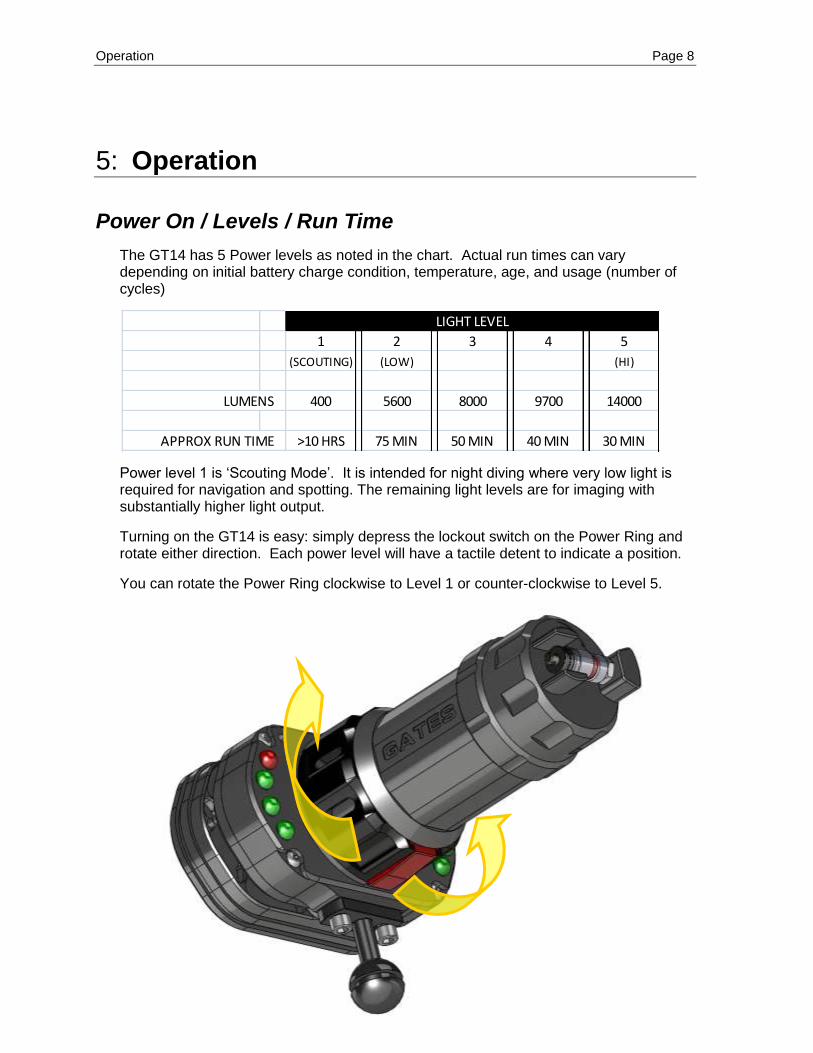
Power On / Levels / Run Time
The GT14 has 5 Power levels as noted in the chart. Actual run times can vary depending on initial battery charge condition, temperature, age, and usage (number of cycles)
Power level 1 is ‘Scouting Mode’. It is intended for night diving where very low light is required for navigation and spotting. The remaining light levels are for imaging with substantially higher light output.
Turning on the GT14 is easy: simply depress the lockout switch on the Power Ring and rotate either direction. Each power level will have a tactile detent to indicate a position.
You can rotate the Power Ring clockwise to Level 1 or counter-clockwise to Level 5.
1 2 3 4 5
(SCOUTING) (LOW) (HI)
400 5600 8000 9700 14000
>10 HRS 75 MIN 50 MIN 40 MIN 30 MIN
LIGHT LEVEL
LUMENS
APPROX RUN TIME
Operation Page 9
1 2 3 4 5
(SCOUTING) (LOW) (HI)
- - - - BLUE
- - - BLUE BLUE
- BLUE BLUE BLUE
MAGENTA BLUE BLUE BLUE BLUE
LED
CO
LOR
LIGHT LEVEL
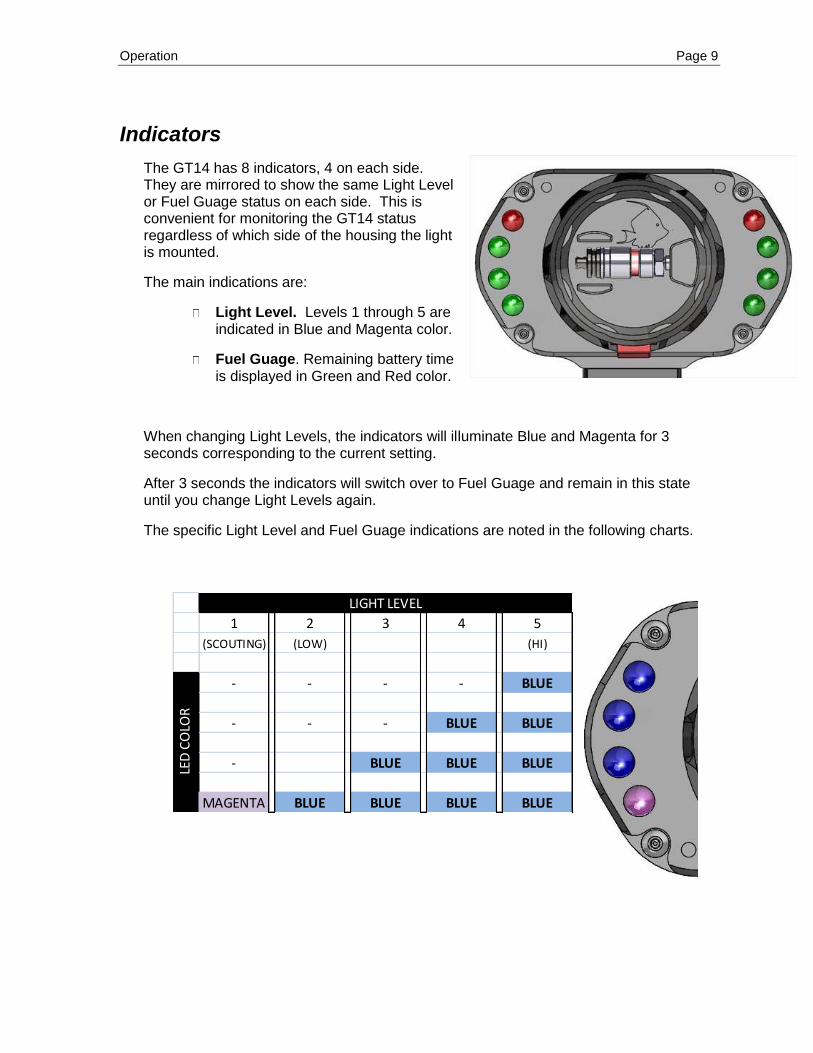
Indicators
The GT14 has 8 indicators, 4 on each side. They are mirrored to show the same Light Level or Fuel Guage status on each side. This is convenient for monitoring the GT14 status regardless of which side of the housing the light is mounted.
The main indications are:
Light Level. Levels 1 through 5 are indicated in Blue and Magenta color.
Fuel Guage. Remaining battery time is displayed in Green and Red color.
When changing Light Levels, the indicators will illuminate Blue and Magenta for 3 seconds corresponding to the current setting.
After 3 seconds the indicators will switch over to Fuel Guage and remain in this state until you change Light Levels again.
The specific Light Level and Fuel Guage indications are noted in the following charts.

Operation Page 10
1
2
3
4
5
OFF
> 35 30 25 20 15 10 5 3
GREEN RED - - - - -
GREEN GREEN GREEN RED - - -
GREEN GREEN GREEN GREEN GREEN RED -
GREEN GREEN GREEN GREEN GREEN GREEN RED
LED
CO
LOR
FUEL GAGE (Minutes remaining)
ALL
FLA
SHIN
G
Actual run times can vary depending on initial battery charge condition, temperature, age, and usage (number of cycles)
Operation Page 11
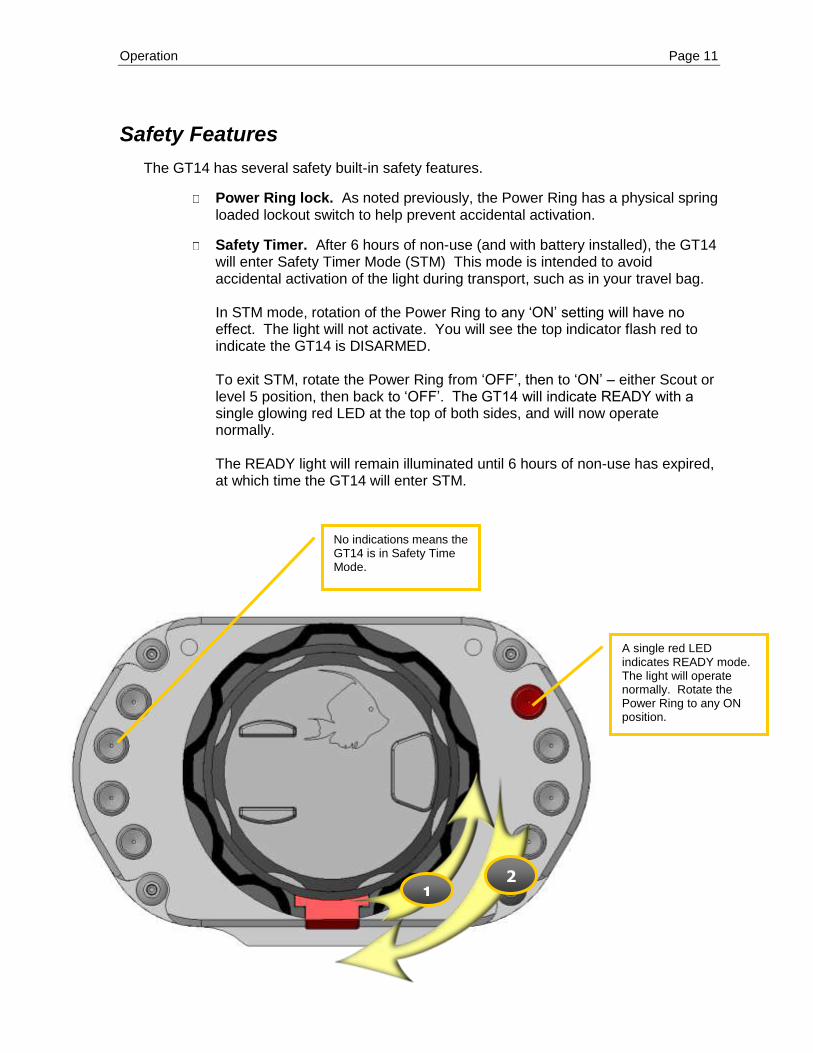
Safety Features
The GT14 has several safety built-in safety features.
Power Ring lock. As noted previously, the Power Ring has a physical spring loaded lockout switch to help prevent accidental activation.
Safety Timer. After 6 hours of non-use (and with battery installed), the GT14 will enter Safety Timer Mode (STM) This mode is intended to avoid accidental activation of the light during transport, such as in your travel bag. In STM mode, rotation of the Power Ring to any ‘ON’ setting will have no effect. The light will not activate. You will see the top indicator flash red to indicate the GT14 is DISARMED. To exit STM, rotate the Power Ring from ‘OFF’, then to ‘ON’ – either Scout or level 5 position, then back to ‘OFF’. The GT14 will indicate READY with a single glowing red LED at the top of both sides, and will now operate normally. The READY light will remain illuminated until 6 hours of non-use has expired, at which time the GT14 will enter STM.
No indications means the GT14 is in Safety Time Mode.
A single red LED indicates READY mode. The light will operate normally. Rotate the Power Ring to any ON position.
1 2
Operation Page 12
Thermal shutdown. The GT14 includes a thermal sensor that will disable the light if it gets too hot, such as inadvertent operation while out of the water. In this mode the Indicators will cascade WHITE from top to bottom repeatedly and the GT14 will not activate until it has cooled down.
Battery Insertion Lockout. If the GT14 Power Ring is rotated to any ‘ON’ position while inserting a battery, the light will not operate. The Power Ring must return to ‘OFF’ then back to ‘ON’ for proper operation. This mode is intended to avoid pointing the light in an unwanted direction (like at another person’s eyes) while inserting a new battery.
Operation Page 13
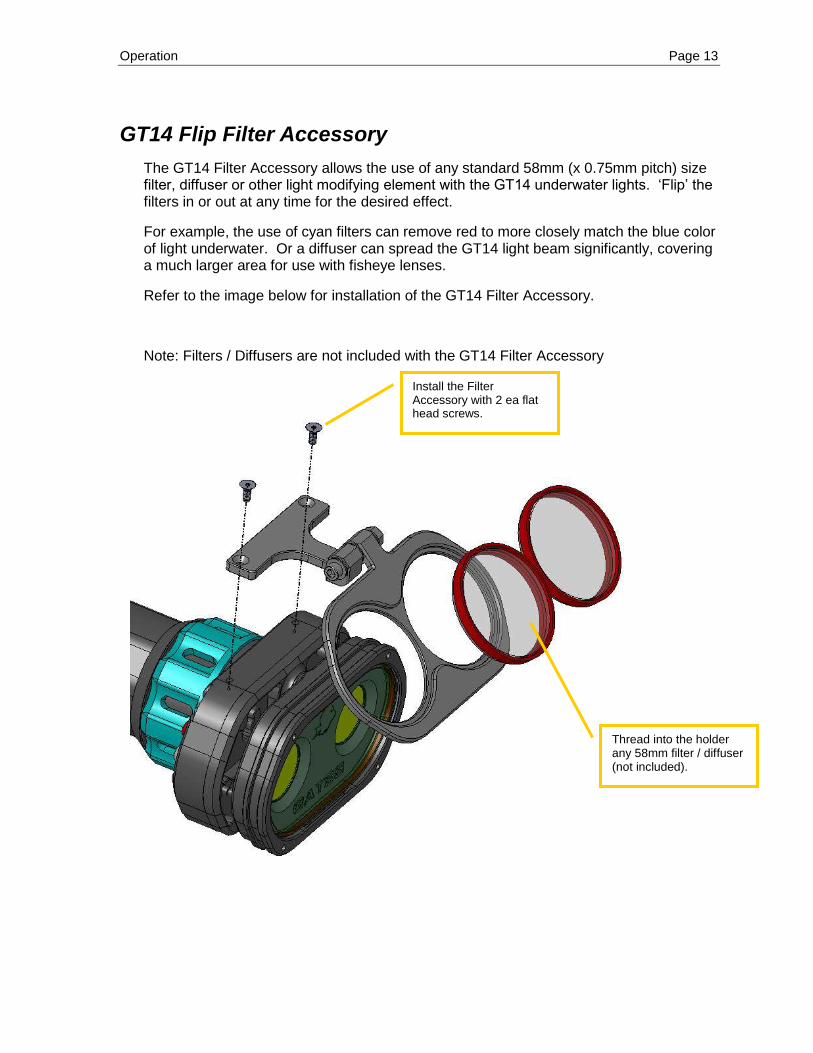
GT14 Flip Filter Accessory
The GT14 Filter Accessory allows the use of any standard 58mm (x 0.75mm pitch) size filter, diffuser or other light modifying element with the GT14 underwater lights. ‘Flip’ the filters in or out at any time for the desired effect.
For example, the use of cyan filters can remove red to more closely match the blue color of light underwater. Or a diffuser can spread the GT14 light beam significantly, covering a much larger area for use with fisheye lenses.
Refer to the image below for installation of the GT14 Filter Accessory.
Note: Filters / Diffusers are not included with the GT14 Filter Accessory
Install the Filter Accessory with 2 ea flat head screws.
Thread into the holder any 58mm filter / diffuser (not included).
Operation Page 14
Tips for Shooting Video with the GT14’s
Light Penetration.
Water is a great absorber of light. In just a few feet, red and yellow are the first to disappear, while blue and green are close behind. For this reason, light penetration through water – even very clear, tropical water – is remarkably limited. This is one reason to be as close to your subject as possible for maximum GT14 effectiveness. At night, video lights appear to work quite well because the GT14’s are not competing with sunlight, so will effectively penetrate further than daylight shooting. In this situation, you may find that ½ power is better than full power so your subjects are not ‘spooked’ nor do you attract mid-water critters (like segmented worms). Daytime shooting is different. The GT14’s are competing with sunlight and so will appear to penetrate substantially less than at night. Conventional use of lights during daylight hours is for ‘fill’ or foreground lighting. Practically speaking GT14’s will effectively light a foreground up to 4 feet away, perhaps even 6 feet on cloudy days. Caution: be sure to white balance your shots when using both GT14’s and daylight.
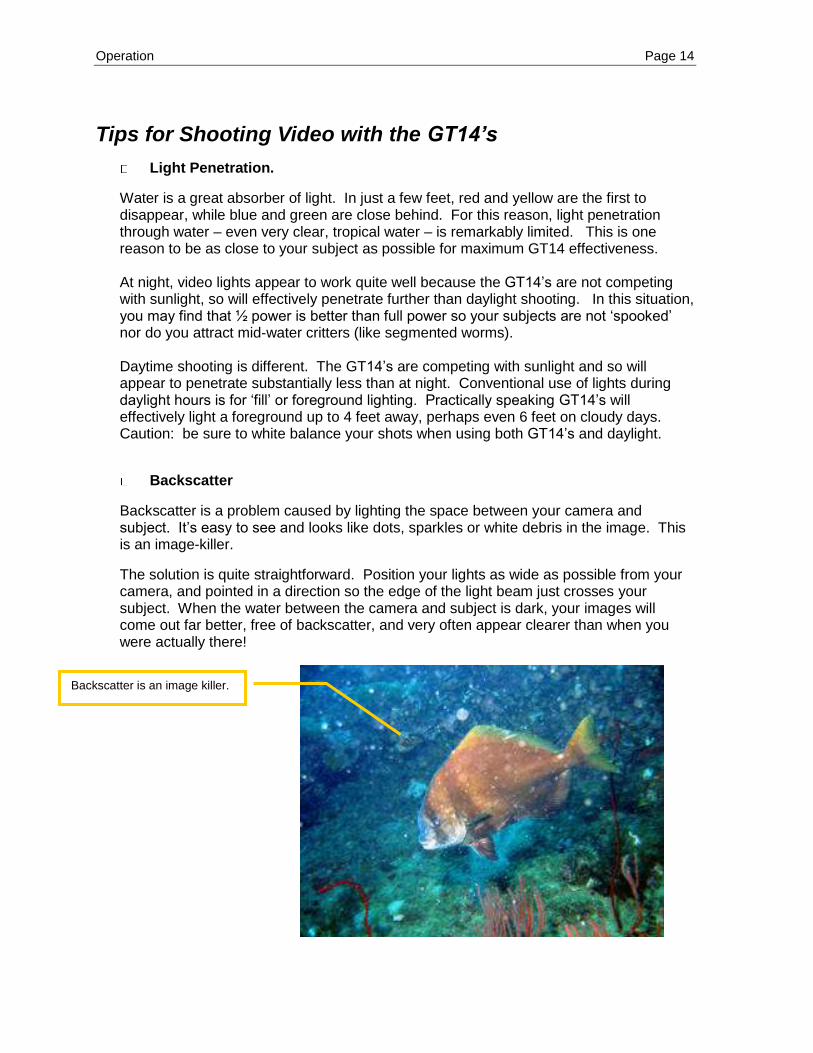
Backscatter
Backscatter is a problem caused by lighting the space between your camera and subject. It’s easy to see and looks like dots, sparkles or white debris in the image. This is an image-killer.
The solution is quite straightforward. Position your lights as wide as possible from your camera, and pointed in a direction so the edge of the light beam just crosses your subject. When the water between the camera and subject is dark, your images will come out far better, free of backscatter, and very often appear clearer than when you were actually there!
Backscatter is an image killer.
Operation Page 15
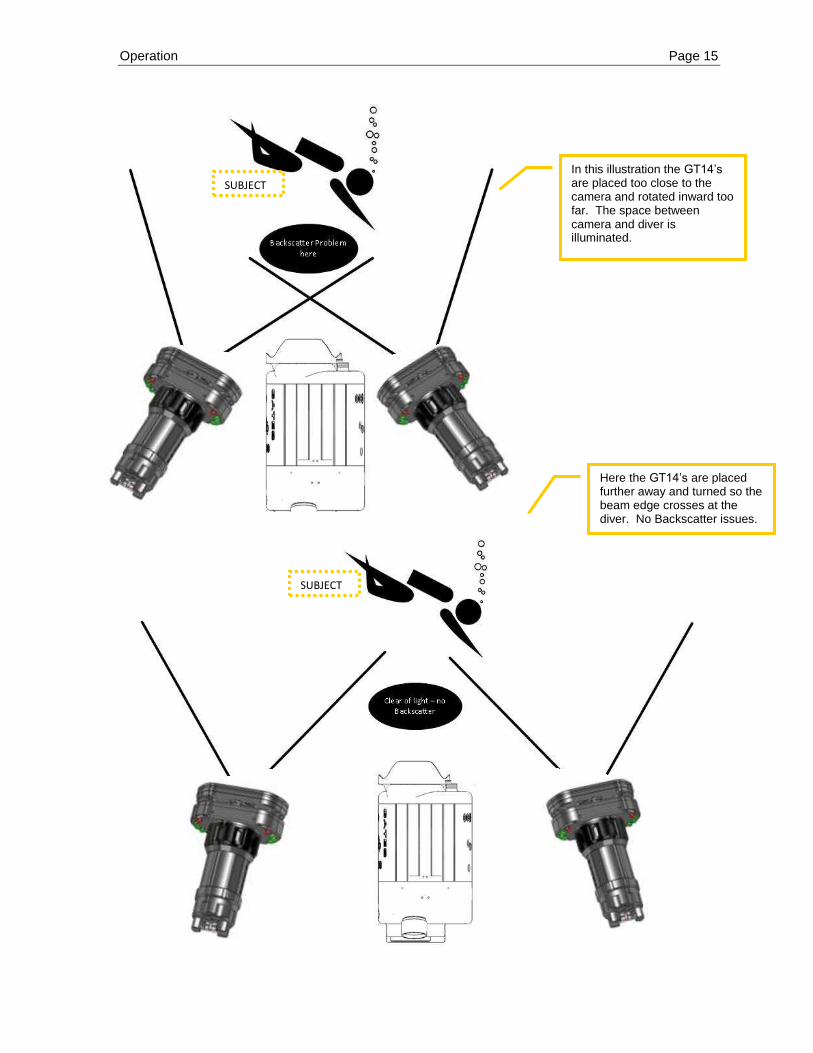
In this illustration the GT14’s are placed too close to the camera and rotated inward too far. The space between camera and diver is illuminated.
Here the GT14’s are placed further away and turned so the beam edge crosses at the diver. No Backscatter issues.
SUBJECT
SUBJECT
Operation Page 16
6: Safety Precautions
Batteries
GT14 Batteries utilize Lithium Ion (LiOn) cells and should be handled, transported and operated in accordance with the applicable laws and this guide. Use only the supplied charger for charging GT14 batteries. Use of any other charger may be hazardous.
Travel
Check with your airline and government security agency for current rules regarding travel with lithium batteries. The rules differ depending on country, but in general you can expect to travel with GT14 lights and spare batteries as carry-on lugguage.
For security inspection purposes, Gates recommends transporting batteries separate from GT14 light. In all cases, ensure the Power Ring is in the ‘OFF’ position.
For transport / shipment, contact the carrier for details.
In-Water Operation
The GT14’s may be momentarily switched ‘on’ for a few seconds in air to verify operation before entering the water.
GT14 Lights are designed for in-water use only. Do not operate in air as overheating, damage and other hazards such as fire may result.
Storage
When storing the GT14 Lights, you should follow these guidelines:
Discharge the battery to ~ 40% charge. If you must do so, start at 100% full charge, and discharge in water for 20 minutes at full power.
Remove the battery from the GT14 Light. Store in a cool, dry place.
Specifications Page 17
7: Specifications
* Power Level / Run Time * 5 Power Levels
* Full Power: 30 minute run time.
* Half Power: > 75 minutes
* Low Power (Scouting mode): > 10 hours
* Dimensions
* 5.2W x 3.3H x 8.4L in / 132W x 84H x 214L mm
* 5.3H in / 135 mm with Mount Ball
* Warranty
* 2 Years material / workmanship
* 1 year electronics
* 90 days batteries
* Light Output / CRI
* 14000 Lumens / 90 Color Rendition * Construction
* Machined Aluminum w/ Type III ‘hard’ anodize
& Nickel Acetate Seal. Stainless steel hardware.
* Weight
* Dry 3.1 lbs / 1.4kg
* Underwater 19 oz negative
* Effective Beam Angle
* 90° Actual Underwater
* Depth Rating * 450 feet / 137 meters
Customer Support Page 18
8: Customer Support
Should you have any questions about the GT14 Underwater Imaging Lights, please contact Gates.
Email: [email protected] Web: www.GatesHousings.com Phone: 858.391.0052 Fax: 858.391.0053