Embed Size (px)
Citation preview

GS2/GS3 Automatic Needle Seeder Owners Manual and Operating Guide
GS2 Needle Seeder
GS3 Needle Seeder© Seederman Seeders 2003
© Seederman Seeders 2003 - 1 -
GS2 and GS3 Owners Manual and Operating Guide
Table of Contents Introduction 2 Space, environment, and air requirements 3 Connecting the to air source 4 Leveling the machine 5 Attaching sowing kit 6 Checking the index length 7 Adjust height of sowing assembly 8 Inserting needles 9 Operation 10 - 11 Cleaning the needles 12 Setup & Operation of dibbling unit 13 Maintenance 14 - 15 Safety precautions 16 Note on Machine Parts 17 Contacts 17
© Seederman Seeders 2003 - 2 -
Introduction The GS2 and GS3 models are operated in the same fashion. The differences between the two are that a GS3 model is standard with a leg kit eliminating the need to place the machine on a table, and the GS3 is standard with a dibbling unit. The GS2 machine can accommodate a dibbling unit, and both machines can also be fitted with a Vermiculite dispenser and a watering bar. The GS2 and GS3 Automatic Needle Seeders were designed for the small greenhouse grower, but are also suitable in a larger growing environment. The speed at which these machines will sow varies greatly upon several factors including: size of tray, seed type, and operator. You should expect to sow UP TO 180 size 288 trays, or 120 size 512 trays per hour. This machine will accommodate plug trays from 50 to 512 cells. The operator can change the sowing kit from one plug tray to another in less than 5 minutes. Seederman has designed these popular machine in various sizes to meet growers demands for additional options (such as dibble bar, water bar, and vermiculite dispenser), and to allow for more trays across the table. Seederman offers a 1 year warranty on all parts (except needles).

© Seederman Seeders 2003 - 3 -
Space, environment and air requirements The GS2 Automatic Needle Seeder is designed as a table top model. The space requirements are as follows: Length = varies 4’ to 8’ Width = 24 inches Height = 28 inches Weight = approx 70 lbs for 4’ model A sturdy working table allowing at least 4 inches in excess of length and width is suggested to support this machine. The table should be able to withstand the weight of the machine and 3 filled trays at a minimum. The GS3 Automatic Needle Seeder was designed with sturdy extruded aluminum legs, leveling feet, and optional wheels. As these machines are manufactured using high grade aluminum it is perfectly capable of withstanding the hot and humid conditions of most greenhouses, however you should avoid running this machine in or under a water source. The GS2 and GS3 Automatic Needle Seeders were engineered to operate using only compressed air as its source of power. No electricity is required. This machine requires 60 psi at 5 cfm to operate all components.
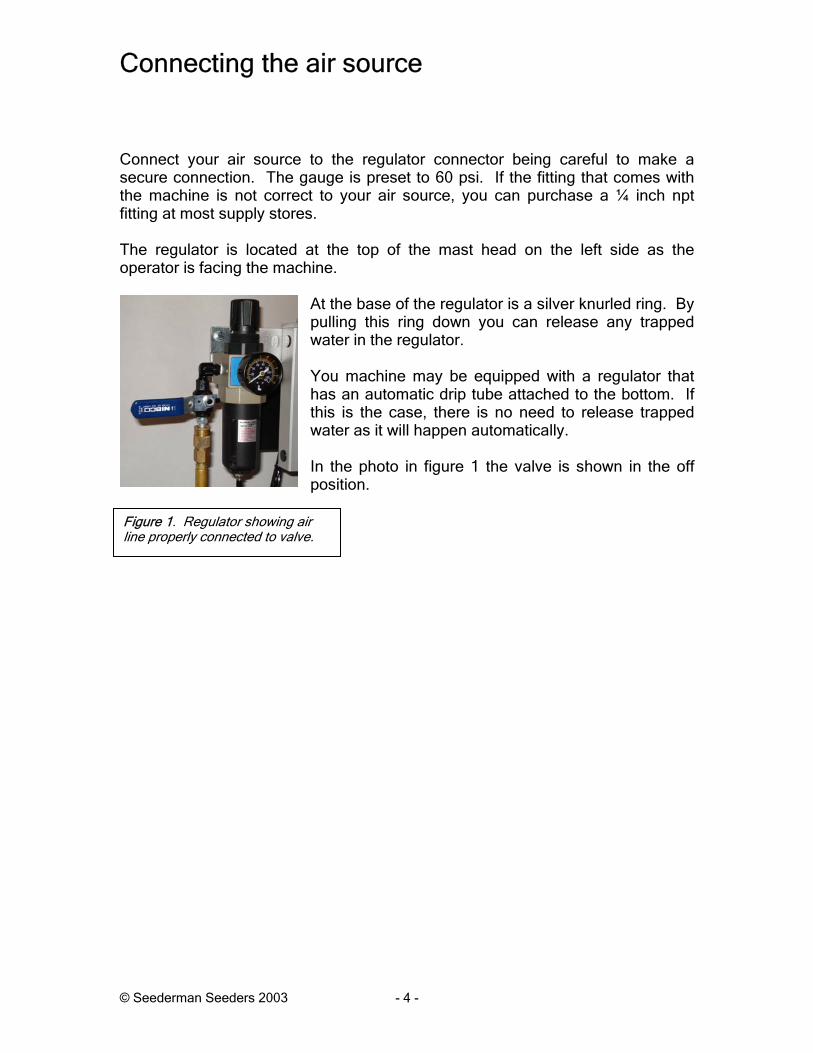
Connecting the air source Connect your air source to the regulator connector being careful to make a secure connection. The gauge is preset to 60 psi. If the fitting that comes with the machine is not correct to your air source, you can purchase a ¼ inch npt fitting at most supply stores. The regulator is located at the top of the mast head on the left side as the operator is facing the machine.
At the base of the regulator is a silver knurled ring. By pulling this ring down you can release any trapped water in the regulator. You machine may be equipped with a regulator that has an automatic drip tube attached to the bottom. If this is the case, there is no need to release trapped water as it will happen automatically. In the photo in figure 1 the valve is shown in the off position.
Figure 1. Regulator showing air line properly connected to valve.
© Seederman Seeders 2003 - 4 -
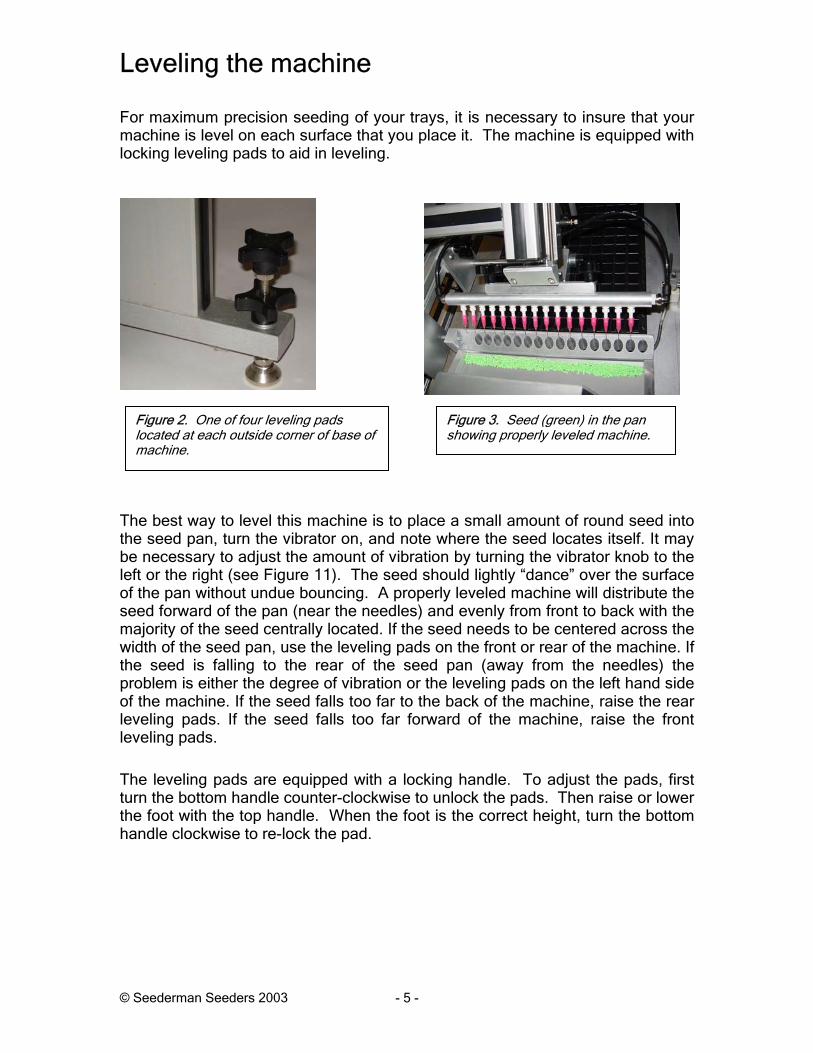
Leveling the machine For maximum precision seeding of your trays, it is necessary to insure that your machine is level on each surface that you place it. The machine is equipped with locking leveling pads to aid in leveling.
Figure 2. One of four leveling pads ocated at each outside corner of base omachine. l f
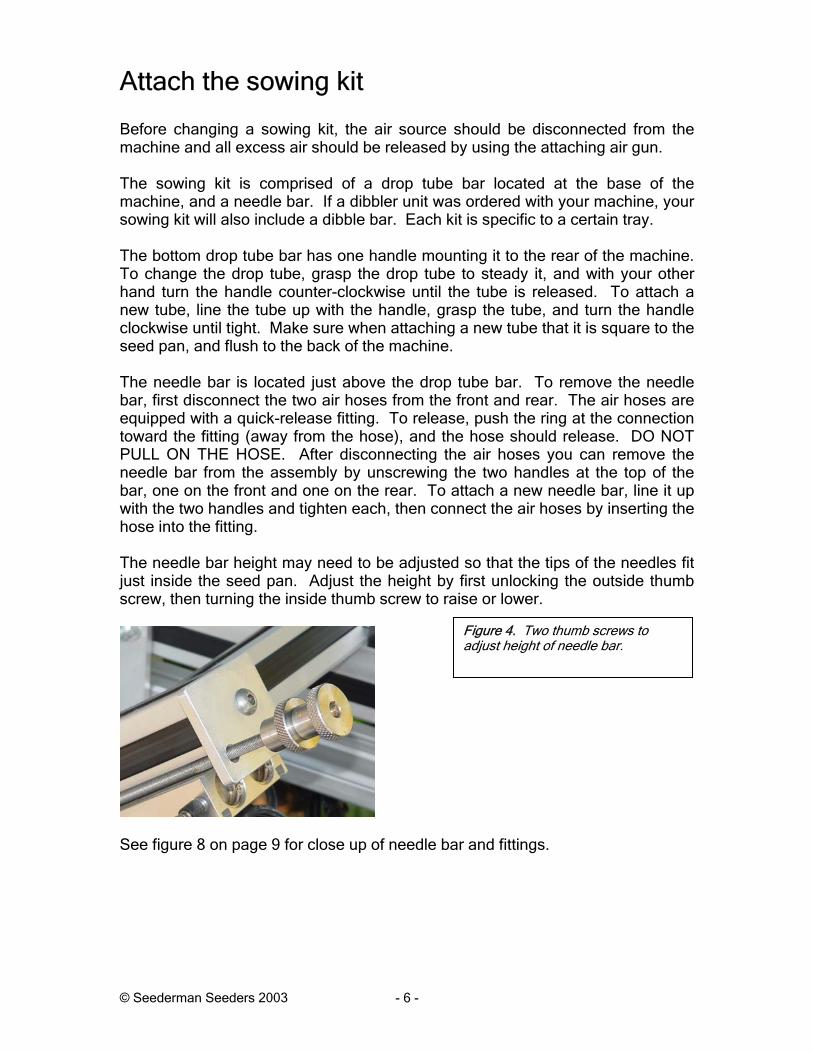
Figure 3. Seed (green) in the pan showing properly leveled machine.
The best way to level this machine is to place a small amount of round seed into the seed pan, turn the vibrator on, and note where the seed locates itself. It may be necessary to adjust the amount of vibration by turning the vibrator knob to the left or the right (see Figure 11). The seed should lightly “dance” over the surface of the pan without undue bouncing. A properly leveled machine will distribute the seed forward of the pan (near the needles) and evenly from front to back with the majority of the seed centrally located. If the seed needs to be centered across the width of the seed pan, use the leveling pads on the front or rear of the machine. If the seed is falling to the rear of the seed pan (away from the needles) the problem is either the degree of vibration or the leveling pads on the left hand side of the machine. If the seed falls too far to the back of the machine, raise the rear leveling pads. If the seed falls too far forward of the machine, raise the front leveling pads.
The leveling pads are equipped with a locking handle. To adjust the pads, first turn the bottom handle counter-clockwise to unlock the pads. Then raise or lower the foot with the top handle. When the foot is the correct height, turn the bottom handle clockwise to re-lock the pad.
© Seederman Seeders 2003 - 5 -
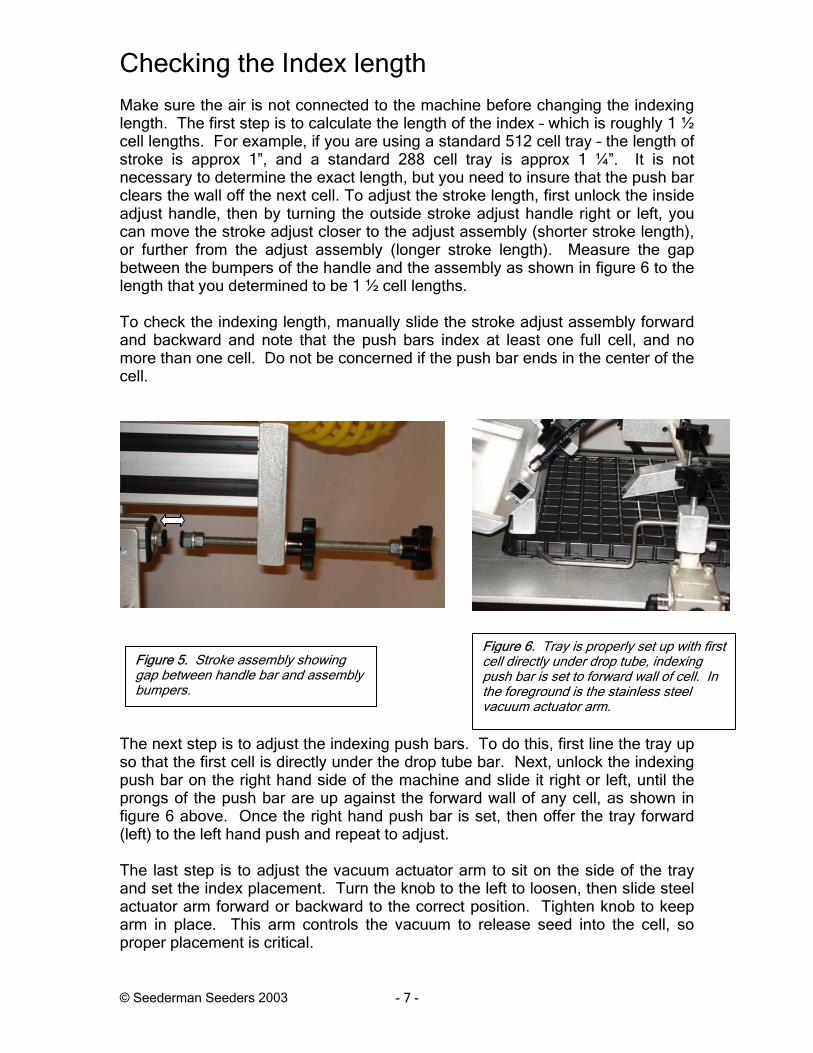
Attach the sowing kit Before changing a sowing kit, the air source should be disconnected from the machine and all excess air should be released by using the attaching air gun. The sowing kit is comprised of a drop tube bar located at the base of the machine, and a needle bar. If a dibbler unit was ordered with your machine, your sowing kit will also include a dibble bar. Each kit is specific to a certain tray. The bottom drop tube bar has one handle mounting it to the rear of the machine. To change the drop tube, grasp the drop tube to steady it, and with your other hand turn the handle counter-clockwise until the tube is released. To attach a new tube, line the tube up with the handle, grasp the tube, and turn the handle clockwise until tight. Make sure when attaching a new tube that it is square to the seed pan, and flush to the back of the machine. The needle bar is located just above the drop tube bar. To remove the needle bar, first disconnect the two air hoses from the front and rear. The air hoses are equipped with a quick-release fitting. To release, push the ring at the connection toward the fitting (away from the hose), and the hose should release. DO NOT PULL ON THE HOSE. After disconnecting the air hoses you can remove the needle bar from the assembly by unscrewing the two handles at the top of the bar, one on the front and one on the rear. To attach a new needle bar, line it up with the two handles and tighten each, then connect the air hoses by inserting the hose into the fitting. The needle bar height may need to be adjusted so that the tips of the needles fit just inside the seed pan. Adjust the height by first unlocking the outside thumb screw, then turning the inside thumb screw to raise or lower.
Figure 4. Two thumb screws to adjust height of needle bar.
See figure 8 on page 9 for close up of needle bar and fittings.
© Seederman Seeders 2003 - 6 -
Checking the Index length Make sure the air is not connected to the machine before changing the indexing length. The first step is to calculate the length of the index – which is roughly 1 ½ cell lengths. For example, if you are using a standard 512 cell tray – the length of stroke is approx 1”, and a standard 288 cell tray is approx 1 ¼”. It is not necessary to determine the exact length, but you need to insure that the push bar clears the wall off the next cell. To adjust the stroke length, first unlock the inside adjust handle, then by turning the outside stroke adjust handle right or left, you can move the stroke adjust closer to the adjust assembly (shorter stroke length), or further from the adjust assembly (longer stroke length). Measure the gap between the bumpers of the handle and the assembly as shown in figure 6 to the length that you determined to be 1 ½ cell lengths. To check the indexing length, manually slide the stroke adjust assembly forward and backward and note that the push bars index at least one full cell, and no more than one cell. Do not be concerned if the push bar ends in the center of the cell.
Figure 6. Tray is properly set up with first cell directly under drop tube, indexing push bar is set to forward wall of cell. In the foreg ound is the stainless steelvacuum actuator arm.
r
Figure 5. S oke assembltr y showing gap between handle bar and assembly bumpers.
The next step is to adjust the indexing push bars. To do this, first line the tray up so that the first cell is directly under the drop tube bar. Next, unlock the indexing push bar on the right hand side of the machine and slide it right or left, until the prongs of the push bar are up against the forward wall of any cell, as shown in figure 6 above. Once the right hand push bar is set, then offer the tray forward (left) to the left hand push and repeat to adjust. The last step is to adjust the vacuum actuator arm to sit on the side of the tray and set the index placement. Turn the knob to the left to loosen, then slide steel actuator arm forward or backward to the correct position. Tighten knob to keep arm in place. This arm controls the vacuum to release seed into the cell, so proper placement is critical. © Seederman Seeders 2003 - 7 -
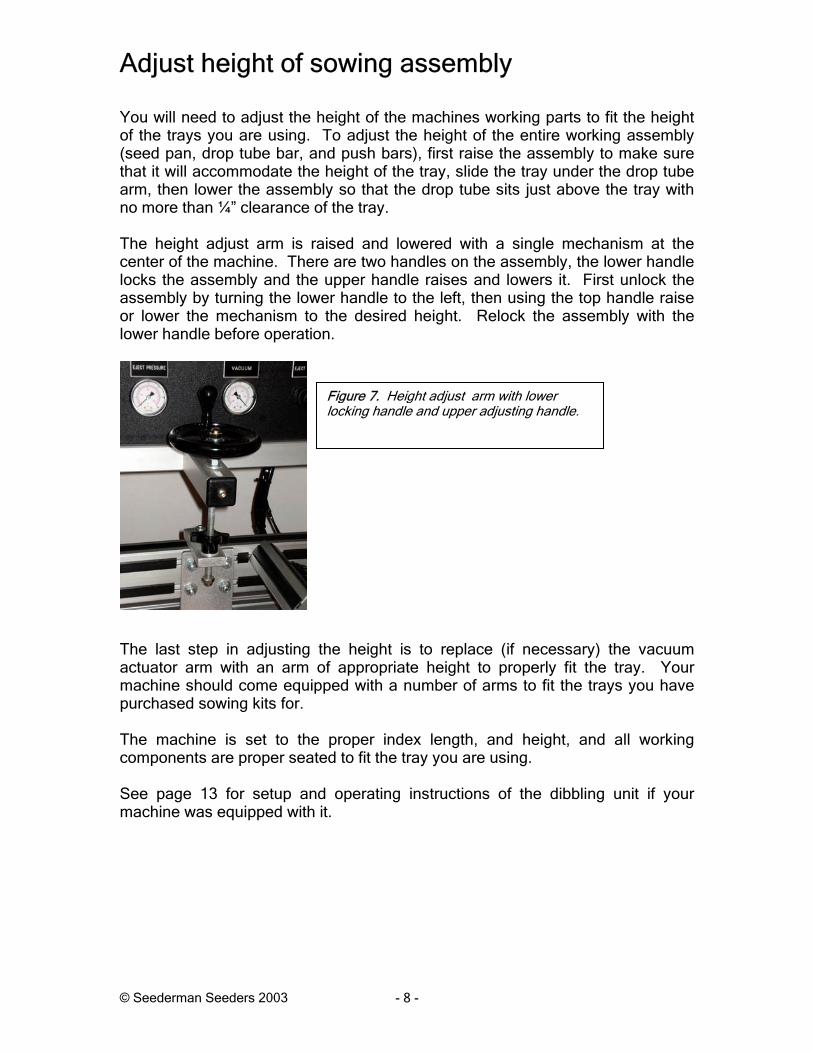
Adjust height of sowing assembly You will need to adjust the height of the machines working parts to fit the height of the trays you are using. To adjust the height of the entire working assembly (seed pan, drop tube bar, and push bars), first raise the assembly to make sure that it will accommodate the height of the tray, slide the tray under the drop tube arm, then lower the assembly so that the drop tube sits just above the tray with no more than ¼” clearance of the tray. The height adjust arm is raised and lowered with a single mechanism at the center of the machine. There are two handles on the assembly, the lower handle locks the assembly and the upper handle raises and lowers it. First unlock the assembly by turning the lower handle to the left, then using the top handle raise or lower the mechanism to the desired height. Relock the assembly with the lower handle before operation.
Figure 7. Height adjust arm with lower ocking handle and upper adjusting handle. l
The last step in adjusting the height is to replace (if necessary) the vacuum actuator arm with an arm of appropriate height to properly fit the tray. Your machine should come equipped with a number of arms to fit the trays you have purchased sowing kits for. The machine is set to the proper index length, and height, and all working components are proper seated to fit the tray you are using. See page 13 for setup and operating instructions of the dibbling unit if your machine was equipped with it.
© Seederman Seeders 2003 - 8 -
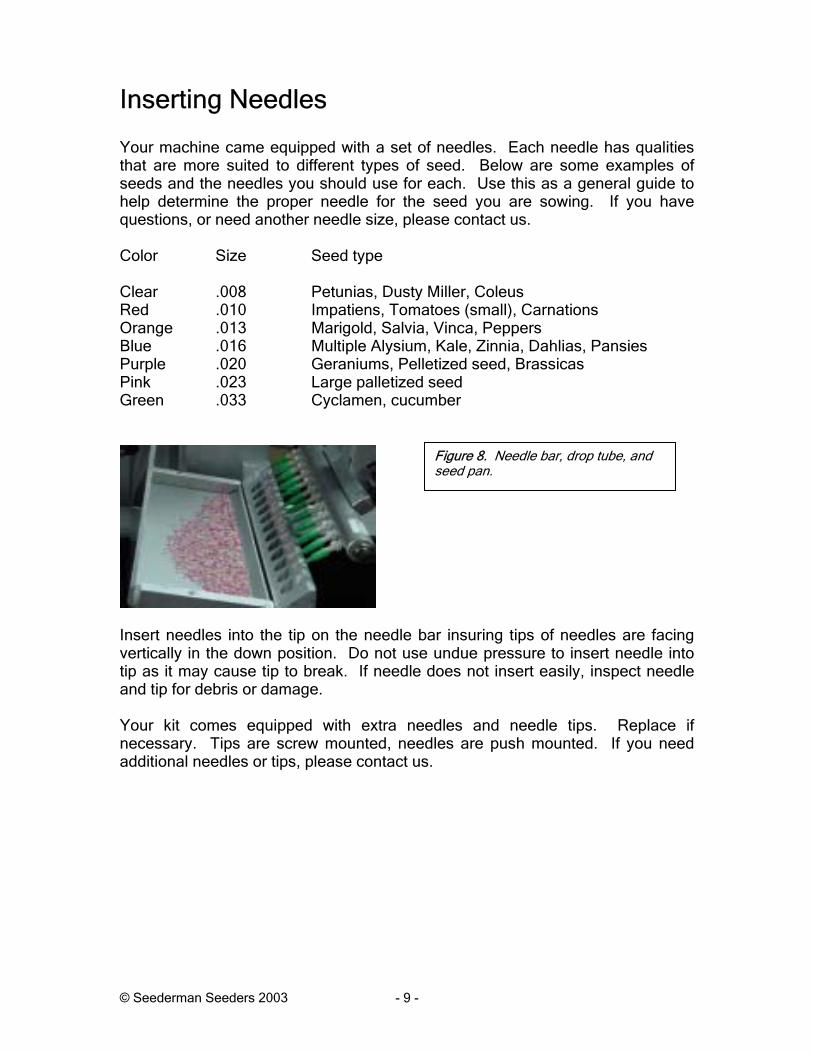
Inserting Needles Your machine came equipped with a set of needles. Each needle has qualities that are more suited to different types of seed. Below are some examples of seeds and the needles you should use for each. Use this as a general guide to help determine the proper needle for the seed you are sowing. If you have questions, or need another needle size, please contact us. Color Size Seed type Clear .008 Petunias, Dusty Miller, Coleus Red .010 Impatiens, Tomatoes (small), Carnations Orange .013 Marigold, Salvia, Vinca, Peppers Blue .016 Multiple Alysium, Kale, Zinnia, Dahlias, Pansies Purple .020 Geraniums, Pelletized seed, Brassicas Pink .023 Large palletized seed Green .033 Cyclamen, cucumber
Figure 8. Needle bar, drop tube, a nd seed pan.
Insert needles into the tip on the needle bar insuring tips of needles are facing vertically in the down position. Do not use undue pressure to insert needle into tip as it may cause tip to break. If needle does not insert easily, inspect needle and tip for debris or damage. Your kit comes equipped with extra needles and needle tips. Replace if necessary. Tips are screw mounted, needles are push mounted. If you need additional needles or tips, please contact us.
© Seederman Seeders 2003 - 9 -
Operating the Machine Before beginning operation, complete the following check list.
The machine is in the OFF position. Seed is in the pan and the machine has been leveled. The correct sowing kit has been attached. The correct needles have been inserted to match the cells. The rails have been adjusted to the correct width for the tray. The indexing has been adjusted to the correct length. Air is connected to the machine.
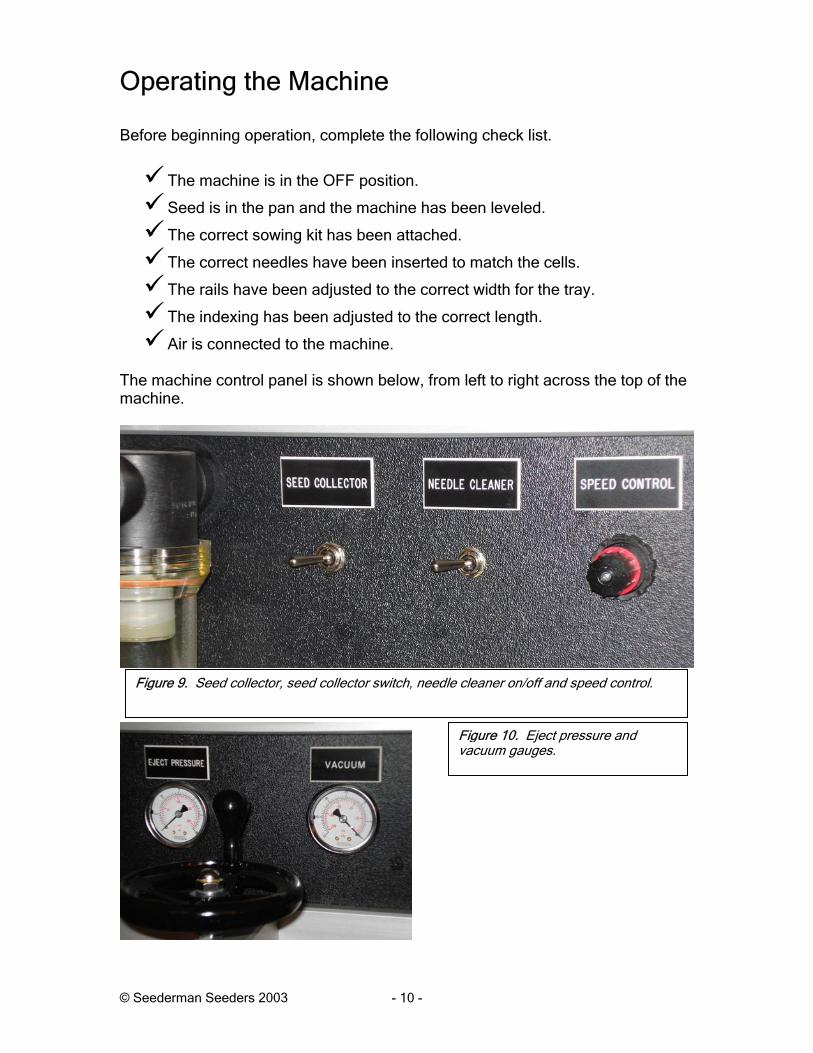
The machine control panel is shown below, from left to right across the top of the machine.
Figure 9. Seed collector, seed collector switch, needle cleaner on/off and speed control.
Figure 10. Eject pressure and vacuum gauges.
© Seederman Seeders 2003 - 10 -
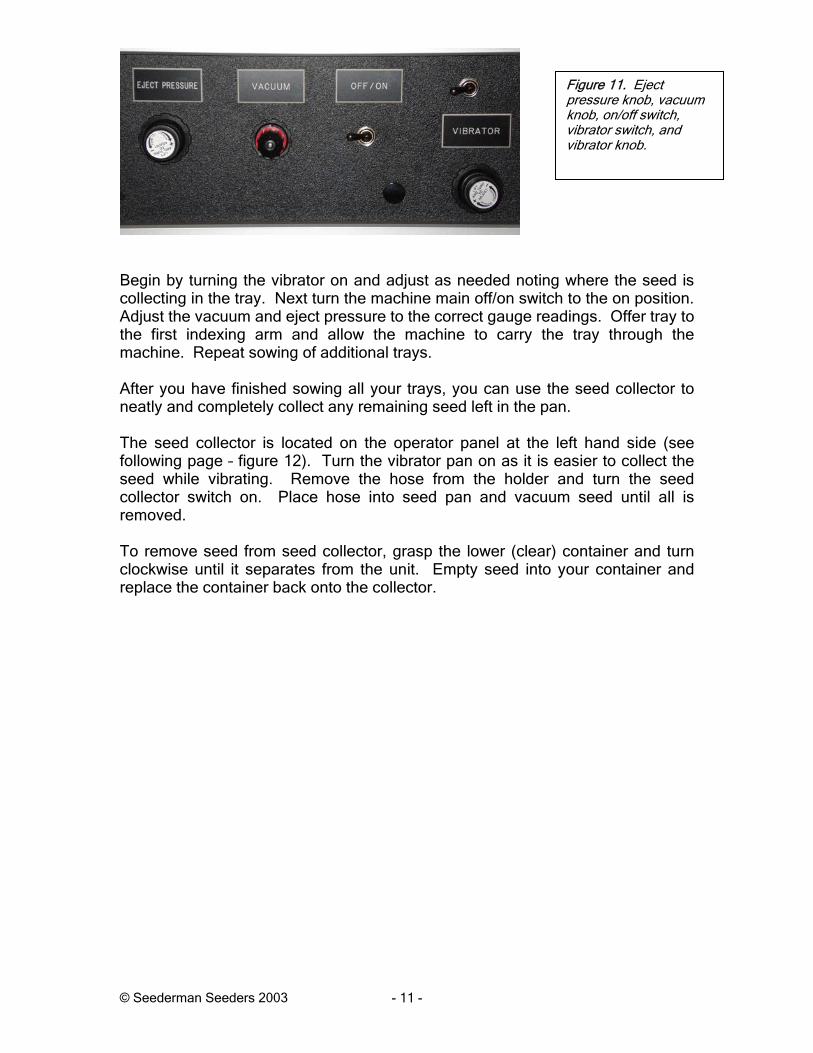
Figure 11. Eject p essure knob, vacuumknob, on/off switch, vibrator swi ch, and vibrator knob.
r
t
Begin by turning the vibrator on and adjust as needed noting where the seed is collecting in the tray. Next turn the machine main off/on switch to the on position. Adjust the vacuum and eject pressure to the correct gauge readings. Offer tray to the first indexing arm and allow the machine to carry the tray through the machine. Repeat sowing of additional trays. After you have finished sowing all your trays, you can use the seed collector to neatly and completely collect any remaining seed left in the pan. The seed collector is located on the operator panel at the left hand side (see following page – figure 12). Turn the vibrator pan on as it is easier to collect the seed while vibrating. Remove the hose from the holder and turn the seed collector switch on. Place hose into seed pan and vacuum seed until all is removed. To remove seed from seed collector, grasp the lower (clear) container and turn clockwise until it separates from the unit. Empty seed into your container and replace the container back onto the collector.
© Seederman Seeders 2003 - 11 -
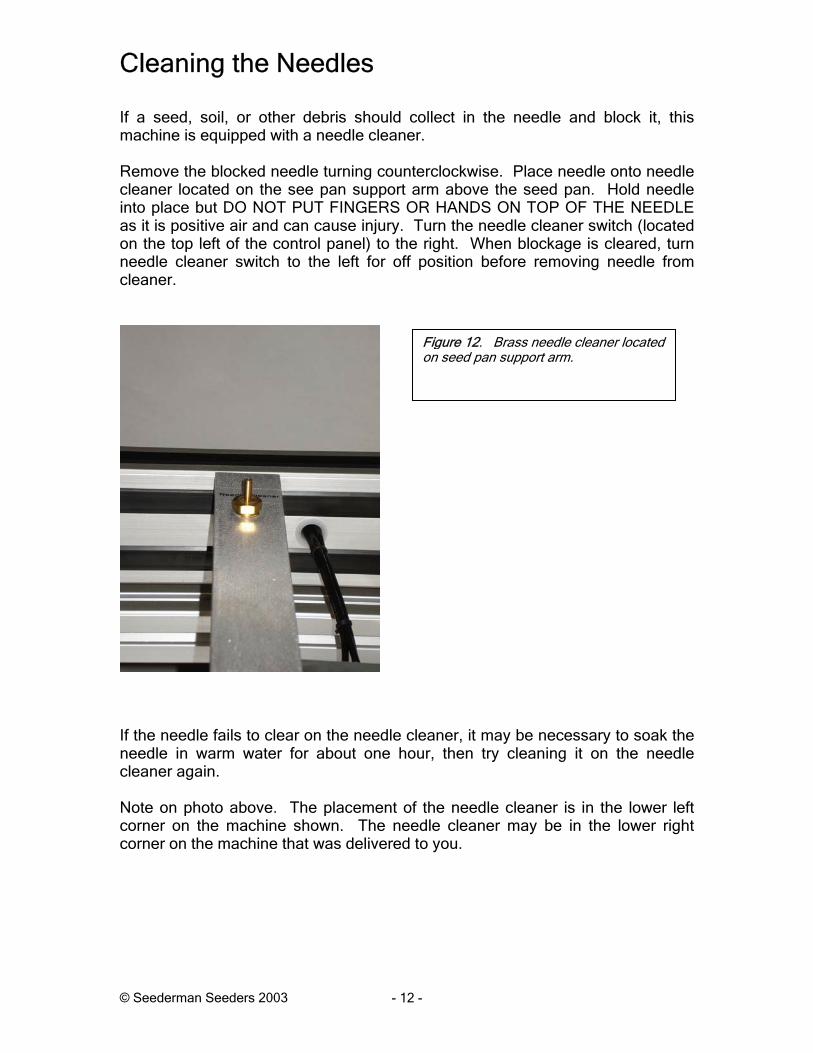
Cleaning the Needles If a seed, soil, or other debris should collect in the needle and block it, this machine is equipped with a needle cleaner. Remove the blocked needle turning counterclockwise. Place needle onto needle cleaner located on the see pan support arm above the seed pan. Hold needle into place but DO NOT PUT FINGERS OR HANDS ON TOP OF THE NEEDLE as it is positive air and can cause injury. Turn the needle cleaner switch (located on the top left of the control panel) to the right. When blockage is cleared, turn needle cleaner switch to the left for off position before removing needle from cleaner.
Figure 12. Brass needle cleaner located on seed pan support arm.
If the needle fails to clear on the needle cleaner, it may be necessary to soak the needle in warm water for about one hour, then try cleaning it on the needle cleaner again. Note on photo above. The placement of the needle cleaner is in the lower left corner on the machine shown. The needle cleaner may be in the lower right corner on the machine that was delivered to you.
© Seederman Seeders 2003 - 12 -
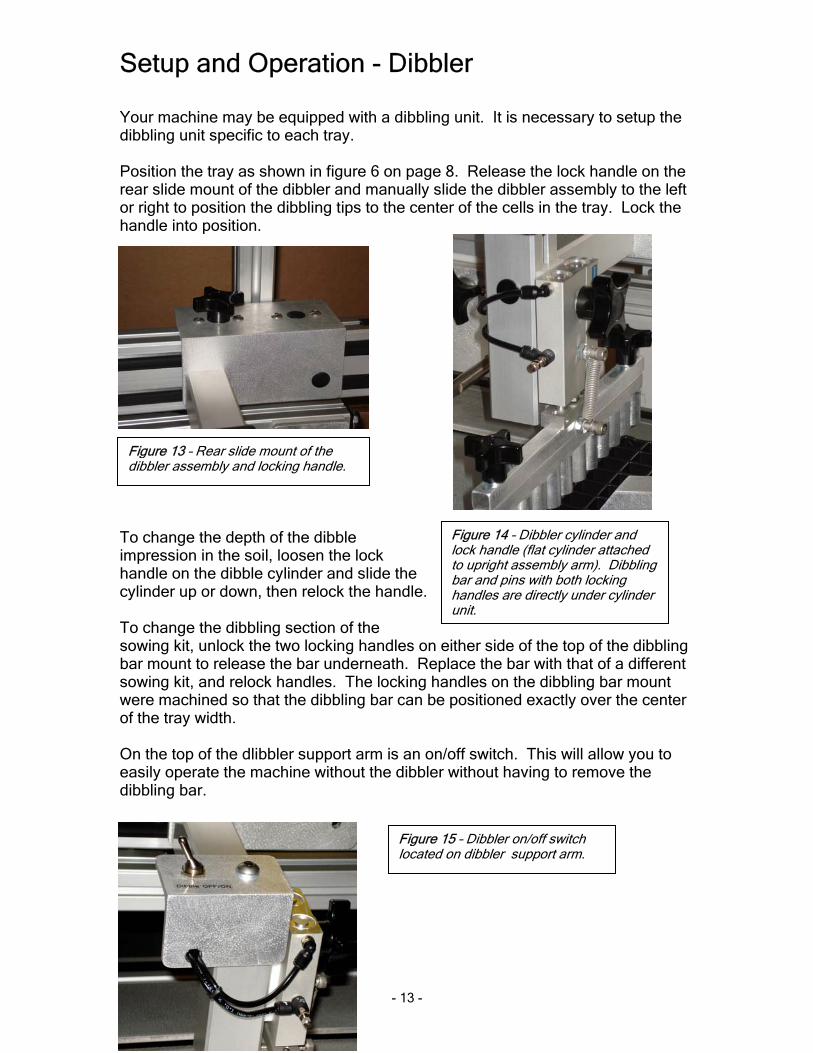
Setup and Operation - Dibbler Your machine may be equipped with a dibbling unit. It is necessary to setup the dibbling unit specific to each tray. Position the tray as shown in figure 6 on page 8. Release the lock handle on the rear slide mount of the dibbler and manually slide the dibbler assembly to the left or right to position the dibbling tips to the center of the cells in the tray. Lock the handle into position.
© Seederman Seeders 2003 - 13 -
Figure 13 – Rear slide mount of the dibbler assembly and locking handle.
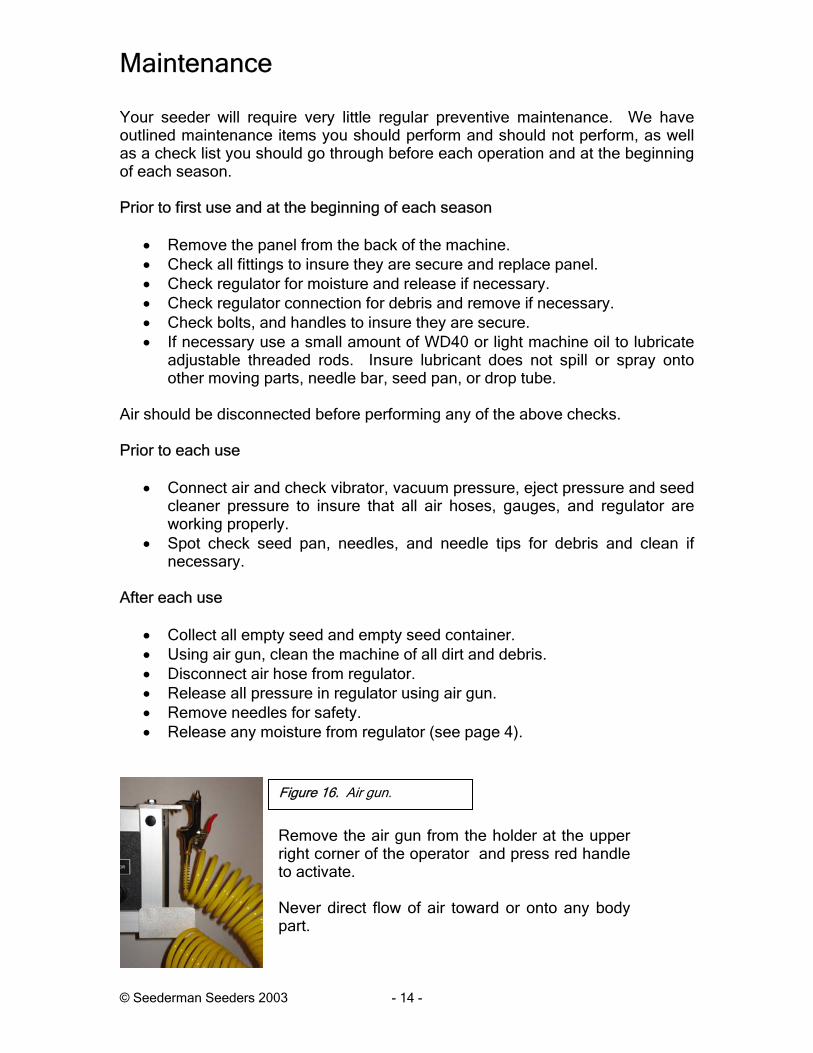
To change the depth of the dibble impression in the soil, loosen the lock handle on the dibble cylinder and slide the cylinder up or down, then relock the handle. To change the dibbling section of the sowing kit, unlock the two locking handles on either side of the top of the dibbling bar mount to release the bar underneath. Replace the bar with that of a different sowing kit, and relock handles. The locking handles on the dibbling bar mount were machined so that the dibbling bar can be positioned exactly over the center of the tray width.
Figure 14 – Dibbler cylinder and lock handle (flat cylinder attachedto upright assembly arm). Dibbling bar and pins with both locking handles are d rectly under cylinder unit.
i
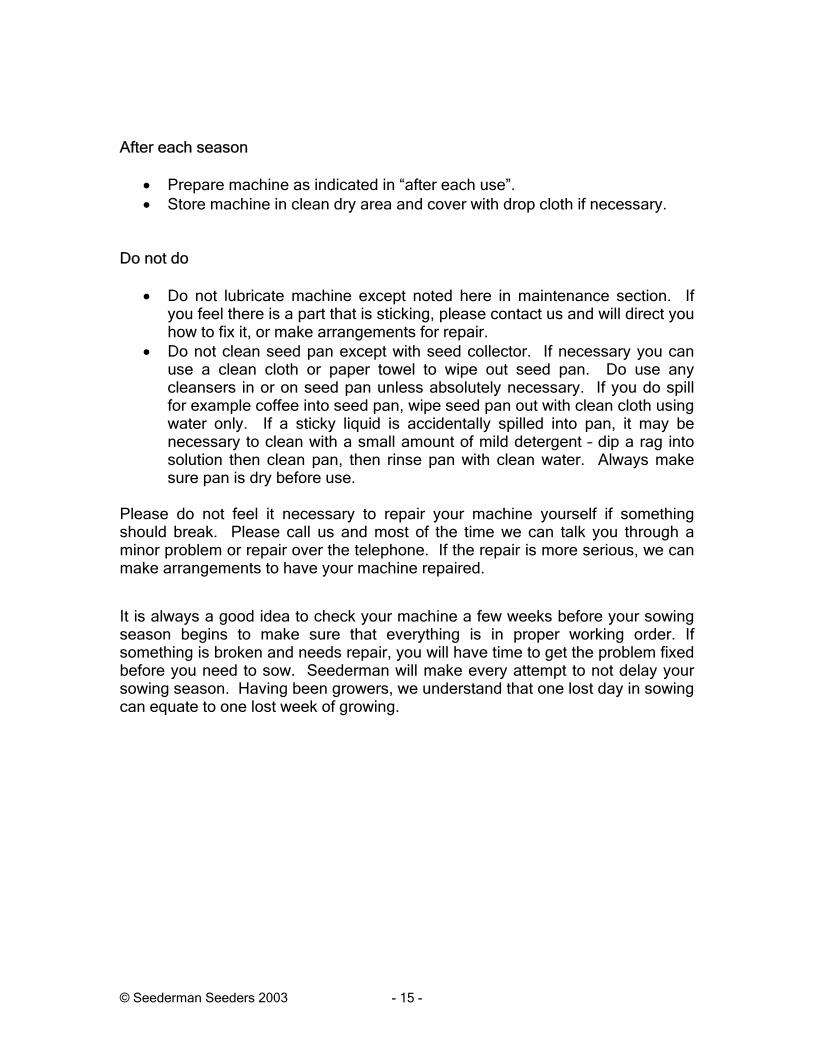
On the top of the dlibbler support arm is an on/off switch. This will allow you to easily operate the machine without the dibbler without having to remove the dibbling bar.
Figure 15 – tl
Dibbler on/off swi ch ocated on dibbler support arm.
Maintenance Your seeder will require very little regular preventive maintenance. We have outlined maintenance items you should perform and should not perform, as well as a check list you should go through before each operation and at the beginning of each season. Prior to first use and at the beginning of each season
• Remove the panel from the back of the machine. • Check all fittings to insure they are secure and replace panel. • Check regulator for moisture and release if necessary. • Check regulator connection for debris and remove if necessary. • Check bolts, and handles to insure they are secure. • If necessary use a small amount of WD40 or light machine oil to lubricate
adjustable threaded rods. Insure lubricant does not spill or spray onto other moving parts, needle bar, seed pan, or drop tube.
Air should be disconnected before performing any of the above checks. Prior to each use
• Connect air and check vibrator, vacuum pressure, eject pressure and seed cleaner pressure to insure that all air hoses, gauges, and regulator are working properly.
• Spot check seed pan, needles, and needle tips for debris and clean if necessary.
After each use
• Collect all empty seed and empty seed container. • Using air gun, clean the machine of all dirt and debris. • Disconnect air hose from regulator. • Release all pressure in regulator using air gun. • Remove needles for safety. • Release any moisture from regulator (see page 4).
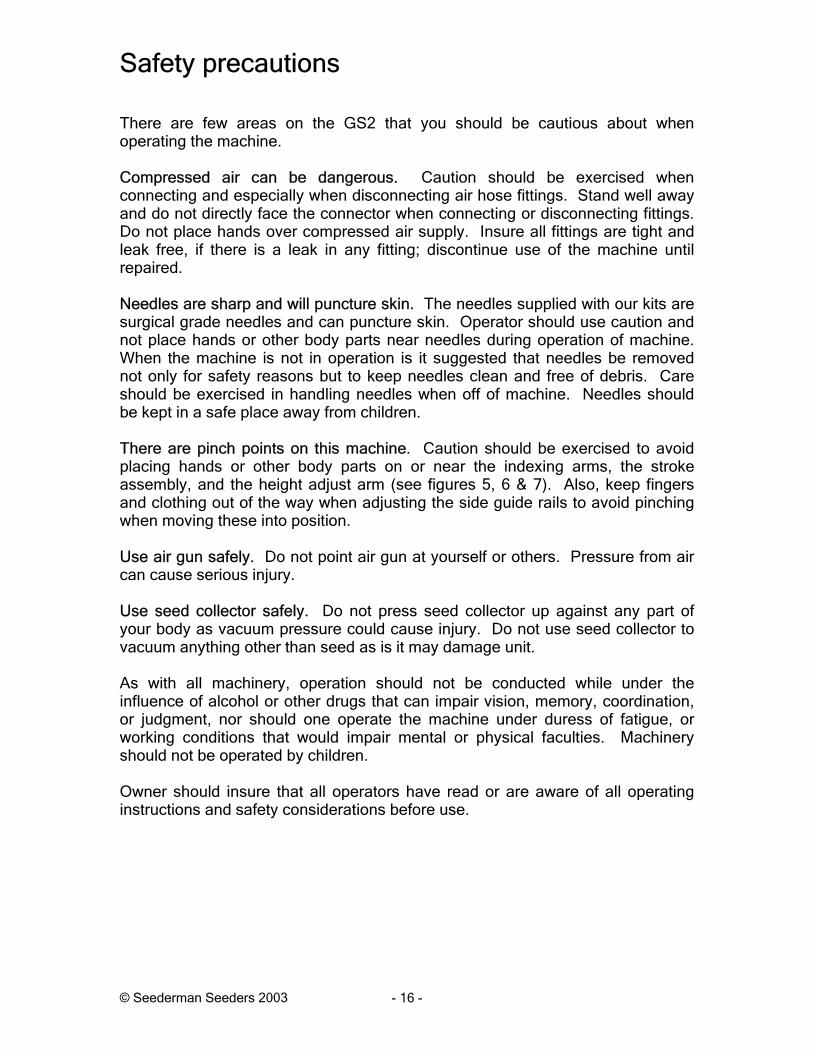
Remove the air gun from the holder at the upper right corner of the operator and press red handle to activate. Never direct flow of air toward or onto any body part.
Figure 16. Air gun.
© Seederman Seeders 2003 - 14 -
After each season
• Prepare machine as indicated in “after each use”. • Store machine in clean dry area and cover with drop cloth if necessary.
Do not do
• Do not lubricate machine except noted here in maintenance section. If you feel there is a part that is sticking, please contact us and will direct you how to fix it, or make arrangements for repair.
• Do not clean seed pan except with seed collector. If necessary you can use a clean cloth or paper towel to wipe out seed pan. Do use any cleansers in or on seed pan unless absolutely necessary. If you do spill for example coffee into seed pan, wipe seed pan out with clean cloth using water only. If a sticky liquid is accidentally spilled into pan, it may be necessary to clean with a small amount of mild detergent – dip a rag into solution then clean pan, then rinse pan with clean water. Always make sure pan is dry before use.
Please do not feel it necessary to repair your machine yourself if something should break. Please call us and most of the time we can talk you through a minor problem or repair over the telephone. If the repair is more serious, we can make arrangements to have your machine repaired.
It is always a good idea to check your machine a few weeks before your sowing season begins to make sure that everything is in proper working order. If something is broken and needs repair, you will have time to get the problem fixed before you need to sow. Seederman will make every attempt to not delay your sowing season. Having been growers, we understand that one lost day in sowing can equate to one lost week of growing.
© Seederman Seeders 2003 - 15 -
© Seederman Seeders 2003 - 16 -
Safety precautions There are few areas on the GS2 that you should be cautious about when operating the machine. Compressed air can be dangerous. Caution should be exercised when connecting and especially when disconnecting air hose fittings. Stand well away and do not directly face the connector when connecting or disconnecting fittings. Do not place hands over compressed air supply. Insure all fittings are tight and leak free, if there is a leak in any fitting; discontinue use of the machine until repaired. Needles are sharp and will puncture skin. The needles supplied with our kits are surgical grade needles and can puncture skin. Operator should use caution and not place hands or other body parts near needles during operation of machine. When the machine is not in operation is it suggested that needles be removed not only for safety reasons but to keep needles clean and free of debris. Care should be exercised in handling needles when off of machine. Needles should be kept in a safe place away from children. There are pinch points on this machine. Caution should be exercised to avoid placing hands or other body parts on or near the indexing arms, the stroke assembly, and the height adjust arm (see figures 5, 6 & 7). Also, keep fingers and clothing out of the way when adjusting the side guide rails to avoid pinching when moving these into position. Use air gun safely. Do not point air gun at yourself or others. Pressure from air can cause serious injury. Use seed collector safely. Do not press seed collector up against any part of your body as vacuum pressure could cause injury. Do not use seed collector to vacuum anything other than seed as is it may damage unit. As with all machinery, operation should not be conducted while under the influence of alcohol or other drugs that can impair vision, memory, coordination, or judgment, nor should one operate the machine under duress of fatigue, or working conditions that would impair mental or physical faculties. Machinery should not be operated by children. Owner should insure that all operators have read or are aware of all operating instructions and safety considerations before use.

© Seederman Seeders 2003 - 17 -
Note on Machine Parts Due to availability of parts, and changes in design, not all parts listed or shown may be the same as delivered on your machine.
Contact Should you need any assistance, or have any questions about your Seederman seeder, please contact us. Additionally, we are interested in hearing from you regarding the use and operation of your machine. Seederman is always striving to perfect our machines. Write us Seederman Seeders PO Box 93 Braceville, IL 60407 E-mail us [email protected]@seederman.com Telephone us 815-370-5075 Fax us 815-237-0423


![CCHAPTERHAPTER INSTALLATION WIRING · GS2-20P5, GS2-21P0, GS2-22P0, GS2-41P0, GS2-42P0, GS2-43P0, GS2-51P0, GS2-52P0, GS2-53P0 Units: mm [inches] GS2 Series AC Drive User Manual 2–5](https://img.pdfslide.us/doc/110x75/5e9f219cb4bfbb48920bd3b3/cchapterhapter-installation-wiring-gs2-20p5-gs2-21p0-gs2-22p0-gs2-41p0-gs2-42p0.jpg)
![GS3 Weekly [9 14 Mar 2015] [The Undercover group ...forumias.com/portal/wp-content/uploads/2015/03/GS3-Weekly-9th-14th... · GS3 Weekly [9th – 14th Mar 2015] ... functioning, limitations,](https://img.pdfslide.us/doc/110x75/5aea4f827f8b9ae5318c47af/gs3-weekly-9-14-mar-2015-the-undercover-group-weekly-9th-14th-mar-2015.jpg)


![GS3 Weekly [2 7 Mar 2015] [The Undercover group ...forumias.com/portal/wp-content/uploads/2015/03/GS3-Weekly-2nd-7th... · GS3 Weekly [2nd – 7th Mar 2015] [The ... such case it](https://img.pdfslide.us/doc/110x75/5b09e21c7f8b9a604c8b9204/gs3-weekly-2-7-mar-2015-the-undercover-group-weekly-2nd-7th-mar-2015.jpg)