Embed Size (px)
Citation preview

GuideGrout Troubleshooting

TABLE OF CONTENTS
Cement Grout Symptom1-2 Grout discoloration3 Efflorescence4 Tile discoloration5 Grout cracking6 Grout with pinholes6 Powdery grout in the joints
Ready-to-Use (RTU) Grout Symptom7-8 Grout discoloration9 Efflorescence9 Tile discoloration10 Grout not curing11 Grout with pinholes11 Grout cracking
Epoxy Grouts Symptom12-13 Grout discoloration13 Efflorescence14 Tile discoloration15 Grout with pinholes16 Grout cracking
18-19 UltraCare Quick-reference guide
Other20 MAPEI Technical Institute

1
Sources Solutions
The mixing water and/or the wash water used to clean had a high content of iron or other minerals.
Use potable water, or use MAPEI’s UltraCareTM Grout Maximizer grout admixture.
Jobsite conditions – such as direct sun exposure, hot ambient or tile temperatures, or too much area being grouted at a time before initiating the cleanup process.
Protect tilework from direct sunlight during application, and always apply within the temperature ranges of the current Technical Data Sheet (TDS). Grout small areas of between 30 to 40 sq. ft. (2,79 to 3,72 m2) at a time, so that cleaning can begin before the grout skins over and dries on the tile surface.
The grout color was not what was desired. Use MAPEI’s UltraCare Grout RefreshTM Pre-Cleaner and UltraCare Grout Refresh to re-color and seal the joints at the same time.
Water was added to the grout powder instead of the powder being added to water.
Always add the grout powder to water for best results. This ensures proper dispersion of the grout and produces a more uniform consistency.
Too much water in the grout will cause pigment “washout,” performance issues and a lighter-than-desired color. Too little water can lead to performance issues like powdery grout and shading (variable shades in the grout color).
Closely follow the mixing ratios found on the product label and TDS.
The grout mix was not thoroughly dispersed. Follow recommended product mixing times on the product label and TDS. These mixing times will vary depending upon the type of cement grout (sanded, unsanded, rapid-set).
Grout was not allowed to slake (sit) after initial mixing.
Follow the recommended slake time on the product label and TDS.
After slaking, remixing was performed too early, too late or not at all.
After slaking, always remix the grout before beginning to use it.
Due to tile-spacing lugs left in the grout joints, variable depths of the joints caused shading.
Grout a test area to determine the impact of the tile-spacing lugs on the grout color. Either use UltraCare Grout Release, or wet the tile surface with clean water.
The varying density and porosity of the tile and natural stone caused the grout to dry blotchy and to shade.
Either wet with UltraCare Grout Release, removing the temporary coating that is formed, or wet with water.
Grout joints were wiped excessively during the initial cleaning process.
On certain rough glazed or textured tile surfaces, there is a tendency to use excessive force to remove grout haze. Use UltraCare Grout Release to minimize the need for excessive wiping during cleaning.
The grout powder was not dry-blended before adding water or admixture.
Dry-blend the powder before adding water or admixture. This is especially important when you have more than one bag of product; the bags could potentially be from different production runs or manufacturing plants, and have a slight color variation between batches.
Cement Grout Symptom Grout discoloration
A non-uniform, blotchy, shaded or dirty appearance of the grout joint that can manifest from a number of different sources
Grout discoloration

2
A non-uniform, blotchy, shaded or dirty appearance of the grout joint that can manifest from a number of different sources
Sources Solutions
Grout cleaning was completed too early or too late after floating the grout into the joints.
There are differences in recommended wash (cleaning) times, depending upon what cement grout is used – for example, some grouts are rapid-set. Typically, cleaning is allowed between 15 to 30 minutes after grouting, or when there is no longer a transfer of grout to your finger. Check the product label and/or TDS to confirm the time before cleaning.
Too much water was used during the cleaning process.
Use a slightly moist sponge where water does not drip out. Follow recommended product application procedures on the product label and TDS.
A sealer was applied prematurely after grouting. Wait 48 hours after grouting before applying a sealer. Follow recommended product application procedures on the product label and TDS. Refer to the UltraCare Quick-reference guide for sealer recommendations.
The grout’s shelf life expired. Reference the product shelf life on the TDS. Dispose of the grout if the shelf life has expired.
The tile-setting material was not properly cured before grouting.
Ensure that the tile-setting material is fully cured before grouting.
There was excessive tile-setting material in the grout joint.
Remove dried residue from the grout joints, ensuring that at least 2/3 of the joint depth is left available for grouting.
There were inconsistent grout joint depths and gap widths.
Use tile spacers to ensure proper color/appearance consistency.
Variable glazed on the tile edges caused the grout to dry/cure at different times and lead to shading.
Use tile that has a uniform glaze coat on the edges.
The concrete slab was not fully cured or had moisture-vapor issues.
Test the concrete’s moisture levels with a calcium chloride test, or a relative humidity or moisture meter. MAPEI moisture-reduction-barrier products can also be used.
Grouting was done by different installers and under different environmental conditions.
When possible, use the same installer or group of installers and follow the same procedures. In addition, try to maintain consistent environmental conditions.
Different batch codes of grout were used when more than one bag was required.
Check the batch codes of the grout bags. Select batch codes that are the same whenever possible – this will minimize the potential for bag-to-bag color variation. Dry-blend bags of different lot numbers before adding water or admixtures to ensure uniformity.
Routine maintenance cleaning of the grout was performed too early after grouting.
Wait 72 hours before beginning routine maintenance cleaning of the grout.
The color of the grout became bleached out (washed out) some time after installation.
All MAPEI cement grouts are rated for both exterior and interior installations. As a result, bleached or washed-out grout is not due to UV exposure. Check for harsh chemicals (such as highly acidic cleaners) or other contaminants that could have caused this discoloration.
Cement Grout Symptom Grout discoloration (continued)

3
SSources Solutions
Water used in mixing and cleaning had a high content of iron and other minerals.
Use potable water, or use MAPEI’s UltraCareTM Grout Maximizer grout admixture.
Grout joints were wiped excessively during the initial cleaning process.
On certain rough glazed or textured tile surfaces, there is a tendency to use excessive force to remove grout haze. Use UltraCare Grout Release to minimize the need for excessive wiping during cleaning.
Too much water or admixture was used to mix the grout.
Follow the recommended product mixing procedures on the product label and Technical Data Sheet (TDS).
Too much water was used during the cleaning process.
Use a slightly moist sponge where water does not drip out. Follow recommended product application procedures on the product label and TDS.
Extreme temperature and humidity conditions occurred during installation.
Grout installations should be completed in temperatures between 50°F and 95°F (10°C and 35°C).
The tile-setting material was not properly cured before grouting.
Before grouting, ensure that tile-setting materials are fully cured and that grout areas are clean and dry.
A moisture source was present in the existing underlying surface or surrounding area. Examples of moisture sources can include leaky plumbing, rain and damaged subfloors that allow moisture to enter.
Utilize MAPEI’s waterproofing or moisture-control products, and/or MAPEI’s rapid-setting products to set and grout (e.g., UltraflexTM RS and Ultracolor ® Plus FA), in order to minimize the possibility for efflorescence and increase the opportunity to have consistent color.
The concrete slab was not cured or had moisture-vapor issues.
Avoid grouting on less than fully cured substrates. Test the moisture levels with a calcium chloride test, or a relative humidity or moisture meter. MAPEI’s moisture-reduction barriers can also be used.
More water or admixture was added to the grout in order to prolong working time.
Do not add more than the recommended amount of water or admixture, according to the product label instructions and/or TDS.
Grout was prematurely exposed to excessive amounts of water. For exterior installations, this is a problem given that weather is unpredictable. For pool-grouting installations, the premature addition of water will compromise the grout and lead to efflorescence and other performance issues.
Exterior grout installations should be covered during inclement weather for the first seven days after grouting. Follow the product label instructions and TDS regarding the time to cover or expose to water (such as for pools), as it can vary with different cement grouts.
Cement Grout Symptom Efflorescence
A white, powdery substance (calcium salts) that can appear in the grout joint
Efflorescence

4
Sources Solutions
Grout haze remained on the surface of the tile. Use MAPEI’s UltraCareTM Cement Grout Haze Remover (see the addendum “UltraCare Quick-reference guide”).
Grout haze was left on the tile surface due to grouting being performed without wetting down the tiles first.
Tile should be moistened to minimize grout haze. Use MAPEI’s UltraCare Cement Grout Haze Remover to remove cement grout haze (see the addendum “UltraCare Quick-reference guide”).
Water used in mixing and cleaning had a high content of iron and other minerals.
Use potable water, or use MAPEI’s UltraCare Grout Maximizer grout admixture.
Jobsite conditions – such as direct sun exposure, hot ambient or tile temperatures, or too much area being grouted at a time before initiating the cleanup process.
Protect tilework from direct sunlight during application, and always apply within the temperature ranges of the current Technical Data Sheet (TDS). Grout small areas of between 30 to 40 sq. ft. (2,79 to 3,72 m2) at a time, so that cleaning can begin before the grout skins over and dries on the tile surface.
Grout was trapped in the pits of tumbled or distressed travertine, or other pitted tiles.
Use UltraCare Grout Release before grouting. For severely pitted tile, keep the grout out of the pits by packing the joints only and avoiding the pitted areas on the tile surface. Optionally, the pitted areas can be filled first with MAPEI’s Keracolor ® U (unsanded) grout.
A non-uniform haze, film, shaded or dirty appearance on the tile surface that can manifest itself from a number of different sources
Cement Grout Symptom Tile discoloration
Tile Discoloration
5
Sources Solutions
The tile material is highly absorptive. Wet the tile surface or use UltraCareTM Grout Release on it, and then use a polymer-modified grout mixed with MAPEI’s UltraCare Grout Maximizer additive.
The wrong grout was used for the installation. Select the correct grout for the job. For instance, do not use an unsanded grout in joint widths larger than 1/8" (3 mm).
Grout was installed before the tile-setting materials had fully cured.
Ensure that the tile-setting material is fully cured before starting to grout.
Tile spacers were left in the grout joint. Remove all tile spacers before grouting.
Improper preparation of the grout occurred, such as too much/little water used, incomplete mixing or insufficient slaking.
Follow the product label instructions and Technical Data Sheet (TDS).
Temperature, humidity and wind can affect the way that grout cures. If grout cures improperly, cracks, pinholes, powdery grout or shading may develop.
Follow the product label instructions and TDS.
Grout was installed in moving joints where there is a change in plane.
Use a MAPEI caulking product in these areas.
There was subfloor deflection (movement). Use a MAPEI caulking product in these areas. Ensure that the subfloor follows Tile Council of North America (TCNA) guidelines for determination of maximum allowable deflection.
Expansion or movement joints were not installed to allow for proper expansion/contraction.
Do not install tile over existing expansion joints, and use an appropriate MAPEI caulk or sealant for those expansion joints.
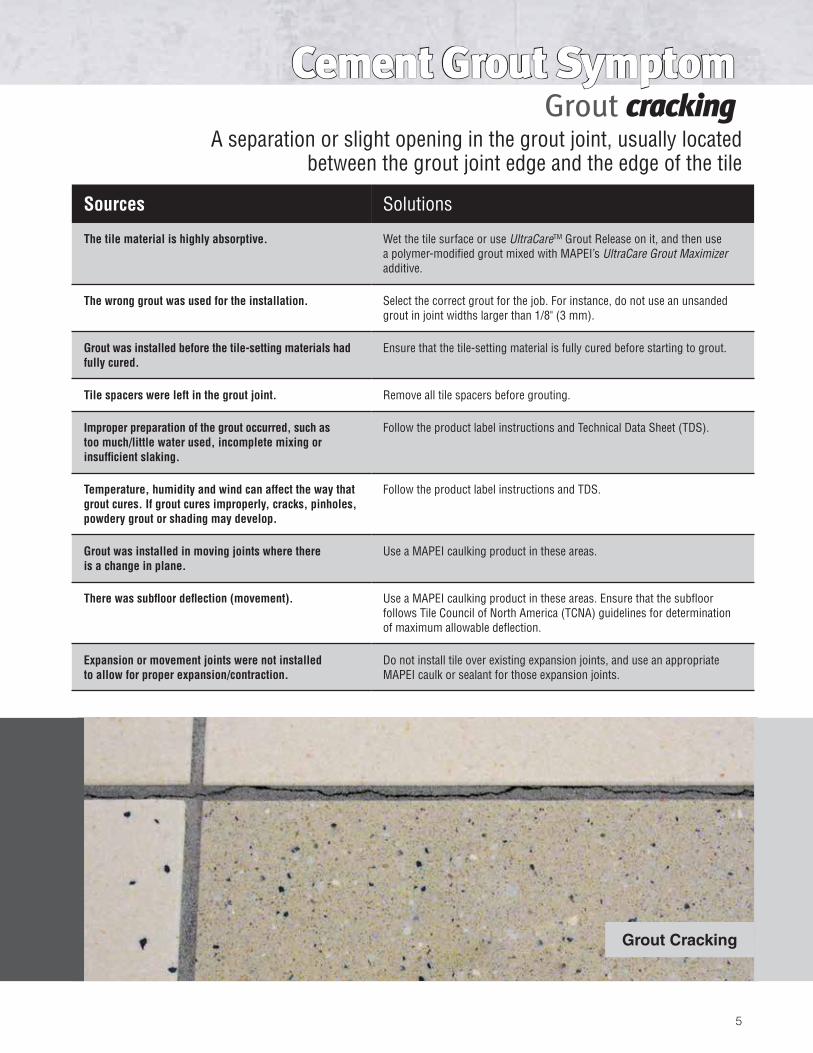
Cement Grout Symptom Grout cracking
A separation or slight opening in the grout joint, usually located between the grout joint edge and the edge of the tile
Grout Cracking

6
Sources Solutions
Grout joints were not properly packed when they were filled with grout.
Use a medium- to hard-rubber float at a 45-degree angle to the tile surface. Excessive grout should be removed using the float at a 90-degree angle from the tile surface, moving diagonally to the joints. To remedy the problem, remove the grout and replace with fresh grout.
Temperature, humidity and wind can affect the way that grout cures. If grout cures improperly, cracks, pinholes, powdery grout or shading may develop.
Follow the product label instructions and Technical Data Sheet (TDS) before installation. To remedy the problem, remove the grout and replace with fresh grout.
Improper preparation of the grout occurred, such as too much/little water used, incomplete mixing or insufficient slaking.
Follow the product label instructions and TDS before installation. To remedy the problem, remove the grout and replace with fresh grout.
The grout’s shelf life expired. Reference the product shelf life on the TDS, and dispose of the grout if the shelf life has expired. To remedy the problem, remove the grout and replace with fresh grout.
Cement Grout Symptom Powdery grout in the joints
The lack of a solid, hard grout joint as exhibited by the presence of grout powder
Powdery Grout
Sources Solutions
Grout joints are less than full. Ensure that the joints are packed well and follow the installation steps found on the product label and/or Technical Data Sheet (TDS). Use MAPEI’s UltraCareTM Grout RefreshTM Pre-Cleaner and UltraCare Grout Refresh to fill and seal the joints at the same time to cover the pinholes.
The grout mix was too wet. Use the correct liquid-to-powder ratio as recommended on the product label and TDS. Use MAPEI’s UltraCare Grout Refresh Pre-Cleaner and UltraCare Grout Refresh to fill the pinholes and seal the joints at the same time.
High-speed mixing trapped air in the grout mix, or the grout was mixed for too long.
Use a drill mixer at a speed of no more than 300 rpm for the recommended time listed on the product label or TDS.
Grout was not correctly forced into the joints. Use a medium- to hard-rubber float at a 45-degree angle to the tile surface. Excessive grout should be removed using the float at a 90-degree angle from the tile surface, moving diagonally to the joints.
Cement Grout Symptom Grout with pinholes
Very small holes – typically the size of a pinhead or less – that appear in the grout joint
Pinholes in Grout

7
Sources Solutions
Jobsite conditions – such as direct sun exposure, hot ambient or tile temperatures, or too much area being grouted at a time before initiating the cleanup process
Protect tilework from direct sunlight during application, and always apply within the temperature ranges of the current Technical Data Sheet (TDS). Grout small areas of between 30 to 40 sq. ft. (2,79 to 3,72 m2) at a time, so that cleaning can begin before the grout skins over and dries on the tile surface.
The grout color was not what was desired. Use MAPEI’s UltraCareTM Grout RefreshTM Pre-Cleaner and UltraCare Grout Refresh to re-color and seal the joints at the same time.
Due to tile-spacing lugs left in the grout joints, variable depths of the joints caused shading.
Grout a test area to determine the impact of the tile-spacing lugs on the grout color. Wet the tile surface or use UltraCare Grout Release on it.
The varying density and porosity of the tile and natural stone caused the grout to dry blotchy and shade.
Either wet with UltraCare Grout Release, removing the temporary coating that is formed, or wet with water.
Grout cleaning was completed too early or too late after floating the grout into the joints.
Cleaning (washing) too early will tend to pull the grout out of the joint. Cleaning too late will tend to leave excessive haze film. Cleaning should follow the product label and TDS recommendations. Typically, 5 to 10 minutes (20 to 30 sq. ft. [1,86 to 2,79 m2]) of grouting is recommended before doing an initial wash. Temperature and humidity conditions can impact this recommendation.
The grout's shelf life expired. Reference the product shelf life on the TDS. Dispose of the grout if the shelf life has expired
The tile-setting material was not properly cured before grouting.
Ensure that the tile-setting material is fully cured before grouting.
A milky latex film formed on the surface of the grout joints just after cleaning.
The film occurs only under certain installation conditions. The film will dissipate between 20 to 30 minutes.
There was excessive tile-setting material in the grout joint.
Remove dried residue from the grout joints, ensuring that at least 2/3 of the depth is left available for grouting.
There were inconsistent grout joint depths and gap widths.
Use tile spacers to ensure proper color/appearance consistency.
Ready-to-Use (RTU) Grout SymptomGrout discoloration
A non-uniform, blotchy, shaded or dirty appearance of the grout joint that can manifest from a number of different sources

8
Sources Solutions
Variable glaze on the tile edges caused the grout to dry/cure at different times and led to shading.
Use tile that has a uniform glaze coat on the edges.
There were 100% relative humidity (RH) conditions at the floor level.
Use fans or air-moving devices to lower the RH and obtain hard grout joints. The product will not become hard at 100% RH. Ideal curing conditions would be 50% RH and 73°F (23°C).
The tile-setting material was not properly cured before grouting.
Before grouting, ensure that tile-setting materials are fully cured and that grout areas are clean and dry.
The concrete slab was not fully cured or had moisture-vapor issues.
Avoid grouting on less than fully cured substrates. Test the moisture levels with a calcium chloride test, or a RH or moisture meter. MAPEI’s moisture-reduction-barrier products can also be used.
Grouting was done by different installers and under different environmental conditions.
When possible, use the same installer or group of installers and follow the same procedures. In addition, try to maintain consistent environmental conditions.
Grout was prematurely exposed to an excessive amount of moisture.
Typically, RTU grouts cannot be exposed to moisture for a minimum of 72 hours after installation. Use fans and air-moving devices to ensure that the conditions are less than 100% RH. MAPEI does not recommend covering RTU grouts with Kraft paper, tarp, etc. that are in direct contact with the grout, as this will trap moisture and keep the RH percentage high. However, for exterior installations, tenting the grouted area with 3 ft. (0,9 m) or more of clearance is acceptable.
Routine maintenance cleaning of the grout was performed too early after grouting.
Wait 72 hours before beginning routine maintenance cleaning of the grout.
Water used in cleaning had a high content of iron and other minerals.
Use potable water.
Ready-to-Use (RTU) Grout Symptom Grout discoloration (continued)
A non-uniform, blotchy, shaded or dirty appearance of the grout joint that can manifest from a number of different sources
Grout Discoloration

9
Sources Solutions
Efflorescence will not occur in this grout chemistry. No solution is required.
Sources Solutions
Grout haze was present on the tile surface after grouting because cleaning was not completed early enough.
Typically, 5 to 10 minutes (20 to 30 sq. ft. [1,86 to 2,79 m2]) of grouting is recommended before doing an initial wash. Temperature and humidity conditions can impact this recommendation. Use MAPEI’s UltraCareTM Heavy-Duty Stone Tile & Grout Cleaner or UltraCare Epoxy Grout Haze Remover to clean the tile surface (see the addendum “UltraCare Quick-reference guide”). Allow the products to dwell or sit for 10 to 15 minutes before removal, depending upon the severity of the haze film.
Jobsite conditions – such as direct sun exposure, hot ambient or tile temperatures, or too much area being grouted at a time before initiating the cleanup process.
Protect tilework from direct sun during application, and always apply within the temperature ranges of the current Technical Data Sheet (TDS). Grout small areas of between 30 to 40 sq. ft. (2,79 to 3,72 m2) at a time, so that cleaning can begin before the grout skins over and dries on the tile surface.
Grout was trapped in the pits of tumbled or distressed travertine, or other pitted tiles.
Use UltraCare Grout Release before grouting. For severely pitted tile, keep the grout out of the pits by packing the joints only and avoiding the pitted areas on the tile surface.
Water used in cleaning had a high content of iron and other minerals.
Use potable water.
Ready-to-Use (RTU) Grout Symptom Efflorescence
A white powdery substance (calcium salts) that can appear in the grout joint
Ready-to-Use (RTU) Grout SymptomTile discoloration
A non-uniform hazy, filmy, shaded or dirty appearance on the tile surface that can manifest itself from a number of different sources

10
Sources Solutions
There were 100% relative humidity (RH) conditions at the floor level.
Use fans or air-moving devices to lower the RH and obtain hard grout joints. The product will not become hard at 100% RH. Ideal curing conditions would be 50% RH and 73°F (23°C).
Too much water was used during the cleaning process.
Use a slightly moist sponge where water does not drip out. Follow recommended product application procedures on the product label and Technical Data Sheet (TDS).
A sealer was applied prematurely after grouting. Wait at least 72 hours before sealing a RTU grout. A sealer is not necessary for this grout, but it can be applied; this can vary depending upon which RTU grout is being used (check the product label and TDS).
The tile-setting material was not properly cured and too much moisture was left in the joints before grouting.
Ensure that the tile-setting material is fully cured and that joints are dry before starting to grout.
Grout was prematurely exposed to excessive amounts of water.
Allow 72 hours after grouting before intermittent water exposure. RTU grouts are generally not for use in full-submersion installations, but this can vary depending upon which RTU grout is being used (check the product label and TDS).
Grout was exposed to harsh chemicals prematurely. Allow 7 days before any exposure to harsh chemicals; this can vary depending upon which RTU grout is being used (check the product label and TDS).
Grout was not allowed to properly dry (cure). Use fans or air-moving devices to lower the RH and obtain hard grout joints. The product will not become hard at 100% RH. Ideal curing conditions would be 50% RH and 73°F (23°C). Light foot traffic is allowed 24 hours after installation, and heavy foot traffic is allowed 72 hours after installation; this can vary depending upon which RTU grout is being used (check the product label and TDS).
Ready-to-Use (RTU) Grout Symptom Grout not curing
A grout that will not become hard or cured over time; it remains soft to the touch
Grout is Soft
11
Sources Solutions
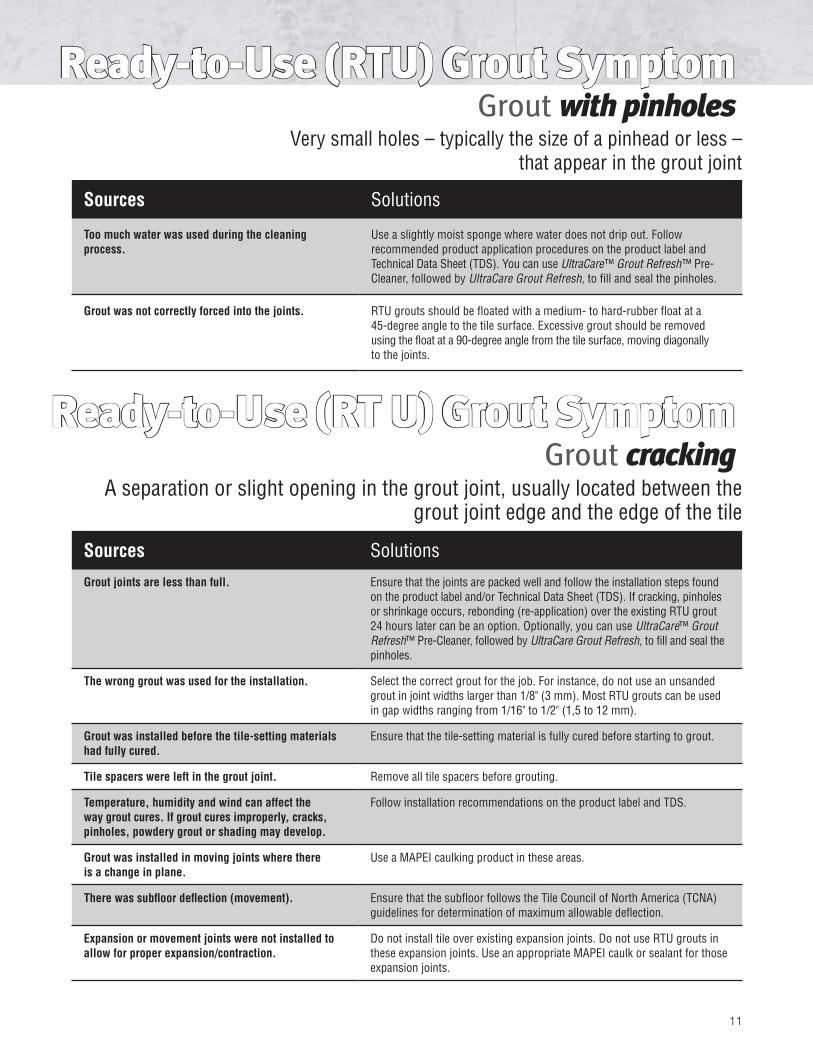
Too much water was used during the cleaning process.
Use a slightly moist sponge where water does not drip out. Follow recommended product application procedures on the product label and Technical Data Sheet (TDS). You can use UltraCare™ Grout Refresh™ Pre-Cleaner, followed by UltraCare Grout Refresh, to fill and seal the pinholes.
Grout was not correctly forced into the joints. RTU grouts should be floated with a medium- to hard-rubber float at a 45-degree angle to the tile surface. Excessive grout should be removed using the float at a 90-degree angle from the tile surface, moving diagonally to the joints.
Ready-to-Use (RTU) Grout Symptom Grout with pinholes
Very small holes – typically the size of a pinhead or less – that appear in the grout joint
Sources Solutions
Grout joints are less than full. Ensure that the joints are packed well and follow the installation steps found on the product label and/or Technical Data Sheet (TDS). If cracking, pinholes or shrinkage occurs, rebonding (re-application) over the existing RTU grout 24 hours later can be an option. Optionally, you can use UltraCare™ Grout Refresh™ Pre-Cleaner, followed by UltraCare Grout Refresh, to fill and seal the pinholes.
The wrong grout was used for the installation. Select the correct grout for the job. For instance, do not use an unsanded grout in joint widths larger than 1/8" (3 mm). Most RTU grouts can be used in gap widths ranging from 1/16" to 1/2" (1,5 to 12 mm).
Grout was installed before the tile-setting materials had fully cured.
Ensure that the tile-setting material is fully cured before starting to grout.
Tile spacers were left in the grout joint. Remove all tile spacers before grouting.
Temperature, humidity and wind can affect the way grout cures. If grout cures improperly, cracks, pinholes, powdery grout or shading may develop.
Follow installation recommendations on the product label and TDS.
Grout was installed in moving joints where there is a change in plane.
Use a MAPEI caulking product in these areas.
There was subfloor deflection (movement). Ensure that the subfloor follows the Tile Council of North America (TCNA) guidelines for determination of maximum allowable deflection.
Expansion or movement joints were not installed to allow for proper expansion/contraction.
Do not install tile over existing expansion joints. Do not use RTU grouts in these expansion joints. Use an appropriate MAPEI caulk or sealant for those expansion joints.
Ready-to-Use (RT U) Grout Symptom Grout cracking
A separation or slight opening in the grout joint, usually located between the grout joint edge and the edge of the tile

12
Sources Solutions
The grout color was not what was desired. Use MAPEI’s UltraCareTM Grout RefreshTM Pre-Cleaner and UltraCare Grout Refresh to re-color and seal the joints at the same time.
Jobsite conditions – such as direct sun exposure, hot ambient or tile temperatures, or too much area being grouted at a time before initiating the cleanup process.
Protect tilework from direct sunlight during application, and always apply within the temperature ranges of the current Technical Data Sheet (TDS). Grout small areas of between 30 to 40 sq. ft. (2,79 to 3,72 m2) at a time, so that cleaning can begin before the grout skins over and dries on the tile surface.
Due to tile-spacing lugs left in the grout joints, variable depths of the joints caused shading.
Grout a test area to determine the impact of the tile-spacing lugs on the grout color. Wet the tile surface or use UltraCare Grout Release on it.
Grout joints were wiped excessively during the initial cleaning process.
On certain rough glazed or textured tile surfaces, there is a tendency to use excessive force to remove grout haze. Use UltraCare Grout Release to minimize the need for excessive wiping during cleaning.
On two- and three-part epoxy grouts, the proper ratio of Part A, B and C (if applicable) was not used.
Ensure that all of Part B (hardener) is removed from the packaging and mixed thoroughly into Part A. Then, add Part C if applicable.
The grout’s shelf life expired. Reference the product shelf life on the TDS. Dispose of the grout if the shelf life has expired.
The tile-setting material was not properly cured before grouting.
Ensure that tile-setting materials are cured before grouting.
There was excessive tile-setting material in the grout joint.
Remove dried residue from the grout joints, ensuring that at least 2/3 of the depth is left available for grouting.
The varying density and porosity of the tile and natural stone caused the grout to dry blotchy and shade.
Pre-wet the tile surface and use UltraCare Grout Release.
There were inconsistent grout joint depths and gap widths.
Use tile spacers to ensure proper color/appearance consistency.
The color of the grout became bleached out (washed out) some time after installation, or the grout has turned yellow.
Confirm that the grout is rated for exterior use. Direct sun exposure can discolor grouts if not rated for exterior use. Some epoxy grouts are not UV-stable.
Epoxy Grouts Symptom (Non-Industrial and Industrial-Grade)
Grout discolorationA non-uniform, blotchy, shaded or dirty appearance of the grout joint
that can manifest from a number of different sources
Grout Discoloration

13
Sources Solutions
Routine maintenance cleaning of the grout was performed too early after grouting.
Wait 72 hours before beginning routine maintenance cleaning of the grout.
Grout was prematurely exposed to excessive amounts of chemically treated water (e.g., chlorinated pool water).
For pool-grouting installations, prematurely filling the pool with water will compromise the grout and lead to grout discoloration and other performance issues. Exterior grout installations should be covered during inclement weather for the first seven days after grouting. Follow the product label instructions and TDS regarding the time to cover or expose to water (such as for pools).
Chemically treated water used in cleaning had a high content of iron and other minerals.
Use potable water.
Sources Solutions
Efflorescence will not occur in this grout chemistry. No solution is required.
Epoxy Grouts Symptom (Non-Industrial and Industrial-Grade)
Grout discoloration (continued)A non-uniform, blotchy, shaded or dirty appearance of the grout joint
that can manifest from a number of different sources
Epoxy Grouts Symptom (Non-Industrial and Industrial-Grade)
EfflorescenceA white powdery substance (calcium salts) that can appear on the grout joint

14
Sources Solutions
Grout haze remained on the surface of the tile. Use MAPEI’s UltraCareTM Epoxy Grout Haze Remover to clean the tile surface. Allow the product to sit for 30 minutes to 1 hour, depending upon the severity of the haze film. During the course of that time, mist the tile surface with water to prevent drying on the surface. Repeat these steps as necessary. Use UltraCare Grout Release before grouting to protect the tile surface and aid in the grout cleanup (see the addendum “UltraCare Quick-reference guide”). For industrial-grade epoxies, it is important to follow the Technical Data Sheet’s (TDS) “Product Application” section very closely. When using Kerapoxy ® IEG CQ, flood the surface on initial and final wash with wash water containing special initial/final wash cleaning additive packets that ensure that haze film will not occur or will be minimized. Also, use a white scrub pad on both the initial and final wash; then, sponge off excess water. The time between the initial and final wash should be 5 to 10 minutes.
Jobsite conditions – such as direct sun exposure, hot ambient or tile temperatures, or too much area being grouted at a time before initiating the cleanup process.
Protect tilework from direct sunlight during application, and always apply within the temperature ranges of the current TDS. Grout small areas of between 30 to 40 sq. ft. (2,79 to 3,72 m2) at a time, so that cleaning can begin before the grout skins over and dries on the tile surface.
Grout was trapped in the pits of tumbled travertine or other pitted tiles.
Use UltraCare Grout Release before grouting. For severely pitted tile, keep the grout out of the pits by packing the joints only and avoiding the pitted areas on the tile surface.
Water used in cleaning had a high content of iron and other minerals.
Use potable water. For MAPEI’s Kerapoxy IEG CQ industrial-grade epoxy grout, be sure to use the initial/final wash cleaning additive packets that are provided in the large kit. For each of the four units of Kerapoxy IEG CQ, there are two additive packets per unit that should be added to clean water (2 U.S. gals. [7,57 L] per packet) for both the initial and final wash.
Foot traffic was prematurely allowed on the tile/grout. When using MAPEI’s non-industrial epoxy grouts Kerapoxy CQ or Kerapoxy, do not allow foot traffic for 24 hours after installation. For heavy foot traffic, allow 48 hours of cure time. When using MAPEI’s industrial-grade epoxy grout Kerapoxy IEG CQ, allow 5 to 12 hours of cure time before heavy foot traffic.
Routine maintenance used a cleaning solution that was too harsh.
For routine cleaning of MAPEI’s non-industrial epoxy grouts Kerapoxy CQ and Kerapoxy, do not use no-wash enzymatic cleaners. For MAPEI’s industrial-grade epoxy grout Kerapoxy IEG CQ (which is resistant to fatty acids and no-wash enzymatic cleaners), tile discoloration will not occur and grout integrity will not be compromised.
Epoxy Grouts Symptom (Non-Industrial and Industrial-Grade)
Tile discolorationA non-uniform haze film, or shaded or dirty appearance on the tile surface that can manifest itself from a number of different sources

15
Sources Solutions
Grout joints are less than full. Ensure that the joints are packed well and follow the installation steps found on the product label and/or Technical Data Sheet (TDS). If pinholes occur, rebonding (re-application) over the existing epoxy grout 24 hours later can be an option.
Grout was not correctly forced into the joints. For epoxy grouts, use a hard rubber float at a 45-degree angle to the tile surface, applying pressure on the float to force grout into the joints. Excessive grout should be removed using the float at a 90-degree angle from the tile surface, moving diagonally to the joints.
High-speed mixing entrapped air in the grout mix or the grout was mixed for too long.
Use a drill mixer at a speed of no more than 300 RPM for the recommended time listed on the product label or TDS.
Epoxy Grouts Symptom (Non-Industrial and Industrial-Grade)
Grout with pinholesVery small holes – typically the size of a pinhead or less –
that appear on the grout joint

16
Sources Solutions
Grout was installed before the tile-setting materials had fully cured.
Ensure that the tile-setting material is fully cured before starting to grout.
Tile spacers were left in the grout joint. Remove all tile spacers before grouting.
Temperature, humidity and wind can affect the way grout cures. If grout cures improperly, cracks, pinholes, powdery grout or shading may develop.
Follow the product label instructions and Technical Data Sheet (TDS).
Grout was installed in moving joints where there is a change in plane.
Use a MAPEI caulking product in these areas.
There was subfloor deflection (movement). Ensure that the subfloor follows the Tile Council of North America (TCNA) guidelines for determination of maximum allowable deflection.
Expansion or movement joints were not installed to allow for proper expansion/contraction.
Do not install tile over existing expansion joints. Do not use epoxy grout in these expansion joints. Use an appropriate MAPEI caulk or sealant for those expansion joints.
Grout joints are less than full. Ensure that the joints are packed well and follow the installation steps found on the product label and/or TDS. If cracking, pinholes or shrinkage occurs, rebonding (re-application) over the existing epoxy grout 24 hours later can be an option. Generally, 1/8" (3 mm) depth is required when re-applying epoxy grout to fill low or cracked joints.
Grout was not correctly forced into the joints. Epoxy grouts should be floated with a hard rubber float at a 45-degree angle to the tile surface. Excessive grout should be removed using the float at a 90-degree angle from the tile surface, moving diagonally to the joints.
A separation or slight opening in the grout joint, usually located between the grout joint edge and the edge of the tile
Cracking of Grout
Epoxy Grouts Symptom (Non-Industrial and Industrial-Grade)
Grout cracking

MAPEI’s world-leading Research and Development team has produced a complete line of high-quality sealers, finishes, cleaners and problem-solvers that will complement our full line of installation products. Each product is formulated to be environmentally friendly, safe to handle and easy to use, as well as to provide outstanding performance and durability. MAPEI’s UltraCare care and maintenance products deliver outstanding results. Contact your local distributor today to see the entire line.
MAPEI’s powerful line of stone, tile and grout care solutions
Sealers Finishes Problem-SolversCleaners

18
Ceramic tile Flagstone Granite Grout
Honed marble,
limestone and travertineProduct Name and Description
Seal
ers
UltraCare Penetrating Plus SB Stone & Porcelain Tile Sealer • • • • •UltraCare Penetrating Stone, Tile & Grout Sealer • • • • •UltraCare Penetrating SB Stone, Tile & Grout Sealer • • • • •UltraCare Penetrating Plus Stone, Tile & Grout Sealer • • • • •UltraCare Enhancing Stone Sealer • • • •UltraCare Enhancing Plus Stone Sealer • • • •UltraCare Grout Sealer •UltraCare Grout Maximizer •
Fini
shes UltraCare High-Gloss Sealer & Finish • •
UltraCare Low-Sheen Sealer & Finish • •
Clea
ners
UltraCare Everyday Stone & Grout Cleaner & Resealer • • • • •UltraCare Everyday Stone, Tile & Grout Cleaner • • • • •UltraCare Concentrated Tile & Grout Cleaner • • • • •UltraCare Everyday Stone Clean & Polish •UltraCare Abrasive Surface Cleaner • • • • •UltraCare Heavy-Duty Stone, Tile & Grout Cleaner • • • • •UltraCare Acidic Tile & Grout Cleaner • • • •UltraCare Grout Refresh™ Pre-Cleaner •
Prob
lem
-Sol
vers
UltraCare Grout Refresh •UltraCare Grout Release • • • • •UltraCare Cement Grout Haze Remover • • •UltraCare Efflorescence Remover • • •UltraCare Epoxy Grout Haze Remover • • • • •UltraCare Deep Stain Remover for Stone • • • •UltraCare Heavy-Duty Sealer & Coating Stripper • • • • •UltraCare Sulfamic Acid Crystals • • • •
Masonry
Polished marble,
limestone and travertine
Porcelain tile Quarry tile Saltillo /
Terra cotta Sandstone Slate
Textured marble,
limestone and travertine*
• • • • • • • •• • • • • • • •• • • • • • • •• • • • • • • •• • • • • • •• • • • • • •
• Textured Unglazed • •• Unglazed • •
• • • • • • •• • • • • • •• • • • • • ••• • • • • • •
• • • • • • • •• • • •
• • • • • • • •• • • • • •• • • • •• • • • • • • •• • • • • •• • • • • • • •• • • • •

19
UltraCare Quick-reference guide
* Textured surfaces include brushed, flamed and tumbled.
Ceramic tile Flagstone Granite Grout
Honed marble,
limestone and travertineProduct Name and Description
Seal
ers
UltraCare Penetrating Plus SB Stone & Porcelain Tile Sealer • • • • •UltraCare Penetrating Stone, Tile & Grout Sealer • • • • •UltraCare Penetrating SB Stone, Tile & Grout Sealer • • • • •UltraCare Penetrating Plus Stone, Tile & Grout Sealer • • • • •UltraCare Enhancing Stone Sealer • • • •UltraCare Enhancing Plus Stone Sealer • • • •UltraCare Grout Sealer •UltraCare Grout Maximizer •
Fini
shes UltraCare High-Gloss Sealer & Finish • •
UltraCare Low-Sheen Sealer & Finish • •
Clea
ners
UltraCare Everyday Stone & Grout Cleaner & Resealer • • • • •UltraCare Everyday Stone, Tile & Grout Cleaner • • • • •UltraCare Concentrated Tile & Grout Cleaner • • • • •UltraCare Everyday Stone Clean & Polish •UltraCare Abrasive Surface Cleaner • • • • •UltraCare Heavy-Duty Stone, Tile & Grout Cleaner • • • • •UltraCare Acidic Tile & Grout Cleaner • • • •UltraCare Grout Refresh™ Pre-Cleaner •
Prob
lem
-Sol
vers
UltraCare Grout Refresh •UltraCare Grout Release • • • • •UltraCare Cement Grout Haze Remover • • •UltraCare Efflorescence Remover • • •UltraCare Epoxy Grout Haze Remover • • • • •UltraCare Deep Stain Remover for Stone • • • •UltraCare Heavy-Duty Sealer & Coating Stripper • • • • •UltraCare Sulfamic Acid Crystals • • • •
Masonry
Polished marble,
limestone and travertine
Porcelain tile Quarry tile Saltillo /
Terra cotta Sandstone Slate
Textured marble,
limestone and travertine*
• • • • • • • •• • • • • • • •• • • • • • • •• • • • • • • •• • • • • • •• • • • • • •
• Textured Unglazed • •• Unglazed • •
• • • • • • •• • • • • • •• • • • • • ••• • • • • • •
• • • • • • • •• • • •
• • • • • • • •• • • • • •• • • • •• • • • • • • •• • • • • •• • • • • • • •• • • • •

For registration information on U.S. seminars, please contact Sophia D’Amico-Campbell at (954) 246-8555.
For registration information on Canadian seminars, please contact Marie-Christine Mercier at (450) 662-1212.
The MAPEI Technical Institute (MTI) provides the highest-quality, basic product knowledge with demonstrations and hands-on training to architects, contractors, installers and distributors in 9 locations: Deerfield Beach (FL), San Bernardino (CA), Garland (TX), Dalton (GA), West Chicago (IL) and Swedesboro (NJ), all in the USA; and Laval (Quebec), Brampton (Ontario) and Delta (British Columbia), all in Canada.
MTI-TV – Technical Services Videos on the Web
Through a series of online videos, Technical Services Director Dan Marvin and National Technical Presenter Sam Biondo discuss issues of interest to contractors and installers. During the discussion, demonstrations are shown of MAPEI products that can meet challenges such as preparing substrates for self-leveling, applying self-levelers, and installing tile and stone with the proper mortars and grouts that best meet the requirements of a specific project. Installments of the MTI-TV videos can be seen on the MAPEI Americas Websites and YouTube channel. The videos are available in English, French and Spanish.

Take MAPEI with you.Download our free mobile app.
Whether you’re using a smartphone or a tablet, you can quickly access the MAPEI information you need via the MAPEI app. Explore product listings, technical data sheets and more – and easily email the data to yourself or a colleague. The app also gives locations where MAPEI products are sold, MAPEI’s grout color palettes, and easy links for MAPEI’s technical support and customer care.
Get the app today at your online Android or Apple app store (search for “MAPEI”).
Android and Apple are third-party trademarks.

Parking Facilities andStadium Solutions
MAPEI Headquarters of the Americas1144 East Newport Center Drive Deerfield Beach, Florida 33442 1-888-US-MAPEI (1-888-876-2734)/ (954) 246-8888
Technical Services1-800-992-6273 (U.S. and Puerto Rico) 1-800-361-9309 (Canada)
Customer Service1-800-42-MAPEI (1-800-426-2734)
Services in Mexico0-1-800-MX-MAPEI (0-1-800-696-2734)
Copyright ©2016 by MAPEI Corporation (“MAPEI”) and all rights are reserved. All intellectual property rights and other information contained in this document are the exclusive property of MAPEI (or its parent or related companies), unless otherwise noted. No part of this document may be reproduced or transmitted in any form without the prior written consent of MAPEI.
Edition Date: October 24, 2016
PR: 7399 MKT: 16-2160 Printed in the USA.
Keyword: MAPEI Americas
Grout TroubleshootingGuide