Embed Size (px)
Citation preview
GRIP User Guide P a g e | 1
Contents Introduction .............................................................................................................................................. 2
ITAP Business Enrollment ........................................................................................................................ 3
ITAP User Enrollment ............................................................................................................................... 5
GRIP Access ............................................................................................................................................... 9
RRGCF Application Submittal ................................................................................................................. 12
Crossing Closure Application Submittal ................................................................................................ 16
Industrial Rail Service Fund (IRSF) Application Submittal .................................................................... 22
Indiana Department of Transportation- Rail Programs Office
Grant Rail Project (GRIP) System
GRIP User Guide P a g e | 2
Introduction
INDOT Technical Applications Pathway (ITAP) is a portal that houses various INDOT systems. In order to access ITAP, each user must first create an Access Indiana Account at the following link https://www.in.gov/access/. There you will find a Getting Started Guide and an FAQ.
The Grant Rail Project (GRIP) system is housed within ITAP. GRIP is a portal used to apply for the state funded rail grants that are administered by the INDOT Rail Programs Office; the Railroad Grade Crossing Fund (RRGCF), Crossing Closure Program, & Industrial Rail Service Fund (IRSF).
Grant Applicants must have an ITAP account and access to GRIP to apply for these grant programs. Enrolling in ITAP & GRIP is only required once per business. However, if multiple users in the business require access, each user is required to request user access for that business.
This User Guide is an applicant instructional manual to use for ITAP and GRIP access. It is also a guide when applying for the state funded rail grant programs. For GRIP questions or issues, please contact Bridgette Hail with the Rail Programs Office at 317-601-4117 [email protected].
For ITAP access questions, please contact ITAP Support at the bottom right of the ITAP login page https://itap.indot.in.gov/login.aspx.
For instructions on Access Indiana Accounts, please refer to the following link: https://www.in.gov/access/.
GRIP User Guide P a g e | 3
ITAP Business Enrollment
1) To access ITAP, use the following link: https://itap.indot.in.gov/login.aspx 2) If your business is NOT enrolled in ITAP, enroll by clicking on the Complete a business
enrollment form.
Note: If your business is already enrolled, but you are not the Primary Contact for your business account, click on the Complete a user enrollment form. Skip down to ITAP User Enrollment Instructions in this manual (page 5).
3) To the right of this screen, there are instructional videos called “How to Enroll a Business”. We recommend viewing this video before completing the ITAP business enrollment.
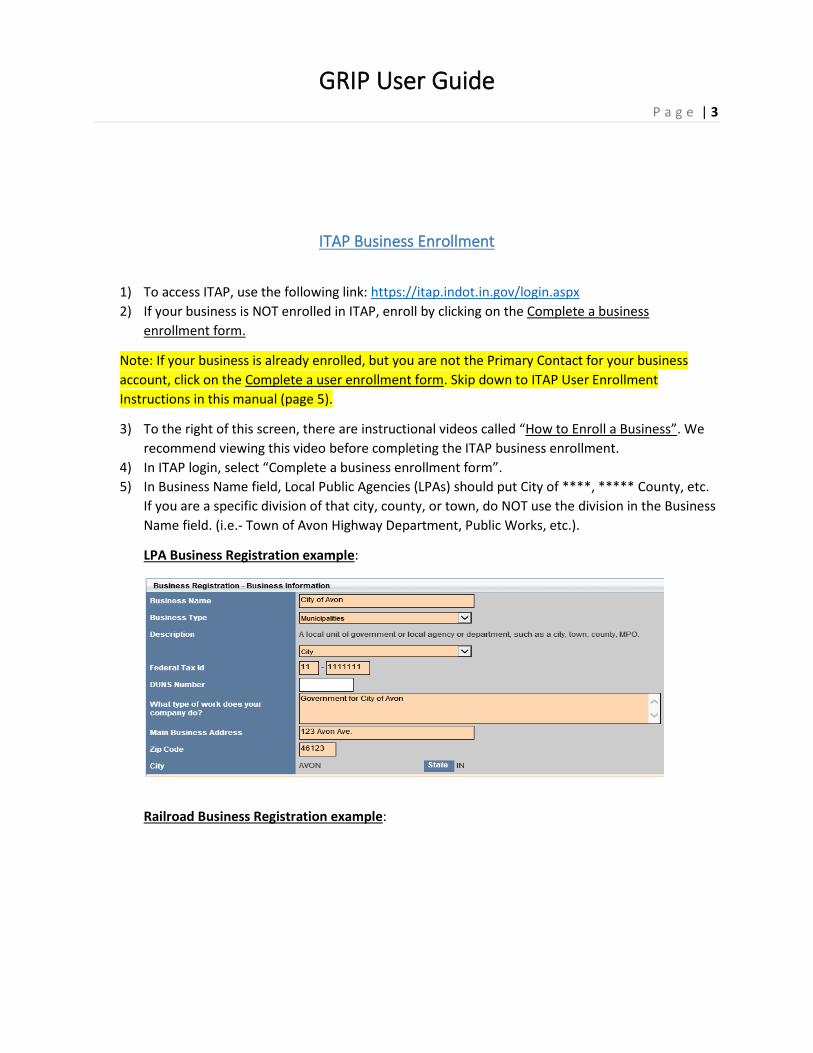
4) In ITAP login, select “Complete a business enrollment form”. 5) In Business Name field, Local Public Agencies (LPAs) should put City of ****, ***** County, etc.
If you are a specific division of that city, county, or town, do NOT use the division in the Business Name field. (i.e.- Town of Avon Highway Department, Public Works, etc.).
LPA Business Registration example:
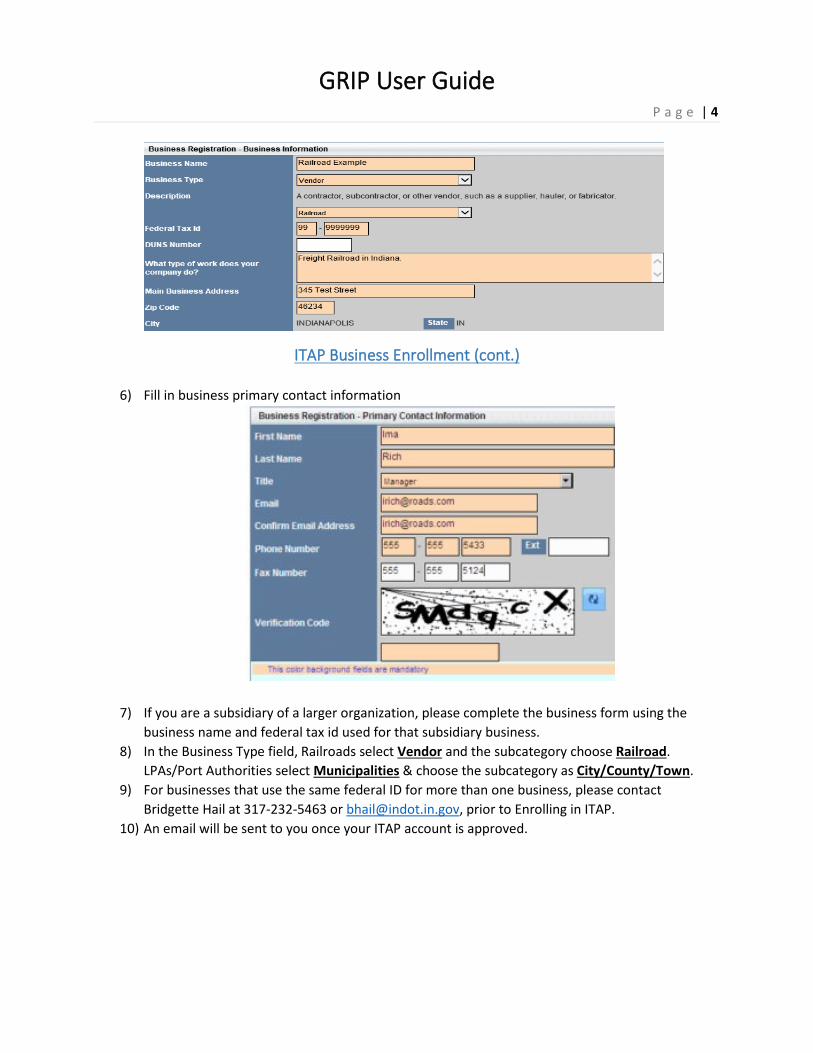
Railroad Business Registration example:
GRIP User Guide P a g e | 4
ITAP Business Enrollment (cont.)
6) Fill in business primary contact information
7) If you are a subsidiary of a larger organization, please complete the business form using the business name and federal tax id used for that subsidiary business.
8) In the Business Type field, Railroads select Vendor and the subcategory choose Railroad. LPAs/Port Authorities select Municipalities & choose the subcategory as City/County/Town.
9) For businesses that use the same federal ID for more than one business, please contact Bridgette Hail at 317-232-5463 or [email protected], prior to Enrolling in ITAP.
10) An email will be sent to you once your ITAP account is approved.
GRIP User Guide P a g e | 5
ITAP User Enrollment
1) If your business is already enrolled in ITAP, but you are not the Primary Contact for your business in the ITAP account, follow these instructions for ITAP User Enrollment.
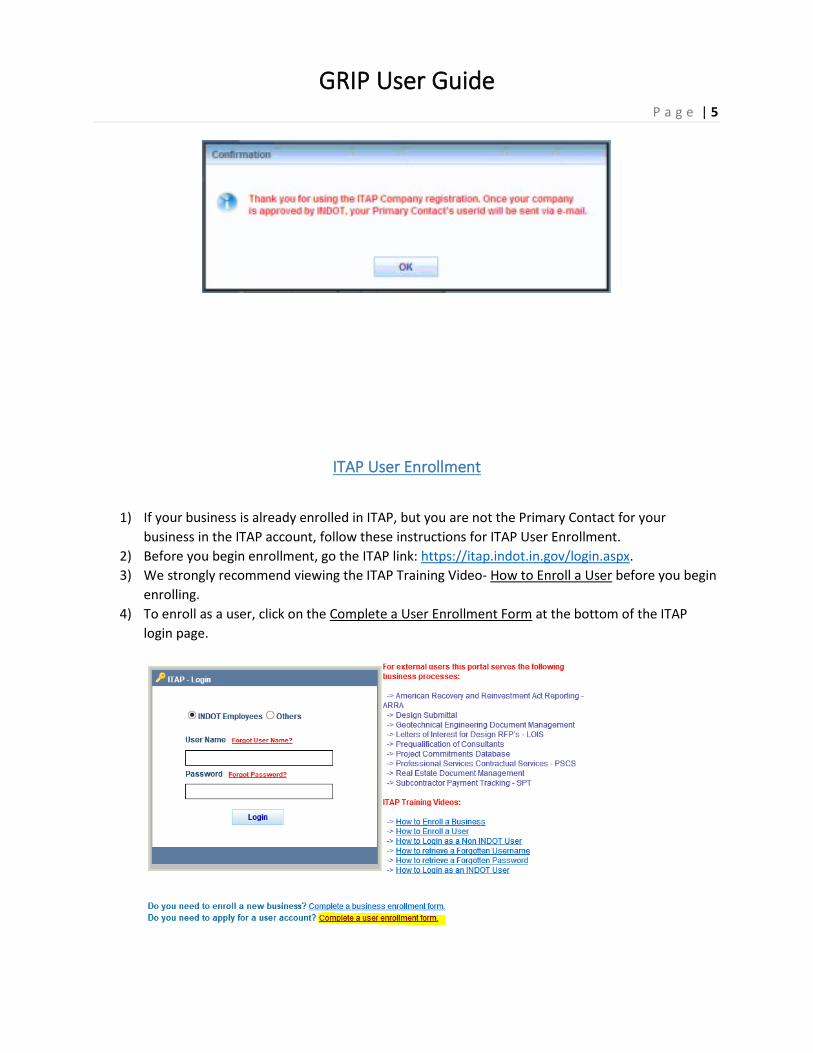
2) Before you begin enrollment, go the ITAP link: https://itap.indot.in.gov/login.aspx. 3) We strongly recommend viewing the ITAP Training Video- How to Enroll a User before you begin
enrolling. 4) To enroll as a user, click on the Complete a User Enrollment Form at the bottom of the ITAP
login page.

GRIP User Guide P a g e | 6
5) This will take you to the User Enrollment- Business Selection page (see below).
ITAP User Enrollment (cont.)
6) Select the business type that defines your business at the top left of the screen. This will display a list of businesses to the right of the screen to choose from. Note (Railroads): For User Enrollment Business Selection- Railroads select Vendor & Railroad (left), their registered business (right). (Example below)
GRIP User Guide P a g e | 7
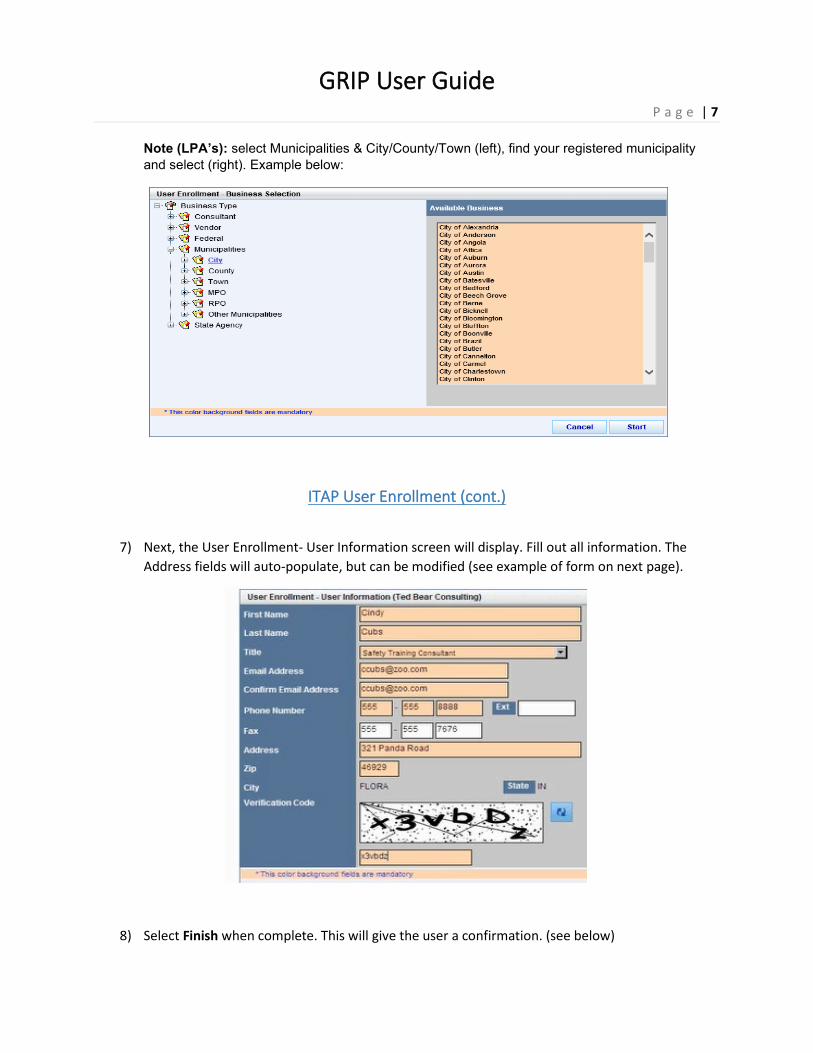
Note (LPA’s): select Municipalities & City/County/Town (left), find your registered municipality and select (right). Example below:
ITAP User Enrollment (cont.)
7) Next, the User Enrollment- User Information screen will display. Fill out all information. The Address fields will auto-populate, but can be modified (see example of form on next page).
8) Select Finish when complete. This will give the user a confirmation. (see below)
GRIP User Guide P a g e | 8
ITAP User Enrollment (cont.)
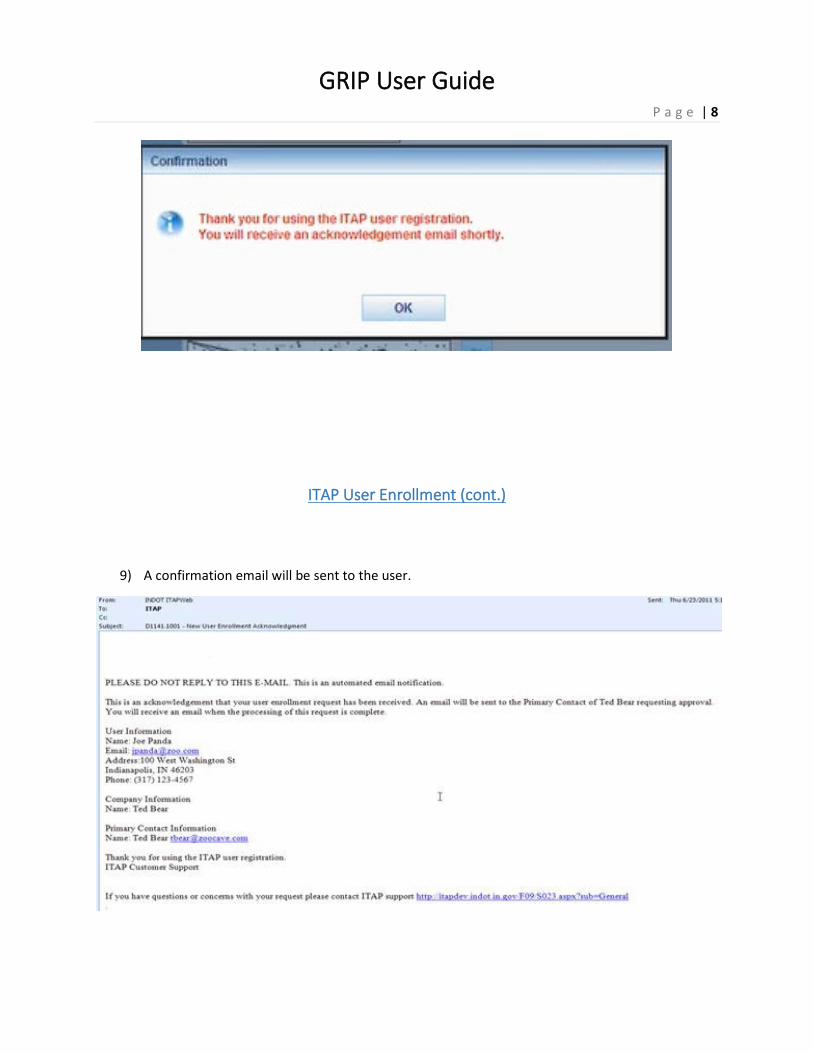
9) A confirmation email will be sent to the user.

GRIP User Guide P a g e | 9
10) An email will be sent to the Primary Contact of your business requesting approval. The user will be sent an email with a link to set a password for the user’s ITAP account.
GRIP Access
1) Once an ITAP account is created for your business, go to the ITAP link & log-in: https://itap.indot.in.gov/login.aspx
2) In the Main Page of ITAP, towards the bottom of the page, select Click here to request a new application (see below).
GRIP User Guide P a g e | 10
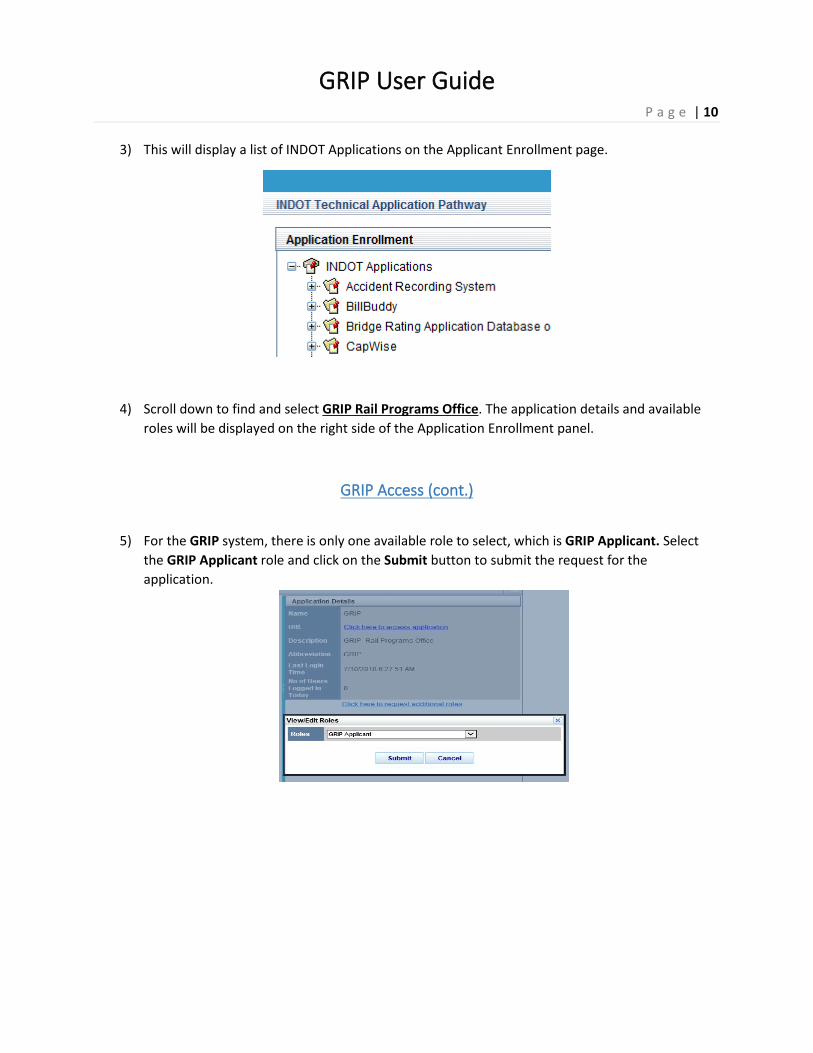
3) This will display a list of INDOT Applications on the Applicant Enrollment page.
4) Scroll down to find and select GRIP Rail Programs Office. The application details and available roles will be displayed on the right side of the Application Enrollment panel.
GRIP Access (cont.)
5) For the GRIP system, there is only one available role to select, which is GRIP Applicant. Select the GRIP Applicant role and click on the Submit button to submit the request for the application.

GRIP User Guide P a g e | 11
6) Once the request is submitted successfully, an Application Enrollment Acknowledgment email
is sent to the user.
7) The INDOT Application Administrator is responsible for approving or denying a user’s request for an application. After the Application Administrator step is complete an approval or denial email is sent to the Users email address. (example is on next page).
GRIP Access (cont.)
8) Once you have access to GRIP, login to ITAP https://itap.indot.in.gov/login.aspx

GRIP User Guide P a g e | 12
9) Select GRIP-Rail Programs office (see above) under the INDOT Applications and select Click here to access application to the right of the screen (see below).
RRGCF Application Submittal
1) Once you’re into the GRIP system (see ITAP & GRIP access instructions), to begin a New Application for the Railroad Grade Crossing Fund click on the green New Grant Application icon towards the top left of screen.
2) From there, select the type of application RRGCF & click Continue.
GRIP User Guide P a g e | 13
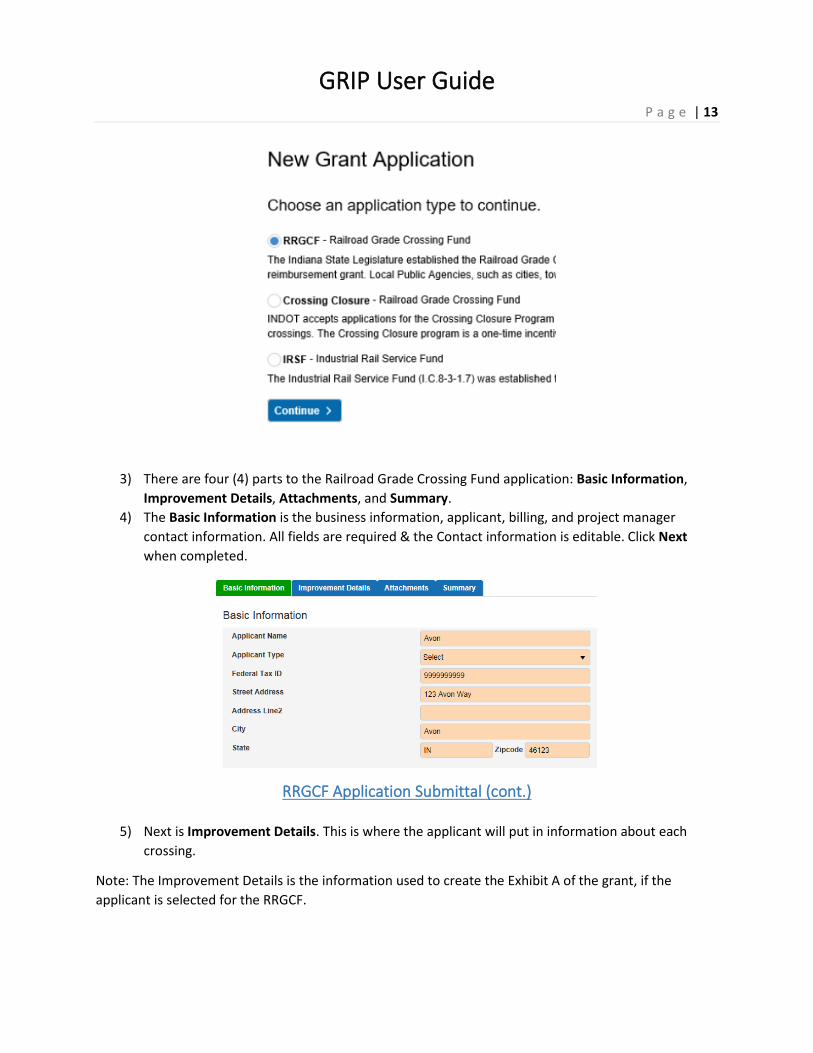
3) There are four (4) parts to the Railroad Grade Crossing Fund application: Basic Information, Improvement Details, Attachments, and Summary.
4) The Basic Information is the business information, applicant, billing, and project manager contact information. All fields are required & the Contact information is editable. Click Next when completed.
RRGCF Application Submittal (cont.)
5) Next is Improvement Details. This is where the applicant will put in information about each crossing.
Note: The Improvement Details is the information used to create the Exhibit A of the grant, if the applicant is selected for the RRGCF.
GRIP User Guide P a g e | 14
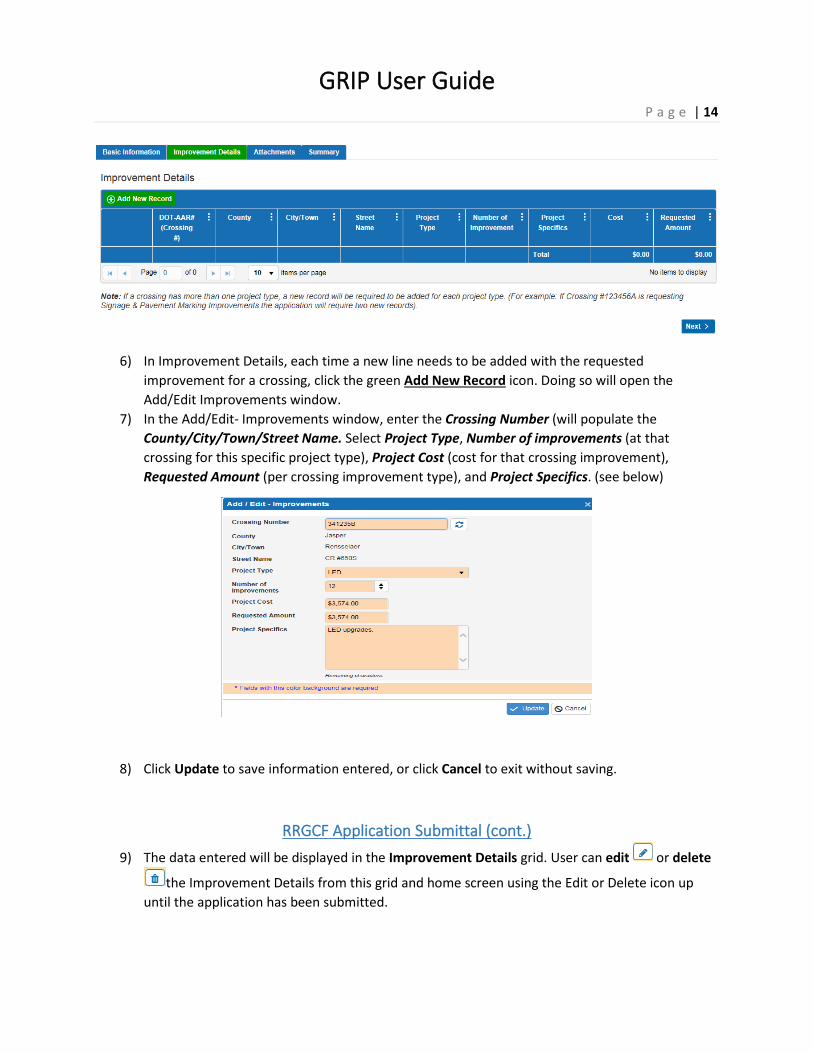
6) In Improvement Details, each time a new line needs to be added with the requested improvement for a crossing, click the green Add New Record icon. Doing so will open the Add/Edit Improvements window.
7) In the Add/Edit- Improvements window, enter the Crossing Number (will populate the County/City/Town/Street Name. Select Project Type, Number of improvements (at that crossing for this specific project type), Project Cost (cost for that crossing improvement), Requested Amount (per crossing improvement type), and Project Specifics. (see below)
8) Click Update to save information entered, or click Cancel to exit without saving.
RRGCF Application Submittal (cont.) 9) The data entered will be displayed in the Improvement Details grid. User can edit or delete
the Improvement Details from this grid and home screen using the Edit or Delete icon up until the application has been submitted.
GRIP User Guide P a g e | 15
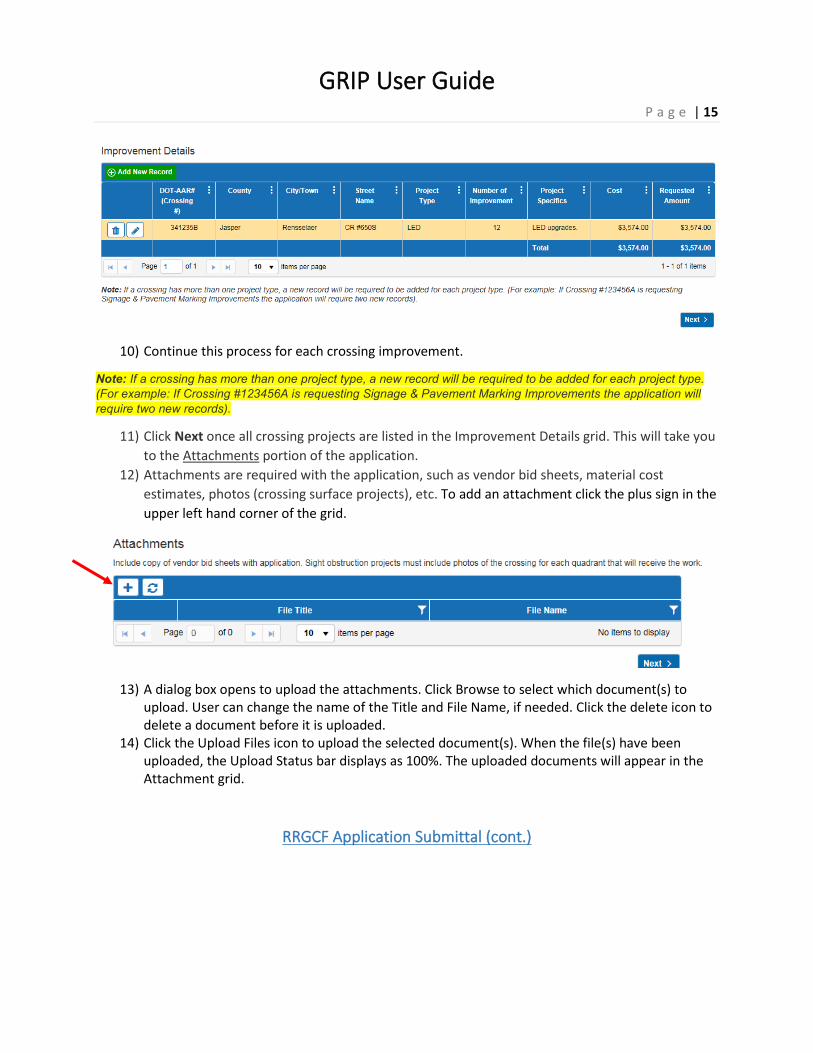
10) Continue this process for each crossing improvement.
Note: If a crossing has more than one project type, a new record will be required to be added for each project type. (For example: If Crossing #123456A is requesting Signage & Pavement Marking Improvements the application will require two new records).
11) Click Next once all crossing projects are listed in the Improvement Details grid. This will take you to the Attachments portion of the application.
12) Attachments are required with the application, such as vendor bid sheets, material cost estimates, photos (crossing surface projects), etc. To add an attachment click the plus sign in the upper left hand corner of the grid.
13) A dialog box opens to upload the attachments. Click Browse to select which document(s) to upload. User can change the name of the Title and File Name, if needed. Click the delete icon to delete a document before it is uploaded.
14) Click the Upload Files icon to upload the selected document(s). When the file(s) have been uploaded, the Upload Status bar displays as 100%. The uploaded documents will appear in the Attachment grid.
RRGCF Application Submittal (cont.)
GRIP User Guide P a g e | 16
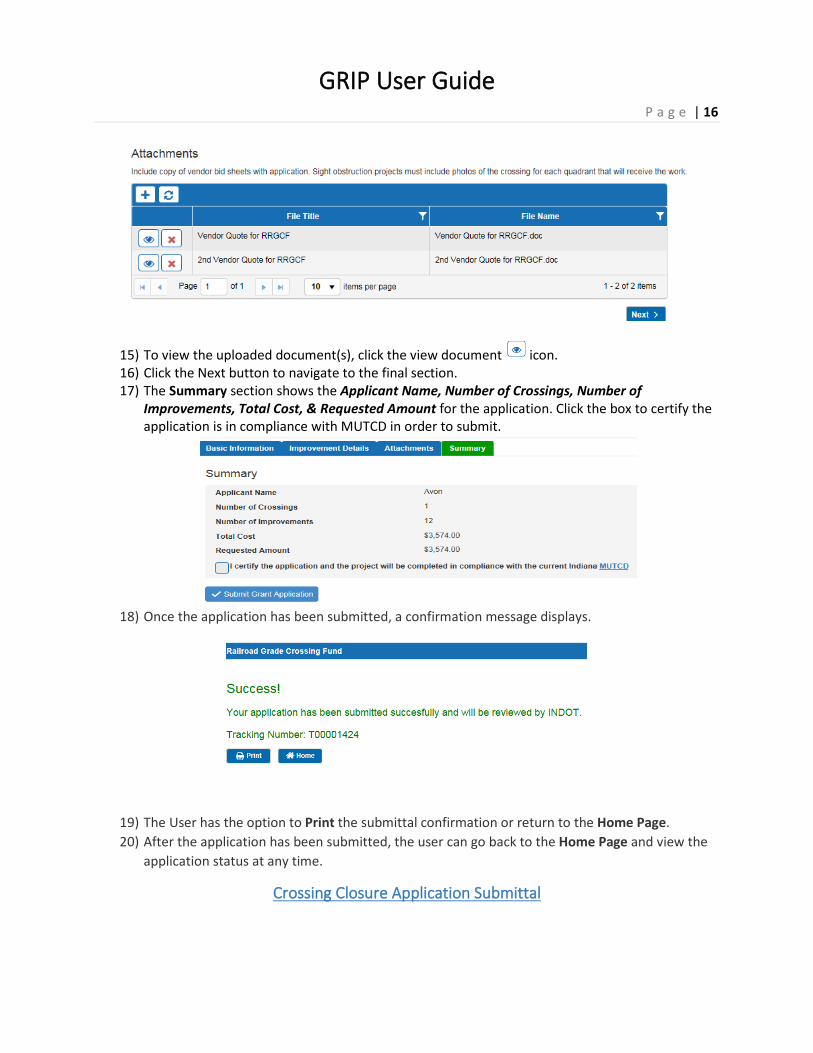
15) To view the uploaded document(s), click the view document icon. 16) Click the Next button to navigate to the final section. 17) The Summary section shows the Applicant Name, Number of Crossings, Number of
Improvements, Total Cost, & Requested Amount for the application. Click the box to certify the application is in compliance with MUTCD in order to submit.
18) Once the application has been submitted, a confirmation message displays.
19) The User has the option to Print the submittal confirmation or return to the Home Page. 20) After the application has been submitted, the user can go back to the Home Page and view the
application status at any time.
Crossing Closure Application Submittal
GRIP User Guide P a g e | 17
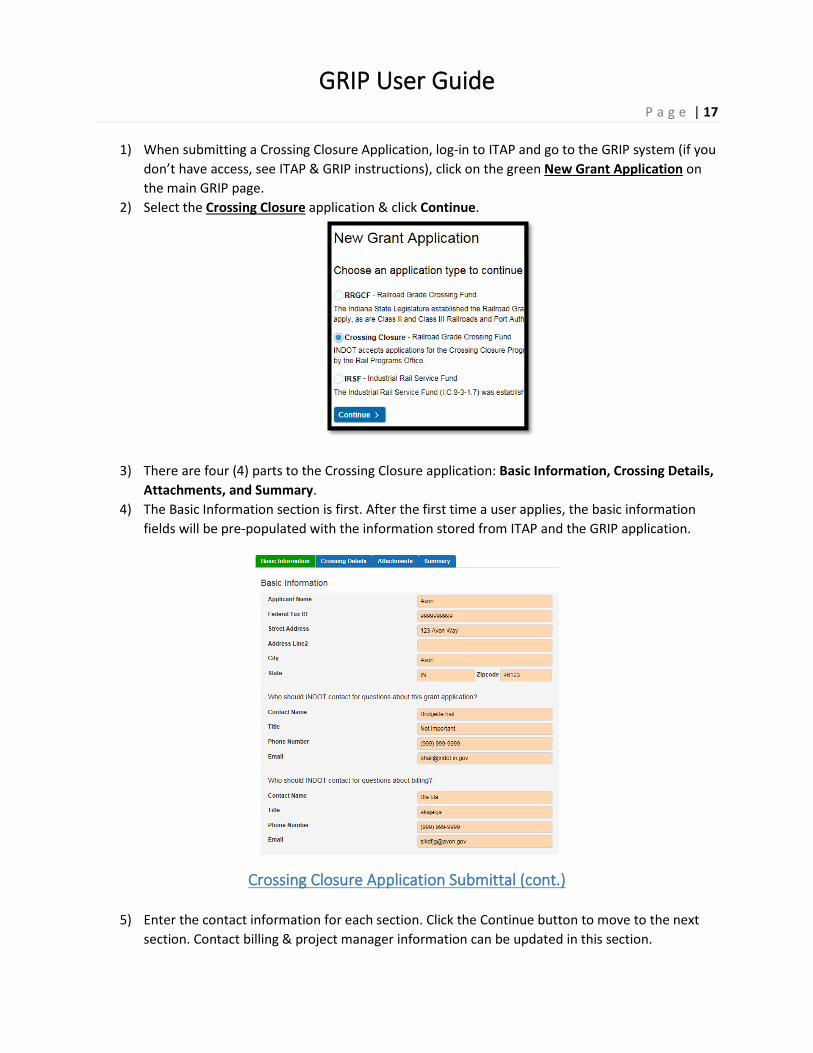
1) When submitting a Crossing Closure Application, log-in to ITAP and go to the GRIP system (if you
don’t have access, see ITAP & GRIP instructions), click on the green New Grant Application on the main GRIP page.
2) Select the Crossing Closure application & click Continue.
3) There are four (4) parts to the Crossing Closure application: Basic Information, Crossing Details, Attachments, and Summary.
4) The Basic Information section is first. After the first time a user applies, the basic information fields will be pre-populated with the information stored from ITAP and the GRIP application.
Crossing Closure Application Submittal (cont.)
5) Enter the contact information for each section. Click the Continue button to move to the next section. Contact billing & project manager information can be updated in this section.
GRIP User Guide P a g e | 18
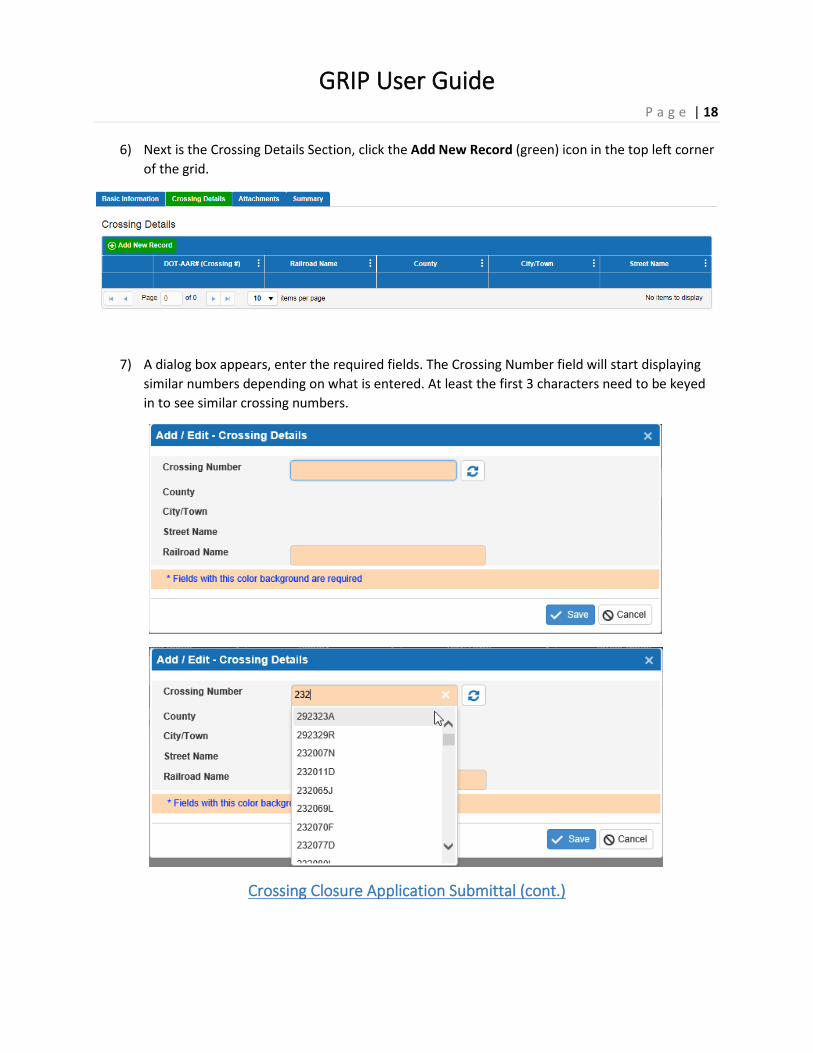
6) Next is the Crossing Details Section, click the Add New Record (green) icon in the top left corner
of the grid.
7) A dialog box appears, enter the required fields. The Crossing Number field will start displaying similar numbers depending on what is entered. At least the first 3 characters need to be keyed in to see similar crossing numbers.
Crossing Closure Application Submittal (cont.)
GRIP User Guide P a g e | 19
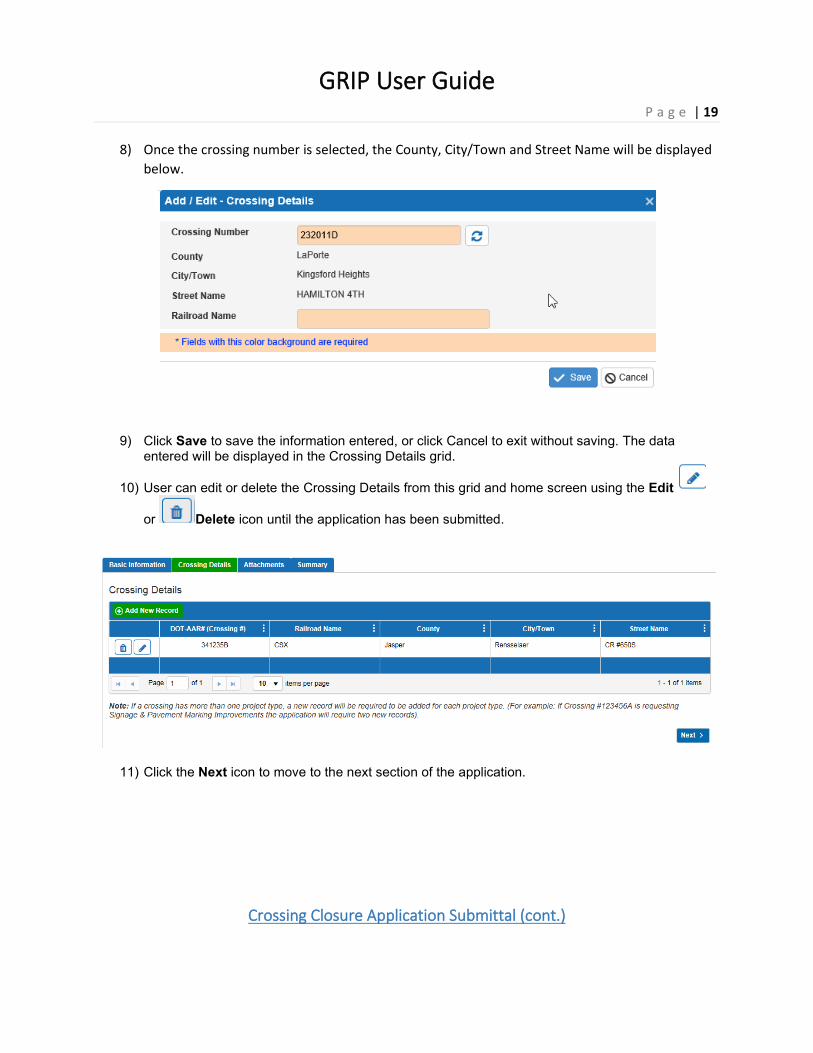
8) Once the crossing number is selected, the County, City/Town and Street Name will be displayed
below.
9) Click Save to save the information entered, or click Cancel to exit without saving. The data entered will be displayed in the Crossing Details grid.
10) User can edit or delete the Crossing Details from this grid and home screen using the Edit
or Delete icon until the application has been submitted.
11) Click the Next icon to move to the next section of the application.
Crossing Closure Application Submittal (cont.)
GRIP User Guide P a g e | 20
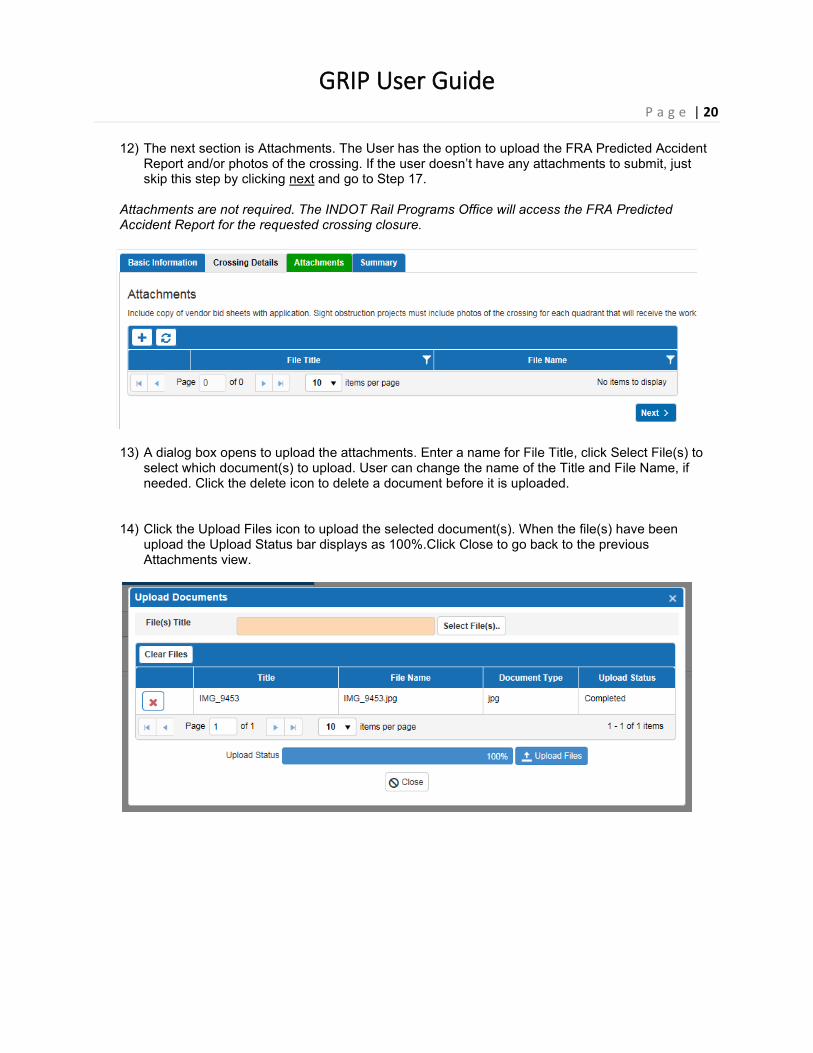
12) The next section is Attachments. The User has the option to upload the FRA Predicted Accident
Report and/or photos of the crossing. If the user doesn’t have any attachments to submit, just skip this step by clicking next and go to Step 17.
Attachments are not required. The INDOT Rail Programs Office will access the FRA Predicted Accident Report for the requested crossing closure.
13) A dialog box opens to upload the attachments. Enter a name for File Title, click Select File(s) to select which document(s) to upload. User can change the name of the Title and File Name, if needed. Click the delete icon to delete a document before it is uploaded.
14) Click the Upload Files icon to upload the selected document(s). When the file(s) have been upload the Upload Status bar displays as 100%.Click Close to go back to the previous Attachments view.
GRIP User Guide P a g e | 21
Crossing Closure Application Submittal (cont.)
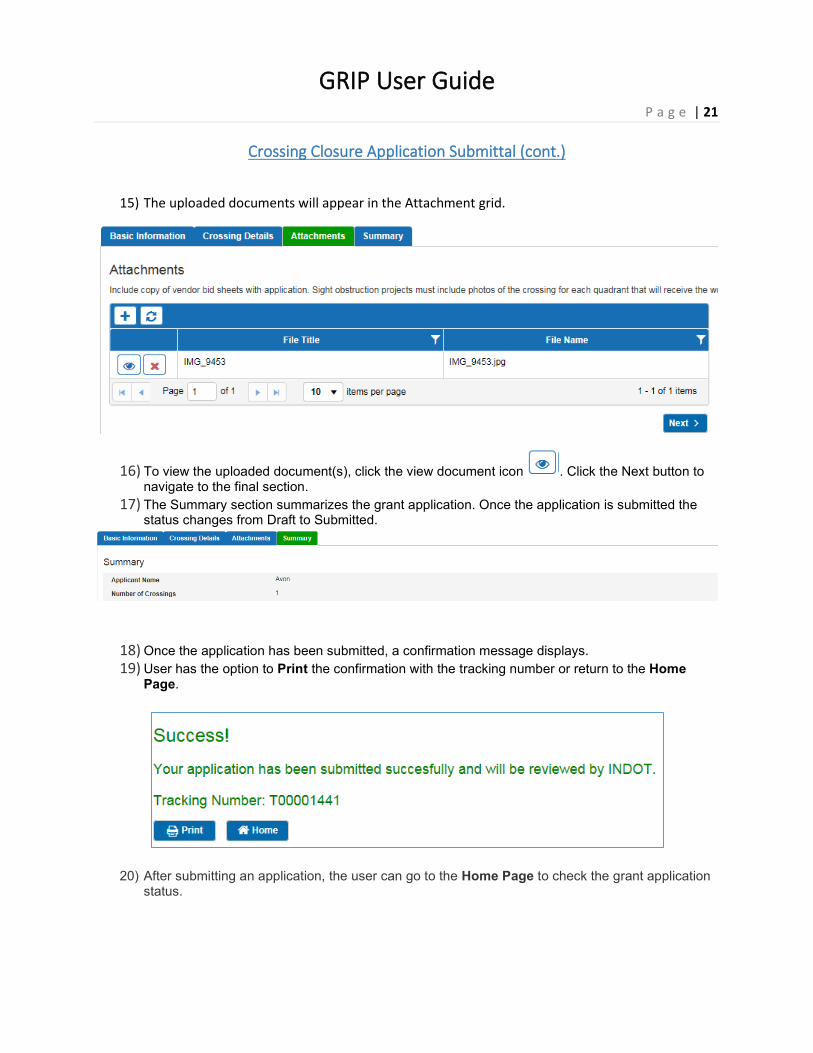
15) The uploaded documents will appear in the Attachment grid.
16) To view the uploaded document(s), click the view document icon . Click the Next button to navigate to the final section.
17) The Summary section summarizes the grant application. Once the application is submitted the status changes from Draft to Submitted.
18) Once the application has been submitted, a confirmation message displays. 19) User has the option to Print the confirmation with the tracking number or return to the Home
Page.
20) After submitting an application, the user can go to the Home Page to check the grant application status.
GRIP User Guide P a g e | 22
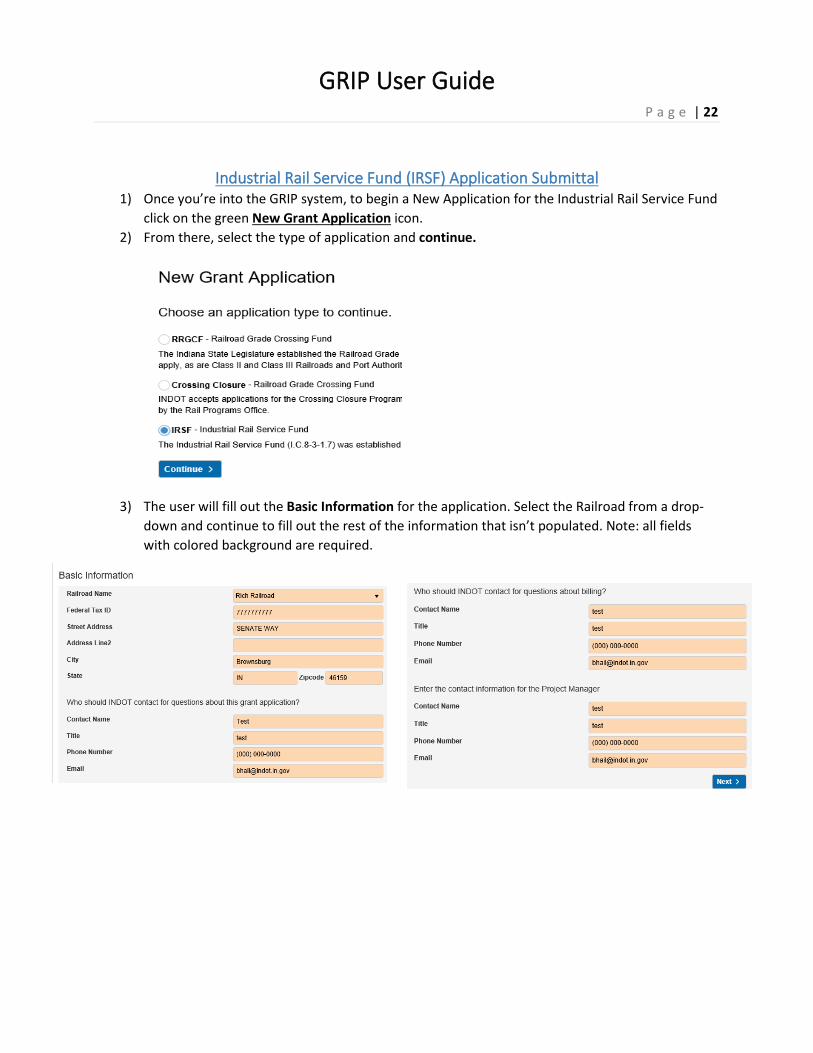
Industrial Rail Service Fund (IRSF) Application Submittal 1) Once you’re into the GRIP system, to begin a New Application for the Industrial Rail Service Fund
click on the green New Grant Application icon. 2) From there, select the type of application and continue.
3) The user will fill out the Basic Information for the application. Select the Railroad from a drop-down and continue to fill out the rest of the information that isn’t populated. Note: all fields with colored background are required.
GRIP User Guide P a g e | 23
Industrial Rail Service Fund (IRSF) Application Submittal (cont.)
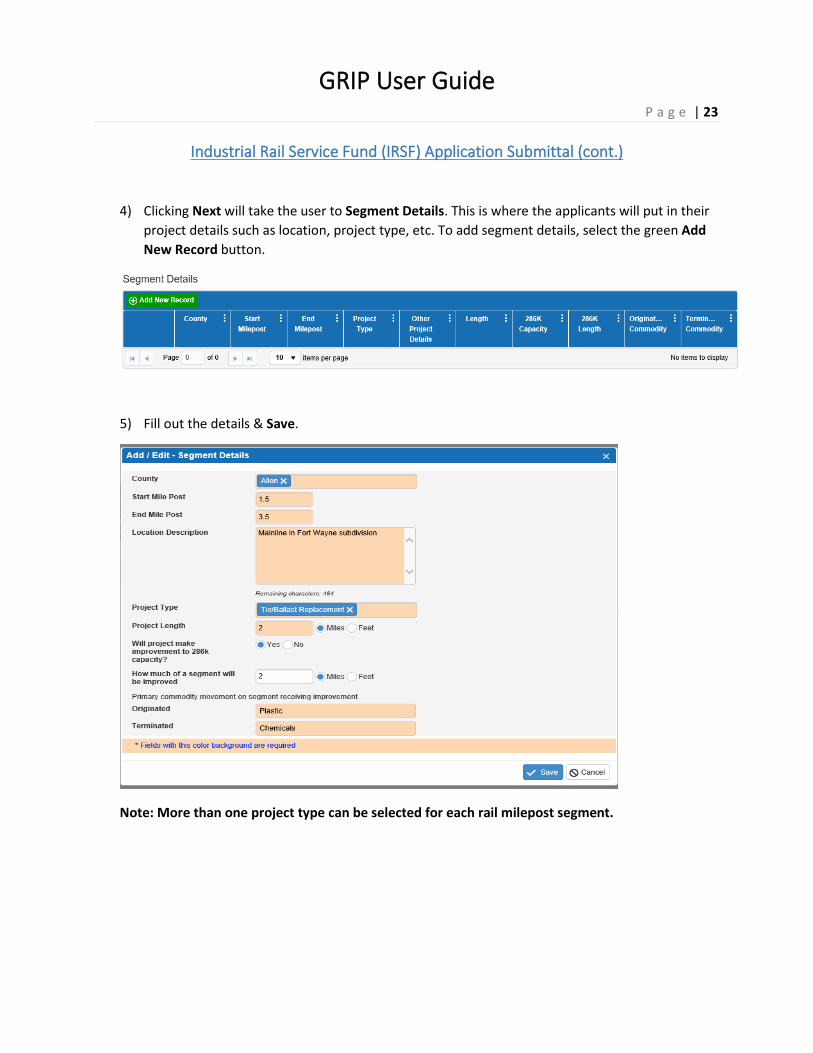
4) Clicking Next will take the user to Segment Details. This is where the applicants will put in their project details such as location, project type, etc. To add segment details, select the green Add New Record button.
5) Fill out the details & Save.
Note: More than one project type can be selected for each rail milepost segment.
GRIP User Guide P a g e | 24
Industrial Rail Service Fund (IRSF) Application Submittal (cont.)
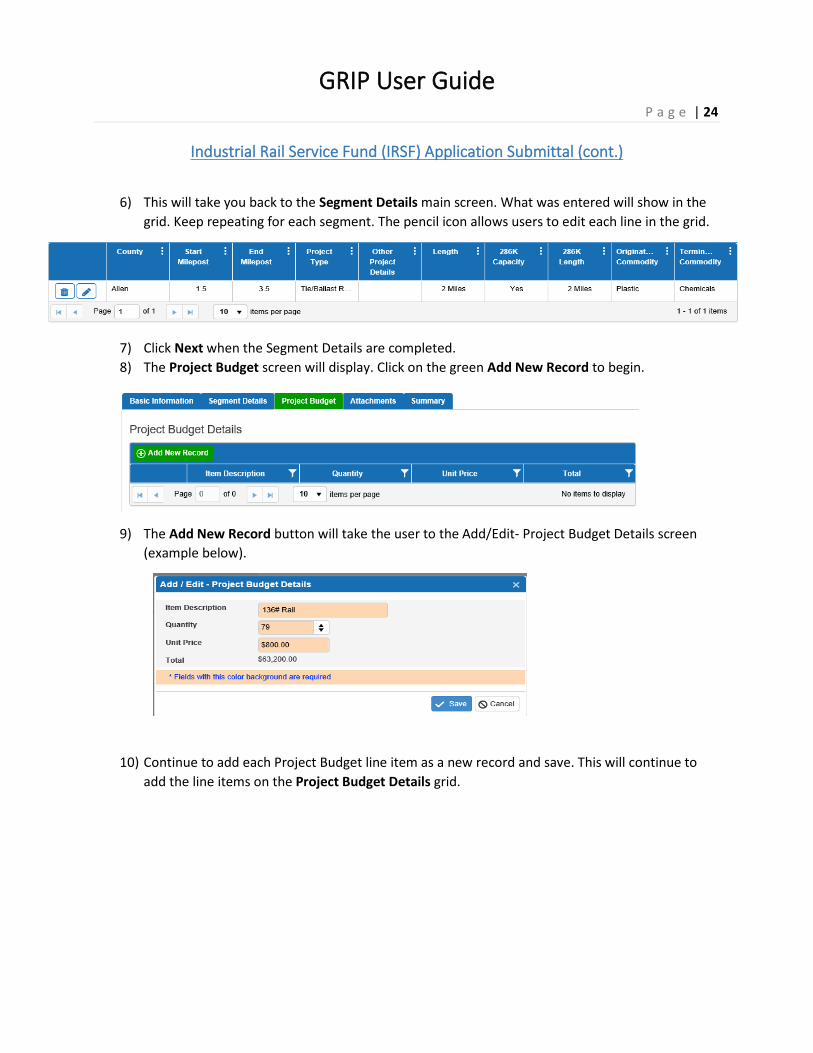
6) This will take you back to the Segment Details main screen. What was entered will show in the grid. Keep repeating for each segment. The pencil icon allows users to edit each line in the grid.
7) Click Next when the Segment Details are completed. 8) The Project Budget screen will display. Click on the green Add New Record to begin.
9) The Add New Record button will take the user to the Add/Edit- Project Budget Details screen (example below).
10) Continue to add each Project Budget line item as a new record and save. This will continue to add the line items on the Project Budget Details grid.
GRIP User Guide P a g e | 25
Industrial Rail Service Fund (IRSF) Application Submittal (cont.)
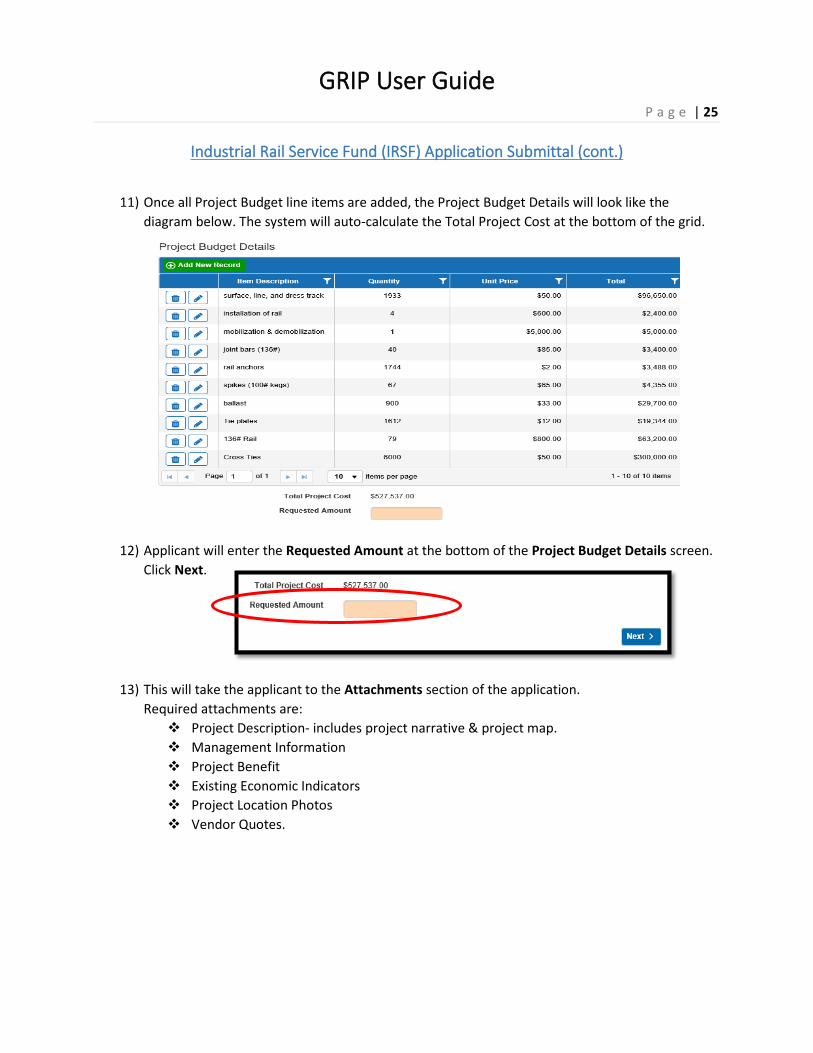
11) Once all Project Budget line items are added, the Project Budget Details will look like the diagram below. The system will auto-calculate the Total Project Cost at the bottom of the grid.
12) Applicant will enter the Requested Amount at the bottom of the Project Budget Details screen. Click Next.
13) This will take the applicant to the Attachments section of the application. Required attachments are: Project Description- includes project narrative & project map. Management Information Project Benefit Existing Economic Indicators Project Location Photos Vendor Quotes.
GRIP User Guide P a g e | 26
Industrial Rail Service Fund (IRSF) Application Submittal (cont.)
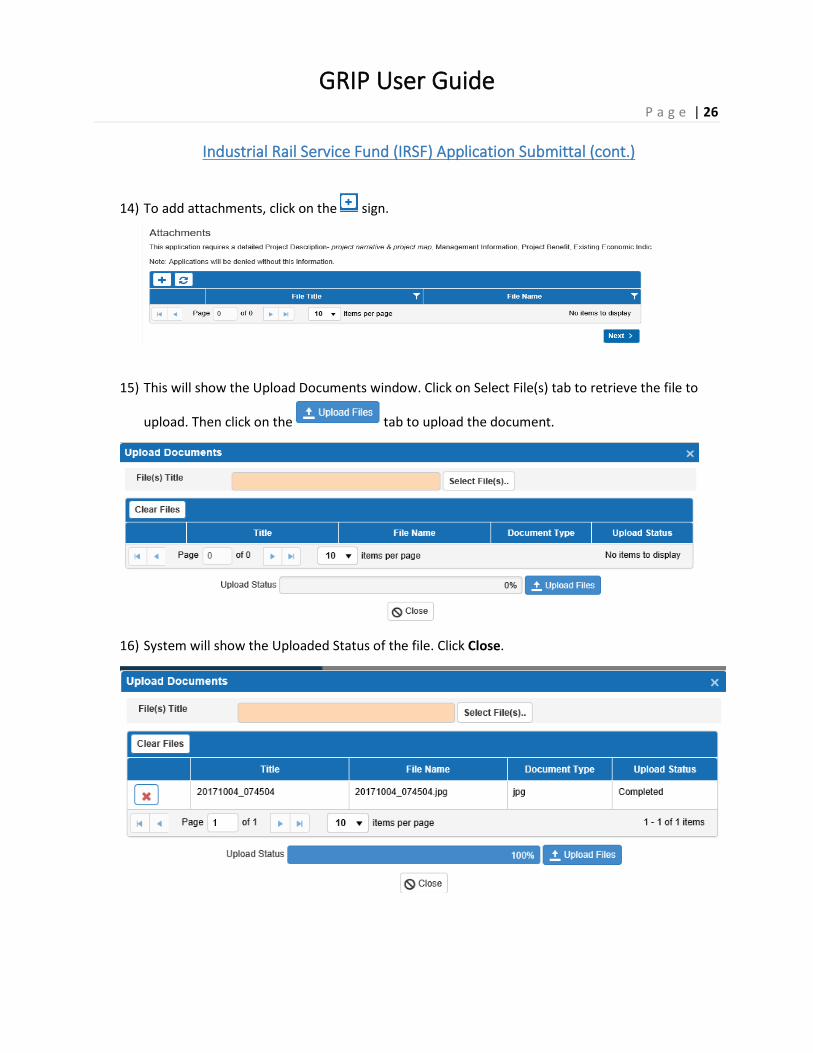
14) To add attachments, click on the sign.
15) This will show the Upload Documents window. Click on Select File(s) tab to retrieve the file to
upload. Then click on the tab to upload the document.
16) System will show the Uploaded Status of the file. Click Close.
GRIP User Guide P a g e | 27
Industrial Rail Service Fund (IRSF) Application Submittal (cont.)
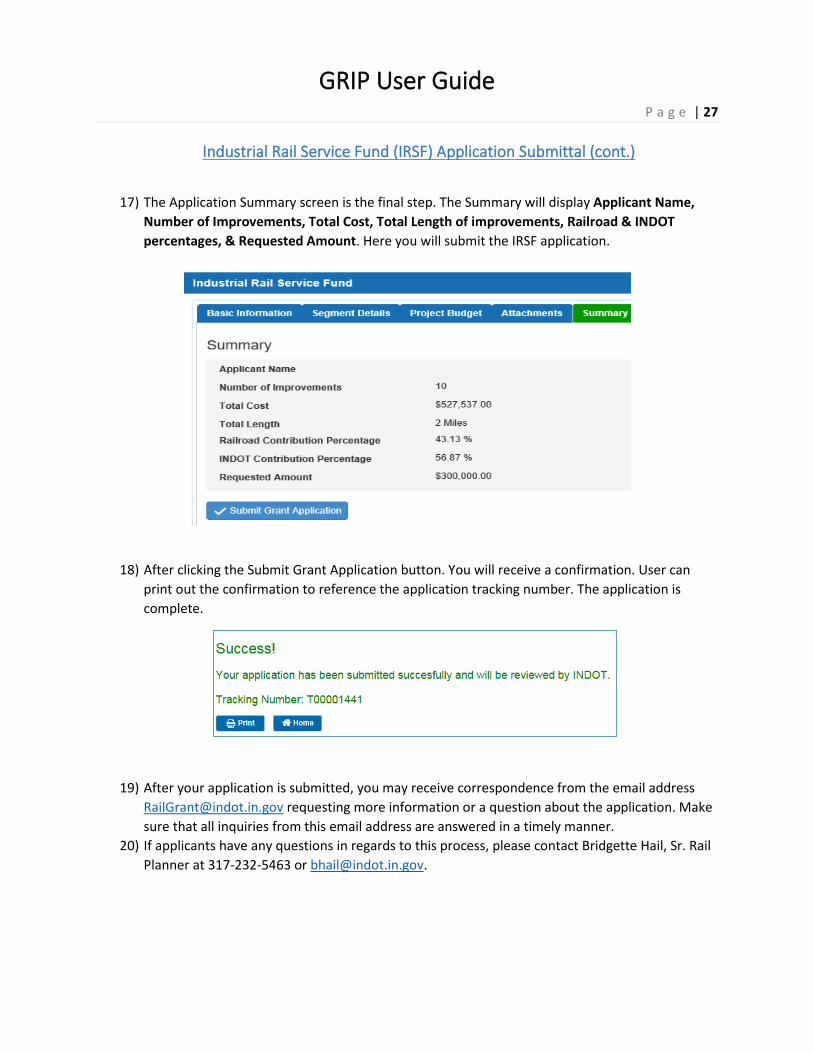
17) The Application Summary screen is the final step. The Summary will display Applicant Name, Number of Improvements, Total Cost, Total Length of improvements, Railroad & INDOT percentages, & Requested Amount. Here you will submit the IRSF application.
18) After clicking the Submit Grant Application button. You will receive a confirmation. User can print out the confirmation to reference the application tracking number. The application is complete.
19) After your application is submitted, you may receive correspondence from the email address [email protected] requesting more information or a question about the application. Make sure that all inquiries from this email address are answered in a timely manner.
20) If applicants have any questions in regards to this process, please contact Bridgette Hail, Sr. Rail Planner at 317-232-5463 or [email protected].