Embed Size (px)
Citation preview
Griffin PowerMate 2.0 User Guide
Release Notes
PowerMate 2.0 for Windows XP® and Windows Vista®
New features in version 2.0:
- Improved and redesigned user interface - Added ability to drag and drop applications and shortcuts to the interface - Added/updated default applications and presets - Added support for multiple users- Added support for multiple PowerMates- Added ability to switch/swap settings between PowerMates- Added ability to import/export settings for each PowerMate

System Requirements
Windows XP or Vista, and a connection to a powered USB hub or USB keyboard, or a direct USB connection to your computer.
Uninstall Previous Software
Important: If you already have older PowerMate software installed on your computer, please follow these steps to uninstall it before using 2.0:
1. Unplug your PowerMate.
2. From Add/Remove Programs in your Control Panel, choose the PowerMate driver.
3. Install the new software and plug in your PowerMate.
Getting Started
PowerMate 2.0 for Windows is distributed as an executable installer.
1. Double-click the installer to run it.
2. The installer will lead you through the installation process. It may lead you through installation of the .Net 2.0 Framework if you do not already have it installed.
3. Open from the Start menu. There should be a PowerMate icon in the Windows toolbar in the lower righthand corner of your screen. If this is the first time you have run it, the settings editor should open automatically.
4. Plug in your PowerMate ... or PowerMates, since Version 2.0 now supports more than one at a time.
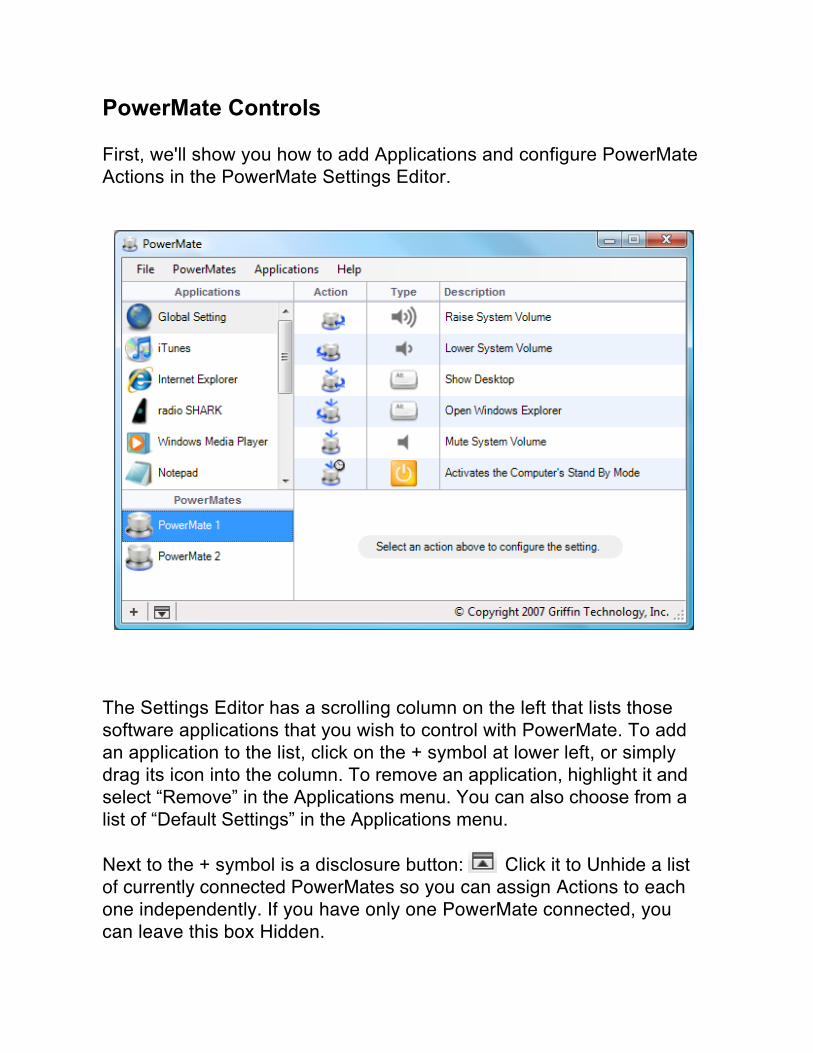
PowerMate Controls
First, we'll show you how to add Applications and configure PowerMate Actions in the PowerMate Settings Editor.
The Settings Editor has a scrolling column on the left that lists those software applications that you wish to control with PowerMate. To add an application to the list, click on the + symbol at lower left, or simply drag its icon into the column. To remove an application, highlight it and select “Remove” in the Applications menu. You can also choose from a list of “Default Settings” in the Applications menu.
Next to the + symbol is a disclosure button: Click it to Unhide a list of currently connected PowerMates so you can assign Actions to each one independently. If you have only one PowerMate connected, you can leave this box Hidden.
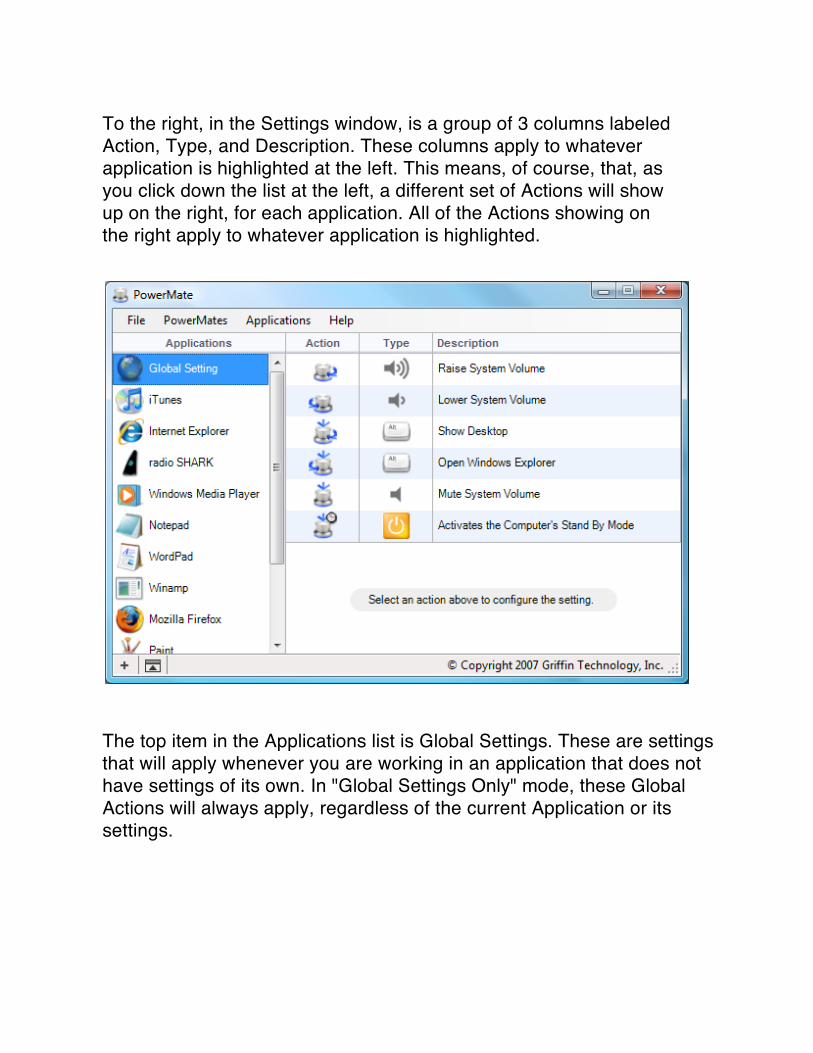
To the right, in the Settings window, is a group of 3 columns labeled Action, Type, and Description. These columns apply to whatever application is highlighted at the left. This means, of course, that, as you click down the list at the left, a different set of Actions will show up on the right, for each application. All of the Actions showing on the right apply to whatever application is highlighted.
The top item in the Applications list is Global Settings. These are settings that will apply whenever you are working in an application that does not have settings of its own. In "Global Settings Only" mode, these Global Actions will always apply, regardless of the current Application or its settings.
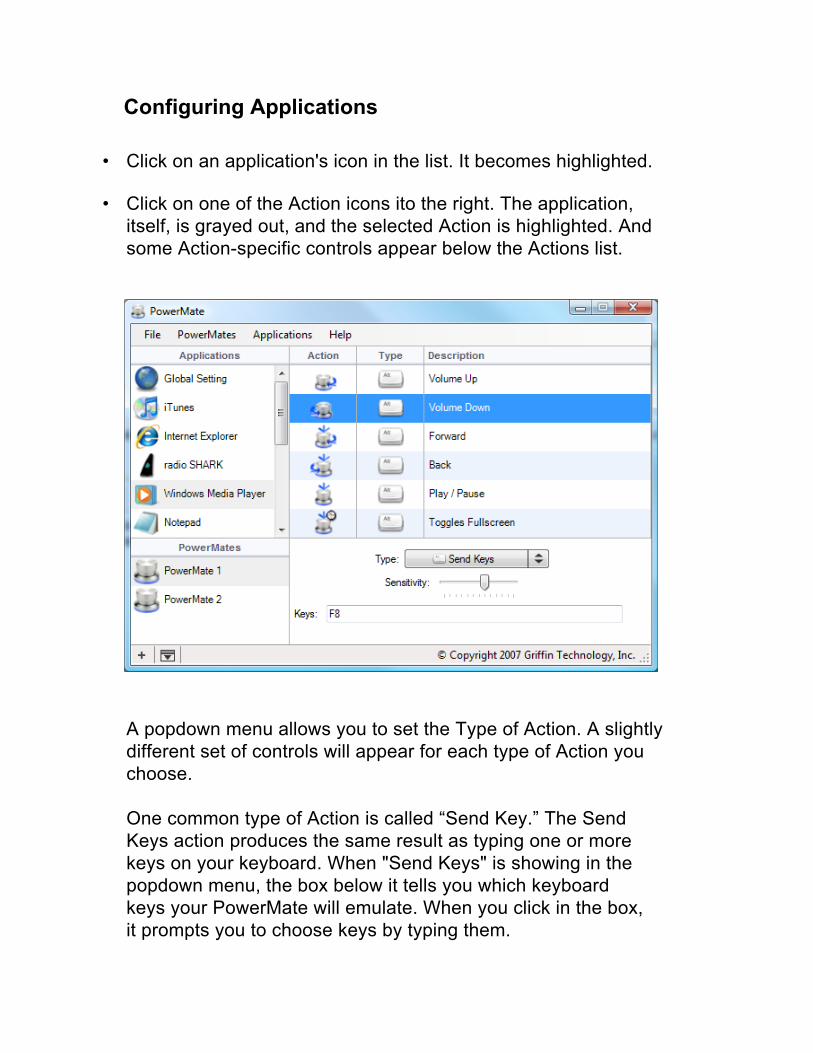
Configuring Applications
• Click on an application's icon in the list. It becomes highlighted.
• Click on one of the Action icons ito the right. The application, itself, is grayed out, and the selected Action is highlighted. And some Action-specific controls appear below the Actions list.
A popdown menu allows you to set the Type of Action. A slightly different set of controls will appear for each type of Action you choose.
One common type of Action is called “Send Key.” The Send Keys action produces the same result as typing one or more keys on your keyboard. When "Send Keys" is showing in the popdown menu, the box below it tells you which keyboard keys your PowerMate will emulate. When you click in the box, it prompts you to choose keys by typing them.
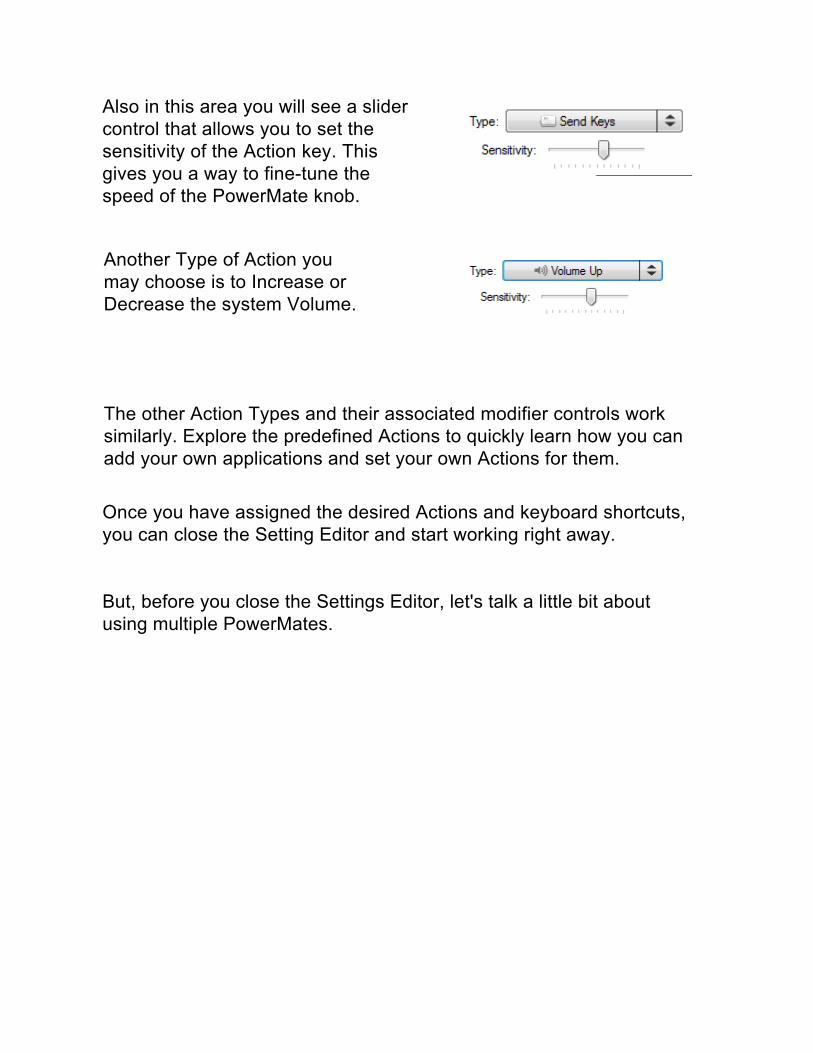
Also in this area you will see a slider control that allows you to set the sensitivity of the Action key. This gives you a way to fine-tune the speed of the PowerMate knob.
Another Type of Action you may choose is to Increase or Decrease the system Volume.
The other Action Types and their associated modifier controls work similarly. Explore the predefined Actions to quickly learn how you can add your own applications and set your own Actions for them.
Once you have assigned the desired Actions and keyboard shortcuts, you can close the Setting Editor and start working right away.
But, before you close the Settings Editor, let's talk a little bit about using multiple PowerMates.
Configuring Multiple PowerMates
The number of PowerMates that can be connected is subject only tothe limitations of USB technology. Theoretically, it should be possible to have up to 127 PowerMate knobs connected at once, glowing and pulsing on your desk. (If you decide to try this, please send pictures!)
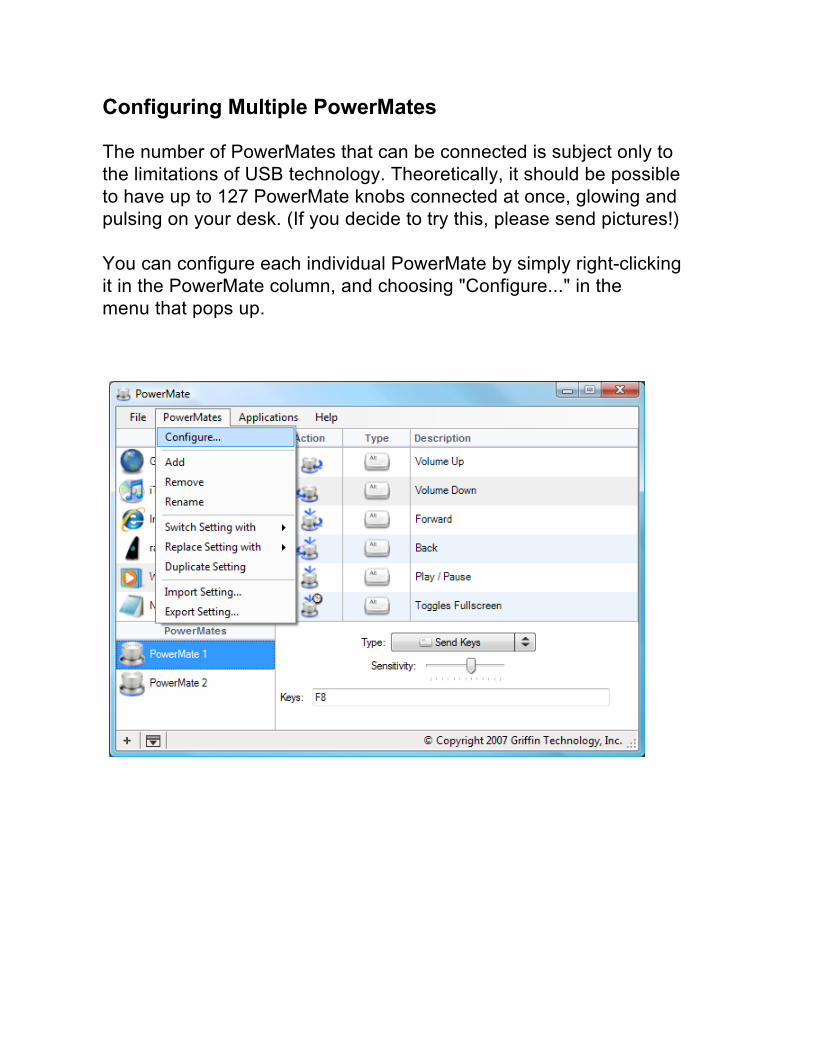
You can configure each individual PowerMate by simply right-clicking it in the PowerMate column, and choosing "Configure..." in the menu that pops up.
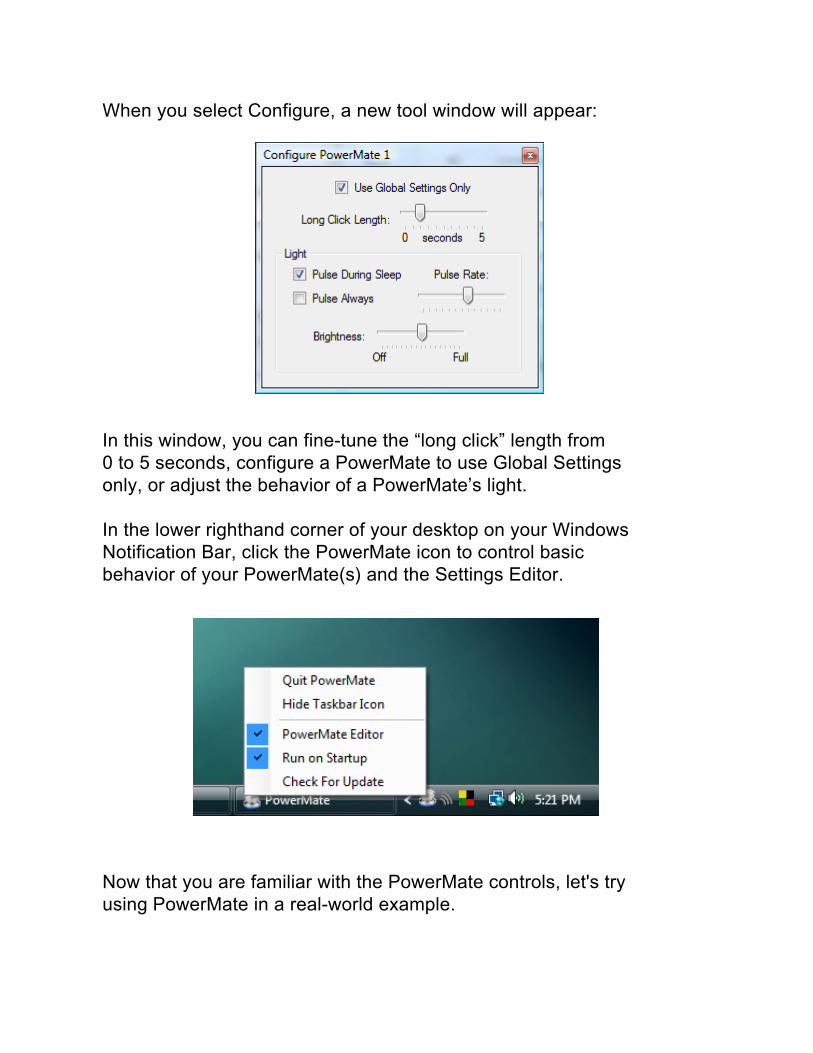
When you select Configure, a new tool window will appear:
In this window, you can fine-tune the “long click” length from 0 to 5 seconds, configure a PowerMate to use Global Settings only, or adjust the behavior of a PowerMate’s light.
In the lower righthand corner of your desktop on your Windows Notification Bar, click the PowerMate icon to control basic behavior of your PowerMate(s) and the Settings Editor.
Now that you are familiar with the PowerMate controls, let's try using PowerMate in a real-world example.
Basic Example: Using PowerMate with Windows Media Player
1. Open the PowerMate Settings Editor, and highlight the application you want to control (in this case, Windows Media Player). If it is not listed, you can add it by clicking the "+" sign, or by dragging its icon from the Start menu into the list.
. A single PowerMate can carry out 6 different commands. It can:
1. Rotate Right2. Rotate Left3. Rotate Right While Depressed (or "clicked")4. Rotate Left While Depressed5. Single Click (depress once briefly)6. Long Click (depress and hold)
2.
3.
Highlight the PowerMate Action.
For example, say you want to scroll left or right to change volume in Windows Media Player. Select Windows Media Player as the application you wish to control. Highlight the first PowerMate action, which is to rotate right. Next to "Type," set the drop-down menu to "Send Key."
The key command to change volume in Windows Media Player is “F9.” So, next to "Keys," click in the text box and press the F9 key on your keyboard. You will see the field now says "F9."
Now open or click on Windows Media Player so that it is the active application. Play some music. Verify that turning PowerMate to the right causes the volume level to increase. You should also see the volume slider moving up.
But turning PowerMate to the left does not reverse this action — yet. You stillneed to go back to your PowerMate Settings Editor and set up the "rotate left" Action to carry out Windows Media Player’s “F8" (decrease volume) command.
Notice that you did not need to select "Apply" or "OK" for your changes to immediately take effect. And, you still have 4 more PowerMate Actions available for use in Windows Media Player.
Okay, we know that programming your PowerMate to control Windows Media Player’s volume is unnecessary, since PowerMate already knows how to control the system volume; but this example shows you how easy it is to program PowerMate Actions. It’s just as easy to program PowerMate as a shuttle control in your favorite video editing program, and you can fine-tune PowerMate’s sensitivity to suit the speed at which you want to work.
4.

And Thank You!
We hope you enjoy your PowerMate, and that you will find many creative and fun uses for it
Griffin Technology, Inc. 1930 Air Lane Dr. Nashville, TN 37210 USA
Telephone: (615) 399-7000 Web Site: http://www.griffintechnology.com/
Legal Notices and Copyright
© 2007 Griffin Technology, Inc. All Rights Reserved. PowerMate™ and attributed technology © 2004–2007 Griffin Technology, Inc. All products and materials are subject to the copyright and other intellectual property protection of the United States and foreign countries. No part of this publication may be reproduced, transmitted, transcribed, altered, or translated into any languages without written permission of Griffin. Information and specifications in this document are subject to change without notice and do not represent a commitment on the part of Griffin Technology, Inc.
“Windows,” Windows XP,“ “Vista,” and “Windows Media Player” are trademarks of Microsoft Corp., registered in the U.S. and other countries.