Embed Size (px)
Citation preview

Grid Administration
LEGAL NOTICE
This publication is based on current information and resource allocations as of its date of publication and is subject to change or withdrawal by CA at any time without notice. The information in this publication could include typographical errors or technical inaccuracies. CA may make modifications to any CA product, software program, method or procedure described in this publication at any time without notice.
Any reference in this publication to non-CA products and non-CA websites are provided for convenience only and shall not serve as CA’s endorsement of such products or websites. Your use of such products, websites, and any information regarding such products or any materials provided with such products or at such websites shall be at your own risk.
Notwithstanding anything in this publication to the contrary, this publication shall not (i) constitute product documentation or specifications under any existing or future written license agreement or services agreement relating to any CA software product, or be subject to any warranty set forth in any such written agreement; (ii) serve to affect the rights and/or obligations of CA or its licensees under any existing or future written license agreement or services agreement relating to any CA software product; or (iii) serve to amend any product documentation or specifications for any CA software product. The development, release and timing of any features or functionality described in this publication remain at CA’s sole discretion.
The information in this publication is based upon CA’s experiences with the referenced software products in a variety of development and customer environments. Past performance of the software products in such development and customer environments is not indicative of the future performance of such software products in identical, similar or different environments. CA does not warrant that the software products will operate as specifically set forth in this publication. CA will support only the referenced products in accordance with (i) the documentation and specifications provided with the referenced product, and (ii) CA’s then-current maintenance and support policy for the referenced product.
Certain information in this publication may outline CA’s general product direction. All information in this publication is for your informational purposes only and may not be incorporated into any contract. CA assumes no responsibility for the accuracy or completeness of the information. To the extent permitted by applicable law, CA provides this document “AS IS” without warranty of any kind, including, without limitation, any implied warranties of merchantability, fitness for a particular purpose, or non-infringement. In no event will CA be liable for any loss or damage, direct or indirect, from the use of this document, including, without limitation, lost profits, lost investment, business interruption, goodwill or lost data, even if CA is expressly advised of the possibility of such damages.
COPYRIGHT LICENSE AND NOTICE:
This publication may contain sample application programming code and/or language which illustrate programming techniques on various operating systems. Notwithstanding anything to the contrary contained in this publication, such sample code does not constitute licensed products or software under any CA license or services agreement. You may copy, modify and use this sample code for the purposes of performing the installation methods and routines described in this document. These samples have not been tested. CA does not make, and you may not rely on, any promise, express or implied, of reliability, serviceability or function of the sample code.
Copyright © 2012 CA. All rights reserved. All trademarks, trade names, service marks and logos referenced herein belong to their respective companies. Microsoft product screen shots reprinted with permission from Microsoft Corporation.
TITLE AND PUBLICATION DATE:
CA AppLogic Best Practices: Grid Administration Publication Date: V1 – posted June 28, 2012
ACKNOWLEDGEMENTS
Principal Authors and Technical Editors
Alex Moscoso
Terry Pisauro
Jeremy Suo-Anttila
CA PRODUCT REFERENCES
This document references the following CA products:
CA AppLogic®
FEEDBACK
Please email us at [email protected] to share your feedback on this publication. Please
include the title of this publication in the subject of your email response. For technical assistance
with a CA product, please contact CA Technical Support at http://ca.com/support. For assistance
with support specific to Japanese operating systems, please contact CA at
http://www.casupport.jp.

3
Chapter 1: Introduction 5 What this Guide Provides .............................................................................................................................. 5 Where to go for more information ............................................................................................................... 5
Required Reading ...................................................................................................................................... 6 Education and User Forums ...................................................................................................................... 6 Technical Support ...................................................................................................................................... 7 Cloud Commons Resources ....................................................................................................................... 7
Chapter 2: Grid Installation Considerations 9 Bios Setup ..................................................................................................................................................... 9 10Gb/s vs 1Gb/s Ethernet ............................................................................................................................. 9 Managing Grid Servers ................................................................................................................................ 10
Chapter 3: Managing Appliances, Applications and Catalogs on the Grid 13 Preparing the Environment for Backup ....................................................................................................... 14
Setting up Trust Between the Grids ........................................................................................................ 14 Backing up Appliance Classes ...................................................................................................................... 15
Migrating an Appliance – “Warm Backup” .............................................................................................. 15 Using the Export Option – “Cold Backup” ............................................................................................... 17 Using the Copy Option – “Hot Backup” ................................................................................................... 18
Backing up Catalogs .................................................................................................................................... 18 Migrating Catalogs – “Warm Backup” ..................................................................................................... 18 Using the Export Option – “Cold Backup” ............................................................................................... 20
Backing up Applications .............................................................................................................................. 21 Migrating Applications – “Warm Backup” ............................................................................................... 21 Using the Export Option – “Cold Backup” ............................................................................................... 22 Using the Copy Option – “Hot Backup” ................................................................................................... 24
Chapter 4: Storage Management 25 Integrated IP SAN ........................................................................................................................................ 25
Adding Storage to the Integrated IP SAN ................................................................................................ 25 SAS vs SATA ............................................................................................................................................. 26
SAN Integration ........................................................................................................................................... 27
Chapter 5: Managing Access to the Grid 31 Grid Maintainers ......................................................................................................................................... 31 Grid Users .................................................................................................................................................... 32 Role Based Access Control (RBAC) .............................................................................................................. 35
Chapter 6: Troubleshooting 39 Grid Monitoring – Basic Metering Client (BMC) .......................................................................................... 39 Grid Monitoring – Email Notifications ......................................................................................................... 40 Volume Repair ............................................................................................................................................. 42

4
Glossary of Terms 45
5
The CA AppLogic® platform is a turnkey cloud computing platform that provides a fast track to a
private cloud with composing, running and scaling distributed applications. It uses advanced
virtualization technologies allowing you to deploy solutions based on your existing operating
systems, middleware, and web applications.
CA AppLogic appears to users as a large system, providing a single point of access to powerful
distributed resources and replaces expensive and difficult to integrate IT infrastructure such as
firewalls, load balancers, servers and SANs with pre-integrated and pre-tested virtual appliances.
Each appliance runs in its own virtual environment that boots its own OS and appears as a
separate physical server to the software that runs inside the appliance. In addition to being
virtual, CA AppLogic appliances are re-usable - users can modify catalog appliances or build their
own appliances from scratch. Instead of being hardwired to each other, infrastructure
components are assembled visually and stored as part of the application in CA AppLogic. This
makes the infrastructure essentially disposable; it is instantiated on the grid when the application
is run, maintained while needed, and disposed of when the application exits. It also supports
business continuity by making it easier for you to quickly recreate both your applications and
their required infrastructure in a back up environment in the event the primary environment
becomes unavailable.
The purpose of this document is to provide you with an insight into the steps you can take to
manage various aspects of the CA AppLogic platform. This includes tasks such as backup and
restore of your critical CA AppLogic resources through the use of targeted backup strategies – on
the appliance class, application, and catalog level – as well as user and group administration,
volume management and more.
The procedures in this document provide a high level overview of strategies inherent to the CA
AppLogic platform and assume that you have already properly architected and installed your CA
AppLogic grid. Note that this guide is designed to be used in conjunction with existing CA
AppLogic documentation, and is not a replacement for such documents.
There are many resources you can consults for additional details on migrating, exporting, and
importing appliances, applications, and catalogs in CA AppLogic, as well as any other topics
discussed in this guide. Following is a selection of some of those resources.
6
Required Reading
Although a summary of key terms and concepts is provided in this chapter, to ensure the most
successful outcome you should already be familiar with the processes and procedures as they are
documented in the provided product bookshelf. The documentation bookshelf for CA AppLogic
r3 can be accessed through the following link:
https://support.ca.com/cadocs/0/CA%203Tera%20Applogic%203%201-ENU/Bookshelf.html
Product documentation for other releases can be found in the Documentation download page on
http://support.ca.com.
In particular, you should be familiar with the following topics prior to using this document:
■ Secure Linux/UNIX access with PuTTY and OpenSSH
■ Command Line Shell Reference Guide:
■ Class Management Commands
■ Application Control Commands
■ Catalog Management Commands
■ Volume Management Commands
■ Grid Control Commands
■ Dashboard Notification Message Reference Guide
■ Grid Controller Recovery
■ Storage Health Monitoring
■ AppLogic Infrastructure High-Availability
In addition to product documentation there are several Best Practices documents that are
available through the following link:
https://support.ca.com/phpdocs/0/common/impcd/r11/Cloud/AppLogic_Frame_sc.htm
One of those documents is the CA AppLogic Windows Appliance Creation Companion and
Examples Guide, which can also be accessed through the following direct link:
https://support.ca.com/phpdocs/0/common/impcd/r11/Cloud/doc/applogic_win_appliance_cre
ation_ex_companion_r3_final.pdf
Education and User Forums
In addition product training is available from the CA Learning Site:
https://calearning.ca.com/plateau/user/cadeeplink.do?linkId=CATALOG_SEARCH_RESULTS&siteI
D=United+States&keywords=applogic

7
Finally, there are also interactive forums where users can post questions, request information, or
offer insight and suggestions. The forums, which were previously located at
http://forums.3tera.com, are now available through the CA 3Tera Global User Community:
https://communities.ca.com/web/ca-3tera-global-user-community/welcome-3tera-forum-users
To access the message boards and forums you will need to first create a CA Support Online
account profile - if you do not already have one - and login in to Support Online. If you previously
participated in the AppLogic Forums, your information has been transferred to the new CA 3Tera
Global User Community - and your user name will be changed to your CA user ID associated with
your email address. If you are a new user to the community you need to join the community first
(click "Join this Community" link).
For additional assistance with your CA AppLogic implementation consult the following.
Technical Support
Support for CA AppLogic is provided through the CA Technologies Support site. This site is
available through the following link:
http://support.ca.com
The product home page for CA AppLogic is
https://support.ca.com/irj/portal/prddtlshome?productID=8383
Cloud Commons Resources
Cloud Commons (http://cloudcommons.com) provides a rich source of information about
working with the CA AppLogic platform – as well as broader topics related to the cloud
environment. In addition to the articles and blog entries available through the Learn tab, there
are user groups that can be accessed through the Collaborate tab:
http://cloudcommons.com/web/cc/collaborate
Scroll through the list and click the respective links to join or request access to “Open” or
“Members Only” user groups that interest you – or create your own group. Scroll through the list
and click the respective links to join or request access to “Open” or “Members Only” user groups
that interest you – or create your own group. To view the AppLogic Enablement Kit request to
join the AppLogic Partners user group. The AppLogic Enablement Kit provides a roadmap for
locating the information you need to get up and running quickly with CA AppLogic. It also
includes helpful video snippets and a forum for accessing additional information.

9
This chapter highlights additional points to consider while planning for the installation of your CA
AppLogic grid system.
Prior to installing your grid, it is important to disable the HyperThreading option in the BIOS setup for each server that will be used within the backbone – with the exception of the Backbone Fabric Controller itself. This will help ensure that both Hypervisors (Xen and VMware ESX) display the correct number of cores. If you do not disable HyperThreading, Xen will report eight cores for a Quad-core machine, while VMware ESX will report four cores.
CA AppLogic r3.1.4 is based on the latest release of the open source Xen hypervisor – XEN 4.1.1 –
which includes the Credit2 Scheduler. It is a complete rewrite that was designed with latency-
sensitive workloads and very large numbers of CPUs in mind. Although the current default
scheduler, Credit1, is HyperThreading-aware, Credit2 will eventually replace Credit1 as the
default scheduler in Xen. There are no plans to make Credit2 HyperThreading-aware at the time
of this writing.
Although the potential for HyperThreading is theoretically valid – since Credit1 is
HyperThreading-aware – it is still rather difficult to derive significant benefits from it. Unless the
load on a server is very carefully scheduled to account for it, having HyperThreading enabled
provides little or no benefit and, in fact, it may actually be detrimental sometimes. Non-
HyperThreaded performance, on the other hand, is more predictable and knowing exactly how
much computing reserves you have is sometimes better than squeezing every last bit of possible
performance – especially since the extra cores are not “true” ones. Those extra cores reported
when HyperThreading is enabled cannot run unique processes, but, rather, they run threads of
processes running on the main cores.
CA AppLogic requires, at a minimum, two 1Gb/s Ethernet switches (one for the external network
and one for the backbone network). The number of ports on each of these switches must be
equal to the number of servers you have plus one.
Note: A full 1Gb/s any-to-any connection between servers on the backbone network must be
provided, otherwise, errors will occur while you are building your grid. Note that 100Mb/s
adapters are supported only on the external network.
10
In addition to measuring the bits per second (b/s) rate, other metrics, such as packets per second
(p/s), are relevant to understanding device performance characteristics and the benefit provided
to the grid.
For example, a 1Gb/s Ethernet interface is capable of transmitting up to 1,000,000,000 b/s. To
determine p/s, we need to convert bits to bytes and then consider that packet size does not have
to be a fixed value as there are minimum and maximum sizes. The minimum size is based on
both the IP-defined minimum IP packet size and the Layer 2-defined minimum frame size (84
bytes). The maximum IP packet size is based on the link Maximum Transmission Unit (MTU) for
the Layer 2 technology (1538 bytes – jumbo frames not currently supported by CA AppLogic).
Based on these factors, consider the following:
■ Maximum Frame Rate (Minimum Frame Size): 1,000,000,000b/s / (84B * 8b/B) =
1,488,096 p/s
■ Maximum Throughput (Maximum Frame Size): 1,000,000,000b/s / (1,538B * 8b/B) =
81,274 p/s
Based on these calculations a 1Gb/s Ethernet interface can deliver anywhere between 81,274
and 1,488,096 p/s. By comparison, a 10Gb/s Ethernet interface can deliver packets at 10 times
these rates – between 812,740 and 14,880,960 p/s –, which is desirable considering that CA
AppLogic mirrors volumes (that can also be striped) and now provides SAN integration over NFS
(backbone bottleneck).
To enable Network High Availability each node must have four 1Gbps NICs – 10Gbps is not
supported along with two of each type of switch (two for the external network and two for the
backbone network). LLDP (Link Layer Discovery Protocol) must be enabled on each switch while
STP must be disabled on the backbone switches.
The procedure for removing a server grid is documented in the Backbone Fabric Controller User
Guide and includes the following steps:
■ Log into the BFC
■ Select the Grid on the navigation pane
■ Click to select the desired grid and then click the Configuration tab
■ Ensure that appropriate values are set for the Minimum and Target number of servers
required by the grid
■ Log into the grid controller and run the “srv disable srvX” server management
command, where srvX is the name of the server to be disabled and later removed
from the grid
■ Click the Servers tab in the BFC UI. Then select the server and choose Remove from the
Server from the Actions drop down box
11
■ Select the Quarantine check box if you want to indicate that the server should not be
picked up by any other grid
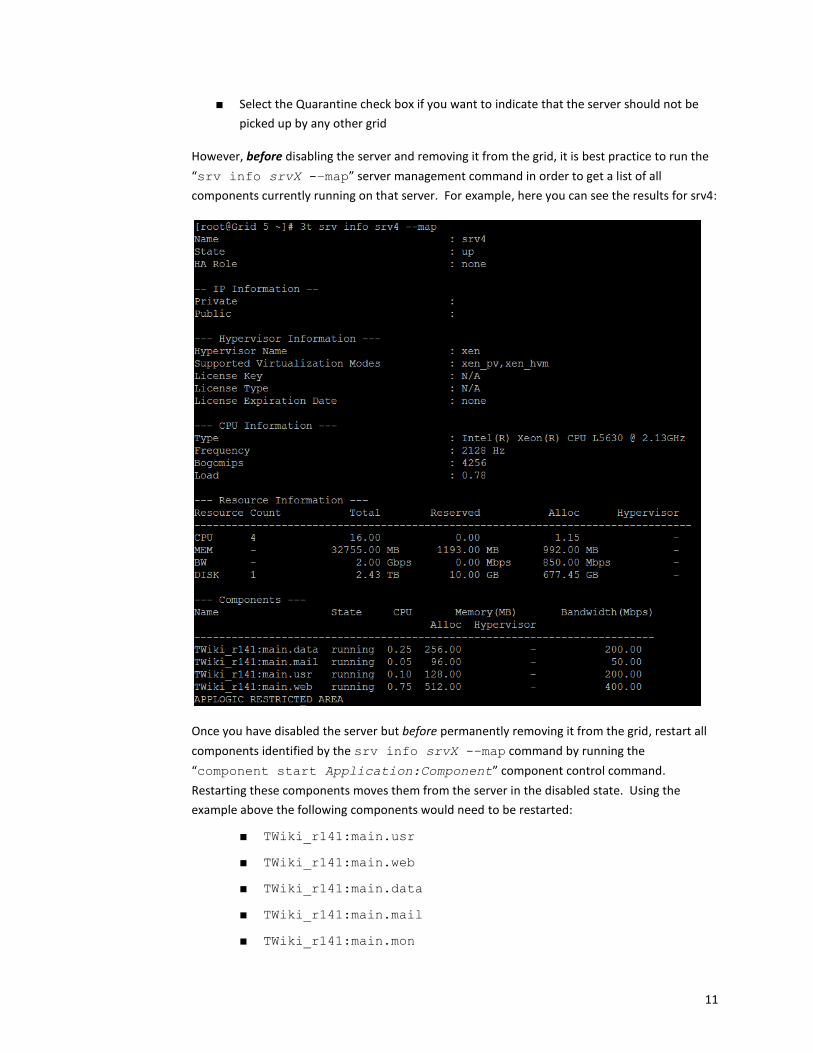
However, before disabling the server and removing it from the grid, it is best practice to run the
“srv info srvX -–map” server management command in order to get a list of all
components currently running on that server. For example, here you can see the results for srv4:
Once you have disabled the server but before permanently removing it from the grid, restart all
components identified by the srv info srvX -–map command by running the
“component start Application:Component” component control command.
Restarting these components moves them from the server in the disabled state. Using the
example above the following components would need to be restarted:
■ TWiki_r141:main.usr
■ TWiki_r141:main.web
■ TWiki_r141:main.data
■ TWiki_r141:main.mail
■ TWiki_r141:main.mon
12
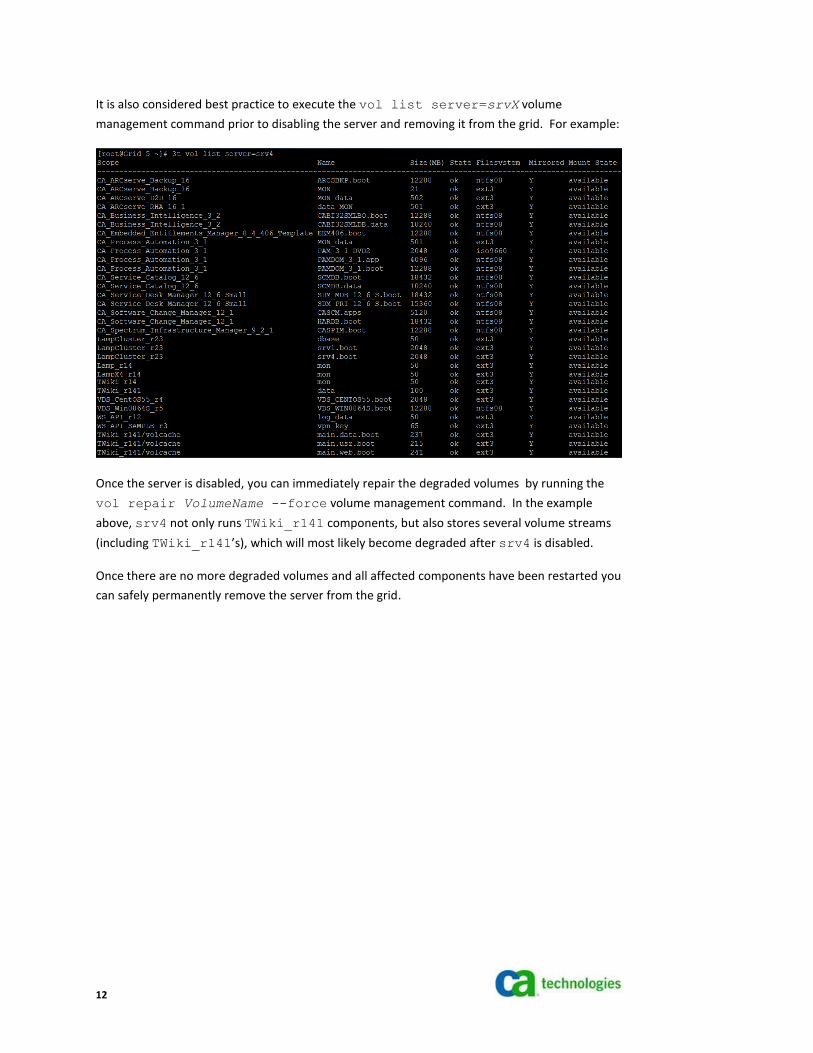
It is also considered best practice to execute the vol list server=srvX volume
management command prior to disabling the server and removing it from the grid. For example:
Once the server is disabled, you can immediately repair the degraded volumes by running the
vol repair VolumeName --force volume management command. In the example
above, srv4 not only runs TWiki_r141 components, but also stores several volume streams
(including TWiki_r141’s), which will most likely become degraded after srv4 is disabled.
Once there are no more degraded volumes and all affected components have been restarted you
can safely permanently remove the server from the grid.
13
Performing regular and sufficient backup of the grid infrastructure is another crucial aspect of
grid maintenance that helps to ensure their continued availability in the event there is a problem
with the grid. The following should be included in the list of items to backup:
■ Appliances\Classes
An “appliance” is a generic term used for individual virtual machines that emulate physical
hardware like servers, switches, routers and load balancers and it represents the basic
building block for more complex appliances and applications. In CA AppLogic, however, an
appliance is more than just a virtual machine. Each CA AppLogic appliance executes in its
own virtualized environment, boots its own operating system, application services and other
required software. It also has a boundary which isolates the interior of the appliance from
the exterior – defining both the structure of the appliance and how it interacts with other CA
AppLogic components – including the grid.
An appliance class is a re-usable device definition whose boundary attributes can be
modified to adapt the device’s behavior for a specific purpose. For example, after dragging a
web server appliance class from the catalog onto the canvas, you can create a singleton
instance of that web server class and modify the boundary properties to suit your particular
environment. Those changes can even be saved as a new class.
■ Catalogs
Both appliance and assembly classes are stored in a CA AppLogic catalog where they can be
dragged and dropped onto the AppLogic editor canvas to create new instances of the class.
When you create a new appliance you can add that class to the local catalog where it can be
used by the application or add it to the global catalog, where it can be accessible to other
applications and users.
■ Applications
Appliances and assemblies can be used to build an application which represents a single
system object that includes everything necessary to provide a specific service in a distributed
architecture, such as a CRM system, a PBX or an e-commerce deployment. In addition to
software implementation binaries a CA AppLogic application will include all html pages,
templates and scripts, databases and content, firewalls and all configuration information
needed to reconstruct and run the application on the grid. Like appliances and assemblies,
CA AppLogic applications have boundaries through which attributes can be manipulated to
manage interaction between the application and the “outside world”.
14
There are two backup methods available for each of these component types:
■ migration
■ import\export
Although the term “migrate” implies that data will be moved from one location to another, for
the purposes of this document what is actually happening is that a copy of the original
component (e.g., an appliance class) is being made on the source grid and then sent to a target
(remote) grid. For this to work, the target grid must trust the source grid. For our example we
want a two way trust to be established so that the target and source grids trust each other
implicitly.
Setting up Trust Between the Grids
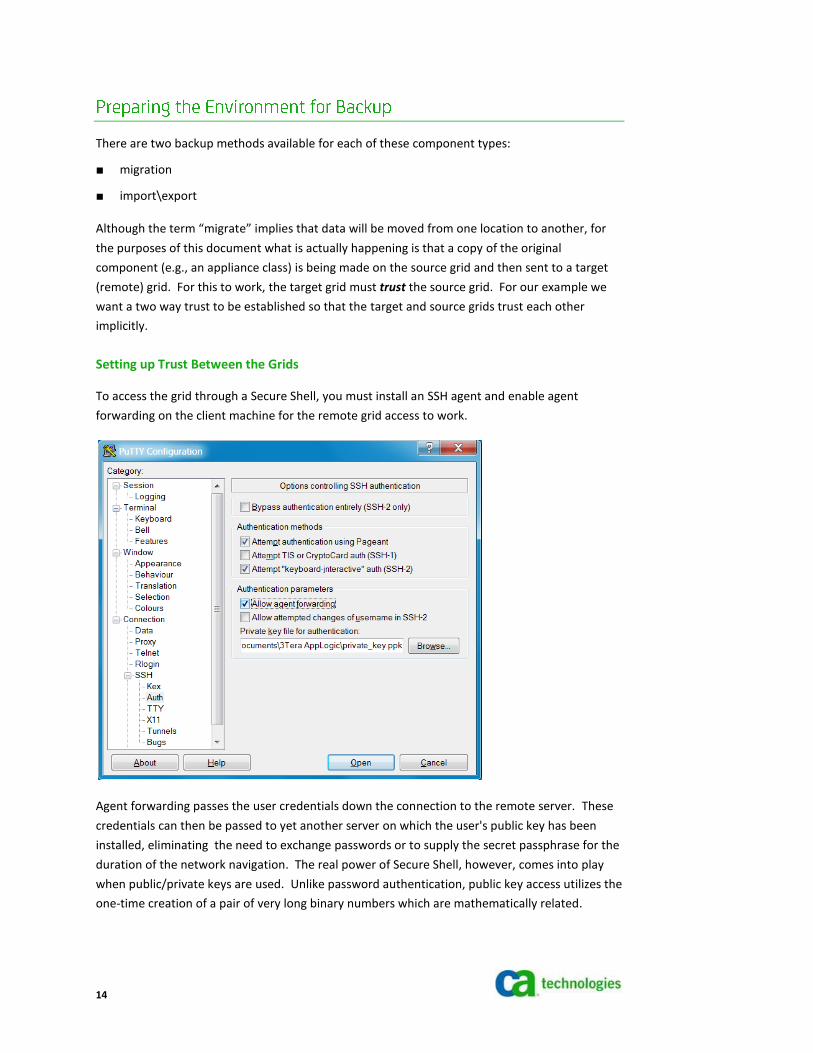
To access the grid through a Secure Shell, you must install an SSH agent and enable agent
forwarding on the client machine for the remote grid access to work.
Agent forwarding passes the user credentials down the connection to the remote server. These
credentials can then be passed to yet another server on which the user's public key has been
installed, eliminating the need to exchange passwords or to supply the secret passphrase for the
duration of the network navigation. The real power of Secure Shell, however, comes into play
when public/private keys are used. Unlike password authentication, public key access utilizes the
one-time creation of a pair of very long binary numbers which are mathematically related.

15
The next step is to setup bidirectional trust so that appliance classes, catalogs, and applications
can be migrated. To do this:
1. Access the source grid via SSH, execute the 3t grid info -v command and copy the
value of the Grid Public SSH Key.
For example:
………
2. Log into the target remote grid and create a new user specifying the Grid Public SSH Key
retrieved in the previous step as the sshkey parameter.
For example:
user create [email protected] pwd=somepwd sshkey=”ssh-rsa AAAAB3NzaC1yc2EAAAABI…”
3. Provide this user with 'app_developer' access on the grid ACL. This will allow this user to
migrate the application. For example:
grid modify_acl local:user:[email protected]=app_developer
4. Repeat the same process on the source grid to create a user for the target grid, using its
Public SSH Key.
A trust relationship between both grids is now established.
Migrating an Appliance – “Warm Backup”
One of the simplest and least expensive ways to back up a CA AppLogic appliance is to migrate it
to a backup grid. Backup grids only require a small amount of CPU and RAM and a large amount
of inexpensive, direct attached storage. They can also be used for other tasks.
The benefit of employing this backup strategy is that you do not have to act within a specific
backup window – appliances classes can be backed up at anytime. This reduces administrative
overhead by enabling you to centralize backup management on a remote backup grid.
Note: Prior to migrating an appliance from a local grid to a backup grid you need to establish a
trust between both grids For more information on how to do this, see the “Preparing the
Environment” section earlier in this chapter.
To migrate a CA AppLogic appliance class execute the class migrate command from a grid shell.
Note: You can open a grid shell from the button on the dashboard or from the application editor
tool bar.
16
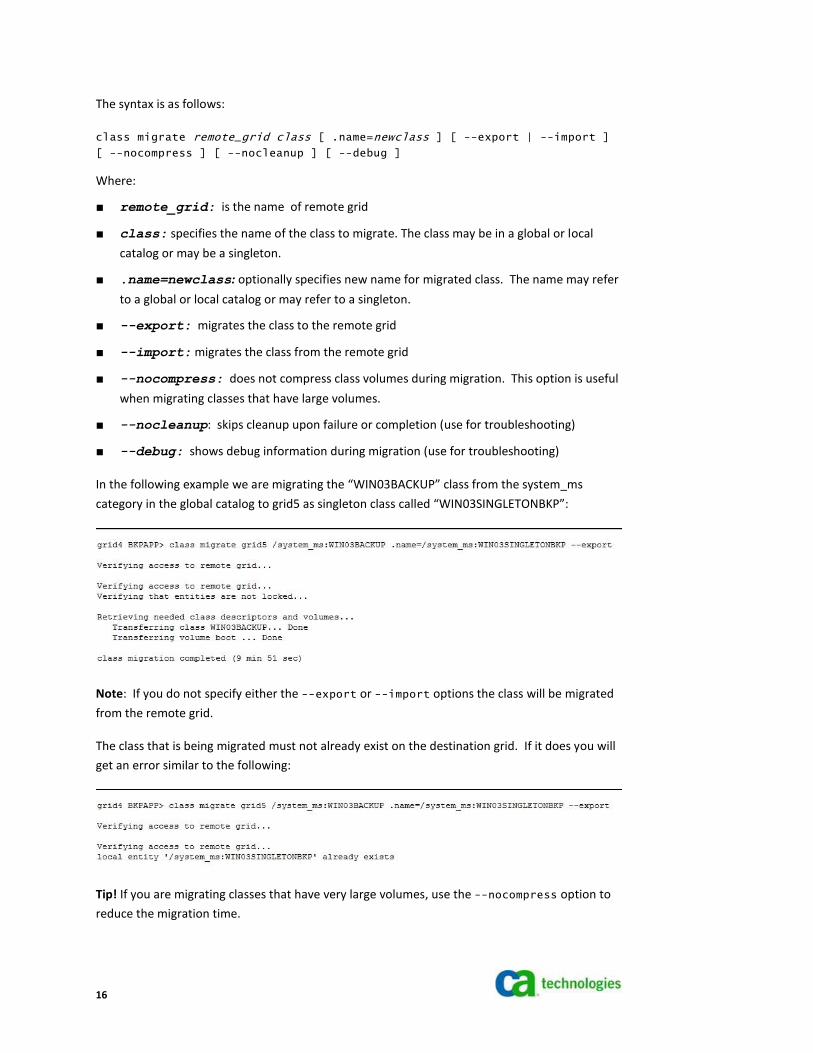
The syntax is as follows:
class migrate remote_grid class [ .name=newclass ] [ --export | --import ]
[ --nocompress ] [ --nocleanup ] [ --debug ]
Where:
■ remote_grid: is the name of remote grid
■ class: specifies the name of the class to migrate. The class may be in a global or local
catalog or may be a singleton.
■ .name=newclass: optionally specifies new name for migrated class. The name may refer
to a global or local catalog or may refer to a singleton.
■ --export: migrates the class to the remote grid
■ --import: migrates the class from the remote grid
■ --nocompress: does not compress class volumes during migration. This option is useful
when migrating classes that have large volumes.
■ --nocleanup: skips cleanup upon failure or completion (use for troubleshooting)
■ --debug: shows debug information during migration (use for troubleshooting)
In the following example we are migrating the “WIN03BACKUP” class from the system_ms
category in the global catalog to grid5 as singleton class called “WIN03SINGLETONBKP”:
Note: If you do not specify either the --export or --import options the class will be migrated
from the remote grid.
The class that is being migrated must not already exist on the destination grid. If it does you will
get an error similar to the following:
Tip! If you are migrating classes that have very large volumes, use the --nocompress option to
reduce the migration time.

17
Using the Export Option – “Cold Backup”
Each appliance class consists of a class descriptor and one or more class volume images
referenced by that descriptor. Using the export option moves both the descriptor and the
volume images to an offsite location (such as a shared folder on a NAS device).
To use this option first, export the class using the following syntax:
class export class dir
Where:
■ class: specifies the name of the class to be exported. Options include:
application/catalog:class – export local application catalog class
/catalog:class – export global catalog class
■ dir : specifies the name of the exchange directory relative to the /vol/_impex directory
which is where the class will be exported.
In the following example the “WIN03BACKUP” class is being exported from the global catalog:
When the export command is executed it creates an exchange directory on the grid’s
import/export (“impex”) volume that contains the class descriptor file and class volumes. For
example:
Once the export is complete you can move the contents of this directory off the impex volume to
a backup location using standard file management tools and commands.
Reimporting the Saved Appliance Class
If you need to reimport the class to the grid, you can use the class import command. The import syntax is as follows:
class import class dir [ --force ]
Where:
■ class : specifies the name of class to be imported. You may specify one of the following:
18
application/catalog:class – import local application catalog class
/catalog:class – import global catalog class
■ dir : specifies the name of exchange directory from which the class is to be imported, relative
to the /vol/_impex
Note: Prior to importing the class back into the grid you will need to move it from the offsite
location to the /vol/_impex volume.
■ --force : allows import of a class even if it is already present in the target directory. In this
case, the existing class is removed and then imported.
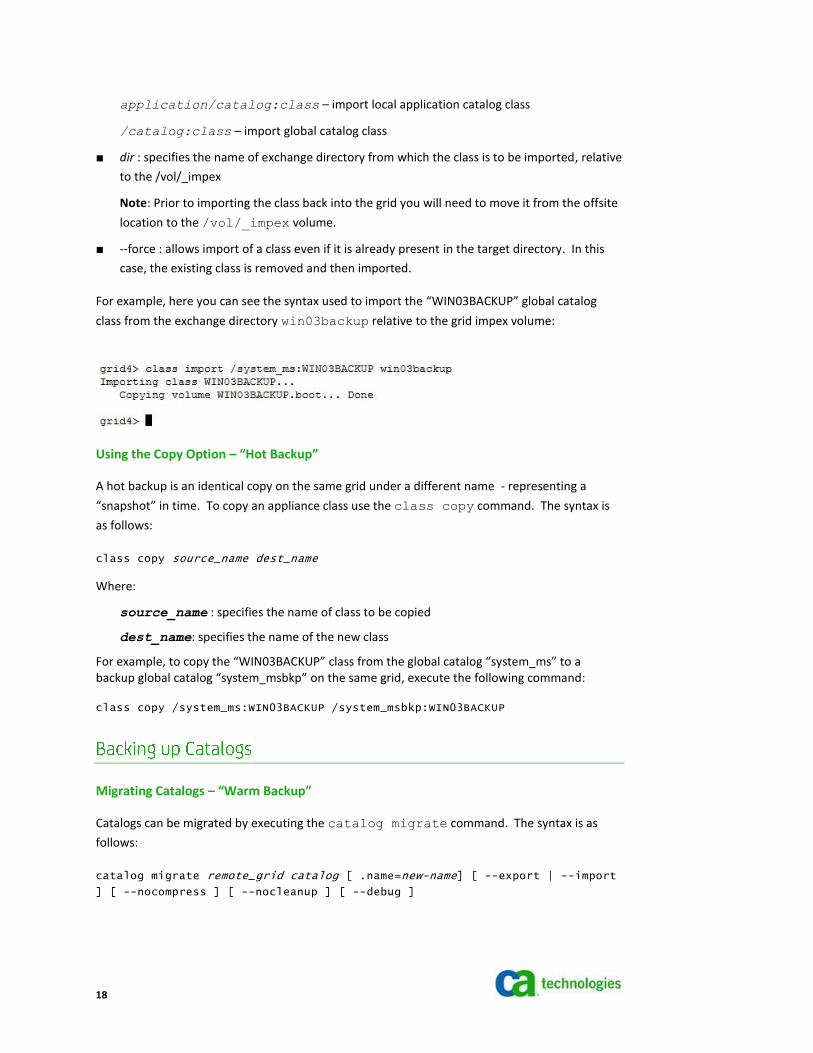
For example, here you can see the syntax used to import the “WIN03BACKUP” global catalog
class from the exchange directory win03backup relative to the grid impex volume:
Using the Copy Option – “Hot Backup”
A hot backup is an identical copy on the same grid under a different name - representing a
“snapshot” in time. To copy an appliance class use the class copy command. The syntax is
as follows:
class copy source_name dest_name
Where:
source_name : specifies the name of class to be copied
dest_name: specifies the name of the new class
For example, to copy the “WIN03BACKUP” class from the global catalog “system_ms” to a backup global catalog “system_msbkp” on the same grid, execute the following command:
class copy /system_ms:WIN03BACKUP /system_msbkp:WIN03BACKUP
Migrating Catalogs – “Warm Backup”
Catalogs can be migrated by executing the catalog migrate command. The syntax is as
follows:
catalog migrate remote_grid catalog [ .name=new-name] [ --export | --import
] [ --nocompress ] [ --nocleanup ] [ --debug ]

19
Where:
remote_grid : specifies the name of the remote grid
catalog : specifies the name of the catalog to migrate. It may a global or application local
catalog.
new-name: specifies the new name for the migrated catalog. It may be a global or
application local catalog.
--export: migrates the catalog to the remote grid
--import: migrates the catalog from the remote grid
--nocompress: does not compress volumes when migrating the catalog.
Tip: If you are migrating catalogs that include large volumes use the --nocompress
option. This reduces the time it takes to complete the migration by eliminating the time
required to compress the volumes.
--nocleanup : skips cleanup upon failure or completion (used for troubleshooting)
--debug: shows debug information during migration (used for troubleshooting)
Notes: The catalog must not already exist on the destination grid.
If you do not specify either the --export or --import options the catalog will be migrated
from the remote grid.
In the following example we are migrating the “BKPCAT” catalog from the current grid (grid4) to
grid5 as BACKUPCAT catalog. The syntax is:
catalog migrate grid5 /BKPCAT .name=/BACKUPCAT -–export
Here you can see the results:

20
Using the Export Option – “Cold Backup”
Each catalog consists of a catalog descriptor that lists all classes included in the catalog, as well as
a set of class descriptors. Each class descriptor, in turn, refers to one or more class volumes
and/or interior descriptors. In the current release of CA AppLogic, catalogs are implemented as
shared directories which contain all the descriptors. The associated volumes may reside in the
same directory (as volume image files), or in the CA AppLogic volume store.
You can backup CA AppLogic catalogs at any time by using the export\import commands. The
syntax is as follows:
catalog export catalog dir
Where:
■ catalog: specifies the name of the catalog to be exported. Options include the following:
application/catalog – export local application catalog
/catalog – export global catalog
■ dir : specifies the name of the exchange directory relative to /vol/_impex directory on
the grid to which the catalog will be exported
For example, the following syntax would be used to export the “BKPCAT” global catalog:
catalog export /BKPCAT bkpcat
The results would be similar to the following:
Once exported, the contents of the exchange directory can then be moved off the impex volume.
Reimporting the Saved Catalog
To reimport a catalog use the catalog import command. The syntax is as follows:
catalog import catalog dir
Where:
■ catalog: specifies the name of the catalog to be imported. Options include the following:
application/catalog – import local application catalog
/catalog – import global catalog
21
■ dir: specifies the name of the exchange directory from which the catalog is to be imported.
The directory may be one of the following:
– directory relative to /vol/_impex
– URL with the following format http://path
For example, to import the “BKPCAT” global catalog from the bkpcat exchange directory
relative to /vol/_impex use the following syntax:
catalog import /BKPCAT bkpcat
As with appliances, CA AppLogic applications can be exported and moved to an offsite location,
however, they should only be backed up when they change. Backing up applications backs up
any application-defined volumes that are required for the application to work properly – it is also
the only way to back up singletons.
Migrating Applications – “Warm Backup”
To migrate an application use the application migrate command. The syntax is as
follows:
application migrate remote_grid app [ .name=newapp ] [--export |--import ]
[ --nocompress ] [ --nocleanup ] [ --debug ] [ (prop=val)* ]
Where:
■ remote_grid: specifies the name of the remote grid
■ gridapp: specifies the name of application to migrate
■ .name=newapp: optionally specifies a new name for the migrated application
■ --export: migrates the application to the remote grid
■ --import: migrates the application from the remote grid
■ --nocompress: does not compress application volumes during migration. This option is
useful when migrating applications that have large volumes as it avoids running resource-
intensive compression on the grid controller.
■ --nocleanup: skips cleanup upon failure or completion (used for troubleshooting)
■ --debug: shows debug information during migration (used for troubleshooting)
■ prop=val: specifies configuration parameter pairs used for the application config command
Note: If you do not specify either the --export or --import options the application will be
migrated from the remote grid.
22
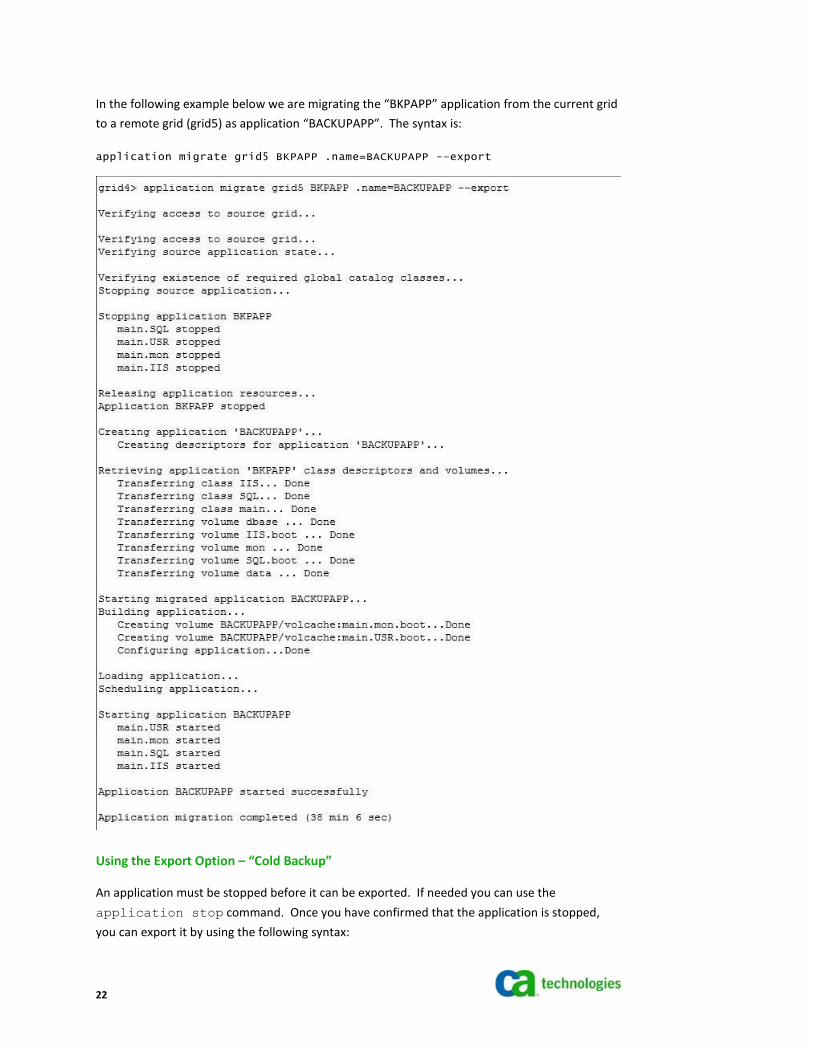
In the following example below we are migrating the “BKPAPP” application from the current grid
to a remote grid (grid5) as application “BACKUPAPP”. The syntax is:
application migrate grid5 BKPAPP .name=BACKUPAPP -–export
Using the Export Option – “Cold Backup”
An application must be stopped before it can be exported. If needed you can use the
application stop command. Once you have confirmed that the application is stopped,
you can export it by using the following syntax:
23
application export name [dir] [file=file]
Where:
■ name: is the name of the application to export
■ dir: specifies the name of exchange directory relative to /vol/_impex directory where the
application is to be exported. If not specified, the exchange directory name is the same as
the application name. Once the command completes the application's packing slip is
created and all descriptors, images, and other key files are copied to the destination
directory.
■ file : specifies the name of tar file that will contain the exported application. The following
file extensions are supported:
– .tar: creates a tar archive without compression
– .tar.gz: creates a zipped tar archive
– .tar.gz2: creates a bzip2 tar archive
In the following example the “CA_SpecIM_9_2_1” application will be exported to the
/vol/_impex directory as a CA_SpecIM_9_2_1.tar.gz zipped tar archive:
The resulting compressed archive can now be moved off the impex volume.
Reimporting the Saved Application
To reimport the application use the application import command. The syntax is as
follows:
application import name [dir | file]
Where:
■ name: specifies the name of the application to import
■ dir : specifies the name of the exchange directory from which the application will be
imported. The directory may be one of the following:
– directory relative to /vol/_impex
– URL with the following format http://path
If no value is specified, the exchange directory name will be the same as the application
name.
Note: Prior to importing the applications back into the grid you will need to move it from the
offsite storage location back to the /vol/_impex volume.
24
■ file: specifies the name of the tar file relative to /vol/_impex containing the previously
exported application. The archive file must be one of the following types:
– tar archive
– tar archive with gzip compression
– tar archive with bzip2 compression
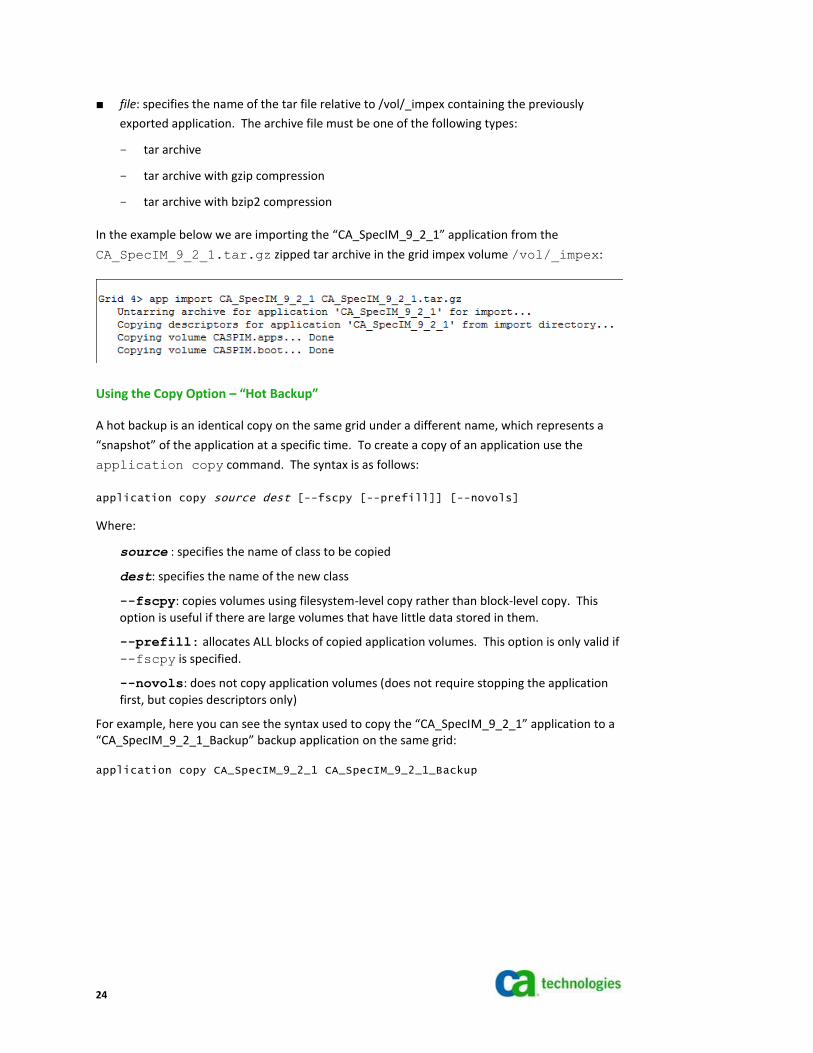
In the example below we are importing the “CA_SpecIM_9_2_1” application from the
CA_SpecIM_9_2_1.tar.gz zipped tar archive in the grid impex volume /vol/_impex:
Using the Copy Option – “Hot Backup”
A hot backup is an identical copy on the same grid under a different name, which represents a
“snapshot” of the application at a specific time. To create a copy of an application use the
application copy command. The syntax is as follows:
application copy source dest [--fscpy [--prefill]] [--novols]
Where:
source : specifies the name of class to be copied
dest: specifies the name of the new class
--fscpy: copies volumes using filesystem-level copy rather than block-level copy. This
option is useful if there are large volumes that have little data stored in them.
--prefill: allocates ALL blocks of copied application volumes. This option is only valid if
--fscpy is specified.
--novols: does not copy application volumes (does not require stopping the application
first, but copies descriptors only)
For example, here you can see the syntax used to copy the “CA_SpecIM_9_2_1” application to a “CA_SpecIM_9_2_1_Backup” backup application on the same grid:
application copy CA_SpecIM_9_2_1 CA_SpecIM_9_2_1_Backup

25
Storage management provides a higher-level view of the disk storage on the grid than the
traditional view of disks and partitions, giving the administrator much more flexibility in
allocating storage to applications.
Use of Storage Area Networks (SANs) makes sense for companies that have the right staff,
budget, and business requirements to support it. In CA AppLogic the software runs on a
hardware grid that is assembled from commodity servers which are expected to have directly
attached storage – inexpensive SATA/SAS/SSD hard drives. These are used to create a shared,
redundant storage pool called an “integrated IP SAN”. With the IP SAN you can modify the
replication levels, create, destroy, repair, resize, export, import, migrate existing volumes, and
more, just like you would on a large commercial SAN, but, typically at a lower cost.
When a grid is assembled from a few inexpensive commodity servers, the use of SANs may not
be as attractive an option as the original CA AppLogic storage architecture because managing a
few servers is easy enough to do without incurring the cost of SANs. For SANs, the true return on
investment comes from the reduction of operational expenses over time and that payback time
may be quite lengthy depending on factors such as floor space, power consumption, manpower
requirements, application uptime, and, ultimately, business growth.
So, for companies that do not already have a SAN, IP SAN can provide many benefits including:
■ Lower cost and a shorter learning curve
■ Improved performance, in certain cases, due to potential lower latency
■ High availability – CA AppLogic replicates data volumes across the network to a second node
on the backbone, and then mirrors data to that volume, which essentially creates a network-
based RAID-1 mirror.
■ Linear scalability as nodes are added to grids – though the potential for underutilizing
processing resources exists when servers are added to account for reaching maximum
storage capacity.
Adding Storage to the Integrated IP SAN
To add storage to the Integrated IP SAN, do the following:
■ Identify which applications are running on the server to which you are plan to add storage
to. For example, here you can see the applications running on server srv4:

26
■ Disable the server that is to receive additional storage For example:
server disable srv4
■ Restart the applications that were running on the disabled server (see example above) so
that they start on other grid servers
■ Migrate the volumes that need to be migrated:
volume migrate -–status/volume migrate --all
■ Decommision the disabled server (srv4 in our example) and remove it from the grid
■ Add new storage
■ Add the server back into the grid. This will reinstall CA AppLogic on that server.
Note: These steps assume that there are sufficient resources on other grid servers to
accommodate everything that was moved off the disabled server.
SAS vs SATA
Deciding between SAS and SATA is important when considering the right storage infrastructure
for key projects such as grid computing.
SATA is marketed as the next generation computer bus interface from the ATA parallel interface
and it has become very common in the consumer market. SAS is a faster and more expensive
interface targeting critical server applications.
The reason that SAS is considered a faster interface is because drives are able to rotate
substantially faster (up to 15K RPM – 15K RPM only available with a SCSI or SAS interface) than
SATA drives (typically 7.2K RPM). This, in turn, translates into faster seek times and higher
maximum and average transfer rates. Performance gains are also observed when comparing
drives that spin at the same speed – 7.2K RPM.
27
Although SAS offers backwards-compatibility with second-generation SATA drives – SATA 3 Gb/s
drives may be connected to SAS backplanes - SAS drives tend to be better solutions for servers.
This is especially true when you consider that SAS error-recovery and error-reporting use SCSI
commands which have more functionality than the ATA SMART commands used by SATA drives.
SAS drives usually have a MTBF of 1.6 million hours, making them generally more reliable than
SATA ones (1.2 billion hours).
The price of high performance SAS drives may climb steeply at higher capacities. At that point
the better option may be to take advantage of dedicated storage infrastructure, such as
Network Attached Storage (NAS), or a Storage Area Network (SAN), rather than populate a server
with expensive direct attached storage.
At lower capacities, however, the performance benefits of SAS may outweigh the price
difference in comparison to SATA, particularly now that SAS drives have entered the capacity-
optimized drive market and are dropping in price. As an alternative, you could can also mix
faster, but potentially smaller, SAS drives with slower, but potentially larger capacity, SATA disks
on the same controller.
Up until CA AppLogic r3.1.4 data could be accessed and stored on an existing SAN or NAS device
if that device allowed you to export volumes with CIFS, NFS, SMBFS or any other networked file
system that could be mounted in Windows or Linux appliances. In CA AppLogic 3.5 support was
introduced for SAN and NAS over NFS and this provided benefits such as:
■ Better disk utilization. Storage is tied together through a centralized network providing the
ability to manage everything as a single entity.
■ Higher capacity per node than is feasible with internal drives
■ Higher storage performance. Defining a baseline performance threshold in terms of IOPS is
good practice. The number of physical disks required in the array should be driven not only
by capacity, but also by performance needs.
– Required # of Disks = (Reads/sec + (Writes/sec * RAID Adjuster)) / Disk IOPS
– RAID Adjuster: RAID 1 and 10 incur two physical writes for the mirrors so the adjuster is
2. RAID 5 requires 4 writes to maintain parity.
■ Higher scalability
■ Higher availability for applications
– Storage arrays in storage networks are built to never go down and to automatically
report imminent failures to the manufacturer
– Storage arrays in SANs use very good data protection algorithms to make sure that data
stays consistent
■ Improved backup and disaster recovery capabilities
28
– Backups for networked storage is boosted by the ability to take rapid "snapshots" of
your data at a given point in time
– Less time needed to back up huge amounts of data
– Quicker recovery if disaster strikes (cost of downtime is critical in many organizations)
■ Decreased load on grid servers hosting VMs because grid server resources are not utilized
serving data to VMs running on different nodes.
■ Preference for using an existing SAN and/or lack of large hard drives
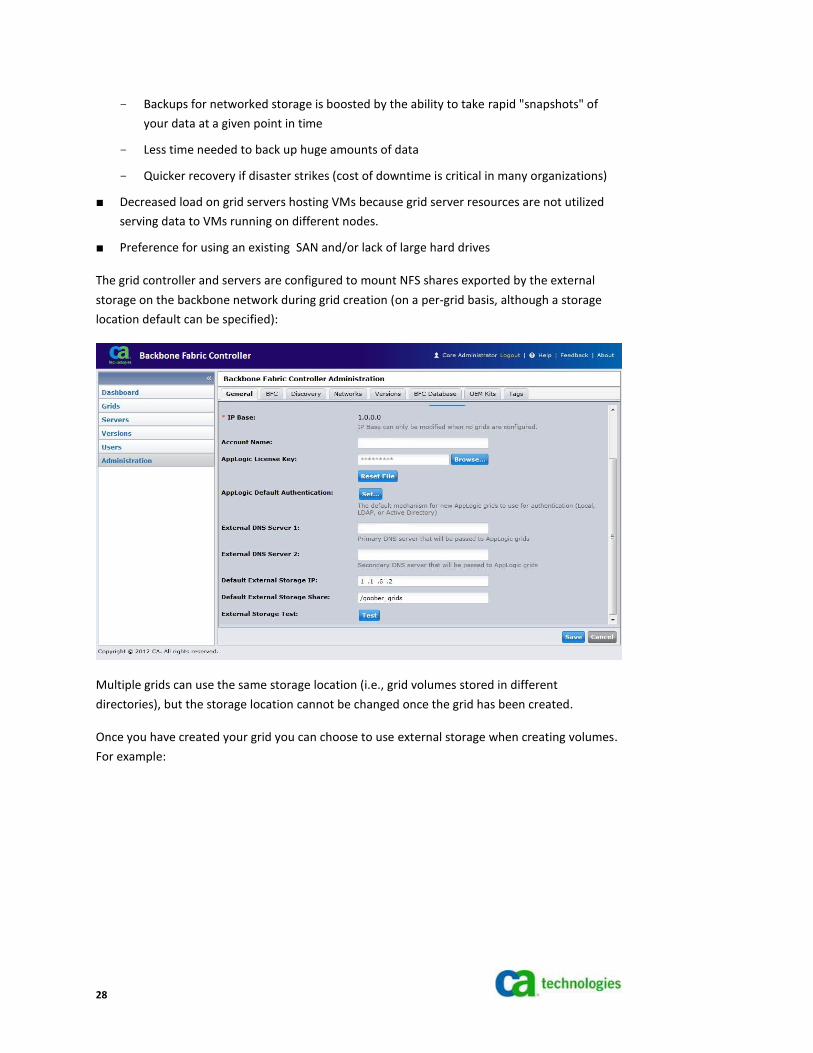
The grid controller and servers are configured to mount NFS shares exported by the external
storage on the backbone network during grid creation (on a per-grid basis, although a storage
location default can be specified):
Multiple grids can use the same storage location (i.e., grid volumes stored in different
directories), but the storage location cannot be changed once the grid has been created.
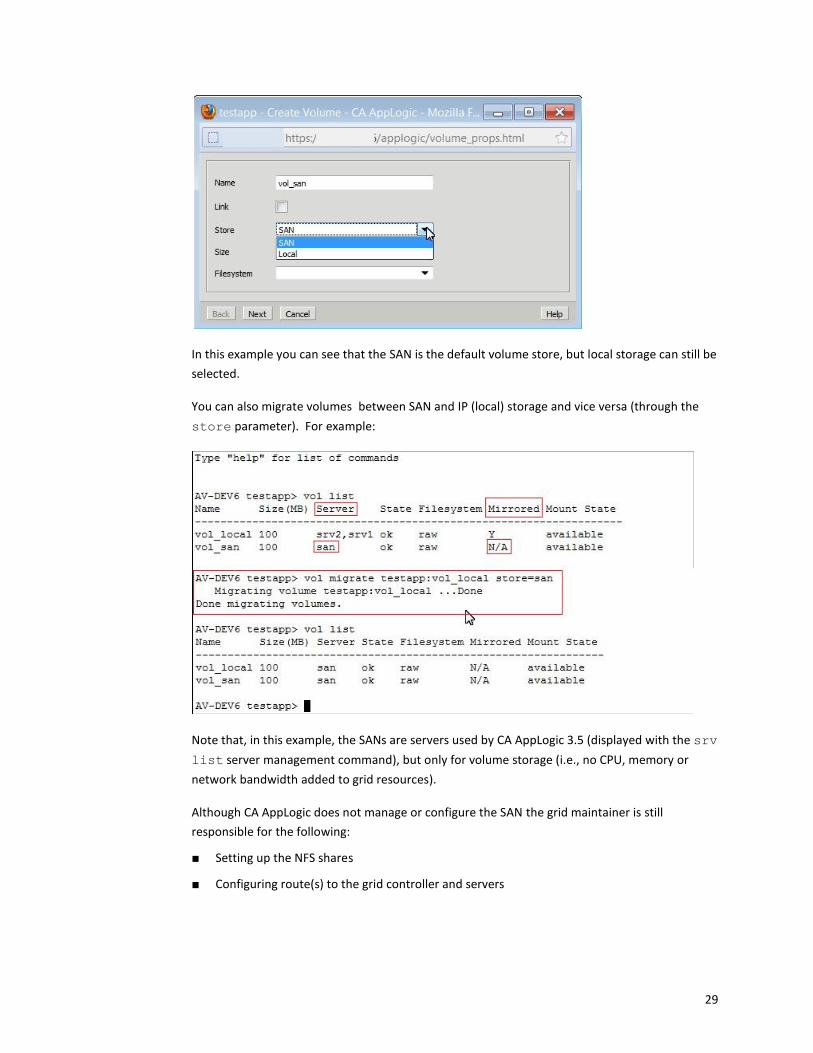
Once you have created your grid you can choose to use external storage when creating volumes.
For example:
29
In this example you can see that the SAN is the default volume store, but local storage can still be
selected.
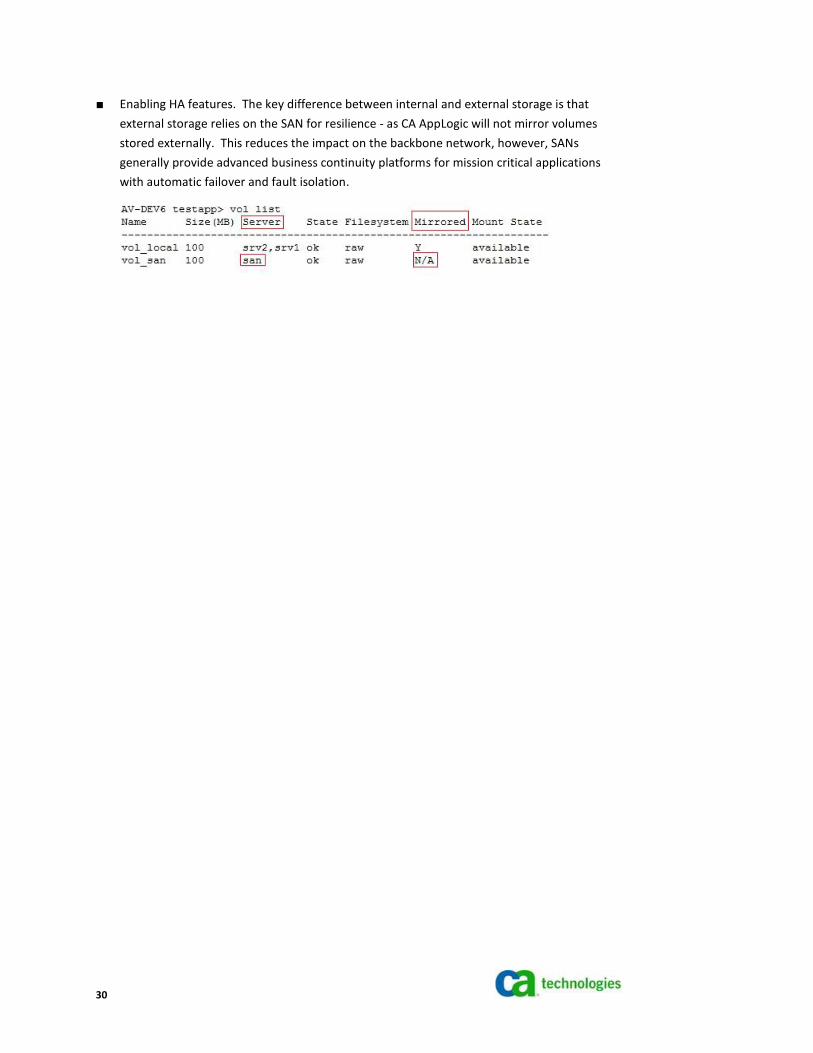
You can also migrate volumes between SAN and IP (local) storage and vice versa (through the
store parameter). For example:
Note that, in this example, the SANs are servers used by CA AppLogic 3.5 (displayed with the srv
list server management command), but only for volume storage (i.e., no CPU, memory or
network bandwidth added to grid resources).
Although CA AppLogic does not manage or configure the SAN the grid maintainer is still
responsible for the following:
■ Setting up the NFS shares
■ Configuring route(s) to the grid controller and servers
30
■ Enabling HA features. The key difference between internal and external storage is that
external storage relies on the SAN for resilience - as CA AppLogic will not mirror volumes
stored externally. This reduces the impact on the backbone network, however, SANs
generally provide advanced business continuity platforms for mission critical applications
with automatic failover and fault isolation.
31
Access to the grid is managed through user IDs and privileges which must be defined after the
grid has been installed.
There are two types of users who require access to the grid:
■ Grid Maintainers
These users are responsible for installing and reconfiguring the grid itself and typically work
on the BFC. Grid Maintainers cannot provision or operate applications.
■ Grid users
These users log in to the CA AppLogic grid controller through a web browser and Secure
Shell (SSH). While Grid Maintainers are placed within the Linux Bash Shell upon successful
login while “regular users” are placed within the CA AppLogic restricted shell (i.e., 3trsh).
Grid users can provision and operate applications on the grid. They can also add and remove
other grid users and fully operate the grid.
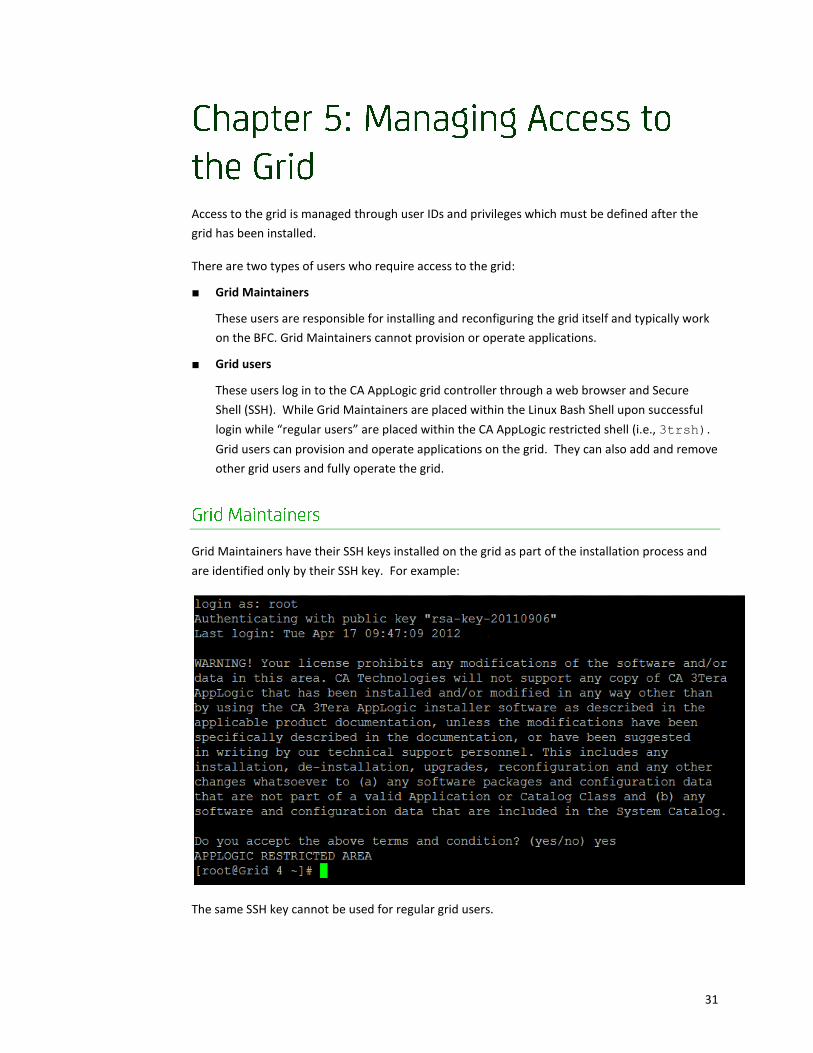
Grid Maintainers have their SSH keys installed on the grid as part of the installation process and
are identified only by their SSH key. For example:
The same SSH key cannot be used for regular grid users.
32
Regular users are created with the user create user management command. The syntax is
as follows:
user create name pwd [group=group(s)] [sshkey=”sshkey”]
Where:
■ name: specifies the login name of the local user to add
■ pwd: specifies the user's password
■ group(s): list of groups. The first group in the list becomes the user's primary group
■ sshkey: specifies the user’s public key
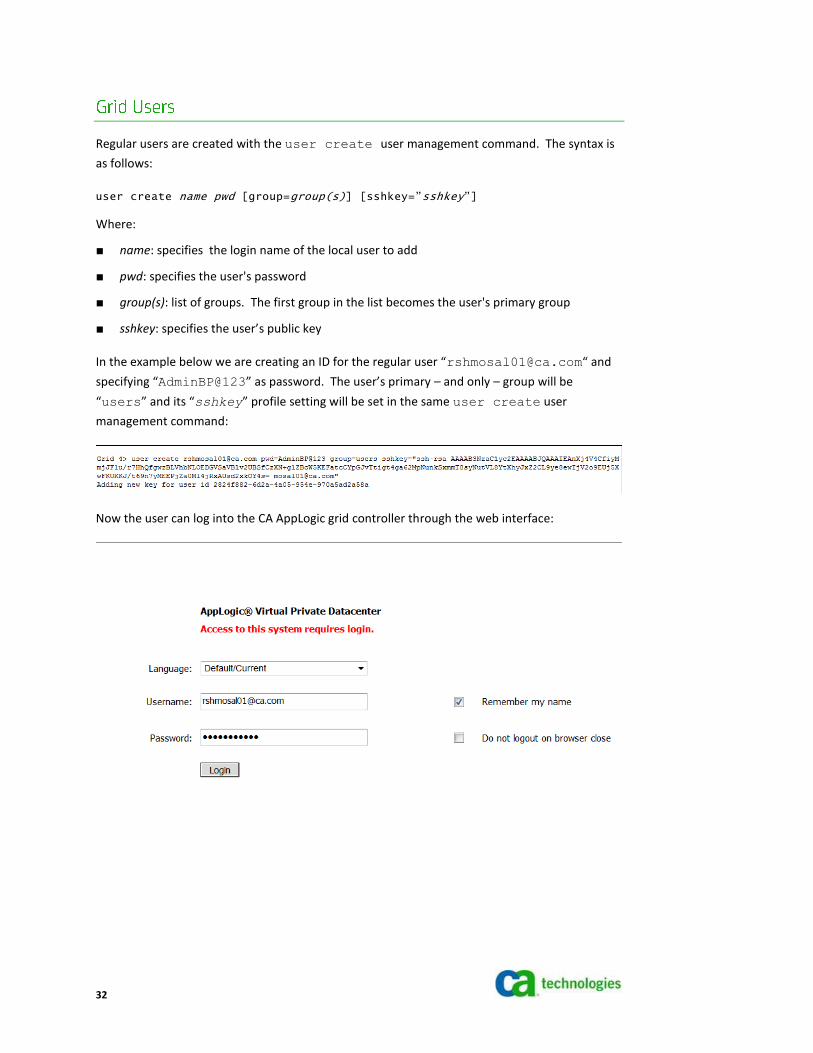
In the example below we are creating an ID for the regular user “[email protected]“ and
specifying “AdminBP@123” as password. The user’s primary – and only – group will be
“users” and its “sshkey” profile setting will be set in the same user create user
management command:
Now the user can log into the CA AppLogic grid controller through the web interface:

33
Once the license acceptance is recorded, the user is logged in:
As noted earlier when regular users SSH into the CA AppLogic grid controller using their private
keys they are placed within the CA AppLogic restricted shell (i.e., 3trsh) even though they login
as root:
34
This is due to the fact that root’s SSH authorization file is consulted by the SSH server at
authentication time and can contain not only keys but also keywords and values that ultimately
control the SSH server.
One of the most commonly used keywords is command, which specifies a “forced” command
(i.e., a command to be executed whenever the key associated with it is used for access). When
we created user ID “[email protected]” , the following forced command was associated
with its public key:
/usr/local/applogic/bin/3trsh.
As you can see forced commands are very useful. CA AppLogic uses them to give regular users
shell access to the grid controller, however that access is limited to executing CA AppLogic shell
commands and nothing else.
3trsh is a restricted shell for use with CA AppLogic. It allows sftp and execution of several
simple commands in addition to CA AppLogic shell commands, such as:
■ help <object>|<command>
Provides help about the specific object or command. To see a list of commands that apply to
a specific component, specify help <object>. For example:
help application
To view details on a specific command and object , specify help <object>
<command>. For example:
help application provision
■ exit
Exits the CA AppLogic interactive shell
■ ca
Sets current application. When the current application is set, specifying the
“application” argument for the commands that require it becomes optional and if
skipped the current application will be used.
■ clear
Clears the screen
■ ls
If current application is not set, this command lists all applications. If current application is
set, this command lists all the components for the current application.
3trsh enables you to give users the ability to run CA AppLogic shell commands – but without
giving them unrestricted shell access – and it can be used to move data to/off the impex volume:

35
RBAC is the CA AppLogic role based access control system. It provides granular control over
which users can perform which actions against which objects on a grid. Although it is not
designed to provide multi-tenancy, the general purpose of RBAC is to allow users to work on a
single grid without stepping on each other's toes. Individual users can view the list of all
applications much the same way that users in Linux can list files which they do not have access
to.
RBAC enables you to authorize access on both the user and the group level. Groups may include
individual users or other groups as members.
RBAC’s main function is to provide for user authorization using Access Control Lists (ACLs). There
are three types of grid objects that have associated ACLs:
■ the grid itself
■ applications
■ global catalogs
An ACL is comprised of an owner and a list of entries. The owner is a user or group that has the
implicit right to modify the ACL. Each entry on the list of entries is comprised of a principal and a
corresponding access level, which governs how that principal is authorized to perform actions on
the object.
CA AppLogic provides three commands – get_newobj_acl, modify_newobj_acl and
put_newobj_acl– that can be used to streamline the process of defining ACLs but allowing you
to retrieve and set defaults. For example, you can define a default ACL that determines that all
objects created by users in a particular group are owned by that group. Consider the following
example:

36
In this example the local user – [email protected] – is a member of the “users” group which
does not currently have a new ACL definition associated with it. Executing the following
command designates that any newly created objects will be automatically owned by – and,
therefore, accessed by – all members of the “users” group:
3t group put_newobj_acl users local:group:users=owner
local:group:users=full
The same commands are available at the user level, as well. For example:

37
In this example the local user – [email protected] – is, again, a member of the “users” group
which has no new object ACL definition associated with it. Executing the following user
management command assigns ownership – along with full access rights – to all members of the
principal’s group:
3t user put_newobj_acl [email protected] local:group:users=owner
local:group:users=ful
Note that, since grid administrators have implicit change ACL authorization there is no way to
orphan applications.
For more information on configuring RBAC consult the CA AppLogic Role Based Access Control
(RBAC) User Guide.

39
This chapter contains some basic troubleshooting tips for managing your grid, including two
different options for monitoring that grid.
The Basic Metering Client (BMC) runs on the CA AppLogic grid controller in your environment and
is responsible for initiating contact with the Basic Metering Server (BMS) which resides in the CA
Technologies grid. By default, the BMC continuously collects several metering metrics for all
running applications on your grid once every 12 minutes. The collection operation is initiated
(via a CRON job) automatically on your grid controller when it is created. The BMC reports all
collected data to the BMS or Metering Gateway (MGT)– if configured to use one – once per day
utilizing SSH to make the connection to transfer data.
The BMC writes the metering data it collects to a file. The location and naming convention for
that file is:
/var/applogic/license/<year>.<mo>.<day>.log.
For example:
/var/applogic/license/2012.05.31.log
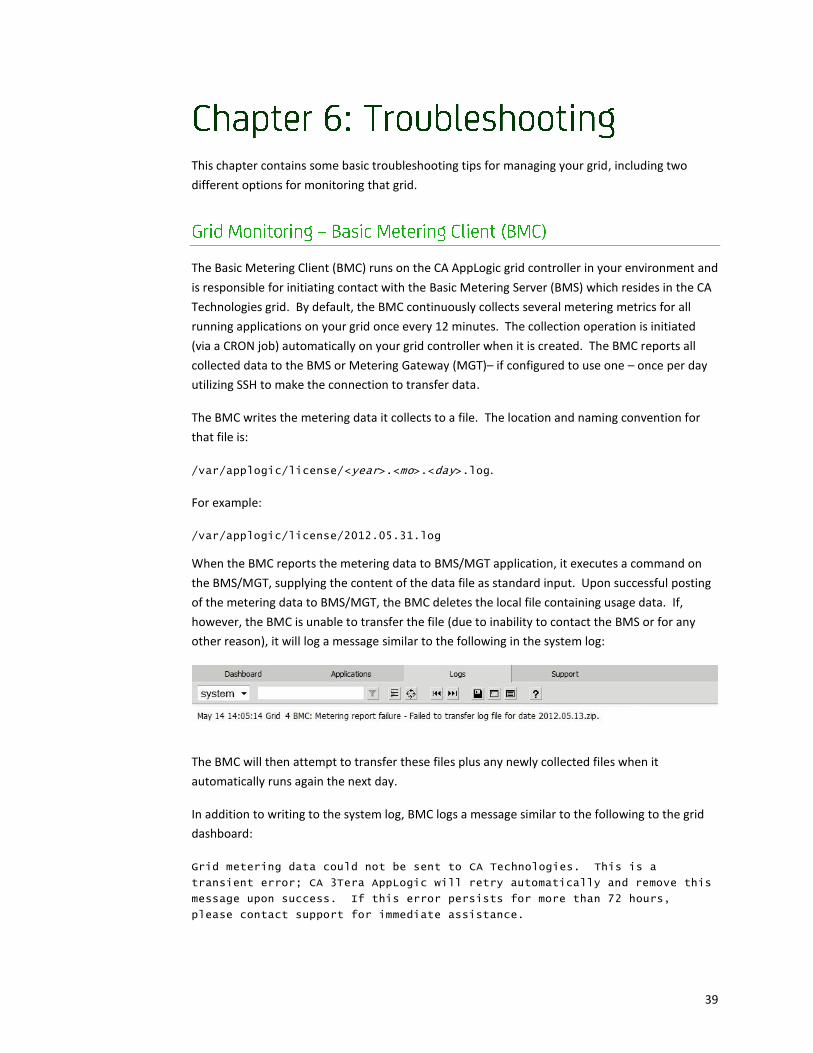
When the BMC reports the metering data to BMS/MGT application, it executes a command on
the BMS/MGT, supplying the content of the data file as standard input. Upon successful posting
of the metering data to BMS/MGT, the BMC deletes the local file containing usage data. If,
however, the BMC is unable to transfer the file (due to inability to contact the BMS or for any
other reason), it will log a message similar to the following in the system log:
The BMC will then attempt to transfer these files plus any newly collected files when it
automatically runs again the next day.
In addition to writing to the system log, BMC logs a message similar to the following to the grid
dashboard:
Grid metering data could not be sent to CA Technologies. This is a
transient error; CA 3Tera AppLogic will retry automatically and remove this
message upon success. If this error persists for more than 72 hours,
please contact support for immediate assistance.
40
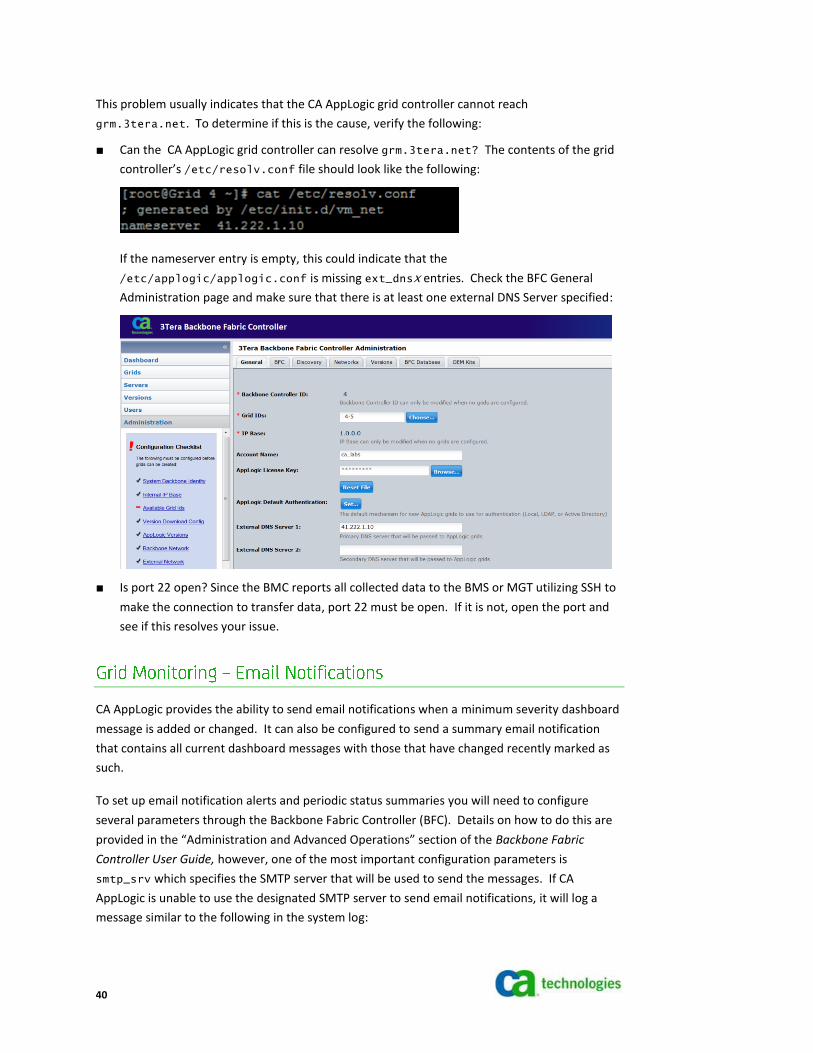
This problem usually indicates that the CA AppLogic grid controller cannot reach
grm.3tera.net. To determine if this is the cause, verify the following:
■ Can the CA AppLogic grid controller can resolve grm.3tera.net? The contents of the grid
controller’s /etc/resolv.conf file should look like the following:
If the nameserver entry is empty, this could indicate that the
/etc/applogic/applogic.conf is missing ext_dnsX entries. Check the BFC General
Administration page and make sure that there is at least one external DNS Server specified:
■ Is port 22 open? Since the BMC reports all collected data to the BMS or MGT utilizing SSH to
make the connection to transfer data, port 22 must be open. If it is not, open the port and
see if this resolves your issue.
CA AppLogic provides the ability to send email notifications when a minimum severity dashboard
message is added or changed. It can also be configured to send a summary email notification
that contains all current dashboard messages with those that have changed recently marked as
such.
To set up email notification alerts and periodic status summaries you will need to configure
several parameters through the Backbone Fabric Controller (BFC). Details on how to do this are
provided in the “Administration and Advanced Operations” section of the Backbone Fabric
Controller User Guide, however, one of the most important configuration parameters is
smtp_srv which specifies the SMTP server that will be used to send the messages. If CA
AppLogic is unable to use the designated SMTP server to send email notifications, it will log a
message similar to the following in the system log:
41
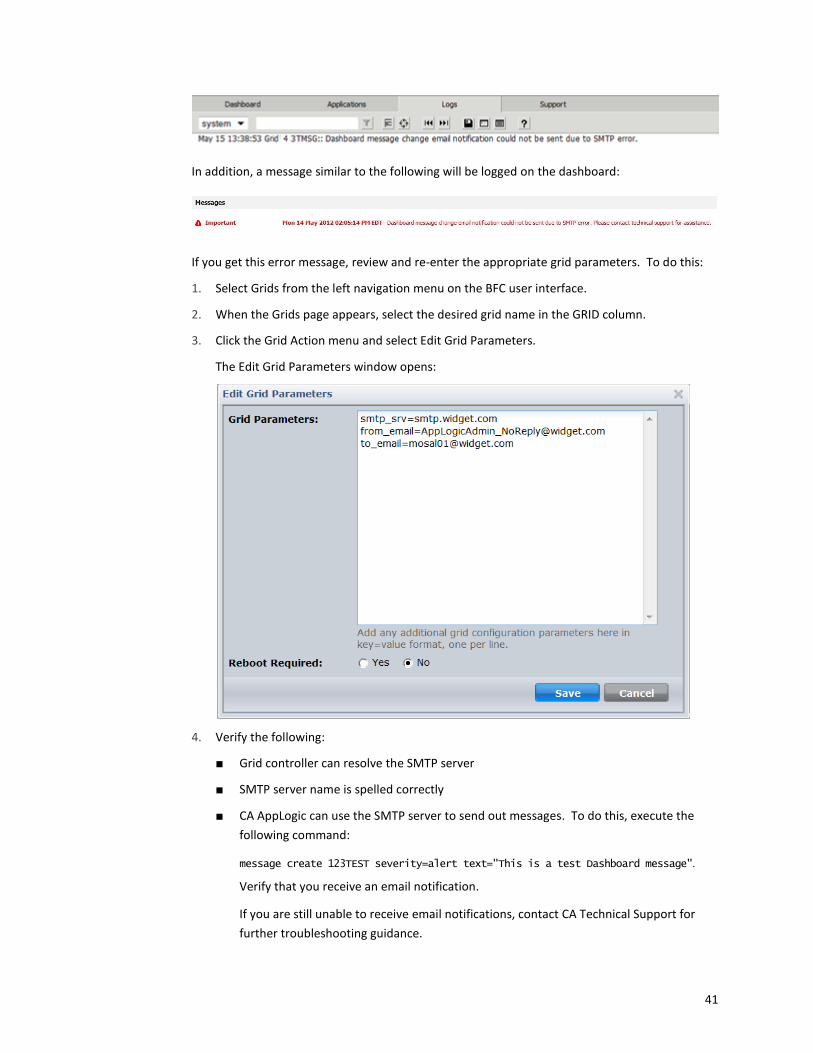
In addition, a message similar to the following will be logged on the dashboard:
If you get this error message, review and re-enter the appropriate grid parameters. To do this:
1. Select Grids from the left navigation menu on the BFC user interface.
2. When the Grids page appears, select the desired grid name in the GRID column.
3. Click the Grid Action menu and select Edit Grid Parameters.
The Edit Grid Parameters window opens:
4. Verify the following:
■ Grid controller can resolve the SMTP server
■ SMTP server name is spelled correctly
■ CA AppLogic can use the SMTP server to send out messages. To do this, execute the
following command:
message create 123TEST severity=alert text="This is a test Dashboard message".
Verify that you receive an email notification.
If you are still unable to receive email notifications, contact CA Technical Support for
further troubleshooting guidance.
42
Although unlikely, over time volumes may fail to be repaired and will be rescheduled with a
suspended status. When this occurs, you might see messages similar to the following:
Feb 24 15:41:02 Grid 4 applogic: [101:error s:47]: srvX: Failed
to add volume to mount
'mnt.srvX.Application.main.Class:Application.class.Class.Volume'
Feb 28 06:45:57 Grid 4-srvX AppLogic: Failed to mount
/var/applogic/volumes/vols/Volume on /dev/hoopX
If this occurs, the first step is to look into the /var/log/applogic log on the server
reporting the error (srvX in the example above). There you might see events indicating that CA
AppLogic encountered problems when hot adding a network block device – “/dev/nbdX” – to
a software array –“/dev/mdX”. For example:
cannot find valid superblock in this array
This can be triggered by a corrupted volume stream, network connection problem, network block
device process issues, or bad blocks. If the hard disk supports SMART, it should print hard disk
errors in the system log of the physical node.
The easiest way to repair the volume is to stop the application whose volume streams are
corrupted, if possible, and then execute the following command:
vol repair Application:Class.Volume --force
This command initiates an immediate repair of the volume, if it is possible.
If you cannot stop the application, execute the following command on the fault node (“srvX”) to
run the CA AppLogic Server Control Utility:
3tsrv bd list
Important! The following steps should be used with caution as they involve destroying devices.
Please consult with the CA Technical Support team if you are uncomfortable proceeding without
further guidance.
md devices that are not attached to any network block or hoop devices can be destroyed by
executing the following command:
mdadm --stop /dev/mdX
Then, execute the following command to immediately start repairing the volume:
vol repair Application:Class.Volume --force
43
You may notice that running the CA AppLogic Server Control Utility “3tsrv bd list” on the
faulty node may also display active “hoop” devices used by CA AppLogic on the server that do not
have any volume streams associated with them. Hoop devices are pseudo-devices that make file
systems accessible as block devices so that they can be mounted as if they were a disk device
(/dev/hoopX ).
Once you have confirmed that such hoop devices are not attached to any software array – md –
or network block devices – nbd – you can execute the following command to destroy them:
hosetup -d LoopDevice
Then, execute the following command to immediately start repairing the volume:
vol repair Application:Class.Volume --force
If, after executing these steps, you notice that volumes are still getting suspended or if you
require additional guidance, please do not hesitate to contact CA Technical Support.


45
Following is a list of common CA AppLogic terms that are used in this document. For more
complete discussion see the CA AppLogic product documentation.
Appliance
A copyable building block used to create AppLogic applications. The term appliance can be used
to denote either the appliance class or an instance of it.
Application
A single system object that includes everything necessary to run a specific distributed application
– application code, HTML pages, templates and scripts, databases and content, as well as the OS,
middleware, file storage, load balancers, firewalls and all configuration information needed to
reconstruct and run the application on an AppLogic grid. Each application also has a defined
resource budget which specifies a minimum set of hardware resources (CPU, memory and
bandwidth) required to run the application, and the maximum resource quota allowed for it.
Boundary
Identifies the class name, input and output terminals, storage volumes, configuration values and
defaults that comprise the definition of an appliance.
Catalogs
Set of disposable infrastructure appliances, such as gateways, firewalls, load balancers, web
servers, application servers, database servers, file servers, and mail servers. The main assembly
of an application ties them together into a logical structure capable of running the application.
This includes all information required to configure each appliance and tie them together.
Class definition
Identifies the class descriptor and one or more class volumes that comprise a particular class of
virtual appliance.
Class descriptor
Defines the characteristics of the appliance as components – including inputs, outputs,
configuration settings and default values, volume and hardware resources.
Class volume
Contains all of the software required to boot and operate an instance of a class – includes the
operating system, application server and anything else the application needs.
Grid
The key component in grid computing. In the context of this document a “grid” refers to the
combination of multiple computer resources that are combined and managed by AppLogic.

46
Grid Controller
Grid appliance that serves as the central point for managing the grid, creating, running and
managing applications and monitoring operations.
Grid Nodes/Servers
The physical computers that comprise the grid on which AppLogic runs.
Grid Shell
Grid shell with the current application and or selected instance set as the current application and
component.
Singleton
An uncopyable appliance. In the AppLogic editor a singleton is indicated by an “S” symbol.
Singletons are often used to edit or troubleshoot code.
SSH – Secure Shell
Network protocol that allows data to be exchanged using a secure channel between two
networked devices.