Embed Size (px)
Citation preview
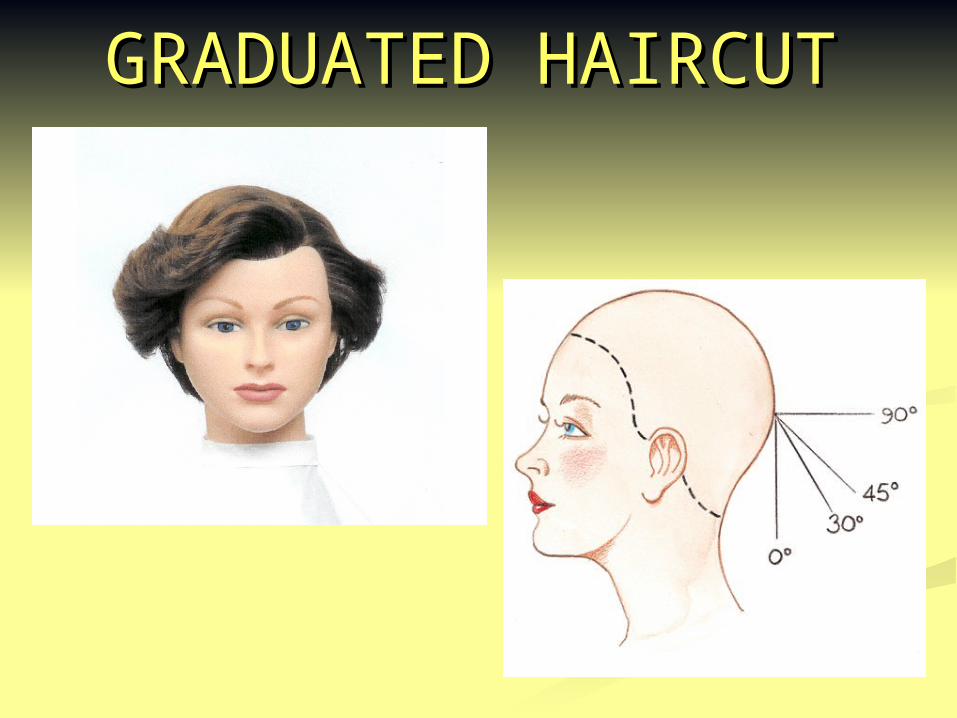
GRADUATED HAIRCUTGRADUATED HAIRCUT
Graduated haircutGraduated haircut
A graduated shape or wedge, an effect or A graduated shape or wedge, an effect or haircut that results from cutting the hair haircut that results from cutting the hair with tension, low to medium elevation. The with tension, low to medium elevation. The most common elevation is 45-degrees. In a most common elevation is 45-degrees. In a graduated haircut, there is a visual buildup graduated haircut, there is a visual buildup of weight in a given area. The ends of the of weight in a given area. The ends of the hair appear to “stacked.” There are many hair appear to “stacked.” There are many variations and effects you can create with variations and effects you can create with graduation simply by adjusting the degree graduation simply by adjusting the degree of elevation, or your cutting line.of elevation, or your cutting line.
Implements and Implements and MaterialsMaterials
TowelsTowels Cutting and Shampoo CapeCutting and Shampoo Cape Shampoo and ConditionerShampoo and Conditioner Wide-Tooth CombWide-Tooth Comb Four Sectioning ClipsFour Sectioning Clips Haircutting ShearsHaircutting Shears Water BottleWater Bottle
PreparationPreparation
Perform the client consultation and Perform the client consultation and hair analysishair analysis
Drape the client Drape the client Shampoo and condition the hair as Shampoo and condition the hair as
necessarynecessary Begin a blunt cut to guide line at zero Begin a blunt cut to guide line at zero
degreesdegrees
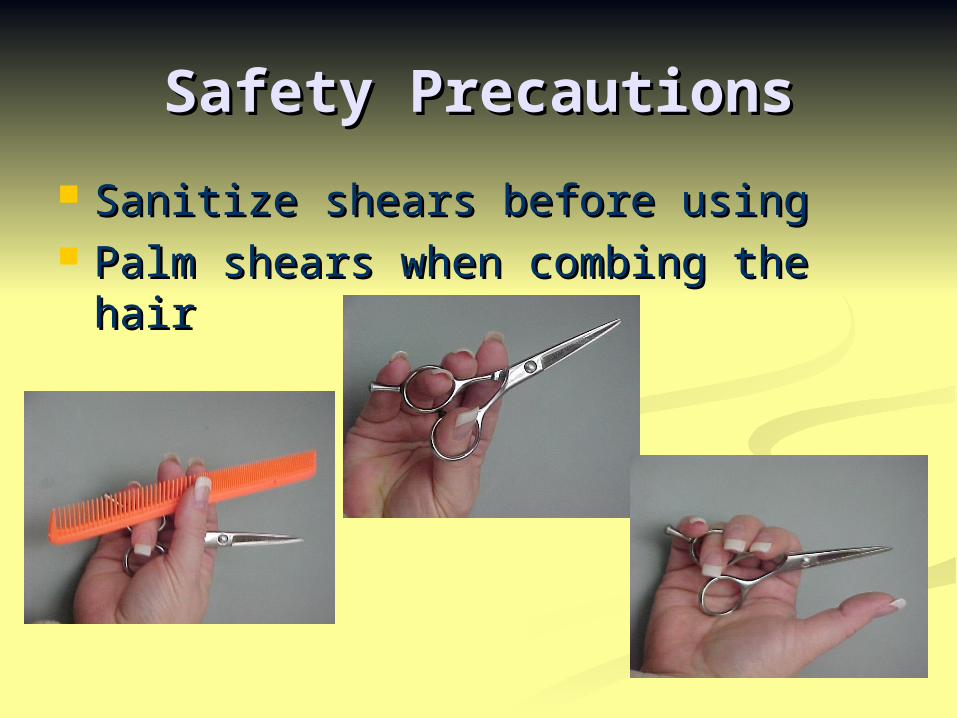
Safety PrecautionsSafety Precautions
Sanitize shears before usingSanitize shears before using Palm shears when combing the hairPalm shears when combing the hair
RelevanceRelevance
This Haircut is incorporated into This Haircut is incorporated into many different Hair cutsmany different Hair cuts
IntroductionIntroduction
In this basic haircut, you will be In this basic haircut, you will be working with a horizontal cutting line working with a horizontal cutting line and a 45-degree elevation.and a 45-degree elevation.
You will be using a stationary guide You will be using a stationary guide and a traveling guidelineand a traveling guideline
Stationary GuideStationary Guide
A guideline that does not move. All A guideline that does not move. All other sections are combed toward other sections are combed toward the guideline and are cut to match itthe guideline and are cut to match it
Traveling GuidelineTraveling Guideline
Moves with you as you work through Moves with you as you work through the haircutthe haircut
ActivityActivity
Here’s a great way to understand what a Here’s a great way to understand what a graduated haircut looks like. Hold a graduated haircut looks like. Hold a telephone book by the spine with the pages telephone book by the spine with the pages hanging down. The edges of the pages make hanging down. The edges of the pages make a straight line, just like a blunt cuta straight line, just like a blunt cut
Now turn the book the other way, open it in Now turn the book the other way, open it in the middle, and let the pages flop down on the middle, and let the pages flop down on either side. The edges of the pages make a either side. The edges of the pages make a beveled line, just like a graduated haircutbeveled line, just like a graduated haircut
ProcedureProcedure
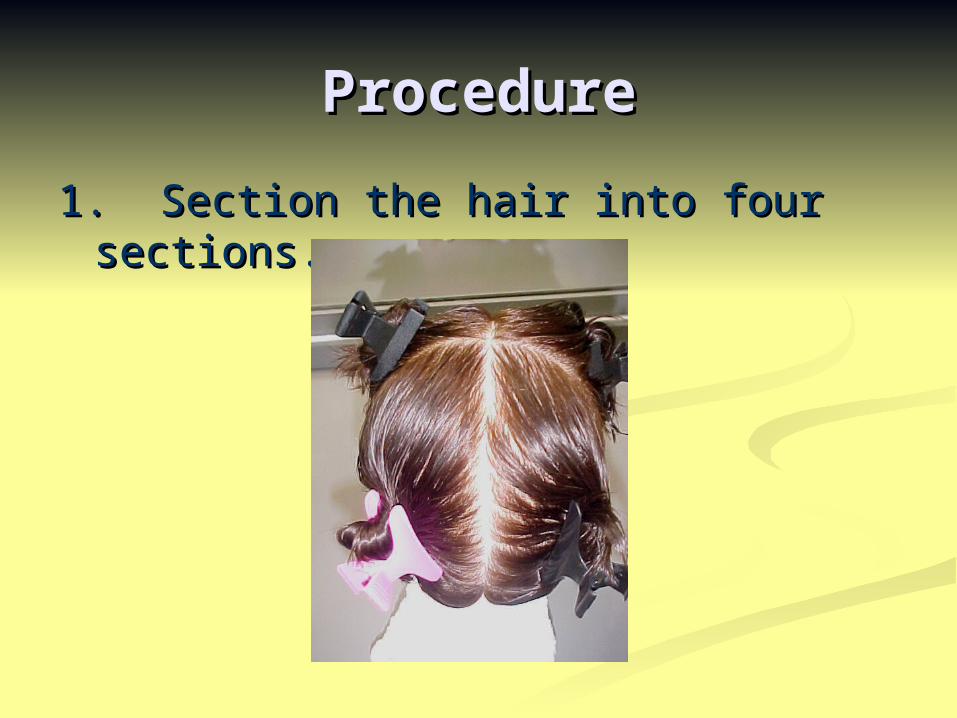
1. Section the hair into four sections. 1. Section the hair into four sections.
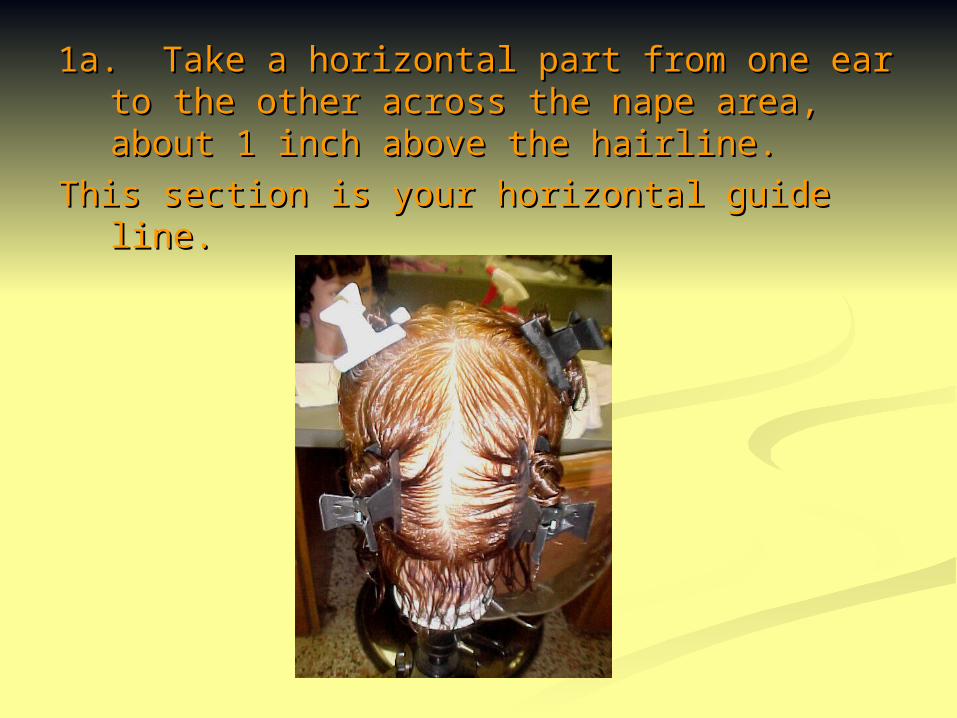
1a. Take a horizontal part from one ear to 1a. Take a horizontal part from one ear to the other across the nape area, about 1 the other across the nape area, about 1 inch above the hairline. inch above the hairline.
This section is your horizontal guide line.This section is your horizontal guide line.
2. Make sure your guideline is 2. Make sure your guideline is correct.correct.
3. Working upward in each back 3. Working upward in each back section, measure and part off the section, measure and part off the first horizontal section approximately first horizontal section approximately 1 inch wide1 inch wide
4. Beginning at the center part, 4. Beginning at the center part, establish a vertical subsection establish a vertical subsection approximately ½ inch wide, no approximately ½ inch wide, no wider than the second knucklewider than the second knuckle
Extend the subsections down to Extend the subsections down to include the nape guideline. Comb include the nape guideline. Comb the subsection smooth at a 45-the subsection smooth at a 45-degree angle to the scalp. Hold degree angle to the scalp. Hold your fingers at a 90-degree angle to your fingers at a 90-degree angle to the strand and cut.the strand and cut.
5.5. Proceed to cut the entire horizontal Proceed to cut the entire horizontal section by parting off vertical section by parting off vertical subsections and cutting in the same subsections and cutting in the same manner as step 4. manner as step 4.
Check each section vertically and Check each section vertically and horizontally throughout the haircut. horizontally throughout the haircut. Each completed section will serve Each completed section will serve as a guideline for the next sectionas a guideline for the next section
6. Part off another horizontal section 6. Part off another horizontal section approximately 1 inch wide. Beginning at approximately 1 inch wide. Beginning at the center, create another vertical the center, create another vertical subsection that extends down and includes subsection that extends down and includes the previously cut strand. Comb the hair the previously cut strand. Comb the hair smoothly at a 45-degree elevation to the smoothly at a 45-degree elevation to the head. Hold the fingers and shears at a 90-head. Hold the fingers and shears at a 90-degree angle to the subsection and cut. degree angle to the subsection and cut. Cut the entire horizontal section in this Cut the entire horizontal section in this manner. Make sure 2manner. Make sure 2ndnd section blends with section blends with previously cut section.previously cut section.
7. Continue taking horizontal sections 7. Continue taking horizontal sections throughout the left and right back throughout the left and right back sections and follow the same cutting sections and follow the same cutting procedure. The hair will gradually procedure. The hair will gradually get longer as it reaches the apex get longer as it reaches the apex (highest point on the top of your (highest point on the top of your head)head)
8. Maintain the length in the crown by 8. Maintain the length in the crown by continuing to hold the hair at a low continuing to hold the hair at a low elevation 45-degree angleelevation 45-degree angle
9. Establish a narrow guide section on 9. Establish a narrow guide section on the left side at the hairline the left side at the hairline approximately ½ inch wide. The side approximately ½ inch wide. The side guideline should be the same length as guideline should be the same length as the nape. Move to the right side of the the nape. Move to the right side of the head and establish a matching head and establish a matching guideline there. This will help ensure guideline there. This will help ensure that both side sections will be the same that both side sections will be the same length when the right side section is cut length when the right side section is cut later.later.
10. Establish a ½ inch side section 10. Establish a ½ inch side section that curves and follows the hairline that curves and follows the hairline above the ear back to the nape above the ear back to the nape section. Smoothly comb the section, section. Smoothly comb the section, including the side guideline and part including the side guideline and part of the nape section.of the nape section.
11. Holding the hair with little or no 11. Holding the hair with little or no tension, cut the hair from the nape tension, cut the hair from the nape guide to the side guide. Note the guide to the side guide. Note the fingers are held at a slight angle to fingers are held at a slight angle to connect the two guides.connect the two guides.
12. Establish a horizontal section on 12. Establish a horizontal section on the left side. The width of this the left side. The width of this section will vary because of the section will vary because of the irregular hairline around the earirregular hairline around the ear
13. Starting at the ear, part a ½ inch 13. Starting at the ear, part a ½ inch vertical subsection, Include the vertical subsection, Include the underlying guideline and a small underlying guideline and a small portion of the nape section.portion of the nape section.
14. Continue the same cutting 14. Continue the same cutting procedure followed thus far. Take procedure followed thus far. Take vertical subsections, comb smoothly, vertical subsections, comb smoothly, elevate at a 45-degree angle from the elevate at a 45-degree angle from the head, holding the fingers at a 90-head, holding the fingers at a 90-degree angle to the strand. Cut the degree angle to the strand. Cut the section even with the side guideline section even with the side guideline and nape section. Be sure to hold the and nape section. Be sure to hold the vertical subsections straight out from vertical subsections straight out from the head at a 45-degree, not pulled to the head at a 45-degree, not pulled to the right or left.the right or left.
15. Continue establishing horizontal 15. Continue establishing horizontal sections on the left side of the head sections on the left side of the head and following the same cutting and following the same cutting procedure. Check each section procedure. Check each section horizontally to ensure the ends are horizontally to ensure the ends are evenly blended. Add strands from evenly blended. Add strands from the back section when checking to the back section when checking to ensure that the two sections are ensure that the two sections are uniform in lengthuniform in length
16. When the left side is complete, the 16. When the left side is complete, the strands in the uppermost part of the strands in the uppermost part of the section should be the same length as section should be the same length as those in the upper crown area.those in the upper crown area.
17. Move to the right side of the head 17. Move to the right side of the head and cut the hair in the same manner and cut the hair in the same manner as you did the left side, using the as you did the left side, using the previously established guide. Once previously established guide. Once the back and both sides are the back and both sides are complete, move to the fringe and top complete, move to the fringe and top area. area.
18. Blow dry the hair cut and view the 18. Blow dry the hair cut and view the design, movement, and evenly design, movement, and evenly blended ends.blended ends.
CompletionCompletion
19. Offer a rebook visit; recommend 19. Offer a rebook visit; recommend retail products; discard non-reusable retail products; discard non-reusable materials, disinfect implements, materials, disinfect implements, arrange work station in proper order arrange work station in proper order and sanitize handsand sanitize hands