Embed Size (px)
Citation preview
GRADE 5 SUPPLEMENTSet C1 Geometry: Triangles & Quadrilaterals
IncludesActivity 1: Classifying Triangles C1.1
Activity 2: Sorting & Classifying Quadrilaterals C1.13
Activity 3: Finding the Perimeter & Area of a Parallelogram C1.25
Activity 4: Three Mathematical Ideas C1.35
Independent Worksheet 1: More Geoboard Triangles C1.43
Independent Worksheet 2: Color & Construct Triangles C1.45
Independent Worksheet 3: Classifying Quadrilaterals C1.47
Independent Worksheet 4: Quad Construction C1.51
Independent Worksheet 5: Perimeter & Area Puzzles C1.53
Independent Worksheet 6: Ebony’s Quilt C1.55
Skills & ConceptsH classify quadrilaterals
H identify, describe, and classify triangles by angle measure and number of congruent sides
H determine the formula for the area of a parallelogram by relating it to the area of a rectangle
H determine the formula for the area of a triangle by relating it to the area of a parallelogram
H use formulas to determine the perimeters and areas of rectangles and parallelograms
H draw quadrilaterals and triangles from given information about sides and angles
H solve single- and multi-step word problems about the perimeters and areas of quadrilater-
als and triangles, and verify the solutions
P201309
Bridges in Mathematics Grade 5 Supplement
Set C1 Geometry: Triangles & Quadrilaterals
The Math Learning Center, PO Box 12929, Salem, Oregon 97309. Tel. 1 800 575–8130.
© 2013 by The Math Learning Center
All rights reserved.
Prepared for publication on Macintosh Desktop Publishing system.
Printed in the United States of America.
P201309
The Math Learning Center grants permission to classroom teachers to reproduce blackline
masters in appropriate quantities for their classroom use.
Bridges in Mathematics is a standards-based K–5 curriculum that provides a unique blend
of concept development and skills practice in the context of problem solving. It incorpo-
rates the Number Corner, a collection of daily skill-building activities for students.
The Math Learning Center is a nonprofit organization serving the education community.
Our mission is to inspire and enable individuals to discover and develop their mathematical
confidence and ability. We offer innovative and standards-based professional development,
curriculum, materials, and resources to support learning and teaching. To find out more,
visit us at www.mathlearningcenter.org.
Set C1 H Activity 1
ACTIVITY
Classifying Triangles
OverviewStudents build and record four different triangles on their
geoboards. Then they classify their triangles, first by angle
size and then by side length.
Skills & ConceptsH classify triangles by the length of their sides as either
scalene, isosceles, or equilateral
H classify triangles by the size of their angles as either
acute, obtuse, or right
H classify angles as either right, acute, or obtuse
You’ll needH Triangles Record Sheet (page C1.5, run a class set plus
a few extra and one copy on a transparency)
H Types of Triangles (page C1.6, run one copy on a trans-
parency)
H overhead geoboard
H class set of geoboards and rubber bands
H class set of rulers
H a piece of paper to mask parts of the overhead
H access to protractors
H Word Resource Cards: acute angle, obtuse angle, right
angle (pages D6.7–D6.12, run 1 copy back to back on
cardstock, cut out each card. See Advance Preparation)
Advance Preparation Post the Word Resource Cards
where all the students can see them clearly before you
conduct this activity.
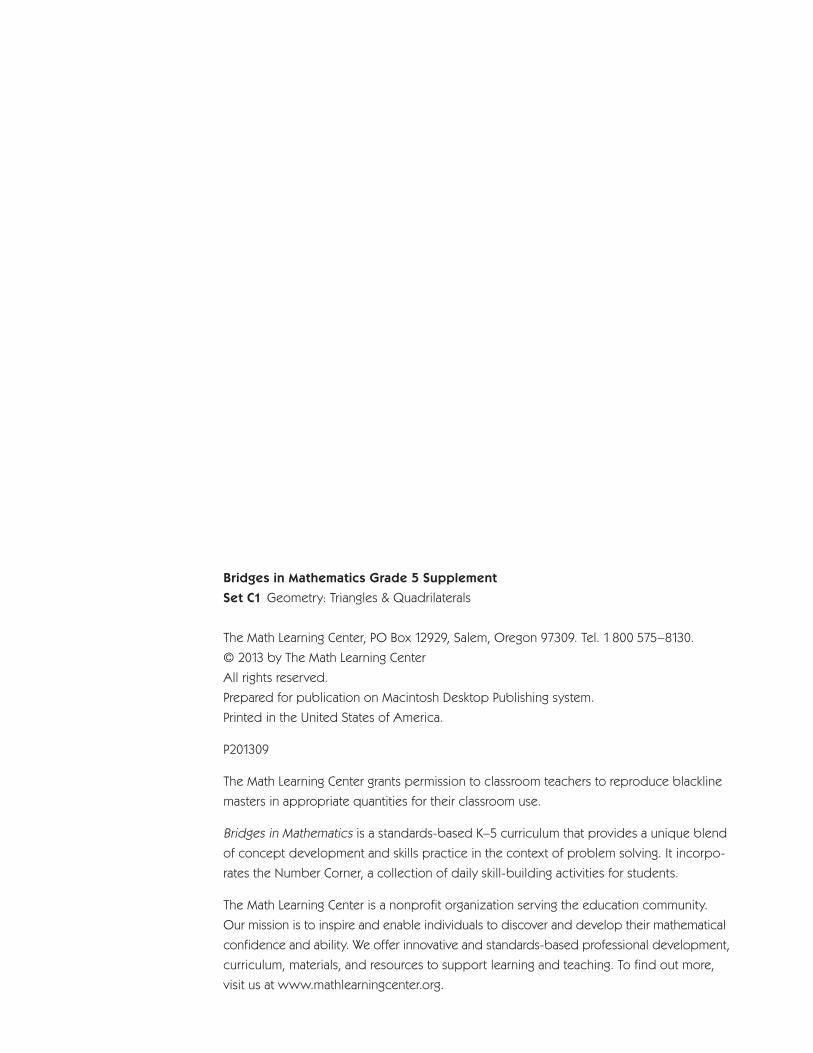
Instructions for Classifying Triangles1. Ask students to get out their rulers and pencils. Then give them each a geoboard and a copy of the Triangles Record Sheet. Explain that they are going to make and record 4 different types of triangles today. Demonstrate by making a triangle on a geoboard at the overhead. If necessary, review any guide-lines you have established with the class for handling the rubber bands carefully. Then copy your trian-gle onto the Triangles Record Sheet transparency. Solicit advice from students about how to do this care-fully and accurately as you are working.
NAME DATE
Set C1 G eometry: Triangles & Quadrilaterals Blacklines Run a class set plus a few extra and one on a transparency.
Triangles Record Sheet
Mr. Black
Right Triangle, Scalene Triangle
Dec. 12
Set C1 Geometry: Triangles & Quadrilaterals
Bridges in Mathematics Grade 5 Supplement • C1.1© The Math Learning Center
2. When students understand what to do, pass out the rubber bands and let them get started. Remind them to make 4 different triangles. Encourage them to make triangles that are different than the one you made, and different from the ones their neighbors are making. Circulate as they are working to talk with them about their triangles. What kinds of angles do they notice as they create their triangles? Can they point out acute, obtuse, and/or right angles in their work?
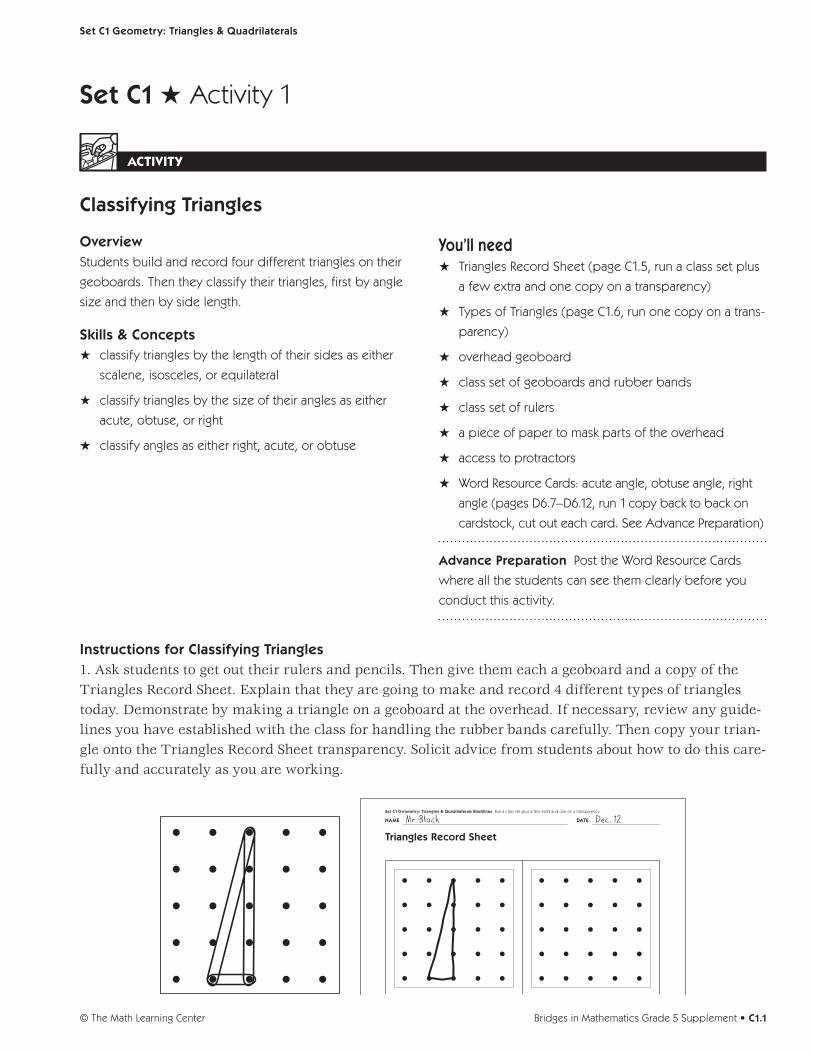
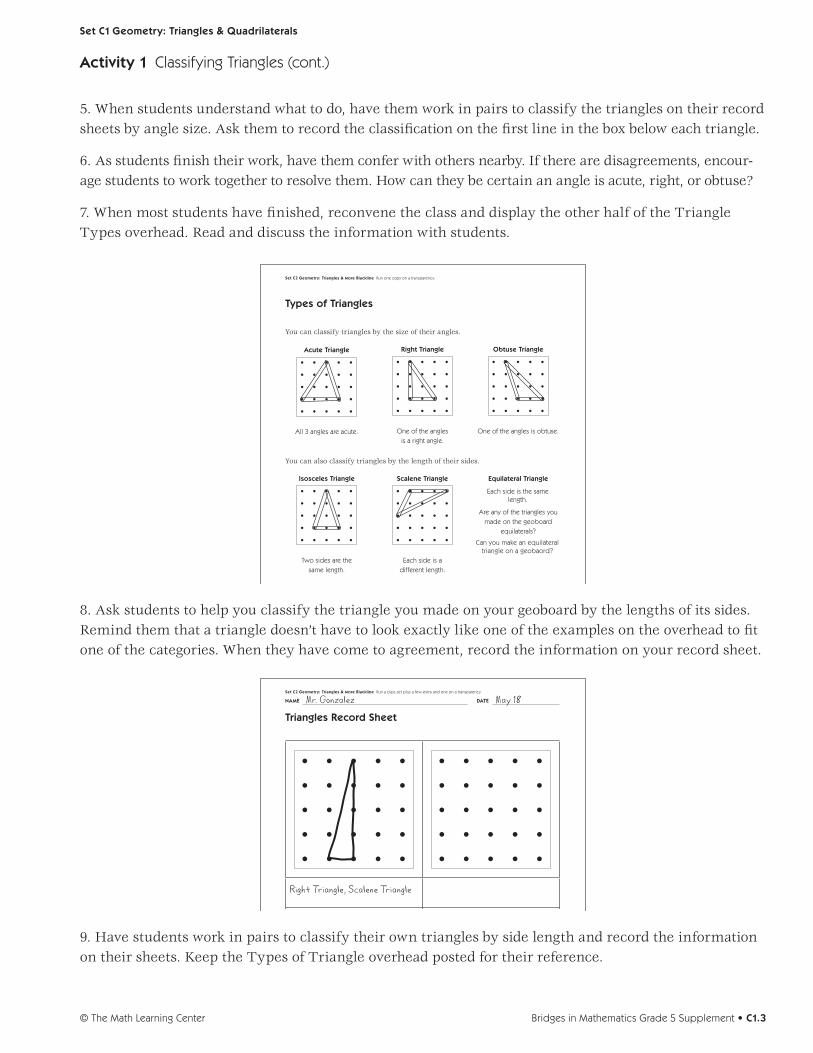
3. When most students have finished, reconvene the class. Explain that they are going to classify by type, and record, the triangles they have just created. Show just the top portion of Types of Triangles at the overhead.
Set C2 Geometry: Triangles & More Blackline Run one copy on a transparency.
Types of Triangles
You can classify triangles by the size of their angles.
Acute Triangle
All 3 angles are acute.
Right Triangle
One of the angles is a right angle.
Obtuse Triangle
One of the angles is obtuse.
You can also classify triangles by the length of their sides.
Isosceles Triangle
Two sides are thesame length.
Scalene Triangle
Each side is adifferent length.
Equilateral Triangle
Each side is the samelength.
Are any of the triangles you
made on the geoboard equilaterals?
Can you make an equilateraltriangle on a geobaord?
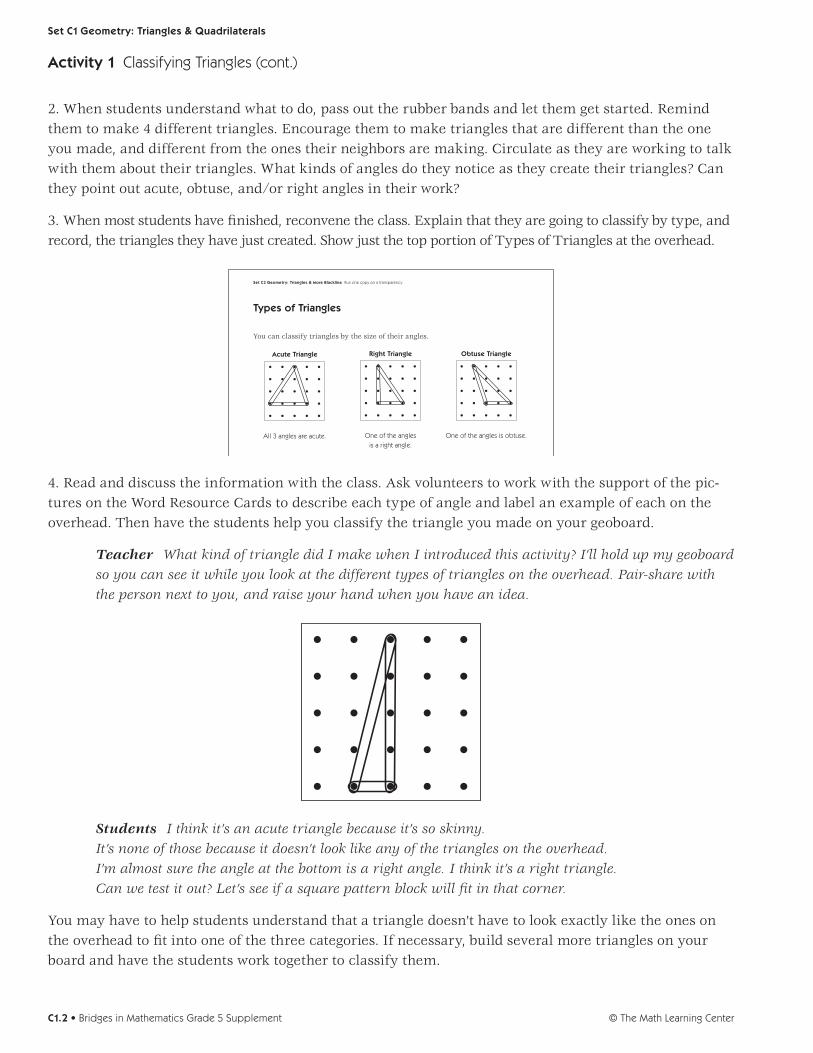
4. Read and discuss the information with the class. Ask volunteers to work with the support of the pic-tures on the Word Resource Cards to describe each type of angle and label an example of each on the overhead. Then have the students help you classify the triangle you made on your geoboard.
Teacher What kind of triangle did I make when I introduced this activity? I’ll hold up my geoboard so you can see it while you look at the different types of triangles on the overhead. Pair-share with the person next to you, and raise your hand when you have an idea.
Students I think it’s an acute triangle because it’s so skinny. It’s none of those because it doesn’t look like any of the triangles on the overhead. I’m almost sure the angle at the bottom is a right angle. I think it’s a right triangle. Can we test it out? Let’s see if a square pattern block will fit in that corner.
You may have to help students understand that a triangle doesn’t have to look exactly like the ones on the overhead to fit into one of the three categories. If necessary, build several more triangles on your board and have the students work together to classify them.
Activity 1 Classifying Triangles (cont.)
Set C1 Geometry: Triangles & Quadrilaterals
© The Math Learning CenterC1.2 • Bridges in Mathematics Grade 5 Supplement
5. When students understand what to do, have them work in pairs to classify the triangles on their record sheets by angle size. Ask them to record the classification on the first line in the box below each triangle.
6. As students finish their work, have them confer with others nearby. If there are disagreements, encour-age students to work together to resolve them. How can they be certain an angle is acute, right, or obtuse?
7. When most students have finished, reconvene the class and display the other half of the Triangle Types overhead. Read and discuss the information with students.
Set C2 Geometry: Triangles & More Blackline Run one copy on a transparency.
Types of Triangles
You can classify triangles by the size of their angles.
Acute Triangle
All 3 angles are acute.
Right Triangle
One of the angles is a right angle.
Obtuse Triangle
One of the angles is obtuse.
You can also classify triangles by the length of their sides.
Isosceles Triangle
Two sides are thesame length.
Scalene Triangle
Each side is adifferent length.
Equilateral Triangle
Each side is the samelength.
Are any of the triangles you
made on the geoboard equilaterals?
Can you make an equilateraltriangle on a geobaord?
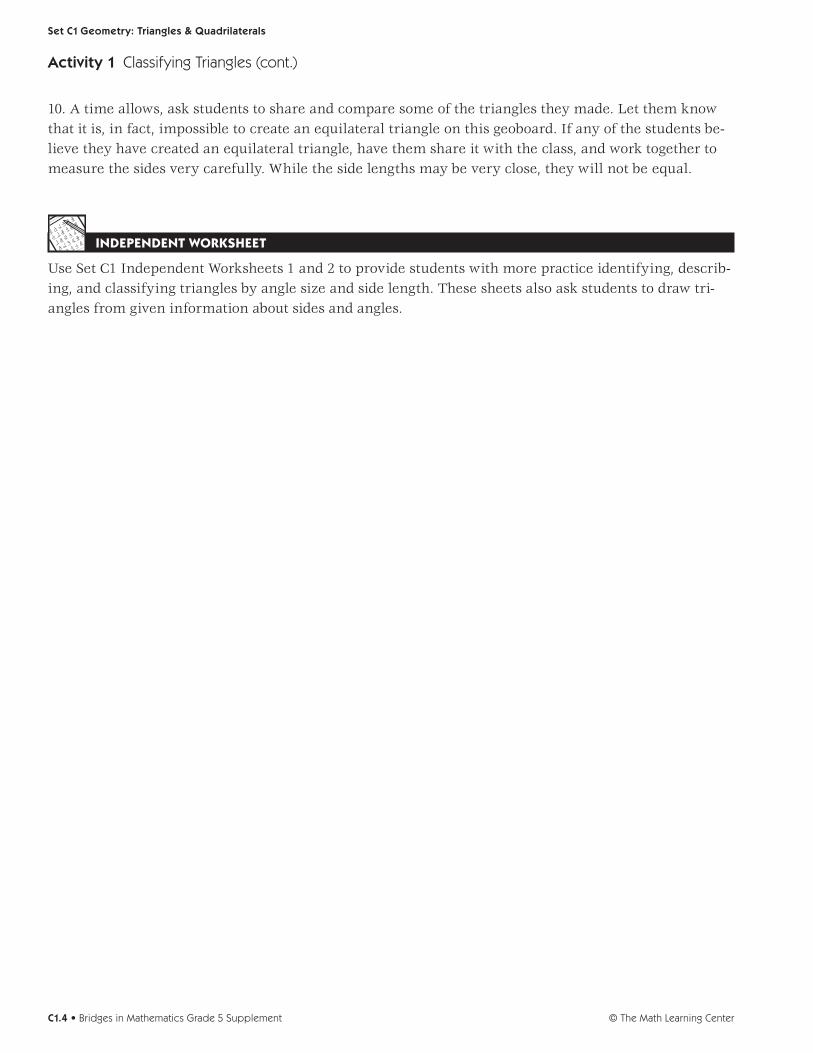
8. Ask students to help you classify the triangle you made on your geoboard by the lengths of its sides. Remind them that a triangle doesn’t have to look exactly like one of the examples on the overhead to fit one of the categories. When they have come to agreement, record the information on your record sheet.
NAME DATE
Set C2 Geometry: Triangles & More Blackline Run a class set plus a few extra and one on a transparency.
Triangles Record Sheet
Mr. Gonzalez
Right Triangle, Scalene Triangle
May 18
9. Have students work in pairs to classify their own triangles by side length and record the information on their sheets. Keep the Types of Triangle overhead posted for their reference.
Activity 1 Classifying Triangles (cont.)
Set C1 Geometry: Triangles & Quadrilaterals
Bridges in Mathematics Grade 5 Supplement • C1.3© The Math Learning Center
10. A time allows, ask students to share and compare some of the triangles they made. Let them know that it is, in fact, impossible to create an equilateral triangle on this geoboard. If any of the students be-lieve they have created an equilateral triangle, have them share it with the class, and work together to measure the sides very carefully. While the side lengths may be very close, they will not be equal.
INDEPENDENT WORKSHEET
Use Set C1 Independent Worksheets 1 and 2 to provide students with more practice identifying, describ-ing, and classifying triangles by angle size and side length. These sheets also ask students to draw tri-angles from given information about sides and angles.
Activity 1 Classifying Triangles (cont.)
Set C1 Geometry: Triangles & Quadrilaterals
© The Math Learning CenterC1.4 • Bridges in Mathematics Grade 5 Supplement
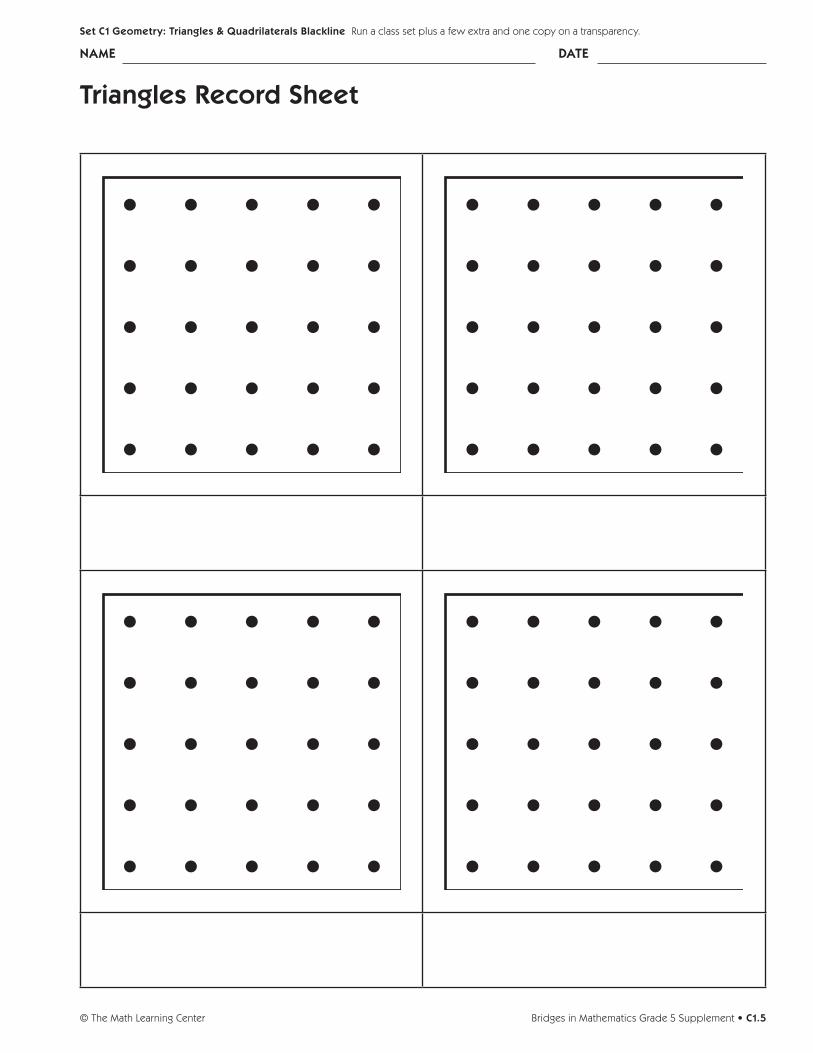
Triangles Record Sheet
Bridges in Mathematics Grade 5 Supplement • C1.5© The Math Learning Center
NAME DATE
Set C1 Geometry: Triangles & Quadrilaterals Blackline Run a class set plus a few extra and one copy on a transparency.
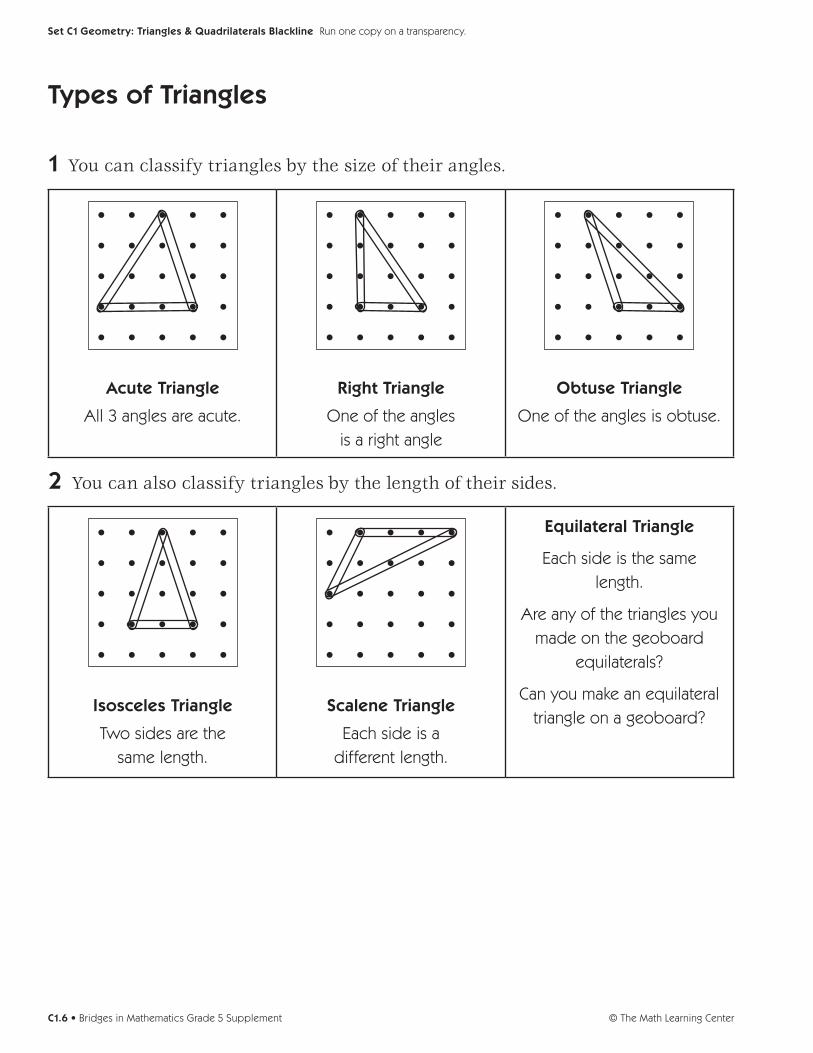
Types of Triangles
1 You can classify triangles by the size of their angles.
Acute Triangle
All 3 angles are acute.
Right Triangle
One of the angles is a right angle
Obtuse Triangle
One of the angles is obtuse.
2 You can also classify triangles by the length of their sides.
Isosceles Triangle
Two sides are the same length.
Scalene Triangle
Each side is a different length.
Equilateral Triangle
Each side is the same length.
Are any of the triangles you made on the geoboard
equilaterals?
Can you make an equilateral triangle on a geoboard?
© The Math Learning CenterC1.6 • Bridges in Mathematics Grade 5 Supplement
Set C1 Geometry: Triangles & Quadrilaterals Blackline Run one copy on a transparency.
Bridges in Mathematics Grade 5 Supplement • C1.7© The Math Learning Center
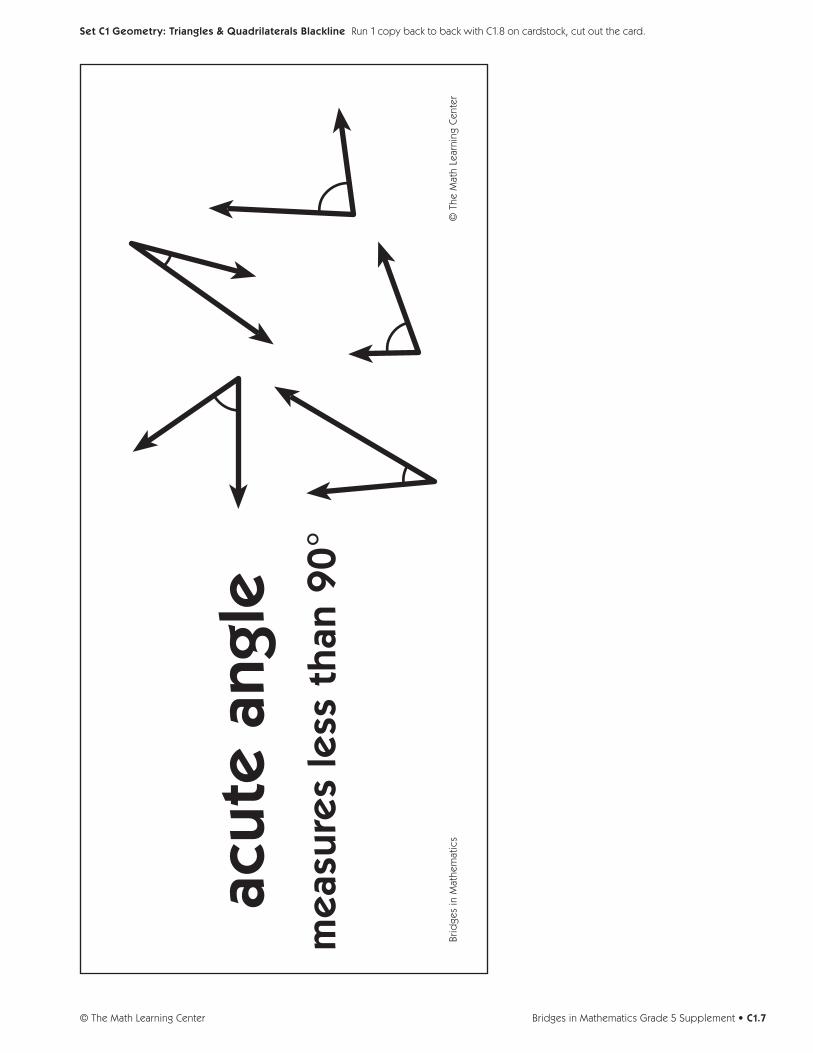
Set C1 Geometry: Triangles & Quadrilaterals Blackline Run 1 copy back to back with C1.8 on cardstock, cut out the card.
© T
he M
ath
Lear
ning
Cen
ter
Brid
ges
in M
athe
mat
ics
acut
e an
gle
mea
sure
s le
ss t
han
90°
© The Math Learning CenterC1.8 • Bridges in Mathematics Grade 5 Supplement
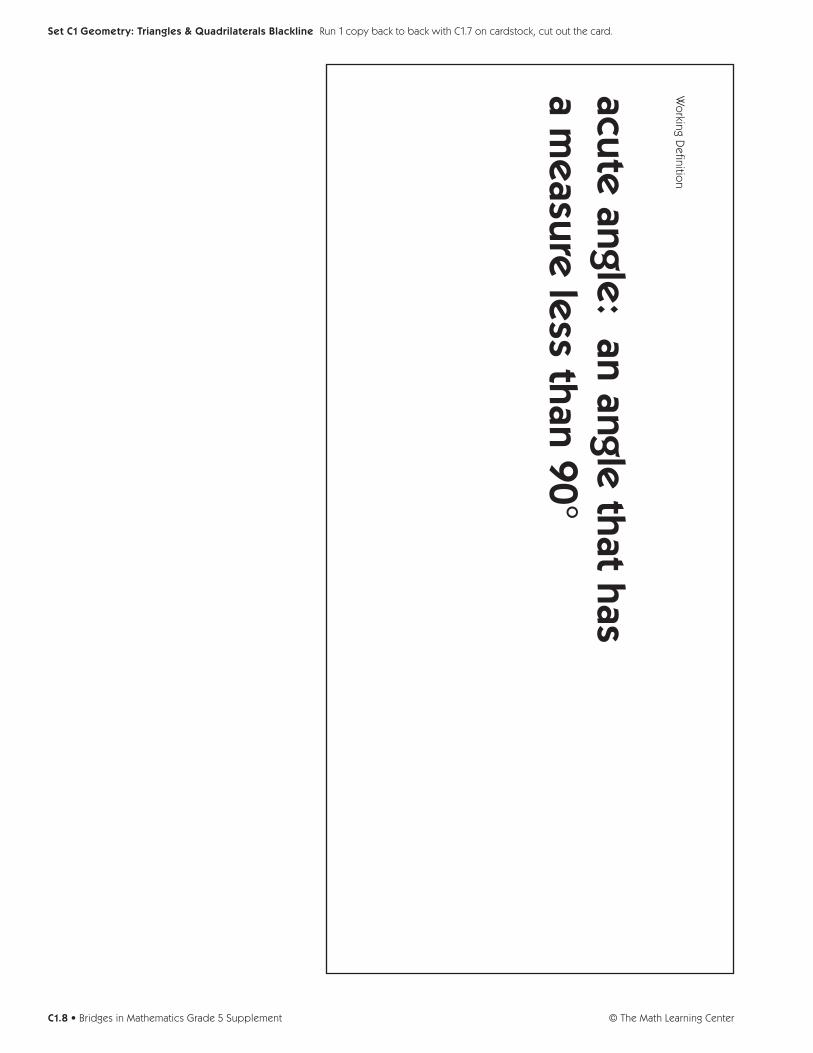
Set C1 Geometry: Triangles & Quadrilaterals Blackline Run 1 copy back to back with C1.7 on cardstock, cut out the card.
Wo
rking Definitio
n
acute angle: an angle that has a m
easure less than 90°
Bridges in Mathematics Grade 5 Supplement • C1.9© The Math Learning Center
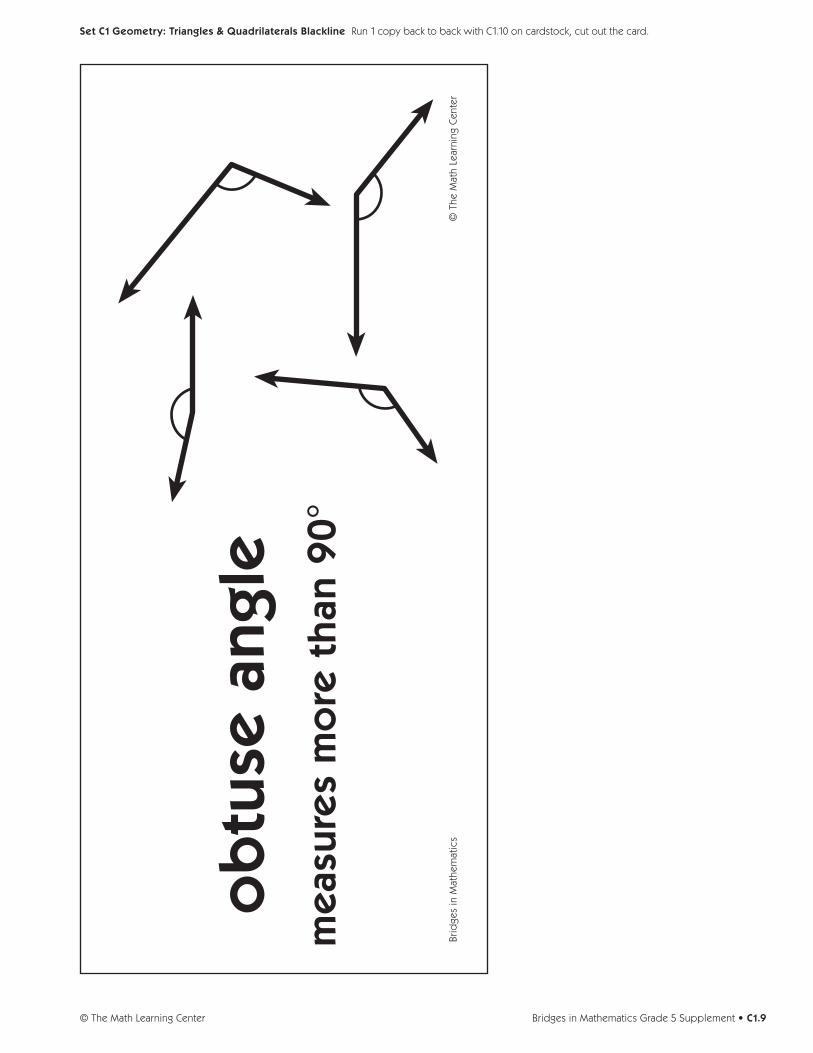
Set C1 Geometry: Triangles & Quadrilaterals Blackline Run 1 copy back to back with C1.10 on cardstock, cut out the card.
© T
he M
ath
Lear
ning
Cen
ter
Brid
ges
in M
athe
mat
ics
ob
tuse
ang
lem
easu
res
mo
re t
han
90°

© The Math Learning CenterC1.10 • Bridges in Mathematics Grade 5 Supplement
Set C1 Geometry: Triangles & Quadrilaterals Blackline Run 1 copy back to back with C1.9 on cardstock, cut out the card.
Wo
rking Definitio
n
ob
tuse angle
: an angle that has a m
easure
mo
re than 90° and less than 180°
Bridges in Mathematics Grade 5 Supplement • C1.11© The Math Learning Center
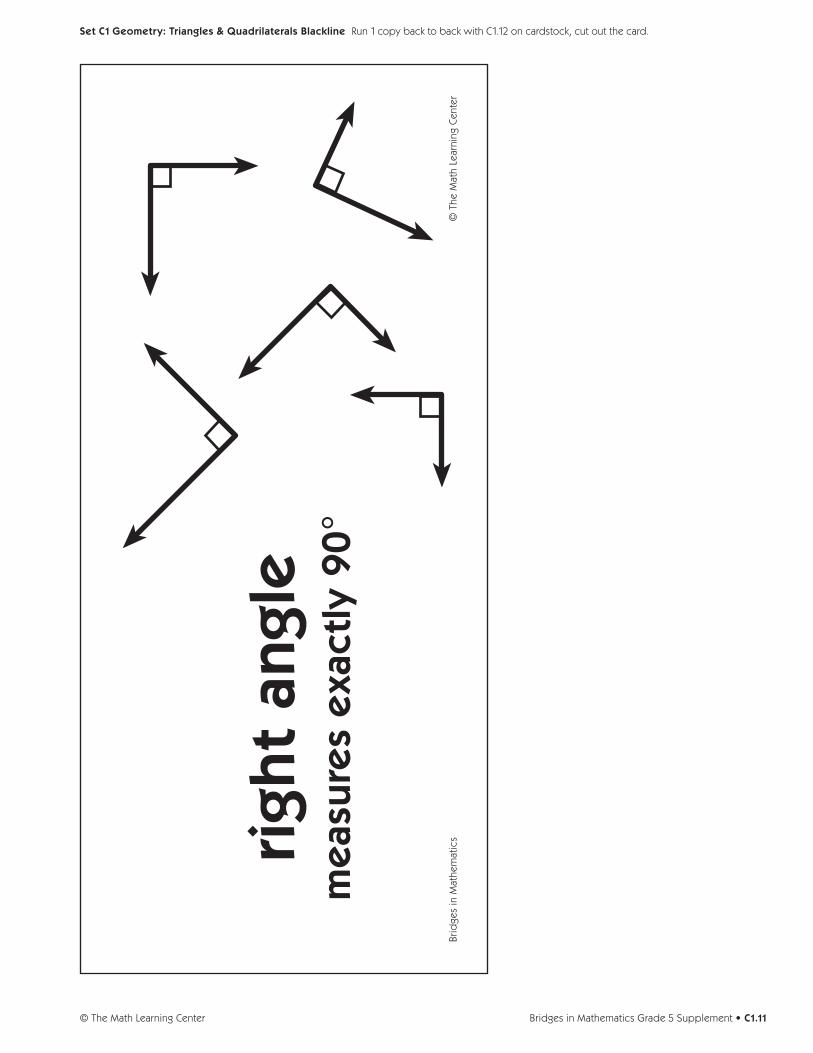
Set C1 Geometry: Triangles & Quadrilaterals Blackline Run 1 copy back to back with C1.12 on cardstock, cut out the card.
© T
he M
ath
Lear
ning
Cen
ter
Brid
ges
in M
athe
mat
icsrigh
t an
gle
mea
sure
s e
xact
ly 9
0°
© The Math Learning CenterC1.12 • Bridges in Mathematics Grade 5 Supplement
Set C1 Geometry: Triangles & Quadrilaterals Blackline Run 1 copy back to back with C1.11 on cardstock, cut out the card.
Wo
rking Definitio
n
right angle
: an angle that has a 90° m
easure
Set C1 H Activity 2
ACTIVITY
Sorting & Classifying Quadrilaterals
OverviewStudents review what they have learned about quadrilat-
erals, and use the information to sort and classify quadri-
laterals in a variety of ways.
Skills & ConceptsH classify quadrilaterals
H measure length with accuracy
You’ll needH Different Kinds of Quadrilaterals (page C1.19, run a
copy on a transparency)
H Sorting Quadrilaterals (page C1.20, run a copy on a
transparency)
H Paper Quadrilaterals (page C1.21, run a half-class set
plus a few extra)
H Venn Diagram Mat (page C1.22, run a half-class set)
H The Logic of Quadrilaterals (page A1.23, optional, run
a class set)
H paper to mask parts of the overhead and overhead pens
H class sets of scissors, rulers and protractors
Instructions for Sorting & Classifying Quadrilaterals1. Write the word quadrilateral on the board or overhead. Ask students to pair-share what they know about this term right now. Then invite a few volunteers to share their ideas with the class. If it doesn’t emerge from the group, solicit agreement that a quadrilateral is a 4-sided polygon. Then work with stu-dent input to list several examples of different quadrilaterals.
2. Explain that the class is going to do some more work with quadrilaterals today. Display the top por-tion of Different Kinds of Quadrilaterals on the overhead. Read and discuss the name and description of each shape with students. Here are some questions you might pose as you review the terms with the class. Encourage students to use the information on the overhead as they formulate their answers.• What is the difference between a rhombus and a square? • Why do people say that a square is a special kind of rectangle?• Would it be fair to say that a square is a special kind of rhombus? Why?• Is a trapezoid also a parallelogram? Why or why not? (No, because it only has 1 pair of parallel sides.)• Why is a rhombus classified as a parallelogram? (Because it has 2 pairs of parallel sides opposite
each other.) • Is a rhombus also a kite? Why or why not? (Yes, because it has two pairs of adjacent sides that are
congruent; in fact, all 4 of its sides are congruent.)• Are there any other quadrilaterals that could be called kites? Which one(s), and why? (A square is
also a kite because it has two pairs of adjacent sides that are congruent.) • Which one of these shapes could be given the most names? Why? (A square, because is can also be
called a quadrilateral, a kite, a parallelogram, a rectangle, and a rhombus!)
Set C1 Geometry: Triangles & Quadrilaterals
Bridges in Mathematics Grade 5 Supplement • C1.13© The Math Learning Center
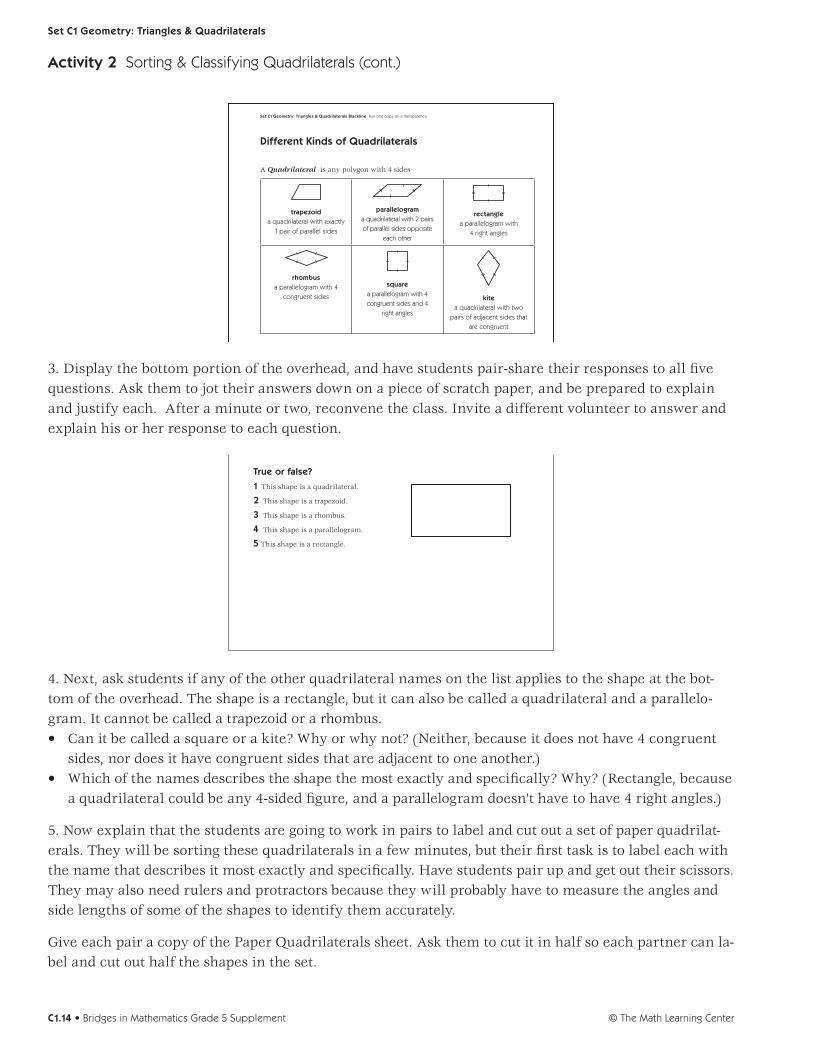
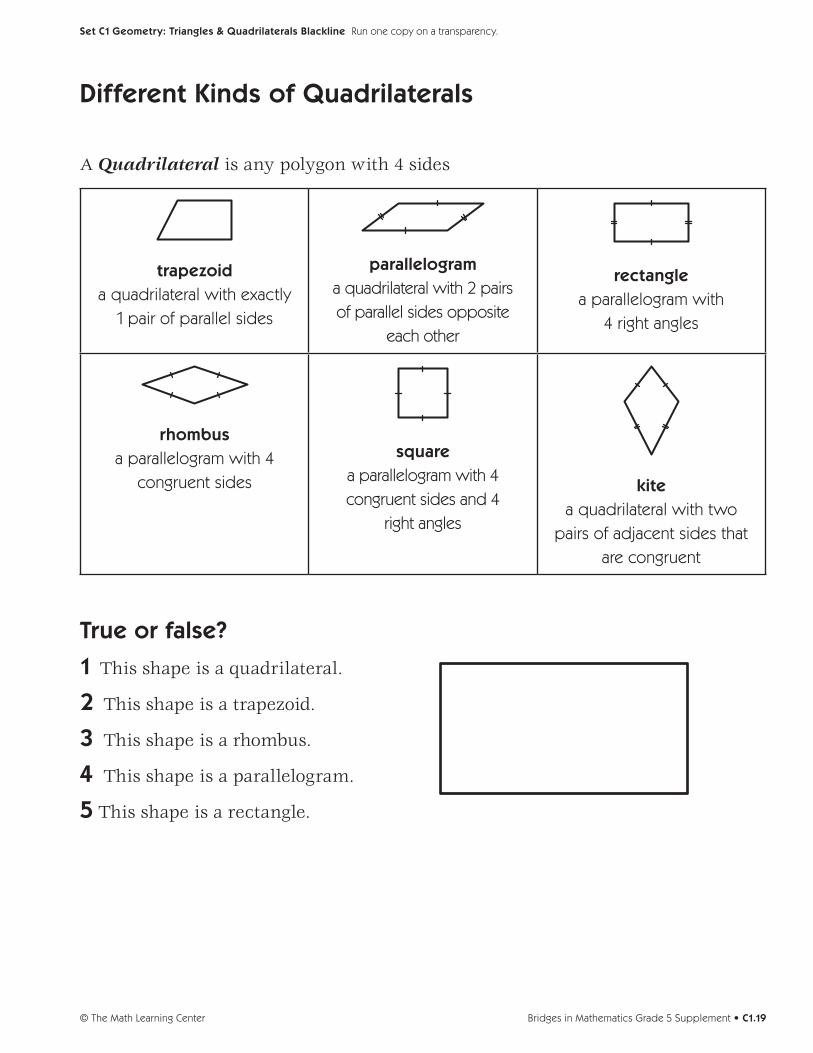
Different Kinds of Quadrilaterals
A Quadrilateral is any polygon with 4 sides
trapezoida quadrilateral with exactly
1 pair of parallel sides
parallelograma quadrilateral with 2 pairs of parallel sides opposite
each other
rectanglea parallelogram with
4 right angles
rhombusa parallelogram with 4
congruent sides
squarea parallelogram with 4 congruent sides and 4
right angles
kitea quadrilateral with two
pairs of adjacent sides that are congruent
True or false?
1 This shape is a quadrilateral.
2 This shape is a trapezoid.
3 This shape is a rhombus.
4 This shape is a parallelogram.
5 This shape is a rectangle.
Set C1 Geometry: Triangles & Quadrilaterals Blackline Run one copy on a transparency.
3. Display the bottom portion of the overhead, and have students pair-share their responses to all five questions. Ask them to jot their answers down on a piece of scratch paper, and be prepared to explain and justify each. After a minute or two, reconvene the class. Invite a different volunteer to answer and explain his or her response to each question.
Different Kinds of Quadrilaterals
quadrilateral any polygon with 4 sides
trapezoid a quadrilateral with exactly 1 pair of parallel sides
parallelogram a quadrilateral with 2 pairs of parallel sides opposite each other
rectangle a parallelogram with 4 right angles
rhombus a parallelogram with 4 congruent sides
square a parallelogram with 4 congruent sides and 4 right angles
kite a quadrilateral with two pairs of adjacent sides that are congruent
True or false?
1 This shape is a quadrilateral.
2 This shape is a trapezoid.
3 This shape is a rhombus.
4 This shape is a parallelogram.
5 This shape is a rectangle.
Set C1 Geometry: Triangles & Quadrilaterals Blackline Run one copy on a transparency.
4. Next, ask students if any of the other quadrilateral names on the list applies to the shape at the bot-tom of the overhead. The shape is a rectangle, but it can also be called a quadrilateral and a parallelo-gram. It cannot be called a trapezoid or a rhombus. • Can it be called a square or a kite? Why or why not? (Neither, because it does not have 4 congruent
sides, nor does it have congruent sides that are adjacent to one another.) • Which of the names describes the shape the most exactly and specifically? Why? (Rectangle, because
a quadrilateral could be any 4-sided figure, and a parallelogram doesn’t have to have 4 right angles.)
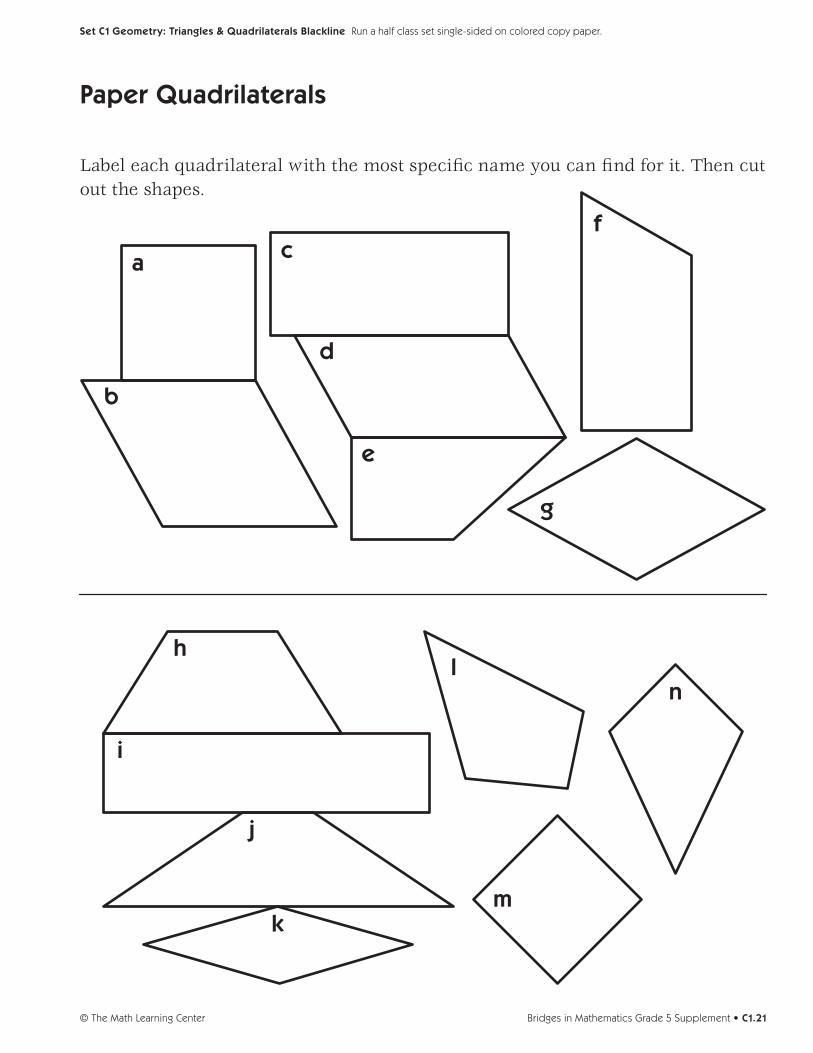
5. Now explain that the students are going to work in pairs to label and cut out a set of paper quadrilat-erals. They will be sorting these quadrilaterals in a few minutes, but their first task is to label each with the name that describes it most exactly and specifically. Have students pair up and get out their scissors. They may also need rulers and protractors because they will probably have to measure the angles and side lengths of some of the shapes to identify them accurately.
Give each pair a copy of the Paper Quadrilaterals sheet. Ask them to cut it in half so each partner can la-bel and cut out half the shapes in the set.
Activity 2 Sorting & Classifying Quadrilaterals (cont.)
Set C1 Geometry: Triangles & Quadrilaterals
© The Math Learning CenterC1.14 • Bridges in Mathematics Grade 5 Supplement

Paper Quadrilaterals
Label each quadrilateral with the most specifi c name you can fi nd for it. Then cut out the shapes.
a
b
c
d
e
f
g
h
m
l
i
j
k
n
Set C1 Geometry: Triangles & Quadrilaterals Blackline Run a half class set single-sided on colored copy paper.
6. Once students understand the labeling and cutting procedures, have them go to work. Leave the Quadrilaterals overhead on display for their reference. Circulate to provide assistance as needed, but en-courage students to help their partners and confirm their answers with other pairs nearby.
7. When most students have finished labeling and cutting out their shapes, confirm the name of each with the class. One simple way to do this is to have volunteers list the letters that belong in each shape group as you record at the overhead.
Different Kinds of Quadrilaterals
A Quadrilateral is any polygon with 4 sides
trapezoida quadrilateral with exactly
1 pair of parallel sides
parallelograma quadrilateral with 2 pairs of parallel sides opposite
each other
rectanglea parallelogram with
4 right angles
rhombusa parallelogram with 4
congruent sides
squarea parallelogram with 4 congruent sides and 4
right angles
kitea quadrilateral with two
pairs of adjacent sides that are congruent
True or false?
1 This shape is a quadrilateral.
2 This shape is a trapezoid.
3 This shape is a rhombus.
4 This shape is a parallelogram.
5 This shape is a rectangle.
Set C1 Geometry: Triangles & Quadrilaterals Blackline Run one copy on a transparency.
Activity 2 Sorting & Classifying Quadrilaterals (cont.)
Set C1 Geometry: Triangles & Quadrilaterals
Bridges in Mathematics Grade 5 Supplement • C1.15© The Math Learning Center
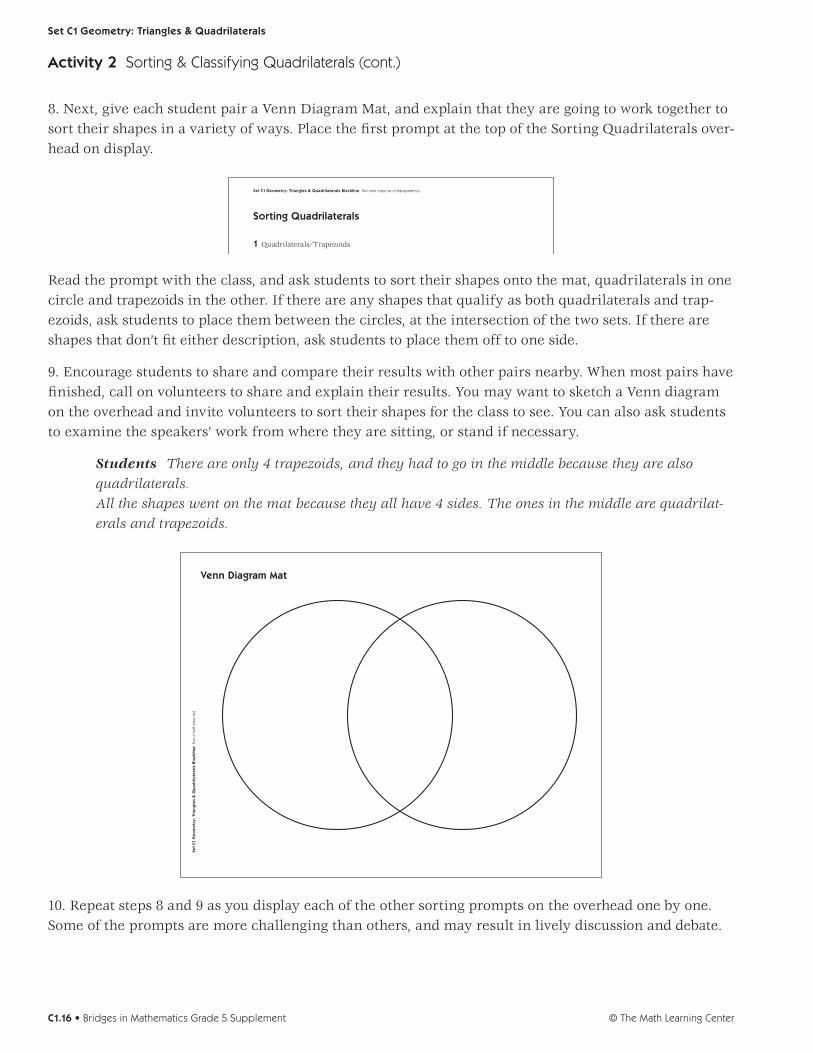
8. Next, give each student pair a Venn Diagram Mat, and explain that they are going to work together to sort their shapes in a variety of ways. Place the first prompt at the top of the Sorting Quadrilaterals over-head on display.
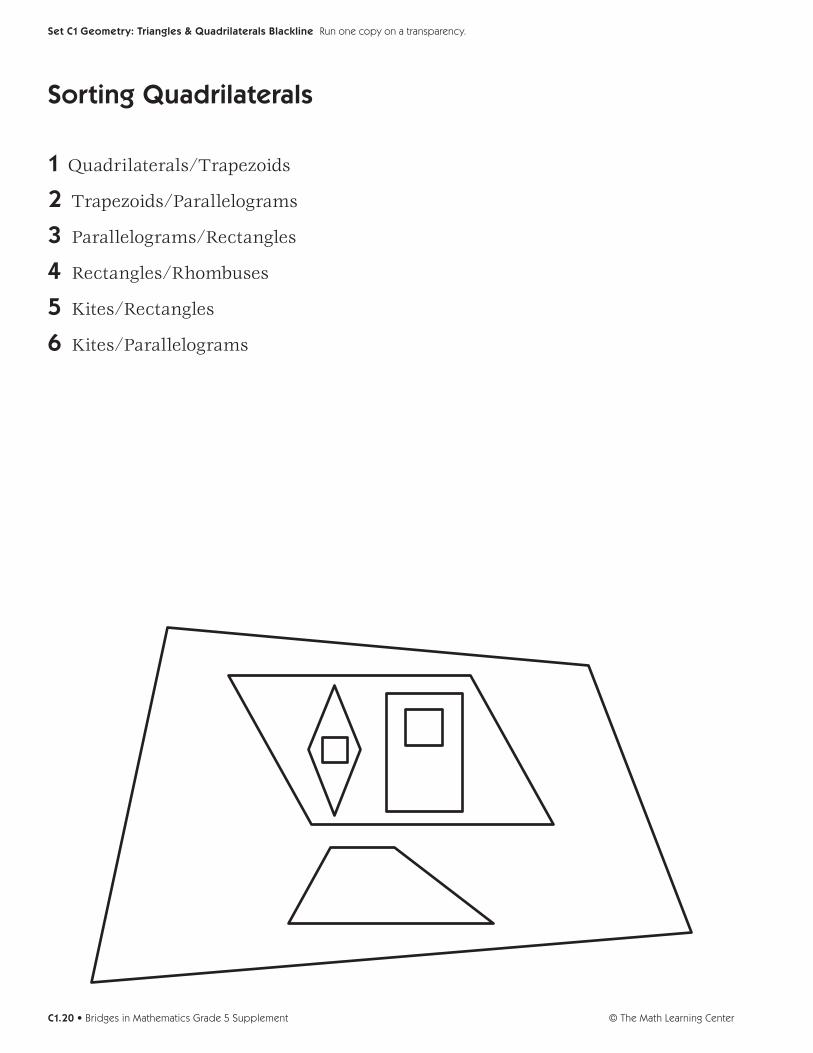
Sorting Quadrilaterals
1 Quadrilaterals/Trapezoids
2 Trapezoids/Parallelograms
3 Parallelograms/Rectangles
4 Rectangles/Rhombuses
5 Kites/Rectangles
6 Kites/Parallelograms
Set C1 Geometry: Triangles & Quadrilaterals Blackline Run one copy on a transparency.
Read the prompt with the class, and ask students to sort their shapes onto the mat, quadrilaterals in one circle and trapezoids in the other. If there are any shapes that qualify as both quadrilaterals and trap-ezoids, ask students to place them between the circles, at the intersection of the two sets. If there are shapes that don’t fit either description, ask students to place them off to one side.
9. Encourage students to share and compare their results with other pairs nearby. When most pairs have finished, call on volunteers to share and explain their results. You may want to sketch a Venn diagram on the overhead and invite volunteers to sort their shapes for the class to see. You can also ask students to examine the speakers’ work from where they are sitting, or stand if necessary.
Students There are only 4 trapezoids, and they had to go in the middle because they are also quadrilaterals. All the shapes went on the mat because they all have 4 sides. The ones in the middle are quadrilat-erals and trapezoids.
Venn Diagram Mat
Set
C1 G
eo
me
try:
Tri
ang
les
& Q
uad
rila
tera
ls B
lack
line
Run
a h
alf c
lass
set
10. Repeat steps 8 and 9 as you display each of the other sorting prompts on the overhead one by one. Some of the prompts are more challenging than others, and may result in lively discussion and debate.
Activity 2 Sorting & Classifying Quadrilaterals (cont.)
Set C1 Geometry: Triangles & Quadrilaterals
© The Math Learning CenterC1.16 • Bridges in Mathematics Grade 5 Supplement

Sorting Quadrilaterals
1 Quadrilaterals/Trapezoids
2 Trapezoids/Parallelograms
3 Parallelograms/Rectangles
4 Rectangles/Rhombuses
5 Kites/Rectangles
6 Kites/Parallelograms
Set C1 Geometry: Triangles & Quadrilaterals Blackline Run one copy on a transparency.
Extension• Give students each a copy of The Logic of Quadrilaterals. The diagram on this sheet illustrates the
relationships between the various quadrilaterals in a very succinct way. Students are asked to label each of the shapes, and then answer a series of questions designed to help them think about how the shapes have been placed in relation to one another, and why. After reviewing the instructions to-gether, have students complete the sheet independently. Then discuss it as a group. (There is a copy of the diagram at the bottom of the Sorting Quadrilaterals overhead you can use to focus and direct the discussion.)
The Logic of Quadrilaterals
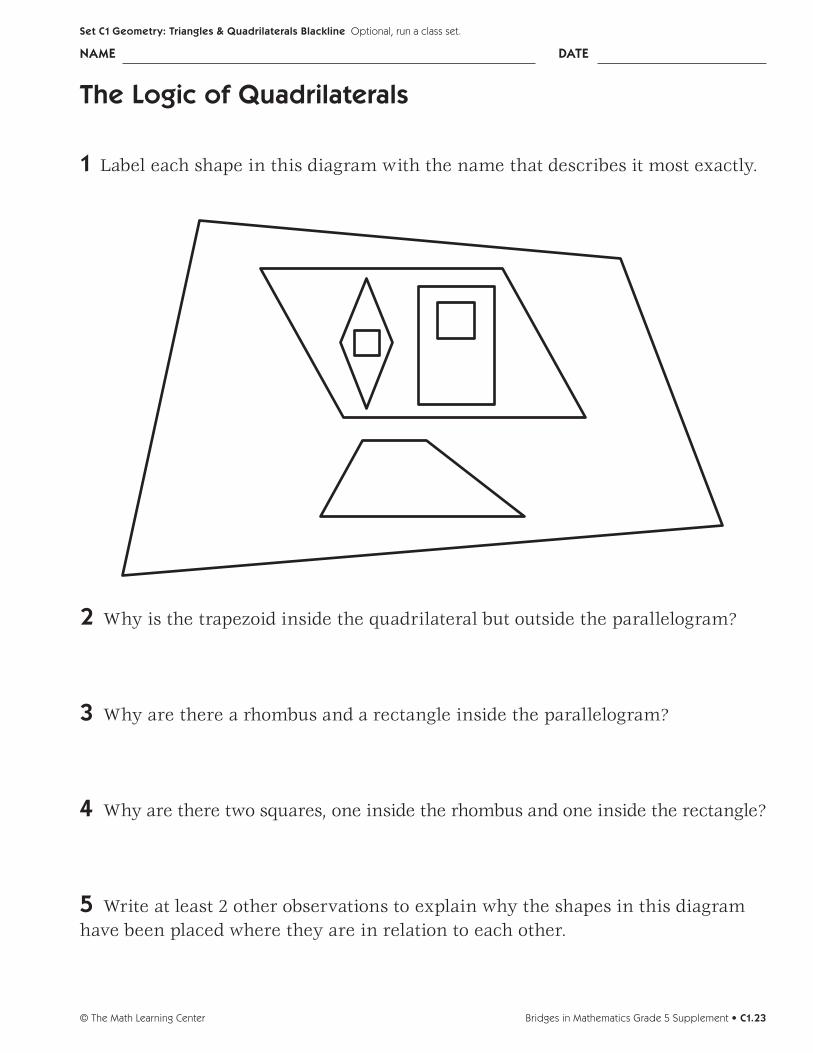
1 Label each shape in this diagram with the name that describes it most exactly.
2 Why is the trapezoid inside the quadrilateral but outside the parallelogram?
3 Why are there a rhombus and a rectangle inside the parallelogram?
4 Why are there two squares, one inside the rhombus and one inside the rectangle?
5 Write at least 2 other observations to explain why the shapes in this diagram have been placed where they are in relation to each other.
NAME DATE
Set C1 Geometry: Triangles & Quadrilaterals Blackline Optional, run a class set.
Activity 2 Sorting & Classifying Quadrilaterals (cont.)
Set C1 Geometry: Triangles & Quadrilaterals
Bridges in Mathematics Grade 5 Supplement • C1.17© The Math Learning Center
INDEPENDENT WORKSHEET
Use Set C1 Independent Worksheets 3 and 4 to provide students with more practice classifying and drawing quadrilaterals from information given about sides and angles.
Activity 2 Sorting & Classifying Quadrilaterals (cont.)
Set C1 Geometry: Triangles & Quadrilaterals
© The Math Learning CenterC1.18 • Bridges in Mathematics Grade 5 Supplement
Different Kinds of Quadrilaterals
A Quadrilateral is any polygon with 4 sides
trapezoida quadrilateral with exactly
1 pair of parallel sides
parallelograma quadrilateral with 2 pairs of parallel sides opposite
each other
rectanglea parallelogram with
4 right angles
rhombusa parallelogram with 4
congruent sides
squarea parallelogram with 4 congruent sides and 4
right angles
kitea quadrilateral with two
pairs of adjacent sides that are congruent
True or false?
1 This shape is a quadrilateral.
2 This shape is a trapezoid.
3 This shape is a rhombus.
4 This shape is a parallelogram.
5 This shape is a rectangle.
Bridges in Mathematics Grade 5 Supplement • C1.19© The Math Learning Center
Set C1 Geometry: Triangles & Quadrilaterals Blackline Run one copy on a transparency.
Sorting Quadrilaterals
1 Quadrilaterals/Trapezoids
2 Trapezoids/Parallelograms
3 Parallelograms/Rectangles
4 Rectangles/Rhombuses
5 Kites/Rectangles
6 Kites/Parallelograms
© The Math Learning CenterC1.20 • Bridges in Mathematics Grade 5 Supplement
Set C1 Geometry: Triangles & Quadrilaterals Blackline Run one copy on a transparency.
Paper Quadrilaterals
Label each quadrilateral with the most specific name you can find for it. Then cut out the shapes.
a
b
c
d
e
f
g
h
m
l
i
j
k
n
Bridges in Mathematics Grade 5 Supplement • C1.21© The Math Learning Center
Set C1 Geometry: Triangles & Quadrilaterals Blackline Run a half class set single-sided on colored copy paper.
Venn
Dia
gra
m M
at
© The Math Learning CenterC1.22 • Bridges in Mathematics Grade 5 Supplement
Set C1 Geometry: Triangles & Quadrilaterals Blackline Run a half class set
The Logic of Quadrilaterals
1 Label each shape in this diagram with the name that describes it most exactly.
2 Why is the trapezoid inside the quadrilateral but outside the parallelogram?
3 Why are there a rhombus and a rectangle inside the parallelogram?
4 Why are there two squares, one inside the rhombus and one inside the rectangle?
5 Write at least 2 other observations to explain why the shapes in this diagram have been placed where they are in relation to each other.
Bridges in Mathematics Grade 5 Supplement • C1.23© The Math Learning Center
NAME DATE
Set C1 Geometry: Triangles & Quadrilaterals Blackline Optional, run a class set.

© The Math Learning CenterC1.24 • Bridges in Mathematics Grade 5 Supplement

Set C1 H Activity 3
ACTIVITY
Finding the Perimeter & Area of a Parallelogram
OverviewStudents find the perimeter and area of an index card,
then cut the card and tape the two resulting pieces
together to form a parallelogram that is not a rectangle.
Then they find the perimeter and area of the parallelo-
gram. As they do so, they discover that multiplying the
length of one side by the other does not yield the area of
a non-rectangular parallelogram. After students investigate
further by creating two more parallelograms, the teacher
shares the formula for finding the area of a parallelogram,
and asks the class to explain and apply it.
Skills & ConceptsH classify quadrilaterals
H determine the formula for the area of a parallelogram
by relating it to the area of a rectangle
H use formulas to determine the perimeters and areas of
rectangles and parallelograms
H use appropriate tools and units to measure objects to
the precision of one-eighth inch
You’ll needH Start with a Rectangle (page C1.30, run a copy on a
transparency)
H Square Inch Grid Paper (page C1.31, run several class
sets and one copy on a transparency)
H Finding the Area of Parallelograms (pages C1.32 and
C1.33 , run a class set)
H paper to mask parts of the overhead
H overhead pens
H 3" x 5" index cards or pieces of construction paper, 3
per student
H class set of rulers
H scissors
H several rolls of scotch tape
Instructions for Finding the Perimeter & Area of a Parallelogram1. Write the words perimeter and area on the board. Have students pair-share the definition of each term, and then ask volunteers to share their definitions with the class. Briefly review the formulas for finding the perimeter (2l + 2w) and area (l × w) of a rectangle, and give students each an index card. Ask stu-dents to measure the length and the width of the index card in inches, and use the information to find its perimeter and the area. Have them use a piece of scratch paper or the card itself if they need to do any writing as they determine these measurements.
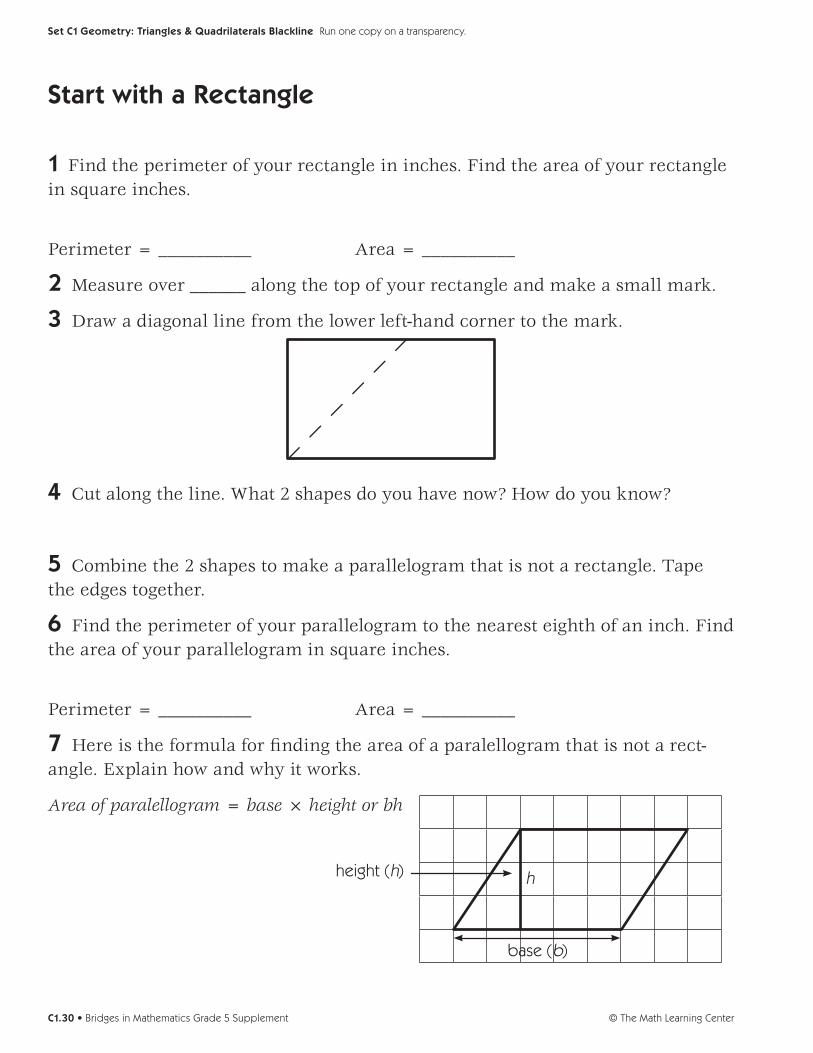
2. When most students have finished, display just the first instruction on the Start with a Rectangle overhead, and work with input from the class to record the perimeter and area of the index card. Then reveal the second task on the overhead. Write 3" in the blank as you read the instruction with the class, and give students time to measure and mark their cards as specified. Ask them to be as precise as pos-sible in their measurements. Show the rest of the tasks on the overhead one by one. Read each task with the class and give students time to complete it before moving on to the next. Take time to discuss each question, and record the answers on the overhead. Ask students to be certain they have formed a paral-lelogram that is not a rectangle before they use any scotch tape.
Set C1 Geometry: Triangles & Quadrilaterals
Bridges in Mathematics Grade 5 Supplement • C1.25© The Math Learning Center
Start with a Rectangle
1 Find the perimeter of your rectangle in inches. Find the area of your rectangle in square inches.
Perimeter = __________ Area = __________
2 Measure over ______ along the top of your rectangle and make a small mark.
3 Draw a diagonal line from the lower left-hand corner to the mark.
4 Cut along the line. What 2 shapes do you have now? How do you know?
5 Combine the 2 shapes to make a parallelogram that is not a rectangle. Tape the edges together.
6 Find the perimeter of your parallelogram to the nearest eighth of an inch. Find the area of your parallelogram in square inches.
Perimeter = __________ Area = __________
7 Here is the formula for fi nding the area of a paralellogram that is not a rect-angle. Explain how and why it works.
Area of paralellogram = base × height or bh
height (h)
base (b)
h
Set C1 Geometry: Triangles & Quadrilaterals Blackline Run one copy on a transparency.
16"3"
15 sq in
right isosceles triangle, trapezoid
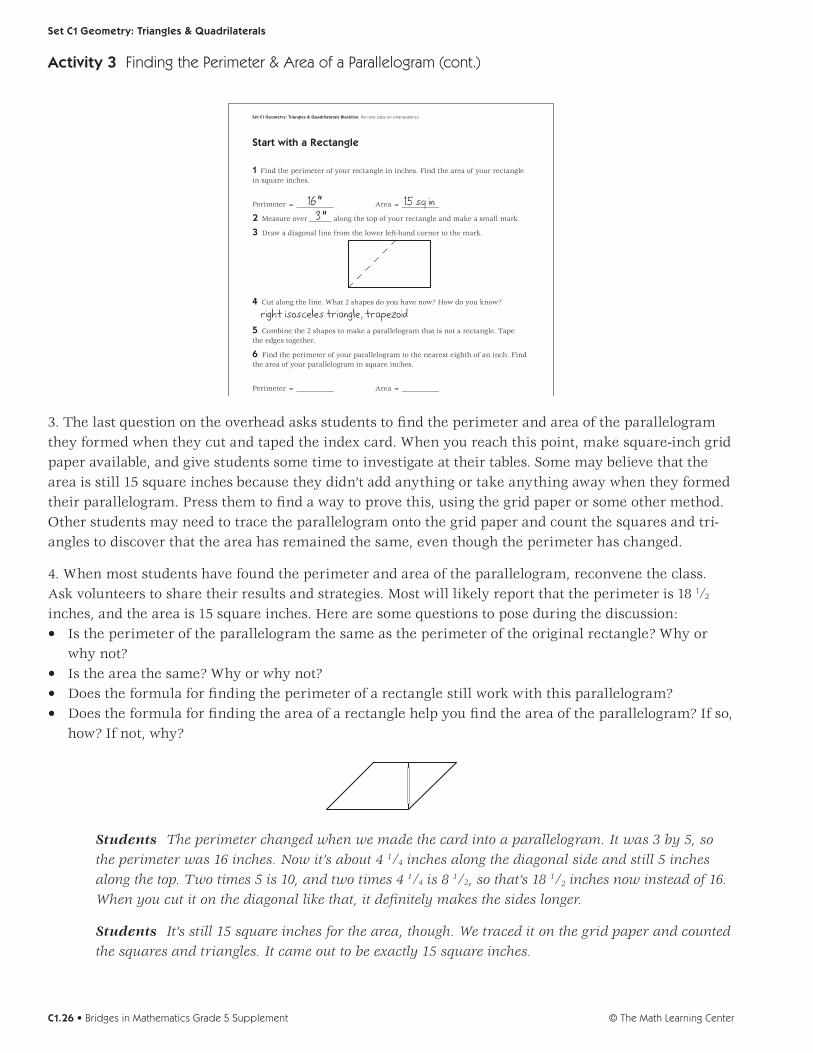
3. The last question on the overhead asks students to find the perimeter and area of the parallelogram they formed when they cut and taped the index card. When you reach this point, make square-inch grid paper available, and give students some time to investigate at their tables. Some may believe that the area is still 15 square inches because they didn’t add anything or take anything away when they formed their parallelogram. Press them to find a way to prove this, using the grid paper or some other method. Other students may need to trace the parallelogram onto the grid paper and count the squares and tri-angles to discover that the area has remained the same, even though the perimeter has changed.
4. When most students have found the perimeter and area of the parallelogram, reconvene the class. Ask volunteers to share their results and strategies. Most will likely report that the perimeter is 18 1/2 inches, and the area is 15 square inches. Here are some questions to pose during the discussion:• Is the perimeter of the parallelogram the same as the perimeter of the original rectangle? Why or
why not?• Is the area the same? Why or why not?• Does the formula for finding the perimeter of a rectangle still work with this parallelogram? • Does the formula for finding the area of a rectangle help you find the area of the parallelogram? If so,
how? If not, why?
Students The perimeter changed when we made the card into a parallelogram. It was 3 by 5, so the perimeter was 16 inches. Now it’s about 4 1/4 inches along the diagonal side and still 5 inches along the top. Two times 5 is 10, and two times 4 1/4 is 8 1/2, so that’s 18 1/2 inches now instead of 16. When you cut it on the diagonal like that, it definitely makes the sides longer.
Students It’s still 15 square inches for the area, though. We traced it on the grid paper and counted the squares and triangles. It came out to be exactly 15 square inches.
Activity 3 Finding the Perimeter & Area of a Parallelogram (cont.)
Set C1 Geometry: Triangles & Quadrilaterals
© The Math Learning CenterC1.26 • Bridges in Mathematics Grade 5 Supplement
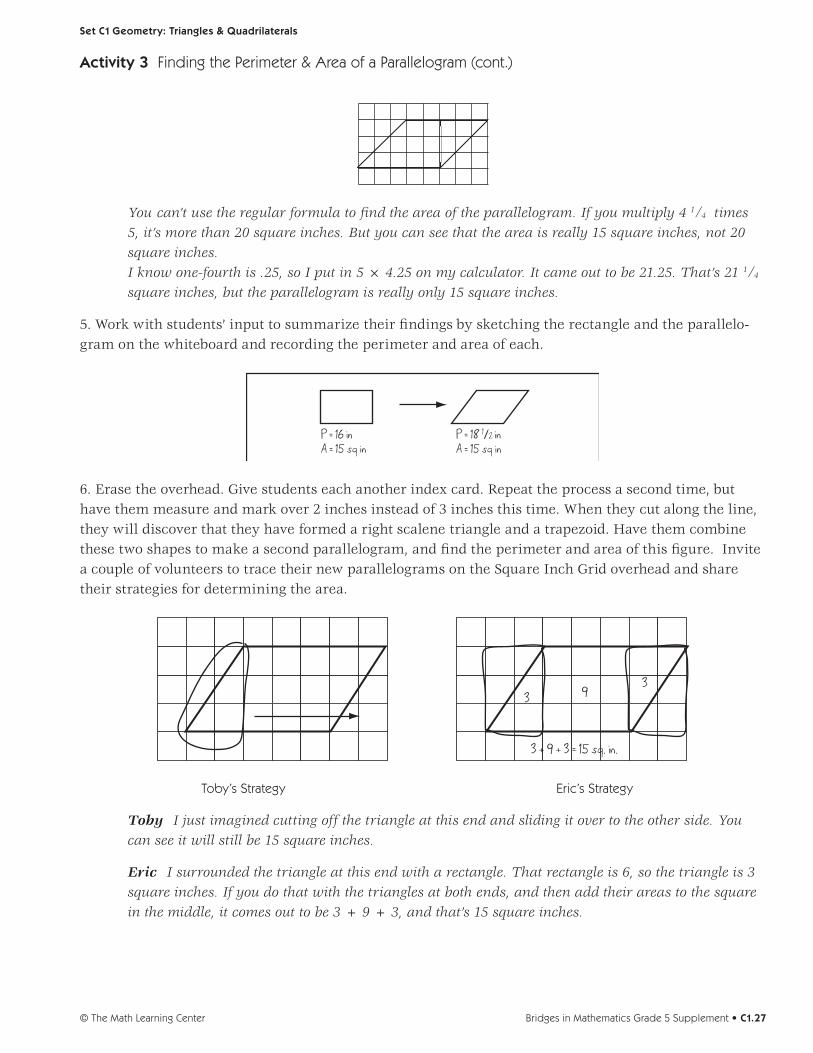
You can’t use the regular formula to find the area of the parallelogram. If you multiply 4 1/4 times 5, it’s more than 20 square inches. But you can see that the area is really 15 square inches, not 20 square inches. I know one-fourth is .25, so I put in 5 × 4.25 on my calculator. It came out to be 21.25. That’s 21 1/4 square inches, but the parallelogram is really only 15 square inches.
5. Work with students’ input to summarize their findings by sketching the rectangle and the parallelo-gram on the whiteboard and recording the perimeter and area of each.
P = 16 inA = 15 sq in
P = 18 1/2 inA = 15 sq in
6. Erase the overhead. Give students each another index card. Repeat the process a second time, but have them measure and mark over 2 inches instead of 3 inches this time. When they cut along the line, they will discover that they have formed a right scalene triangle and a trapezoid. Have them combine these two shapes to make a second parallelogram, and find the perimeter and area of this figure. Invite a couple of volunteers to trace their new parallelograms on the Square Inch Grid overhead and share their strategies for determining the area.
3 9
3 + 9 + 3 = 15 sq. in.
3
Toby’s Strategy Eric’s Strategy
Toby I just imagined cutting off the triangle at this end and sliding it over to the other side. You can see it will still be 15 square inches.
Eric I surrounded the triangle at this end with a rectangle. That rectangle is 6, so the triangle is 3 square inches. If you do that with the triangles at both ends, and then add their areas to the square in the middle, it comes out to be 3 + 9 + 3, and that’s 15 square inches.
Activity 3 Finding the Perimeter & Area of a Parallelogram (cont.)
Set C1 Geometry: Triangles & Quadrilaterals
Bridges in Mathematics Grade 5 Supplement • C1.27© The Math Learning Center
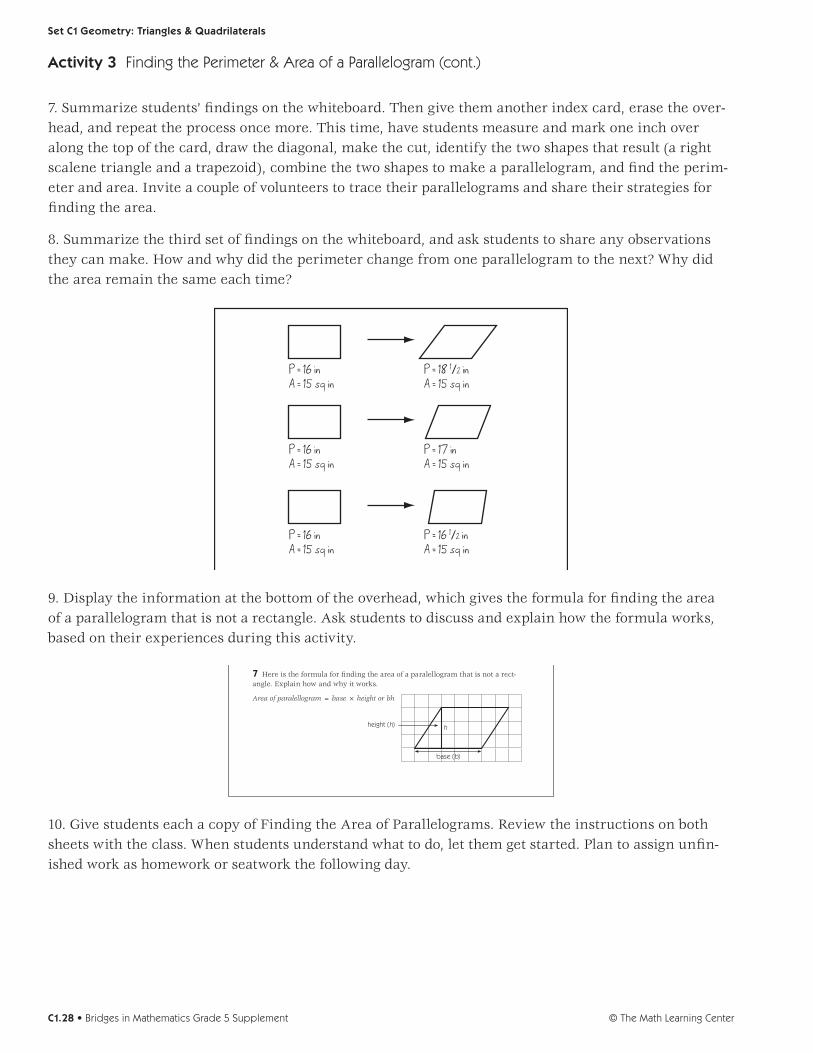
7. Summarize students’ findings on the whiteboard. Then give them another index card, erase the over-head, and repeat the process once more. This time, have students measure and mark one inch over along the top of the card, draw the diagonal, make the cut, identify the two shapes that result (a right scalene triangle and a trapezoid), combine the two shapes to make a parallelogram, and find the perim-eter and area. Invite a couple of volunteers to trace their parallelograms and share their strategies for finding the area.
8. Summarize the third set of findings on the whiteboard, and ask students to share any observations they can make. How and why did the perimeter change from one parallelogram to the next? Why did the area remain the same each time?
P = 16 inA = 15 sq in
P = 18 1/2 inA = 15 sq in
P = 16 inA = 15 sq in
P = 17 inA = 15 sq in
P = 16 inA = 15 sq in
P = 16 1/2 inA = 15 sq in
9. Display the information at the bottom of the overhead, which gives the formula for finding the area of a parallelogram that is not a rectangle. Ask students to discuss and explain how the formula works, based on their experiences during this activity.
Start with a Rectangle
1 Find the perimeter of your rectangle in inches. Find the area of your rectangle in square inches.
Perimeter = __________ Area = __________
2 Measure over ______ along the top of your rectangle and make a small mark.
3 Draw a diagonal line from the lower left-hand corner to the mark.
4 Cut along the line. What 2 shapes do you have now? How do you know?
5 Combine the 2 shapes to make a parallelogram that is not a rectangle. Tape the edges together.
6 Find the perimeter of your parallelogram to the nearest eighth of an inch. Find the area of your parallelogram in square inches.
Perimeter = __________ Area = __________
7 Here is the formula for fi nding the area of a paralellogram that is not a rect-angle. Explain how and why it works.
Area of paralellogram = base × height or bh
height (h)
base (b)
h
Set C1 Geometry: Triangles & Quadrilaterals Blackline Run one copy on a transparency.
16"3"
15 sq in
right isosceles triangle, trapezoid
10. Give students each a copy of Finding the Area of Parallelograms. Review the instructions on both sheets with the class. When students understand what to do, let them get started. Plan to assign unfin-ished work as homework or seatwork the following day.
Activity 3 Finding the Perimeter & Area of a Parallelogram (cont.)
Set C1 Geometry: Triangles & Quadrilaterals
© The Math Learning CenterC1.28 • Bridges in Mathematics Grade 5 Supplement
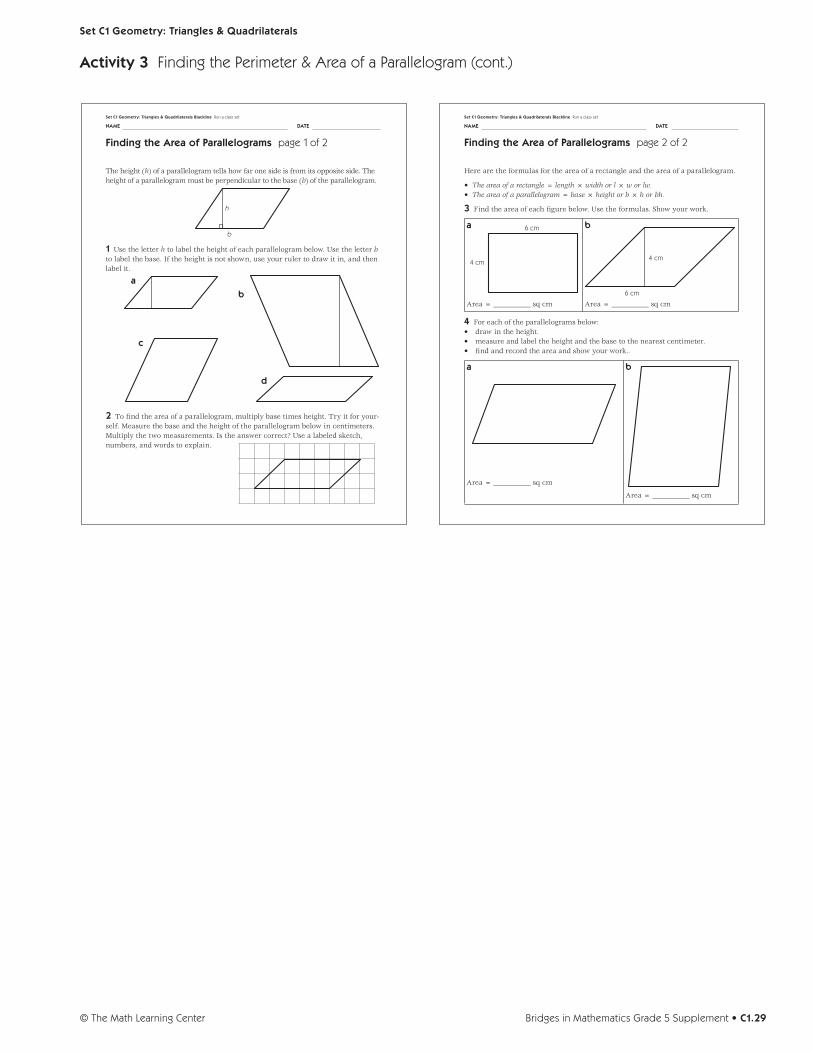
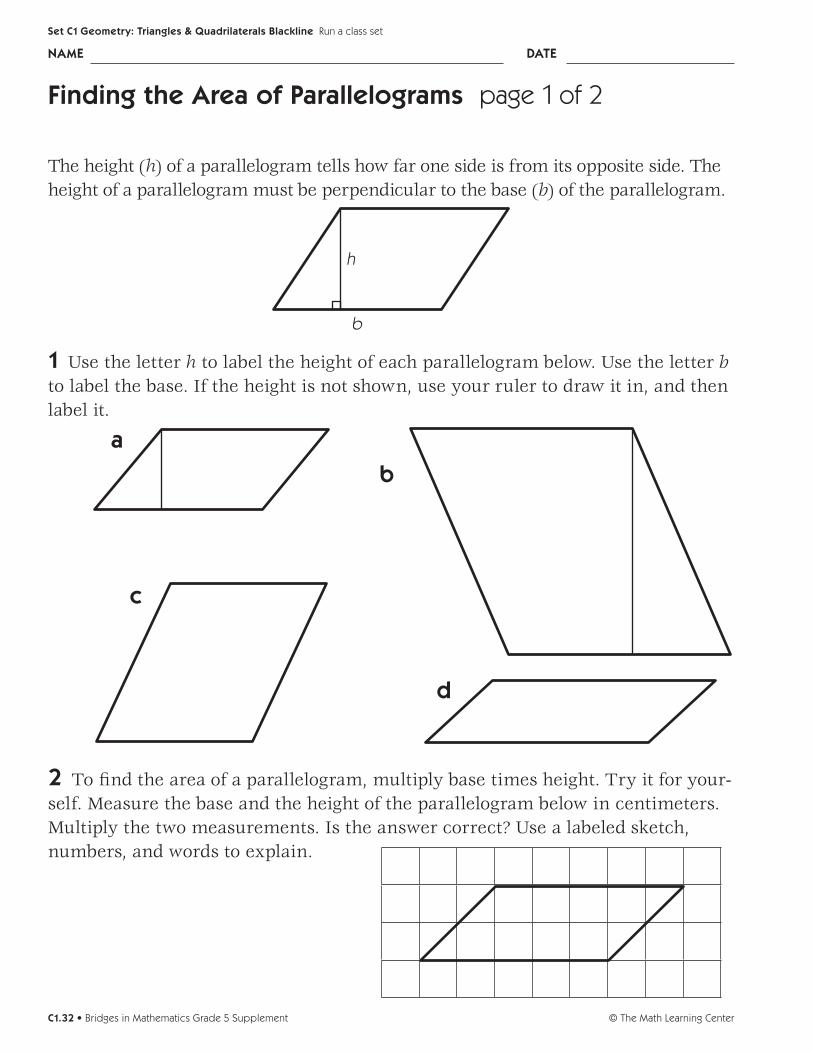
Finding the Area of Parallelograms page 1 of 2
The height (h) of a parallelogram tells how far one side is from its opposite side. Theheight of a parallelogram must be perpendicular to the base (b) of the parallelogram.
h
b
1 Use the letter h to label the height of each parallelogram below. Use the letter b to label the base. If the height is not shown, use your ruler to draw it in, and then label it.
2 To fi nd the area of a parallelogram, multiply base times height. Try it for your-self. Measure the base and the height of the parallelogram below in centimeters. Multiply the two measurements. Is the answer correct? Use a labeled sketch, numbers, and words to explain.
ab
d
c
NAME DATE
Set C1 Geometry: Triangles & Quadrilaterals Blackline Run a class set
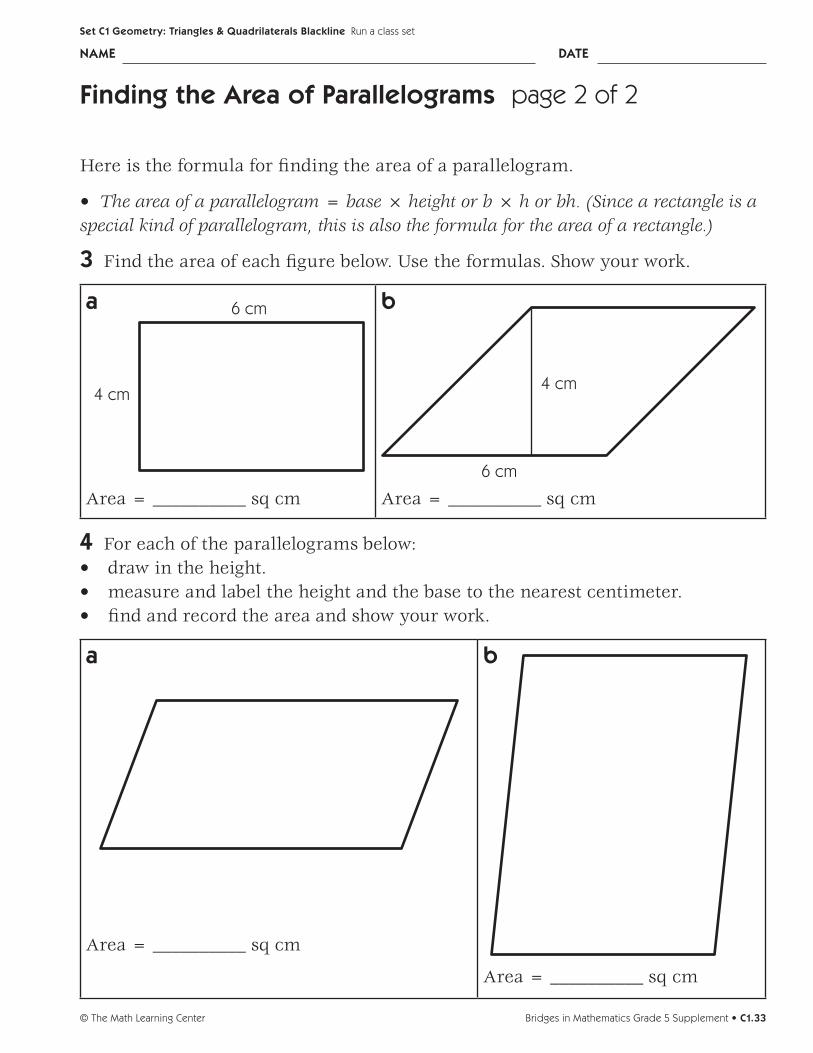
Finding the Area of Parallelograms page 2 of 2
Here are the formulas for the area of a rectangle and the area of a parallelogram.
• The area of a rectangle = length × width or l × w or lw.• The area of a parallelogram = base × height or b × h or bh.
3 Find the area of each fi gure below. Use the formulas. Show your work.
a 6 cm
4 cm
Area = __________ sq cm
b
4 cm
6 cm
Area = __________ sq cm
4 For each of the parallelograms below:• draw in the height.• measure and label the height and the base to the nearest centimeter.• fi nd and record the area and show your work..
a
Area = __________ sq cm
b
Area = __________ sq cm
NAME DATE
Set C1 Geometry: Triangles & Quadrilaterals Blackline Run a class set
Activity 3 Finding the Perimeter & Area of a Parallelogram (cont.)
Set C1 Geometry: Triangles & Quadrilaterals
Bridges in Mathematics Grade 5 Supplement • C1.29© The Math Learning Center
Start with a Rectangle
1 Find the perimeter of your rectangle in inches. Find the area of your rectangle in square inches.
Perimeter = __________ Area = __________
2 Measure over ______ along the top of your rectangle and make a small mark.
3 Draw a diagonal line from the lower left-hand corner to the mark.
4 Cut along the line. What 2 shapes do you have now? How do you know?
5 Combine the 2 shapes to make a parallelogram that is not a rectangle. Tape the edges together.
6 Find the perimeter of your parallelogram to the nearest eighth of an inch. Find the area of your parallelogram in square inches.
Perimeter = __________ Area = __________
7 Here is the formula for finding the area of a paralellogram that is not a rect-angle. Explain how and why it works.
Area of paralellogram = base × height or bh
height (h)
base (b)
h
© The Math Learning CenterC1.30 • Bridges in Mathematics Grade 5 Supplement
Set C1 Geometry: Triangles & Quadrilaterals Blackline Run one copy on a transparency.
Square Inch Grid Paper
Bridges in Mathematics Grade 5 Supplement • C1.31© The Math Learning Center
Set C1 Geometry: Triangles & Quadrilaterals Blackline Run several class sets and one copy on a transparency.
Finding the Area of Parallelograms page 1 of 2
The height (h) of a parallelogram tells how far one side is from its opposite side. The height of a parallelogram must be perpendicular to the base (b) of the parallelogram.
h
b
1 Use the letter h to label the height of each parallelogram below. Use the letter b to label the base. If the height is not shown, use your ruler to draw it in, and then label it.
2 To find the area of a parallelogram, multiply base times height. Try it for your-self. Measure the base and the height of the parallelogram below in centimeters. Multiply the two measurements. Is the answer correct? Use a labeled sketch, numbers, and words to explain.
ab
d
c
© The Math Learning CenterC1.32 • Bridges in Mathematics Grade 5 Supplement
NAME DATE
Set C1 Geometry: Triangles & Quadrilaterals Blackline Run a class set
Finding the Area of Parallelograms page 2 of 2
Here is the formula for finding the area of a parallelogram.
• The area of a parallelogram = base × height or b × h or bh. (Since a rectangle is a special kind of parallelogram, this is also the formula for the area of a rectangle.)
3 Find the area of each figure below. Use the formulas. Show your work.
a 6 cm
4 cm
Area = __________ sq cm
b
4 cm
6 cm
Area = __________ sq cm
4 For each of the parallelograms below:• draw in the height.• measure and label the height and the base to the nearest centimeter.• find and record the area and show your work.
a
Area = __________ sq cm
b
Area = __________ sq cm
Bridges in Mathematics Grade 5 Supplement • C1.33© The Math Learning Center
NAME DATE
Set C1 Geometry: Triangles & Quadrilaterals Blackline Run a class set

© The Math Learning CenterC1.34 • Bridges in Mathematics Grade 5 Supplement
Set C1 H Activity 4
ACTIVITY
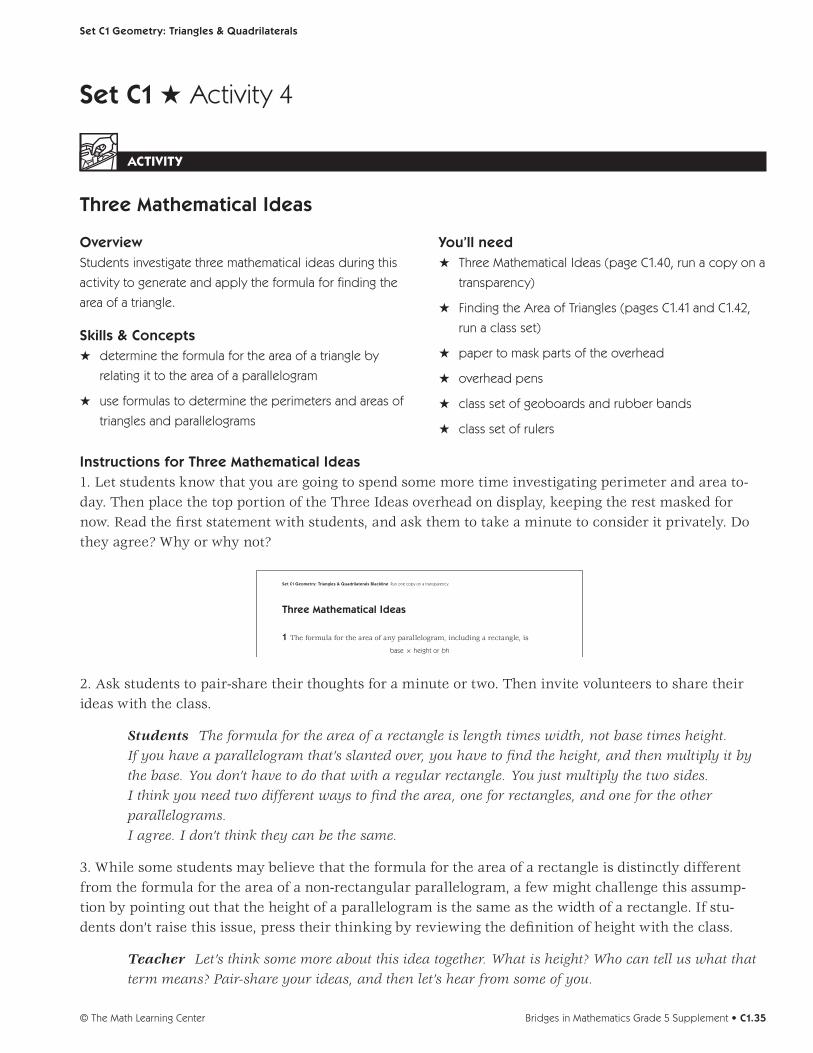
Three Mathematical Ideas
OverviewStudents investigate three mathematical ideas during this
activity to generate and apply the formula for finding the
area of a triangle.
Skills & ConceptsH determine the formula for the area of a triangle by
relating it to the area of a parallelogram
H use formulas to determine the perimeters and areas of
triangles and parallelograms
You’ll needH Three Mathematical Ideas (page C1.40, run a copy on a
transparency)
H Finding the Area of Triangles (pages C1.41 and C1.42,
run a class set)
H paper to mask parts of the overhead
H overhead pens
H class set of geoboards and rubber bands
H class set of rulers
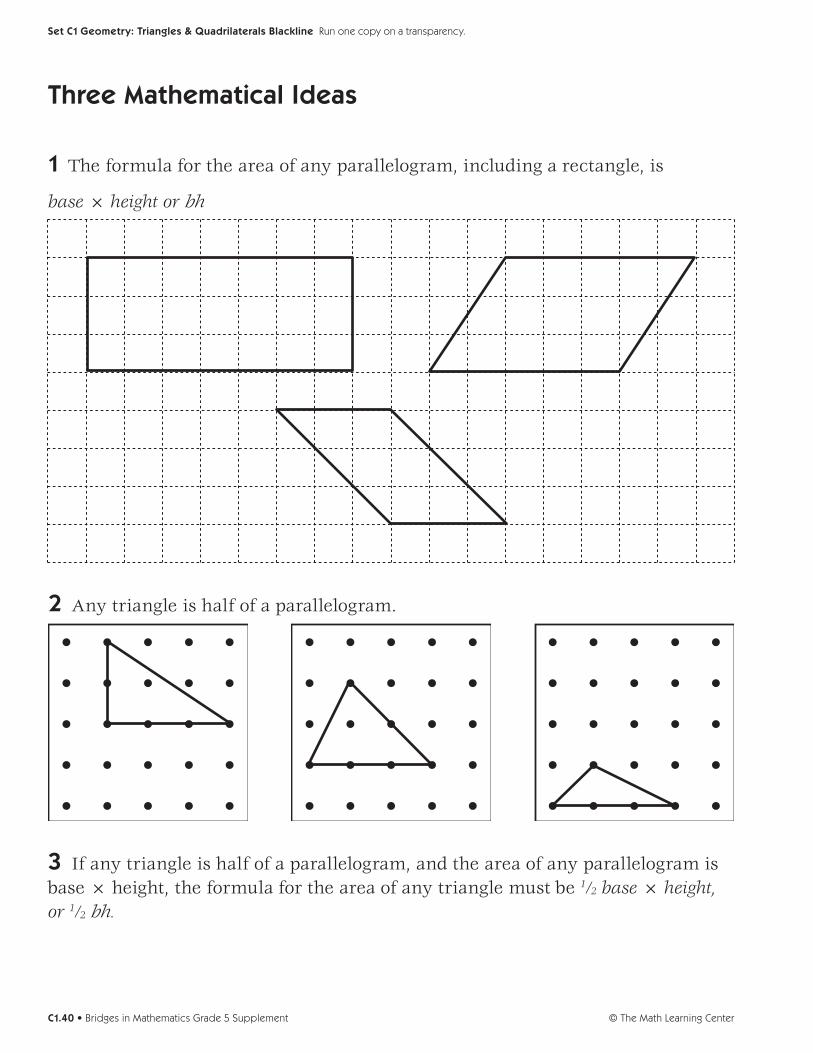
Instructions for Three Mathematical Ideas1. Let students know that you are going to spend some more time investigating perimeter and area to-day. Then place the top portion of the Three Ideas overhead on display, keeping the rest masked for now. Read the first statement with students, and ask them to take a minute to consider it privately. Do they agree? Why or why not?
Three Mathematical Ideas
1 The formula for the area of any parallelogram, including a rectangle, is
base × height or bh
2 Any triangle is half of a parallelogram.
3 If any triangle is half of a parallelogram, and the area of any parallelogram is base x height, the formula for the area of any triangle must be
1⁄2 base × height, or 1⁄2 bh.
Set C1 Geometry: Triangles & Quadrilaterals Blackline Run one copy on a transparency.
2. Ask students to pair-share their thoughts for a minute or two. Then invite volunteers to share their ideas with the class.
Students The formula for the area of a rectangle is length times width, not base times height. If you have a parallelogram that’s slanted over, you have to find the height, and then multiply it by the base. You don’t have to do that with a regular rectangle. You just multiply the two sides. I think you need two different ways to find the area, one for rectangles, and one for the other parallelograms. I agree. I don’t think they can be the same.
3. While some students may believe that the formula for the area of a rectangle is distinctly different from the formula for the area of a non-rectangular parallelogram, a few might challenge this assump-tion by pointing out that the height of a parallelogram is the same as the width of a rectangle. If stu-dents don’t raise this issue, press their thinking by reviewing the definition of height with the class.
Teacher Let’s think some more about this idea together. What is height? Who can tell us what that term means? Pair-share your ideas, and then let’s hear from some of you.
Set C1 Geometry: Triangles & Quadrilaterals
Bridges in Mathematics Grade 5 Supplement • C1.35© The Math Learning Center
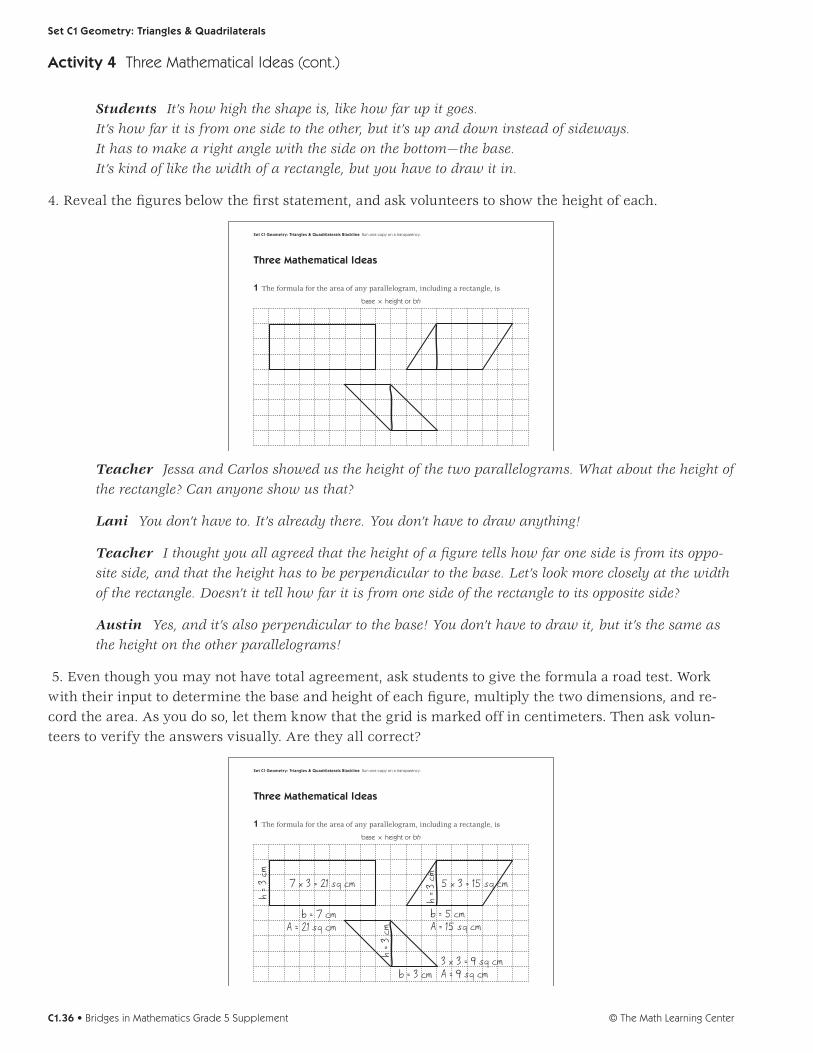
Students It’s how high the shape is, like how far up it goes. It’s how far it is from one side to the other, but it’s up and down instead of sideways. It has to make a right angle with the side on the bottom—the base. It’s kind of like the width of a rectangle, but you have to draw it in.
4. Reveal the figures below the first statement, and ask volunteers to show the height of each.
Three Mathematical Ideas
1 The formula for the area of any parallelogram, including a rectangle, is
base × height or bh
2 Any triangle is half of a parallelogram.
3 If any triangle is half of a parallelogram, and the area of any parallelogram is base x height, the formula for the area of any triangle must be
1⁄2 base × height, or 1⁄2 bh.
Set C1 Geometry: Triangles & Quadrilaterals Blackline Run one copy on a transparency.
Teacher Jessa and Carlos showed us the height of the two parallelograms. What about the height of the rectangle? Can anyone show us that?
Lani You don’t have to. It’s already there. You don’t have to draw anything!
Teacher I thought you all agreed that the height of a figure tells how far one side is from its oppo-site side, and that the height has to be perpendicular to the base. Let’s look more closely at the width of the rectangle. Doesn’t it tell how far it is from one side of the rectangle to its opposite side?
Austin Yes, and it’s also perpendicular to the base! You don’t have to draw it, but it’s the same as the height on the other parallelograms!
5. Even though you may not have total agreement, ask students to give the formula a road test. Work with their input to determine the base and height of each figure, multiply the two dimensions, and re-cord the area. As you do so, let them know that the grid is marked off in centimeters. Then ask volun-teers to verify the answers visually. Are they all correct?
Three Mathematical Ideas
1 The formula for the area of any parallelogram, including a rectangle, is
base × height or bh
2 Any triangle is half of a parallelogram.
3 If any triangle is half of a parallelogram, and the area of any parallelogram is base x height, the formula for the area of any triangle must be
1⁄2 base × height, or 1⁄2 bh.
Set C1 Geometry: Triangles & Quadrilaterals Blackline Run one copy on a transparency.
7 x 3 = 21 sq cm 5 x 3 = 15 sq cm
b = 7 cmA = 21 sq cm
b = 5 cmA = 15 sq cm
b = 3 cm3 x 3 = 9 sq cmA = 9 sq cm
h = 3
cm
h = 3
cm
h = 3
cm
Activity 4 Three Mathematical Ideas (cont.)
Set C1 Geometry: Triangles & Quadrilaterals
© The Math Learning CenterC1.36 • Bridges in Mathematics Grade 5 Supplement
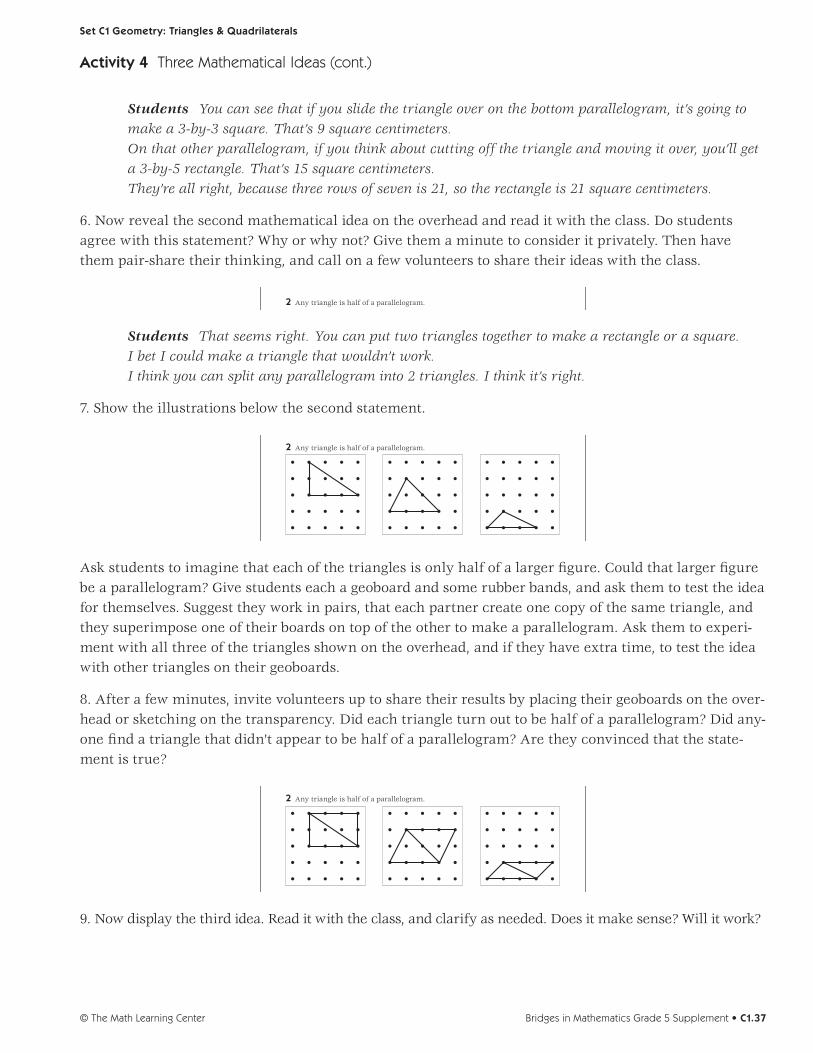
Students You can see that if you slide the triangle over on the bottom parallelogram, it’s going to make a 3-by-3 square. That’s 9 square centimeters. On that other parallelogram, if you think about cutting off the triangle and moving it over, you’ll get a 3-by-5 rectangle. That’s 15 square centimeters. They’re all right, because three rows of seven is 21, so the rectangle is 21 square centimeters.
6. Now reveal the second mathematical idea on the overhead and read it with the class. Do students agree with this statement? Why or why not? Give them a minute to consider it privately. Then have them pair-share their thinking, and call on a few volunteers to share their ideas with the class.
Three Mathematical Ideas
1 The formula for the area of any parallelogram, including a rectangle, is
base × height or bh
2 Any triangle is half of a parallelogram.
3 If any triangle is half of a parallelogram, and the area of any parallelogram is base x height, the formula for the area of any triangle must be
1⁄2 base × height, or 1⁄2 bh.
Set C1 Geometry: Triangles & Quadrilaterals Blackline Run one copy on a transparency.
Students That seems right. You can put two triangles together to make a rectangle or a square. I bet I could make a triangle that wouldn’t work. I think you can split any parallelogram into 2 triangles. I think it’s right.
7. Show the illustrations below the second statement.
Three Mathematical Ideas
1 The formula for the area of any parallelogram, including a rectangle, is
base × height or bh
2 Any triangle is half of a parallelogram.
3 If any triangle is half of a parallelogram, and the area of any parallelogram is base x height, the formula for the area of any triangle must be
1⁄2 base × height, or 1⁄2 bh.
Set C1 Geometry: Triangles & Quadrilaterals Blackline Run one copy on a transparency.
Ask students to imagine that each of the triangles is only half of a larger figure. Could that larger figure be a parallelogram? Give students each a geoboard and some rubber bands, and ask them to test the idea for themselves. Suggest they work in pairs, that each partner create one copy of the same triangle, and they superimpose one of their boards on top of the other to make a parallelogram. Ask them to experi-ment with all three of the triangles shown on the overhead, and if they have extra time, to test the idea with other triangles on their geoboards.
8. After a few minutes, invite volunteers up to share their results by placing their geoboards on the over-head or sketching on the transparency. Did each triangle turn out to be half of a parallelogram? Did any-one find a triangle that didn’t appear to be half of a parallelogram? Are they convinced that the state-ment is true?
Three Mathematical Ideas
1 The formula for the area of any parallelogram, including a rectangle, is
base × height or bh
2 Any triangle is half of a parallelogram.
3 If any triangle is half of a parallelogram, and the area of any parallelogram is base x height, the formula for the area of any triangle must be
1⁄2 base × height, or 1⁄2 bh.
Set C1 Geometry: Triangles & Quadrilaterals Blackline Run one copy on a transparency.
9. Now display the third idea. Read it with the class, and clarify as needed. Does it make sense? Will it work?
Activity 4 Three Mathematical Ideas (cont.)
Set C1 Geometry: Triangles & Quadrilaterals
Bridges in Mathematics Grade 5 Supplement • C1.37© The Math Learning Center
Three Mathematical Ideas
1 The formula for the area of any parallelogram, including a rectangle, is
base × height or bh
2 Any triangle is half of a parallelogram.
3 If any triangle is half of a parallelogram, and the area of any parallelogram is base x height, the formula for the area of any triangle must be
1⁄2 base × height, or 1⁄2 bh.
Set C1 Geometry: Triangles & Quadrilaterals Blackline Run one copy on a transparency.
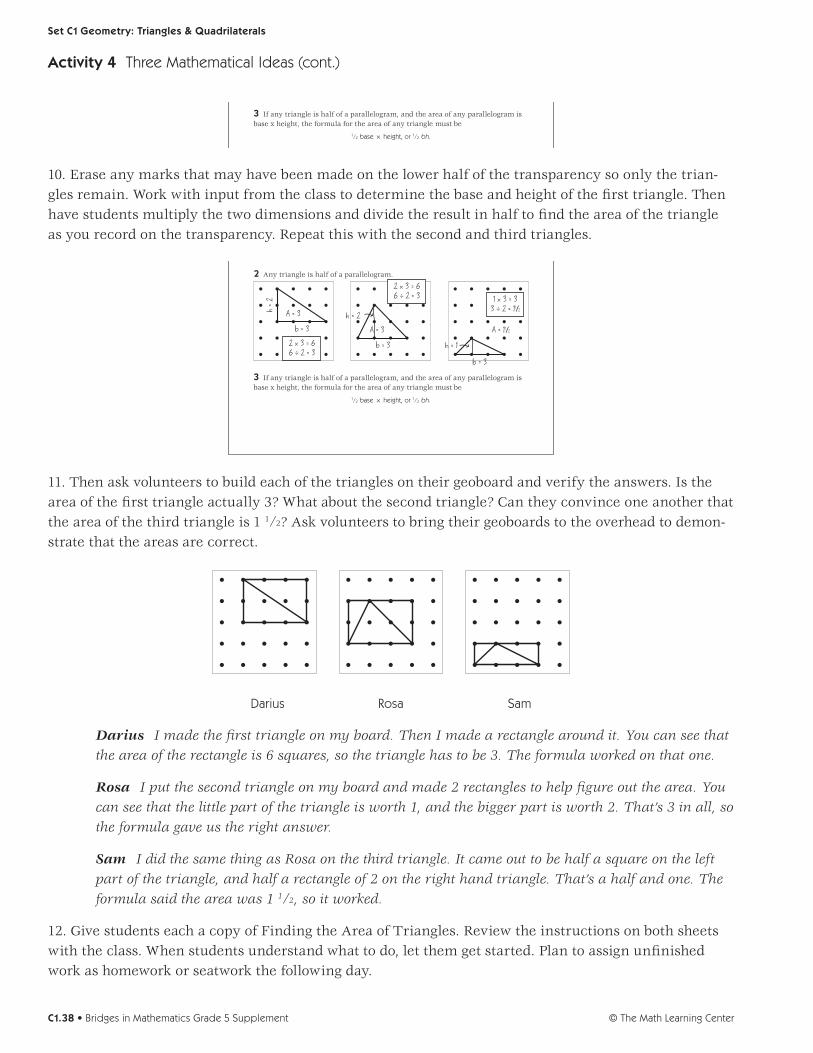
10. Erase any marks that may have been made on the lower half of the transparency so only the trian-gles remain. Work with input from the class to determine the base and height of the first triangle. Then have students multiply the two dimensions and divide the result in half to find the area of the triangle as you record on the transparency. Repeat this with the second and third triangles.
Three Mathematical Ideas
1 The formula for the area of any parallelogram, including a rectangle, is
base × height or bh
2 Any triangle is half of a parallelogram.
3 If any triangle is half of a parallelogram, and the area of any parallelogram is base x height, the formula for the area of any triangle must be
1⁄2 base × height, or 1⁄2 bh.
Set C1 Geometry: Triangles & Quadrilaterals Blackline Run one copy on a transparency.
b = 3
A = 3
b = 3
b = 3
A = 3 A = 11/2
h = 2
2 x 3 = 66 ÷ 2 = 3
2 x 3 = 66 ÷ 2 = 3 1 x 3 = 3
3 ÷ 2 = 11/2
h = 2
h = 1
11. Then ask volunteers to build each of the triangles on their geoboard and verify the answers. Is the area of the first triangle actually 3? What about the second triangle? Can they convince one another that the area of the third triangle is 1 1/2? Ask volunteers to bring their geoboards to the overhead to demon-strate that the areas are correct.
Darius Rosa Sam
Darius I made the first triangle on my board. Then I made a rectangle around it. You can see that the area of the rectangle is 6 squares, so the triangle has to be 3. The formula worked on that one.
Rosa I put the second triangle on my board and made 2 rectangles to help figure out the area. You can see that the little part of the triangle is worth 1, and the bigger part is worth 2. That’s 3 in all, so the formula gave us the right answer.
Sam I did the same thing as Rosa on the third triangle. It came out to be half a square on the left part of the triangle, and half a rectangle of 2 on the right hand triangle. That’s a half and one. The formula said the area was 1 1/2, so it worked.
12. Give students each a copy of Finding the Area of Triangles. Review the instructions on both sheets with the class. When students understand what to do, let them get started. Plan to assign unfinished work as homework or seatwork the following day.
Activity 4 Three Mathematical Ideas (cont.)
Set C1 Geometry: Triangles & Quadrilaterals
© The Math Learning CenterC1.38 • Bridges in Mathematics Grade 5 Supplement
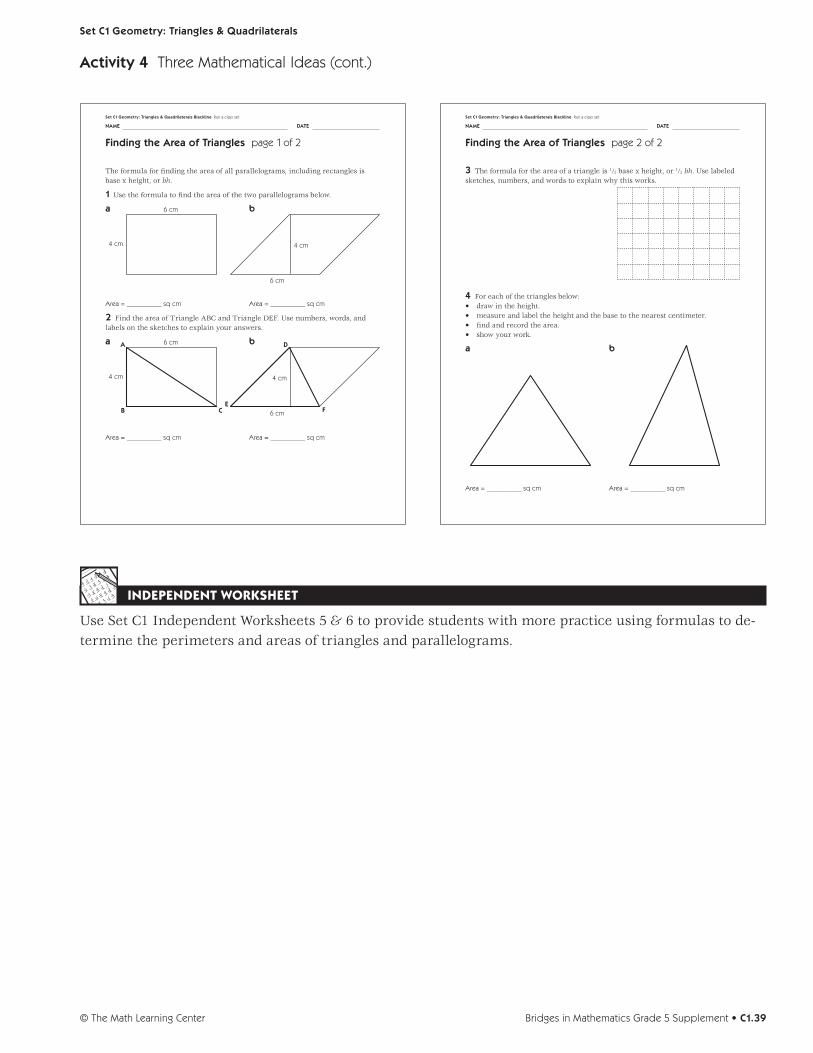
Finding the Area of Triangles page 1 of 2
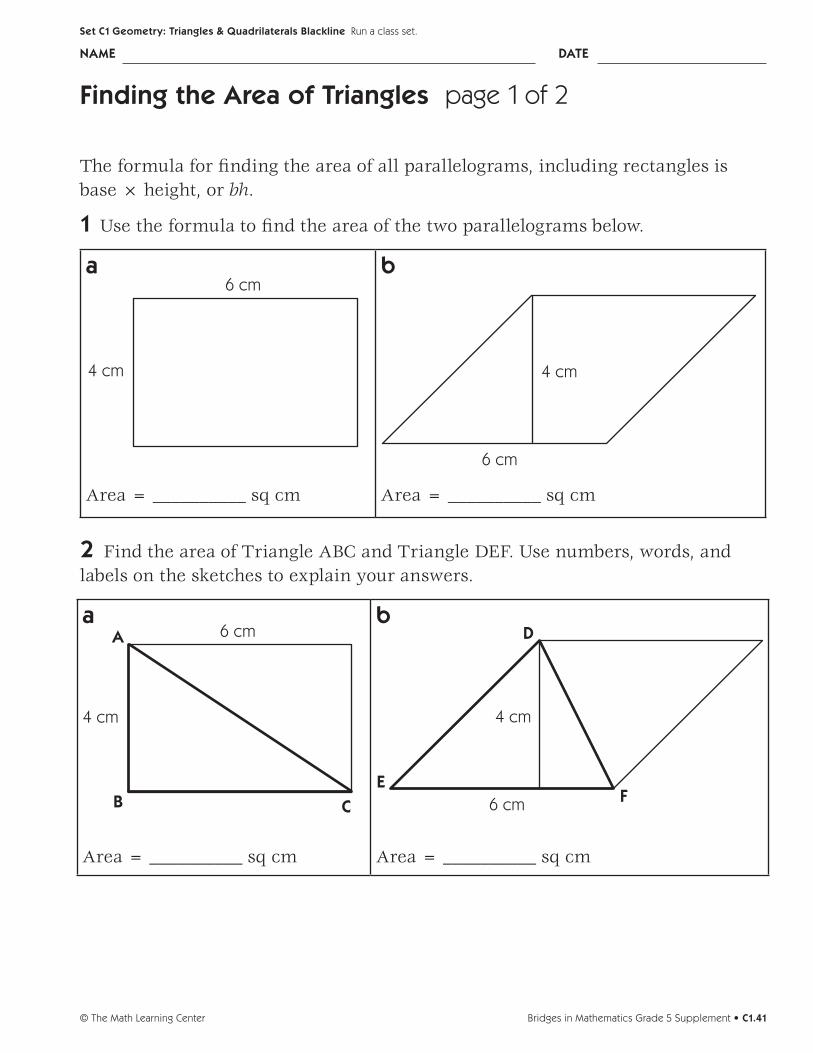
The formula for fi nding the area of all parallelograms, including rectangles is base x height, or bh.
1 Use the formula to fi nd the area of the two parallelograms below.
a b
Area = __________ sq cm Area = __________ sq cm
2 Find the area of Triangle ABC and Triangle DEF. Use numbers, words, and labels on the sketches to explain your answers.
a b
6 cm
4 cm
6 cm
4 cm
4 cm
6 cm
4 cm
6 cm
Area = __________ sq cm Area = __________ sq cm
A
B CE
D
F
NAME DATE
Set C1 Geometry: Triangles & Quadrilaterals Blackline Run a class set
INDEPENDENT WORKSHEET
Use Set C1 Independent Worksheets 5 & 6 to provide students with more practice using formulas to de-termine the perimeters and areas of triangles and parallelograms.
Activity 4 Three Mathematical Ideas (cont.)
Finding the Area of Triangles page 2 of 2
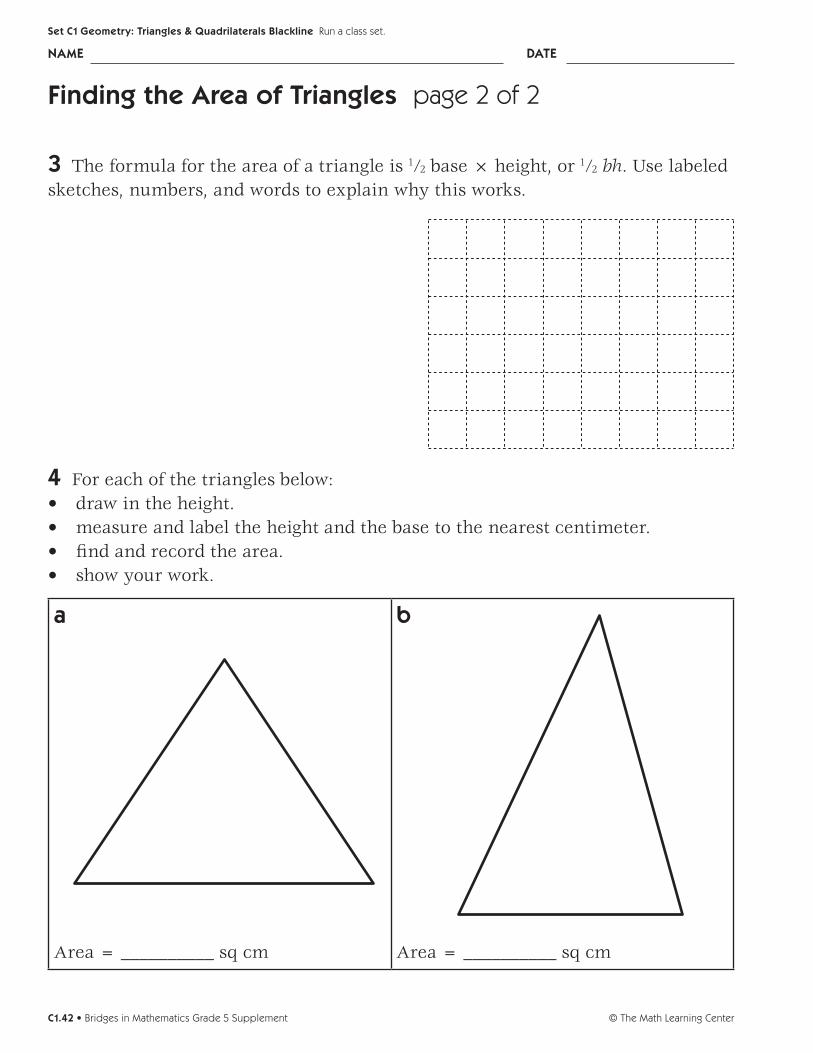
3 The formula for the area of a triangle is 1⁄2 base x height, or 1⁄2 bh. Use labeled sketches, numbers, and words to explain why this works.
4 For each of the triangles below:• draw in the height.• measure and label the height and the base to the nearest centimeter.• fi nd and record the area.• show your work.
a b
Area = __________ sq cm Area = __________ sq cm
NAME DATE
Set C1 Geometry: Triangles & Quadrilaterals Blackline Run a class set
Set C1 Geometry: Triangles & Quadrilaterals
Bridges in Mathematics Grade 5 Supplement • C1.39© The Math Learning Center
Three Mathematical Ideas
1 The formula for the area of any parallelogram, including a rectangle, is
base × height or bh
2 Any triangle is half of a parallelogram.
3 If any triangle is half of a parallelogram, and the area of any parallelogram is base × height, the formula for the area of any triangle must be 1⁄2 base × height, or 1⁄2 bh.
© The Math Learning CenterC1.40 • Bridges in Mathematics Grade 5 Supplement
Set C1 Geometry: Triangles & Quadrilaterals Blackline Run one copy on a transparency.
Finding the Area of Triangles page 1 of 2
The formula for finding the area of all parallelograms, including rectangles is base × height, or bh.
1 Use the formula to find the area of the two parallelograms below.
a
Area = __________ sq cm
b
Area = __________ sq cm
2 Find the area of Triangle ABC and Triangle DEF. Use numbers, words, and labels on the sketches to explain your answers.
a
Area = __________ sq cm
b
Area = __________ sq cm
4 cm
6 cmE
D
F
6 cm
4 cm
A
B C
6 cm
4 cm 4 cm
6 cm
Bridges in Mathematics Grade 5 Supplement • C1.41© The Math Learning Center
NAME DATE
Set C1 Geometry: Triangles & Quadrilaterals Blackline Run a class set.
Finding the Area of Triangles page 2 of 2
3 The formula for the area of a triangle is 1⁄2 base × height, or 1⁄2 bh. Use labeled sketches, numbers, and words to explain why this works.
4 For each of the triangles below:• draw in the height.• measure and label the height and the base to the nearest centimeter.• find and record the area.• show your work.
a
Area = __________ sq cm
b
Area = __________ sq cm
© The Math Learning CenterC1.42 • Bridges in Mathematics Grade 5 Supplement
NAME DATE
Set C1 Geometry: Triangles & Quadrilaterals Blackline Run a class set.
Set C2 H Independent Worksheet 1
INDEPENDENT WORKSHEET
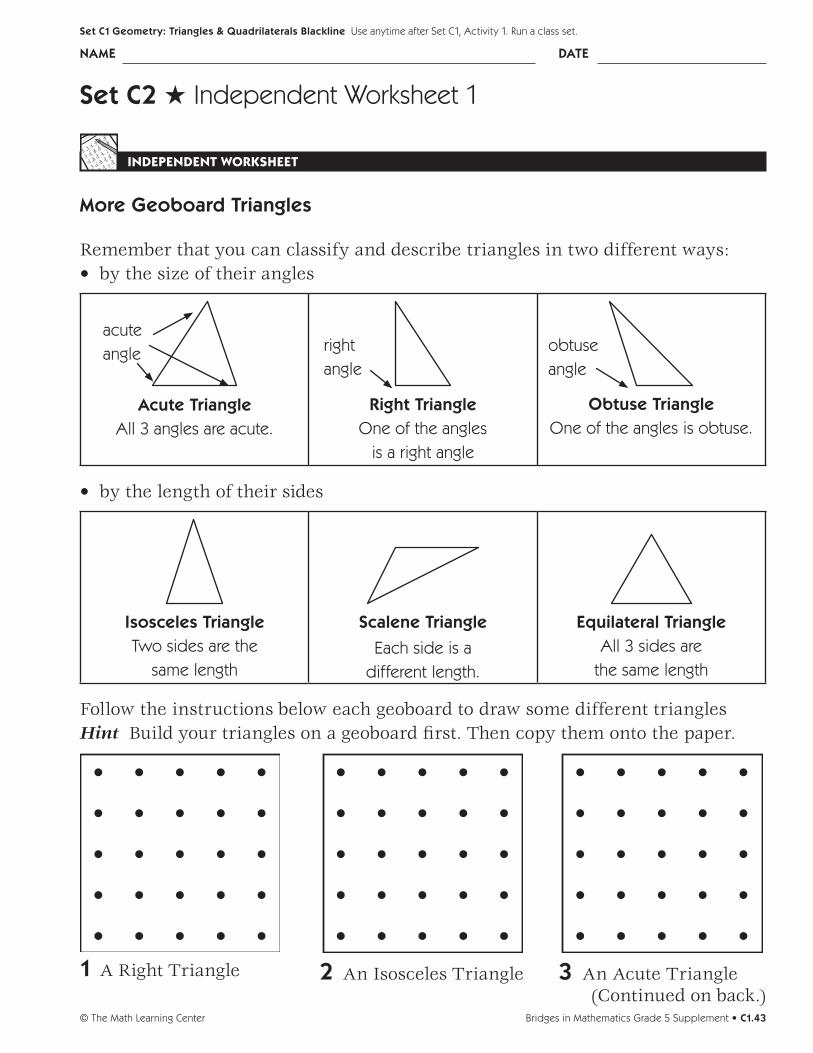
More Geoboard Triangles
Remember that you can classify and describe triangles in two different ways: • by the size of their angles
Acute TriangleAll 3 angles are acute.
Right TriangleOne of the angles
is a right angle
Obtuse TriangleOne of the angles is obtuse.
• by the length of their sides
Isosceles TriangleTwo sides are the
same length
Scalene Triangle
Each side is a different length.
Equilateral Triangle All 3 sides are
the same length
Follow the instructions below each geoboard to draw some different triangles Hint Build your triangles on a geoboard first. Then copy them onto the paper.
1 A Right Triangle 2 An Isosceles Triangle 3 An Acute Triangle
acute angle right
angleobtuse angle
(Continued on back.)Bridges in Mathematics Grade 5 Supplement • C1.43© The Math Learning Center
NAME DATE
Set C1 Geometry: Triangles & Quadrilaterals Blackline Use anytime after Set C1, Activity 1. Run a class set.
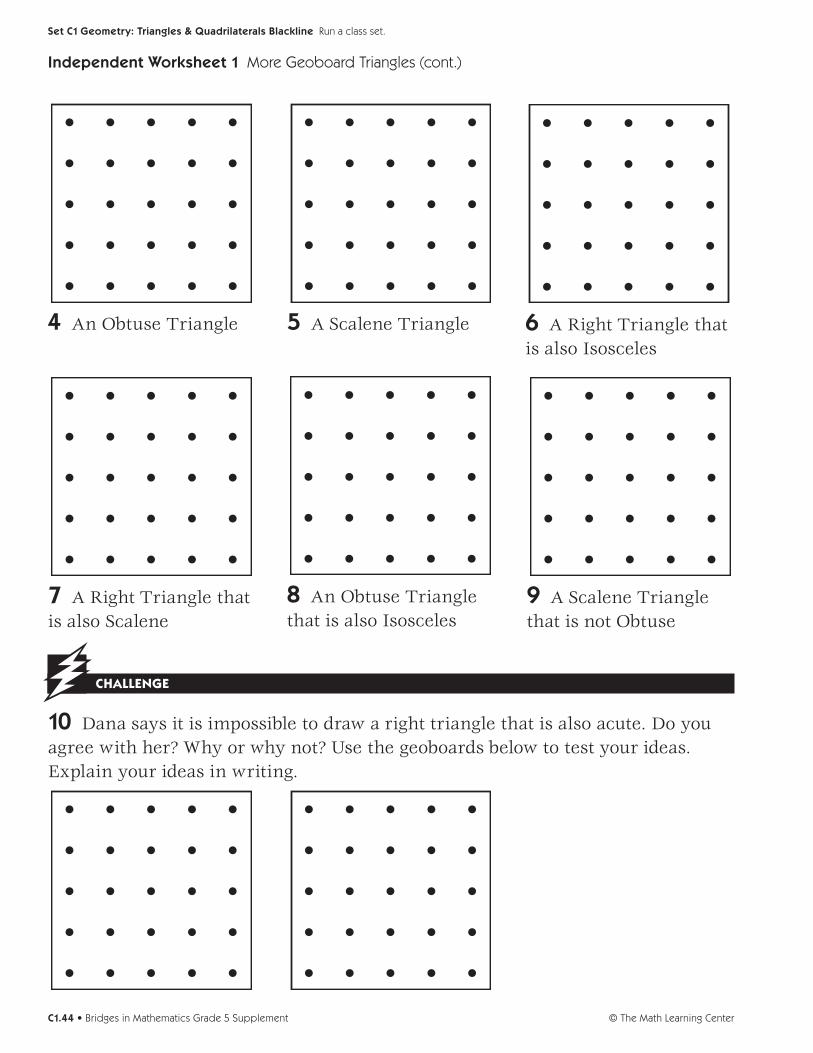
4 An Obtuse Triangle
Independent Worksheet 1 More Geoboard Triangles (cont.)
5 A Scalene Triangle 6 A Right Triangle that is also Isosceles
7 A Right Triangle that is also Scalene
8 An Obtuse Triangle that is also Isosceles
9 A Scalene Triangle that is not Obtuse
CHALLENGE
10 Dana says it is impossible to draw a right triangle that is also acute. Do you agree with her? Why or why not? Use the geoboards below to test your ideas. Explain your ideas in writing.
© The Math Learning CenterC1.44 • Bridges in Mathematics Grade 5 Supplement
Set C1 Geometry: Triangles & Quadrilaterals Blackline Run a class set.

Set C1 H Independent Worksheet 2
INDEPENDENT WORKSHEET
Color & Construct Triangles
You can classify triangles by the size of their angles,
Acute TriangleAll 3 angles are acute.
Right TriangleOne of the angles is a right angle.
Obtuse TriangleOne of the angles is obtuse
1 Look at the triangles below. Color: • the acute triangles green. • the right triangles red. • the obtuse triangles orange.
Hint Use the corner of a piece of paper, a tile, or a square pattern block to help test the angles. Some of these triangles might fool you!
2 Follow the instructions below to draw your own triangles.
a Draw a right triangle with no congruent sides.
b Draw an acute triangle with 3 congruent sides.
c Draw an obtuse triangle with 2 congruent sides.
acute angle right
angleobtuse angle
(Continued on back.)Bridges in Mathematics Grade 5 Supplement • C1.45© The Math Learning Center
NAME DATE
Set C1 Geometry: Triangles & Quadrilaterals Blackline Use anytime after Set C1, Activity 1. Run a class set.
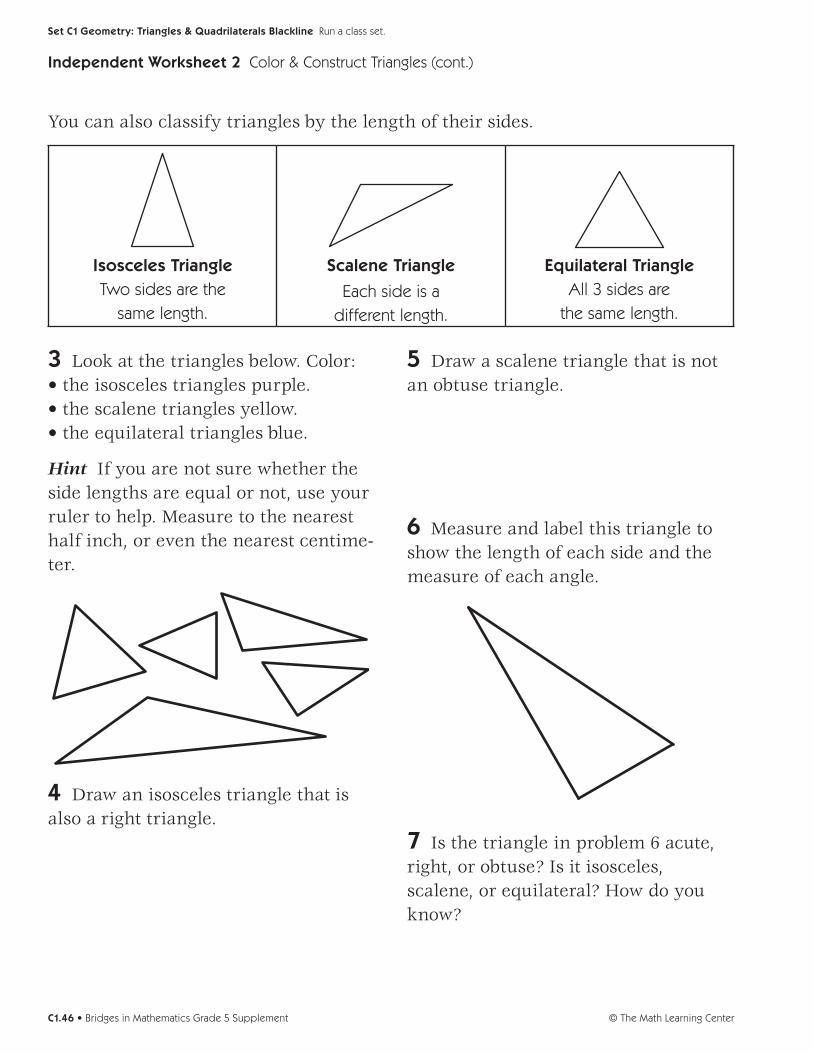
You can also classify triangles by the length of their sides.
Isosceles TriangleTwo sides are the
same length.
Scalene Triangle
Each side is a different length.
Equilateral TriangleAll 3 sides are
the same length.
Independent Worksheet 2 Color & Construct Triangles (cont.)
3 Look at the triangles below. Color: • the isosceles triangles purple. • the scalene triangles yellow. • the equilateral triangles blue.
Hint If you are not sure whether the side lengths are equal or not, use your ruler to help. Measure to the nearest half inch, or even the nearest centime-ter.
4 Draw an isosceles triangle that is also a right triangle.
5 Draw a scalene triangle that is not an obtuse triangle.
6 Measure and label this triangle to show the length of each side and the measure of each angle.
7 Is the triangle in problem 6 acute, right, or obtuse? Is it isosceles, scalene, or equilateral? How do you know?
© The Math Learning CenterC1.46 • Bridges in Mathematics Grade 5 Supplement
Set C1 Geometry: Triangles & Quadrilaterals Blackline Run a class set.
Set C1 H Independent Worksheet 3
INDEPENDENT WORKSHEET
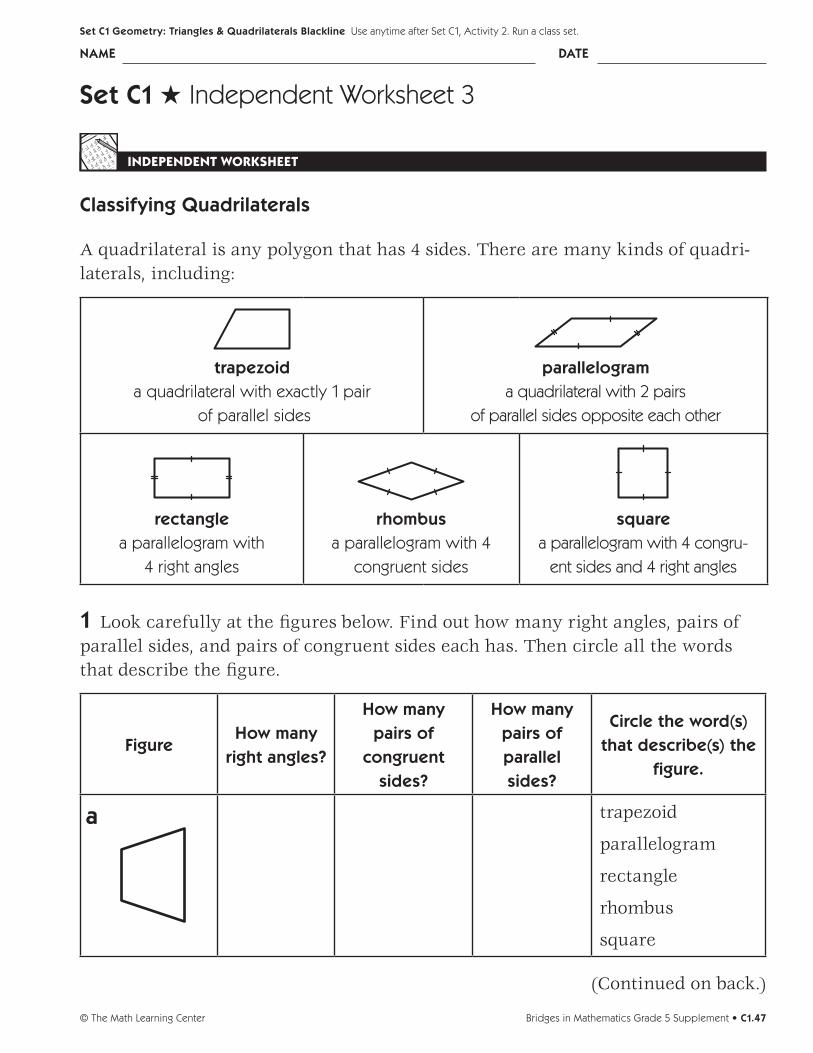
Classifying Quadrilaterals
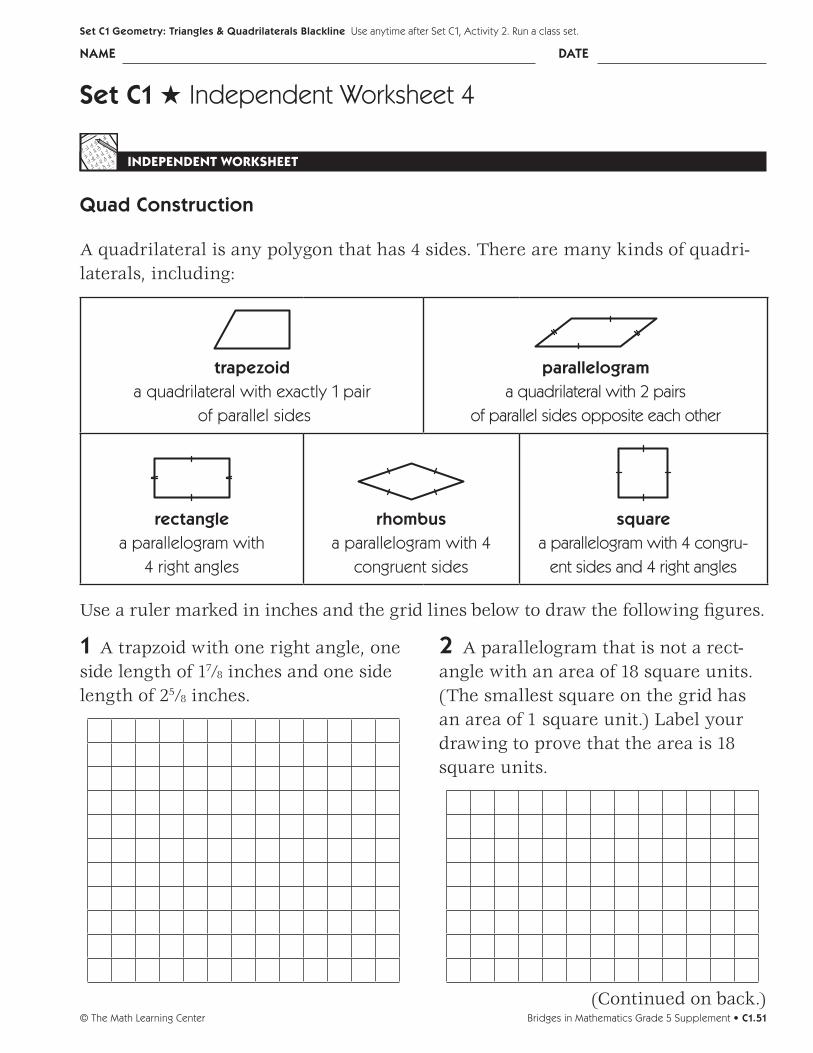
A quadrilateral is any polygon that has 4 sides. There are many kinds of quadri-laterals, including:
trapezoida quadrilateral with exactly 1 pair
of parallel sides
parallelograma quadrilateral with 2 pairs
of parallel sides opposite each other
rectanglea parallelogram with
4 right angles
rhombusa parallelogram with 4
congruent sides
squarea parallelogram with 4 congru-
ent sides and 4 right angles
1 Look carefully at the figures below. Find out how many right angles, pairs of parallel sides, and pairs of congruent sides each has. Then circle all the words that describe the figure.
FigureHow many
right angles?
How many pairs of
congruent sides?
How many pairs of parallel sides?
Circle the word(s) that describe(s) the
figure.
a trapezoid
parallelogram
rectangle
rhombus
square
(Continued on back.)
Bridges in Mathematics Grade 5 Supplement • C1.47© The Math Learning Center
NAME DATE
Set C1 Geometry: Triangles & Quadrilaterals Blackline Use anytime after Set C1, Activity 2. Run a class set.
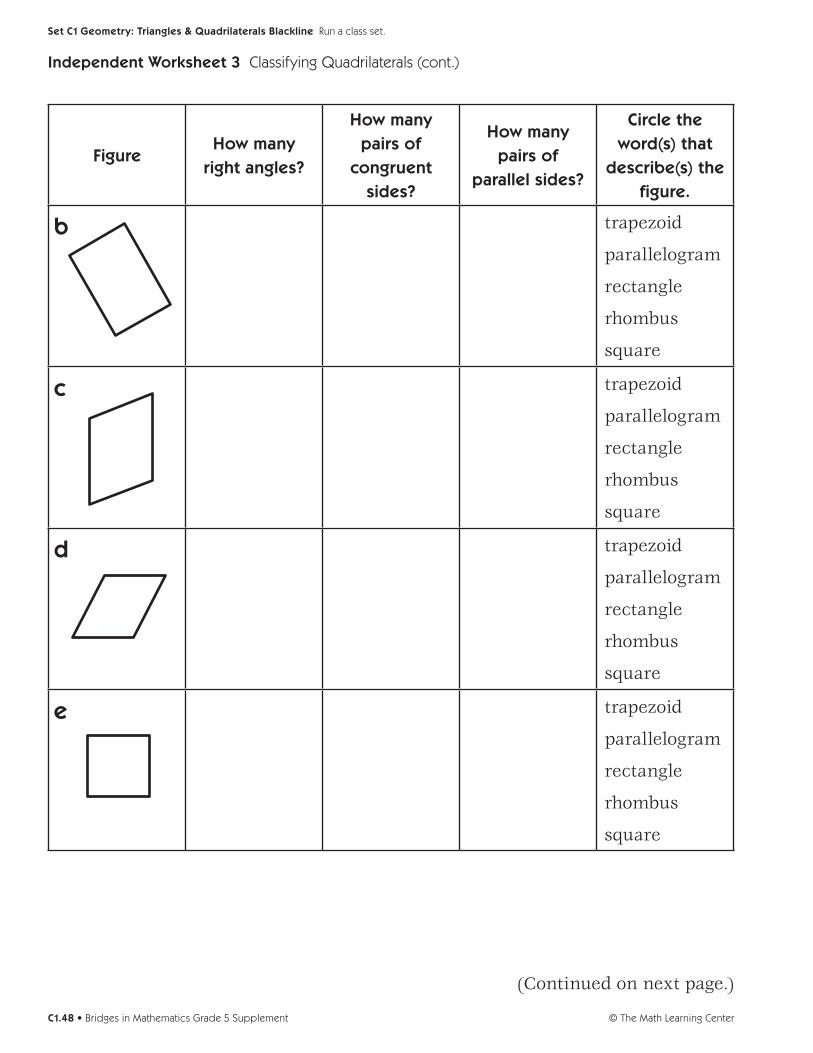
FigureHow many
right angles?
How many pairs of
congruent sides?
How many pairs of
parallel sides?
Circle the word(s) that
describe(s) the figure.
b trapezoid
parallelogram
rectangle
rhombus
square
c trapezoid
parallelogram
rectangle
rhombus
square
d trapezoid
parallelogram
rectangle
rhombus
square
e trapezoid
parallelogram
rectangle
rhombus
square
Independent Worksheet 3 Classifying Quadrilaterals (cont.)
(Continued on next page.)
© The Math Learning CenterC1.48 • Bridges in Mathematics Grade 5 Supplement
Set C1 Geometry: Triangles & Quadrilaterals Blackline Run a class set.
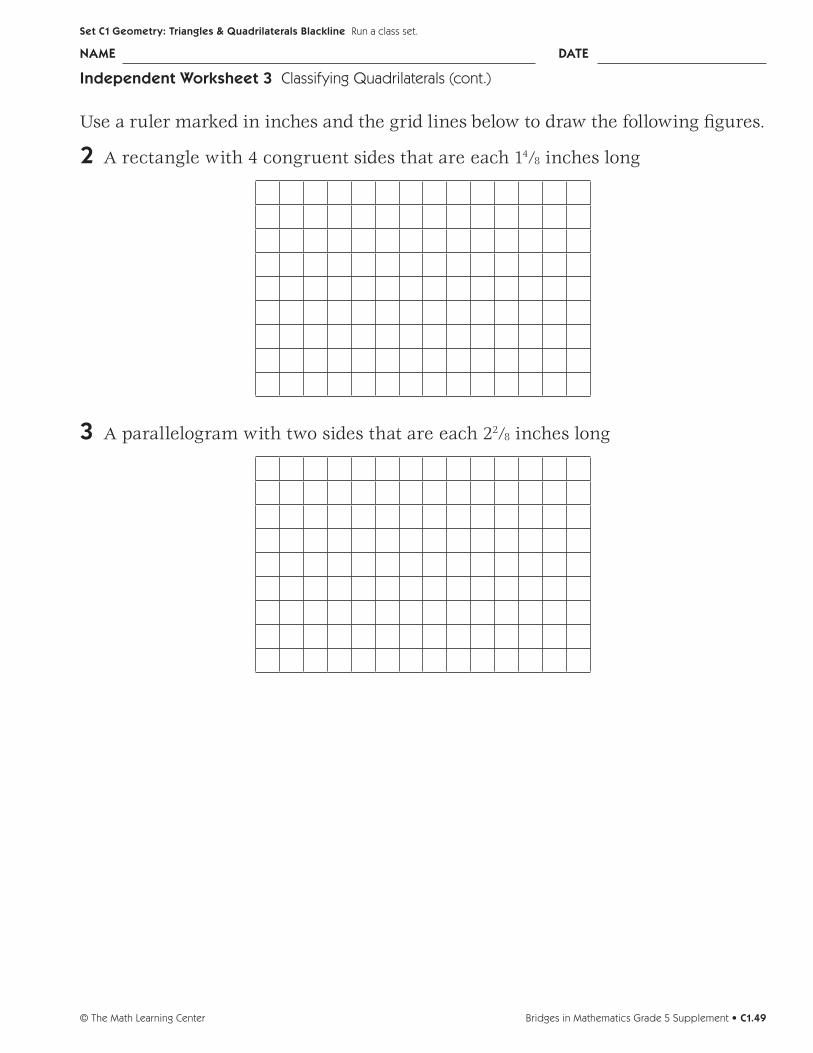
Independent Worksheet 3 Classifying Quadrilaterals (cont.)
Use a ruler marked in inches and the grid lines below to draw the following figures.
2 A rectangle with 4 congruent sides that are each 14⁄8 inches long
3 A parallelogram with two sides that are each 22⁄8 inches long
Bridges in Mathematics Grade 5 Supplement • C1.49© The Math Learning Center
NAME DATE
Set C1 Geometry: Triangles & Quadrilaterals Blackline Run a class set.

© The Math Learning CenterC1.50 • Bridges in Mathematics Grade 5 Supplement
Set C1 H Independent Worksheet 4
INDEPENDENT WORKSHEET
Quad Construction
A quadrilateral is any polygon that has 4 sides. There are many kinds of quadri-laterals, including:
trapezoida quadrilateral with exactly 1 pair
of parallel sides
parallelograma quadrilateral with 2 pairs
of parallel sides opposite each other
rectanglea parallelogram with
4 right angles
rhombusa parallelogram with 4
congruent sides
squarea parallelogram with 4 congru-
ent sides and 4 right angles
Use a ruler marked in inches and the grid lines below to draw the following figures.
1 A trapzoid with one right angle, one side length of 17⁄8 inches and one side length of 25⁄8 inches.
2 A parallelogram that is not a rect-angle with an area of 18 square units. (The smallest square on the grid has an area of 1 square unit.) Label your drawing to prove that the area is 18 square units.
(Continued on back.)Bridges in Mathematics Grade 5 Supplement • C1.51© The Math Learning Center
NAME DATE
Set C1 Geometry: Triangles & Quadrilaterals Blackline Use anytime after Set C1, Activity 2. Run a class set.
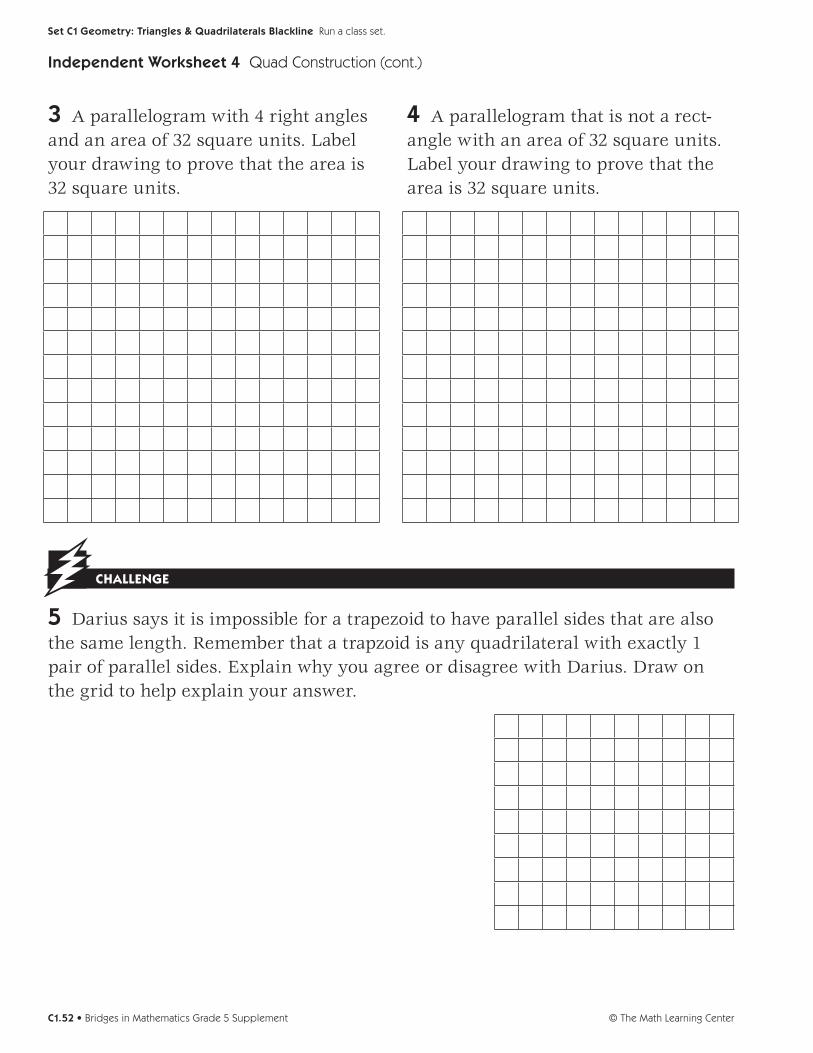
3 A parallelogram with 4 right angles and an area of 32 square units. Label your drawing to prove that the area is 32 square units.
Independent Worksheet 4 Quad Construction (cont.)
4 A parallelogram that is not a rect-angle with an area of 32 square units. Label your drawing to prove that the area is 32 square units.
CHALLENGE
5 Darius says it is impossible for a trapezoid to have parallel sides that are also the same length. Remember that a trapzoid is any quadrilateral with exactly 1 pair of parallel sides. Explain why you agree or disagree with Darius. Draw on the grid to help explain your answer.
© The Math Learning CenterC1.52 • Bridges in Mathematics Grade 5 Supplement
Set C1 Geometry: Triangles & Quadrilaterals Blackline Run a class set.
3 m
Set C1 H Independent Worksheet 5
INDEPENDENT WORKSHEET
Perimeter & Area Puzzles
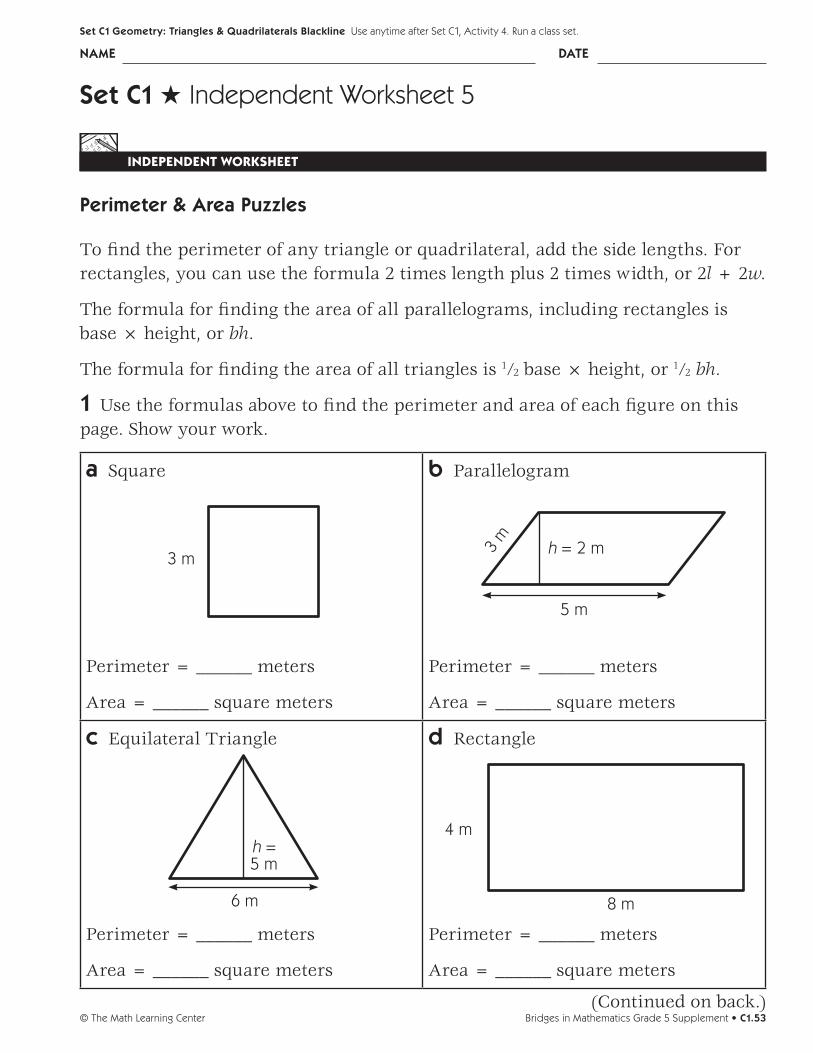
To find the perimeter of any triangle or quadrilateral, add the side lengths. For rectangles, you can use the formula 2 times length plus 2 times width, or 2l + 2w.
The formula for finding the area of all parallelograms, including rectangles is base × height, or bh.
The formula for finding the area of all triangles is 1⁄2 base × height, or 1⁄2 bh.
1 Use the formulas above to find the perimeter and area of each figure on this page. Show your work.
a Square
Perimeter = ______ meters
Area = ______ square meters
b Parallelogram
Perimeter = ______ meters
Area = ______ square meters
c Equilateral Triangle
Perimeter = ______ meters
Area = ______ square meters
d Rectangle
Perimeter = ______ meters
Area = ______ square meters
5 m
3 m
h = 2 m
4 m
8 m6 m
h = 5 m
(Continued on back.)Bridges in Mathematics Grade 5 Supplement • C1.53© The Math Learning Center
NAME DATE
Set C1 Geometry: Triangles & Quadrilaterals Blackline Use anytime after Set C1, Activity 4. Run a class set.
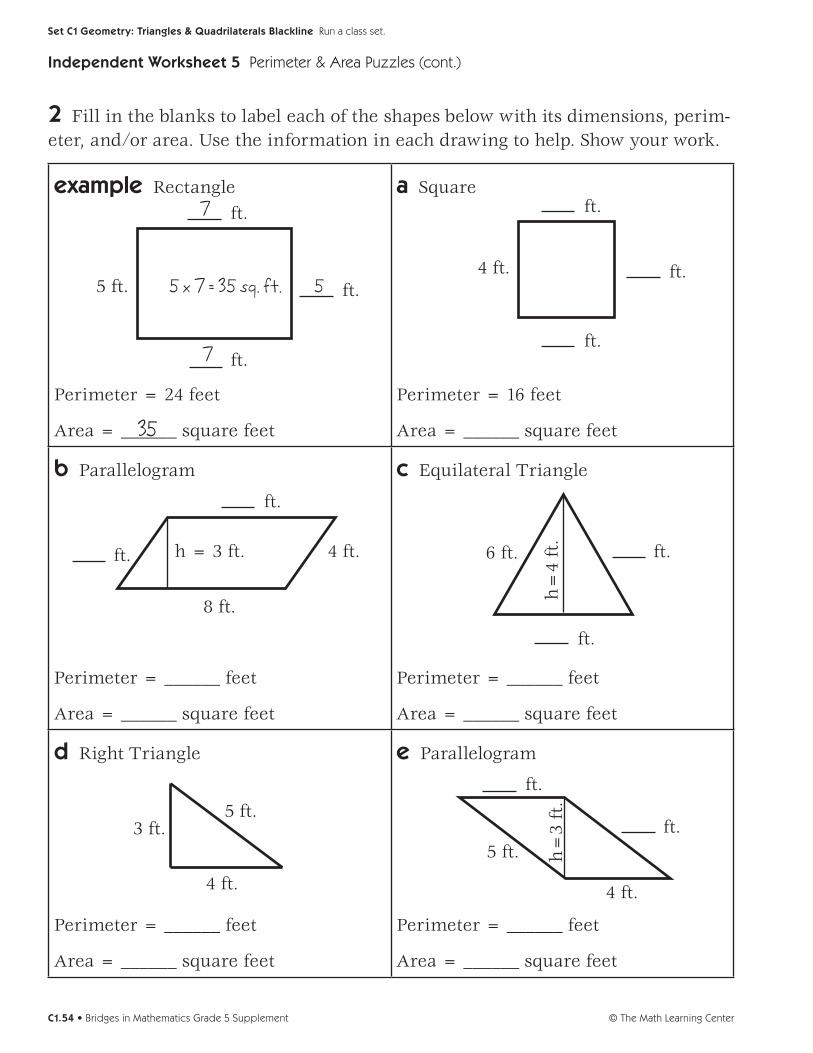
2 Fill in the blanks to label each of the shapes below with its dimensions, perim-eter, and/or area. Use the information in each drawing to help. Show your work.
example Rectangle
Perimeter = 24 feet
Area = ______ square feet
a Square
Perimeter = 16 feet
Area = ______ square feet
b Parallelogram
Perimeter = ______ feet
Area = ______ square feet
c Equilateral Triangle
Perimeter = ______ feet
Area = ______ square feet
d Right Triangle
Perimeter = ______ feet
Area = ______ square feet
e Parallelogram
Perimeter = ______ feet
Area = ______ square feet
Independent Worksheet 5 Perimeter & Area Puzzles (cont.)
5 ft.
ft.
ft.
ft.
7
5 x 7 = 35 sq. ft. 5
7
35
4 ft.
ft.
ft.
ft.
4 ft.h = 3 ft.
ft.
8 ft.
ft.h
=4
ft.
ft.
ft.6 ft.h
=3
ft.
4 ft.
5 ft.ft.
ft.
3 ft.
4 ft.
5 ft.
© The Math Learning CenterC1.54 • Bridges in Mathematics Grade 5 Supplement
Set C1 Geometry: Triangles & Quadrilaterals Blackline Run a class set.
Set C1 H Independent Worksheet 6
INDEPENDENT WORKSHEET
Ebony’s Quilt
Ebony and her mom are going to make a quilt for Ebony’s bed. When it is fin-ished, the quilt will be 72 inches by 90 inches.
1 How many square inches will Ebony’s quilt be in all? Show your work.
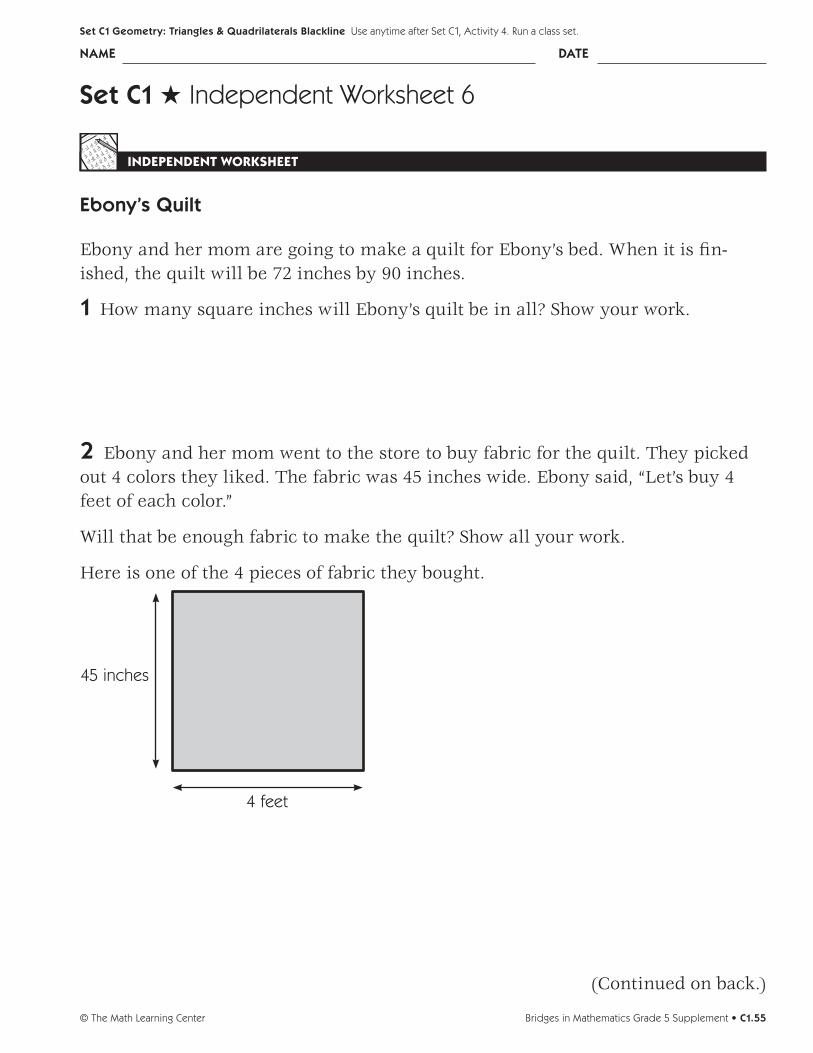
2 Ebony and her mom went to the store to buy fabric for the quilt. They picked out 4 colors they liked. The fabric was 45 inches wide. Ebony said, “Let’s buy 4 feet of each color.”
Will that be enough fabric to make the quilt? Show all your work.
Here is one of the 4 pieces of fabric they bought.
4 feet
45 inches
(Continued on back.)
Bridges in Mathematics Grade 5 Supplement • C1.55© The Math Learning Center
NAME DATE
Set C1 Geometry: Triangles & Quadrilaterals Blackline Use anytime after Set C1, Activity 4. Run a class set.
3 Ebony’s quilt will be made out of squares that are 9 inches on each side. Make a labeled sketch on the grid below to show how Ebony and her mom will have to arrange the squares to make a 72" by 90" quilt.
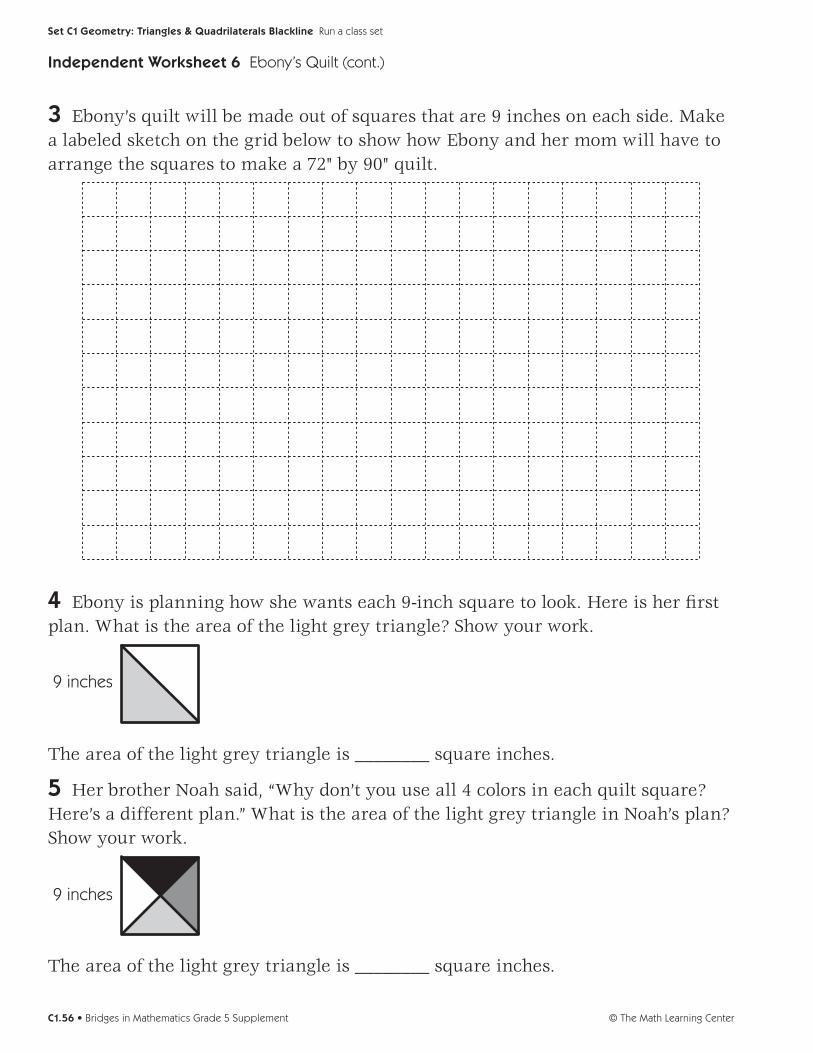
4 Ebony is planning how she wants each 9-inch square to look. Here is her first plan. What is the area of the light grey triangle? Show your work.
9 inches
The area of the light grey triangle is ________ square inches.
5 Her brother Noah said, “Why don’t you use all 4 colors in each quilt square? Here’s a different plan.” What is the area of the light grey triangle in Noah’s plan? Show your work.
9 inches
The area of the light grey triangle is ________ square inches.
Independent Worksheet 6 Ebony’s Quilt (cont.)
© The Math Learning CenterC1.56 • Bridges in Mathematics Grade 5 Supplement
Set C1 Geometry: Triangles & Quadrilaterals Blackline Run a class set