Embed Size (px)
Citation preview
Kenmore-Town of Tonawanda UFSD
We educate, prepare, and inspire all students to achieve their highest potential
Grade 3 Module 7
Parent Handbook
The materials contained within this packet have been taken from the Great Minds curriculum Eureka Math.
Pag
e1
Pag
e2
Pag
e3
Grade 3 • Module 7
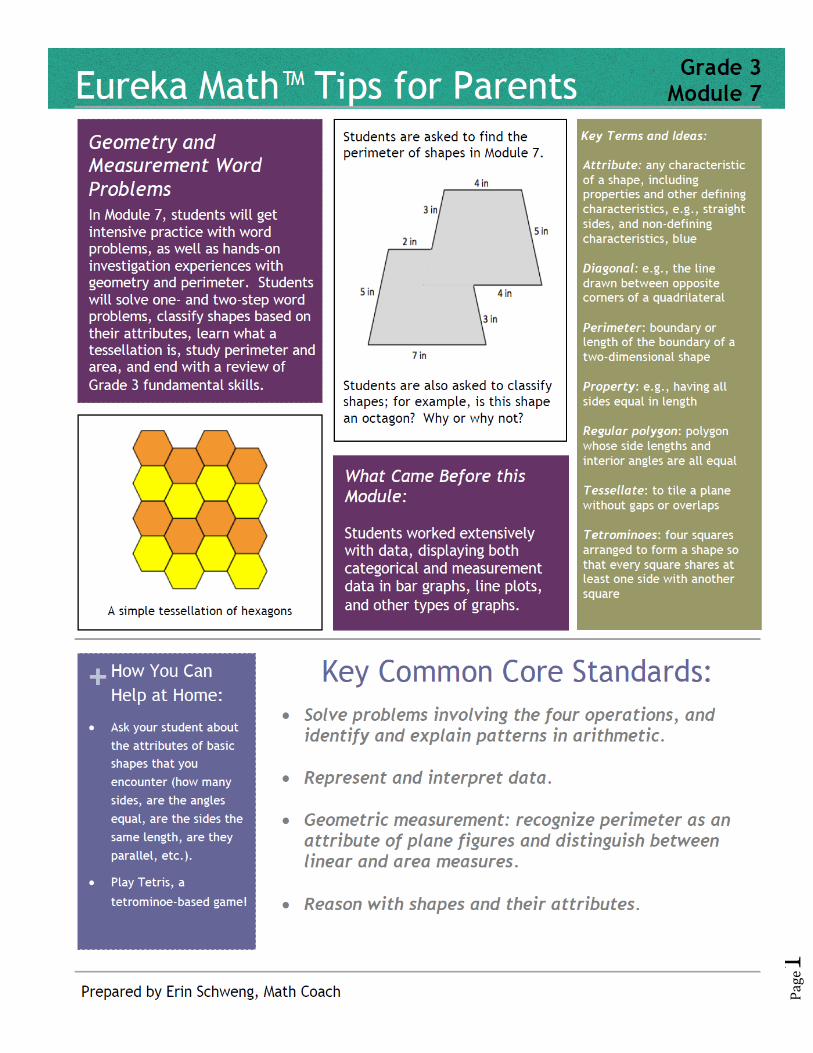
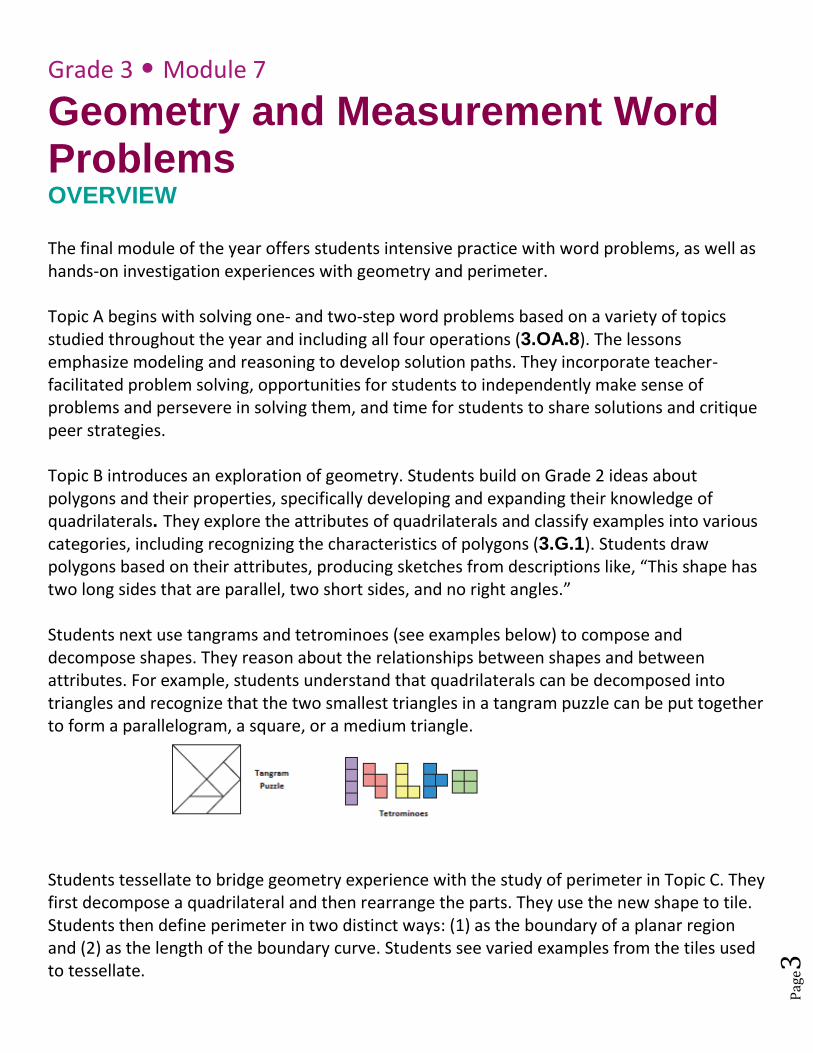
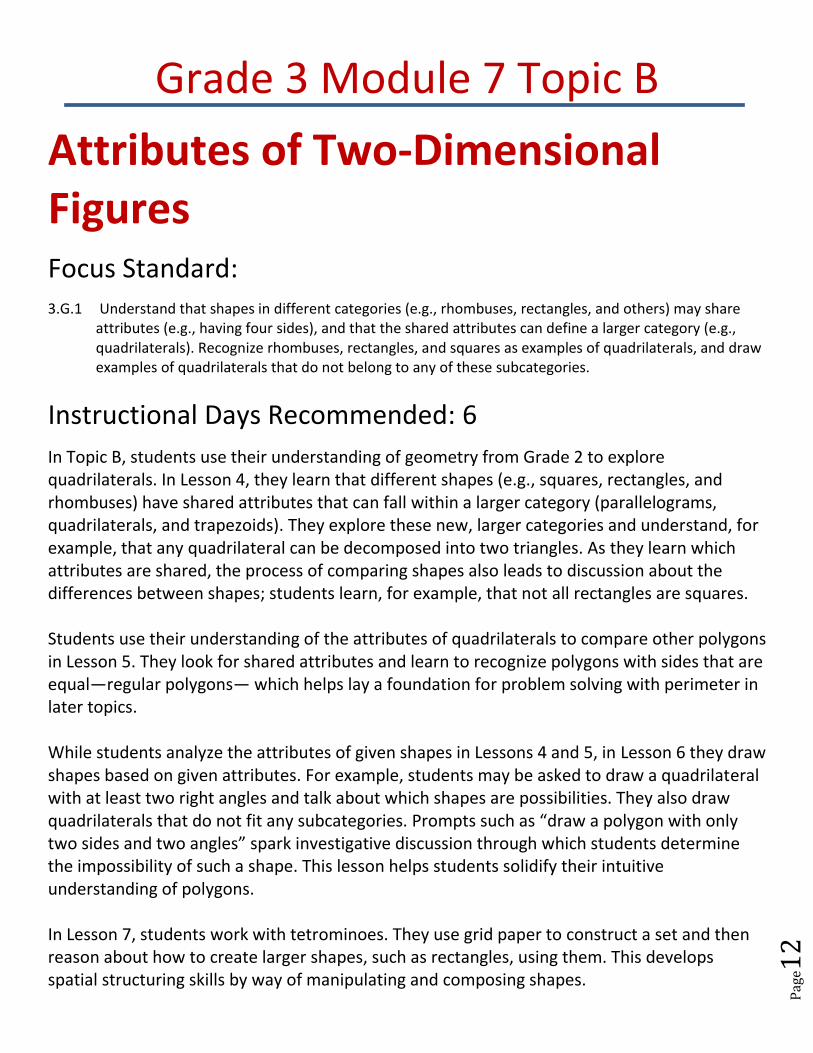
Geometry and Measurement Word Problems OVERVIEW The final module of the year offers students intensive practice with word problems, as well as hands-on investigation experiences with geometry and perimeter. Topic A begins with solving one- and two-step word problems based on a variety of topics studied throughout the year and including all four operations (3.OA.8). The lessons emphasize modeling and reasoning to develop solution paths. They incorporate teacher-facilitated problem solving, opportunities for students to independently make sense of problems and persevere in solving them, and time for students to share solutions and critique peer strategies. Topic B introduces an exploration of geometry. Students build on Grade 2 ideas about polygons and their properties, specifically developing and expanding their knowledge of quadrilaterals. They explore the attributes of quadrilaterals and classify examples into various categories, including recognizing the characteristics of polygons (3.G.1). Students draw polygons based on their attributes, producing sketches from descriptions like, “This shape has two long sides that are parallel, two short sides, and no right angles.” Students next use tangrams and tetrominoes (see examples below) to compose and decompose shapes. They reason about the relationships between shapes and between attributes. For example, students understand that quadrilaterals can be decomposed into triangles and recognize that the two smallest triangles in a tangram puzzle can be put together to form a parallelogram, a square, or a medium triangle.
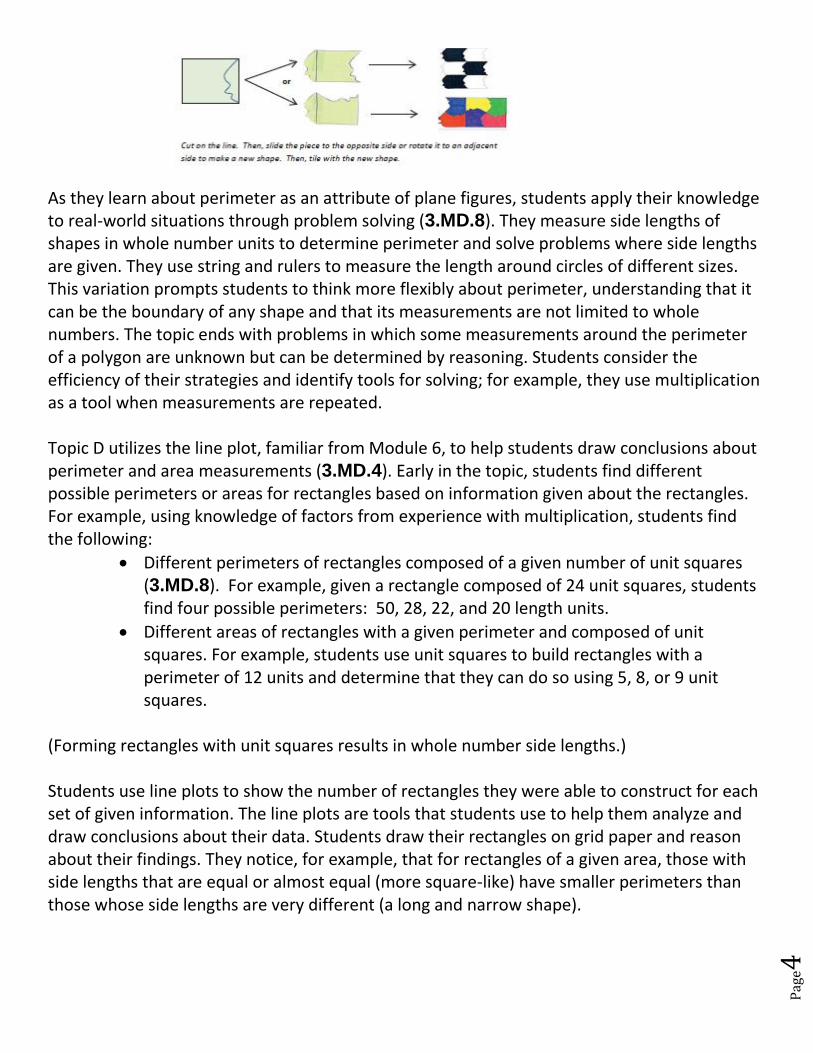
Students tessellate to bridge geometry experience with the study of perimeter in Topic C. They first decompose a quadrilateral and then rearrange the parts. They use the new shape to tile. Students then define perimeter in two distinct ways: (1) as the boundary of a planar region and (2) as the length of the boundary curve. Students see varied examples from the tiles used to tessellate.
Pag
e4
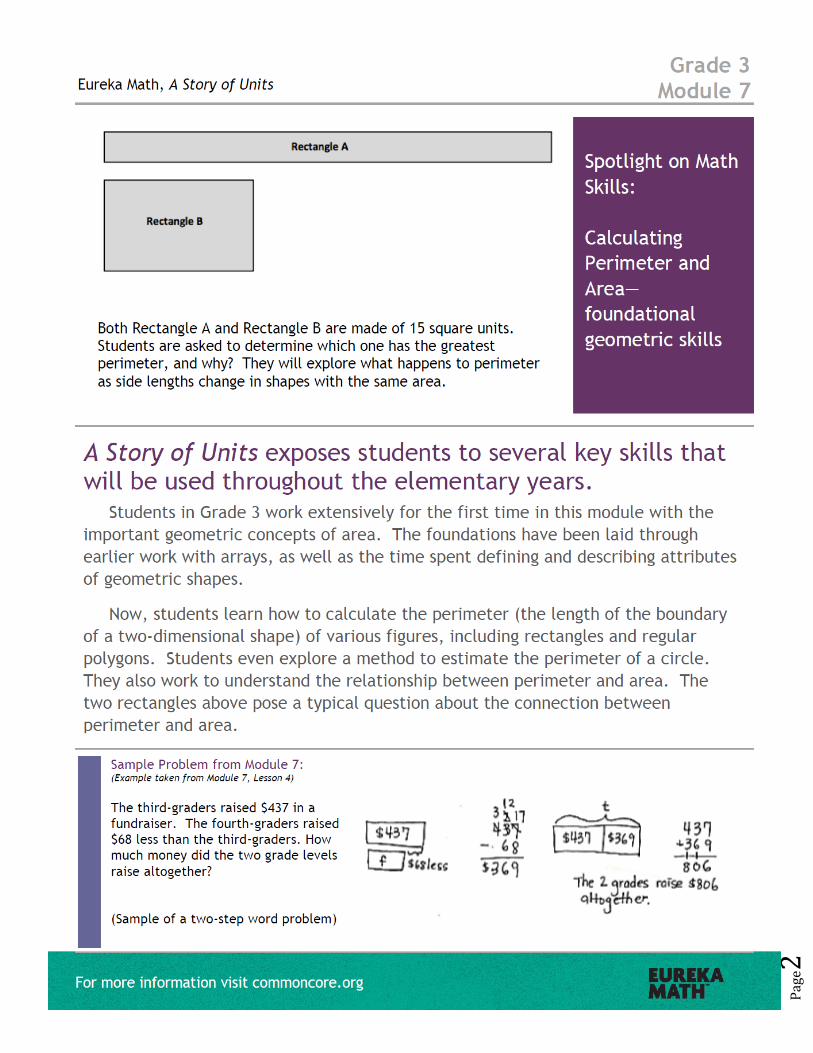
As they learn about perimeter as an attribute of plane figures, students apply their knowledge to real-world situations through problem solving (3.MD.8). They measure side lengths of shapes in whole number units to determine perimeter and solve problems where side lengths are given. They use string and rulers to measure the length around circles of different sizes. This variation prompts students to think more flexibly about perimeter, understanding that it can be the boundary of any shape and that its measurements are not limited to whole numbers. The topic ends with problems in which some measurements around the perimeter of a polygon are unknown but can be determined by reasoning. Students consider the efficiency of their strategies and identify tools for solving; for example, they use multiplication as a tool when measurements are repeated. Topic D utilizes the line plot, familiar from Module 6, to help students draw conclusions about perimeter and area measurements (3.MD.4). Early in the topic, students find different possible perimeters or areas for rectangles based on information given about the rectangles. For example, using knowledge of factors from experience with multiplication, students find the following:
Different perimeters of rectangles composed of a given number of unit squares (3.MD.8). For example, given a rectangle composed of 24 unit squares, students find four possible perimeters: 50, 28, 22, and 20 length units.
Different areas of rectangles with a given perimeter and composed of unit squares. For example, students use unit squares to build rectangles with a perimeter of 12 units and determine that they can do so using 5, 8, or 9 unit squares.
(Forming rectangles with unit squares results in whole number side lengths.) Students use line plots to show the number of rectangles they were able to construct for each set of given information. The line plots are tools that students use to help them analyze and draw conclusions about their data. Students draw their rectangles on grid paper and reason about their findings. They notice, for example, that for rectangles of a given area, those with side lengths that are equal or almost equal (more square-like) have smaller perimeters than those whose side lengths are very different (a long and narrow shape).
Pag
e5
By the end of the topic, students are able to conclude that there is no direct relationship between area and perimeter. If an area is given, there is no way of knowing a shape’s corresponding perimeter without more information about the side lengths. In Topic E, students solve problems involving area and perimeter. After an initial lesson of problem solving with perimeter, students create a robot composed of rectangles. Given specific perimeter measurements for the rectangles, they reason about the different possible side lengths. Students compare and analyze their work, discussing how different choices for side lengths can affect area while conforming to the criteria for perimeter. Students synthesize their learning in the final lessons through solving word problems involving area and perimeter using all four operations (3.OA.8). Topic F concludes the school year with a set of engaging lessons that briefly review the fundamental Grade 3 concepts of fractions, multiplication, and division. This topic comes after the End-of-Module Assessment. It begins with a pair of lessons on fractions, engaging students in analyzing and creating unusual representations of one-half, such as those shown below. Students analyze and discuss these representations, using their knowledge of fractions to justify their constructions and critique the work of others. The final lessons in this topic are fluency based and engage students in games that provide practice to solidify their automaticity with Grade 3 skills. Using simple origami techniques, students create booklets of these games. The booklets go home and become resources for summer practice.
Pag
e6
Terminology New or Recently Introduced Terms
Diagonal (e.g., the line drawn between opposite corners of a quadrilateral)
Perimeter (the boundary or length of the boundary of a two-dimensional shape)
Regular polygon (a polygon whose side lengths and interior angles are all equal)
Tessellate (to tile a plane without gaps or overlaps)
Tetromino (a shape composed of four squares that are connected so that every square shares at
least one side with another square)
Familiar Terms and Symbols
Area (the measurement of two-dimensional space in a bounded region)
Attribute (any characteristic of a shape, including properties and other defining characteristics,
e.g., straight sides and non-defining characteristics such as the color blue)
Compose (to put two or more objects or numbers together)
Decompose (to break an object or number into smaller parts)
Heptagon (a flat figure enclosed by seven straight sides and seven angles)
Hexagon (a flat figure enclosed by six straight sides and six angles)
Octagon (a flat figure enclosed by eight straight sides and eight angles)
Parallel (lines that do not intersect, even when extended in both directions)*
Parallelogram (a quadrilateral with both pairs of opposite sides parallel)
Pentagon (a flat figure enclosed by five straight sides and five angles)
Polygon (a closed figure with three or more straight sides, e.g., triangle, quadrilateral, pentagon,
hexagon)*
Quadrilateral (a four-sided polygon, e.g., square, rhombus, rectangle, parallelogram, trapezoid)*
Rectangle (a flat figure enclosed by four straight sides, having four right angles)
Rhombus (a flat figure enclosed by four straight sides of the same length)*
Right angle (e.g., a square corner)*
Square (a rectangle with four sides of the same length)
Tangram (a special set of puzzle pieces with five triangles and two quadrilaterals that compose a
square)
Trapezoid (a quadrilateral with at least one pair of parallel sides)*
Triangle (a flat figure enclosed by three straight sides and three angles)
Pag
e7
Suggested Tools and Representations
Cardstock (for making student copies of templates)
Circular objects (a variety of sizes for students to measure)
Grid paper
Index cards (to use as right angle tools)
Pattern blocks
Rulers (measuring to the nearest quarter inch, constructed by students in Module 6)
String
Square tiles
Tangrams (see the example illustrated in the Module Overview narrative)
Tetrominoes (see the example illustrated in the Module Overview narrative)
Pag
e8
Grade 3 Module 7 Topic A
Solving Word Problems Focus Standard: 3.OA.8 Solve two-step word problems using the four operations. Represent these problems using
equations with a letter standing for the unknown quantity. Assess the reasonableness of answers using mental computation and estimation strategies including rounding. (This standard is limited to problems posed with whole numbers and having whole number answers; students should know how to perform operations in the conventional order when there are no parentheses to specify a particular order [Order of Operations].)
Instructional Days Recommended: 3
In Topic A, students use all four operations to solve one- and two-step word problems within various contexts that were studied throughout the year. The problems are challenging and require students to carefully consider solution paths as they “make sense of problems and persevere in solving them” (MP.1). Guided practice with strategies for problem solving is built into Lessons 1 and 2. These lessons emphasize the use of modeling through the Read-Draw-Write (RDW) process and revisit models such as tape diagrams and number bonds. Students flexibly use a letter to represent the unknown as they solve. This practice readies them for problem solving with perimeter and area in Topics C and E. In Lesson 3, students’ level of independence within the lesson increases. They work together or on their own to develop solution paths and then share strategies and solutions. Students think critically about their own work and that of others through peer review and critique. They discuss the clarity, practicality, and efficiency of different models and strategies, refining their own understandings and approaches. Student presentations of work and protocols for critiquing are structures that provide a platform for this dialogue.
*The sample homework responses contained in this manual are intended to provide insight into the skills expected of students and instructional strategies used in Eureka Math.
Pag
e9
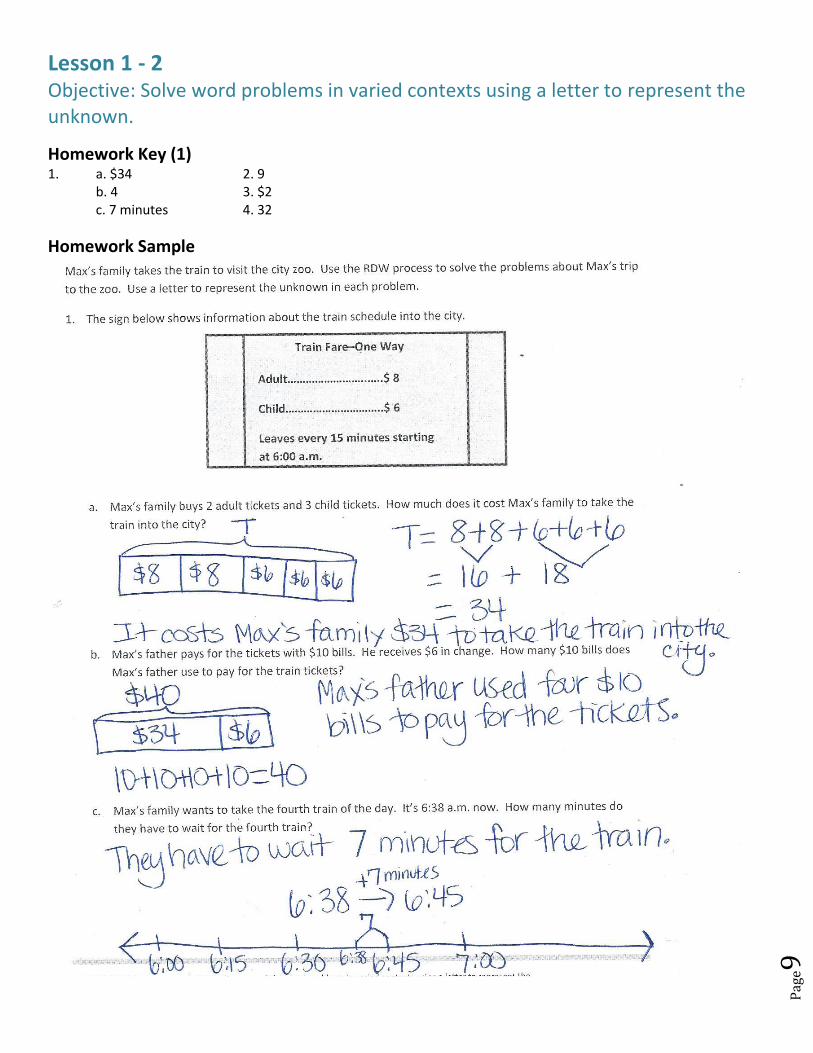
Lesson 1 - 2 Objective: Solve word problems in varied contexts using a letter to represent the unknown.
Homework Key (1) 1. a. $34 2. 9
b. 4 3. $2 c. 7 minutes 4. 32
Homework Sample
Pag
e10
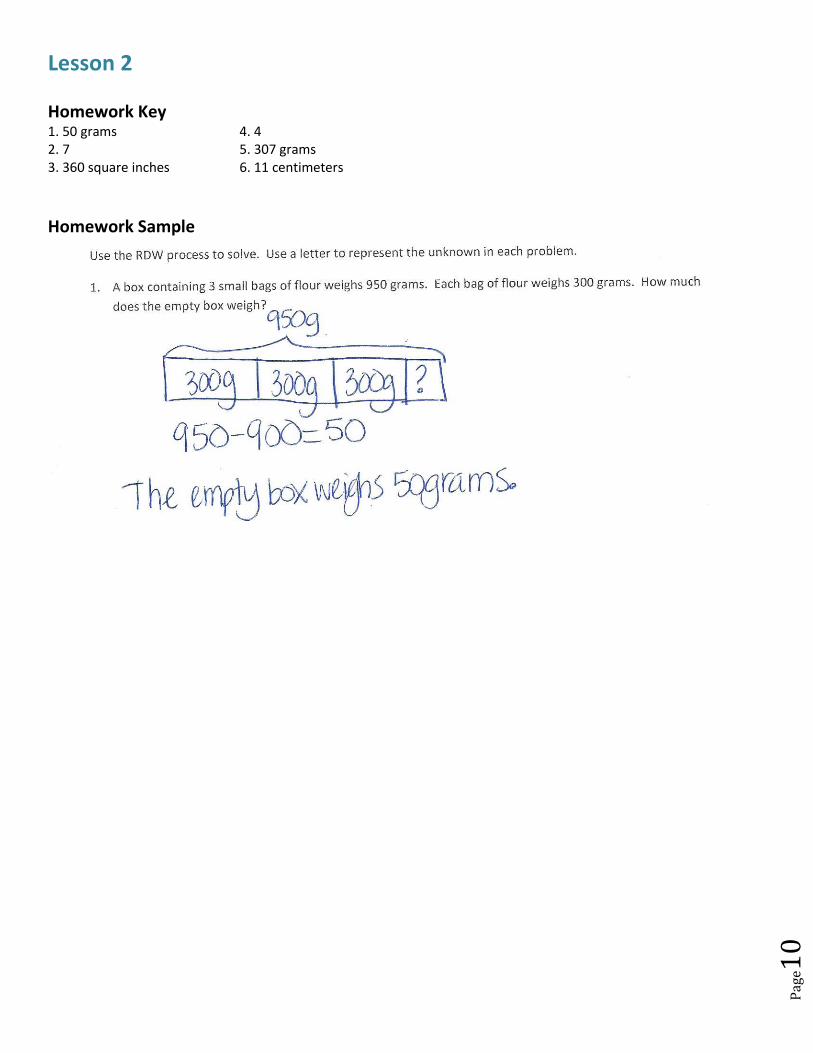
Lesson 2 Homework Key 1. 50 grams 4. 4 2. 7 5. 307 grams 3. 360 square inches 6. 11 centimeters
Homework Sample
Pag
e11
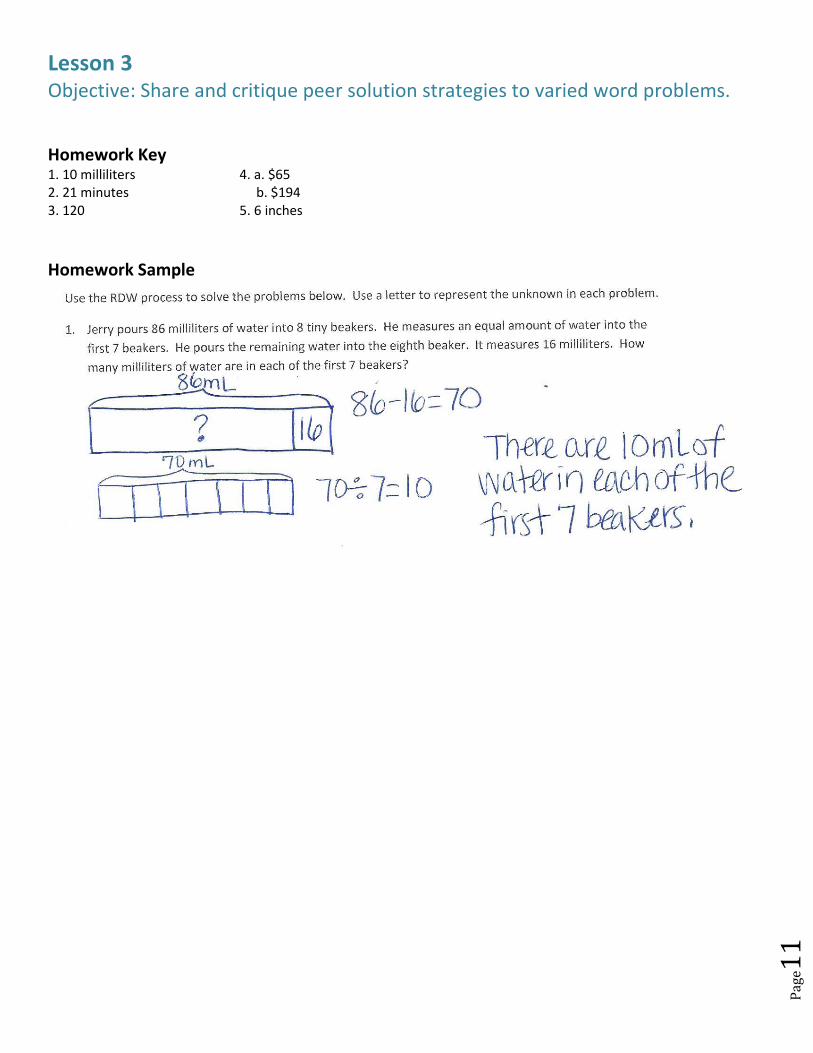
Lesson 3 Objective: Share and critique peer solution strategies to varied word problems.
Homework Key 1. 10 milliliters 4. a. $65 2. 21 minutes b. $194 3. 120 5. 6 inches
Homework Sample
Pag
e12
Grade 3 Module 7 Topic B
Attributes of Two-Dimensional Figures Focus Standard:
3.G.1 Understand that shapes in different categories (e.g., rhombuses, rectangles, and others) may share attributes (e.g., having four sides), and that the shared attributes can define a larger category (e.g., quadrilaterals). Recognize rhombuses, rectangles, and squares as examples of quadrilaterals, and draw examples of quadrilaterals that do not belong to any of these subcategories.
Instructional Days Recommended: 6
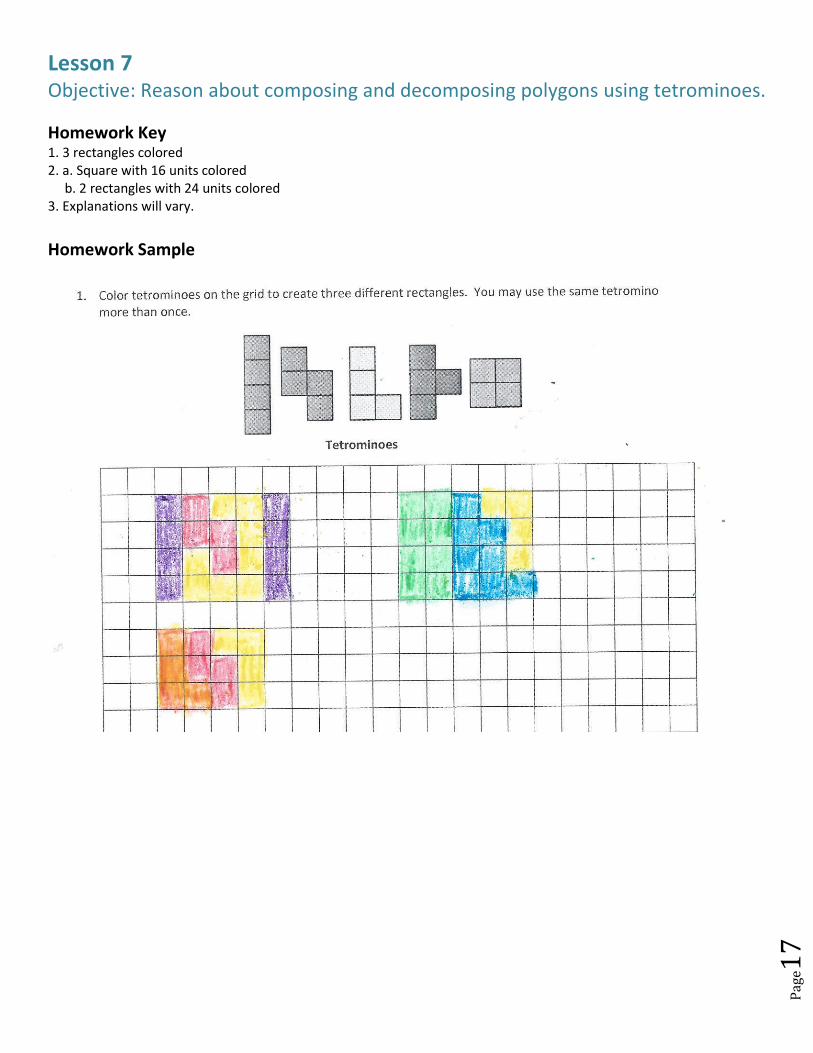
In Topic B, students use their understanding of geometry from Grade 2 to explore quadrilaterals. In Lesson 4, they learn that different shapes (e.g., squares, rectangles, and rhombuses) have shared attributes that can fall within a larger category (parallelograms, quadrilaterals, and trapezoids). They explore these new, larger categories and understand, for example, that any quadrilateral can be decomposed into two triangles. As they learn which attributes are shared, the process of comparing shapes also leads to discussion about the differences between shapes; students learn, for example, that not all rectangles are squares. Students use their understanding of the attributes of quadrilaterals to compare other polygons in Lesson 5. They look for shared attributes and learn to recognize polygons with sides that are equal—regular polygons— which helps lay a foundation for problem solving with perimeter in later topics. While students analyze the attributes of given shapes in Lessons 4 and 5, in Lesson 6 they draw shapes based on given attributes. For example, students may be asked to draw a quadrilateral with at least two right angles and talk about which shapes are possibilities. They also draw quadrilaterals that do not fit any subcategories. Prompts such as “draw a polygon with only two sides and two angles” spark investigative discussion through which students determine the impossibility of such a shape. This lesson helps students solidify their intuitive understanding of polygons. In Lesson 7, students work with tetrominoes. They use grid paper to construct a set and then reason about how to create larger shapes, such as rectangles, using them. This develops spatial structuring skills by way of manipulating and composing shapes.
Pag
e13
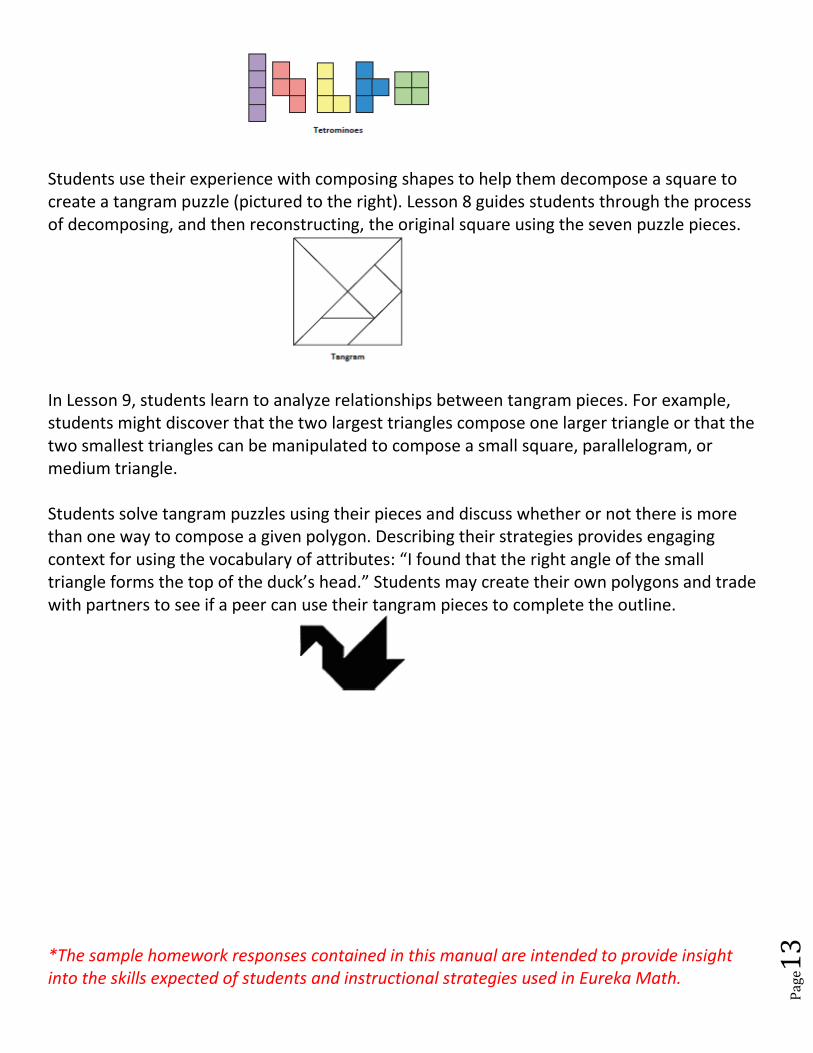
Students use their experience with composing shapes to help them decompose a square to create a tangram puzzle (pictured to the right). Lesson 8 guides students through the process of decomposing, and then reconstructing, the original square using the seven puzzle pieces.
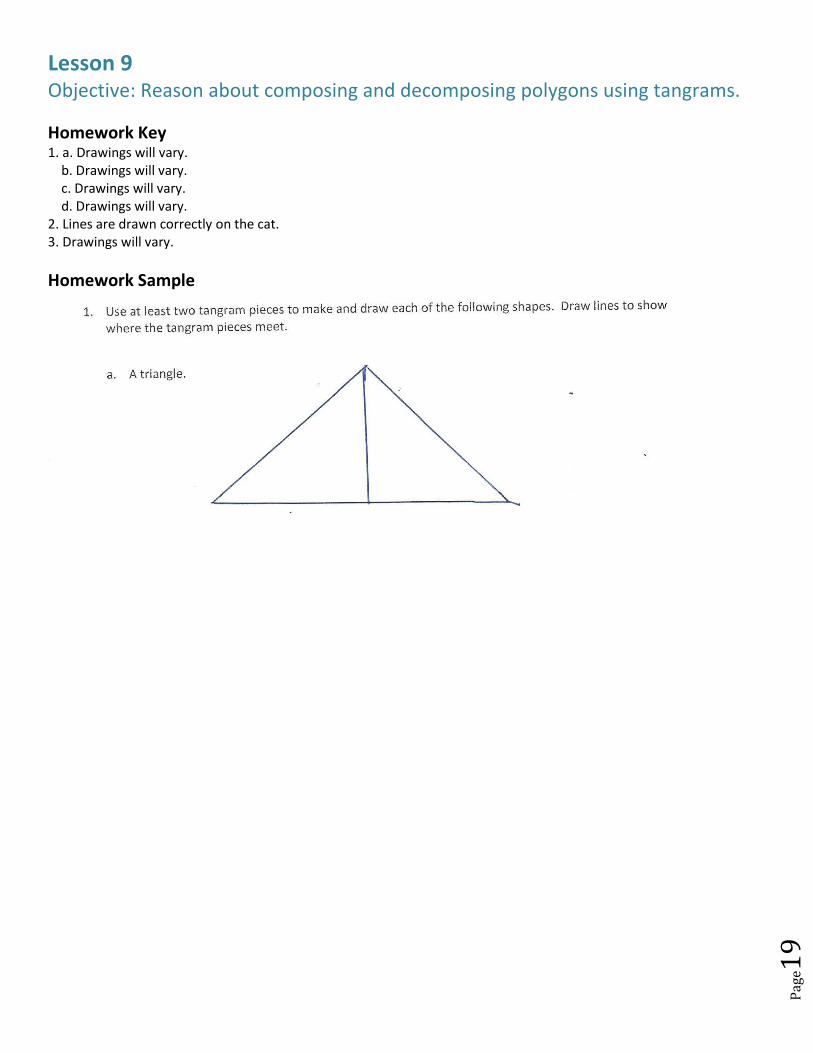
In Lesson 9, students learn to analyze relationships between tangram pieces. For example, students might discover that the two largest triangles compose one larger triangle or that the two smallest triangles can be manipulated to compose a small square, parallelogram, or medium triangle. Students solve tangram puzzles using their pieces and discuss whether or not there is more than one way to compose a given polygon. Describing their strategies provides engaging context for using the vocabulary of attributes: “I found that the right angle of the small triangle forms the top of the duck’s head.” Students may create their own polygons and trade with partners to see if a peer can use their tangram pieces to complete the outline.
*The sample homework responses contained in this manual are intended to provide insight into the skills expected of students and instructional strategies used in Eureka Math.
Pag
e14
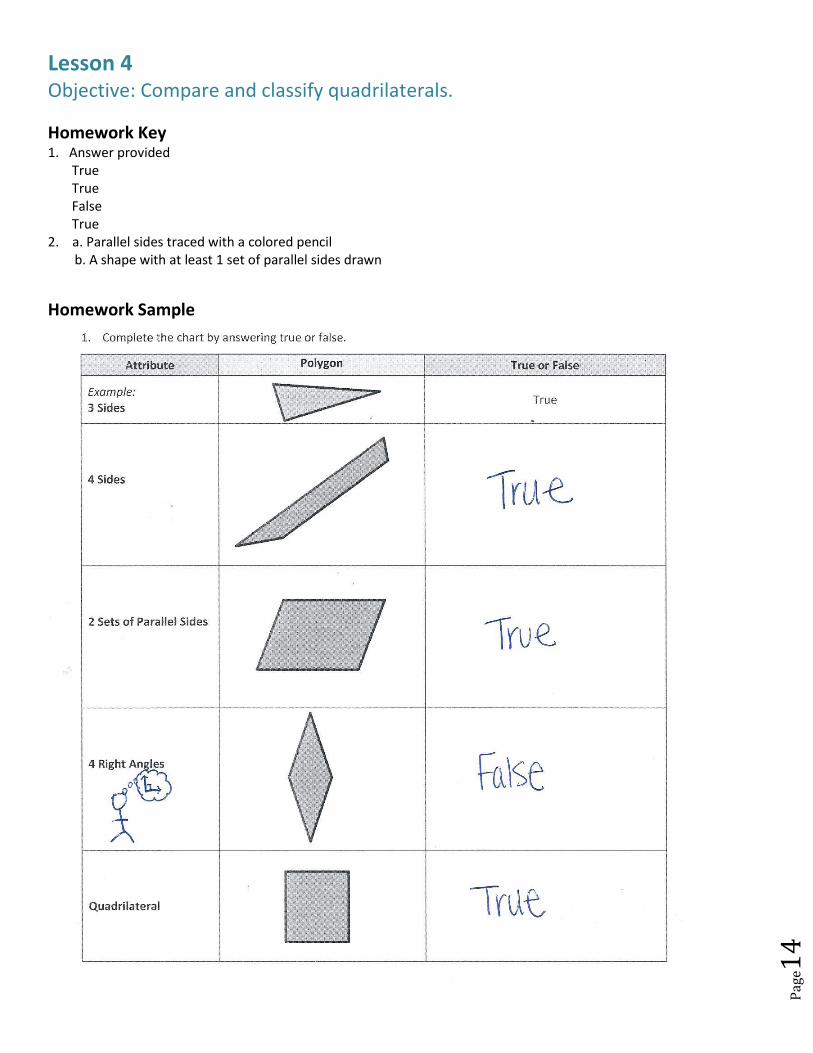
Lesson 4 Objective: Compare and classify quadrilaterals.
Homework Key 1. Answer provided
True True False True
2. a. Parallel sides traced with a colored pencil b. A shape with at least 1 set of parallel sides drawn
Homework Sample
Pag
e15
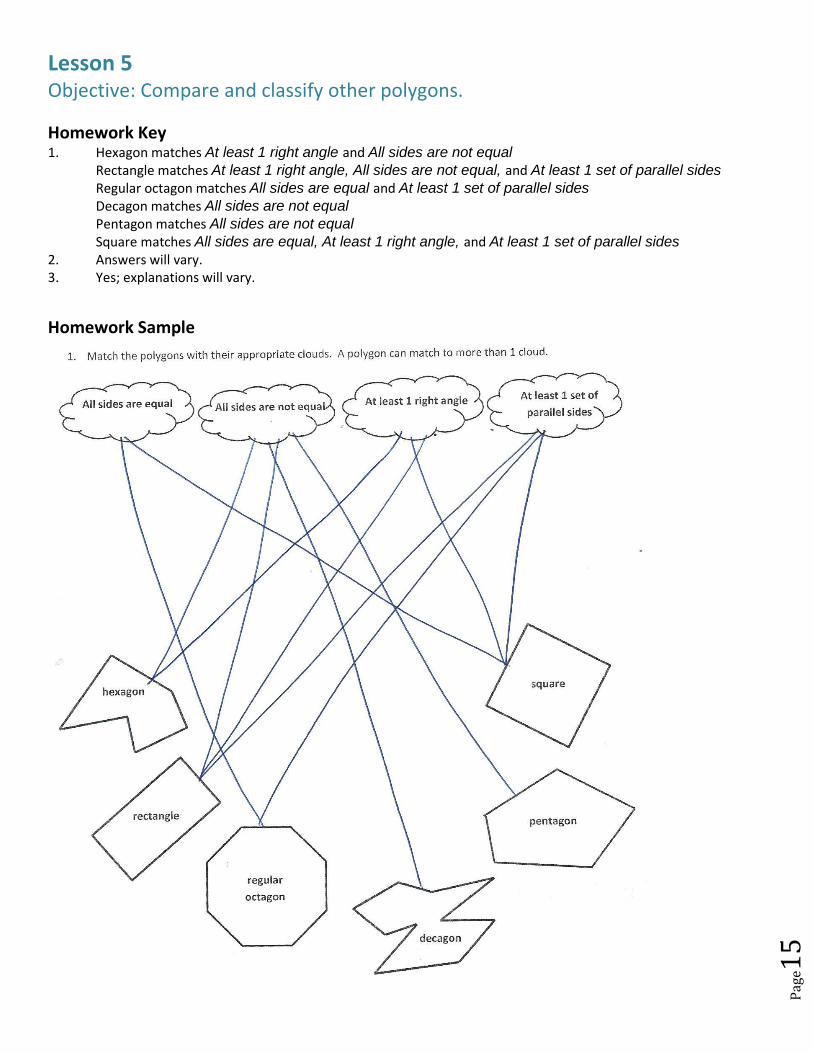
Lesson 5 Objective: Compare and classify other polygons.
Homework Key 1. Hexagon matches At least 1 right angle and All sides are not equal
Rectangle matches At least 1 right angle, All sides are not equal, and At least 1 set of parallel sides
Regular octagon matches All sides are equal and At least 1 set of parallel sides
Decagon matches All sides are not equal
Pentagon matches All sides are not equal
Square matches All sides are equal, At least 1 right angle, and At least 1 set of parallel sides
2. Answers will vary. 3. Yes; explanations will vary. Homework Sample
Pag
e16
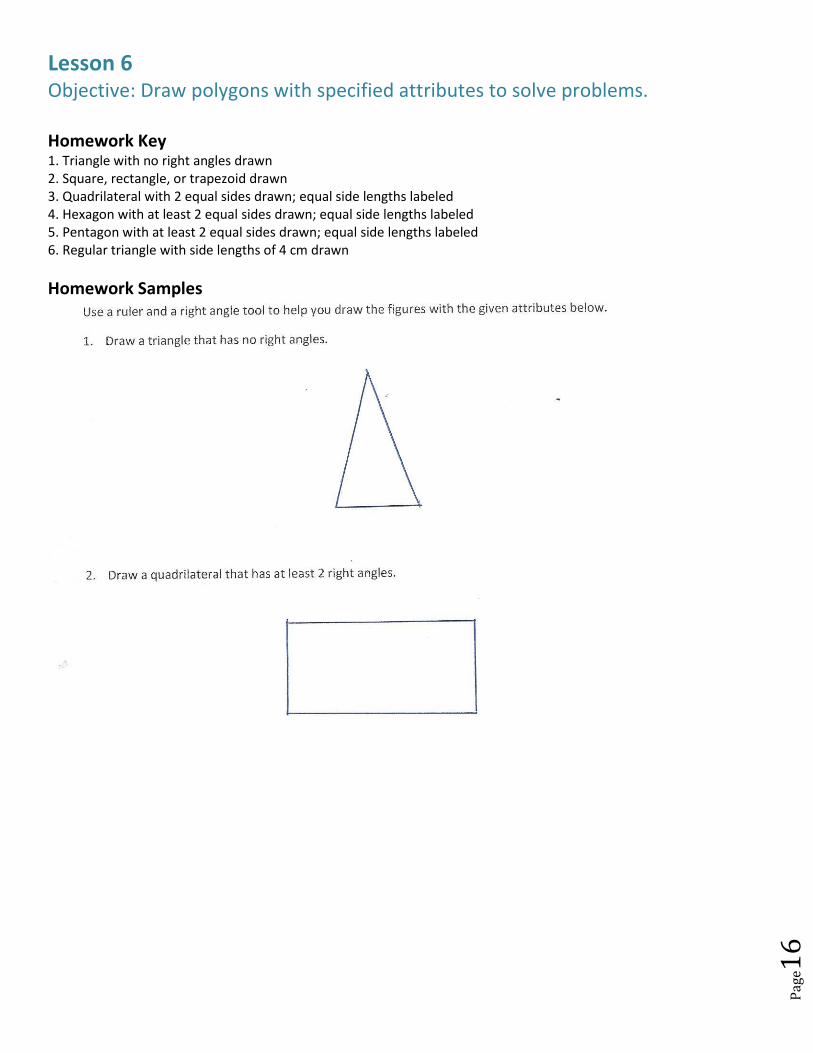
Lesson 6 Objective: Draw polygons with specified attributes to solve problems. Homework Key 1. Triangle with no right angles drawn 2. Square, rectangle, or trapezoid drawn 3. Quadrilateral with 2 equal sides drawn; equal side lengths labeled 4. Hexagon with at least 2 equal sides drawn; equal side lengths labeled 5. Pentagon with at least 2 equal sides drawn; equal side lengths labeled 6. Regular triangle with side lengths of 4 cm drawn
Homework Samples
Pag
e17
Lesson 7 Objective: Reason about composing and decomposing polygons using tetrominoes.
Homework Key 1. 3 rectangles colored 2. a. Square with 16 units colored b. 2 rectangles with 24 units colored 3. Explanations will vary.
Homework Sample
Pag
e18
Lesson 8 Objective: Create a tangram puzzle and observe relationships among the shapes.
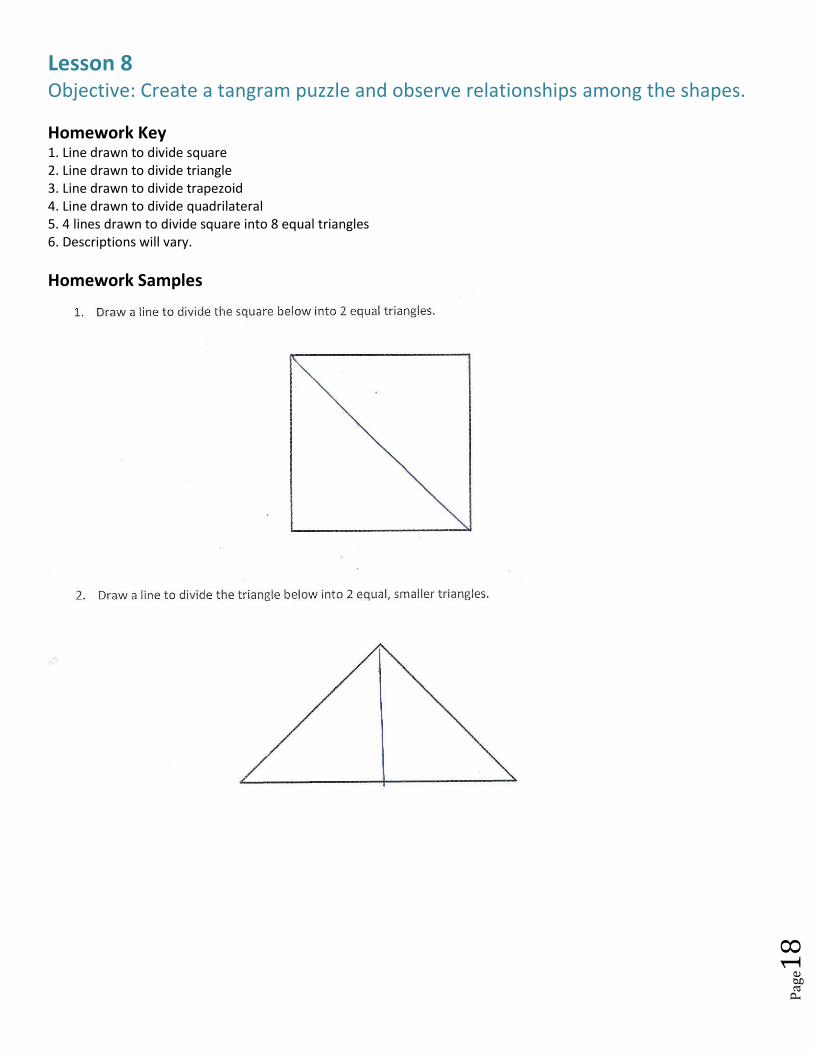
Homework Key 1. Line drawn to divide square 2. Line drawn to divide triangle 3. Line drawn to divide trapezoid 4. Line drawn to divide quadrilateral 5. 4 lines drawn to divide square into 8 equal triangles 6. Descriptions will vary.
Homework Samples
Pag
e19
Lesson 9 Objective: Reason about composing and decomposing polygons using tangrams.
Homework Key 1. a. Drawings will vary. b. Drawings will vary. c. Drawings will vary. d. Drawings will vary. 2. Lines are drawn correctly on the cat. 3. Drawings will vary.
Homework Sample

Pag
e20
Grade 3 Module 7 Topic C
Problem Solving with Perimeter
Focus Standards:
3.MD.8 Solve real world and mathematical problems involving perimeters of polygons, including finding the perimeter given the side lengths, finding an unknown side length, and exhibiting rectangles with the same perimeter and different areas or with the same area and different perimeters.
Instructional Days Recommended: 8
Students are introduced to perimeter in Topic C. Conceptual exploration begins by creating tessellations. In Lessons 10 and 11, students decompose a quadrilateral. They rearrange the parts to form a new shape. They then use the new shape to tile, tracing its perimeter until a new larger shape (the complete tessellation) is formed. Through this work, students define perimeter as the boundary of a two-dimensional shape and use their new vocabulary in context as they describe the process of tessellating. These lessons begin the study of perimeter with unusual shapes to encourage flexible thinking about perimeter and avoid the misconception that it is a property of rectangles alone.
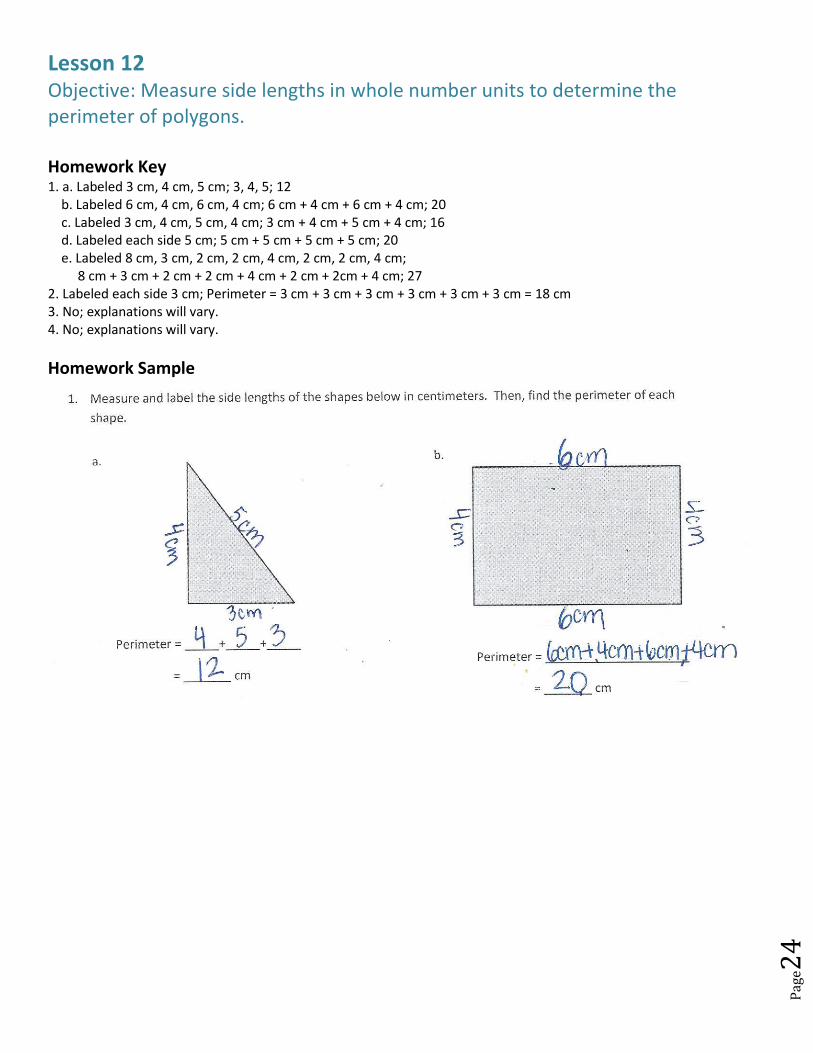
In Lesson 12, students measure side lengths and calculate perimeters. They measure the side lengths of polygons (in whole number units) using rulers and then use these side lengths to determine perimeter. Students attend to units as they solve and discuss the efficiency of strategies for adding side lengths. The complexity increases in Lesson 13 when students are given pictorial models, including the side lengths of polygons, from which they determine the perimeter.
Pag
e21
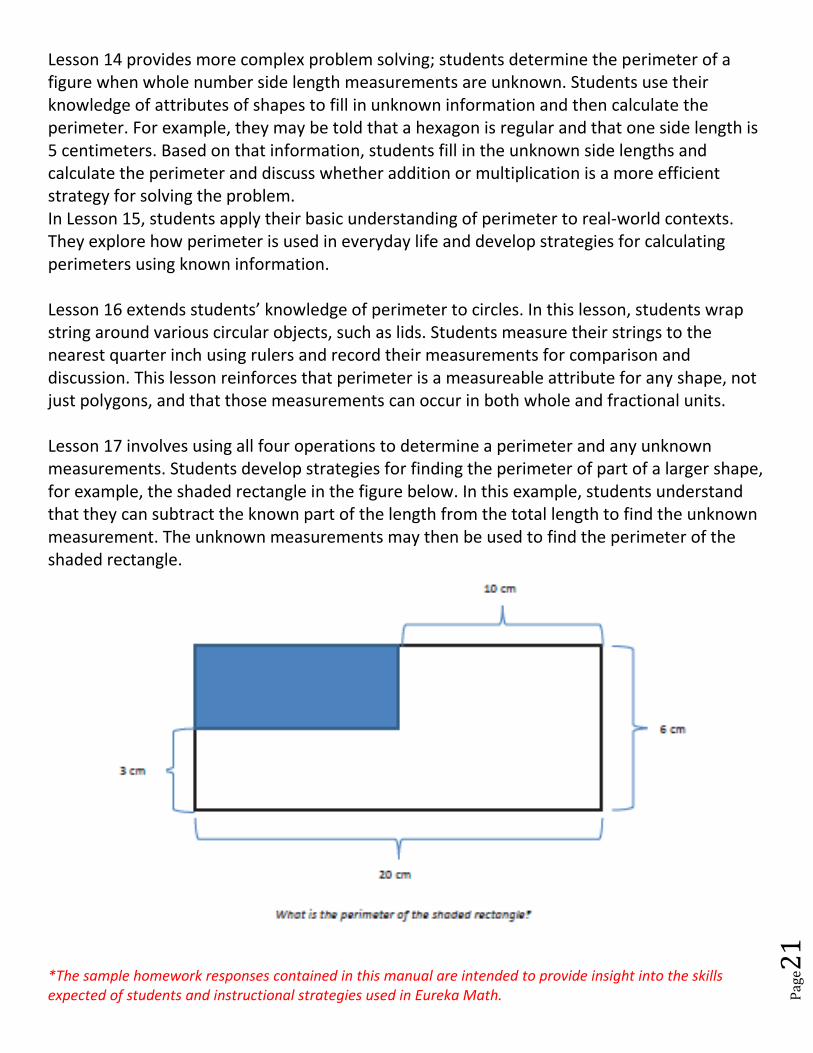
Lesson 14 provides more complex problem solving; students determine the perimeter of a figure when whole number side length measurements are unknown. Students use their knowledge of attributes of shapes to fill in unknown information and then calculate the perimeter. For example, they may be told that a hexagon is regular and that one side length is 5 centimeters. Based on that information, students fill in the unknown side lengths and calculate the perimeter and discuss whether addition or multiplication is a more efficient strategy for solving the problem. In Lesson 15, students apply their basic understanding of perimeter to real-world contexts. They explore how perimeter is used in everyday life and develop strategies for calculating perimeters using known information. Lesson 16 extends students’ knowledge of perimeter to circles. In this lesson, students wrap string around various circular objects, such as lids. Students measure their strings to the nearest quarter inch using rulers and record their measurements for comparison and discussion. This lesson reinforces that perimeter is a measureable attribute for any shape, not just polygons, and that those measurements can occur in both whole and fractional units. Lesson 17 involves using all four operations to determine a perimeter and any unknown measurements. Students develop strategies for finding the perimeter of part of a larger shape, for example, the shaded rectangle in the figure below. In this example, students understand that they can subtract the known part of the length from the total length to find the unknown measurement. The unknown measurements may then be used to find the perimeter of the shaded rectangle.
*The sample homework responses contained in this manual are intended to provide insight into the skills expected of students and instructional strategies used in Eureka Math.
Pag
e22
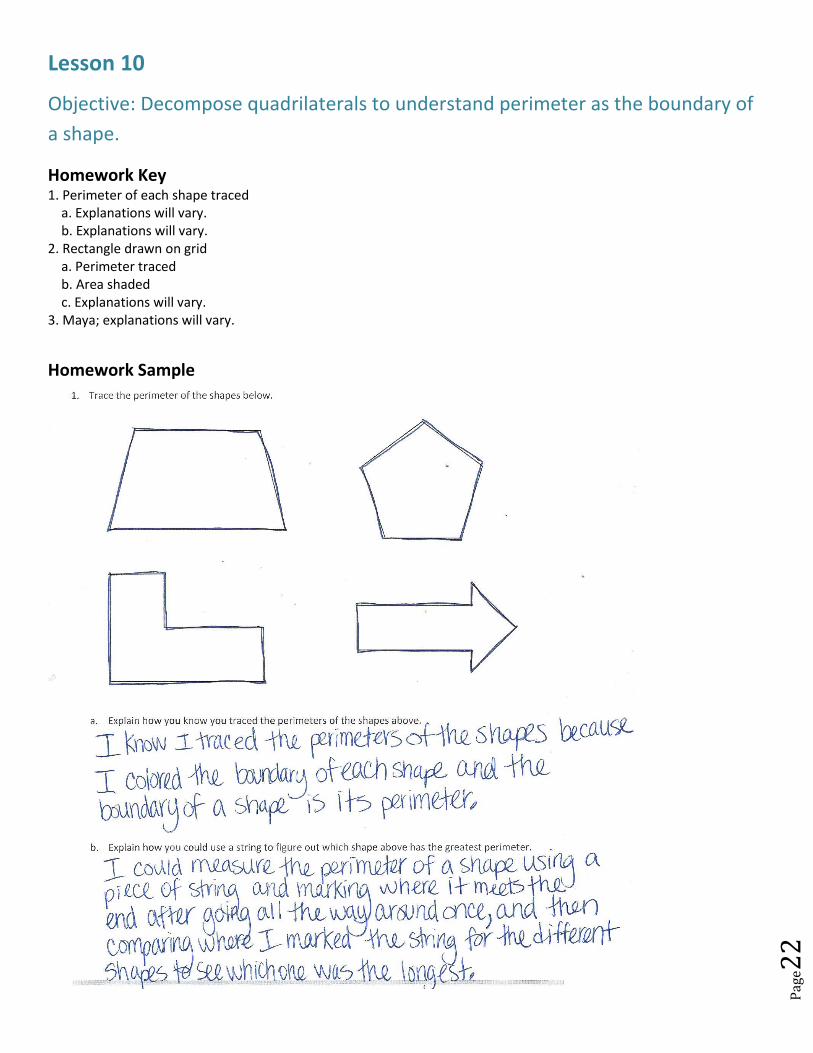
Lesson 10
Objective: Decompose quadrilaterals to understand perimeter as the boundary of
a shape.
Homework Key 1. Perimeter of each shape traced a. Explanations will vary. b. Explanations will vary. 2. Rectangle drawn on grid a. Perimeter traced b. Area shaded c. Explanations will vary. 3. Maya; explanations will vary.
Homework Sample
Pag
e23
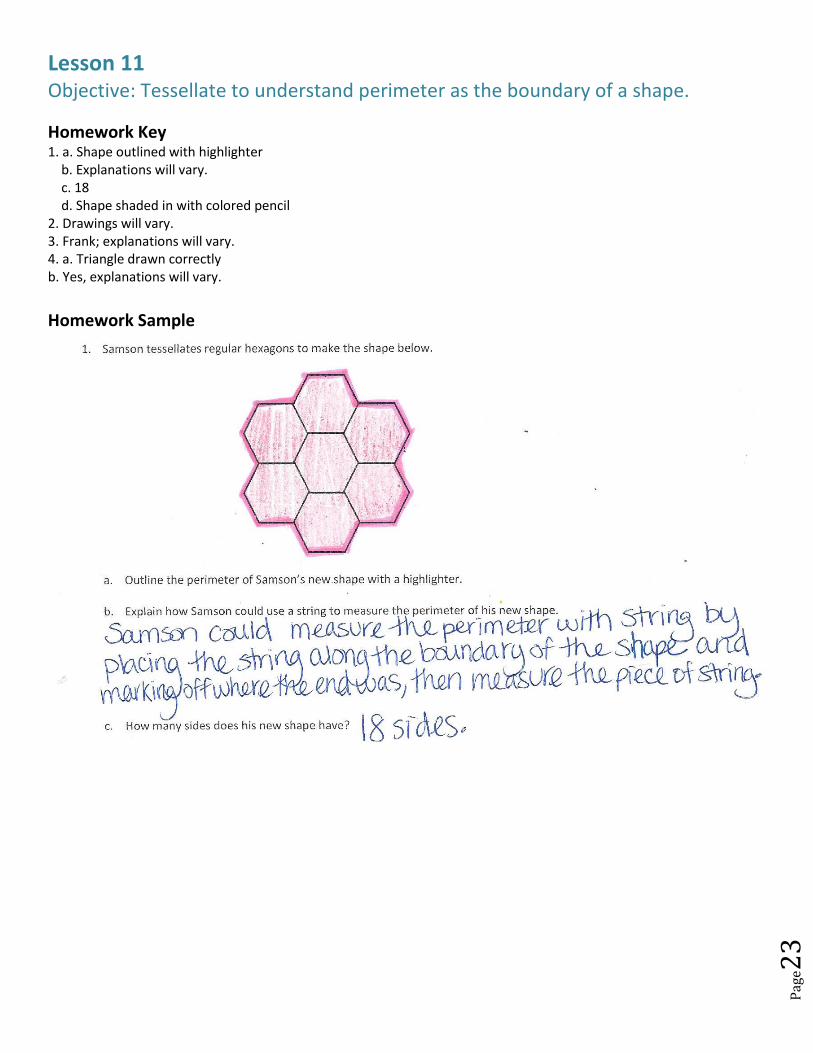
Lesson 11 Objective: Tessellate to understand perimeter as the boundary of a shape.
Homework Key 1. a. Shape outlined with highlighter b. Explanations will vary. c. 18 d. Shape shaded in with colored pencil 2. Drawings will vary. 3. Frank; explanations will vary. 4. a. Triangle drawn correctly b. Yes, explanations will vary.
Homework Sample
Pag
e24
Lesson 12 Objective: Measure side lengths in whole number units to determine the perimeter of polygons. Homework Key 1. a. Labeled 3 cm, 4 cm, 5 cm; 3, 4, 5; 12 b. Labeled 6 cm, 4 cm, 6 cm, 4 cm; 6 cm + 4 cm + 6 cm + 4 cm; 20 c. Labeled 3 cm, 4 cm, 5 cm, 4 cm; 3 cm + 4 cm + 5 cm + 4 cm; 16 d. Labeled each side 5 cm; 5 cm + 5 cm + 5 cm + 5 cm; 20 e. Labeled 8 cm, 3 cm, 2 cm, 2 cm, 4 cm, 2 cm, 2 cm, 4 cm; 8 cm + 3 cm + 2 cm + 2 cm + 4 cm + 2 cm + 2cm + 4 cm; 27 2. Labeled each side 3 cm; Perimeter = 3 cm + 3 cm + 3 cm + 3 cm + 3 cm + 3 cm = 18 cm 3. No; explanations will vary. 4. No; explanations will vary.
Homework Sample
Pag
e25
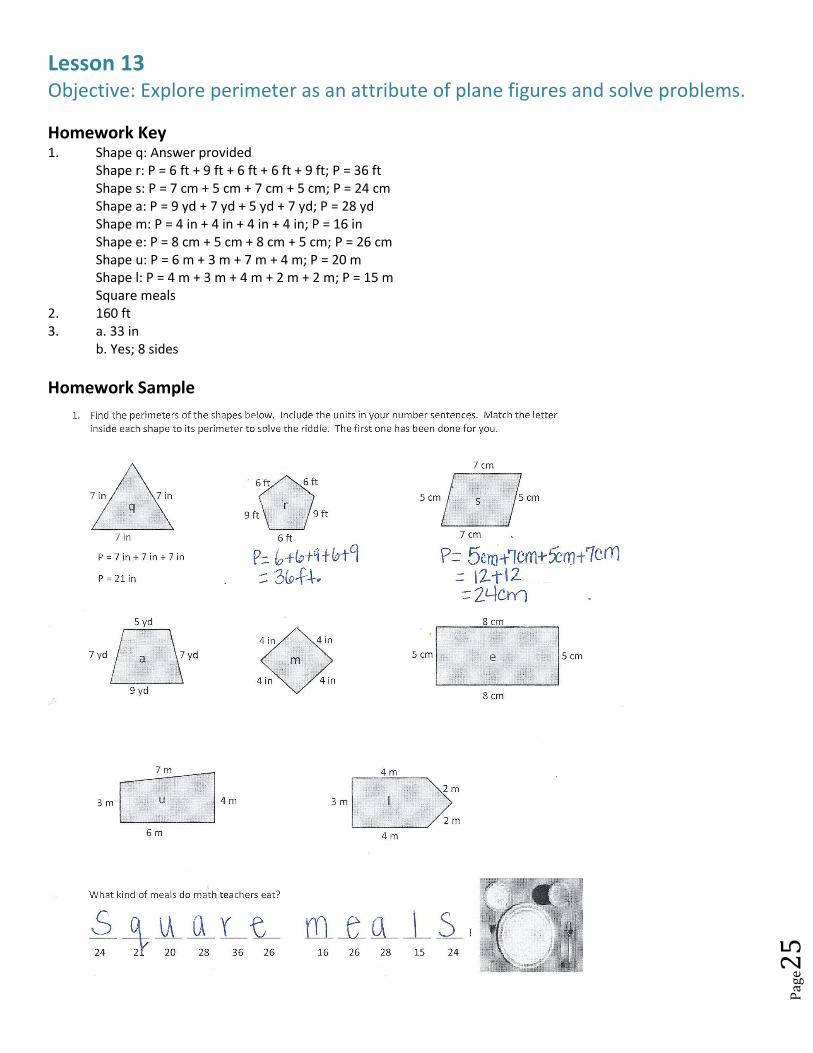
Lesson 13 Objective: Explore perimeter as an attribute of plane figures and solve problems.
Homework Key 1. Shape q: Answer provided
Shape r: P = 6 ft + 9 ft + 6 ft + 6 ft + 9 ft; P = 36 ft Shape s: P = 7 cm + 5 cm + 7 cm + 5 cm; P = 24 cm Shape a: P = 9 yd + 7 yd + 5 yd + 7 yd; P = 28 yd Shape m: P = 4 in + 4 in + 4 in + 4 in; P = 16 in Shape e: P = 8 cm + 5 cm + 8 cm + 5 cm; P = 26 cm Shape u: P = 6 m + 3 m + 7 m + 4 m; P = 20 m Shape l: P = 4 m + 3 m + 4 m + 2 m + 2 m; P = 15 m Square meals
2. 160 ft 3. a. 33 in
b. Yes; 8 sides
Homework Sample
Pag
e26
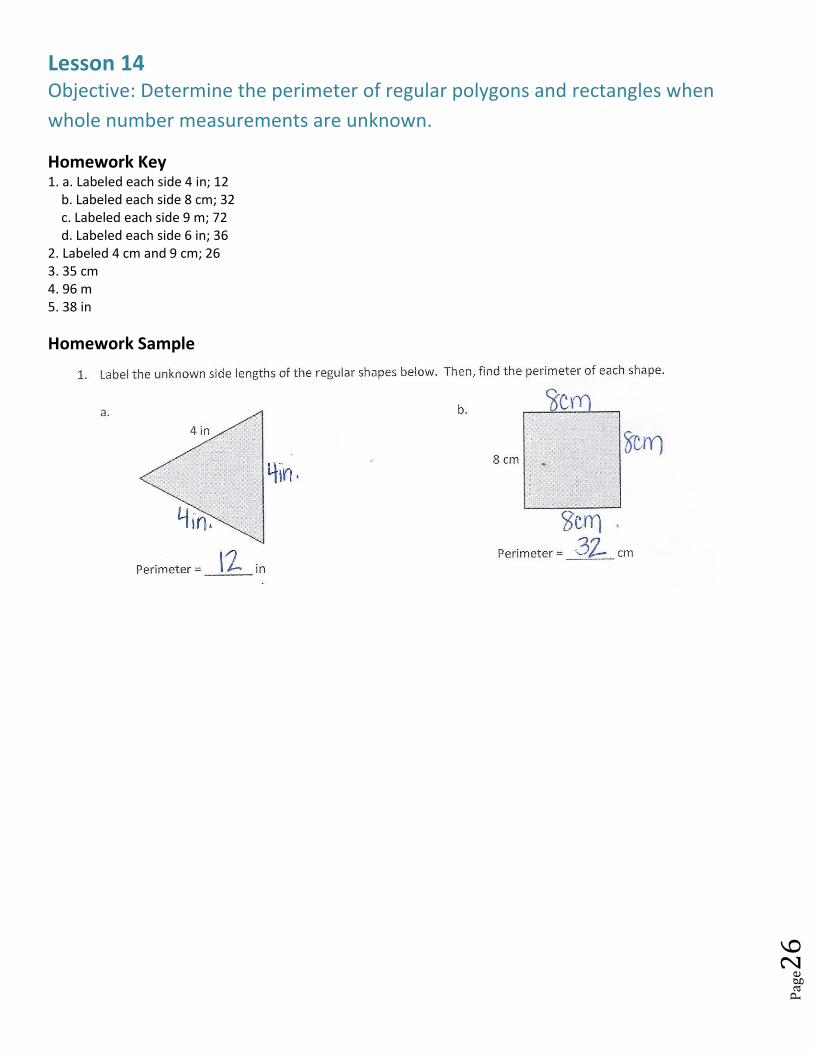
Lesson 14 Objective: Determine the perimeter of regular polygons and rectangles when
whole number measurements are unknown.
Homework Key 1. a. Labeled each side 4 in; 12 b. Labeled each side 8 cm; 32 c. Labeled each side 9 m; 72 d. Labeled each side 6 in; 36 2. Labeled 4 cm and 9 cm; 26 3. 35 cm 4. 96 m 5. 38 in
Homework Sample
Pag
e27
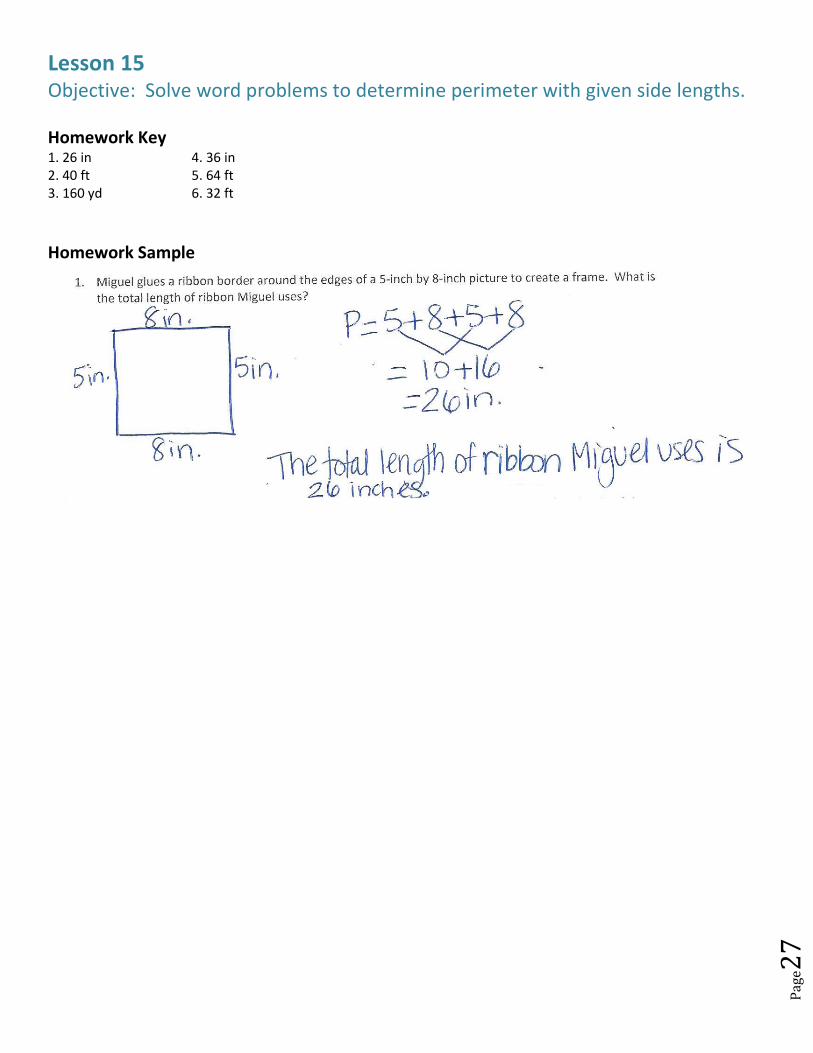
Lesson 15 Objective: Solve word problems to determine perimeter with given side lengths. Homework Key 1. 26 in 4. 36 in 2. 40 ft 5. 64 ft 3. 160 yd 6. 32 ft
Homework Sample

Pag
e28
Lesson 16 Objective: Use string to measure the perimeter of various circles to the nearest quarter inch. Homework Key 1. a. Answers will vary. b. Explanations will vary.
2. Shape A: 8 in; Shape B: 8
in
a. Shape B b. About 1 in; answers may vary. 3. Answers will vary.
Homework Sample

Pag
e29
Lesson 17 Objective: Use all four operations to solve problems involving perimeter and unknown measurements. Homework Key 1. a. Labeled 3 m, 7 m; P = (2 × 7 m) + 3 m + 2 m + 9 m + 4 m = 32 m (equations may vary)
b. Labeled 4 cm; P = (2 × 2 cm) + (2 × 4 cm) + 3 cm + 5 cm + 6 cm + 8 cm = 34 cm (equations may vary) c. Labeled 2 in, 6 in, 4 in; P = (2 × 2 in) + (3 × 4 in) +(2 × 6 in) + 12 in = 40 in (equations may vary) d. Labeled 3 ft, 3 ft; P = (4 × 3 ft) + 1 ft + 2 ft + 7 ft + 8 ft = 30 ft (equations may vary)
2. 72 cm 3. a = 13 in, b = 6 in; 38 in
Homework Sample
Pag
e30
Grade 3 Module 7 Topic D
Recording Perimeter and Area Data on Line Plots Focus Standards:
3.MD.4 Generate measurement data by measuring lengths using rulers marked with halves and fourths of an inch. Show the data by making a line plot, where the horizontal scale is marked off in appropriate units—whole numbers, halves, or quarters.
3.MD.8 Solve real world and mathematical problems involving perimeters of polygons, including finding
the perimeter given the side lengths, finding an unknown side length, and exhibiting rectangles with the same perimeter and different areas or with the same area and different perimeters.
Instructional Days Recommended: 5
In Topic D, students utilize a line plot to draw conclusions about perimeter and area measurements. Students use a given number of unit squares to build and determine different perimeters of rectangles in Lesson 18. For example, given a rectangle composed of 24 unit squares, students find there are four possible perimeters: 50, 28, 22, and 20 length units. They draw their rectangles on grid paper and discuss the fact that rectangles with side lengths that are equal or almost equal (squares or square-like rectangles) have smaller perimeters than rectangles whose side lengths are very different (long and narrow rectangles). Students continue to explore with different numbers of unit squares and record the number of possibilities, noting when they have found all the possible combinations. They recognize that area and perimeter are measured in different units and conclude that, in general, there is no way of knowing an exact perimeter for any number of unit squares without more information about the side lengths.
Pag
e31
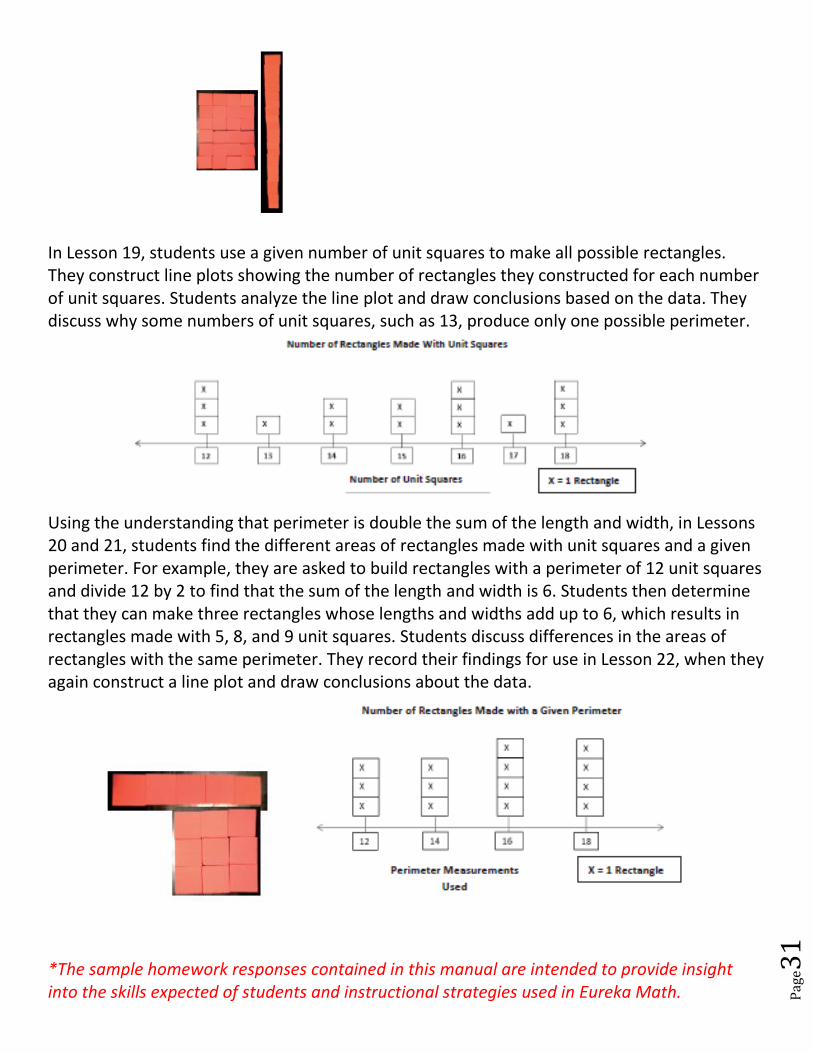
In Lesson 19, students use a given number of unit squares to make all possible rectangles. They construct line plots showing the number of rectangles they constructed for each number of unit squares. Students analyze the line plot and draw conclusions based on the data. They discuss why some numbers of unit squares, such as 13, produce only one possible perimeter.
Using the understanding that perimeter is double the sum of the length and width, in Lessons 20 and 21, students find the different areas of rectangles made with unit squares and a given perimeter. For example, they are asked to build rectangles with a perimeter of 12 unit squares and divide 12 by 2 to find that the sum of the length and width is 6. Students then determine that they can make three rectangles whose lengths and widths add up to 6, which results in rectangles made with 5, 8, and 9 unit squares. Students discuss differences in the areas of rectangles with the same perimeter. They record their findings for use in Lesson 22, when they again construct a line plot and draw conclusions about the data.
*The sample homework responses contained in this manual are intended to provide insight into the skills expected of students and instructional strategies used in Eureka Math.
Pag
e32
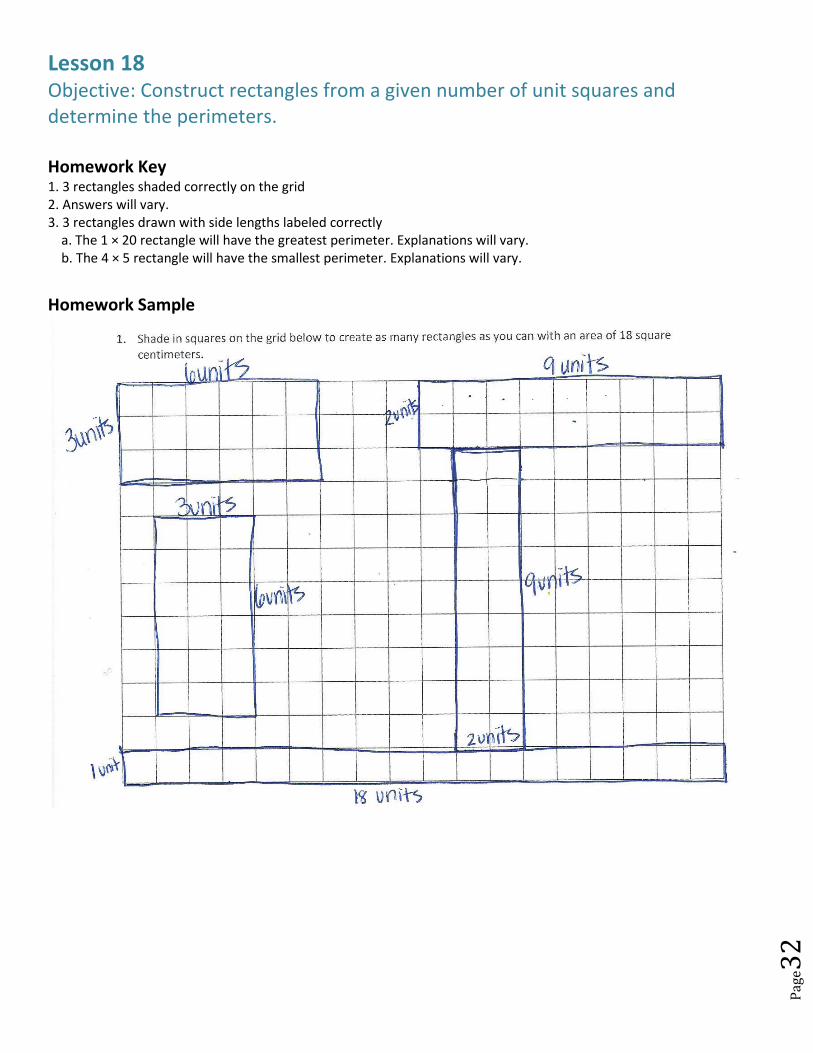
Lesson 18 Objective: Construct rectangles from a given number of unit squares and determine the perimeters.
Homework Key 1. 3 rectangles shaded correctly on the grid 2. Answers will vary. 3. 3 rectangles drawn with side lengths labeled correctly a. The 1 × 20 rectangle will have the greatest perimeter. Explanations will vary. b. The 4 × 5 rectangle will have the smallest perimeter. Explanations will vary.
Homework Sample

Pag
e33
Lesson 19 Objective: Use a line plot to record the number of rectangles constructed from a given number of unit squares.
Homework Key 1. 2, 1, 6, 2, 3; 1, 1, 7; 2, 1, 8, 2, 4; 2, 1, 9, 3, 3; 2, 1, 10, 2, 5; 1, 1, 11 2. Line plot created a. No; explanations will vary. b. 2; explanations will vary.
Homework Sample
Pag
e34
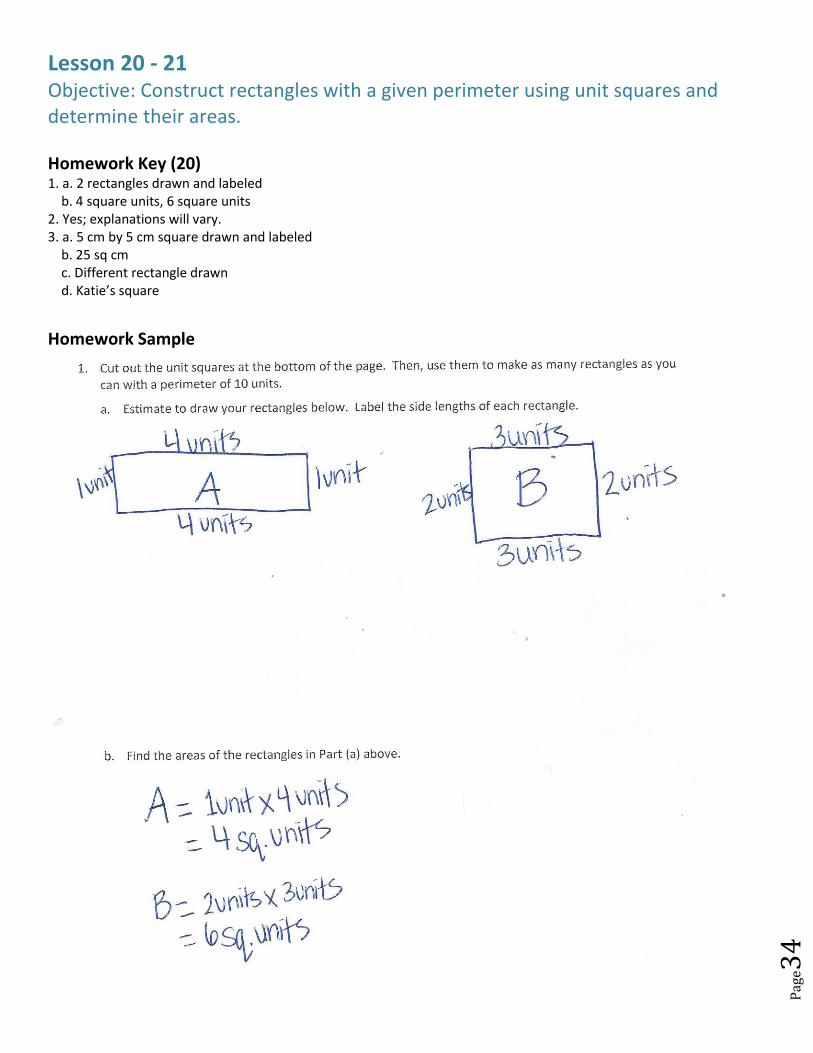
Lesson 20 - 21 Objective: Construct rectangles with a given perimeter using unit squares and determine their areas. Homework Key (20) 1. a. 2 rectangles drawn and labeled b. 4 square units, 6 square units 2. Yes; explanations will vary. 3. a. 5 cm by 5 cm square drawn and labeled b. 25 sq cm c. Different rectangle drawn d. Katie’s square
Homework Sample
Pag
e35
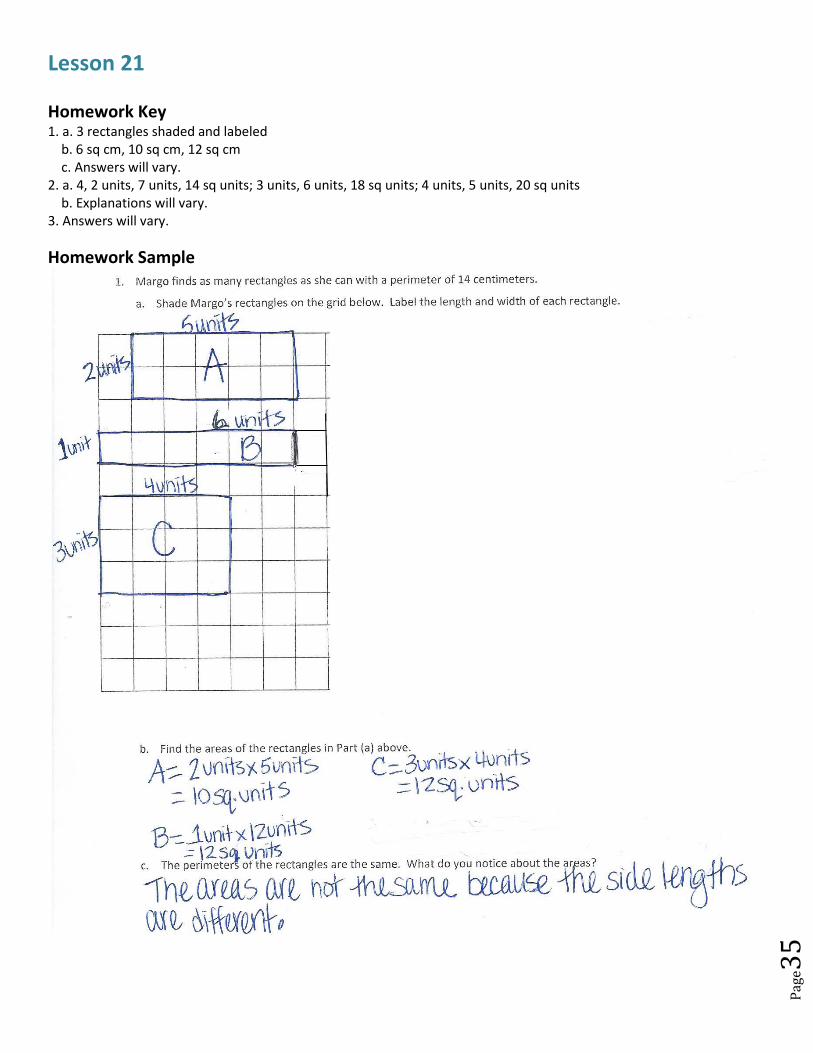
Lesson 21 Homework Key 1. a. 3 rectangles shaded and labeled b. 6 sq cm, 10 sq cm, 12 sq cm c. Answers will vary. 2. a. 4, 2 units, 7 units, 14 sq units; 3 units, 6 units, 18 sq units; 4 units, 5 units, 20 sq units b. Explanations will vary. 3. Answers will vary.
Homework Sample
Pag
e36
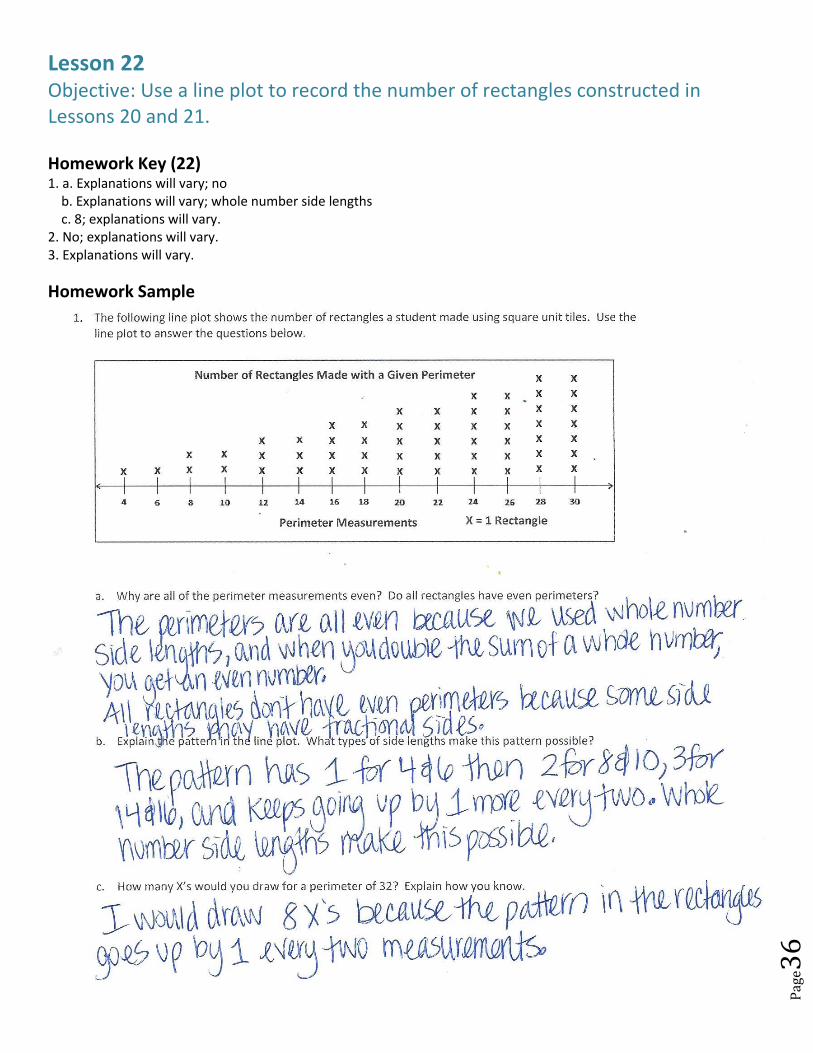
Lesson 22 Objective: Use a line plot to record the number of rectangles constructed in Lessons 20 and 21. Homework Key (22) 1. a. Explanations will vary; no b. Explanations will vary; whole number side lengths c. 8; explanations will vary. 2. No; explanations will vary. 3. Explanations will vary.
Homework Sample

Pag
e37
Grade 3 Module 7 Topic E
Problem Solving with Perimeter and Area Focus Standards:
3.MD.8 Solve real world and mathematical problems involving perimeters of polygons, including finding the perimeter given the side lengths, finding an unknown side length, and exhibiting rectangles with the same perimeter and different areas or with the same area and different perimeters.
3.G.1 Understand that shapes in different categories (e.g., rhombuses, rectangles, and others) may share attributes (e.g., having four sides), and that the shared attributes can define a larger category (e.g., quadrilaterals). Recognize rhombuses, rectangles, and squares as examples of quadrilaterals, and draw examples of quadrilaterals that do not belong to any of these subcategories.
Instructional Days Recommended: 8
In Topic E, students solve problems with perimeter and area. Lesson 23 focuses on solving a variety of word problems involving perimeter. This provides students an opportunity to use multiplication and division strategies to solve problems about perimeter. Students use rectangles and circles to create robots and environments for the robots using specified perimeter measurements in Lessons 24 through 27. They reason about the different whole number side lengths that may be produced for a given perimeter. For example, when given the requirement that the perimeter of the arms of the robot must be 14 inches, students experiment and draw different possibilities for rectangles to determine which ones they prefer for the robot’s arms. Students cut out and assemble the parts of the robot from grid or construction paper and compare their robots with those of their peers. This comparison leads to a discussion about the different areas that are generated for their classmates’ robot bodies, despite the fact that they have the same given perimeter. The final lesson in this sequence provides an opportunity for peer review and critique. Students return to problem solving in Lessons 28 and 29, this time working with a variety of word problems involving both area and perimeter. For example, if students are given both the length and the width of a rectangular football field, they should be able to determine both the perimeter and the area of the field. In these lessons, students explore and develop strategies for solving a sequence of increasingly complex problems. In Lesson 30, students further develop analyzing and critiquing skills. They initially discuss anonymous student work samples before sharing their own work and receiving feedback in small groups.
*The sample homework responses contained in this manual are intended to provide insight into the skills expected of students and instructional strategies used in Eureka Math.
Pag
e38
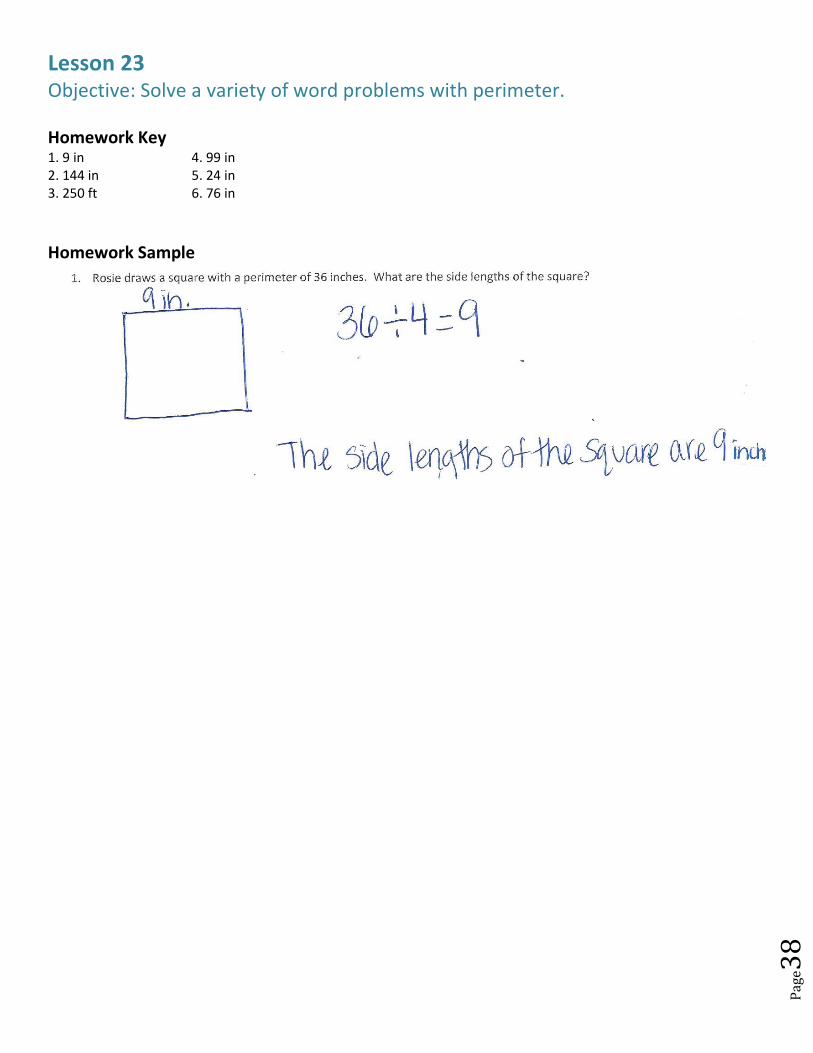
Lesson 23 Objective: Solve a variety of word problems with perimeter. Homework Key 1. 9 in 4. 99 in 2. 144 in 5. 24 in 3. 250 ft 6. 76 in
Homework Sample
Pag
e39
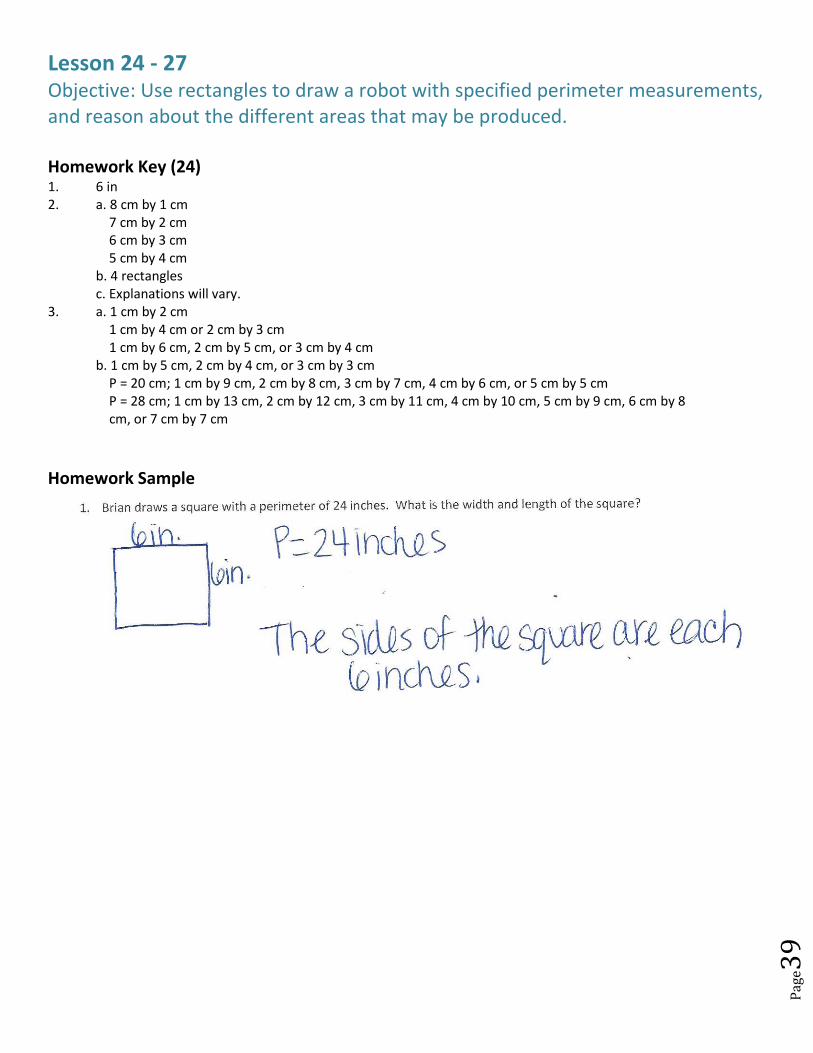
Lesson 24 - 27 Objective: Use rectangles to draw a robot with specified perimeter measurements, and reason about the different areas that may be produced. Homework Key (24) 1. 6 in 2. a. 8 cm by 1 cm
7 cm by 2 cm 6 cm by 3 cm 5 cm by 4 cm b. 4 rectangles c. Explanations will vary.
3. a. 1 cm by 2 cm 1 cm by 4 cm or 2 cm by 3 cm 1 cm by 6 cm, 2 cm by 5 cm, or 3 cm by 4 cm b. 1 cm by 5 cm, 2 cm by 4 cm, or 3 cm by 3 cm P = 20 cm; 1 cm by 9 cm, 2 cm by 8 cm, 3 cm by 7 cm, 4 cm by 6 cm, or 5 cm by 5 cm P = 28 cm; 1 cm by 13 cm, 2 cm by 12 cm, 3 cm by 11 cm, 4 cm by 10 cm, 5 cm by 9 cm, 6 cm by 8 cm, or 7 cm by 7 cm
Homework Sample
Pag
e40
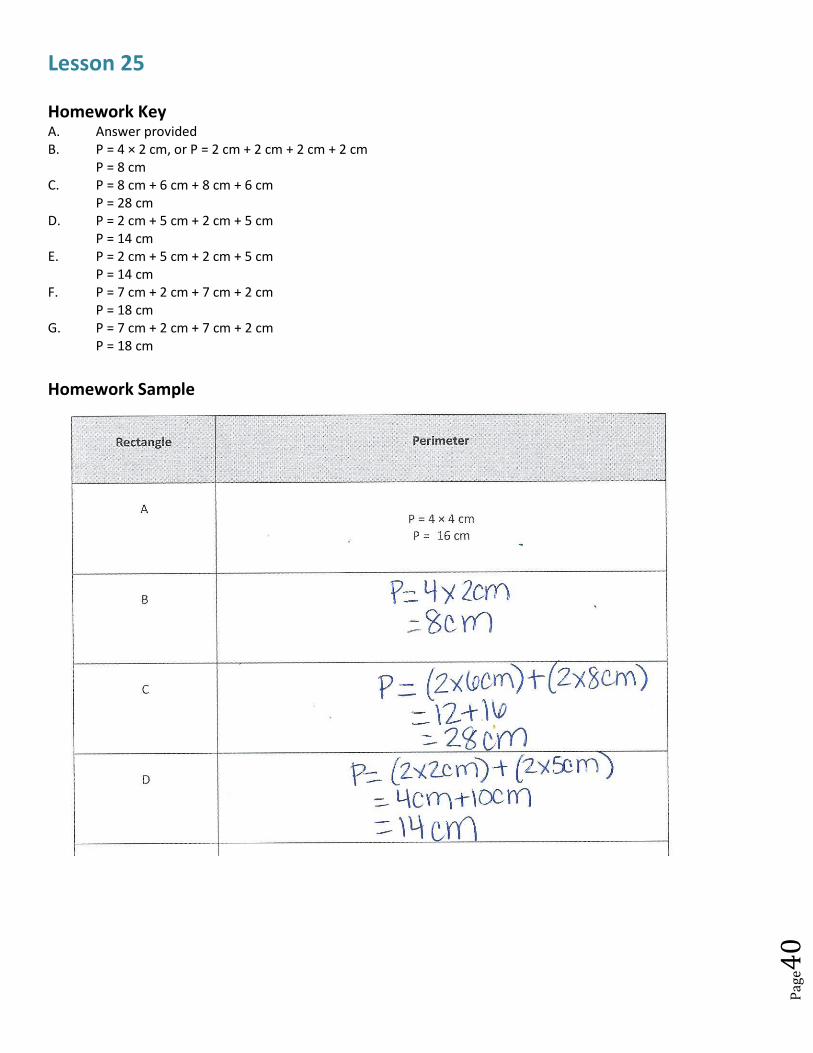
Lesson 25 Homework Key A. Answer provided B. P = 4 × 2 cm, or P = 2 cm + 2 cm + 2 cm + 2 cm
P = 8 cm C. P = 8 cm + 6 cm + 8 cm + 6 cm
P = 28 cm D. P = 2 cm + 5 cm + 2 cm + 5 cm
P = 14 cm E. P = 2 cm + 5 cm + 2 cm + 5 cm
P = 14 cm F. P = 7 cm + 2 cm + 7 cm + 2 cm
P = 18 cm G. P = 7 cm + 2 cm + 7 cm + 2 cm
P = 18 cm
Homework Sample
Pag
e41
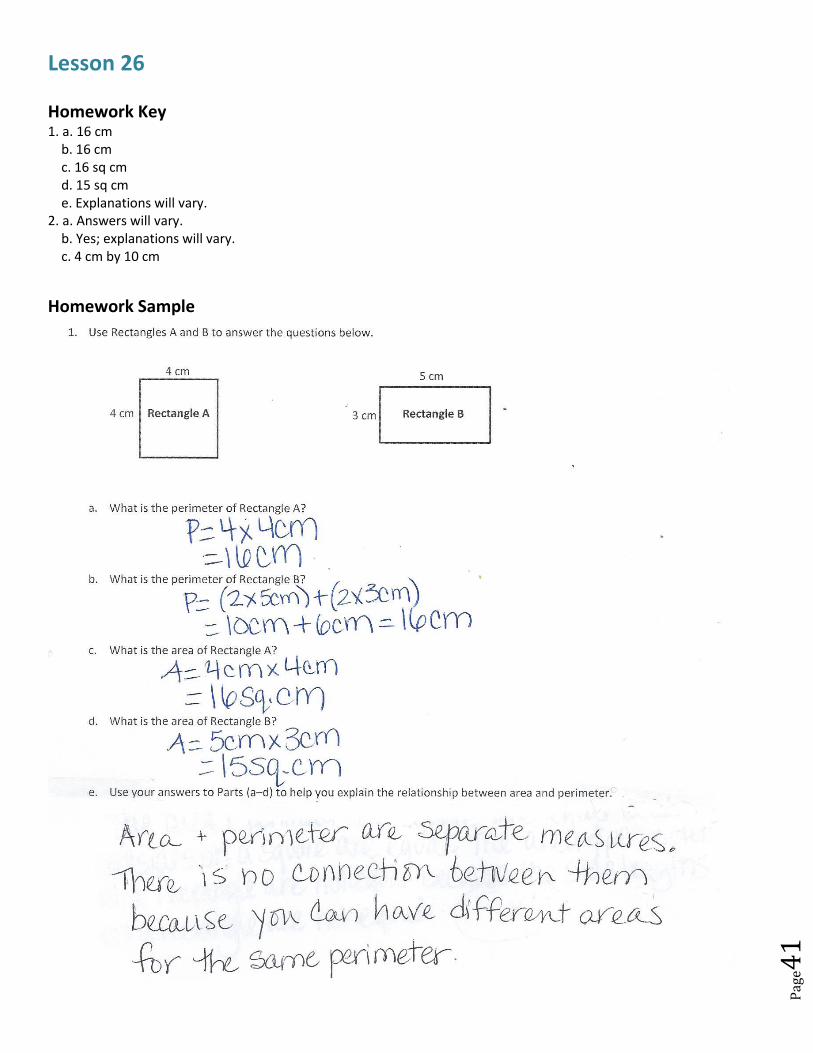
Lesson 26 Homework Key 1. a. 16 cm b. 16 cm c. 16 sq cm d. 15 sq cm e. Explanations will vary. 2. a. Answers will vary. b. Yes; explanations will vary. c. 4 cm by 10 cm
Homework Sample
Pag
e42
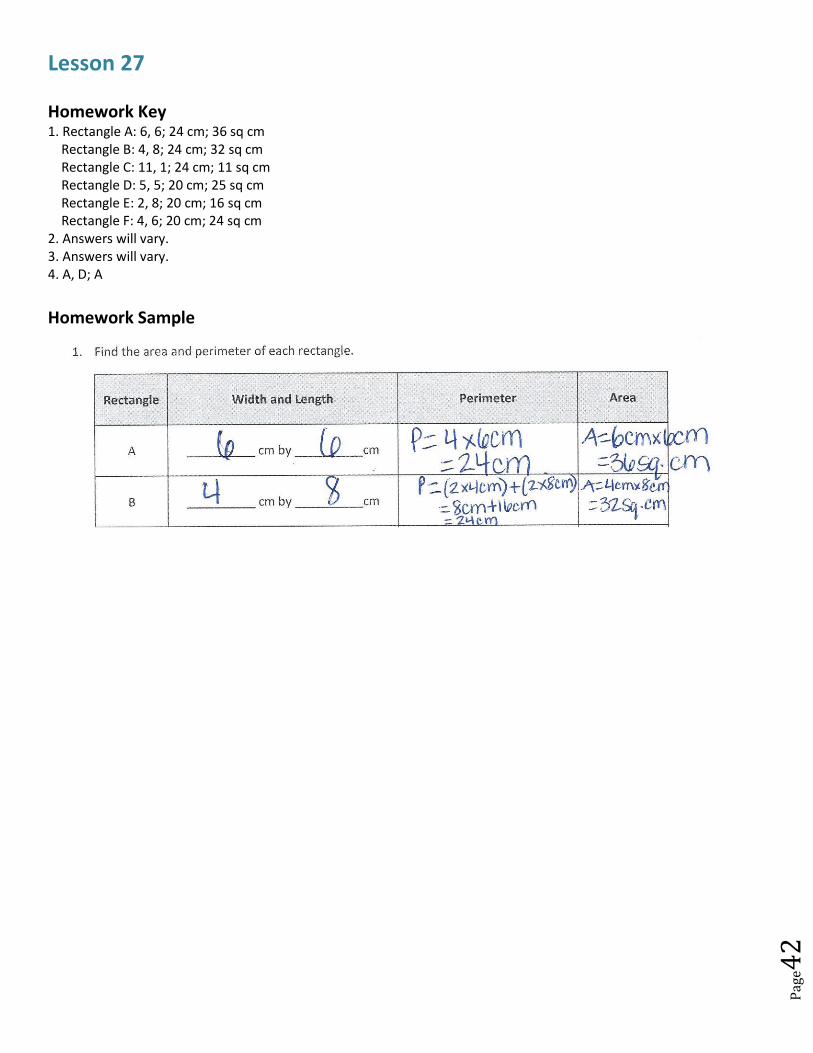
Lesson 27 Homework Key 1. Rectangle A: 6, 6; 24 cm; 36 sq cm Rectangle B: 4, 8; 24 cm; 32 sq cm Rectangle C: 11, 1; 24 cm; 11 sq cm Rectangle D: 5, 5; 20 cm; 25 sq cm Rectangle E: 2, 8; 20 cm; 16 sq cm Rectangle F: 4, 6; 20 cm; 24 sq cm 2. Answers will vary. 3. Answers will vary. 4. A, D; A
Homework Sample
Pag
e43
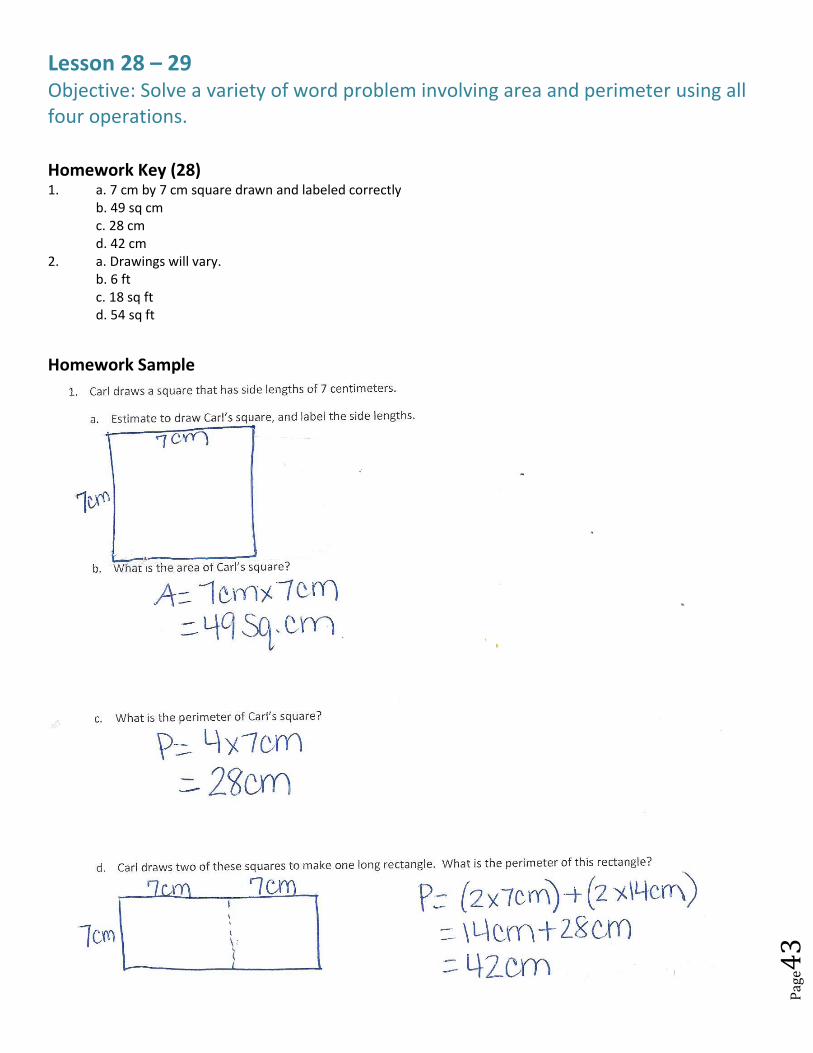
Lesson 28 – 29 Objective: Solve a variety of word problem involving area and perimeter using all four operations. Homework Key (28) 1. a. 7 cm by 7 cm square drawn and labeled correctly
b. 49 sq cm c. 28 cm d. 42 cm
2. a. Drawings will vary. b. 6 ft c. 18 sq ft d. 54 sq ft
Homework Sample
Pag
e44
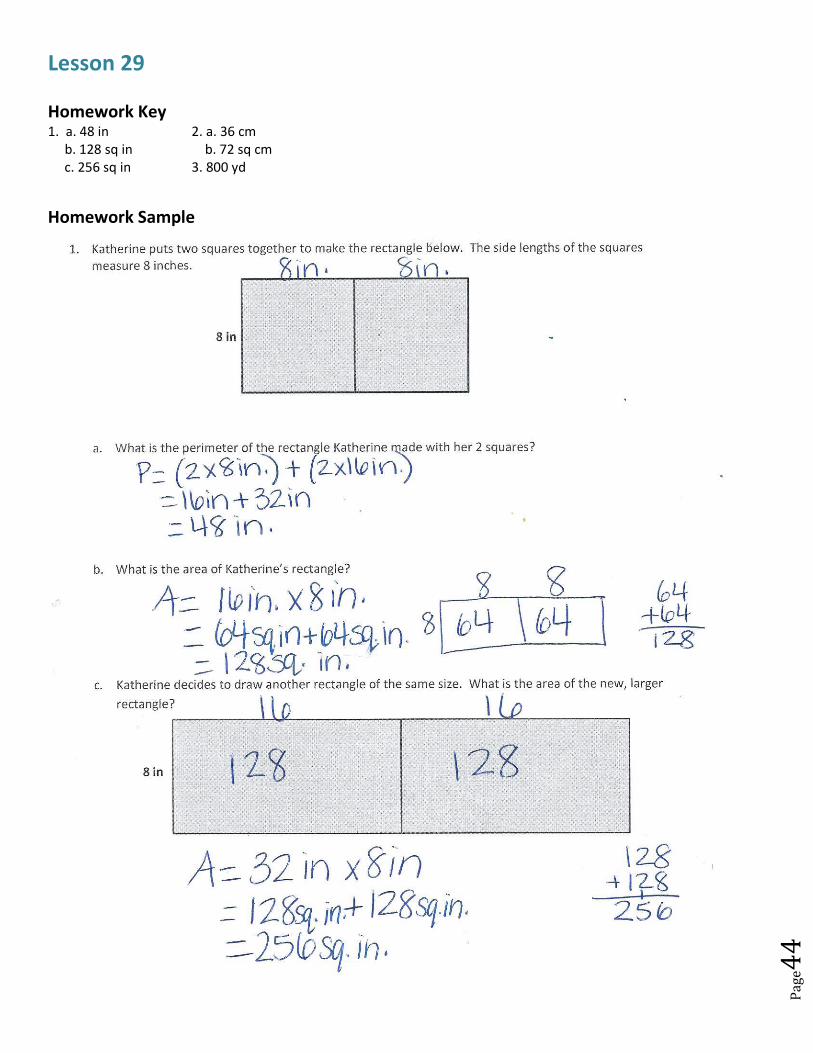
Lesson 29 Homework Key 1. a. 48 in 2. a. 36 cm b. 128 sq in b. 72 sq cm c. 256 sq in 3. 800 yd
Homework Sample
Pag
e45
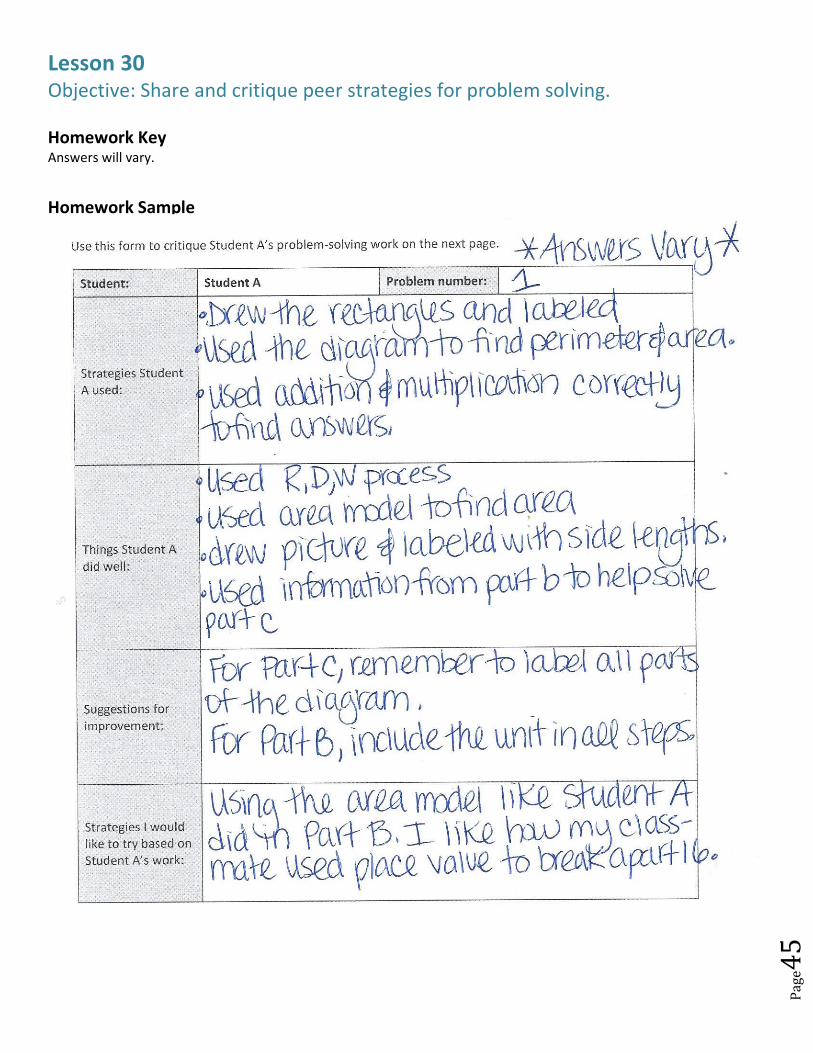
Lesson 30 Objective: Share and critique peer strategies for problem solving. Homework Key Answers will vary.
Homework Sample
Pag
e46
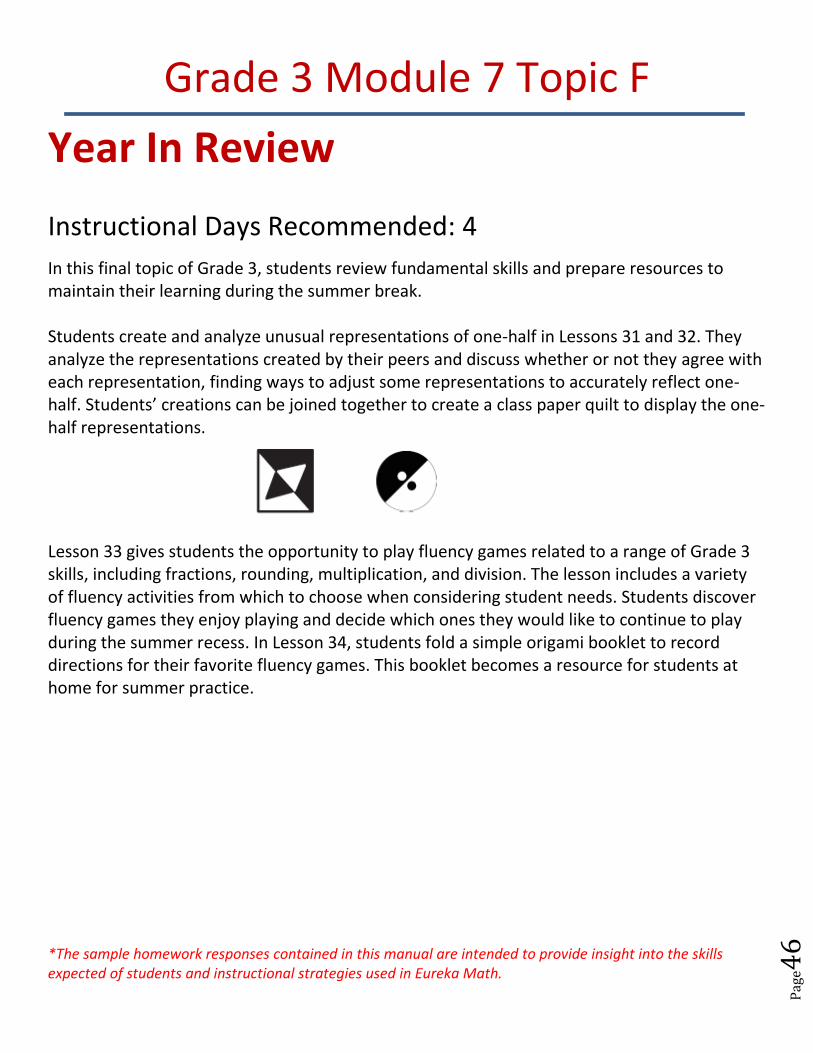
Grade 3 Module 7 Topic F
Year In Review
Instructional Days Recommended: 4
In this final topic of Grade 3, students review fundamental skills and prepare resources to maintain their learning during the summer break. Students create and analyze unusual representations of one-half in Lessons 31 and 32. They analyze the representations created by their peers and discuss whether or not they agree with each representation, finding ways to adjust some representations to accurately reflect one-half. Students’ creations can be joined together to create a class paper quilt to display the one-half representations.
Lesson 33 gives students the opportunity to play fluency games related to a range of Grade 3 skills, including fractions, rounding, multiplication, and division. The lesson includes a variety of fluency activities from which to choose when considering student needs. Students discover fluency games they enjoy playing and decide which ones they would like to continue to play during the summer recess. In Lesson 34, students fold a simple origami booklet to record directions for their favorite fluency games. This booklet becomes a resource for students at home for summer practice.
*The sample homework responses contained in this manual are intended to provide insight into the skills expected of students and instructional strategies used in Eureka Math.
Pag
e47
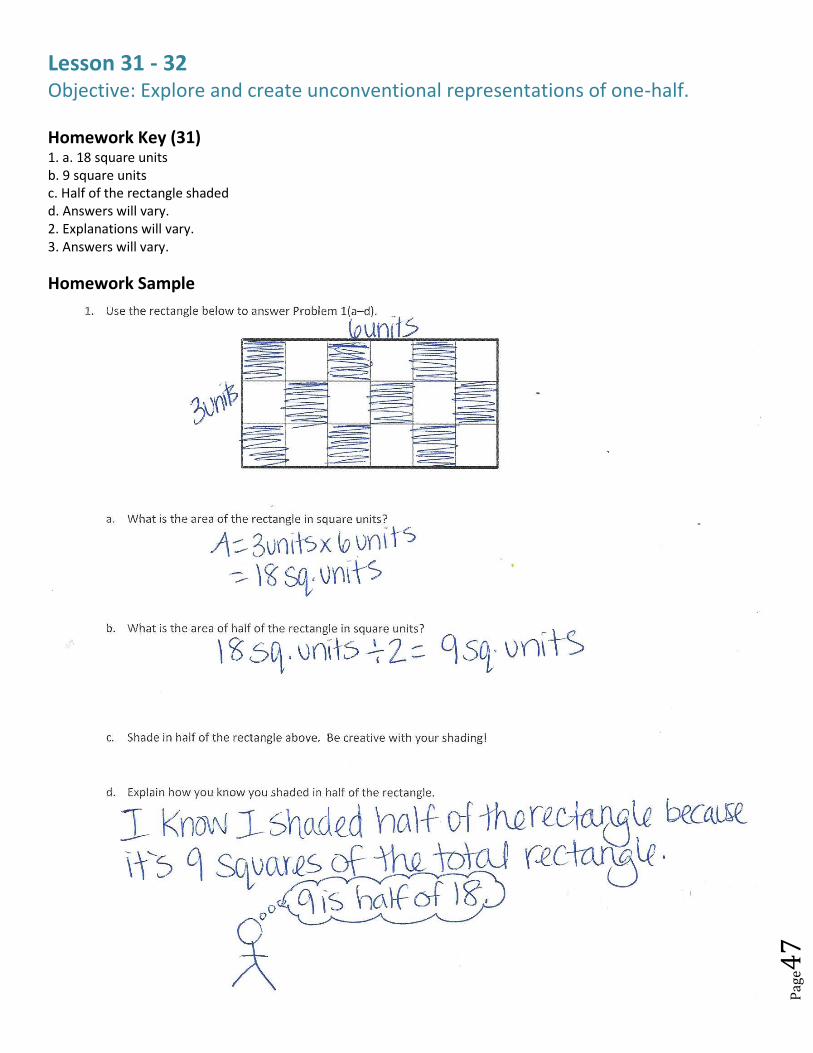
Lesson 31 - 32 Objective: Explore and create unconventional representations of one-half. Homework Key (31) 1. a. 18 square units b. 9 square units c. Half of the rectangle shaded d. Answers will vary. 2. Explanations will vary. 3. Answers will vary.
Homework Sample
Pag
e48
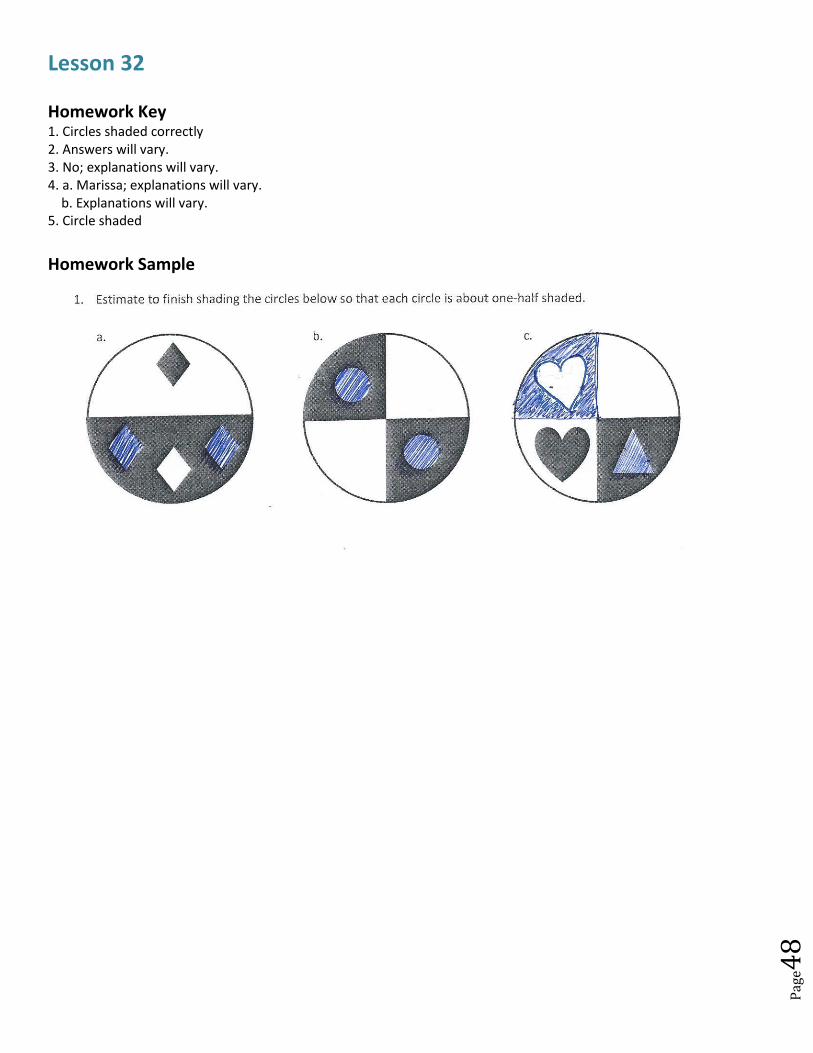
Lesson 32 Homework Key 1. Circles shaded correctly 2. Answers will vary. 3. No; explanations will vary. 4. a. Marissa; explanations will vary. b. Explanations will vary. 5. Circle shaded
Homework Sample
Pag
e49
Lesson 33 Objective: Solidify fluency with Grade 3 skills. Homework Key Answers will vary.
Homework Sample Answers will vary for each family.
Pag
e50
Lesson 34 Objective: Create resource booklets to support fluency with Grade 3 skills. No Homework Key
Calendar has been provided for summer math review