Embed Size (px)
Citation preview

GP Reports Viewer Dynamics GP Reporting Made Easy
GP REPORTS VIEWER USER GUIDE
For
Dynamics GP Version 2018 (Build 1) Dynamics GP Version 2016 (Build 6) Dynamics GP Version 2015 (Build 11) Dynamics GP Version 2013 (Build 20) Dynamics GP Version 2010 (Build 65)
Last updated Janaury 15, 2018
2
Flex
ible
Sol
utio
ns, I
nc. –
GP
Rep
orts
Vie
wer
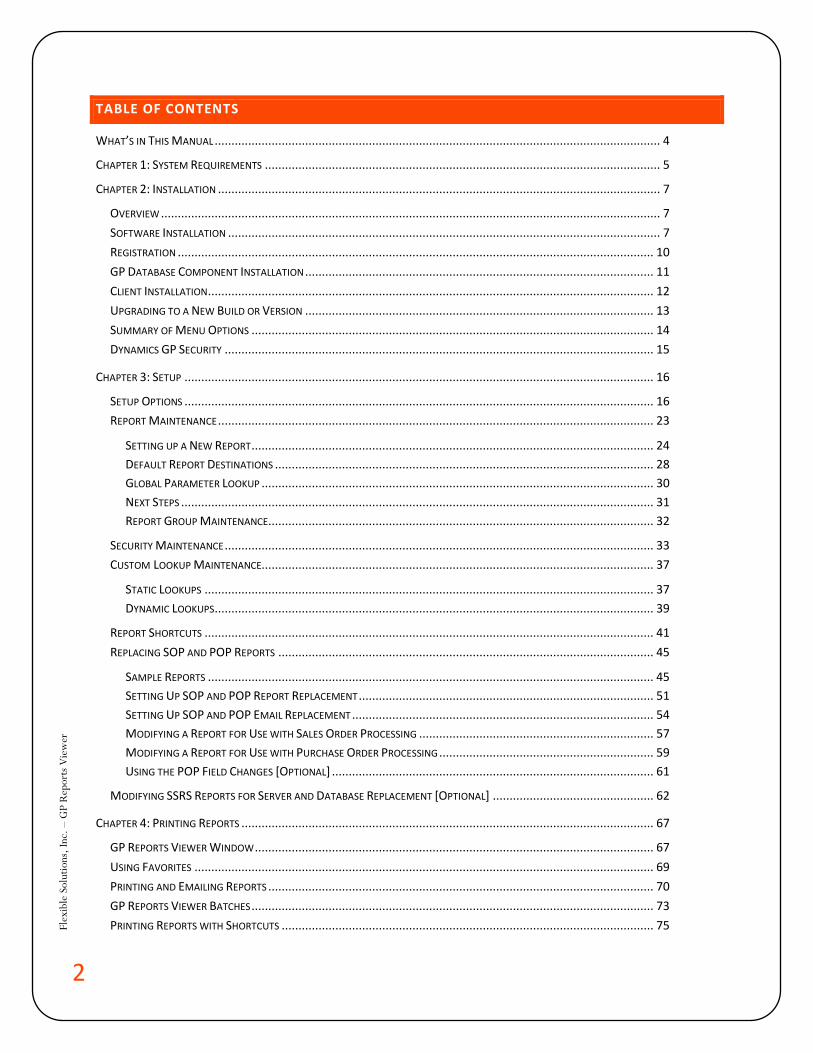
TABLE OF CONTENTS
WHAT’S IN THIS MANUAL ..................................................................................................................................... 4
CHAPTER 1: SYSTEM REQUIREMENTS ...................................................................................................................... 5
CHAPTER 2: INSTALLATION .................................................................................................................................... 7
OVERVIEW ..................................................................................................................................................... 7 SOFTWARE INSTALLATION ................................................................................................................................. 7 REGISTRATION .............................................................................................................................................. 10 GP DATABASE COMPONENT INSTALLATION ........................................................................................................ 11 CLIENT INSTALLATION ..................................................................................................................................... 12 UPGRADING TO A NEW BUILD OR VERSION ........................................................................................................ 13 SUMMARY OF MENU OPTIONS ........................................................................................................................ 14 DYNAMICS GP SECURITY ................................................................................................................................ 15
CHAPTER 3: SETUP ............................................................................................................................................ 16
SETUP OPTIONS ............................................................................................................................................ 16 REPORT MAINTENANCE .................................................................................................................................. 23
SETTING UP A NEW REPORT ........................................................................................................................ 24 DEFAULT REPORT DESTINATIONS ................................................................................................................. 28 GLOBAL PARAMETER LOOKUP ..................................................................................................................... 30 NEXT STEPS ............................................................................................................................................. 31 REPORT GROUP MAINTENANCE ................................................................................................................... 32
SECURITY MAINTENANCE ................................................................................................................................ 33 CUSTOM LOOKUP MAINTENANCE..................................................................................................................... 37
STATIC LOOKUPS ...................................................................................................................................... 37 DYNAMIC LOOKUPS ................................................................................................................................... 39
REPORT SHORTCUTS ...................................................................................................................................... 41 REPLACING SOP AND POP REPORTS ................................................................................................................ 45
SAMPLE REPORTS ..................................................................................................................................... 45 SETTING UP SOP AND POP REPORT REPLACEMENT ........................................................................................ 51 SETTING UP SOP AND POP EMAIL REPLACEMENT .......................................................................................... 54 MODIFYING A REPORT FOR USE WITH SALES ORDER PROCESSING ...................................................................... 57 MODIFYING A REPORT FOR USE WITH PURCHASE ORDER PROCESSING ................................................................ 59 USING THE POP FIELD CHANGES [OPTIONAL] ................................................................................................ 61
MODIFYING SSRS REPORTS FOR SERVER AND DATABASE REPLACEMENT [OPTIONAL] ................................................ 62
CHAPTER 4: PRINTING REPORTS ........................................................................................................................... 67
GP REPORTS VIEWER WINDOW ....................................................................................................................... 67 USING FAVORITES ......................................................................................................................................... 69 PRINTING AND EMAILING REPORTS ................................................................................................................... 70 GP REPORTS VIEWER BATCHES ........................................................................................................................ 73 PRINTING REPORTS WITH SHORTCUTS ............................................................................................................... 75
3
Flex
ible
Sol
utio
ns, I
nc. –
GP
Rep
orts
Vie
wer
PRINTING OR EMAILING REPORTS FROM SALES ORDER PROCESSING ........................................................................ 76 PRINTING REPORTS FROM PURCHASE ORDER PROCESSING .................................................................................... 78
CHAPTER 5: CUSTOMER STATEMENTS ................................................................................................................... 80
SAMPLE REPORT ........................................................................................................................................... 80 MODIFYING A REPORT FOR USE WITH CUSTOMER STATEMENTS ............................................................................. 82 PRINTING CUSTOMER STATEMENTS .................................................................................................................. 83
CHAPTER 6: EXCEL REPORTS ................................................................................................................................ 87
SAMPLE REPORTS .......................................................................................................................................... 87 SETTING UP REPORTS IN EXCEL FOR USE WITH GP REPORTS VIEWER ...................................................................... 90
USING A SQL SERVER TABLE OR VIEW .......................................................................................................... 90 USING A SQL SERVER STORED PROCEDURE ................................................................................................... 93
CHAPTER 7: MASS EMAIL .................................................................................................................................... 97
SETTING UP MASS EMAIL OPTIONS FOR A REPORT ............................................................................................... 97 CREATING SQL OBJECTS FOR MASS EMAIL ......................................................................................................... 99 EMAILING REPORTS USING THE MASS EMAIL FEATURE ......................................................................................... 99
CHAPTER 8: COLLECTIONS MANAGEMENT ............................................................................................................ 102
SAMPLE REPORTS PROVIDED FOR USE WITH COLLECTIONS MANAGEMENT ............................................................. 102 CONFIGURING REPORTS FOR RM AND SOP REPLACEMENT ................................................................................. 102 EMAILING DOCUMENTS FROM COLLECTIONS MANAGEMENT ............................................................................... 104
CHAPTER 9: TROUBLESHOOTING AND REPORT CREATION TIPS .................................................................................. 105
GP REPORTS VIEWER TROUBLESHOOTING TIPS ................................................................................................. 105 CRYSTAL REPORTS TIPS ................................................................................................................................. 106
CHAPTER 10: SUPPORT RESOURCES .................................................................................................................... 108
BEFORE CALLING FOR SUPPORT ...................................................................................................................... 108 FREQUENTLY ASKED QUESTIONS .................................................................................................................... 108 SUPPORT CONTACT INFORMATION ................................................................................................................. 109
4
Flex
ible
Sol
utio
ns, I
nc. –
GP
Rep
orts
Vie
wer
WHAT’S IN THIS MANUAL
This manual provides guidelines for installing and setting up GP Reports Viewer. It lists the latest system requirements, contains a step-by-step guide through the installation and setup process, and describes report printing procedures. Please note that this manual covers Microsoft Dynamics GP versions 2010, 2013, 2015, 2016 and 2018.
The manual is divided into the following parts:
• Chapter 1: System Requirements, contains a list of the supported client and server operating systems as well as additional notes for installation.
• Chapter 2: Installation, describes how to register, install and upgrade GP Reports Viewer and describes Dynamics GP security for GP Reports Viewer windows.
• Chapter 3: Setup, describes how to configure additional components such as setting up reports, assigning GP Reports Viewer security, creating lookups, setting up SOP and POP report replacement and assigning report shortcuts.
• Chapter 4: Printing Reports, provides information on printing reports and batches, managing favorites and using report shortcuts. This chapter also includes emailing reports.
• Chapter 5: Customer Statements, describes how to set up and use the Customer Statement feature of GP Reports Viewer.
• Chapter 6: Excel Reports, goes over how to create Excel report for use with GP Reports Viewer.
• Chapter 7: Mass Email, available for GP 2013 and higher, goes over how to set up mass emailing of reports using GP Reports Viewer.
• Chapter 8: Collections Management, available for GP 2013 and higher, describes how to integrate reports with the Collections Management module using GP Reports Viewer.
• Chapter 9: Troubleshooting and Report Creation Tips, provides information on determining a resolution to possible issues prior to contacting Technical Support as well as tips on creating reports.
• Chapter 10: Support Resources, provides information on how to obtain Technical Support, as well as answers to frequently asked questions.
5
Flex
ible
Sol
utio
ns, I
nc. –
GP
Rep
orts
Vie
wer
CHAPTER 1: SYSTEM REQUIREMENTS
Client System Requirements:
Microsoft Windows 10 Professional or Enterprise Microsoft Windows 8 or 8.1 Professional, Enterprise or Ultimate Microsoft Windows 7 Professional, Enterprise or Ultimate Microsoft Windows Vista Business, Ultimate or Enterprise Editions Microsoft .NET Framework 4.5 or later
Microsoft Dynamics GP Versions Supported:
Microsoft Dynamics GP 2018 – RTM Microsoft Dynamics GP 2016 – any service pack level including R2 Microsoft Dynamics GP 2015 R2 – requires GP Reports Viewer for Dynamics GP 2015 build 3 or higher Microsoft Dynamics GP 2015 – RTM Microsoft Dynamics GP 2013 – any service pack level including R2 Microsoft Dynamics GP 2010 R2 – requires GP Reports Viewer for Dynamics GP 2010 build 55 or higher Microsoft Dynamics GP 2010 – any service pack level
SQL Server Requirements*:
Microsoft SQL Server 2016 Microsoft SQL Server 2014 Microsoft SQL Server 2012 Microsoft SQL Server 2008 R2 Microsoft SQL Server 2008 Microsoft SQL Server 2005 with SP 2 or later
*At this time SQL Server Reporting Services is only supported with GP Reports Viewer when configured in Native Mode. SharePoint Integrated Mode is not supported.
Windows Server Requirements**:
Microsoft Windows Server 2016 Microsoft Windows Server 2012 or 2012 R2 Microsoft Windows Server 2008 R2 Microsoft Windows Server 2008 – SP 1 or later Microsoft Windows Server 2003 or 2003 R2 – SP 2 or later
Microsoft Windows Small Business Server 2011 Standard Edition with Premium Add-on Microsoft Windows Small Business Server 2008 Premium Edition Microsoft Windows Essential Business Server 2008 Premium Edition Microsoft Windows Small Business Server 2003 or R2 – SP 2 or later
**GP Reports Viewer is supported on any Windows Server edition and service pack level that is supported by Microsoft Dynamics GP.
6
Flex
ible
Sol
utio
ns, I
nc. –
GP
Rep
orts
Vie
wer
Additional Notes:
1. GP Reports Viewer is currently only supported on the Desktop Client of Dynamics GP. It is not available for the Web Client.
2. GP Reports Viewer is supported on both 32-bit and 64-bit systems.
3. IMPORTANT: We strongly recommend performing the installation of GP Reports Viewer as the local administrator (built-in account for administering the computer/domain). This will ensure that you have the proper permissions to install and register all files that are required for GP Reports Viewer. Once installed, we recommend that users running Dynamics GP and GP Reports Viewer be members of the Standard User’s group (typically referred to as Power Users in Windows XP or Users in Windows Vista and later versions of Windows).
4. We are always testing new versions and service packs of both Windows and SQL Server. If your Operating System or SQL Server version is not listed, please email [email protected] to ask if we have tested GP Reports Viewer with your specific configuration.
5. At least one printer must be set up on any computer running GP Reports Viewer. This does not have to be a physical printer.
6. Crystal Reports versions 9, 10, XI, XI R2, 2008, 2011, 2013 and 2016 have been tested and are supported with GP Reports Viewer. It is likely that reports created with older Crystal Reports versions will also work with GP Reports Viewer, however this has not been tested. You can use any combination of Crystal Reports versions together at the same time when using GP Reports Viewer.
7. If you will be using GP Reports Viewer to email reports from Dynamics GP 2010, please note that Microsoft currently only supports 32-bit versions of Office for email functionality in GP 2010. The Operating System can still be 64-bit, but Office needs to be 32-bit.
8. Emailing from Dynamics GP 2013, GP 2015, GP 2016 and GP 2018 using GP Reports Viewer has been tested successfully using the MAPI and Exchange Server Type.
9. Microsoft Excel 2010, 2013 and 2016 have been tested and are supported with the Excel reports feature of GP Reports Viewer. It is likely that older versions of Excel may work with GP Reports Viewer, however, they have not been thoroughly tested. Microsoft Excel must be installed locally on the computer where Excel reports are being generated using GP Reports Viewer.
10. The Mass Email features in GP Reports Viewer are available only for Dynamics GP 2013 and higher.
11. GP Reports Viewer supports only one installation per computer.
7
Flex
ible
Sol
utio
ns, I
nc. –
GP
Rep
orts
Vie
wer
CHAPTER 2: INSTALLATION
This chapter contains the following sections:
• Overview • Software Installation • Registration • GP Database Component Installation • Client Installation • Upgrading to a New Build or Version • Summary of Menu Options • Dynamics GP Security
OVERVIEW
GP Reports Viewer is an add-in product for Microsoft Dynamics GP. It is used to set up, secure, print and email Excel, Crystal Reports and Microsoft SQL Reporting Services Reports inside of Dynamics GP. This manual applies to Microsoft Dynamics GP versions 2010, 2013, 2015, 2016 and 2018.
SOFTWARE INSTALLATION
GP Reports Viewer can be installed on any computer that has a working Dynamics GP installation.
TIP You do not need to install GP Reports Viewer application on the GP SQL
Server. You can do so if you have Dynamics GP installed there, however it
is not required. All of the installation, registration and setup tasks for GP
Reports Viewer can be performed from any computer that has Dynamics
GP and GP Reports Viewer installed.
We recommend performing the installation of GP Reports Viewer while logged into Windows as the local built-in administrator (built-in account for administering the computer/domain). This will ensure that you have the proper permissions to install and register all the components that are required for GP Reports Viewer. We also recommend running Dynamics GP and printing a report using GP Reports Viewer while still logged in as the local built-in administrator after the installation.
To install GP Reports Viewer:
1. Make a backup of your DYNAMICS database and all your company databases.
2. Ensure that you have the GP Reports Viewer installation file that matches your version of Dynamics GP. You must run the appropriate version of GP Reports Viewer for the version of Dynamics GP you are using.
3. Run the gprvXXbYY.exe file to begin the installation. (XX is the GP version and YY the build number.)
8
Flex
ible
Sol
utio
ns, I
nc. –
GP
Rep
orts
Vie
wer
4. Follow the steps on the installation wizard. Please note: GP Reports Viewer must be installed to the same directory as your Dynamics GP. The installation will attempt to find the correct folder, but if you have multiple instances of Dynamics GP installed, you may need to manually select the proper directory.
5. Launch Dynamics GP. You will receive the following message: “New code must be included in the Dynamics.set dictionary. Do you wish to include new code now?” Click Yes.
TIP If you are not logged into Windows as the local built-in administrator, you may need to right click on the GP shortcut and choose Run as administrator for the new code to be added correctly to the GP installation.
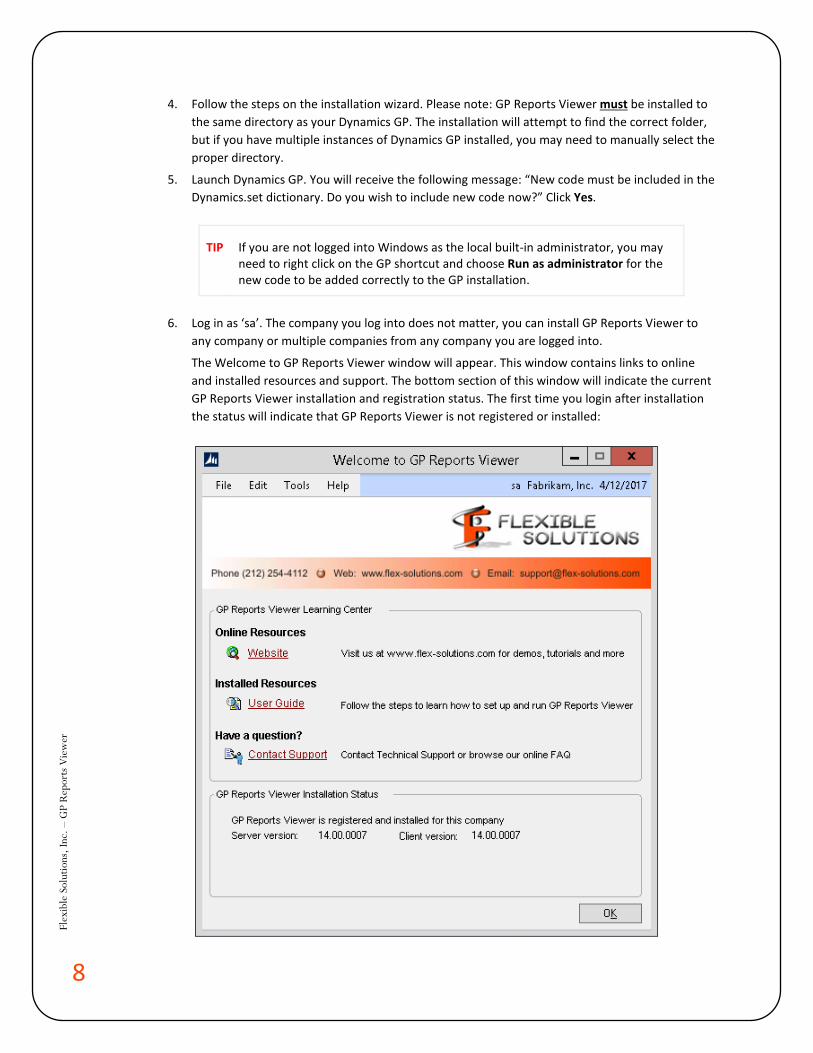
6. Log in as ‘sa’. The company you log into does not matter, you can install GP Reports Viewer to any company or multiple companies from any company you are logged into.
The Welcome to GP Reports Viewer window will appear. This window contains links to online and installed resources and support. The bottom section of this window will indicate the current GP Reports Viewer installation and registration status. The first time you login after installation the status will indicate that GP Reports Viewer is not registered or installed:

9
Flex
ible
Sol
utio
ns, I
nc. –
GP
Rep
orts
Vie
wer
7. Click the Register/Install button on the Welcome window and both the Registration and Installation windows will open.
TIP This window will pop up each time you log into a GP company where GP Reports Viewer is either not registered, not installed, or both. If you do not want this message to appear again for certain companies, you can select the Don’t show this screen again for this Company checkbox at the bottom of this window.
You can open this window again from the following menu option:
GP >>Tools >> GP Reports Viewer >> About
10
Flex
ible
Sol
utio
ns, I
nc. –
GP
Rep
orts
Vie
wer
REGISTRATION
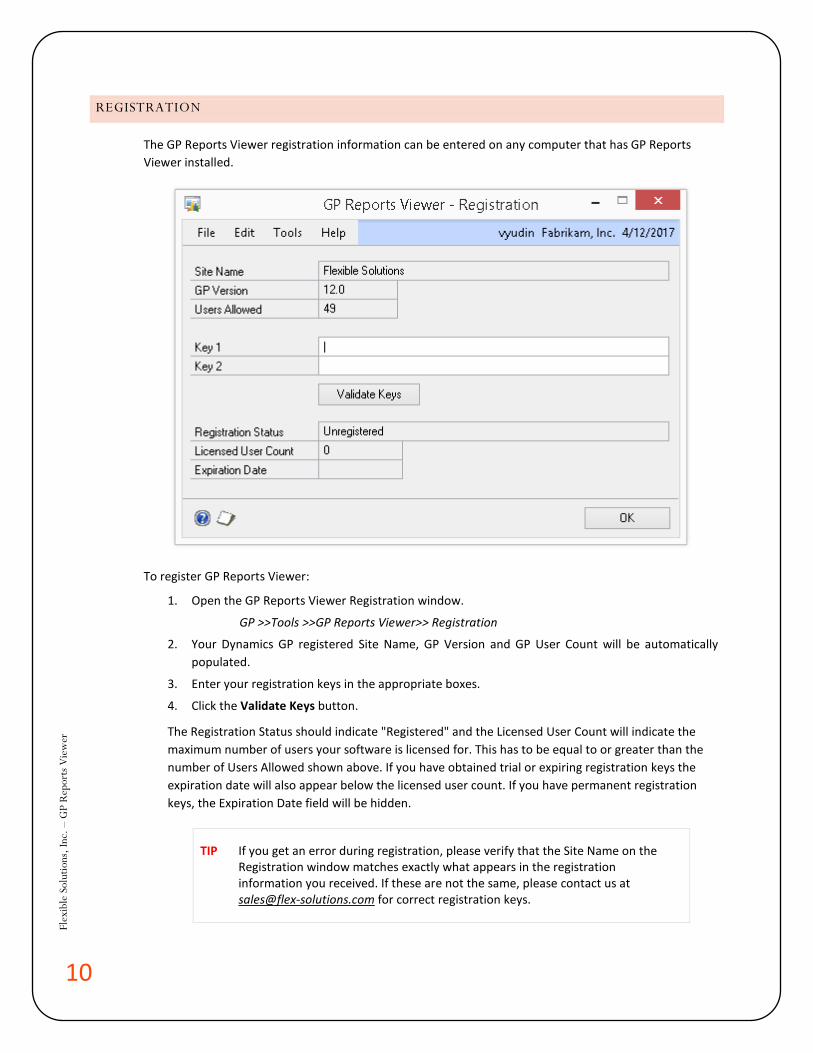
The GP Reports Viewer registration information can be entered on any computer that has GP Reports Viewer installed.
To register GP Reports Viewer:
1. Open the GP Reports Viewer Registration window.
GP >>Tools >>GP Reports Viewer>> Registration
2. Your Dynamics GP registered Site Name, GP Version and GP User Count will be automatically populated.
3. Enter your registration keys in the appropriate boxes.
4. Click the Validate Keys button.
The Registration Status should indicate "Registered" and the Licensed User Count will indicate the maximum number of users your software is licensed for. This has to be equal to or greater than the number of Users Allowed shown above. If you have obtained trial or expiring registration keys the expiration date will also appear below the licensed user count. If you have permanent registration keys, the Expiration Date field will be hidden.
TIP If you get an error during registration, please verify that the Site Name on the Registration window matches exactly what appears in the registration information you received. If these are not the same, please contact us at [email protected] for correct registration keys.
11
Flex
ible
Sol
utio
ns, I
nc. –
GP
Rep
orts
Vie
wer
GP DATABASE COMPONENT INSTALLATION
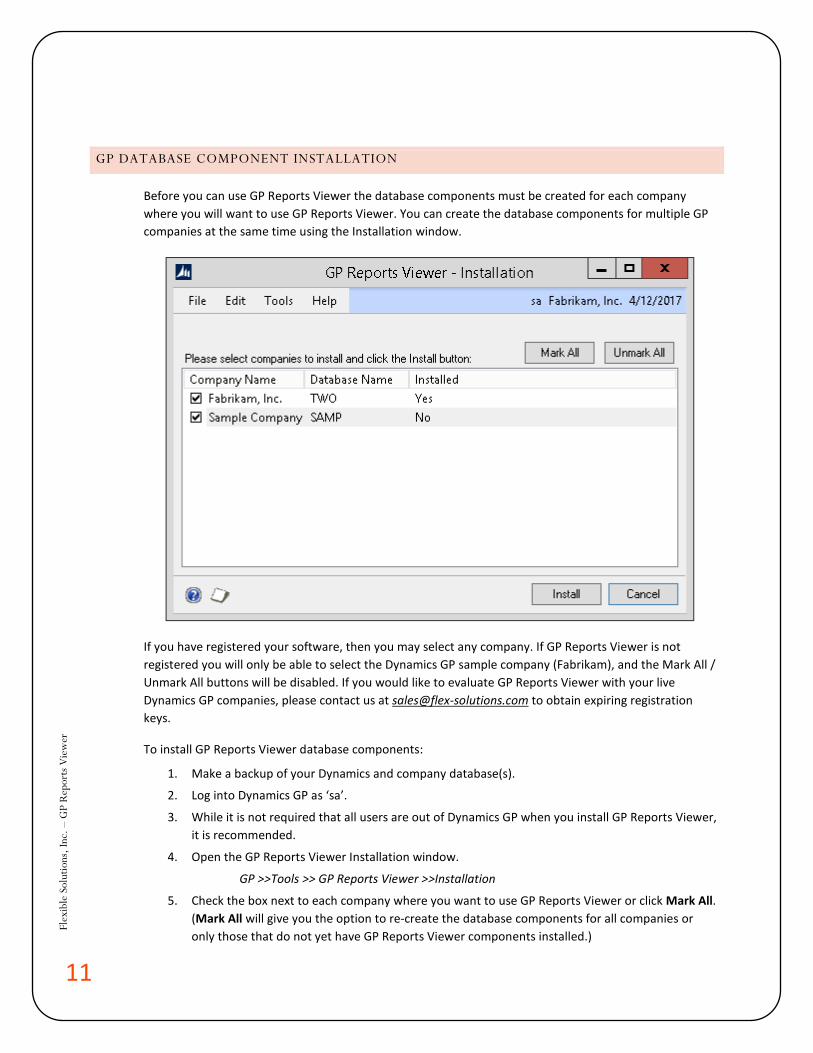
Before you can use GP Reports Viewer the database components must be created for each company where you will want to use GP Reports Viewer. You can create the database components for multiple GP companies at the same time using the Installation window.
If you have registered your software, then you may select any company. If GP Reports Viewer is not registered you will only be able to select the Dynamics GP sample company (Fabrikam), and the Mark All / Unmark All buttons will be disabled. If you would like to evaluate GP Reports Viewer with your live Dynamics GP companies, please contact us at [email protected] to obtain expiring registration keys.
To install GP Reports Viewer database components:
1. Make a backup of your Dynamics and company database(s).
2. Log into Dynamics GP as ‘sa’.
3. While it is not required that all users are out of Dynamics GP when you install GP Reports Viewer, it is recommended.
4. Open the GP Reports Viewer Installation window.
GP >>Tools >> GP Reports Viewer >>Installation
5. Check the box next to each company where you want to use GP Reports Viewer or click Mark All. (Mark All will give you the option to re-create the database components for all companies or only those that do not yet have GP Reports Viewer components installed.)
12
Flex
ible
Sol
utio
ns, I
nc. –
GP
Rep
orts
Vie
wer
6. Click the Install button.
7. Click Yes on the confirmation dialog asking if you would like to install to the selected companies.
Once the installation is completed you will see a message indicating that GP Reports Viewer server components have been installed.
CLIENT INSTALLATION
Once the database component installation of GP Reports Viewer is complete, you can install GP Reports Viewer on client workstations. We recommend performing the installation of GP Reports Viewer as the local administrator (built-in account for administering the computer/domain). This will ensure that you have the proper permissions to install and register all files and registry keys that are required for GP Reports Viewer. We also recommend running Dynamics GP and printing a report using GP Reports Viewer while still logged in as the local built-in administrator the first time after installation.
To install GP Reports Viewer on workstations:
1. Ensure that you have the GP Reports Viewer installation file that matches your version of Dynamics GP. You must run the appropriate version of GP Reports Viewer for the version of Dynamics GP you are using.
2. Run the gprvXXbYY.exe file to begin the installation. (XX is the GP version and YY the build number.)
3. Follow the steps on the installation wizard. Please note: GP Reports Viewer must be installed to the Dynamics GP directory.
4. Launch Dynamics GP and log in as any user. You will receive the message prompt “New code must be included in the Dynamics.set dictionary. Do you wish to include new code now?” Click Yes.
TIP If you are not logged into Windows as the local built-in administrator, you may need to right click on the GP shortcut and choose Run as administrator for the new code to be added correctly to the GP installation.
13
Flex
ible
Sol
utio
ns, I
nc. –
GP
Rep
orts
Vie
wer
UPGRADING TO A NEW BUILD OR VERSION
Upgrading to a new build or new version of GP Reports Viewer includes running the installation file for the new version on each computer where GP Reports Viewer is installed and performing a onetime upgrade of the database components.
All data stored in GP Reports Viewer tables will be preserved during an upgrade, however, backing up all Dynamics GP databases is recommended as a precaution prior to any upgrades. It is also recommended to perform all installations while logged in as the local administrator (built-in account for administering the computer/domain) on each computer.
To install a new build or upgrade versions of GP Reports Viewer:
1. Run the gprvXXbYY.exe file (XX is the GP version and YY the build number). It is important to make sure that the GP version of the installation file corresponds to your version of GP.
2. Follow the instructions on the screen. If you have more than one installation of Dynamics GP on this computer, please make sure that you select the path to the correct instance of GP.
3. Launch Dynamics GP.
4. You will receive the following message: “New code must be included in the Dynamics.set dictionary. Do you wish to include new code now?” Click Yes.
5. Upgrading the database objects only needs to be done once, typically on the first computer where you have installed the new build of version of GP Reports Viewer. To do this:
a. Log into Dynamics GP as ‘sa’. The company you log into does not matter.
b. Upon login you will see the Welcome to GP Reports Viewer window with a warning on the bottom that the server and client versions do not match. Click the Upgrade button to open the GP Reports Viewer Installation window.
c. Choose the companies you want to upgrade to the new build (or choose Mark All). You will get a message saying, “Some companies are already installed; do you want to install to All Companies or only those not already installed?” – choose All Companies.
d. Click Install, then click Yes on the “Install GP Reports Viewer to the selected Companies?” message.
e. You will see an Installation Progress bar and a message saying, “GP Reports Viewer has successfully installed to the selected companies.” when the installation is finished.
f. If you’d like to verify the installation, you can go to Tools >> GP Reports Viewer >>About. The server and client versions on the bottom of the Welcome to GP Reports Viewer window should now match.
TIP You can upgrade directly from any build of GP Reports Viewer to any newer build, you do not need to upgrade incrementally. If you are performing a Dynamics GP upgrade in multiple steps, you can wait until you get to the final desired Dynamics GP version and build before upgrading GP Reports Viewer.
14
Flex
ible
Sol
utio
ns, I
nc. –
GP
Rep
orts
Vie
wer
SUMMARY OF MENU OPTIONS
Click a link below to find more information about each menu option:
Navigation Path Short Description
Tools GP Reports Viewer
Setup Options
Reports
Security
Lookups
Shortcuts
Replace SOP / POP Reports
Assign company options for GP Reports Viewer
Set up your reports for use in GP
Assign report security to users
Create custom lookups for parameters
Link to reports from any window in GP
Replace SOP / POP reports with custom reports
Installation
Registration
Install database components on the server
Register GP Reports Viewer
About Installation status and links to resources
Reports GP Reports Viewer
Print Customer Statements
Run reports, assign favorites, create batches
Print and email customer statements
15
Flex
ible
Sol
utio
ns, I
nc. –
GP
Rep
orts
Vie
wer
DYNAMICS GP SECURITY
Three Security Tasks and Roles are created by GP Reports Viewer during installation: GPRV ADMIN, GPRV USER and GPRV STATEMENTS:
• The GPRV ADMIN role and task allow access to all windows in GP Reports Viewer. • The GPRV USER role and task allow access only to windows that are used to print and email
reports and create report batches. • The GPRV STATEMENTS role and task allow access only to the windows needed to print and
email customer statements.
The GPRV USER and GPRV STATEMENTS roles are separate so that you can more easily control what users have access to which functionality. For example, you might have 20 users who print reports and need the GPRV USER role, but only 3 of those users need to print or email customer statements.
For more information on what windows are accessible for each role and task, please view the details for these tasks in the Security Task Setup window (GP >>Tools >> Setup >> System >> Security Tasks).
TIP In a typical GP Reports Viewer installation there are one or two administrators who need access to all GP Reports Viewer windows (GPRV ADMIN role). Usually a GP Reports Viewer end user will only need access to be able to print reports and create batches, so the GPRV USER role can be used for most end users. Only users that need to print/email customer statements need the GPRV STATEMENTS role.
For information regarding controlling access to reports that are set up in GP Reports Viewer, please see the Security Maintenance section.
16
Flex
ible
Sol
utio
ns, I
nc. –
GP
Rep
orts
Vie
wer
CHAPTER 3: SETUP
This chapter contains the following sections:
• Setup Options • Report Maintenance • Security Maintenance • Custom Lookup Maintenance • Report Shortcuts • Replacing SOP and POP Reports • Modifying SSRS Reports for Server and Database Replacement (Optional)
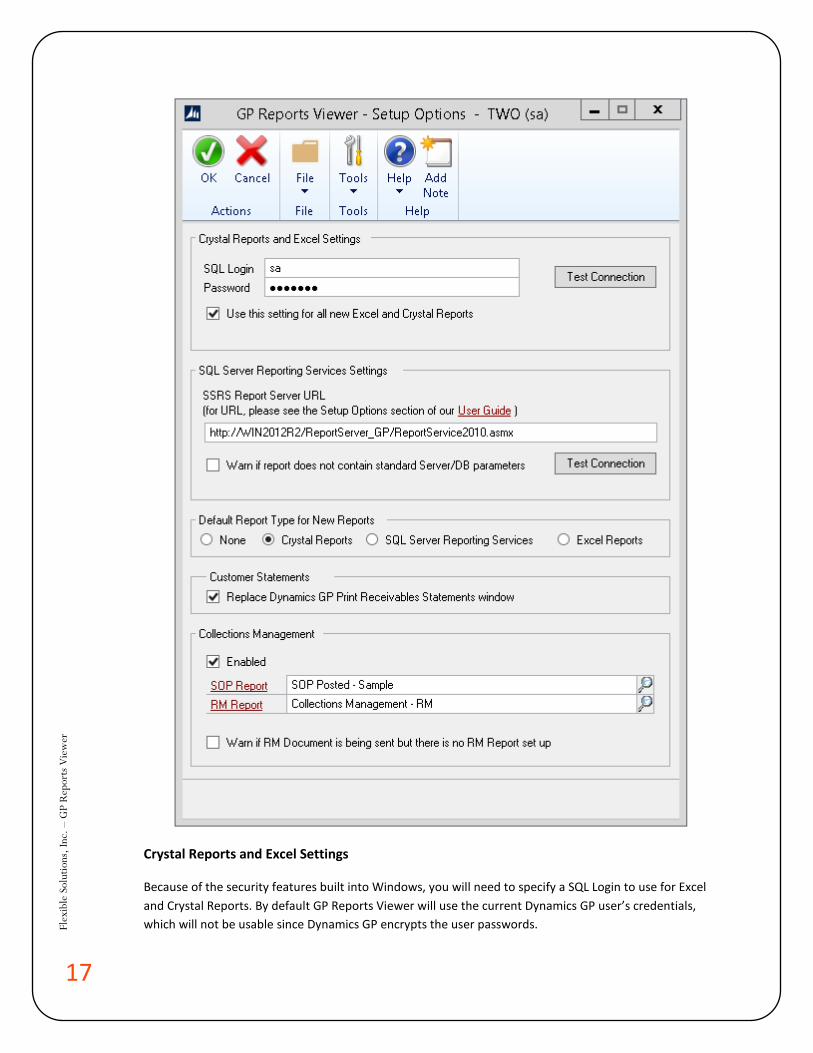
SETUP OPTIONS
The Setup Options window will allow you to specify default settings to be used when running reports. These are GP company-specific settings and need to be completed once per Dynamics GP company where GP Reports Viewer is used.
17
Flex
ible
Sol
utio
ns, I
nc. –
GP
Rep
orts
Vie
wer
Crystal Reports and Excel Settings
Because of the security features built into Windows, you will need to specify a SQL Login to use for Excel and Crystal Reports. By default GP Reports Viewer will use the current Dynamics GP user’s credentials, which will not be usable since Dynamics GP encrypts the user passwords.
18
Flex
ible
Sol
utio
ns, I
nc. –
GP
Rep
orts
Vie
wer
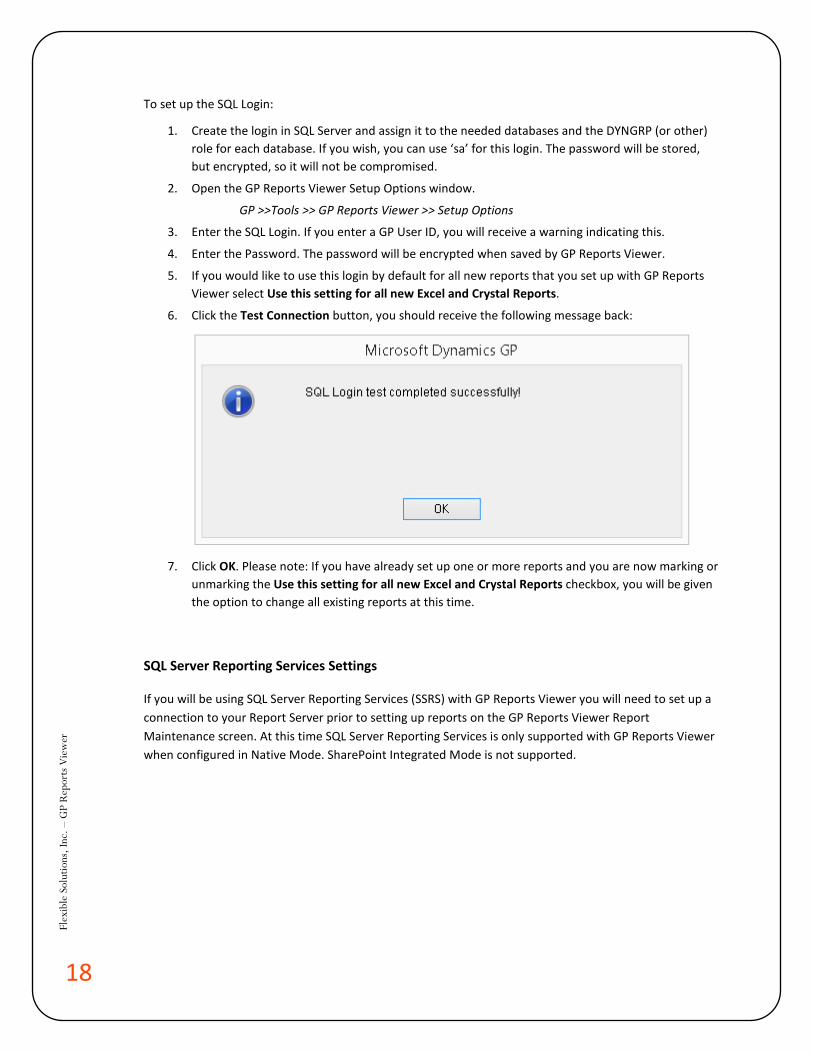
To set up the SQL Login:
1. Create the login in SQL Server and assign it to the needed databases and the DYNGRP (or other) role for each database. If you wish, you can use ‘sa’ for this login. The password will be stored, but encrypted, so it will not be compromised.
2. Open the GP Reports Viewer Setup Options window.
GP >>Tools >> GP Reports Viewer >> Setup Options
3. Enter the SQL Login. If you enter a GP User ID, you will receive a warning indicating this.
4. Enter the Password. The password will be encrypted when saved by GP Reports Viewer.
5. If you would like to use this login by default for all new reports that you set up with GP Reports Viewer select Use this setting for all new Excel and Crystal Reports.
6. Click the Test Connection button, you should receive the following message back:
7. Click OK. Please note: If you have already set up one or more reports and you are now marking or unmarking the Use this setting for all new Excel and Crystal Reports checkbox, you will be given the option to change all existing reports at this time.
SQL Server Reporting Services Settings
If you will be using SQL Server Reporting Services (SSRS) with GP Reports Viewer you will need to set up a connection to your Report Server prior to setting up reports on the GP Reports Viewer Report Maintenance screen. At this time SQL Server Reporting Services is only supported with GP Reports Viewer when configured in Native Mode. SharePoint Integrated Mode is not supported.
19
Flex
ible
Sol
utio
ns, I
nc. –
GP
Rep
orts
Vie
wer
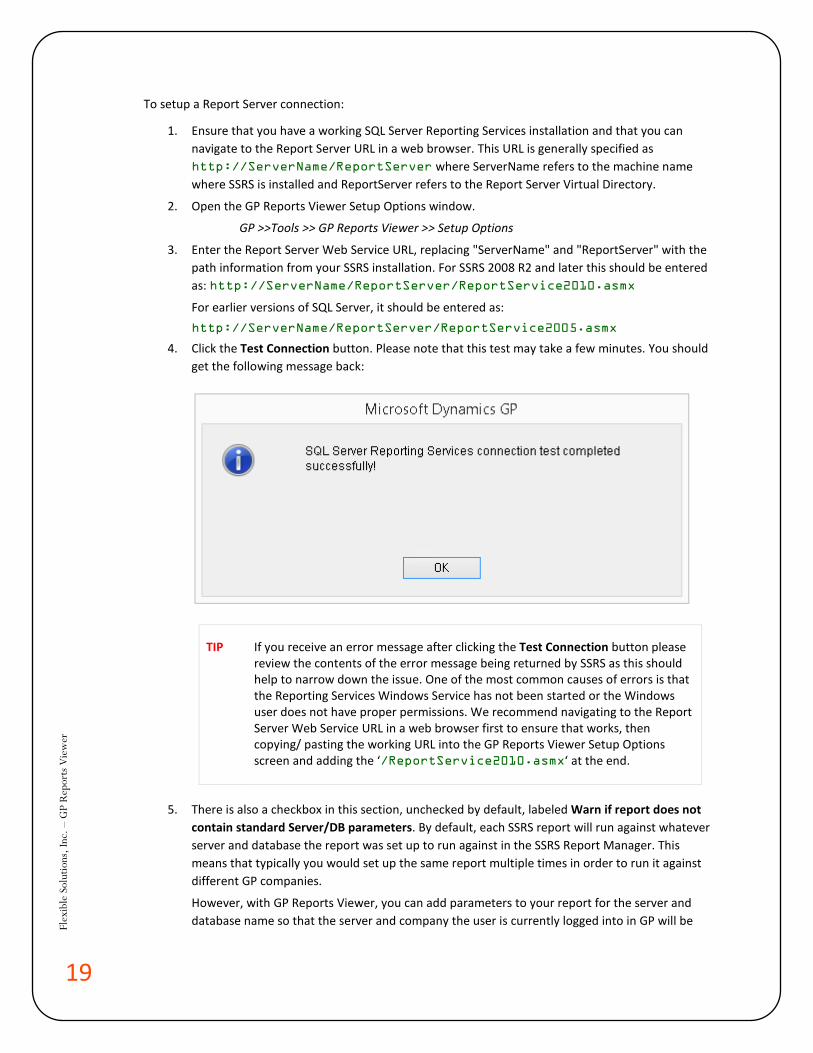
To setup a Report Server connection:
1. Ensure that you have a working SQL Server Reporting Services installation and that you can navigate to the Report Server URL in a web browser. This URL is generally specified as http://ServerName/ReportServer where ServerName refers to the machine name where SSRS is installed and ReportServer refers to the Report Server Virtual Directory.
2. Open the GP Reports Viewer Setup Options window.
GP >>Tools >> GP Reports Viewer >> Setup Options
3. Enter the Report Server Web Service URL, replacing "ServerName" and "ReportServer" with the path information from your SSRS installation. For SSRS 2008 R2 and later this should be entered as: http://ServerName/ReportServer/ReportService2010.asmx
For earlier versions of SQL Server, it should be entered as: http://ServerName/ReportServer/ReportService2005.asmx
4. Click the Test Connection button. Please note that this test may take a few minutes. You should get the following message back:
TIP If you receive an error message after clicking the Test Connection button please review the contents of the error message being returned by SSRS as this should help to narrow down the issue. One of the most common causes of errors is that the Reporting Services Windows Service has not been started or the Windows user does not have proper permissions. We recommend navigating to the Report Server Web Service URL in a web browser first to ensure that works, then copying/ pasting the working URL into the GP Reports Viewer Setup Options screen and adding the ‘/ReportService2010.asmx‘ at the end.
5. There is also a checkbox in this section, unchecked by default, labeled Warn if report does not contain standard Server/DB parameters. By default, each SSRS report will run against whatever server and database the report was set up to run against in the SSRS Report Manager. This means that typically you would set up the same report multiple times in order to run it against different GP companies.
However, with GP Reports Viewer, you can add parameters to your report for the server and database name so that the server and company the user is currently logged into in GP will be
20
Flex
ible
Sol
utio
ns, I
nc. –
GP
Rep
orts
Vie
wer
passed to the report and the report will be run against that server and company database. This is convenient if you have multiple GP companies and would like to maintain only one version of the report to use with GP Reports Viewer.
If you plan to use these parameters with all of your SQL Server Reporting Services reports we recommend checking the Warn if report does not contain standard Server/DB parameters box so that you will receive a warning if these two parameters are not present in a report when it is run. This helps alert the user that they may not be getting data from the company they are logged into. If you just want the report to run against whatever server and database are set up in the report or do not want to be prompted if the parameters are not in the report, leave this box unchecked. Please refer to the section on Modifying a SQL Server Reporting Services Report for Server and Database Replacement for more information on adding these parameters to SSRS reports.
Default Report Type for New Reports
This will be defaulted to None but you can change this to the report type you will most commonly be setting up if you would like the Report Type to default to one of these options when setting up new reports on the GP Reports Viewer - Report Maintenance window. No matter what option is chosen here you will always be able to override this default when setting up a new report.
Customer Statements
GP Reports Viewer has a Customer Statements feature that can be used instead of the Dynamics GP out-of-the-box statement routine to print and/or email customer statements. To have the GP Reports Viewer Statements windows automatically come up when your users select the Statements routine (GP >> Tools >> Routines > Sales >> Statements), select the checkbox next to Replace Dynamics GP Print Receivables Statements window.
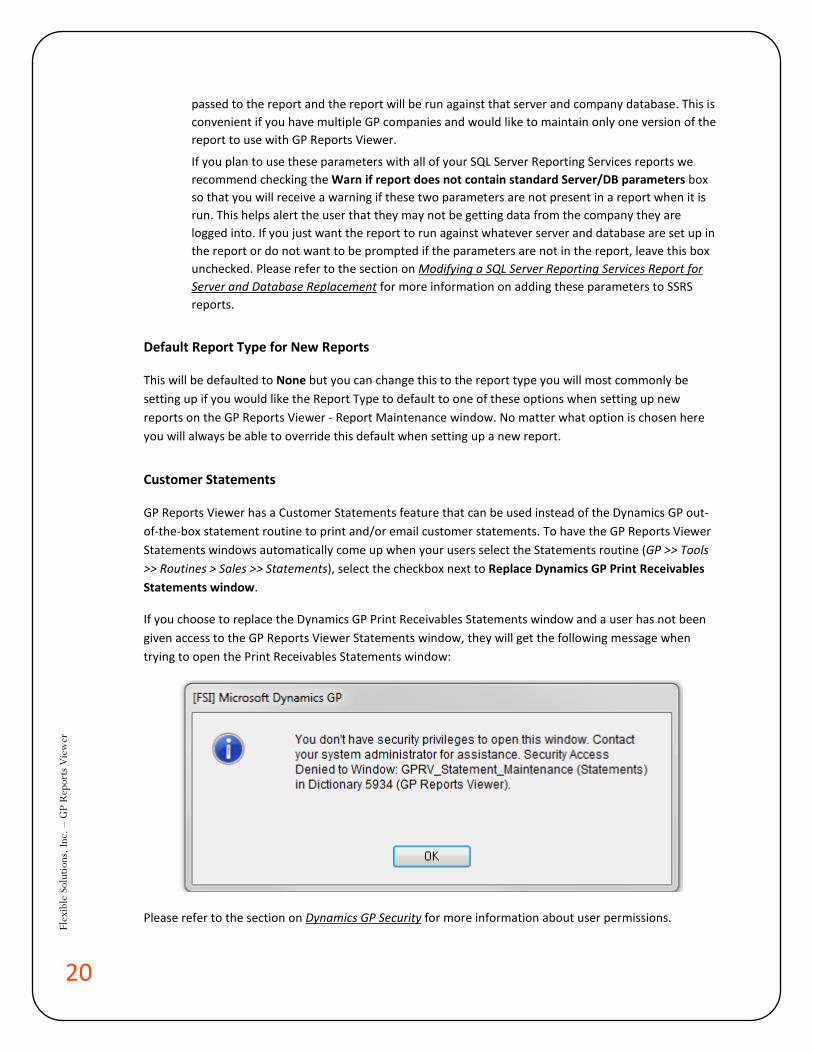
If you choose to replace the Dynamics GP Print Receivables Statements window and a user has not been given access to the GP Reports Viewer Statements window, they will get the following message when trying to open the Print Receivables Statements window:
Please refer to the section on Dynamics GP Security for more information about user permissions.
21
Flex
ible
Sol
utio
ns, I
nc. –
GP
Rep
orts
Vie
wer
Collections Management Setup Options
GP Reports Viewer provides integration with the Collections Management module from Professional Advantage. This allows replacement of the out-of-the-box Receivables Management (RM) and/or Sales Order Processing (SOP) reports with custom Crystal and SSRS reports when emailing documents from Collections Management. This feature is available for Dynamics GP 2013 and higher. Please note that Collections Management for GP 2018 was not yet released at the time of the release of GP Reports Viewer for GP 2018, so that has not been tested yet.
TIP If Collections Management is not installed on the computer, the Collections Management setup section will be greyed out,
To enable this feature, follow the steps below:
1. Mark the Enabled checkbox in the Collections Management section. 2. Select reports that replace the default SOP and RM reports in Dynamics GP. At least one
selection is required here, and the integration with the Collections Management module will work in the following manner based on the selections made for these reports:
a. If a SOP Report is selected but a RM Report is not selected, any SOP documents will be replaced with the custom SOP Report chosen, but there will be no RM report replacement made and Collections Management will email the default Dynamics GP report for RM documents. The checkbox Warn if RM Document is being sent but there is no RM Report set up may be used to provide a warning message to the user when emailing RM documents from Collections Management but there is no custom RM Report set up for replacement.
b. If a RM Report is selected but a SOP report is not selected, the RM report chosen will be used to replace both RM and SOP reports when emailing from Collections Management.
c. If both RM and SOP Reports are selected, the RM report will be used to replace RM reports and the SOP report will be used to replace SOP reports when emailing from Collections Management.
TIP There are sample reports that may be used for the RM and SOP replacement with Collections Management located in the GP Reports Viewer Sample Reports folder in your Dynamics GP installation folder. Please see Chapter 8 Collections Management for more information on the sample reports provided.
3. Ensure that the users that will be sending emails via Collections Management have been granted security access to the reports set up for RM and SOP replacement. Please refer to the section on GP Reports Viewer Security Maintenance for more information about user report permissions.
TIP Users that have not been granted access to the RM and SOP replacement reports in GP Reports Viewer will get the out-of-the-box Collections Management report attachments instead.

22
Flex
ible
Sol
utio
ns, I
nc. –
GP
Rep
orts
Vie
wer
4. In the Collections Management module, set up a path to use for the Invoice Folder setting on the Collections Management Setup window (GP >>Tools >> Setup >> Sales >> Collections Setup):
Please note that this setting is required in order to provide a local working folder where email file attachments can be created and picked up by the Collections Management module when sending emails. This should be pointing to a shared directory and all Dynamics GP users emailing from Collections Management will need to have read and write permissions to this folder.
TIP If you do not set up the path to use for the Invoice Folder setting on the Collections Management Setup window, you will receive the error message “Unable to get the default file location from Collections Management. Unable to replace attachments.” when emailing from Collections Management, and the default out-of-the-box reports will be used instead of the GP Reports Viewer report replacements.
Please refer to Chapter 8 Collections Management for more information on setting up reports to use for RM and SOP replacement and emailing documents with Collections Management.
23
Flex
ible
Sol
utio
ns, I
nc. –
GP
Rep
orts
Vie
wer
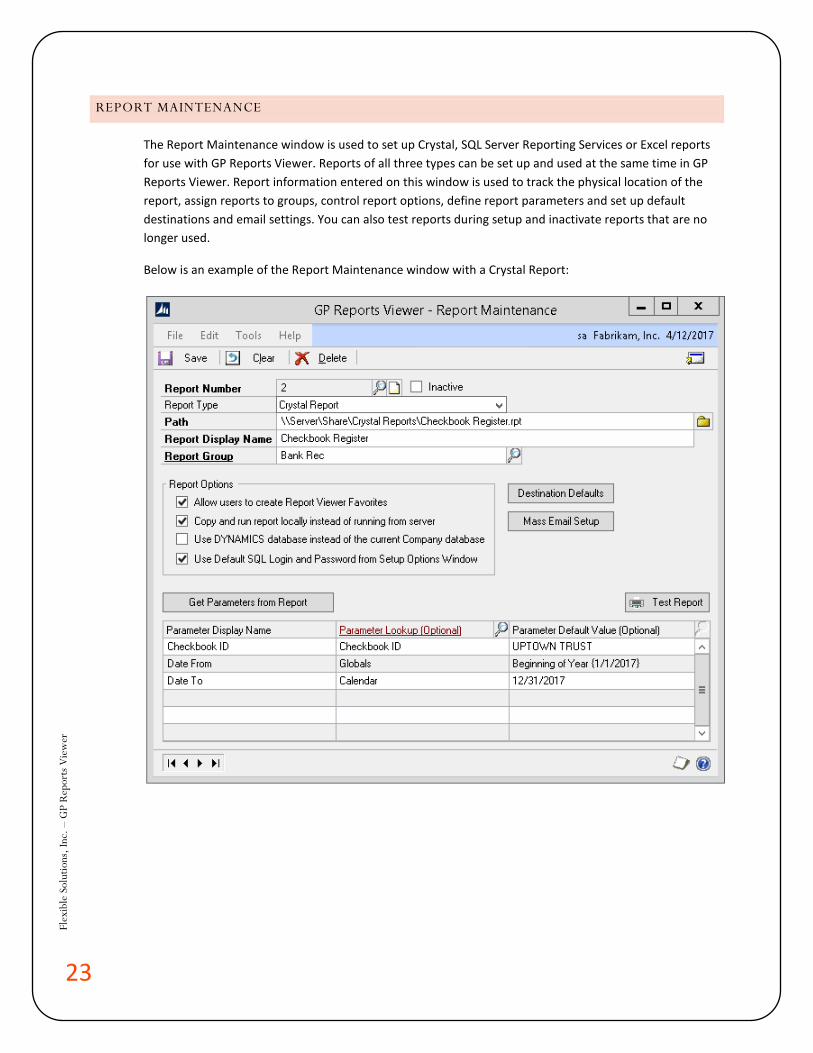
REPORT MAINTENANCE
The Report Maintenance window is used to set up Crystal, SQL Server Reporting Services or Excel reports for use with GP Reports Viewer. Reports of all three types can be set up and used at the same time in GP Reports Viewer. Report information entered on this window is used to track the physical location of the report, assign reports to groups, control report options, define report parameters and set up default destinations and email settings. You can also test reports during setup and inactivate reports that are no longer used.
Below is an example of the Report Maintenance window with a Crystal Report:
24
Flex
ible
Sol
utio
ns, I
nc. –
GP
Rep
orts
Vie
wer
SETTING UP A NEW REPORT
To set up a new report:
1. Navigate to GP >> Tools >> GP Reports Viewer >> Reports.
2. The Report Number will automatically use the next available number.
3. The Inactive checkbox is unchecked by default, meaning that the report is available to users. To disable a report temporarily, check the Inactive box and Save the report. An inactive report will not appear on the GP Reports Viewer window and cannot be accessed by any Report Shortcuts that have been defined for it. To re-activate the report uncheck the Inactive box and Save the report.
TIP To permanently remove a report from the GP Reports Viewer module, click the Delete button. NOTE: If you delete a report from GP Reports Viewer the actual report will NOT be deleted, just the reference to it within GP Reports Viewer is deleted.
4. Select a Report Type that corresponds to the type of report you are setting up: Crystal Report, SQL Server Reporting Services or Excel Report.
5. Select a Path to the report:
a. For Excel and Crystal Reports:
Enter or select the report path to the physical report file. Reports can be located anywhere on your network. Please ensure that users have access to this network location, otherwise they will receive an error message when running the report. Click on the folder button to open the file browser and navigate to the report location.
TIP We recommend that you always use a UNC (Universal Naming Convention) path when setting up the path to Crystal or Excel Reports to ensure that all Dynamics GP users will have access to the reports, regardless of where they are running the report from. When you set up a report that is on the same computer where you are working, the path may default in as a local path, you can simply type over that so that it has the UNC path instead.
b. For SQL Server Reporting Services reports:
It is recommended that you use the folder lookup button and choose a report from the popup window as this will put in the path with the correct folder/report naming structure as it is set up in your SSRS Report Manager. If you choose to enter the path manually it must follow the structure /Report Folder/Report Sub-Folder/Report Name.
6. Enter a Report Display Name. This is the name that users will see on the GP Reports Viewer window and on any Report Shortcuts that you create. This will also be the default name that will be used for the PDF file created if you are emailing the report from the GP Reports Viewer window and have not specified an alternate file name under Destination Defaults (please refer the Default Report Destinations section for more details).
25
Flex
ible
Sol
utio
ns, I
nc. –
GP
Rep
orts
Vie
wer
7. Enter or select a Report Group. Report Groups are used for organizing reports together for usability and to simplify security settings. Please refer to Report Group Maintenance for more information.
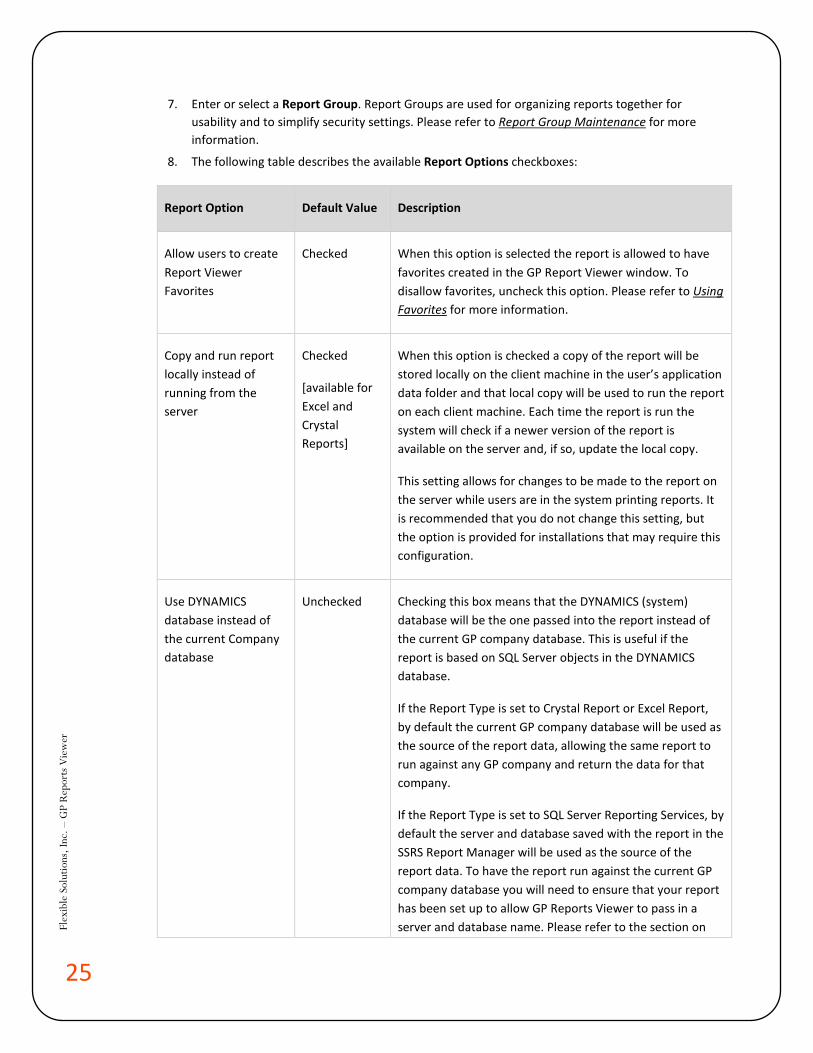
8. The following table describes the available Report Options checkboxes:
Report Option Default Value Description
Allow users to create Report Viewer Favorites
Checked When this option is selected the report is allowed to have favorites created in the GP Report Viewer window. To disallow favorites, uncheck this option. Please refer to Using Favorites for more information.
Copy and run report locally instead of running from the server
Checked
[available for Excel and Crystal Reports]
When this option is checked a copy of the report will be stored locally on the client machine in the user’s application data folder and that local copy will be used to run the report on each client machine. Each time the report is run the system will check if a newer version of the report is available on the server and, if so, update the local copy.
This setting allows for changes to be made to the report on the server while users are in the system printing reports. It is recommended that you do not change this setting, but the option is provided for installations that may require this configuration.
Use DYNAMICS database instead of the current Company database
Unchecked Checking this box means that the DYNAMICS (system) database will be the one passed into the report instead of the current GP company database. This is useful if the report is based on SQL Server objects in the DYNAMICS database.
If the Report Type is set to Crystal Report or Excel Report, by default the current GP company database will be used as the source of the report data, allowing the same report to run against any GP company and return the data for that company.
If the Report Type is set to SQL Server Reporting Services, by default the server and database saved with the report in the SSRS Report Manager will be used as the source of the report data. To have the report run against the current GP company database you will need to ensure that your report has been set up to allow GP Reports Viewer to pass in a server and database name. Please refer to the section on
26
Flex
ible
Sol
utio
ns, I
nc. –
GP
Rep
orts
Vie
wer
Report Option Default Value Description
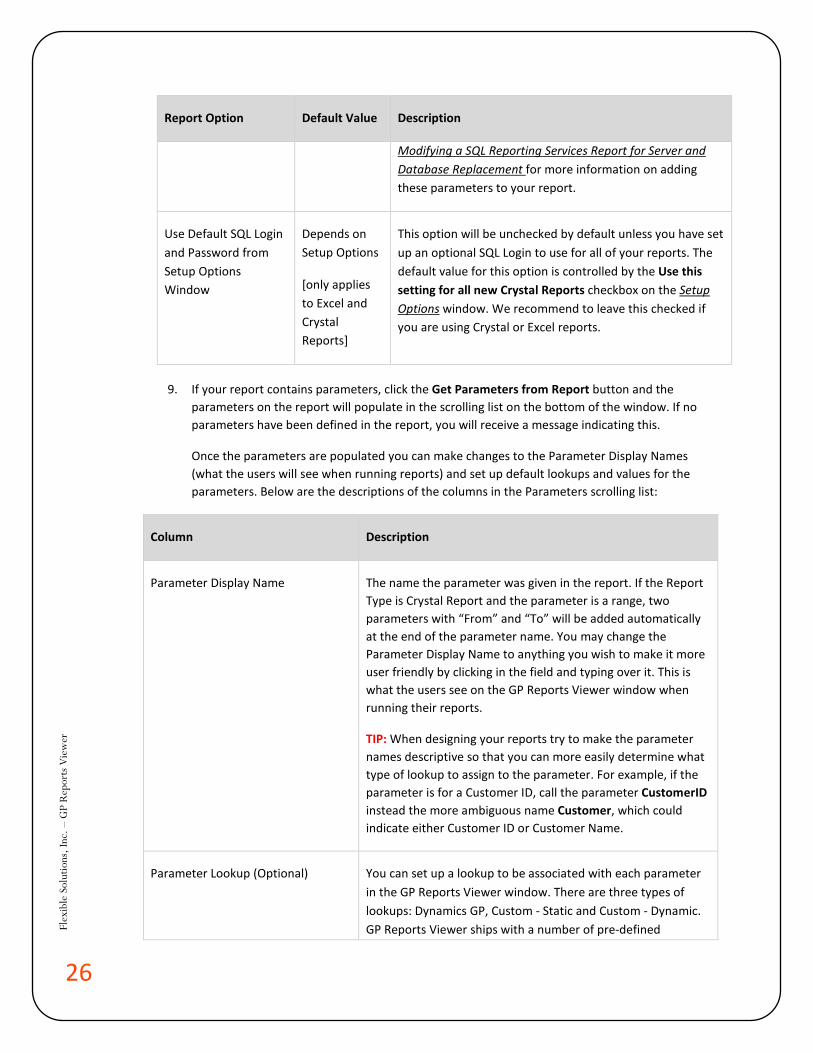
Modifying a SQL Reporting Services Report for Server and Database Replacement for more information on adding these parameters to your report.
Use Default SQL Login and Password from Setup Options Window
Depends on Setup Options
[only applies to Excel and Crystal Reports]
This option will be unchecked by default unless you have set up an optional SQL Login to use for all of your reports. The default value for this option is controlled by the Use this setting for all new Crystal Reports checkbox on the Setup Options window. We recommend to leave this checked if you are using Crystal or Excel reports.
9. If your report contains parameters, click the Get Parameters from Report button and the parameters on the report will populate in the scrolling list on the bottom of the window. If no parameters have been defined in the report, you will receive a message indicating this.
Once the parameters are populated you can make changes to the Parameter Display Names (what the users will see when running reports) and set up default lookups and values for the parameters. Below are the descriptions of the columns in the Parameters scrolling list:
Column Description
Parameter Display Name The name the parameter was given in the report. If the Report Type is Crystal Report and the parameter is a range, two parameters with “From” and “To” will be added automatically at the end of the parameter name. You may change the Parameter Display Name to anything you wish to make it more user friendly by clicking in the field and typing over it. This is what the users see on the GP Reports Viewer window when running their reports.
TIP: When designing your reports try to make the parameter names descriptive so that you can more easily determine what type of lookup to assign to the parameter. For example, if the parameter is for a Customer ID, call the parameter CustomerID instead the more ambiguous name Customer, which could indicate either Customer ID or Customer Name.
Parameter Lookup (Optional) You can set up a lookup to be associated with each parameter in the GP Reports Viewer window. There are three types of lookups: Dynamics GP, Custom - Static and Custom - Dynamic. GP Reports Viewer ships with a number of pre-defined
27
Flex
ible
Sol
utio
ns, I
nc. –
GP
Rep
orts
Vie
wer
Column Description
Dynamics GP lookups or you can create your own as needed. Please refer to Custom Lookup Maintenance for more information.
A ‘Globals’ Parameter Lookup is available in GP Reports Viewer to allow for automatically populating parameters such as User ID, Company ID, Database Name and several calculated dates. Please refer to the Global Parameter Lookup section below for additional information on using the Globals parameters.
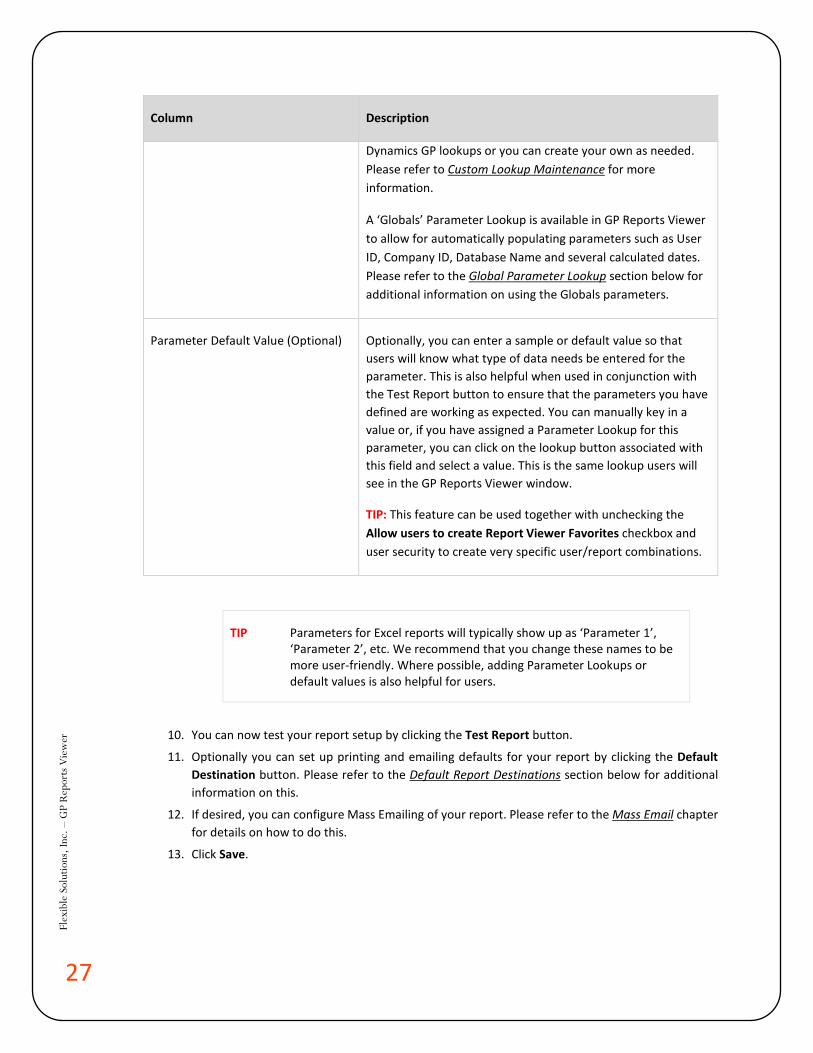
Parameter Default Value (Optional) Optionally, you can enter a sample or default value so that users will know what type of data needs be entered for the parameter. This is also helpful when used in conjunction with the Test Report button to ensure that the parameters you have defined are working as expected. You can manually key in a value or, if you have assigned a Parameter Lookup for this parameter, you can click on the lookup button associated with this field and select a value. This is the same lookup users will see in the GP Reports Viewer window.
TIP: This feature can be used together with unchecking the Allow users to create Report Viewer Favorites checkbox and user security to create very specific user/report combinations.
TIP Parameters for Excel reports will typically show up as ‘Parameter 1’, ‘Parameter 2’, etc. We recommend that you change these names to be more user-friendly. Where possible, adding Parameter Lookups or default values is also helpful for users.
10. You can now test your report setup by clicking the Test Report button.
11. Optionally you can set up printing and emailing defaults for your report by clicking the Default Destination button. Please refer to the Default Report Destinations section below for additional information on this.
12. If desired, you can configure Mass Emailing of your report. Please refer to the Mass Email chapter for details on how to do this.
13. Click Save.
28
Flex
ible
Sol
utio
ns, I
nc. –
GP
Rep
orts
Vie
wer
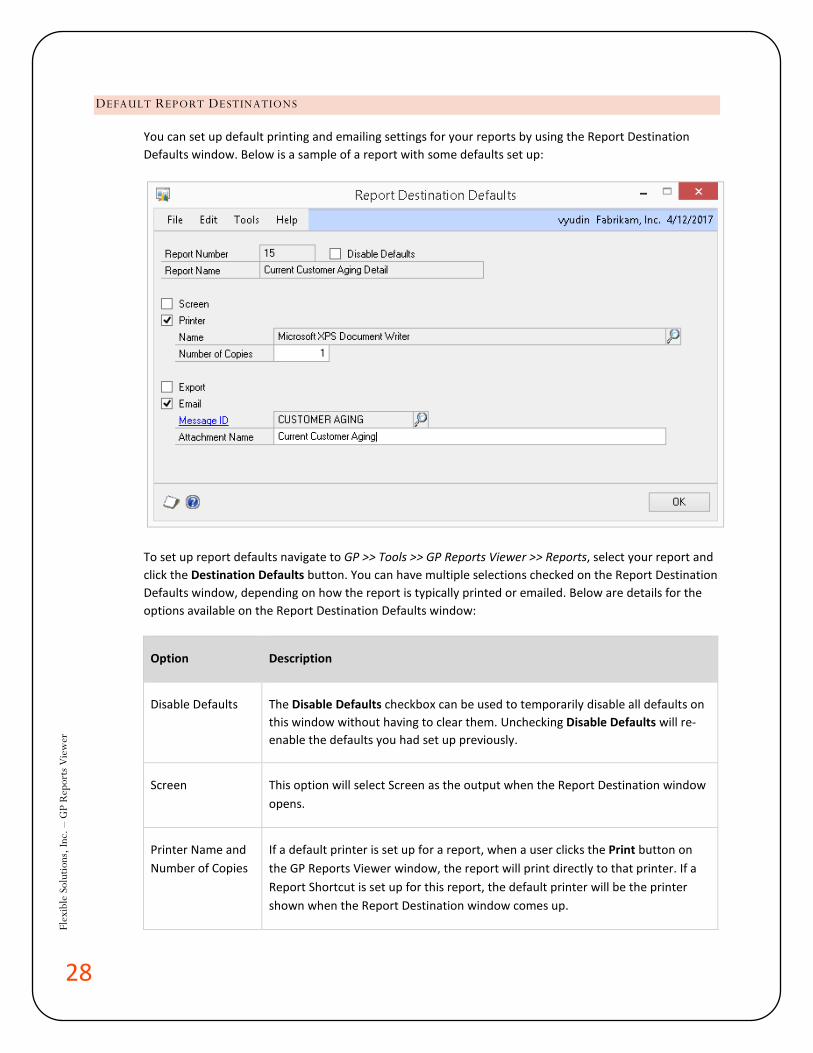
DEFAULT REPORT DESTINATIONS
You can set up default printing and emailing settings for your reports by using the Report Destination Defaults window. Below is a sample of a report with some defaults set up:
To set up report defaults navigate to GP >> Tools >> GP Reports Viewer >> Reports, select your report and click the Destination Defaults button. You can have multiple selections checked on the Report Destination Defaults window, depending on how the report is typically printed or emailed. Below are details for the options available on the Report Destination Defaults window:
Option Description
Disable Defaults The Disable Defaults checkbox can be used to temporarily disable all defaults on this window without having to clear them. Unchecking Disable Defaults will re-enable the defaults you had set up previously.
Screen This option will select Screen as the output when the Report Destination window opens.
Printer Name and Number of Copies
If a default printer is set up for a report, when a user clicks the Print button on the GP Reports Viewer window, the report will print directly to that printer. If a Report Shortcut is set up for this report, the default printer will be the printer shown when the Report Destination window comes up.
29
Flex
ible
Sol
utio
ns, I
nc. –
GP
Rep
orts
Vie
wer
Option Description
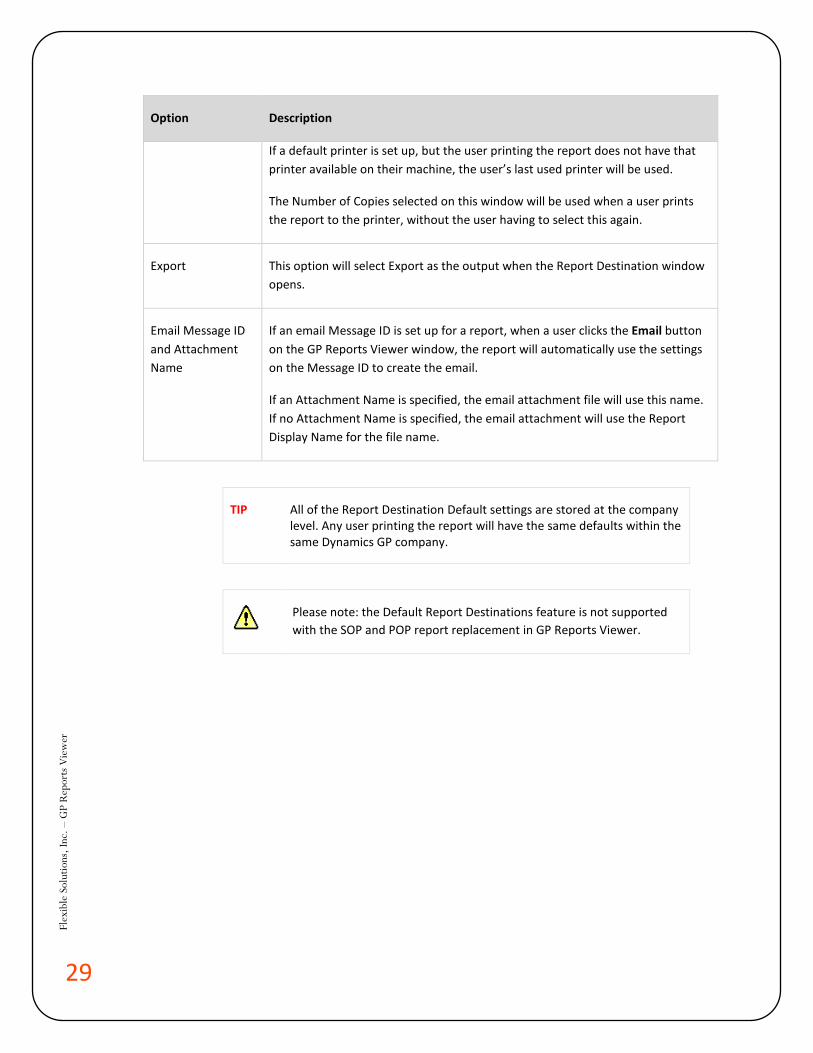
If a default printer is set up, but the user printing the report does not have that printer available on their machine, the user’s last used printer will be used.
The Number of Copies selected on this window will be used when a user prints the report to the printer, without the user having to select this again.
Export This option will select Export as the output when the Report Destination window opens.
Email Message ID and Attachment Name
If an email Message ID is set up for a report, when a user clicks the Email button on the GP Reports Viewer window, the report will automatically use the settings on the Message ID to create the email.
If an Attachment Name is specified, the email attachment file will use this name. If no Attachment Name is specified, the email attachment will use the Report Display Name for the file name.
TIP All of the Report Destination Default settings are stored at the company level. Any user printing the report will have the same defaults within the same Dynamics GP company.
Please note: the Default Report Destinations feature is not supported with the SOP and POP report replacement in GP Reports Viewer.
30
Flex
ible
Sol
utio
ns, I
nc. –
GP
Rep
orts
Vie
wer
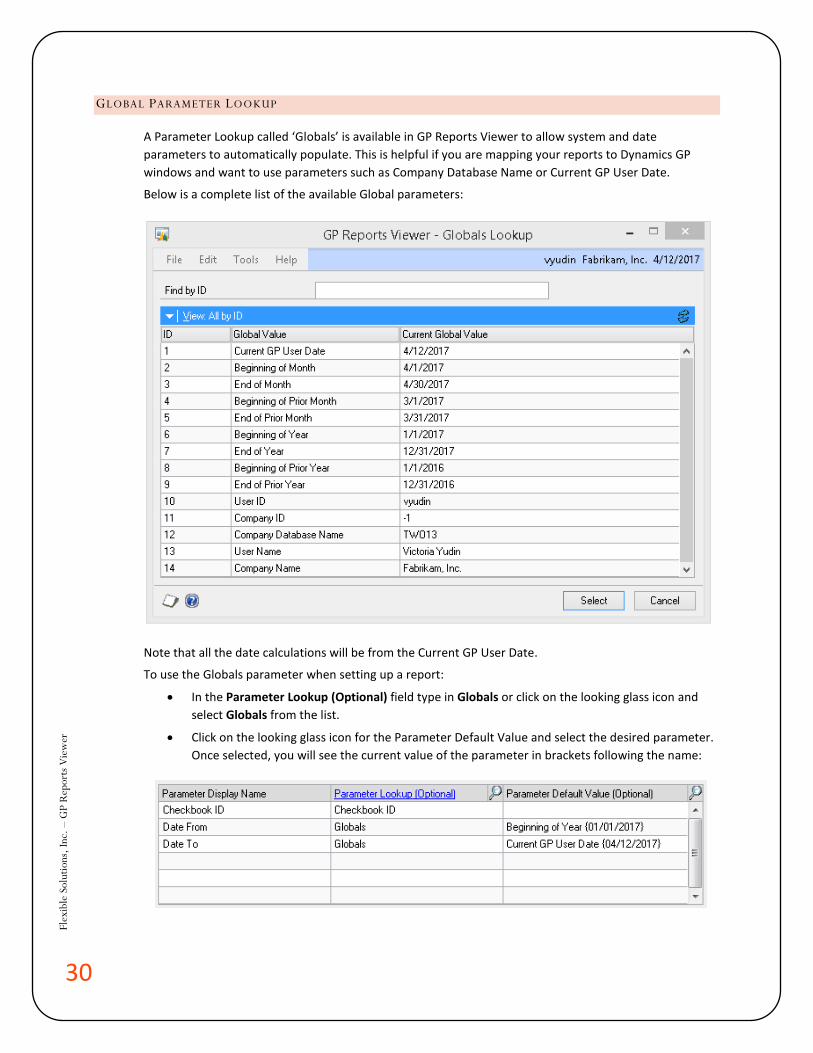
GLOBAL PARAMETER LOOKUP
A Parameter Lookup called ‘Globals’ is available in GP Reports Viewer to allow system and date parameters to automatically populate. This is helpful if you are mapping your reports to Dynamics GP windows and want to use parameters such as Company Database Name or Current GP User Date.
Below is a complete list of the available Global parameters:
Note that all the date calculations will be from the Current GP User Date.
To use the Globals parameter when setting up a report:
• In the Parameter Lookup (Optional) field type in Globals or click on the looking glass icon and select Globals from the list.
• Click on the looking glass icon for the Parameter Default Value and select the desired parameter. Once selected, you will see the current value of the parameter in brackets following the name:
31
Flex
ible
Sol
utio
ns, I
nc. –
GP
Rep
orts
Vie
wer
NEXT STEPS
Once you have set up a report, you can navigate to other steps directly from the Report Maintenance window:
• To set up security for the report, click the GoTo button at the top of the window and choose Security. For more information about report security please refer to Security Maintenance.
• If you wish to set up report shortcuts to print this report from other Dynamics GP windows, including third-party or customized windows, click the GoTo button at the top of the window and choose Report Shortcuts. For more information about setting up report shortcuts please refer to Report Shortcuts.
• To replace Sales Order Processing or Purchase Order Processing reports, click on the GoTo button at the top of the window and choose Replace SOP / POP reports. For more information about setting up SOP and POP replacement please refer to Replacing SOP and POP Reports.
• To create custom Lookups, click on the GoTo button at the top of the window and choose Lookups.
• You can now print your reports from the GP Reports Viewer window.
32
Flex
ible
Sol
utio
ns, I
nc. –
GP
Rep
orts
Vie
wer
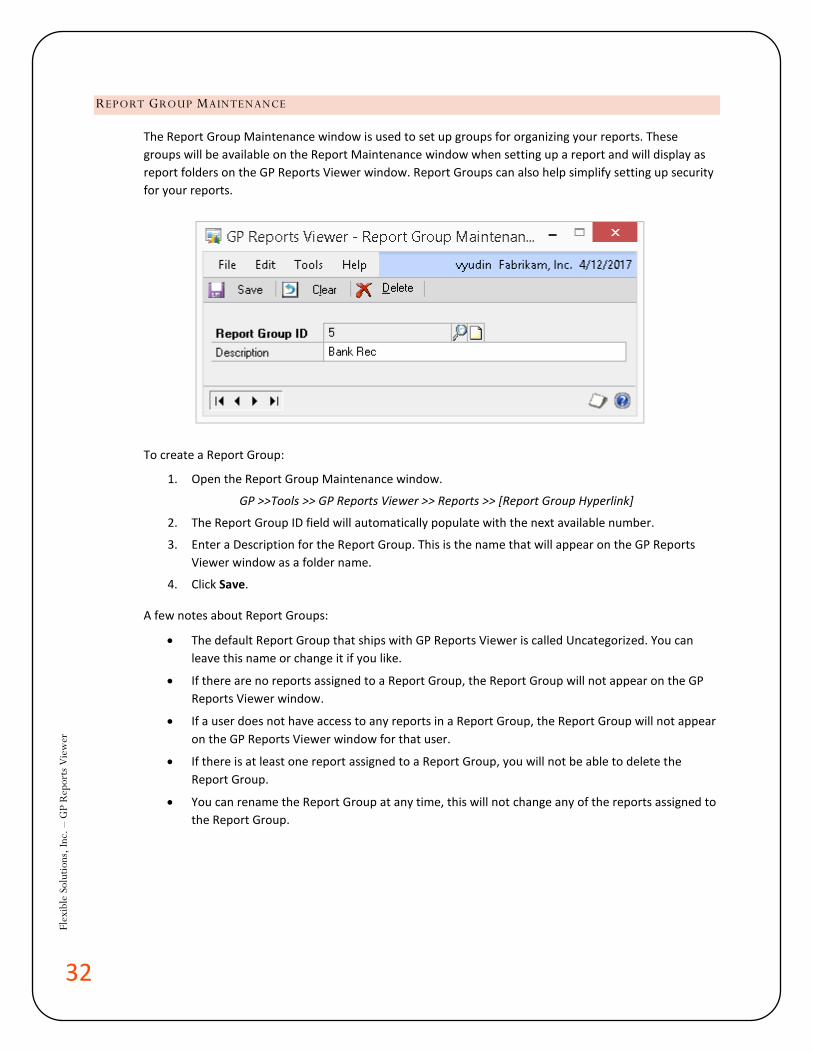
REPORT GROUP MAINTENANCE
The Report Group Maintenance window is used to set up groups for organizing your reports. These groups will be available on the Report Maintenance window when setting up a report and will display as report folders on the GP Reports Viewer window. Report Groups can also help simplify setting up security for your reports.
To create a Report Group:
1. Open the Report Group Maintenance window.
GP >>Tools >> GP Reports Viewer >> Reports >> [Report Group Hyperlink]
2. The Report Group ID field will automatically populate with the next available number.
3. Enter a Description for the Report Group. This is the name that will appear on the GP Reports Viewer window as a folder name.
4. Click Save.
A few notes about Report Groups:
• The default Report Group that ships with GP Reports Viewer is called Uncategorized. You can leave this name or change it if you like.
• If there are no reports assigned to a Report Group, the Report Group will not appear on the GP Reports Viewer window.
• If a user does not have access to any reports in a Report Group, the Report Group will not appear on the GP Reports Viewer window for that user.
• If there is at least one report assigned to a Report Group, you will not be able to delete the Report Group.
• You can rename the Report Group at any time, this will not change any of the reports assigned to the Report Group.
33
Flex
ible
Sol
utio
ns, I
nc. –
GP
Rep
orts
Vie
wer
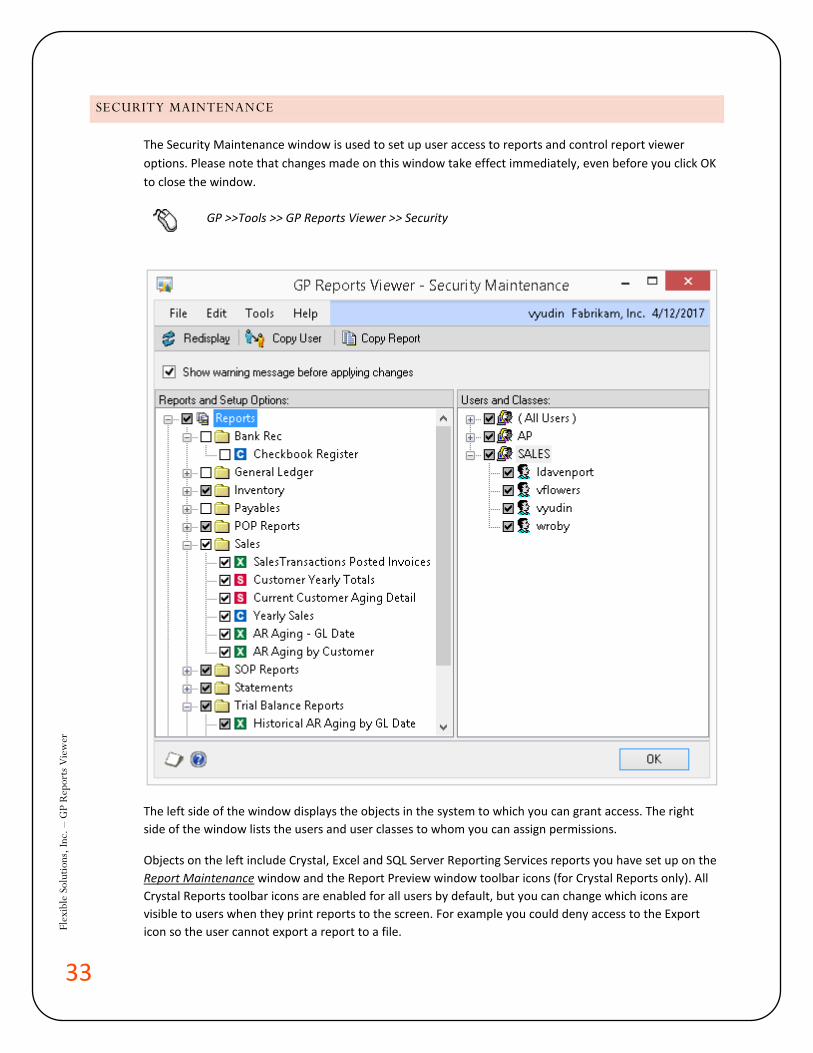
SECURITY MAINTENANCE
The Security Maintenance window is used to set up user access to reports and control report viewer options. Please note that changes made on this window take effect immediately, even before you click OK to close the window.
GP >>Tools >> GP Reports Viewer >> Security
The left side of the window displays the objects in the system to which you can grant access. The right side of the window lists the users and user classes to whom you can assign permissions.
Objects on the left include Crystal, Excel and SQL Server Reporting Services reports you have set up on the Report Maintenance window and the Report Preview window toolbar icons (for Crystal Reports only). All Crystal Reports toolbar icons are enabled for all users by default, but you can change which icons are visible to users when they print reports to the screen. For example you could deny access to the Export icon so the user cannot export a report to a file.
34
Flex
ible
Sol
utio
ns, I
nc. –
GP
Rep
orts
Vie
wer
By default when a new report is set up on the GP Reports Viewer - Report Maintenance window only the currently logged in user and the ‘sa’ user will automatically be granted access to the report.
Security Window Navigation
Navigation Option Description
Expand a Node Expand any node by clicking on the icon.
View Security Assignments Selecting the name of an object on the left side will show you who has access to it in the window on the right.
Selecting the name of a user or class on the right side will show you what permissions have been set in the window on the left.
Checkbox Status A white, unmarked checkbox indicates that no permission is granted.
A white, marked checkbox indicates that permission has been granted. In the case of a tree node with items under it, this indicates that permissions have been granted for ALL items under this node.
A gray, marked checkbox will only occur at a tree node with items under it and indicates that permissions have been granted for SOME items under this node.
Assigning Security
Selecting an item anywhere on the Security Maintenance window will determine what object you will be assigning security to and at what level. Clicking an item to highlight it will show what permissions have already been assigned to the object. You can mark or unmark checkboxes next to an item on either the left or right side, at any level. Example: to assign security to All Users for a report called Checkbook Register, click the expand node buttons to navigate down to the Checkbook Register report on the left, click on the name of the report to select it. In the tree on the right place a check mark next to the All Users node. Marking a checkbox grants access, unmarking a checkbox denies access. Note that Security Classes are only used to initially assign security to reports. Moving a user from one Security Class to another will not change their report permissions, as the permissions are assigned to the actual user, not the class.
35
Flex
ible
Sol
utio
ns, I
nc. –
GP
Rep
orts
Vie
wer
TIP Security assignments take effect immediately. For this reason, there is a confirmation dialog that pops up whenever you click a checkbox that asks if you are sure you want to proceed. To turn this confirmation message off uncheck the Show warning message before applying changes checkbox at the top of the Security Maintenance window.
If a user is granted access to a report in GP Reports Viewer they will be able to run the report regardless of whether they have access to the tables used by the report within GP Security.
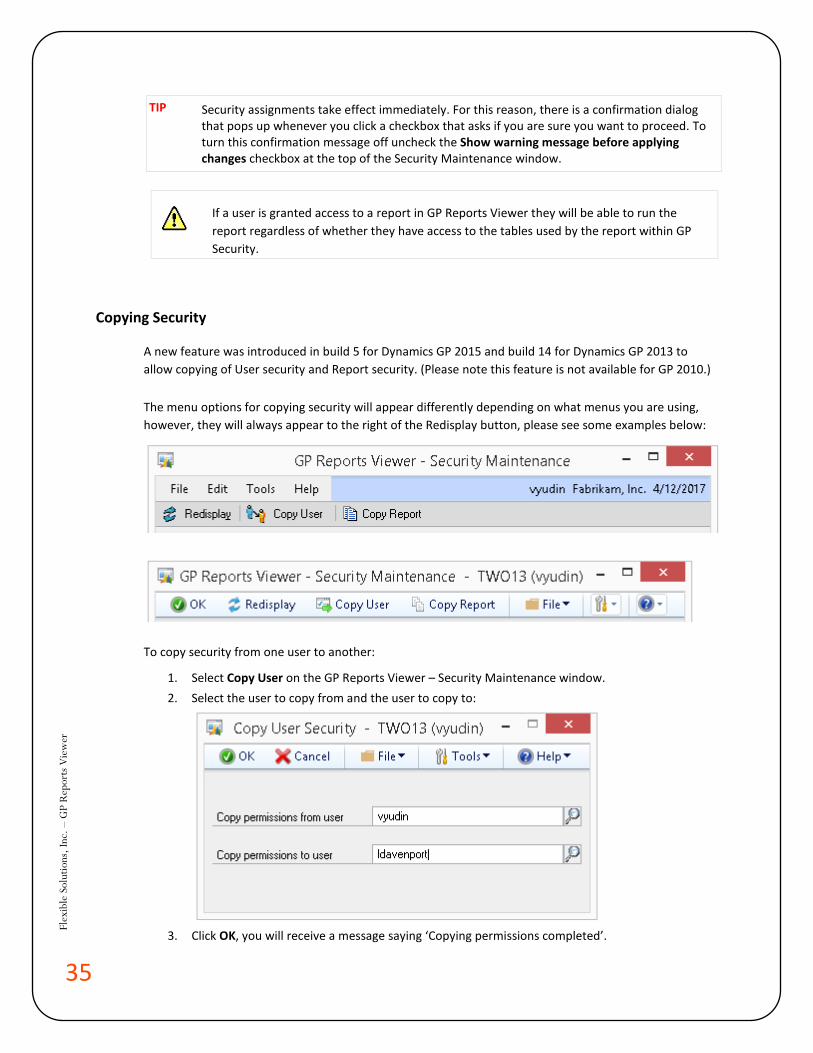
Copying Security
A new feature was introduced in build 5 for Dynamics GP 2015 and build 14 for Dynamics GP 2013 to allow copying of User security and Report security. (Please note this feature is not available for GP 2010.)
The menu options for copying security will appear differently depending on what menus you are using, however, they will always appear to the right of the Redisplay button, please see some examples below:
To copy security from one user to another:
1. Select Copy User on the GP Reports Viewer – Security Maintenance window. 2. Select the user to copy from and the user to copy to:
3. Click OK, you will receive a message saying ‘Copying permissions completed’.
36
Flex
ible
Sol
utio
ns, I
nc. –
GP
Rep
orts
Vie
wer
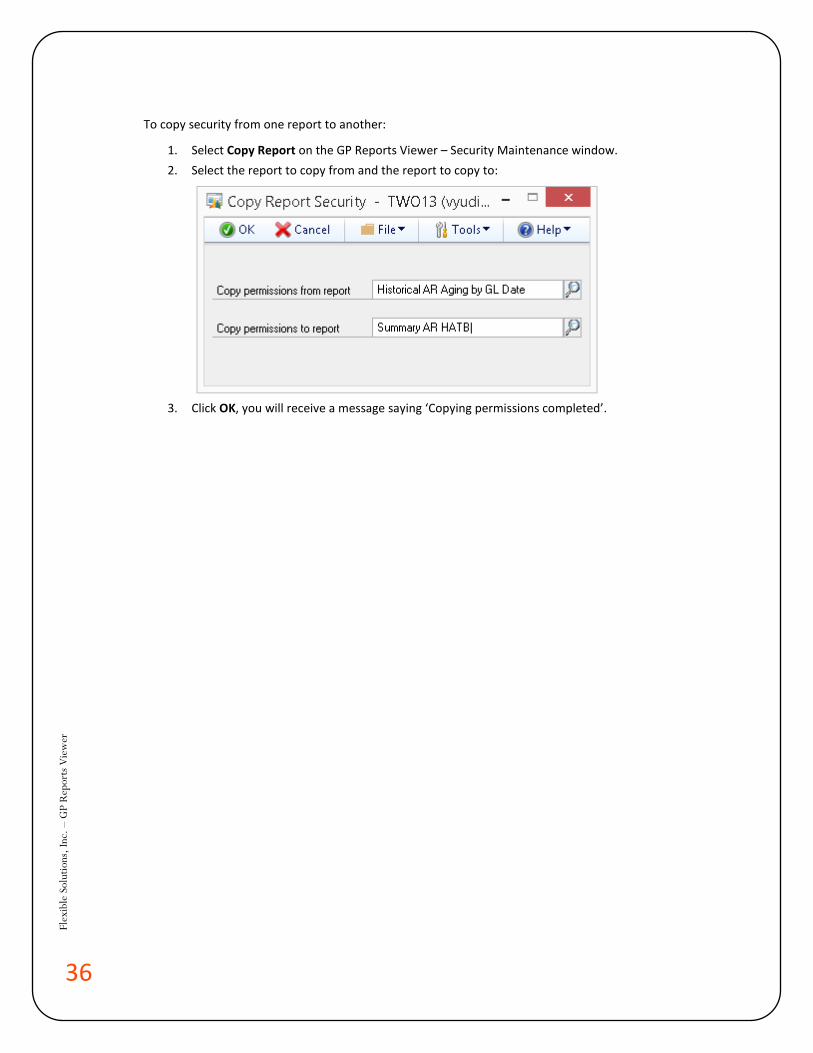
To copy security from one report to another:
1. Select Copy Report on the GP Reports Viewer – Security Maintenance window. 2. Select the report to copy from and the report to copy to:
3. Click OK, you will receive a message saying ‘Copying permissions completed’.
37
Flex
ible
Sol
utio
ns, I
nc. –
GP
Rep
orts
Vie
wer
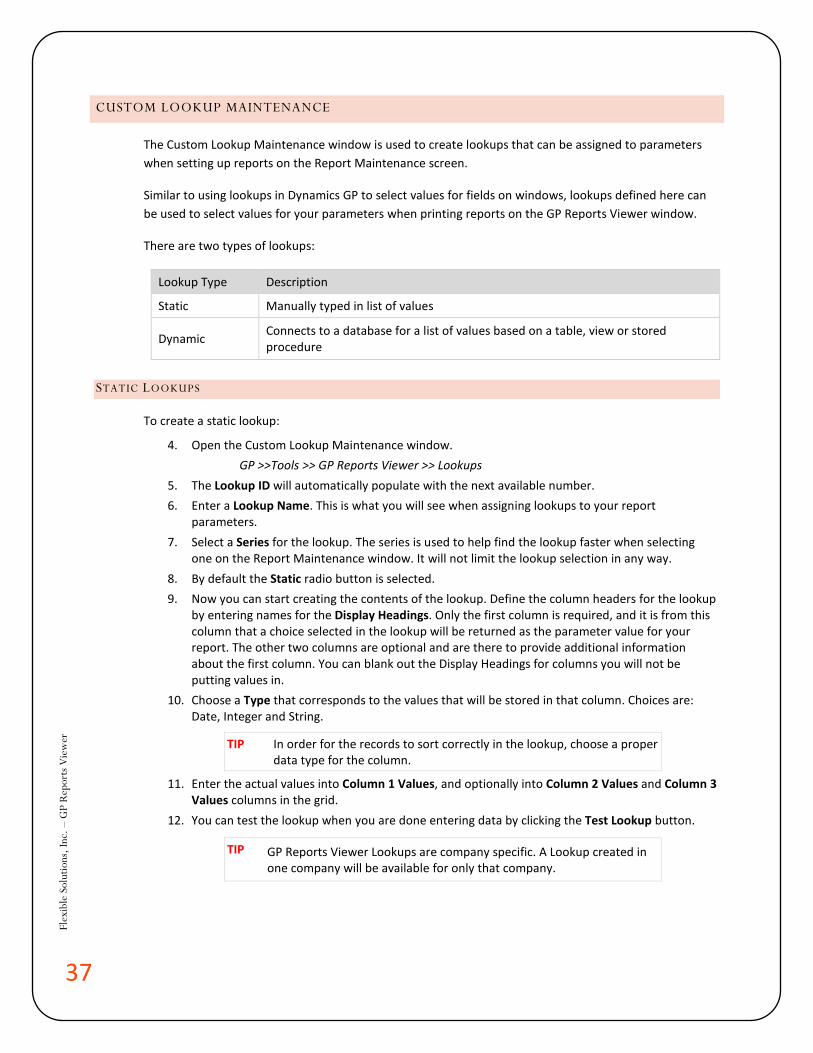
CUSTOM LOOKUP MAINTENANCE
The Custom Lookup Maintenance window is used to create lookups that can be assigned to parameters when setting up reports on the Report Maintenance screen.
Similar to using lookups in Dynamics GP to select values for fields on windows, lookups defined here can be used to select values for your parameters when printing reports on the GP Reports Viewer window.
There are two types of lookups:
Lookup Type Description
Static Manually typed in list of values
Dynamic Connects to a database for a list of values based on a table, view or stored procedure
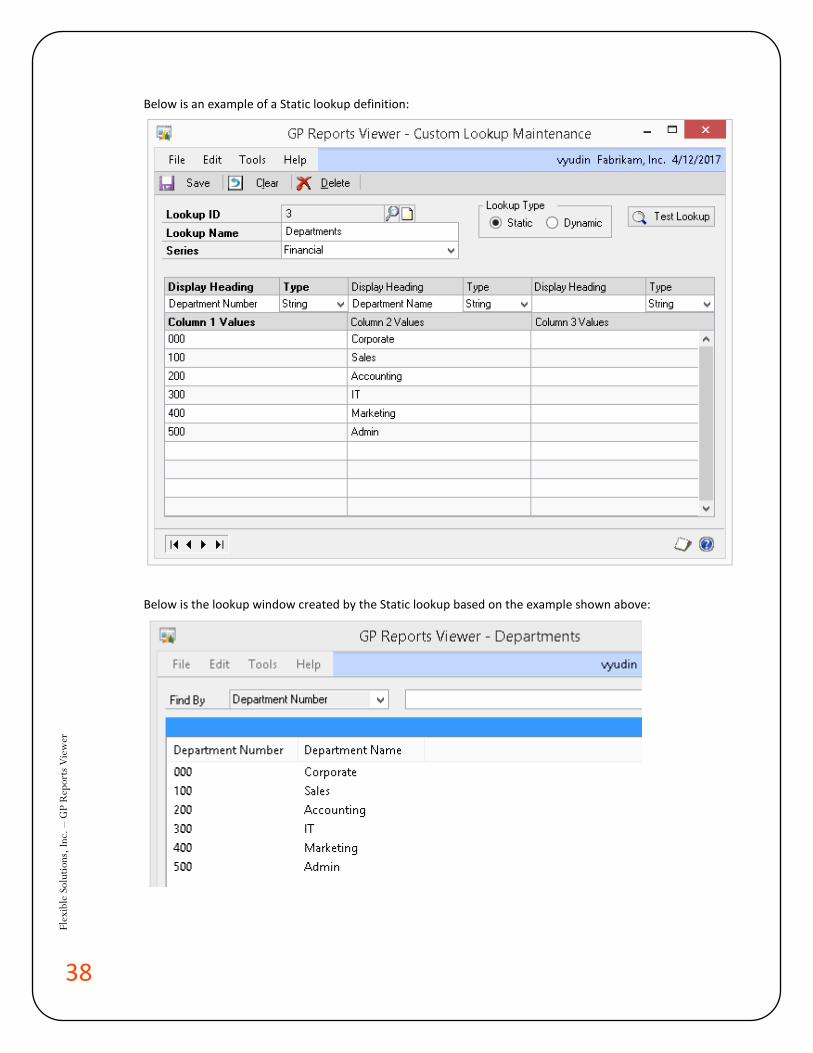
STATIC LOOKUPS
To create a static lookup:
4. Open the Custom Lookup Maintenance window. GP >>Tools >> GP Reports Viewer >> Lookups
5. The Lookup ID will automatically populate with the next available number. 6. Enter a Lookup Name. This is what you will see when assigning lookups to your report
parameters. 7. Select a Series for the lookup. The series is used to help find the lookup faster when selecting
one on the Report Maintenance window. It will not limit the lookup selection in any way. 8. By default the Static radio button is selected. 9. Now you can start creating the contents of the lookup. Define the column headers for the lookup
by entering names for the Display Headings. Only the first column is required, and it is from this column that a choice selected in the lookup will be returned as the parameter value for your report. The other two columns are optional and are there to provide additional information about the first column. You can blank out the Display Headings for columns you will not be putting values in.
10. Choose a Type that corresponds to the values that will be stored in that column. Choices are: Date, Integer and String.
TIP In order for the records to sort correctly in the lookup, choose a proper data type for the column.
11. Enter the actual values into Column 1 Values, and optionally into Column 2 Values and Column 3 Values columns in the grid.
12. You can test the lookup when you are done entering data by clicking the Test Lookup button.
TIP GP Reports Viewer Lookups are company specific. A Lookup created in one company will be available for only that company.
38
Flex
ible
Sol
utio
ns, I
nc. –
GP
Rep
orts
Vie
wer
Below is an example of a Static lookup definition:
Below is the lookup window created by the Static lookup based on the example shown above:
39
Flex
ible
Sol
utio
ns, I
nc. –
GP
Rep
orts
Vie
wer
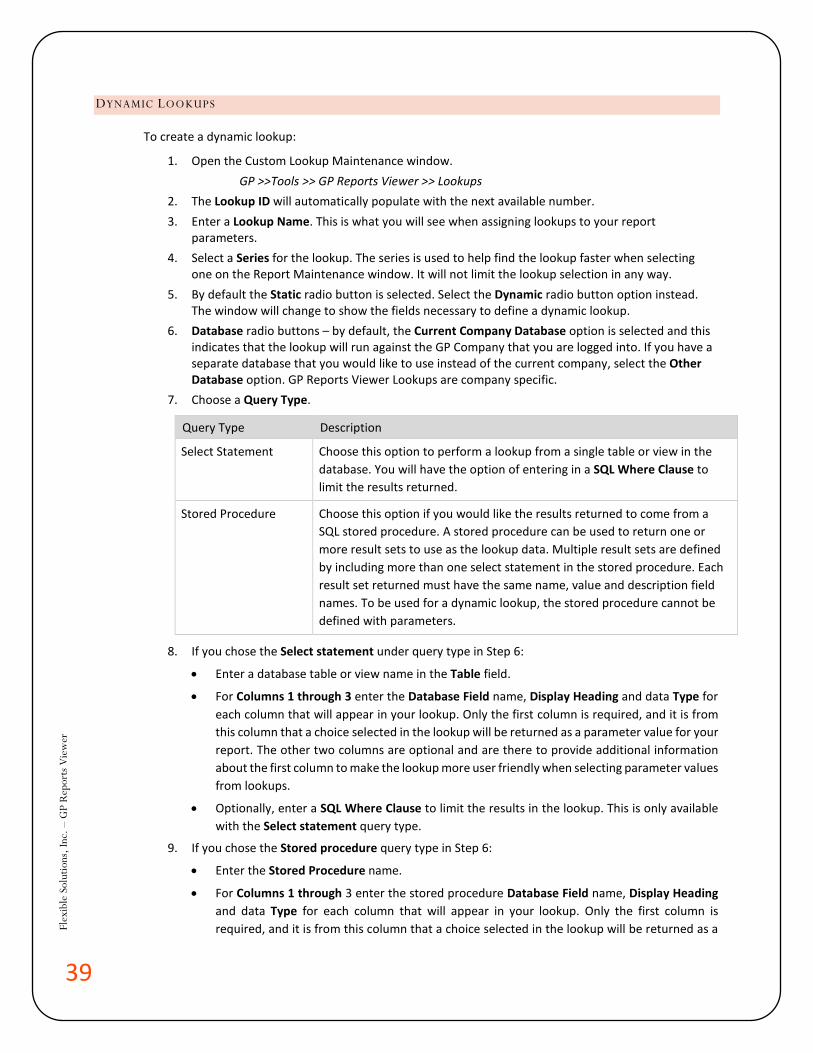
DYNAMIC LOOKUPS
To create a dynamic lookup:
1. Open the Custom Lookup Maintenance window. GP >>Tools >> GP Reports Viewer >> Lookups
2. The Lookup ID will automatically populate with the next available number. 3. Enter a Lookup Name. This is what you will see when assigning lookups to your report
parameters. 4. Select a Series for the lookup. The series is used to help find the lookup faster when selecting
one on the Report Maintenance window. It will not limit the lookup selection in any way. 5. By default the Static radio button is selected. Select the Dynamic radio button option instead.
The window will change to show the fields necessary to define a dynamic lookup. 6. Database radio buttons – by default, the Current Company Database option is selected and this
indicates that the lookup will run against the GP Company that you are logged into. If you have a separate database that you would like to use instead of the current company, select the Other Database option. GP Reports Viewer Lookups are company specific.
7. Choose a Query Type.
Query Type Description
Select Statement Choose this option to perform a lookup from a single table or view in the database. You will have the option of entering in a SQL Where Clause to limit the results returned.
Stored Procedure Choose this option if you would like the results returned to come from a SQL stored procedure. A stored procedure can be used to return one or more result sets to use as the lookup data. Multiple result sets are defined by including more than one select statement in the stored procedure. Each result set returned must have the same name, value and description field names. To be used for a dynamic lookup, the stored procedure cannot be defined with parameters.
8. If you chose the Select statement under query type in Step 6:
• Enter a database table or view name in the Table field.
• For Columns 1 through 3 enter the Database Field name, Display Heading and data Type for each column that will appear in your lookup. Only the first column is required, and it is from this column that a choice selected in the lookup will be returned as a parameter value for your report. The other two columns are optional and are there to provide additional information about the first column to make the lookup more user friendly when selecting parameter values from lookups.
• Optionally, enter a SQL Where Clause to limit the results in the lookup. This is only available with the Select statement query type.
9. If you chose the Stored procedure query type in Step 6:
• Enter the Stored Procedure name.
• For Columns 1 through 3 enter the stored procedure Database Field name, Display Heading and data Type for each column that will appear in your lookup. Only the first column is required, and it is from this column that a choice selected in the lookup will be returned as a
40
Flex
ible
Sol
utio
ns, I
nc. –
GP
Rep
orts
Vie
wer
parameter value for your report. The other two columns are optional and are there to provide additional information about the first column to make the lookup more user friendly when selecting parameter values from lookups.
10. You can test the lookup when you are done entering data by clicking the Test Lookup button.
Below is an example of a dynamic lookup definition:
Below is what the lookup test shows for the lookup example shown above:
41
Flex
ible
Sol
utio
ns, I
nc. –
GP
Rep
orts
Vie
wer
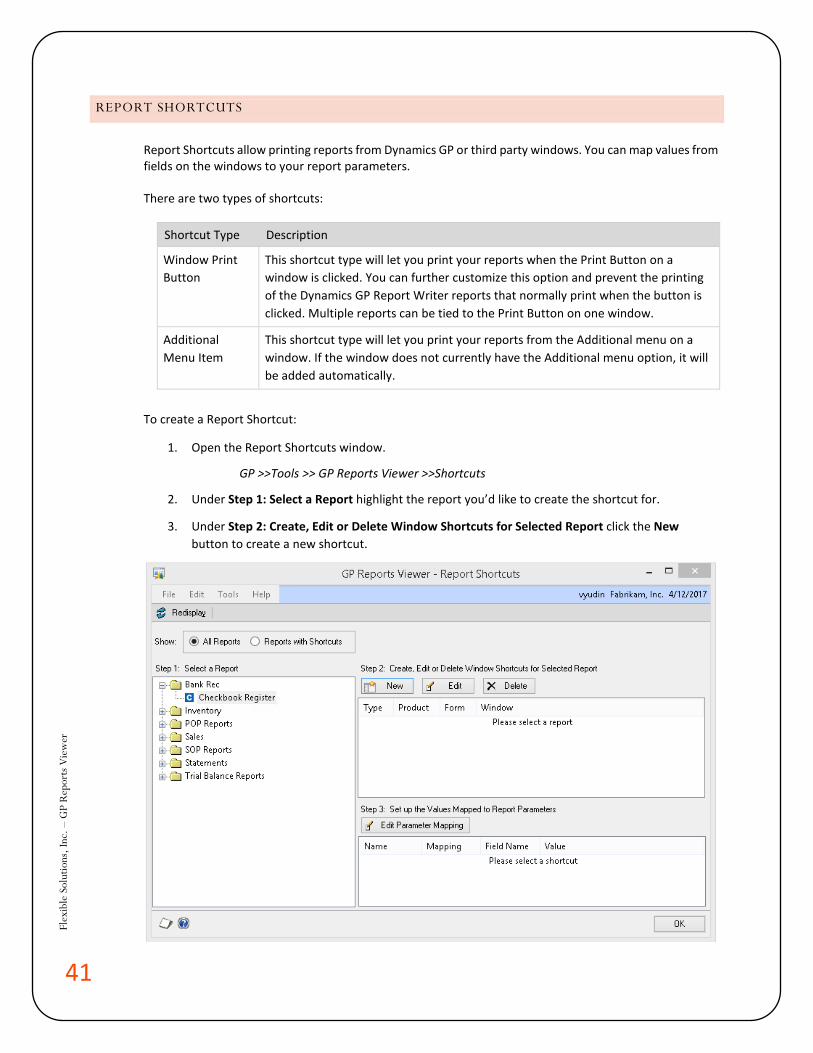
REPORT SHORTCUTS
Report Shortcuts allow printing reports from Dynamics GP or third party windows. You can map values from fields on the windows to your report parameters.
There are two types of shortcuts:
Shortcut Type Description
Window Print Button
This shortcut type will let you print your reports when the Print Button on a window is clicked. You can further customize this option and prevent the printing of the Dynamics GP Report Writer reports that normally print when the button is clicked. Multiple reports can be tied to the Print Button on one window.
Additional Menu Item
This shortcut type will let you print your reports from the Additional menu on a window. If the window does not currently have the Additional menu option, it will be added automatically.
To create a Report Shortcut:
1. Open the Report Shortcuts window.
GP >>Tools >> GP Reports Viewer >>Shortcuts
2. Under Step 1: Select a Report highlight the report you’d like to create the shortcut for.
3. Under Step 2: Create, Edit or Delete Window Shortcuts for Selected Report click the New button to create a new shortcut.
42
Flex
ible
Sol
utio
ns, I
nc. –
GP
Rep
orts
Vie
wer
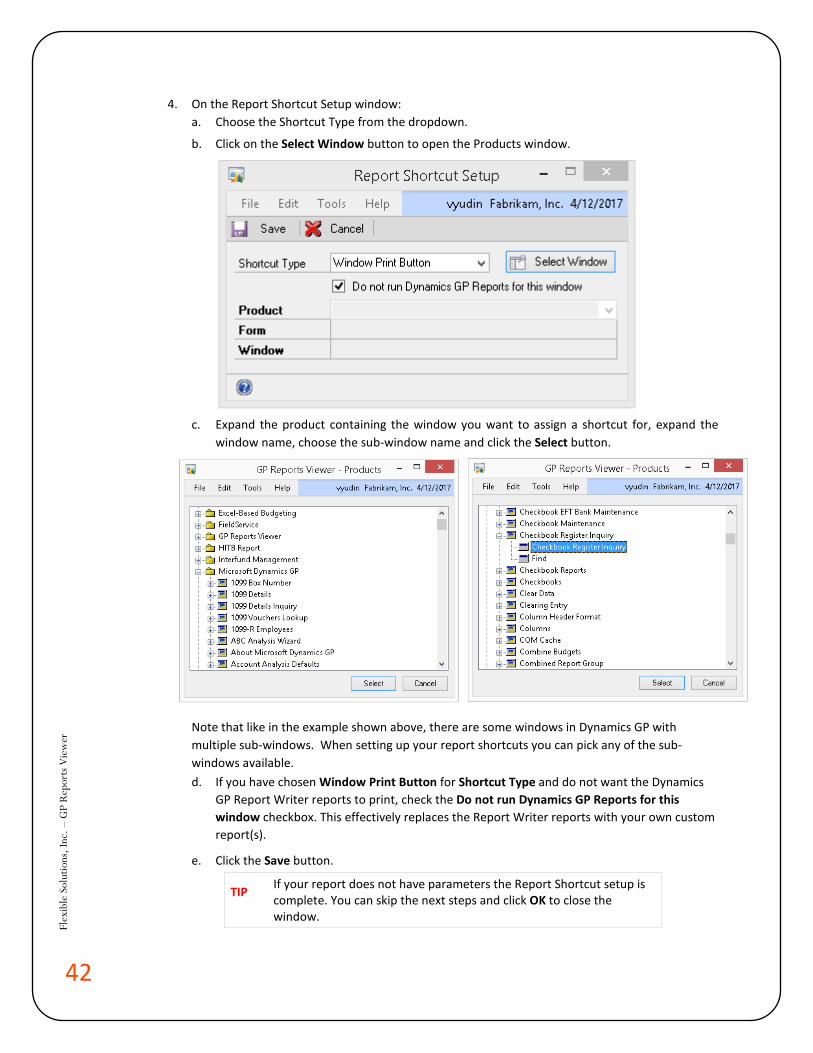
4. On the Report Shortcut Setup window: a. Choose the Shortcut Type from the dropdown.
b. Click on the Select Window button to open the Products window.
c. Expand the product containing the window you want to assign a shortcut for, expand the
window name, choose the sub-window name and click the Select button.
Note that like in the example shown above, there are some windows in Dynamics GP with multiple sub-windows. When setting up your report shortcuts you can pick any of the sub-windows available. d. If you have chosen Window Print Button for Shortcut Type and do not want the Dynamics
GP Report Writer reports to print, check the Do not run Dynamics GP Reports for this window checkbox. This effectively replaces the Report Writer reports with your own custom report(s).
e. Click the Save button.
TIP If your report does not have parameters the Report Shortcut setup is complete. You can skip the next steps and click OK to close the window.
43
Flex
ible
Sol
utio
ns, I
nc. –
GP
Rep
orts
Vie
wer
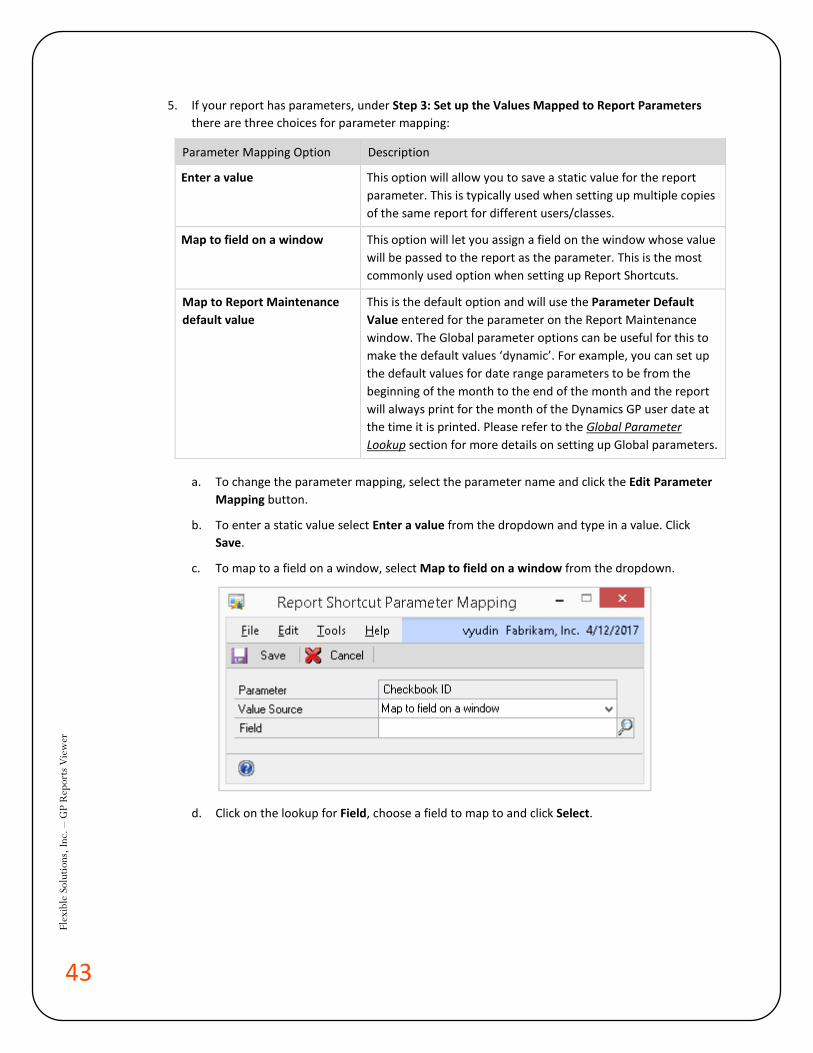
5. If your report has parameters, under Step 3: Set up the Values Mapped to Report Parameters there are three choices for parameter mapping:
Parameter Mapping Option Description
Enter a value This option will allow you to save a static value for the report parameter. This is typically used when setting up multiple copies of the same report for different users/classes.
Map to field on a window This option will let you assign a field on the window whose value will be passed to the report as the parameter. This is the most commonly used option when setting up Report Shortcuts.
Map to Report Maintenance default value
This is the default option and will use the Parameter Default Value entered for the parameter on the Report Maintenance window. The Global parameter options can be useful for this to make the default values ‘dynamic’. For example, you can set up the default values for date range parameters to be from the beginning of the month to the end of the month and the report will always print for the month of the Dynamics GP user date at the time it is printed. Please refer to the Global Parameter Lookup section for more details on setting up Global parameters.
a. To change the parameter mapping, select the parameter name and click the Edit Parameter Mapping button.
b. To enter a static value select Enter a value from the dropdown and type in a value. Click Save.
c. To map to a field on a window, select Map to field on a window from the dropdown.
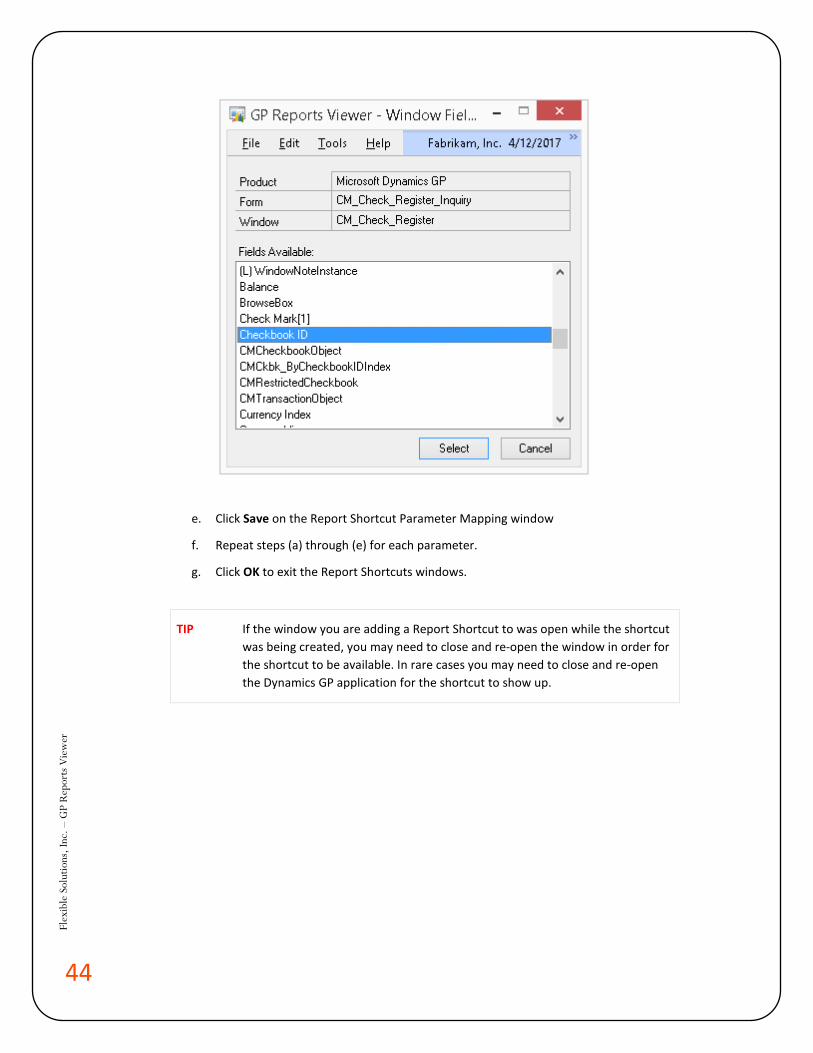
d. Click on the lookup for Field, choose a field to map to and click Select.
44
Flex
ible
Sol
utio
ns, I
nc. –
GP
Rep
orts
Vie
wer
e. Click Save on the Report Shortcut Parameter Mapping window
f. Repeat steps (a) through (e) for each parameter.
g. Click OK to exit the Report Shortcuts windows.
TIP If the window you are adding a Report Shortcut to was open while the shortcut was being created, you may need to close and re-open the window in order for the shortcut to be available. In rare cases you may need to close and re-open the Dynamics GP application for the shortcut to show up.
45
Flex
ible
Sol
utio
ns, I
nc. –
GP
Rep
orts
Vie
wer
REPLACING SOP AND POP REPORTS
The Dynamics GP Report Writer reports that print by default in the Sales Order Processing and Purchase Order Processing modules can be replaced with custom Crystal and SQL Server Reporting Services reports using GP Reports Viewer. This will allow your GP users to print Invoices, Returns, Orders, Quotes, Fulfillment Orders, Packing Slips, Picking Tickets and Purchase Orders the same way they currently do, but have those reports be replaced by your custom reports. You can also use GP Reports Viewer to replace reports emailed with Dynamics GP. GP Reports Viewer ships with sample reports that you can use as a template, or you can modify your existing reports to work with this feature.
SAMPLE REPORTS
The sample reports that ship GP Reports Viewer are listed below:
1. SOP Unposted.rpt (Crystal) and SOP Unposted.rdl (SSRS) This report is used to print all unposted SOP document types: Invoices, Returns, Orders, Quotes, Fulfillment Orders, Packing Slips and Picking Tickets.
2. SOP Posted.rpt (Crystal) and SOP Posted.rdl (SSRS) This report is used to print all posted SOP document types: Invoices, Returns, Orders and Quotes.
3. POP Open.rpt (Crystal) and POP Open.rdl (SSRS) This report is used to print open Purchase Orders.
4. POP Historical.rpt (Crystal) and POP Historical.rdl (SSRS) This report is used to print historical Purchase Orders.
Notes regarding the sample reports:
• During GP Reports Viewer installation these reports will be placed inside the Dynamics GP installation directory in a folder called GP Reports Viewer Sample Reports.
• The Crystal reports were created in Crystal Reports 2008 and 2011 and will open with Crystal Reports version 9 or later.
• The SQL Server Reporting Services reports were created in Visual Studio 2005 and have been tested with SSRS 2005, SSRS 2008, SSRS 2008 R2, SSRS 2012, SSRS 2014 and SSRS 2016. These versions include additional parameters for server and database name replacement so that only one version of the reports will be needed no matter how many GP companies you have. It is recommended that you review the section on Modifying a SQL Reporting Services Report for Server and Database Replacement for more information on how these parameters work together with GP Reports Viewer.
• In order to use the SQL Server Reporting Services versions of these reports with GP Reports Viewer, you must first upload them to your SSRS Report Manager. To share the Crystal reports on a network, they will need to be copied to a network share available to all Dynamics GP users.
The sample reports are intended to provide an example of how to create or modify existing Crystal and SSRS reports for use with the SOP and POP modules. Although they may be used as-is, they may not include all the same features and functionality that are present in the Dynamics GP Report Writer SOP and POP reports.
46
Flex
ible
Sol
utio
ns, I
nc. –
GP
Rep
orts
Vie
wer
Notes specific to SOP sample reports:
• The reports will print different details depending on which type of sales document is printed. For example, a Picking Ticket will not display prices but it will include lines for quantities to be picked.
• Currency fields will always use the Originating currency values and will not show a currency symbol.
• No kit components or customer item numbers are shown on these reports.
• The additional selections available on the Sales Document Print Options window (for example, Print Separate Picking Ticket Per Site) will not be passed through as parameters to the Crystal or SSRS reports by GP Reports Viewer. Only the selections under the Include section and the Print Previously Printed checkbox should be used when replacing SOP reports.
• Picking Tickets and Packing Lists will show Serial/Lot Numbers, other documents will not.
Notes specific to the POP sample reports:
• One Ship to Address per PO is assumed and the Ship To Address is taken from the header of the Purchase Order only.
• Vendor Items, FOB and Reference fields are not shown.
• Currency fields will always use the Originating currency values and will not show a currency symbol.
• For Blanket POs, all lines are shown, but only line 0 shows the unit price and extended price.
TIP You do not need to use the sample reports in order to take advantage of this feature. You can use your existing reports with just a few modifications. Please refer to the sections on Modifying a Report For use with Sales Order Processing and Modifying a Report For use with Purchase Order Processing for further instructions. If you do choose to use the sample reports, you will need to set them up on the Report Maintenance window and grant access to them using GP Reports Viewer Security Maintenance.
Users can only see and print reports that they have been granted access to using GP Reports Viewer Security Maintenance. If a user does not have access to a report, when they print an SOP or POP report, the default Dynamics GP report will print – no error message will be shown to the user. This is designed to accommodate a combination of Report Writer and Crystal and/or SQL Server Reporting Services reports co-existing and being used as needed by different users.
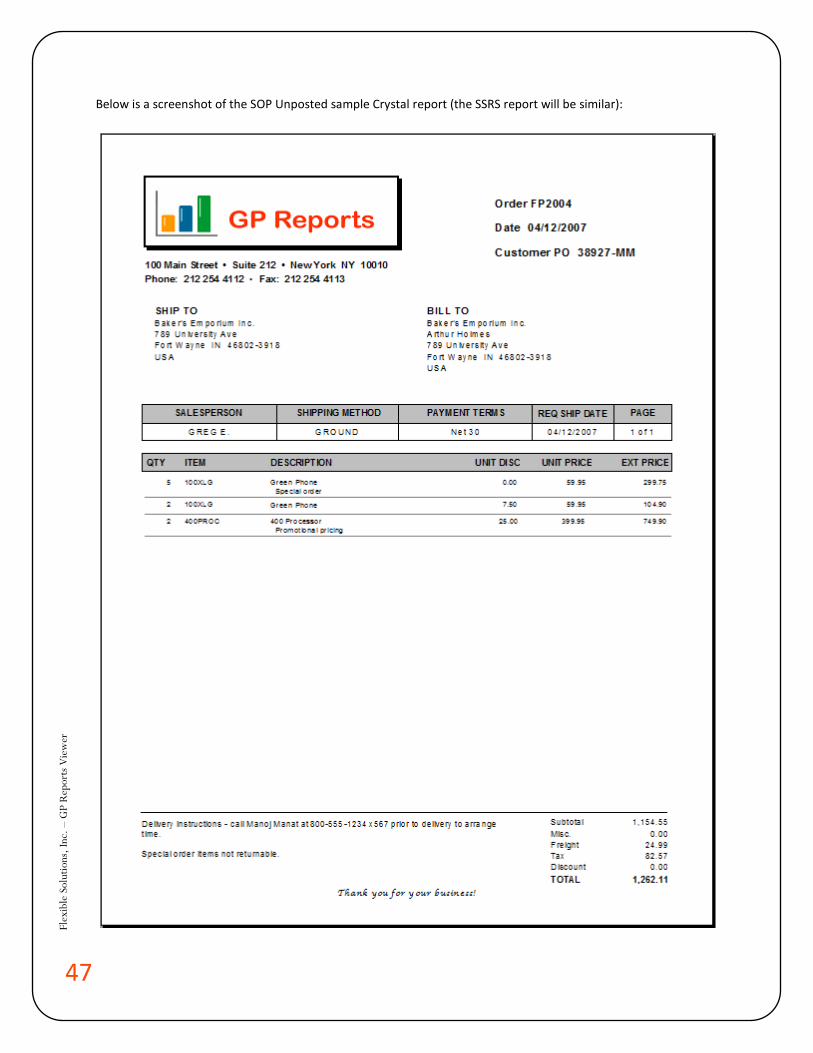
47
Flex
ible
Sol
utio
ns, I
nc. –
GP
Rep
orts
Vie
wer
Below is a screenshot of the SOP Unposted sample Crystal report (the SSRS report will be similar):
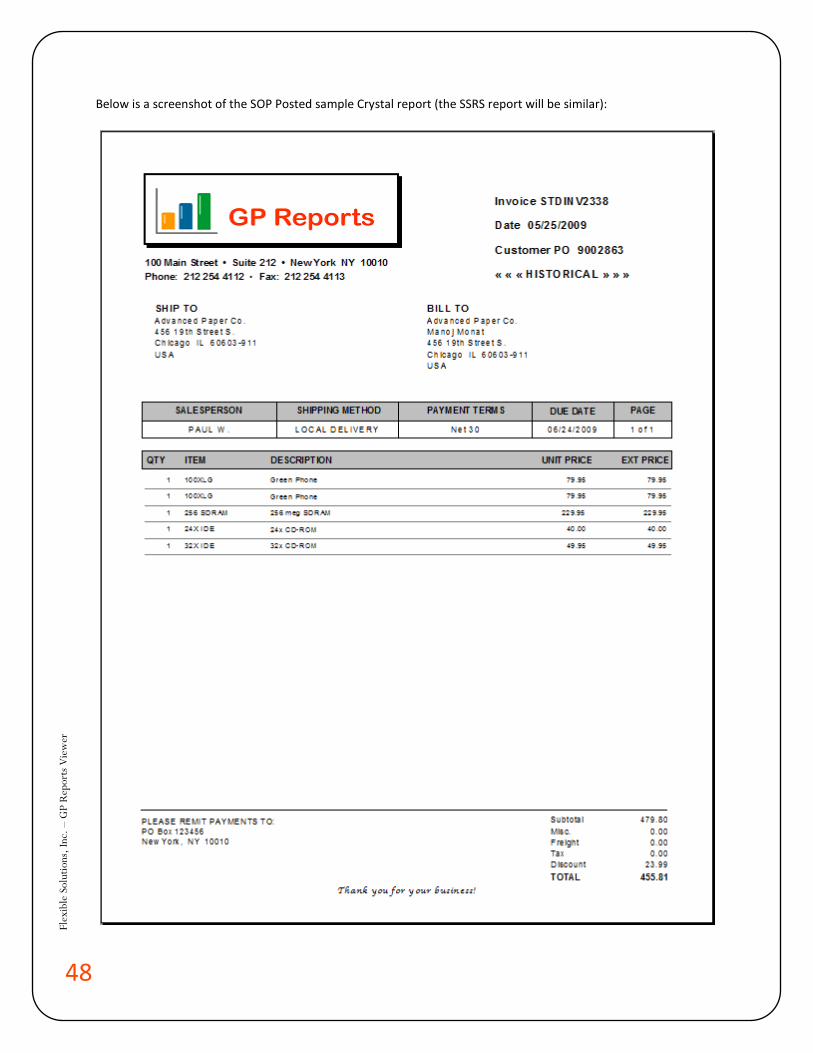
48
Flex
ible
Sol
utio
ns, I
nc. –
GP
Rep
orts
Vie
wer
Below is a screenshot of the SOP Posted sample Crystal report (the SSRS report will be similar):
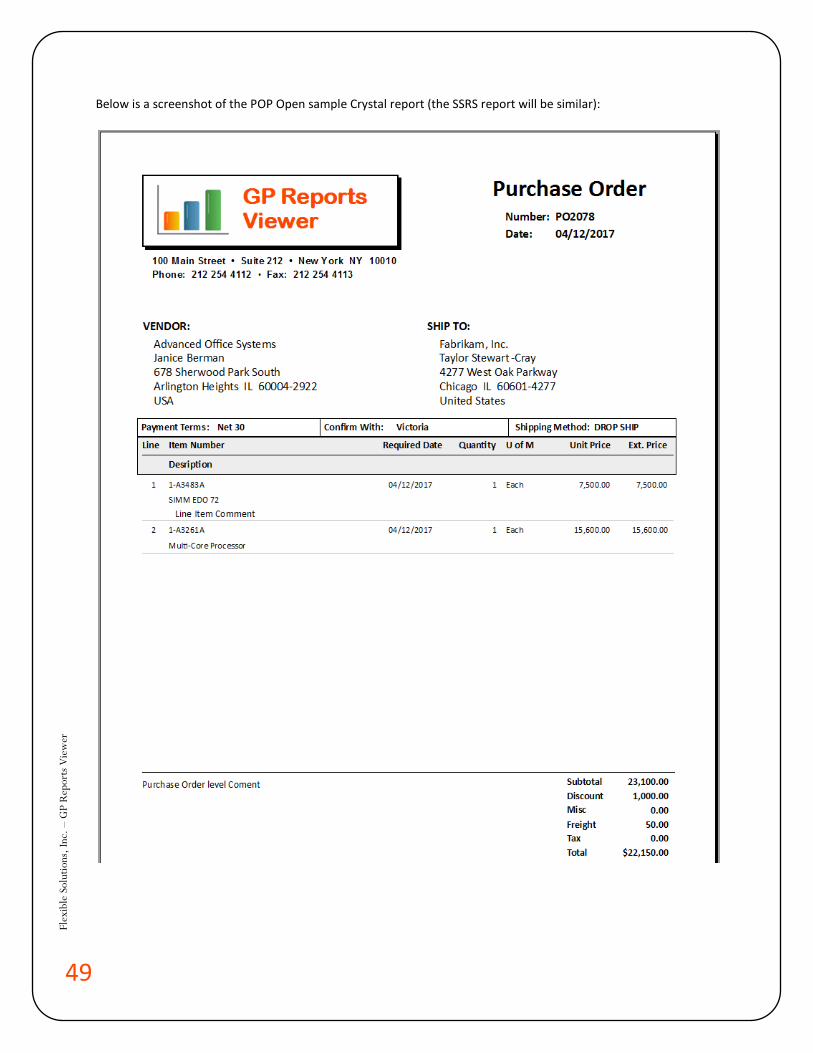
49
Flex
ible
Sol
utio
ns, I
nc. –
GP
Rep
orts
Vie
wer
Below is a screenshot of the POP Open sample Crystal report (the SSRS report will be similar):
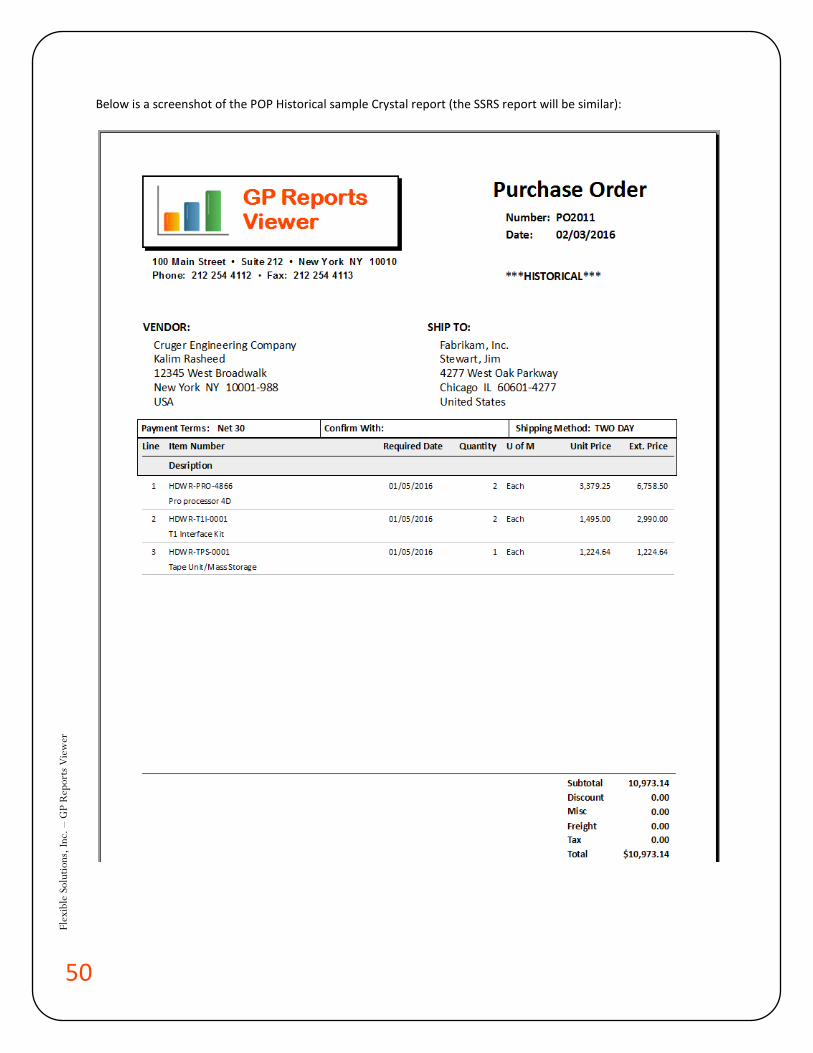
50
Flex
ible
Sol
utio
ns, I
nc. –
GP
Rep
orts
Vie
wer
Below is a screenshot of the POP Historical sample Crystal report (the SSRS report will be similar):
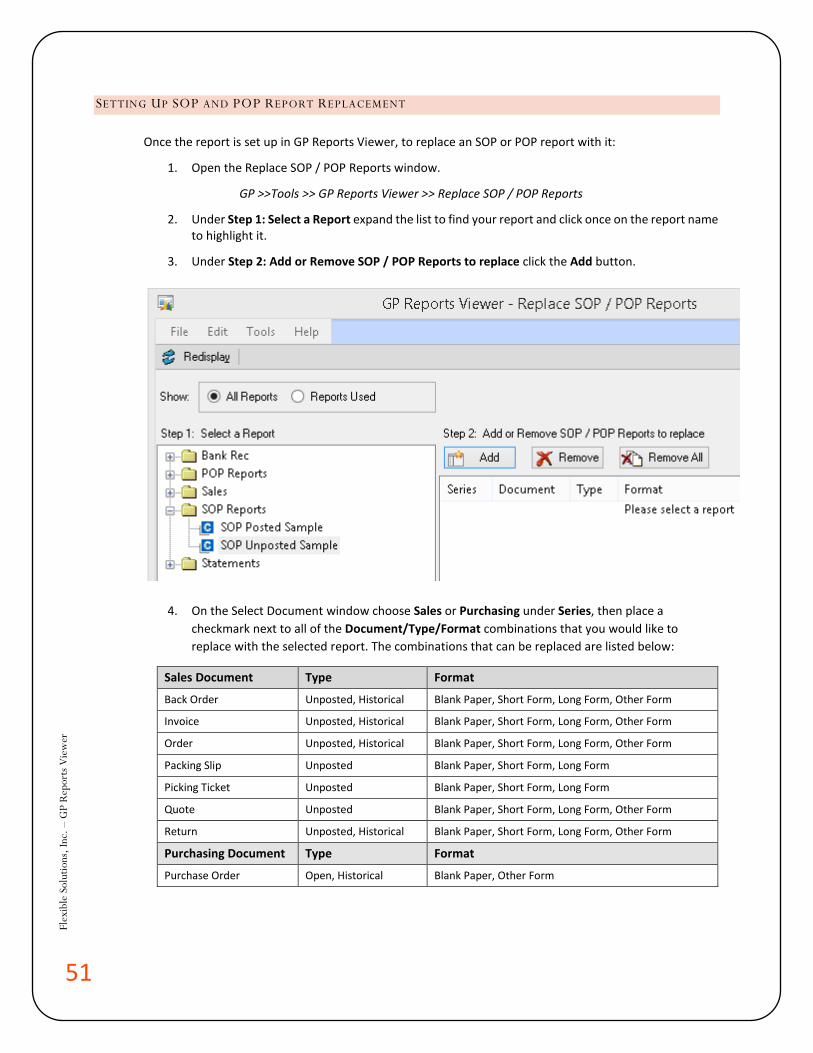
51
Flex
ible
Sol
utio
ns, I
nc. –
GP
Rep
orts
Vie
wer
SETTING UP SOP AND POP REPORT REPLACEMENT
Once the report is set up in GP Reports Viewer, to replace an SOP or POP report with it:
1. Open the Replace SOP / POP Reports window.
GP >>Tools >> GP Reports Viewer >> Replace SOP / POP Reports
2. Under Step 1: Select a Report expand the list to find your report and click once on the report name to highlight it.
3. Under Step 2: Add or Remove SOP / POP Reports to replace click the Add button.
4. On the Select Document window choose Sales or Purchasing under Series, then place a checkmark next to all of the Document/Type/Format combinations that you would like to replace with the selected report. The combinations that can be replaced are listed below:
Sales Document Type Format
Back Order Unposted, Historical Blank Paper, Short Form, Long Form, Other Form
Invoice Unposted, Historical Blank Paper, Short Form, Long Form, Other Form
Order Unposted, Historical Blank Paper, Short Form, Long Form, Other Form
Packing Slip Unposted Blank Paper, Short Form, Long Form
Picking Ticket Unposted Blank Paper, Short Form, Long Form
Quote Unposted Blank Paper, Short Form, Long Form, Other Form
Return Unposted, Historical Blank Paper, Short Form, Long Form, Other Form
Purchasing Document Type Format
Purchase Order Open, Historical Blank Paper, Other Form
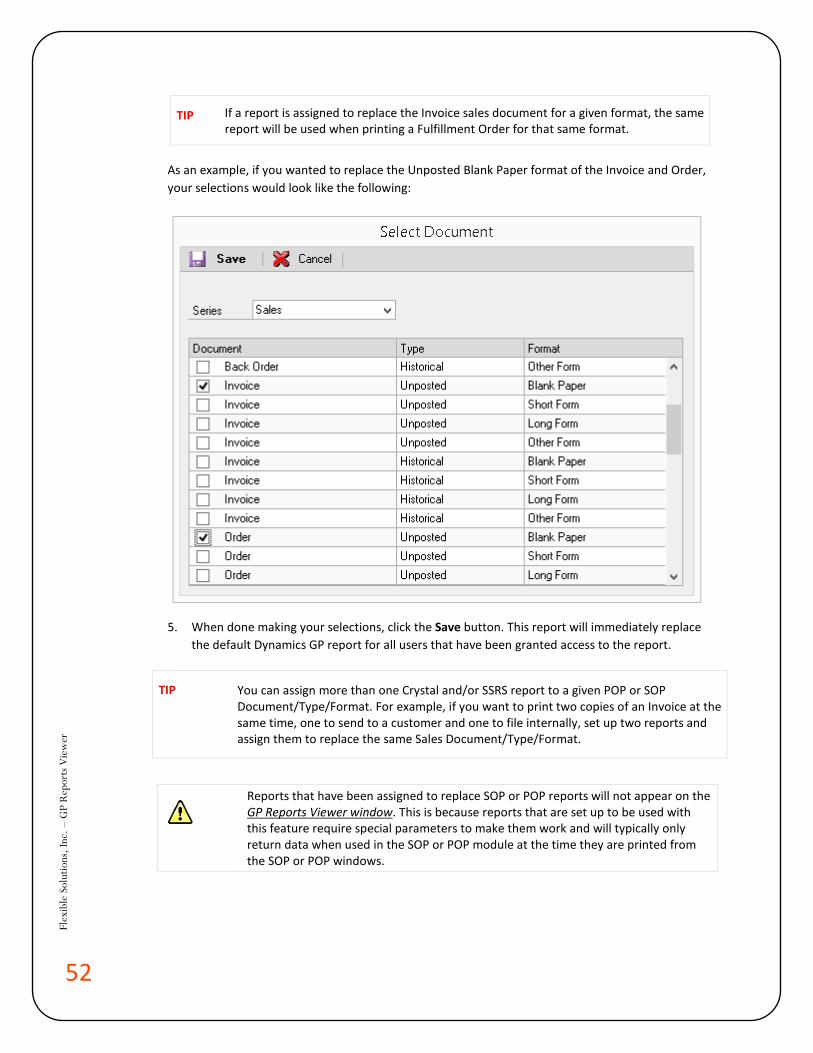
52
Flex
ible
Sol
utio
ns, I
nc. –
GP
Rep
orts
Vie
wer
TIP If a report is assigned to replace the Invoice sales document for a given format, the same report will be used when printing a Fulfillment Order for that same format.
As an example, if you wanted to replace the Unposted Blank Paper format of the Invoice and Order, your selections would look like the following:
5. When done making your selections, click the Save button. This report will immediately replace the default Dynamics GP report for all users that have been granted access to the report.
TIP You can assign more than one Crystal and/or SSRS report to a given POP or SOP Document/Type/Format. For example, if you want to print two copies of an Invoice at the same time, one to send to a customer and one to file internally, set up two reports and assign them to replace the same Sales Document/Type/Format.
Reports that have been assigned to replace SOP or POP reports will not appear on the GP Reports Viewer window. This is because reports that are set up to be used with this feature require special parameters to make them work and will typically only return data when used in the SOP or POP module at the time they are printed from the SOP or POP windows.
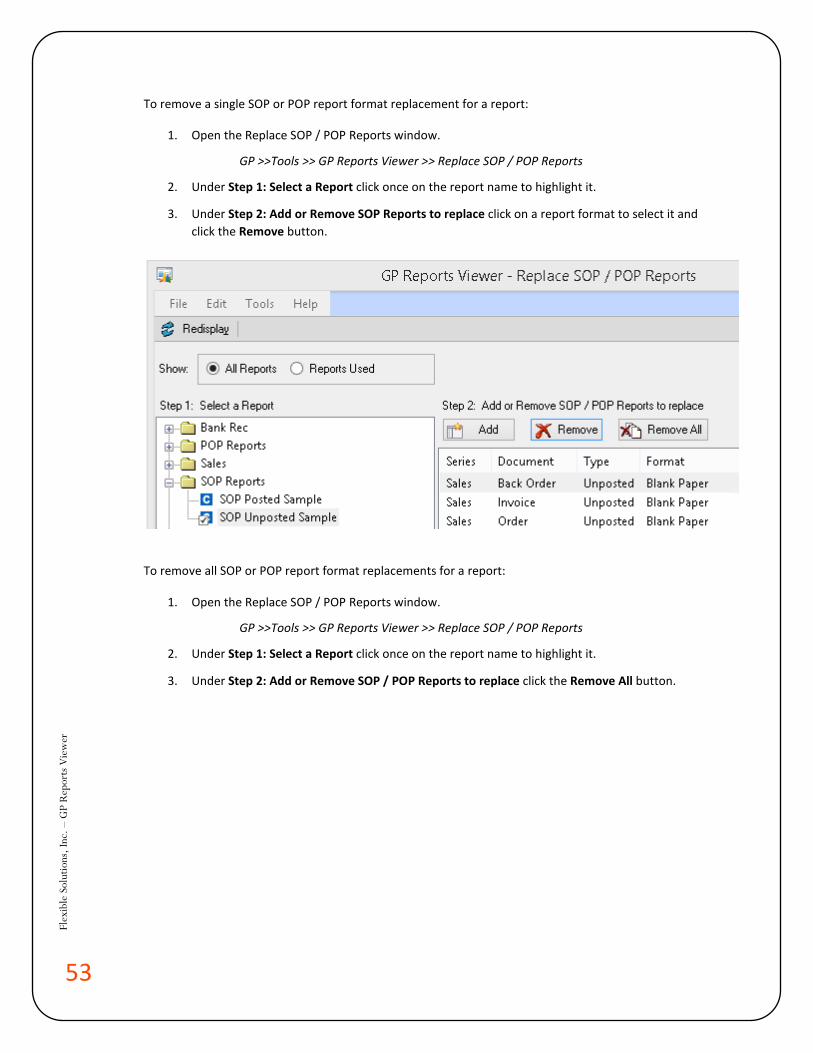
53
Flex
ible
Sol
utio
ns, I
nc. –
GP
Rep
orts
Vie
wer
To remove a single SOP or POP report format replacement for a report:
1. Open the Replace SOP / POP Reports window.
GP >>Tools >> GP Reports Viewer >> Replace SOP / POP Reports
2. Under Step 1: Select a Report click once on the report name to highlight it.
3. Under Step 2: Add or Remove SOP Reports to replace click on a report format to select it and click the Remove button.
To remove all SOP or POP report format replacements for a report:
1. Open the Replace SOP / POP Reports window.
GP >>Tools >> GP Reports Viewer >> Replace SOP / POP Reports
2. Under Step 1: Select a Report click once on the report name to highlight it.
3. Under Step 2: Add or Remove SOP / POP Reports to replace click the Remove All button.
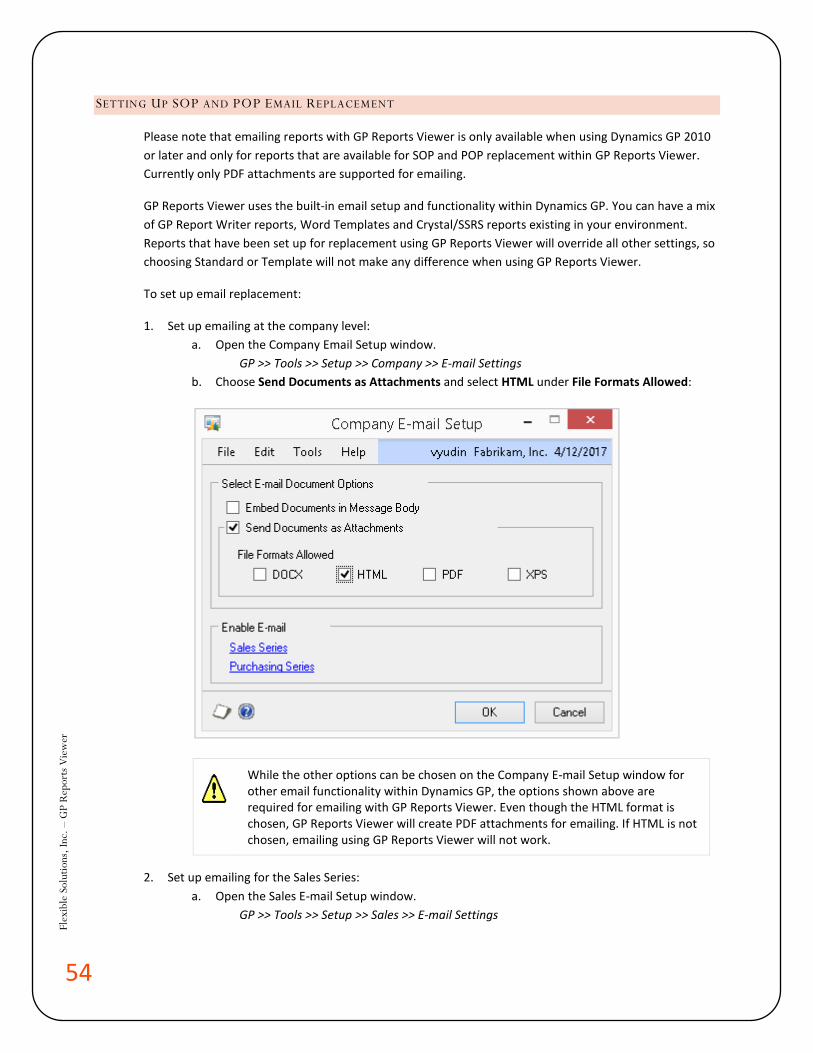
54
Flex
ible
Sol
utio
ns, I
nc. –
GP
Rep
orts
Vie
wer
SETTING UP SOP AND POP EMAIL REPLACEMENT
Please note that emailing reports with GP Reports Viewer is only available when using Dynamics GP 2010 or later and only for reports that are available for SOP and POP replacement within GP Reports Viewer. Currently only PDF attachments are supported for emailing.
GP Reports Viewer uses the built-in email setup and functionality within Dynamics GP. You can have a mix of GP Report Writer reports, Word Templates and Crystal/SSRS reports existing in your environment. Reports that have been set up for replacement using GP Reports Viewer will override all other settings, so choosing Standard or Template will not make any difference when using GP Reports Viewer.
To set up email replacement:
1. Set up emailing at the company level: a. Open the Company Email Setup window.
GP >> Tools >> Setup >> Company >> E-mail Settings b. Choose Send Documents as Attachments and select HTML under File Formats Allowed:
While the other options can be chosen on the Company E-mail Setup window for other email functionality within Dynamics GP, the options shown above are required for emailing with GP Reports Viewer. Even though the HTML format is chosen, GP Reports Viewer will create PDF attachments for emailing. If HTML is not chosen, emailing using GP Reports Viewer will not work.
2. Set up emailing for the Sales Series: a. Open the Sales E-mail Setup window.
GP >> Tools >> Setup >> Sales >> E-mail Settings
55
Flex
ible
Sol
utio
ns, I
nc. –
GP
Rep
orts
Vie
wer
b. Enable the documents that you would like to email and set up the corresponding Message ID’s. (Please refer to the Dynamics GP documentation and online help for more details on setting these up.)
c. The following documents will be available for replacement with GP Reports Viewer: i. Sales Quote
ii. Sales Order iii. Sales Fulfillment Order iv. Sales Invoice v. Sales Return
d. Make sure to review the section on Modifying a Report for Use with Sales Order Processing. If you are upgrading from a previous version of GP Reports Viewer, you will need to add an additional parameter to your reports to enable emailing.
e. Note that only the blank formats of reports are available for emailing from Dynamics GP.
3. Set up emailing for Customers: a. Open the Customer Maintenance window.
Cards >> Sales >> Customer b. Click the E-mail button to open the Customer E-mail Options window. c. Select Send Documents as Attachments. d. Optional – select Attachment Options. e. Enable documents that you will want to email to this customer and the corresponding
Message ID. f. IMPORTANT: Choose HTML for the Format to allow emailing with GP Reports Viewer. g. Enter email addresses for the Customer in the E-mail Addresses section of the Internet
Information widow.
4. Set up emailing for the Purchasing Series: a. Open the Purchasing E-mail Setup window.
GP >> Tools >> Setup >> Purchasing >> E-mail Settings b. Enable the Purchase Order document and set up a corresponding Message ID. (Please refer
to the Dynamics GP documentation and online help for more details on setting up email Messages.)
c. Make sure to review the section on Modifying a Report for Use with Purchase Order Processing. If you are upgrading from a previous version of GP Reports Viewer, you will need to add an additional parameter to your reports to enable emailing.
d. Note that only the blank formats of reports are available for emailing from Dynamics GP.
5. Set up emailing for Vendors: a. Open the Vendor Maintenance window:
Cards >> Purchasing >> Vendor b. Click the E-mail button to open the Vendor E-mail Options window. c. Select Send Documents as Attachments. d. Optional – select Attachment Options. e. Enable Purchase Order and the corresponding Message ID. f. IMPORTANT: Choose HTML for the Format to allow emailing with GP Reports Viewer.
56
Flex
ible
Sol
utio
ns, I
nc. –
GP
Rep
orts
Vie
wer
g. Enter email addresses for the Vendor in the E-mail Addresses section of the Internet Information widow.
The PDF creator may not work with all fonts and may shrink some fonts. You may need to adjust your reports to accommodate this.
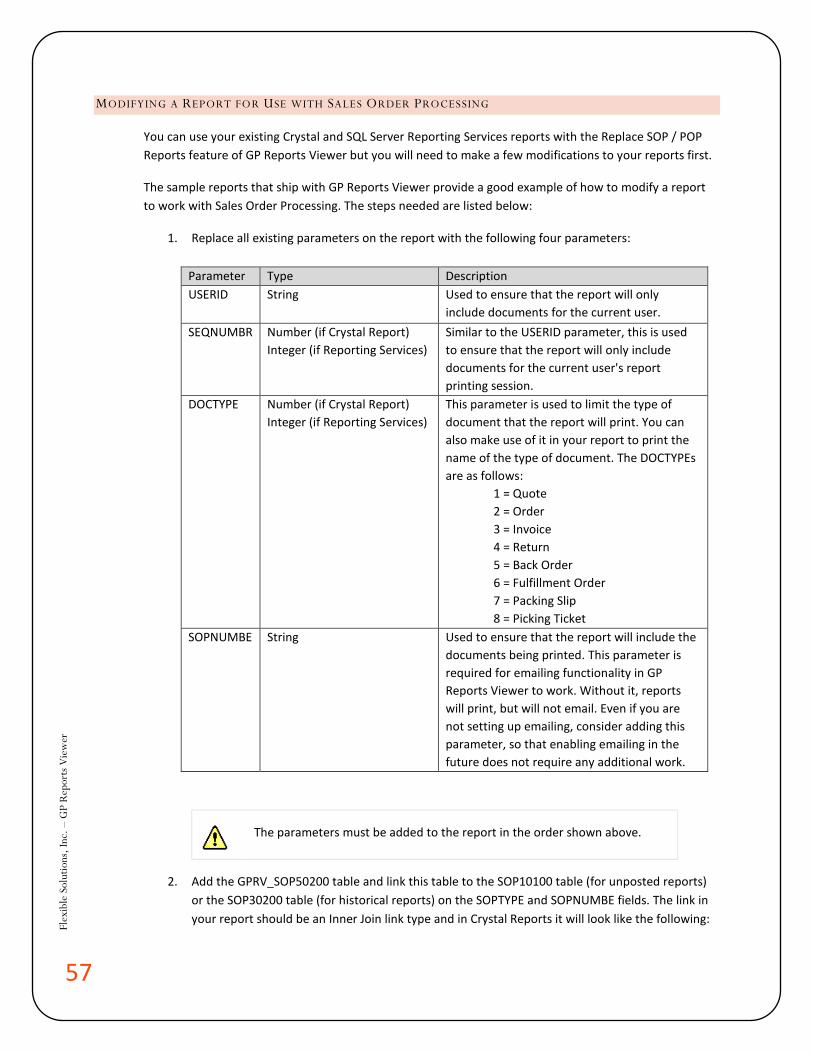
57
Flex
ible
Sol
utio
ns, I
nc. –
GP
Rep
orts
Vie
wer
MODIFYING A REPORT FOR USE WITH SALES ORDER PROCESSING
You can use your existing Crystal and SQL Server Reporting Services reports with the Replace SOP / POP Reports feature of GP Reports Viewer but you will need to make a few modifications to your reports first.
The sample reports that ship with GP Reports Viewer provide a good example of how to modify a report to work with Sales Order Processing. The steps needed are listed below:
1. Replace all existing parameters on the report with the following four parameters:
Parameter Type Description USERID String Used to ensure that the report will only
include documents for the current user. SEQNUMBR Number (if Crystal Report)
Integer (if Reporting Services) Similar to the USERID parameter, this is used to ensure that the report will only include documents for the current user's report printing session.
DOCTYPE Number (if Crystal Report) Integer (if Reporting Services)
This parameter is used to limit the type of document that the report will print. You can also make use of it in your report to print the name of the type of document. The DOCTYPEs are as follows:
1 = Quote 2 = Order 3 = Invoice 4 = Return 5 = Back Order 6 = Fulfillment Order 7 = Packing Slip 8 = Picking Ticket
SOPNUMBE String Used to ensure that the report will include the documents being printed. This parameter is required for emailing functionality in GP Reports Viewer to work. Without it, reports will print, but will not email. Even if you are not setting up emailing, consider adding this parameter, so that enabling emailing in the future does not require any additional work.
The parameters must be added to the report in the order shown above.
2. Add the GPRV_SOP50200 table and link this table to the SOP10100 table (for unposted reports) or the SOP30200 table (for historical reports) on the SOPTYPE and SOPNUMBE fields. The link in your report should be an Inner Join link type and in Crystal Reports it will look like the following:
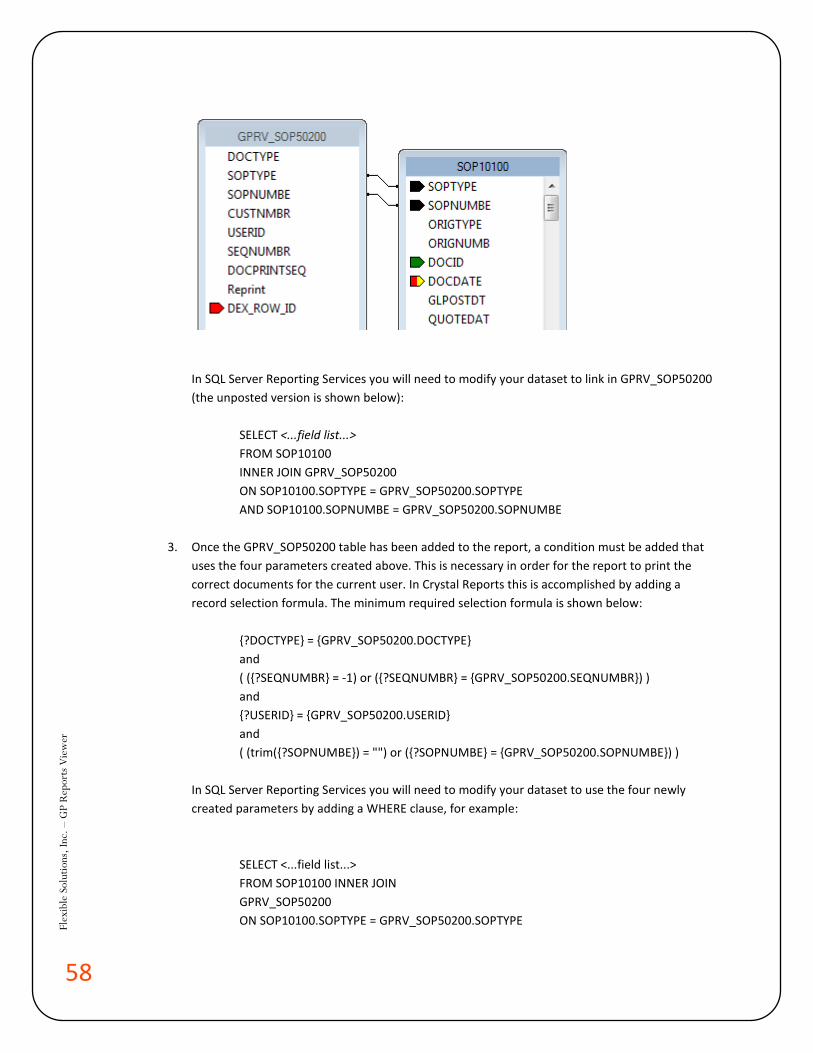
58
Flex
ible
Sol
utio
ns, I
nc. –
GP
Rep
orts
Vie
wer
In SQL Server Reporting Services you will need to modify your dataset to link in GPRV_SOP50200 (the unposted version is shown below):
SELECT <...field list...> FROM SOP10100 INNER JOIN GPRV_SOP50200 ON SOP10100.SOPTYPE = GPRV_SOP50200.SOPTYPE AND SOP10100.SOPNUMBE = GPRV_SOP50200.SOPNUMBE
3. Once the GPRV_SOP50200 table has been added to the report, a condition must be added that
uses the four parameters created above. This is necessary in order for the report to print the correct documents for the current user. In Crystal Reports this is accomplished by adding a record selection formula. The minimum required selection formula is shown below:
{?DOCTYPE} = {GPRV_SOP50200.DOCTYPE} and ( ({?SEQNUMBR} = -1) or ({?SEQNUMBR} = {GPRV_SOP50200.SEQNUMBR}) ) and {?USERID} = {GPRV_SOP50200.USERID} and ( (trim({?SOPNUMBE}) = "") or ({?SOPNUMBE} = {GPRV_SOP50200.SOPNUMBE}) )
In SQL Server Reporting Services you will need to modify your dataset to use the four newly created parameters by adding a WHERE clause, for example:
SELECT <...field list...> FROM SOP10100 INNER JOIN GPRV_SOP50200 ON SOP10100.SOPTYPE = GPRV_SOP50200.SOPTYPE
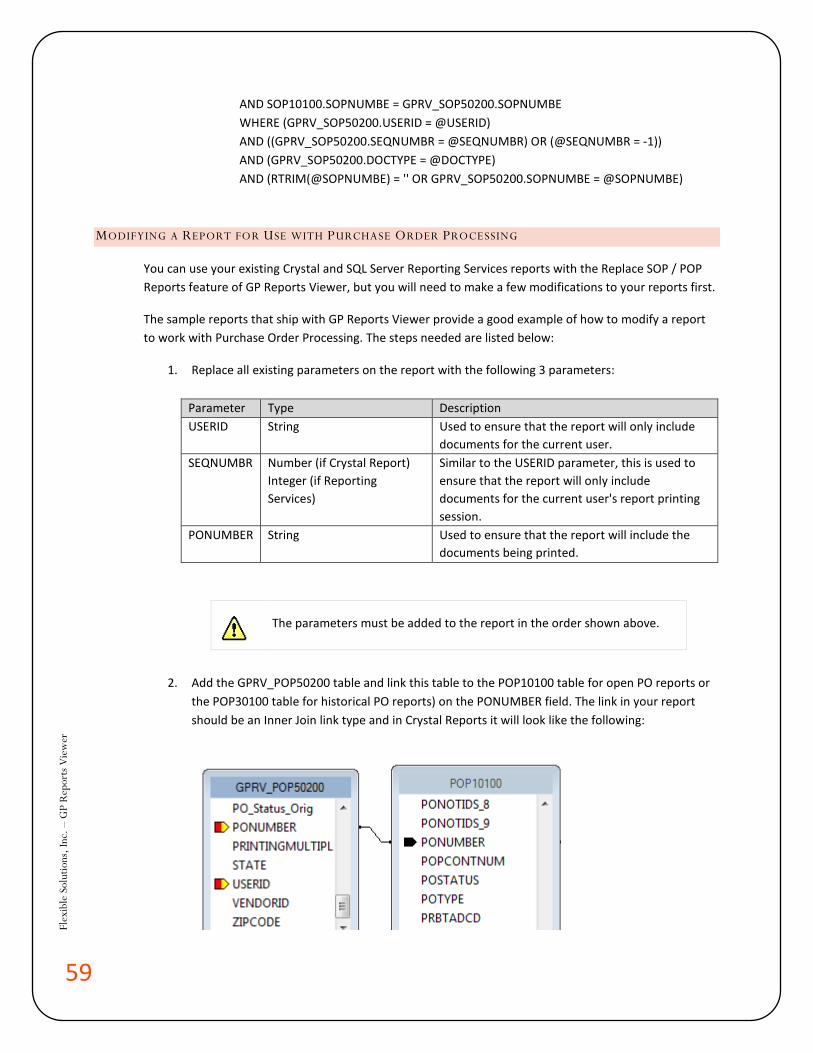
59
Flex
ible
Sol
utio
ns, I
nc. –
GP
Rep
orts
Vie
wer
AND SOP10100.SOPNUMBE = GPRV_SOP50200.SOPNUMBE WHERE (GPRV_SOP50200.USERID = @USERID) AND ((GPRV_SOP50200.SEQNUMBR = @SEQNUMBR) OR (@SEQNUMBR = -1)) AND (GPRV_SOP50200.DOCTYPE = @DOCTYPE) AND (RTRIM(@SOPNUMBE) = '' OR GPRV_SOP50200.SOPNUMBE = @SOPNUMBE)
MODIFYING A REPORT FOR USE WITH PURCHASE ORDER PROCESSING
You can use your existing Crystal and SQL Server Reporting Services reports with the Replace SOP / POP Reports feature of GP Reports Viewer, but you will need to make a few modifications to your reports first.
The sample reports that ship with GP Reports Viewer provide a good example of how to modify a report to work with Purchase Order Processing. The steps needed are listed below:
1. Replace all existing parameters on the report with the following 3 parameters:
Parameter Type Description USERID String Used to ensure that the report will only include
documents for the current user. SEQNUMBR Number (if Crystal Report)
Integer (if Reporting Services)
Similar to the USERID parameter, this is used to ensure that the report will only include documents for the current user's report printing session.
PONUMBER String Used to ensure that the report will include the documents being printed.
The parameters must be added to the report in the order shown above.
2. Add the GPRV_POP50200 table and link this table to the POP10100 table for open PO reports or the POP30100 table for historical PO reports) on the PONUMBER field. The link in your report should be an Inner Join link type and in Crystal Reports it will look like the following:
60
Flex
ible
Sol
utio
ns, I
nc. –
GP
Rep
orts
Vie
wer
In SQL Server Reporting Services you will need to modify your dataset to link in GPRV_POP50200 (the unposted version is shown below): SELECT <...field list...> FROM POP10100 INNER JOIN GPRV_POP50200 ON POP10100.PONUMBER = GPRV_POP50200.PONUMBER
3. Once the GPRV_POP50200 table has been added to the report, a condition must be added that uses the three parameters created above. This is necessary for the reports to print the correct Purchase Order(s) for the current user. In Crystal Reports this is accomplished by adding a record selection formula. The minimum required selection formula is shown below: {?USERID} = {GPRV_POP50200.USERID} and ( {?SEQNUMBR} = -1 or {?SEQNUMBR} = {GPRV_POP50200.DOCPRINTSEQ}) and (trim({?PONUMBER}) = "" or {?PONUMBER} = {GPRV_POP50200.PONUMBER}) In SQL Server Reporting Services you will need to modify your dataset to use the three newly created parameters by adding a WHERE clause, for example:
SELECT <...field list...> FROM POP10100 INNER JOIN GPRV_POP50200 ON POP10100.PONUMBER = GPRV_POP50200.PONUMBER WHERE (GPRV_POP50200.USERID=@USERID) AND ((GPRV_POP50200.DOCPRINTSEQ=@SEQNUMBR) OR (@SEQNUMBR = -1)) AND (RTRIM(@PONUMBER) = '' OR GPRV_POP50200.PONUMBER = @PONUMBER)
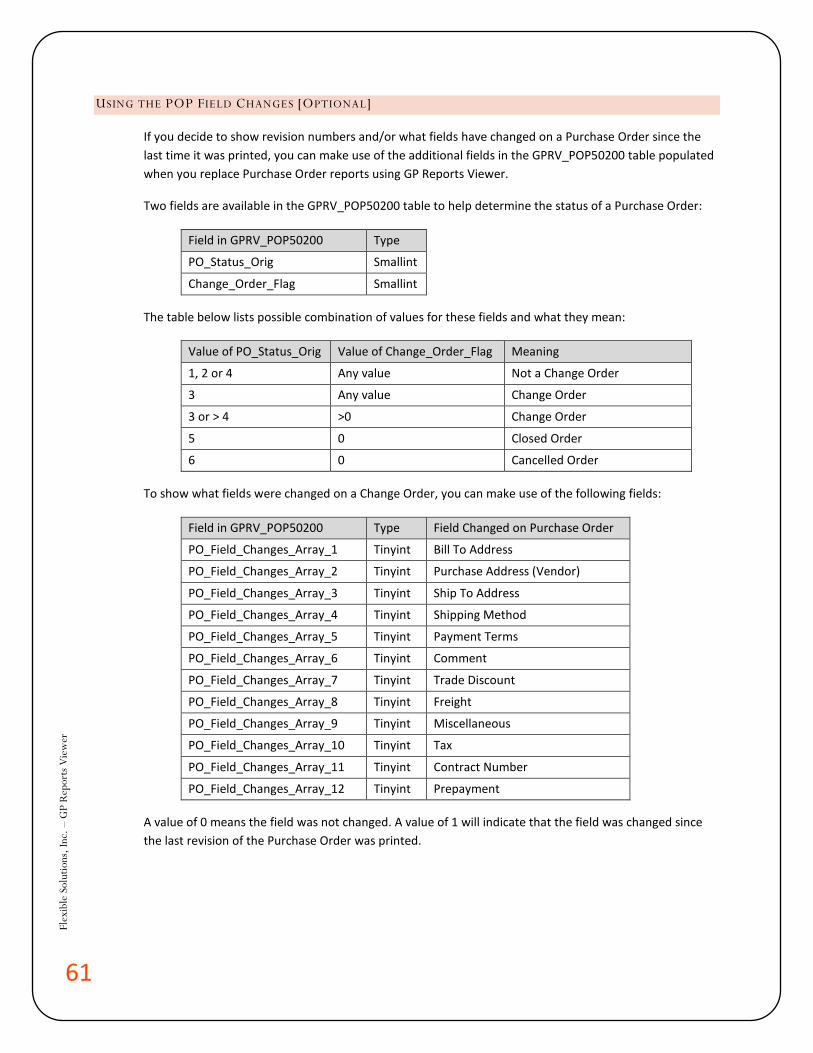
61
Flex
ible
Sol
utio
ns, I
nc. –
GP
Rep
orts
Vie
wer
USING THE POP FIELD CHANGES [OPTIONAL]
If you decide to show revision numbers and/or what fields have changed on a Purchase Order since the last time it was printed, you can make use of the additional fields in the GPRV_POP50200 table populated when you replace Purchase Order reports using GP Reports Viewer.
Two fields are available in the GPRV_POP50200 table to help determine the status of a Purchase Order:
Field in GPRV_POP50200 Type
PO_Status_Orig Smallint
Change_Order_Flag Smallint
The table below lists possible combination of values for these fields and what they mean:
Value of PO_Status_Orig Value of Change_Order_Flag Meaning
1, 2 or 4 Any value Not a Change Order
3 Any value Change Order
3 or > 4 >0 Change Order
5 0 Closed Order
6 0 Cancelled Order
To show what fields were changed on a Change Order, you can make use of the following fields:
Field in GPRV_POP50200 Type Field Changed on Purchase Order
PO_Field_Changes_Array_1 Tinyint Bill To Address
PO_Field_Changes_Array_2 Tinyint Purchase Address (Vendor)
PO_Field_Changes_Array_3 Tinyint Ship To Address
PO_Field_Changes_Array_4 Tinyint Shipping Method
PO_Field_Changes_Array_5 Tinyint Payment Terms
PO_Field_Changes_Array_6 Tinyint Comment
PO_Field_Changes_Array_7 Tinyint Trade Discount
PO_Field_Changes_Array_8 Tinyint Freight
PO_Field_Changes_Array_9 Tinyint Miscellaneous
PO_Field_Changes_Array_10 Tinyint Tax
PO_Field_Changes_Array_11 Tinyint Contract Number
PO_Field_Changes_Array_12 Tinyint Prepayment
A value of 0 means the field was not changed. A value of 1 will indicate that the field was changed since the last revision of the Purchase Order was printed.
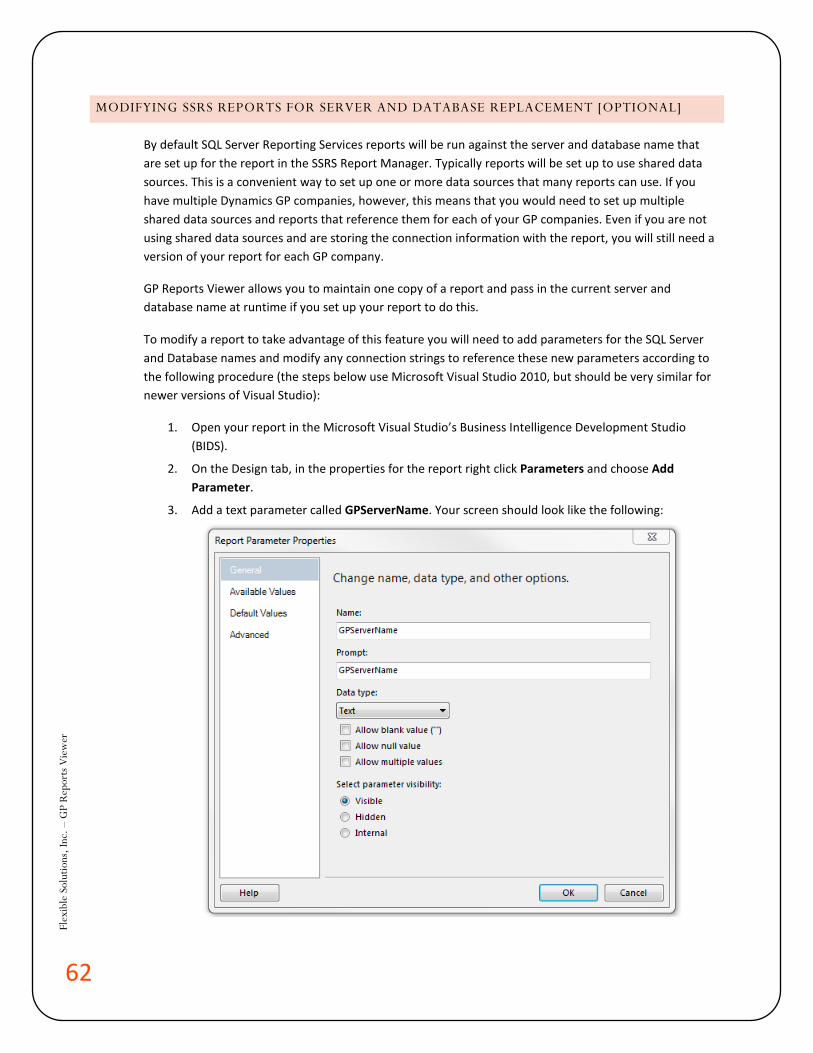
62
Flex
ible
Sol
utio
ns, I
nc. –
GP
Rep
orts
Vie
wer
MODIFYING SSRS REPORTS FOR SERVER AND DATABASE REPLACEMENT [OPTIONAL]
By default SQL Server Reporting Services reports will be run against the server and database name that are set up for the report in the SSRS Report Manager. Typically reports will be set up to use shared data sources. This is a convenient way to set up one or more data sources that many reports can use. If you have multiple Dynamics GP companies, however, this means that you would need to set up multiple shared data sources and reports that reference them for each of your GP companies. Even if you are not using shared data sources and are storing the connection information with the report, you will still need a version of your report for each GP company.
GP Reports Viewer allows you to maintain one copy of a report and pass in the current server and database name at runtime if you set up your report to do this.
To modify a report to take advantage of this feature you will need to add parameters for the SQL Server and Database names and modify any connection strings to reference these new parameters according to the following procedure (the steps below use Microsoft Visual Studio 2010, but should be very similar for newer versions of Visual Studio):
1. Open your report in the Microsoft Visual Studio’s Business Intelligence Development Studio (BIDS).
2. On the Design tab, in the properties for the report right click Parameters and choose Add Parameter.
3. Add a text parameter called GPServerName. Your screen should look like the following:

63
Flex
ible
Sol
utio
ns, I
nc. –
GP
Rep
orts
Vie
wer
4. Click OK.
5. Right click on Parameters and choose Add Parameter and add another text parameter called GPDBName.
6. Click OK.
7. Modify your Data Sources to use expressions that point to the two new parameters:
Right click on the name of the Data Source and choose Data Source Properties.
The details for the Data Source will be shown:
Modify the Connection string to use the following syntax instead: ="Data Source=" + Parameters!GPServerName.Value + ";Initial Catalog=" + Parameters!GPDBName.Value
Click OK.
Repeat this step for each Data Source in your report that will need to have the Server and Database name replaced at report runtime.
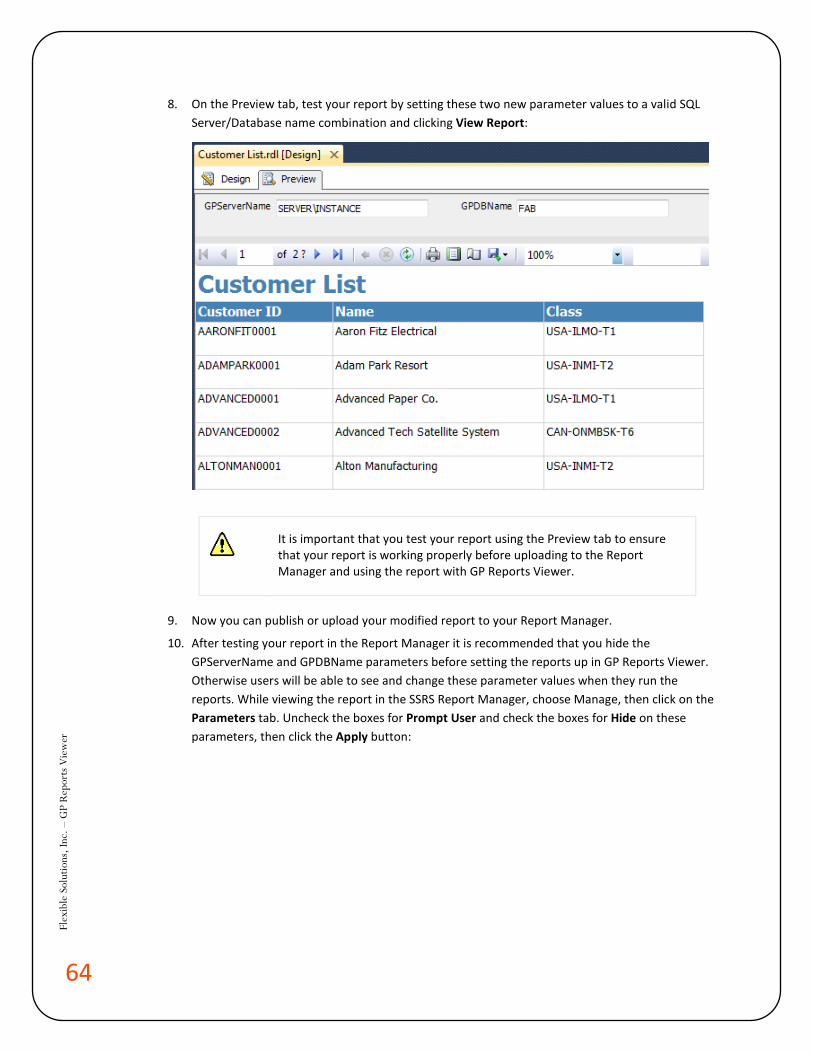
64
Flex
ible
Sol
utio
ns, I
nc. –
GP
Rep
orts
Vie
wer
8. On the Preview tab, test your report by setting these two new parameter values to a valid SQL Server/Database name combination and clicking View Report:
It is important that you test your report using the Preview tab to ensure that your report is working properly before uploading to the Report Manager and using the report with GP Reports Viewer.
9. Now you can publish or upload your modified report to your Report Manager.
10. After testing your report in the Report Manager it is recommended that you hide the GPServerName and GPDBName parameters before setting the reports up in GP Reports Viewer. Otherwise users will be able to see and change these parameter values when they run the reports. While viewing the report in the SSRS Report Manager, choose Manage, then click on the Parameters tab. Uncheck the boxes for Prompt User and check the boxes for Hide on these parameters, then click the Apply button:
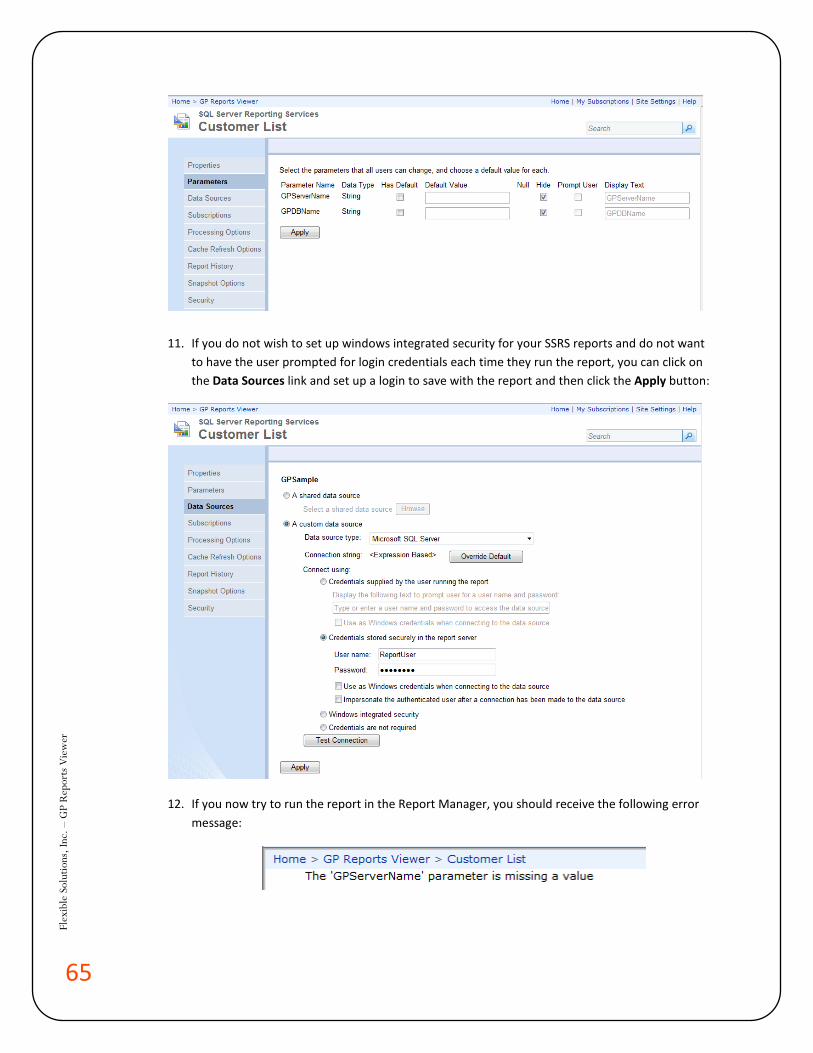
65
Flex
ible
Sol
utio
ns, I
nc. –
GP
Rep
orts
Vie
wer
11. If you do not wish to set up windows integrated security for your SSRS reports and do not want to have the user prompted for login credentials each time they run the report, you can click on the Data Sources link and set up a login to save with the report and then click the Apply button:
12. If you now try to run the report in the Report Manager, you should receive the following error message:
66
Flex
ible
Sol
utio
ns, I
nc. –
GP
Rep
orts
Vie
wer
This is expected because the parameters will be sent to the report at runtime when your report is launched from Dynamics GP with GP Reports Viewer.
13. The report is now ready to be set up in Dynamics GP on the Report Maintenance window.
TIP You may want to group reports that are set up in this manner with Server and Database name replacement into a single folder in SSRS called GP Reports Viewer to keep these separate from other SSRS reports that are intended to be run from the SSRS Report Manager interface.
TIP If you are going to use the server and database replacement feature with GP Reports Viewer for all of your SSRS Reports, you may want to consider using the missing parameter warning message feature located in the Setup Options window. This will provide a warning message if the GPServerName and GPDBName parameters are not present in a report when the report is run.
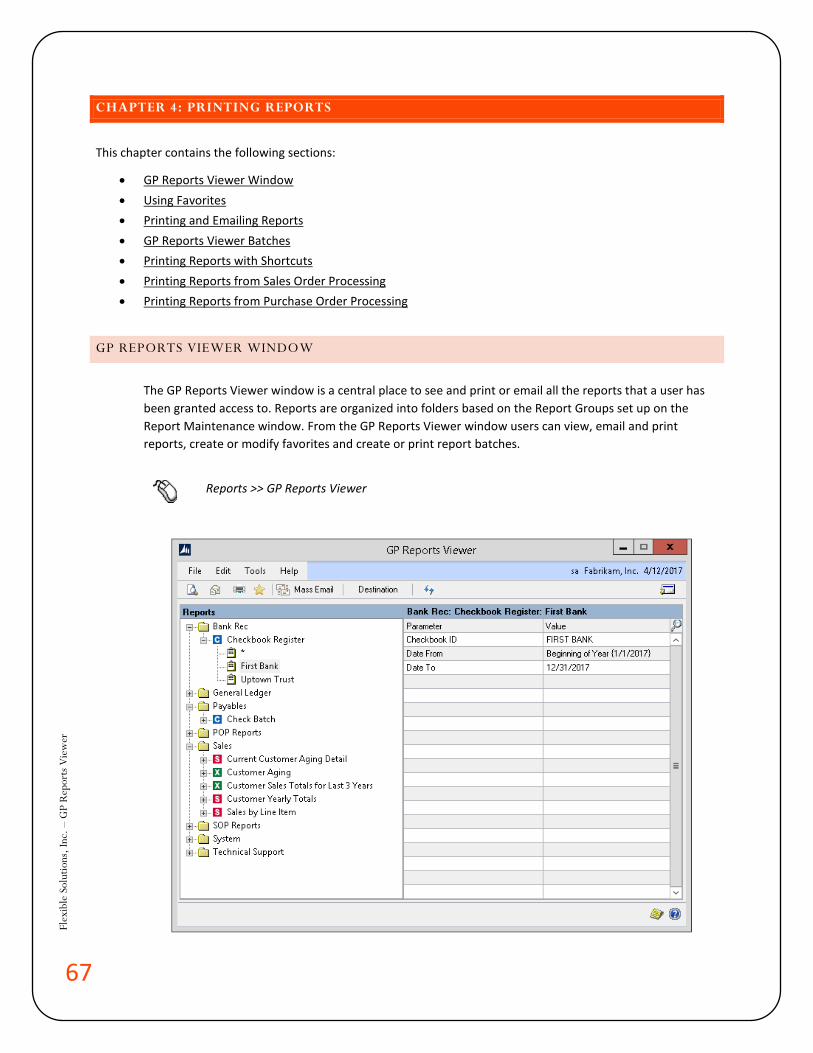
67
Flex
ible
Sol
utio
ns, I
nc. –
GP
Rep
orts
Vie
wer
CHAPTER 4: PRINTING REPORTS
This chapter contains the following sections:
• GP Reports Viewer Window • Using Favorites • Printing and Emailing Reports • GP Reports Viewer Batches • Printing Reports with Shortcuts • Printing Reports from Sales Order Processing • Printing Reports from Purchase Order Processing
GP REPORTS VIEWER WINDOW
The GP Reports Viewer window is a central place to see and print or email all the reports that a user has been granted access to. Reports are organized into folders based on the Report Groups set up on the Report Maintenance window. From the GP Reports Viewer window users can view, email and print reports, create or modify favorites and create or print report batches.
Reports >> GP Reports Viewer
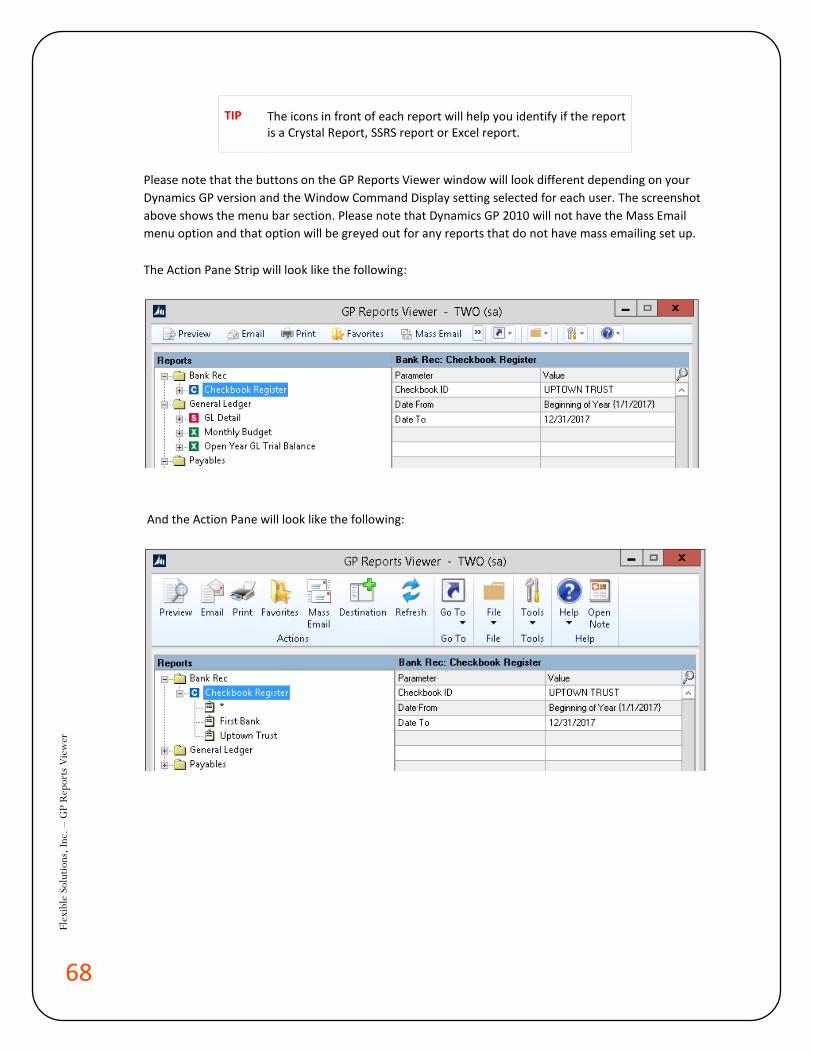
68
Flex
ible
Sol
utio
ns, I
nc. –
GP
Rep
orts
Vie
wer
TIP The icons in front of each report will help you identify if the report is a Crystal Report, SSRS report or Excel report.
Please note that the buttons on the GP Reports Viewer window will look different depending on your Dynamics GP version and the Window Command Display setting selected for each user. The screenshot above shows the menu bar section. Please note that Dynamics GP 2010 will not have the Mass Email menu option and that option will be greyed out for any reports that do not have mass emailing set up.
The Action Pane Strip will look like the following:
And the Action Pane will look like the following:

69
Flex
ible
Sol
utio
ns, I
nc. –
GP
Rep
orts
Vie
wer
USING FAVORITES
All reports are automatically created with a Default (*) favorite, even if the report does not have any parameters. If your report has parameters, you can set up favorites to save you time when printing reports that use the same parameter values.
To create a Favorite:
1. Choose a report and enter parameters.
2. Click the Favorites button.
3. Enter a name for the favorite.
4. Choose if you want the favorite to be Visible To you (User) or to all users in this company that have access to the report (Company).
5. Click Add.
To edit a Favorite:
1. Select an existing favorite and modify the parameters.
2. Click the Favorites button.
3. Edit Favorite Name or Visible To fields if desired.
4. Click Modify.
To delete a Favorite:
1. Select a favorite and click the Favorites button.
2. Click Remove.

70
Flex
ible
Sol
utio
ns, I
nc. –
GP
Rep
orts
Vie
wer
PRINTING AND EMAILING REPORTS
To print and email reports:
1. On the GP Reports Viewer window expand the report groups in the list on the left.
2. Click once to highlight either the report name or a favorite under the report.
3. To preview the report, click the Preview button. This will print the report to the screen.
4. To email the report, click the Email button and this will create a new email message with your report attached as a PDF. Please refer to the Report Default Destinations section for details on setting up a default Message ID and the file attachment name.
TIP If there is no default specified, the subject line and name of the PDF email attachment will be the same as the report name that appears on the GP Reports Viewer window.
5. To print the report directly to the printer, click the Print button. The report will print to the default printer set up for it, or the last printer used by the user on this window if there is no default set up or if the user does not have access to the default printer. In the case where no default printer is set or if the user does not have access to the default printer and this is the first report being printed for the current Dynamics GP session, the Windows default printer will be used.
6. Alternately, you can click the Destination button for customizing your printing and emailing options on the fly.
TIP The Report Destination window will show the defaults set up for this report, but any of the Screen, Printer, Export or Email options can be changed as desired prior to printing. If there are no report defaults for a particular report, this window will default to the settings chosen the previous time for each GP user.
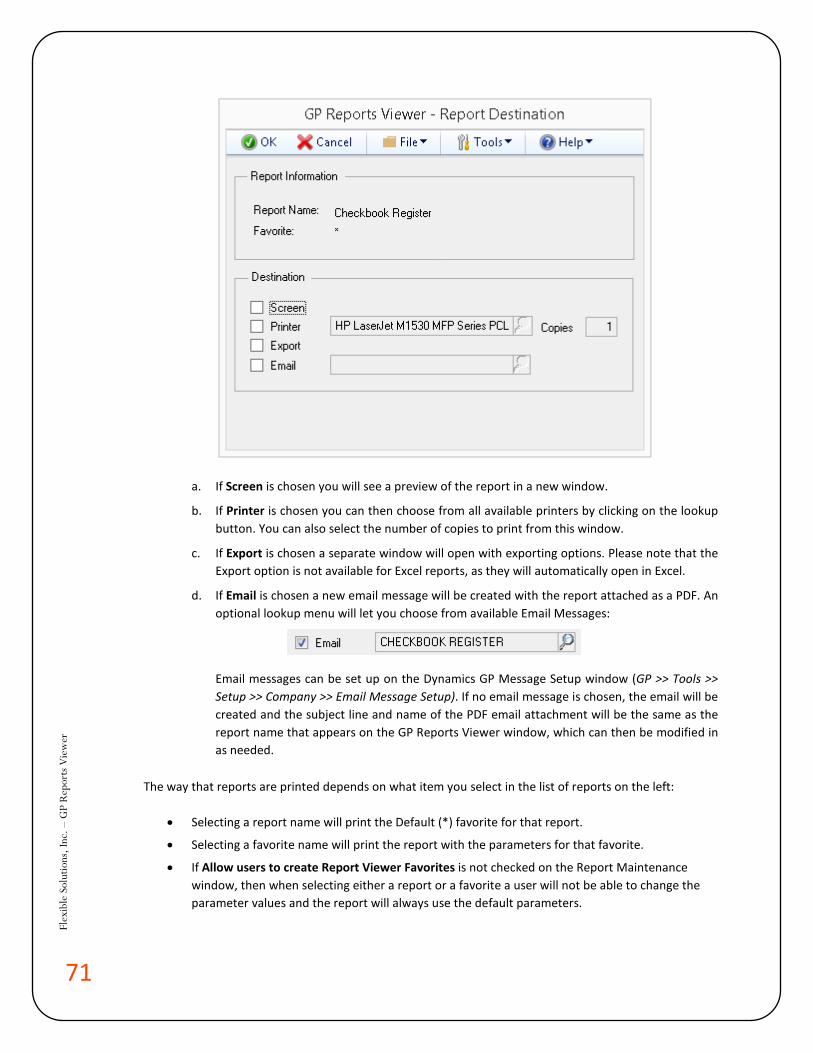
71
Flex
ible
Sol
utio
ns, I
nc. –
GP
Rep
orts
Vie
wer
a. If Screen is chosen you will see a preview of the report in a new window.
b. If Printer is chosen you can then choose from all available printers by clicking on the lookup button. You can also select the number of copies to print from this window.
c. If Export is chosen a separate window will open with exporting options. Please note that the Export option is not available for Excel reports, as they will automatically open in Excel.
d. If Email is chosen a new email message will be created with the report attached as a PDF. An optional lookup menu will let you choose from available Email Messages:
Email messages can be set up on the Dynamics GP Message Setup window (GP >> Tools >> Setup >> Company >> Email Message Setup). If no email message is chosen, the email will be created and the subject line and name of the PDF email attachment will be the same as the report name that appears on the GP Reports Viewer window, which can then be modified in as needed.
The way that reports are printed depends on what item you select in the list of reports on the left:
• Selecting a report name will print the Default (*) favorite for that report.
• Selecting a favorite name will print the report with the parameters for that favorite.
• If Allow users to create Report Viewer Favorites is not checked on the Report Maintenance window, then when selecting either a report or a favorite a user will not be able to change the parameter values and the report will always use the default parameters.
72
Flex
ible
Sol
utio
ns, I
nc. –
GP
Rep
orts
Vie
wer
TIP Double-clicking a report name on the GP Reports Viewer window will open the Report Maintenance window with that report selected. Double-clicking on a report group will open the Report Group Maintenance window with that group selected. If you do not want your users to open these setup windows, make sure they are not granted security access to them and then double-clicking on the report name or report group will have the same effect as single clicking on them.
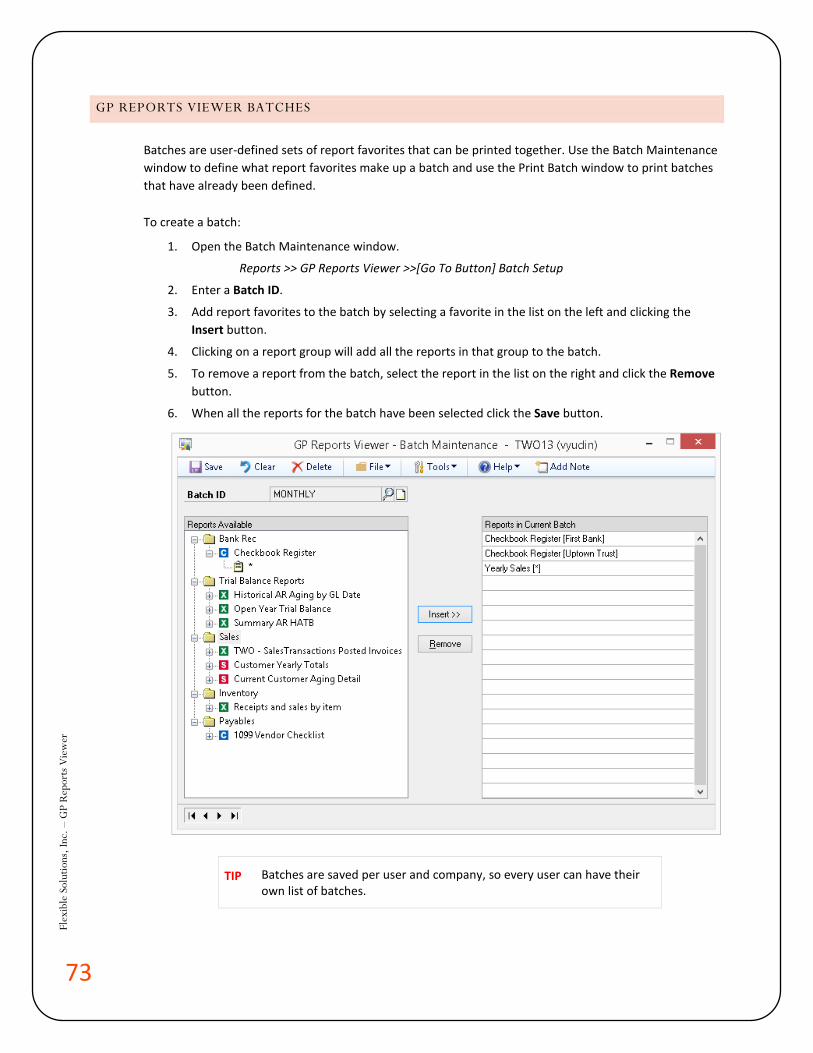
73
Flex
ible
Sol
utio
ns, I
nc. –
GP
Rep
orts
Vie
wer
GP REPORTS VIEWER BATCHES
Batches are user-defined sets of report favorites that can be printed together. Use the Batch Maintenance window to define what report favorites make up a batch and use the Print Batch window to print batches that have already been defined.
To create a batch:
1. Open the Batch Maintenance window.
Reports >> GP Reports Viewer >>[Go To Button] Batch Setup
2. Enter a Batch ID.
3. Add report favorites to the batch by selecting a favorite in the list on the left and clicking the Insert button.
4. Clicking on a report group will add all the reports in that group to the batch.
5. To remove a report from the batch, select the report in the list on the right and click the Remove button.
6. When all the reports for the batch have been selected click the Save button.
TIP Batches are saved per user and company, so every user can have their own list of batches.
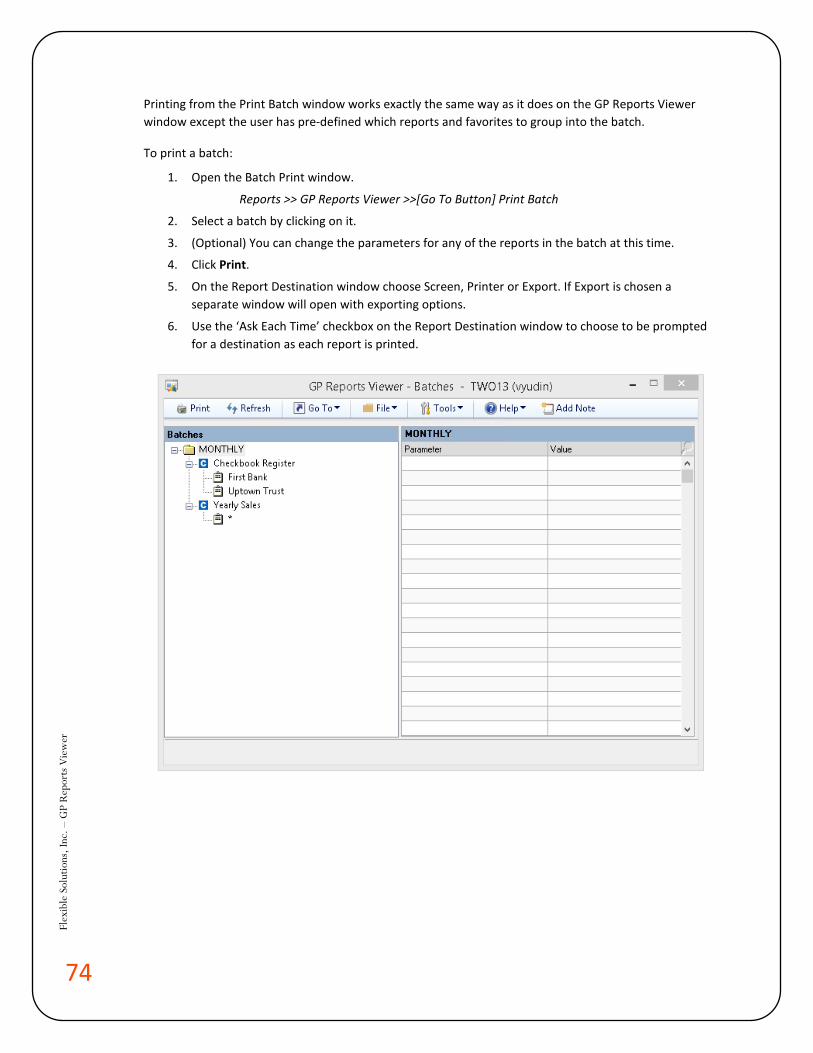
74
Flex
ible
Sol
utio
ns, I
nc. –
GP
Rep
orts
Vie
wer
Printing from the Print Batch window works exactly the same way as it does on the GP Reports Viewer window except the user has pre-defined which reports and favorites to group into the batch.
To print a batch:
1. Open the Batch Print window.
Reports >> GP Reports Viewer >>[Go To Button] Print Batch
2. Select a batch by clicking on it.
3. (Optional) You can change the parameters for any of the reports in the batch at this time.
4. Click Print.
5. On the Report Destination window choose Screen, Printer or Export. If Export is chosen a separate window will open with exporting options.
6. Use the ‘Ask Each Time’ checkbox on the Report Destination window to choose to be prompted for a destination as each report is printed.
75
Flex
ible
Sol
utio
ns, I
nc. –
GP
Rep
orts
Vie
wer
PRINTING REPORTS WITH SHORTCUTS
If you have set up any Report Shortcuts to print reports from windows in Dynamics GP these will be available immediately to any user that has security access to the report(s).
Window Print Button Shortcuts
If the report was set up to print from the Window Print Button, clicking the Print button on the window will open the GP Reports Viewer Report Destination window where you can select where to print the report. If any report destination defaults were set up for a report, these will be shown as the default settings on the Report Destination window. In the case of a Window Print shortcut, the Dynamics GP Report Writer reports may or may not also print depending on how the shortcut was defined. More than one report can be set to print from the Window Print Button.
TIP You can also print these reports by choosing File > Print from the menu or Ctrl+P on your keyboard.
Additional Menu Shortcuts
If the report was set up as an Additional Menu shortcut, navigate to Additional >>Your Report Name.
This will open the GP Reports Viewer Report Destination window where you can select where to print the report.
TIP If the window you added a shortcut to was open while the shortcut was being created, you may need to close and re-open the window in order for the report shortcut to be available.
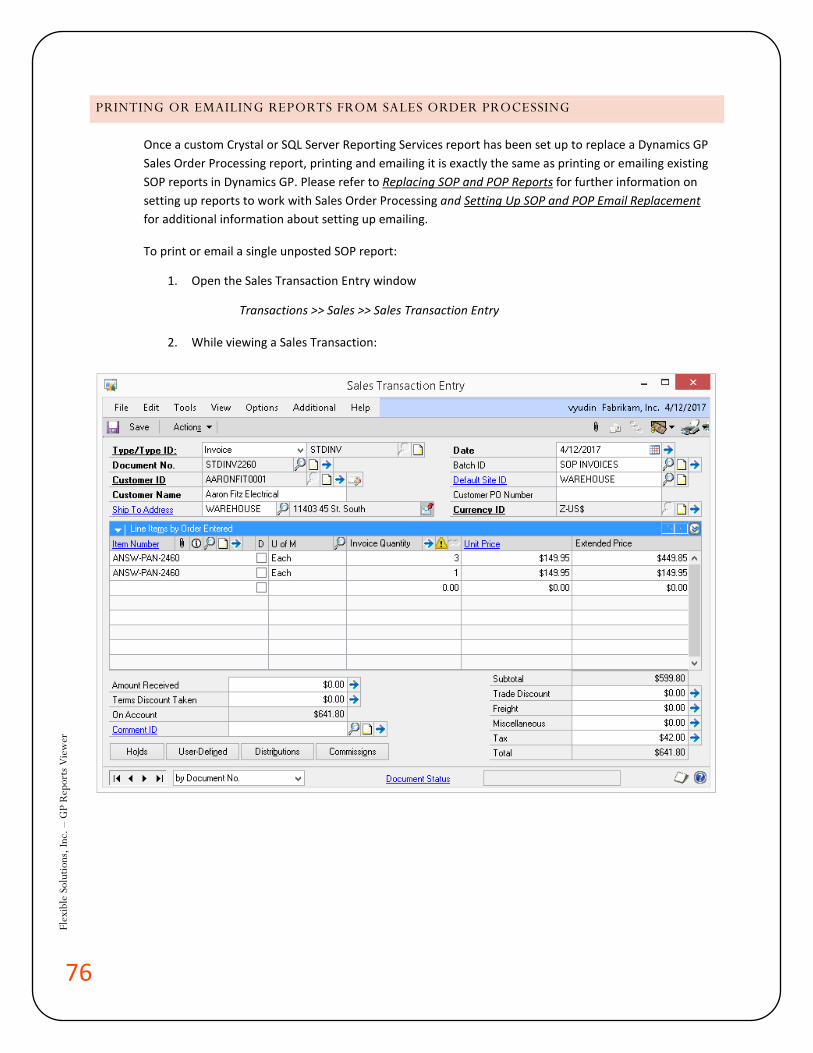
76
Flex
ible
Sol
utio
ns, I
nc. –
GP
Rep
orts
Vie
wer
PRINTING OR EMAILING REPORTS FROM SALES ORDER PROCESSING
Once a custom Crystal or SQL Server Reporting Services report has been set up to replace a Dynamics GP Sales Order Processing report, printing and emailing it is exactly the same as printing or emailing existing SOP reports in Dynamics GP. Please refer to Replacing SOP and POP Reports for further information on setting up reports to work with Sales Order Processing and Setting Up SOP and POP Email Replacement for additional information about setting up emailing.
To print or email a single unposted SOP report:
1. Open the Sales Transaction Entry window
Transactions >> Sales >> Sales Transaction Entry
2. While viewing a Sales Transaction:
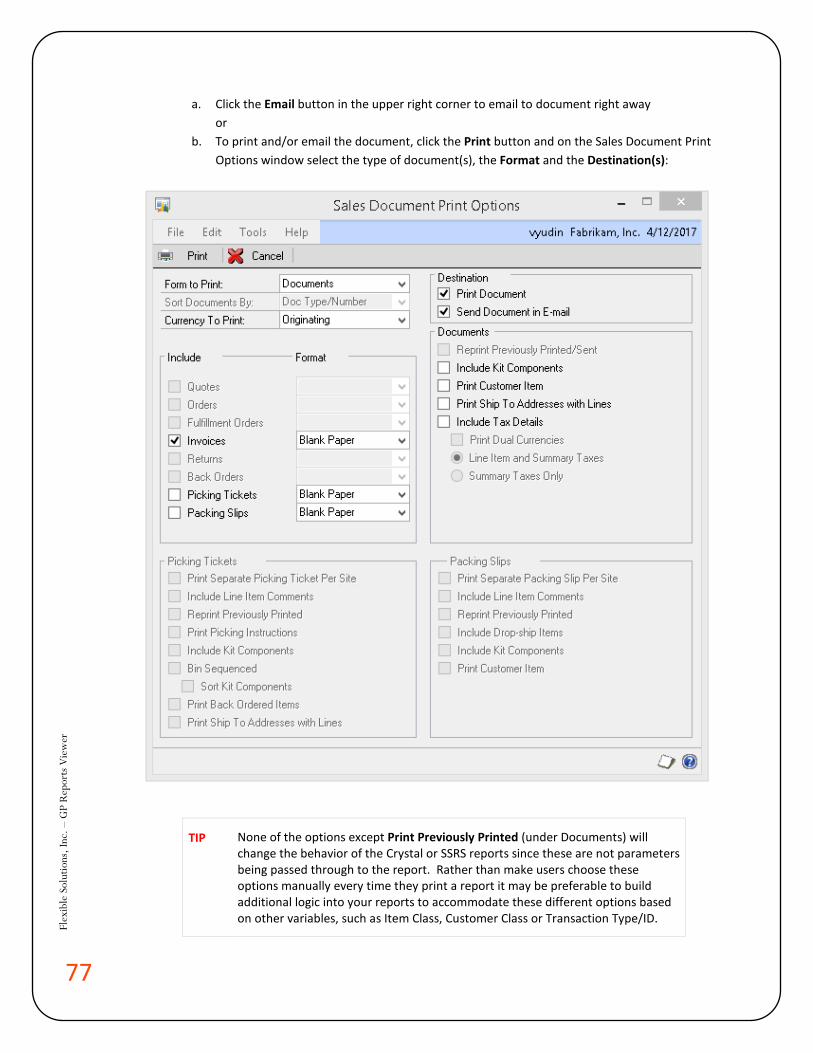
77
Flex
ible
Sol
utio
ns, I
nc. –
GP
Rep
orts
Vie
wer
a. Click the Email button in the upper right corner to email to document right away or
b. To print and/or email the document, click the Print button and on the Sales Document Print Options window select the type of document(s), the Format and the Destination(s):
TIP None of the options except Print Previously Printed (under Documents) will change the behavior of the Crystal or SSRS reports since these are not parameters being passed through to the report. Rather than make users choose these options manually every time they print a report it may be preferable to build additional logic into your reports to accommodate these different options based on other variables, such as Item Class, Customer Class or Transaction Type/ID.
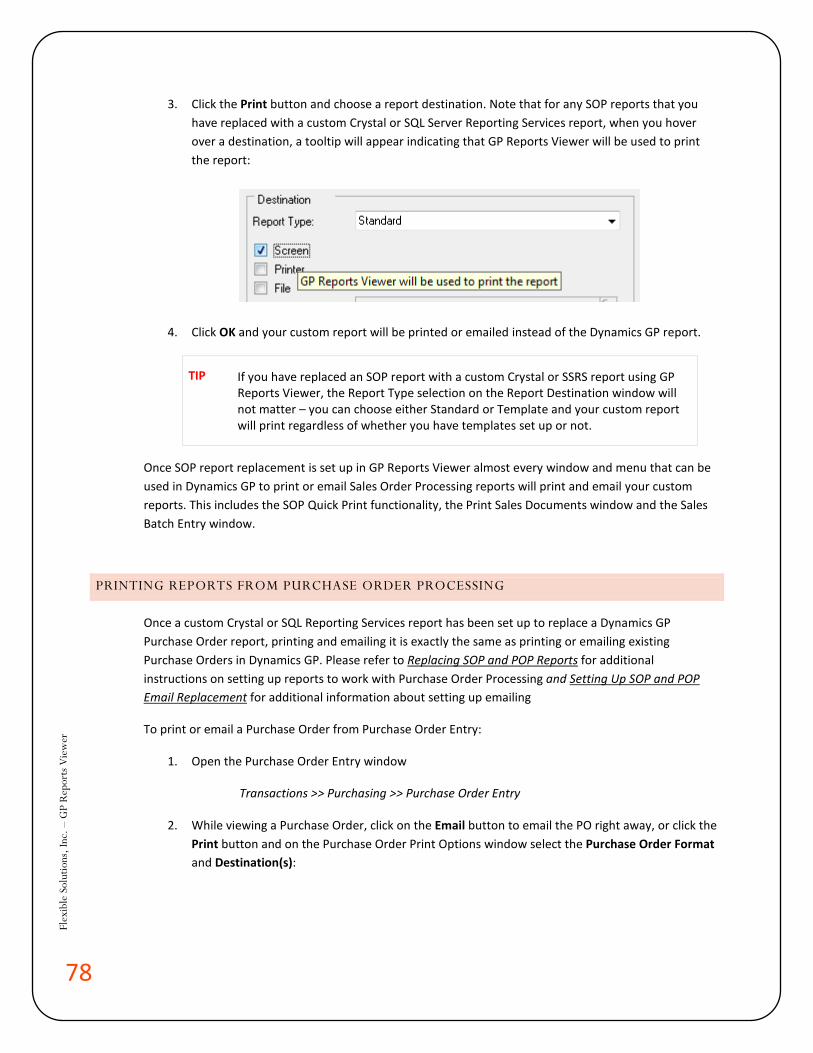
78
Flex
ible
Sol
utio
ns, I
nc. –
GP
Rep
orts
Vie
wer
3. Click the Print button and choose a report destination. Note that for any SOP reports that you have replaced with a custom Crystal or SQL Server Reporting Services report, when you hover over a destination, a tooltip will appear indicating that GP Reports Viewer will be used to print the report:
4. Click OK and your custom report will be printed or emailed instead of the Dynamics GP report.
TIP If you have replaced an SOP report with a custom Crystal or SSRS report using GP Reports Viewer, the Report Type selection on the Report Destination window will not matter – you can choose either Standard or Template and your custom report will print regardless of whether you have templates set up or not.
Once SOP report replacement is set up in GP Reports Viewer almost every window and menu that can be used in Dynamics GP to print or email Sales Order Processing reports will print and email your custom reports. This includes the SOP Quick Print functionality, the Print Sales Documents window and the Sales Batch Entry window.
PRINTING REPORTS FROM PURCHASE ORDER PROCESSING
Once a custom Crystal or SQL Reporting Services report has been set up to replace a Dynamics GP Purchase Order report, printing and emailing it is exactly the same as printing or emailing existing Purchase Orders in Dynamics GP. Please refer to Replacing SOP and POP Reports for additional instructions on setting up reports to work with Purchase Order Processing and Setting Up SOP and POP Email Replacement for additional information about setting up emailing
To print or email a Purchase Order from Purchase Order Entry:
1. Open the Purchase Order Entry window
Transactions >> Purchasing >> Purchase Order Entry
2. While viewing a Purchase Order, click on the Email button to email the PO right away, or click the Print button and on the Purchase Order Print Options window select the Purchase Order Format and Destination(s):
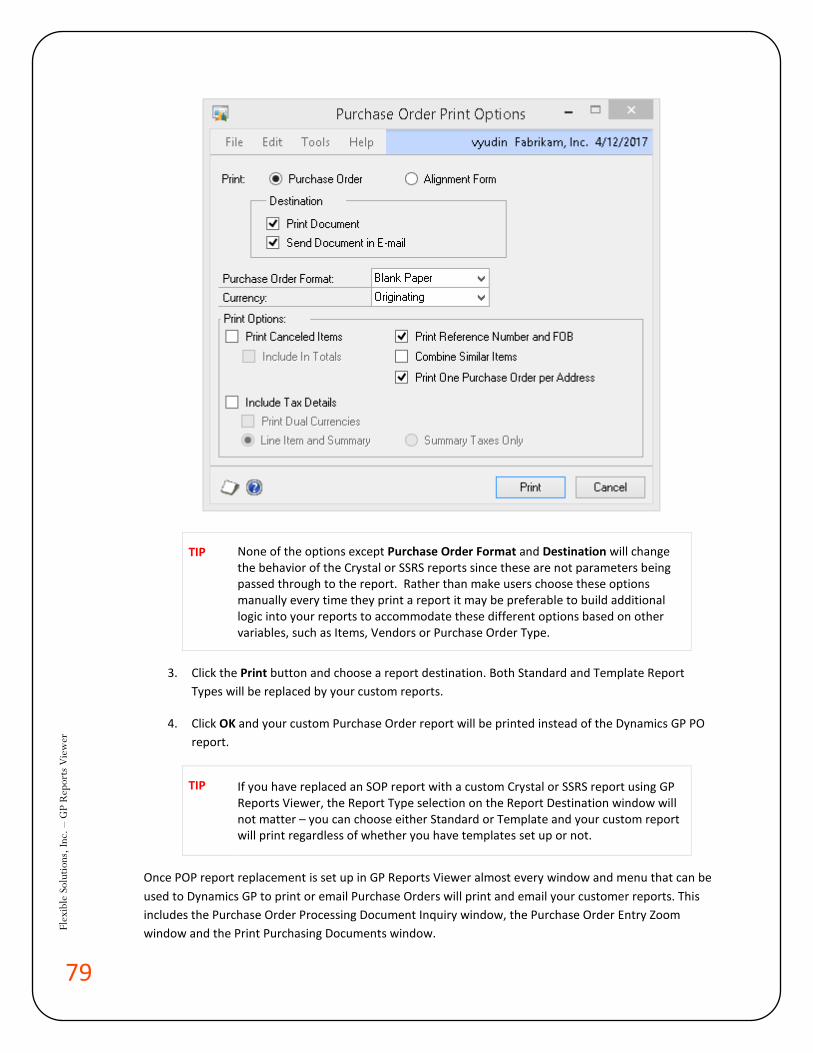
79
Flex
ible
Sol
utio
ns, I
nc. –
GP
Rep
orts
Vie
wer
TIP None of the options except Purchase Order Format and Destination will change the behavior of the Crystal or SSRS reports since these are not parameters being passed through to the report. Rather than make users choose these options manually every time they print a report it may be preferable to build additional logic into your reports to accommodate these different options based on other variables, such as Items, Vendors or Purchase Order Type.
3. Click the Print button and choose a report destination. Both Standard and Template Report Types will be replaced by your custom reports.
4. Click OK and your custom Purchase Order report will be printed instead of the Dynamics GP PO report.
TIP If you have replaced an SOP report with a custom Crystal or SSRS report using GP Reports Viewer, the Report Type selection on the Report Destination window will not matter – you can choose either Standard or Template and your custom report will print regardless of whether you have templates set up or not.
Once POP report replacement is set up in GP Reports Viewer almost every window and menu that can be used to Dynamics GP to print or email Purchase Orders will print and email your customer reports. This includes the Purchase Order Processing Document Inquiry window, the Purchase Order Entry Zoom window and the Print Purchasing Documents window.
80
Flex
ible
Sol
utio
ns, I
nc. –
GP
Rep
orts
Vie
wer
CHAPTER 5: CUSTOMER STATEMENTS
GP Reports Viewer can be used to print and mass email customer statements from GP Reports Viewer. This chapter contains the following sections:
• Sample Report • Setting Up Customer Statement Replacement • Modifying a Report for Use with Customer Statement Replacement • Printing Customer Statements
SAMPLE REPORT
GP Reports Viewer includes a sample statement report that you can use as a starting point for creating your own Customer Statement report, or as an example to see how it should be set up. Notes about the sample statement report:
• During GP Reports Viewer installation two files will be added inside the Dynamics GP installation directory in a folder called GP Reports Viewer Sample Reports. These will be called Customer Statement Sample.rpt (for Crystal Reports) and Customer Statement Sample.rdl (SSRS).
• Both of the sample reports are based on the same SQL stored procedure called GPRVStatementReport.
• The Crystal report was created in Crystal 2011 and will open in Crystal Reports version 9 or later.
• The SSRS report was created in Visual Studio 2005 and has been tested with SSRS 2005, SSRS 2008, SSRS 2008 R2, SSRS 2012 and SSRS 2014. This report includes parameters for server and database name replacement so that only one version of the reports will be needed no matter how many Dynamics GP companies you have. More information on this feature is in the section on Modifying a SQL Reporting Services Report for Server and Database Replacement.
TIP You do not need to use the sample report in order to take advantage of this feature. To use your own report you will need to make a few modifications to it first. Please refer to the section on Modifying a Report for Use with Customer Statements for further instructions. If you do choose to use the sample report, you will need to set it up on the Report Maintenance window and grant access to it using GP Reports Viewer Security Maintenance.
The sample report is intended to provide an example of how to create or modify existing Crystal and SSRS reports for use with the Customer Statement functionality in GP Reports Viewer. Although this report may be used as-is, it may not include all the same features and functionality that are present in the Dynamics GP Report Writer Statement report.

81
Flex
ible
Sol
utio
ns, I
nc. –
GP
Rep
orts
Vie
wer
Screenshot of the Customer Statement sample Crystal report (SSRS will be similar):
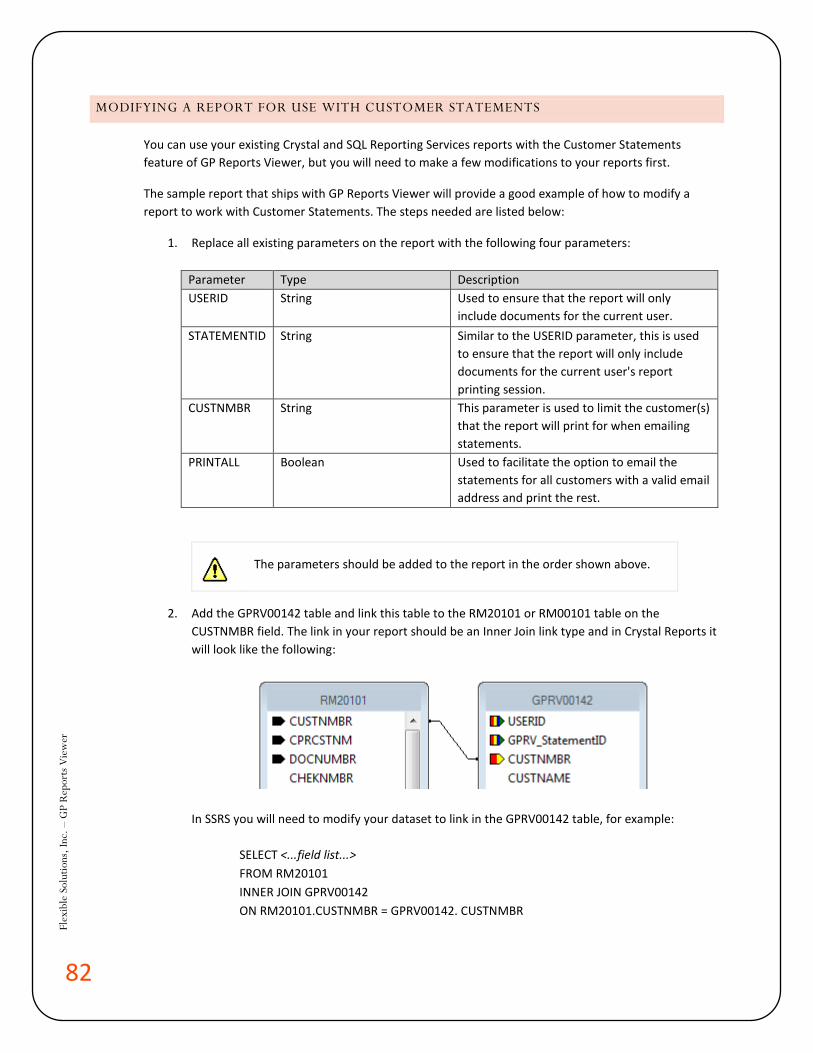
82
Flex
ible
Sol
utio
ns, I
nc. –
GP
Rep
orts
Vie
wer
MODIFYING A REPORT FOR USE WITH CUSTOMER STATEMENTS
You can use your existing Crystal and SQL Reporting Services reports with the Customer Statements feature of GP Reports Viewer, but you will need to make a few modifications to your reports first.
The sample report that ships with GP Reports Viewer will provide a good example of how to modify a report to work with Customer Statements. The steps needed are listed below:
1. Replace all existing parameters on the report with the following four parameters:
Parameter Type Description USERID String Used to ensure that the report will only
include documents for the current user. STATEMENTID String Similar to the USERID parameter, this is used
to ensure that the report will only include documents for the current user's report printing session.
CUSTNMBR String This parameter is used to limit the customer(s) that the report will print for when emailing statements.
PRINTALL Boolean Used to facilitate the option to email the statements for all customers with a valid email address and print the rest.
The parameters should be added to the report in the order shown above.
2. Add the GPRV00142 table and link this table to the RM20101 or RM00101 table on the CUSTNMBR field. The link in your report should be an Inner Join link type and in Crystal Reports it will look like the following:
In SSRS you will need to modify your dataset to link in the GPRV00142 table, for example:
SELECT <...field list...> FROM RM20101 INNER JOIN GPRV00142 ON RM20101.CUSTNMBR = GPRV00142. CUSTNMBR
83
Flex
ible
Sol
utio
ns, I
nc. –
GP
Rep
orts
Vie
wer
3. Once the GPRV00142 table has been added to the report, a condition must be added that uses
the four parameters created above. This is necessary in order for the report to print the correct statements for the current user. In Crystal Reports this is accomplished by adding a record selection formula. The minimum required selection formula is shown below:
{?USERID} = {GPRV00142.USERID} and {?STATEMENTID} = {GPRV00142.GPRV_STATEMENTID} and if Trim({?CUSTNMBR}) = "" then if {?PRINTALL} = true then {GPRV00142.GPRVSelected} = 1 else {GPRV00142.GPRVSelected} = 1 and {GPRV00142.Valid} = 0 else {?CUSTNMBR} = {GPRV00142.CUSTNMBR}
In SQL Server Reporting Services you will need to modify your dataset to use the four newly created parameters and some additional required code by adding a WHERE clause:
WHERE (GPRV00142.USERID = @USERID) AND (GPRV00142.GPRV_StatementID = @STATEMENTID) AND (GPRV00142.GPRVSelected = 1) AND ((RTRIM(@CUSTNMBR) = ’’ AND @PRINTALL = 1) OR (RTRIM(@CUSTNMBR) = ‘’ AND @PRINTALL = 0 AND GPRV00142.Valid = 0) OR (@CUSTNMBR = GPRV00142.CUSTNMBR))
PRINTING CUSTOMER STATEMENTS
The GP Reports Viewer Statements window is used to select the customers that you would like to print statements for and also to determine whether to preview, print and/or email the customer statements. There are several ways to get to the GP Reports Viewer Statements window:
From the main Dynamics GP menu:
Reports >> Print Customer Statements
From the Sales Routines menu:
GP >> Tools >> Routines >> Sales >> Print Customer Statements
If you have chosen to replace the Dynamics GP Print Receivables Statements window with GP Reports Viewer:
GP >> Tools >> Routines >> Sales >> Statements
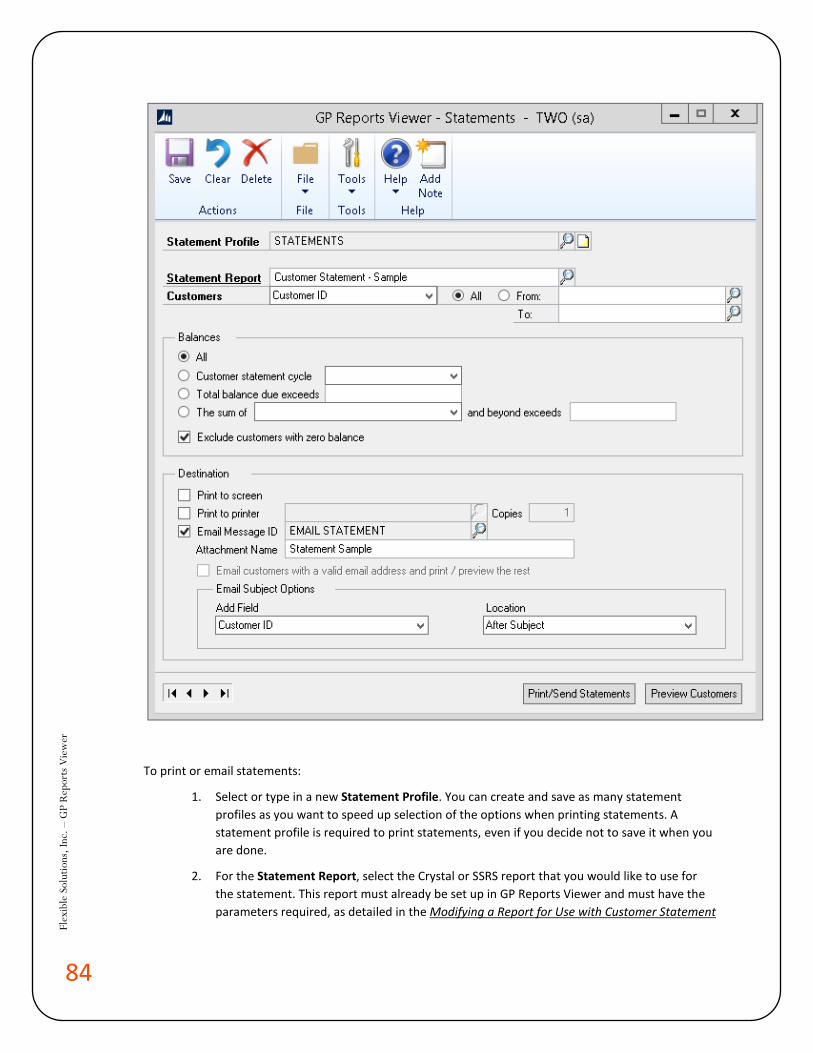
84
Flex
ible
Sol
utio
ns, I
nc. –
GP
Rep
orts
Vie
wer
To print or email statements:
1. Select or type in a new Statement Profile. You can create and save as many statement profiles as you want to speed up selection of the options when printing statements. A statement profile is required to print statements, even if you decide not to save it when you are done.
2. For the Statement Report, select the Crystal or SSRS report that you would like to use for the statement. This report must already be set up in GP Reports Viewer and must have the parameters required, as detailed in the Modifying a Report for Use with Customer Statement
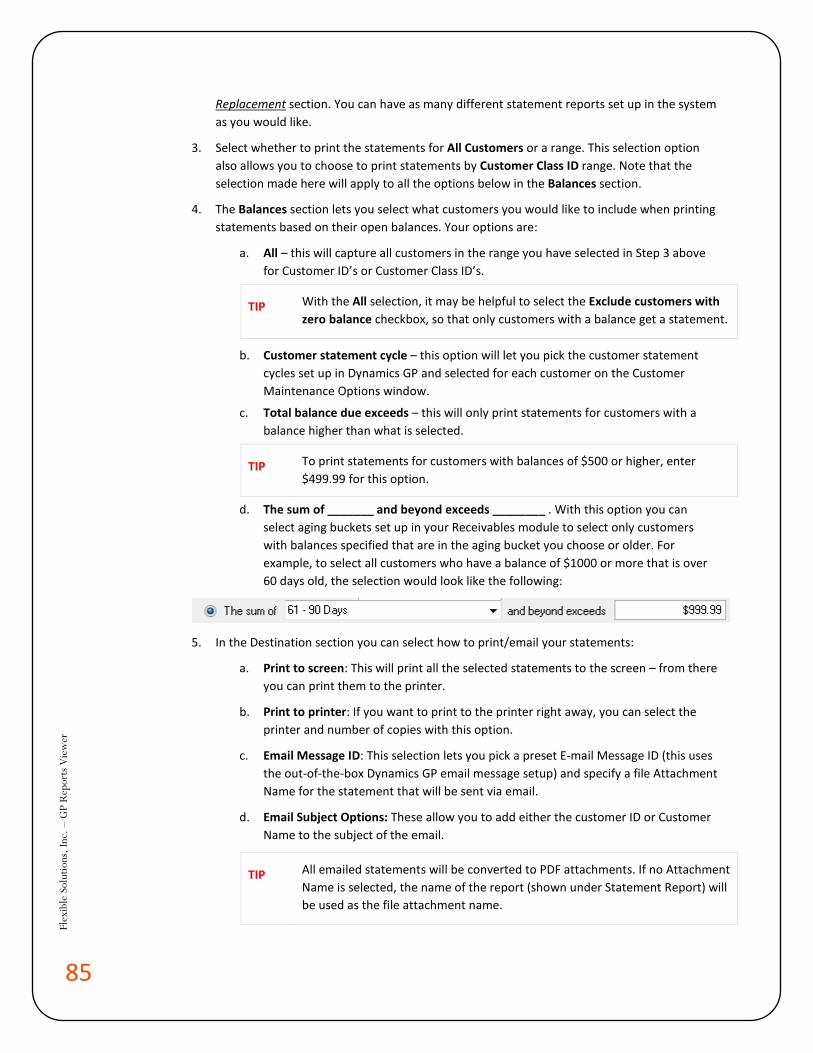
85
Flex
ible
Sol
utio
ns, I
nc. –
GP
Rep
orts
Vie
wer
Replacement section. You can have as many different statement reports set up in the system as you would like.
3. Select whether to print the statements for All Customers or a range. This selection option also allows you to choose to print statements by Customer Class ID range. Note that the selection made here will apply to all the options below in the Balances section.
4. The Balances section lets you select what customers you would like to include when printing statements based on their open balances. Your options are:
a. All – this will capture all customers in the range you have selected in Step 3 above for Customer ID’s or Customer Class ID’s.
TIP With the All selection, it may be helpful to select the Exclude customers with zero balance checkbox, so that only customers with a balance get a statement.
b. Customer statement cycle – this option will let you pick the customer statement cycles set up in Dynamics GP and selected for each customer on the Customer Maintenance Options window.
c. Total balance due exceeds – this will only print statements for customers with a balance higher than what is selected.
TIP To print statements for customers with balances of $500 or higher, enter $499.99 for this option.
d. The sum of _______ and beyond exceeds ________ . With this option you can select aging buckets set up in your Receivables module to select only customers with balances specified that are in the aging bucket you choose or older. For example, to select all customers who have a balance of $1000 or more that is over 60 days old, the selection would look like the following:
5. In the Destination section you can select how to print/email your statements:
a. Print to screen: This will print all the selected statements to the screen – from there you can print them to the printer.
b. Print to printer: If you want to print to the printer right away, you can select the printer and number of copies with this option.
c. Email Message ID: This selection lets you pick a preset E-mail Message ID (this uses the out-of-the-box Dynamics GP email message setup) and specify a file Attachment Name for the statement that will be sent via email.
d. Email Subject Options: These allow you to add either the customer ID or Customer Name to the subject of the email.
TIP All emailed statements will be converted to PDF attachments. If no Attachment Name is selected, the name of the report (shown under Statement Report) will be used as the file attachment name.
86
Flex
ible
Sol
utio
ns, I
nc. –
GP
Rep
orts
Vie
wer
If you choose to email statements, you will also have the option to select the checkbox to Email customers with a valid email address and print / preview the rest. For example, if you have 100 customers selected and choose Print to printer and Email and Email customers with a valid email address and print / preview the rest checkbox is selected:
• With 90 customers that have valid email addresses: 90 customer statements will be sent via email, the other 10 will print to the printer.
• With all customers that have valid email addresses: all 100 customer statements will be sent via email. You will receive a message indicating that all customer statements were emailed and there are none that need to be printed.
TIP All emailed statements will be sent as a PDF attachment. If no Attachment Name is selected, the name of the report (shown under Statement Report) will be used as the file attachment name.
The email address for the statements will be taken from the E-mail Addresses section of the Internet Information window for the Address ID selected under the Statement To address for each customer on the Customer Maintenance window.
6. Once you have selected the customers and balances you want to print statements for, you can click the Preview Customers button to see the customers that have been selected. This will also show you the balance and the Email Address for the customers:

87
Flex
ible
Sol
utio
ns, I
nc. –
GP
Rep
orts
Vie
wer
Here you can unmark any customers you do not want to print/email statements for. You can also drill down on the customer, the balance and the email address. Clicking the hyperlink for the email address will take you to the Internet Information window for the customer with their Statement To Address ID selected, so you can edit the email address.
If you have made changes to the email addresses, you can click Redisplay to see the revised list.
7. Click the Print/Send Statements button to print or email the statements or click OK to go to the previous window and check or change your print and email settings.
CHAPTER 6: EXCEL REPORTS
GP Reports Viewer can be used to generate refreshable Excel reports using predefined Excel files. This chapter contains the following sections:
• Sample Reports
• Setting Up Reports in Excel for Use with GP Reports Viewer
SAMPLE REPORTS
GP Reports Viewer includes two sample Excel reports that you can use as a starting point for creating your own reports, or as an example to see how reports should be set up. Notes about the sample reports:
• During GP Reports Viewer installation two files will be added inside the Dynamics GP installation directory in a folder called GP Reports Viewer Sample Reports. These will be called Customer Sales Totals for Last 3 Years.xlsx and Open Year GL Trial Balance - with month end balances.xlsx.
88
Flex
ible
Sol
utio
ns, I
nc. –
GP
Rep
orts
Vie
wer
• The Customer Sales Totals for Last 3 Years sample report is based on a SQL stored procedure called GPRVCustomerTotals3Years. It accepts one parameter for the current year and returns sales totals per customer for the current year and the 2 previous years. The sales totals are calculated by adding up functional amounts for not voided Invoices, Debit Memos, Finance Charges, Credit Memos and Returns from the RM20101 and RM30101 tables. This logic may not be accurate for some companies, so this report is only intended as a sample.
• The Open Year GL Trial Balance - with month end balances sample report is based on a SQL view called GPRVOpenYrGLTBMonthEnd. There are no parameters for this report, it will return the month end balances for all GL accounts with transactions in the earliest open year in Dynamics GP.
• These sample reports were created with Microsoft Excel 2010 and have been tested with Excel 2013 and Excel 2016. While these reports may also work with older versions of Excel, those have not been tested with GP Reports Viewer.
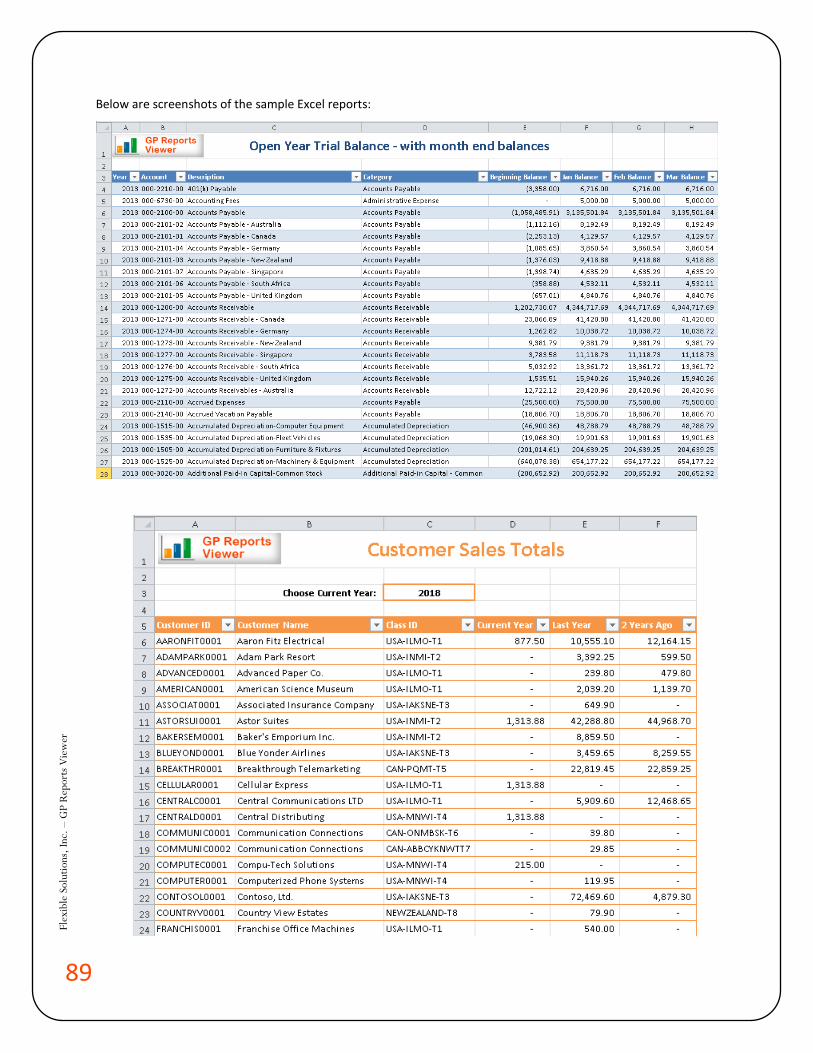
89
Flex
ible
Sol
utio
ns, I
nc. –
GP
Rep
orts
Vie
wer
Below are screenshots of the sample Excel reports:
90
Flex
ible
Sol
utio
ns, I
nc. –
GP
Rep
orts
Vie
wer
SETTING UP REPORTS IN EXCEL FOR USE WITH GP REPORTS VIEWER
You can create Excel reports based on a Microsoft SQL Server table, view or stored procedure. You can also embed SQL code directly into your Excel report. There are many methods for creating Excel reports using data from SQL Server, however if you are starting from scratch or troubleshooting your reports, we have included steps for creating Excel reports in the sections below.
TIP If you set up your SQL reports using the steps outlined below, when these are used with GP Reports Viewer the database used for the reports will be automatically changed to the database for the Dynamics GP company the user is logged into.
USING A SQL SERVER TABLE OR VIEW
To create an Excel report based on a SQL Server table or view:
1. Open a new Excel file and navigate to the Data tab.
2. Select From Other Sources and choose From SQL Server:
3. Enter your Server and SQL instance and login credentials, then click Next:

91
Flex
ible
Sol
utio
ns, I
nc. –
GP
Rep
orts
Vie
wer
TIP When Excel reports are launched from Dynamics GP using GP Reports Viewer they will use the SQL Login specified on the GP Reports Viewer Setup Options window. When creating reports, it may be easier to simply use ‘sa’ or another admin user login so as to avoid permissions issues.
4. Select the database and view or table. Note that in the scrolling list views are listed first, then tables. Click Next once you have made your selections:
5. Click Finish on the Data Connection Wizard window, the file and friendly names do not matter, you can change them if you would like.
6. On the Import Data window select Table and Existing worksheet, then choose where to start showing the data. You may want to leave a few rows at the top for a report label or logo, click Properties:
7. On the Usage tab select Refresh data when opening file, this will update the data each time the Excel report is generated.
8. On the Definition tab, make sure to take the database name out of the Command text. When the window opens it will look like the following:
92
Flex
ible
Sol
utio
ns, I
nc. –
GP
Rep
orts
Vie
wer
Change this to only have the table or view name:
Taking out the database name is critical to allow GP Reports Viewer to be able to switch the company database that the report is generated.
9. You will get a pop-up warning that the connection in this workbook is no longer identical to the connection defined in the external file and asking if you want to proceed with changes. Click Yes.
10. Click OK on the Import Data window.
11. Enter your SQL credentials on the SQL Server Login window and click OK.
12. You will now see your data in a table:
13. Optionally, you can change the formatting of any of the columns and change the design of the table.
14. Save the Excel file on a network share that your GP users can access.
15. Set up the Excel report in GP Reports Viewer. Please refer to the Report Maintenance section for instructions on setting up reports.

93
Flex
ible
Sol
utio
ns, I
nc. –
GP
Rep
orts
Vie
wer
USING A SQL SERVER STORED PROCEDURE
To create an Excel report based on a SQL Server stored procedure:
1. Open a new Excel file and navigate to the Data tab.
2. Select From Other Sources and choose From Microsoft Query.
3. Select an existing Data Source or create a new one, click OK.
4. Enter your login credentials, then click OK.
TIP When Excel reports are launched from Dynamics GP using GP Reports Viewer they will use the SQL Login specified on the GP Reports Viewer Setup Options window. When creating reports, it may be easier to simply use ‘sa’ or another admin user login so as to avoid permissions issues.
5. On the Query Wizard – Choose Columns window, click Cancel.
6. You will see a pop-up asking if you want to continue editing this query in Microsoft Query, choose Yes.
7. Click Close on the Add Tables window.
8. Click the SQL button on the Microsoft Query window:
9. Enter your stored procedure and parameters using the following syntax:
{call YourStoredProcedureName (?, ?)}
For example, with one parameter you would have one question mark:
If your stored procedure has multiple parameters, separate them with a comma:
94
Flex
ible
Sol
utio
ns, I
nc. –
GP
Rep
orts
Vie
wer
10. When you click OK you will get a pop-up for each of your parameters, enter a value and click OK:
11. You will then get the following pop-up, click OK:
12. Microsoft Query will run your stored procedure with the parameter specified and show your data. Click the X at the top right corner to close this window:
13. On the Import Data window select Table and Existing worksheet, then choose where to start showing the data. You may want to leave a few rows at the top for a report label or logo and also for your parameter(s). Click OK:
95
Flex
ible
Sol
utio
ns, I
nc. –
GP
Rep
orts
Vie
wer
14. You will now see your data in a table, at this point you can add a logo, report name and, most importantly, a cell for each parameter in your stored procedure:
15. Once you have a cell for each parameter and a value entered in each, click on one of the cells in the table of data and choose Properties on the Data tab.
16. On the External Data Properties window you can adjust data formatting and layout options if you want, then click on the Connection Properties icon at the upper right corner:
17. On the Definition tab click the Parameters button at the bottom to open the Parameters window.
18. For each of your parameters, select Get the Value from the following cell and choose the cell where you want the parameter to be taken from. Your will want to also select Refresh automatically when cell value changes for most of your parameters. Once in a while you may have a report where you want to leave this unchecked for some of the parameters. For example, if you have From Date and To Date parameters, you may decide to not refresh if the From Date is changed, and only refresh when the To Date is changed. This will vary with your reports, as well as how your users will use them. The only danger to selecting the select Refresh automatically when cell value changes for all of your parameters is that if it takes 20 seconds to refresh the report and you have 5 parameters, your users will be waiting longer than they need to when they are changing parameters.
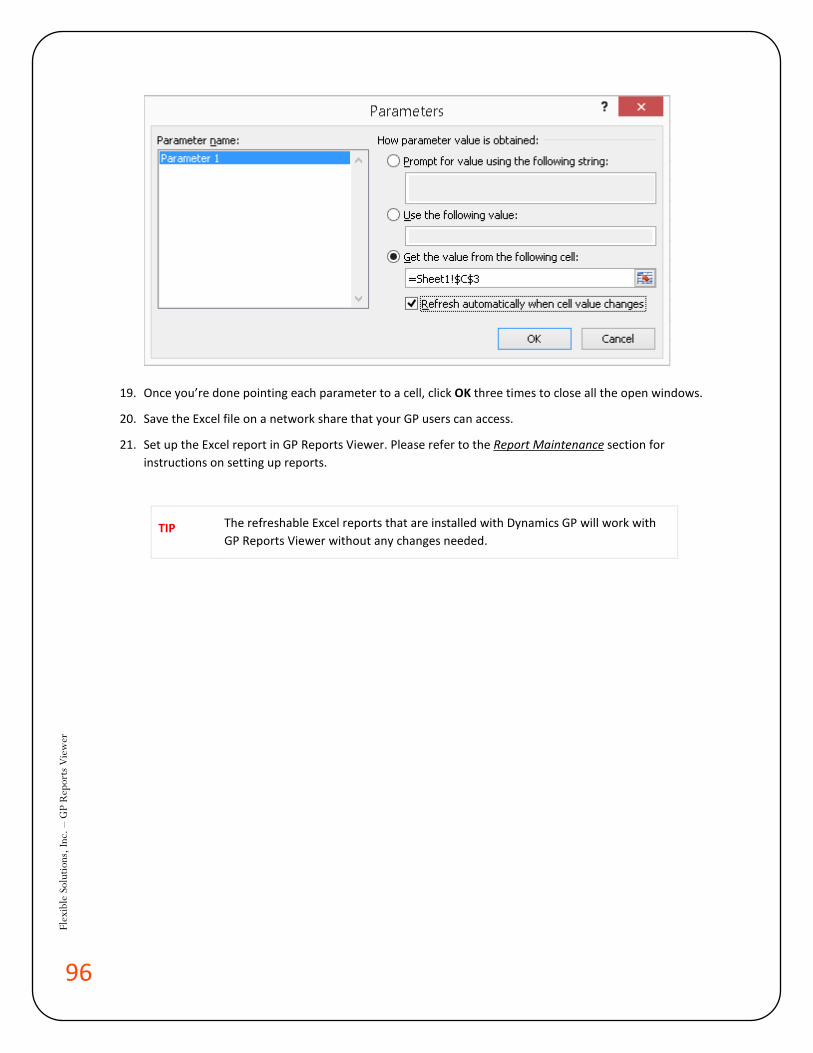
96
Flex
ible
Sol
utio
ns, I
nc. –
GP
Rep
orts
Vie
wer
19. Once you’re done pointing each parameter to a cell, click OK three times to close all the open windows.
20. Save the Excel file on a network share that your GP users can access.
21. Set up the Excel report in GP Reports Viewer. Please refer to the Report Maintenance section for instructions on setting up reports.
TIP The refreshable Excel reports that are installed with Dynamics GP will work with GP Reports Viewer without any changes needed.
0
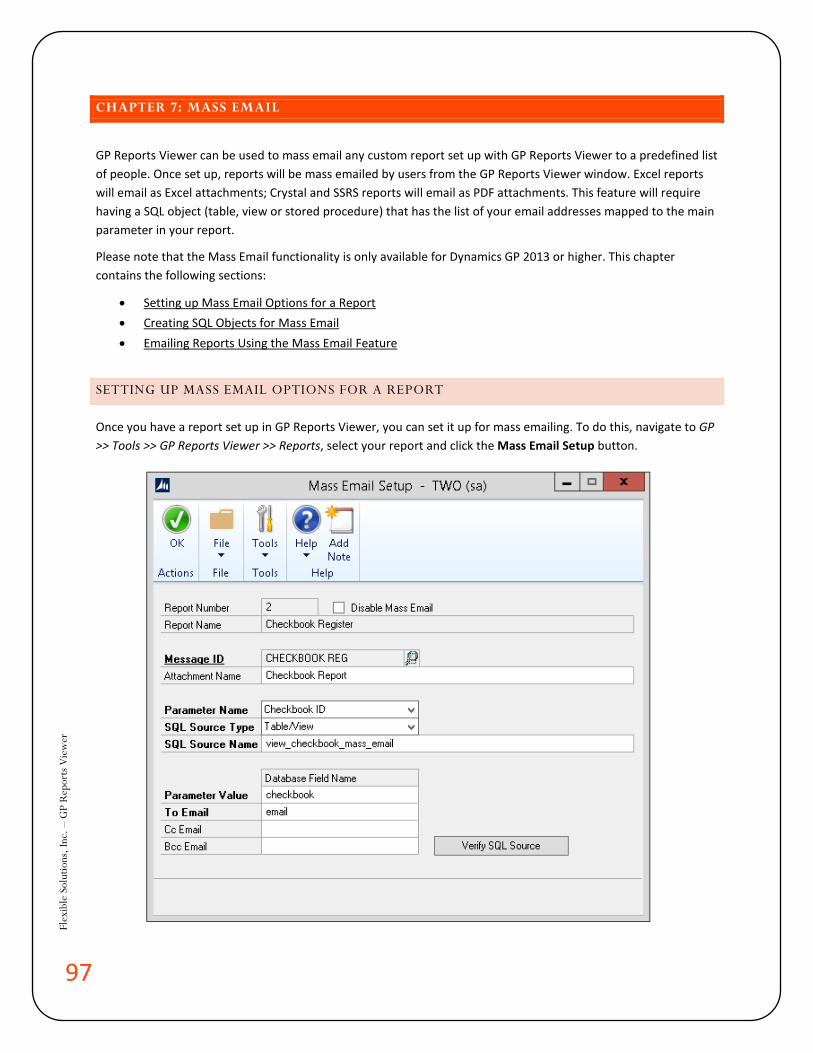
97
Flex
ible
Sol
utio
ns, I
nc. –
GP
Rep
orts
Vie
wer
CHAPTER 7: MASS EMAIL
GP Reports Viewer can be used to mass email any custom report set up with GP Reports Viewer to a predefined list of people. Once set up, reports will be mass emailed by users from the GP Reports Viewer window. Excel reports will email as Excel attachments; Crystal and SSRS reports will email as PDF attachments. This feature will require having a SQL object (table, view or stored procedure) that has the list of your email addresses mapped to the main parameter in your report.
Please note that the Mass Email functionality is only available for Dynamics GP 2013 or higher. This chapter contains the following sections:
• Setting up Mass Email Options for a Report • Creating SQL Objects for Mass Email • Emailing Reports Using the Mass Email Feature
SETTING UP MASS EMAIL OPTIONS FOR A REPORT
Once you have a report set up in GP Reports Viewer, you can set it up for mass emailing. To do this, navigate to GP >> Tools >> GP Reports Viewer >> Reports, select your report and click the Mass Email Setup button.
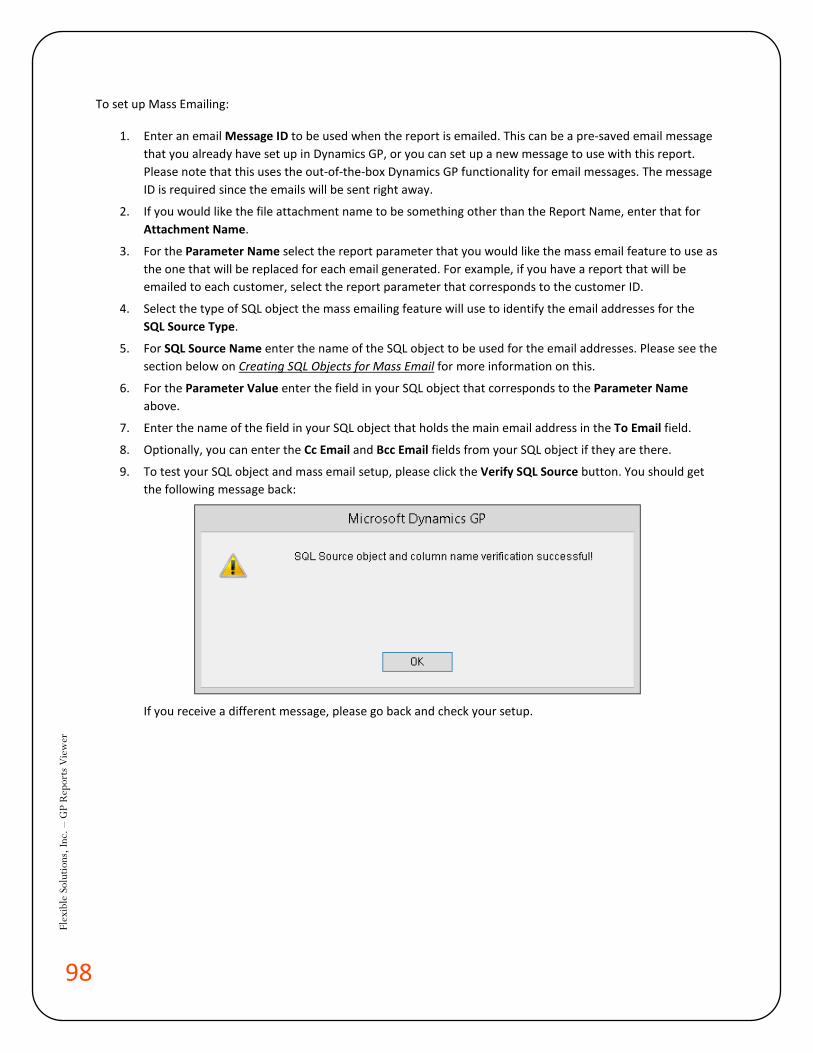
98
Flex
ible
Sol
utio
ns, I
nc. –
GP
Rep
orts
Vie
wer
To set up Mass Emailing:
1. Enter an email Message ID to be used when the report is emailed. This can be a pre-saved email message that you already have set up in Dynamics GP, or you can set up a new message to use with this report. Please note that this uses the out-of-the-box Dynamics GP functionality for email messages. The message ID is required since the emails will be sent right away.
2. If you would like the file attachment name to be something other than the Report Name, enter that for Attachment Name.
3. For the Parameter Name select the report parameter that you would like the mass email feature to use as the one that will be replaced for each email generated. For example, if you have a report that will be emailed to each customer, select the report parameter that corresponds to the customer ID.
4. Select the type of SQL object the mass emailing feature will use to identify the email addresses for the SQL Source Type.
5. For SQL Source Name enter the name of the SQL object to be used for the email addresses. Please see the section below on Creating SQL Objects for Mass Email for more information on this.
6. For the Parameter Value enter the field in your SQL object that corresponds to the Parameter Name above.
7. Enter the name of the field in your SQL object that holds the main email address in the To Email field.
8. Optionally, you can enter the Cc Email and Bcc Email fields from your SQL object if they are there.
9. To test your SQL object and mass email setup, please click the Verify SQL Source button. You should get the following message back:
If you receive a different message, please go back and check your setup.
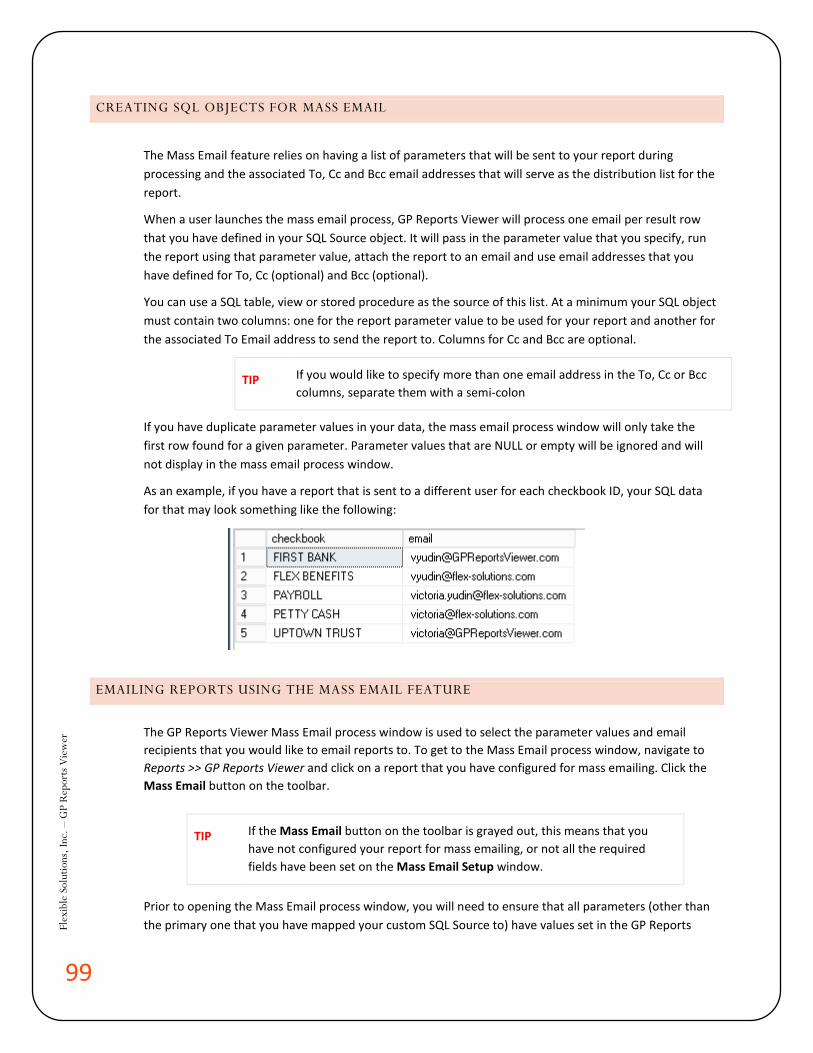
99
Flex
ible
Sol
utio
ns, I
nc. –
GP
Rep
orts
Vie
wer
CREATING SQL OBJECTS FOR MASS EMAIL
The Mass Email feature relies on having a list of parameters that will be sent to your report during processing and the associated To, Cc and Bcc email addresses that will serve as the distribution list for the report.
When a user launches the mass email process, GP Reports Viewer will process one email per result row that you have defined in your SQL Source object. It will pass in the parameter value that you specify, run the report using that parameter value, attach the report to an email and use email addresses that you have defined for To, Cc (optional) and Bcc (optional).
You can use a SQL table, view or stored procedure as the source of this list. At a minimum your SQL object must contain two columns: one for the report parameter value to be used for your report and another for the associated To Email address to send the report to. Columns for Cc and Bcc are optional.
TIP If you would like to specify more than one email address in the To, Cc or Bcc columns, separate them with a semi-colon
If you have duplicate parameter values in your data, the mass email process window will only take the first row found for a given parameter. Parameter values that are NULL or empty will be ignored and will not display in the mass email process window.
As an example, if you have a report that is sent to a different user for each checkbook ID, your SQL data for that may look something like the following:
EMAILING REPORTS USING THE MASS EMAIL FEATURE
The GP Reports Viewer Mass Email process window is used to select the parameter values and email recipients that you would like to email reports to. To get to the Mass Email process window, navigate to Reports >> GP Reports Viewer and click on a report that you have configured for mass emailing. Click the Mass Email button on the toolbar.
TIP If the Mass Email button on the toolbar is grayed out, this means that you have not configured your report for mass emailing, or not all the required fields have been set on the Mass Email Setup window.
Prior to opening the Mass Email process window, you will need to ensure that all parameters (other than the primary one that you have mapped your custom SQL Source to) have values set in the GP Reports
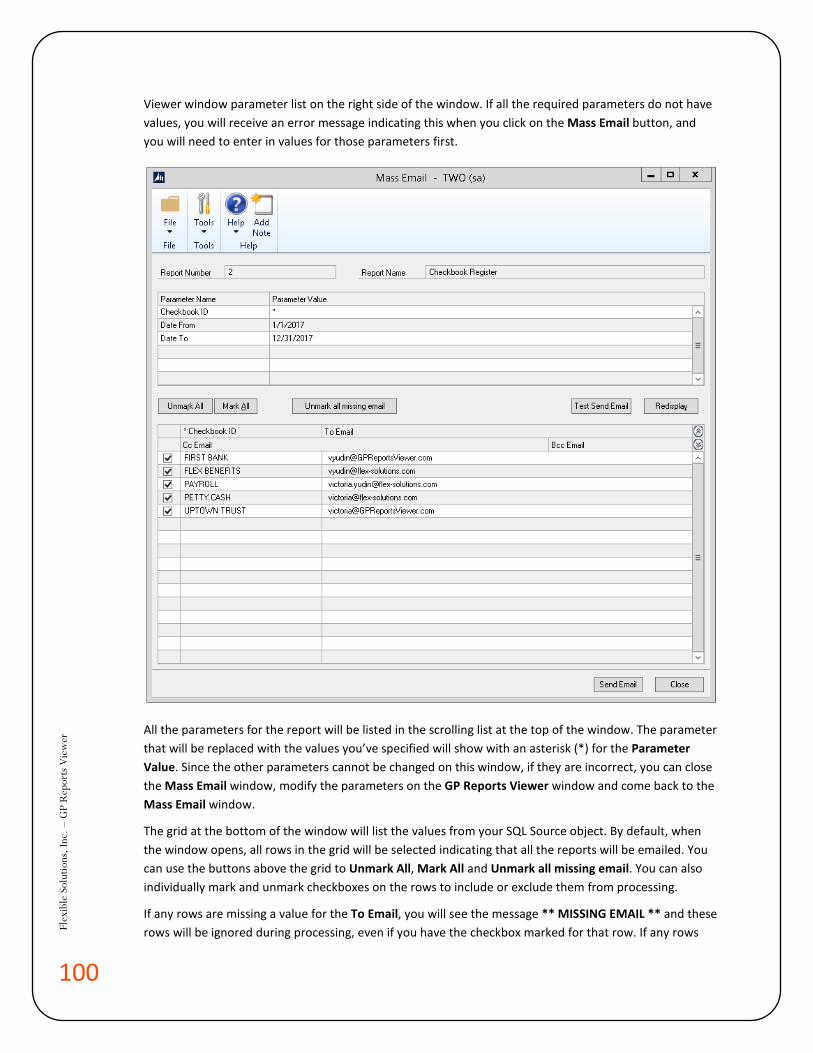
100
Flex
ible
Sol
utio
ns, I
nc. –
GP
Rep
orts
Vie
wer
Viewer window parameter list on the right side of the window. If all the required parameters do not have values, you will receive an error message indicating this when you click on the Mass Email button, and you will need to enter in values for those parameters first.
All the parameters for the report will be listed in the scrolling list at the top of the window. The parameter that will be replaced with the values you’ve specified will show with an asterisk (*) for the Parameter Value. Since the other parameters cannot be changed on this window, if they are incorrect, you can close the Mass Email window, modify the parameters on the GP Reports Viewer window and come back to the Mass Email window.
The grid at the bottom of the window will list the values from your SQL Source object. By default, when the window opens, all rows in the grid will be selected indicating that all the reports will be emailed. You can use the buttons above the grid to Unmark All, Mark All and Unmark all missing email. You can also individually mark and unmark checkboxes on the rows to include or exclude them from processing.
If any rows are missing a value for the To Email, you will see the message ** MISSING EMAIL ** and these rows will be ignored during processing, even if you have the checkbox marked for that row. If any rows

101
Flex
ible
Sol
utio
ns, I
nc. –
GP
Rep
orts
Vie
wer
are missing a value for the Cc Email or Bcc Email, these will display as blank in the grid; the emails will still be processed, as long as there is a To Email present.
During the mass email processing, one email will be generated per row in the grid at the bottom of the window if the row has the checkbox next to it selected. GP Reports Viewer will pass in the parameter value that you see listed to the right of the checkbox, run the report using that parameter value, attach the report to an email and set the values shown for the To, Cc (optional) and Bcc (optional) Email addresses. The email message will use whatever was set up on the Mass Email Setup window.
TIP Crystal and SSRS reports will be converted to PDF attachments. Excel reports will be attached as Excel documents. If no Attachment Name is specified on the Mass Email Setup window, the name of the report will be used as the file attachment name.
Once you have selected all the rows desired, click the Send Email button on the bottom to send the emails. While the emails are being generated you will see a Sending Emails; Please wait… message in the bottom right corner of the window. When done, that message will disappear.
If you would like to test your email before sending it, click the Test Send Email button; that will open a new window where you can enter the To, Cc and Bcc email addresses for your test. Only the To email is required, the others can be left blank, as in the example shown below. Multiple addresses can be separated with a semi-colon. When you click the Test Send button a report for each row that you have selected on the Mass Email window will be emailed to the address(es) on the Mass Email Test Send window.
102
Flex
ible
Sol
utio
ns, I
nc. –
GP
Rep
orts
Vie
wer
CHAPTER 8: COLLECTIONS MANAGEMENT
GP Reports Viewer can be used to replace the reports used when emailing RM and SOP documents from the Professional Advantage Collections Management module with your custom Crystal or SSRS reports. This feature requires that Collections Management is installed and at least one custom report set up for use with this module. Please refer to the Collections Management Setup Options section of the GP Reports Viewer Setup Options window for additional information about enabling and configuring this feature.
The Collections Management integration feature is only available for Dynamics GP 2013 or higher. Please note that Collections Management for GP 2018 was not yet released at the time of the release of GP Reports Viewer for GP 2018, so that has not been tested yet.
This chapter contains the following sections:
• Sample Reports Provided for Use with Collections Management • Configuring Reports for RM and SOP Replacement • Emailing Documents from Collections Management
SAMPLE REPORTS PROVIDED FOR USE WITH COLLECTIONS MANAGEMENT
When emailing invoices from Collections Management, there are two types of documents that may be emailed: Sales Order Processing (SOP) and Receivables Management (RM). SOP Documents only includes documents that were originally entered in the SOP module. RM documents includes all documents that were originally entered in the Receivables module and can include documents such as Debit Memos, Credit Memos and Finance Charges.
GP Reports Viewer already includes a sample SOP report that may be used to replace SOP reports in Collections Management. This is the ‘SOP Posted’ report and there is a Crystal Reports as well as an SSRS version available for this report. Please see the Replacing SOP and POP Reports – Sample Reports section of this user guide for more information on this sample report.
For RM document report replacement, new sample reports are included with the GP Reports Viewer installation: Collections Management RM Sample.rpt (Crystal Reports) and Collections Management RM Sample.rdl (SSRS). These reports are used to replace RM document reports, however they can also be used to replace SOP document reports if you would prefer to have one report that is used for both document types. Please refer to the Collections Management Setup Options section of the GP Reports Viewer Setup Options window for more details on how the reports are chosen.
CONFIGURING REPORTS FOR RM AND SOP REPLACEMENT
If you would like to have one report set up that may be used for both RM and SOP documents, we suggest that you configure a report for RM replacement and use that for both types. You can, however, have one report set up for SOP replacement and one for RM replacement.
To set up a report for SOP replacement, please refer to the Modifying a Report for Use with Sales Order Processing section for more information how now to set this up.
103
Flex
ible
Sol
utio
ns, I
nc. –
GP
Rep
orts
Vie
wer
To set up a report for RM replacement:
1. Replace all existing parameters on the report with the following three parameters:
Parameter Type Description CUSTNMBR String Used to filter the report for the current
customer you are working with in Collections Management
DOCNUMBR String Used to ensure that the report will only include the selected document being emailed
RMDTYPAL Number (if Crystal Report) Integer (if Reporting Services)
This parameter is used to limit the type of document that the report will print. The RMDTYPAL values that may be used are as follows:
1 = Sale / Invoice 2 = Reserved for scheduled payments 3 = Debit Memo 4 = Finance Charge 5 = Service / Repair 6 = Warranty 7 = Credit Memo 8 = Return 9 = Payment
The parameters must be added to the report in the order shown above.
2. As a minimum, add the RM20101 table to your report, but we suggest also adding the RM00101 and RM00102 tables so that you can include customer name and address information. A condition must be added that uses the three parameters created above. This is necessary in order for the report to gather the correct document(s) selected for emailing from Collections Management. In Crystal Reports this is accomplished by adding a record selection formula. The minimum required selection formula is shown below:
{RM20101.CURTRXAM} <> 0 and {RM20101.CUSTNMBR} = {?CUSTNMBR} and {RM20101.DOCNUMBR} = {?DOCNUMBR} and {RM20101.RMDTYPAL} = {?RMDTYPAL}
In SQL Server Reporting Services, you will need to modify your dataset to use the three newly created parameters by adding a WHERE clause, for example:
SELECT <…field list…>

104
Flex
ible
Sol
utio
ns, I
nc. –
GP
Rep
orts
Vie
wer
FROM RM20101 WHERE RM20101.CURTRXAM <> 0 AND RM20101.CUSTNMBR = @CUSTNMBR AND RM20101.DOCNUMBR = @DOCNUMBR AND RM20101.RMDTYPAL = @RMDTYPAL
EMAILING DOCUMENTS FROM COLLECTIONS MANAGEMENT
Once custom Crystal or SQL Server Reporting Services reports have been set up to replace Collections Management SOP and/or RM reports, emailing documents from Collections Management is exactly the same as emailing out-of-the-box documents. Please refer to Configuring Reports for RM and SOP Replacement for further information on setting up reports to work with Collections Management and Collections Management Setup Options section of the GP Reports Viewer Setup Options window for additional information about setting up your reports and configuring GP Reports Viewer to use this feature.
To email RM and SOP reports with Collections Management:
1. Open the Collections Management Main Window
Transaction >> Sales >> Collection Main
2. While viewing a Customer, click the E-Mail button on the menu at the top of the window (note this may look different based on the type of menu you currently have set up in Dynamics GP):
3. Configure your email selections and mark the documents that you would like to email to the customer at the bottom of the window, then click the Send button.
105
Flex
ible
Sol
utio
ns, I
nc. –
GP
Rep
orts
Vie
wer
CHAPTER 9: TROUBLESHOOTING AND REPORT CREATION TIPS
This chapter contains the following sections:
• GP Reports Viewer Troubleshooting Tips • Crystal Reports Tips
GP REPORTS VIEWER TROUBLESHOOTING TIPS
GP Report Viewer crashes when printing a report
If GP Reports Viewer (and sometimes GP) crashes when you print a report, try the following:
• Exit Dynamics GP. • Right click the GP shortcut and choose Run as administrator. • Test printing the report.
If printing the report now works:
• Exit Dynamics GP. • Launch GP again without choosing the administrator option. • Test printing the report again. In most cases reports will now print correctly with no error.
If these steps do not work, it may indicate that there is an issue with the GP Reports Viewer installation and the next step would typically be to uninstall and reinstall GP Reports Viewer while logged into the computer as the local administrator (built-in account for administering the computer/domain).
GP Report Viewer gives an error that it is not registered
Verify that you have proper registration keys for your version of GP Reports Viewer. Navigate to GP >> Tools >> GP Reports Viewer >> Registration and confirm that the Registration Status says Registered. If it does not, or if there are any errors on the window, please email a screenshot to our sales team and we will help determine correct registration keys.
Email is generated using GP Reports Viewer, but the document does not have any data
This is typically caused by not having the required parameters or the right record selection formula in the Crystal or SSRS report. Please refer to the sections on Modifying a Report for Use with Sales Order Processing and Modifying a Report for Use with Purchase Order Processing for details on how to set up parameters to work with GP Reports Viewer. Note that if you had versions of GP Reports Viewer prior to build 56 installed and reports set up for them, you will need to add additional parameters to your reports for the changed made in build 56.

106
Flex
ible
Sol
utio
ns, I
nc. –
GP
Rep
orts
Vie
wer
Email is generated using GP Reports Viewer, but the attachment is the default Dynamics GP HTML report, not your Crystal or SSRS report
This is typically caused by one of two issues:
1. Not having the required parameters or the right record selection formula in the Crystal or SSRS report. Please refer to the sections on Modifying a Report for Use with Sales Order Processing and Modifying a Report for Use with Purchase Order Processing for details on how to set up parameters to work with GP Reports Viewer. Note that if you had versions of GP Reports Viewer prior to build 56 installed and reports set up for them, you will need to add additional parameters to your reports for the changed made in build 56.
2. Not having completed the setup for emailing. Please refer to the section for Setting Up SOP and POP Email Replacement for additional details.
Execute permission denied error when opening a GP Reports Viewer window or clicking on a field
In some cases we have seen permissions not granted correctly during the initial installation. Usually the error will be similar to the following: [Microsoft][ODBC SQL Server Driver][SQL Server]EXECUTE permission denied on object ‘zDP_GPRV00104SS_1’, database ‘TWO’, schema ‘dbo’.
If you receive an error similar to this, run the Dynamics GP SQL Grant script on the DYNAMICS database and all company databases where you have GP Reports Viewer installed. The Grant script can be found on a GP installation in the SQL/Util folder. It can also be downloaded from Microsoft: https://mbs.microsoft.com/fileexchange/?fileID=f7c10cf9-3a8a-4e9a-b0c7-e04adf37672e.
CRYSTAL REPORTS TIPS
The issues we have seen when using Crystal reports with GP Reports Viewer fall into 2 categories: SQL Server permissions and Crystal report setup.
SQL Server Permissions
If you are getting an error when printing a report as a regular GP user, test printing the same report when logged into GP as ‘sa’. If ‘sa’ can print the report successfully, then confirm that the original GP user has access to the proper SQL Server components and/or make sure you have set up the Crystal Reports SQL Server Login described in the Setup Options section.
Crystal Reports setup – errors when printing report
If the Crystal Reports Preview window opens, but instead of the report, there is an error, check the list of possible causes below:
• Is the report set up with an ODBC connection? If not, in certain cases, you will receive a ‘Failed to open the connection’ error. Change the report to use an ODBC connection.
107
Flex
ible
Sol
utio
ns, I
nc. –
GP
Rep
orts
Vie
wer
• Are there spaces in any of the objects used in the report? Crystal reports will not typically work when there are spaces in any names. This includes tables, stored procedures, views or any of the fields in them.
• Are you using the Optional Parameters and/or ‘hasValue’ function new to Crystal Reports 2008? The Crystal Viewer within GP Reports Viewer is not able to interpret these correctly and may cause the following error: A number, currency, amount, Boolean, date, time, date-time, or string is expected here.
• To rule out SQL Server permissions issues, test printing the report with ‘sa’ set up for the Optional SQL Login (please see Setup Options for more detail). When testing this, make sure that the Use Default SQL Login and Password from Setup Options Window option on the Report Maintenance window is checked. Often incorrect permissions will result in an error similar to The table ‘’ could not be found.
• If your report is saved with the option to ‘Save Data with Report’ this can sometimes cause issues. If you are experiencing a problem with a particular report, try resaving it without the data. To do this, go to File and make sure the Save Data with Report toggle does not have a checkmark next to it, then Save the report.
• If a table, view or stored procedure that you Crystal Report is based on has been changed, you may receive an error about unknown field names (for example, The field name is not known). Any time there are changes to the underlying tables, views or stored procedures a one-time update needs to be performed directly in Crystal. The steps for this are below:
o Open your report in Crystal Reports. o Go to Database >> Verify Database. o You may be asked for a SQL Server login at this point. o Once completed you will receive a message saying The database is up to date. o Save the report.
Crystal Reports setup –report prints, but to the wrong printer or margins are off
If the report prints to the screen correctly but is not printing to the correct printer, or if the margins of the report are not what you are expecting, check the Page Setup options in Crystal Reports (under File > Page Setup). If the report will be printed to multiple printers, check the No Printer checkbox. If you are seeing an issue with margins, make sure the Adjust Automatically box is unchecked and that your printer allows the margins specified on the report.
108
Flex
ible
Sol
utio
ns, I
nc. –
GP
Rep
orts
Vie
wer
CHAPTER 10: SUPPORT RESOURCES
This chapter contains the following sections:
• Before calling for support • Frequently asked questions • Support contact information
BEFORE CALLING FOR SUPPORT
Below are some questions that may help to isolate the cause of the problem when troubleshooting:
1. Are the results the same when logged into GP as another user on the same computer? 2. Are the results the same when logged into GP as the same user on a different computer?
3. Are the results the same when logged into GP as ‘sa’?
4. Are the results the same in all GP companies?
5. Are the results the same when logged into Windows as a user in the local administrators group?
6. Are the results the same when logged into Windows as the local administrator (built-in account
for administering the computer/domain)?
7. If printing a report is not working, are the results the same the same when choosing to print to
screen only, instead of choosing printer or export?
8. Please be sure to capture a screenshot or the exact wording of the error message you receive
when planning to contact your GP Partner or Flexible Solutions for support.
FREQUENTLY ASKED QUESTIONS
QUESTION If I install and set up GP Reports Viewer using and use trial registration keys, do I need to re-install or re-set up once I have permanent registration keys?
ANSWER You will not have to reinstall or re-set up anything in GP Reports Viewer – simply enter your
permanent registration keys and you can continue printing your reports.
QUESTION I am planning on installing a new service pack for Dynamics GP or SQL Server, do I need a service
pack for GP Reports Viewer?
ANSWER
Typically new service packs for GP or SQL do not require any changes to GP Reports Viewer. While the GP Reports Viewer version must match the Dynamics GP version, applying a GP or SQL
service pack should not cause any issues for GP Reports Viewer. The only exception to this so far
is Dynamics GP 2010 R2/SP 2, which requires build 55 or later of GP Reports Viewer for GP 2010.
We recommend making backups of all data and reports prior to applying new service packs and,
if at all possible, testing service packs prior to installing them in a production environment.

109
Flex
ible
Sol
utio
ns, I
nc. –
GP
Rep
orts
Vie
wer
QUESTION I am not seeing any options for emailing in my Dynamics GP or GP Reports Viewer.
ANSWER
You must be on Dynamics GP 2018, 2016, 2015, 2013 or Dynamics GP 2010 with build 56 and
higher of GP Reports Viewer to use the emailing functionality. GP Reports Viewer uses the built
in emailing setup windows in Dynamics GP for emailing reports.
QUESTION I am not seeing any options for customer statements in my Dynamics GP or GP Reports Viewer.
ANSWER
You must be on at least Dynamics GP 2013 with build 4 of GP Reports Viewer or Dynamics GP 2010 with build 61 of GP Reports Viewer to use the statement functionality in GP Reports
Viewer.
SUPPORT CONTACT INFORMATION
Obtaining support from Flexible Solutions:
Website: http://support.flex-solutions.com
Email: [email protected]
Phone: 212-254-4112 (Option 2 for Technical Support)
Tutorials: http://www.GPReportsViewer.com/demos.html