Embed Size (px)
Citation preview

Governor’s Electronic Classroom (GEC) Room and Distance Learning Operations
Northern State University, Aberdeen, SD

Governor’s Electronic Classroom Switch Operation 1 - 6
• Turn on all switches in this numbered order. • Switch 3 is for cable, record functions.• Switch 2 is for non-teleconference operations. • plus Switch 6 is still used

Governor’s Electronic ClassroomElmo Visual Presenter Power & Instructor Cam Power
Make certain that the Epson DocCam power switch is turned on!
Instructor Cam power is the only device that is not connectedto the 6 power strips for full room operation. Please remember to turn off!
Instructor Monitor and Instructor cam. Are on a Power Strip.

Governor’s Electronic Classroomprinter & student desk switches
The Network Printer (MJ141
Gec Lab) is accessible from
all workstations.
The Links monitor system will not work if station 1 is not turned on.
All workstations are turned onwith desk power strip under the top. Do not use machine switches. Logout of the network before shut down of the desk switch.

Governor’s Electronic ClassroomInstructor and Student Projectors
Turn off the AMX switches
for the projectors before the
AC power strips are turned
off OR the projectors
will never shut down !
Bulbs are not easily
replaced.
Must press OFF twice.
Turn the Instructor and Student
Projector on and off with these
buttons on the AMX panel.

Governor’s Electronic ClassroomStudent Projector Input Select - AMX panel
Select sources from theStudent Projector InputSelect to send thesesignals to the class andremote sites.
Use Program Volume toadjust in-room and transmission volume.
Remember to lower theprojector screens.

Governor’s Electronic ClassroomCharging the Instructor’s Mic. Parkervision
The instructor’s mic must betotally discharged before it isrecharged.
AC/DC Power bloc will blinkred when charging. Turntransmitter power OFF. PlugIn the DC wire to the transmitter !!
Telex mic is battery operated (9 volt)

Classroom and Polycom operation in the GECRecord and Play VCRs
This is a must check!
Have the Record VCR in
the gun rack ON and set
to Input L1. The remote
can be used to change
Input status.
Also turn on the Play
VCR in the Instructor’s
desk.

Governor’s Electronic ClassroomDigistation and Instructor Monitors
• Turn on the monitors at the Digistation and Instructor’s desk.
Set digi mon. to Video 3
Record VCR is Video 2

Governor’s Electronic ClassroomLink Controller With TouchScreen Monitor
Mobile LinkSystem Demonstration

Presentation & Polycom Operation in the GEC Routing Display Signals
Classroom &remote students need to see Powerpoints, etc. It is vital that they see the Instructor and the local
students so that they feel like active members of the class.
CPU Display must be set to 800x600, 60 Hz
Necessary for Polycom & Media Operation

Link Operations for Specific Outputs Instructor CPU only Display
• Select “Instructor to Projector”.
• Select also “Transmit All” to send Instructor CPU to all students.
• Select AMX “Visual Presenter” to send doc cam to Student Projector.

Link Operations for Specific Outputs Display Instructor CPU to selected students
• Select “Transmit Individual” and select desired student workstations.
• To transmit a student select “Receive Student” then select desired student workstation.

Link Operations for Specific Outputs Student Workstation Display
• Select “Receive Student” then select a student workstation (Will display only on instructor CPU).
• Also select “Student to Projector” (will display selected student on projector).
• Also select “Transmit All” to send selected student to all students.

Link Operations for Specific Outputs Scanning Student Workstations
• To privately scan all workstations select “Scan”

NSU GEC Polycom Operation and LinkSystem Display
LinkSystem display of classroom
student and instructor workstations
utilize the Mobile Link touch panel.
Polycom signals (video and VGA
graphics) can be displayed in the GEC
using the LinkSystem. Polycom uses
the “Aux In” port and associated
buttons, “Aux In to Local” and “Aux In
to Projector.”
“Aux In to Projector” is Polycom
monitor 2 (VGA signal) to the Link
Instructor Projector

Link and Polycom Operations for Teleconference Instructor CPU Display to Remote Site
• Select “Instructor to Projector”. Can do “Transmit All” to local class.
• Select Polycom “Graphics” to send VGA People and Content to remote site. THIS IS CONTENT.
This will also send output of AMX “Student Projector Input Select”.
THIS IS PEOPLE.

Link and Polycom Operations for Teleconference Student Workstation Display
• Select “Receive Student” and choose student to display, then select “Student Projector”. Must reselect Polycom “Graphics”.
• If you change student selection, you MUST reselect the Polycom “Graphics”.
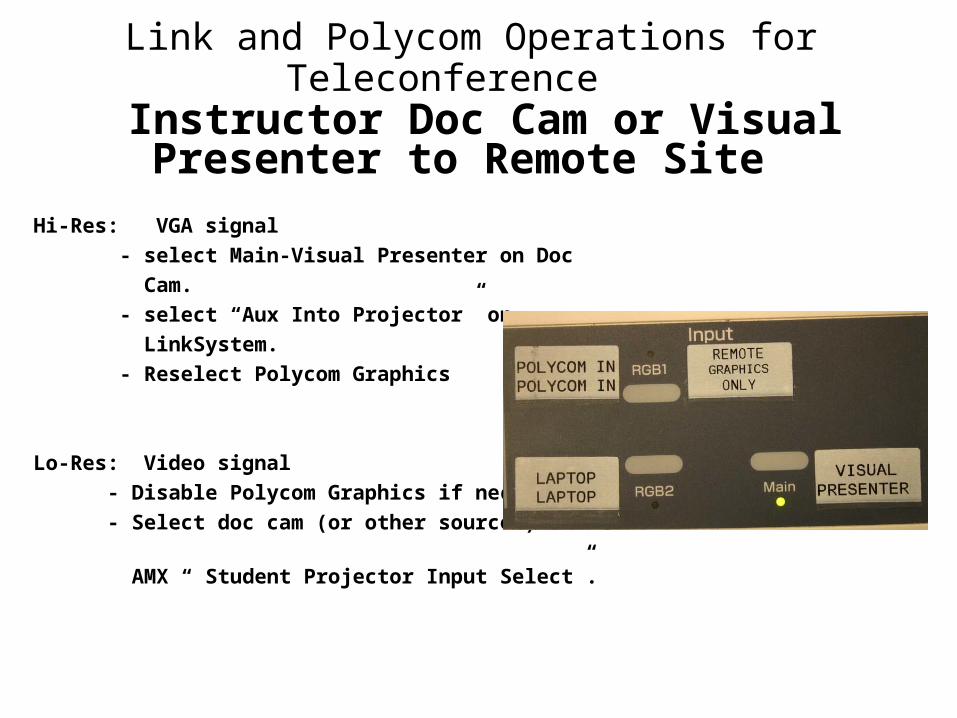
Link and Polycom Operations for Teleconference Instructor Doc Cam or Visual Presenter to
Remote Site
Hi-Res: VGA signal
- select Main-Visual Presenter on Doc
Cam.
- select “Aux Into Projector” on
LinkSystem.
- Reselect Polycom Graphics
Lo-Res: Video signal
- Disable Polycom Graphics if necessary.
- Select doc cam (or other sources) from
AMX “ Student Projector Input Select”.

Link and Polycom Operations for TeleconferenceRemote Site VGA People and Content Display
• First, select “RBG1- Polycom In” on the doc cam.
• Select “Aux In to Projector” to send Polycom signal to instructor projector. Can select Link “Transmit All” to send to student desktops.

GEC Startup Operations
• At the Digistation, turn on switches 1 through 3, and video monitor.
• Make sure that the Record VCR in the Gun Rack is on and set to L1.
• At the Instructor’s Desk, turn on switches 4 through 6, and video monitor.
• Make sure the Doc Cam is on.• Check printer switch. • Turn on Instructor CPU and monitor.• Turn on Mobile Link System Touch Panel.• Turn on the Monitor and Camera at the back of the room
(powerstrip). • Reverse to shutdown.