Embed Size (px)
Citation preview
GoToMeeting™ User Guide
Citrix Online © Citrix Online, LLC. All rights reserved.
5385 Hollister Avenue • Santa Barbara, CA 93111 • (805) 690-6400 • Fax: (805) 690-6471
GoToMeeting User Guide
Organizing, Conducting, Presenting and Attending Web Meetings Version 1.1
GoToMeeting™ User Guide
© 2004 Citrix Online, LLC. All rights reserved.
Contents
Getting Started........................................................................................................... 1 Using This Guide .........................................................................................................2
Guide Structure........................................................................................................2 Personal and Corporate Users ....................................................................................2
System Requirements ..................................................................................................2 Terms ........................................................................................................................3 Feature Notes .............................................................................................................4 Create Your Organizer Account – Personal Plan Organizers ...............................................5 Create Your Organizer Account – Corporate Plan Organizer...............................................5
Install the GoToMeeting Application ............................................................................6 The GoToMeeting System Tray Icon ............................................................................7 Set GoToMeeting Application Preferences.....................................................................8
The GoToMeeting Outlook Bar .....................................................................................10 The GoToMeeting Messenger Button ............................................................................10
The GoToMeeting Organizer Web Site ...................................................................... 11 Log In to Your Organizer Web Site ............................................................................11 View Scheduled Meetings.........................................................................................11 View Meeting History...............................................................................................12 View and Edit Organizer Account Information.............................................................12 Change Account Password .......................................................................................12 View and Edit Organizer Account Billing Information ...................................................13 View Organizer Account Billing History ......................................................................13
Organizing and Conducting Meetings ....................................................................... 14 Organizer Role Overview ............................................................................................14 Schedule a Meeting ...................................................................................................15
Schedule a Recurring Meeting ..................................................................................16 View Scheduled Meetings.........................................................................................17 Invite Attendees to a Scheduled Meeting ...................................................................17 Edit a Scheduled Meeting.........................................................................................18 Cancel a Scheduled Meeting.....................................................................................18 Impromptu Meetings...............................................................................................18
Start a Scheduled Meeting..........................................................................................19 Start an Impromptu Meeting.......................................................................................21 GoToMeeting Integrated Voice Conferencing Service......................................................23 The Presenter Control Panel........................................................................................24
GoToMeeting™ User Guide
© 2004 Citrix Online, LLC. All rights reserved.
Manage Attendees .....................................................................................................27 Invite Attendees during a Meeting ............................................................................28
Chat with Attendees ..................................................................................................29 Present at a Meeting ..................................................................................................29 Leave or End a Meeting..............................................................................................29
Organizing and Conducting Events ........................................................................... 30 Notes on Organizing and Conducting Events .................................................................30
Schedule an Event ..................................................................................................31 View Scheduled Events............................................................................................32 Invite Attendees to a Scheduled Event ......................................................................32 Edit a Scheduled Event............................................................................................33 Cancel a Scheduled Event........................................................................................33
Start a Scheduled Event .............................................................................................34 Leave or End an Event ...............................................................................................36
Presenting at Meetings............................................................................................. 37 Presenter Role Overview ............................................................................................37 The Presenter Screen Tools Pane.................................................................................37
The Presenter Control Panel Grab Tab .......................................................................38 Use Presenter Controls...............................................................................................38
Attending Meetings .................................................................................................. 39 Attendee Role Overview .............................................................................................39 Join a Meeting...........................................................................................................39 GoToMeeting Attendee Application Components ............................................................40 The Attendee Control Panel.........................................................................................41
The Attendee Control Panel Menu Bar .......................................................................42 The Attendee Control Panel Grab Tab ........................................................................42
Chat with Other Attendees..........................................................................................43 The GoToMeeting Viewer Window ................................................................................44
Configure the Viewer Window...................................................................................45 Share Presenter Keyboard and Mouse ..........................................................................45 Become a Presenter...................................................................................................45 Become an Organizer.................................................................................................46 Leave a Meeting or Event ...........................................................................................46
Tips for Success ....................................................................................................... 47 FAQs......................................................................................................................... 48 Support .................................................................................................................... 51
GoToMeeting™ User Guide
© 2004 Citrix Online, LLC. All rights reserved. 1
Getting Started
Welcome
GoToMeeting’s “simpler is better” approach to online meetings makes it the easiest, fastest, most cost-efficient and secure online presentation and collaboration service available.
GoToMeeting users can collaborate on documents, deliver presentations, perform product demonstrations and securely share confidential information from anywhere, at any time. GoToMeeting’s rapid download, quick meeting setup and intuitive user interface has meeting Organizers and Attendees up and running in a matter of seconds.
GoToMeeting incorporates industry-standard security features and end-to-end SSL encryption to ensure that login information and meeting data are secure. The GoToMeeting architecture is the most advanced security foundation available on the market and offers meeting Hosts and Attendees true end-to-end data security. The high level of security provides a greater sense of safety to meeting participants and allows GoToMeeting users to confidently present and collaborate on any data. Users can rest assured that information such as sales forecasts, financial data and M&A contracts will not be viewable to anyone except meeting participants.
With GoToMeeting, travel costs can be dramatically reduced or eliminated because meetings can be held online with anyone, anywhere. Spend time meeting online rather than traveling, getting through security or waiting in airports.
GoToMeeting’s liberal All You Can Meet™ pricing model provides easy-to-understand billing that helps you effectively budget and manage online meeting costs with no unexpected “overage” charges or additional fees.
A new breed in online meeting technology, GoToMeeting was designed to make it easier for everyone to organize and participate in online meetings. Make every meeting a GoToMeeting and get more meeting done.
MMeeeett AAnnyyttiimmee
MMeeeett AAnnyywwhheerree
MMeeeett wwiitthh MMaannyy
MMeeeett OOnnee--ttoo--OOnnee
MMeeeett SSeeccuurreellyy
MMeeeettiinngg DDoonnee

GoToMeeting™ User Guide
© 2004 Citrix Online, LLC. All rights reserved. 2
Using This Guide
Guide Structure
This guide is divided into five sections:
• The GoToMeeting Web Site - This section is for GoToMeeting Organizers and covers how to access and use the GoToMeeting Organizer Web site.
• Organizing and Conducting Meetings – This section is for GoToMeeting Organizers and covers how to schedule, view, edit, delete, start, conduct and manage attendees at scheduled and impromptu GoToMeeting meetings.
• Organizing and Conducting Events – This section is for GoToMeeting Organizers and covers how to schedule, view, edit, delete, start, conduct and manage attendees at scheduled GoToMeeting events.
• Presenting at Meetings – This section is for any GoToMeeting Attendee who may be given the role of presenting during a meeting or event. The section covers how to use GoToMeeting Presenter controls.
• Attending Meetings – This section is for any GoToMeeting Attendee and covers how to join a meeting and how to use Attendee features.
Personal and Corporate Users
This user guide addresses both personal GoToMeeting users and GoToMeeting Corporate users. While most features apply to both audiences, some content relates to just one audience. To help you identify when something is just for one specific audience, this guide will clearly note the audience for any user-specific content.
System Requirements
For Organizers: ! Required: Windows® 95, 98, Me, NT4.0, 2000, XP Home, XP Pro, 2003 Server ! Required: Internet Explorer 5.0 or greater, Netscape 6.0 or greater, or Mozilla Firefox
1.0 or later ! Required: Stable 56k, cable modem, ISDN, DSL or better Internet connection ! Recommended: Minimum of Pentium 300 with 64 MB of RAM
For Attendees: ! Required: Internet Explorer 5.0 or greater, Netscape 6.0 or greater, or Mozilla Firefox
1.0 or later ! Required: Stable 56k, cable modem, ISDN, DSL or better Internet connection ! Recommended: Java Virtual Machine enabled ! Recommended: Minimum of Pentium 300 with 64 MB of RAM
For Instant Messenger Integration: ! GoToMeeting integrates with the most widely used instant-messaging applications.
For Outlook Integration: ! Microsoft® Outlook® 2000 or later
GoToMeeting™ User Guide
© 2004 Citrix Online, LLC. All rights reserved. 3
Terms • Organizer – Organizers have accounts with GoToMeeting that enable them to schedule
and conduct meetings. Organizers are also the meeting Host and the initial meeting Presenter, but may pass the Presenter role to any other Attendee. Organizers have the ability to grant or revoke Attendee privileges, invite or dismiss Attendees during a meeting and make other Attendees Organizers.
• Attendee – An Attendee is any person who attends a meeting. Organizers, Hosts and Presenters are all Attendees. By default, Attendees can view the Presenter's screen. An Attendee may remotely control the Presenter's computer screen if given the privilege. An Attendee may chat with other Attendees or view the Attendee List.
• Presenter – A Presenter is any Attendee who is giving a presentation and shares his or her computer screen with all the Attendees. The initial Presenter is also the initial meeting Host. The Presenter also determines who gets to control the keyboard and mouse of the remotely viewed screen.
• GoToMeeting Web Site – The Web site located at www.gotomeeting.com is used by Organizers to manage their accounts and host meetings and by Attendees to join meetings.
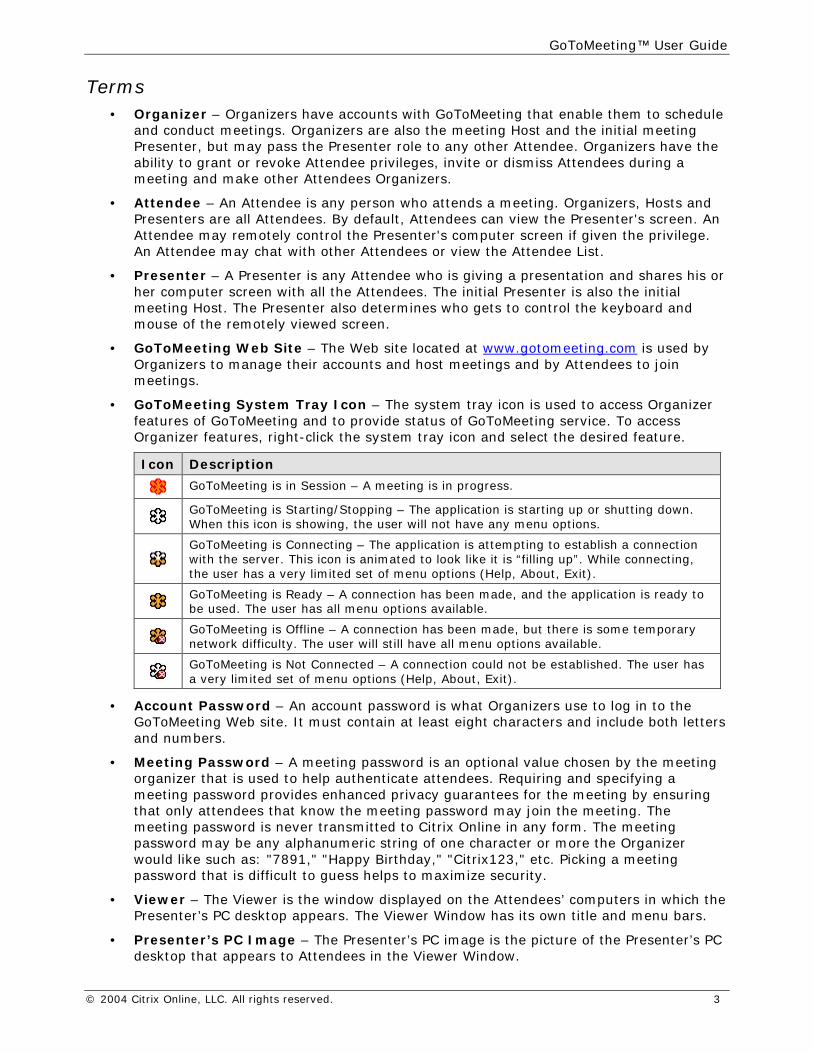
• GoToMeeting System Tray Icon – The system tray icon is used to access Organizer features of GoToMeeting and to provide status of GoToMeeting service. To access Organizer features, right-click the system tray icon and select the desired feature.
Icon Description
GoToMeeting is in Session – A meeting is in progress.
GoToMeeting is Starting/Stopping – The application is starting up or shutting down. When this icon is showing, the user will not have any menu options.
GoToMeeting is Connecting – The application is attempting to establish a connection with the server. This icon is animated to look like it is “filling up”. While connecting, the user has a very limited set of menu options (Help, About, Exit).
GoToMeeting is Ready – A connection has been made, and the application is ready to be used. The user has all menu options available.
GoToMeeting is Offline – A connection has been made, but there is some temporary network difficulty. The user will still have all menu options available.
GoToMeeting is Not Connected – A connection could not be established. The user has a very limited set of menu options (Help, About, Exit).
• Account Password – An account password is what Organizers use to log in to the GoToMeeting Web site. It must contain at least eight characters and include both letters and numbers.
• Meeting Password – A meeting password is an optional value chosen by the meeting organizer that is used to help authenticate attendees. Requiring and specifying a meeting password provides enhanced privacy guarantees for the meeting by ensuring that only attendees that know the meeting password may join the meeting. The meeting password is never transmitted to Citrix Online in any form. The meeting password may be any alphanumeric string of one character or more the Organizer would like such as: "7891," "Happy Birthday," "Citrix123," etc. Picking a meeting password that is difficult to guess helps to maximize security.
• Viewer – The Viewer is the window displayed on the Attendees’ computers in which the Presenter’s PC desktop appears. The Viewer Window has its own title and menu bars.
• Presenter’s PC Image – The Presenter’s PC image is the picture of the Presenter’s PC desktop that appears to Attendees in the Viewer Window.

GoToMeeting™ User Guide
© 2004 Citrix Online, LLC. All rights reserved. 4
Product Features • Intuitive User Interface: Easy-to-understand controls enable you to start and join
meetings in seconds without training.
• Share Keyboard and Mouse Control: Securely collaborate on documents in real time.
• Instantly Change Presenters: Enable any participant to present to the entire group.
• Chat Window: Chat online with any participant in the meeting.
• Integration: Easily start or join GoToMeeting sessions through email or instant-messaging applications.
• Attendee Authority: Grant and revoke attendee privileges before or during a meeting session.
• Reporting: Get detailed reports for trend analysis and ROI validation.
• True 24-Bit Color: Share presentations, graphics, pictures and PC applications with all meeting attendees in True 24-bit color.
• Event Licensing: GoToMeeting Corporate Organizers may also be enabled to use the GoToMeeting Event Licensing feature; this feature expands meeting capacity to up to 200 attendees.
Feature Notes • Organizers using GoToMeeting are limited to 10 meeting Attendees, plus the Organizer,
for a total of 11 people in each meeting.
• Organizers using GoToMeeting Corporate may invite up to 25 meeting Attendees, for a total of 26 people in each meeting.
• GoToMeeting Event Licensing is only available for GoToMeeting Corporate Organizer accounts. Event Licensing enables Organizers to hold meetings with up to 200 Attendees.
GoToMeeting™ User Guide
© 2004 Citrix Online, LLC. All rights reserved. 5
Create Your Organizer Account – Personal Plan Organizers Before they can schedule or start a meeting, first time Organizers need to create their GoToMeeting accounts and download the GoToMeeting software. It generally takes less than 2 minutes to set up a GoToMeeting account.
! To create your account
1. Go to www.gotomeeting.com and click the Try It Now button.
2. On the Create Account page, enter your information and click Create Account.
3. On the Download GoToMeeting page, click the Download button.
4. If prompted, click Yes or Grant to accept the download.
5. Once the download is complete, click Start to begin the GoToMeeting software installation.
6. Once the installation is complete, click Finish to finalize the process.
Create Your Organizer Account – Corporate Plan Organizer If you are a GoToMeeting Corporate user you will be invited to join by your company’s GoToMeeting Administrator. Before being able to schedule or start a meeting you need to create your GoToMeeting account and download the GoToMeeting software.
! To create your account
1. Go to your email application and open the GoToMeeting invitation email you received from your administrator entitled Set Up GoToMeeting Corporate.
2. In the email, click the activation link to create your Organizer account.
3. On the Create Account page, enter your information and click Create Account.
4. On the Download GoToMeeting page, click the Download button.
5. If prompted, click Yes or Grant to accept the download.
6. Once the download is complete, click Start to begin the GoToMeeting software installation.
7. Once the installation is complete, click Finish to finalize the process.
GoToMeeting™ User Guide
© 2004 Citrix Online, LLC. All rights reserved. 6
Install the GoToMeeting Application
The Organizer application must be on the computer in order to schedule and host meetings. The application will automatically download with creation of your Organizer account.
! To install the Organizer application
1. Open an Internet browser and go to www.gotomeeting.com.
2. In the left navigation bar, click Log In.
3. In the Returning Users section, enter your email address and password and click the Log In button.
You will be logged in to your Organizer Web site and taken directly to the My Meetings page.
4. At the bottom of the My Meetings page, click the re-install the GoToMeeting software link.
5. On the Download GoToMeeting page, click the Download button.
6. On the File Download dialog box, click Open.
The GoToMeeting application downloads to your computer.
7. On the GoToMeeting Installation dialog box, click Next and follow the onscreen directions to install GoToMeeting.
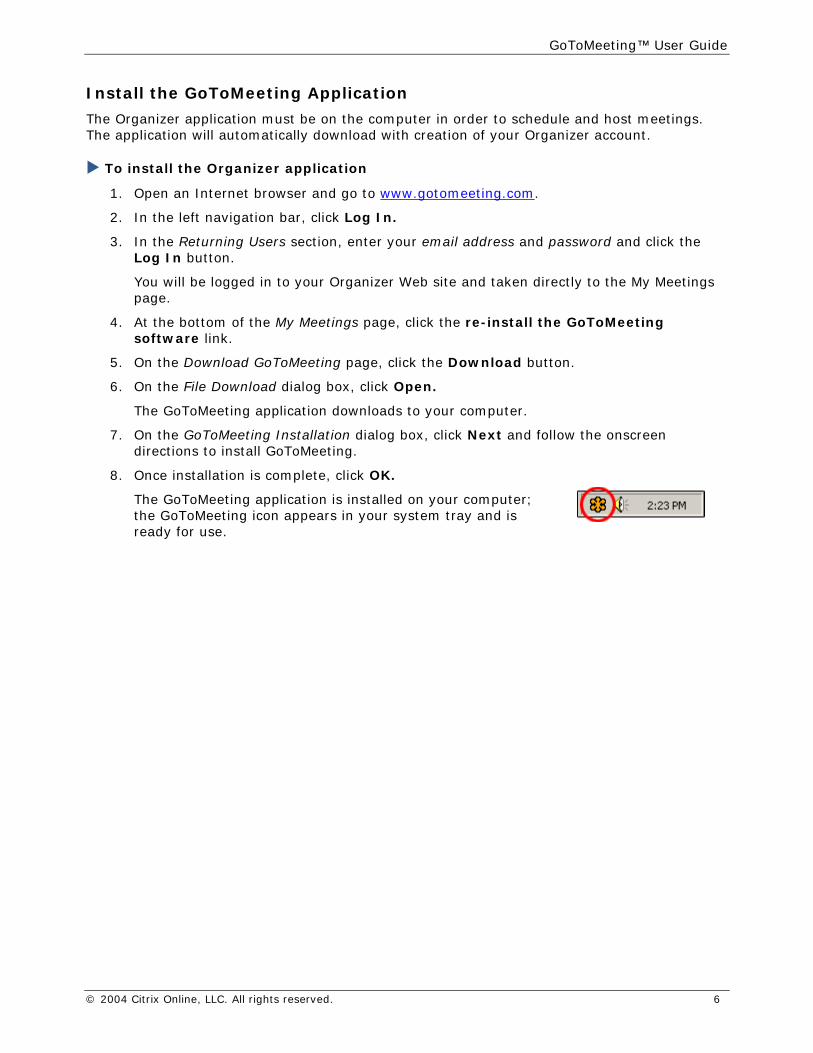
8. Once installation is complete, click OK.
The GoToMeeting application is installed on your computer; the GoToMeeting icon appears in your system tray and is ready for use.
GoToMeeting™ User Guide
© 2004 Citrix Online, LLC. All rights reserved. 7
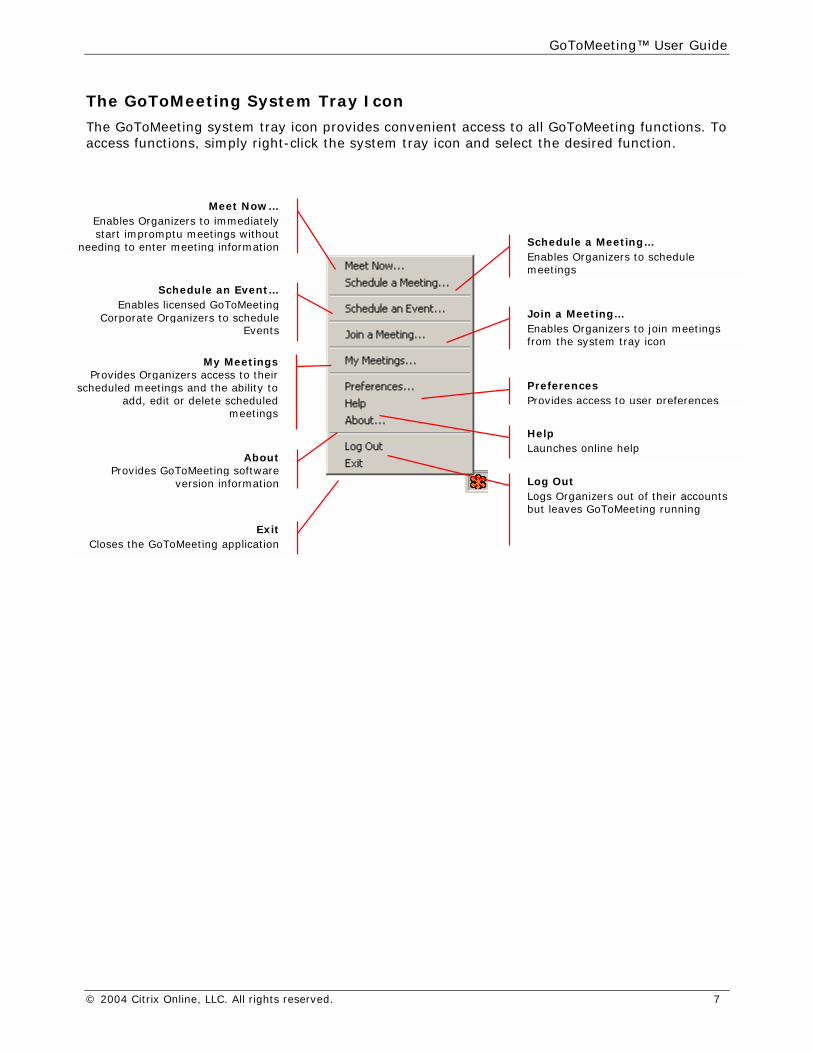
The GoToMeeting System Tray Icon
The GoToMeeting system tray icon provides convenient access to all GoToMeeting functions. To access functions, simply right-click the system tray icon and select the desired function.
Meet Now…Enables Organizers to immediatelystart impromptu meetings without
needing to enter meeting information
Join a Meeting… Enables Organizers to join meetings from the system tray icon
My MeetingsProvides Organizers access to their
scheduled meetings and the ability toadd, edit or delete scheduled
meetings
Preferences Provides access to user preferences
Help Launches online help
AboutProvides GoToMeeting software
version information
ExitCloses the GoToMeeting application
Log Out Logs Organizers out of their accounts but leaves GoToMeeting running
Schedule an Event…Enables licensed GoToMeeting
Corporate Organizers to scheduleEvents
Schedule a Meeting… Enables Organizers to schedule meetings

GoToMeeting™ User Guide
© 2004 Citrix Online, LLC. All rights reserved. 8
Set GoToMeeting Application Preferences
GoToMeeting preferences allow Organizers to set preferences for running GoToMeeting, choose which GoToMeeting toolbars are displayed and test the GoToMeeting connection.
! To set GoToMeeting preferences
1. Right-click the GoToMeeting system tray icon and select Preferences.
2. Select the appropriate tab for the set of preferences you want to customize – Start Up, Toolbars or Connect.
3. Select your preferences.
4. Click OK.
Start Up Tab
The Start Up tab enables Organizers to determine how to start GoToMeeting. Options include:
• “Automatically after I log in to Windows” – This option starts GoToMeeting automatically after you log in to your PC.
• “Manually” – This option sets GoToMeeting to start only when you launch the application from your Programs Menu.
• Log in checkbox – This checkbox becomes available if you select “Automatically after I log in to Windows” and will enable automatic log in to the system.
Meetings Tab
The Meetings tab enables Organizers to determine what GoToMeeting options are available to Attendees during a meeting and set the default preferences for what the Organizer sees during a meeting. Options include:
• Enabling or disabling the ability for Attendees to chat and view the Attendee List.
• Enabling or disabling various system messages to appear to the Organizer when specific meeting actions occur.
• Selecting the desired color for the GoToMeeting Viewer and Control Panel.
Note: Turning off chat bubble messages will display a new message icon on the Grab Tab to notify you of new chat messages.
Designates a private chat
Designates a public chat
GoToMeeting™ User Guide
© 2004 Citrix Online, LLC. All rights reserved. 9
Events Tab
The Events tab enables Organizers to determine what GoToMeeting options are available to Attendees during an event and sets the default preferences for what the Organizer sees during a meeting. Options include:
• Enabling or disabling the ability for Attendees to chat and view the Attendee List.
• Enabling or disabling various system messages to appear to the Organizer when specific meeting actions occur.
• Selecting the desired color for the GoToMeeting Viewer and Control Panel.
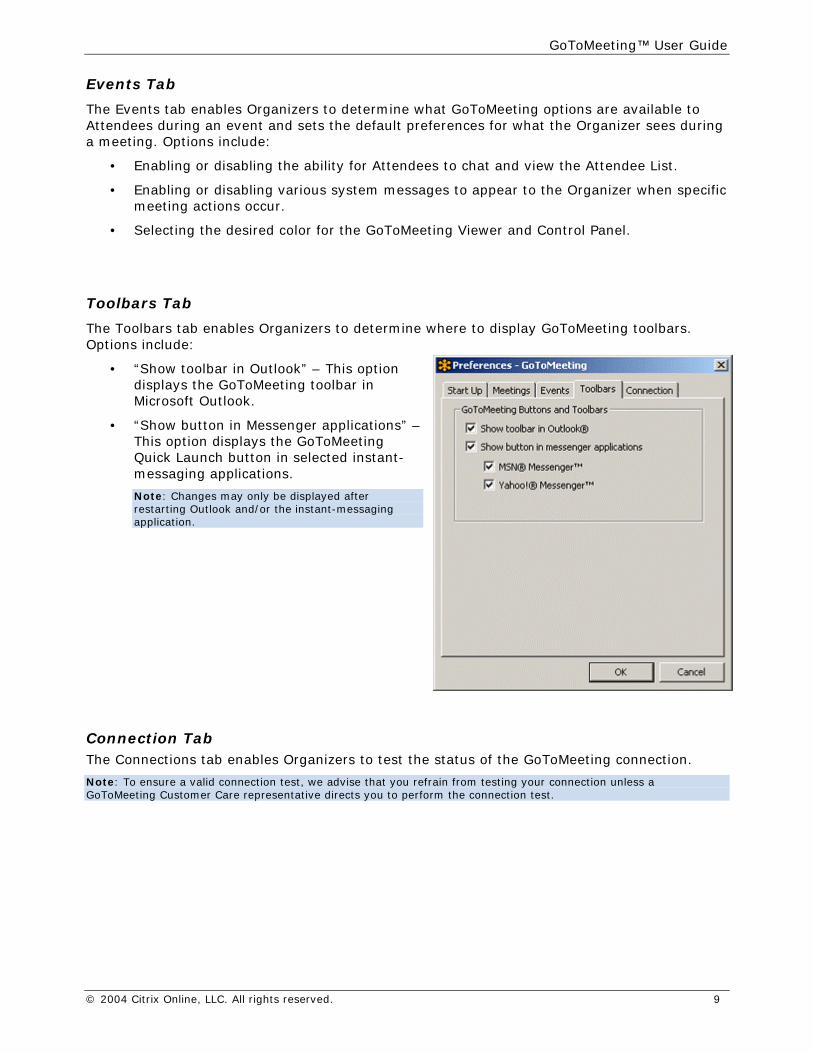
Toolbars Tab
The Toolbars tab enables Organizers to determine where to display GoToMeeting toolbars. Options include:
• “Show toolbar in Outlook” – This option displays the GoToMeeting toolbar in Microsoft Outlook.
• “Show button in Messenger applications” – This option displays the GoToMeeting Quick Launch button in selected instant-messaging applications.
Note: Changes may only be displayed after restarting Outlook and/or the instant-messaging application.
Connection Tab The Connections tab enables Organizers to test the status of the GoToMeeting connection.
Note: To ensure a valid connection test, we advise that you refrain from testing your connection unless a GoToMeeting Customer Care representative directs you to perform the connection test.

GoToMeeting™ User Guide
© 2004 Citrix Online, LLC. All rights reserved. 10
The GoToMeeting Outlook Bar The GoToMeeting Outlook Bar provides quick and easy access to GoToMeeting functions right from Microsoft Outlook. It includes the Meet Now and Schedule Meeting buttons, in addition to access to all the same features of GoToMeeting that the GoToMeeting system tray icon provides.
Note: Outlook integration requires Microsoft Outlook 2000 or later. Outlook may need to be shut down and restarted for the GoToMeeting Outlook bar to appear. The GoToMeeting Outlook bar can be added or removed from the Preferences Menu.
The GoToMeeting Messenger Button The GoToMeeting Messenger button provides a convenient way to start an impromptu meeting, right from your selected instant-messaging application.
Note: Please see the Software Requirements section to check what Messenger products and version are supported. Messenger applications may need to be shut down and restarted for the GoToMeeting Messenger button to appear. The GoToMeeting Messenger button can be added or removed from the Preferences Menu Toolbars tab.
GoToMeeting™ User Guide
© 2004 Citrix Online, LLC. All rights reserved. 11
The GoToMeeting Organizer Web Site The GoToMeeting Organizer Web site enables Organizers to view their scheduled meetings and meeting history and to edit their account information.
Note: To schedule meetings, Organizers need to log in to the Organizer application. Please see the GoToMeeting Organizer Application section below for more on scheduling meetings.
Log In to Your Organizer Web Site
To access Organizer Web site features, Organizers must first log in.
! To log in to your Organizer Web site
1. Open an Internet browser and go to www.gotomeeting.com.
2. In the left navigation bar, click Log In.
3. In the Returning Users section, enter your email address and password and click the Log In button.
You will be logged in to your Organizer Web site account and taken directly to the My Meetings page.
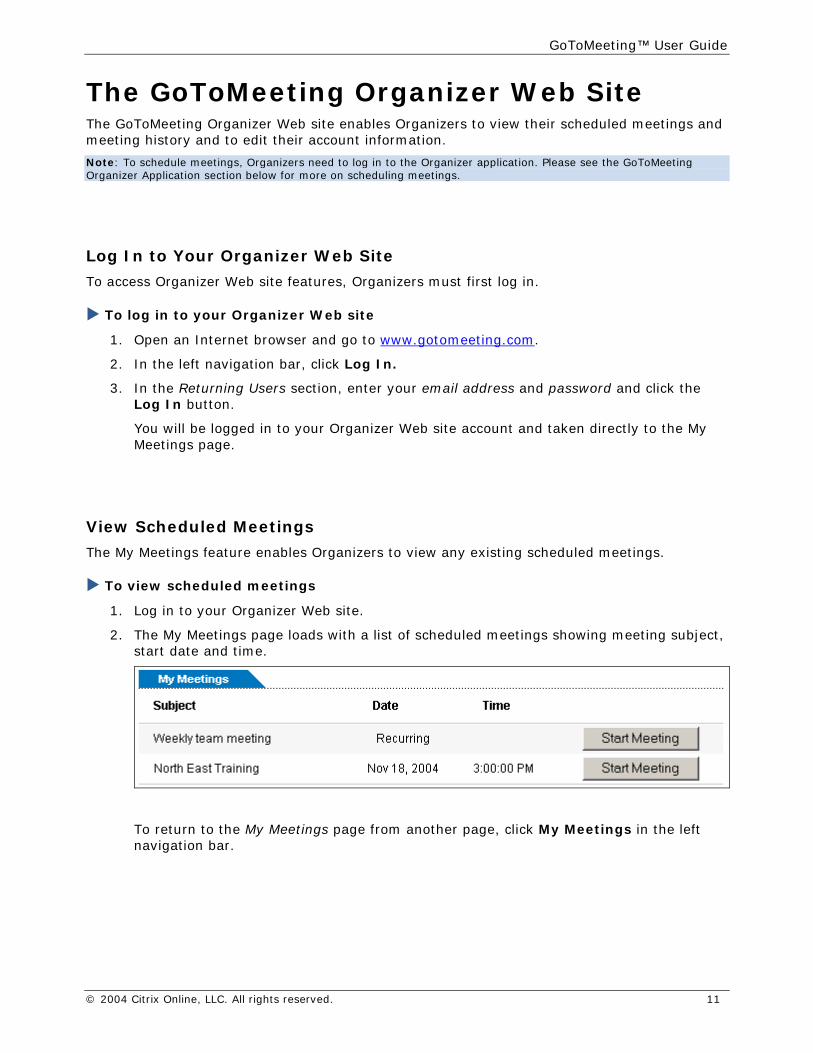
View Scheduled Meetings
The My Meetings feature enables Organizers to view any existing scheduled meetings.
! To view scheduled meetings
1. Log in to your Organizer Web site.
2. The My Meetings page loads with a list of scheduled meetings showing meeting subject, start date and time.
To return to the My Meetings page from another page, click My Meetings in the left navigation bar.
GoToMeeting™ User Guide
© 2004 Citrix Online, LLC. All rights reserved. 12
View Meeting History
The Meeting History feature enables Organizers to view a report of completed meetings for a selected month.
! To view meeting history
1. Log in to your Organizer Web site.
2. In the left navigation bar, click Meeting History.
The Meeting History page loads, listing any completed meetings for the present month and giving the option to report on meetings from past months.
3. In the Meeting History section, from the selection boxes select the Month and Year for the meeting period you want to review and click the Update History button.
The Meeting History section updates and displays the subject, date/time, duration and number of Attendees for all completed meetings for the selected month.
View and Edit Organizer Account Information
The My Account feature enables Organizers to view and edit their personal account information and to change their account passwords.
! To view account information
1. Log in to your Organizer Web site.
2. In the left navigation bar, click My Account.
The My Account Details page loads, displaying Organizer account information.
! To edit account information
1. Log in to your Organizer Web site.
2. In the left navigation bar, click My Account.
The My Account Details page loads, displaying Organizer account information.
3. At the top of the My Account Details section, enter your Current Password, make any desired account or password changes and click the Save Changes button at the bottom of the page.
Change Account Password
The My Account feature enables Organizers to change their password.
! To change account password
1. Log in to your Organizer Web site.
2. In the left navigation bar, click My Account.
The My Account Details page loads, displaying Organizer account information.
3. At the top of the My Account Details section, enter your Current Password, enter your new password in the New Password and Re-Type New Password fields and click the Save Changes button at the bottom of the page.
Note: Your new password must contain at least 8 characters and include both letters and numbers.
GoToMeeting™ User Guide
© 2004 Citrix Online, LLC. All rights reserved. 13
View and Edit Organizer Account Billing Information
The billing information feature enables Organizers to view and edit their GoToMeeting Personal Plan account billing information.
Note: This feature only appears for GoToMeeting Personal Plan Organizers and does not apply to Corporate plan Organizers.
! To view account billing information
1. Log in to your Organizer Web site.
2. In the left navigation bar, click My Account.
3. In the left navigation bar, click Billing Information.
The My Account: Billing Information page loads, displaying Organizer billing information.
! To edit account billing information
1. Log in to your Organizer Web site.
2. In the left navigation bar, click My Account.
3. In the left navigation bar, click Billing Information.
The My Account: Billing Information page loads, displaying Organizer billing information.
4. At the bottom of the My Account: Billing Information section, click the Edit button.
5. Make any desired billing information change and click the Save Changes button at the bottom of the page.
View Organizer Account Billing History
The billing information history feature enables Organizers to view the history of all activity for their account billing information.
Note: This feature only appears for GoToMeeting Personal Plan Organizers and does not apply to Corporate plan Organizers.
! To view account billing information
1. Log in to your Organizer Web site.
2. In the left navigation bar, click My Account.
3. In the left navigation bar, click Account History.
The My Account: Account History page loads, displaying Organizer billing information.
GoToMeeting™ User Guide
© 2004 Citrix Online, LLC. All rights reserved. 14
Organizing and Conducting Meetings
Organizer Role Overview Organizers have accounts with GoToMeeting that enable them to schedule and conduct meetings. An Organizer must be present at the start of any meeting as the meeting Host.
Organizers need to first create their accounts and download the GoToMeeting software on their computers before they can schedule or conduct meetings.
Organizers are responsible for creating scheduled meetings or starting impromptu meetings. Organizers invite Attendees and may do so via phone, email or instant message.
Once a meeting starts, the Organizer becomes the meeting Presenter. During the meeting, the Organizer may pass the role of Organizer or Presenter to other Attendees.
GoToMeeting Organizers start all meetings and one must be present before a meeting can begin.
Organizers need to first create their accounts and download the GoToMeeting software on their computers before they can conduct meetings.
Organizers invite Attendees and may do so via telephone, email or instant-messaging integration before a scheduled meeting or during a scheduled or impromptu meeting. Once a meeting starts, the Organizer becomes the meeting Presenter. During a meeting the Organizer may pass the role of Organizer or Presenter to other Attendees.

GoToMeeting™ User Guide
© 2004 Citrix Online, LLC. All rights reserved. 15
Schedule a Meeting Organizers can schedule pre-planned meetings from the GoToMeeting system tray icon.
! To schedule a meeting
1. Right-click the GoToMeeting system tray icon and select Schedule a Meeting…
2. On the Login – GoToMeeting dialog box, enter your Email address and Password and click Log In.
3. On the Schedule Meeting – GoToMeeting dialog box, enter:
a. Meeting Subject – this is the name of the meeting.
b. Meeting date.
c. Meeting start and end times.
d. Conference call information – this is the information Attendees will use to connect to the meeting by phone. You can chose to use a provided conference call number (toll fees will be charged to Attendees) or provide your own.
e. Meeting password, if desired.
4. Once meeting information has been entered, click the Schedule button.
You will be notified your meeting has been scheduled. If you are using Microsoft® Outlook®, a meeting reminder will be generated and give you the option of inviting Attendees via an Outlook Calendar appointment.
Note: Your meeting will keep showing in "My Meetings" until the midnight of the scheduled date.
GoToMeeting™ User Guide
© 2004 Citrix Online, LLC. All rights reserved. 16
Schedule a Recurring Meeting
GoToMeeting enables Organizers to reuse a meeting ID for future recurring meetings without having to create a new meeting ID for each meeting. There are several important considerations to keep in mind when creating recurring meetings:
• The recurring meeting will only appear once in the My Meetings dialog box and the Organizer Web site and will be labeled “recurring.” Organizers will need to use their own local calendar applications to schedule and track recurring meetings.
• The Meeting URL/ID stays active indefinitely as long as it is used at least once every 40 days. If a recurring meeting is not conducted at least once every 40 days, it becomes inactive, the meeting URL/ID will no longer work, and Organizers will need to create a new recurring meeting.
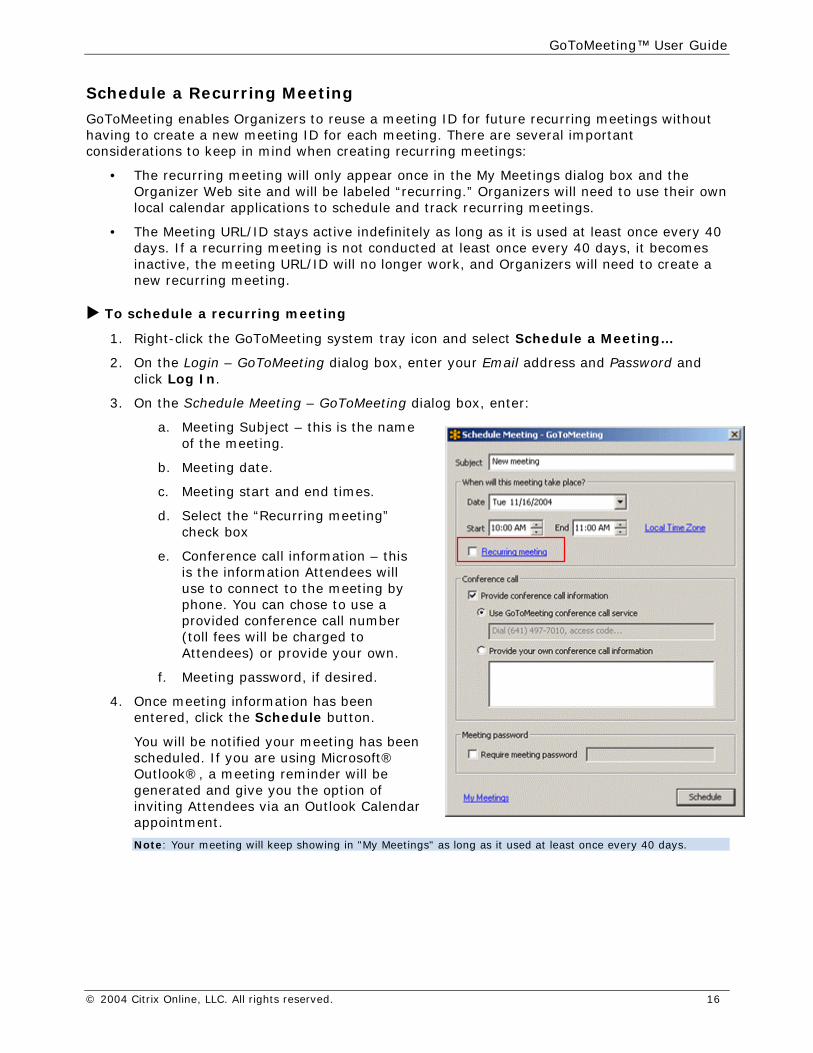
! To schedule a recurring meeting
1. Right-click the GoToMeeting system tray icon and select Schedule a Meeting…
2. On the Login – GoToMeeting dialog box, enter your Email address and Password and click Log In.
3. On the Schedule Meeting – GoToMeeting dialog box, enter:
a. Meeting Subject – this is the name of the meeting.
b. Meeting date.
c. Meeting start and end times.
d. Select the “Recurring meeting” check box
e. Conference call information – this is the information Attendees will use to connect to the meeting by phone. You can chose to use a provided conference call number (toll fees will be charged to Attendees) or provide your own.
f. Meeting password, if desired.
4. Once meeting information has been entered, click the Schedule button.
You will be notified your meeting has been scheduled. If you are using Microsoft® Outlook®, a meeting reminder will be generated and give you the option of inviting Attendees via an Outlook Calendar appointment.
Note: Your meeting will keep showing in "My Meetings" as long as it used at least once every 40 days.
GoToMeeting™ User Guide
© 2004 Citrix Online, LLC. All rights reserved. 17
View Scheduled Meetings
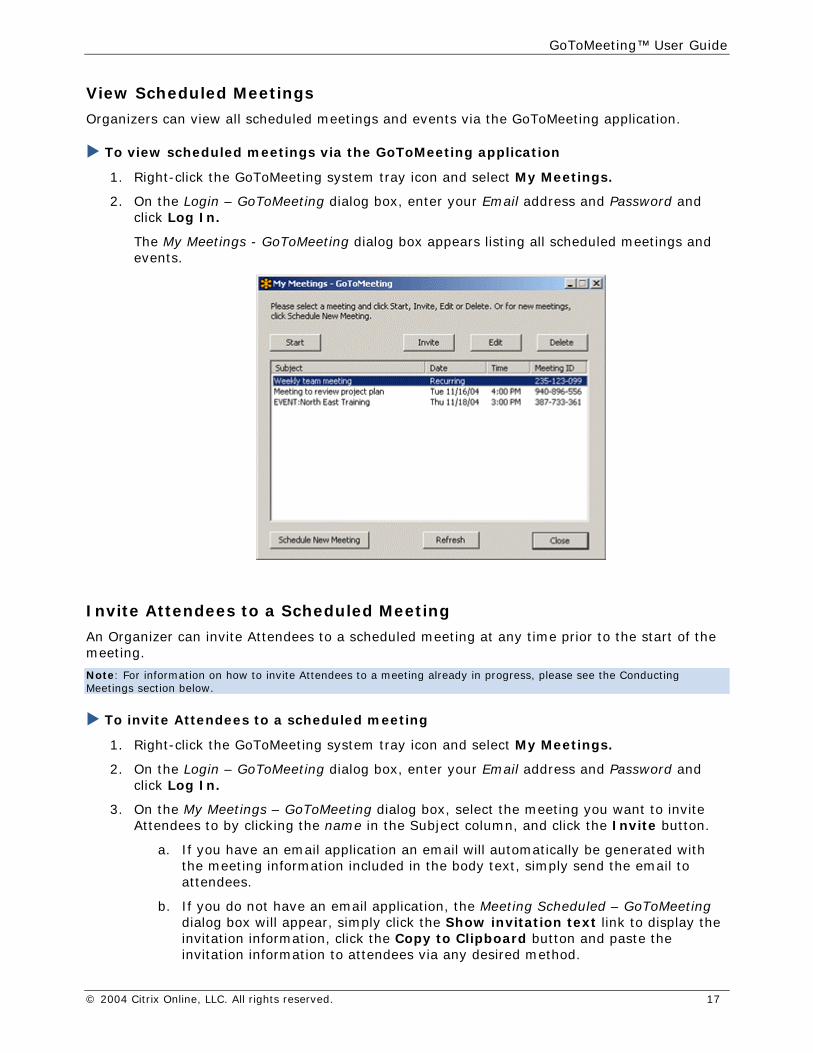
Organizers can view all scheduled meetings and events via the GoToMeeting application.
! To view scheduled meetings via the GoToMeeting application
1. Right-click the GoToMeeting system tray icon and select My Meetings.
2. On the Login – GoToMeeting dialog box, enter your Email address and Password and click Log In.
The My Meetings - GoToMeeting dialog box appears listing all scheduled meetings and events.
Invite Attendees to a Scheduled Meeting
An Organizer can invite Attendees to a scheduled meeting at any time prior to the start of the meeting.
Note: For information on how to invite Attendees to a meeting already in progress, please see the Conducting Meetings section below.
! To invite Attendees to a scheduled meeting
1. Right-click the GoToMeeting system tray icon and select My Meetings.
2. On the Login – GoToMeeting dialog box, enter your Email address and Password and click Log In.
3. On the My Meetings – GoToMeeting dialog box, select the meeting you want to invite Attendees to by clicking the name in the Subject column, and click the Invite button.
a. If you have an email application an email will automatically be generated with the meeting information included in the body text, simply send the email to attendees.
b. If you do not have an email application, the Meeting Scheduled – GoToMeeting dialog box will appear, simply click the Show invitation text link to display the invitation information, click the Copy to Clipboard button and paste the invitation information to attendees via any desired method.

GoToMeeting™ User Guide
© 2004 Citrix Online, LLC. All rights reserved. 18
Edit a Scheduled Meeting
Meeting Organizers can edit details for a scheduled meeting at any time prior to the start of the meeting.
Note: Changes to scheduled meetings will not be automatically updated in Microsoft Outlook or other calendar applications; neither will meeting Attendees receive notice of the change from GoToMeeting. Please be sure to contact meeting Attendees directly to notify them of any changes.
! To edit a scheduled meeting
1. Right-click the GoToMeeting system tray icon and select My Meetings.
2. On the Login – GoToMeeting dialog box, enter your Email address and Password and click Log In.
3. On the My Meetings – GoToMeeting dialog box, select the meeting you want to edit by clicking the name in the Subject column and then click the Edit button.
4. On the Edit Meeting – GoToMeeting dialog box, make the desired changes to the meeting and click Save.
5. Be sure to contact any previously invited Attendees to notify them of the change.
Cancel a Scheduled Meeting
Meeting Organizers can delete a scheduled meeting at any time prior to the start of the meeting.
Note: Canceling a scheduled meeting will not be automatically updated in Microsoft Outlook or other calendar applications; neither will meeting Attendees receive notice of the cancellation from GoToMeeting. Please be sure to contact meeting Attendees directly to notify them of the cancellation.
! To cancel a scheduled meeting or event
1. Right-click the GoToMeeting system tray icon and select My Meetings.
2. On the Login – GoToMeeting dialog box, enter your Email address and Password and click Log In.
3. On the My Meetings – GoToMeeting dialog box, select the meeting you want to cancel by clicking the name of the meeting in the Subject column and then click the Delete button.
4. On the Meeting Deleted – GoToMeeting dialog box, click OK to confirm deletion of meeting.
5. Be sure to notify any previously invited Attendees about the cancellation.
Impromptu Meetings
Impromptu meetings are meetings that are not scheduled in advance. For more information about Impromptu meetings, please see the Start an Impromptu Meeting section of this guide. Please note the Events must be scheduled in advance.

GoToMeeting™ User Guide
© 2004 Citrix Online, LLC. All rights reserved. 19
Start a Scheduled Meeting Scheduled meetings are any GoToMeeting meetings that have been previously scheduled by the organizer in the GoToMeeting application.
Scheduled GoToMeeting meetings can be started from the GoToMeeting system tray icon, the GoToMeeting Web site and the GoToMeeting Outlook bar.
Note: To start a meeting, the GoToMeeting application must be installed on the PC being used by the meeting Organizer. For more information on installing the GoToMeeting application please see the Getting Started section of this guide.
! To start a scheduled meeting from the GoToMeeting system tray icon
1. Right-click the GoToMeeting system tray icon and select My Meetings.
2. On the Login – GoToMeeting dialog box, enter your Email address and Password and click Log In.
3. On the My Meetings – GoToMeeting dialog box, select the meeting you want to start by clicking the name in the Subject column and then click the Start button.
Your meeting will start and the GoToMeeting Organizer Control Panel will appear on the right side of your desktop. For more information on the Organizer Control Panel see the Organizer Control Panel section below.
GoToMeeting™ User Guide
© 2004 Citrix Online, LLC. All rights reserved. 20
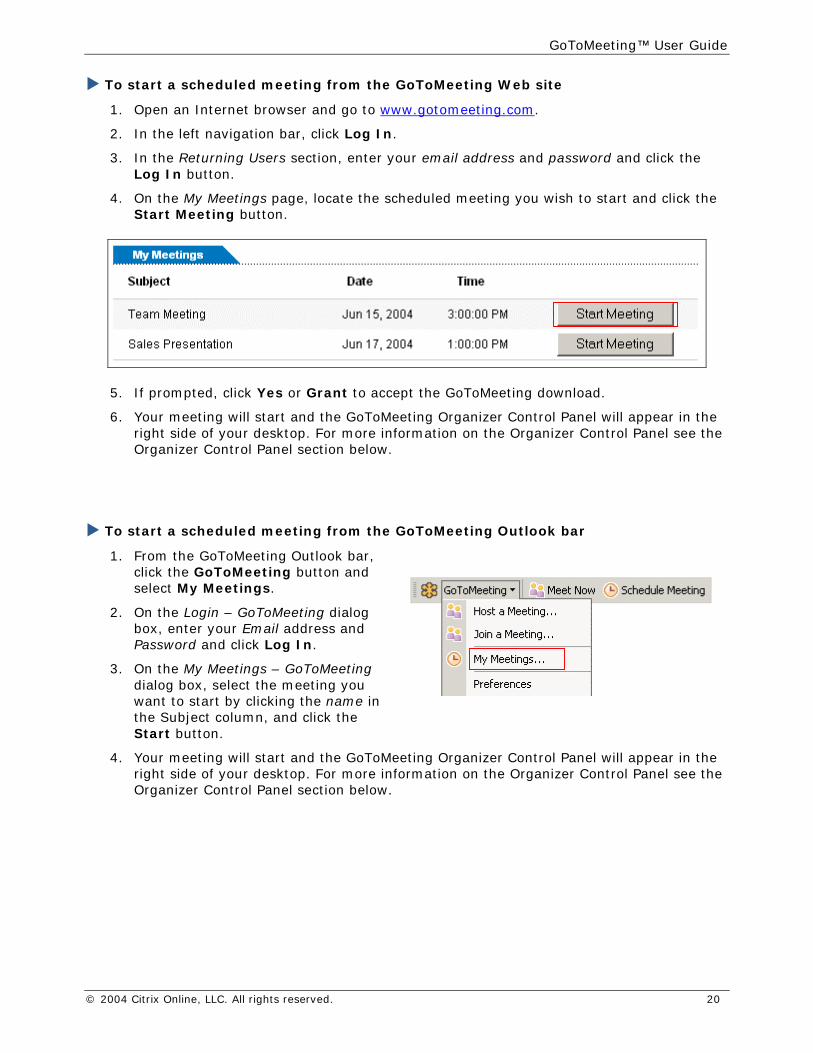
! To start a scheduled meeting from the GoToMeeting Web site
1. Open an Internet browser and go to www.gotomeeting.com.
2. In the left navigation bar, click Log In.
3. In the Returning Users section, enter your email address and password and click the Log In button.
4. On the My Meetings page, locate the scheduled meeting you wish to start and click the Start Meeting button.
5. If prompted, click Yes or Grant to accept the GoToMeeting download.
6. Your meeting will start and the GoToMeeting Organizer Control Panel will appear in the right side of your desktop. For more information on the Organizer Control Panel see the Organizer Control Panel section below.
! To start a scheduled meeting from the GoToMeeting Outlook bar
1. From the GoToMeeting Outlook bar, click the GoToMeeting button and select My Meetings.
2. On the Login – GoToMeeting dialog box, enter your Email address and Password and click Log In.
3. On the My Meetings – GoToMeeting dialog box, select the meeting you want to start by clicking the name in the Subject column, and click the Start button.
4. Your meeting will start and the GoToMeeting Organizer Control Panel will appear in the right side of your desktop. For more information on the Organizer Control Panel see the Organizer Control Panel section below.

GoToMeeting™ User Guide
© 2004 Citrix Online, LLC. All rights reserved. 21
Start an Impromptu Meeting Impromptu meetings are any meetings that an Organizer starts without first scheduling them in advance. This is an ideal feature for last-minute and on-the-fly meetings that need to occur without prior notice. Impromptu meetings may be initiated either from the GoToMeeting system tray icon or from an integrated instant-messaging application. Please note that all Events must be scheduled in advance.
Note: To start a meeting, the GoToMeeting application must be installed on the PC being used by the meeting Organizer. For more information on installing the GoToMeeting application, please see the Getting Started section of this guide.
! To start an impromptu meeting from the GoToMeeting system tray icon
1. Right-click the GoToMeeting system tray icon and select Meet Now…
2. On the Login – GoToMeeting dialog box, enter your Email address and Password and click Log In.
3. Your meeting will start and the GoToMeeting Organizer Control Panel will appear in the right side of your desktop.
4. To add voice conferencing to the impromptu meeting: Expand your control panel and in the Meeting Info pane, click the Edit button. Select the box to Provide conference call information and select the desired option to either use the integrated service or enter custom conference call information.
! To start an impromptu meeting from the GoToMeeting Web site
1. Go to www.gotomeeting.com and click the Host a Meeting button.
2. If prompted, click Yes or Grant to accept the GoToMeeting download.
3. On the Login – GoToMeeting dialog box, enter your Email address and Password and click Log In.
4. On the Host a Meeting – GoToMeeting dialog box, select Meet Now.
5. Your meeting will start and the GoToMeeting Organizer Control Panel will appear in the right side of your desktop.
6. To add voice conferencing to the impromptu meeting: Expand your control panel and in the Meeting Info pane, click the Edit button. Select the box to Provide conference call information and select the desired option to either use the integrated service or enter custom conference call information.
! To start an impromptu meeting from the GoToMeeting Outlook bar
1. From the GoToMeeting Outlook bar, click the Meet Now button.
2. On the Login – GoToMeeting dialog box, enter your Email address and Password and click Log In.
3. Your meeting will start and the GoToMeeting Organizer Control Panel will appear in the right side of your desktop.
4. To add voice conferencing to the impromptu meeting: Expand your control panel and in the Meeting Info pane, click the Edit button. Select the box to Provide conference call information and select the desired option to either use the integrated service or enter custom conference call information.
GoToMeeting™ User Guide
© 2004 Citrix Online, LLC. All rights reserved. 22
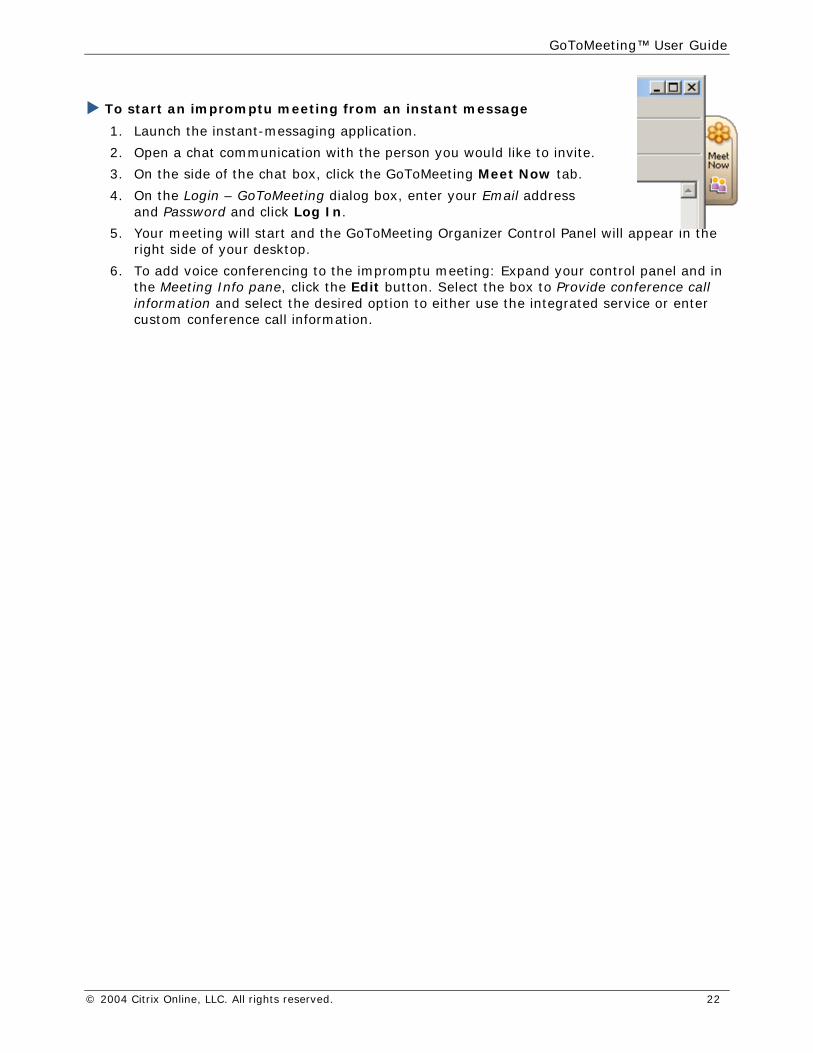
! To start an impromptu meeting from an instant message
1. Launch the instant-messaging application.
2. Open a chat communication with the person you would like to invite.
3. On the side of the chat box, click the GoToMeeting Meet Now tab.
4. On the Login – GoToMeeting dialog box, enter your Email address and Password and click Log In.
5. Your meeting will start and the GoToMeeting Organizer Control Panel will appear in the right side of your desktop.
6. To add voice conferencing to the impromptu meeting: Expand your control panel and in the Meeting Info pane, click the Edit button. Select the box to Provide conference call information and select the desired option to either use the integrated service or enter custom conference call information.
GoToMeeting™ User Guide
© 2004 Citrix Online, LLC. All rights reserved. 23
GoToMeeting Integrated Voice Conferencing Service
GoToMeeting includes a conference call service at no extra cost to you. All participants dial a toll-based number that GoToMeeting provides automatically. Participants are then charged their standard long-distance rate for calling this toll-based number, just as if they made a regular long-distance call. You may decide to use this service or choose another method of bringing audio to your online meetings.
Dialing in to the Conference
At the specified meeting time, dial the conference call number. When prompted, enter the access code followed by the # key. (Meeting organizers can enter the access code followed by the ! key to enable additional conference call features.)
Conference Call Features
Once in a conference call, participants and organizers can enter commands using their phone keypads. Meeting organizers can access additional commands by pressing the ! key after entering the access code (instead of the # key).
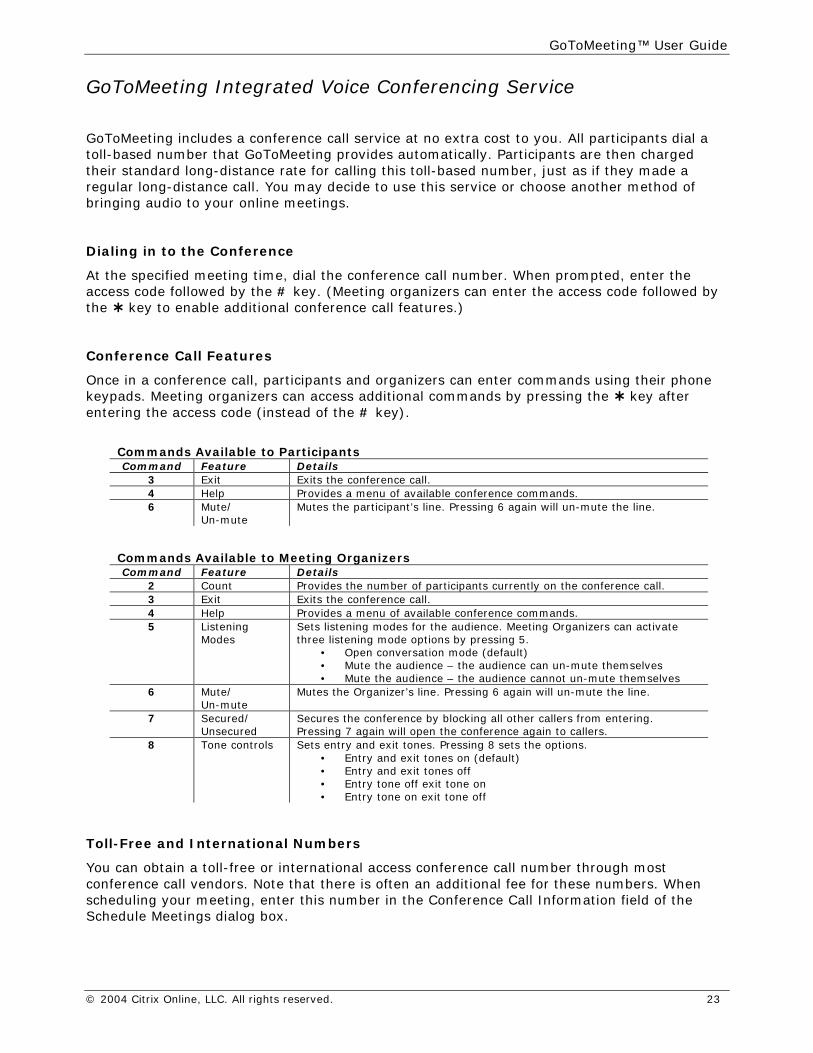
Commands Available to Participants Command Feature Details
3 Exit Exits the conference call. 4 Help Provides a menu of available conference commands. 6 Mute/
Un-mute Mutes the participant’s line. Pressing 6 again will un-mute the line.
Commands Available to Meeting Organizers Command Feature Details
2 Count Provides the number of participants currently on the conference call. 3 Exit Exits the conference call. 4 Help Provides a menu of available conference commands. 5 Listening
Modes Sets listening modes for the audience. Meeting Organizers can activate three listening mode options by pressing 5.
• Open conversation mode (default) • Mute the audience – the audience can un-mute themselves • Mute the audience – the audience cannot un-mute themselves
6 Mute/ Un-mute
Mutes the Organizer’s line. Pressing 6 again will un-mute the line.
7 Secured/ Unsecured
Secures the conference by blocking all other callers from entering. Pressing 7 again will open the conference again to callers.
8 Tone controls Sets entry and exit tones. Pressing 8 sets the options. • Entry and exit tones on (default) • Entry and exit tones off • Entry tone off exit tone on • Entry tone on exit tone off
Toll-Free and International Numbers
You can obtain a toll-free or international access conference call number through most conference call vendors. Note that there is often an additional fee for these numbers. When scheduling your meeting, enter this number in the Conference Call Information field of the Schedule Meetings dialog box.

GoToMeeting™ User Guide
© 2004 Citrix Online, LLC. All rights reserved. 24
The Presenter Control Panel When the Organizer first joins the meeting the Presenter Control Panel appears on the right side of the desktop. The Presenter Control Panel gives Organizers and Presenters access to various Organizer and Presenter functions. The Presenter Control Panel is comprised of four panes – Screen Tools, Attendee List, Chat and Invite Others – and the Grab Tab.
Note: When the Organizer passes the Presenter role to another Attendee, the Control Panel changes and the Screen Tools section is removed and given to the new Presenter. Anytime the Presenter opens the Control Panel or uses the Grab Tab to access controls, invite others, use Attendee List, or chat, screen sharing will be paused. Screen sharing will be automatically resumed once the Control Panel is minimized back to the side of the desktop or the mouse is removed from the Grab Tab. Therefore Presenters should not attempt to present information to Attendees anytime they are using these features.
Screen Tools PaneProvides Organizers/Presenters with a visualreminder of On Air status, the ability to show
their screens, pause showing their screens, passkeyboard control and change Presenters
Attendee List PaneProvides Organizers/Presenters with a list of allmeeting Attendees and enables them to make
other Attendees Organizers or Presenters,grant or revoke Attendee privileges and
dismiss Attendees
Chat PaneEnables Organizers/Presenters to chat withother Attendees, either individually or all at
once
Invite Others PaneProvides information for Organizers to invite
Attendees to meetings via phone, email orinstant-messaging applications while
meetings are in progress
Grab TabEnables Organizers/Presenters to minimize
the Control Panel to the side of theirdesktops to display their full desktops to
Attendees and still access Presenter ScreenTools
Meeting Information PaneProvided for quick reference, may be edited
or copied into an email or messengerapplication
GoToMeeting™ User Guide
© 2004 Citrix Online, LLC. All rights reserved. 25
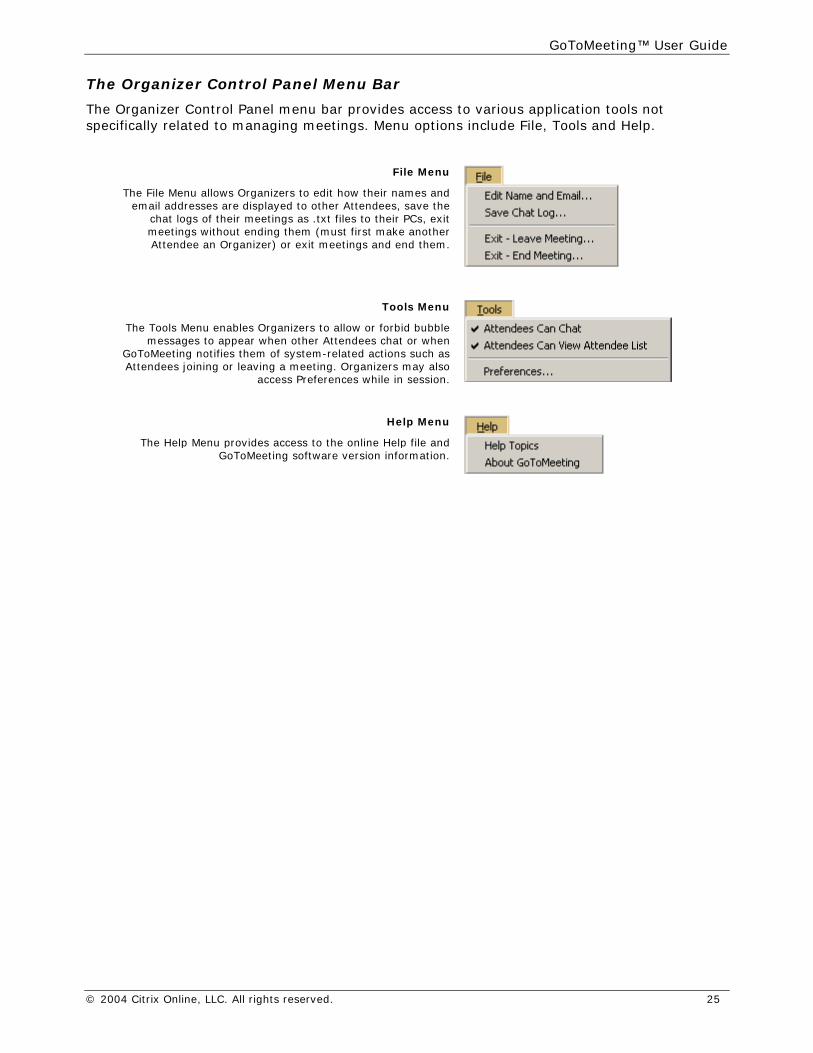
The Organizer Control Panel Menu Bar
The Organizer Control Panel menu bar provides access to various application tools not specifically related to managing meetings. Menu options include File, Tools and Help.
File Menu
The File Menu allows Organizers to edit how their names and email addresses are displayed to other Attendees, save the
chat logs of their meetings as .txt files to their PCs, exit meetings without ending them (must first make another Attendee an Organizer) or exit meetings and end them.
Tools Menu
The Tools Menu enables Organizers to allow or forbid bubble messages to appear when other Attendees chat or when
GoToMeeting notifies them of system-related actions such as Attendees joining or leaving a meeting. Organizers may also
access Preferences while in session.
Help Menu
The Help Menu provides access to the online Help file and GoToMeeting software version information.
GoToMeeting™ User Guide
© 2004 Citrix Online, LLC. All rights reserved. 26
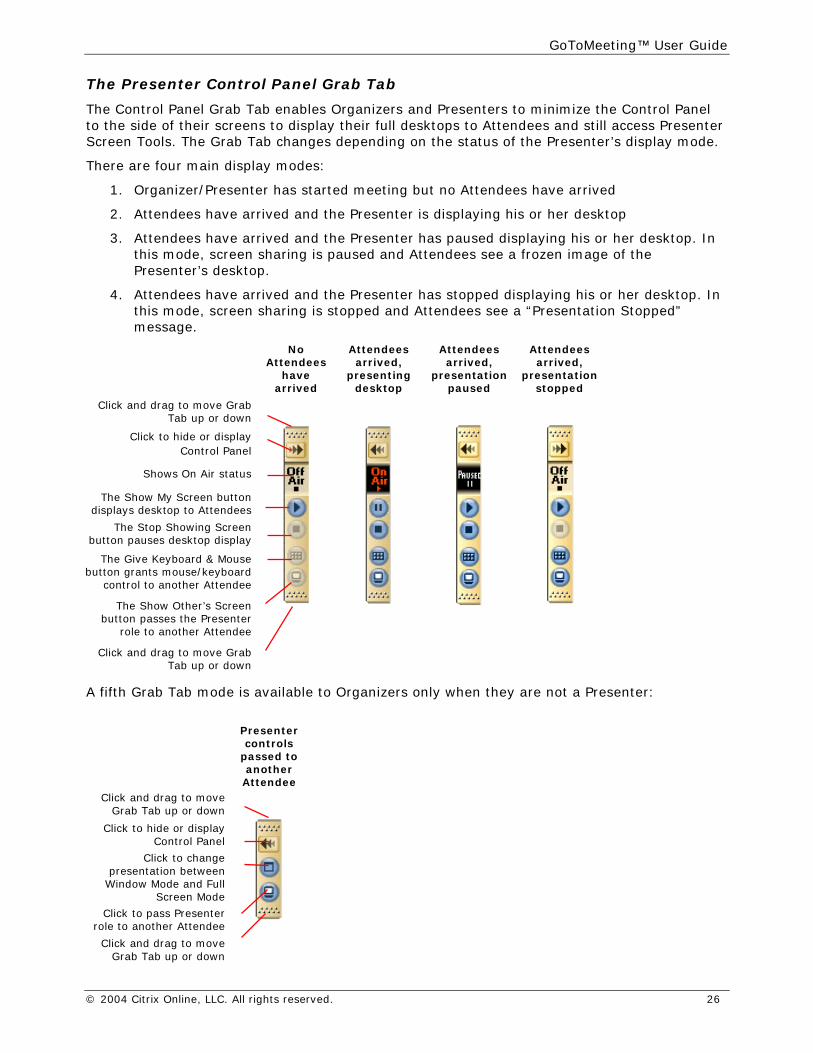
The Presenter Control Panel Grab Tab
The Control Panel Grab Tab enables Organizers and Presenters to minimize the Control Panel to the side of their screens to display their full desktops to Attendees and still access Presenter Screen Tools. The Grab Tab changes depending on the status of the Presenter’s display mode.
There are four main display modes:
1. Organizer/Presenter has started meeting but no Attendees have arrived
2. Attendees have arrived and the Presenter is displaying his or her desktop
3. Attendees have arrived and the Presenter has paused displaying his or her desktop. In this mode, screen sharing is paused and Attendees see a frozen image of the Presenter’s desktop.
4. Attendees have arrived and the Presenter has stopped displaying his or her desktop. In this mode, screen sharing is stopped and Attendees see a “Presentation Stopped” message.
No
Attendees have
arrived
Attendees arrived,
presenting desktop
Attendees arrived,
presentation paused
Attendees arrived,
presentation stopped
Click and drag to move Grab Tab up or down
Click to hide or display Control Panel
Shows On Air status
The Show My Screen button displays desktop to Attendees
The Stop Showing Screen button pauses desktop display
The Give Keyboard & Mouse button grants mouse/keyboard
control to another Attendee
The Show Other’s Screen button passes the Presenter
role to another Attendee
Click and drag to move Grab Tab up or down
A fifth Grab Tab mode is available to Organizers only when they are not a Presenter:
Presenter
controls passed to another
Attendee Click and drag to move
Grab Tab up or down
Click to hide or display Control Panel
Click to change presentation between
Window Mode and Full Screen Mode
Click to pass Presenter role to another Attendee
Click and drag to move Grab Tab up or down

GoToMeeting™ User Guide
© 2004 Citrix Online, LLC. All rights reserved. 27
Manage Attendees Organizers can manage Attendees by right-clicking Attendee names in the Attendee Pane and selecting or deselecting the desired Attendee options.
! To make an Attendee an Organizer
Organizers can make an attendee an organizer to share control of a meeting or to let the first organizer leave the meeting and enable the meeting to remain in progress.
• In the Attendee List, right-click the Attendee’s name and select Make Organizer.
! To make an Attendee a Presenter
• In the Attendee List, right-click the Attendee’s name and select Make Presenter.
Or
• On the Screen Tools Pane or the Grab Tab, click the Show Other’s Screen button.
! To enable an Attendee to share Organizer’s mouse and keyboard (when a Presenter)
• In the Attendee List, right-click the Attendee’s name and select Allow Remote Control.
Or
• On the Screen Tools Pane or the Grab Tab, click the Give Keyboard & Mouse button.
Assigns Attendee the role of Presenter and/or
Organizer
Allows the Attendee to see thelist of other Attendees
Allows Attendee to control the Presenter’s keyboard and/or mouse
Allows Attendee to chat
Sends a chat message directlyto the Attendee
Dismisses an Attendee from the meeting
GoToMeeting™ User Guide
© 2004 Citrix Online, LLC. All rights reserved. 28
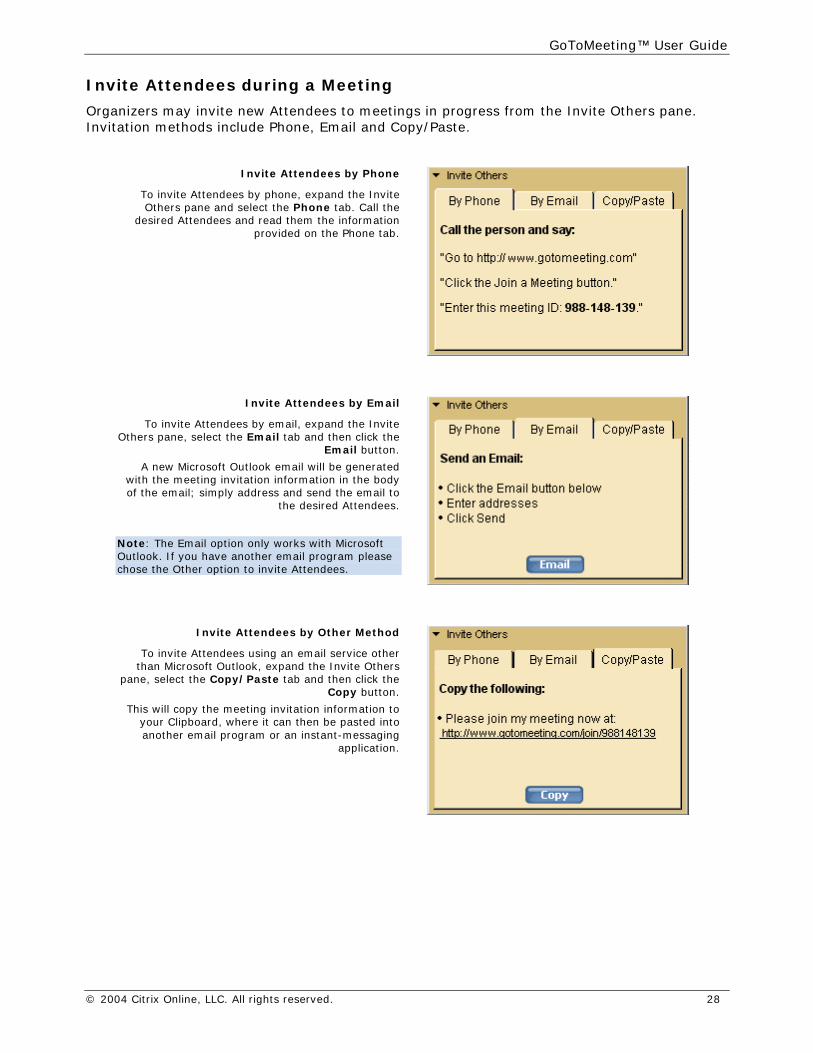
Invite Attendees during a Meeting
Organizers may invite new Attendees to meetings in progress from the Invite Others pane. Invitation methods include Phone, Email and Copy/Paste.
Invite Attendees by Phone
To invite Attendees by phone, expand the Invite Others pane and select the Phone tab. Call the
desired Attendees and read them the information provided on the Phone tab.
Invite Attendees by Email
To invite Attendees by email, expand the Invite Others pane, select the Email tab and then click the
Email button.
A new Microsoft Outlook email will be generated with the meeting invitation information in the body of the email; simply address and send the email to
the desired Attendees.
Note: The Email option only works with Microsoft Outlook. If you have another email program please chose the Other option to invite Attendees.
Invite Attendees by Other Method
To invite Attendees using an email service other than Microsoft Outlook, expand the Invite Others
pane, select the Copy/Paste tab and then click the Copy button.
This will copy the meeting invitation information to your Clipboard, where it can then be pasted into another email program or an instant-messaging
application.
GoToMeeting™ User Guide
© 2004 Citrix Online, LLC. All rights reserved. 29
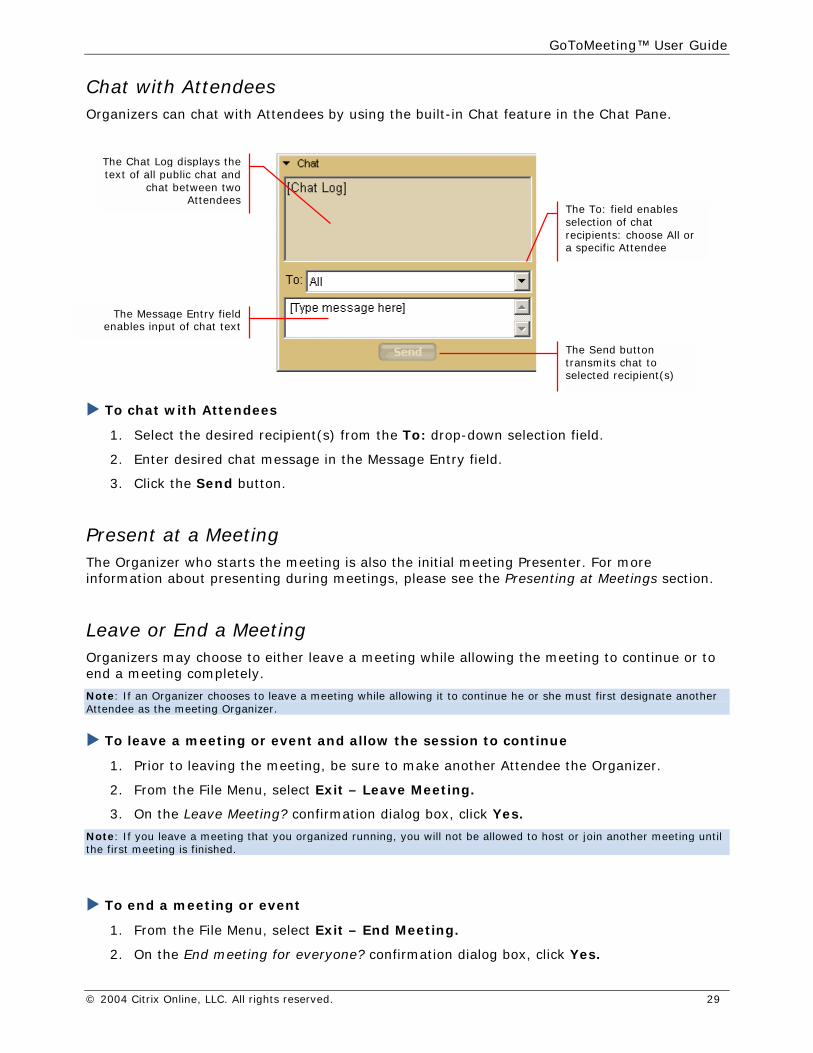
Chat with Attendees Organizers can chat with Attendees by using the built-in Chat feature in the Chat Pane.
! To chat with Attendees
1. Select the desired recipient(s) from the To: drop-down selection field.
2. Enter desired chat message in the Message Entry field.
3. Click the Send button.
Present at a Meeting The Organizer who starts the meeting is also the initial meeting Presenter. For more information about presenting during meetings, please see the Presenting at Meetings section.
Leave or End a Meeting Organizers may choose to either leave a meeting while allowing the meeting to continue or to end a meeting completely.
Note: If an Organizer chooses to leave a meeting while allowing it to continue he or she must first designate another Attendee as the meeting Organizer.
! To leave a meeting or event and allow the session to continue
1. Prior to leaving the meeting, be sure to make another Attendee the Organizer.
2. From the File Menu, select Exit – Leave Meeting.
3. On the Leave Meeting? confirmation dialog box, click Yes.
Note: If you leave a meeting that you organized running, you will not be allowed to host or join another meeting until the first meeting is finished.
! To end a meeting or event
1. From the File Menu, select Exit – End Meeting.
2. On the End meeting for everyone? confirmation dialog box, click Yes.
The Chat Log displays thetext of all public chat and
chat between twoAttendees
The To: field enables selection of chat recipients: choose All or a specific Attendee
The Message Entry fieldenables input of chat text
The Send button transmits chat to selected recipient(s)
GoToMeeting™ User Guide
© 2004 Citrix Online, LLC. All rights reserved. 30
Organizing and Conducting Events
Notes on Organizing and Conducting Events GoToMeeting Corporate Organizers may also be enabled to use the GoToMeeting Event Licensing feature, This feature expands their meeting capacity to 50, 100, 150 or 200 attendees, depending on the license purchased.
Organizers need to first create their accounts and download the GoToMeeting software on their computers before they can conduct events.
Organizers invite Attendees and may do so via telephone, email or instant message before or during a scheduled event.
GoToMeeting Organizers start all events and one must be present before an event can begin.
During events, the display feature for Attendees is set to not allow them to view the Attendee list. In addition, the chat feature for Attendees is set to only allow them to chat with event Organizers. While event Organizers will see all chat messages, event Attendees will only see chat messages sent directly to them from an Organizer. Organizers can use the Events tab under Preferences to override these default settings.
Once an event starts, the Organizer becomes the initial event Presenter. During an event the Organizer may pass the role of Organizer or Presenter to other Attendees.
GoToMeeting™ User Guide
© 2004 Citrix Online, LLC. All rights reserved. 31
Schedule an Event
With GoToMeeting Corporate Event Licensing, Organizers can expand their meeting capacity to up to 200 attendees. And just like all GoToMeeting customers, event license users get unlimited online meetings at flat All You Can Meet™ prices.
GoToMeeting Event Licensing is only available to GoToMeeting Corporate account Organizers. Please contact your GoToMeeting Administrator to inquire about Event capability.
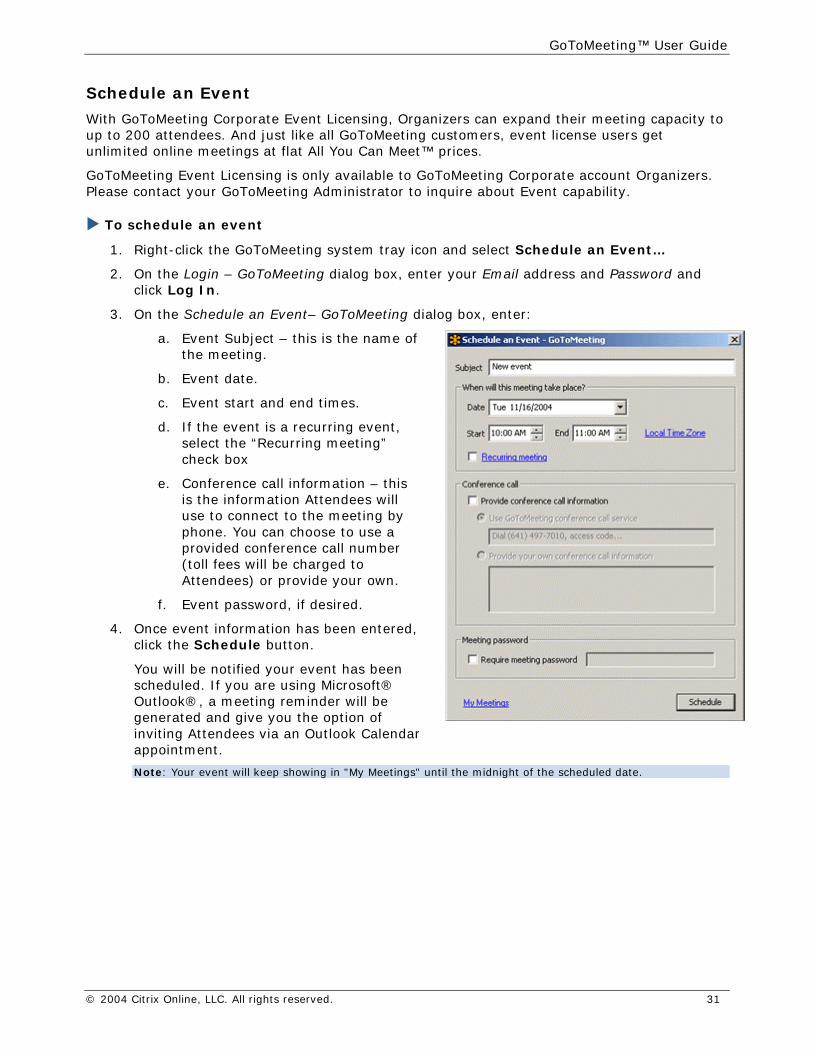
! To schedule an event
1. Right-click the GoToMeeting system tray icon and select Schedule an Event…
2. On the Login – GoToMeeting dialog box, enter your Email address and Password and click Log In.
3. On the Schedule an Event– GoToMeeting dialog box, enter:
a. Event Subject – this is the name of the meeting.
b. Event date.
c. Event start and end times.
d. If the event is a recurring event, select the “Recurring meeting” check box
e. Conference call information – this is the information Attendees will use to connect to the meeting by phone. You can choose to use a provided conference call number (toll fees will be charged to Attendees) or provide your own.
f. Event password, if desired.
4. Once event information has been entered, click the Schedule button.
You will be notified your event has been scheduled. If you are using Microsoft® Outlook®, a meeting reminder will be generated and give you the option of inviting Attendees via an Outlook Calendar appointment.
Note: Your event will keep showing in "My Meetings" until the midnight of the scheduled date.
GoToMeeting™ User Guide
© 2004 Citrix Online, LLC. All rights reserved. 32
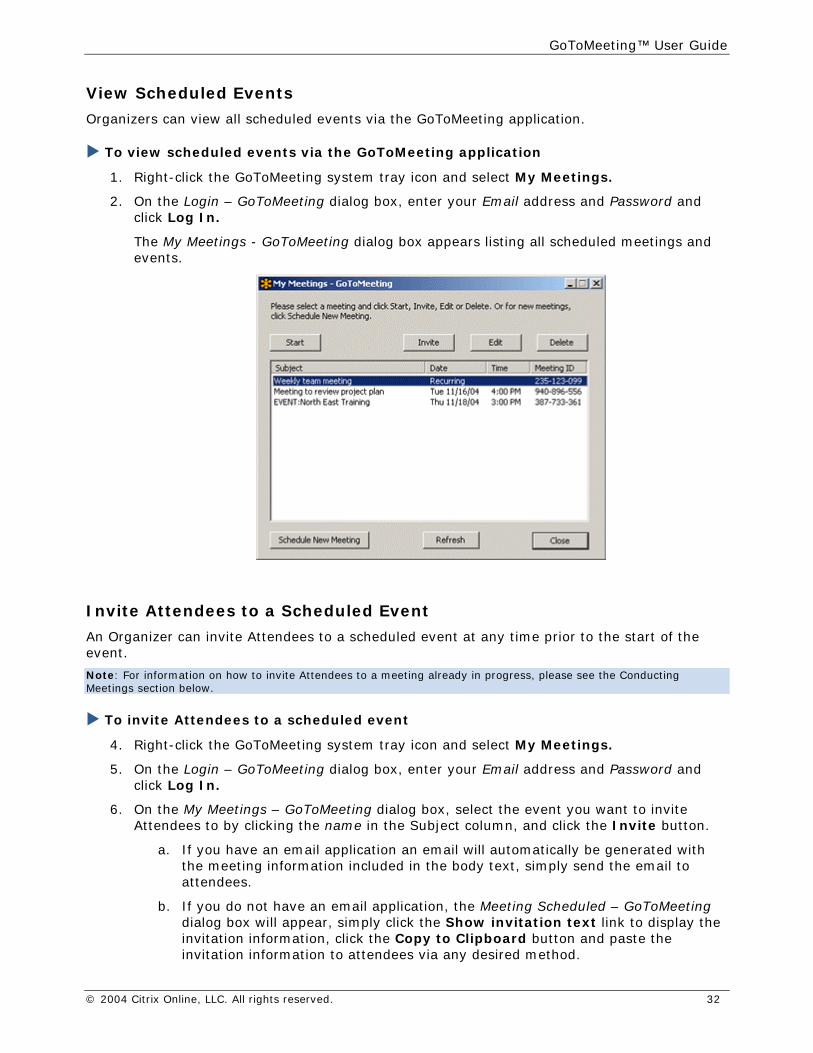
View Scheduled Events
Organizers can view all scheduled events via the GoToMeeting application.
! To view scheduled events via the GoToMeeting application
1. Right-click the GoToMeeting system tray icon and select My Meetings.
2. On the Login – GoToMeeting dialog box, enter your Email address and Password and click Log In.
The My Meetings - GoToMeeting dialog box appears listing all scheduled meetings and events.
Invite Attendees to a Scheduled Event
An Organizer can invite Attendees to a scheduled event at any time prior to the start of the event.
Note: For information on how to invite Attendees to a meeting already in progress, please see the Conducting Meetings section below.
! To invite Attendees to a scheduled event
4. Right-click the GoToMeeting system tray icon and select My Meetings.
5. On the Login – GoToMeeting dialog box, enter your Email address and Password and click Log In.
6. On the My Meetings – GoToMeeting dialog box, select the event you want to invite Attendees to by clicking the name in the Subject column, and click the Invite button.
a. If you have an email application an email will automatically be generated with the meeting information included in the body text, simply send the email to attendees.
b. If you do not have an email application, the Meeting Scheduled – GoToMeeting dialog box will appear, simply click the Show invitation text link to display the invitation information, click the Copy to Clipboard button and paste the invitation information to attendees via any desired method.
GoToMeeting™ User Guide
© 2004 Citrix Online, LLC. All rights reserved. 33
Edit a Scheduled Event
Meeting Organizers can edit details for a scheduled event at any time prior to the start of the event.
Note: Changes to scheduled events will not be automatically updated in Microsoft Outlook or other calendar applications; neither will meeting attendees receive notice of the event change from GoToMeeting. Please be sure to contact meeting attendees directly with any changes to a scheduled event.
! To edit a scheduled event
1. Right-click the GoToMeeting system tray icon and select My Meetings.
2. On the Login – GoToMeeting dialog box, enter your Email address and Password and click Log In.
3. On the My Meetings – GoToMeeting dialog box, select the event you want to edit by clicking the name in the Subject column and then click the Edit button.
4. On the Edit Meeting – GoToMeeting dialog box, make the desired changes to the event and click Save.
5. Be sure to contact any previously invited Attendees to notify them of the change.
Cancel a Scheduled Event
Meeting Organizers can delete a scheduled event at any time prior to the start of the event.
Note: Canceling a scheduled event will not be automatically updated in Microsoft Outlook or other calendar applications; neither will meeting Attendees receive notice of the cancellation from GoToMeeting. Please be sure to contact meeting Attendees directly to notify them of the cancellation.
! To cancel a scheduled event
1. Right-click the GoToMeeting system tray icon and select My Meetings.
2. On the Login – GoToMeeting dialog box, enter your Email address and Password and click Log In.
3. On the My Meetings – GoToMeeting dialog box, select the event you want to cancel by clicking the name in the Subject column and then click the Delete button.
4. On the Meeting Deleted – GoToMeeting dialog box, click OK to confirm deletion of event.
5. Be sure to notify any previously invited Attendees about the cancellation.

GoToMeeting™ User Guide
© 2004 Citrix Online, LLC. All rights reserved. 34
Start a Scheduled Event
Scheduled events are any GoToMeeting events that have been previously scheduled by the organizer in the GoToMeeting application.
Scheduled GoToMeeting events can be started from the GoToMeeting system tray icon, the GoToMeeting Web site and the GoToMeeting Outlook bar.
Note: To start an event, the GoToMeeting application must be installed on the PC being used by the meeting Organizer. For more information on installing the GoToMeeting application please see the Getting Started section of this guide.
! To start a scheduled event from the GoToMeeting system tray icon
1. Right-click the GoToMeeting system tray icon and select My Meetings.
2. On the Login – GoToMeeting dialog box, enter your Email address and Password and click Log In.
3. On the My Meetings – GoToMeeting dialog box, select the event you want to start by clicking the name in the Subject column and then click the Start button.
Your event will start and the GoToMeeting Organizer Control Panel will appear on the right side of your desktop. For more information on the Organizer Control Panel see the Organizer Control Panel section of this guide.

GoToMeeting™ User Guide
© 2004 Citrix Online, LLC. All rights reserved. 35
! To start a scheduled event from the GoToMeeting Web site
1. Open an Internet browser and go to www.gotomeeting.com.
2. In the left navigation bar, click Log In.
3. In the Returning Users section, enter your email address and password and click the Log In button.
4. On the My Meetings page, locate the scheduled event you wish to start and click the Start Meeting button.
5. If prompted, click Yes or Grant to accept the GoToMeeting download.
6. Your event will start and the GoToMeeting Organizer Control Panel will appear in the right side of your desktop. For more information on the Organizer Control Panel see the Organizer Control Panel section of this guide.
! To start a scheduled meeting from the GoToMeeting Outlook bar
1. From the GoToMeeting Outlook bar, click the GoToMeeting button and select My Meetings.
2. On the Login – GoToMeeting dialog box, enter your Email address and Password and click Log In.
3. On the My Meetings – GoToMeeting dialog box, select the event you want to start by clicking the name in the Subject column, and click the Start button.
4. Your event will start and the GoToMeeting Organizer Control Panel will appear in the right side of your desktop. For more information on the Organizer Control Panel see the Organizer Control Panel section of this guide.
GoToMeeting™ User Guide
© 2004 Citrix Online, LLC. All rights reserved. 36
Leave or End an Event Organizers may choose to either leave a event while allowing the event to continue or to end a event completely.
Note: If an Organizer chooses to leave an event while allowing it to continue he or she must first designate another Attendee as the meeting Organizer.
! To leave a event and allow the session to continue
1. Prior to leaving the event, be sure to make another Attendee the Organizer.
2. From the File Menu, select Exit – Leave Meeting.
3. On the Leave Meeting? confirmation dialog box, click Yes.
Note: If you leave a event that you organized running, you will not be allowed to host or join another meeting or event until the first event is finished.
! To end an event
1. From the File Menu, select Exit – End Meeting.
2. On the End meeting for everyone? confirmation dialog box, click Yes.
GoToMeeting™ User Guide
© 2004 Citrix Online, LLC. All rights reserved. 37
Presenting at Meetings
Presenter Role Overview The meeting Organizer is always enabled as the first meeting Presenter. The Presenter role may be passed to any meeting Attendee.
Presenters show their complete desktops to all meeting Attendees. Presenters may choose to pause showing their desktops at any time. Presenters may grant other Attendees the ability to share the Presenter’s mouse and keyboard.
Note: Anytime the Presenter opens the Control Panel or uses the Grab Tab to access controls, invite others, use Attendee List, chat with Attendees or accesses either the 'Show Other’s Screen' or 'Give Keyboard & Mouse Control' menus from the Grab Tab, screen sharing to Attendees will be paused. Screen sharing is automatically resumed once the Control Panel is minimized back to the side of the desktop and the mouse is removed from the Grab Tab. Therefore Presenters should not attempt to present information to Attendees anytime they are using these features.
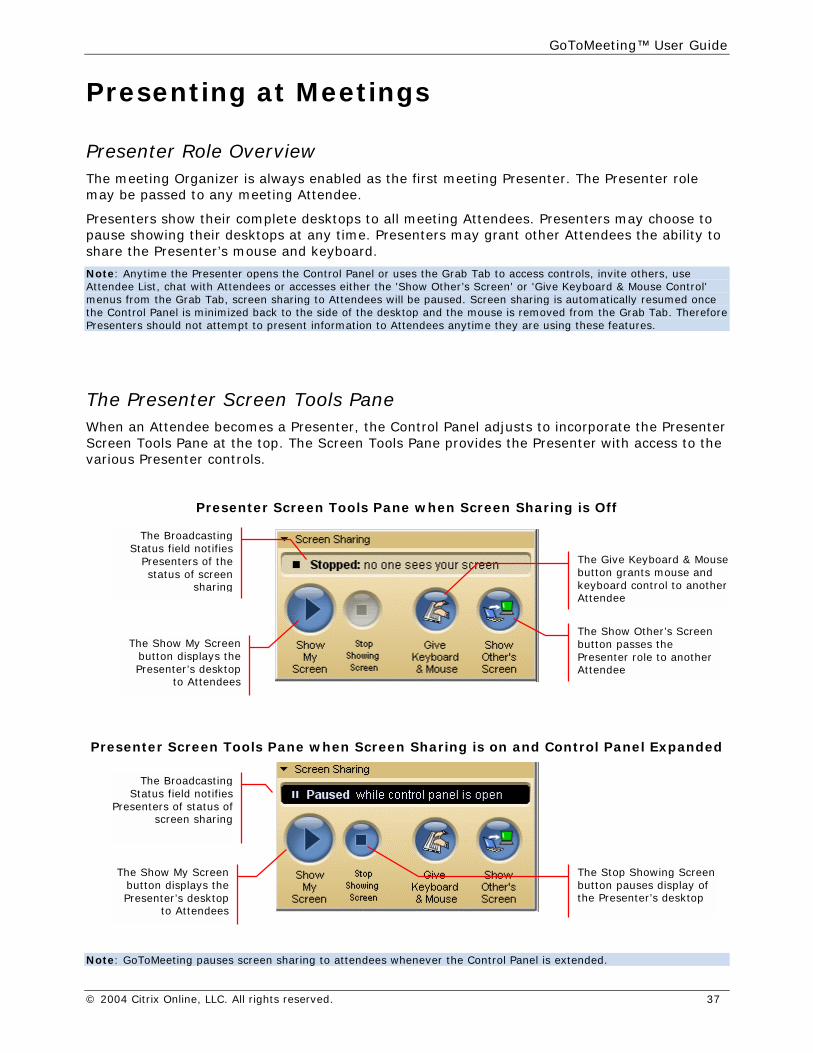
The Presenter Screen Tools Pane When an Attendee becomes a Presenter, the Control Panel adjusts to incorporate the Presenter Screen Tools Pane at the top. The Screen Tools Pane provides the Presenter with access to the various Presenter controls.
Presenter Screen Tools Pane when Screen Sharing is Off
Presenter Screen Tools Pane when Screen Sharing is on and Control Panel Expanded
Note: GoToMeeting pauses screen sharing to attendees whenever the Control Panel is extended.
The BroadcastingStatus field notifies
Presenters of thestatus of screen
sharing
The Show My Screenbutton displays thePresenter’s desktop
to Attendees
The Give Keyboard & Mouse button grants mouse and keyboard control to another Attendee
The Show Other’s Screen button passes the Presenter role to another Attendee
The BroadcastingStatus field notifies
Presenters of status ofscreen sharing
The Stop Showing Screen button pauses display of the Presenter’s desktop
The Show My Screenbutton displays thePresenter’s desktop
to Attendees

GoToMeeting™ User Guide
© 2004 Citrix Online, LLC. All rights reserved. 38
The Presenter Control Panel Grab Tab
The Control Panel Grab Tab enables Presenters to minimize the Control Panel to the side of their desktops to display their full desktops to Attendees and still access Presenter Screen Tools. The Grab Tab changes depending on the status of the Presenter role.
No
Attendees have
arrived
Attendees arrived,
presenting desktop
Attendees arrived,
presentation paused
Attendees arrived,
presentation stopped
Click and drag to move Grab Tab up or down
Click to hide or display Control Panel
Shows On Air status
The Show My Screen button displays desktop to Attendees
The Stop Showing Screen button pauses desktop display
The Give My Keyboard button grants mouse/keyboard control
to another Attendee
The Change Presenters button passes the Presenter role to
another Attendee
Click and drag to move Grab Tab up or down
Use Presenter Controls When granted the Presenter role the Presenter Controls will appear at the top of your Control Panel.
Note: Anytime the Presenter opens the Control Panel or uses the Grab Tab to access controls, invite others, use Attendee List, chat with Attendees or accesses either the 'Show Other’s Screen' or 'Give Keyboard & Mouse Control' menus from the Grab Tab, screen sharing to Attendees will be paused. Screen sharing is automatically resumed once the Control Panel is minimized back to the side of the desktop and the mouse is removed from the Grab Tab. Therefore Presenters should not attempt to present information to Attendees anytime they are using these features.
! To show the Presenter’s desktop
• On the Screen Tools Pane or the Grab Tab, click the Show My Screen button.
! To pause showing the Presenter’s desktop
• On the Screen Tools Pane or the Grab Tab, click the Pause Showing Screen button.
! To share the Presenter’s mouse and keyboard
• On the Screen Tools Pane or the Grab Tab, click the Give Keyboard & Mouse button.
! To change Presenters
• On the Screen Tools Pane or the Grab Tab, click the Show Other’s Screen button.
GoToMeeting™ User Guide
© 2004 Citrix Online, LLC. All rights reserved. 39
Attending Meetings
Attendee Role Overview A meeting Attendee can be any person with an Internet connection. All that is needed to join a meeting is the meeting ID and, if required, the meeting password. Attendees do not need to subscribe to GoToMeeting; they meet at no cost to them, as guests of the Organizer.
Attendees may be given the role of Organizer and/or Presenter from the original meeting Organizer at any time once a meeting has started.
Join a Meeting There are several ways to join a meeting depending on how you receive the meeting invitation. Joining a meeting requires no pre-registration or software installation or configuration.
Note: When joining a meeting, remember to also conference into the meeting using the conference call information provided by your meeting Organizer.
! To join a meeting from an email invitation, Outlook meeting appointment or instant message invitation
1. Open the email, appointment or instant message that contains the meeting invitation.
2. Click the link provided in the email to join the meeting.
3. If prompted, click Yes or Grant to accept the download.
4. If requested, enter the meeting password provided by your meeting Organizer.
You will be entered into the meeting and the Attendee Control Panel and the GoToMeeting Viewer Window will appear.
! To join a meeting from the GoToMeeting Web site
1. Open an Internet browser and go to www.gotomeeting.com.
2. In the left navigation bar click the Join a Meeting button.
3. If prompted, click Yes or Grant to accept the download.
4. On the Join a Meeting – GoToMeeting dialog box, enter the Meeting ID you received from your meeting Organizer.
5. If requested, enter the meeting password provided by your meeting Organizer.
You will be entered into the meeting and the Attendee Control Panel and the GoToMeeting Viewer Window will appear.
! To join a meeting from the GoToMeeting system tray icon
1. Right-click the GoToMeeting system tray icon and select Join a Meeting.
2. On the Join a Meeting – GoToMeeting dialog box, enter the Meeting ID you received from your meeting Organizer.
3. If requested, enter the meeting password provided by your meeting Organizer.
You will be entered into the meeting and the Attendee Control Panel and the GoToMeeting Viewer Window will appear.

GoToMeeting™ User Guide
© 2004 Citrix Online, LLC. All rights reserved. 40
GoToMeeting Attendee Application Components Once Attendees join a meeting they see two GoToMeeting Attendee components, the GoToMeeting Attendee Control Panel and the GoToMeeting Viewer Window.
GoToMeeting ViewerWindow
GoToMeeting AttendeeControl Panel
GoToMeeting™ User Guide
© 2004 Citrix Online, LLC. All rights reserved. 41
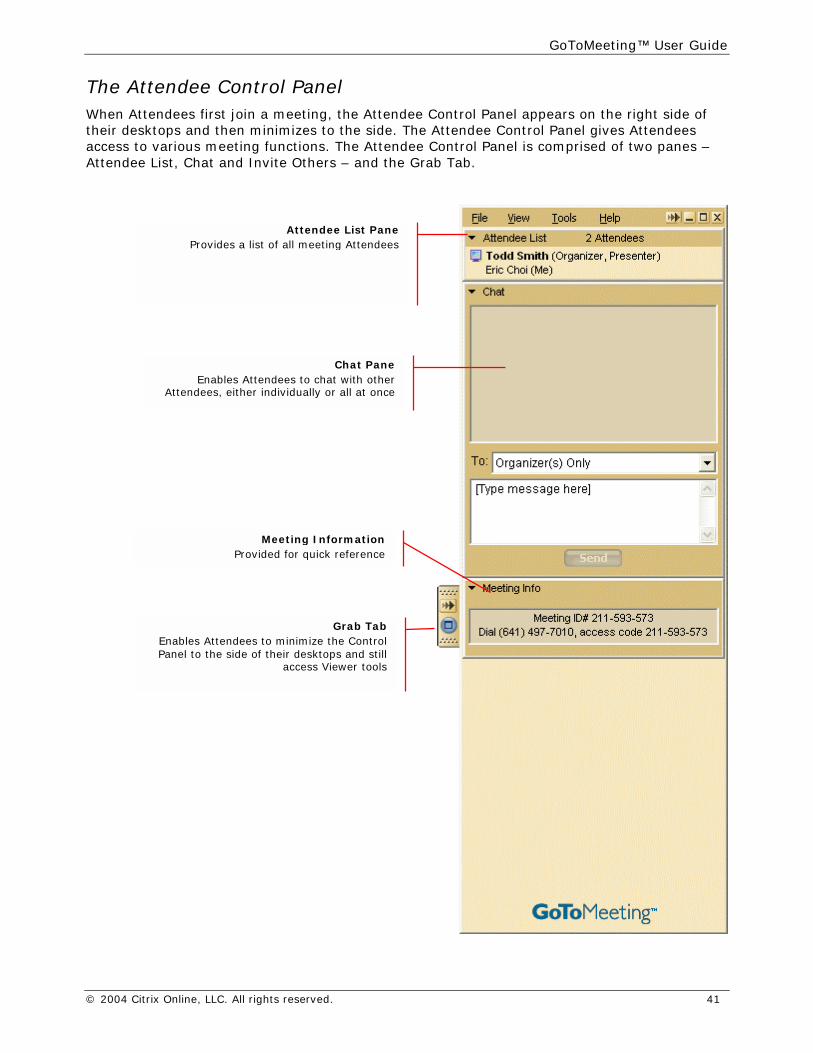
The Attendee Control Panel When Attendees first join a meeting, the Attendee Control Panel appears on the right side of their desktops and then minimizes to the side. The Attendee Control Panel gives Attendees access to various meeting functions. The Attendee Control Panel is comprised of two panes –Attendee List, Chat and Invite Others – and the Grab Tab.
Attendee List PaneProvides a list of all meeting Attendees
Chat PaneEnables Attendees to chat with other
Attendees, either individually or all at once
Grab TabEnables Attendees to minimize the ControlPanel to the side of their desktops and still
access Viewer tools
Meeting InformationProvided for quick reference
GoToMeeting™ User Guide
© 2004 Citrix Online, LLC. All rights reserved. 42
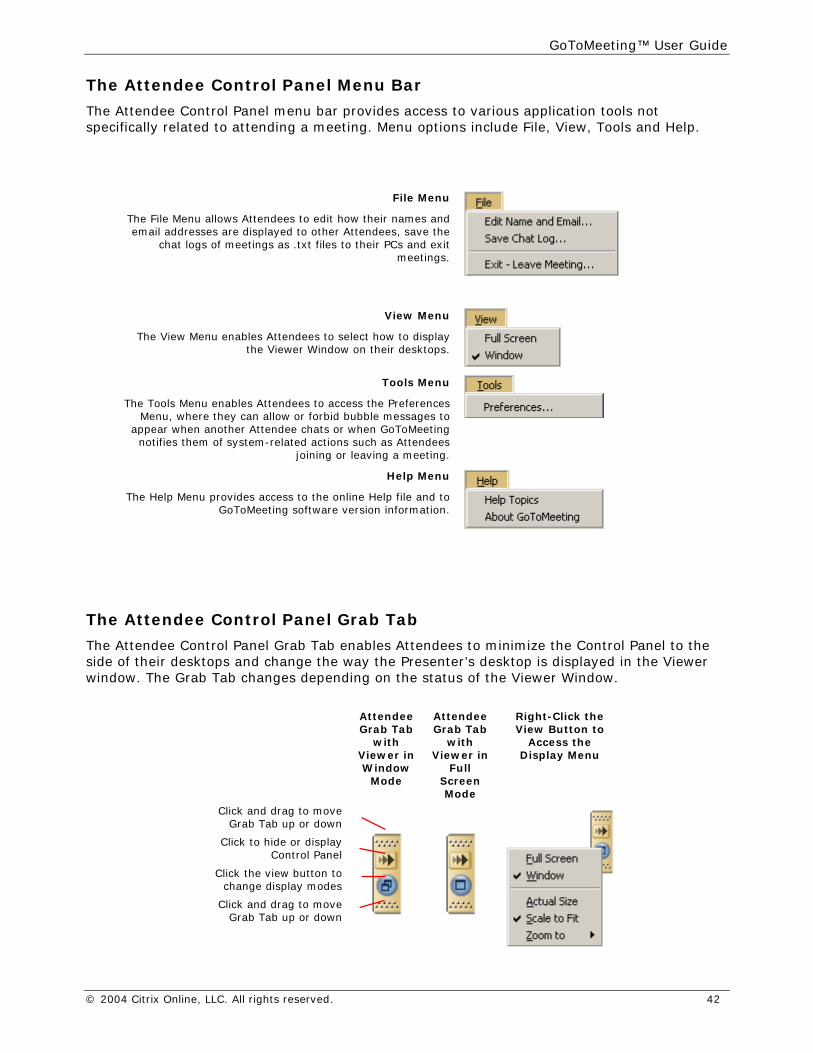
The Attendee Control Panel Menu Bar
The Attendee Control Panel menu bar provides access to various application tools not specifically related to attending a meeting. Menu options include File, View, Tools and Help.
File Menu
The File Menu allows Attendees to edit how their names and email addresses are displayed to other Attendees, save the
chat logs of meetings as .txt files to their PCs and exit meetings.
View Menu
The View Menu enables Attendees to select how to display the Viewer Window on their desktops.
Tools Menu
The Tools Menu enables Attendees to access the Preferences Menu, where they can allow or forbid bubble messages to
appear when another Attendee chats or when GoToMeeting notifies them of system-related actions such as Attendees
joining or leaving a meeting.
Help Menu
The Help Menu provides access to the online Help file and to GoToMeeting software version information.
The Attendee Control Panel Grab Tab
The Attendee Control Panel Grab Tab enables Attendees to minimize the Control Panel to the side of their desktops and change the way the Presenter’s desktop is displayed in the Viewer window. The Grab Tab changes depending on the status of the Viewer Window.
Attendee
Grab Tab with
Viewer in Window
Mode
Attendee Grab Tab
with Viewer in
Full Screen Mode
Right-Click the View Button to
Access the Display Menu
Click and drag to move Grab Tab up or down
Click to hide or display Control Panel
Click the view button to change display modes
Click and drag to move Grab Tab up or down
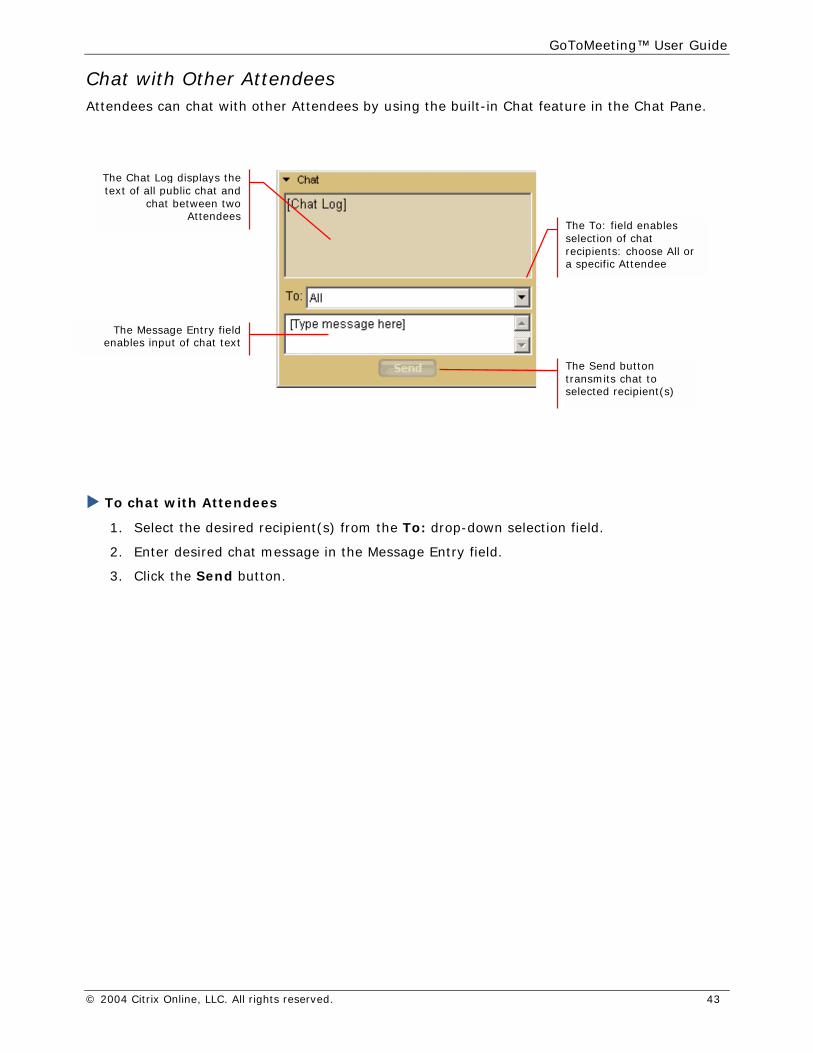
GoToMeeting™ User Guide
© 2004 Citrix Online, LLC. All rights reserved. 43
Chat with Other Attendees Attendees can chat with other Attendees by using the built-in Chat feature in the Chat Pane.
! To chat with Attendees
1. Select the desired recipient(s) from the To: drop-down selection field.
2. Enter desired chat message in the Message Entry field.
3. Click the Send button.
The Chat Log displays thetext of all public chat and
chat between twoAttendees
The To: field enables selection of chat recipients: choose All or a specific Attendee
The Message Entry fieldenables input of chat text
The Send button transmits chat to selected recipient(s)
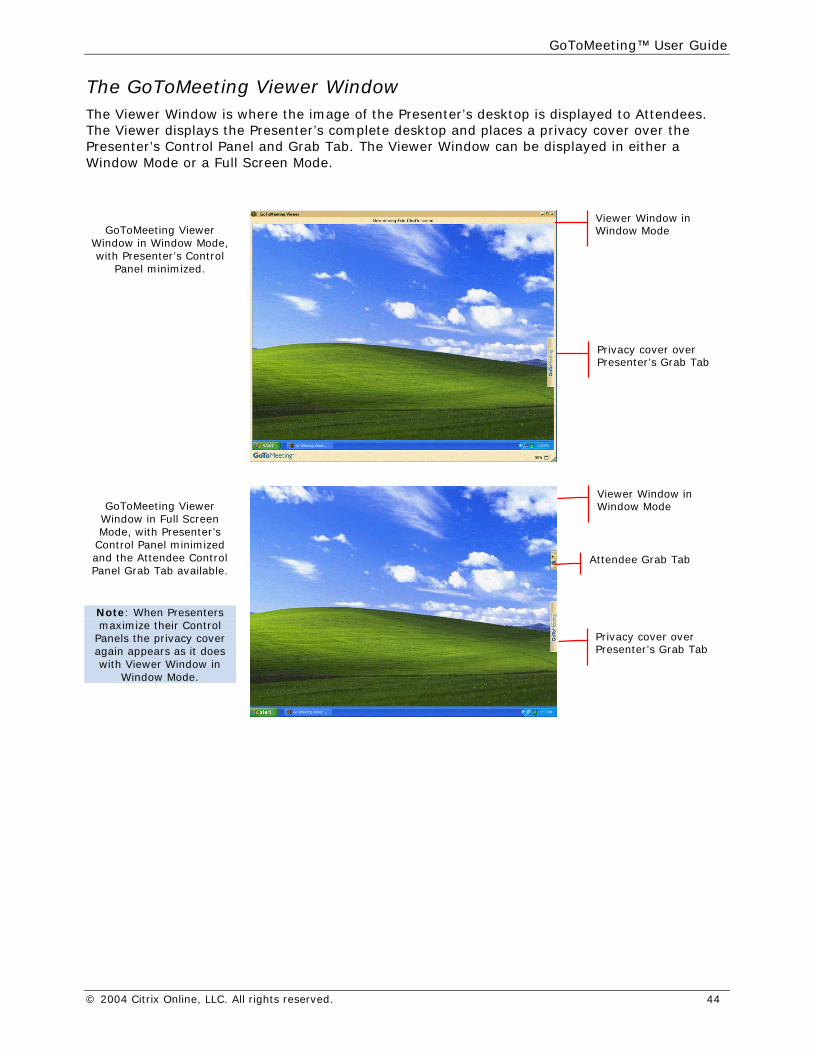
GoToMeeting™ User Guide
© 2004 Citrix Online, LLC. All rights reserved. 44
The GoToMeeting Viewer Window The Viewer Window is where the image of the Presenter’s desktop is displayed to Attendees. The Viewer displays the Presenter’s complete desktop and places a privacy cover over the Presenter’s Control Panel and Grab Tab. The Viewer Window can be displayed in either a Window Mode or a Full Screen Mode.
GoToMeeting Viewer Window in Window Mode, with Presenter’s Control
Panel minimized.
GoToMeeting Viewer Window in Full Screen Mode, with Presenter’s
Control Panel minimized and the Attendee Control Panel Grab Tab available.
Note: When Presenters maximize their Control
Panels the privacy cover again appears as it does with Viewer Window in
Window Mode.
Viewer Window in Window Mode
Privacy cover over Presenter’s Grab Tab
Viewer Window in Window Mode
Privacy cover over Presenter’s Grab Tab
Attendee Grab Tab

GoToMeeting™ User Guide
© 2004 Citrix Online, LLC. All rights reserved. 45
Configure the Viewer Window
The Viewer Window may be configured to display in either Window mode or Full Screen mode.
! To display the Viewer Window in Window mode
• From the Attendee Grab Tab, select the Window Mode button.
Or
• From the Attendee Control Panel View Menu, select Window.
! To display the Viewer Window in Full Screen mode
• From the Attendee Grab Tab, select the Full Screen Mode button.
Or
• From the Attendee Control Panel View Menu, select Full Screen.
Share Presenter Keyboard and Mouse At any time during a meeting Presenters may share control of their keyboard and mouse with any other Attendee to enable that Attendee to share control of applications on the desktop being displayed.
When an Attendee is given shared control, the GoToMeeting application notifies all Attendees of the change in control by providing a System Bubble Message.
Note: Even though an Attendee may gain shared keyboard and mouse control of the Presenter’s desktop, the Presenter always retains overriding control.
Become a Presenter At any time during a meeting the Presenter may pass the Presenter role to any other Attendee to enable that Attendee to share his or her desktop with the other Attendees.
When an Attendee is made a Presenter the GoToMeeting application shows a dialog box notifying the Attendee that he or she has been made Presenter and updates his or her Control Panel and Grab Tab with Presenter Tools.
For more information about being a Presenter, please see the Present at a Meeting section.
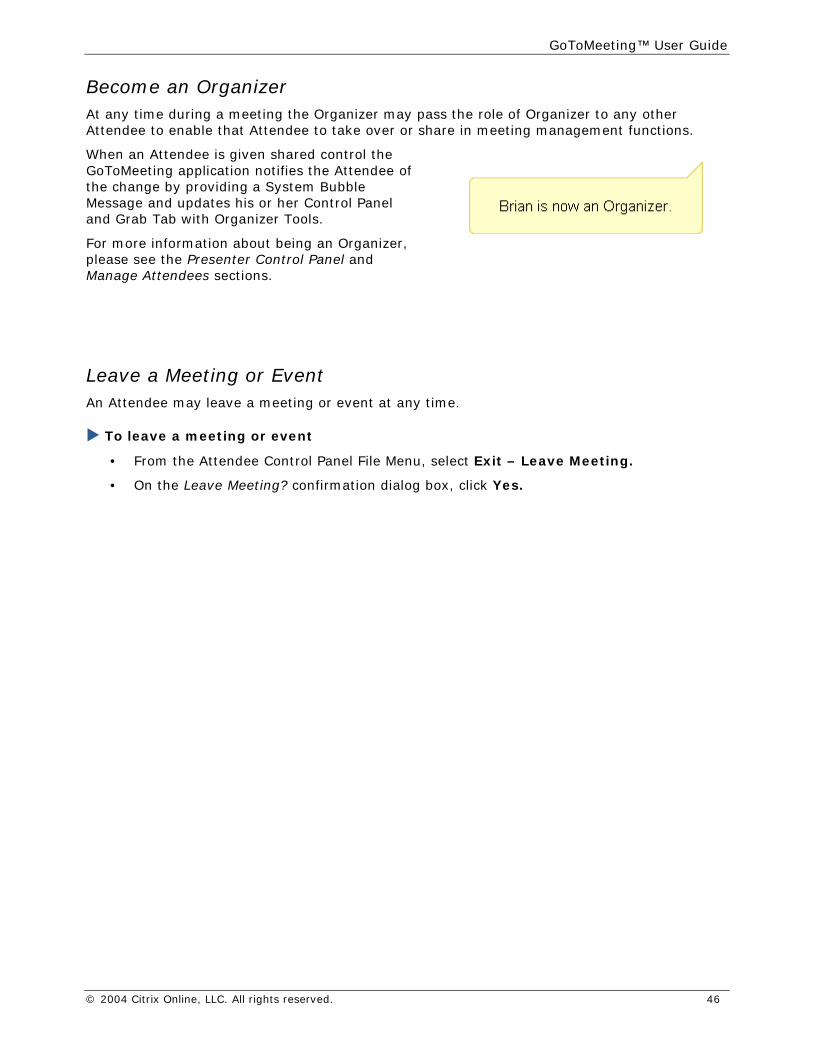
GoToMeeting™ User Guide
© 2004 Citrix Online, LLC. All rights reserved. 46
Become an Organizer At any time during a meeting the Organizer may pass the role of Organizer to any other Attendee to enable that Attendee to take over or share in meeting management functions.
When an Attendee is given shared control the GoToMeeting application notifies the Attendee of the change by providing a System Bubble Message and updates his or her Control Panel and Grab Tab with Organizer Tools.
For more information about being an Organizer, please see the Presenter Control Panel and Manage Attendees sections.
Leave a Meeting or Event An Attendee may leave a meeting or event at any time.
! To leave a meeting or event
• From the Attendee Control Panel File Menu, select Exit – Leave Meeting.
• On the Leave Meeting? confirmation dialog box, click Yes.
GoToMeeting™ User Guide
© 2004 Citrix Online, LLC. All rights reserved. 47
Tips for Success
Prior to Meeting or Event Start • Turn off any instant-messaging applications, notification software or other programs that
may interrupt or distract from the meeting.
• Turn off any streaming media applications that may take up bandwidth and resource-intensive applications that may be taxing processor ability.
• Set the desktop display to a neutral background and adjust display settings to a mid-range resolution (e.g., 1024x768) to improve the display for Attendees with lesser settings.
• Clean up your desktop before a meeting. Eliminate wallpaper and icons that may distract your Attendees.
• Have the documents you wish to share ready to be accessed in one or two clicks.
• Run a trial meeting with a friend to anticipate questions and to familiarize yourself with the format of your online presentation.
Managing the Meeting • Arrive a few minutes early to greet the Attendees as they arrive and start the meeting on
time. It also helps to have a welcome presentation running during this time. Your presence in these opening minutes can help establish the tone and direction of the meeting.
• Provide an agenda at the start of the meeting, including estimated duration, and stick to it.
• Provide meeting operational expectations and directions. Inform attendees what the purpose/goal of the meeting is, what to expect and when and how to ask questions and participate in the meeting.
• Provide information on how to use equipment or services and how to get assistance if needed.
• Nominate a co-organizer to monitor and respond to the chat log when someone is presenting.
• Encourage participation by using open questions such as “What would you suggest?” and “How do you feel about…?”
• End the meeting clearly. Make sure all the Attendees know that the meeting is formally over and stay on the line to address any last questions.
Managing the Conference Call
• Call in to the meeting from a location where there is little background noise.
• Consider globally muting participants at the start of the meeting to avoid noise issues. Turn off system prompts and sounds for when Attendees join or leave a meeting.
• Avoid using cellular and cordless phones because of static and use the phone handset or a headset instead of speakerphones because of background noise, tunnel effect and sentence clipping.
• Turn off your call waiting. The beep of a new call on another line is heard by everyone on the teleconference.
• Avoid putting your phone on hold during a teleconference. Your hold music will play into the conference call, and make it impossible for the other attendees to continue the meeting.
• Introduce yourself when you begin speaking and ask other attendees to also identify themselves before speaking. Not everyone in the meeting may know everyone else’s voice.
• If you find you are having a sound quality issue, hang up and dial back in. Sometimes these problems clear themselves up when the bad connection is terminated.
GoToMeeting™ User Guide
© 2004 Citrix Online, LLC. All rights reserved. 48
FAQs
I never received my meeting organizer invitation email, what should I do?
Sometimes the meeting organizer invitation email will get blocked by your email server as spam. If you do not have the ability to check the emails in a spam folder, check with your Administrator to see if the invitation can be resent. Otherwise, ask your Administrator to contact the account manager for help.
How can I see what future meetings I have scheduled?
To see what meetings you have scheduled, right-click on the GoToMeeting system tray icon and select My Meetings. After your login email address is verified, you will see the list of scheduled meetings.
Likewise, you can log into www.gotomeeting.com to view your scheduled meetings.
What is an Event? How do I schedule an Event?
An Event is a GoToMeeting session that can accommodate up to 200 attendees. If you are interested in hosting an Event, have your Administrator inquire with the account manager for more information.
To schedule an Event, right click on the system tray icon and select Schedule an Event. You will be prompted to enter the subject, date and time and your own conference call information. You may also include a password if you wish.
I forgot my password, what should I do?
First make sure you are entering your correct login email address and password – note that your password is case sensitive and must contain at least 8 characters and include numbers and letters.
If you still need to reset your password, just visit https://www.gotomeeting.com/en_US/forgotpassword/forgotPassword.tmpl and enter your email address. You can also reach this page via the www.gotomeeting.com login page. An email will automatically be sent to your login email address to reset your password.
How long will my past meetings appear in my Meeting History?
Past meetings will appear in your Meeting History for 90 days, after which they will be deleted from the system. If you would like to keep records of your meetings for audit purposes, have your Administrator run a Meeting History report at least once every 90 days.
Why does it show Paused when I pull out the Control Panel?
Since the Control Panel is used to chat and manage the GoToMeeting session, the screen sharing is paused during the times you have the Control Panel open. This allows you to focus on the tasks needed within the Control Panel such as chatting, changing presenters or managing your attendees, without having to worry about what is being displayed on your desktop. Once you close the Control Panel, screen sharing will resume.
GoToMeeting™ User Guide
© 2004 Citrix Online, LLC. All rights reserved. 49
What happens when I stop showing my screen? What do my attendees see?
When you click the Stop button, screen sharing will be turned off and you will no longer transmit your desktop contents to your attendees. Instead, your attendees will see the Presentation Stopped screen until your click the Play button to resume screen sharing.
After I've given keyboard and mouse control away, how do I get it back?
As a security feature, you can regain control of your desktop/laptop by touching your mouse. The change of control happens almost instantaneously.
Do my attendees need to uninstall GoToMeeting after joining my meeting? Will there be anything left behind on my attendee’s PC after my meeting ends?
Your attendees do not need to uninstall the software. Once they have exited the meeting or the meeting has been concluded the software uninstalls itself.
Why would I make someone else an organizer in my meeting?
If you created a meeting and needed to leave you would want to make someone else the Organizer. The meeting would proceed without you without interruption.
Is there a charge for using the integrated conference call service?
GoToMeeting is packaged with a conference call service at no extra cost to you. You may decide to use this service or choose another method of bringing audio to your online meetings. Our service provides a toll-based number that is dialed by all meeting participants. Participants are then charged their standard long-distance rate for calling this toll-based number, just as if they made a regular long-distance call. There is no additional charge for the conferencing feature.
Where can I find instructions for the integrated conference call service?
Please visit: https://www.freeconferencecall.com/citrix/
Do you have self-paced training for GoToMeeting?
Currently we do not have a self-paced training session for GoToMeeting. However,
We do offer training twice weekly, every Tuesday at 2PM (PST) and Thursday at 8AM (PST) 1. Click to Join: http://www.gotomeeting.com/join/446680854
2. Conference Call Details: North American Conference Call Number: (888) 481.3032 International Conference Call Number: (617) 801.9600 Please Enter Passcode: 25653086 Meeting ID: 446-680-854
GoToMeeting™ User Guide
© 2004 Citrix Online, LLC. All rights reserved. 50
Is there a log of who has attended my meetings? How can I view information about past attendees?
Sign in to www.gotomeeting.com with your email address and password. Select My Meetings from the menu options on the left. Select sub menu, Meeting History.
The information is grouped by month. You can see your meetings in chronological order. Each meeting contains the number of attendees, shown in blue. Click on this number, and a window opens listing the attendees first and last name and their email addresses. This information can be copied into another document.
Are Macintosh or Linux operating systems supported with GoToMeeting?
Currently, Macintosh or Linux operating systems are not supported with GoToMeeting, either to host or join a meeting.
Is audio streaming supported in GoToMeeting?
Audio streaming is not an available option with GoToMeeting at this time, but we are continually looking to improve the features while still keeping the same ease-of-use. Look for more features to become available in future versions.
Is video streaming supported in GoToMeeting?
While we still do not support steaming video, our GoToMeeting technology is fast enough to keep up with screen changes on the desktop, so it appears as if we are streaming video. We do not at this time support audio along with the video. Because more data is being sent to all meeting attendees, bandwidth usage will go up for all meeting participants. The amount will depend on the resolution and length of the video. Also, certain versions of Windows Media Player with DirectX (Microsoft DirectX is an advanced suite of multimedia application programming interfaces (APIs) built into Microsoft Windows operating systems), will not display the video. To enable video display for your GoToMeetings you need to disable Hardware Overlay for your player. Please see your players help for directions on how to disable Hardware Overlay
GoToMeeting™ User Guide
© 2004 Citrix Online, LLC. All rights reserved. 51
Support
Please direct any support questions to: [email protected]
Or call:
• (888) 259-8414 (toll free from the U.S. and Canada)
• 001-800-574-4234 (toll free from Mexico)
• 00-800-5744-2340 (toll free from Europe)
• (805) 690-5753 (direct dial)
Please direct any account questions to: [email protected]
Or call:
• (888) 646-0016 (toll free from the U.S. and Canada)
To provide feedback on the GoToMeeting product, click the feedback link located in the footer of each section of the Administration Center.