Embed Size (px)
Citation preview
GoToAssist for Salesforce Installation Guide
© 2017 LogMeIn, Inc. All rights reserved. 1
GoToAssist Corporate
GoToAssist for Salesforce
Installation Guide

GoToAssist for Salesforce Install Guide
Contents
Install GoToAssist for Salesforce 3
Customize GoToAssist for Salesforce 5
Deploy Custom Objects 5
Configure an Email Service 6
Send Completed Session Emails to Salesforce 8
Customize Layout Pages 9
Enable Access to GoToAssist Login Credentials 10
Log Incoming Emails 10
Provide Access to User Profiles 11
Assign Custom Page Layout to Users 13
View the GoToAssist Application 13

GoToAssist for Salesforce Install Guide
Install GoToAssist for Salesforce
In order to streamline your support operations and deliver quick, seamless session connections with the GoToAssist for Salesforce application, you must first install it into your salesforce.com instance.
To install the GoToAssist Integration for Salesforce
1. Visit the GoToAssist for Salesforce AppExchange listing and click Get it Now.
2. Select your environment type (Production or Sandbox).
3. When prompted, log in with your administrator user account. You will be presented with the list of
items in the GoToAssist for Salesforce AppExchange package, including Apps, Objects and Code.
4. Click Continue.
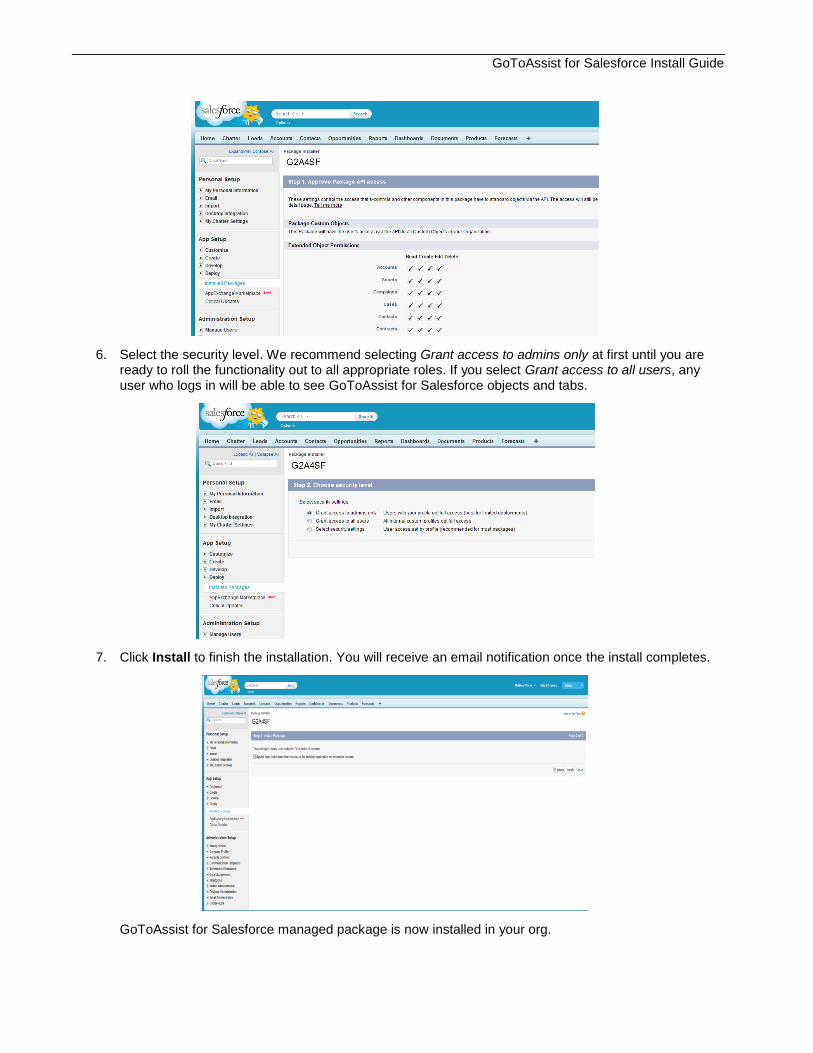
5. Approve the package API access. This allows you to use the API to access certain objects.
GoToAssist for Salesforce Install Guide
6. Select the security level. We recommend selecting Grant access to admins only at first until you are ready to roll the functionality out to all appropriate roles. If you select Grant access to all users, any user who logs in will be able to see GoToAssist for Salesforce objects and tabs.
7. Click Install to finish the installation. You will receive an email notification once the install completes.
GoToAssist for Salesforce managed package is now installed in your org.
GoToAssist for Salesforce Install Guide
Customize GoToAssist for Salesforce
Upon deploying the managed package, you must perform the following steps to make your app fully functional. Additionally, you can customize the application by setting permissions and adding buttons, links and images to your layout and related lists.
Deploy Custom Objects
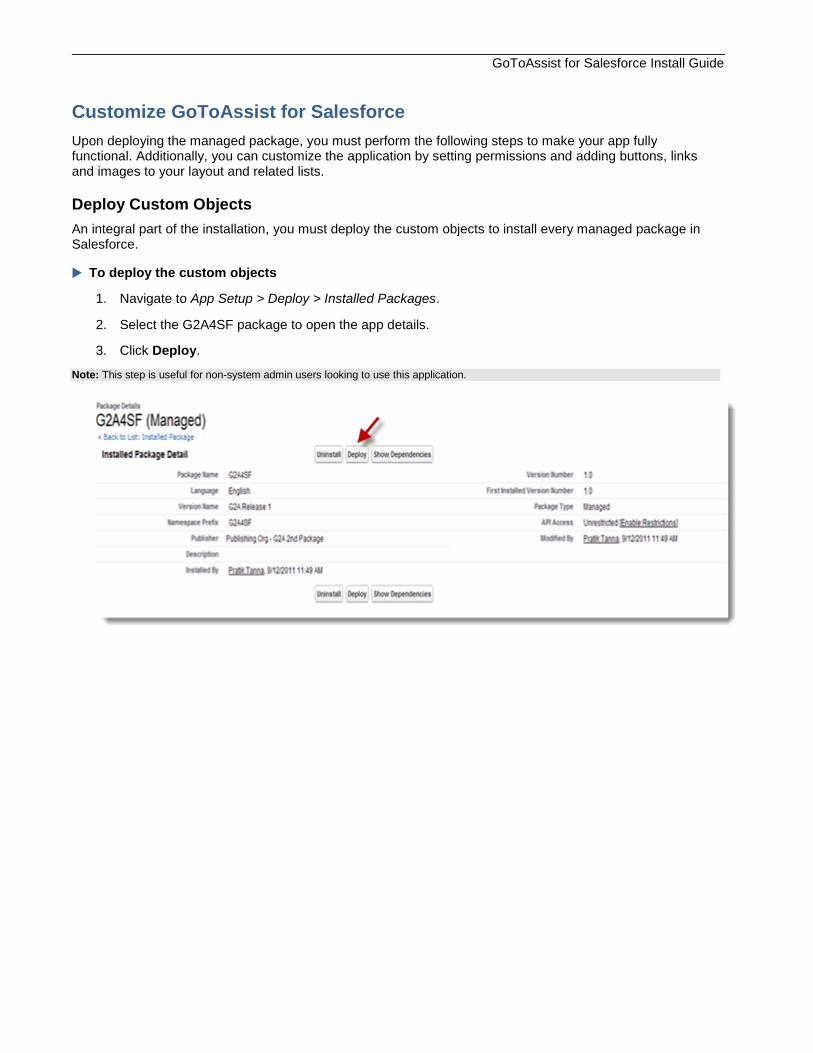
An integral part of the installation, you must deploy the custom objects to install every managed package in Salesforce.
To deploy the custom objects
1. Navigate to App Setup > Deploy > Installed Packages.
2. Select the G2A4SF package to open the app details.
3. Click Deploy.
Note: This step is useful for non-system admin users looking to use this application.

GoToAssist for Salesforce Install Guide
Configure an Email Service
A Salesforce Email Service is used to receive, process and associate the GoToAssist session information with a Salesforce case. To do this, the email address for this service needs to be registered with a GoToAssist support portal through the GoToAssist Management Center.
To set up the new email service
1. Navigate to App Setup > Develop > Email Services.
2. Select New Email Service.
3. Set the Email Service Name to G2A4SF.
4. Set the Apex Class to G2AToCaseUpdate.
5. Select the Active checkbox.
6. Configure the rest of the email settings for the service as per your organization’s requirements. We recommend that you requeue or bounce email addresses and enable error email routing to one of your system administrators.
7. Click Save and New Email Address.
GoToAssist for Salesforce Install Guide
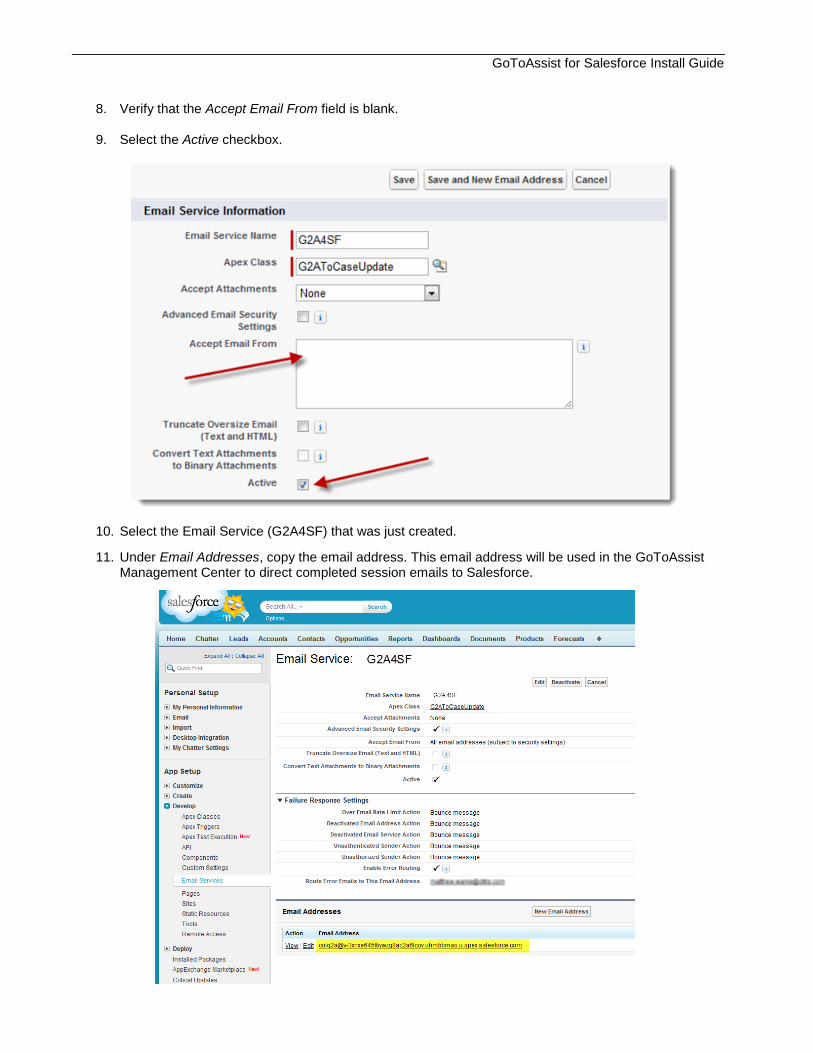
8. Verify that the Accept Email From field is blank.
9. Select the Active checkbox.
10. Select the Email Service (G2A4SF) that was just created.
11. Under Email Addresses, copy the email address. This email address will be used in the GoToAssist Management Center to direct completed session emails to Salesforce.
GoToAssist for Salesforce Install Guide
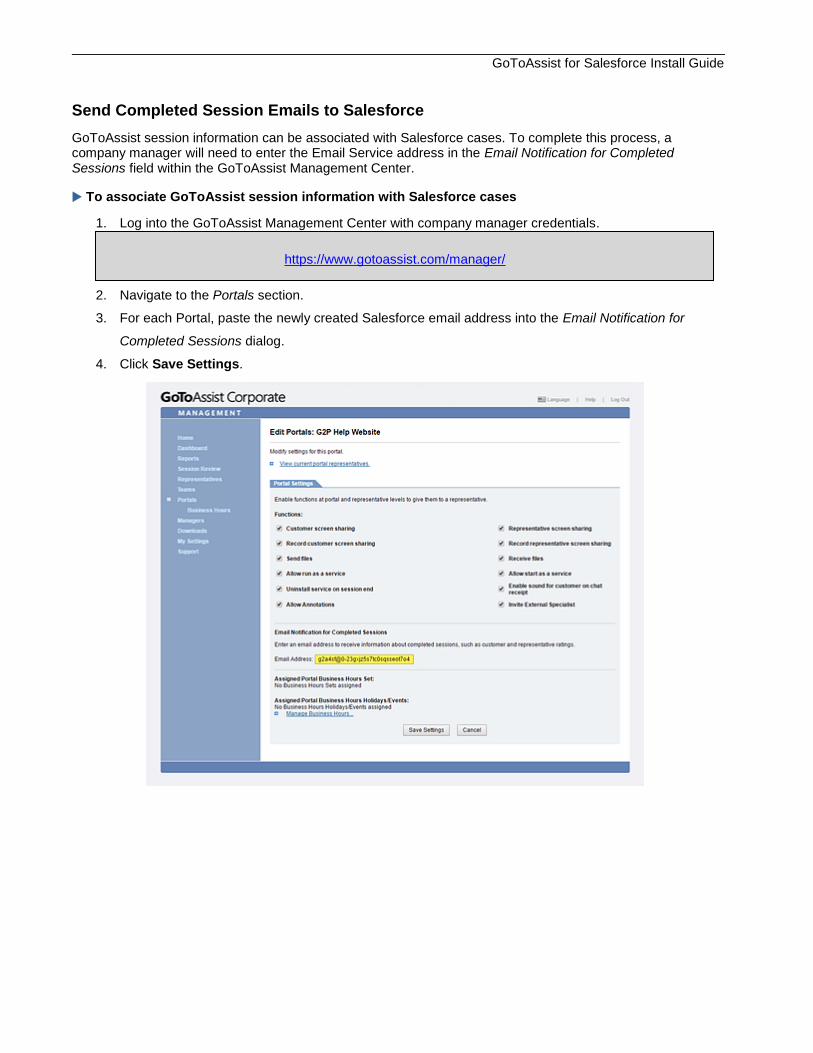
Send Completed Session Emails to Salesforce
GoToAssist session information can be associated with Salesforce cases. To complete this process, a company manager will need to enter the Email Service address in the Email Notification for Completed Sessions field within the GoToAssist Management Center.
To associate GoToAssist session information with Salesforce cases
1. Log into the GoToAssist Management Center with company manager credentials.
https://www.gotoassist.com/manager/
2. Navigate to the Portals section.
3. For each Portal, paste the newly created Salesforce email address into the Email Notification for
Completed Sessions dialog.
4. Click Save Settings.
GoToAssist for Salesforce Install Guide
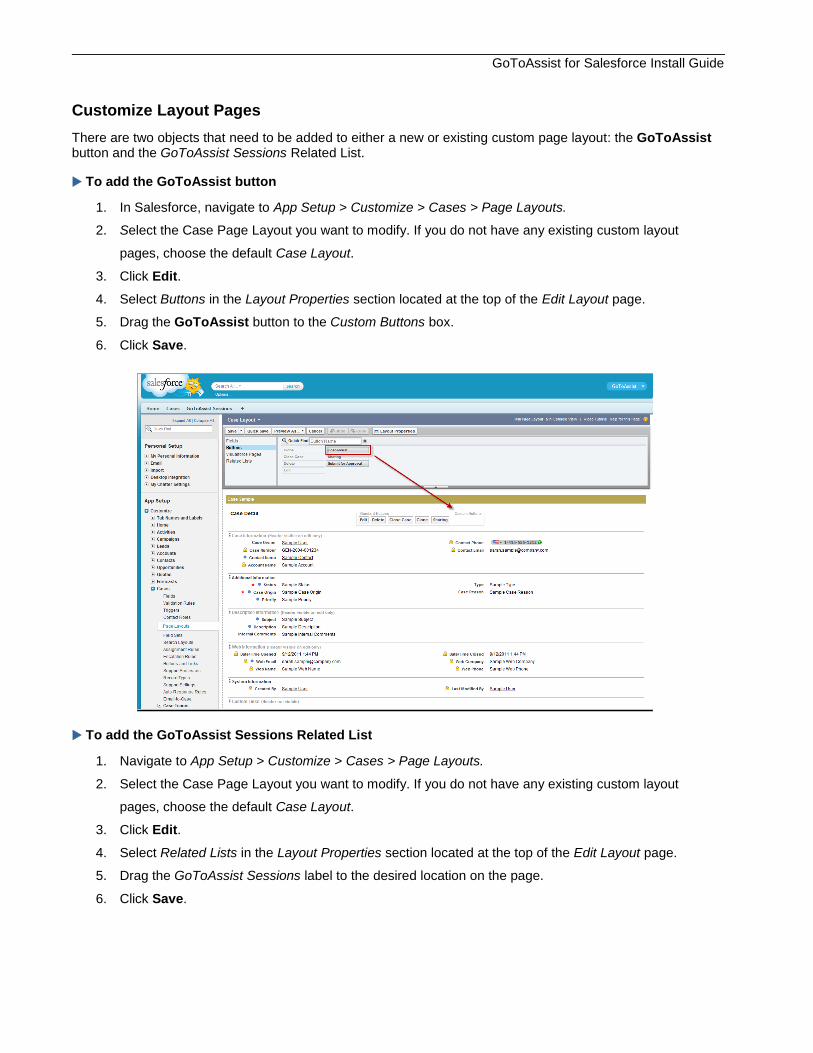
Customize Layout Pages
There are two objects that need to be added to either a new or existing custom page layout: the GoToAssist button and the GoToAssist Sessions Related List.
To add the GoToAssist button
1. In Salesforce, navigate to App Setup > Customize > Cases > Page Layouts.
2. Select the Case Page Layout you want to modify. If you do not have any existing custom layout
pages, choose the default Case Layout.
3. Click Edit.
4. Select Buttons in the Layout Properties section located at the top of the Edit Layout page.
5. Drag the GoToAssist button to the Custom Buttons box.
6. Click Save.
To add the GoToAssist Sessions Related List
1. Navigate to App Setup > Customize > Cases > Page Layouts.
2. Select the Case Page Layout you want to modify. If you do not have any existing custom layout
pages, choose the default Case Layout.
3. Click Edit.
4. Select Related Lists in the Layout Properties section located at the top of the Edit Layout page.
5. Drag the GoToAssist Sessions label to the desired location on the page.
6. Click Save.
GoToAssist for Salesforce Install Guide
Enable Access to GoToAssist Login Credentials
First-time GoToAssist for Salesforce users are prompted for their GoToAssist representative login credentials.
After the first time, these credentials are cached within Salesforce.
Additional custom fields on the User Layout page are required to manage and remove the email credentials
cache.
To add the GoToAssist Sessions Related List
1. Navigate to App Setup > Customize > Users > Page Layouts.
2. Select the User Page Layout you want to modify. If you do not have any existing user layout pages,
choose the default User Layout.
3. Click Edit.
4. Select Fields from the Layout Properties section at the top of the Edit Layout page.
5. Drag the G2A_Password and G2A_Username custom fields to the Additional Information section.
6. Click Save.
Log Incoming Emails
There is a custom object named Incoming Emails included in the package that logs incoming emails
depending on the value chosen. You can track the incoming emails if the value of Enable Email Logging
under G2A Settings is set to True.
To access this setting, you must first create the Incoming Emails tab.
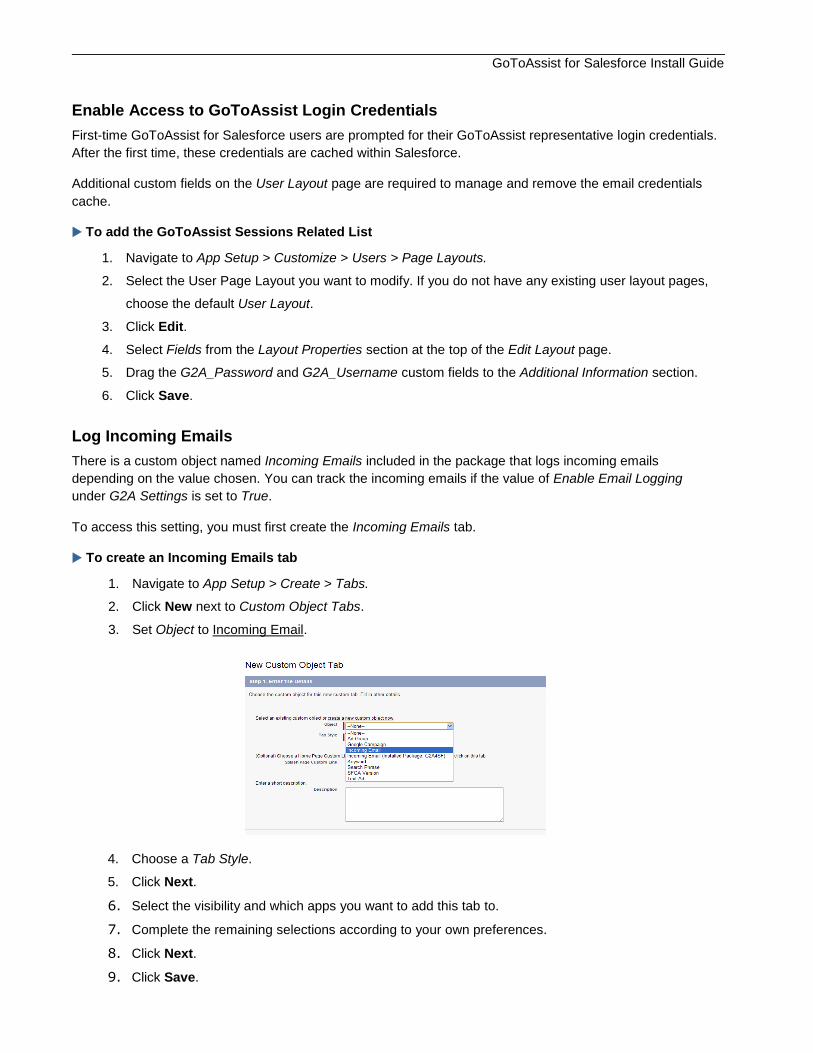
To create an Incoming Emails tab
1. Navigate to App Setup > Create > Tabs.
2. Click New next to Custom Object Tabs.
3. Set Object to Incoming Email.
4. Choose a Tab Style.
5. Click Next.
6. Select the visibility and which apps you want to add this tab to.
7. Complete the remaining selections according to your own preferences.
8. Click Next.
9. Click Save.
GoToAssist for Salesforce Install Guide
Provide Access to User Profiles
By default, the custom objects in the managed package are only visible to the system administrator profile. Administrators can provide access to any user profiles that are going to run the application.
Standard profiles cannot be edited to give CRUD access to custom objects of the managed package, so the user will have to create a new profile by cloning the existing one. Make sure the custom objects are deployed (see Deploy Custom Objects, page 5) before beginning.
Please note that these steps can only be carried on in Salesforce Enterprise Edition orgs. For Professional Edition and Group Edition, access needs to be granted at time of installation of G2A4SF: it may be necessary to uninstall the G2A4SF managed package and reinstall it again giving proper access to all profiles that are going to use it.
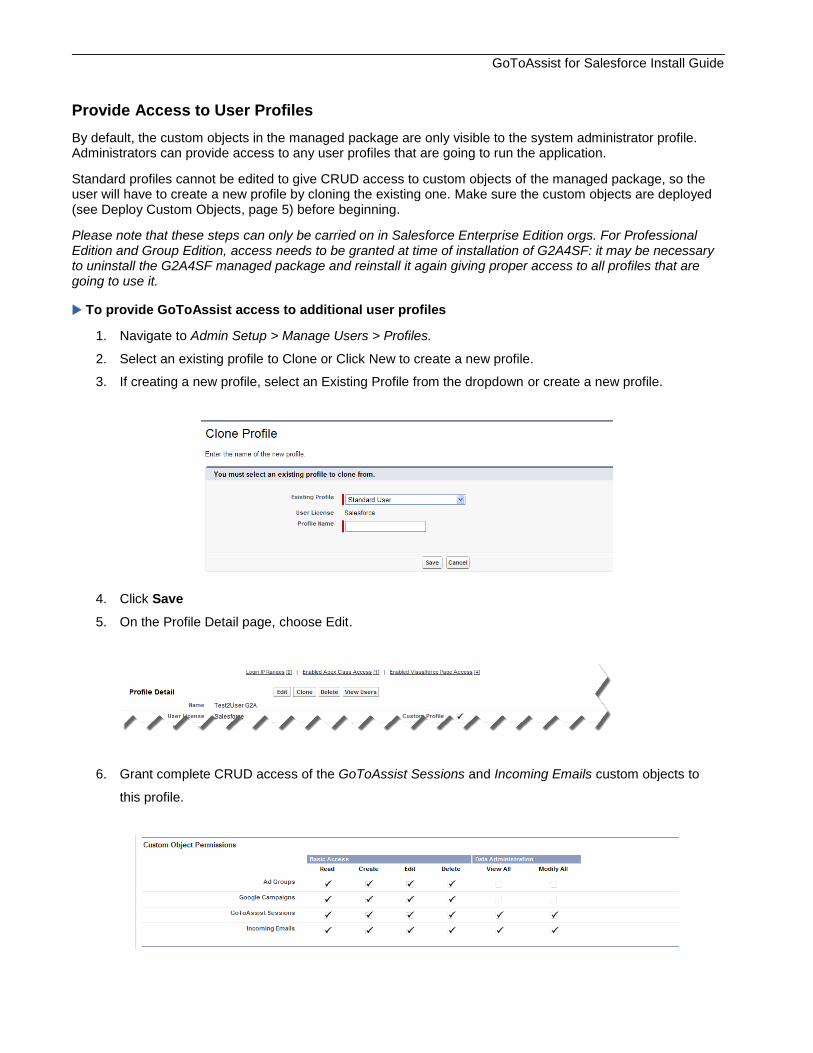
To provide GoToAssist access to additional user profiles
1. Navigate to Admin Setup > Manage Users > Profiles.
2. Select an existing profile to Clone or Click New to create a new profile.
3. If creating a new profile, select an Existing Profile from the dropdown or create a new profile.
4. Click Save
5. On the Profile Detail page, choose Edit.
6. Grant complete CRUD access of the GoToAssist Sessions and Incoming Emails custom objects to
this profile.
GoToAssist for Salesforce Install Guide
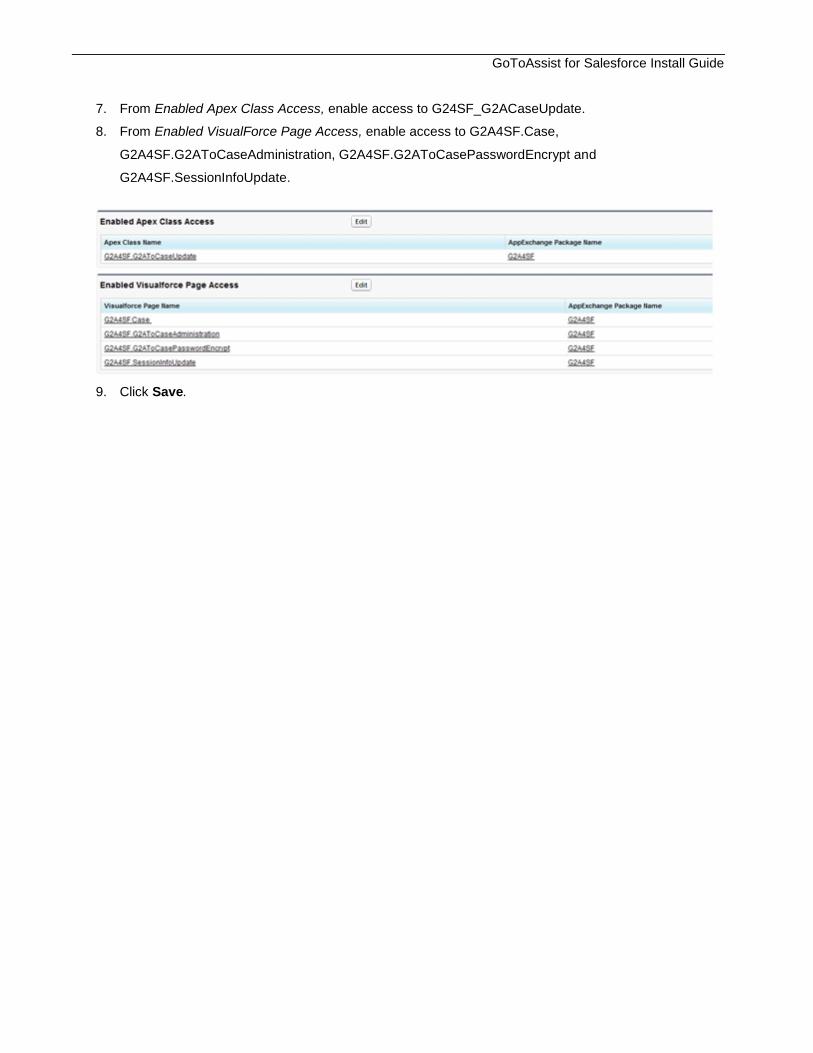
7. From Enabled Apex Class Access, enable access to G24SF_G2ACaseUpdate.
8. From Enabled VisualForce Page Access, enable access to G2A4SF.Case,
G2A4SF.G2AToCaseAdministration, G2A4SF.G2AToCasePasswordEncrypt and
G2A4SF.SessionInfoUpdate.
9. Click Save.
GoToAssist for Salesforce Install Guide
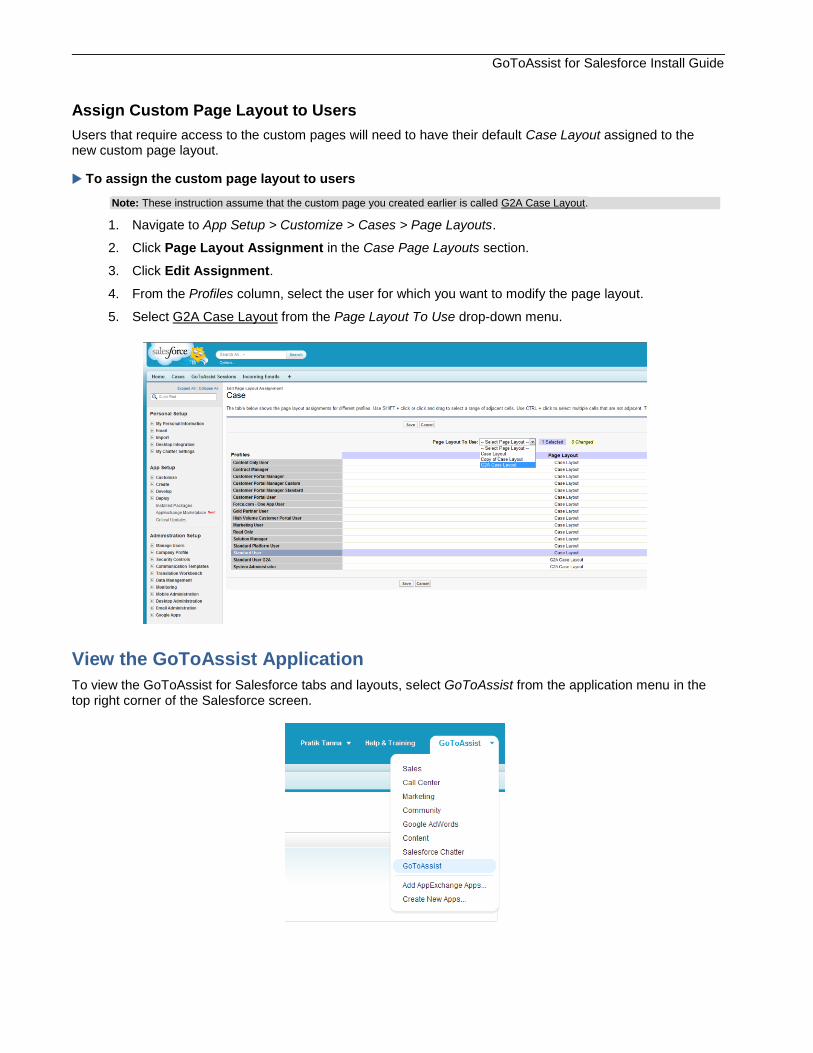
Assign Custom Page Layout to Users
Users that require access to the custom pages will need to have their default Case Layout assigned to the new custom page layout.
To assign the custom page layout to users
Note: These instruction assume that the custom page you created earlier is called G2A Case Layout.
1. Navigate to App Setup > Customize > Cases > Page Layouts.
2. Click Page Layout Assignment in the Case Page Layouts section.
3. Click Edit Assignment.
4. From the Profiles column, select the user for which you want to modify the page layout.
5. Select G2A Case Layout from the Page Layout To Use drop-down menu.
View the GoToAssist Application
To view the GoToAssist for Salesforce tabs and layouts, select GoToAssist from the application menu in the top right corner of the Salesforce screen.