Embed Size (px)
Citation preview

created August 2018
GoPro Fusion Using the GoPro Fusion 360 Camera
GoProcom
College of Communications
ldquoHave you ever heard a blindfolded octopus un-wrap a cellophane-covered bathtubrdquo
~ The Phantom Tollbooth
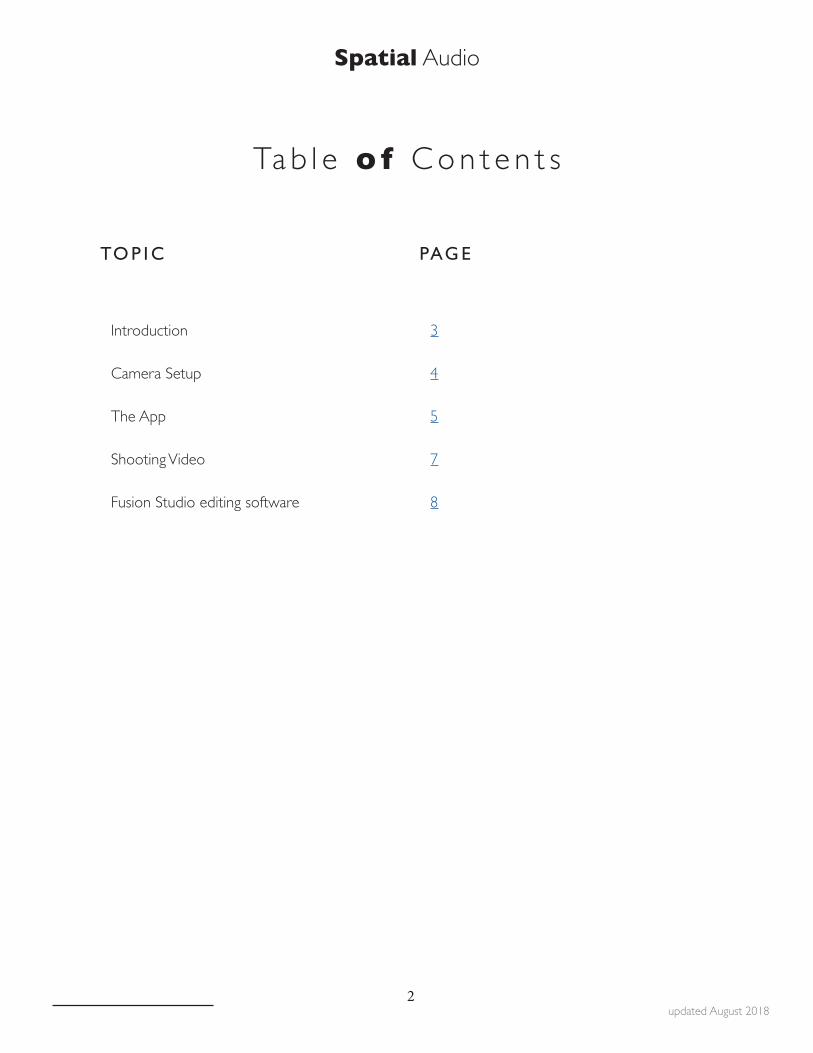
Spatial Audio
updated August 20182
TO P I C PAG E
Introduction 3
Camera Setup 4
The App 5
Shooting Video 7
Fusion Studio editing software 8
Ta b l e o f C o n t e n t s
GoPro Fusion Camera
Tips amp Tricks
created August 20183
Introduction
The GoPro Fusion camera GoProrsquos first attempt at a 360 camera can produce 360 VR video
The 360 world changes by the minute But as of this writing the camera offers high quality at a relatively affordable price compared to the competition
By the time you read this it will certainly be out of date and something better and newer will have come along
The camera shoots 5K video In the world of 360 video that is less impressive than it sounds but still better than much of the low-end camera world Remember all those pixels (it shoots at 5120x2560) are spread out over 360 degrees
The iPhone app (and I presume the Android one) works well to allow you to remotely control the camera
The video files from the camera must first be processed by GoProrsquos Fusion Studio editing application While it is pretty simple to use it takes a VERY long time to pro-cess these large files
That needs repeating
The desktop software for processing your video is VERY slow
This tutorial will look atbull Basic Camera Setupbull Shooting Videobull Editing using the Fusion Studio softwarebull Setting up Premiere
bullNOTE This tutorial was written for the Mac OS
GoPro Fusion Camera
Tips amp Tricks
created August 20184
Camera Setup
The GoPro Fusion camera is really two cameras in one A front facing and rear facing camera take separate videos that are then stitched together with the Fusion Studio software in the computer to produce a single 360 degree video
The front of the camera has the small screen and the red button for stopping and starting recordings
On the side shown in the photo is the Powermode button bull Press to turn on the camerabull Press again to cycle through the menu (press the red record button to
select a menu item)bull Press and hold to turn off
Above the Power button is a release to access the USB plug (for charging the camera) Press and slide the gate up to open it
On the other side is another gate with access to the two micro SD card slots and the battery
NOTE the lenses of the camera are exposed Take care to protect them ALWAYS keep the lenses covered when yoursquore not using the camera
bullItrsquos important to know which is the front of
the camera
By default this will be the orientation when the video starts to
play so generally try to aim your camera at
what is most important in the
scenebull
bull The camera MUST have two micro SD cards installed to
shoot 360 video Each camera
records to a separate card
bull
GoPro Fusion Camera
Tips amp Tricks
created August 20185
The APPThe easiest way to use the camera is to control it through the phone appFor iPhoneFor Android
The App will allow you to set up the camera and control recording all from your phone
Connecting your camera to the app
Click the small camera icon in the top left
ldquoAdd a Camerardquo Select Fusion
Turn on your camera by pressing the button on the side then select lsquoMy camera is onrsquo
Use the OnMode button to cycle through the menu The red button on the front to select
Click continue to connect phone to camera
GoPro Fusion Camera
Tips amp Tricks
created August 20186
Watch a 244 video on using the app with your camera
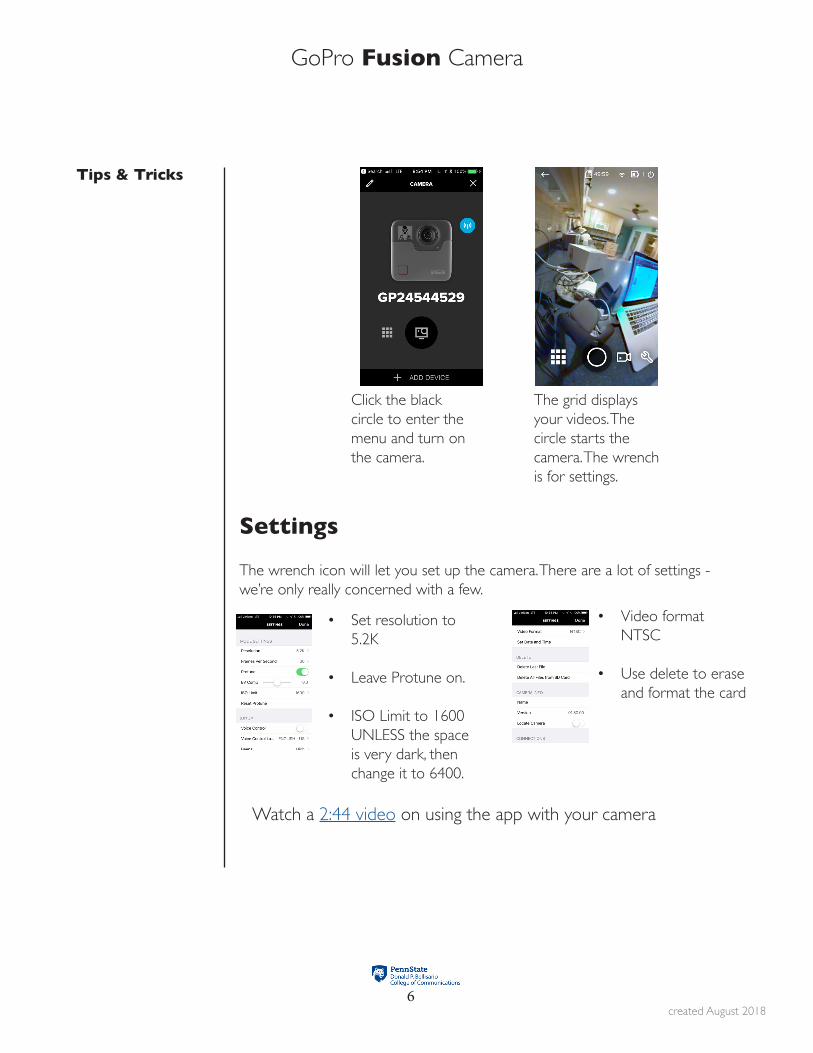
Click the black circle to enter the menu and turn on the camera
The grid displays your videos The circle starts the camera The wrench is for settings
Settings
The wrench icon will let you set up the camera There are a lot of settings - wersquore only really concerned with a few
bull Set resolution to 52K
bull Leave Protune on
bull ISO Limit to 1600 UNLESS the space is very dark then change it to 6400
bull Video format NTSC
bull Use delete to erase and format the card
GoPro Fusion Camera
Tips amp Tricks
created August 20187
Shooting VideoUsing the camera is a pretty straightforward process
First adjust your settings in the settings menu in the phone app
bull Erase the cards the first time you use the camera If yoursquove downloaded previous videos delete them to make sure you have enough room on the cards
bull Use the highest resolution for the camera - 52K This will generate large files that will give the best image quality
bull Select the Protune setting to allow the camera to adjust exposure and tone
bull Video format should be NTSC
From there yoursquore ready to go
Make sure the camera is level A tilted horizon is very distracting in 360
Think about where to place the camera bull It is our viewpoint Do we want to be on a table looking up or at eye
level bull Are there elements you want to emphasize by being closebull Think about light from all directionsbull What will we see in front and behind
Try to capture a few minutes of each scene - knowing you will probably use 20-30 seconds
Think about sound as well What will engage the viewer drive them to want to look around
Using the App you can stop and start the camera while you hide out of the way Keep yourself out of your videos
GoPro Fusion Camera
Tips amp Tricks
created August 20188
Editing
Video must be edited using GoPro Fusion Studio App
This free software can be downloaded from the GoPro website
Once installed the software can adjust tone stitch and save your video to your computer or external hard drive
This process is slow It can take a long time to process and copy these folders It will depend on how much you shoot the speed of your hard drives and the speed of your computers
One example
Two minutes of 360 video processed on a 2013 MacBook Pro took about two hours to process in the Fusion Studio App
From there it could be brought into Adobe Premiere and edited and combined with other audio etc Then finally exported and up-loaded to YouTube or another site A process that also took many hours
bullTwo important
things to remember
1 360 Video takes up a lot of space These large files need to be stored on a fast external hard drive
2 The Fusion Studio software does a nice
job but is VERY SLOW
You need to give yourself time to pro-cess the files which if yoursquove shot a lot can
take many hoursbull
GoPro Fusion Camera
Tips amp Tricks
created August 20189
Fusion Studio
To start you have two options
1 Browse Camera Media - With your camera connected to the computer by a USB cable Fusion Studio will load your videos let you edit and then export and render to your computer On a Mac by default this means the files will end up in your Picture Folder Advantages Itrsquos simple to plug in the camera and go When yoursquore done everything is on your computer hard drive Disadvantages Yoursquore tied to the camera while the process-ing is happening and it can take a long time
2 Add Media - First copy your files to an external hard drive and then use Fusion Studio to process the files and stitch them together on your external drive Advantages - Files are by default stored on an external drive and wonrsquot fill up your hard drive Disadvantages - there are a few extra steps You MUST make sure you copy over the video files with the proper file structure Yoursquoll need a card reader for microSD or adaptor
Recommended
bullA fast external hard drive is a necessity
Get a Solid State(SSD) drive
They are faster and more reliable
bullSamsung makes a nice solid state
drive(SSD)
GoPro Fusion Camera
Tips amp Tricks
created August 201810
Browse Camera Media (recommended)
bull Connect your camera to the computerbull Turn the camera onbull Select ldquoBrowse Camera Mediardquobull Fusion Studiogt Preferences to select a different destination for your files
Create a project folder for your 360 project Select that folder as the destination for both Import and Export Locations
This will place the original movie files (Source) and stitched 360 video(Rendered) in your project folder
Add Media
Use a card reader and copy the movie files to a folder on your hard drive Use a portable drive and create a project folder for best results
You MUST copy over the folder that says lsquobackrsquo and lsquofrontrsquo that contain the movie files
Create a project folder with a subfolder labeled lsquovideorsquo Place the lsquobackrsquo and lsquofrontrsquo folders inside the video folder
bullUse a fast external hard drive Invest in a SSD drive
500GB should be enough for the
class
Donrsquot save to your computer Use the Fusion Studio pref-erences to save to your external hard
drivebull
GoPro Fusion Camera
Tips amp Tricks
created August 201811
Click Add Media and select the video folder (with the back and front fold-ers within it) DONrsquoT select the individual back or front folder or movie clips Make sure to select the folder that holds those folders
After using either method continue
bull Select the clips you want to processbull Select 360 (Overcapture is for creating standard video from part of the
360)bull Select settings to adjust color and tonebull Select Add to Render Queue when you are ready to begin processing the
files
Adjustments
Adjust the Yaw pitch and roll if the image is tilted or off center If you used a tripod and it was level you probably wonrsquot need to adjust anythingUse the button on the right the three sliders icon to adjust the image settings - color and contrast
Select lsquoGoProrsquo and the software will automatically tone the image You can make adjustments using the sliders
Select lsquoFlatrsquo to have more control over the image in Premiere
Edit the clips before rendering
It will take your computer a LONG time to process the files - depending on how long each clip is and how powerful your computer
You can trim the clips and select which part you want to render out saving yourself a lot of time
bullSave time and edit your clips in Fusion
Studio
You can always shorten a clip later
in Premiere so leave yourself some extra
bull
GoPro Fusion Camera
Tips amp Tricks
created August 201812
You can Select lsquoFlatrdquo for a very low contrast dull looking clip that will allow you to edit more fully in Premiere OR use the GoPro setting and tweak it in the software and again later in Premiere
The ldquoflatrdquo setting will give you the most control of the image quality The GoPro setting will be faster and works well if the lighting was good at the scene
GoPro Fusion Camera
Tips amp Tricks
created August 201813
Drag in the vertical bars to trim the 360 video Fusion Studio will only export the section selected - potentially saving you a LOT of time rendering
The full original video will still be saved to your computer
Remember you can always shorten and edit the video in Premiere but you wonrsquot be able to add back in anything without starting over in Fusion Studio
EditingAfter the files have been rendered they can be imported into Adobe Premiere and edited
If you have audio files import them and synch them together following the tutorial
It is important to set up your Adobe Premiere project properly for the size and type of video
bullA reminder that
rendering the files in the Fusion Studio app takes
a LONG time
Selecting the best parts of your video rather than rendering everything will save you a lot of time
bull
GoPro Fusion Camera
Tips amp Tricks
created August 201814
Create New Sequence
FilegtNew gt SequenceOpen VR and then Monoscopic
The GoPro fusion is NOT 4096x2048 so we will change that in the settings But Make sure Ambisonics is selected
Select OK
GoPro Fusion Camera
Tips amp Tricks
created August 201815
Set Timeline Preferences
Premiere Pro CCgtPreferencesgtTimeline
Set ldquoMultichannel Mono Mediardquo to ldquoAdaptiverdquo
Change Sequence size to match the GoPro Fusion Camera
Click on the sequence and select Sequence SettingsSequencegtSequence SettingsChange the frame size to match 5120x2560 IF you shot the GoPro Fusion Camera in the 52K mode (itrsquos highest quality setting)
bullIf yoursquore using a different camera
or arenrsquot sure what mode you shot with and want to check
the size of the video file do that before
adjusting the sequence
Right or Option click on the video file in the Project folder
and select Properties to display the ac-
tual resolution of the video file
Use this to set your sequence to match
bull
GoPro Fusion Camera
Tips amp Tricks
created August 201816
Bring your audio onto the timeline
Place it underneath the videorsquos audio and then sync the two
Select both audio tracks and then go to the menuClipgtSynchronizeClick AudioChange Track Channel to Mix DownClick OK
GoPro Fusion Camera
Tips amp Tricks
created August 201817
Mute the camerarsquos audio and you should be able to play and edit the video with your Zoom H2N Ambisonic audio synchronized to your 360 video
Watch a 322 video on setting up the Premiere Sequence for Ambisonic Audio and 360 video
Spatial Audio
updated August 20182
TO P I C PAG E
Introduction 3
Camera Setup 4
The App 5
Shooting Video 7
Fusion Studio editing software 8
Ta b l e o f C o n t e n t s
GoPro Fusion Camera
Tips amp Tricks
created August 20183
Introduction
The GoPro Fusion camera GoProrsquos first attempt at a 360 camera can produce 360 VR video
The 360 world changes by the minute But as of this writing the camera offers high quality at a relatively affordable price compared to the competition
By the time you read this it will certainly be out of date and something better and newer will have come along
The camera shoots 5K video In the world of 360 video that is less impressive than it sounds but still better than much of the low-end camera world Remember all those pixels (it shoots at 5120x2560) are spread out over 360 degrees
The iPhone app (and I presume the Android one) works well to allow you to remotely control the camera
The video files from the camera must first be processed by GoProrsquos Fusion Studio editing application While it is pretty simple to use it takes a VERY long time to pro-cess these large files
That needs repeating
The desktop software for processing your video is VERY slow
This tutorial will look atbull Basic Camera Setupbull Shooting Videobull Editing using the Fusion Studio softwarebull Setting up Premiere
bullNOTE This tutorial was written for the Mac OS
GoPro Fusion Camera
Tips amp Tricks
created August 20184
Camera Setup
The GoPro Fusion camera is really two cameras in one A front facing and rear facing camera take separate videos that are then stitched together with the Fusion Studio software in the computer to produce a single 360 degree video
The front of the camera has the small screen and the red button for stopping and starting recordings
On the side shown in the photo is the Powermode button bull Press to turn on the camerabull Press again to cycle through the menu (press the red record button to
select a menu item)bull Press and hold to turn off
Above the Power button is a release to access the USB plug (for charging the camera) Press and slide the gate up to open it
On the other side is another gate with access to the two micro SD card slots and the battery
NOTE the lenses of the camera are exposed Take care to protect them ALWAYS keep the lenses covered when yoursquore not using the camera
bullItrsquos important to know which is the front of
the camera
By default this will be the orientation when the video starts to
play so generally try to aim your camera at
what is most important in the
scenebull
bull The camera MUST have two micro SD cards installed to
shoot 360 video Each camera
records to a separate card
bull
GoPro Fusion Camera
Tips amp Tricks
created August 20185
The APPThe easiest way to use the camera is to control it through the phone appFor iPhoneFor Android
The App will allow you to set up the camera and control recording all from your phone
Connecting your camera to the app
Click the small camera icon in the top left
ldquoAdd a Camerardquo Select Fusion
Turn on your camera by pressing the button on the side then select lsquoMy camera is onrsquo
Use the OnMode button to cycle through the menu The red button on the front to select
Click continue to connect phone to camera
GoPro Fusion Camera
Tips amp Tricks
created August 20186
Watch a 244 video on using the app with your camera
Click the black circle to enter the menu and turn on the camera
The grid displays your videos The circle starts the camera The wrench is for settings
Settings
The wrench icon will let you set up the camera There are a lot of settings - wersquore only really concerned with a few
bull Set resolution to 52K
bull Leave Protune on
bull ISO Limit to 1600 UNLESS the space is very dark then change it to 6400
bull Video format NTSC
bull Use delete to erase and format the card
GoPro Fusion Camera
Tips amp Tricks
created August 20187
Shooting VideoUsing the camera is a pretty straightforward process
First adjust your settings in the settings menu in the phone app
bull Erase the cards the first time you use the camera If yoursquove downloaded previous videos delete them to make sure you have enough room on the cards
bull Use the highest resolution for the camera - 52K This will generate large files that will give the best image quality
bull Select the Protune setting to allow the camera to adjust exposure and tone
bull Video format should be NTSC
From there yoursquore ready to go
Make sure the camera is level A tilted horizon is very distracting in 360
Think about where to place the camera bull It is our viewpoint Do we want to be on a table looking up or at eye
level bull Are there elements you want to emphasize by being closebull Think about light from all directionsbull What will we see in front and behind
Try to capture a few minutes of each scene - knowing you will probably use 20-30 seconds
Think about sound as well What will engage the viewer drive them to want to look around
Using the App you can stop and start the camera while you hide out of the way Keep yourself out of your videos
GoPro Fusion Camera
Tips amp Tricks
created August 20188
Editing
Video must be edited using GoPro Fusion Studio App
This free software can be downloaded from the GoPro website
Once installed the software can adjust tone stitch and save your video to your computer or external hard drive
This process is slow It can take a long time to process and copy these folders It will depend on how much you shoot the speed of your hard drives and the speed of your computers
One example
Two minutes of 360 video processed on a 2013 MacBook Pro took about two hours to process in the Fusion Studio App
From there it could be brought into Adobe Premiere and edited and combined with other audio etc Then finally exported and up-loaded to YouTube or another site A process that also took many hours
bullTwo important
things to remember
1 360 Video takes up a lot of space These large files need to be stored on a fast external hard drive
2 The Fusion Studio software does a nice
job but is VERY SLOW
You need to give yourself time to pro-cess the files which if yoursquove shot a lot can
take many hoursbull
GoPro Fusion Camera
Tips amp Tricks
created August 20189
Fusion Studio
To start you have two options
1 Browse Camera Media - With your camera connected to the computer by a USB cable Fusion Studio will load your videos let you edit and then export and render to your computer On a Mac by default this means the files will end up in your Picture Folder Advantages Itrsquos simple to plug in the camera and go When yoursquore done everything is on your computer hard drive Disadvantages Yoursquore tied to the camera while the process-ing is happening and it can take a long time
2 Add Media - First copy your files to an external hard drive and then use Fusion Studio to process the files and stitch them together on your external drive Advantages - Files are by default stored on an external drive and wonrsquot fill up your hard drive Disadvantages - there are a few extra steps You MUST make sure you copy over the video files with the proper file structure Yoursquoll need a card reader for microSD or adaptor
Recommended
bullA fast external hard drive is a necessity
Get a Solid State(SSD) drive
They are faster and more reliable
bullSamsung makes a nice solid state
drive(SSD)
GoPro Fusion Camera
Tips amp Tricks
created August 201810
Browse Camera Media (recommended)
bull Connect your camera to the computerbull Turn the camera onbull Select ldquoBrowse Camera Mediardquobull Fusion Studiogt Preferences to select a different destination for your files
Create a project folder for your 360 project Select that folder as the destination for both Import and Export Locations
This will place the original movie files (Source) and stitched 360 video(Rendered) in your project folder
Add Media
Use a card reader and copy the movie files to a folder on your hard drive Use a portable drive and create a project folder for best results
You MUST copy over the folder that says lsquobackrsquo and lsquofrontrsquo that contain the movie files
Create a project folder with a subfolder labeled lsquovideorsquo Place the lsquobackrsquo and lsquofrontrsquo folders inside the video folder
bullUse a fast external hard drive Invest in a SSD drive
500GB should be enough for the
class
Donrsquot save to your computer Use the Fusion Studio pref-erences to save to your external hard
drivebull
GoPro Fusion Camera
Tips amp Tricks
created August 201811
Click Add Media and select the video folder (with the back and front fold-ers within it) DONrsquoT select the individual back or front folder or movie clips Make sure to select the folder that holds those folders
After using either method continue
bull Select the clips you want to processbull Select 360 (Overcapture is for creating standard video from part of the
360)bull Select settings to adjust color and tonebull Select Add to Render Queue when you are ready to begin processing the
files
Adjustments
Adjust the Yaw pitch and roll if the image is tilted or off center If you used a tripod and it was level you probably wonrsquot need to adjust anythingUse the button on the right the three sliders icon to adjust the image settings - color and contrast
Select lsquoGoProrsquo and the software will automatically tone the image You can make adjustments using the sliders
Select lsquoFlatrsquo to have more control over the image in Premiere
Edit the clips before rendering
It will take your computer a LONG time to process the files - depending on how long each clip is and how powerful your computer
You can trim the clips and select which part you want to render out saving yourself a lot of time
bullSave time and edit your clips in Fusion
Studio
You can always shorten a clip later
in Premiere so leave yourself some extra
bull
GoPro Fusion Camera
Tips amp Tricks
created August 201812
You can Select lsquoFlatrdquo for a very low contrast dull looking clip that will allow you to edit more fully in Premiere OR use the GoPro setting and tweak it in the software and again later in Premiere
The ldquoflatrdquo setting will give you the most control of the image quality The GoPro setting will be faster and works well if the lighting was good at the scene
GoPro Fusion Camera
Tips amp Tricks
created August 201813
Drag in the vertical bars to trim the 360 video Fusion Studio will only export the section selected - potentially saving you a LOT of time rendering
The full original video will still be saved to your computer
Remember you can always shorten and edit the video in Premiere but you wonrsquot be able to add back in anything without starting over in Fusion Studio
EditingAfter the files have been rendered they can be imported into Adobe Premiere and edited
If you have audio files import them and synch them together following the tutorial
It is important to set up your Adobe Premiere project properly for the size and type of video
bullA reminder that
rendering the files in the Fusion Studio app takes
a LONG time
Selecting the best parts of your video rather than rendering everything will save you a lot of time
bull
GoPro Fusion Camera
Tips amp Tricks
created August 201814
Create New Sequence
FilegtNew gt SequenceOpen VR and then Monoscopic
The GoPro fusion is NOT 4096x2048 so we will change that in the settings But Make sure Ambisonics is selected
Select OK
GoPro Fusion Camera
Tips amp Tricks
created August 201815
Set Timeline Preferences
Premiere Pro CCgtPreferencesgtTimeline
Set ldquoMultichannel Mono Mediardquo to ldquoAdaptiverdquo
Change Sequence size to match the GoPro Fusion Camera
Click on the sequence and select Sequence SettingsSequencegtSequence SettingsChange the frame size to match 5120x2560 IF you shot the GoPro Fusion Camera in the 52K mode (itrsquos highest quality setting)
bullIf yoursquore using a different camera
or arenrsquot sure what mode you shot with and want to check
the size of the video file do that before
adjusting the sequence
Right or Option click on the video file in the Project folder
and select Properties to display the ac-
tual resolution of the video file
Use this to set your sequence to match
bull
GoPro Fusion Camera
Tips amp Tricks
created August 201816
Bring your audio onto the timeline
Place it underneath the videorsquos audio and then sync the two
Select both audio tracks and then go to the menuClipgtSynchronizeClick AudioChange Track Channel to Mix DownClick OK
GoPro Fusion Camera
Tips amp Tricks
created August 201817
Mute the camerarsquos audio and you should be able to play and edit the video with your Zoom H2N Ambisonic audio synchronized to your 360 video
Watch a 322 video on setting up the Premiere Sequence for Ambisonic Audio and 360 video

GoPro Fusion Camera
Tips amp Tricks
created August 20185
The APPThe easiest way to use the camera is to control it through the phone appFor iPhoneFor Android
The App will allow you to set up the camera and control recording all from your phone
Connecting your camera to the app
Click the small camera icon in the top left
ldquoAdd a Camerardquo Select Fusion
Turn on your camera by pressing the button on the side then select lsquoMy camera is onrsquo
Use the OnMode button to cycle through the menu The red button on the front to select
Click continue to connect phone to camera
GoPro Fusion Camera
Tips amp Tricks
created August 20186
Watch a 244 video on using the app with your camera
Click the black circle to enter the menu and turn on the camera
The grid displays your videos The circle starts the camera The wrench is for settings
Settings
The wrench icon will let you set up the camera There are a lot of settings - wersquore only really concerned with a few
bull Set resolution to 52K
bull Leave Protune on
bull ISO Limit to 1600 UNLESS the space is very dark then change it to 6400
bull Video format NTSC
bull Use delete to erase and format the card
GoPro Fusion Camera
Tips amp Tricks
created August 20187
Shooting VideoUsing the camera is a pretty straightforward process
First adjust your settings in the settings menu in the phone app
bull Erase the cards the first time you use the camera If yoursquove downloaded previous videos delete them to make sure you have enough room on the cards
bull Use the highest resolution for the camera - 52K This will generate large files that will give the best image quality
bull Select the Protune setting to allow the camera to adjust exposure and tone
bull Video format should be NTSC
From there yoursquore ready to go
Make sure the camera is level A tilted horizon is very distracting in 360
Think about where to place the camera bull It is our viewpoint Do we want to be on a table looking up or at eye
level bull Are there elements you want to emphasize by being closebull Think about light from all directionsbull What will we see in front and behind
Try to capture a few minutes of each scene - knowing you will probably use 20-30 seconds
Think about sound as well What will engage the viewer drive them to want to look around
Using the App you can stop and start the camera while you hide out of the way Keep yourself out of your videos
GoPro Fusion Camera
Tips amp Tricks
created August 20188
Editing
Video must be edited using GoPro Fusion Studio App
This free software can be downloaded from the GoPro website
Once installed the software can adjust tone stitch and save your video to your computer or external hard drive
This process is slow It can take a long time to process and copy these folders It will depend on how much you shoot the speed of your hard drives and the speed of your computers
One example
Two minutes of 360 video processed on a 2013 MacBook Pro took about two hours to process in the Fusion Studio App
From there it could be brought into Adobe Premiere and edited and combined with other audio etc Then finally exported and up-loaded to YouTube or another site A process that also took many hours
bullTwo important
things to remember
1 360 Video takes up a lot of space These large files need to be stored on a fast external hard drive
2 The Fusion Studio software does a nice
job but is VERY SLOW
You need to give yourself time to pro-cess the files which if yoursquove shot a lot can
take many hoursbull
GoPro Fusion Camera
Tips amp Tricks
created August 20189
Fusion Studio
To start you have two options
1 Browse Camera Media - With your camera connected to the computer by a USB cable Fusion Studio will load your videos let you edit and then export and render to your computer On a Mac by default this means the files will end up in your Picture Folder Advantages Itrsquos simple to plug in the camera and go When yoursquore done everything is on your computer hard drive Disadvantages Yoursquore tied to the camera while the process-ing is happening and it can take a long time
2 Add Media - First copy your files to an external hard drive and then use Fusion Studio to process the files and stitch them together on your external drive Advantages - Files are by default stored on an external drive and wonrsquot fill up your hard drive Disadvantages - there are a few extra steps You MUST make sure you copy over the video files with the proper file structure Yoursquoll need a card reader for microSD or adaptor
Recommended
bullA fast external hard drive is a necessity
Get a Solid State(SSD) drive
They are faster and more reliable
bullSamsung makes a nice solid state
drive(SSD)
GoPro Fusion Camera
Tips amp Tricks
created August 201810
Browse Camera Media (recommended)
bull Connect your camera to the computerbull Turn the camera onbull Select ldquoBrowse Camera Mediardquobull Fusion Studiogt Preferences to select a different destination for your files
Create a project folder for your 360 project Select that folder as the destination for both Import and Export Locations
This will place the original movie files (Source) and stitched 360 video(Rendered) in your project folder
Add Media
Use a card reader and copy the movie files to a folder on your hard drive Use a portable drive and create a project folder for best results
You MUST copy over the folder that says lsquobackrsquo and lsquofrontrsquo that contain the movie files
Create a project folder with a subfolder labeled lsquovideorsquo Place the lsquobackrsquo and lsquofrontrsquo folders inside the video folder
bullUse a fast external hard drive Invest in a SSD drive
500GB should be enough for the
class
Donrsquot save to your computer Use the Fusion Studio pref-erences to save to your external hard
drivebull
GoPro Fusion Camera
Tips amp Tricks
created August 201811
Click Add Media and select the video folder (with the back and front fold-ers within it) DONrsquoT select the individual back or front folder or movie clips Make sure to select the folder that holds those folders
After using either method continue
bull Select the clips you want to processbull Select 360 (Overcapture is for creating standard video from part of the
360)bull Select settings to adjust color and tonebull Select Add to Render Queue when you are ready to begin processing the
files
Adjustments
Adjust the Yaw pitch and roll if the image is tilted or off center If you used a tripod and it was level you probably wonrsquot need to adjust anythingUse the button on the right the three sliders icon to adjust the image settings - color and contrast
Select lsquoGoProrsquo and the software will automatically tone the image You can make adjustments using the sliders
Select lsquoFlatrsquo to have more control over the image in Premiere
Edit the clips before rendering
It will take your computer a LONG time to process the files - depending on how long each clip is and how powerful your computer
You can trim the clips and select which part you want to render out saving yourself a lot of time
bullSave time and edit your clips in Fusion
Studio
You can always shorten a clip later
in Premiere so leave yourself some extra
bull
GoPro Fusion Camera
Tips amp Tricks
created August 201812
You can Select lsquoFlatrdquo for a very low contrast dull looking clip that will allow you to edit more fully in Premiere OR use the GoPro setting and tweak it in the software and again later in Premiere
The ldquoflatrdquo setting will give you the most control of the image quality The GoPro setting will be faster and works well if the lighting was good at the scene
GoPro Fusion Camera
Tips amp Tricks
created August 201813
Drag in the vertical bars to trim the 360 video Fusion Studio will only export the section selected - potentially saving you a LOT of time rendering
The full original video will still be saved to your computer
Remember you can always shorten and edit the video in Premiere but you wonrsquot be able to add back in anything without starting over in Fusion Studio
EditingAfter the files have been rendered they can be imported into Adobe Premiere and edited
If you have audio files import them and synch them together following the tutorial
It is important to set up your Adobe Premiere project properly for the size and type of video
bullA reminder that
rendering the files in the Fusion Studio app takes
a LONG time
Selecting the best parts of your video rather than rendering everything will save you a lot of time
bull
GoPro Fusion Camera
Tips amp Tricks
created August 201814
Create New Sequence
FilegtNew gt SequenceOpen VR and then Monoscopic
The GoPro fusion is NOT 4096x2048 so we will change that in the settings But Make sure Ambisonics is selected
Select OK
GoPro Fusion Camera
Tips amp Tricks
created August 201815
Set Timeline Preferences
Premiere Pro CCgtPreferencesgtTimeline
Set ldquoMultichannel Mono Mediardquo to ldquoAdaptiverdquo
Change Sequence size to match the GoPro Fusion Camera
Click on the sequence and select Sequence SettingsSequencegtSequence SettingsChange the frame size to match 5120x2560 IF you shot the GoPro Fusion Camera in the 52K mode (itrsquos highest quality setting)
bullIf yoursquore using a different camera
or arenrsquot sure what mode you shot with and want to check
the size of the video file do that before
adjusting the sequence
Right or Option click on the video file in the Project folder
and select Properties to display the ac-
tual resolution of the video file
Use this to set your sequence to match
bull
GoPro Fusion Camera
Tips amp Tricks
created August 201816
Bring your audio onto the timeline
Place it underneath the videorsquos audio and then sync the two
Select both audio tracks and then go to the menuClipgtSynchronizeClick AudioChange Track Channel to Mix DownClick OK
GoPro Fusion Camera
Tips amp Tricks
created August 201817
Mute the camerarsquos audio and you should be able to play and edit the video with your Zoom H2N Ambisonic audio synchronized to your 360 video
Watch a 322 video on setting up the Premiere Sequence for Ambisonic Audio and 360 video
GoPro Fusion Camera
Tips amp Tricks
created August 20186
Watch a 244 video on using the app with your camera
Click the black circle to enter the menu and turn on the camera
The grid displays your videos The circle starts the camera The wrench is for settings
Settings
The wrench icon will let you set up the camera There are a lot of settings - wersquore only really concerned with a few
bull Set resolution to 52K
bull Leave Protune on
bull ISO Limit to 1600 UNLESS the space is very dark then change it to 6400
bull Video format NTSC
bull Use delete to erase and format the card
GoPro Fusion Camera
Tips amp Tricks
created August 20187
Shooting VideoUsing the camera is a pretty straightforward process
First adjust your settings in the settings menu in the phone app
bull Erase the cards the first time you use the camera If yoursquove downloaded previous videos delete them to make sure you have enough room on the cards
bull Use the highest resolution for the camera - 52K This will generate large files that will give the best image quality
bull Select the Protune setting to allow the camera to adjust exposure and tone
bull Video format should be NTSC
From there yoursquore ready to go
Make sure the camera is level A tilted horizon is very distracting in 360
Think about where to place the camera bull It is our viewpoint Do we want to be on a table looking up or at eye
level bull Are there elements you want to emphasize by being closebull Think about light from all directionsbull What will we see in front and behind
Try to capture a few minutes of each scene - knowing you will probably use 20-30 seconds
Think about sound as well What will engage the viewer drive them to want to look around
Using the App you can stop and start the camera while you hide out of the way Keep yourself out of your videos
GoPro Fusion Camera
Tips amp Tricks
created August 20188
Editing
Video must be edited using GoPro Fusion Studio App
This free software can be downloaded from the GoPro website
Once installed the software can adjust tone stitch and save your video to your computer or external hard drive
This process is slow It can take a long time to process and copy these folders It will depend on how much you shoot the speed of your hard drives and the speed of your computers
One example
Two minutes of 360 video processed on a 2013 MacBook Pro took about two hours to process in the Fusion Studio App
From there it could be brought into Adobe Premiere and edited and combined with other audio etc Then finally exported and up-loaded to YouTube or another site A process that also took many hours
bullTwo important
things to remember
1 360 Video takes up a lot of space These large files need to be stored on a fast external hard drive
2 The Fusion Studio software does a nice
job but is VERY SLOW
You need to give yourself time to pro-cess the files which if yoursquove shot a lot can
take many hoursbull
GoPro Fusion Camera
Tips amp Tricks
created August 20189
Fusion Studio
To start you have two options
1 Browse Camera Media - With your camera connected to the computer by a USB cable Fusion Studio will load your videos let you edit and then export and render to your computer On a Mac by default this means the files will end up in your Picture Folder Advantages Itrsquos simple to plug in the camera and go When yoursquore done everything is on your computer hard drive Disadvantages Yoursquore tied to the camera while the process-ing is happening and it can take a long time
2 Add Media - First copy your files to an external hard drive and then use Fusion Studio to process the files and stitch them together on your external drive Advantages - Files are by default stored on an external drive and wonrsquot fill up your hard drive Disadvantages - there are a few extra steps You MUST make sure you copy over the video files with the proper file structure Yoursquoll need a card reader for microSD or adaptor
Recommended
bullA fast external hard drive is a necessity
Get a Solid State(SSD) drive
They are faster and more reliable
bullSamsung makes a nice solid state
drive(SSD)
GoPro Fusion Camera
Tips amp Tricks
created August 201810
Browse Camera Media (recommended)
bull Connect your camera to the computerbull Turn the camera onbull Select ldquoBrowse Camera Mediardquobull Fusion Studiogt Preferences to select a different destination for your files
Create a project folder for your 360 project Select that folder as the destination for both Import and Export Locations
This will place the original movie files (Source) and stitched 360 video(Rendered) in your project folder
Add Media
Use a card reader and copy the movie files to a folder on your hard drive Use a portable drive and create a project folder for best results
You MUST copy over the folder that says lsquobackrsquo and lsquofrontrsquo that contain the movie files
Create a project folder with a subfolder labeled lsquovideorsquo Place the lsquobackrsquo and lsquofrontrsquo folders inside the video folder
bullUse a fast external hard drive Invest in a SSD drive
500GB should be enough for the
class
Donrsquot save to your computer Use the Fusion Studio pref-erences to save to your external hard
drivebull
GoPro Fusion Camera
Tips amp Tricks
created August 201811
Click Add Media and select the video folder (with the back and front fold-ers within it) DONrsquoT select the individual back or front folder or movie clips Make sure to select the folder that holds those folders
After using either method continue
bull Select the clips you want to processbull Select 360 (Overcapture is for creating standard video from part of the
360)bull Select settings to adjust color and tonebull Select Add to Render Queue when you are ready to begin processing the
files
Adjustments
Adjust the Yaw pitch and roll if the image is tilted or off center If you used a tripod and it was level you probably wonrsquot need to adjust anythingUse the button on the right the three sliders icon to adjust the image settings - color and contrast
Select lsquoGoProrsquo and the software will automatically tone the image You can make adjustments using the sliders
Select lsquoFlatrsquo to have more control over the image in Premiere
Edit the clips before rendering
It will take your computer a LONG time to process the files - depending on how long each clip is and how powerful your computer
You can trim the clips and select which part you want to render out saving yourself a lot of time
bullSave time and edit your clips in Fusion
Studio
You can always shorten a clip later
in Premiere so leave yourself some extra
bull
GoPro Fusion Camera
Tips amp Tricks
created August 201812
You can Select lsquoFlatrdquo for a very low contrast dull looking clip that will allow you to edit more fully in Premiere OR use the GoPro setting and tweak it in the software and again later in Premiere
The ldquoflatrdquo setting will give you the most control of the image quality The GoPro setting will be faster and works well if the lighting was good at the scene
GoPro Fusion Camera
Tips amp Tricks
created August 201813
Drag in the vertical bars to trim the 360 video Fusion Studio will only export the section selected - potentially saving you a LOT of time rendering
The full original video will still be saved to your computer
Remember you can always shorten and edit the video in Premiere but you wonrsquot be able to add back in anything without starting over in Fusion Studio
EditingAfter the files have been rendered they can be imported into Adobe Premiere and edited
If you have audio files import them and synch them together following the tutorial
It is important to set up your Adobe Premiere project properly for the size and type of video
bullA reminder that
rendering the files in the Fusion Studio app takes
a LONG time
Selecting the best parts of your video rather than rendering everything will save you a lot of time
bull
GoPro Fusion Camera
Tips amp Tricks
created August 201814
Create New Sequence
FilegtNew gt SequenceOpen VR and then Monoscopic
The GoPro fusion is NOT 4096x2048 so we will change that in the settings But Make sure Ambisonics is selected
Select OK
GoPro Fusion Camera
Tips amp Tricks
created August 201815
Set Timeline Preferences
Premiere Pro CCgtPreferencesgtTimeline
Set ldquoMultichannel Mono Mediardquo to ldquoAdaptiverdquo
Change Sequence size to match the GoPro Fusion Camera
Click on the sequence and select Sequence SettingsSequencegtSequence SettingsChange the frame size to match 5120x2560 IF you shot the GoPro Fusion Camera in the 52K mode (itrsquos highest quality setting)
bullIf yoursquore using a different camera
or arenrsquot sure what mode you shot with and want to check
the size of the video file do that before
adjusting the sequence
Right or Option click on the video file in the Project folder
and select Properties to display the ac-
tual resolution of the video file
Use this to set your sequence to match
bull
GoPro Fusion Camera
Tips amp Tricks
created August 201816
Bring your audio onto the timeline
Place it underneath the videorsquos audio and then sync the two
Select both audio tracks and then go to the menuClipgtSynchronizeClick AudioChange Track Channel to Mix DownClick OK
GoPro Fusion Camera
Tips amp Tricks
created August 201817
Mute the camerarsquos audio and you should be able to play and edit the video with your Zoom H2N Ambisonic audio synchronized to your 360 video
Watch a 322 video on setting up the Premiere Sequence for Ambisonic Audio and 360 video

GoPro Fusion Camera
Tips amp Tricks
created August 20187
Shooting VideoUsing the camera is a pretty straightforward process
First adjust your settings in the settings menu in the phone app
bull Erase the cards the first time you use the camera If yoursquove downloaded previous videos delete them to make sure you have enough room on the cards
bull Use the highest resolution for the camera - 52K This will generate large files that will give the best image quality
bull Select the Protune setting to allow the camera to adjust exposure and tone
bull Video format should be NTSC
From there yoursquore ready to go
Make sure the camera is level A tilted horizon is very distracting in 360
Think about where to place the camera bull It is our viewpoint Do we want to be on a table looking up or at eye
level bull Are there elements you want to emphasize by being closebull Think about light from all directionsbull What will we see in front and behind
Try to capture a few minutes of each scene - knowing you will probably use 20-30 seconds
Think about sound as well What will engage the viewer drive them to want to look around
Using the App you can stop and start the camera while you hide out of the way Keep yourself out of your videos
GoPro Fusion Camera
Tips amp Tricks
created August 20188
Editing
Video must be edited using GoPro Fusion Studio App
This free software can be downloaded from the GoPro website
Once installed the software can adjust tone stitch and save your video to your computer or external hard drive
This process is slow It can take a long time to process and copy these folders It will depend on how much you shoot the speed of your hard drives and the speed of your computers
One example
Two minutes of 360 video processed on a 2013 MacBook Pro took about two hours to process in the Fusion Studio App
From there it could be brought into Adobe Premiere and edited and combined with other audio etc Then finally exported and up-loaded to YouTube or another site A process that also took many hours
bullTwo important
things to remember
1 360 Video takes up a lot of space These large files need to be stored on a fast external hard drive
2 The Fusion Studio software does a nice
job but is VERY SLOW
You need to give yourself time to pro-cess the files which if yoursquove shot a lot can
take many hoursbull
GoPro Fusion Camera
Tips amp Tricks
created August 20189
Fusion Studio
To start you have two options
1 Browse Camera Media - With your camera connected to the computer by a USB cable Fusion Studio will load your videos let you edit and then export and render to your computer On a Mac by default this means the files will end up in your Picture Folder Advantages Itrsquos simple to plug in the camera and go When yoursquore done everything is on your computer hard drive Disadvantages Yoursquore tied to the camera while the process-ing is happening and it can take a long time
2 Add Media - First copy your files to an external hard drive and then use Fusion Studio to process the files and stitch them together on your external drive Advantages - Files are by default stored on an external drive and wonrsquot fill up your hard drive Disadvantages - there are a few extra steps You MUST make sure you copy over the video files with the proper file structure Yoursquoll need a card reader for microSD or adaptor
Recommended
bullA fast external hard drive is a necessity
Get a Solid State(SSD) drive
They are faster and more reliable
bullSamsung makes a nice solid state
drive(SSD)
GoPro Fusion Camera
Tips amp Tricks
created August 201810
Browse Camera Media (recommended)
bull Connect your camera to the computerbull Turn the camera onbull Select ldquoBrowse Camera Mediardquobull Fusion Studiogt Preferences to select a different destination for your files
Create a project folder for your 360 project Select that folder as the destination for both Import and Export Locations
This will place the original movie files (Source) and stitched 360 video(Rendered) in your project folder
Add Media
Use a card reader and copy the movie files to a folder on your hard drive Use a portable drive and create a project folder for best results
You MUST copy over the folder that says lsquobackrsquo and lsquofrontrsquo that contain the movie files
Create a project folder with a subfolder labeled lsquovideorsquo Place the lsquobackrsquo and lsquofrontrsquo folders inside the video folder
bullUse a fast external hard drive Invest in a SSD drive
500GB should be enough for the
class
Donrsquot save to your computer Use the Fusion Studio pref-erences to save to your external hard
drivebull
GoPro Fusion Camera
Tips amp Tricks
created August 201811
Click Add Media and select the video folder (with the back and front fold-ers within it) DONrsquoT select the individual back or front folder or movie clips Make sure to select the folder that holds those folders
After using either method continue
bull Select the clips you want to processbull Select 360 (Overcapture is for creating standard video from part of the
360)bull Select settings to adjust color and tonebull Select Add to Render Queue when you are ready to begin processing the
files
Adjustments
Adjust the Yaw pitch and roll if the image is tilted or off center If you used a tripod and it was level you probably wonrsquot need to adjust anythingUse the button on the right the three sliders icon to adjust the image settings - color and contrast
Select lsquoGoProrsquo and the software will automatically tone the image You can make adjustments using the sliders
Select lsquoFlatrsquo to have more control over the image in Premiere
Edit the clips before rendering
It will take your computer a LONG time to process the files - depending on how long each clip is and how powerful your computer
You can trim the clips and select which part you want to render out saving yourself a lot of time
bullSave time and edit your clips in Fusion
Studio
You can always shorten a clip later
in Premiere so leave yourself some extra
bull
GoPro Fusion Camera
Tips amp Tricks
created August 201812
You can Select lsquoFlatrdquo for a very low contrast dull looking clip that will allow you to edit more fully in Premiere OR use the GoPro setting and tweak it in the software and again later in Premiere
The ldquoflatrdquo setting will give you the most control of the image quality The GoPro setting will be faster and works well if the lighting was good at the scene
GoPro Fusion Camera
Tips amp Tricks
created August 201813
Drag in the vertical bars to trim the 360 video Fusion Studio will only export the section selected - potentially saving you a LOT of time rendering
The full original video will still be saved to your computer
Remember you can always shorten and edit the video in Premiere but you wonrsquot be able to add back in anything without starting over in Fusion Studio
EditingAfter the files have been rendered they can be imported into Adobe Premiere and edited
If you have audio files import them and synch them together following the tutorial
It is important to set up your Adobe Premiere project properly for the size and type of video
bullA reminder that
rendering the files in the Fusion Studio app takes
a LONG time
Selecting the best parts of your video rather than rendering everything will save you a lot of time
bull
GoPro Fusion Camera
Tips amp Tricks
created August 201814
Create New Sequence
FilegtNew gt SequenceOpen VR and then Monoscopic
The GoPro fusion is NOT 4096x2048 so we will change that in the settings But Make sure Ambisonics is selected
Select OK
GoPro Fusion Camera
Tips amp Tricks
created August 201815
Set Timeline Preferences
Premiere Pro CCgtPreferencesgtTimeline
Set ldquoMultichannel Mono Mediardquo to ldquoAdaptiverdquo
Change Sequence size to match the GoPro Fusion Camera
Click on the sequence and select Sequence SettingsSequencegtSequence SettingsChange the frame size to match 5120x2560 IF you shot the GoPro Fusion Camera in the 52K mode (itrsquos highest quality setting)
bullIf yoursquore using a different camera
or arenrsquot sure what mode you shot with and want to check
the size of the video file do that before
adjusting the sequence
Right or Option click on the video file in the Project folder
and select Properties to display the ac-
tual resolution of the video file
Use this to set your sequence to match
bull
GoPro Fusion Camera
Tips amp Tricks
created August 201816
Bring your audio onto the timeline
Place it underneath the videorsquos audio and then sync the two
Select both audio tracks and then go to the menuClipgtSynchronizeClick AudioChange Track Channel to Mix DownClick OK
GoPro Fusion Camera
Tips amp Tricks
created August 201817
Mute the camerarsquos audio and you should be able to play and edit the video with your Zoom H2N Ambisonic audio synchronized to your 360 video
Watch a 322 video on setting up the Premiere Sequence for Ambisonic Audio and 360 video
GoPro Fusion Camera
Tips amp Tricks
created August 20188
Editing
Video must be edited using GoPro Fusion Studio App
This free software can be downloaded from the GoPro website
Once installed the software can adjust tone stitch and save your video to your computer or external hard drive
This process is slow It can take a long time to process and copy these folders It will depend on how much you shoot the speed of your hard drives and the speed of your computers
One example
Two minutes of 360 video processed on a 2013 MacBook Pro took about two hours to process in the Fusion Studio App
From there it could be brought into Adobe Premiere and edited and combined with other audio etc Then finally exported and up-loaded to YouTube or another site A process that also took many hours
bullTwo important
things to remember
1 360 Video takes up a lot of space These large files need to be stored on a fast external hard drive
2 The Fusion Studio software does a nice
job but is VERY SLOW
You need to give yourself time to pro-cess the files which if yoursquove shot a lot can
take many hoursbull
GoPro Fusion Camera
Tips amp Tricks
created August 20189
Fusion Studio
To start you have two options
1 Browse Camera Media - With your camera connected to the computer by a USB cable Fusion Studio will load your videos let you edit and then export and render to your computer On a Mac by default this means the files will end up in your Picture Folder Advantages Itrsquos simple to plug in the camera and go When yoursquore done everything is on your computer hard drive Disadvantages Yoursquore tied to the camera while the process-ing is happening and it can take a long time
2 Add Media - First copy your files to an external hard drive and then use Fusion Studio to process the files and stitch them together on your external drive Advantages - Files are by default stored on an external drive and wonrsquot fill up your hard drive Disadvantages - there are a few extra steps You MUST make sure you copy over the video files with the proper file structure Yoursquoll need a card reader for microSD or adaptor
Recommended
bullA fast external hard drive is a necessity
Get a Solid State(SSD) drive
They are faster and more reliable
bullSamsung makes a nice solid state
drive(SSD)
GoPro Fusion Camera
Tips amp Tricks
created August 201810
Browse Camera Media (recommended)
bull Connect your camera to the computerbull Turn the camera onbull Select ldquoBrowse Camera Mediardquobull Fusion Studiogt Preferences to select a different destination for your files
Create a project folder for your 360 project Select that folder as the destination for both Import and Export Locations
This will place the original movie files (Source) and stitched 360 video(Rendered) in your project folder
Add Media
Use a card reader and copy the movie files to a folder on your hard drive Use a portable drive and create a project folder for best results
You MUST copy over the folder that says lsquobackrsquo and lsquofrontrsquo that contain the movie files
Create a project folder with a subfolder labeled lsquovideorsquo Place the lsquobackrsquo and lsquofrontrsquo folders inside the video folder
bullUse a fast external hard drive Invest in a SSD drive
500GB should be enough for the
class
Donrsquot save to your computer Use the Fusion Studio pref-erences to save to your external hard
drivebull
GoPro Fusion Camera
Tips amp Tricks
created August 201811
Click Add Media and select the video folder (with the back and front fold-ers within it) DONrsquoT select the individual back or front folder or movie clips Make sure to select the folder that holds those folders
After using either method continue
bull Select the clips you want to processbull Select 360 (Overcapture is for creating standard video from part of the
360)bull Select settings to adjust color and tonebull Select Add to Render Queue when you are ready to begin processing the
files
Adjustments
Adjust the Yaw pitch and roll if the image is tilted or off center If you used a tripod and it was level you probably wonrsquot need to adjust anythingUse the button on the right the three sliders icon to adjust the image settings - color and contrast
Select lsquoGoProrsquo and the software will automatically tone the image You can make adjustments using the sliders
Select lsquoFlatrsquo to have more control over the image in Premiere
Edit the clips before rendering
It will take your computer a LONG time to process the files - depending on how long each clip is and how powerful your computer
You can trim the clips and select which part you want to render out saving yourself a lot of time
bullSave time and edit your clips in Fusion
Studio
You can always shorten a clip later
in Premiere so leave yourself some extra
bull
GoPro Fusion Camera
Tips amp Tricks
created August 201812
You can Select lsquoFlatrdquo for a very low contrast dull looking clip that will allow you to edit more fully in Premiere OR use the GoPro setting and tweak it in the software and again later in Premiere
The ldquoflatrdquo setting will give you the most control of the image quality The GoPro setting will be faster and works well if the lighting was good at the scene
GoPro Fusion Camera
Tips amp Tricks
created August 201813
Drag in the vertical bars to trim the 360 video Fusion Studio will only export the section selected - potentially saving you a LOT of time rendering
The full original video will still be saved to your computer
Remember you can always shorten and edit the video in Premiere but you wonrsquot be able to add back in anything without starting over in Fusion Studio
EditingAfter the files have been rendered they can be imported into Adobe Premiere and edited
If you have audio files import them and synch them together following the tutorial
It is important to set up your Adobe Premiere project properly for the size and type of video
bullA reminder that
rendering the files in the Fusion Studio app takes
a LONG time
Selecting the best parts of your video rather than rendering everything will save you a lot of time
bull
GoPro Fusion Camera
Tips amp Tricks
created August 201814
Create New Sequence
FilegtNew gt SequenceOpen VR and then Monoscopic
The GoPro fusion is NOT 4096x2048 so we will change that in the settings But Make sure Ambisonics is selected
Select OK
GoPro Fusion Camera
Tips amp Tricks
created August 201815
Set Timeline Preferences
Premiere Pro CCgtPreferencesgtTimeline
Set ldquoMultichannel Mono Mediardquo to ldquoAdaptiverdquo
Change Sequence size to match the GoPro Fusion Camera
Click on the sequence and select Sequence SettingsSequencegtSequence SettingsChange the frame size to match 5120x2560 IF you shot the GoPro Fusion Camera in the 52K mode (itrsquos highest quality setting)
bullIf yoursquore using a different camera
or arenrsquot sure what mode you shot with and want to check
the size of the video file do that before
adjusting the sequence
Right or Option click on the video file in the Project folder
and select Properties to display the ac-
tual resolution of the video file
Use this to set your sequence to match
bull
GoPro Fusion Camera
Tips amp Tricks
created August 201816
Bring your audio onto the timeline
Place it underneath the videorsquos audio and then sync the two
Select both audio tracks and then go to the menuClipgtSynchronizeClick AudioChange Track Channel to Mix DownClick OK
GoPro Fusion Camera
Tips amp Tricks
created August 201817
Mute the camerarsquos audio and you should be able to play and edit the video with your Zoom H2N Ambisonic audio synchronized to your 360 video
Watch a 322 video on setting up the Premiere Sequence for Ambisonic Audio and 360 video
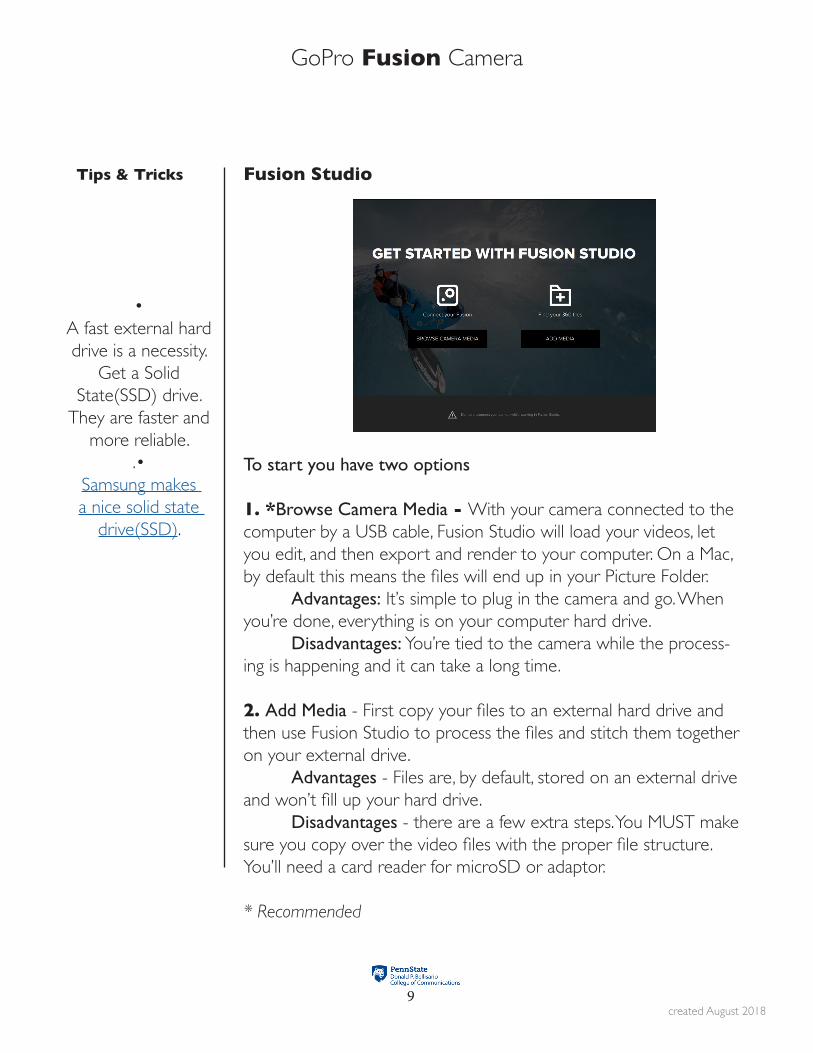
GoPro Fusion Camera
Tips amp Tricks
created August 201817
Mute the camerarsquos audio and you should be able to play and edit the video with your Zoom H2N Ambisonic audio synchronized to your 360 video
Watch a 322 video on setting up the Premiere Sequence for Ambisonic Audio and 360 video