Embed Size (px)
DESCRIPTION
Google Earth
Citation preview

7/21/2019 Google Earth Pro Basics
http://slidepdf.com/reader/full/google-earth-pro-basics 1/8
Google Earth Pro Basics
Pro Essentials
Google Earth Pro is a yearly subscription to the user interface which not only allows one to view the 3D globe and Google Earthdatabase, but also enables professional users to share and analyze industry data, as well as creating visually powerful presentations.
With Google Earth Pro, it’s easy to research locations and present your discoveries. You can import site plans, property lists or client
sites and share the view with your clients or colleagues. You can even export high-quality images to documents or the web.
Advanced Features of Google Earth Pro
Fastest performance
Premium printing resolution: 4800 dpi
Premium image output resolution: 4800 dpi
GPS data importSpreadsheet import: 2500 points
Web site, email and chat support
Measuring toolset
Movie Maker module
GIS data import with style wizard
Live traffic count data (additional annual feature)
Goals of the American Watershed Project
Problem-based, interdisciplinary project designBasic techniques of environmental data collection on local watershed
Use of GPS technology to record geographical data points
Use of spreadsheet technology to store and analyze the data
Use of online GIS database technology to share information between schools
Promote social networking between environmental teachers and area experts
Collaboration between participating groups to complete a large task

7/21/2019 Google Earth Pro Basics
http://slidepdf.com/reader/full/google-earth-pro-basics 2/8
Logging into Google Earth Pro
1. Double click on the icon with your cursor to launch
the software. There should be an icon on your
desktop. If you do not have an icon, please informthe instructor.
2. Choose the primary database from the list of servers.
The time it takes for the database to load will depend
on the speed of your internet connection.
Moving Around In Google Earth Pro
1. The software offers a navigation tool in the upper right-
hand corner of the screen. This tool will help you to
zoom in or out, change your direction, or tilt your
perspective.
2. Spend some time zooming in and out.
3. Use your mouse to move around the Earth. Try to center
your location on the southeastern United States.
4. Change the viewing direction and your perspective.
Zoom Tool
Tilt Tool
Rotation Tool
7/21/2019 Google Earth Pro Basics
http://slidepdf.com/reader/full/google-earth-pro-basics 3/8
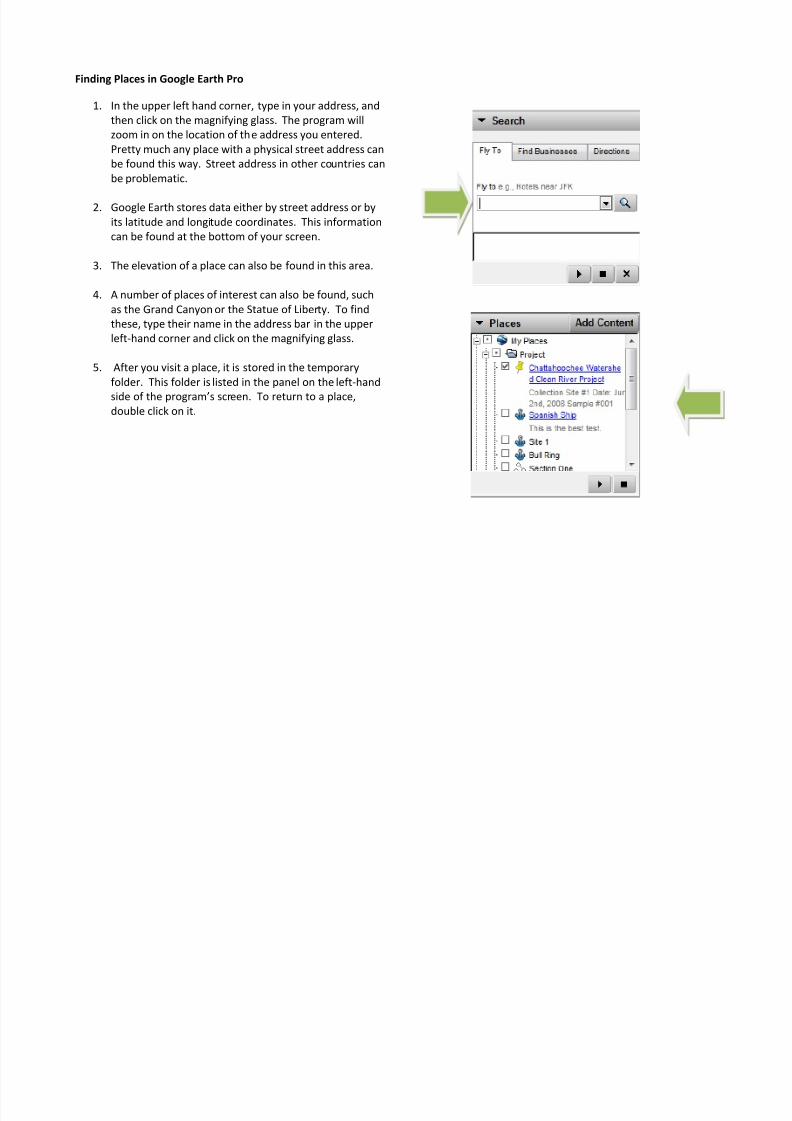
Finding Places in Google Earth Pro
1. In the upper left hand corner, type in your address, and
then click on the magnifying glass. The program will
zoom in on the location of the address you entered.Pretty much any place with a physical street address can
be found this way. Street address in other countries can
be problematic.
2. Google Earth stores data either by street address or by
its latitude and longitude coordinates. This information
can be found at the bottom of your screen.
3. The elevation of a place can also be found in this area.
4. A number of places of interest can also be found, such
as the Grand Canyon or the Statue of Liberty. To find
these, type their name in the address bar in the upper
left-hand corner and click on the magnifying glass.
5. After you visit a place, it is stored in the temporary
folder. This folder is listed in the panel on the left-hand
side of the program’s screen. To return to a place,
double click on it.

7/21/2019 Google Earth Pro Basics
http://slidepdf.com/reader/full/google-earth-pro-basics 4/8
Using Layers in Google Earth Pro
1. Google Earth Pro’s data base comes with a number of
data layers that can be turned on and off. These layers
are found in the left-hand panel at the bottom.
2. Sometimes this layer is collapsed to give you more
viewing pace for the other panels. You can open or
close a panel by clicking on the arrow in the title bar for
that panel.
3. Once the panel is open, use your cursor and slide the
panel up so you can see the available layers. To do this,move your cursor over the darker line just above the
arrow to expand the panel. Notice your cursor changes
to a bar with arrows. Click and drag up to increase the
size of the panel, or drag down to decrease the size.
4. There are layers for roads, buildings, traffic and weather
to name just a few. To activate a layer, check the box on
the left-hand side of the layer. This will activate it.
5. Some of these layers are actually comprised of many
individual layers. To see each layer in a category (or
folder), left click on the plus sign to expand that layer.
Click on the minus sign to collapse that layer.
7/21/2019 Google Earth Pro Basics
http://slidepdf.com/reader/full/google-earth-pro-basics 5/8
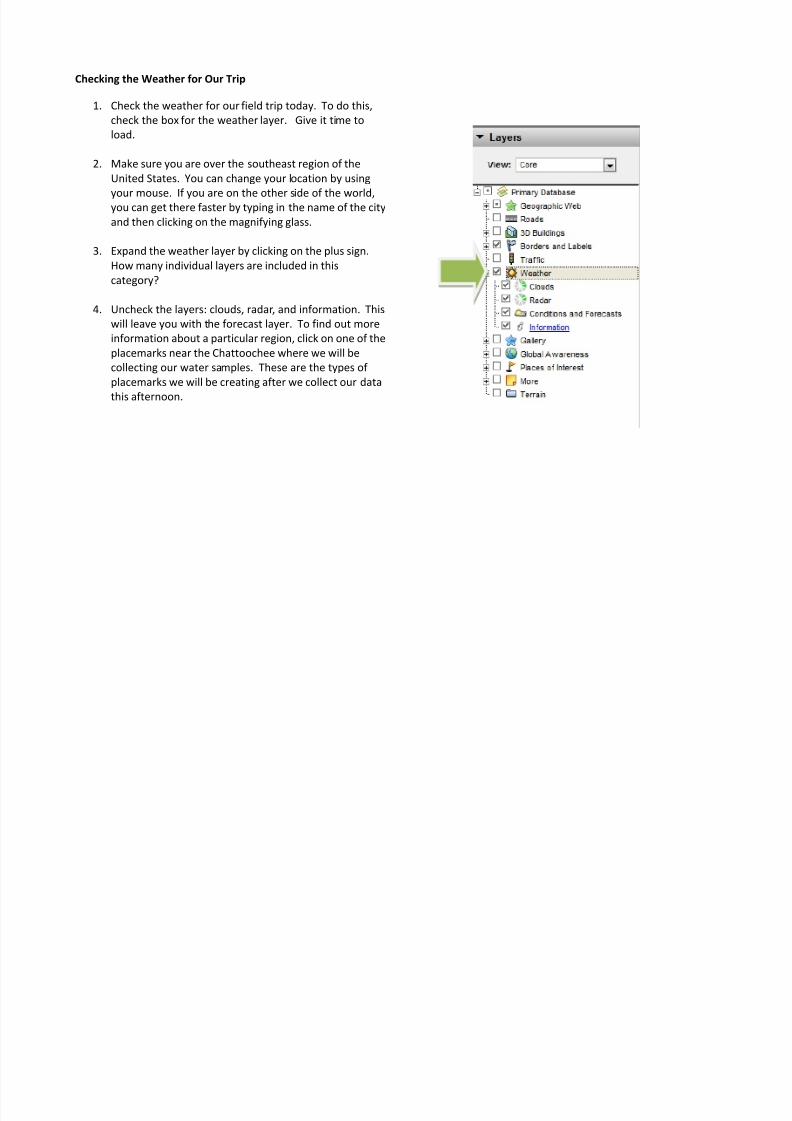
Checking the Weather for Our Trip
1. Check the weather for our field trip today. To do this,
check the box for the weather layer. Give it time to
load.
2. Make sure you are over the southeast region of the
United States. You can change your location by using
your mouse. If you are on the other side of the world,
you can get there faster by typing in the name of the city
and then clicking on the magnifying glass.
3. Expand the weather layer by clicking on the plus sign.
How many individual layers are included in this
category?
4. Uncheck the layers: clouds, radar, and information. This
will leave you with the forecast layer. To find out more
information about a particular region, click on one of the
placemarks near the Chattoochee where we will be
collecting our water samples. These are the types of
placemarks we will be creating after we collect our data
this afternoon.
7/21/2019 Google Earth Pro Basics
http://slidepdf.com/reader/full/google-earth-pro-basics 6/8
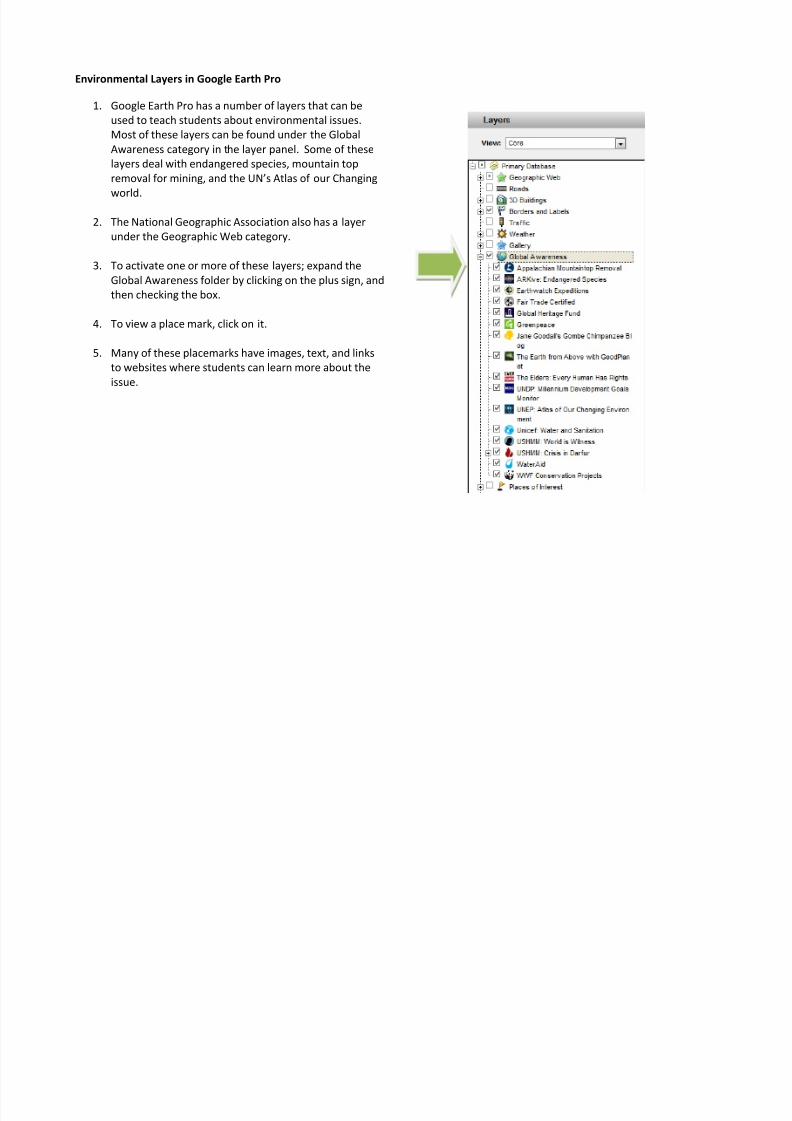
Environmental Layers in Google Earth Pro
1. Google Earth Pro has a number of layers that can be
used to teach students about environmental issues.
Most of these layers can be found under the GlobalAwareness category in the layer panel. Some of these
layers deal with endangered species, mountain top
removal for mining, and the UN’s Atlas of our Changing
world.
2. The National Geographic Association also has a layer
under the Geographic Web category.
3. To activate one or more of these layers; expand the
Global Awareness folder by clicking on the plus sign, andthen checking the box.
4. To view a place mark, click on it.
5. Many of these placemarks have images, text, and links
to websites where students can learn more about the
issue.
7/21/2019 Google Earth Pro Basics
http://slidepdf.com/reader/full/google-earth-pro-basics 7/8
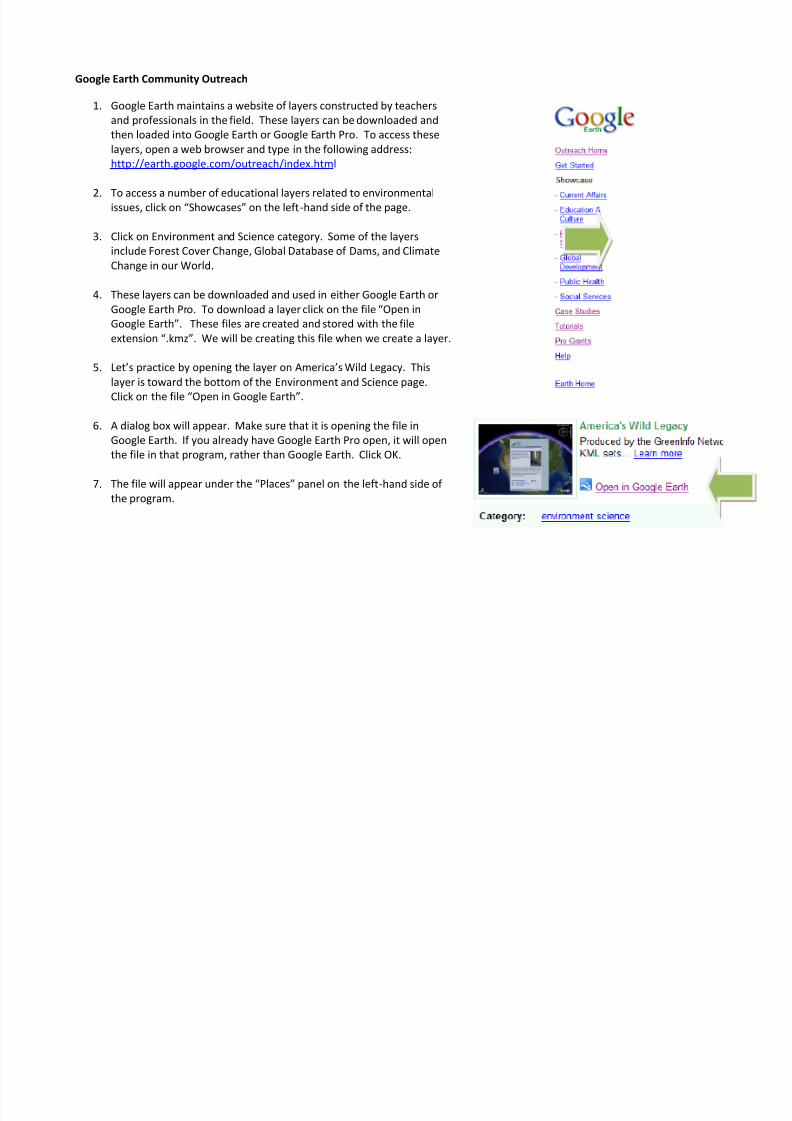
Google Earth Community Outreach
1. Google Earth maintains a website of layers constructed by teachers
and professionals in the field. These layers can be downloaded and
then loaded into Google Earth or Google Earth Pro. To access theselayers, open a web browser and type in the following address:
http://earth.google.com/outreach/index.html
2. To access a number of educational layers related to environmental
issues, click on “Showcases” on the left-hand side of the page.
3. Click on Environment and Science category. Some of the layers
include Forest Cover Change, Global Database of Dams, and Climate
Change in our World.
4. These layers can be downloaded and used in either Google Earth or
Google Earth Pro. To download a layer click on the file “Open in
Google Earth”. These files are created and stored with the file
extension “.kmz”. We will be creating this file when we create a layer.
5. Let’s practice by opening the layer on America’s Wild Legacy. This
layer is toward the bottom of the Environment and Science page.
Click on the file “Open in Google Earth”.
6. A dialog box will appear. Make sure that it is opening the file in
Google Earth. If you already have Google Earth Pro open, it will open
the file in that program, rather than Google Earth. Click OK.
7. The file will appear under the “Places” panel on the left-hand side of
the program.

7/21/2019 Google Earth Pro Basics
http://slidepdf.com/reader/full/google-earth-pro-basics 8/8
Adding a Network Link
Many industries save their data in formats that are readable
by Google Earth Pro (e.g. KMZ and KML). You can add a
network link to view this data. When the data is updated to
their server, you can view it too.
To Do This:
1. Click on “Add” and then choose “Network Link”.
2. Type in the name of the link. This can be any name you
choose, really. For this example we will use “USGS
Streamgage Watch.” 3. Type in the link address. For this example we will use:
http://water.usgs.gov/waterwatch/kmls/real.kmz
4. Set refresh to “Never”. If you do this, you can update
the information by right-clicking on the folder and then
choosing “Refresh”.