Embed Size (px)
Citation preview

Google Docs Basics
UCFSD Google Docs Training
On a PC Use Firefox for Google Docs Presentations
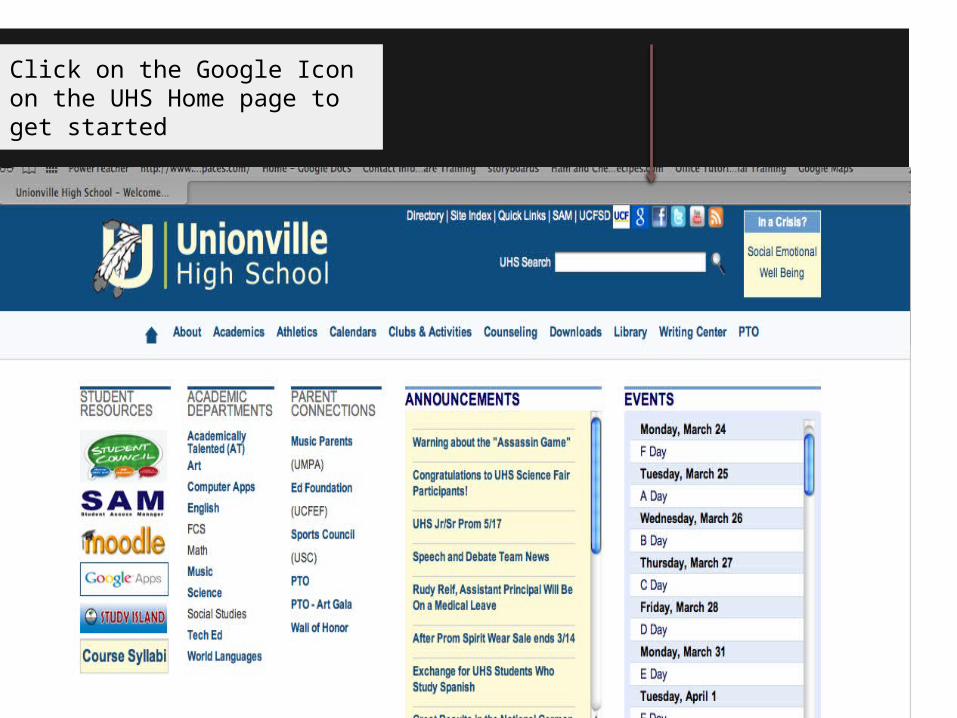
Click on the Google Icon on the UHS Home page to get started
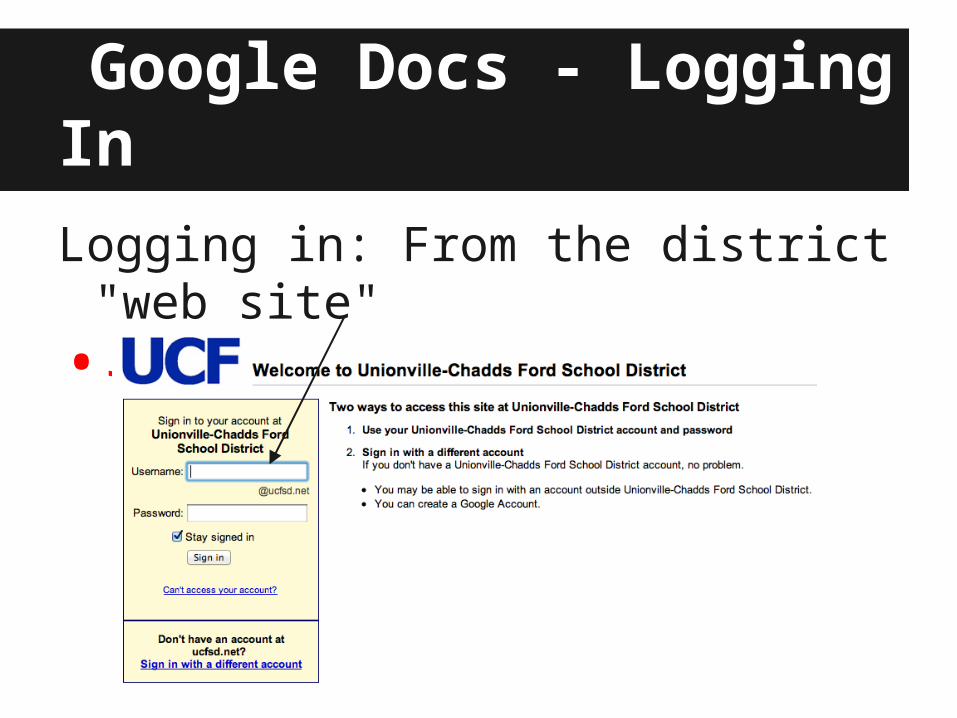
Google Docs - Logging In
Logging in: From the district "web site" • Just Username and Password
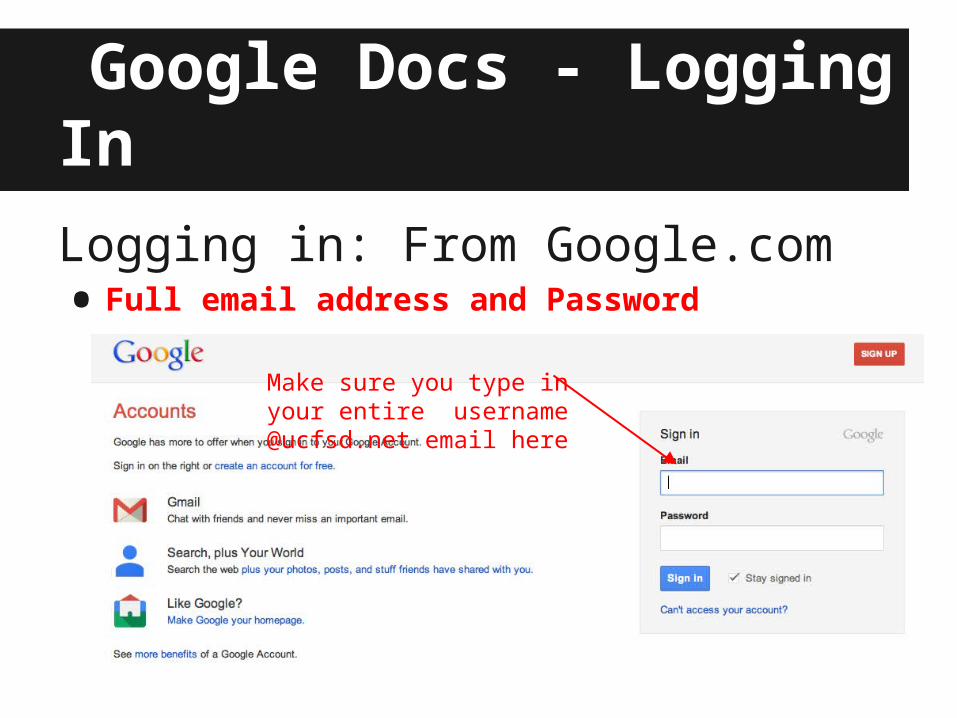
Google Docs - Logging In
Logging in: From Google.com• Full email address and Password
Make sure you type in your entire username @ucfsd.net email here
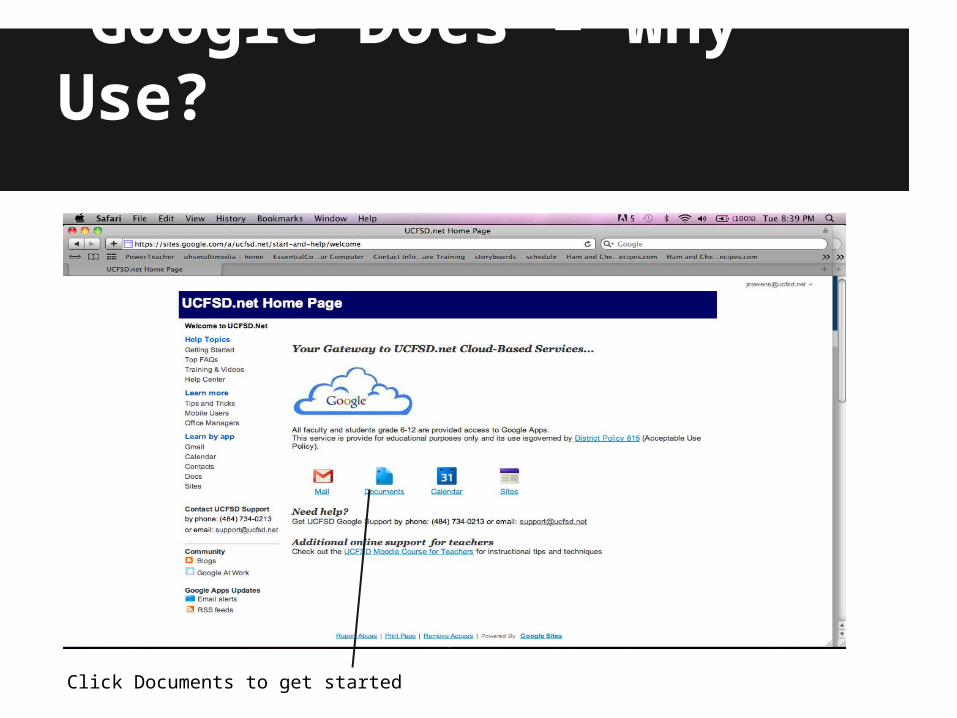
Google Docs – Why Use?
Click Documents to get started
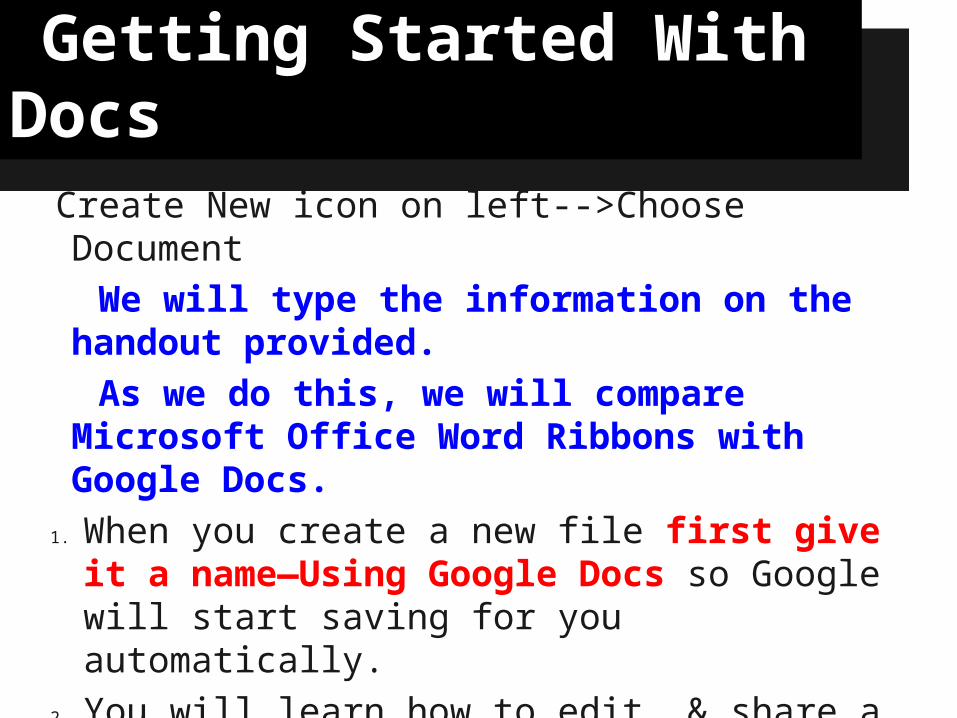
Getting Started With DocsCreate New icon on left-->Choose Document
We will type the information on the handout provided.
As we do this, we will compare Microsoft Office Word Ribbons with Google Docs.
1. When you create a new file first give it a name—Using Google Docs so Google will start saving for you automatically.
2. You will learn how to edit, & share a document as well as email an attachment using the document from the handout you will type. So let's begin!

Creating a Spreadsheet
1. Create -->New Spreadsheet or Upload one that is created.
2. We will Upload one that has been created for you for this exercise.
3. Upload Sales Report.xls from File Pickup
4. Typing text and creating formulas are very similar to Excel. To add to cells in Google Spreadsheets you would type (=B3+C3) (Remember PEMDAS) order of operations in creating your own formulas
5. Use the - to subtract, * to multiply, / to divide
Functions Same as Excel
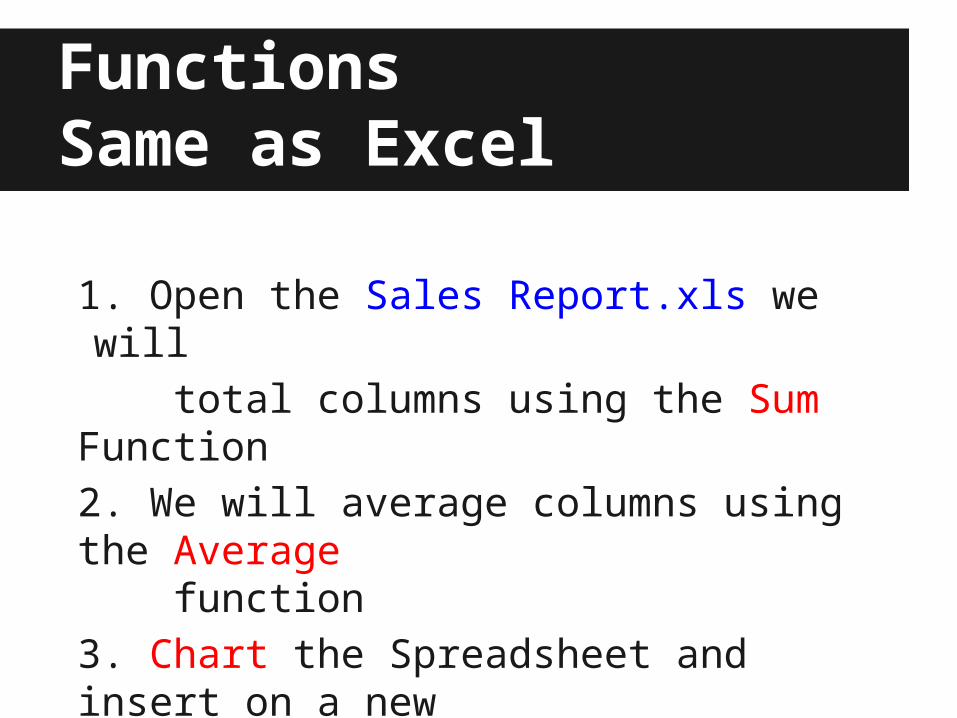
1. Open the Sales Report.xls we will
total columns using the Sum Function
2. We will average columns using the Average function
3. Chart the Spreadsheet and insert on a new sheet.

Working with the Sales Report
We will insert a Sum Function to Sum the WEB SALES Total
In Cell B11 type =Sum then highlight the Cells as in Excel B4 down to B9 the close ) is added to end the function Press enter to see results 3,248. Second way to add a Function --Use the Insert Menu and choose Function and select the function Average, which we will do after copying this function to Columns C & D to see the sum of STORE & BULK sales totals columns
Copying the Function to other cell columns
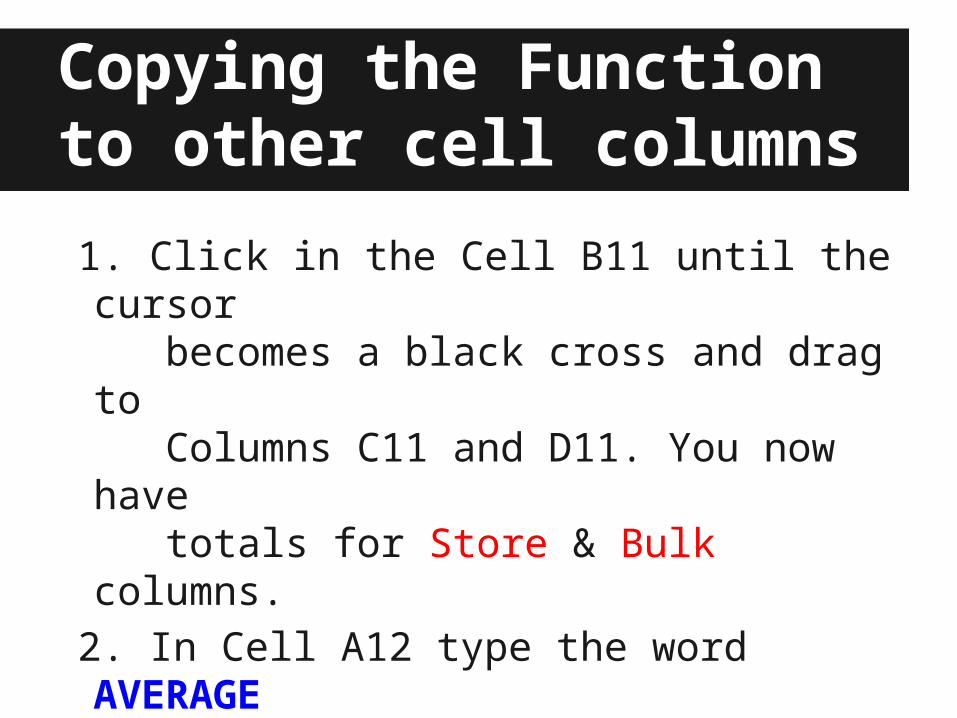
1. Click in the Cell B11 until the cursor becomes a black cross and drag to Columns C11 and D11. You now have totals for Store & Bulk columns.
2. In Cell A12 type the word AVERAGE
3. In B12 go to the Insert Menu Choose Average Function and highlight the cells C4 thru C9. Press Enter and the Average appears in the cell 541.33.......
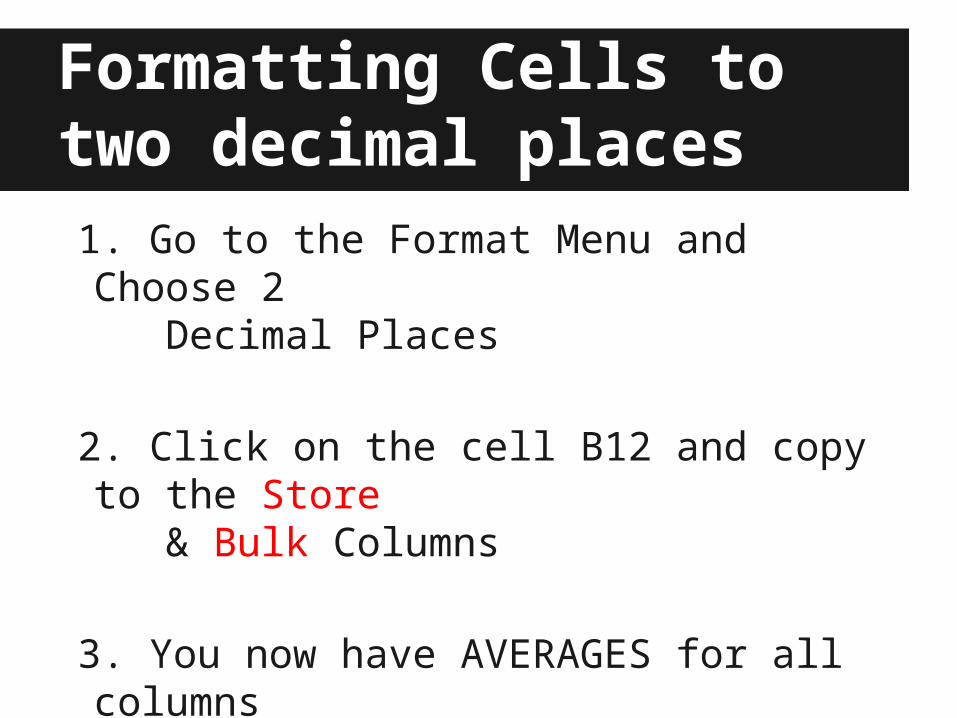
Formatting Cells to two decimal places1. Go to the Format Menu and Choose 2 Decimal Places
2. Click on the cell B12 and copy to the Store & Bulk Columns
3. You now have AVERAGES for all columns

Creating a Chart1. Select Cells A3: D9 (varieties and amounts of each type)
2. Insert Menu--choose Chart or the Chart icon on the right of your menu bar
3. Chart Editor appears
4. On Start Tab Google recommends type of charts for your Data
5. Click More Charts to see other types--
6. View All --choose Column for this example
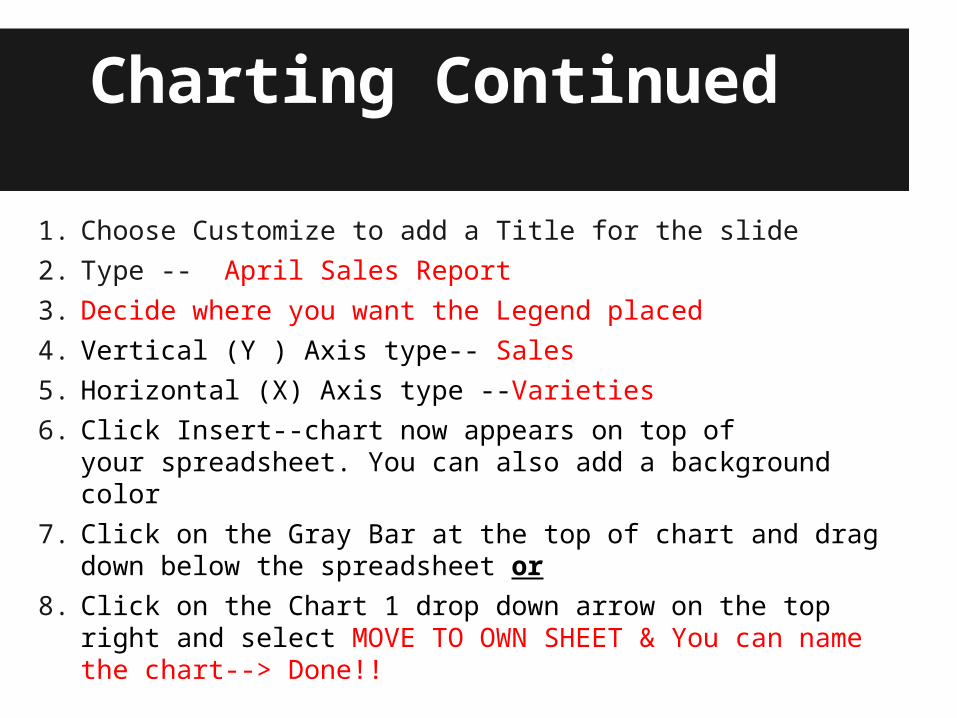
Charting Continued
1. Choose Customize to add a Title for the slide
2. Type -- April Sales Report
3. Decide where you want the Legend placed
4. Vertical (Y ) Axis type-- Sales
5. Horizontal (X) Axis type --Varieties
6. Click Insert--chart now appears on top of your spreadsheet. You can also add a background color
7. Click on the Gray Bar at the top of chart and drag down below the spreadsheet or
8. Click on the Chart 1 drop down arrow on the top right and select MOVE TO OWN SHEET & You can name the chart--> Done!!

Please Note:•When DOWNLOADING a Google Spreadsheet as an Excel file, the chart does not download on certain Browsers. You will have to click SAVE IMAGE in the Upper Right corner of the chart and it will have the extension .png
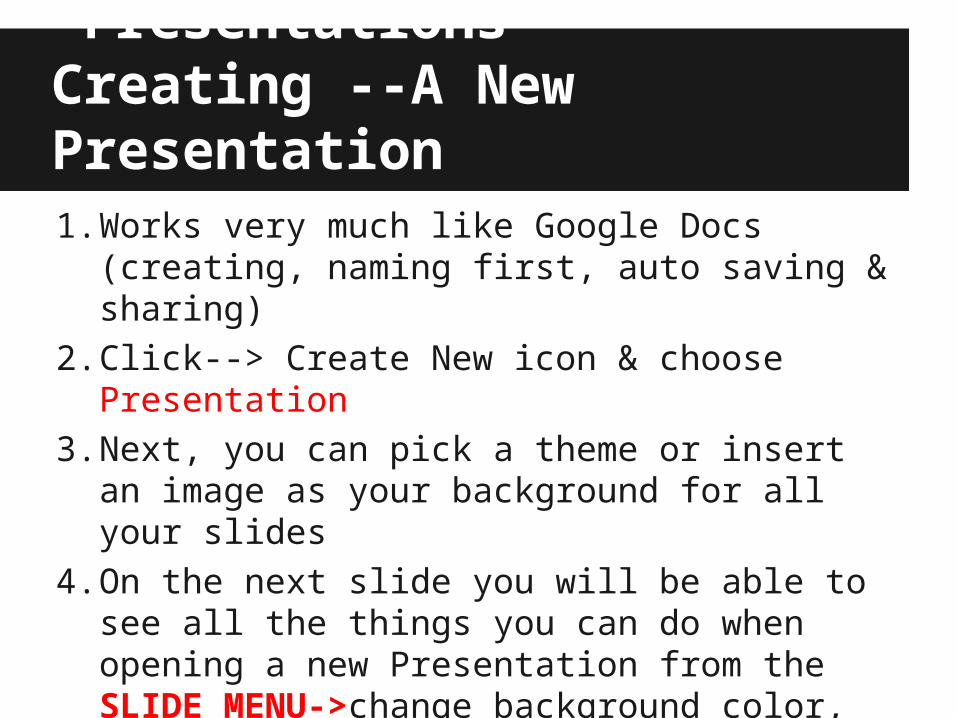
Presentations Creating --A New Presentation1. Works very much like Google Docs (creating,
naming first, auto saving & sharing)
2. Click--> Create New icon & choose Presentation
3. Next, you can pick a theme or insert an image as your background for all your slides
4. On the next slide you will be able to see all the things you can do when opening a new Presentation from the SLIDE MENU->change background color, pick a theme or insert and image
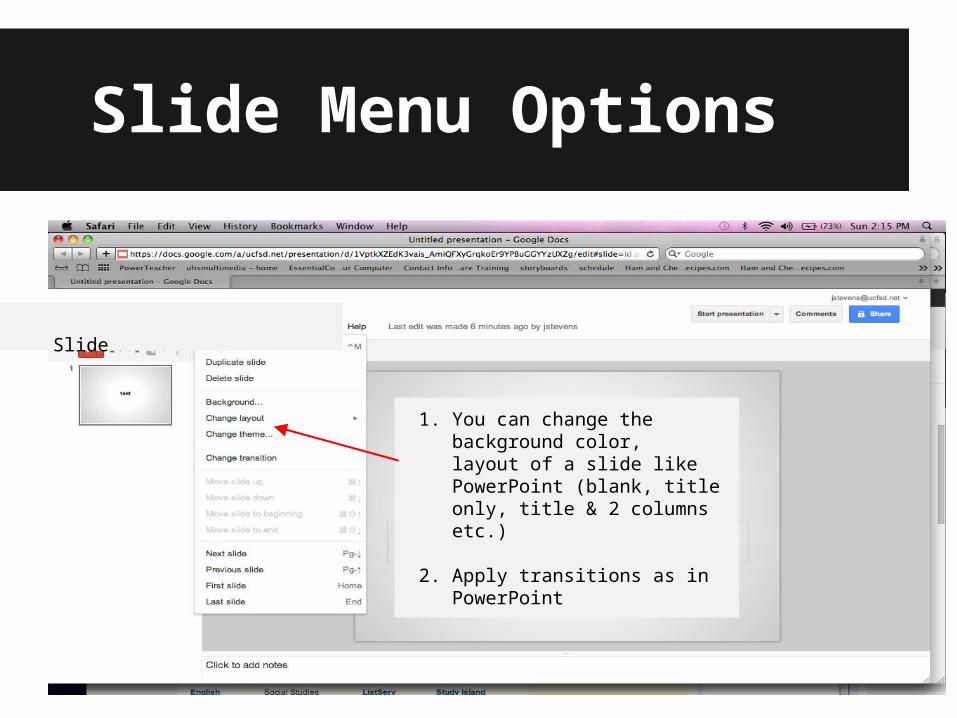
Slide Menu Options
1. You can change the background color, layout of a slide like PowerPoint (blank, title only, title & 2 columns etc.)
2. Apply transitions as in PowerPoint
Slide
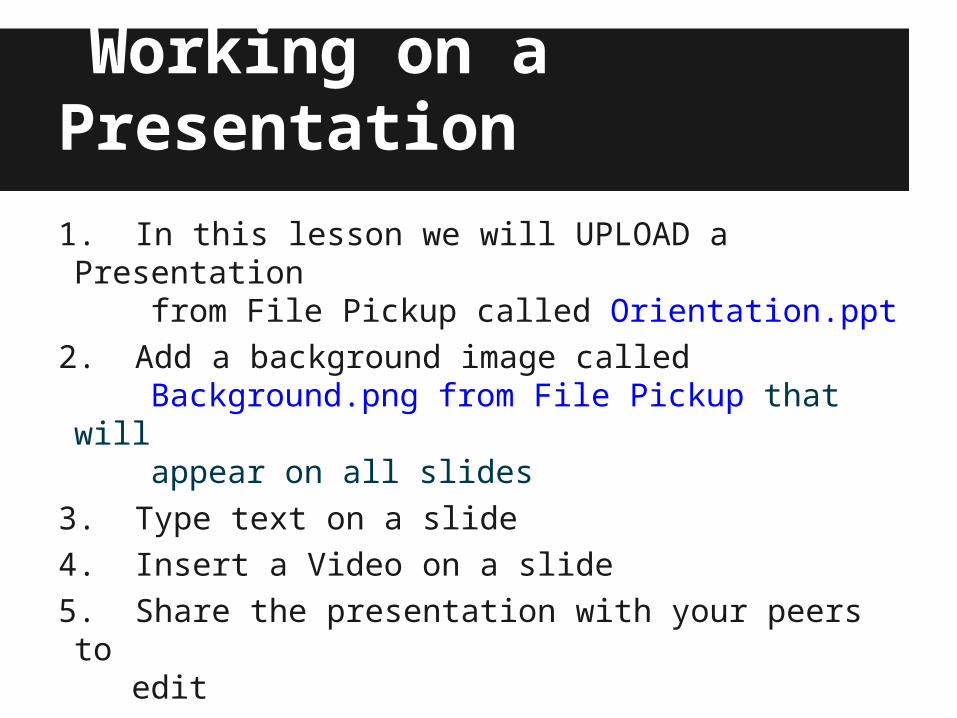
Working on a Presentation
1. In this lesson we will UPLOAD a Presentation from File Pickup called Orientation.ppt
2. Add a background image called Background.png from File Pickup that will appear on all slides
3. Type text on a slide
4. Insert a Video on a slide
5. Share the presentation with your peers to edit
6. Download as a PowerPoint to add all the bells and whistles --so let's begin!!
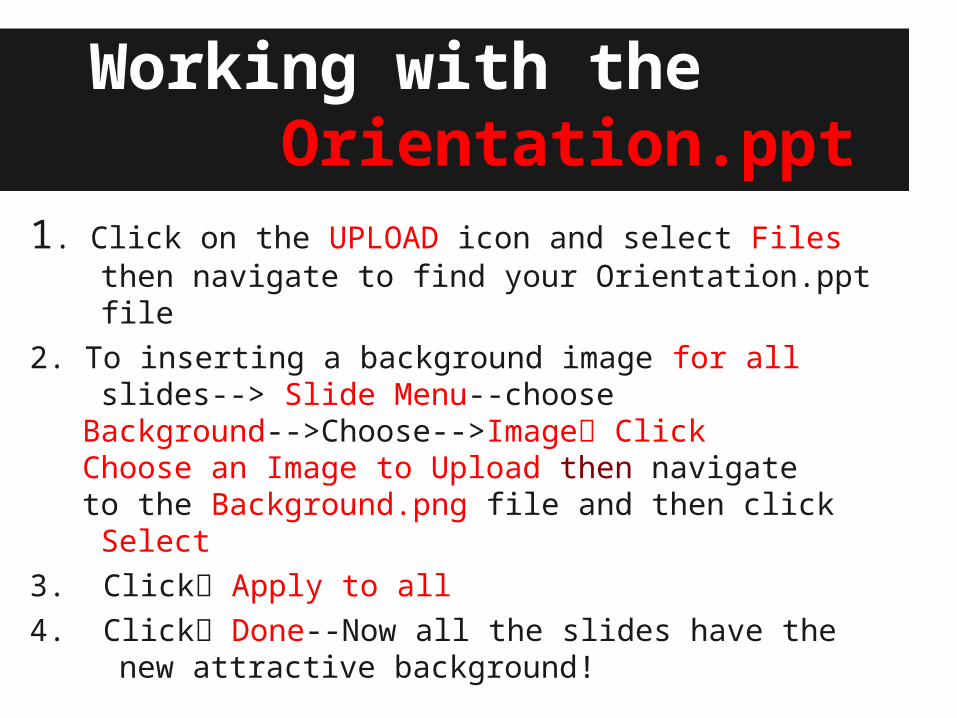
Working with the Orientation.ppt
1. Click on the UPLOAD icon and select Files then navigate to find your Orientation.ppt file
2. To inserting a background image for all slides--> Slide Menu--choose Background-->Choose-->Image Click Choose an Image to Upload then navigate to the Background.png file and then click Select
3. Click Apply to all
4. Click Done--Now all the slides have the new attractive background!
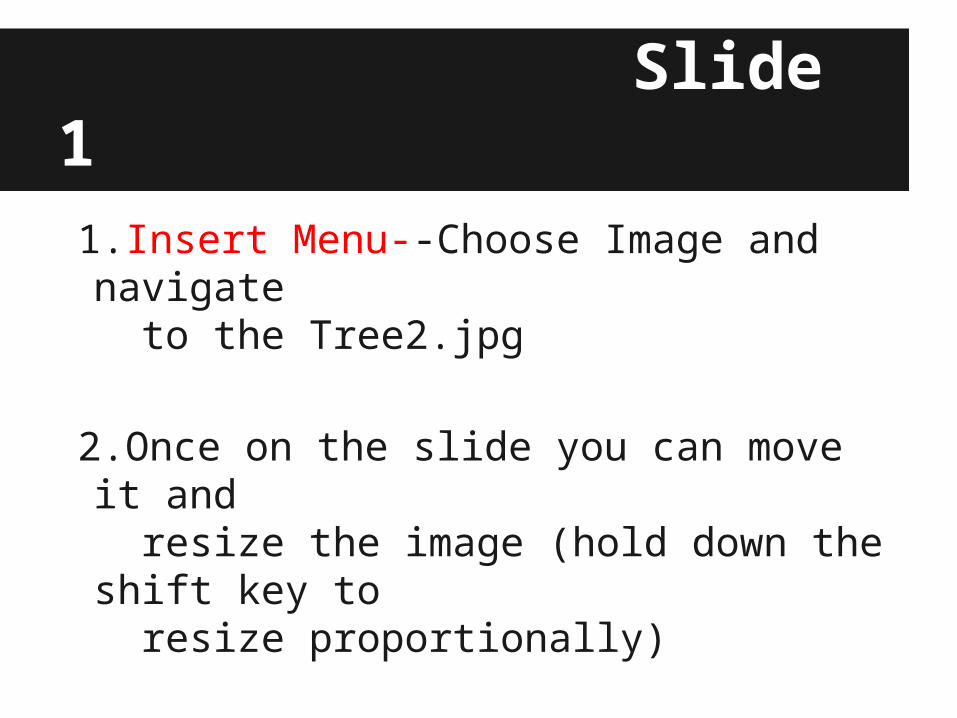
Inserting an Image on Slide 11.Insert Menu--Choose Image and navigate to the Tree2.jpg
2.Once on the slide you can move it and resize the image (hold down the shift key to resize proportionally)
3. Place it attractively on the slide
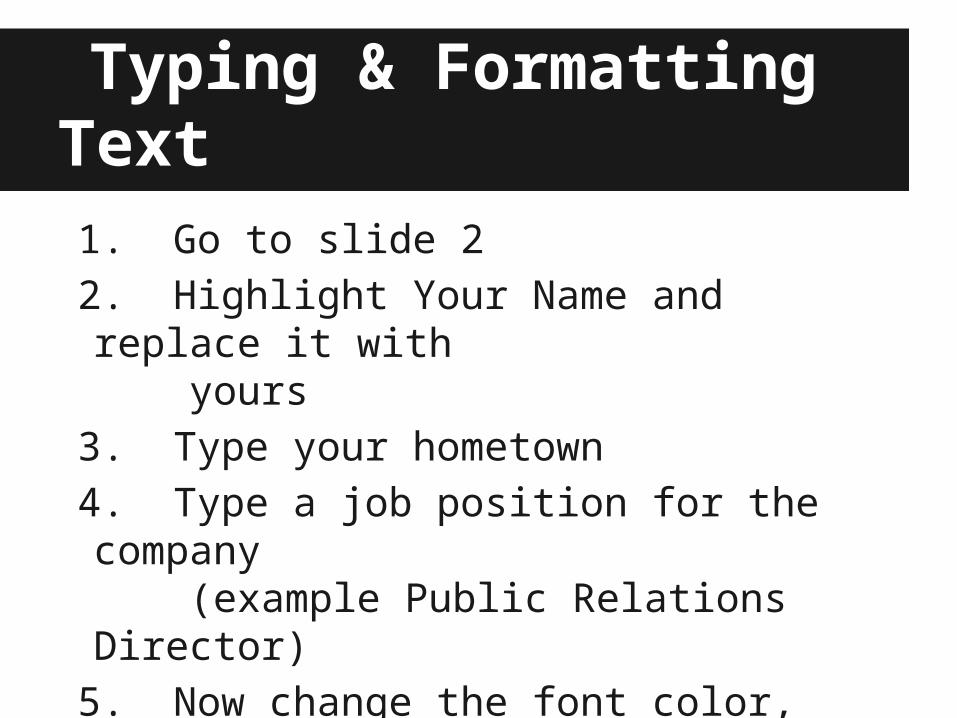
Typing & Formatting Text1. Go to slide 2
2. Highlight Your Name and replace it with yours
3. Type your hometown
4. Type a job position for the company (example Public Relations Director)
5. Now change the font color, size and font style
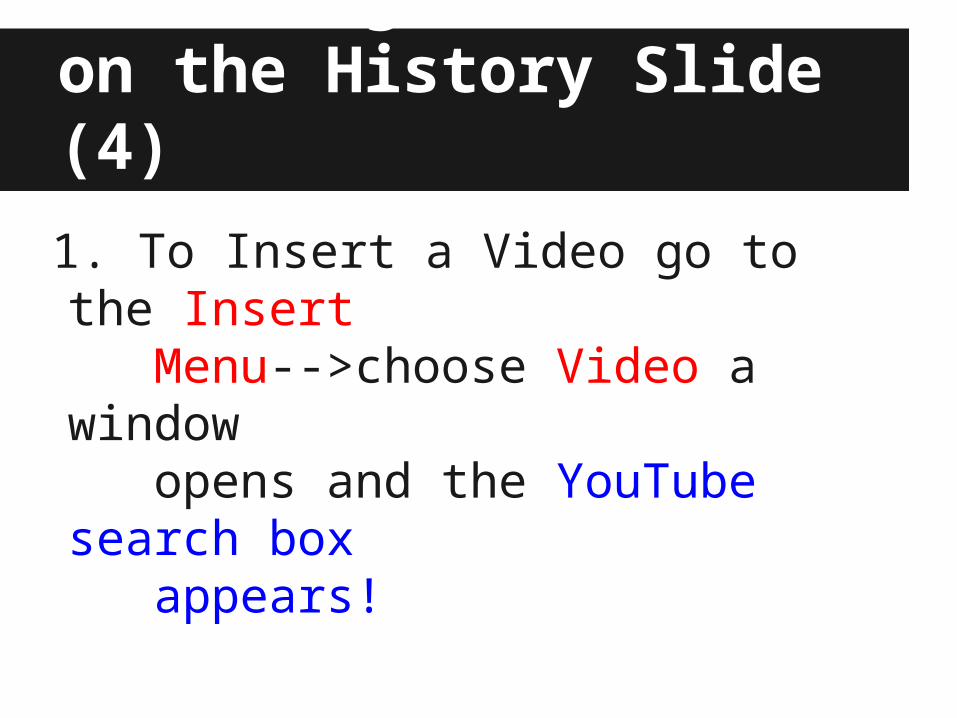
Inserting a Video on the History Slide (4)
1. To Insert a Video go to the Insert Menu-->choose Video a window opens and the YouTube search box appears!
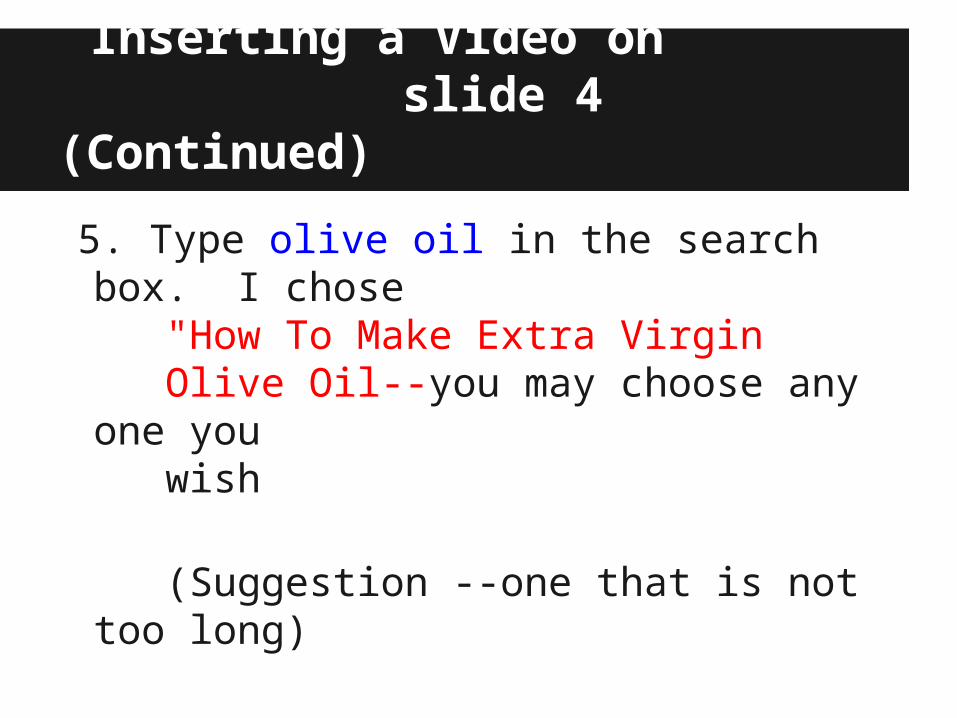
Inserting a Video on slide 4 (Continued)
5. Type olive oil in the search box. I chose "How To Make Extra Virgin Olive Oil--you may choose any one you wish
(Suggestion --one that is not too long)
Please see next slide for an example
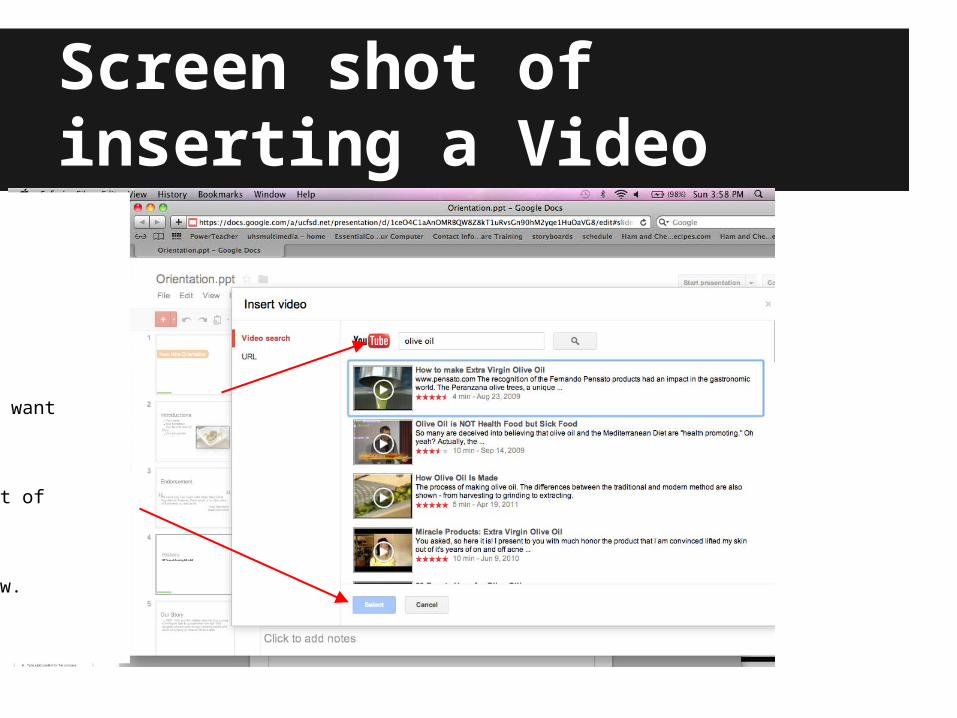
Screen shot of inserting a Video
Type what you want to search here & a list of videos appears below. Click SELECT
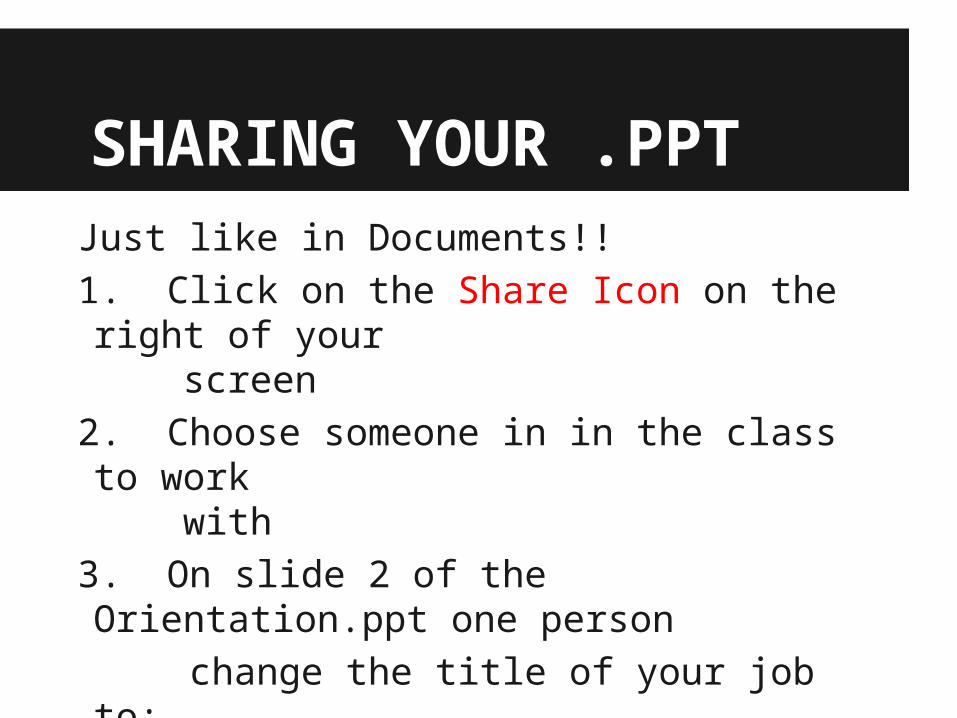
SHARING YOUR .PPTJust like in Documents!!
1. Click on the Share Icon on the right of your screen
2. Choose someone in in the class to work with
3. On slide 2 of the Orientation.ppt one person
change the title of your job to:
Human Resource Director
4. On slide 4 your partner should change History to Click to Play Movie
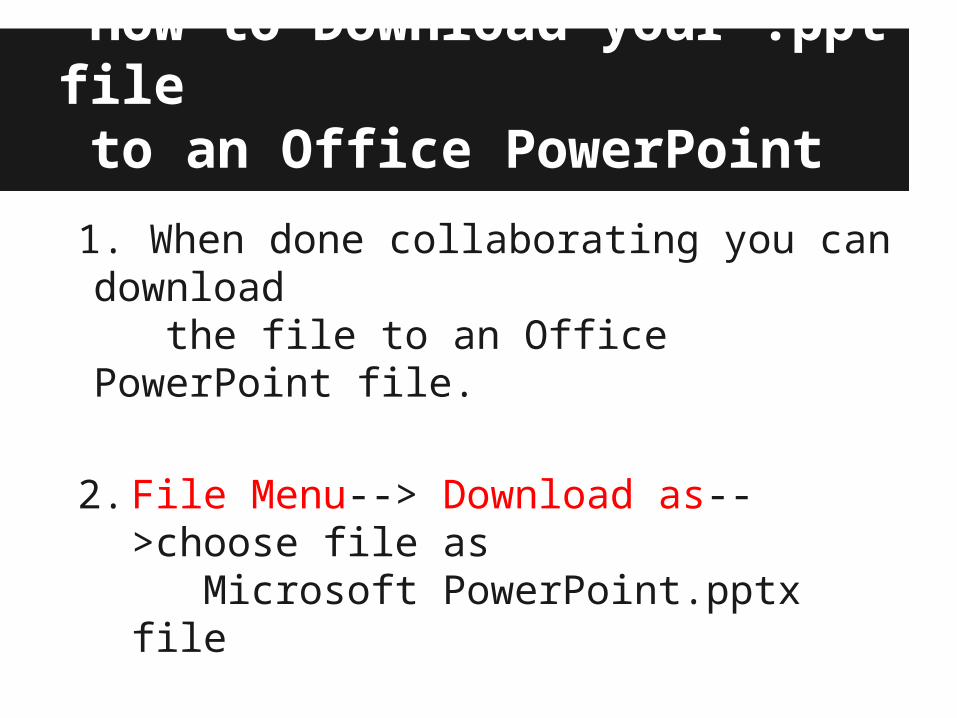
How to Download your .ppt file to an Office PowerPoint
1. When done collaborating you can download the file to an Office PowerPoint file.
2. File Menu--> Download as-->choose file as Microsoft PowerPoint.pptx file
THE END--created by Jean C. Stevens
Computer Applications Dept.