Embed Size (px)
Citation preview
Google Cardboard & Virtual Reality EEC 687 | MOBILE COMPUTING
FINAL REPORT
DECEMBER 5TH, 2016
Jaimal Bhairavia | 2668554
Arpit Patel | 2657673
Supervisor | Dr. Chansu Yu
EEC 687 | FINAL REPORT | PAGE 1
1.0 Introduction
With the rise in the virtual reality paradigm, we were keen on exploring the possibilities
and gaining a firsthand experience of the same. The aim of this project was to fulfill the
above criteria and develop an application on a platform that supported Google
Cardboard and its Software Development kit. We were lucky as we got a chance to
explore the Unity software as we choose it to be the platform for development.
This report presents a detailed explanation of the process of developing the application
that we have named MazedOut, and the learnings of virtual reality, Unity software, and
the Google cardboard Software development kit. All the technical aspects of the project
are covered.
All the issues faced and their solutions are also discussed in the later section of this
report. It has been an indulging process and the world of virtual reality is very
interesting and vast and the possibilities are humungous!
2.0 Virtual Reality
In its mere form, virtual means something which you see but doesn’t exist in real.
Similarly, Virtual reality (VR) is a computer-generated environment that lets you
experience a different reality with different senses like vision, hear, touch and smell in
some cases. It includes simulating user’s physical presence in this virtual environment.
Instead of viewing a screen in front of them, users are immersed and can interact with
3D worlds. VR are displayed either on a computer monitor, a projector screen or in most
cases virtual reality headsets also known as head mounted devices [7]. Virtual reality
has a plethora of areas where it can be applied and used for advancing in them.
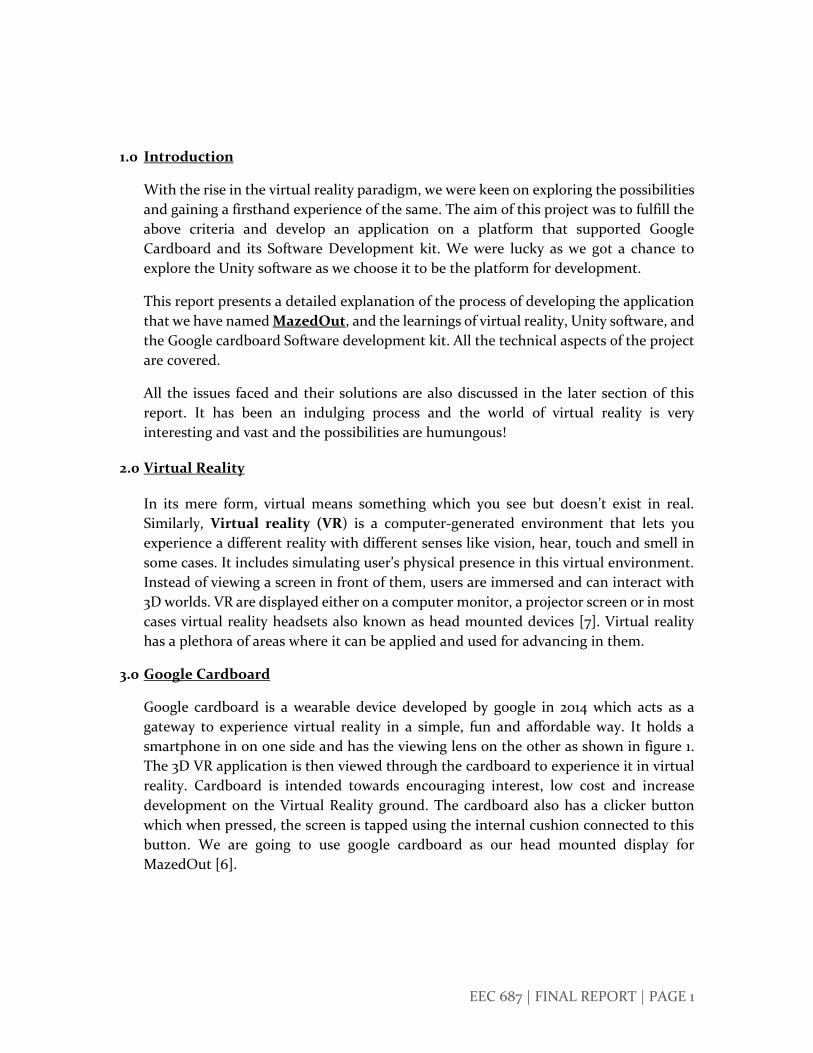
3.0 Google Cardboard
Google cardboard is a wearable device developed by google in 2014 which acts as a
gateway to experience virtual reality in a simple, fun and affordable way. It holds a
smartphone in on one side and has the viewing lens on the other as shown in figure 1.
The 3D VR application is then viewed through the cardboard to experience it in virtual
reality. Cardboard is intended towards encouraging interest, low cost and increase
development on the Virtual Reality ground. The cardboard also has a clicker button
which when pressed, the screen is tapped using the internal cushion connected to this
button. We are going to use google cardboard as our head mounted display for
MazedOut [6].
EEC 687 | FINAL REPORT | PAGE 2
Figure 1: Google cardboard
4.0 Unity and its attributes
Unity is a game engine developed by Unity technologies. It is a cross platform engine
which is used to develop games for consoles, PC, website and mobile devices. Unity is
an advanced software that figures out its settings and properties of the game in
accordance to the platform it is developed for. It also gives the freedom to test and build
the game for multiple platforms. Unity offers 2D & 3D support and hence is vastly used
nowadays. Moreover, the coding for unity components and functions are done in C#
which is an object-oriented programming language. All these attributes made us
shortlist our game development software to Unity as we could put our knowledge and
imagination into a virtual reality while learning and exploring it [1].
5.0 Software Development Kit
A software development kit (SDK) is typically a set of software development tools that
supports the creation of applications for a certain software framework, hardware
platform, computer system, video game console, operating system, or similar
development platform. Google provides distinct development kits for developing VR
application on different platforms: Android, iOS, Unity, Unreal.
5.1 Google Cardboard SDK
As discussed in section 3.0, cardboard is the easiest way to get started with
experiencing virtual reality on an android phone. Also, SDK for Unity is also
available with all documentation about the scripting. Scripting is a vital part of the
game development and will be discussed in the further sections. We’ll see a few
important components of the Google cardboard SDK [5] below
EEC 687 | FINAL REPORT | PAGE 3
5.1.1 SDK Components
5.1.1.1 GVR main
GVR Main is a pre-fabricated component of the SDK that replaces the
normal main camera in the unity project. This prefab contains a script
attached to it which controls the basic VR mode settings. Further, it has
a head object as a child. The head has main camera as a child object with
the stereo controller script attached to it. And the main camera has left
and right stereo eye camera. So GVR Main is the most important
component without which the game cannot function.
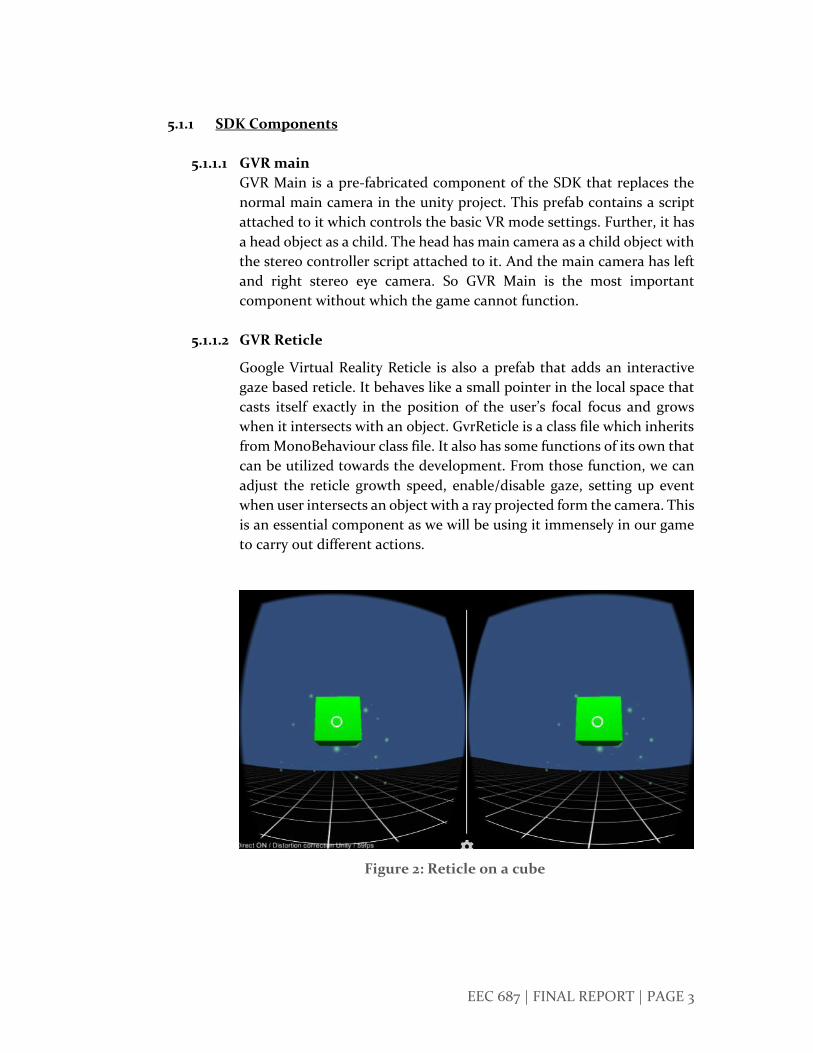
5.1.1.2 GVR Reticle
Google Virtual Reality Reticle is also a prefab that adds an interactive
gaze based reticle. It behaves like a small pointer in the local space that
casts itself exactly in the position of the user’s focal focus and grows
when it intersects with an object. GvrReticle is a class file which inherits
from MonoBehaviour class file. It also has some functions of its own that
can be utilized towards the development. From those function, we can
adjust the reticle growth speed, enable/disable gaze, setting up event
when user intersects an object with a ray projected form the camera. This
is an essential component as we will be using it immensely in our game
to carry out different actions.
Figure 2: Reticle on a cube
EEC 687 | FINAL REPORT | PAGE 4
6.0 MazedOut
We have named our application MazedOut. It is an VR game which revolves around the
concept of the player finding his or her way out of a maze while collecting as many coins as
possible which eventually would increase their score.
6.1 Gameplay
The game starts with the display of a window which has a start button. The player
needs to select this button and click on it which changes the scene and the game
starts. Further, the player navigates through the maze. Since an auto walk feature is
implemented in the game, the player would walk automatically and in case he or
she needs to stop, all that needs to be done is to look at the ground. The maze has a
total of 40 coins’ places randomly. The players must collect as many coins as possible
before they exit the maze. To collect the coin, they need to locate it and click on
them twice, as soon as it seen irrespective of the distance and once more when the
player is in close proximity of the coin. The feature on clicking twice is done on
purpose to give the player the feel of virtual reality of the coins. Each coin is worth
10 points. Hence the final score is calculated according the number of coins
collected. After the player finds the exit gate and walks through it, the game ends
and the final score is displayed with two other options on the Scoreboard. Restart
and exit are the options. Restart button would lead to restarting the game all over
again from the same start point in the maze. Exit button would simply exit the
application.
6.2 Features
The main features of MazedOut are as follows:
Gameplay Instructions on the main menu
Auto Walk of the player
Stopping by looking at the ground
Coins change color to green on first click
Coins collected and score updated on second click
3 scenes interfaced to create main menu and scoreboard
Final score displayed on the scoreboard
Game restarts when restart option selected
6.3 Development Phases
This section covers an overview of MazedOut during its development phases. We
have bifurcated them into 4 major phases. They are briefly discussed below
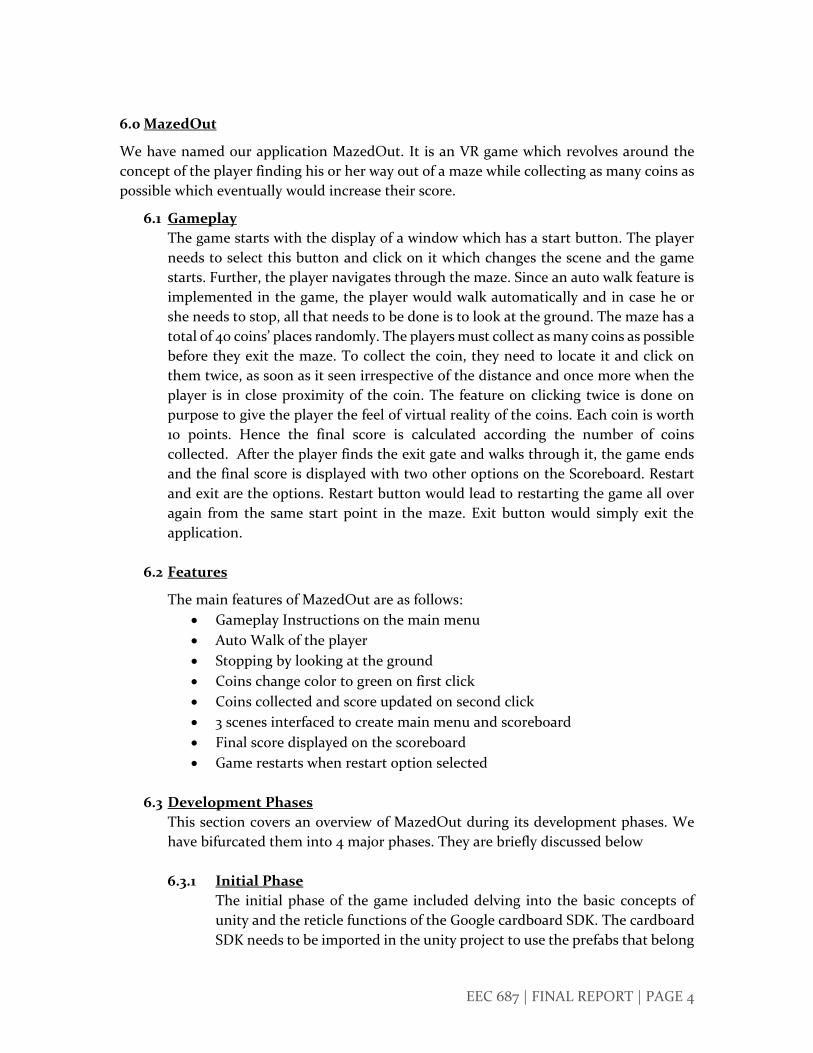
6.3.1 Initial Phase
The initial phase of the game included delving into the basic concepts of
unity and the reticle functions of the Google cardboard SDK. The cardboard
SDK needs to be imported in the unity project to use the prefabs that belong
EEC 687 | FINAL REPORT | PAGE 5
to it. As discussed above, GVR Reticle is one of them. We tried to create a
project with a set of cubes that changed color while a pointer click was
detected on them. The click event and actions taken on them were
configured. The project and the game window for this project are as follows:
Figure 3.a: Project window
Figure 3.b: Game window
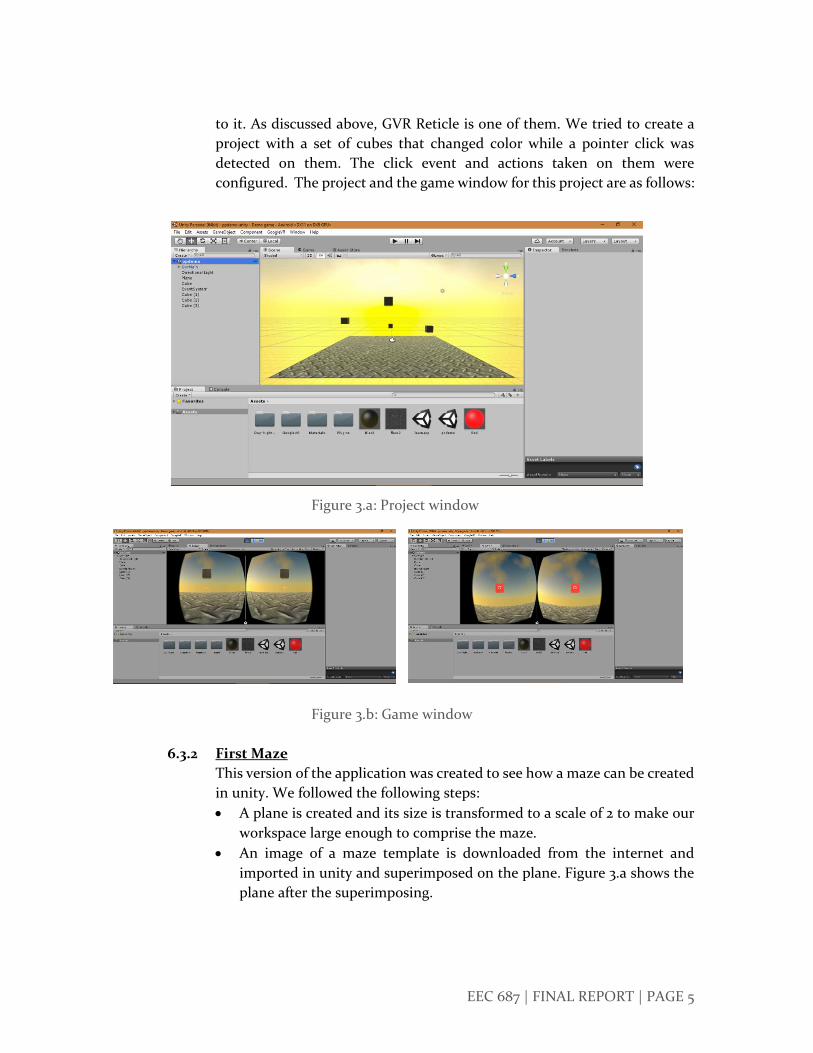
6.3.2 First Maze
This version of the application was created to see how a maze can be created
in unity. We followed the following steps:
A plane is created and its size is transformed to a scale of 2 to make our
workspace large enough to comprise the maze.
An image of a maze template is downloaded from the internet and
imported in unity and superimposed on the plane. Figure 3.a shows the
plane after the superimposing.
EEC 687 | FINAL REPORT | PAGE 6
Figure 4.a: Plane in the project window
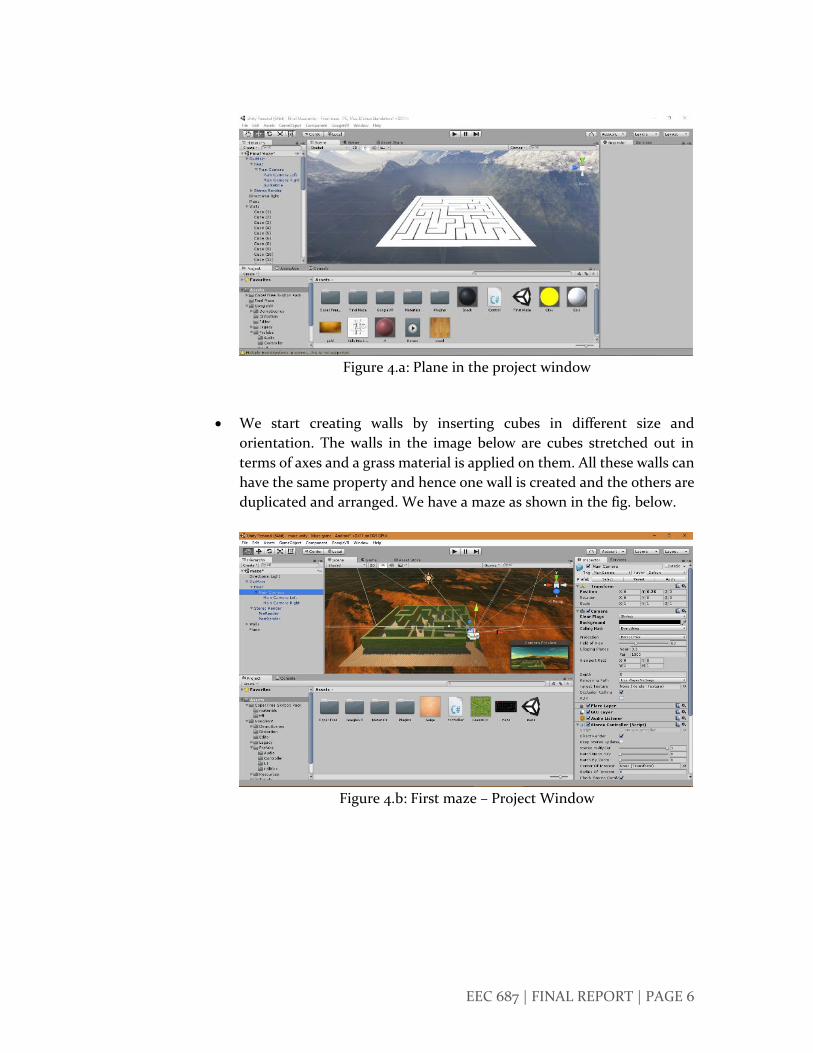
We start creating walls by inserting cubes in different size and
orientation. The walls in the image below are cubes stretched out in
terms of axes and a grass material is applied on them. All these walls can
have the same property and hence one wall is created and the others are
duplicated and arranged. We have a maze as shown in the fig. below.
Figure 4.b: First maze – Project Window
EEC 687 | FINAL REPORT | PAGE 7
Figure 4.c: First maze – Game window
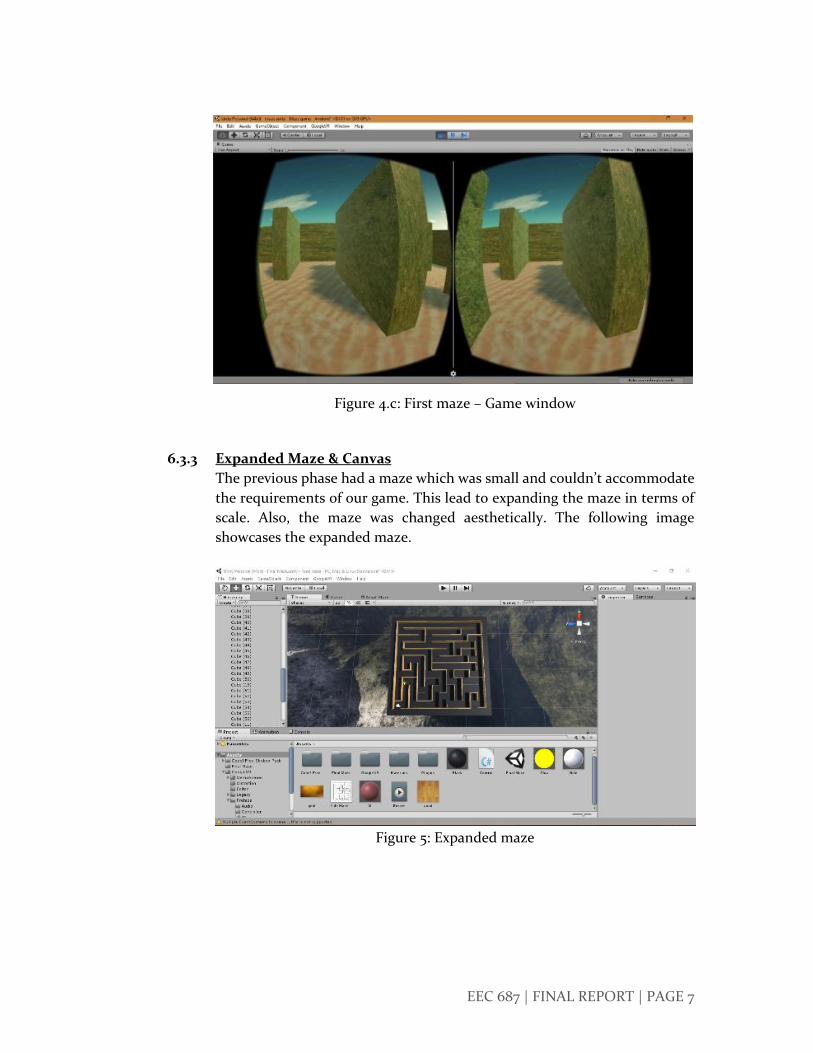
6.3.3 Expanded Maze & Canvas
The previous phase had a maze which was small and couldn’t accommodate
the requirements of our game. This lead to expanding the maze in terms of
scale. Also, the maze was changed aesthetically. The following image
showcases the expanded maze.
Figure 5: Expanded maze

EEC 687 | FINAL REPORT | PAGE 8
Another development under this phase was implementing the canvas and its
attributes. We studied the properties of the canvas and designed one to be
used as a scoreboard for our game. Buttons, Text, and images were added to
the canvas to create the scoreboard.
Figure 6: Scoreboard Canvas
6.3.4 Final Maze with coins
The final version of the game saw the modification of the expanded maze
with the addition of coins and the display of number of coins in the game. A
total of 40 coins were added. The coins’ count is updated whenever a coin is
picked up. An image of the maze with the coins is shown below. The yellow
objects represent the coins:
Figure 7: Maze with coins

EEC 687 | FINAL REPORT | PAGE 9
Also, the scoreboard canvas was aesthetically modified in terms of fonts and
colors of the buttons. An image is shown to show that.
Figure 8: Modified Scoreboard
7.0 Scripts and Scripting in Unity
Scripting is the most integral part of the Unity. Developers can create any and every
kind of function through scripts. Every function, irrespective of it being predefined or
developer defined, is always created in terms of scripts coded in C#. There is one main
script which controls overall behavior of the game. When we create a new script, two
libraries: UnityEngine and System.Collections and two functions: Start() and Update,
are automatically implemented. The libraries include some essential predefined
functions. Start function returns nothing, but is used for initializing variables and
GameObjects which will be used later in the script. Update function works in a different
way, it is called on every frame [2]. Explaining this, in unity, the frame per second (FPS)
is 60 by default. This means that the motion in the application is calculated per the
frame rate. Hence, any object that needs to considered for further actions, they can be
addressed in the update function. In MazedOut, we have used this functionality to move
gameplayer in direction of his focal direction. Update function is called 80 times per
second because the FPS is 80.
EEC 687 | FINAL REPORT | PAGE 10
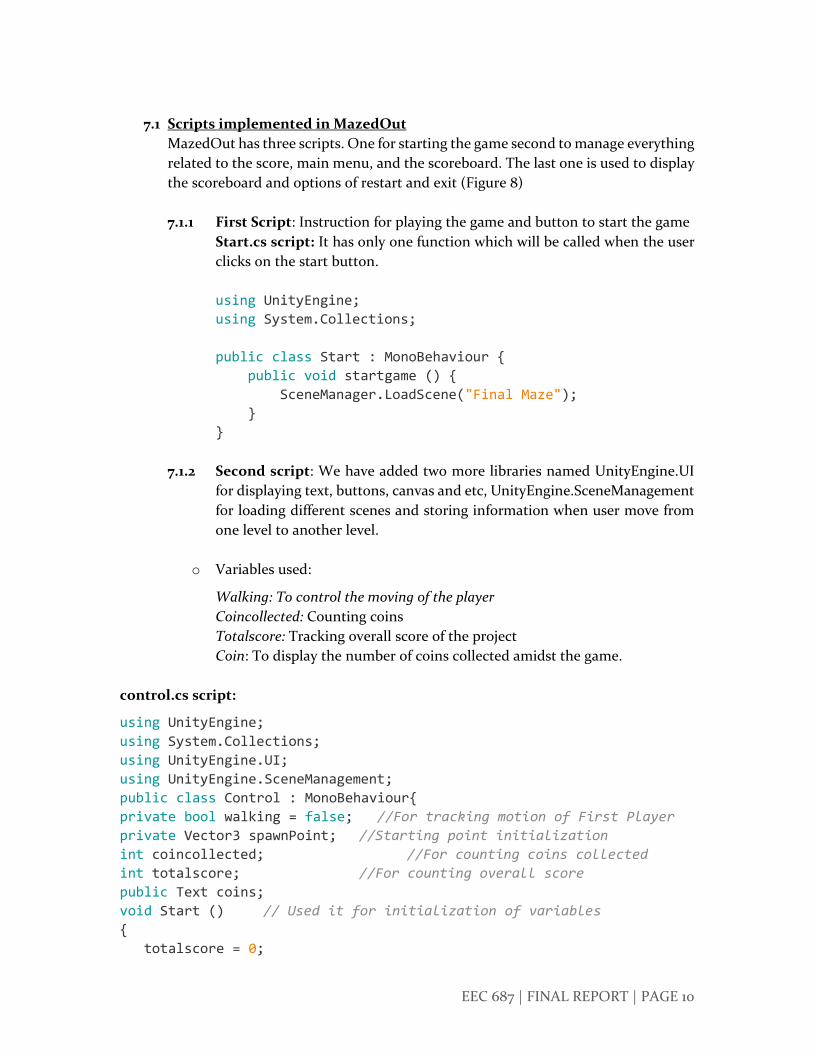
7.1 Scripts implemented in MazedOut
MazedOut has three scripts. One for starting the game second to manage everything
related to the score, main menu, and the scoreboard. The last one is used to display
the scoreboard and options of restart and exit (Figure 8)
7.1.1 First Script: Instruction for playing the game and button to start the game
Start.cs script: It has only one function which will be called when the user
clicks on the start button.
using UnityEngine;
using System.Collections;
public class Start : MonoBehaviour {
public void startgame () {
SceneManager.LoadScene("Final Maze");
}
}
7.1.2 Second script: We have added two more libraries named UnityEngine.UI
for displaying text, buttons, canvas and etc, UnityEngine.SceneManagement
for loading different scenes and storing information when user move from
one level to another level.
o Variables used:
Walking: To control the moving of the player
Coincollected: Counting coins
Totalscore: Tracking overall score of the project
Coin: To display the number of coins collected amidst the game.
control.cs script:
using UnityEngine;
using System.Collections;
using UnityEngine.UI;
using UnityEngine.SceneManagement;
public class Control : MonoBehaviour{
private bool walking = false; //For tracking motion of First Player
private Vector3 spawnPoint; //Starting point initialization
int coincollected; //For counting coins collected
int totalscore; //For counting overall score
public Text coins;
void Start () // Used it for initialization of variables
{
totalscore = 0;
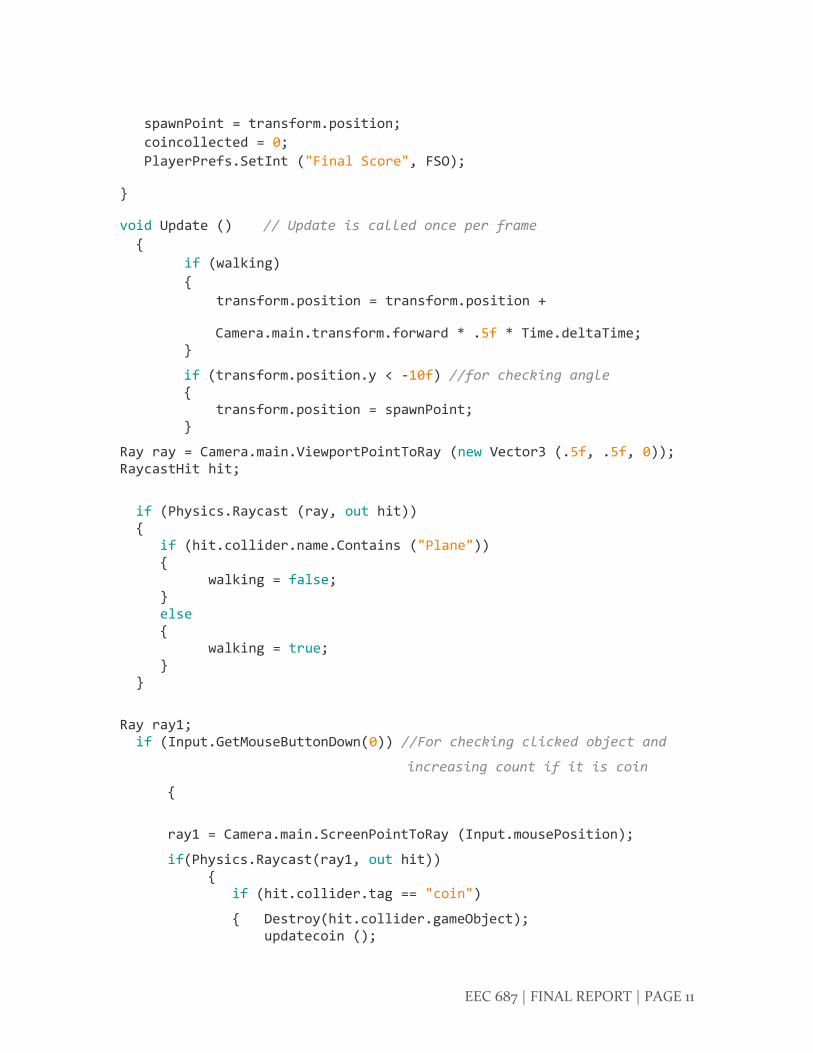
EEC 687 | FINAL REPORT | PAGE 11
spawnPoint = transform.position;
coincollected = 0;
PlayerPrefs.SetInt ("Final Score", FSO);
}
void Update () // Update is called once per frame
{
if (walking)
{
transform.position = transform.position +
Camera.main.transform.forward * .5f * Time.deltaTime; }
if (transform.position.y < -10f) //for checking angle { transform.position = spawnPoint; }
Ray ray = Camera.main.ViewportPointToRay (new Vector3 (.5f, .5f, 0)); RaycastHit hit;
if (Physics.Raycast (ray, out hit)) { if (hit.collider.name.Contains ("Plane")) { walking = false; } else { walking = true; } }
Ray ray1; if (Input.GetMouseButtonDown(0)) //For checking clicked object and
increasing count if it is coin
{
ray1 = Camera.main.ScreenPointToRay (Input.mousePosition);
if(Physics.Raycast(ray1, out hit)) { if (hit.collider.tag == "coin")
{ Destroy(hit.collider.gameObject); updatecoin ();
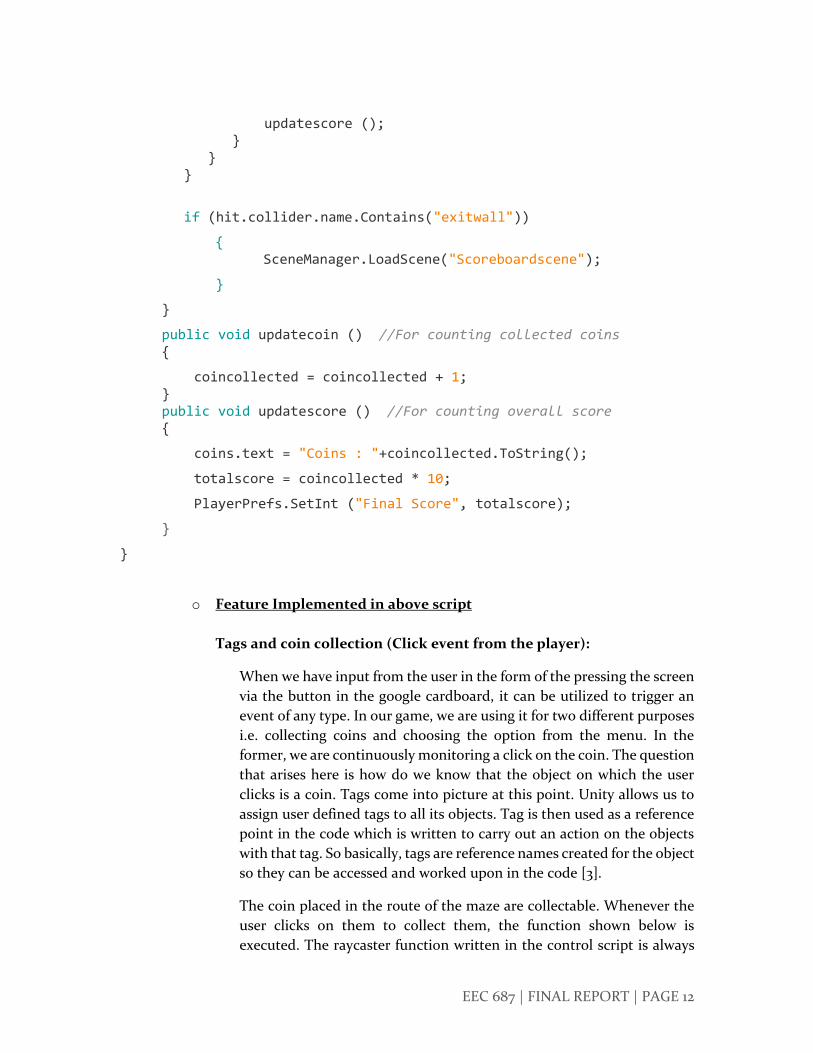
EEC 687 | FINAL REPORT | PAGE 12
updatescore (); } } }
if (hit.collider.name.Contains("exitwall"))
{ SceneManager.LoadScene("Scoreboardscene");
}
}
public void updatecoin () //For counting collected coins {
coincollected = coincollected + 1; } public void updatescore () //For counting overall score {
coins.text = "Coins : "+coincollected.ToString();
totalscore = coincollected * 10;
PlayerPrefs.SetInt ("Final Score", totalscore);
}
}
o Feature Implemented in above script
Tags and coin collection (Click event from the player):
When we have input from the user in the form of the pressing the screen
via the button in the google cardboard, it can be utilized to trigger an
event of any type. In our game, we are using it for two different purposes
i.e. collecting coins and choosing the option from the menu. In the
former, we are continuously monitoring a click on the coin. The question
that arises here is how do we know that the object on which the user
clicks is a coin. Tags come into picture at this point. Unity allows us to
assign user defined tags to all its objects. Tag is then used as a reference
point in the code which is written to carry out an action on the objects
with that tag. So basically, tags are reference names created for the object
so they can be accessed and worked upon in the code [3].
The coin placed in the route of the maze are collectable. Whenever the
user clicks on them to collect them, the function shown below is
executed. The raycaster function written in the control script is always
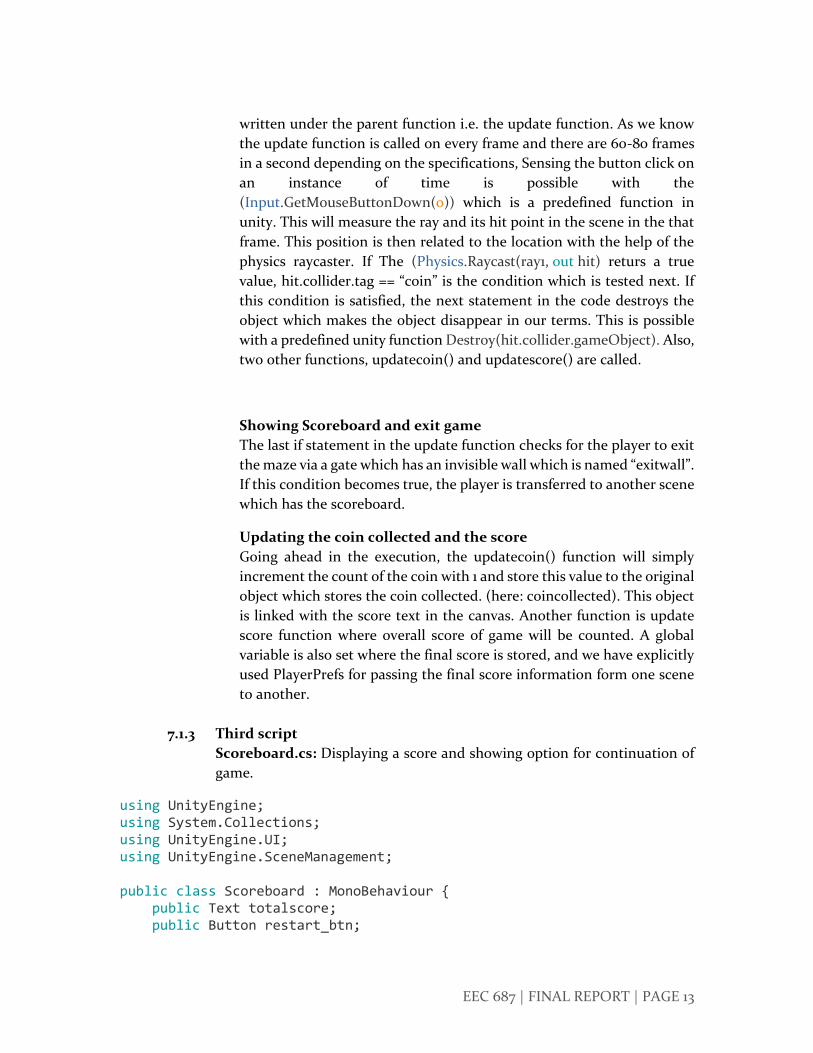
EEC 687 | FINAL REPORT | PAGE 13
written under the parent function i.e. the update function. As we know
the update function is called on every frame and there are 60-80 frames
in a second depending on the specifications, Sensing the button click on
an instance of time is possible with the
(Input.GetMouseButtonDown(0)) which is a predefined function in
unity. This will measure the ray and its hit point in the scene in the that
frame. This position is then related to the location with the help of the
physics raycaster. If The (Physics.Raycast(ray1, out hit) returs a true
value, hit.collider.tag == “coin” is the condition which is tested next. If
this condition is satisfied, the next statement in the code destroys the
object which makes the object disappear in our terms. This is possible
with a predefined unity function Destroy(hit.collider.gameObject). Also,
two other functions, updatecoin() and updatescore() are called.
Showing Scoreboard and exit game
The last if statement in the update function checks for the player to exit
the maze via a gate which has an invisible wall which is named “exitwall”.
If this condition becomes true, the player is transferred to another scene
which has the scoreboard.
Updating the coin collected and the score
Going ahead in the execution, the updatecoin() function will simply
increment the count of the coin with 1 and store this value to the original
object which stores the coin collected. (here: coincollected). This object
is linked with the score text in the canvas. Another function is update
score function where overall score of game will be counted. A global
variable is also set where the final score is stored, and we have explicitly
used PlayerPrefs for passing the final score information form one scene
to another.
7.1.3 Third script
Scoreboard.cs: Displaying a score and showing option for continuation of
game.
using UnityEngine; using System.Collections; using UnityEngine.UI; using UnityEngine.SceneManagement; public class Scoreboard : MonoBehaviour { public Text totalscore; public Button restart_btn;
EEC 687 | FINAL REPORT | PAGE 14
public Button exit_btn; void Start () //For getting score from previous level
{ totalscore.text = PlayerPrefs.GetInt ("Final Score").ToString(); } public void restart () //For restarting game
{ SceneManager.LoadScene("Final Maze"); } public void quit () //To exit game
{ Application.Quit (); } }
In this script, we have used same libraries with UI objects such as Texts and
Buttons. Two main function are restart for restarting the game and quit for
exiting the game. Figure 8 represents the canvas where these functions are
used.
7.2 Linking the objects in the script with the objects in unity
This is a mandatory step in making the actual script work. After a script is ready to
be used with the project, it needs to be added to the project. After adding it, all the
objects in the project which would have a function attached to them must be linked
with the script so that unity knows what objects are referred to in the script. An
example to explain this procedure is shown in figure 7. The fields on the right are
the ones in the scripts. They represent functions, texts, and buttons. The Final score
is the text in the canvas scoreboard. Hence, it will be linked to the text from that
canvas. This is shown with arrows. Similarly, all the functions are assigned specific
objects that are required. In case this is not done before running the project, the
project wouldn’t work in the manner desired. Specifically, expected functions on an
event would not occur.
EEC 687 | FINAL REPORT | PAGE 15
8.0 Issues encountered during development and their solutions
As every project development procedure encounters a fair share of problems to achieve
the desired, similarly we came across a few problems that are talked about below. The
solutions to the problem are also discussed.
Reticle function, we couldn’t make it work correctly until we created an event
system and then a gaze input module to detect the collision and take an action if
any event occurred.
Stopping when looking at the ground. It seemed easy in the beginning but the script
had to be adjusted per the coordinates of the ground.
Another problem that persisted the longest was exporting the application onto the
device. Since it was a technical issue, we tried a list of different things. We tried
using different devices with the same OS version. But that dint work. So, we tried a
device with a higher android OS version (5.0). For some reason, the performance of
the app was not as desired on this version. Finally, we could export it in a device
working on marshmallow (Android 6.0). We tried playing the game on 2 different
devices with the 6.0 OS and it worked completely fine.
Making the game object opaque. This was an issue which had to be fixed for the
maze to look like a real structure. It was solved by changing the properties of the
camera. The clipping space for near and far objects were adjusted to 0.01 and 1000
respectively. This changes solved our problem successfully.
Ending the game. We tried different ways to detect the instant when the player exits
the maze. The solution was easy but overlooked. We created a wall and disabled the
mesh render which made the wall invisible. The box collider was monitored for an
event and if it occurred, we knew the game ended. The display was changed to the
scene with the scoreboard.
The canvas brought in a list of problems with it. Making the main menu and the
scoreboard canvas appear before and after the game was a task. Even though we
could capture an event, the display dint switch to the canvas. We created two
different scenes. One for the start and one for the end of the game. And we changed
the scenes via the scripts to achieve our desired functionality.
The value of the score was being fetched and stored correctly to be displayed in the
final scoreboard. We used PlayerPrefs to store and recall the value.
9.0 References
1. https://en.wikipedia.org/wiki/Unity_(game_engine)
2. https://docs.unity3d.com/Manual/ScriptingSection.html
3. https://docs.unity3d.com/Manual/Tags.html
4. https://docs.unity3d.com/Manual/UnityManual.html
5. https://developers.google.com/vr/unity/
6. https://vr.google.com/cardboard/
7. https://en.wikipedia.org/wiki/Virtual_reality


![Works with Google Cardboardstatic.googleusercontent.com/media/...with Google Cardboard,” or “[device] works on Google Cardboard”. Use the title case for “Works with Google](https://img.pdfslide.us/doc/110x75/5e93f8efb275df6a6202d3f8/works-with-google-with-google-cardboarda-or-aoedevice-works-on-google-cardboarda.jpg)