Embed Size (px)
Citation preview
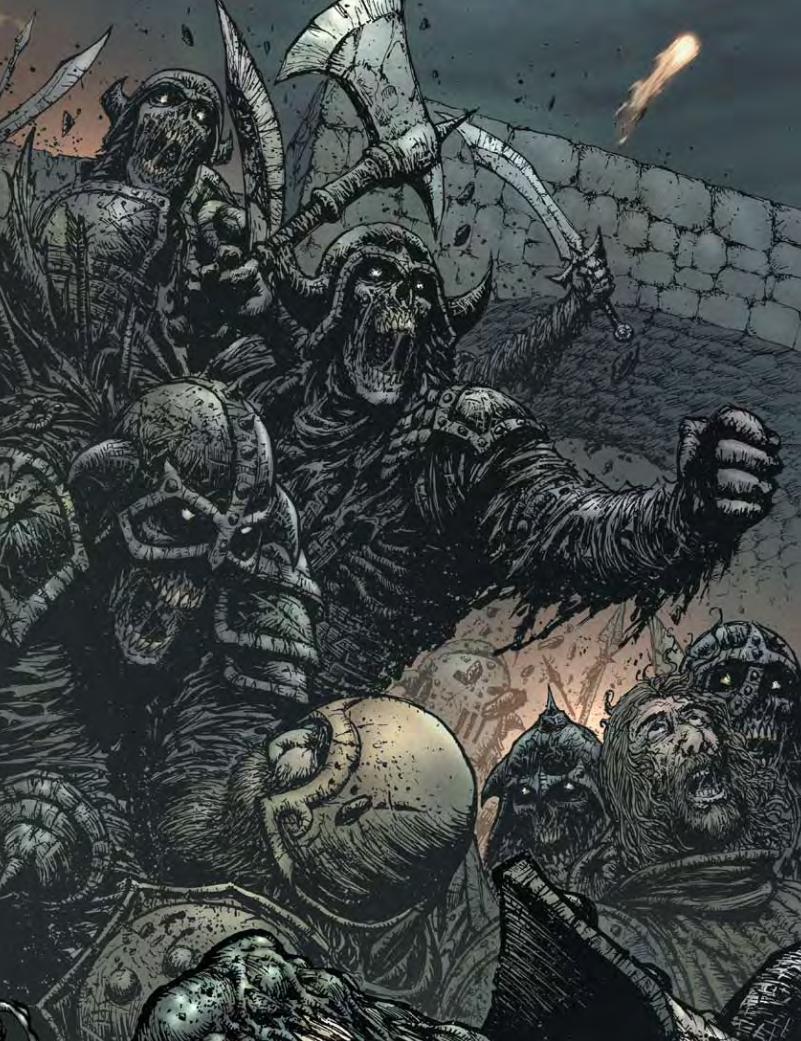
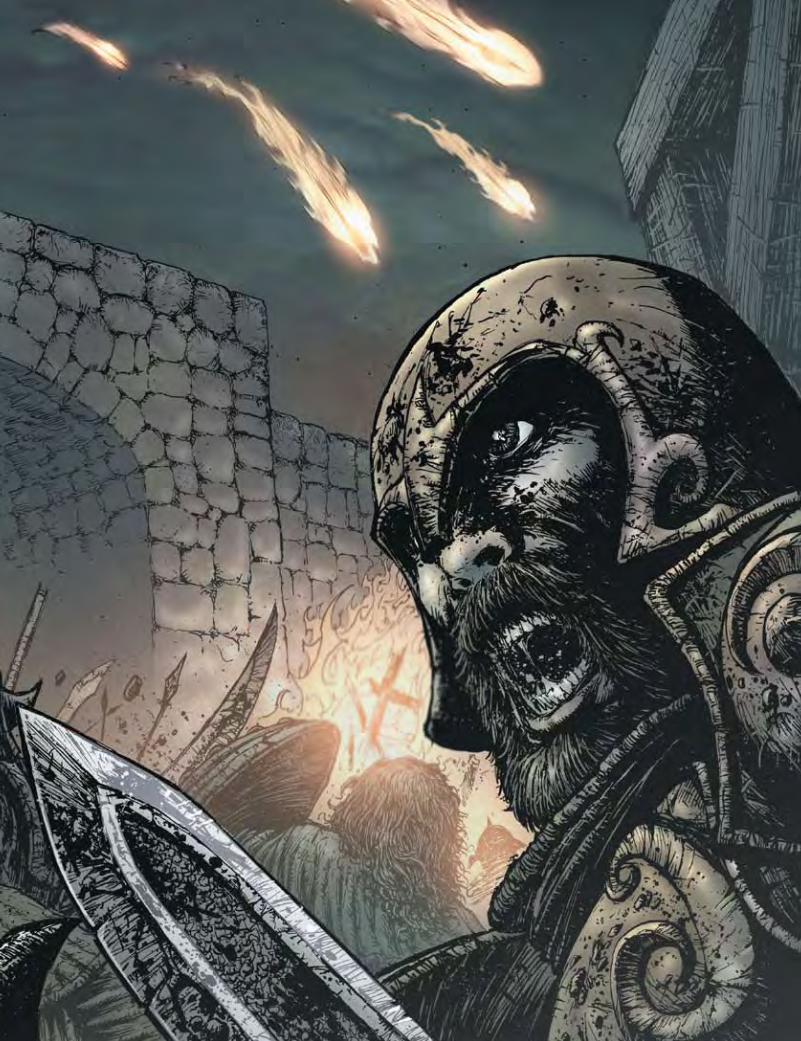
Death stalks the lands of Iparsia.
Mirahan, Destroyer of Worlds, is reborn, unleashingan army of undead warriors. Citadels fall beneath
the march of iron as entire kingdoms are laid to waste.The hope for salvation rests on an unlikely band of heroes
discovering the ancient secret of the druids:
The Death Dealer.
An epic adventure of dark fantasy, magic, and horror, Shadows of Mirahan brings the savage world of Frank Frazetta’s Death Dealer
to life with setting details, rules variants, and pre-generated characters. When the armies of good have all fallen, and the last citadel burns in the night, will your heroes have the courage to
rise against the shadows of Mirahan?
A 4E adventure for level 7–9 characters.
GMG5
371
$9.99
GOODMAN GAMESGMG5371
DEATHDEALER: SHADOWS OF MIRAHAN
Shadows of Mirahan
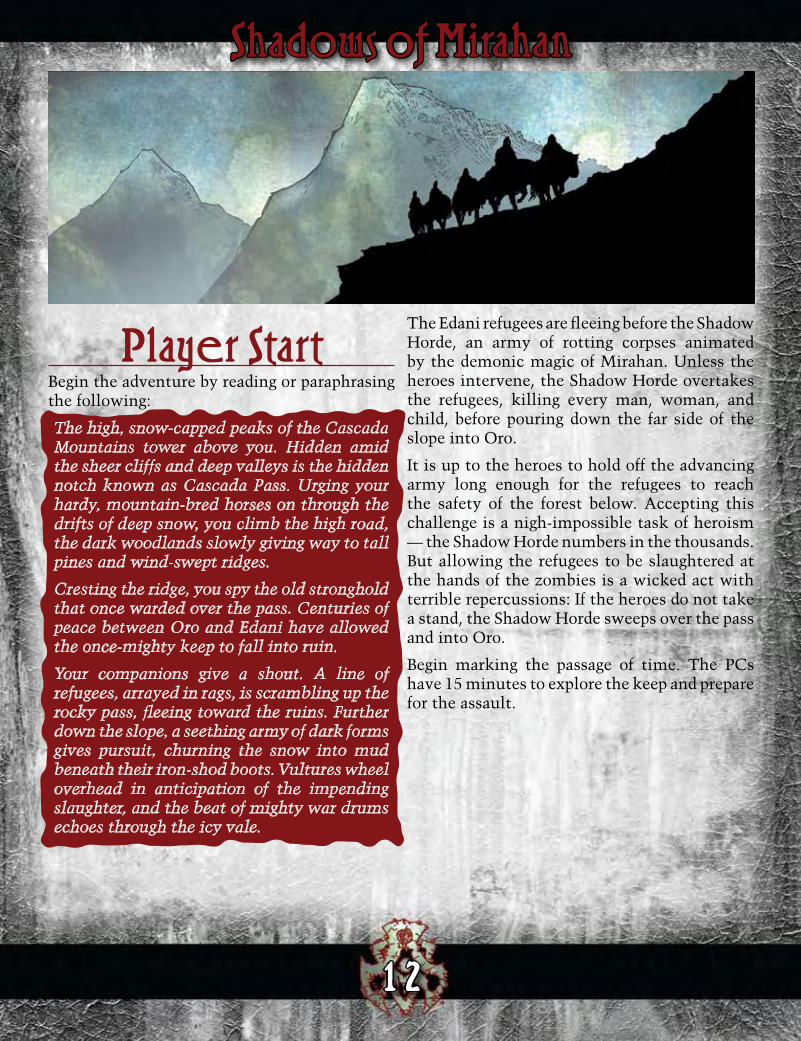
Player StartBegin the adventure by reading or paraphrasing the following:
The high, snow-capped peaks of the Cascada Mountains tower above you. Hidden amid the sheer cliffs and deep valleys is the hidden notch known as Cascada Pass. Urging your hardy, mountain-bred horses on through the drifts of deep snow, you climb the high road, the dark woodlands slowly giving way to tall pines and wind-swept ridges.
Cresting the ridge, you spy the old stronghold that once warded over the pass. Centuries of peace between Oro and Edani have allowed the once-mighty keep to fall into ruin.
Your companions give a shout. A line of refugees, arrayed in rags, is scrambling up the rocky pass, fleeing toward the ruins. Further down the slope, a seething army of dark forms gives pursuit, churning the snow into mud beneath their iron-shod boots. Vultures wheel overhead in anticipation of the impending slaughter, and the beat of mighty war drums echoes through the icy vale.
The Edani refugees are fleeing before the Shadow Horde, an army of rotting corpses animated by the demonic magic of Mirahan. Unless the heroes intervene, the Shadow Horde overtakes the refugees, killing every man, woman, and child, before pouring down the far side of the slope into Oro.
It is up to the heroes to hold off the advancing army long enough for the refugees to reach the safety of the forest below. Accepting this challenge is a nigh-impossible task of heroism — the Shadow Horde numbers in the thousands. But allowing the refugees to be slaughtered at the hands of the zombies is a wicked act with terrible repercussions: If the heroes do not take a stand, the Shadow Horde sweeps over the pass and into Oro.
Begin marking the passage of time. The PCs have 15 minutes to explore the keep and prepare for the assault.
12
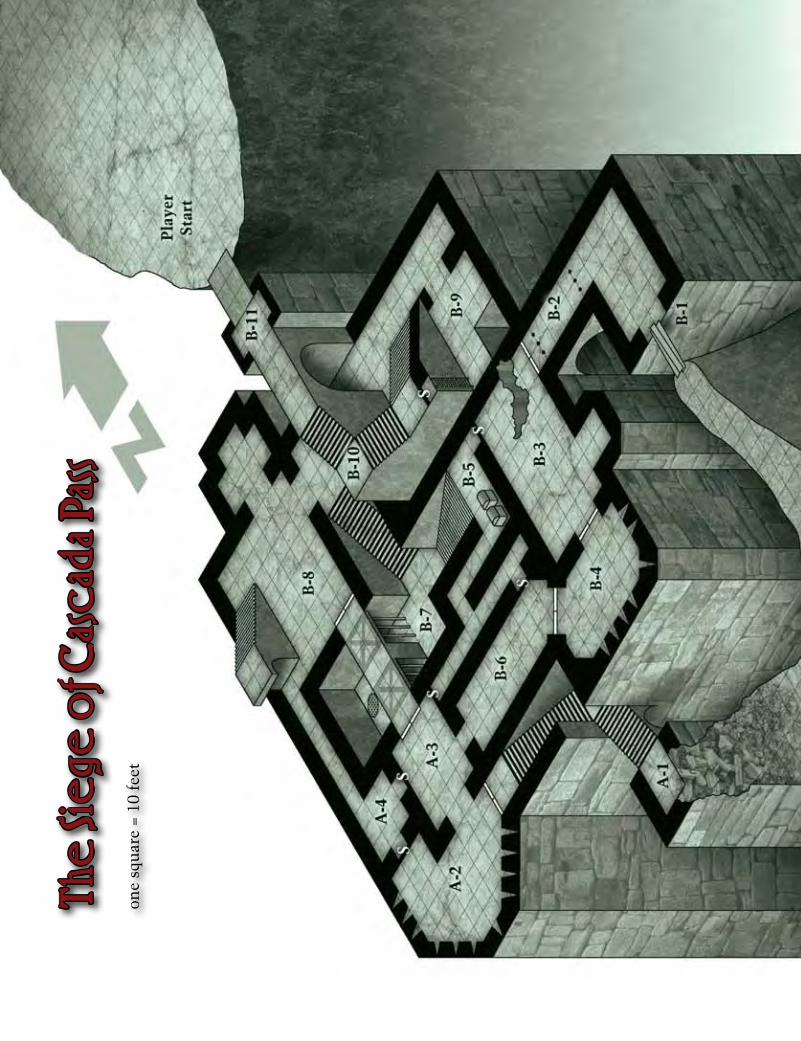
The
Siege
of C
ascad
a Pass
one
squ
are
= 10
fee
t
Shadows of MirahanThe Ruined Keep of the BorderlandsExcept where noted, the ruins are dusted with snow and cobwebs. The ruins are seldom visited, and apart from the refugees, the ruined keep has slept undisturbed for decades. The keep’s roof is holed in a dozen spots; the floor is littered with shattered roof tiles, bits of broken plaster and stucco have collected in the corners of the chambers, and the entire complex seems home to deep shadows — hints of a glorious history, long since past.
The Running Battle: Unlike most adventures, the battle for the keep will be one running melee. Any respite the heroes receive will be respites they have earned. Their enemies number in the thousands — the best the heroes can hope for a series of quick victories, all the while knowing that they must cede the day to the Shadow Horde.
With any series of combats, there is the danger of the battle becoming a monotonous grind. It is vitally important that your descriptions of the zombies be visceral and evocative. Describe the stinking gasses issuing from their bloated bodies, and the black bile and crawling maggots spilling from the wounds. Describe the deafening shriek of the zombies’ howls with every blow struck, and their eyes that glow like dying embers — pulsing brighter when they catch sight of their prey. The more you can bring these undead to “life” the greater the scene’s drama and tension.
Milestones: For purposes of determining “encounters,” each area that PCs defend counts towards a milestone. Fleeing through the chambers is not enough — the PCs have to make a stand and slay at least one non-minion foe.
Secret Doors & Evading the Shadow Horde: The keep offers heroes plenty of opportunity to skulk through the walls, assailing the Shadow Horde outriders before vanishing back into the network of secret corridors that riddle the ancient citadel.
While the outriders aren’t particularly effective at discovering secret doors, their shadow wolves are terribly quick to scent out hidden PCs. Once a shadow wolf has found a PC’s trail, the outriders simply hammer on the walls until the secret door gives way.
Anytime a shadow wolf passes by a secret door concealing the heroes, it howls with the fury of a damned soul, calling all nearby undead to its location.
Might of the Horde: Tactically minded heroes can, with a little luck, hold the key entrances to the keep (A–1 and B–1) against the ravening hordes. If the heroes succeed in holding the gates, they win the horde’s full attention — a dubious honor to be sure.
If the horde hasn’t made significant headway into the A–1 or B–1 by round 5 of the battle, a troop of 10 archers moves within range and rains down arrows on the heroes.
If, by 10 rounds into the battle, the heroes still manage to hold the gates, the masters of the Shadow Horde send in the dragas. A mournful war horn wails above the crash and clamor of the battle and a flight of 3 dragas descends upon the ruins. The dragas crash into the heroes using their flyby attack, dragging the heroes into the ruins, breaking the line of the defenders.
14
Shadows of MirahanArea A–1
The Far Tower Read or paraphrase the following:
The small tower has fallen into ruin — the entire southeast corner has fallen away, leaving a rough slope of granite blocks and scree, running to the mountain side below.
Climbing the slope is rough terrain, considerably slowing attackers. Descending the slope is far easier, though characters must succeed on a DC 20 Athletics check or stumble on the descent, sliding prone to the base of the slope and taking 1d8 damage in the fall.
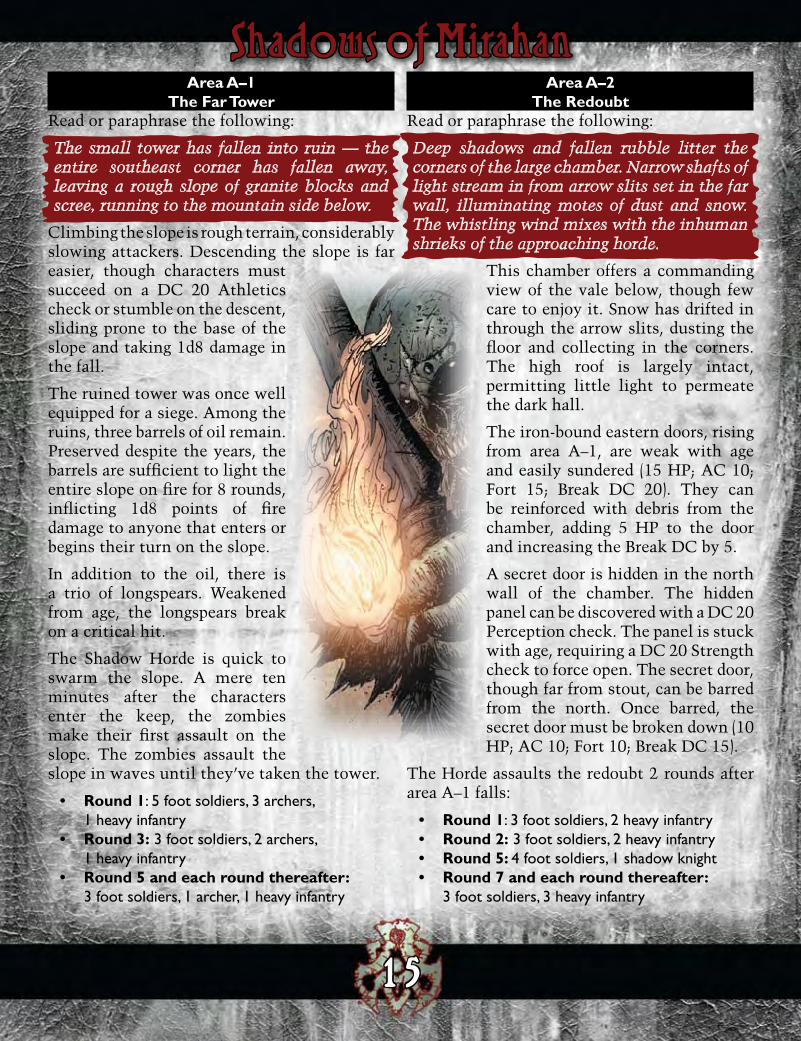
The ruined tower was once well equipped for a siege. Among the ruins, three barrels of oil remain. Preserved despite the years, the barrels are sufficient to light the entire slope on fire for 8 rounds, inflicting 1d8 points of fire damage to anyone that enters or begins their turn on the slope.
In addition to the oil, there is a trio of longspears. Weakened from age, the longspears break on a critical hit.
The Shadow Horde is quick to swarm the slope. A mere ten minutes after the characters enter the keep, the zombies make their first assault on the slope. The zombies assault the slope in waves until they’ve taken the tower.
Round 1• : 5 foot soldiers, 3 archers, 1 heavy infantryRound 3:• 3 foot soldiers, 2 archers, 1 heavy infantryRound 5 and each round thereafter: •3 foot soldiers, 1 archer, 1 heavy infantry
Area A–2The Redoubt
Read or paraphrase the following:
Deep shadows and fallen rubble litter the corners of the large chamber. Narrow shafts of light stream in from arrow slits set in the far wall, illuminating motes of dust and snow. The whistling wind mixes with the inhuman shrieks of the approaching horde.
This chamber offers a commanding view of the vale below, though few care to enjoy it. Snow has drifted in through the arrow slits, dusting the floor and collecting in the corners. The high roof is largely intact, permitting little light to permeate the dark hall.
The iron-bound eastern doors, rising from area A–1, are weak with age and easily sundered (15 HP; AC 10; Fort 15; Break DC 20). They can be reinforced with debris from the chamber, adding 5 HP to the door and increasing the Break DC by 5.
A secret door is hidden in the north wall of the chamber. The hidden panel can be discovered with a DC 20 Perception check. The panel is stuck with age, requiring a DC 20 Strength check to force open. The secret door, though far from stout, can be barred from the north. Once barred, the secret door must be broken down (10 HP; AC 10; Fort 10; Break DC 15).
The Horde assaults the redoubt 2 rounds after area A–1 falls:
Round 1• : 3 foot soldiers, 2 heavy infantryRound 2:• 3 foot soldiers, 2 heavy infantryRound 5: • 4 foot soldiers, 1 shadow knight Round 7 and each round thereafter: •3 foot soldiers, 3 heavy infantry
15
Shadows of MirahanArea A–3
Hall of LionsRead or paraphrase the following:
The short hall terminates before a pair of enormous, iron-bound doors. Weakened and rotted with age, the portal has clearly suffered at the hands of time. The once-strong iron bands are now eaten through with rust, and the wooden beams are warped and splintered.
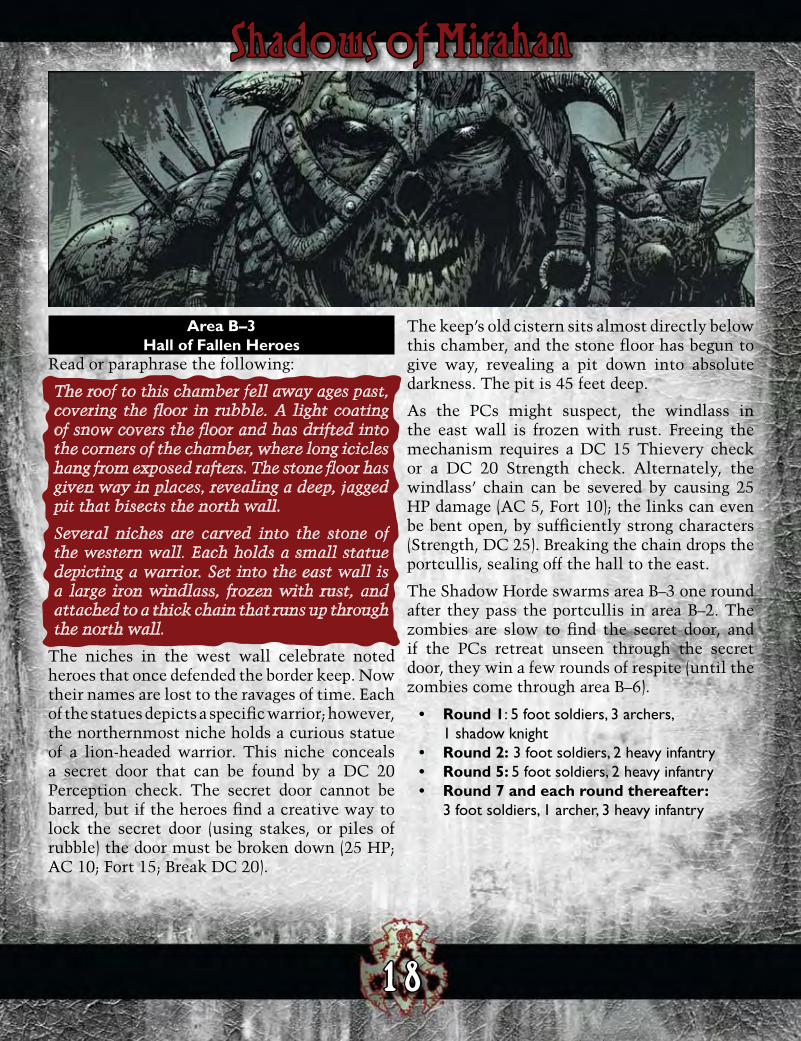
Three stone lions loom above the portal, their heads frozen in a silent roar.
A close inspection of the lion-heads reveals that each is stained with oily grime. The lion-heads are part of trap that can be activated from hiding in area A–4, driving flaming oil through the maws. When the trap is triggered, the flaming oil attacks: +8 vs. Reflex; 1d8 +3 fire damage, and ongoing 5 fire damage (save ends). The trap targets the four squares directly in front of the doors.
The portal itself is unbarred, and can be pulled open with a DC 20 Strength check. The portal can be locked with a DC 20 Thievery check. Once locked, the door must be broken down (25 HP; AC 10; Fort 15; Break DC 20).
Secret doors are hidden in the walls of the hall. The secret doors can be found with a DC 20 Perception check. They cannot be bolted and are easily broken down (HP 10, AC 10, Fort 10, Break DC 10).
The Horde assaults the hall 1 round after area A–2 falls:
Round 1• : 3 foot soldiers, 2 archers, 1 shadow knightRound 2:• 3 heavy infantryRound 5: • 5 foot soldiers, 1 shadow knightRound 7 and each round thereafter: •3 heavy infantry
Area A–4Trap Chamber
Read or paraphrase the following:
The small, gloomy chamber is thick with dust and shadow. Rubble, crusted with ice and snow, lines the floor and walls and crackles underfoot with every step. The air smells faintly of oil and soot.
The rubble conceals a trio of small ceramic jugs. Stopped with beeswax, each jug contains several quarts of oil.
A close search of the chamber (Perception, DC 20) uncovers a narrow peephole set in the secret door the east wall, permitting characters to spy on area A–3.
A quick inspection of the northeast corner of the room reveals a pair of bellows, set into the east wall. The bellow is capped with a funnel and a small, bronze cup. The funnel is designed to be filled with oil, and an ember placed in the cup. Pumping the bellows ignites the oil, forcing the oil through the wall and out the maws of the stone lions in area A–3.
A pair of secret doors (on the south and east walls, respectively) are not concealed from the inside. Each is secured with a simple latch. The secret door set in the south wall can be secured with an iron bolt; the bolt to the secret door set in the east wall rusted open decades ago and cannot be closed.
The Shadow Horde is slow to discover area A–4, only making it to the hidden chamber once area B–8 is overrun. Characters retreating (unseen) into the secret chamber are safe for the time being.
16
Shadows of MirahanArea B–1
The Old Drawbridge Read or paraphrase the following:
The snowy path wends its way up the side of the ruined keep, ending at a precipitous cliff. A trio of worn wooden planks bridges the gap between the path and the gatehouse. A chill wind buffets you with stinging ice and snow, threatening to drive you over the precipice.
There is a 15-foot gap between the path and the gatehouse. Any creature struck in combat while passing over the planks must succeed on a DC 15 Acrobatics (or Dexterity) check, or plummet 50 feet into the rocky crevice below. The planks are easily kicked or knocked down; if a creature is on the planks, knocking the planks down requires a DC 17 Athletics (or Strength) check.
A mere ten minutes after the characters enter the keep, the zombies swarm the gatehouse, attacking in waves until it falls to the Shadow Horde. If the PCs kick away the planks, the Horde is forced to cross via grappling hooks and rope. Throwing a hook requires a zombie’s standard action and has a 50% chance of hooking the gatehouse. Once hooked, it takes the zombie 1 round to scramble up the rope (granting combat advantage the entire round and round following).
Severing a rope is a simple matter (HP 5, AC 10, Fort 5, Break DC 20). Any zombie falling is assumed to die on the rocks far below. The entire time the infantry and foot soldiers struggle to take the gatehouse, the archers pelt the house with arrows.
Round 1• : 3 foot soldiers, 2 archers, 1 heavy infantryRound 3:• 3 archers, 2 heavy infantryRound 5 and each round thereafter: •3 foot soldiers, 1 archer, 1 heavy infantry
Area B–2Portcullis
Read or paraphrase the following:
A short, narrow corridor crosses from the tower to the citadel. Thin arrow slits permit a view of the icy gorge below. A cold wind whistles through the arrow slits, driving shards of stinging snow.
When the keep was still occupied, this hall was the defenders’ second line of defense. Outside the west end of the hall is a large windlass that winds a heavy iron chain. The chain runs to the ceiling, where it raises and lowers a pair of heavy portcullises. Lowered, the portcullises cut off the hall.
The windlass used to hoist the portcullis is located along the east wall of area B–3. Alternately, the portcullises can be hoisted by hand with a DC 25 Strength check, bent open with a DC 27 Strength check, or battered down by inflicting 120 HP (AC 10, Fort 10). It takes two zombies 3 rounds to hoist the portcullises high enough for their allies to pass.
The Shadow Horde makes it to area B–2 one round after they take the gatehouse.
Round 1• : 4 heavy infantry, 3 archersRound 2:• 5 foot soldiersRound 5: • 5 foot soldiers, 3 heavy infantryRound 7 and each round thereafter: •3 foot soldiers, 1 archer, 3 heavy infantry
17
Shadows of Mirahan
Area B–3Hall of Fallen Heroes
Read or paraphrase the following:
The roof to this chamber fell away ages past, covering the floor in rubble. A light coating of snow covers the floor and has drifted into the corners of the chamber, where long icicles hang from exposed rafters. The stone floor has given way in places, revealing a deep, jagged pit that bisects the north wall.
Several niches are carved into the stone of the western wall. Each holds a small statue depicting a warrior. Set into the east wall is a large iron windlass, frozen with rust, and attached to a thick chain that runs up through the north wall.
The niches in the west wall celebrate noted heroes that once defended the border keep. Now their names are lost to the ravages of time. Each of the statues depicts a specific warrior; however, the northernmost niche holds a curious statue of a lion-headed warrior. This niche conceals a secret door that can be found by a DC 20 Perception check. The secret door cannot be barred, but if the heroes find a creative way to lock the secret door (using stakes, or piles of rubble) the door must be broken down (25 HP; AC 10; Fort 15; Break DC 20).
The keep’s old cistern sits almost directly below this chamber, and the stone floor has begun to give way, revealing a pit down into absolute darkness. The pit is 45 feet deep.
As the PCs might suspect, the windlass in the east wall is frozen with rust. Freeing the mechanism requires a DC 15 Thievery check or a DC 20 Strength check. Alternately, the windlass’ chain can be severed by causing 25 HP damage (AC 5, Fort 10); the links can even be bent open, by sufficiently strong characters (Strength, DC 25). Breaking the chain drops the portcullis, sealing off the hall to the east.
The Shadow Horde swarms area B–3 one round after they pass the portcullis in area B–2. The zombies are slow to find the secret door, and if the PCs retreat unseen through the secret door, they win a few rounds of respite (until the zombies come through area B–6).
Round 1• : 5 foot soldiers, 3 archers, 1 shadow knightRound 2:• 3 foot soldiers, 2 heavy infantry Round 5: • 5 foot soldiers, 2 heavy infantryRound 7 and each round thereafter: •3 foot soldiers, 1 archer, 3 heavy infantry
18
Shadows of MirahanArea B–4
Fletchers’ TowerThe doors to this chamber are stuck with age, and must be torn open (Strength, DC 15) or broken in (15 HP; AC 10; Fort 10; Break DC 20). If the doors are broken in, they cannot be used to seal the chamber.
Once the heroes gain entry, read or paraphrase the following:
The exterior walls of this chamber are punctuated with arrow slits, permitting a protected view of the ledge below. A trio of barrels stands in one corner, while ancient bows hang from the walls, waiting for a battle that will never come.
The barrels hold 75 arrows total. Ruined with age, the arrows no longer have fletching, and most are warped and splintered. The 10 bows are similarly ruined: any attempt to fire one of the bows in battle causes the weapon to break in two, inflicting 1d8 damage to the wielder.
Unless the heroes bar the doors, the Shadow Horde reaches area B–4 one round after they pass the portcullis in area B–2.
Round 1• : 5 foot soldiers, 3 heavy infantry archers, 1 shadow knightRound 2:• 3 foot soldiers, 1 shadow titan Round 7 and each round thereafter: •3 foot soldiers, 1 archer, 3 heavy infantry
Area B–5The Captain’s Passage
Read or paraphrase the following:
The narrow, rubble-strewn corridor, with its high, crumbling walls, lends a sense of claustrophobia to the palpable gloom. The hall snakes its way through the hollow walls of the citadel, a secret rat’s nest forgotten in the passage of time.
Once, ages past, this hall was used to great efficacy by the citadel’s defenders, allowing men-at-arms to pass quickly through the citadel and launch surprise attacks at the invaders’ flanks. Now the halls have fallen into ruin like the rest of the citadel.
The south, west, and east entrances to this hall are sealed by secret doors. While concealed from the outside of the hall, the stone panels are readily recognized from inside the corridor. The doors once sported bolts that could be used to lock the panels closed, but the pins and latches are pitted and rusted — worthless when it comes to securing the secret doors.
Treasure: A pair of ancient iron coffers sits against the east wall of the main passage. All are rusted with age and locked. Opening the coffers requires a DC 23 Thievery check, followed with a DC 20 Strength check to crack the rusted seals. (Creative would-be thieves can also pry open the lids with the tip of a narrow blade with a DC 10 Strength check; a natural 1 on this check results in the weapon snapping.)
The coffers hold the personal weapons of the captain-at-arms:
Coffer A• : This coffer holds 2 worn leather quivers wrapped in oilskin. Each quiver contains 20 black-fletched war arrows. The arrows are unusually large and heavy, and useless when fired from regular short or longbows. Coffer B• : This cover holds a single, enormous recurve bow. A composite of rare woods, bone, and sinew, the bow can only be strung or drawn by a character with an 18 Strength or greater. The singular Black Bow inflicts 1d12 damage when used in conjunction with the arrows from coffer A. A trio of thick, braided bowstrings is tied to the bow.
19
The passage is relatively safe from the Shadow Horde. So long as the heroes don’t reveal themselves, the zombies only discover the secret passageway after taking area B–7. See area B–7 for more details.
Once the zombies discover the secret passage, they press into the corridor with a fury. However, if the PCs use the tight confines to their advantage, they can winnow down the opposing force, one zombie at a time.
Round 1• : 5 foot soldiers, 3 shadow hounds, 1 shadow knightRound 2:• 3 foot soldiers, 1 shadow titan Round 7 and each round thereafter: •3 foot soldiers, 1 archer, 3 heavy infantry
Area B–6Great Hall
Read or paraphrase the following:
This short corridor is perhaps 9 paces in length, with a pair of ancient doors at one end, and a simple arch at the other.
The southeast doors are stuck and must be torn open (Strength, DC 15) or broken in (15 HP; AC 10; Fort 10; Break DC 20). If the doors are broken in, they cannot be used to seal the chamber.
A secret door is hidden in the north wall of the chamber (Perception, DC 20). The secret door is wedged closed with age and must be torn open (Strength, DC 15) or broken in (15 HP; AC 10; Fort 10; Break DC 20).
Unfortunately for the heroes, B–6 falls directly between the two paths used by the invading forces, so that even if the heroes manage to hold off the zombies from A–3, they are still flanked by the zombies swarming from B–4. The encounter can very quickly go from simple to deadly, but the heroes receive plenty of warning: the howls of the zombies as they throng the outlying halls, the stench of undeath, and
the unmistakable crash and drone of armored troops in full harness.
The zombies enter from the west two rounds after A–3 falls, and from the east one round after the doors to B–4 are battered open.
West, Round 1• : 5 foot soldiers, 1 heavy infantryWest, Round 2:• 3 foot soldiers, 1 shadow titan West, Round 7 and each round thereafter: •3 foot soldiers, 1 archer, 3 heavy infantry
East, Round 1• : 5 foot soldiers, 1 heavy infantryEast, Round 2:• 3 foot soldiers, 1 shadow knightEast, Round 3: • 3 foot soldiers, 1 shadow titanEast, Round 7 and each round thereafter: •3 foot soldiers, 3 heavy infantry
Area B–7Slaughter Cells
This chamber has two levels: a deceptively simple “hall” and the trap chambers underneath. Read or paraphrase the following if the PCs enter the upper level:
A short, narrow hall runs between a pair of imposing double doors. Large stone lion heads stand watch over each portal, their jaws thrown open wide, as if to ward off those foolish enough to assault the citadel.
Both ends of the hall conceal pit traps (Perception, DC 20). The traps trigger when loaded with more than 50 pounds, dropping anyone on the trapped squares into the caged cells below. The mechanical trap doors immediately return to their original positions, but quick and agile heroes have a chance of escaping the trap. A DC 23 Acrobatics or Athletics check allows the
20
Shadows of Mirahan
hero to spring back onto the trap door, riding it back up. When the trap resets, it requires another 50 pounds or more to trigger the trap again (thus, a PC riding the trap door back up doesn’t immediately trigger the trap again).
The pit traps empty into a barred cell below. The cell’s gate is locked from the outside and frozen with rust; a DC 20 Thievery check or a DC 15 Strength check is sufficient to open the gate. Alternately, the cell’s bars, pitted with rust, can be bent aside or torn from their anchors (Strength, DC 23), or hammered down (AC 10, HP 20, Fort 20).
Read or paraphrase the following if the PCs enter the lower level:
The stairs descend into a gloomy dungeon below. Peering through the darkness you make out a wall of iron bars, bisecting the chamber in two. The cage has a single simple door, secured with a rusty lock. Grim implements of torture, laden with dust and snow, hang from the walls, alongside manacles, shackles, and chains.
The chamber is key to the keep’s defenses, allowing defenders to easily dispatch invaders dropped by the pit traps above. The west half of the chamber forms a large cage to hold invaders, while the east side allowed defenders to attack captive at their leisure and doubled as a torture chamber.
An ancient iron grate is set in the floor on the west half of the chamber. Designed to permit the defenders to flush the gore and entrails from the chamber, time has weakened the grate considerably. A DC 20 Strength check is sufficient to tear the grate from its moorings, allowing characters to move in the narrow drain tunnel that runs west beneath the keep. See Fleeing the Shadow Horde at the end of this chapter for additional details on escaping through the drain tunnel.
The Shadow Horde attempts to cross the pit traps in B–7 three rounds after they take area A–3. The horde presses into the chamber in a series of quick waves, dozens of foot soldiers plunging into the pit traps. After 4 rounds, the Shadow Horde discovers the secret door to area B–5, and redirects their assault. Two rounds later, the zombies burst from area B–5, charging down the steps into B–7.
Round 1• : 12 foot soldiers, 1 shadow wolf, 1 shadow knightRound 2:• 13 foot soldiers, 2 archers Round 3: • 1 archer, 1 shadow wolf, 1 heavy infantryRound 5 and every 2 rounds thereafter: •3 foot soldiers, 1 heavy infantry
Area B–8Barracks
Read or paraphrase the following:
A large, ruined chamber stands before you. The roof collapsed decades ago, leaving a floor of broken tiles, rotting beams, and rubble. The snow is thick here, covering nearly the entire floor, and thick icicles hang on the walls and broken rafters.
A ruined staircase stands on the west wall, rising to a second floor that no longer exists. On the north side of the chamber, you can spy a small sub-chamber with a winch and chain windlass.
A chill wind blows through the open chamber. Dark clouds gather overhead, blotting out the sun and lacing the wind with stinging snow.
This chamber once housed the men-at-arms that watched over Cascada Pass. Now those dedicated soldiers are long since dead, with little to mark the seasons passed high atop the Cascada Mountains.
21
Shadows of Mirahan