Embed Size (px)
Citation preview

“Gold” Series Lever Hoist Manual – 050111
Operators Manual
“Gold” Series Manual Lever Hoists
With Overload Protection
1/4 to 6 Metric Ton
Read this manual BEFORE using this product
This manual should be available to all persons responsible for the operation, installation, maintenance and/or repair of these products
Record the following information for future reference
Serial Number
Model Number
Capacity and Lift
Date of Purchase/Invoice Number
Name of Distributor
Meet ASME B30.21 Safety Standard
Canadian Distribution Centre Locations
Quebec Ontario Manitoba Alberta British Columbia
2205 de l’Aviation Dorval, Quebec
H9P 2X6
Ph: (514) 685-1515 Fax: (514) 685-1516
2160 Meadowpine Blvd.
Mississauga, Ontario L5N 6H6
Ph: (905) 821-1100 Fax: (905) 821-2024
190 Omands Creek Blvd.
Winnipeg, Manitoba R2R 1V7
Ph: (204) 694-2259 Fax: (204) 633-7230
7606 McIntyre Rd. N.W.
Edmonton, Alberta T6E 6Z1
Ph: (780) 466-1115 Fax: (780) 469-4545
7880 Fraser Park Dr.
Burnaby, British Columbia V5J 5L8
Ph: (604) 294-3191 Fax: (604) 294-8845
For orders/service in the United States please contact our Ontario distribution center.

“Gold” Series Lever Hoist Manual – 010112
2
Table of Content
Warranty 2 Inspection and Maintenance of Manual Lever Hoists 2 Operation Instructions 3 WARNINGS - Rules to Ensure Operator Safety 3 Load chain inspection 4 Hook inspection 4 Proper hook attachment 5 Parts Break Down 6 – 7 Trouble Shooting 8 Lubrication 9 Common Component Replacement Procedures 9 - 10 Hoist Disposal 10 In Service Inspection and Maintenance 11
Recommended hoist maintenance program 11 - 12 Hoist inspection journal 13
Limited One Year Warranty
Gold Series manual hoists are guaranteed to be free of defect in both material and workmanship. If one of our hoists fails during the first year of operation due to defect in either material or workmanship we will repair or replace the unit (at our discretion) after physical inspection by our repair department. This warranty does not cover normal wear and tear of the units, and it does not apply to units that show signs of misuse, overloading, alteration or improper/lack of maintenance. No unit can be returned for inspection without first receiving authorization from our customer service department. The unit(s) for which there is a warranty claim must be returned to the location that has authorized the units return prepaid complete with proof of purchase. For our branch locations please refer to the front cover.
Inspection and Maintenance of Manual Lever Hoists
It is the responsibility of the hoist owner/user to establish proper programs to train and designated hoist operators and train and designate hoist inspection and maintenance personnel. The hoist operator, inspector and maintenance personnel’s training program should be based on the requirements in accordance with the latest edition of: ♦ ASME B30.21 Safety Standard Please ensure to check for any additional federal/provincial/state/local code requirements, existing
plant/site safety rules and regulations, and all instructions provided in this manual.

“Gold” Series Lever Hoist Manual – 010112
3
Operation Instructions
BEFORE using a manual lever hoist ALWAYS inspect the top and bottom hooks for signs of wear, reshaping and/or damage also make sure to inspect all load pins and nylon lock nuts for wear and any signs of loosening. Inspect the load chain for any signs of distortion, bending, stretching or corrosion. Inspect the working condition of the lever handle and directional change over latch.
Test the brake device by raising the load slightly and stopping to ensure that the brake will hold the load BEFORE proceeding with operation. Always ensure that the block and chain are properly lubricated.
After use, clean the chain block from dirt and keep it in a dry place, free from rust or corrosion.
WARNINGS - Rules to Ensure Operator Safety
“Use Common Sense”
♦ ALWAYS read the warning tags and manual BEFORE using a hoist ♦ NEVER exceed the rated capacity ♦ NEVER use hoists as a sling ♦ NEVER use a hoist if the load chain is twisted, kinked, damaged, stretched or capsized ♦ NEVER operate unless load is centered under hoist ♦ NEVER operate hoists with other than manual power ♦ NEVER lift or transport loads over or near people ♦ NEVER use a hoist for lifting, supporting or transporting people ♦ NEVER operate a hoist if damaged or malfunctioning ♦ NEVER shock load ♦ ALWAYS ensure that the work area is clear/free of people and any obstructions ♦ ALWAYS ensure that the hoist meets/exceeds the capacity requirements for the material being
lifted ♦ ALWAYS ensure that the top hook is attached in a proper manner (the latch kit should always be
fully engaged), to an anchorage point that is rated for the weight of the material being lifted ♦ ALWAYS ensure that the bottom hook is properly attached (the latch kit should always be fully
engaged) to the material/clamp being lifted ♦ ALWAYS make sure that the hoist is properly lubricated. Failure to ensure that the hoist in
properly lubricated may result in the units failure during use which may cause injury, death or substantial property damage
The control function/directional latch has three settings, (UP, NEUTRAL and DOWN). When the directional latch is in the “N” (NEUTRAL) setting the unit will free wheel allowing the operator to adjust the load hooks position (provided the unit is not under load)
When lifting make sure that the directional latch is in the “UP” position, then slowly ratchet the load making sure to watch for any obstructions
When lowering make sure that the directional latch is in the “DOWN” position, and then slowly ratchet the load, this operation may require additional effort/force to release the friction between the brake components

“Gold” Series Lever Hoist Manual – 010112
4
Load Chain Inspection
Load chain can become excessively worn, elongated and/or damaged beyond safe working condition. A visual inspection of the load chain should be performed BEFORE each use of the hoist. The full length of load chain must be replaced immediately if even one link is excessively worn, elongated or damaged.
Chain Diameter
Capacity
Load Chain Dimensions 10 Links
Standard Maximum
4 mm 1/4t 250Kg 120 122.4
5 mm 1/2t 500Kg 150 153
6 mm 3/4t 750Kgs 180 183.6
7 mm 1-1/2t 1,500Kgs 210 214.2
10 mm 3t 3,000Kgs
280 285.6 6t 6,000Kgs
When measuring hook openings the use of vernier calipers is required. Any load chain that exceeds the maximum load chain dimensions shown above must be immediately replaced with new load chain BEFORE being used/returned to service.
Hook Inspection
When Gold Series top and bottom hooks are overloaded they will stretch/open before failing, to prevent unit failure a visual inspection of both the top and bottom hooks should be performed BEFORE each use of the hoist.
This inspection should involve checking for wear, reshaping, damage, corrosion, and hook stretch. Any hook that is not in safe working order must be disposed of immediately and replaced with a new hook.
Hook Capacity
Standard A Size (mm)
Maximum A Size (mm)
1/4t 250 Kgs 19.0 20.90
1/2t 500 Kgs 23.0 25.30
3/4t 750 Kgs 24.5 26.95
1-1/2t 1500 Kgs 29.5 32.45
3t 3000 Kgs 37.5 41.25
6t 6000 Kgs 43.5 47.85
When measuring hook openings the use of vernier calipers is required Any hook that exceeds the maximum A size shown above must be immediately replaced with a new hook BEFORE being used/returned to service.
Hoists should always be recertified before being used after repair or alteration

“Gold” Series Lever Hoist Manual – 010112
5
Proper hook attachment
The load must be applied squarely to the center of the hook, and the hook must be attached in a manner that ensures it will not become loose during operation. Never attach the hook directly to the load, use of a sling or device such as a lifting clamp is required for safe use. .
Examples of unsafe hook attachment
Improper hook attachment may cause the hook to elongate or bend increasing the risk of hook failure. Improper hook attachment may also interfere with the flow of the load chain to the load sheave preventing the lever hoist from operating in a safe and reliable manner (see images 1 to 5).
Image 3 Image 4
Image 1 Image 2
Image 5

“Gold” Series Lever Hoist Manual – 010112
6
1/4t to 6t Parts Breakdown
6t Top Hook Assy
6t Bottom Hook Assy

“Gold” Series Lever Hoist Manual – 010112
7
1 Gear case assembly 44 Rubber grip
2 Disc gear assembly 45 Top hook assembly **
3 Drive shaft 46 Double spring
4 Splined gear 47 Latch ***
5 Right side plate assembly 48 Load pin/top hook shaft
7 Load sheave assembly/sprocket 49 Load pin/top hook shaft – 6t
8 Chain guide 50 Bottom hook assembly ***
9 Chain Leader A 51 Load pin/bottom hook shaft
10 Stripper 54 Chain ring
11 Chain Leader B 55 Load chain
12 Lever side plate assembly 56 Idler sheave assembly
13 Pawl spring 57 Bottom hook frame
14 Pawl 60 Lock nut
15 Disc hub 62 Snap ring
16 Free spring 63 Snap ring
17 Friction disc (asbestos free) 64 Bolt
18 Ratchet disc 65 Washer
19 Brake cover assembly 66 Split pin for directional changeover latch
20 Changeover gear 67 Rivets
21 Changeover pawl pin 68 Lock washer
22 Changeover pawl 69 Bolt
23 Spring seat 70 Castle nut
24 Changeover spring 71 Cotter/split pin
25 Lever handle assembly * 75 Nylon lock nut
26 Directional changeover latch 76 Bolt
27 Name plate 77 Lock nut
28 Hand wheel 81 Nut
29 Cover plate 82 Bolt
30 Retaining ring for cover plate 84 Prevailing type nut
31 Bushing * Lever handle assemblies are sold as complete units (lever handle, rubber grip, changeover pawl,
spring and seat). ** Top & bottom hook assembly sold as complete unit (hook, load chain pin and nylon lock nut) *** Latch kits are sold as complete assemblies (latch, double spring, bolt and nylon lock nut)

“Gold” Series Lever Hoist Manual – 010112
8
Trouble Shooting
This section covers common problems that maybe encountered when operating a hoist. The best means of identifying any problem is by thorough inspection by properly trained personnel. The information shown below provides a brief guide to help pinpoint the required repairs.
Problem Encountered Possible Cause Recommendation
Hoist will not operate Hoist is overloaded Reduce load to/below the rated
capacity of hoist
Load continues to move when hoist is stopped
Hoist is overloaded Reduce load to/below the rated capacity of hoist
Brake is slipping/failing Inspect brake adjustments and
friction disc wear. Also make sure that the brakes are clean
Load chain binds Possible damage to load chain, pinion shaft, gears or sheaves
Disassemble hoist, inspect and repair/replace required component(s)
Load chain may not be properly
installed (twisted, kinked or capsized)
Remove and re-install load chain
Latches don’t work properly
Broken Latch Remove and replace latch kit Hook bent or twisted Inspect load hook and replace if
necessary
“Gold” Series Lever Hoist Manual – 010112
9
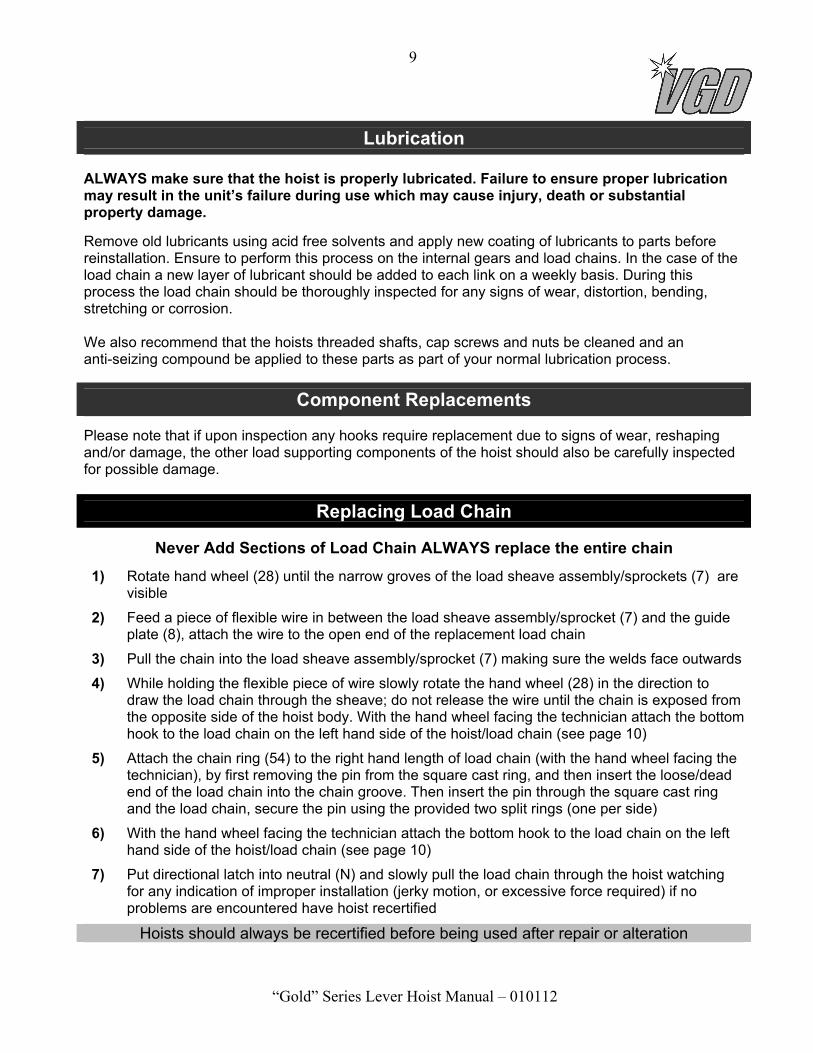
Lubrication
ALWAYS make sure that the hoist is properly lubricated. Failure to ensure proper lubrication may result in the unit’s failure during use which may cause injury, death or substantial property damage.
Remove old lubricants using acid free solvents and apply new coating of lubricants to parts before reinstallation. Ensure to perform this process on the internal gears and load chains. In the case of the load chain a new layer of lubricant should be added to each link on a weekly basis. During this process the load chain should be thoroughly inspected for any signs of wear, distortion, bending, stretching or corrosion. We also recommend that the hoists threaded shafts, cap screws and nuts be cleaned and an anti-seizing compound be applied to these parts as part of your normal lubrication process.
Component Replacements
Please note that if upon inspection any hooks require replacement due to signs of wear, reshaping and/or damage, the other load supporting components of the hoist should also be carefully inspected for possible damage.
Replacing Load Chain
Never Add Sections of Load Chain ALWAYS replace the entire chain
1) Rotate hand wheel (28) until the narrow groves of the load sheave assembly/sprockets (7) are visible
2) Feed a piece of flexible wire in between the load sheave assembly/sprocket (7) and the guide plate (8), attach the wire to the open end of the replacement load chain
3) Pull the chain into the load sheave assembly/sprocket (7) making sure the welds face outwards
4) While holding the flexible piece of wire slowly rotate the hand wheel (28) in the direction to draw the load chain through the sheave; do not release the wire until the chain is exposed from the opposite side of the hoist body. With the hand wheel facing the technician attach the bottom hook to the load chain on the left hand side of the hoist/load chain (see page 10)
5) Attach the chain ring (54) to the right hand length of load chain (with the hand wheel facing the technician), by first removing the pin from the square cast ring, and then insert the loose/dead end of the load chain into the chain groove. Then insert the pin through the square cast ring and the load chain, secure the pin using the provided two split rings (one per side)
6) With the hand wheel facing the technician attach the bottom hook to the load chain on the left hand side of the hoist/load chain (see page 10)
7) Put directional latch into neutral (N) and slowly pull the load chain through the hoist watching for any indication of improper installation (jerky motion, or excessive force required) if no problems are encountered have hoist recertified
Hoists should always be recertified before being used after repair or alteration

“Gold” Series Lever Hoist Manual – 010112
10
Attaching/Replacing Bottom Hooks 1/2t to 3t units
When replacing hooks or latches only use NEW parts. NEVER attempt to repair damaged components as their reliability/safety will be compromised
1) Insert the open end of the load chain into the into the hook slot located at the top of the bottom
hook assembly (50)
2) Insert bottom hook assembly chain pin (51) through the bottom hook assembly (50) and the load chain
3) Tighten the nylon lock nut (77) until properly secured
Attaching/Replacing Bottom Hooks 6t units
1) Feed a piece of flexible wire through the load chain opening found at the top of the bottom
hook assembly (50) around the idler sheave assembly (56) and back through the second load chain opening.
2) Then attach the wire to the open end of the replacement load chain and pull the chain into the bottom hook assembly (50) and around the idler sheave assembly (56) making sure the welds face outwards and the links do not twist
3) Tighten the nylon lock nut (77) until properly secured
Hoist Disposal
We recommend that any/all hoists that service life has expired be fully disassembled and degreased. The components should also be separated by material so they can be recycled.
Hoists should always be recertified before being used after repair or alteration

“Gold” Series Lever Hoist Manual – 010112
11
In Service Inspection and Maintenance
All inspections, repairs and/or hoist recertification should be performed by a competent/properly trained person
All parts that show signs of wear or damage must be replaced with NEW parts. Never attempt to repair damaged components as their reliability/safety will be compromised
Daily – Visual Inspection
♦ Inspect condition of the hoist body
♦ Inspect the load chain for signs of distortion, bending, stretching or corrosion
♦ Inspect the top and bottom hooks for signs of wear, reshaping and/or damage
♦ Inspect the condition of the latch kits
♦ Inspect the condition of the lever arm assembly and directional changeover latch
♦ Clean the dust from all external components
Monthly – Visual Inspection
Inspect the following items in addition to the daily inspection
♦ Check the lubrication/greasing of the load chain and hooks (reapply as required) ♦ Inspect the operation of the brakes, including the condition of the friction discs, pawls and ratchet disc
Every 6 Months – In-depth Inspection
Inspect the following item in addition to your monthly inspection
♦ Check the condition of the load sheave assembly
Hoists should always be recertified before being used after repair or alteration

“Gold” Series Lever Hoist Manual – 010112
12
In Service Inspection and Maintenance
All inspections, repairs and/or hoist recertification should be performed by a competent/properly trained person
All parts that show signs of wear or damage must be replaced with NEW parts. Never attempt to repair damaged components as their reliability/safety will be compromised
Annual (every 12 Months) – In-depth Inspection
♦ Inspect condition of the hoist body
♦ Inspect the load chain for signs of distortion, bending, stretching or corrosion
♦ Inspect the top and bottom hooks for signs of wear, reshaping and/or damage
♦ Inspect the condition of the latch kits
♦ Inspect the condition of the lever arm assembly and directional changeover latch
♦ Inspect the operation of the brakes, including the condition of the friction discs, pawls and ratchet disc
♦ Check the condition of the load sheave assembly
♦ Clean the hoist annually, by purging the parts in an acid free solvent (except for the brake friction discs). A stiff bristle brush should be used to remove the accumulated dirt and/or sediment from the gears, shafts and housings.
♦ Reapplying a new coating of lubricant to all parts before reinstallation
♦ The gears should be checked for any signs of wear, cracked or broken teeth
♦ The shafts should be inspected for signs of wear or damage
♦ After cleaning and making any necessary repairs, the hoist should be reassembled and recertified The recommended frequency of the outlined hoist maintenance program is based upon normal use of a lever hoist under normal working conditions (free from excessive dust, moisture and corrosive fumes). If your usage exceeds these guidelines the inspection/maintenance intervals should be increased accordingly.
Hoists should always be recertified before being used after repair or alteration
“Gold” Series Lever Hoist Manual – 010112
13
Hoist Inspection Journal
Date of Inspection
Inspected/ Repaired By
Full Details of Inspection Including Required/Completed Repairs