Embed Size (px)
Citation preview

Going Soloa simple guide
to soaring
Derek Piggdtt

GOING SOLO
A simple guide to soaring
GOING SOLOA simple guide to soaring
Derek Piggott
-£ U
Adam and Charles Black • London

First published 1978Reprinted 1984A. & C. Black (Publishers) Ltd35 Bedford Row, London WCiR 4JH
© Derek Piggott 1978
ISBN 0-7136-1899-x
All rights reserved. No part of this publication may be reproduced, stored in a retrieval system, or transmitted in any form or by any means, electronic, mechanical, photocopying, recording or otherwise, without the prior permission in writing of A. & C. Black (Publishers) Ltd.
Piggott, Derek Going solo. i . Gliding and soaring I. Title
ISBN 0-7 1 36- 1 899-x
Filmset and printed in Great Britain byBAS Printers Limited, Over Wallop, Hampshire

ContentsIntroduction 9
1 Facts and formalities 10Training, licences and formalities, facts about gliders2 The glider 14The controls, how an aeroplane flies, flying speed, turning, launching, performance3 Before your first flight 20When to go gliding, sensations, cockpit checks, your seating position4 Early nights 26The correct flying attitude, using the controls, trimming, turns, the landing5 Getting up there 40Launching methods, aerotow launching—positioning up and down, the low tow position, lateral control on tow, signals on tow, car and winch launches, cable breaks and launch failures6 Stalling and spinning 55Stalling, incipient spins, full spins, recovery from a full spin, low 'g' sensations7 Control of the approach 65Airbrakes, approach speeds, uses of airbrakes8 Circuit planning 75Circuit planning, preparing to land, never low and slow, S- turns, landing out of wind, flying in high winds
9 Solo at last! * 93Requirements for solo local soaring, thermal soaring, hill soaring, wave soaring, things to practiseFurther reading 105
Index 107
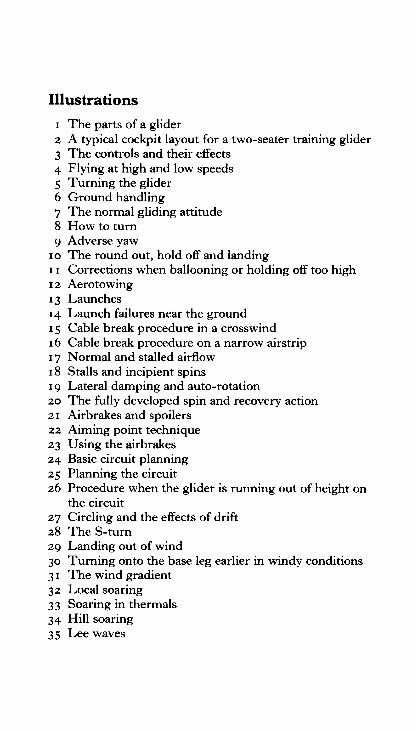
Illustrations
1 The parts of a glider2 A typical cockpit layout for a two-seater training glider3 The controls and their effects4 Flying at high and low speeds5 Turning the glider6 Ground handling7 The normal gliding attitude8 How to turn9 Adverse yaw
10 The round out, hold off and landing11 Corrections when ballooning or holding off too high12 Aerotowing13 Launches14 Launch failures near the ground15 Cable break procedure in a crosswind16 Cable break procedure on a narrow airstrip17 Normal and stalled airflow18 Stalls and incipient spins19 Lateral damping and auto-rotation20 The fully developed spin and recovery action21 Airbrakes and spoilers22 Aiming point technique23 Using the airbrakes24 Basic circuit planning25 Planning the circuit26 Procedure when the glider is running out of height on
the circuit27 Circling and the effects of drift28 The S-turn29 Landing out of wind30 Turning onto the base leg earlier in windy conditions31 The wind gradient32 Local soaring33 Soaring in thermals34 Hill soaring35 Lee waves

Introduction
The excitement and fascination of soaring flight must be experienced to be appreciated. On a summer's day huge warm buoyant bubbles of air are continually leaving the ground to form thermals, rising currents of air which a glider pilot can use to gain height. These invisible air currents often rise hundreds of feet a minute, carrying the glider with them up to the little white cumulus clouds at four or five thousand feet. By circling inside the thermal, adjusting the position of the glider until it is in the strongest part of the up-current, the glider pilot gains his height before setting off in search of the next area of lift.
Thermals occur almost everywhere on a fine sunny day, but the airflow over hills and mountain ranges also provides a source of rising air. In this case, unlike thermal activity, the strength and direction of the wind is the most important factor. Hill lift was the first form of lift used by gliders and many of the older gliding sites are on hills. Wave lift occurs in some circumstances when the airflow over hills or mountains takes up a wave motion, producing strong up-currents capable of taking gliders up to twenty or thirty thousand feet. Since hill and wave soaring do not depend on the sun's heat they are possible in the winter, which makes it an all the year round sport.
The modern glider pilot tries to master all ways of soaring. Each has its particular fascination, but the majority of flights are made in thermals and on a good day a skilled pilot can cover two or three hundred miles.
This kind of flying may seem remote to you if you are only just starting to learn. It is difficult to comprehend that if you fly regularly you will be solo in a few weeks or months. Once you are solo it is only a matter of practice before you will be making flights of hours instead of minutes.

1FACTS AND FORMALITIES
Training, licences and formalities, facts about gliders
Every glider pilot will tell you that soaring is the greatest sport. The flying, of course, is wonderful but we cannot all be in the air together. There must be wingtip holders, tug pilots, signallers, tow car or winch drivers and others willing and able to help push your glider out to the launch point or back for another flight. Alternatively, someone must be paid to do the work, making your gliding much more expensive. Rich or poor, you alone can decide whether this is worth your while. If you want to be able to book your flying and have the aircraft waiting for you to step into, then you should go to your nearest power flying club.
If you decide that you want to learn to glide, this little book will give you most of the information you will need as you start your training.
Training
There are various ways in which you can learn to glide. It will not take very long if you are already a power pilot. But in any case it is a good plan to visit your nearest gliding clubs, talk to the members and have at least one flight before you commit yourself to joining as a full flying member. If you are discouraged by finding that you must wait your turn to fly and that even as a prospective member you will not receive any special priority, then perhaps club gliding is not the sport for you. Give up the idea now, rather than begin over-10

FACTS AND FORMALITIES
enthusiastically only to lose interest after a few flights.Training can either be on a casual day-to-day basis as a
member of a gliding club, or on a residential course of a week or longer. Two or three weeks of training may get you solo but it is only by flying regularly that you will become really proficient. Eventually, that means becoming an active member of a club.
Licences and formalities
In Great Britain there are very few restrictions placed on the glider pilot. No glider pilot's licence is required but there are internationally recognised certificates and badges to mark the pilot's progress. Most other countries have glider pilot's licences involving a medical, and flying and ground exam inations similar to those for a Private Power Pilot Licence. In addition each pilot keeps a personal log book and the entries and comments by instructors give a good indication of the pupil's competence. However, even an experienced pilot would expect to make at least one dual check flight at a new site or club before flying solo there.
Provided that you are reasonably healthy and do not suffer from epilepsy, blackouts or fainting fits and have average eyesight (if necessary with glasses) you are almost certainly fit to glide. At some clubs you may be asked to get your doctor to sign a statement to this effect.
As you gain experience you will have to learn about the special rules of the air regarding airways etc., but this need not worry you until you are solo and are beginning to think about flying across country.
The first step is to learn to fly the glider.
Facts about gliders
It is not within the scope of this book to explain in detail exactly how and why an aeroplane or glider flies. In fact it is not really essential for you to understand more than the fundamentals, since learning to glide is mainly a practical affair.
ii
GOING SOLO
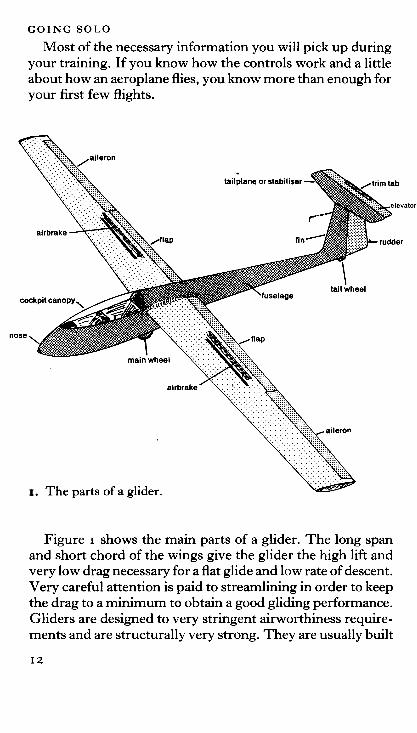
Most of the necessary information you will pick up during your training. If you know how the controls work and a little about how an aeroplane flies, you know more than enough for your first few flights.
i. The parts of a glider.
Figure i shows the main parts of a glider. The long span and short chord of the wings give the glider the high lift and very low drag necessary for a flat glide and low rate of descent. Very careful attention is paid to streamlining in order to keep the drag to a minimum to obtain a good gliding performance. Gliders are designed to very stringent airworthiness require ments and are structurally very strong. They are usually built
12

FACTS AND FORMALITIES
to withstand loads over five times greater than normal flying loads at speeds of over 120 mph, and they can perform simple aerobatics such as loops, chandelles and spins. Landing shocks are taken by the mainwheel and tailwheel or skid under the tail. On high performance machines the main wheel is invariably retracted in flight to reduce the drag. Training aircraft and many other medium performance gliders have a fixed main wheel and an additional nose skid to absorb the shocks of a bad nose-down landing on rough ground.
The wings and tailplane of gliders can be quickly removed to allow the glider to be retrieved by road in a long trailer.

THE GLIDERThe controls, how an aeroplane flies, flying speed, turning, launching, performance
The controls
The cockpit and main controls of a glider are identical to those of any other aircraft and consist of the stick (or control column) and the rudder pedals. (Fig. 2.) The stick is always held in the right hand and both feet are rested against the rudder pedals. Forward and backward movements of the stick operate the elevator and result in nose down and nose up pitching movements. Movements to the left or right operate the ailerons out on the wing tips and these control surfaces move in opposite directions. A movement to the left on the stick moves the aileron on the left wingtip up, and the one on the right wingtip down. The left wingtip loses a little lift and the right wingtip gains a little additional lift, resulting in a rolling or banking to the left. (Fig. 3.) The movements of the stick soon become instinctive. You lean or press the stick in the direction you want the glider to go, so you press the stick forward to put the nose down. Move the stick to the left to bank over to the left.
The rudder movements are not instinctive. Left foot forward moves the rudder surface to the left and swings or yaws the nose to the left. Right foot or right rudder swings the nose to the right. If the rudder is applied and held on while the wings are kept level, the nose swings a little to the side and then stops swinging. The glider skids sideways through the air as if skating on ice and scarcely changes direction. When the rudder is centralised again the nose swings back and the aircraft returns to accurate straight flight. Sideways move-14

THE GLIDERcompass turn and slip
ndicator
direct vision panel
2. A typical cockpit layout for a two-seater training glider.
ments like this result in the fuselage creating much more drag and there is very little tendency to turn. For efficient flight the rudder is used to prevent any sideways slipping or skidding, particularly as the glider is changing its angle of bank.
The glider is always banked over to make it turn and once it is turning very little rudder is required. Flat unbanked turns are practically impossible.
In smooth air the glider can be made to fly 'hands and feet off and it will continue flying steadily by itself. In more turbulent conditions the glider is disturbed from time to time and the pilot has to make corrections to bring the wings level and occasionally to reposition the nose in the correct attitude. But it is stable and tends to correct itself if allowed to do so. During early flights students invariably become too tense, make jerky movements and over-control. The glider will often fly far better if the pilot relaxes on the controls and allows the natural stability of the glider to work.
15

GOING SOLO
elevator depressed stick forward - nose goes down
PITCHING MOVEMENTS effect of the elevator
elevator up ^?. stick back -nose comes up
YAWING OR SWINGING effect of the rudder
3. The controls and their effects. The elevator controls pitching movements, the ailerons rolling or banking, and the rudder yawing.

THE GLIDER
How an aeroplane flies
With a powered aircraft, the thrust from the engine or propeller drives the aircraft through the air to overcome the resistance we call drag. If there is sufficient flying speed the wing generates enough lift to support the weight. The tail keeps the wing steady and the fuselage pointing accurately in the line of flight so that there is no unnecessary drag.
Flying speed
The lift from the wings depends on the speed of the airflow over them and on the angle of attack (the angle at which the wing meets the airflow). If the speed is high enough, lift is created at a small angle of attack and the aircraft flies rather nose down. At low speeds the wing is pulled to a larger angle of attack and the aircraft is rather nose high. (Fig. 4.) In reality the speed and angle of attack are controlled by the elevator.
Beyond a certain angle the wing becomes very inefficient
4. Flying at high and low speeds. Notice the nose high attitude and the larger angle of attack of the wing at low speed.
LOW SPEEDS
large angle ~~f~* of attack
relative airflow

GOING SOLO
and the lift decreases so that there is a definite limit as to how slowly each type of aircraft can fly. For this reason a glider has to maintain a minimum speed of about 40 knots or 45 mph.
Flying is, in some respects, rather like cycling. In level flight or on level ground, power is required to overcome the drag and to maintain speed. In gliding flight the speed is maintained by descending the glide slope, much like freewheeling down a hill. As the weight of the glider must be supported by lift a certain minimum speed is essential for steady flight. In steady flight the airspeed depends on the attitude, which is controlled by the elevator (the stick movements forwards or backwards).
Turning
The aircraft is turned by banking the wings so that the lift
5. Turning. The turning force is provided by banking over and easing back on the stick. This pulls the wings to a slightly larger angle of attack to provide more lift.
18

THE GLIDER
force acts at an angle, thus pulling the aircraft round in the turn. In a turn the wing still has to support the weight, but in addition it provides the turning force so that more lift is required for a turn. This is obtained by making a small backward movement of the stick to pull the wing to a larger angle relative to the airflow. (Fig. 5.)
Launching
Briefly, gliders are usually launched by towing them up to height with a light aircraft. They can also be launched by catapult (bungee), or with a winch, or towing by motor car. Once the tow has been released, the gliders drift down, losing height gradually, unless they are flown into an area of rising air. From a 2000 foot launch height a training glider will take about i o to 15 minutes to glide down for a landing. In soaring conditions however the flight can be extended for as long as the weather remains favourable.
Performance
Most training gliders have a normal flying speed of about 45 knots (50 mph) and a maximum permissible speed in a dive of about 120 knots. In many countries knots or nautical miles per hour are used in preference to miles an hour or kilometres per hour, i knot is almost exactly equal to 100 feet per minute and by using these units it is possible to make quick estimates of the gliding performance. For example, if the rate of descent is 3 knots or 300 feet per minute and the airspeed is 60 knots, the gliding angle is 60 -r- 3 = 20: i. This means that the glider will fly a distance of 20 times its height or, in no wind, just under 4 miles per thousand feet of height lost.
The normal rate of descent of most gliders is 150 to 200 feet per minute (i£ to 2 knots) at a speed of about 45 knots. At higher speeds, of course, the glider is gliding much more steeply and the rate of sink is far greater.
BEFORE YOUR FIRST FLIGHT
When to go gliding, sensations,.cockpit checks, your seating position
When to go gliding
If you can choose on which days you are going to go gliding, always listen to the radio or look at the weather forecast and try to avoid obviously bad weather. For your first few flights, you need good conditions to make quick progress. Do not go gliding if the forecast is for gales, rain or hill fog. Strong winds usually mean bumpy conditions and these are best avoided until you have done several flights and are used to handling the controls. Rain makes gliding unpleasant since everyone gets wet. You cannot see clearly and the perform ance of all gliders is spoiled by the effect of water on the wing, so gliders are not normally flown in rain. Any dry day with a light wind and without low cloud will be ideal for learning. Unfortunately, at a soaring club a really good day will attract all the more experienced pilots—which leaves fewer launches for instructional flying.
If you arrive and the weather is too bad to fly, you can learn useful things by helping in the hangar or by listening to the other pilots chatting over a cup of tea. There may be talks and discussions by the instructors and you will probably be welcome to join in and listen even if, as on weekdays, they are primarily for course members. Go to as many talks as you can as this will save you time and money.
Remember that drinking and flying do not mix and if you do have any alcoholic drinks, then you certainly should not fly solo. Whereas you may be able to drive fairly safely after a few drinks, research shows that ability to fly is seriously affected
20

BEFORE YOUR FIRST FLIGHT
wind direction
do not handle hereold tyres on the into wind wingtip or stake down
6. Ground handling. It is easy to damage an aircraft by bad ground handling. Gliders are parked at right angles to the wind and are never left unattended unless they are properly parked.
by any alcohol and that the effects last 10-12 hours or more. So even if the weather looks hopeless at lunch time, it is best to stick to soft drinks in case of an improvement later on.
When you arrive at the gliding site, before you do anything else put your name on the flying list. If you are first to arrive, start a flying list yourself, even if the weather looks doubtful. The flying list is the order of flying, so no name—no fly! Then offer to help with the gliders. Figure 6 shows which parts must not be handled, but if you are not sure ask the pilot or the instructor in charge.
21

GOING SOLO
The training at most gliding clubs is on two-seater gliders, but it can also be done on a motor glider, as at the Lasham Gliding Centre. Changing from one type of glider to another or from gliders to motor gliders from flight to flight will be like trying to learn to drive using a car for some lessons and a truck for others. It makes it all rather difficult and confusing.
The motor glider is vastly superior for learning how to land and can extend its flights if required. Instead of a turn of 2 or 3 launches on the glider, you can get 8 landings in a 3O-minute session in the motor glider and it is practice you need. Naturally you will be keen to progress to real gliders, but be patient because you will learn more quickly in the motor glider and an extra day or so on it can save you many days of training on the glider.
All two-seater training machines have full dual control so that the instructor can take over in an instant if you need help at any stage. In smooth air the glider will fly 'hands ofF without assistance. It is stable and is not about to fall out of the sky, although it may feel like it.
Sensations
On your first few flights you will experience some vivid and occasionally worrying sensations. This is quite normal and you will find that after a few flights the sensations become less and less noticeable. An aeroplane is often tipped slightly by bumps in the air, so that even if you hold the controls still it does not continue in steady flight. This means that the pilot has to make some corrections on the controls to keep the glider in level flight. Eventually you will learn to recognise these bumps and to correct for them, when they happen, smoothly and automatically.
While you are still getting used to the controls, these bumps are rather disconcerting and it will be difficult for you to tell, for example, whether the glider is banking over rather quickly because of a bump lifting one wing or whether it is because of a movement you have made on the controls. Sometimes a bump will tip you one way, sometimes the
22

BEFORE YOUR FIRST FLIGHT
other. A small movement on the stick to apply some bank for a turn may have no effect at all for a few seconds if a bump is opposing the control movement, whereas on another occasion a small movement may result in a rapid banking movement into quite a steep turn. This can be rather alarming and is bound to be confusing until the control movements have become more or less instinctive.
These sensations and how and why they occur are explained in the author's Beginning Gliding (A. & C. Black). Briefly, any nose-down pitching movement of the glider or any turbulence causing the glider suddenly to sink a few feet produces an unpleasant feeling, similar to that felt when driving over a hump-backed bridge or in an elevator or lift. After a few flights this feeling decreases because when we lower the nose and as we look ahead and see the movement against the horizon, our brain suppresses the sensation which we have learned to expect.
You will also notice that on some occasions as you bank the glider over into a turn you get a vivid feeling that the banking movement is getting out of control. This impression of overbanking and falling towards the lower wing can be very unnerving. This will not happen after a few more flights as it is caused by failing to use the rudder correctly at the start of the turn. Also with a little more practice, you can see that the angle of bank is not getting too steep. Once again your eyesight helps your brain to suppress the sensation and it ceases to be a problem.
We all have an inborn fear of falling, and our senses of balance are primarily to protect us from toppling over and hurting ourselves. Normally the sensations are suppressed by our eyesight, which confirms that all is well. After a few flights have made you familiar with the three-dimensional movements of an aircraft, the eyesight once again becomes the master of the situation so that as long as you can see what is happening the sensations are scarcely noticeable. Contrary to your expectations you will not experience the same sensation of height as when you look down from a cliff or high building.
23

GOING SOLO
Cockpit checks
A routine check ensures that nothing vital can be missed and that the pilot can take off without a nagging fear that perhaps he has forgotten something. In Great Britain this take off check is standardised for gliders and is remembered by the mnemonic CB SIFT CB. Each letter stands for a particular item. Other countries have similar checks and you should ask your instructor for details. These checks must be learned by heart. C—Controls-check for full and free movement of the stick and
rudder and that these controls are all working correctly. B-Ballast-check that the cockpit loads (pilot weight plus the
weight of the parachute) are within the limits on thecockpit placard. Additional ballast is vital if the pilot'sweight is less than the prescribed minimum (note: gliders ofthe same type do not necessarily have the same minimumor maximum cockpit loads).
S-Straps-check that your safety harness (and that of anypassengers) is tight.
I—Instruments-check that there are no obvious errors orbroken glasses in the critical instruments and reset thealtimeter if necessary.
F-Flaps-Set the flaps, if fitted, for take off. (Flaps are notalways fitted to training aircraft and this is sometimesomitted).
T-Trimmer-The trim lever should be checked for full andfree movement and set to the appropriate position for takeoff—on most gliders it is central for wire launches andslightly forward for aerotow.
C-Canopy-check the canopy lock and push up in the centreof the canopy to check that the whole canopy is secure.
B-Brakes—check by pulling the airbrake lever fully open andseeing that the airbrakes are open on both wings. Then closeand lock them.Once this check has been completed the launching rope or
cable can be attached and the glider is ready to be launched.In a motor glider the instructor operates the engine and
checks any additional items such as fuel, switches, etc.
BEFORE YOUR FIRST FLIGHT
Seating position
As far as possible you should always sit in the same position each time you fly, so that your view ahead is identical. If you are very small, you will need extra padding behind you and perhaps under you to be able to reach all the controls easily. If you are rather short in the leg it may be worth bringing your own cushions. Firm ones are best and a collection of old cardboard boxes folded flat and covered in brown paper or cloth is ideal. You should be able to obtain full rudder movement either way without having to straighten your knees completely and you should also be able to hold the airbrake lever and cable release knob without stretching.

EARLY FLIGHTS
The correct flying attitude, using the controls, trimming, turns, the landing
The correct flying attitude
During the early flights you must try to keep the glider flying in the correct attitude and speed for efficiency by looking ahead and learning to recognise the correct position of the nose in relation to the horizon. By looking ahead you can detect both nose up and down and banking movements. Do not look at the wingtips or you will find the nose position changing unnoticed. If the attitude is correct, the speed is correct, the glider is flying efficiently and the handling will be normal; if the nose is too high, the speed will be too slow, the controls will be sluggish and ineffective and the glider will mush down losing height rather quickly. If the nose is too low, the glider will be diving at a high speed and losing height rapidly.
Notice that whereas any change in attitude (nose position) can be seen and corrected immediately, both the airspeed indicator and the sound of the airflow have a considerable time lag. This is because the glider gains or loses speed gradually, quite a few seconds after any change of attitude. (In the same way, a bicycle freewheeling onto a steeper slope takes time to gain speed.)
If you look ahead and see the nose dropping, it is usually possible to bring it back to the correct position long before there is any change in the airspeed. Notice that the speed is always controlled by the attitude. Even in the motor glider or a normal aircraft the engine power has little effect on the
26
EARLY FLIGHTS
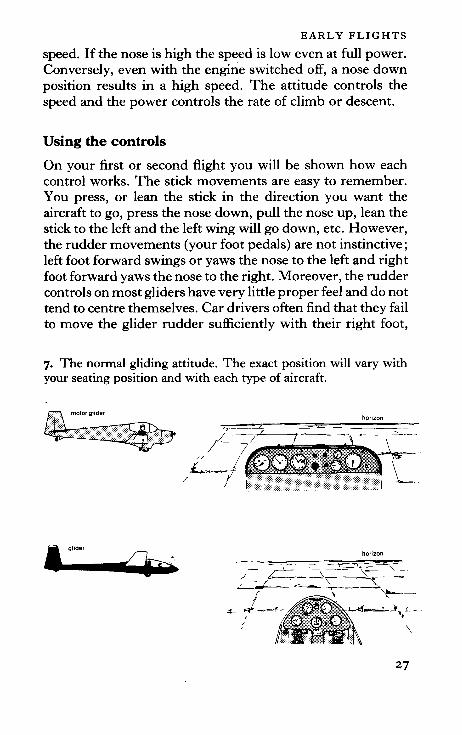
speed. If the nose is high the speed is low even at full power. Conversely, even with the engine switched off, a nose down position results in a high speed. The attitude controls the speed and the power controls the rate of climb or descent.
Using the controls
On your first or second flight you will be shown how each control works. The stick movements are easy to remember. You press, or lean the stick in the direction you want the aircraft to go, press the nose down, pull the nose up, lean the stick to the left and the left wing will go down, etc. However, the rudder movements (your foot pedals) are not instinctive; left foot forward swings or yaws the nose to the left and right foot forward yaws the nose to the right. Moreover, the rudder controls on most gliders have very little proper feel and do not tend to centre themselves. Car drivers often find that they fail to move the glider rudder sufficiently with their right foot,
7. The normal gliding attitude. The exact position will vary with your seating position and with each type of aircraft.

GOING SOLO
probably because in a car the right foot has the more delicate job of controlling the accelerator. A common fault at first is to brace both feet so firmly on the rudders that pressing on one pedal has little or no effect. As you push on one foot, the other foot must be moved back to allow the rudder to move.
There are several points to remember about the effects of the controls. Notice that any forward movement on the stick to lower the nose gives you that nasty hump-backed bridge feeling. Be gentle. The elevator is very powerful and sensitive. The size of a sideways movement of the stick controls the rate of roll and not the angle of bank—e.g. a small move to the left will result in a slow rolling movement to the left, with the angle of bank getting steeper and steeper until the pilot makes a countermove to stop it. A large move to the left will give a rapid rolling movement which again will continue until the pilot makes a countermove to stop it—in other words to bank to a certain angle the pilot initiates the banking by moving the stick, and then stops it with a countermove when it reaches the angle he wants. Turns can only be made by banking the glider.
Trimming
All gliders have some degree of fore and aft stability which means that if they are trimmed to fly 'hands off at a particular speed, they will always tend to return to that speed after being disturbed. When the glider is correctly trimmed the pilot can relax without the need for constant corrections on the elevator.
The first essential is to adjust the attitude until the glider is flying steadily at the desired speed. Remember to make only small changes in attitude and to wait for the speed to settle down. Then relax your hold of the stick just enough to detect whether the nose is tending to rise or fall, but correct it immediately. Hold the correct attitude and readjust the trim lever a little at a time until there is apparently no forward or backward pressure remaining on the stick. Test the trimming by relaxing once again. If the glider is correctly trimmed it28

EARLY FLIGHTS
will fly 'hands off' with the speed and attitude remaining constant. It is useful to practise trimming at various speeds until you can do it quickly. Always retrim at any time you notice any constant load on the stick; it is easier to fly a well trimmed glider. Never move the trimmer in flight unless your other hand is holding the stick. Nose heaviness is corrected by moving the trim lever further back; i.e. it works on the same principle as the stick movement.
Remember, do not attempt to retrim the glider exactly unless you have it flying at the correct speed and attitude. It must be in steady flight at the time.
Turns
Because of the low flying speed and large span of a glider, the rudder has to be used in conjunction with the stick movement (sideways) to apply and to take off the bank when entering and coming out of turns. During the turn, very, very little rudder is required, but a small backward move is needed on the stick to prevent the nose dropping and to ensure that the glider maintains the same speed. It is surprisingly difficult to make the rudder movements correctly in harmony with the stick movements and many beginners find it easiest to think aloud about the moves.
To turn correctly (Fig. 8.)Look around and particularly behind in the direction you are going to turn; then look ahead and correct the position of the nose if it is too high or too low; apply the bank with the stick and rudder together (stick to the left with left rudder, i.e. left foot forward), check the bank with a countermove sideways on the stick just beyorid the central position to stop the bank increasing, and then reduce the rudder to leave a very small amount of rudder in the direction of the turn (left rudder in a left turn). Finally ease back on the stick to prevent the nose dropping as the turn continues.
During a continuous turn use sideways moves on the stick
29

GOING SOLO
(3) check the bank, then reduce the rudder and ease back a little
(2) apply bank with stick and rudder
(1)look around, then correct the attitude if necessary
(4) recheck nose position and bank angle
(7) centralise all controls and recheck the attitude
(6) take off the bank using stick and rudder and relax the backward pressure
8. How to turn.1. Look around and behind for other aircraft, and recheck the
attitude.2. Watching ahead, apply the bank with stick and rudder together.3. Check the bank with the stick and then reduce the rudder.4. Recheck the nose position and the angle of bank.5. Recheck it is all clear to continue turning.6. Take off the bank using the stick and rudder together and relax
the backward pressure on the stick.7. Centralise the stick and rudder as the wings come level and
recheck the attitude and speed.
to correct small changes in the angle of bank, and changes in forward or backward pressures to maintain the correct position of the nose in relation to the horizon. Look around several times in each circle. As you come out of the turn, take off the bank by leaning the stick the way you want the aircraft to go, using the rudder at the same time—i.e. stick to the right with right foot forward. As the wings come level relax the
30

This handbook is the ideal quick reference guidefor the novice glider pilot.
It provides a clear and concise introduction toeverything he needs to know, from his first lesson
up to the great moment of the first solo flight -and after it. It describes the sequences of
training, the problems that are likely to occurand how to solve them, common mistakes and how
to avoid them, and all in a format that is portableand durable enough to take out onto the airfield
itself. It is a practical manual to the extent that there are even blank pages for the beginner pilot to jot down his own questions and comments
as his training progresses.The book is fully illustrated with the author's
clear line drawings.Derek Piggott is superbly qualified to write a beginner's gliding handbook. He is one of the world's finest gliding instructors, and as Chief Flying Instructor at Lasham Gliding Centre in
Hampshire he has introduced many people to the pleasures of silent flight. He is also the author
of the standard works of reference Gliding, Beginning Gliding and Understanding Gliding.
35 line illustrations
ISBN 0 7136 1899 X
Cover photograph by Steve Bicknell
ADAM AND CHARLES BLACK LONDON

The Wally Kahn/British Gliding Association eBook Library is unable to obtain copyright approval to provide
the reader with the complete eBook.
By including a number of pages we have endeavoured to provide you with the flavour and content of this book
so that you can decide whether or not to purchase a copy.
It may be that the Publisher and/or Author are intending to print a further edition so we recommend you contact
the Publisher or Author before purchasing.
If there are no details provided in the sample Search online to find a new or
second hand copy.
Addall, a book search and price comparison web site at http://www.addall.com is very
good for gliding books.
Copyright of this book sample and the book remains that of the Publisher(s) and Author(s) shown in this
sample extract.
No use other than personal use should be made of this document without written permission of all parties.
They are not to be amended or used on other websites.