Embed Size (px)
Citation preview

Date: January 2009Based on go1984 Desktop Client Version 3.7.2.8 © 2000-2009 logiware gmbh
User manual
go1984 Desktop Client
Alfred-Mozer-Str. 42D-48527 Nordhorn
Germany
Telephone: +49 (0)5921 7139925Fax: +49 (0)5921 7139929
http://www.logiware.de
http://www.go1984.com

© 2000-2009 logiware gmbh
Contents
................................................................................................................................... 11 Introduction
................................................................................................................................... 22 Installation
................................................................................................................................... 63 Requirements
................................................................................................................................... 74 Starting the go1984 Desktop Client
................................................................................................................................... 85 Adding servers
................................................................................................................................... 116 Settings
................................................................................................................................... 127 Using the go1984 Desktop Client
......................................................................................................................................................... 12Single image view
.................................................................................................................................................. 13Available Cameras
.................................................................................................................................................. 15Changing cameras
.................................................................................................................................................. 16Previewing images
.................................................................................................................................................. 19Live and motion modes
.................................................................................................................................................. 20Sound and popup in the event of movement
.................................................................................................................................................. 21Operating PTZ cameras
......................................................................................................................................................... 23Multiple image view
.................................................................................................................................................. 24Creating a view
.................................................................................................................................................. 25Adding a camera
.................................................................................................................................................. 27Adding a background image
.................................................................................................................................................. 28Selecting a camera
.................................................................................................................................................. 29Deleting a view
......................................................................................................................................................... 30Recording folder
................................................................................................................................... 348 Closing the go1984 Desktop Client
................................................................................................................................... 359 Editorial information

© 2000-2009 logiware gmbh
Introduction
- 1 -
1 Introduction
The operators of digital video surveillance solutions often need not only to display live images andrecordings centrally, but also to make them available to a range of users in different locations.
The go1984 Desktop Client makes it easy to access the cameras in a go1984 system, their recordings andtheir control functions remotely from any computer over a network or the internet. This also allows access toseveral distributed go1984 systems, thereby providing a central monitoring tool.
The go1984 Desktop Client has the following features:
· The option of transmitting all live images or only those where motion is detected· Access to the entire archive of recordings from all the cameras in the system· Depending on your requirements, single or multiple views which allow you to display one live image or
several simultaneously - the cameras shown may be located on different go1984 servers· Inform users via a popup and/or sound in the event of any movement· Controls for pan/tilt/zoom cameras

© 2000-2009 logiware gmbh - 2 -
Installation
2 Installation
Start the installation by double-clicking on setup.exe:
You will then be guided step-by-step through the process of installing the go1984 Desktop Client:
In most cases you will be able to use the default settings and simply move through the installation processby clicking on the "Next >" button.

© 2000-2009 logiware gmbh
Installation
- 3 -
If you want to install the go1984 Desktop Client in a different folder or on a different drive, you can choosethe folder or drive from this dialog box:
The installation process automatically adds an item called "go1984 Desktop Client" to your Start menu. Youcan choose a different name from the following dialog box:

© 2000-2009 logiware gmbh - 4 -
Installation
You have now entered all the information needed for the installation. Click on the "Install" button to completethe installation and copy the files to your hard disk.
The installation of the go1984 Desktop Client is now complete. Click on the "Finish" button to end theinstallation process. You also have the option of starting the go1984 Desktop Client immediately.

© 2000-2009 logiware gmbh
Installation
- 5 -
To uninstall the go1984 Desktop Client, choose "Uninstall go1984 Desktop Client" from the Start menu:
Start à Programs à go1984 Desktop Client à Uninstall go1984 Desktop Client

© 2000-2009 logiware gmbh - 6 -
Requirements
3 Requirements
You can access the go1984 Web Server using the go1984 Desktop Client over a network or the internet. Inorder to be able to establish a connection with the go1984 Web Server, it must be running and accessible.
To access the go1984 Web Server over your internal network, you simply need the IP address and port ofthe go1984 computer (for example, 192.168.0.1:81).
To access the go1984 computer over the internet, you need a static public IP address or a dynamic domainname. The port used by the go1984 Web Server (standard 80) must be configured in the router in such away that queries sent over the internet are passed to the machine running go1984. This router setting isoften called NAT or port forwarding, but it may have other names, depending on the model. In the go1984Web Server you must enter the (dynamic) domain name (without "http://www.") or the internet IP address ofthe computer in the "Domain" field on the "Domainname" tab.
The following figure shows sample settings for the go1984 Web Server. You can find more informationabout this in the go1984 manual:
You should also be aware that go1984 Standard Edition allows one access and go1984 Pro Edition allowstwo simultaneous accesses to the go1984 Web Server. In go1984 Enterprise Edition the software puts norestrictions on the number of simultaneous accesses.
In addition the version number of the go1984 software must be the same or higher than that of the go1984Desktop Client. In other words, you cannot use a current version of the go1984 Desktop Client to accessprevious versions of go1984.
You should also ensure that ".Net Compact Framework 3.0" is installed on the PC.
© 2000-2009 logiware gmbh
Starting the go1984 Desktop Client
- 7 -
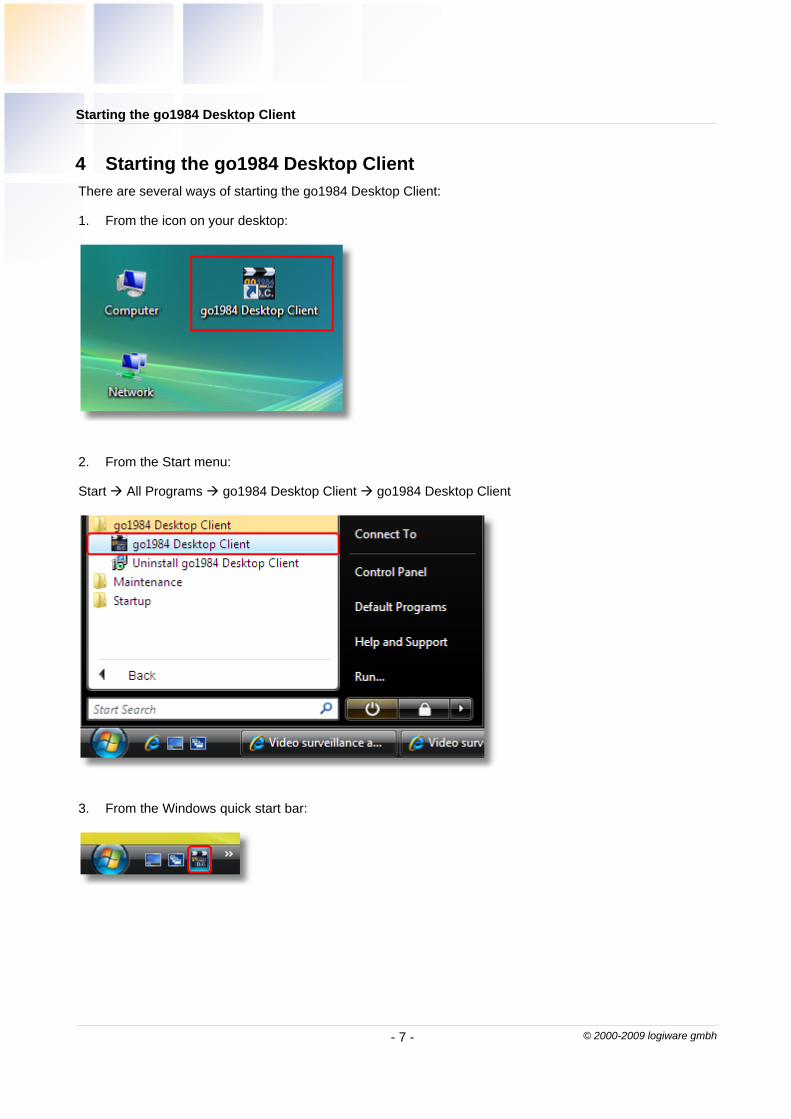
4 Starting the go1984 Desktop Client
There are several ways of starting the go1984 Desktop Client:
1. From the icon on your desktop:
2. From the Start menu:
Start à All Programs à go1984 Desktop Client à go1984 Desktop Client
3. From the Windows quick start bar:

© 2000-2009 logiware gmbh - 8 -
Adding servers
5 Adding servers
After start-up you have the option to specify one or more go1984 servers whose pictures and recordings youwould like to access from the desktop client:
In order to be able to connect to the go1984 Web Server, you must enter its connection data in the go1984Desktop Client:
Enter the following settings under the heading "Server":
Name Name of the go1984 web server, which the server will berun under from now on in the desktop client
Host IP address or hostname of your go1984 web server without "http://www."
Port The port of your go1984 PC.
Username The user name from the go1984 user administration.
Password The password from the go1984 user administration.

© 2000-2009 logiware gmbh
Adding servers
- 9 -
You can easily specify additional go1984 web servers and configure the settings for each one as describedabove:
If a version conflict occurs the go1984 desktop client will inform you of this by highlighting the server nameyou have allocated in red. The following message also appears:
You click on the key icon to access the settings dialog box for the web server currently selected. Click
on to delete the web server from the list.

© 2000-2009 logiware gmbh - 10 -
Adding servers
The "Quality" setting determines the image compression. Using the sliders you can set this value for:
· Live images· Preview images in the recordings overview and in the preview of the most recently transmitted scenes· Recordings
A value of "100" ensures that the images are transmitted in the original quality. If there is limited bandwidthavailable (for example, using internet access), you can reduce the settings to obtain an appropriate framerate.
Quality of preview image = 100 Quality of preview image = 10
To save your settings and close the dialog box, click on the "Save" button:

© 2000-2009 logiware gmbh
Settings
- 11 -
6 Settings
Other settings can be configured which apply across all the servers. Click on the following button at any timeto open the settings dialog box:
The "Settings" dialog box appears:
In addition you can choose whether to establish a connection to the go1984 web werver (or go1984 webservers) automatically when you start up the go1984 Desktop Client. If you do not choose this option, youmust establish the connection manually by clicking on the following button:
This establishes or disconnects the connection with all go1984 servers. This means that servers cannot beconnected or disconnected individually.
Use the slider "Reload Thumbs (s)" to set the interval for updating the preview images.
Enable the relevant option so that the go1984 desktop client always remains on top.You can also set a forced pause in seconds by setting an alarm to be emitted via a popup and/or soundusing the “Pause between alarms (s)” slide control so that you are not sent several messages in the event ofmovement.
To save your settings and close the dialog box, click on the "Save" button:

© 2000-2009 logiware gmbh - 12 -
Using the go1984 Desktop Client
7 Using the go1984 Desktop Client
7.1 Single image view
In the single image view, you can display the live or motion images from any of the available cameras. (Youcan find out more about these concepts in the "Live and motion modes" section). In addition you alwayshave access to the most recently transmitted scenes and can operate controllable cameras using thego1984 Desktop Client.

© 2000-2009 logiware gmbh
Using the go1984 Desktop Client
- 13 -
7.1.1 Available Cameras
If the go1984 user administration is running, only the cameras for which the user whose details were
entered in the "Settings" dialog box has permissions are displayed on the list.
You can assign users permissions in the go1984 user administration. You can find more information aboutthis in the go1984 user manual. You should be aware in particular that after you add a new camera, existingusers will not by default have access to the camera via the go1984 Desktop Client, so you will need toassign the user permissions for the camera in go1984:
In addition the user must be given the "pda" permission under the heading "Web".

© 2000-2009 logiware gmbh - 14 -
Using the go1984 Desktop Client
Only the cameras for which the current user has permissions are displayed in the go1984 Desktop Client:
You can determine the order in which the available cameras are shown in the list from the "Sequence ofcameras" tab in the go1984 Web Server settings dialog box:

© 2000-2009 logiware gmbh
Using the go1984 Desktop Client
- 15 -
7.1.2 Changing cameras
If several servers have been connected you can first select the server you want by clicking on it and thendisplay the picture from a camera for this server by clicking on the name of the camera in the selection list.This means that only ever the cameras for the server which has just been selected will be available tochoose from. If you change server the picture from the previously selected camera will be displayed untilanother camera is selected by clicking on it.

© 2000-2009 logiware gmbh - 16 -
Using the go1984 Desktop Client
7.1.3 Previewing images
In order to allow you to check quickly and easily what has been happening, the last twelve available scenesfrom the recordings folder of the camera you selected are shown on the right-hand side of the window. Thepreview image is the image from the middle of the scene, as this is generally the most useful. Underneaththe preview image you can see its date and time:

© 2000-2009 logiware gmbh
Using the go1984 Desktop Client
- 17 -
To replay a scene, simply click on its preview image:
"REC" in the top right-hand corner of the image indicates that the system is in playback mode. Below thecontrol buttons you can also see the date and the time, the current image number (Image 24 / 83) and thetotal number of images in the scene (Image 24 / 83).You can move directly to any point in the scene by clicking on the appropriate place in the playbackindicator:
© 2000-2009 logiware gmbh - 18 -
Using the go1984 Desktop Client
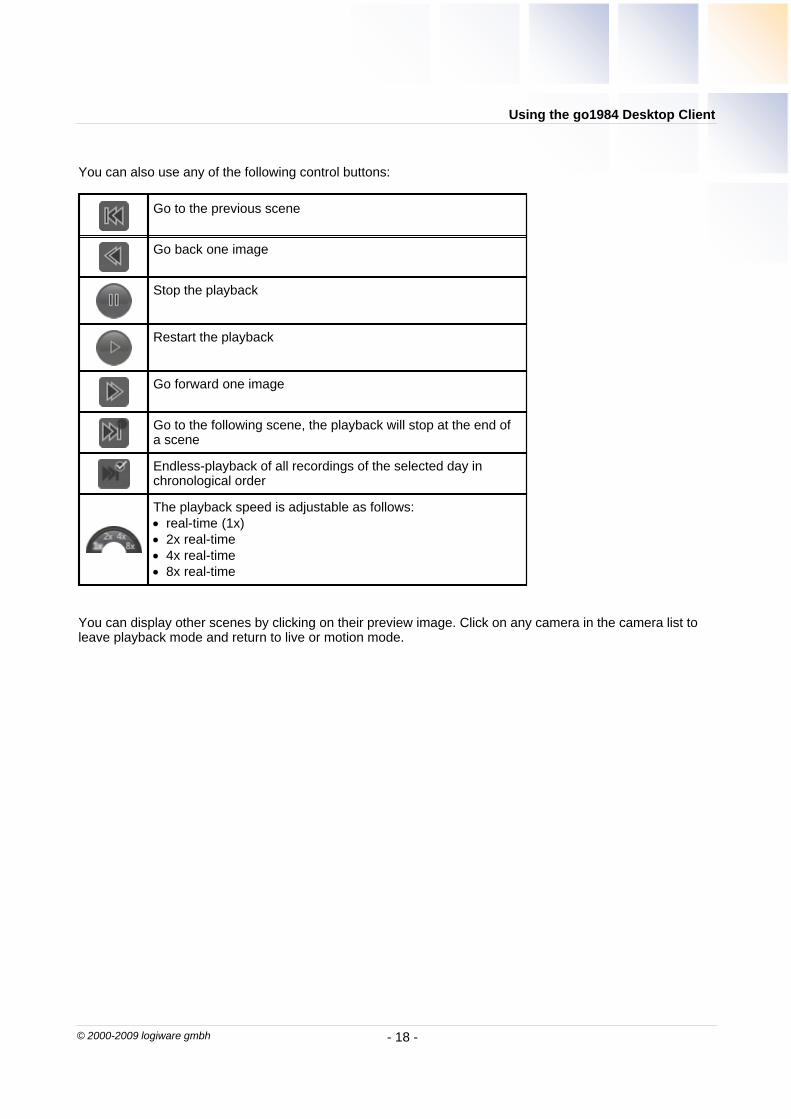
You can also use any of the following control buttons:
Go to the previous scene
Go back one image
Stop the playback
Restart the playback
Go forward one image
Go to the following scene, the playback will stop at the end ofa scene
Endless-playback of all recordings of the selected day inchronological order
The playback speed is adjustable as follows:· real-time (1x)· 2x real-time· 4x real-time· 8x real-time
You can display other scenes by clicking on their preview image. Click on any camera in the camera list toleave playback mode and return to live or motion mode.

© 2000-2009 logiware gmbh
Using the go1984 Desktop Client
- 19 -
7.1.4 Live and motion modes
There are two transmission modes:
1. Live mode2. Motion mode
In live mode the images are transmitted constantly regardless of whether motion is detected or not.
In motion mode only those images where motion is detected are transmitted. This means that the imagesare only updated for each camera when motion is detected. We generally recommend using this mode as itallows for the most efficient use of the available bandwidth. You can choose the mode you want at any timeusing these buttons:
You are currently in live mode. Click on the button toswitch to motion mode.
You are currently in motion mode. Click on the buttonto switch to live mode.
If you choose motion mode, where images are only transmitted when motion is detected, make sure that themotion detection function of the cameras in go1984 is enabled:

© 2000-2009 logiware gmbh - 20 -
Using the go1984 Desktop Client
7.1.5 Sound and popup in the event of movement
If the desktop client is in motion mode (pictures are refreshed only in the event of movement), you have theoption to be informed as follows in the event of a recognised movement:
1. Popup in the event of movement
Popup enabled - the desktop client will appear on top in the event ofa recognised movement
Popup disabled
2. Sound in the event of movement
Sound enabled - in the event of a recognised movement, you will bealerted by an acoustic signal. You need to have a suitable sound cardand loudspeakers for this.
Sound disabled

© 2000-2009 logiware gmbh
Using the go1984 Desktop Client
- 21 -
7.1.6 Operating PTZ cameras
If the currently selected camera is a pan/tilt/zoom (PTZ) camera with control functions supported by go1984,you can operate the camera using the go1984 Desktop Client:
Moves the selected PTZ camera up.
Moves the selected PTZ camera down.
Moves the selected PTZ camera to the left.
Moves the selected PTZ camera to the right.
You can also move the camera in the direction you wantusing the joystick.
The camera's zoom is controlled via [+] to enlarge theimage or [-] to reduce it. Cameras supporting an absolutepositioning may also be controlled using the the slider.
Use the position buttons to move the camera to positionsthat have been defined in go1984.

© 2000-2009 logiware gmbh - 22 -
Using the go1984 Desktop Client
If a camera with no PTZ functionality is selected or if the current user does not have the permissions to usethe PTZ functions, the PTZ field is grayed out and does not respond to input:
You can set the PTZ function permissions for the current user from the go1984 user administration:
© 2000-2009 logiware gmbh
Using the go1984 Desktop Client
- 23 -
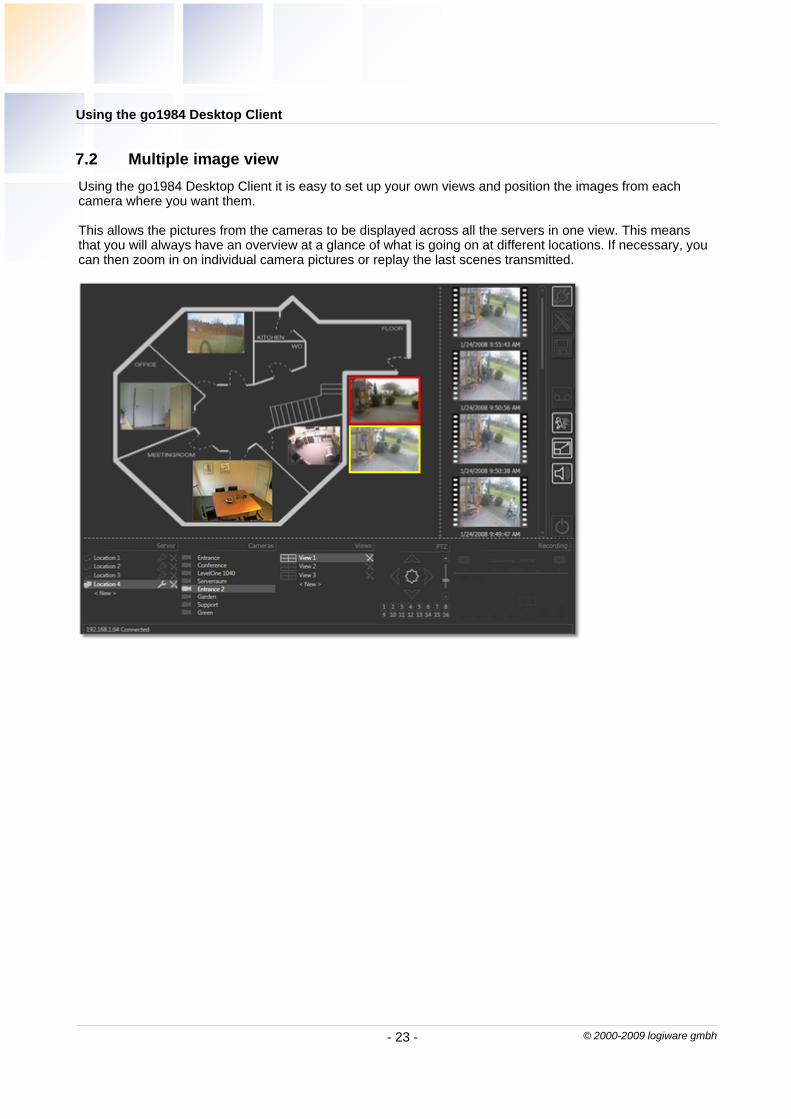
7.2 Multiple image view
Using the go1984 Desktop Client it is easy to set up your own views and position the images from eachcamera where you want them.
This allows the pictures from the cameras to be displayed across all the servers in one view. This meansthat you will always have an overview at a glance of what is going on at different locations. If necessary, youcan then zoom in on individual camera pictures or replay the last scenes transmitted.

© 2000-2009 logiware gmbh - 24 -
Using the go1984 Desktop Client
7.2.1 Creating a view
By clicking on < New > you can create a new empty view:
It is automatically given the name View (or View1, View2 etc.).
To rename a view, click again on the highlighted view name:
Enter the new name and then press "Return" to confirm it.

© 2000-2009 logiware gmbh
Using the go1984 Desktop Client
- 25 -
7.2.2 Adding a camera
To add a camera image, right-click on the view area:
By default the first camera in the list is added. Right-click on the image to select a different camera. Ifcameras are available from various go1984 servers the cameras for each server will be listed, separated bya line:
Press and hold the left mouse button to drag the image to a new position. The current position is displayedwithin the image as distance to the top left-hand corner:

© 2000-2009 logiware gmbh - 26 -
Using the go1984 Desktop Client
To change the size of the image, move the mouse pointer to the bottom right-hand corner of the image. The
mouse pointer will change to this symbol and you can enlarge or reduce the size of the image. Thecurrent size is also displayed within the image:
Right-click on the camera image if you want to scale the image to 320 x 240 pixel / 640 x 480 pixel or wantto remove a camera from the view:
This allows you to add as many cameras as you want to the view:
If you have made changes, you can save your new settings by clicking on the following button:

© 2000-2009 logiware gmbh
Using the go1984 Desktop Client
- 27 -
7.2.3 Adding a background image
You can add a background image to the view you have created. All the common formats, such as .bmp,.jpg, .gif and .png, are supported. This allows you to position the camera images in the appropriate place ona site plan, for example.
Right-click on the view area to display the following pop-up menu:
Choose "Set background image" and then select the image you want in the dialog box that appears:
If you want to remove the background image, right-click on the view area to display the pop-up menu again:
You can then save your new settings:

© 2000-2009 logiware gmbh - 28 -
Using the go1984 Desktop Client
7.2.4 Selecting a camera
The camera you have selected is indicated by a yellow border around the image:
When you switch camera, the relevant server is highlighted in the “Server” zone and the camera’s name ishighlighted in the “Cameras” zone.
In the same way as for the single image view, the last twelve scenes from the selected camera aredisplayed for previewing.By clicking on a scene you can play it back. Double-click on the scene you are playing back to return to themultiple view.You can find more information about this in the "Previewing images" section.
If the camera you have selected has PTZ support in go1984, you can use these functions from the go1984Desktop Client. You will find more information about this in the "Operating PTZ cameras" section.
As in the single image view, you can choose live or motion mode for transmitting the images. In motionmode the image with the latest motion will be marked with a red frame. See the "Live and motion modes"section for further information. The alert function via popup or sound, which has already been described inthe "Sound and popup in the event of movement” section, is only enabled for the cameras displayed inmultiple view.
To display a camera image as a single image view, double-click on the image. Double-click on the imageagain to return to the multiple view.

© 2000-2009 logiware gmbh
Using the go1984 Desktop Client
- 29 -
7.2.5 Deleting a view
To delete a view permanently, click on the after the camera name:

© 2000-2009 logiware gmbh - 30 -
Using the go1984 Desktop Client
7.3 Recording folder
As well as previewing the most recently transmitted scenes from the selected camera in single or multipleviews, the go1984 Desktop Client also allows you to access the entire archive of recordings.
In order to access the archive, you must have the necessary permissions, which you can set in the go1984user administration:
You can define the access periods for each camera. You will find more information about this in the go1984user manual:

© 2000-2009 logiware gmbh
Using the go1984 Desktop Client
- 31 -
Click on the following button to go to the recordings archive for the camera you have currently selected inthe single or multiple view:
The button is now enabled, which indicates that you are in the recordings archive:
The preview images are the images from the middle of each scene, as these are generally the most useful.Each preview image is labeled with the date and time.
If there are more images on this specific day for the selected camera than can be displayed on one screen,you can use the arrow buttons to display the remaining recordings:

© 2000-2009 logiware gmbh - 32 -
Using the go1984 Desktop Client
The calendar which was previously grayed out and disabled can now be used to select the day for which youwant to view the recordings:
Use the arrow keys to select the month you want:
Click on the scene to start it:
You can find more information about the control buttons and how to use them in the "Previewing images"section.

© 2000-2009 logiware gmbh
Using the go1984 Desktop Client
- 33 -
Double-click on the camera image or click on the recording button to return to the camera's recording view:
To move to another camera in the archive, click on the camera of your choice in the camera list:
Click on the recording button again to leave the archive:
You will return to the previously selected camera or view in live or motion mode.
© 2000-2009 logiware gmbh - 34 -
Closing the go1984 Desktop Client
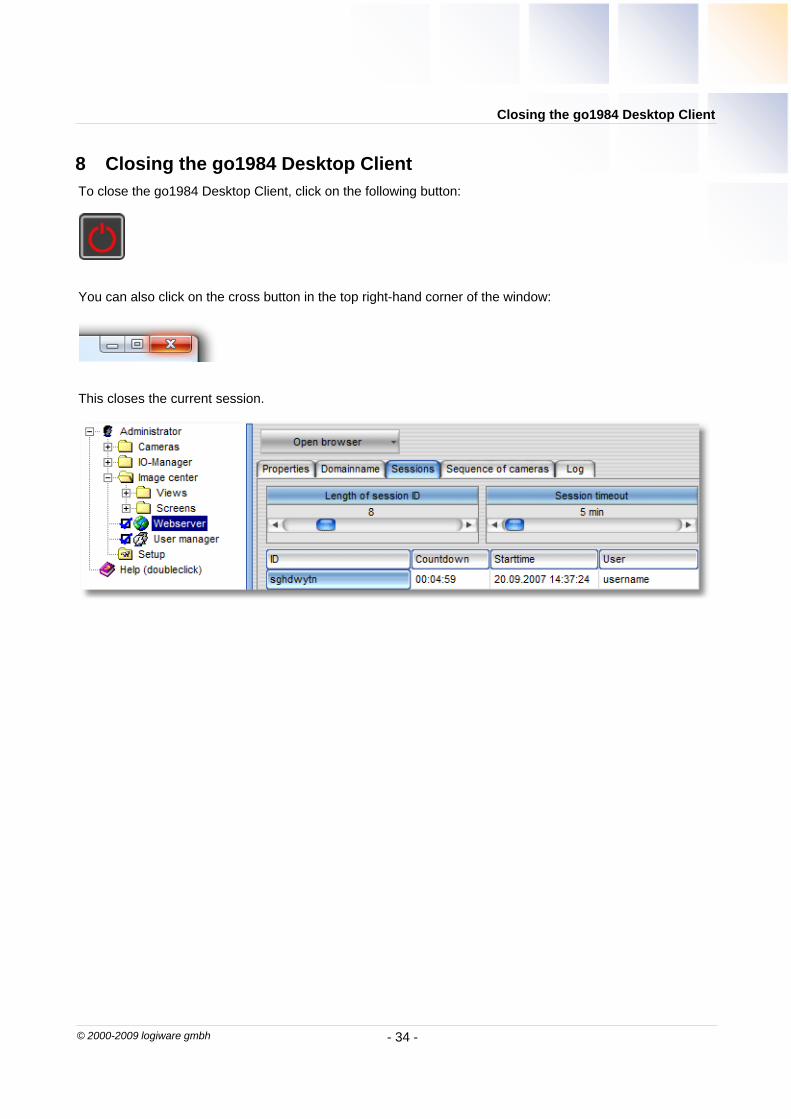
8 Closing the go1984 Desktop Client
To close the go1984 Desktop Client, click on the following button:
You can also click on the cross button in the top right-hand corner of the window:
This closes the current session.

© 2000-2009 logiware gmbh
Editorial information
- 35 -
9 Editorial information
logiware gmbhAlfred-Mozer-Str. 42
D-48527 NordhornGermany
Telephone: +49 (0)5921 7139925Fax: +49 (0)5921 7139929
Website: http://www.go1984.comSales e-mail address: [email protected]
Support e-mail address: [email protected]
All company and/or product names are trademarks and/or registered trademarks or brands of the relevantmanufacturers. Subject to technical changes. Errors excepted.


![[MS-RDPECLIP]: Remote Desktop Protocol: Clipboard … · Remote Desktop Protocol: Clipboard Virtual Channel ... Remote Desktop Protocol: Clipboard Virtual ... Remote Desktop Protocol:](https://img.pdfslide.us/doc/110x75/5ae3205b7f8b9a097a8dc1a3/ms-rdpeclip-remote-desktop-protocol-clipboard-desktop-protocol-clipboard.jpg)
![[ORAL ARGUMENT NOT SCHEDULED] No. 17-5207 IN THE … › wp-content › uploads › 2019 › 10 › US... · 2019-10-09 · [ORAL ARGUMENT NOT SCHEDULED] No. 17-5207 IN THE UNITED](https://img.pdfslide.us/doc/110x75/5f1a14b25eab7b2230052273/oral-argument-not-scheduled-no-17-5207-in-the-a-wp-content-a-uploads-a.jpg)