Embed Size (px)
Citation preview

2 GlucoMen® Gm - 41208 - 07/09
Menarini Helpline
If you have any questions, please contact your distributor:
Menarini Helpline: A. MENARINI DIAGNOSTICS Ltd 405 Wharfedale Road, Winnersh, Wokingham Berkshire, RG41 5RA Tel. +44-1189-444100 - Fax +44-1189-444111 Menarini Helpline: (GB) 0800 243667 (Northern Ireland) 0800 783 7286 (Republic of Ireland) 1800 709903 E-mail: [email protected]
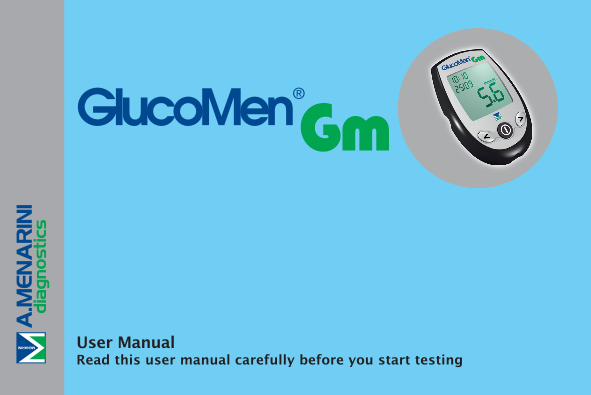
The GlucoMen® Gm meter is an in vitro diagnostic medical device intended for blood glucose self-testing.
The product conforms to the requirements of Directive 98/79/EC on in vitro diagnostic medical devices.
Date of issue July 2009
3
UK
GlucoMen® Gm - 41208 - 07/09
WarninG
please pay attention to the following messages
WarninGGlycaemic results may be presented in two different types of measurement units (mmol/L or mg/dL).For this reason GlucoMen® Gm meters are pre-set in either of the two different types of measurement unit according to the label of the meter box.Please ensure that your meter uses the unit of measurement indicated by your healthcare professional.
WarninGHandling blood can be dangerous. oHealthcare professionals carrying out tests on different patients should be strongly advised that any
devices which come into contact with blood may constitute a risk of cross infection. This product may become infectious in the course of use. Discard the product in accordance with local regulations for biohazardous waste.
WarninGFollow the instructions given by your healthcare professional.oDo not deviate from the instructions on the basis of the results produced, without first consulting your
health care professional. oSeek medical advice if you are unsure of a result.oIf symptoms are not consistent with test results and all the instructions have been followed carefully,
contact your diabetes healthcare professional.
4 GlucoMen® Gm - 41208 - 07/09
WarninG
CaUTiOnTo prevent injury and damage to any object, follow the instructions given in this manual.
nOTeTo prevent damage to the device, additional notes and explanations are provided in this manual.
nOTeThe manufacturer cannot be held responsible for any consequences resulting from the incorrect use of the GlucoMen® Gm meter which does not fall in line with the instructions set out in this user manual.
5
UK
GlucoMen® Gm - 41208 - 07/09
COnTenTS
INTRODUCTION 7
INTENDED USE - IMPORTANT INFORMATION 8
THE GLUCOMEN® Gm SYSTEM INCLUDES 9
GETTING TO KNOW THE GLUCOMEN® Gm METER 11
GENERAL FEATURES 13
CARING FOR YOUR GLUCOMEN® Gm BLOOD GLUCOSE MONITORING SYSTEM 14STORAGE AND HANDLING 14CLEANING THE METER 16
CHANGING THE BATTERY 17
METER SET UP 19TIME AND DATE 20
USING GLUCOMEN® Gm GLUCOSE CONTROL SOLUTIONS 25
MARKING CONTROL SOLUTION TESTS IN THE MEMORY 26
PERFORMING A CONTROL SOLUTION TEST 27COMPARING CONTROL SOLUTION RESULTS 31
TESTING WITH GLUCOMEN® Gm SENSOR 32GLUCOMEN® Gm SENSOR 32
6 GlucoMen® Gm - 41208 - 07/09
COnTenTS
IMPORTANT TEST STRIP INFORMATION 33
PERFORMING A BLOOD GLUCOSE TEST 34
IMPORTANT INFORMATION ABOUT ALTERNATIVE SITE TESTING 39
PERFORMING A BLOOD GLUCOSE TEST FROM AN ALTERNATIVE SITE 40
UNDERSTANDING TEST RESULTS 46
USING THE GLUCOMEN® Gm METER MEMORY 48RECALLING RESULTS 48
DATA MANAGEMENT SOFTWARE 52
COMPARING METER AND LABORATORY RESULTS 53
TROUBLESHOOTING 54
SPECIFICATIONS 62
UNDERSTANDING THE SYMBOLS 63
WARRANTY 65
7
UK
GlucoMen® Gm - 41208 - 07/09
inTrODUCTiOn
Thank you for choosing the GlucoMen® Gm Blood Glucose Monitoring System. This system is suitable for self-testing of blood glucose.Frequent blood glucose testing is important. It tells you how your diabetes is affected by factors such as medication, diet, exercise, and stress management. Blood glucose test results can also tell you if your diabetes is changing in ways that affect your treatment plan. always consult your diabetes healthcare professional before making any changes.
all of the information needed to use the GlucoMen® Gm meter is included in this manual. please read it thoroughly before using the system.
If you have any questions regarding this product, please contact your distributor for assistance on the following number: (GB) 0800 243667 - (Northern Ireland) 0800 783 7286 - (Republic of Ireland) 1800 709903.Contact your healthcare professional with questions if you are unable to reach the Menarini Helpline.
please remember to return the enclosed warranty card.
8 GlucoMen® Gm - 41208 - 07/09
inTenDeD USe - iMpOrTanT inFOrMaTiOn
inTenDeD USeThe GlucoMen® Gm Blood Glucose Monitoring System is intended for the quantitative measurement of glucose in fresh capillary whole blood. Testing is done outside the body (in vitro diagnostic use). It is intended for blood glucose self-testing at home. It may also be used in clinical settings by healthcare professionals.
iMpOrTanT inFOrMaTiOn (1)
o A blood glucose level in a normal subject, under fasting conditions, is between 3.8 mmol/L and 6.1 mmol/L.
o A blood glucose level, under fasting conditions, between 6.1 mmol/L and 6.9 mmol/L is an indication of impaired fasting glucose.
o A blood glucose level, under fasting conditions, over 7.0 mmol/L is an indicator of diabetes.
(1) Report of the expert committee on the diagnosis and classification of diabetes mellitus. Diabetes Care 1999;22:S5-19.
9
UK
GlucoMen® Gm - 41208 - 07/09
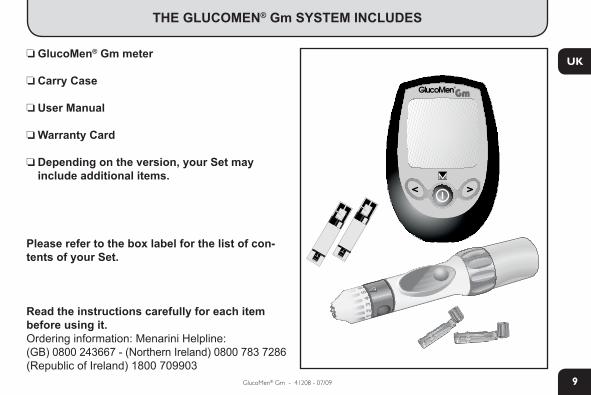
THe GlUCOMen® Gm SYSTeM inClUDeS
o GlucoMen® Gm meter
o Carry Case
o User Manual
o Warranty Card
o Depending on the version, your Set may include additional items.
please refer to the box label for the list of con-tents of your Set.
read the instructions carefully for each item before using it.Ordering information: Menarini Helpline: (GB) 0800 243667 - (Northern Ireland) 0800 783 7286(Republic of Ireland) 1800 709903
10 GlucoMen® Gm - 41208 - 07/09
THe GlUCOMen® Gm SYSTeM inClUDeS
IMPORTANTo The GlucoMen® Gm Sensor is the exclusive test strip for the GlucoMen® Gm metero Before using the GlucoMen® Gm meter, read the instructions on the GlucoMen® Gm Sensor package
insert carefully. Follow all the instructions to ensure safe and accurate operation of the meter.o To perform a blood glucose test, you must draw blood using a lancing device and lancet. Please use
only Glucoject® branded pricking devices and lancets.o Before using the lancing device to obtain blood, read the appropriate instructions carefully.
Be very careful when handling these materials, especially when dealing with blood.
nOTeThe GlucoMen® Gm system does not contain latex by design.
nOTe:Healthcare professionals who test their patients’ blood are advised to wear non-latex disposable gloves.
Glucoject® branded pricking devices and lancets are products manufactured by Owen Mumford Ltd, Brook Hill, Woodstock, Oxford OX20 ITU, UK.
11
UK
GlucoMen® Gm - 41208 - 07/09
GeTTinG TO KnOW THe GlUCOMen® Gm MeTer
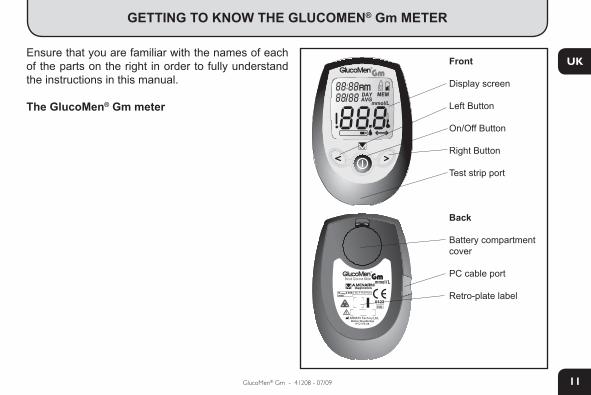
Ensure that you are familiar with the names of each of the parts on the right in order to fully understand the instructions in this manual.
The GlucoMen® Gm meter
Front
Display screen
Left Button
On/Off Button
Right Button
Test strip port
Back
Battery compartment cover
PC cable port
Retro-plate label
12 GlucoMen® Gm - 41208 - 07/09
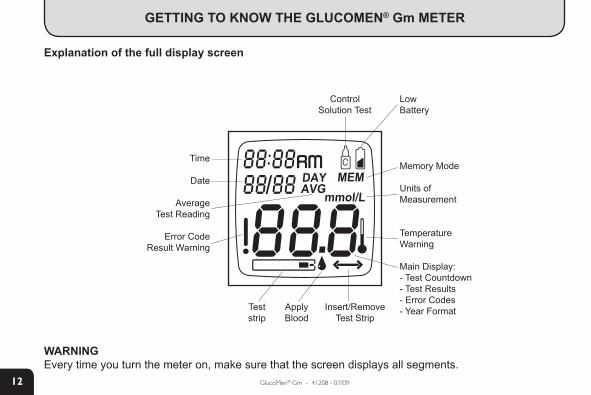
explanation of the full display screen
WarninGEvery time you turn the meter on, make sure that the screen displays all segments.
GeTTinG TO KnOW THe GlUCOMen® Gm MeTer
ControlSolution Test
LowBattery
Memory Mode
Units of Measurement
TemperatureWarning
Main Display:- Test Countdown- Test Results- Error Codes- Year Format
Time
Date
AverageTest Reading
Error CodeResult Warning
Teststrip
ApplyBlood
Insert/RemoveTest Strip
13
UK
GlucoMen® Gm - 41208 - 07/09
General FeaTUreS
GlucoMen® Gm system has the following features:
o The system is suitable for blood glucose testing on samples from both fingers and palm/alternative sites.
o The GlucoMen® Gm Sensor has a sample volume control and detects when the right amount of blood has been applied.
o The system requires only 0.5 µL of blood.o Test results are available in 7 seconds.o The last 250 test results will be stored in the memory of the GlucoMen® Gm meter, and can be recalled
whenever necessary by using the Function Buttons.o Glucose results stored in the meter’s memory can be also downloaded and filed by using Menarini
software, which is supplied separately.o Blood glucose tests are easily performed in a simple two-step procedure.o The meter automatically turns ON by inserting a strip, and turns OFF 2 minutes after completing the
measurement.o Power is supplied by a single battery and approximately 2,000 tests may be performed before replacing
the battery.o GlucoMen® Gm meter will never produce an audible “beep”. This ensures that privacy is maintained
when obtaining a blood glucose measurement.o Information about the performances of the system are found in the insert of the GlucoMen® Gm Sensor
pack.
nOTeBefore testing, always make sure you are using the test strips GlucoMen® Gm Sensor.
14 GlucoMen® Gm - 41208 - 07/09
CarinG FOr YOUr GlUCOMen® Gm BlOOD GlUCOSe MOniTOrinG SYSTeM
STOraGe anD HanDlinGMetero Always use the GlucoMen® Gm meter in a location which has a temperature of 10°C - 40°C (50°F -
104°F) and a humidity of 20 - 80 % RH (room humidity); allow the meter to stabilize.o If you perform a test at 5°C - 10°C (41°F - 50°F) or at 40°C - 45°C (104°F - 113°F) the temperature
warning symbol will appear on the screen. In this case results may be less accurate and you should repeat the test in a location within the temperature range of 10°C - 40°C (50°F - 104°F).
o The GlucoMen® Gm meter is designed for storage at temperatures from -10°C to +60°C (14°F - 140°F) and a humidity of 20 - 80 % RH; if the meter has been exposed to these temperatures, wait for at least 2 hours before using the meter.
Test Stripo Always use the GlucoMen® Gm Sensor in a location which has a temperature of 10°C - 40°C (50°F -
104°F) and a humidity of 20 - 80 % RH.o Store the GlucoMen® Gm Sensor pot in a dry place at 1°C - 30°C (34°F - 86°F). In this case allow them
to stabilize, placing test strips at the right temperature at least 20 minutes before starting the test. o Keep away from direct sunlight and heat.o Do not freeze.
Warning and precautionso Do not leave your meter or test strips in extremely hot or cold places such as near a heat source
(radiator) or in a car in very hot or cold weather.o Do not store or use your meter or test strips where they may be exposed to high humidity, such as in a
bathroom or kitchen.
15
UK
GlucoMen® Gm - 41208 - 07/09
CarinG FOr YOUr GlUCOMen® Gm BlOOD GlUCOSe MOniTOrinG SYSTeM
o Never hold the meter or test strips under running water.o Do NOT use the GlucoMen® Gm meter if you drop it into water, or if any water has leaked inside the
meter. Even if you dry the meter, correct test results may not be obtained and malfunctioning of the system may result.
o The GlucoMen® Gm meter complies with applicable EMC (electromagnetic compatibility) emission requirements and has been tested for immunity to electrostatic discharge/radio frequency interference as required in the applicable international standards.
However, do not use your meter on or near a strong electro-magnetic field such as a microwave oven, stereo amplifiers, a mobile or cordless telephone, walkie talkies, electronic garage door openers, radio transmitters, or any other electrical or electronic equipment that are sources of electromagnetic radiation, since these may interfere with the correct working of the meter.
o Do not store your meter or test strips near bleach or cleaners that contain bleacho Never disassemble the GlucoMen® Gm meter under any circumstance.o Do NOT expose the GlucoMen® Gm meter to dust or dirt. When the meter is not in use, ensure that it is
always stored in the carrying case.o BE CAREFUL! The test strip port is a very delicate area: • Never touch the test strip port with blood. • Never rub the test strip port with any tissue or cleaning cloth. • Never spray anything directly inside the test strip port.o Do not use the GlucoMen® Gm System at altitudes in excess of 3,048 m (10,000 ft).o This product may become infectious in the course of use. Discard the product in accordance with local
regulations for bio-hazardous waste.o Before disposal, remove the battery (see page 17).
16 GlucoMen® Gm - 41208 - 07/09
CarinG FOr YOUr GlUCOMen® Gm BlOOD GlUCOSe MOniTOrinG SYSTeM
CleaninG THe MeTerPlease handle your GlucoMen® Gm meter with care.
o Gently clean the outside of the meter with a soft clean cloth dampened with a moderate amount of 70% ethanol, iso propanol or 0.05% household bleach diluted 1 part in 100. Avoid using any other solvent as this may damage the meter or lens.
o Dirt, dust, blood, control solution, or water entering the meter’s test strip port could cause damage.
17
UK
GlucoMen® Gm - 41208 - 07/09
CHanGinG THe BaTTerY
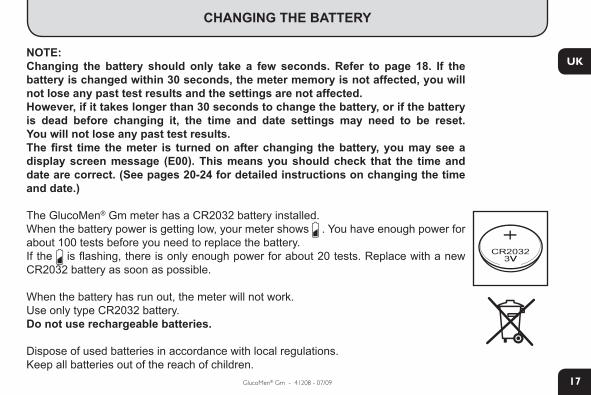
nOTe:Changing the battery should only take a few seconds. refer to page 18. if the battery is changed within 30 seconds, the meter memory is not affected, you will not lose any past test results and the settings are not affected.However, if it takes longer than 30 seconds to change the battery, or if the battery is dead before changing it, the time and date settings may need to be reset. You will not lose any past test results.The first time the meter is turned on after changing the battery, you may see a display screen message (e00). This means you should check that the time and date are correct. (See pages 20-24 for detailed instructions on changing the time and date.)
The GlucoMen® Gm meter has a CR2032 battery installed.When the battery power is getting low, your meter shows . You have enough power for about 100 tests before you need to replace the battery. If the is flashing, there is only enough power for about 20 tests. Replace with a new CR2032 battery as soon as possible.
When the battery has run out, the meter will not work.Use only type CR2032 battery.Do not use rechargeable batteries.
Dispose of used batteries in accordance with local regulations.Keep all batteries out of the reach of children.
18 GlucoMen® Gm - 41208 - 07/09
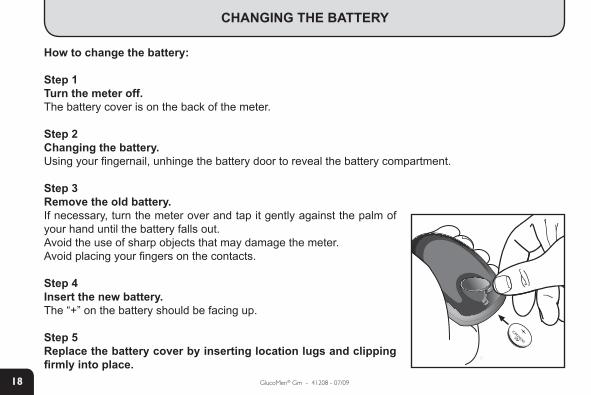
How to change the battery:
Step 1Turn the meter off.The battery cover is on the back of the meter.
Step 2Changing the battery.Using your fingernail, unhinge the battery door to reveal the battery compartment.
Step 3remove the old battery.If necessary, turn the meter over and tap it gently against the palm of your hand until the battery falls out.Avoid the use of sharp objects that may damage the meter. Avoid placing your fingers on the contacts.
Step 4insert the new battery.The “+” on the battery should be facing up.
Step 5replace the battery cover by inserting location lugs and clipping firmly into place.
CHanGinG THe BaTTerY
19
UK
GlucoMen® Gm - 41208 - 07/09
MeTer SeT Up
The measurement unit is factory set and cannot be changed by the user. Before using the meter for the first time, ensure that your meter is displaying the measurement unit which is printed on the label on the meter box (mg/dL or mmol/L). The measurement unit is confirmed by turning the meter on using the On/Off button.
You can choose between the 12-hour format and the 24-hour format. The date format can either be displayed as day/month or month/day.
Do not perform a blood glucose test until you have set the meter correctly.
20 GlucoMen® Gm - 41208 - 07/09
MeTer SeT Up - TiMe anD DaTe
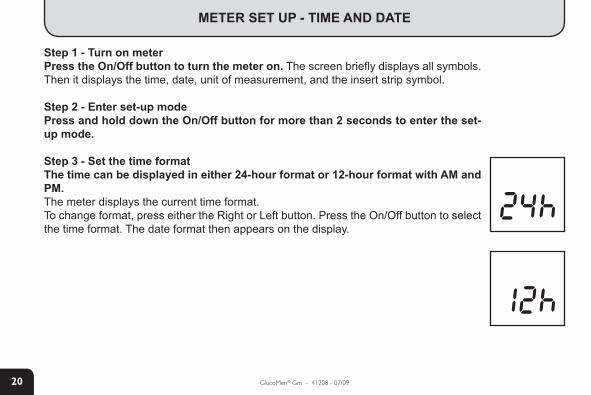
Step 1 - Turn on meterpress the On/Off button to turn the meter on. The screen briefly displays all symbols. Then it displays the time, date, unit of measurement, and the insert strip symbol.
Step 2 - enter set-up modepress and hold down the On/Off button for more than 2 seconds to enter the set-up mode.
Step 3 - Set the time formatThe time can be displayed in either 24-hour format or 12-hour format with aM and pM. The meter displays the current time format. To change format, press either the Right or Left button. Press the On/Off button to select the time format. The date format then appears on the display.
21
UK
GlucoMen® Gm - 41208 - 07/09
MeTer SeT Up - TiMe anD DaTe
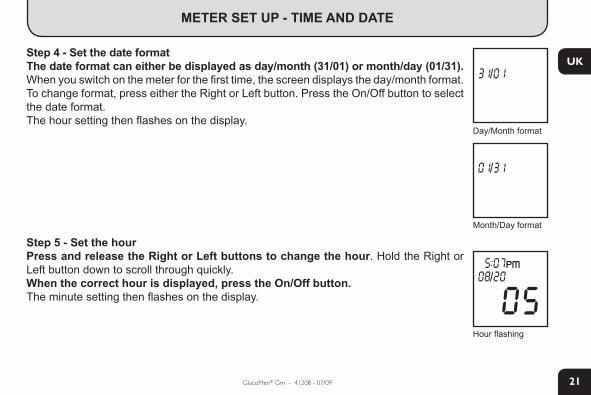
Step 4 - Set the date formatThe date format can either be displayed as day/month (31/01) or month/day (01/31). When you switch on the meter for the first time, the screen displays the day/month format. To change format, press either the Right or Left button. Press the On/Off button to select the date format. The hour setting then flashes on the display.
Step 5 - Set the hourpress and release the right or left buttons to change the hour. Hold the Right or Left button down to scroll through quickly. When the correct hour is displayed, press the On/Off button. The minute setting then flashes on the display.
Day/Month format
Month/Day format
Hour flashing
22 GlucoMen® Gm - 41208 - 07/09
MeTer SeT Up - TiMe anD DaTe
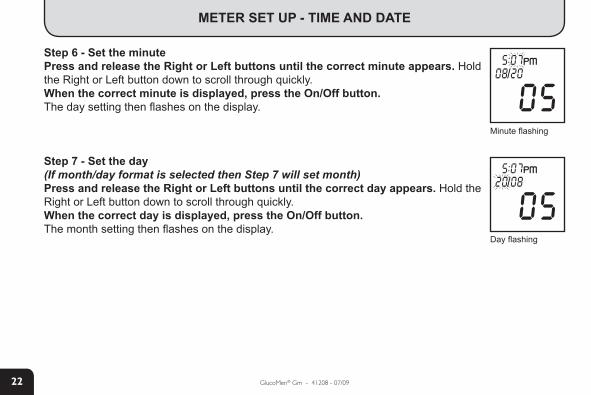
Step 6 - Set the minutepress and release the right or left buttons until the correct minute appears. Hold the Right or Left button down to scroll through quickly. When the correct minute is displayed, press the On/Off button. The day setting then flashes on the display.
Step 7 - Set the day(If month/day format is selected then Step 7 will set month)press and release the right or left buttons until the correct day appears. Hold the Right or Left button down to scroll through quickly. When the correct day is displayed, press the On/Off button. The month setting then flashes on the display.
Minute flashing
Day flashing
23
UK
GlucoMen® Gm - 41208 - 07/09
MeTer SeT Up - TiMe anD DaTe
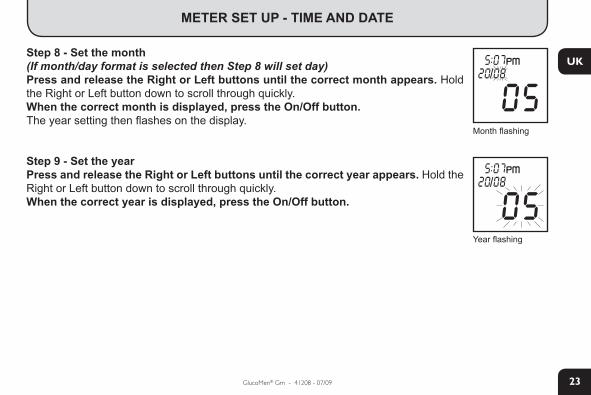
Step 8 - Set the month (If month/day format is selected then Step 8 will set day)press and release the right or left buttons until the correct month appears. Hold the Right or Left button down to scroll through quickly.When the correct month is displayed, press the On/Off button.The year setting then flashes on the display.
Step 9 - Set the yearpress and release the right or left buttons until the correct year appears. Hold the Right or Left button down to scroll through quickly. When the correct year is displayed, press the On/Off button.
Month flashing
Year flashing
24 GlucoMen® Gm - 41208 - 07/09
MeTer SeT Up - TiMe anD DaTe
Step 10 - SaveSave all your settings by pressing the On/Off button for more than two seconds, you may save your settings at any stage during meter set up.
The meter automatically shuts off after 2 minutes if no buttons are pressed.
nOTe:if you allow the meter to time out before pressing the On/Off button for more than two seconds, your settings will not be saved.
25
UK
GlucoMen® Gm - 41208 - 07/09
USinG GlUCOMen® GlUCOSe COnTrOl SOlUTiOnS
Use the GlucoMen® Gm Control solutions to check that the meter and test strips are working correctly. It is important that you carry out this simple check regularly.
GlucoMen® Gm Control solutions contain a known amount of glucose that reacts with the GlucoMen® Gm Sensor test strips.
Compare the control solution test results with the range printed on the test strip pot label. Make sure that the range you compare has the correct units of measurement (e.g. mmol/L or mg/dL).
Use control solution:o To confirm that your meter and test strips are working together correctly.o If symptoms are not consistent with test results.o If you think your meter has been damaged.o Each time a new pot of test strips is opened.o If the test strips have been exposed to extreme temperature, light or humidity.o Each time the battery is changed.o To learn how to test with the GlucoMen® Gm blood glucose monitoring system.
26 GlucoMen® Gm - 41208 - 07/09
MarKinG COnTrOl SOlUTiOn TeSTS in THe MeMOrY
You should mark results by using the control bottle symbol .put the meter into control solution mode by holding the right or left button until appears in the upper right corner of the screen. Do this BeFOre performing a test. if you do not mark control solution tests before applying control solution to the test strip, the results may not be accurate and control solution test results will be included in your test result averages.The meter does not use results marked when it calculates the 14- and 30-day average. This ensures that your 14- and 30-day average includes only results from testing your own blood.To mark a result , press the Right or Left button BEFORE testing with control solution (See pages 25 - 31 for detailed instructions on testing with control solution).
27
UK
GlucoMen® Gm - 41208 - 07/09
perFOrMinG a COnTrOl SOlUTiOn TeST
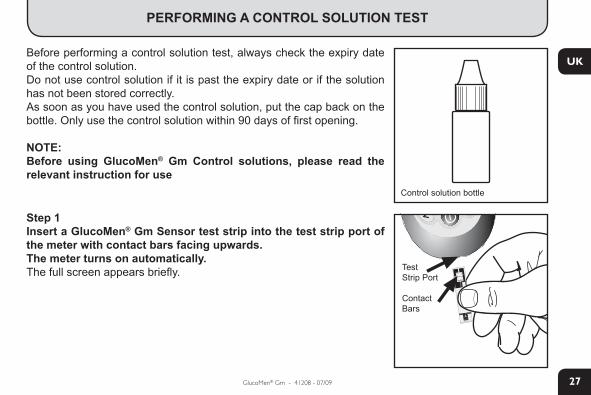
Before performing a control solution test, always check the expiry date of the control solution. Do not use control solution if it is past the expiry date or if the solution has not been stored correctly. As soon as you have used the control solution, put the cap back on the bottle. Only use the control solution within 90 days of first opening.
nOTe:Before using GlucoMen® Gm Control solutions, please read the relevant instruction for use
Step 1insert a GlucoMen® Gm Sensor test strip into the test strip port of the meter with contact bars facing upwards. The meter turns on automatically.The full screen appears briefly.
Control solution bottle
TestStrip Port
Contact Bars
28 GlucoMen® Gm - 41208 - 07/09
perFOrMinG a COnTrOl SOlUTiOn TeST
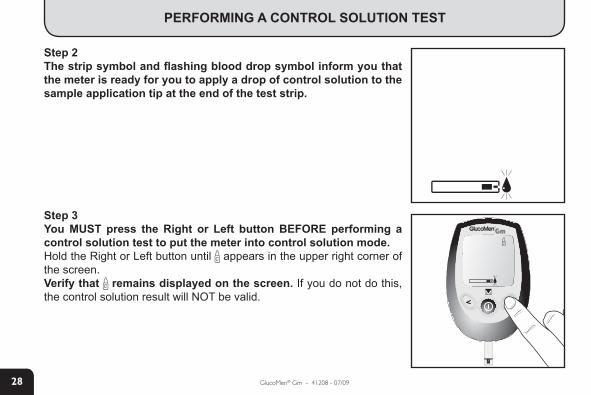
Step 2The strip symbol and flashing blood drop symbol inform you that the meter is ready for you to apply a drop of control solution to the sample application tip at the end of the test strip.
Step 3You MUST press the right or left button BeFOre performing a control solution test to put the meter into control solution mode.Hold the Right or Left button until appears in the upper right corner of the screen. Verify that remains displayed on the screen. If you do not do this, the control solution result will NOT be valid.
29
UK
GlucoMen® Gm - 41208 - 07/09
perFOrMinG a COnTrOl SOlUTiOn TeST
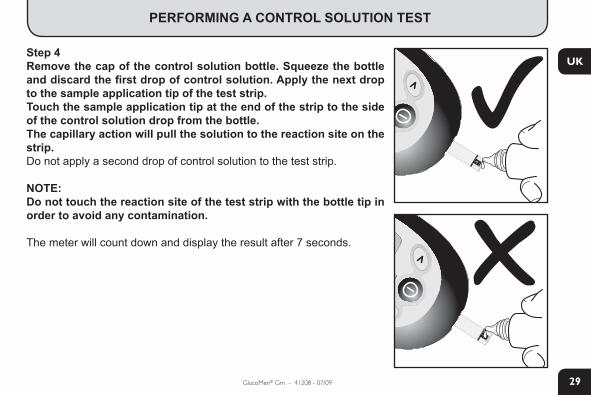
Step 4remove the cap of the control solution bottle. Squeeze the bottle and discard the first drop of control solution. apply the next drop to the sample application tip of the test strip. Touch the sample application tip at the end of the strip to the side of the control solution drop from the bottle. The capillary action will pull the solution to the reaction site on the strip. Do not apply a second drop of control solution to the test strip.
nOTe: Do not touch the reaction site of the test strip with the bottle tip in order to avoid any contamination.
The meter will count down and display the result after 7 seconds.
30 GlucoMen® Gm - 41208 - 07/09
perFOrMinG a COnTrOl SOlUTiOn TeST
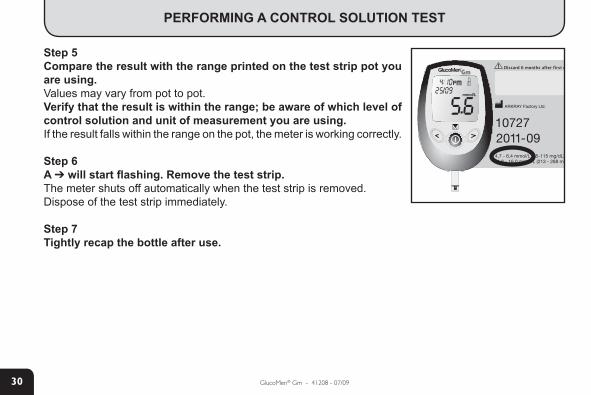
Step 5Compare the result with the range printed on the test strip pot you are using. Values may vary from pot to pot. Verify that the result is within the range; be aware of which level of control solution and unit of measurement you are using.If the result falls within the range on the pot, the meter is working correctly.
Step 6a ➔ will start flashing. remove the test strip.The meter shuts off automatically when the test strip is removed.Dispose of the test strip immediately.
Step 7Tightly recap the bottle after use.
31
UK
GlucoMen® Gm - 41208 - 07/09
perFOrMinG a COnTrOl SOlUTiOn TeST
COMparinG COnTrOl SOlUTiOn reSUlTS
If the result is outside the range printed on the test strip pot, repeat the test. One or more of the following may cause an out-of-range result:o The control solution is expired or contaminated.o The control solution was stored below 2°C (35.6°F) or above 30°C (86°F).o Failure to discard the first drop of control solution.o The test strip was not stored correctly.o The meter was not placed in control solution mode before adding control solution.o The test strip was used after the expiry date on the pot.o The test strip pot was open for more than 180 days (6 months).o The control solution bottle was open for more then 90 days (3 months).o The GlucoMen® Gm meter has been damaged or has malfunctioned.
Repeat the test, carefully following instructions, using control solution mode with a new drop of control solution and a new test strip. Compare the result with the range printed on the test strip pot you are using.
nOTe:if your control solution result continues to fall outside the required range printed on the test strips label, the system may not be working correctly. DO nOT USe the system to test your blood. if you are unable to resolve the problem, call the Menarini Helpline: (GB) 0800 243667 - (Northern Ireland) 0800 783 7286 - (Republic of Ireland) 1800 709903
32 GlucoMen® Gm - 41208 - 07/09
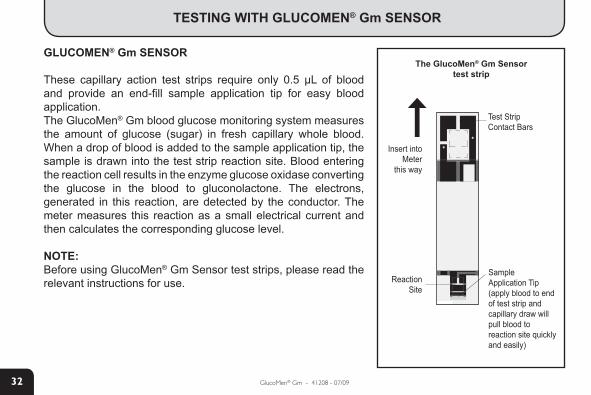
TeSTinG WiTH GlUCOMen® Gm SenSOr
GlUCOMen® Gm SenSOr
These capillary action test strips require only 0.5 µL of blood and provide an end-fill sample application tip for easy blood application. The GlucoMen® Gm blood glucose monitoring system measures the amount of glucose (sugar) in fresh capillary whole blood. When a drop of blood is added to the sample application tip, the sample is drawn into the test strip reaction site. Blood entering the reaction cell results in the enzyme glucose oxidase converting the glucose in the blood to gluconolactone. The electrons, generated in this reaction, are detected by the conductor. The meter measures this reaction as a small electrical current and then calculates the corresponding glucose level.
nOTe:Before using GlucoMen® Gm Sensor test strips, please read the relevant instructions for use.
The GlucoMen® Gm Sensortest strip
Insert into Meter
this way
ReactionSite
Test StripContact Bars
Sample Application Tip(apply blood to end of test strip and capillary draw will pull blood to reaction site quickly and easily)
33
UK
GlucoMen® Gm - 41208 - 07/09
iMpOrTanT TeST STrip inFOrMaTiOn
o Use only GlucoMen® Gm Sensor test strips with the GlucoMen® Gm meter.
o Do not store or transfer the test strips outside the original pot.
o Ensure your hands are clean and dry before handling test strips.
o As soon as you have removed a test strip, replace the cap securely on the pot.
o Use test strips within 180 days (6 months) of opening and not beyond the expiry date.
o Write the date of opening on the pot label to remind you to discard the strips after 180 days (6 months).
o Do not bend, cut or alter a test strip.
o Do not reuse a test strip.
o Keep all strips out of the reach of children. If a strip is swallowed, contact a doctor immediately.
o When you open the pack for the first time, ensure there are no signs of the pot of test strips being previously opened or damaged.
o Do not expose test strips to dust, dirt or chemicals.
34 GlucoMen® Gm - 41208 - 07/09
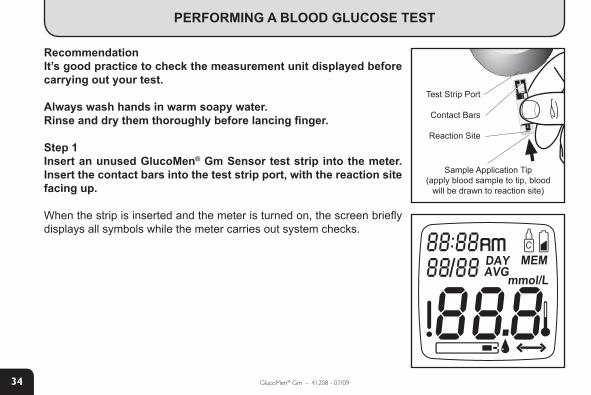
perFOrMinG a BlOOD GlUCOSe TeST
recommendationit’s good practice to check the measurement unit displayed before carrying out your test.
always wash hands in warm soapy water. rinse and dry them thoroughly before lancing finger.
Step 1insert an unused GlucoMen® Gm Sensor test strip into the meter. insert the contact bars into the test strip port, with the reaction site facing up.
When the strip is inserted and the meter is turned on, the screen briefly displays all symbols while the meter carries out system checks.
Test Strip Port
Contact Bars
Reaction Site
Sample Application Tip(apply blood sample to tip, blood
will be drawn to reaction site)
35
UK
GlucoMen® Gm - 41208 - 07/09
perFOrMinG a BlOOD GlUCOSe TeST
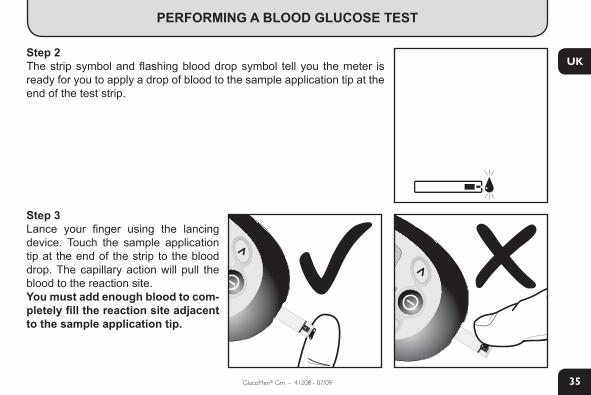
Step 2The strip symbol and flashing blood drop symbol tell you the meter is ready for you to apply a drop of blood to the sample application tip at the end of the test strip.
Step 3Lance your finger using the lancing device. Touch the sample application tip at the end of the strip to the blood drop. The capillary action will pull the blood to the reaction site. You must add enough blood to com-pletely fill the reaction site adjacent to the sample application tip.
36 GlucoMen® Gm - 41208 - 07/09
perFOrMinG a BlOOD GlUCOSe TeST
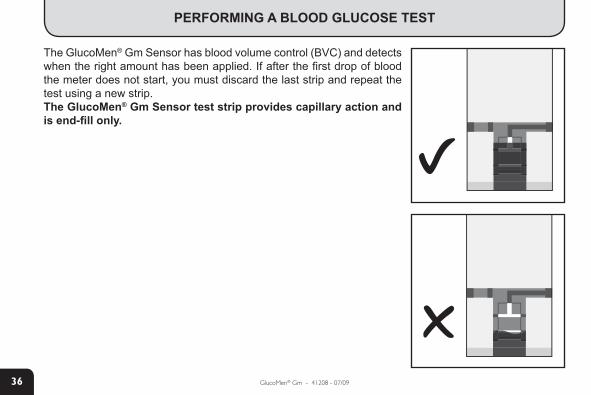
The GlucoMen® Gm Sensor has blood volume control (BVC) and detects when the right amount has been applied. If after the first drop of blood the meter does not start, you must discard the last strip and repeat the test using a new strip.The GlucoMen® Gm Sensor test strip provides capillary action and is end-fill only.
37
UK
GlucoMen® Gm - 41208 - 07/09
perFOrMinG a BlOOD GlUCOSe TeST
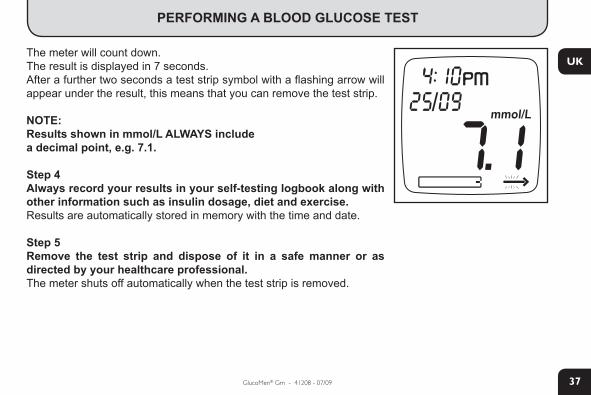
The meter will count down.The result is displayed in 7 seconds.After a further two seconds a test strip symbol with a flashing arrow will appear under the result, this means that you can remove the test strip.
nOTe:results shown in mmol/l alWaYS include a decimal point, e.g. 7.1.
Step 4always record your results in your self-testing logbook along with other information such as insulin dosage, diet and exercise.Results are automatically stored in memory with the time and date.
Step 5remove the test strip and dispose of it in a safe manner or as directed by your healthcare professional.The meter shuts off automatically when the test strip is removed.
38 GlucoMen® Gm - 41208 - 07/09
perFOrMinG a BlOOD GlUCOSe TeST
nOTe:You must pay attention to the following messages:“lo” will be displayed if your blood glucose level is lower than 0.6 mmol/l and “Hi” will be displayed if it is higher than 33.3 mmol/l. in either case you should repeat the test if possible, or if it is in line with how you feel you should follow the instructions given by your diabetes healthcare professional and treat the hyperglycemia (if “Hi” is displayed) or the hypoglycemia (if “lo” is displayed).
nOTe:Follow the instructions for the Glucoject® branded lancing device in order to obtain a blood sample. a lancet must only be used once. Dispose of used lancets in a safe manner so as not to cause accidental injury.Do not use lancets beyond expiry date reported on their box.
Marking resultsYou can mark results with an when you do nOT want to include the result in your 14- and 30-day average. For example, if someone else used your meter, or if you believe the test result is incorrect, because you applied blood to the strip incorrectly, use the exclamation mark to ensure that your 14- and 30-day average includes only those results from testing your own blood that you want included in your average.To mark a result with , press the Right or Left button aFTer the meter displays the test result.
nOTe:To remove , simply press the right or left button again.
39
UK
GlucoMen® Gm - 41208 - 07/09
iMpOrTanT inFOrMaTiOn aBOUT alTernaTiVe SiTe TeSTinG (2,3,4)
Sites other than your fingertips may have fewer nerve endings so obtaining a blood sample from these sites may be less painful. The technique for alternative site testing is different from fingertip testing. Blood glucose results from sites other than your fingertips could be significantly different due to blood glucose levels changing rapidly after a meal, insulin, or exercise(2).
Rapidly changing results are shown in the fingertip more quickly than in alternative sites. Nevertheless studies showed that blood glucose values obtained at the palm were comparable to fingertip results under all testing conditions(3,4).
We recommend to use the palm, as good correlation in clinical studies has been shown between finger and palm test results.
Ask your diabetes healthcare professional about recommended testing procedures if you operate machinery or drive a car, as fingertip testing is usually the preferred method of testing under these circumstances.
If bruising occurs for alternative site testing, you may choose to lance a fingertip instead.
(2) Jungheim K, Koshinsky T.: Glucose Monitoring at the arm” Diabetes Care, 25, N°6, 956-960(3) D. M. Bina, R. L. Anderson, M. L. Johnson, R. M. Bergenstal, D. M. Kendall: “Clinical Impact of Prandial State, Exercise, and Site
Preparation on the Equivalence of Alternative-Site Blood Glucose Testing” Diabetes Care, 26, N° 4, 981-985(4) Peled N, Wong D, Gwalani SL: “Camparison of Glucose levels in capillary blood samples obtained from a variety of body sites. Diabetes Technol. Ther. 4:35-44, 2002
40 GlucoMen® Gm - 41208 - 07/09
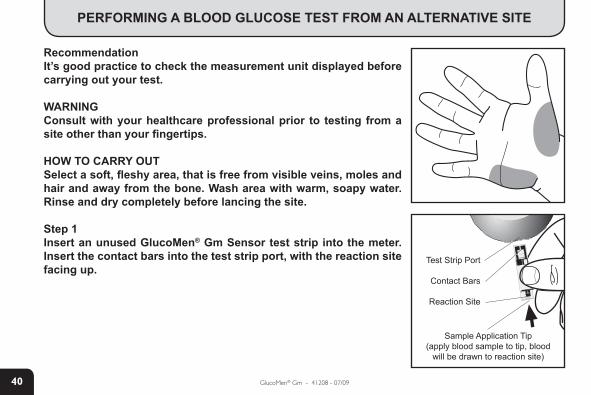
perFOrMinG a BlOOD GlUCOSe TeST FrOM an alTernaTiVe SiTe
recommendationit’s good practice to check the measurement unit displayed before carrying out your test.
WarninGConsult with your healthcare professional prior to testing from a site other than your fingertips.
HOW TO CarrY OUTSelect a soft, fleshy area, that is free from visible veins, moles and hair and away from the bone. Wash area with warm, soapy water. rinse and dry completely before lancing the site.
Step 1insert an unused GlucoMen® Gm Sensor test strip into the meter. insert the contact bars into the test strip port, with the reaction site facing up.
Test Strip Port
Contact Bars
Reaction Site
Sample Application Tip(apply blood sample to tip, blood
will be drawn to reaction site)
41
UK
GlucoMen® Gm - 41208 - 07/09
perFOrMinG a BlOOD GlUCOSe TeST FrOM an alTernaTiVe SiTe
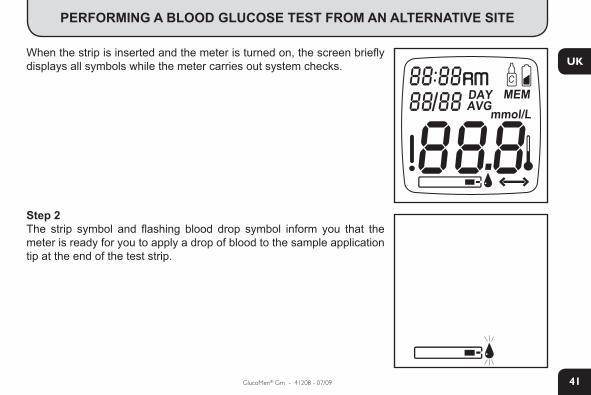
When the strip is inserted and the meter is turned on, the screen briefly displays all symbols while the meter carries out system checks.
Step 2The strip symbol and flashing blood drop symbol inform you that the meter is ready for you to apply a drop of blood to the sample application tip at the end of the test strip.
42 GlucoMen® Gm - 41208 - 07/09
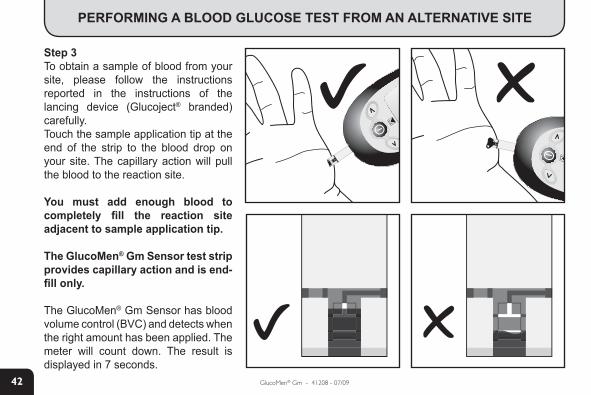
perFOrMinG a BlOOD GlUCOSe TeST FrOM an alTernaTiVe SiTe
Step 3To obtain a sample of blood from your site, please follow the instructions reported in the instructions of the lancing device (Glucoject® branded) carefully.Touch the sample application tip at the end of the strip to the blood drop on your site. The capillary action will pull the blood to the reaction site.
You must add enough blood to completely fill the reaction site adjacent to sample application tip.
The GlucoMen® Gm Sensor test strip provides capillary action and is end-fill only.
The GlucoMen® Gm Sensor has blood volume control (BVC) and detects when the right amount has been applied. The meter will count down. The result is displayed in 7 seconds.
43
UK
GlucoMen® Gm - 41208 - 07/09
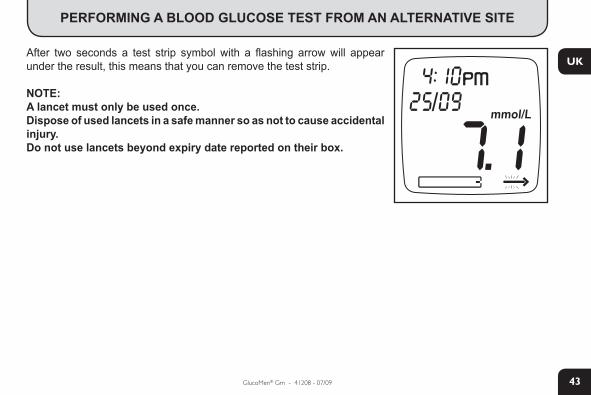
perFOrMinG a BlOOD GlUCOSe TeST FrOM an alTernaTiVe SiTe
After two seconds a test strip symbol with a flashing arrow will appear under the result, this means that you can remove the test strip.
nOTe:a lancet must only be used once. Dispose of used lancets in a safe manner so as not to cause accidental injury.Do not use lancets beyond expiry date reported on their box.
44 GlucoMen® Gm - 41208 - 07/09
perFOrMinG a BlOOD GlUCOSe TeST FrOM an alTernaTiVe SiTe
nOTe:Use Glucoject® branded pricking devices and lancets only.
nOTe:results shown in mmol/l alWaYS include a decimal point, e.g. 7.1.
Step 4always record your results in your self-testing logbook along with other information such as insulin dosage, diet and exercise.Results are automatically stored in memory with the time and date.
Step 5remove the test strip and dispose of it in a safe manner or as directed by your healthcare professional.The meter shuts off automatically when the test strip is removed.
nOTe:You must pay attention to the following messages:“lo” will be displayed if your blood glucose level is lower than 0.6 mmol/l and “Hi” will be displayed if it is higher than 33.3 mmol/l. in either case you should repeat the test if possible, or if it is in line with how you feel you should follow the instructions given by your diabetes healthcare professional and treat the hyperglycemia (if “Hi” is displayed) or the hypoglycemia (if “lo” is displayed).

45
UK
GlucoMen® Gm - 41208 - 07/09
perFOrMinG a BlOOD GlUCOSe TeST FrOM an alTernaTiVe SiTe
Marking resultsYou can mark results with an when you do nOT want to include the result in your 14- and 30-day average. For example, if someone else used your meter, or if you believe the test result is incorrect, because you applied blood to the strip incorrectly, use the exclamation mark to ensure that your 14- and 30-day average includes only those results from testing your own blood that you want included in your average.To mark a result with , press the Right or Left button aFTer the meter displays the test result.
nOTe:To remove , simply press the right or left button again.
46 GlucoMen® Gm - 41208 - 07/09
UnDerSTanDinG TeST reSUlTS
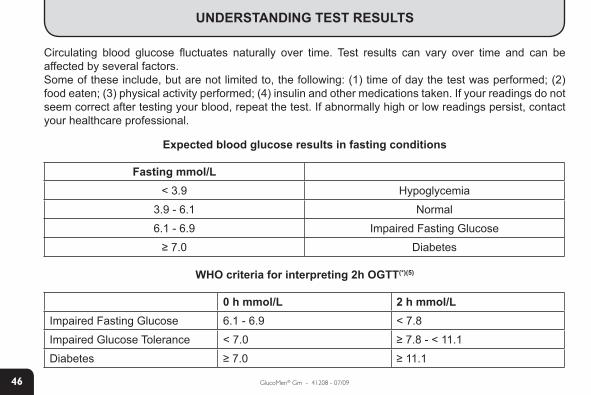
Circulating blood glucose fluctuates naturally over time. Test results can vary over time and can be affected by several factors. Some of these include, but are not limited to, the following: (1) time of day the test was performed; (2) food eaten; (3) physical activity performed; (4) insulin and other medications taken. If your readings do not seem correct after testing your blood, repeat the test. If abnormally high or low readings persist, contact your healthcare professional.
expected blood glucose results in fasting conditions
Fasting mmol/l< 3.9 Hypoglycemia
3.9 - 6.1 Normal
6.1 - 6.9 Impaired Fasting Glucose
≥ 7.0 Diabetes
WHO criteria for interpreting 2h OGTT(*)(5)
0 h mmol/l 2 h mmol/lImpaired Fasting Glucose 6.1 - 6.9 < 7.8
Impaired Glucose Tolerance < 7.0 ≥ 7.8 - < 11.1
Diabetes ≥ 7.0 ≥ 11.1
47
UK
GlucoMen® Gm - 41208 - 07/09
UnDerSTanDinG TeST reSUlTS
(*) Oral Glucose Tolerance Test: Is performed by ingestion of 75 g of anhydrous glucose in 250-300 mL of water over 5 minutes. This operation should simulate eating a meal. The blood samples are collected 2 hours after the load. The results are interpreted as detailed.
(5) Alberti KG, Zimmet PZ. “Definition, diagnosis and classification of diabetes mellitus and its complications. Part 1: diagnosis and classification of diabetes mellitus provisional report of a WHO consultation”. Diabet Med 1998;15:539-53.
BlOOD GlUCOSe reaDinGSo If the test results are abnormally low (≤3.9 mmol/L) and/or one or more symptoms of low blood glucose
are observed, such as sweating, shakiness, trembling, blurred vision, hunger, headache, confusion, rapid heartbeat, or tingling or numbness around the mouth or fingertips, proceed according to the advice given by your healthcare professional in case of hypoglycemia.
o If the test results are abnormally high (≥11.1 mmol/L) and/or one or more symptoms of high blood glucose are observed, such as dry mouth, thirst, frequent urination, nausea, vomiting, blurred vision, sleepiness, or abdominal pain, proceed according to the advice given by your healthcare professional in case of hyperglycemia.
48 GlucoMen® Gm - 41208 - 07/09
USinG THe GlUCOMen® Gm MeTer MeMOrY
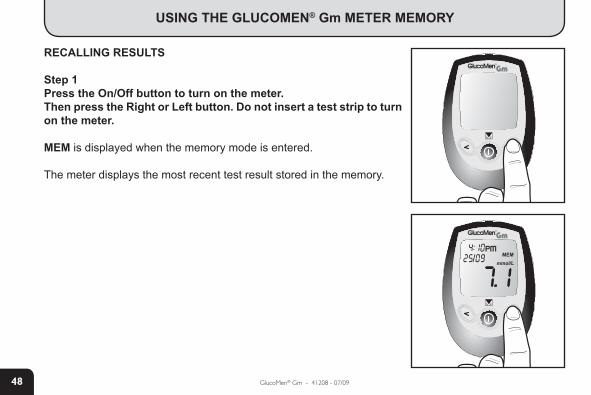
reCallinG reSUlTS
Step 1press the On/Off button to turn on the meter. Then press the right or left button. Do not insert a test strip to turn on the meter.
MeM is displayed when the memory mode is entered.
The meter displays the most recent test result stored in the memory.

49
UK
GlucoMen® Gm - 41208 - 07/09
USinG THe GlUCOMen® Gm MeTer MeMOrY
Step 2press the right or left button to display the average of tests over the last 14 days.This can include 1 to 250 results, depending on how frequently you test. The number at the top (20n) shows the number of tests that have produced the average.
aVG is displayed when the average is shown.
Step 3press the right or left button again to display the 30-day average. The number at the top (250n) shows the number of tests included in the average. The greater the frequency of testing the higher this number will be.
aVG is displayed when the average is shown.
If no results are stored, or you are using the meter for the first time, the meter will display 3 bars.
Displaying the average (14 day)
Displaying the average (30 day)
No results stored
50 GlucoMen® Gm - 41208 - 07/09
USinG THe GlUCOMen® Gm MeTer MeMOrY
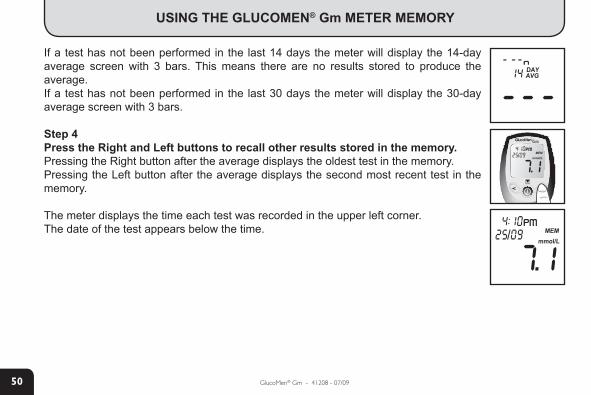
If a test has not been performed in the last 14 days the meter will display the 14-day average screen with 3 bars. This means there are no results stored to produce the average. If a test has not been performed in the last 30 days the meter will display the 30-day average screen with 3 bars.
Step 4press the right and left buttons to recall other results stored in the memory. Pressing the Right button after the average displays the oldest test in the memory.Pressing the Left button after the average displays the second most recent test in the memory.
The meter displays the time each test was recorded in the upper left corner. The date of the test appears below the time.
51
UK
GlucoMen® Gm - 41208 - 07/09
USinG THe GlUCOMen® Gm MeTer MeMOrY
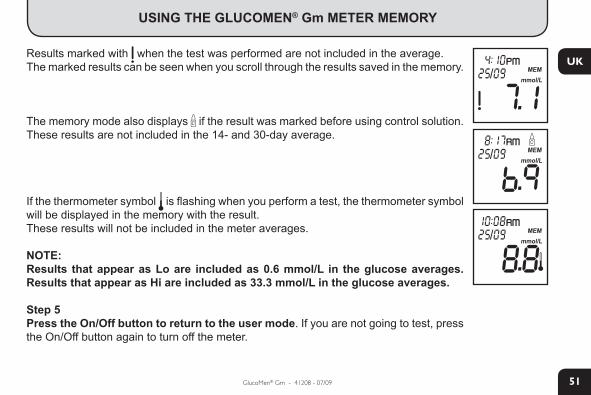
Results marked with when the test was performed are not included in the average. The marked results can be seen when you scroll through the results saved in the memory.
The memory mode also displays if the result was marked before using control solution. These results are not included in the 14- and 30-day average.
If the thermometer symbol is flashing when you perform a test, the thermometer symbol will be displayed in the memory with the result. These results will not be included in the meter averages.
nOTe:results that appear as lo are included as 0.6 mmol/l in the glucose averages. results that appear as Hi are included as 33.3 mmol/l in the glucose averages.
Step 5press the On/Off button to return to the user mode. If you are not going to test, press the On/Off button again to turn off the meter.
52 GlucoMen® Gm - 41208 - 07/09
DaTa ManaGeMenT SOFTWare
Glucose results stored in the GlucoMen® Gm meter’s memory can also be downloaded using a dedicated cable and filed by using Menarini software.These are supplied separately.
The minimum requirements for a PC to use the Menarini software are shown on the software packaging.
For further information on these products or ordering information call the Menarini Helpline:(GB) 0800 243667 - (Northern Ireland) 0800 783 7286 - (Republic of Ireland) 1800 709903
53
UK
GlucoMen® Gm - 41208 - 07/09
COMparinG MeTer anD laBOraTOrY reSUlTS
Your GlucoMen® Gm blood glucose meter is referenced to venous plasma measurement. This was performed in a clinical laboratory using the glucose oxidase method on a laboratory analyser (YSI Yellow Springs Instrument - Ohio) calibrated with glucose standard calibration to the NIST (National Institute of Science and Technology, Gaithersburg, MD, USA). If you want to compare your meter with a laboratory instrument, you have to use fresh capillary whole blood with the meter and venous plasma with the laboratory instrument, taking venous blood from the arm of the patient, immediately after the self-testing measurement.The results you get from your meter may differ from the tightly controlled clinical laboratory result. This is due to normal variation.
54 GlucoMen® Gm - 41208 - 07/09
TrOUBleSHOOTinG
A list of all possible screen messages is included below.If the display screen shows , you should be able to clear the error message yourself.
If you have any questions after reading these messages, or if the meter displays a message not listed here, call the Menarini Helpline on: (GB) 0800 243667 - (Northern Ireland) 0800 783 7286 - (Republic of Ireland) 1800 709903
55
UK
GlucoMen® Gm - 41208 - 07/09
TrOUBleSHOOTinG
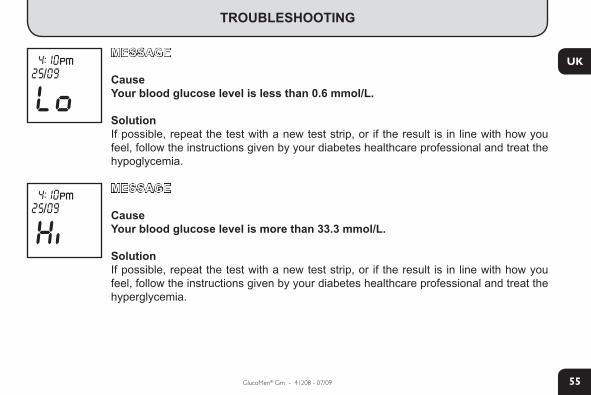
MeSSaGe
CauseYour blood glucose level is less than 0.6 mmol/l.
SolutionIf possible, repeat the test with a new test strip, or if the result is in line with how you feel, follow the instructions given by your diabetes healthcare professional and treat the hypoglycemia.
MeSSaGe
CauseYour blood glucose level is more than 33.3 mmol/l.
Solution If possible, repeat the test with a new test strip, or if the result is in line with how you feel, follow the instructions given by your diabetes healthcare professional and treat the hyperglycemia.
56 GlucoMen® Gm - 41208 - 07/09
TrOUBleSHOOTinG
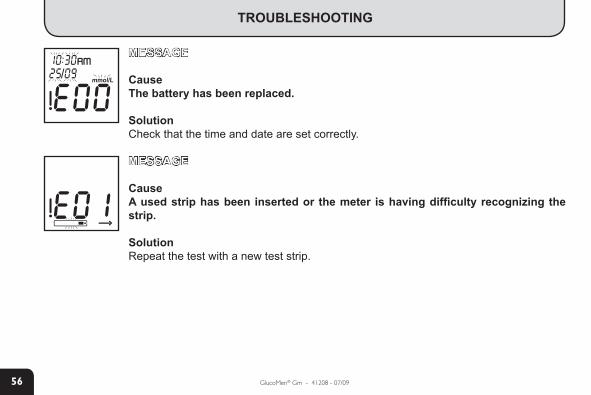
MeSSaGe
CauseThe battery has been replaced.
SolutionCheck that the time and date are set correctly.
MeSSaGe
Causea used strip has been inserted or the meter is having difficulty recognizing the strip.
SolutionRepeat the test with a new test strip.
57
UK
GlucoMen® Gm - 41208 - 07/09
TrOUBleSHOOTinG
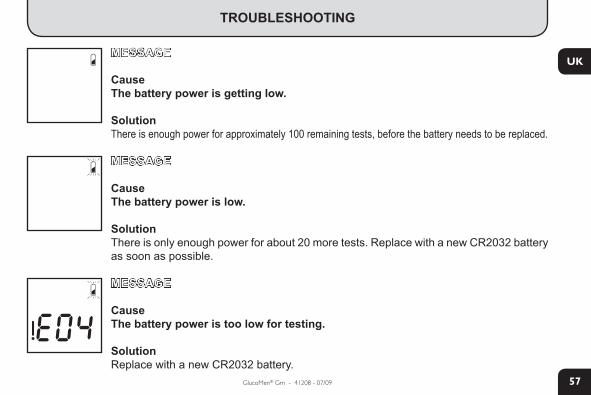
MeSSaGe
CauseThe battery power is getting low.
SolutionThere is enough power for approximately 100 remaining tests, before the battery needs to be replaced.
MeSSaGe
CauseThe battery power is low.
SolutionThere is only enough power for about 20 more tests. Replace with a new CR2032 battery as soon as possible.
MeSSaGe
CauseThe battery power is too low for testing.
SolutionReplace with a new CR2032 battery.
58 GlucoMen® Gm - 41208 - 07/09
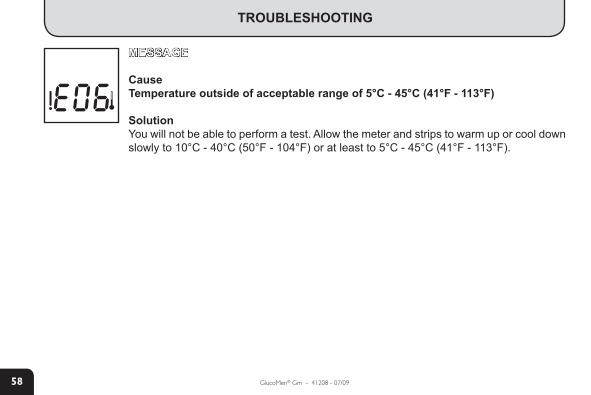
TrOUBleSHOOTinG
MeSSaGe
CauseTemperature outside of acceptable range of 5°C - 45°C (41°F - 113°F)
SolutionYou will not be able to perform a test. Allow the meter and strips to warm up or cool down slowly to 10°C - 40°C (50°F - 104°F) or at least to 5°C - 45°C (41°F - 113°F).
59
UK
GlucoMen® Gm - 41208 - 07/09
TrOUBleSHOOTinG
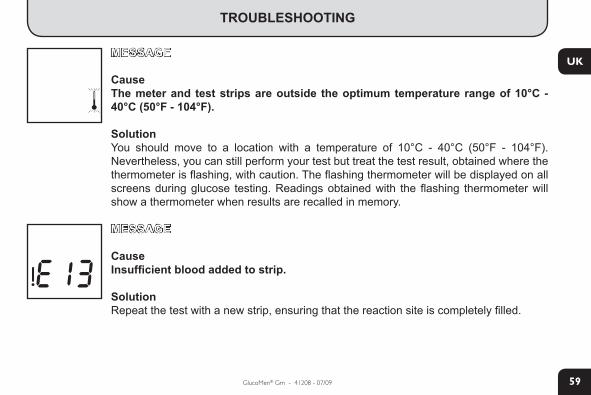
MeSSaGe
CauseThe meter and test strips are outside the optimum temperature range of 10°C - 40°C (50°F - 104°F).
SolutionYou should move to a location with a temperature of 10°C - 40°C (50°F - 104°F). Nevertheless, you can still perform your test but treat the test result, obtained where the thermometer is flashing, with caution. The flashing thermometer will be displayed on all screens during glucose testing. Readings obtained with the flashing thermometer will show a thermometer when results are recalled in memory.
MeSSaGe
Causeinsufficient blood added to strip.
SolutionRepeat the test with a new strip, ensuring that the reaction site is completely filled.
60 GlucoMen® Gm - 41208 - 07/09
TrOUBleSHOOTinG
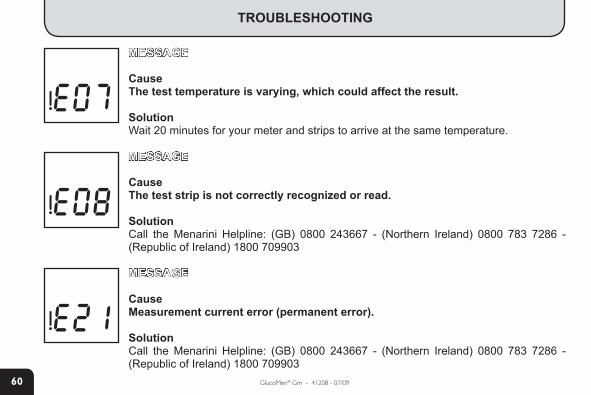
MeSSaGe
CauseThe test temperature is varying, which could affect the result.
SolutionWait 20 minutes for your meter and strips to arrive at the same temperature.
MeSSaGe
CauseThe test strip is not correctly recognized or read.
SolutionCall the Menarini Helpline: (GB) 0800 243667 - (Northern Ireland) 0800 783 7286 - (Republic of Ireland) 1800 709903
MeSSaGe
CauseMeasurement current error (permanent error).
SolutionCall the Menarini Helpline: (GB) 0800 243667 - (Northern Ireland) 0800 783 7286 - (Republic of Ireland) 1800 709903
61
UK
GlucoMen® Gm - 41208 - 07/09
TrOUBleSHOOTinG
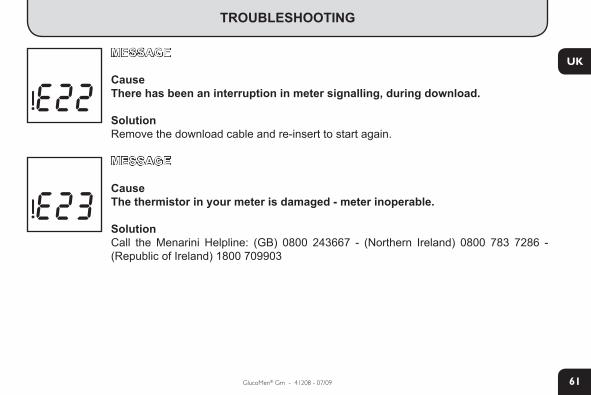
MeSSaGe
CauseThere has been an interruption in meter signalling, during download.
SolutionRemove the download cable and re-insert to start again.
MeSSaGe
CauseThe thermistor in your meter is damaged - meter inoperable.
SolutionCall the Menarini Helpline: (GB) 0800 243667 - (Northern Ireland) 0800 783 7286 - (Republic of Ireland) 1800 709903
62 GlucoMen® Gm - 41208 - 07/09
SpeCiFiCaTiOnS
Test: Glucose in capillary whole bloodTest strips: GlucoMen® Gm Sensor Sample size: 0.5 µLSample type: Fresh capillary whole blood from different sites (either finger or palm/alternative site)result range: 0.6 to 33.3 mmol/LCalibration: Venous plasma referencedTest Time: 7 seconds after detecting a sampleGlucose Units: Either mmol/L or mg/dL (Factory set)assay Method: Biosensor, Glucose oxidase (Aspergillus niger sourced )power Source: 3 - Volt lithium battery (CR2032), 1 batteryBattery life: Approx. 2,000 tests at 4 tests a dayMemory: 250 results with 14- and 30-day averagingautomatic Shut-off: 2 minutes after last user actionSize: Approx. 80 mm x 65 mm x 16 mmWeight: Approx. 39 g (with battery)Operating ranges: 5°C - 45°C (41°F - 113°F), 20% - 80% relative humidity Optimal Measuring Range 10°C - 40°C (50°F - 104°F)accuracy and precision: Please refer to the package insert of GlucoMen® Gm Sensor
63
UK
GlucoMen® Gm - 41208 - 07/09
UnDerSTanDinG THe SYMBOlS
Manufacturer
Attention, read user manual before use
Serial number
Direct current (voltage)
Catalogue number
Batch code
Temperature limitation
Use by
Consult instructions for use
64 GlucoMen® Gm - 41208 - 07/09
UnDerSTanDinG THe SYMBOlS
Contents of Set
This product fulfils the requirements of Directive 98/79/EC on in vitro diagnostic medical devices
In Vitro Diagnostic Medical Device
In vitro device for self-testing
Blood glucose meter
Biohazard - This meter could be potentially contaminated due to the blood samples used
Significant additions or changes from previous user manual revision
0 1 2 3
65
UK
GlucoMen® Gm - 41208 - 07/09
WarranTY
The manufacturer guarantees that the GlucoMen® Gm shall be free of defects in material and workmanship for a period of 2 years. This warranty is valid from the date of purchase.
For technical service call the Menarini Helpline: (GB) 0800 243667 - (Northern Ireland) 0800 783 7286 - (Republic of Ireland) 1800 709903
66 GlucoMen® Gm - 41208 - 07/09


![t o } u } / l/^ s î ì í ó } u u ] < Ç v } ^ l W v o ...iceee.net/2017/Program/images/Program_Final0718.pdf · Management, Battery and Battery Management, Charging Systems and](https://img.pdfslide.us/doc/110x75/5e69293c4d799b31b82d64ae/t-o-u-l-s-u-u-v-l-w-v-o-iceeenet2017programimagesprogram.jpg)