Embed Size (px)
Citation preview
1
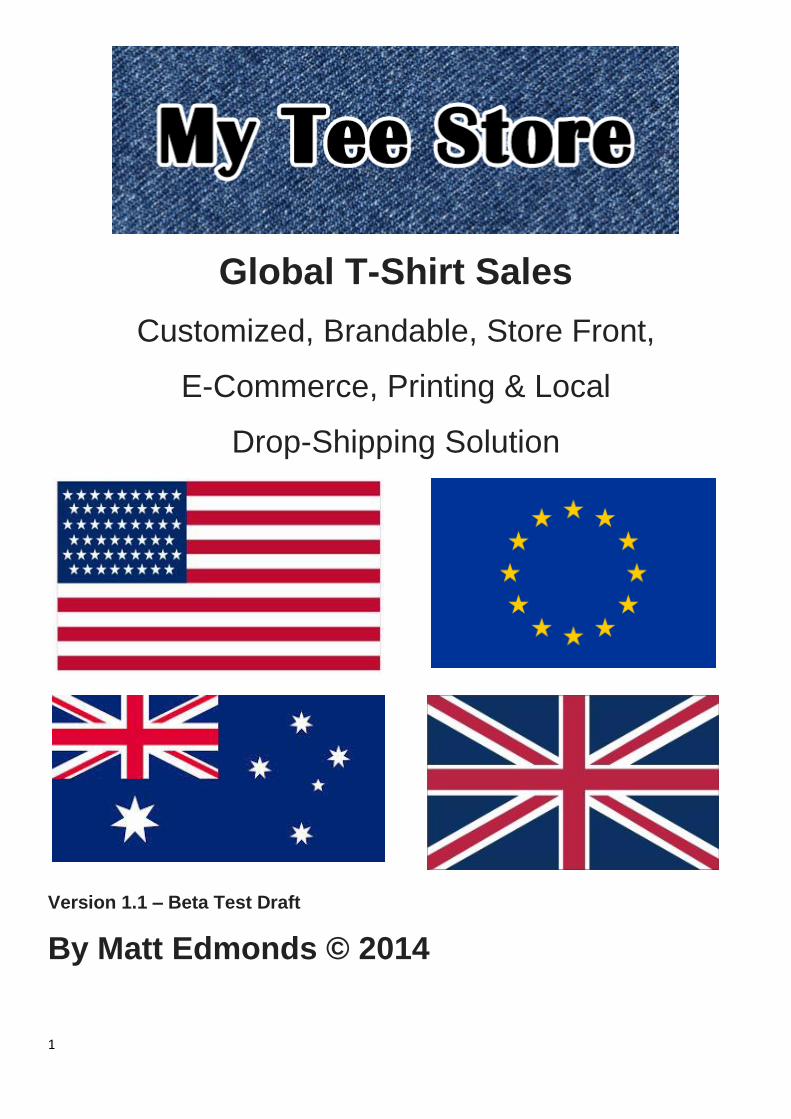
Global T-Shirt Sales
Customized, Brandable, Store Front,
E-Commerce, Printing & Local
Drop-Shipping Solution
Version 1.1 – Beta Test Draft
By Matt Edmonds © 2014
2
The Key Issues with the Main Platforms
People are Using to Sell T-Shirts
Teespring, Fabrily and Teezily all require you to sell at least 10 T-Shirts, or
you don’t get paid at all. You are simply out of pocket on your advertising costs
The number 1 rule of internet marketing is to “Build a List!”. These platforms
take your customers, but you never build your own email list
They don’t allow you to build your own brand name on your own website
You pay lots of money to send traffic to build their brand, not your own!
Their costs are higher for 10 or more T-Shirts than My Tee Store offers for a
single T-Shirt!
Adding more colors to the design adds more cost, as they are using old
printing technology
They don’t allow truly customizable designs, or genuine print on demand
models
You can only sell during a campaign
There is no point engaging in SEO or other normal long term brand building
exercises
Can’t set up Google Analytics to understand your customers’ behaviour
A successful T-Shirt on Teespring will appear on new software like Tee
Inspector. If you aren’t familiar with it, this software which has sold thousands
of copies, allows people to see every successful T-Shirt, how it was advertised
including the ad copy and how many are being sold each day. Listing your
successful T-Shirt on Teespring means that there can be 10 copies by other
marketers using the exact same ad the next day to your target market!
My Tee Store resolves all of these issues, with local printing solutions in USA, UK,
Europe and Australia. They can print and Drop-ship anywhere in the world
affordably, with a minimum order of 1 and fast delivery to the customer!
3
Introduction to My Tee Store
My Tee Store is the only solution you will need, to be able to make money selling
Tee-Shirts to consumers in USA, UK, Europe and Australia. Their pricing, business
model and flexibility all combine to set us apart from competitors in these markets.
My Tee Store provides you with your own stores that you can brand as your
own, using your own domain name.
You can take successful T-Shirt campaigns across the globe, with offers in
local currency and great local retail pricing, that leaves you with fantastic
margins!
No minimum orders and fully customizable products!
No-one has visibility of your successful campaigns, or how many are being
sold using spy software
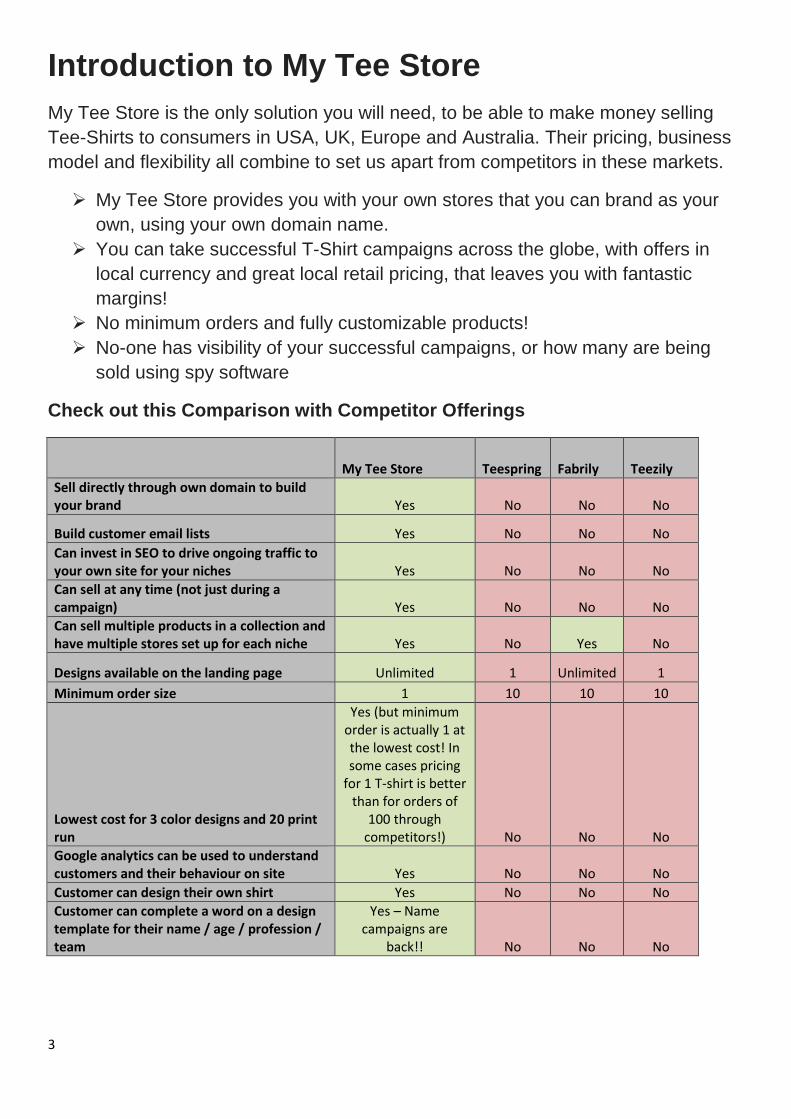
Check out this Comparison with Competitor Offerings
My Tee Store Teespring Fabrily Teezily
Sell directly through own domain to build your brand Yes No No No
Build customer email lists Yes No No No
Can invest in SEO to drive ongoing traffic to your own site for your niches Yes No No No
Can sell at any time (not just during a campaign) Yes No No No
Can sell multiple products in a collection and have multiple stores set up for each niche Yes No Yes No
Designs available on the landing page Unlimited 1 Unlimited 1
Minimum order size 1 10 10 10
Lowest cost for 3 color designs and 20 print run
Yes (but minimum order is actually 1 at the lowest cost! In some cases pricing
for 1 T-shirt is better than for orders of
100 through competitors!) No No No
Google analytics can be used to understand customers and their behaviour on site Yes No No No
Customer can design their own shirt Yes No No No
Customer can complete a word on a design template for their name / age / profession / team
Yes – Name campaigns are
back!! No No No
4
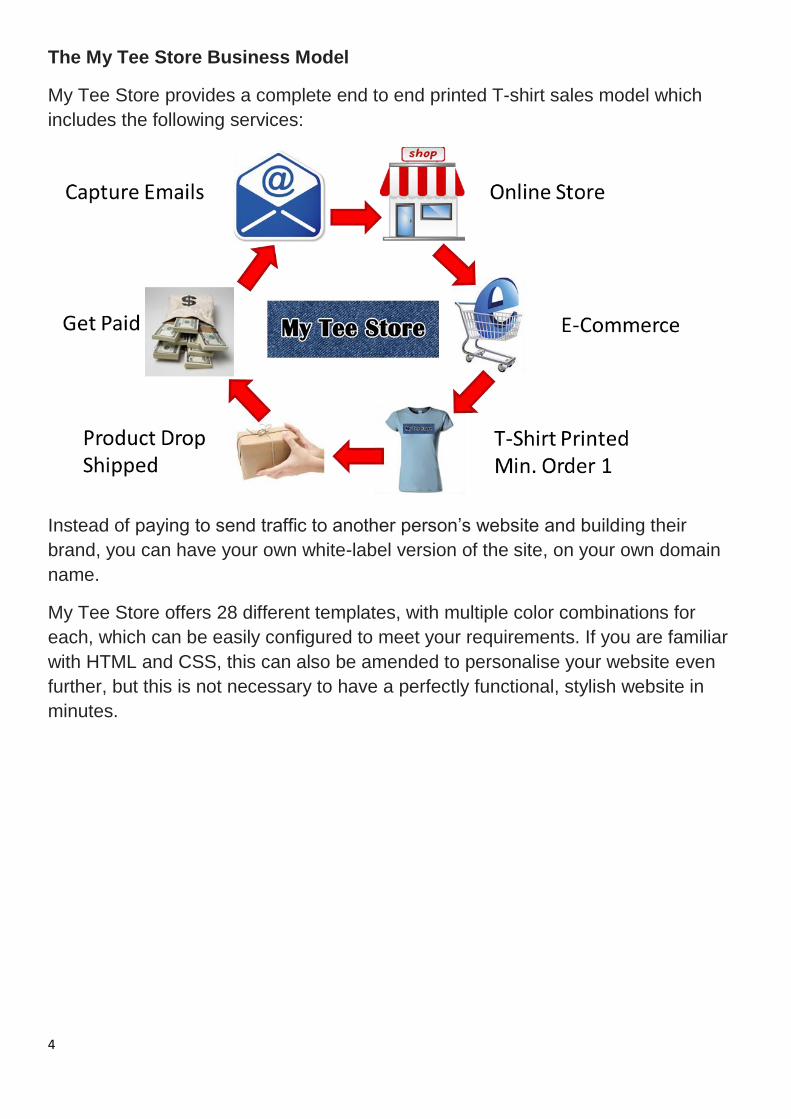
The My Tee Store Business Model
My Tee Store provides a complete end to end printed T-shirt sales model which
includes the following services:
Instead of paying to send traffic to another person’s website and building their
brand, you can have your own white-label version of the site, on your own domain
name.
My Tee Store offers 28 different templates, with multiple color combinations for
each, which can be easily configured to meet your requirements. If you are familiar
with HTML and CSS, this can also be amended to personalise your website even
further, but this is not necessary to have a perfectly functional, stylish website in
minutes.

5
Group Buying Power for Amazing Wholesale Pricing
With My Tee Store’s group buying power, they can offer quality T-Shirts to you at
amazing wholesale printed pricing in multiple markets, (note a minimum order of 1 in
any color, both mens and womens styles) for as low as:
Country White T-Shirts from
Dark T-Shirts from
US$9.99 (beats Teespring pricing at 30 units with 3 colors,
for a 1 unit order!)
US$9.99 (beats Teespring at 58
units with 3 colors, for a 1 unit order!)
€10.99* (beats Teezily pricing at
100 units, *incl shipping costs!)
€12.49* (beats Teezily pricing at
100 units, *incl shipping costs!)
£5.49 (beats Fabrily pricing at 70 units, with a 1 unit
order!)
£6.49 (beats Fabrily pricing at 19 units, with a 1 unit
order!)
AU$11.99 (no equivalent offer in Australia at this price)
AU$14.72 (no equivalent offer in Australia at this price)
Fees that are Included in the Pricing Above
*European pricing includes shipping costs to drop ship to the customer. This
allows you to advertise as free shipping included in the retail price!
The pricing offered above includes My Tee Store covering ALL:
Paypal and Credit Card fees on the customer’s order at retail price, normally
2.9%+30c
Cross border fees and international transaction fees on all purchases and
payouts, which typically add 1-2% to the transaction costs
1.86% Deco Network fees for use of the system on each retail transaction
No additional fees are charged to the store owner. You simply profit on every
item!
6
The only other cost which needs to be included is VAT or GST where applicable, (a
tax which applies on sales to all EU countries and in Australia).
My Tee Store can also offer other apparel in some markets, with great pricing
including:
Hoodies (USA)
Dog wear (Coming soon in USA)
Youth T-Shirts (USA, Australia)
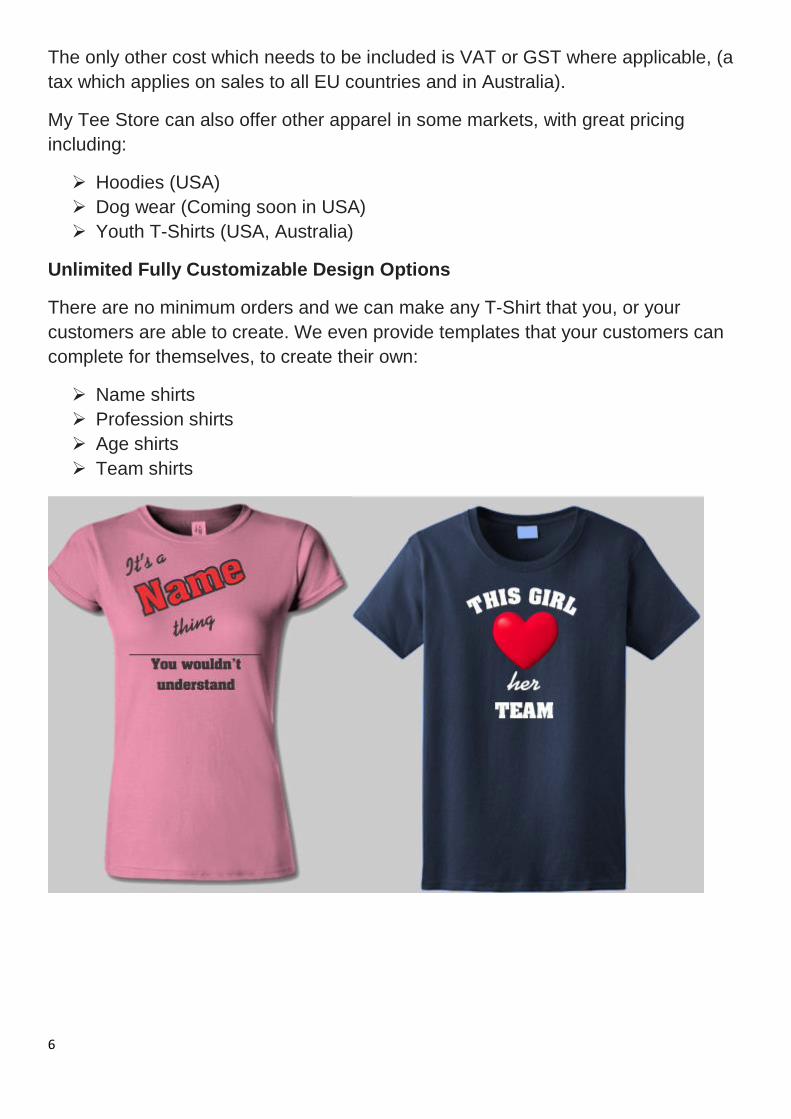
Unlimited Fully Customizable Design Options
There are no minimum orders and we can make any T-Shirt that you, or your
customers are able to create. We even provide templates that your customers can
complete for themselves, to create their own:
Name shirts
Profession shirts
Age shirts
Team shirts

7
The Platform
My Tee Store uses the fully automated Deco Network system, the World’s best and
most established platform, which has been running for over 6 years and is
continually being upgraded. This gives you the functionality and reliability that you
require to support your Store.
DTG Printing Solution
My Tee Store are able to offer this great pricing with no minimums, utilizing Direct to
Garment (DTG) printing. This is the latest, state of the art printing method, that
allows small print runs from digital files, to be printed at low cost. Their competitors
are typically doing screen printing, which has many downsides, requiring large print
runs, and they typically charge you more cost for each extra colour you want to add.
Drop Shipping
The pricing provided includes the handling for drop shipping of orders, directly to
your customer. The details that they enter on your website when the order is taken,
are used to create the packing slip and shipping details.
Your Own Brand with the Best Wholesale
Pricing in Local Markets
You may be familiar with T-Shirt sales sites like Teespring in USA, Fabrily in UK or
Teezily in Europe. You pay lots of money to send traffic to their website and help
them to build their brand. They also require minimum orders of at least 10 shirts, but
with My Tee Store the minimum order quantity is 1, at a lower cost per T-Shirt than
they will charge you for 10 to be printed! It is a genuine print on demand model.
My Tee Store is a totally different proposition, which allows you to build your own
brand, with the best possible price advantage to succeed, using their consolidated
buying power.
8
USA Offering
http://www.myteestore.net offers this business model with USA based apparel
printing, in US dollars.
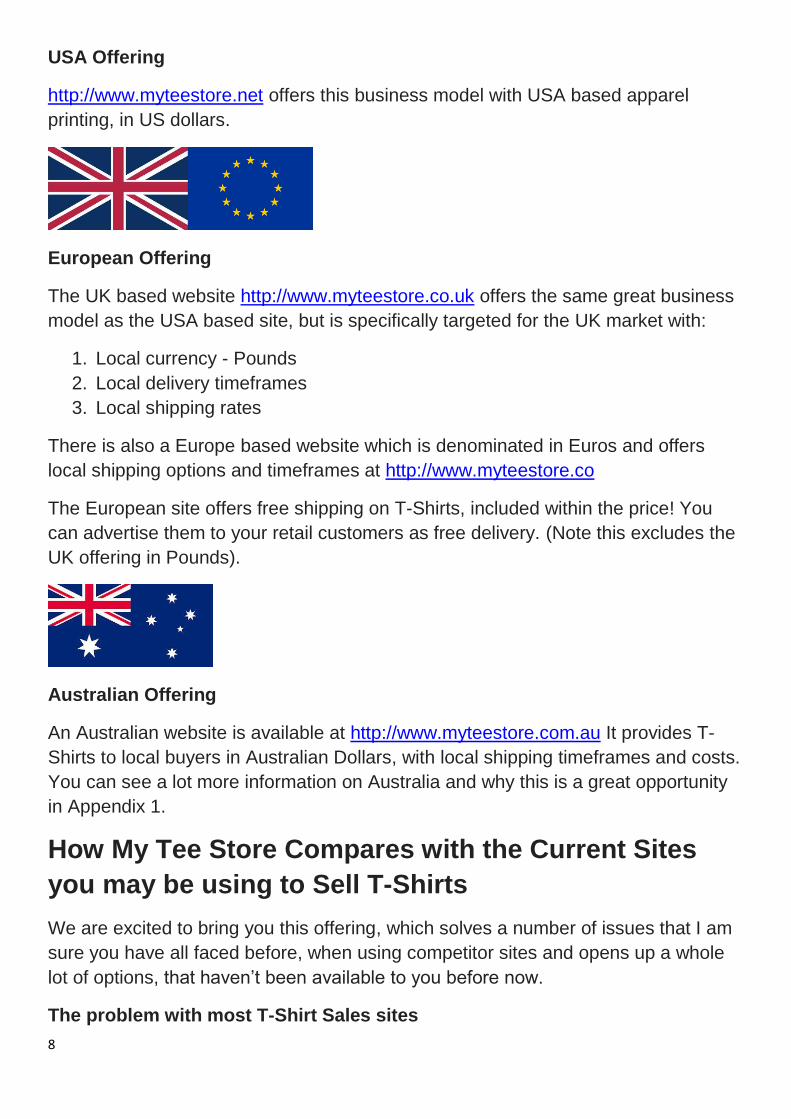
European Offering
The UK based website http://www.myteestore.co.uk offers the same great business
model as the USA based site, but is specifically targeted for the UK market with:
1. Local currency - Pounds
2. Local delivery timeframes
3. Local shipping rates
There is also a Europe based website which is denominated in Euros and offers
local shipping options and timeframes at http://www.myteestore.co
The European site offers free shipping on T-Shirts, included within the price! You
can advertise them to your retail customers as free delivery. (Note this excludes the
UK offering in Pounds).
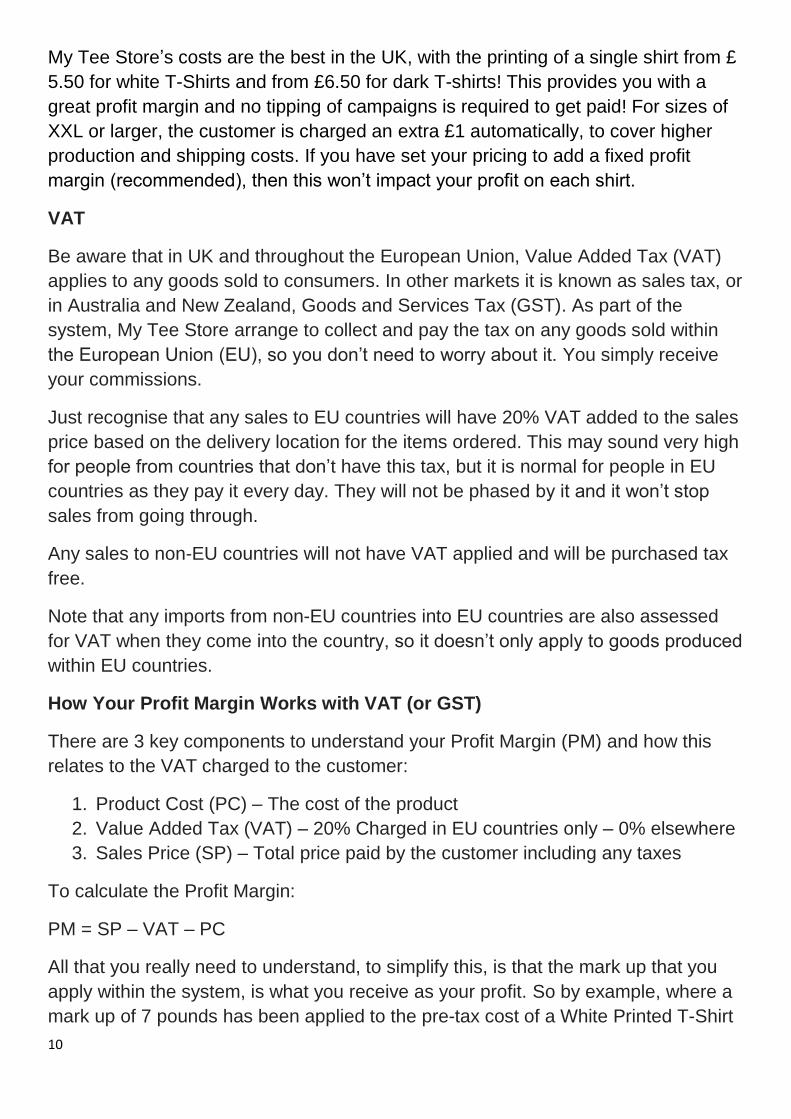
Australian Offering
An Australian website is available at http://www.myteestore.com.au It provides T-
Shirts to local buyers in Australian Dollars, with local shipping timeframes and costs.
You can see a lot more information on Australia and why this is a great opportunity
in Appendix 1.
How My Tee Store Compares with the Current Sites
you may be using to Sell T-Shirts
We are excited to bring you this offering, which solves a number of issues that I am
sure you have all faced before, when using competitor sites and opens up a whole
lot of options, that haven’t been available to you before now.
The problem with most T-Shirt Sales sites

9
Teespring, Fabrily and Teezily require you to have at least 10 orders for a T-Shirt
before any can be printed. Even if you reach that volume, the cost to print is far
higher than My Tee Store can do a single print at for you in each of these markets!
Their business model gives you the peace of mind that you never need to worry
about tipping a campaign with 10 or 20 shirt sales ever again. If a customer orders a
shirt, you get paid for it, you never miss out on sales, even on your less successful
campaigns. No more awkward decisions of whether to continue a campaign or not,
just to get paid for shirts you have already sold.
You also don’t need to worry about campaign timing. You can leave ads running for
as long as they remain profitable. This also allows you to bid lower for your
Facebook ads, as you can take your time to reach people with your shirts. Lower ad
cost = Higher ROI.
Build a business, not campaigns. A business is an asset, not a one-time income.
3 Different Printing Product Types on the One Platform
You can promote 3 different types of T-Shirt printing to your customers:
1. Your own Designs, by creating them using My Tee Store’s T-Shirt Design
Software
2. Your customer can create and print their own unique design, using My Tee
Store’s T-Shirt Design Software in your own store
3. My Tee Store provides templates so that the customer can create their own
Name Shirts, Birth Year Shirts, Favourite Team Shirts, or Profession Shirts.
Name Shirts can be promoted without breaking Facebook guidelines, as the
user is able to create their own unique shirt with their own name on it!
The printing cost is the same under all 3 models, so you can make the same profit
margin on a customer designed unique T-Shirt as on your own designs.
Taking your Winning Shirts to Europe
You may already have successful Teespring campaigns that you can now run again,
targeting UK and European customers in their local market!
Even though your shirts are available as a single print, the pricing for 1 T-Shirt is
better than the printing costs of 20 T-Shirts at either Fabrily or Teezily! The customer
receives a quality Direct to Garment print on a great T-shirt. You won’t be charged
any more costs for using multiple colours on the T-Shirts and you can build your
own brand. The choice is clear on which is the best model!
T-Shirt Costs
10
My Tee Store’s costs are the best in the UK, with the printing of a single shirt from £
5.50 for white T-Shirts and from £6.50 for dark T-shirts! This provides you with a
great profit margin and no tipping of campaigns is required to get paid! For sizes of
XXL or larger, the customer is charged an extra £1 automatically, to cover higher
production and shipping costs. If you have set your pricing to add a fixed profit
margin (recommended), then this won’t impact your profit on each shirt.
VAT
Be aware that in UK and throughout the European Union, Value Added Tax (VAT)
applies to any goods sold to consumers. In other markets it is known as sales tax, or
in Australia and New Zealand, Goods and Services Tax (GST). As part of the
system, My Tee Store arrange to collect and pay the tax on any goods sold within
the European Union (EU), so you don’t need to worry about it. You simply receive
your commissions.
Just recognise that any sales to EU countries will have 20% VAT added to the sales
price based on the delivery location for the items ordered. This may sound very high
for people from countries that don’t have this tax, but it is normal for people in EU
countries as they pay it every day. They will not be phased by it and it won’t stop
sales from going through.
Any sales to non-EU countries will not have VAT applied and will be purchased tax
free.
Note that any imports from non-EU countries into EU countries are also assessed
for VAT when they come into the country, so it doesn’t only apply to goods produced
within EU countries.
How Your Profit Margin Works with VAT (or GST)
There are 3 key components to understand your Profit Margin (PM) and how this
relates to the VAT charged to the customer:
1. Product Cost (PC) – The cost of the product
2. Value Added Tax (VAT) – 20% Charged in EU countries only – 0% elsewhere
3. Sales Price (SP) – Total price paid by the customer including any taxes
To calculate the Profit Margin:
PM = SP – VAT – PC
All that you really need to understand, to simplify this, is that the mark up that you
apply within the system, is what you receive as your profit. So by example, where a
mark up of 7 pounds has been applied to the pre-tax cost of a White Printed T-Shirt
11
which has been sold to a UK customer, you receive 7 pounds in profit on each sale.
VAT is automatically calculated on top of it.
PM = 14.99 – 2.50 – 5.49 = 7 pounds ~ US$11.80 profit on a single shirt at current
exchange rates, after VAT is accounted for!
You are getting over $11 margin on every shirt sold from the very first shirt, even if
10 sales are never reached! If you want to have a higher profit margin, you can have
a higher sales price and capture this for yourself. It is not shared with My Tee Store
at all.
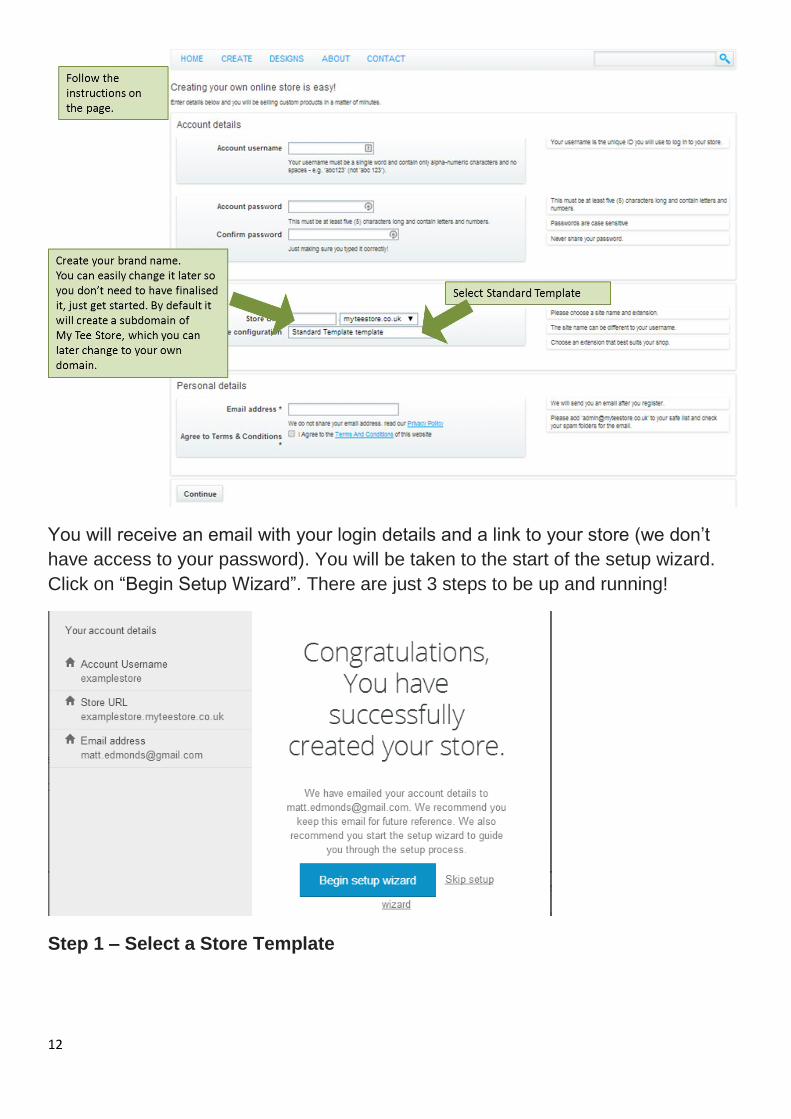
Getting Started with your Free Store Signup
You will want to have a different store in each location, as it allows localized
currency, shipping costs and timeframes. You could have a consistent look to your
brand in each location, just with different localized domains and terms. Using our
system, this is easily set up.
You can start your own branded online store in each location in local currency by
going to:
USA - https://myteestoreusa.secure-decoration.com/affiliate?as=1
UK – https://myteestore.secure-decoration.com/affiliate?as=1
Europe – https://myteestoreeu.secure-decoration.com/affiliate?as=1
Australia - https://myteestoreoz.secure-decoration.com/affiliate?as=1
Each link will take you through to a screen that looks like this
12
You will receive an email with your login details and a link to your store (we don’t
have access to your password). You will be taken to the start of the setup wizard.
Click on “Begin Setup Wizard”. There are just 3 steps to be up and running!
Step 1 – Select a Store Template
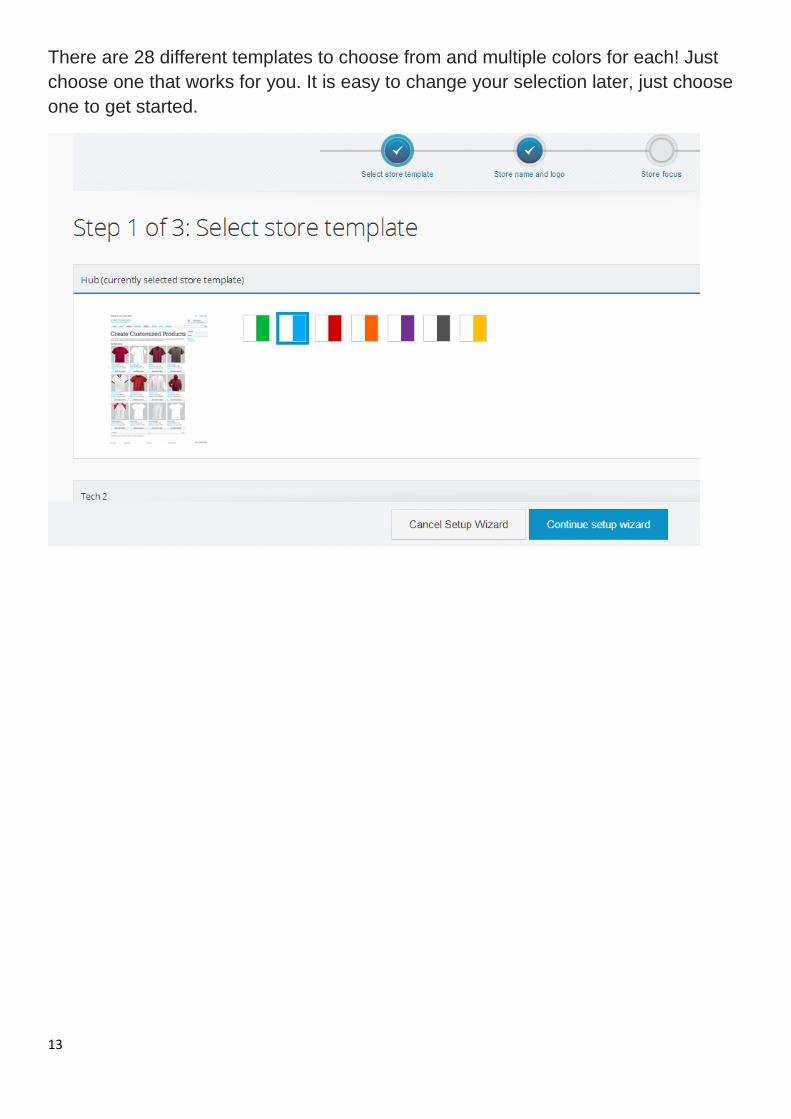
13
There are 28 different templates to choose from and multiple colors for each! Just
choose one that works for you. It is easy to change your selection later, just choose
one to get started.
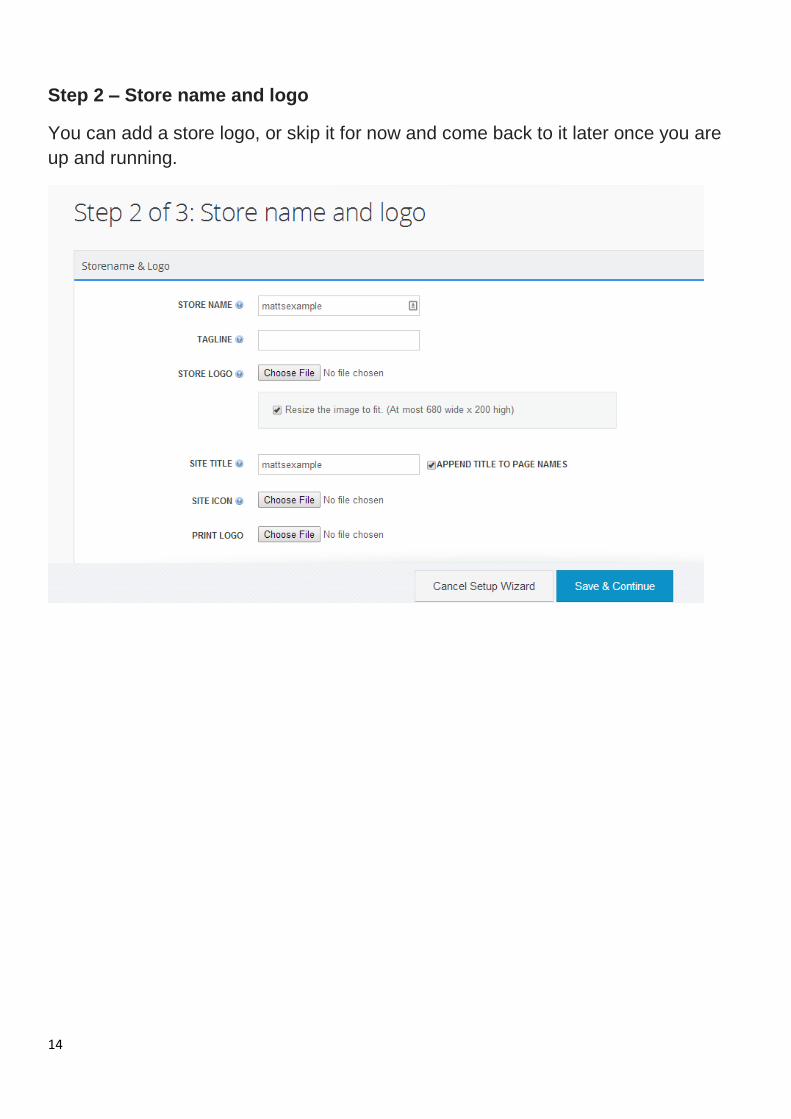
14
Step 2 – Store name and logo
You can add a store logo, or skip it for now and come back to it later once you are
up and running.
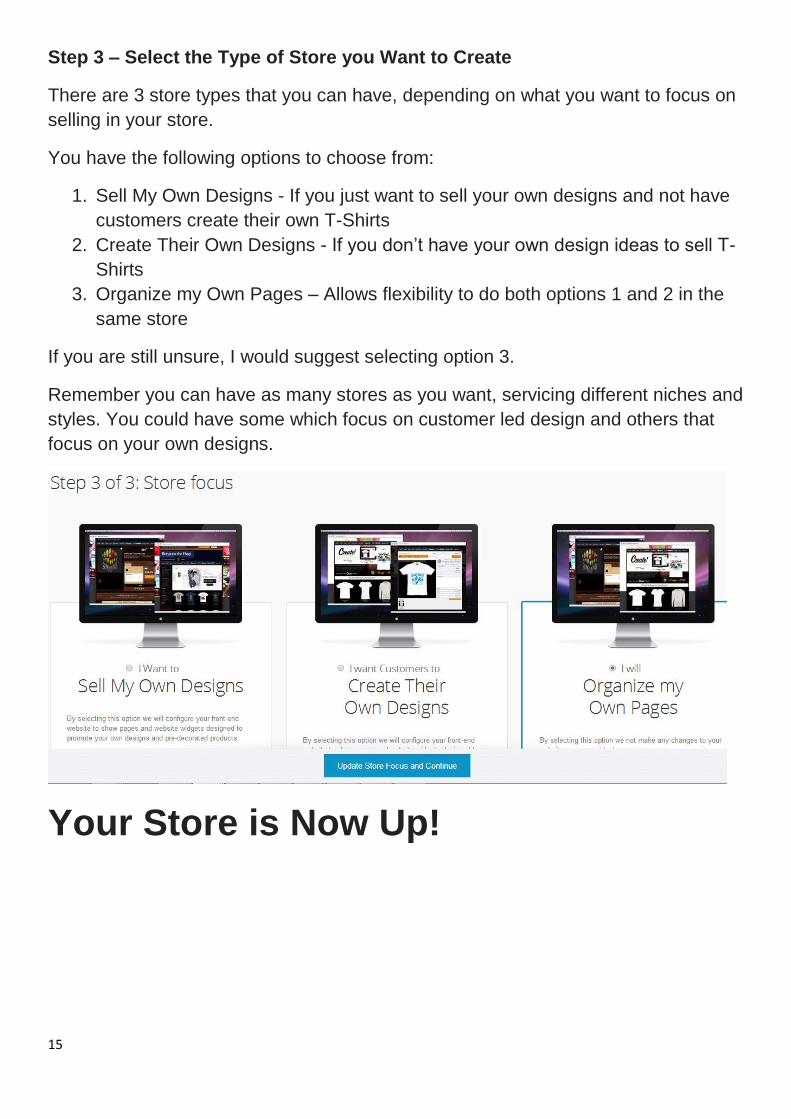
15
Step 3 – Select the Type of Store you Want to Create
There are 3 store types that you can have, depending on what you want to focus on
selling in your store.
You have the following options to choose from:
1. Sell My Own Designs - If you just want to sell your own designs and not have
customers create their own T-Shirts
2. Create Their Own Designs - If you don’t have your own design ideas to sell T-
Shirts
3. Organize my Own Pages – Allows flexibility to do both options 1 and 2 in the
same store
If you are still unsure, I would suggest selecting option 3.
Remember you can have as many stores as you want, servicing different niches and
styles. You could have some which focus on customer led design and others that
focus on your own designs.
Your Store is Now Up!
16
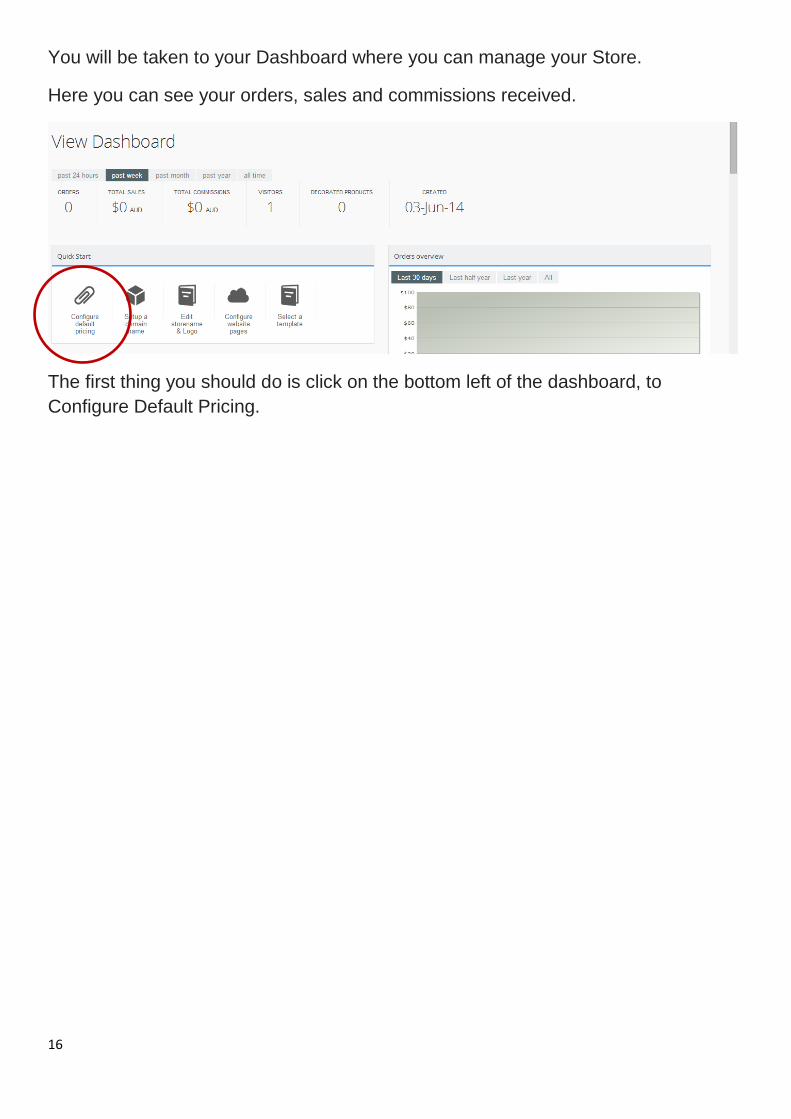
You will be taken to your Dashboard where you can manage your Store.
Here you can see your orders, sales and commissions received.
The first thing you should do is click on the bottom left of the dashboard, to
Configure Default Pricing.
17
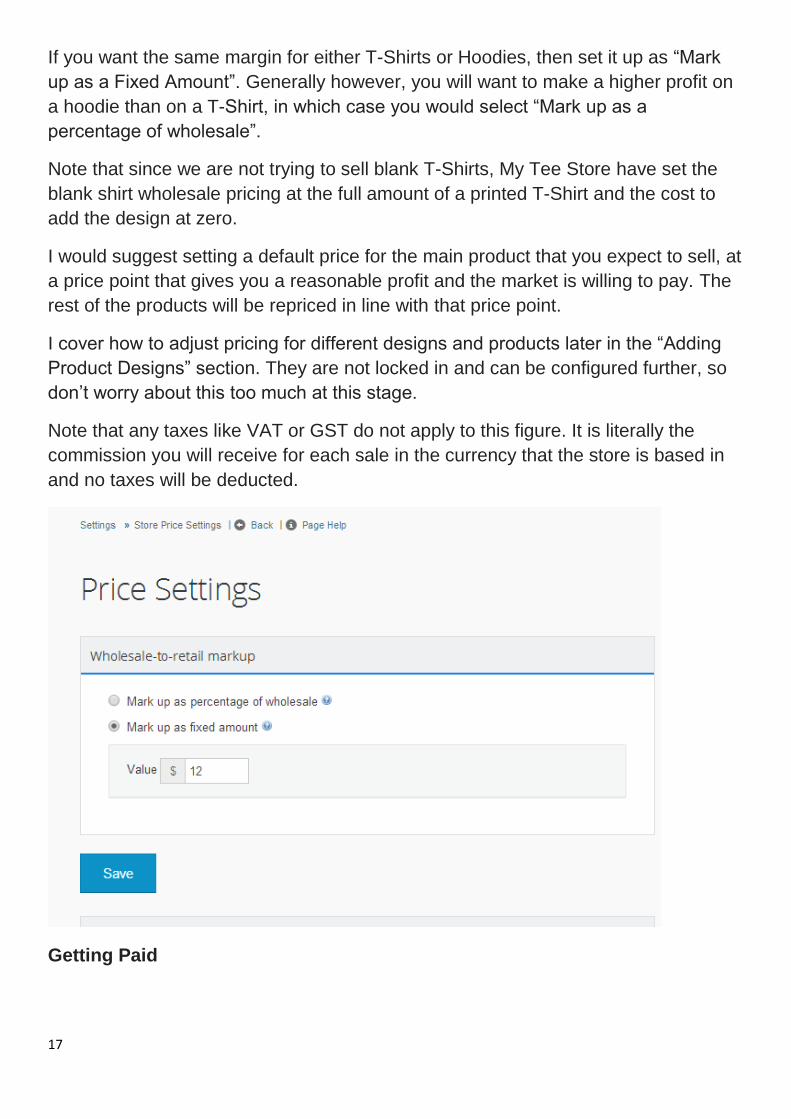
If you want the same margin for either T-Shirts or Hoodies, then set it up as “Mark
up as a Fixed Amount”. Generally however, you will want to make a higher profit on
a hoodie than on a T-Shirt, in which case you would select “Mark up as a
percentage of wholesale”.
Note that since we are not trying to sell blank T-Shirts, My Tee Store have set the
blank shirt wholesale pricing at the full amount of a printed T-Shirt and the cost to
add the design at zero.
I would suggest setting a default price for the main product that you expect to sell, at
a price point that gives you a reasonable profit and the market is willing to pay. The
rest of the products will be repriced in line with that price point.
I cover how to adjust pricing for different designs and products later in the “Adding
Product Designs” section. They are not locked in and can be configured further, so
don’t worry about this too much at this stage.
Note that any taxes like VAT or GST do not apply to this figure. It is literally the
commission you will receive for each sale in the currency that the store is based in
and no taxes will be deducted.
Getting Paid
18
You can now make money by directing sales to your site! You want to make sure My
Tee Store have your Paypal details to be able to make transfers into your account.
This is under “Settings / Commission Settings”, just add your details there.
Standard payments are monthly, and there must be accumulated earnings of at
least $50, or it will be carried over to the following month. My Tee Store are happy to
pay out when you have reached at least $500 in commissions at any time in any
single currency account. Just send Matt Edmonds a message on Facebook,
advising that you want to be paid out, the store name and which site it is attached to.
He will sort it out for you.
19
Setting up your own domain
To set up your own domain, go to the label “Dashboard” and “Set up a Domain
Name” on the bottom left.
There are basic instructions on the page on setting up your own Domain Name,
which unfortunately varies between different service providers. Once the A record
has been transferred (this can take up to 48 hours depending on the hosting
company), your website will be live! This allows you to create your own brand,
instead of paying to advertise to build someone else’s brand.
Setting up your Domain in Go Daddy
We recommend setting up your domain name with http://www.godaddy.com They
have a very simple system which allows you to easily set up your domain A record,
which can be transferred without needing a hosting account. All you need to pay is
the annual domain name fee, which is typically around $10! This includes your email
account.
You can get discounts on Go Daddy through http://www.fatwallet.com
Here is the Deconetwork video on setting this up in Go Daddy
https://www.youtube.com/watch?v=_JFDAnb6Y40
With other companies you may need a hosting account. Here is how to set this up
using CPanel.
Setting up your Domain using CPanel for Hostgator
You will need to have purchased a domain name and have a hosting account. I am
using Hostgator, as they have plans which allow you to have multiple domains in the
one hosting account, that is affordable. If you want to have multiple niches on a
number of different domains that are local for each market that you are targeting,
Hostgator is a reasonable option if you are on a budget.
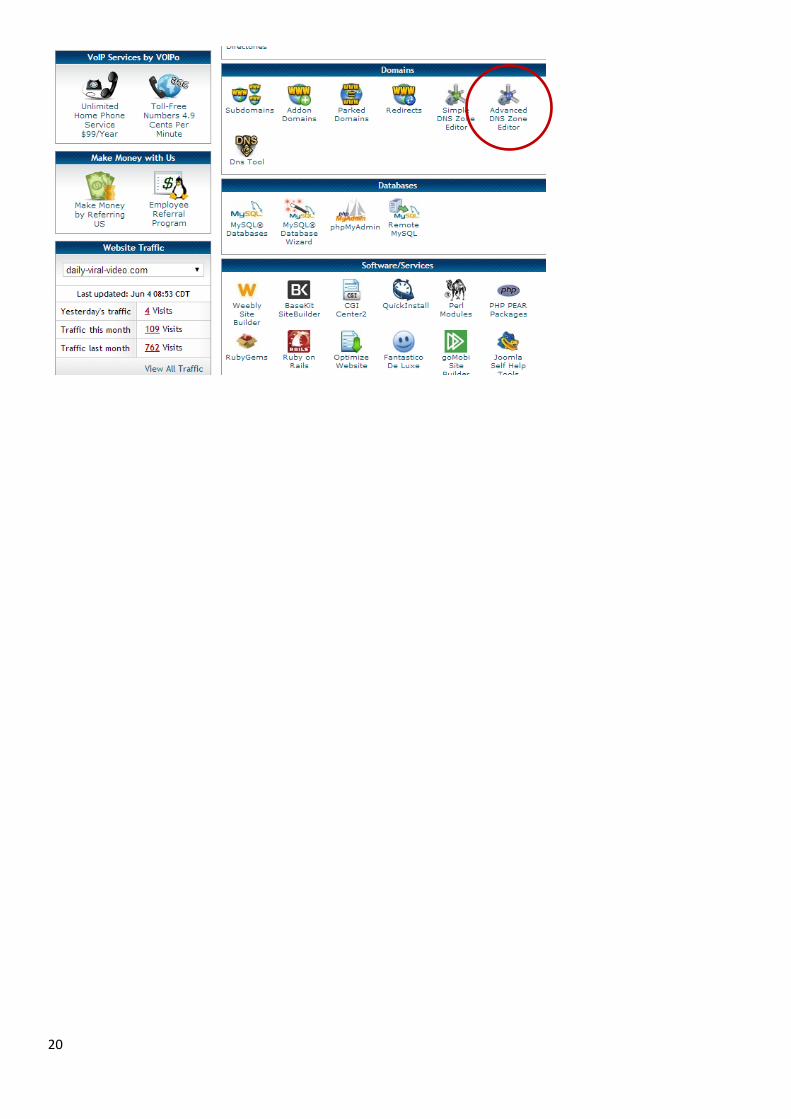
When logged into CPanel which comes with your hosting account, scroll down the
home page to the section Domains and select the icon Advanced DNS Zone Editor
as circled in red in the image below.
20
21
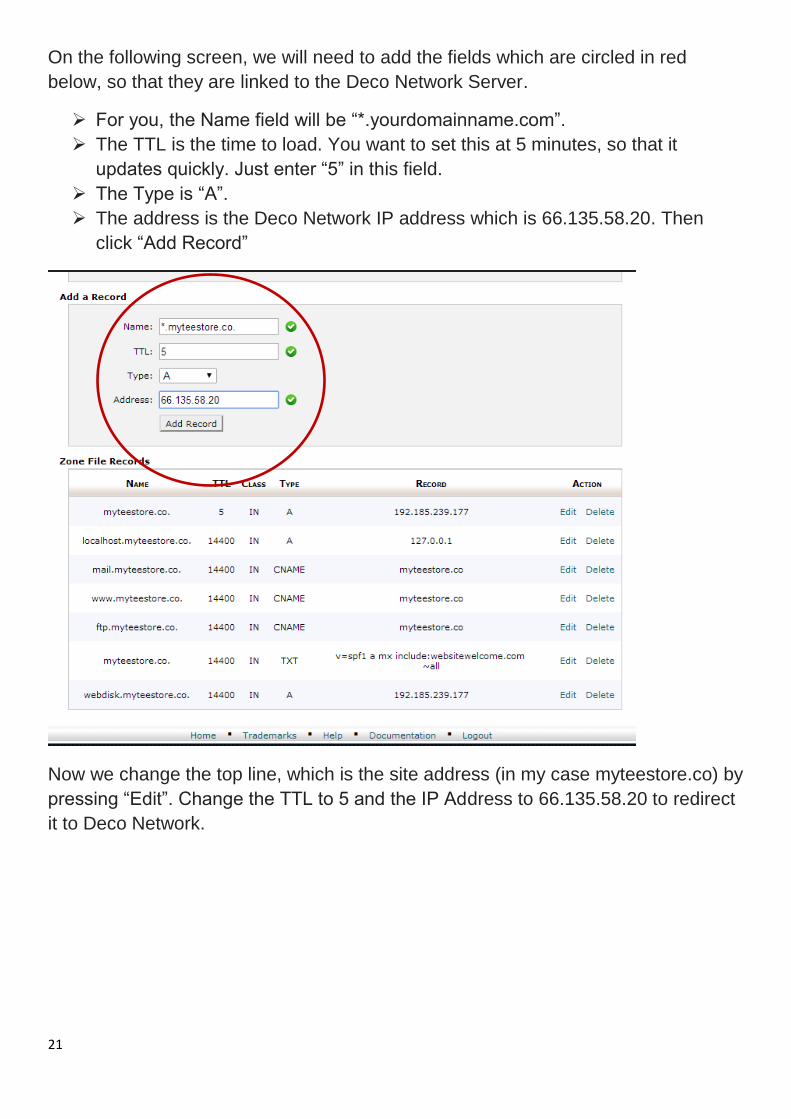
On the following screen, we will need to add the fields which are circled in red
below, so that they are linked to the Deco Network Server.
For you, the Name field will be “*.yourdomainname.com”.
The TTL is the time to load. You want to set this at 5 minutes, so that it
updates quickly. Just enter “5” in this field.
The Type is “A”.
The address is the Deco Network IP address which is 66.135.58.20. Then
click “Add Record”
Now we change the top line, which is the site address (in my case myteestore.co) by
pressing “Edit”. Change the TTL to 5 and the IP Address to 66.135.58.20 to redirect
it to Deco Network.
22
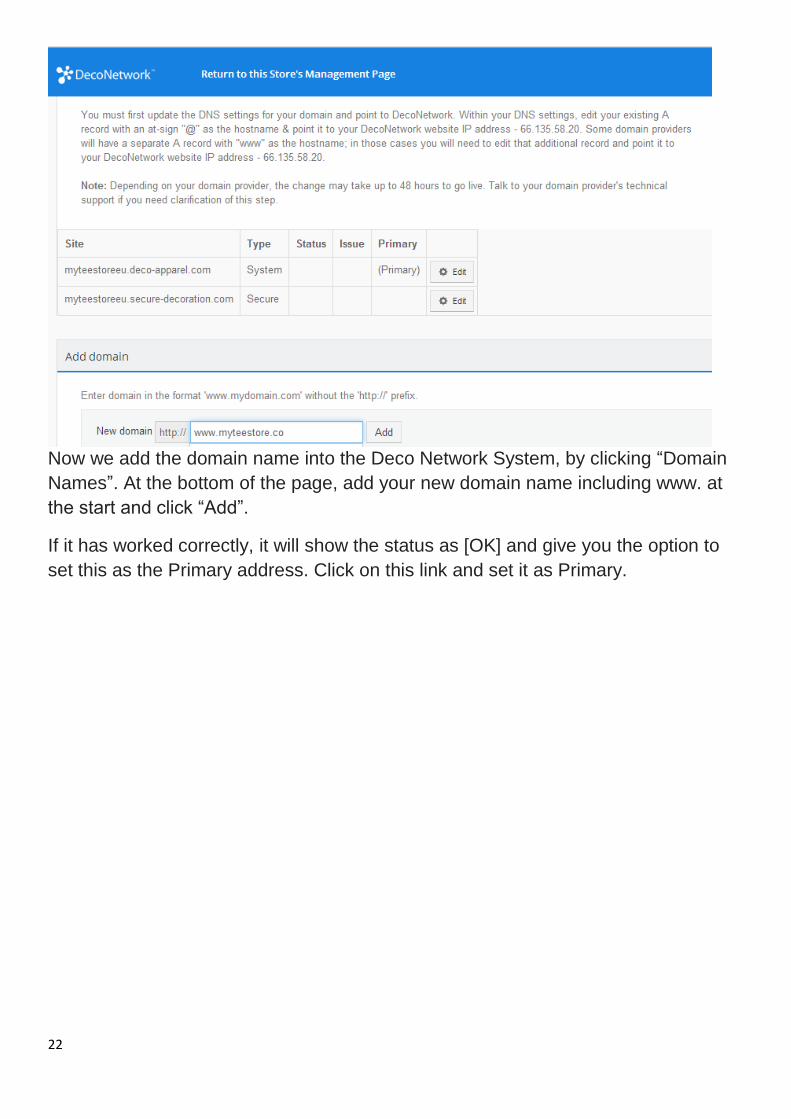
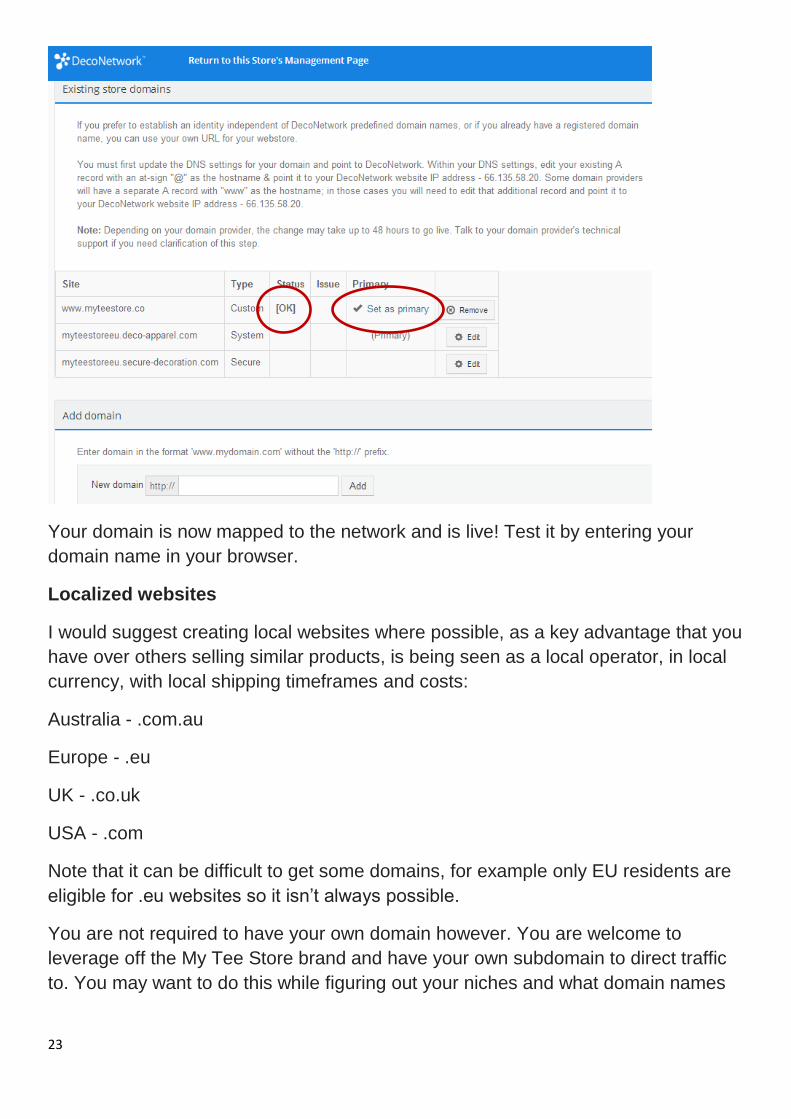
Now we add the domain name into the Deco Network System, by clicking “Domain
Names”. At the bottom of the page, add your new domain name including www. at
the start and click “Add”.
If it has worked correctly, it will show the status as [OK] and give you the option to
set this as the Primary address. Click on this link and set it as Primary.
23
Your domain is now mapped to the network and is live! Test it by entering your
domain name in your browser.
Localized websites
I would suggest creating local websites where possible, as a key advantage that you
have over others selling similar products, is being seen as a local operator, in local
currency, with local shipping timeframes and costs:
Australia - .com.au
Europe - .eu
UK - .co.uk
USA - .com
Note that it can be difficult to get some domains, for example only EU residents are
eligible for .eu websites so it isn’t always possible.
You are not required to have your own domain however. You are welcome to
leverage off the My Tee Store brand and have your own subdomain to direct traffic
to. You may want to do this while figuring out your niches and what domain names

24
you want. In the meantime you can be building up your own product range and
making sales.
Configuring your Website
You can configure the layout of the website, while retaining the look of your theme.
This provides a level of customization of what will appear and the order it appears
in. To do this, go to “Website Pages”.
Here you can change the order that each item appears in, just drag the arrows up or
down. I would suggest that typically you will want to have designs at the top of the
page, for the customer to choose from, as sales tend to be design driven, rather
than product type driven. Once the customer has selected a design, they can then
choose the product and colours and personalize it further if they wish to.
You can easily configure what does or doesn’t appear on your site. I would suggest
having 2 tabs open, one where you are making changes to the site’s appearance
and another that you can refresh to see what impact the changes you are making
are having, just refresh when changes have been saved. This is the fastest way to
get your site looking how you want it to.
You can add further details on the “About” page, to advise customers what your site
is about.
Here is a video created by Deco Network to assist you with configuring your
website. https://www.youtube.com/watch?v=myaaoQQpJYg It includes some more
advanced techniques like changing CSS and HTML on your site.
Adding Product Designs
The designer tool in the Deco Network system is run on Corel Draw X6. It has over
300 font types built into the system, so you or your customers can easily create your
own text and has thousands of simple images that are allowed to be used
commercially. You can also add your own images, ideally png files.
To do this, you simply go to “Products / Create Decorated Products”
In here, select a t-shirt product that you want to customize (it can be applied to any
products). This will load the online designer. Just add text and any images, either
from the art library or add your own. The designer is far more advanced than in any
other sites like Teespring. It allows you to do gradients, shadows and glow effects
because the printing is digital. This opens up 11 million+ colors at your disposal
instead of being charged more for using more than 1 colour. See Appendix 3 for
further information on the features of the designer.
25
If you have designs already in a website like Sunfrog, you can transfer them directly,
by adding the png print file to the t-shirt. It automatically adds the design to all t-shirt
colors and allows it to be accessed on other product types. This makes for a much
simpler user experience than on other sites, which don’t provide a designer. There
are also ladies shirts designs in all markets and wrinkle-free presentation of the
product to the customer.
Once you have finished customizing the product, and adding it to all the other
products, (just “select all”) it is available in your store for sale on every product and
in every color. Very simple!
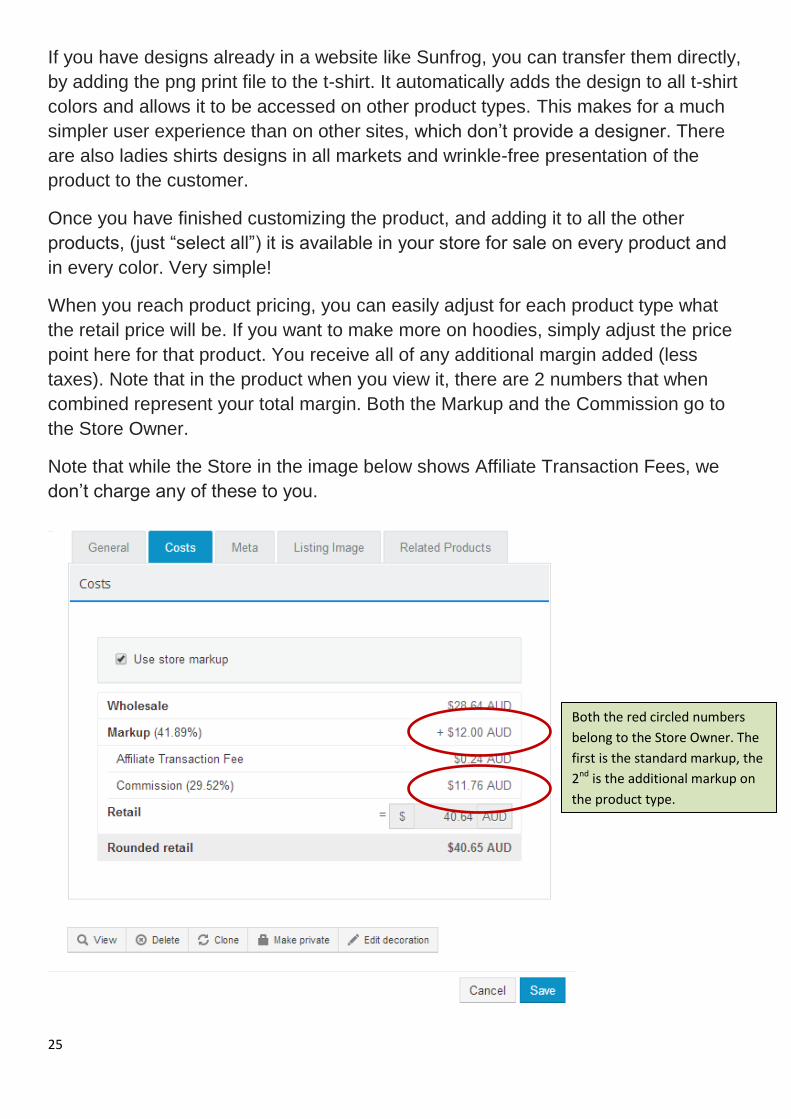
When you reach product pricing, you can easily adjust for each product type what
the retail price will be. If you want to make more on hoodies, simply adjust the price
point here for that product. You receive all of any additional margin added (less
taxes). Note that in the product when you view it, there are 2 numbers that when
combined represent your total margin. Both the Markup and the Commission go to
the Store Owner.
Note that while the Store in the image below shows Affiliate Transaction Fees, we
don’t charge any of these to you.
Both the red circled numbers
belong to the Store Owner. The
first is the standard markup, the
2nd is the additional markup on
the product type.
26
Adding Editable Templates
You will note that I have created some templates, which allow customers to add
their:
Name
Profession
Favourite team
Birth Year (coming soon)
There are 2 ways that these templates can be created, the first is what My Tee
Store have used, through the actual software program Corel Draw. The X6 version
can be purchased for around $150 if you search for it online. Just keep in mind that
the only fonts which are able to be used, are those that are already configured in
Deco Network (300+ to choose from). If you try to use any other fonts, they will
appear as “Arial” instead, if inserted as .cdr files. You can use other fonts if installed
as .png files, but then they aren’t editable templates.
An alternative method to add your own customizable templates is by using the
designer in My Tee Store instead. Go to “Products and Designs / Decorated
Products”, then on the right click “Create Decorated Products”. Choose a shirt style
you want to create the product on (you can add it to more products later). Add text
and designs, just create 1 row of text at a time and add it. This makes it much
simpler as a template.
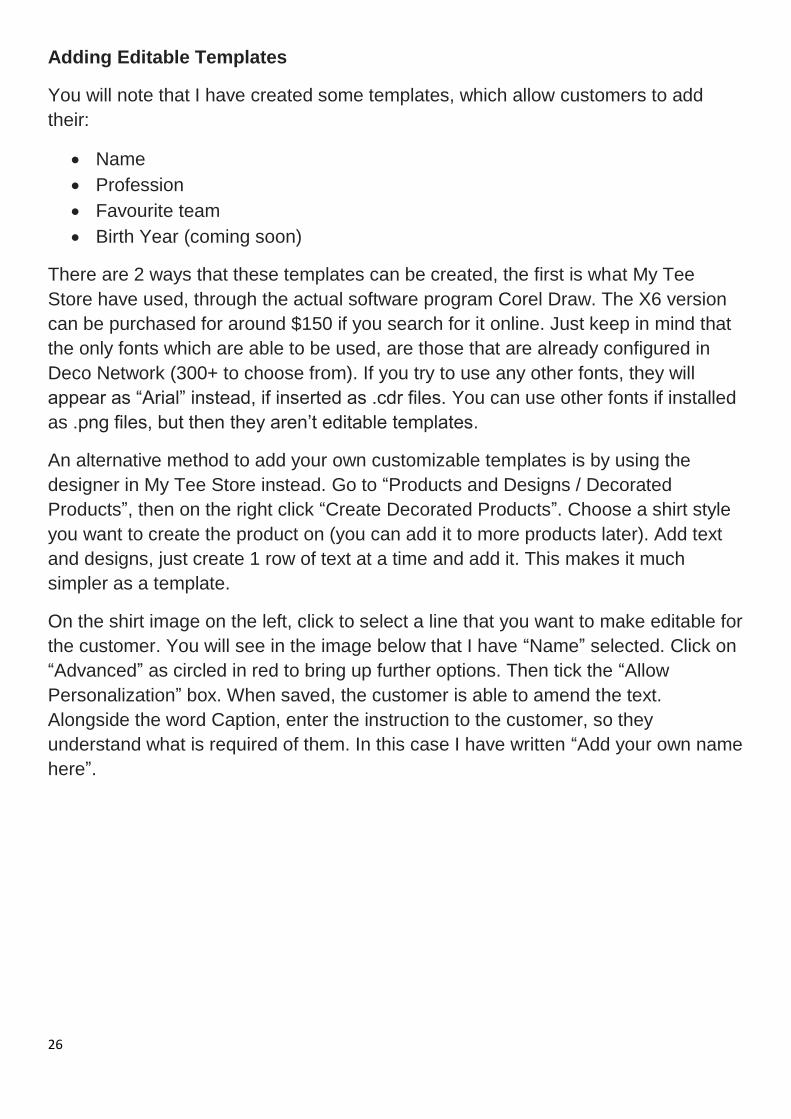
On the shirt image on the left, click to select a line that you want to make editable for
the customer. You will see in the image below that I have “Name” selected. Click on
“Advanced” as circled in red to bring up further options. Then tick the “Allow
Personalization” box. When saved, the customer is able to amend the text.
Alongside the word Caption, enter the instruction to the customer, so they
understand what is required of them. In this case I have written “Add your own name
here”.
27
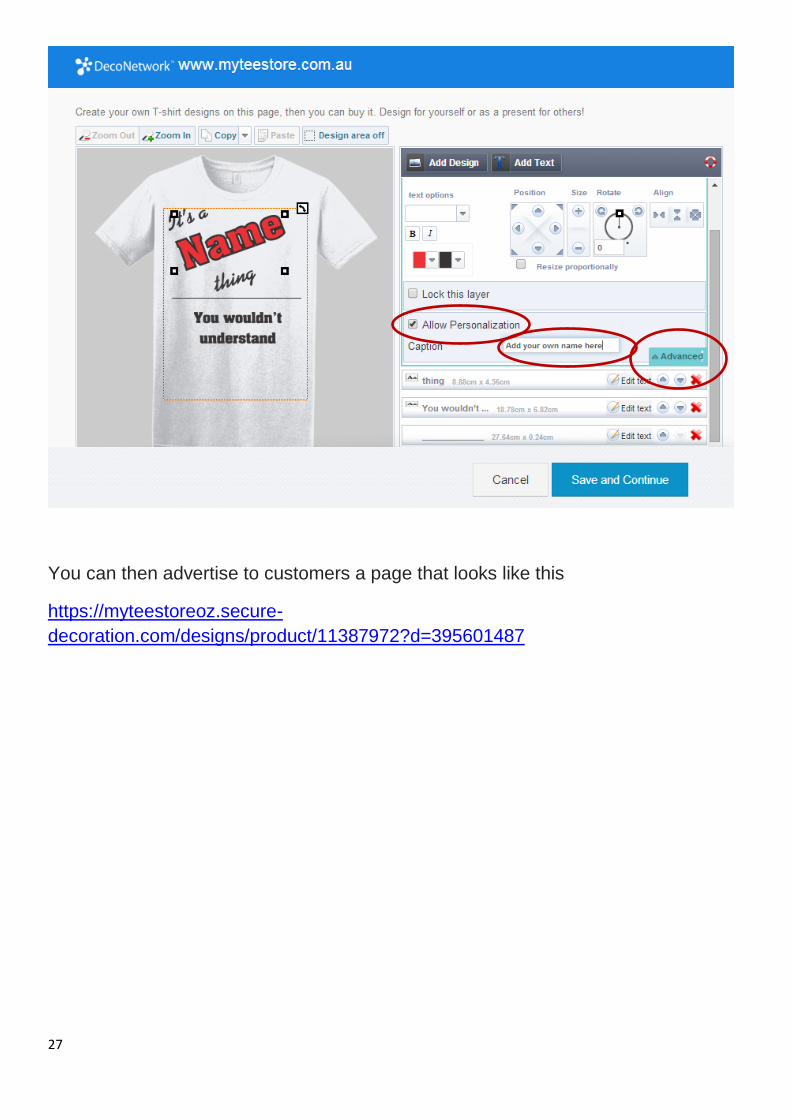
You can then advertise to customers a page that looks like this
https://myteestoreoz.secure-
decoration.com/designs/product/11387972?d=395601487
28
The template is very simple for the customer to complete, they just select the colors
they want for the text and outline, change the template so that it specifies their own
name, amend the t-shirt color & size and click add to cart to purchase.
***Name shirts are back!!***
Capture Customer Email Details
Doesn’t it annoy you that sites like Teespring capture your customer’s email details,
and then don’t share them with you? You have paid to get the customer to the site,
they have bought your product and you still don’t have them on your own mailing
list. Online marketing’s first rule is, “The money is in the list!”. If you don’t get their
details, you are missing out. With My Tee Store, this is never an issue.
If you click on “Customers” you will see a list of any customers that have purchased.
By clicking on “View Customer”, you can see in great detail what they have ordered
and when. You can do highly targeted marketing to them to draw them back to your
store, based on what they have already purchased.
If you go to “Marketing” you will see that you have the ability to send customized
html based emails to your customers and those that have signed up for newsletters.
You can even export the list, if you wanted to add it to an autoresponder.
29
Create Multiple Niche Stores
It is free to set up as many stores as you like. You can create multiple niches, with
sites covering:
animal owners
sports niches
hobbies
expats
name t-shirts
job t-shirts
create your own t-shirt
You can even advertise the other sites by linking them to one another.
Alternatively you could have a single site with all of these niches in it, or a mix of
specialist and generalist stores.
Google Analytics for your Store
You can set up Google Analytics for your Store. This gives you much greater, in
depth analysis of where your sales leads are coming from, how many people are
seeing your site each day and how they are interacting with your site.
Just create a Google Analytics account by following the steps in this video
https://www.youtube.com/watch?v=uyrKu-yb05c
Once you have done this, go to “Marketing and Promotions / SEO and Google
Analytics”. Use the tracking code and place it in the Google Analytics Code box.
That’s it, you now have real time insights to be able to see what is happening on
your site. This can help immensely to determine when you should be running ads
and who to run them to.
Facebook Group
We encourage you to join our Facebook group at
https://www.facebook.com/groups/1408189579467286/
You will be able to discuss the platform with other Store Owners and ask any
questions you may have.
30
Appendix 1 - Notes on the Australian Market
Population – 23 million
Fulltime Wages – Average $72,000, Median $57,000
Minimum Wage (by law) - $16.37 per hour + 9% superannuation (like a 401k
plan)
High standard of living, high pay, high living costs
I live in Australia and am very familiar with the local market. Australians get
frustrated at being ripped off with very high prices on goods compared to the prices
paid overseas in USA, Asia and Europe.
A custom T-Shirt like we are selling, will typically retail online for AU$32 to $42 and
on top of that they will charge anywhere from $6 to $12.50 in shipping!
Just check out sites like zazzle.com.au and cafepress.com.au to see what we mean.
On Zazzle we can see basic “Keep Calm” T-Shirts retailing for between $38.95 and
$45.95! On top of that they will charge $6 in shipping, bringing the total price to
$44.95 to $51.95! http://www.zazzle.com.au/keep+calm+and+carry+on+tshirts
Here is the same T-Shirt on the Zazzle USA website at a retail price of $28.95 with
$6.49 shipping http://www.zazzle.com/make_your_own_keep_calm_template_shirt-
235771820047214070
Here is the same customizable T-Shirt at Café Press
http://www.cafepress.com.au/mf/85739898/keep-calm-
personalize_tshirt?productId=1213526354
They are “only” charging $32 for the T-Shirt, but when you get to the checkout, they
are charging a further $12.50 for shipping! This brings the delivered product price up
to $44.50, in line with the cost of Zazzle.
This shows the massive premium being charged in the Australian market that you
can take advantage of!
Our price to you is only AU$11.99 for white and $14.72 for dark t-shirts, with $7.99
delivery to the customer. This gives you plenty of room for margin. Margins of
AU$12+ per t-shirt are easily achievable in this market. At current exchange rates
that is roughly US$11+ per t-shirt sold.
Australia also has a 10% Goods and Services Tax (GST), which is equivalent to
VAT in Europe.
31
More information on Australia
Cultural differences between Australia and USA
There are some important differences between Australia and USA that you should
be aware of:
Australians tend to be a bit more conservative than Americans. More subtle
marketing is going to work better than “in your face”. They will be more likely to
share a simple image that they like, than an obvious advertisement.
Australians use British English, so words need to be spelled correctly – colour,
flavour, tyres, cheques to give a few examples
Don’t use Teespring style “Normally $29.99, now $19.99. Your $10 discount
has been applied”. This is illegal in Australia, if it was never sold at full price.
Be careful using slogans such as “Australian made” or “Made in Australia”.
There are requirements for such statements to appear and can be found to be
misleading. If in doubt, don’t use it.
The trademarks and copyright rules apply just as much in Australia as in USA.
Don’t use logos of the local sports teams, or USA teams for that matter.
Remember that the seasons are opposite in the Southern Hemisphere. When
you are switching from selling T-Shirts to selling Hoodies coming into winter in
USA or Europe, you should be doing the opposite in Australia. (Note hoodies
are planned, but not available yet in Australia at the time of writing).
The further North the location, the hotter it tends to be and the more mild the
winters are. Hoodies are more likely to sell well in Sydney, Canberra,
Melbourne than in Brisbane or Perth, where Winter tends to be much more
moderate.
If you are going to focus on sports in Australia, here are a few key things to note:
The biggest sports are:
o Australian Rules Football
o Rugby League
o Rugby Union
o Cricket
o Motor Racing
o Soccer
o Basketball
pretty much in that order, although it varies by state which sport has the greatest
following.
32
Sports like NFL, Ice Hockey and Baseball have pretty much no following, while
the NBA is quite popular
There is strong interstate and interclub rivalry. In rugby league for example
there is an annual series between New South Wales and Queensland which
fans are very passionate about.
The biggest sporting events of the year are:
o State of Origin (Rugby League) – 28th May to 9th July 2014
o Soccer World Cup – 12th June to 13th July 2014
o Rugby Championship (Rugby Union) – 16th August to 5th October 2014
o Aussie Rules Grand Final – 27th September 2014
o NRL Grand Final (Rugby League) – October 5th 2014
o Bathurst 1,000 (Motor racing) – 9th to 12th October 2014
o Melbourne Cup (Horse racing) – 4th November 2014
o Australian Open Tennis – 19th January to 1st February 2015
o Australian Grand Prix – 12th March 2015
Australians will follow Australian sports stars who are doing well
internationally, a few examples:
o Patty Mills and Aron Baynes both play for the San Antonio Spurs, who
are in the NBA finals series against the Miami Heat – Go Spurs!
o There is a top 5 NBA draft pick from Australia, Dante Exum. Whichever
team he ends up with, will suddenly have lots of Australian fans and
could be a good opportunity. It is being held on June 26th 2014.
o Will Power is currently leading the Indycar series
o Chad Reid is a 2 time series champion in Motorcross
o Marcus Ambrose in Nascar
o Daniel Ricciardo in Formula 1
We get ESPN and ESPN2 and can watch most of what you will get to see in
USA.
Appendix 2 – FAQs
Q1. If I want to sell in all international markets in local currency, do I need to
create multiple stores?
A1. Yes. Deco Network is based in a single currency on the back end. To be
able to sell in local currency in each market, you will need to create a new
store in each separate platform that is based in that currency. It is easy to
transfer designs from one platform to another, once they have been created.
33
Q2. Are you going to be more lenient than Teespring and other sites when it
comes to banning teeshirts that infringe on copyright or trademarks?
A2. No. It is likely that if your t-shirt has been banned elsewhere, that My Tee
Store won’t print it either. As a general rule, if you couldn’t use it at another
site, don’t try putting it up in your store either. My Tee Store need to approve
any designs that go to print and it is the number 1 risk, so it is taken very
seriously.
My Tee Store want to build a long term sustainable business and appreciate
your support by not forcing them to take down t-shirts. Note that while they
can’t review every t-shirt before it is sold, as soon as the sales start coming
through, there will be an issue as they can’t be printed. You won’t get paid for
any orders that you have received and will have wasted money advertising
them.
Q3. What email address does the customer get contacted from when they
place an order?
A3. For the white label model that My Tee Store are utilizing, all customers will
receive an automated confirmation message from the generic email address
[email protected] when they place their order. The “from” details
of the email include the name of your store as it appears in the system.
There is nothing that indicates anything other than your store providing the
goods. My Tee Store manage any questions, complaints or issues on your
behalf, but on a white label basis. If there is anything which specifically relates
to your store / design, they will forward it to you so you can respond, where
appropriate.
Q4. Do I need to include an affiliate link in the url to get paid?
A4. No, there is no affiliate link required. You get paid for all sales that go
through your store, regardless of whether you send the traffic to your site or
not.
Q5. If I have any questions, where do I go to ask them?
A5. In the first instance, you can either post into the Facebook Group for
assistance, or contact Matt Edmonds directly in his Facebook account. Please
34
don’t contact Deco Network or any of My Tee Store’s printers directly. Their
contracts are with My Tee Store, not with the store owner, so they will only act
on their instruction. We will do our best to assist you where possible. If we
can’t assist you ourselves, we will try to get an answer for you.
Q6. What sizes do you offer?
A6. This varies by location. In USA we offer up to 5XL in both T-Shirts and
Hoodies, as well as Youth T-Shirts!
Q7. Can I change the shipping costs and take more / less profit margin?
A7. Only in some markets. My Tee Store have configured USA so that you can
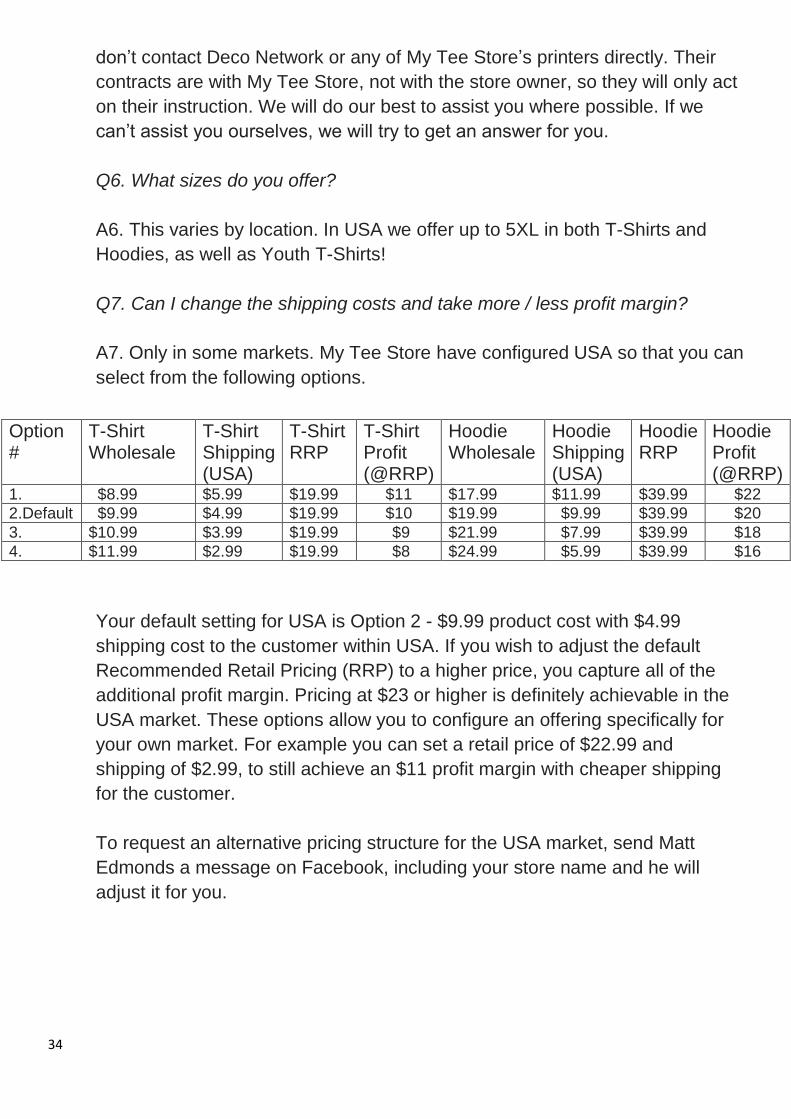
select from the following options.
Your default setting for USA is Option 2 - $9.99 product cost with $4.99
shipping cost to the customer within USA. If you wish to adjust the default
Recommended Retail Pricing (RRP) to a higher price, you capture all of the
additional profit margin. Pricing at $23 or higher is definitely achievable in the
USA market. These options allow you to configure an offering specifically for
your own market. For example you can set a retail price of $22.99 and
shipping of $2.99, to still achieve an $11 profit margin with cheaper shipping
for the customer.
To request an alternative pricing structure for the USA market, send Matt
Edmonds a message on Facebook, including your store name and he will
adjust it for you.
Option #
T-Shirt Wholesale
T-Shirt Shipping (USA)
T-Shirt RRP
T-Shirt Profit (@RRP)
Hoodie Wholesale
Hoodie Shipping (USA)
Hoodie RRP
Hoodie Profit (@RRP)
1. $8.99 $5.99 $19.99 $11 $17.99 $11.99 $39.99 $22
2.Default $9.99 $4.99 $19.99 $10 $19.99 $9.99 $39.99 $20
3. $10.99 $3.99 $19.99 $9 $21.99 $7.99 $39.99 $18
4. $11.99 $2.99 $19.99 $8 $24.99 $5.99 $39.99 $16
35
Appendix 3 – The Great Online Designer – Provided by Deco Network
Overview
My Tee Store's powerful online designer allows you to:
Upload images and create full-color designs for a wide range of products.
Create and maintain your gallery of designs.
Mix design elements - single image or multiple images, digital photos or artwork, as well
as text.
Quick Start Tips
To decorate the current product
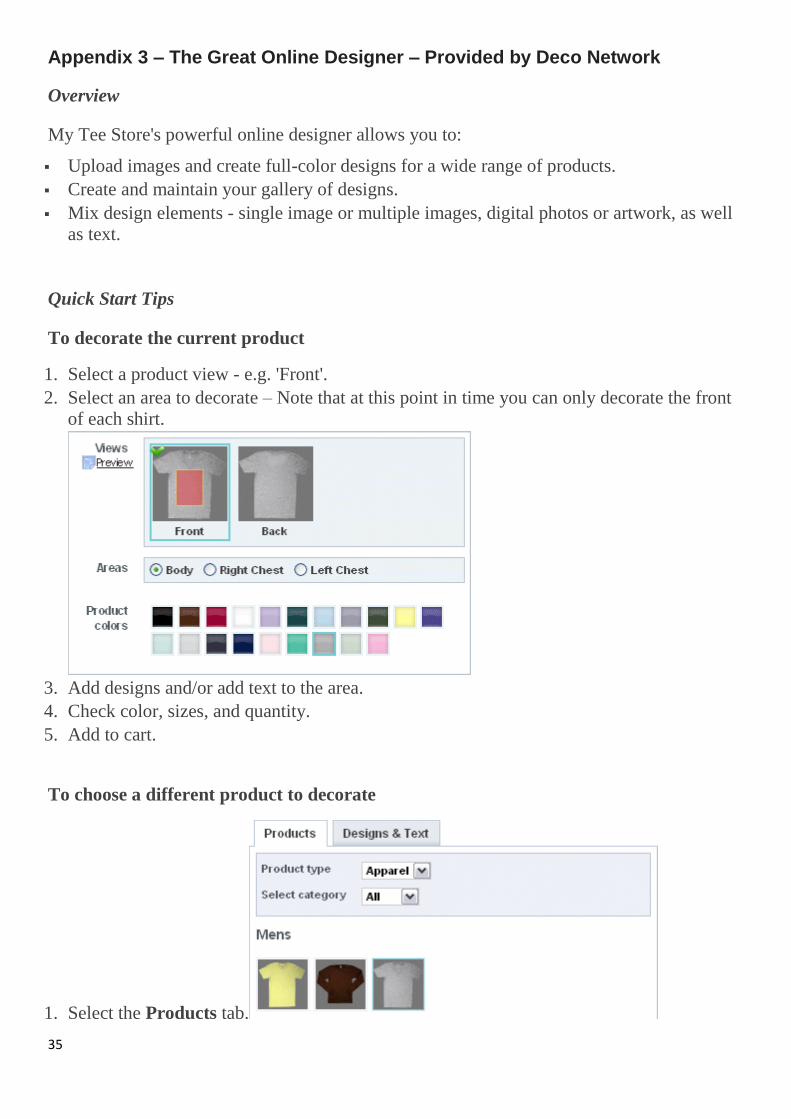
1. Select a product view - e.g. 'Front'.
2. Select an area to decorate – Note that at this point in time you can only decorate the front
of each shirt.
3. Add designs and/or add text to the area.
4. Check color, sizes, and quantity.
5. Add to cart.
To choose a different product to decorate
1. Select the Products tab.
36
2. Select a different product.
3. Decorate as outlined above.
To save a custom-designed item for later use
Click the Save Design button near the bottom-right.
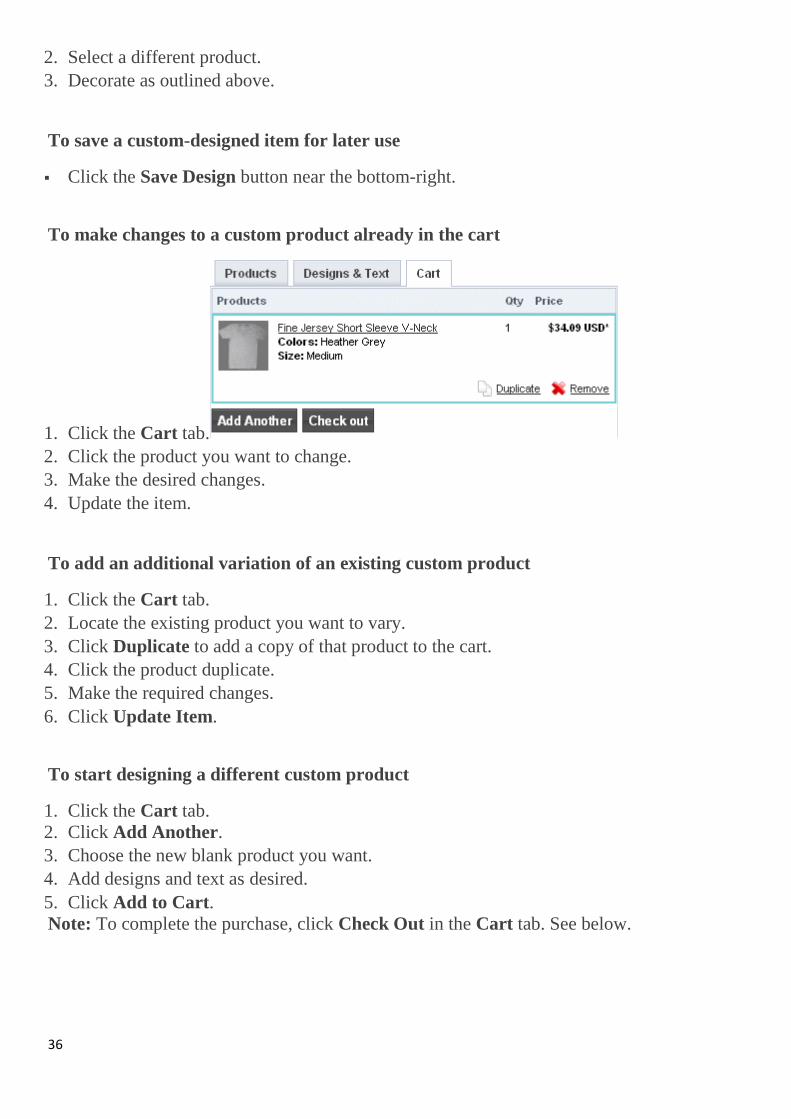
To make changes to a custom product already in the cart
1. Click the Cart tab.
2. Click the product you want to change.
3. Make the desired changes.
4. Update the item.
To add an additional variation of an existing custom product
1. Click the Cart tab.
2. Locate the existing product you want to vary.
3. Click Duplicate to add a copy of that product to the cart.
4. Click the product duplicate.
5. Make the required changes.
6. Click Update Item.
To start designing a different custom product
1. Click the Cart tab.
2. Click Add Another.
3. Choose the new blank product you want.
4. Add designs and text as desired.
5. Click Add to Cart.
Note: To complete the purchase, click Check Out in the Cart tab. See below.
37
Adding Images
Uploading images
Designs can comprise single or multiple images - stock or your own. Before using your own,
you must upload them from your computer.
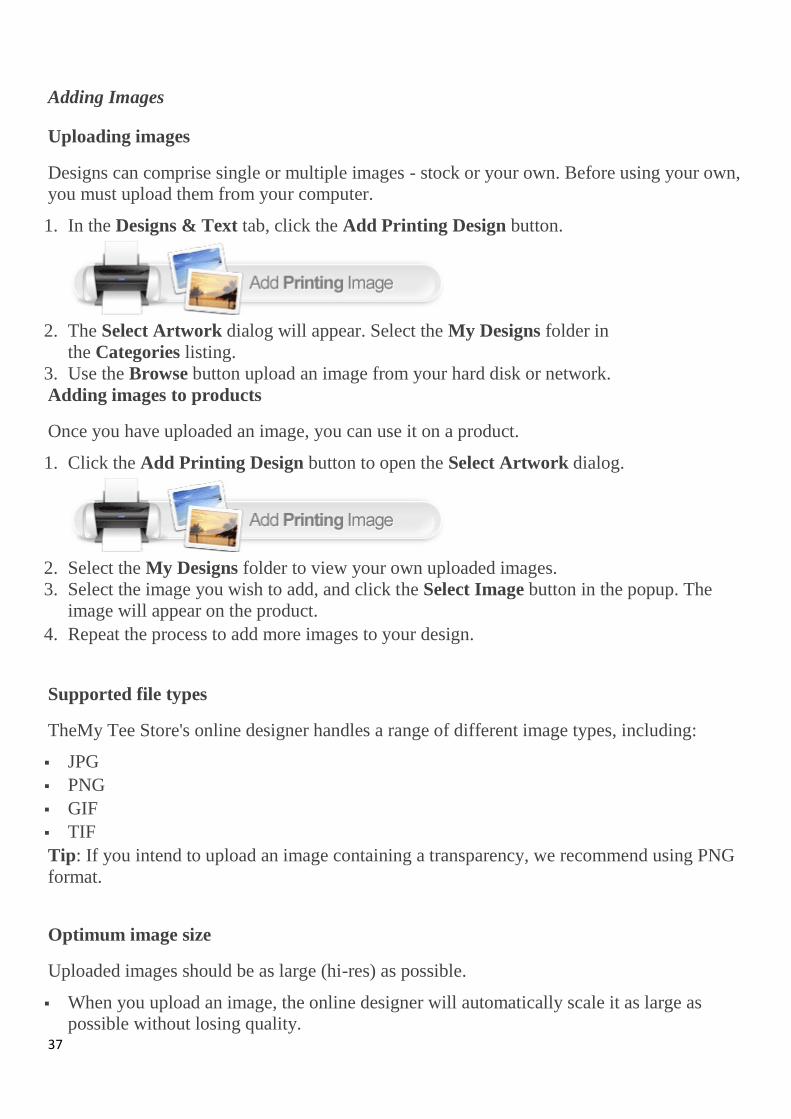
1. In the Designs & Text tab, click the Add Printing Design button.
2. The Select Artwork dialog will appear. Select the My Designs folder in
the Categories listing.
3. Use the Browse button upload an image from your hard disk or network.
Adding images to products
Once you have uploaded an image, you can use it on a product.
1. Click the Add Printing Design button to open the Select Artwork dialog.
2. Select the My Designs folder to view your own uploaded images.
3. Select the image you wish to add, and click the Select Image button in the popup. The
image will appear on the product.
4. Repeat the process to add more images to your design.
Supported file types
TheMy Tee Store's online designer handles a range of different image types, including:
JPG
PNG
GIF
TIF
Tip: If you intend to upload an image containing a transparency, we recommend using PNG
format.
Optimum image size
Uploaded images should be as large (hi-res) as possible.
When you upload an image, the online designer will automatically scale it as large as
possible without losing quality.
38
Scale it down to suit your purposes.
If you scale the image up, you will notice the quality meter turn from green to amber.
If you go into the red, a warning notice appear. This indicates that the uploaded image
cannot be printed at the size you require. You will either need to provide a higher
resolution image or reduce the size of your design.
If you add a product to the cart containing an oversized image, you will be warned that
this will result in a poor quality product.
Moving & Scaling Images
Selecting
Once you have added artwork to your product, select it by clicking it. Sizing handles will
appear at the extremities of the image. It will also appear within the control panel on the
right. This panel gives you further control of the image.
Layering
Layering your items gives you greater control.
When adding multiple elements to a design, you may want one to appear above another.
This determines the layer order.
Select an element in Design Mode and the layer will appear within the Designs &
Text panel to the right.
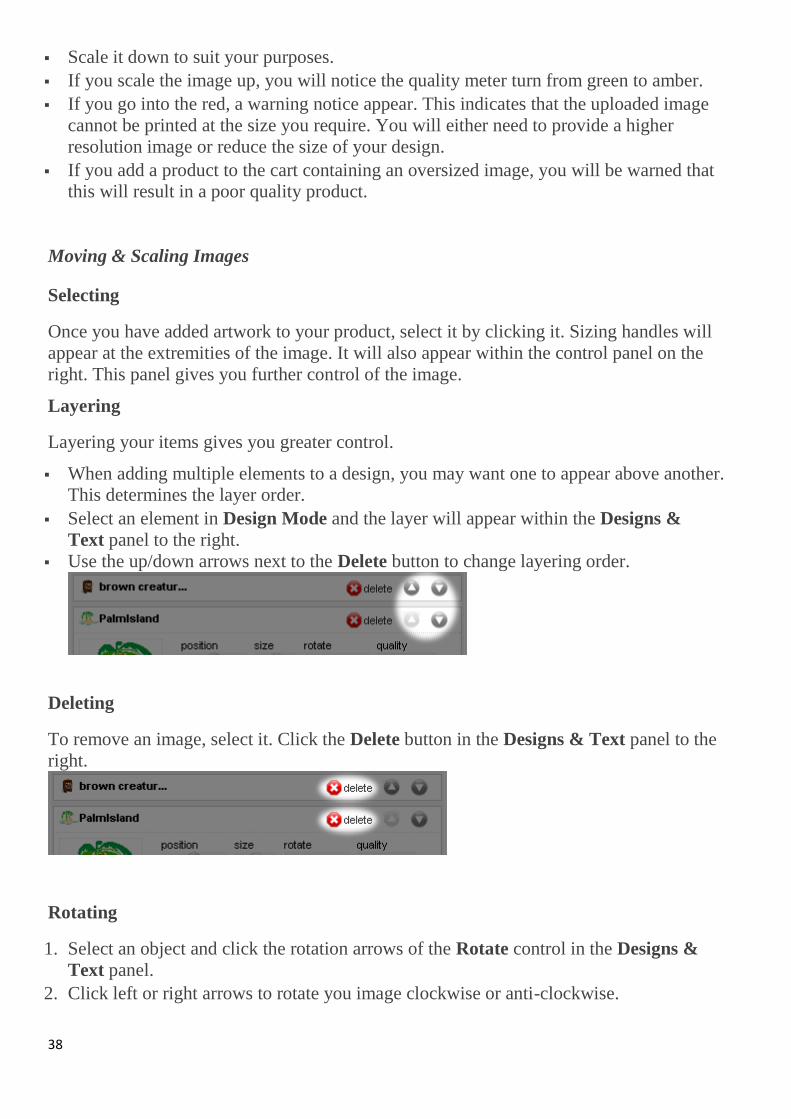
Use the up/down arrows next to the Delete button to change layering order.
Deleting
To remove an image, select it. Click the Delete button in the Designs & Text panel to the
right.
Rotating
1. Select an object and click the rotation arrows of the Rotate control in the Designs &
Text panel.
2. Click left or right arrows to rotate you image clockwise or anti-clockwise.
39
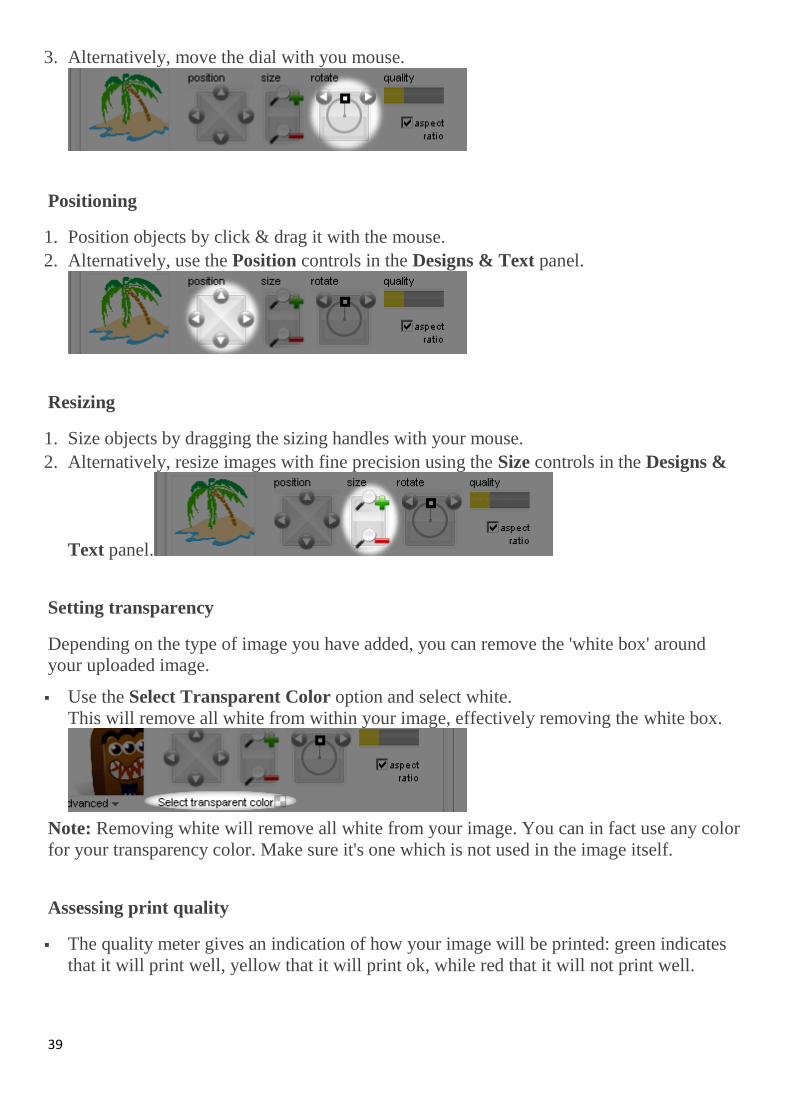
3. Alternatively, move the dial with you mouse.
Positioning
1. Position objects by click & drag it with the mouse.
2. Alternatively, use the Position controls in the Designs & Text panel.
Resizing
1. Size objects by dragging the sizing handles with your mouse.
2. Alternatively, resize images with fine precision using the Size controls in the Designs &
Text panel.
Setting transparency
Depending on the type of image you have added, you can remove the 'white box' around
your uploaded image.
Use the Select Transparent Color option and select white.
This will remove all white from within your image, effectively removing the white box.
Note: Removing white will remove all white from your image. You can in fact use any color
for your transparency color. Make sure it's one which is not used in the image itself.
Assessing print quality
The quality meter gives an indication of how your image will be printed: green indicates
that it will print well, yellow that it will print ok, while red that it will not print well.
40
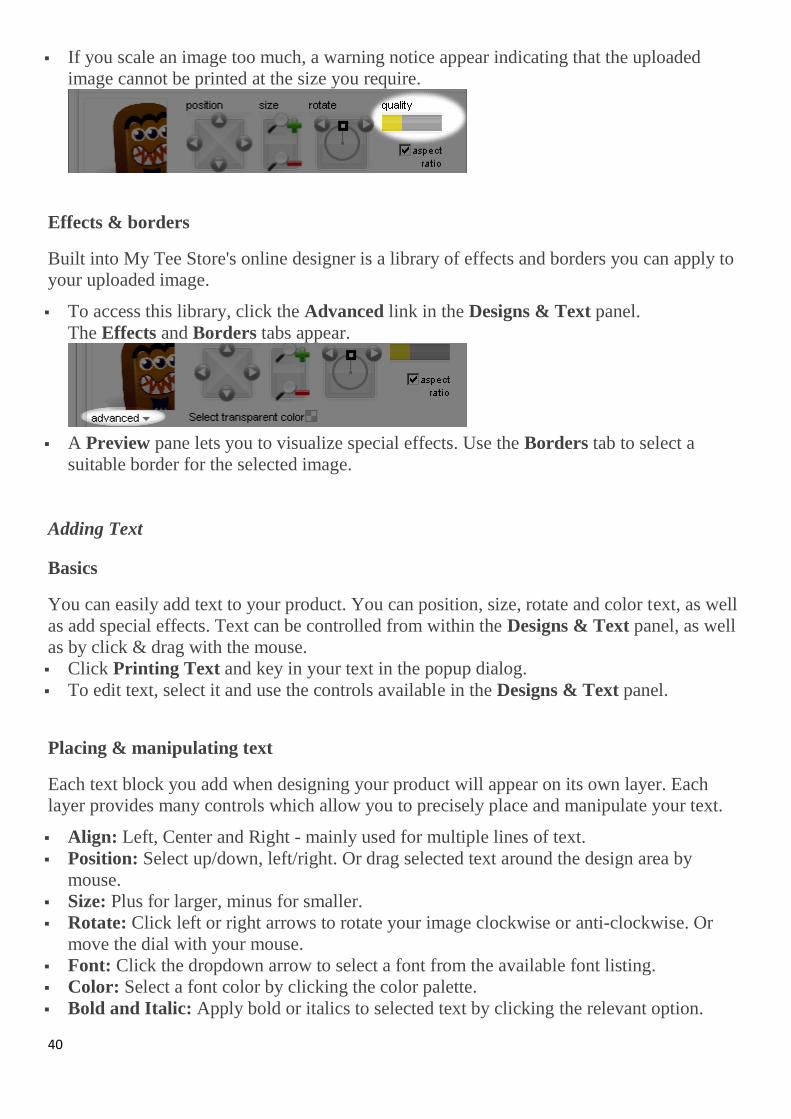
If you scale an image too much, a warning notice appear indicating that the uploaded
image cannot be printed at the size you require.
Effects & borders
Built into My Tee Store's online designer is a library of effects and borders you can apply to
your uploaded image.
To access this library, click the Advanced link in the Designs & Text panel.
The Effects and Borders tabs appear.
A Preview pane lets you to visualize special effects. Use the Borders tab to select a
suitable border for the selected image.
Adding Text
Basics
You can easily add text to your product. You can position, size, rotate and color text, as well
as add special effects. Text can be controlled from within the Designs & Text panel, as well
as by click & drag with the mouse.
Click Printing Text and key in your text in the popup dialog.
To edit text, select it and use the controls available in the Designs & Text panel.
Placing & manipulating text
Each text block you add when designing your product will appear on its own layer. Each
layer provides many controls which allow you to precisely place and manipulate your text.
Align: Left, Center and Right - mainly used for multiple lines of text.
Position: Select up/down, left/right. Or drag selected text around the design area by
mouse.
Size: Plus for larger, minus for smaller.
Rotate: Click left or right arrows to rotate your image clockwise or anti-clockwise. Or
move the dial with your mouse.
Font: Click the dropdown arrow to select a font from the available font listing.
Color: Select a font color by clicking the color palette.
Bold and Italic: Apply bold or italics to selected text by clicking the relevant option.
41
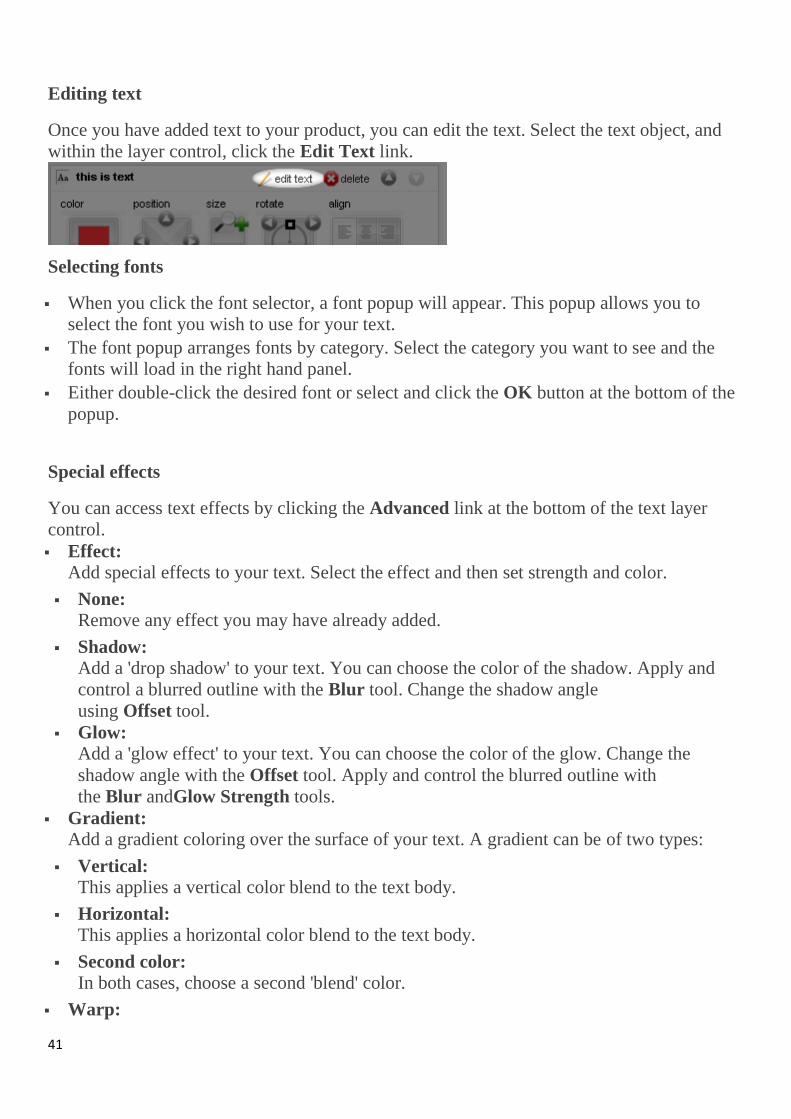
Editing text
Once you have added text to your product, you can edit the text. Select the text object, and
within the layer control, click the Edit Text link.
Selecting fonts
When you click the font selector, a font popup will appear. This popup allows you to
select the font you wish to use for your text.
The font popup arranges fonts by category. Select the category you want to see and the
fonts will load in the right hand panel.
Either double-click the desired font or select and click the OK button at the bottom of the
popup.
Special effects
You can access text effects by clicking the Advanced link at the bottom of the text layer
control.
Effect: Add special effects to your text. Select the effect and then set strength and color.
None: Remove any effect you may have already added.
Shadow: Add a 'drop shadow' to your text. You can choose the color of the shadow. Apply and
control a blurred outline with the Blur tool. Change the shadow angle
using Offset tool.
Glow: Add a 'glow effect' to your text. You can choose the color of the glow. Change the
shadow angle with the Offset tool. Apply and control the blurred outline with
the Blur andGlow Strength tools.
Gradient: Add a gradient coloring over the surface of your text. A gradient can be of two types:
Vertical: This applies a vertical color blend to the text body.
Horizontal: This applies a horizontal color blend to the text body.
Second color: In both cases, choose a second 'blend' color.
Warp:
42
Add a curve to your text. There are many different types you can use.
None:
Turn off all warping effects.
Wavy: Apply and control wave effects.
Expanding: Add and control perspective effects to your text.
Fisheye: Create a 'fat text' effect.
Squeeze: Create a 'skinny text' effect.
Stroke: Add an outline to your text. Adjust outline settings as preferred.
Color: Specify a color for the text outline.
Width: Specify a width for the text outline.
Purchasing
Adding items to the cart
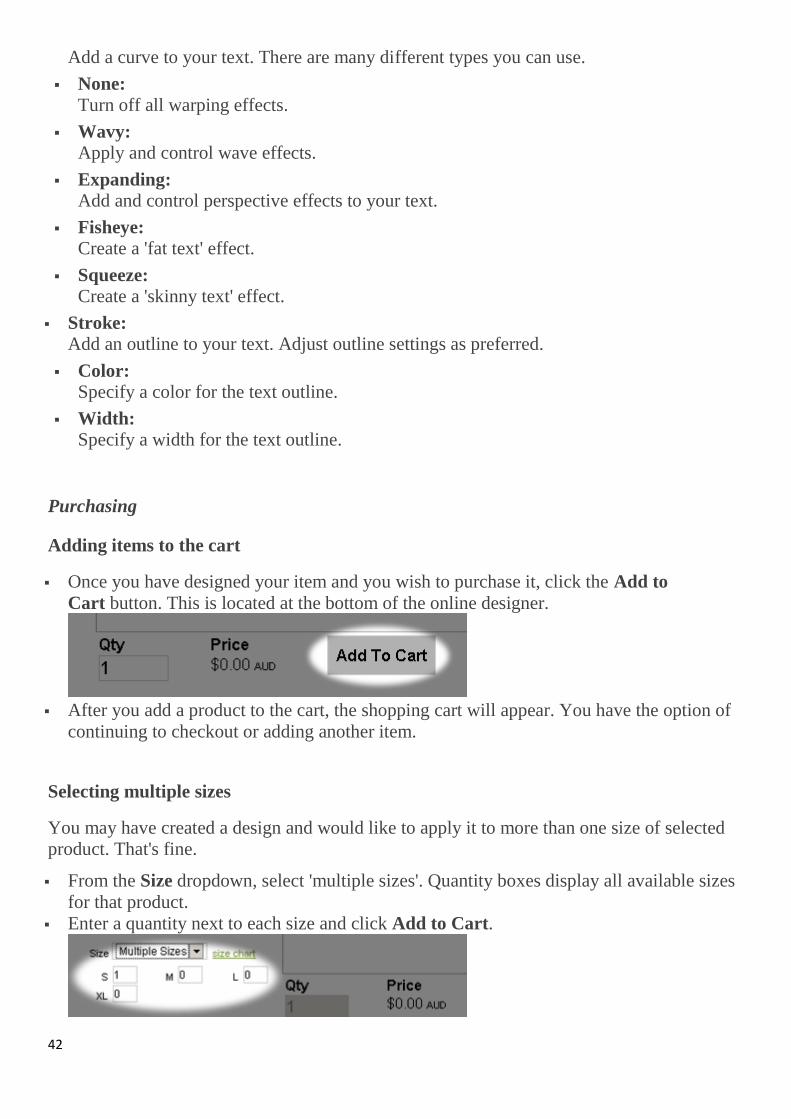
Once you have designed your item and you wish to purchase it, click the Add to
Cart button. This is located at the bottom of the online designer.
After you add a product to the cart, the shopping cart will appear. You have the option of
continuing to checkout or adding another item.
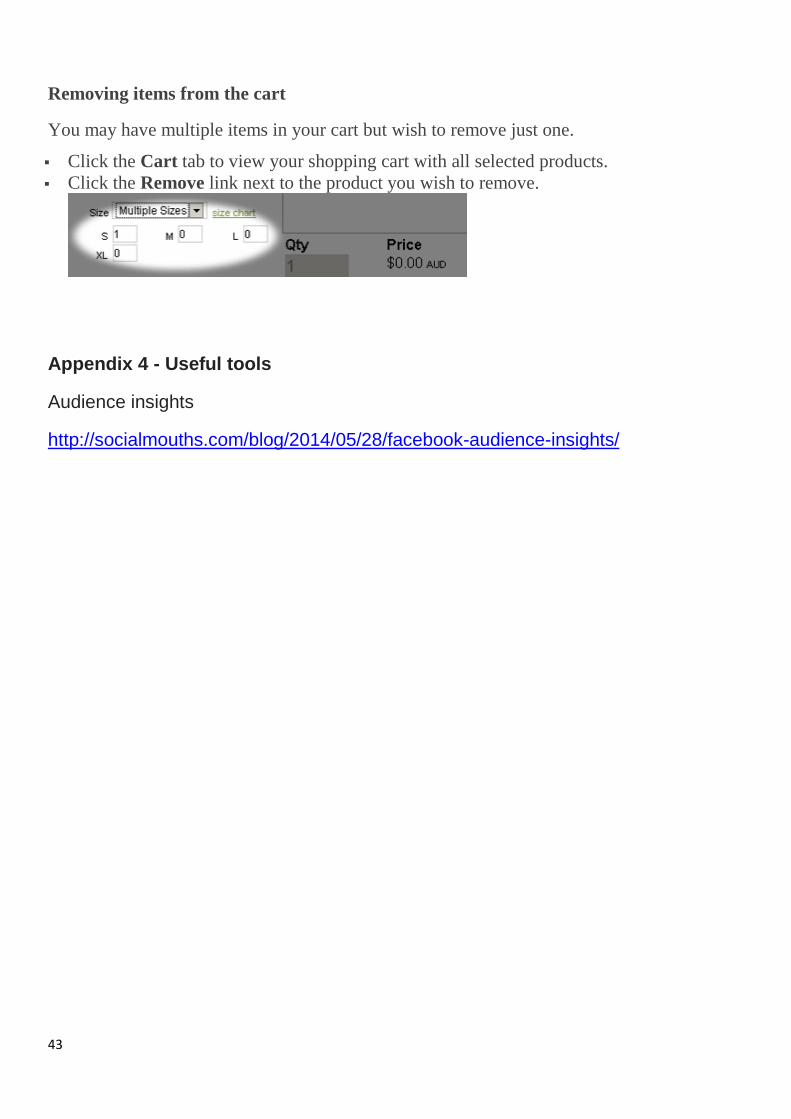
Selecting multiple sizes
You may have created a design and would like to apply it to more than one size of selected
product. That's fine.
From the Size dropdown, select 'multiple sizes'. Quantity boxes display all available sizes
for that product.
Enter a quantity next to each size and click Add to Cart.
43
Removing items from the cart
You may have multiple items in your cart but wish to remove just one.
Click the Cart tab to view your shopping cart with all selected products.
Click the Remove link next to the product you wish to remove.
Appendix 4 - Useful tools
Audience insights
http://socialmouths.com/blog/2014/05/28/facebook-audience-insights/