Embed Size (px)
Citation preview
Git workflow and basic commands
By:Anuj Sharma
Why git?Git is a distributed revision control system with an emphasis on speed, data integrity, and support for distributed, non-linear workflows. Git was initially designed and developed by Linus Torvalds for Linux kernel development in 2005, and has since become the most widely adopted version control system for software development.As with most other distributed revision control systems, and unlike most client–server systems, every Git working directory is a full-fledged repository with complete history and full version-tracking capabilities, independent of network access or a central server. Like the Linux kernel, Git is free software distributed under the terms of the GNU General Public License version 2.
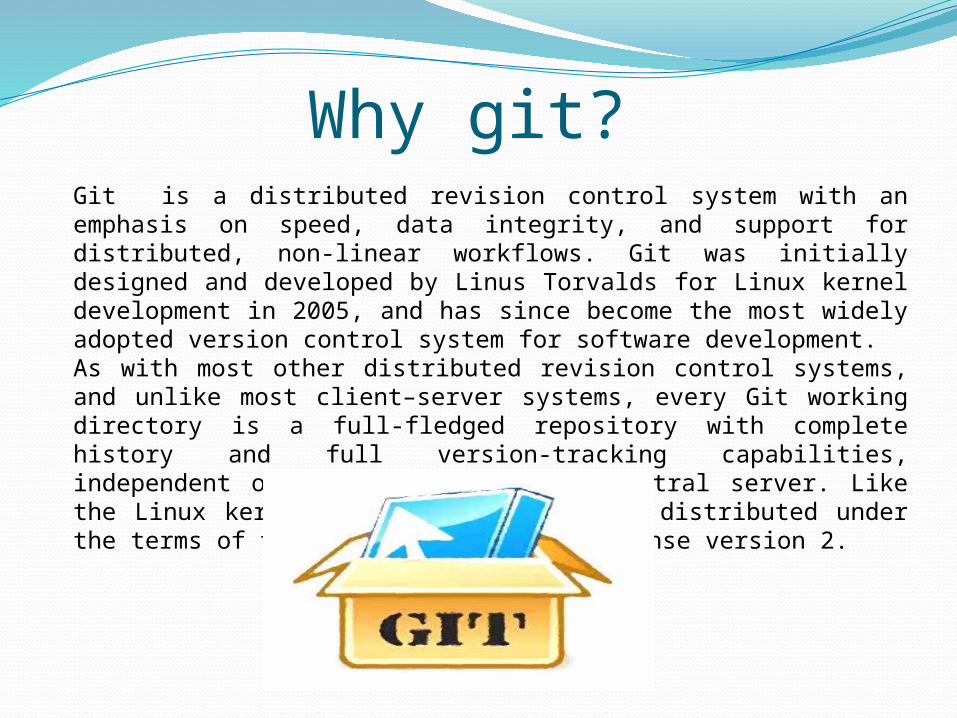
Basic work-flow of using git
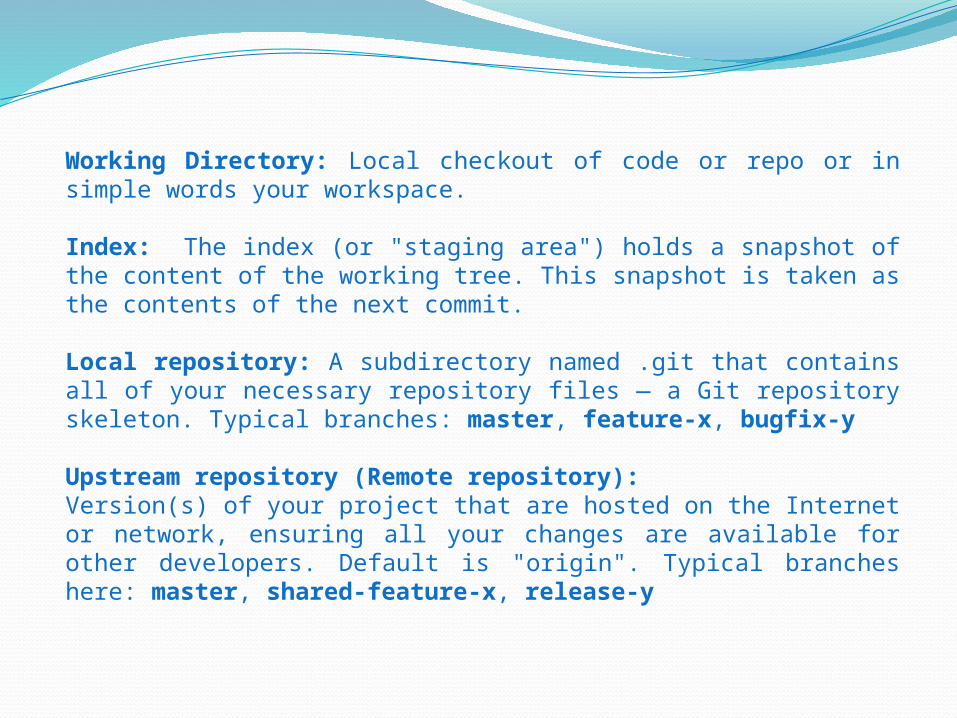
Working Directory: Local checkout of code or repo or in simple words your workspace.
Index: The index (or "staging area") holds a snapshot of the content of the working tree. This snapshot is taken as the contents of the next commit.
Local repository: A subdirectory named .git that contains all of your necessary repository files — a Git repository skeleton. Typical branches: master, feature-x, bugfix-y
Upstream repository (Remote repository):Version(s) of your project that are hosted on the Internet or network, ensuring all your changes are available for other developers. Default is "origin". Typical branches here: master, shared-feature-x, release-y

Creating your workspace (or working directory) :
First of developer has to clone the git repo using command “git clone” as shown in the below snapshot:
Git clone command will make the copy of your remote repo, to your workspace. In my case, now i have the copy of “MyProject” repo in my local system as a directory. If we got to this directory “MyProject” and you will be able to see your local repo also.
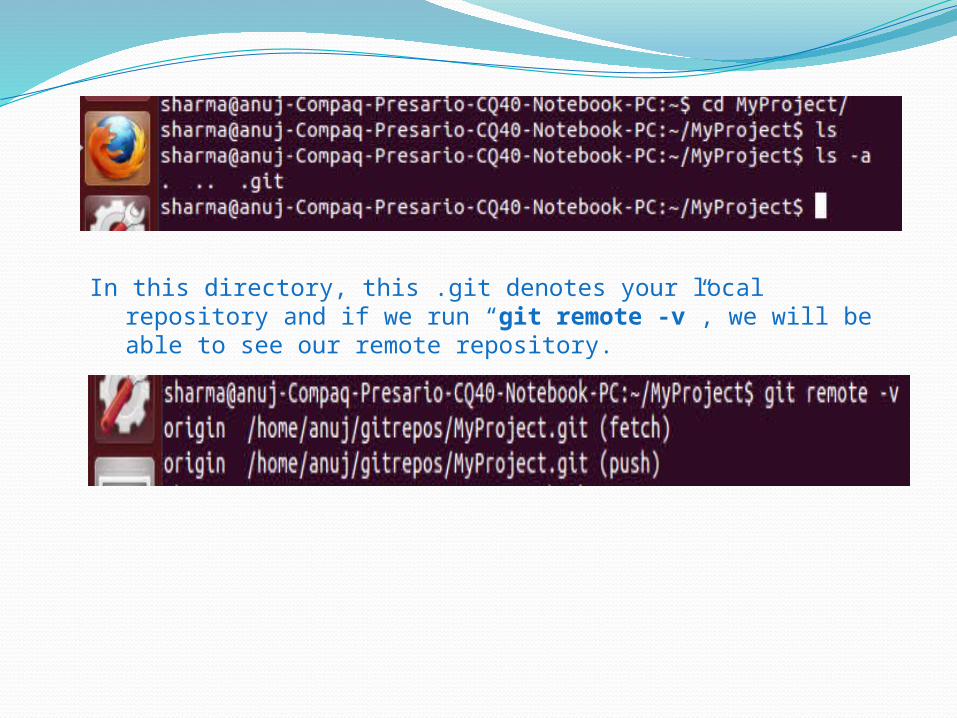
In this directory, this .git denotes your local repository and if we run “git remote -v”, we will be able to see our remote repository.
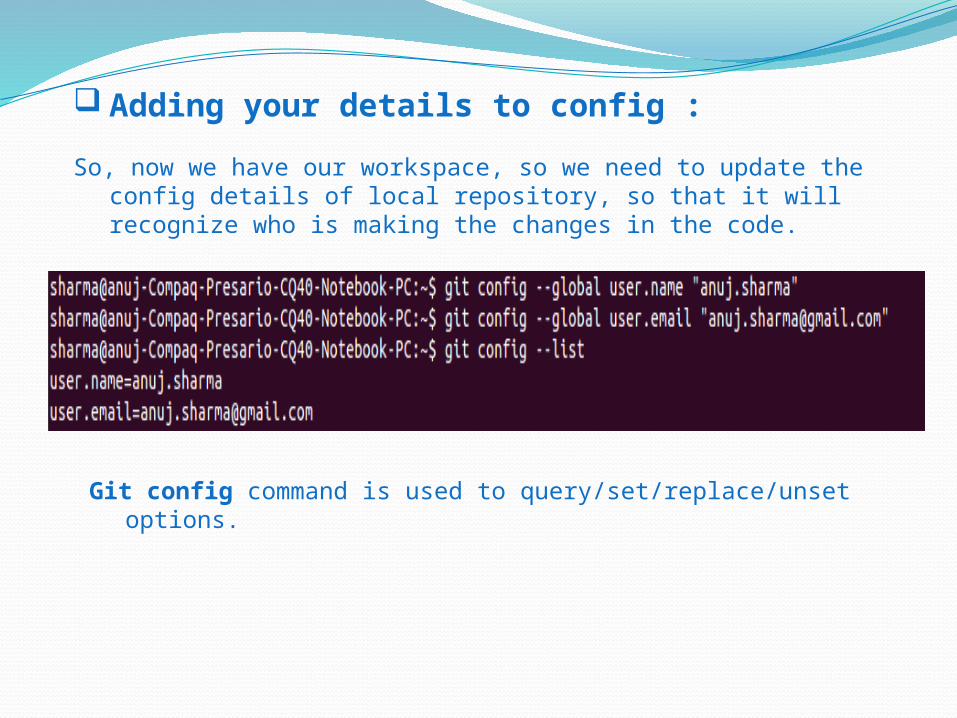
Adding your details to config :
So, now we have our workspace, so we need to update the config details of local repository, so that it will recognize who is making the changes in the code.
Git config command is used to query/set/replace/unset options.

Adding a file to git :
Now, we can start working on our repo. Lets create a test file in git repo “abc.txt”. git status will give the . It can be shown in below snapshot.
So, this file is currently a part of your working directory (unstage area), to make it a part of “Index”, you need to add this file. For that you need to run “git add touch.txt” command and it will go to Index or stage area,
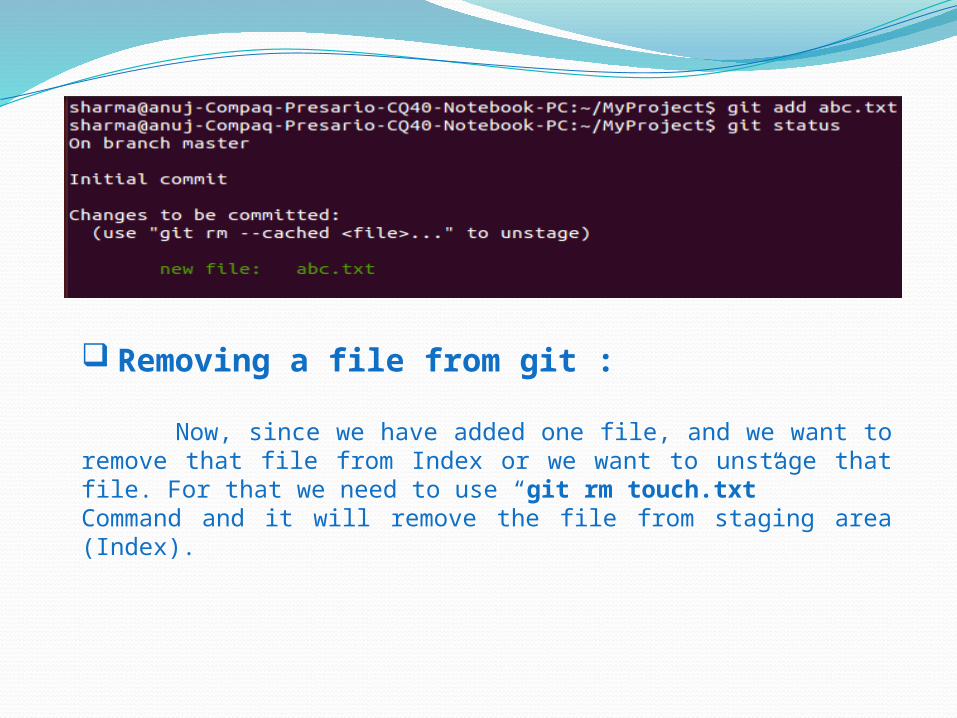
Removing a file from git :
Now, since we have added one file, and we want to remove that file from Index or we want to unstage that file. For that we need to use “git rm touch.txt”Command and it will remove the file from staging area (Index).
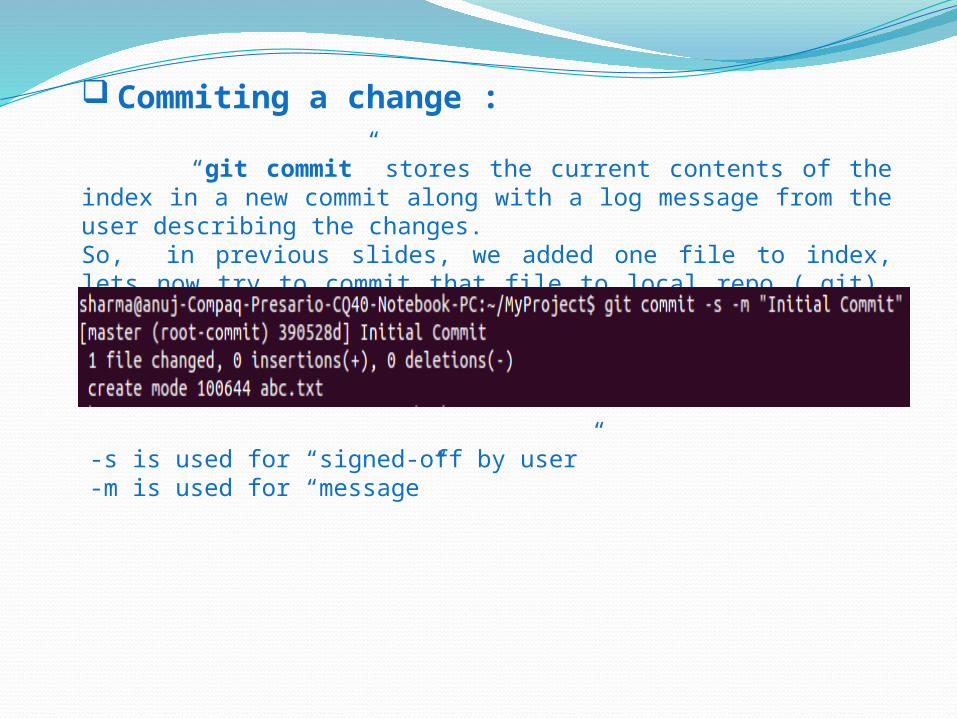
Commiting a change :
“git commit” stores the current contents of the index in a new commit along with a log message from the user describing the changes.So, in previous slides, we added one file to index, lets now try to commit that file to local repo (.git), so that it will get stored.
-s is used for “signed-off by user”-m is used for “message”

Checking logs :
“git log” shows the commit logs.It will give the complete log of commits made on local repository.
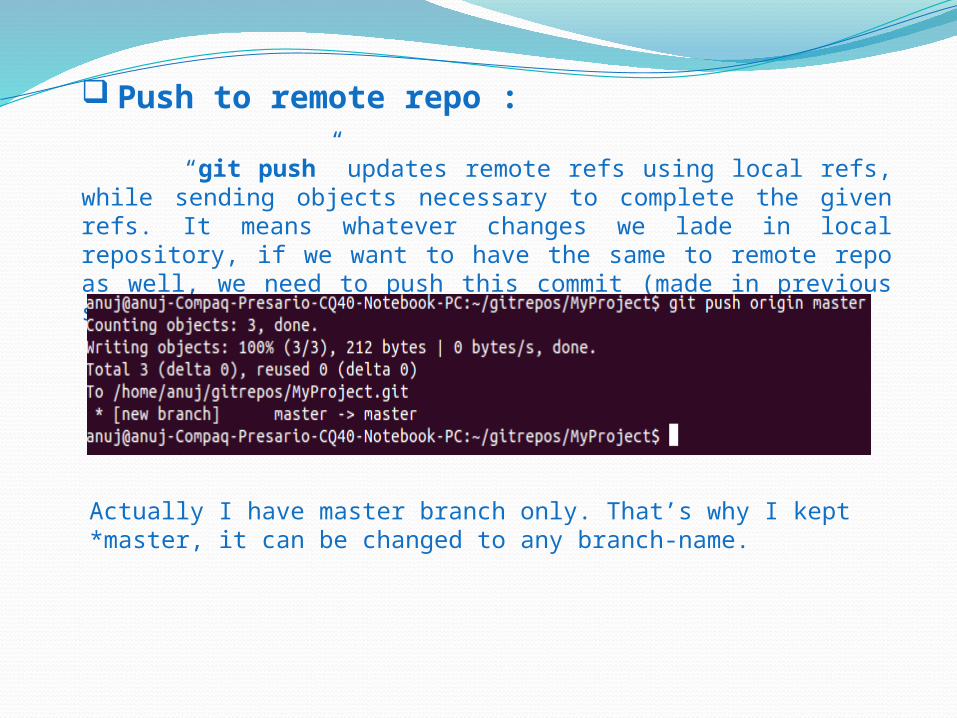
Push to remote repo :
“git push” updates remote refs using local refs, while sending objects necessary to complete the given refs. It means whatever changes we lade in local repository, if we want to have the same to remote repo as well, we need to push this commit (made in previous slide).
Actually I have master branch only. That’s why I kept *master, it can be changed to any branch-name.
Update the local repo :
“git pull” incorporates changes from a remote repository into the current branch. Git pull is simply used to update your local repository with the remote repository changes.
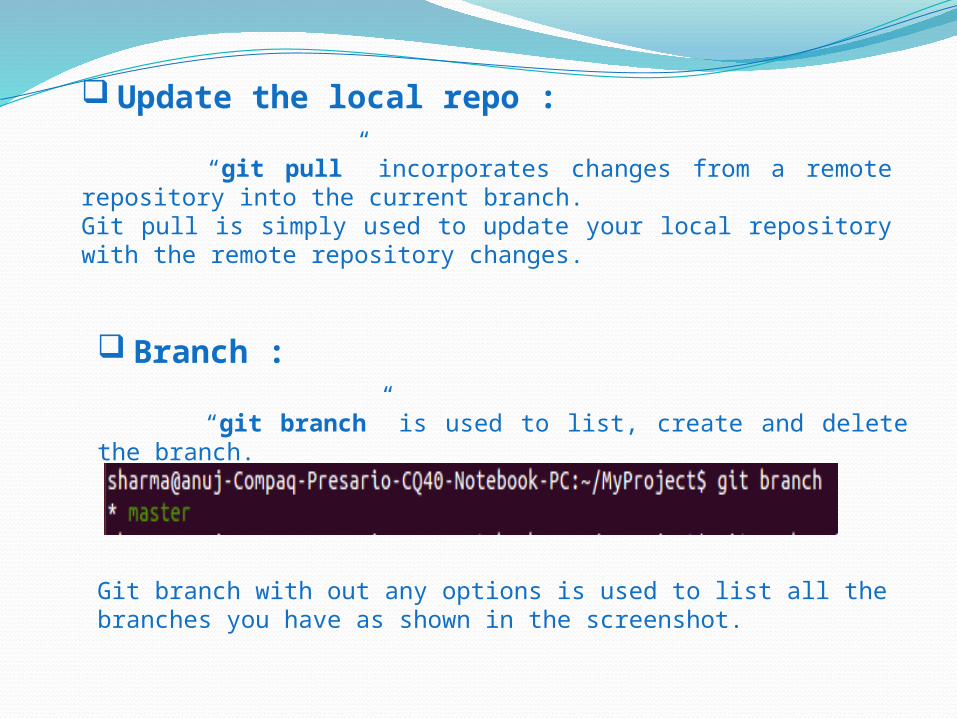
Branch :
“git branch” is used to list, create and delete the branch.
Git branch with out any options is used to list all the branches you have as shown in the screenshot.
git branch <branch name>It will create a new branch with the given name.
Then if you want to switch to new branch,git checkout branch nameIt will switch your current branch with new one.
There is one more way to create and checkout to new branch in one line.git checkout –b <branch name>It will create and checkout to new branch automatically
git branch when used with –d will delete the branch.git branch –d branch name
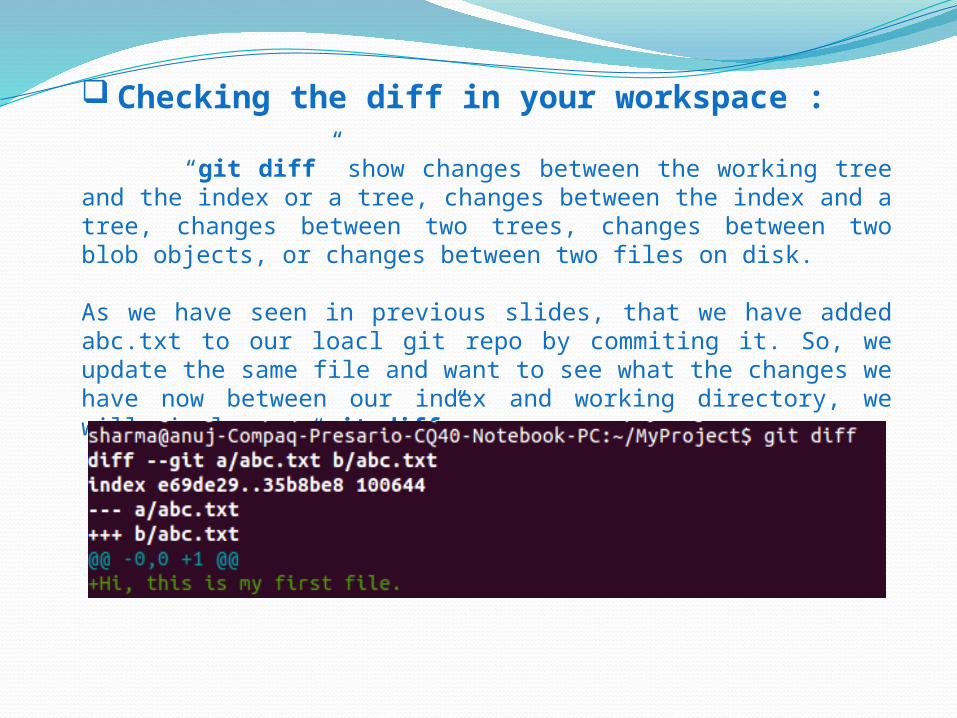
Checking the diff in your workspace :
“git diff” show changes between the working tree and the index or a tree, changes between the index and a tree, changes between two trees, changes between two blob objects, or changes between two files on disk.
As we have seen in previous slides, that we have added abc.txt to our loacl git repo by commiting it. So, we update the same file and want to see what the changes we have now between our index and working directory, we will simply run “git diff”.
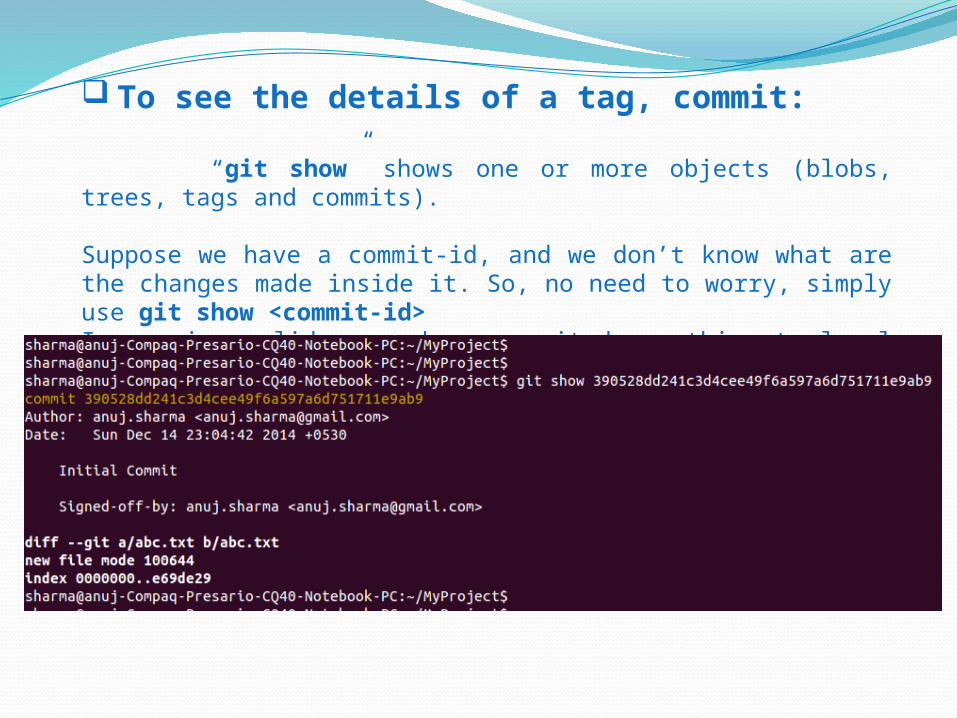
To see the details of a tag, commit:
“git show” shows one or more objects (blobs, trees, tags and commits).
Suppose we have a commit-id, and we don’t know what are the changes made inside it. So, no need to worry, simply use git show <commit-id>In previous slides, we have commited something to local repo. Lets take the commit id and use this command.

Thank you…


![Red Hat Enterprise Linux 6 · ~]# yum install git Configuring the Default Text Editor Certain Git commands, such as git commit, require the user to write a short message or make some](https://img.pdfslide.us/doc/110x75/5f74d8eda14201647245f9e2/red-hat-enterprise-linux-6-yum-install-git-configuring-the-default-text-editor.jpg)


![Git History - s3-ap-southeast-1.amazonaws.comGit commands command description git clone url [dir] copy a git repository so you can add to it git add files adds file contents to the](https://img.pdfslide.us/doc/110x75/5e4ffc64fe3b0704a66aa143/git-history-s3-ap-southeast-1-git-commands-command-description-git-clone-url.jpg)

![Participating in gawk Developmentsummarizing all the Git commands referenced in this booklet. Appendix B [Git Resources], page 27, provides a few pointers to Internet resources for](https://img.pdfslide.us/doc/110x75/603296a4fea42f33e042fbce/participating-in-gawk-development-summarizing-all-the-git-commands-referenced-in.jpg)