Embed Size (px)
Citation preview
GISA Web Inspect User’s Guide ©2016, Midwest Technical Inspections, Inc
Page 1 of 40
GISA “Web Inspect” User’s Guide
The GISA Web Inspect interface provides a convenient, Web-based interface for
the completion of field reports from any Internet-connected computer. The
following pages provide instructions on the use of the Web Inspect application.
First, we will examine the basic workflow for the GISA Web Inspect system. These
steps are explained in greater detail in the upcoming pages. The specifics may
vary depending upon individual circumstances.
1. Logging into the GISA Web Inspect portal.
2. Selecting an order request to be completed.
3. Attaching any applicable photos.
4. Attaching file attachments (diagrams, scan documents, etc.).
5. Completing an individual inspection form.
6. Updating hourly charges (where applicable) or other specialty
surcharge items.
7. Navigating report statuses.
8. Navigating particulars of the Library

GISA Web Inspect User’s Guide ©2016, Midwest Technical Inspections, Inc
Page 2 of 40
TABLE OF CONTENTS
Logging into the GISA Web Inspect Application Page 3 - 4
Accessing Inspection Reports Page 4 - 9
Workflow - Ticket List Features Page 5
Ticket List Statuses Page 5
System Uploading / Downloading Page 6
Ticket List Columns Page 7, 8
Sorting Page 8
Utilizing the Planner Pages 9 – 11
Working with an Inspection Report Page 11 - 23
Launching a Ticket for Entry Page 11
Ticket Details Page 12 - 14
Attaching Photos Pages 14 – 18
Working with Attachments Page 19, 20
Launching the Diagram Attachment feature Pages 20 - 22
Using “Notes” option Page 22 - 23
Completion of Forms Pages 23 - 33
Navigation: Page 23 - 25
Form Question Types: Page 25 - 29
Recommendations: Page 30 - 32
Inspection Completion: Page 33
Navigating Inspection “Status” Page 33
Transmittal of Completed Work Page 33
Payroll Dates Page 34
Accessing the Library Page 35
Appendix I: Document Request Function (Auditors only) Pages 36- 40
GISA Web Inspect User’s Guide ©2016, Midwest Technical Inspections, Inc
Page 3 of 40
Logging into the GISA Web Inspect Application
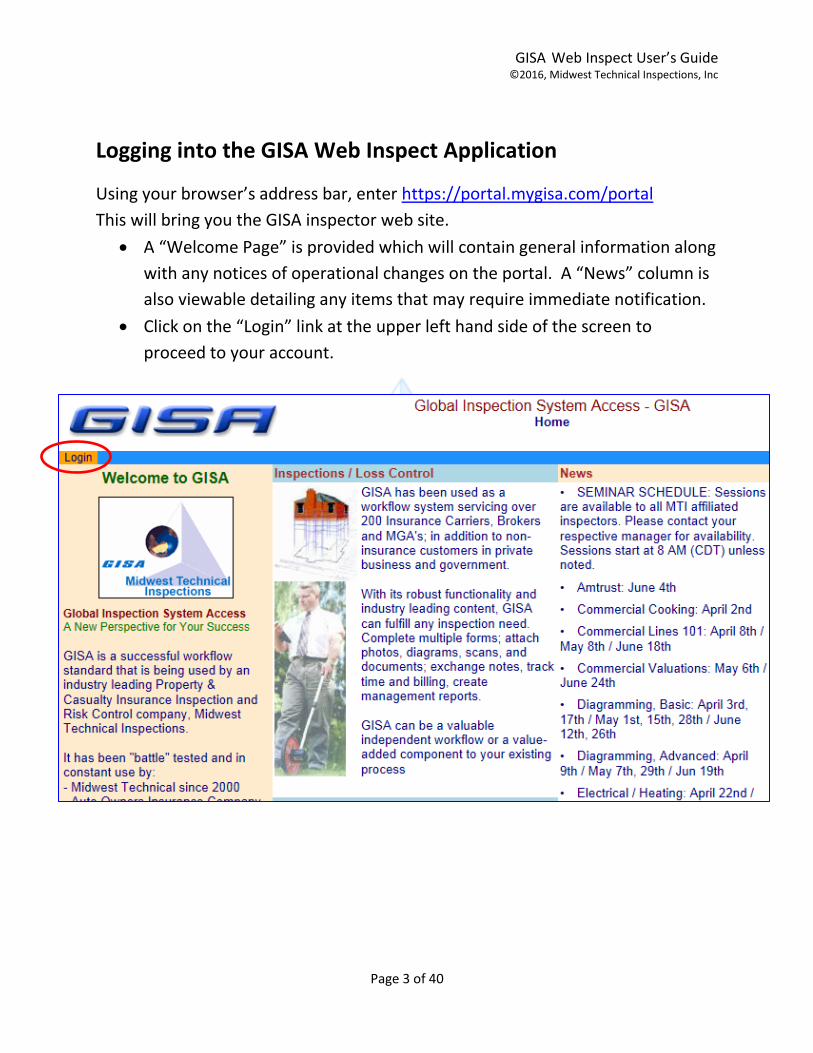
Using your browser’s address bar, enter https://portal.mygisa.com/portal
This will bring you the GISA inspector web site.
A “Welcome Page” is provided which will contain general information along
with any notices of operational changes on the portal. A “News” column is
also viewable detailing any items that may require immediate notification.
Click on the “Login” link at the upper left hand side of the screen to
proceed to your account.
GISA Web Inspect User’s Guide ©2016, Midwest Technical Inspections, Inc
Page 4 of 40
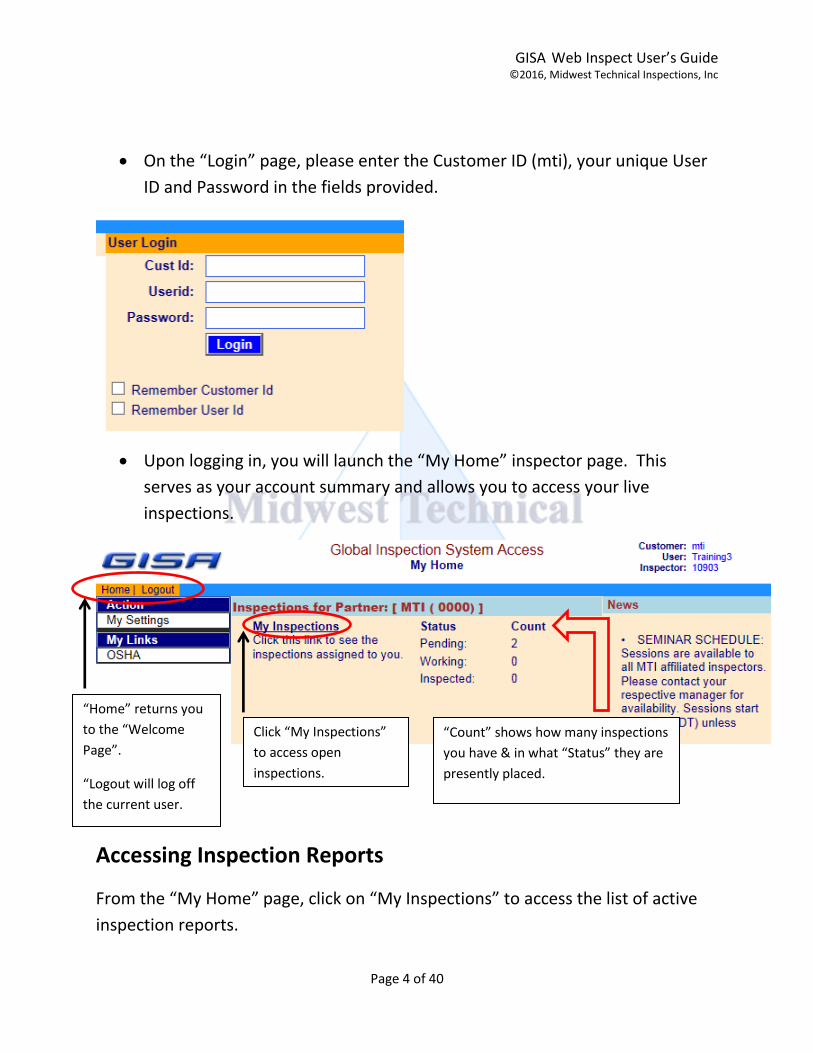
On the “Login” page, please enter the Customer ID (mti), your unique User
ID and Password in the fields provided.
Upon logging in, you will launch the “My Home” inspector page. This
serves as your account summary and allows you to access your live
inspections.
Accessing Inspection Reports
From the “My Home” page, click on “My Inspections” to access the list of active
inspection reports.
“Count” shows how many inspections
you have & in what “Status” they are
presently placed.
Click “My Inspections”
to access open
inspections.
“Home” returns you
to the “Welcome
Page”.
“Logout will log off
the current user.
GISA Web Inspect User’s Guide ©2016, Midwest Technical Inspections, Inc
Page 5 of 40
Workflow – Ticket List Features
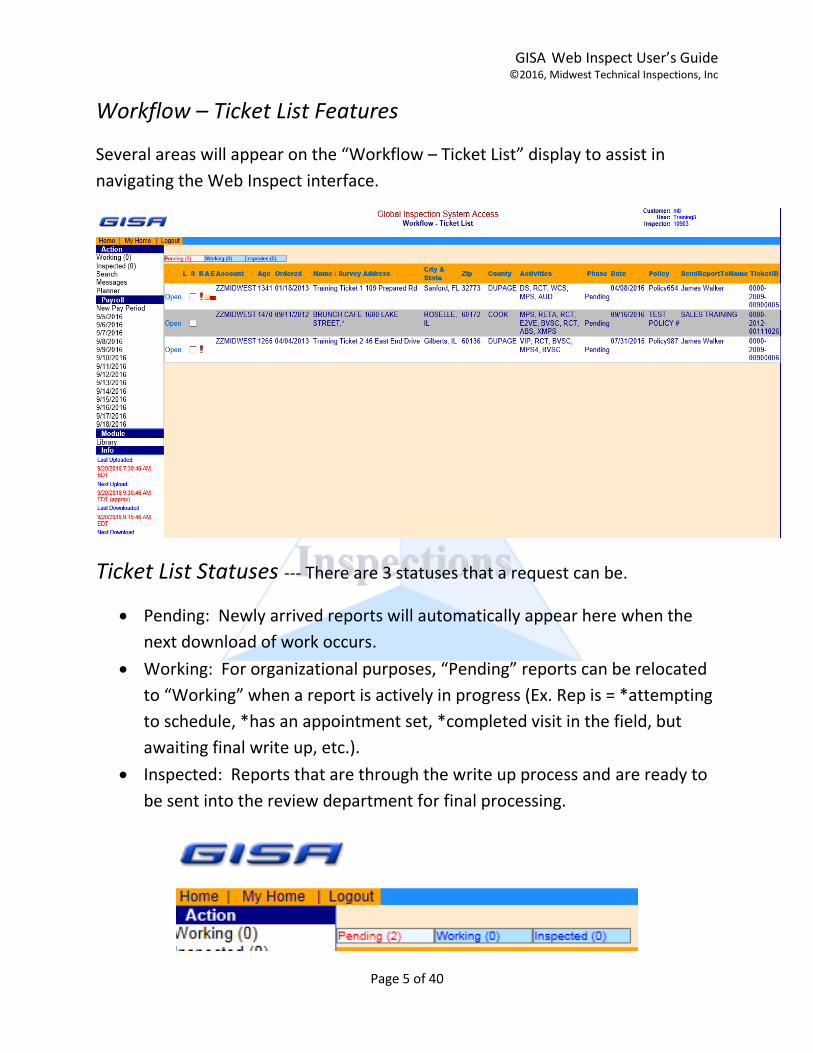
Several areas will appear on the “Workflow – Ticket List” display to assist in
navigating the Web Inspect interface.
Ticket List Statuses --- There are 3 statuses that a request can be.
Pending: Newly arrived reports will automatically appear here when the
next download of work occurs.
Working: For organizational purposes, “Pending” reports can be relocated
to “Working” when a report is actively in progress (Ex. Rep is = *attempting
to schedule, *has an appointment set, *completed visit in the field, but
awaiting final write up, etc.).
Inspected: Reports that are through the write up process and are ready to
be sent into the review department for final processing.
GISA Web Inspect User’s Guide ©2016, Midwest Technical Inspections, Inc
Page 6 of 40
System Uploading and Downloading
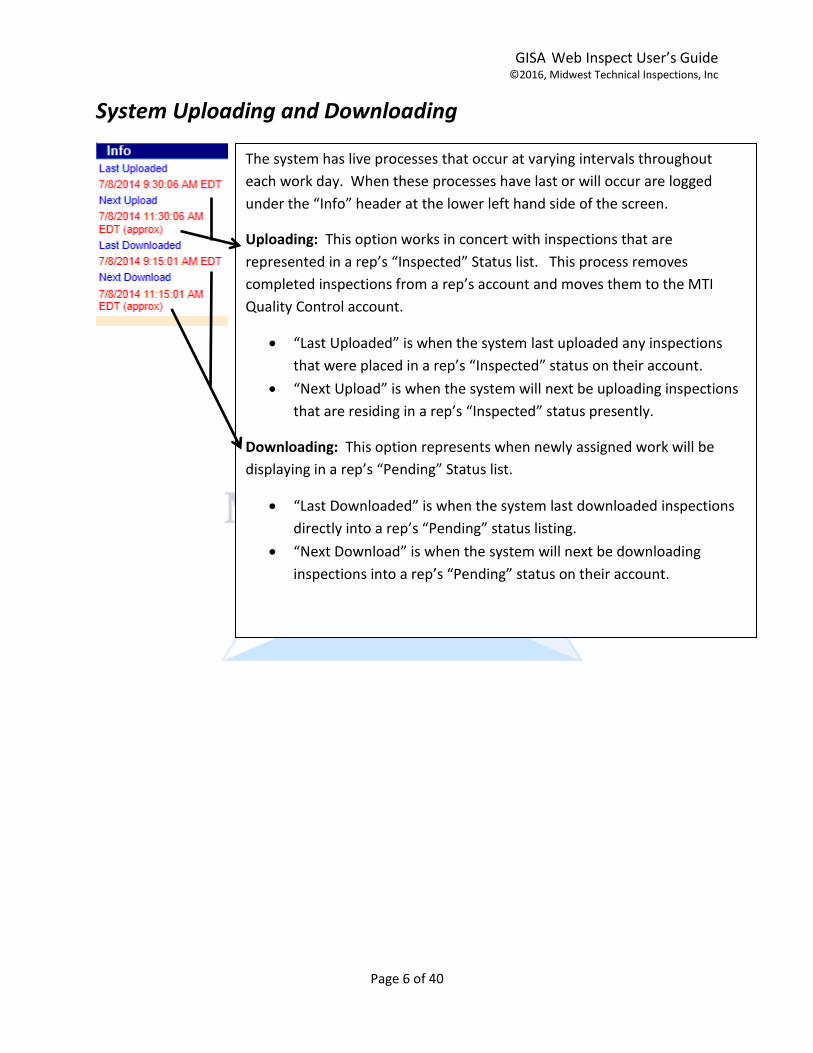
The system has live processes that occur at varying intervals throughout
each work day. When these processes have last or will occur are logged
under the “Info” header at the lower left hand side of the screen.
Uploading: This option works in concert with inspections that are
represented in a rep’s “Inspected” Status list. This process removes
completed inspections from a rep’s account and moves them to the MTI
Quality Control account.
“Last Uploaded” is when the system last uploaded any inspections
that were placed in a rep’s “Inspected” status on their account.
“Next Upload” is when the system will next be uploading inspections
that are residing in a rep’s “Inspected” status presently.
Downloading: This option represents when newly assigned work will be
displaying in a rep’s “Pending” Status list.
“Last Downloaded” is when the system last downloaded inspections
directly into a rep’s “Pending” status listing.
“Next Download” is when the system will next be downloading
inspections into a rep’s “Pending” status on their account.
GISA Web Inspect User’s Guide ©2016, Midwest Technical Inspections, Inc
Page 7 of 40
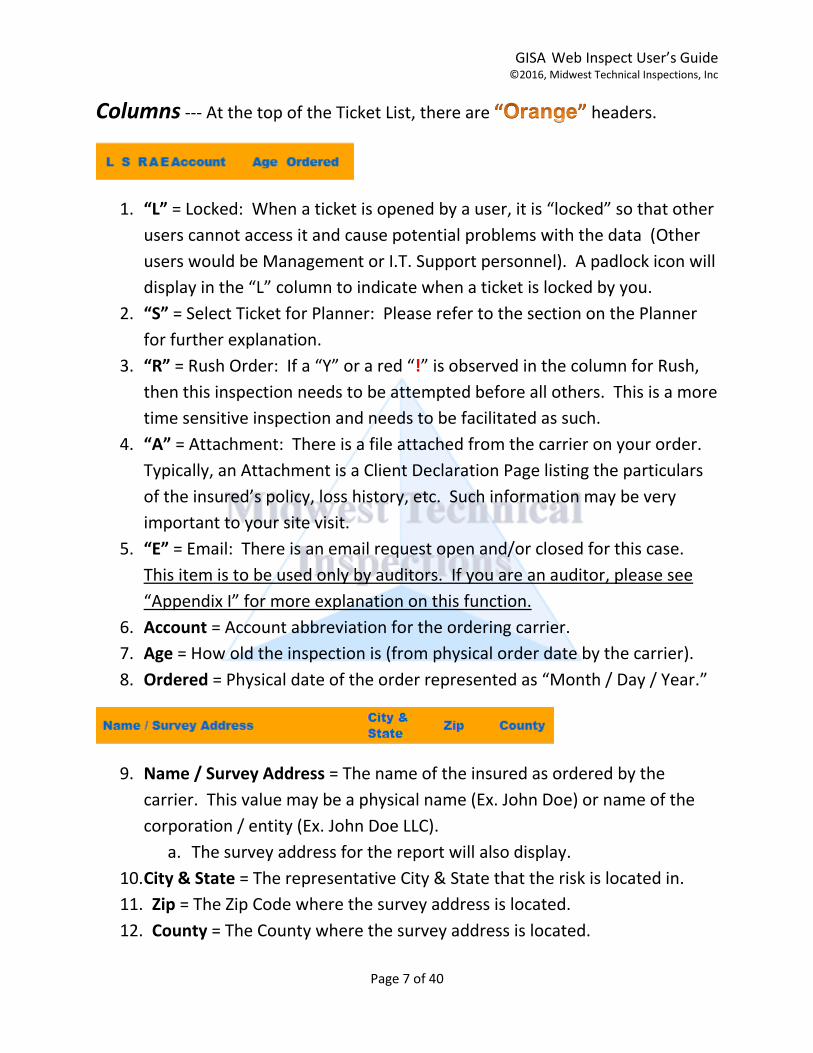
Columns --- At the top of the Ticket List, there are headers.
1. = Locked: When a ticket is opened by a user, it is “locked” so that other “L”
users cannot access it and cause potential problems with the data (Other
users would be Management or I.T. Support personnel). A padlock icon will
display in the “L” column to indicate when a ticket is locked by you.
2. = Select Ticket for Planner: Please refer to the section on the Planner “S”
for further explanation.
3. “R” = Rush Order: If a “Y” or a red “!” is observed in the column for Rush,
then this inspection needs to be attempted before all others. This is a more
time sensitive inspection and needs to be facilitated as such.
4. = Attachment: There is a file attached from the carrier on your order. “A”
Typically, an Attachment is a Client Declaration Page listing the particulars
of the insured’s policy, loss history, etc. Such information may be very
important to your site visit.
5. “E” = Email: There is an email request open and/or closed for this case.
This item is to be used only by auditors. If you are an auditor, please see
“Appendix I” for more explanation on this function.
6. Account = Account abbreviation for the ordering carrier.
7. Age = How old the inspection is (from physical order date by the carrier).
8. Ordered = Physical date of the order represented as “Month / Day / Year.”
9. Name / Survey Address = The name of the insured as ordered by the
carrier. This value may be a physical name (Ex. John Doe) or name of the
corporation / entity (Ex. John Doe LLC).
a. The survey address for the report will also display.
10. City & State = The representative City & State that the risk is located in.
11. Zip = The Zip Code where the survey address is located.
12. County = The County where the survey address is located.
GISA Web Inspect User’s Guide ©2016, Midwest Technical Inspections, Inc
Page 8 of 40
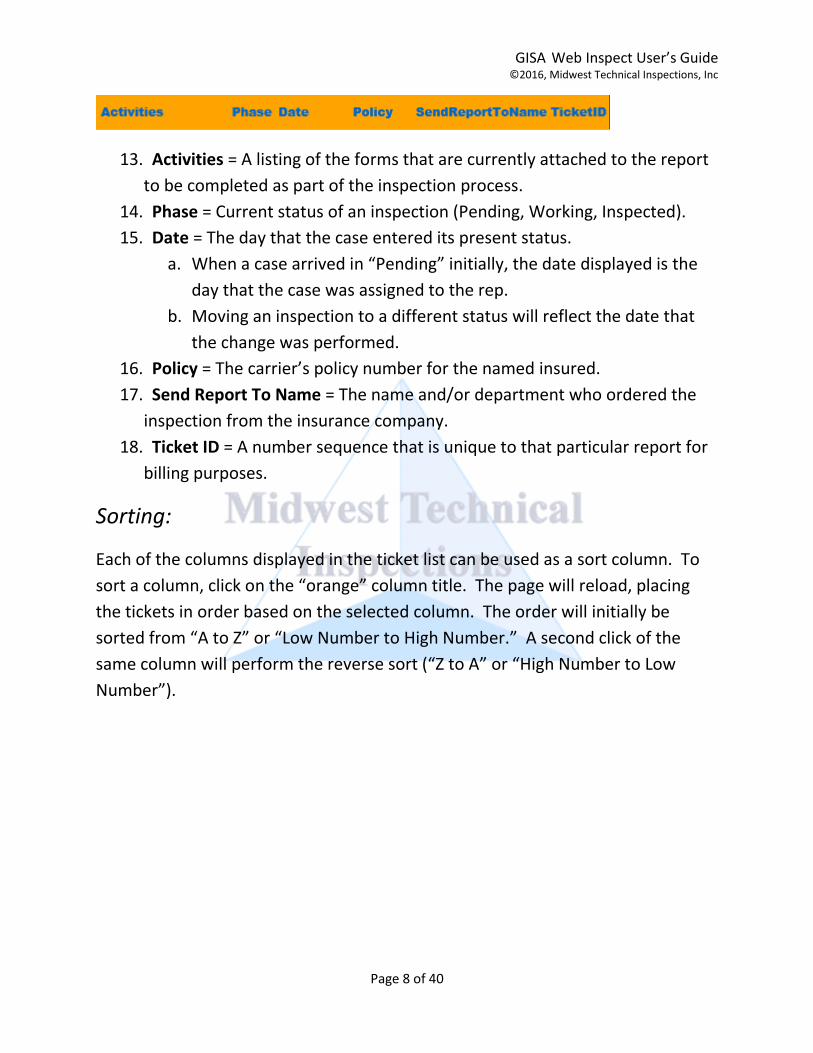
13. Activities = A listing of the forms that are currently attached to the report
to be completed as part of the inspection process.
14. Phase = Current status of an inspection (Pending, Working, Inspected).
15. Date = The day that the case entered its present status.
a. When a case arrived in “Pending” initially, the date displayed is the
day that the case was assigned to the rep.
b. Moving an inspection to a different status will reflect the date that
the change was performed.
16. Policy = The carrier’s policy number for the named insured.
17. Send Report To Name = The name and/or department who ordered the
inspection from the insurance company.
18. Ticket ID = A number sequence that is unique to that particular report for
billing purposes.
Sorting:
Each of the columns displayed in the ticket list can be used as a sort column. To
sort a column, click on the “orange” column title. The page will reload, placing
the tickets in order based on the selected column. The order will initially be
sorted from “A to Z” or “Low Number to High Number.” A second click of the
same column will perform the reverse sort (“Z to A” or “High Number to Low
Number”).
GISA Web Inspect User’s Guide ©2016, Midwest Technical Inspections, Inc
Page 9 of 40
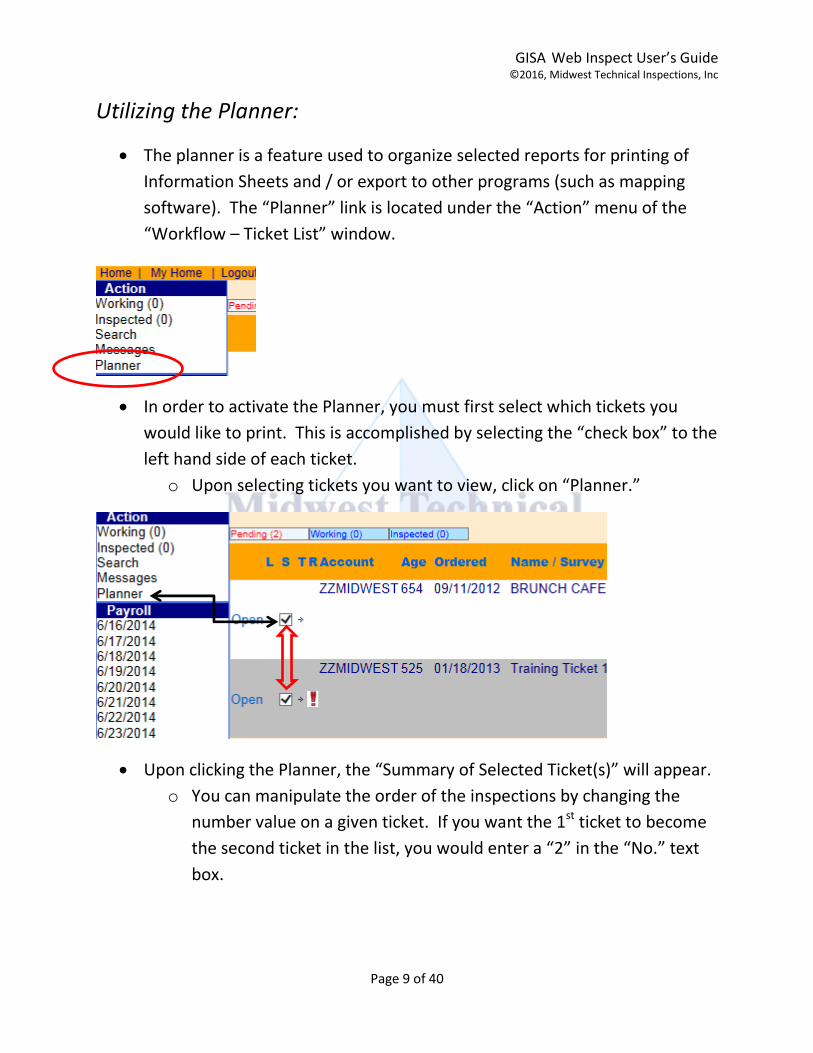
Utilizing the Planner:
The planner is a feature used to organize selected reports for printing of
Information Sheets and / or export to other programs (such as mapping
software). The “Planner” link is located under the “Action” menu of the
“Workflow – Ticket List” window.
In order to activate the Planner, you must first select which tickets you
would like to print. This is accomplished by selecting the “check box” to the
left hand side of each ticket.
o Upon selecting tickets you want to view, click on “Planner.”
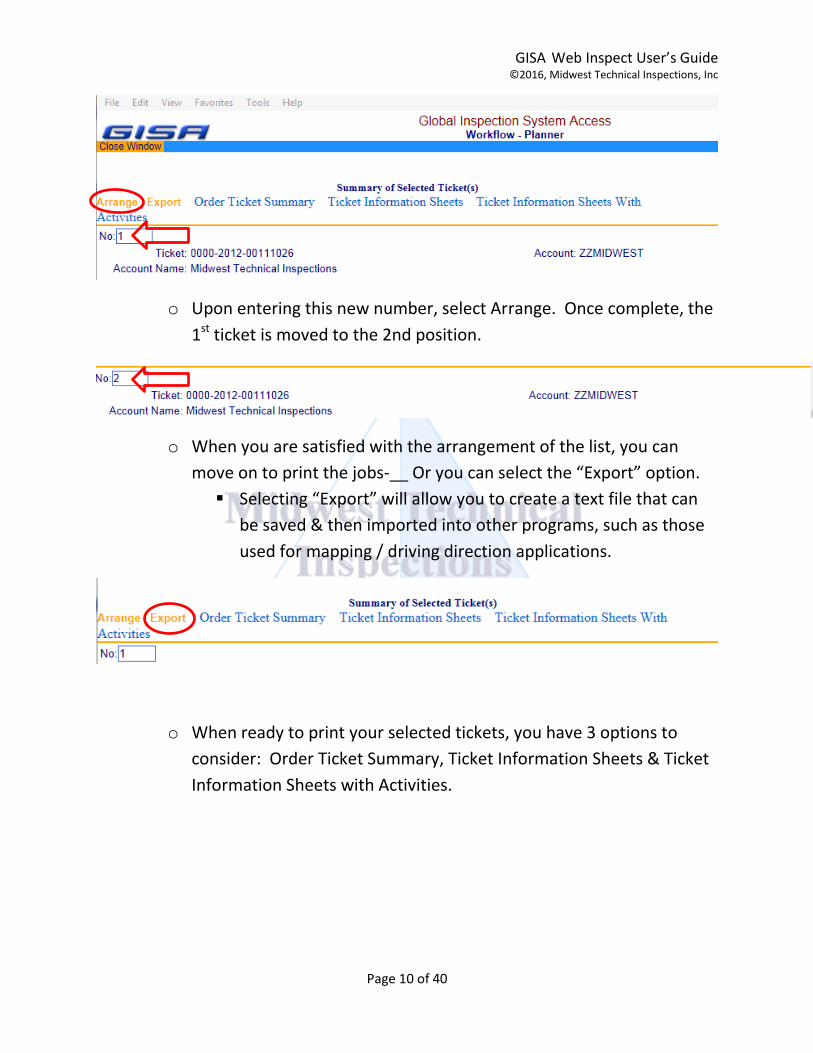
Upon clicking the Planner, the “Summary of Selected Ticket(s)” will appear.
o You can manipulate the order of the inspections by changing the
number value on a given ticket. If you want the 1st ticket to become
the second ticket in the list, you would enter a “2” in the “No.” text
box.
GISA Web Inspect User’s Guide ©2016, Midwest Technical Inspections, Inc
Page 10 of 40
o Upon entering this new number, select Arrange. Once complete, the
1st ticket is moved to the 2nd position.
o When you are satisfied with the arrangement of the list, you can
move on to print the jobs-__ Or you can select the “Export” option.
Selecting “Export” will allow you to create a text file that can
be saved & then imported into other programs, such as those
used for mapping / driving direction applications.
o When ready to print your selected tickets, you have 3 options to
consider: Order Ticket Summary, Ticket Information Sheets & Ticket
Information Sheets with Activities.
GISA Web Inspect User’s Guide ©2016, Midwest Technical Inspections, Inc
Page 11 of 40
“Order Ticket Summary” will display a brief summation of
each ticket. Selected tickets will typical display 3 orders per
page.
“Ticket Information Sheets” will print 1 page per order for the
total number of tickets selected (Ex. 5 tickets = 5 pages). This
option provides some “work area” at the bottom of the page
to allow the field rep to record notes, etc. when making calls.
“Ticket Information Sheets with Activities” will print each
order ticket as well as all requested activity codes for each
inspection. The assortment will print in the following fashion:
Ticket #1 – Order ticket with corresponding forms,
Ticket #2 – Order ticket with corresponding forms,
And onward for all remaining tickets selected to print.
Working with an Inspection Report
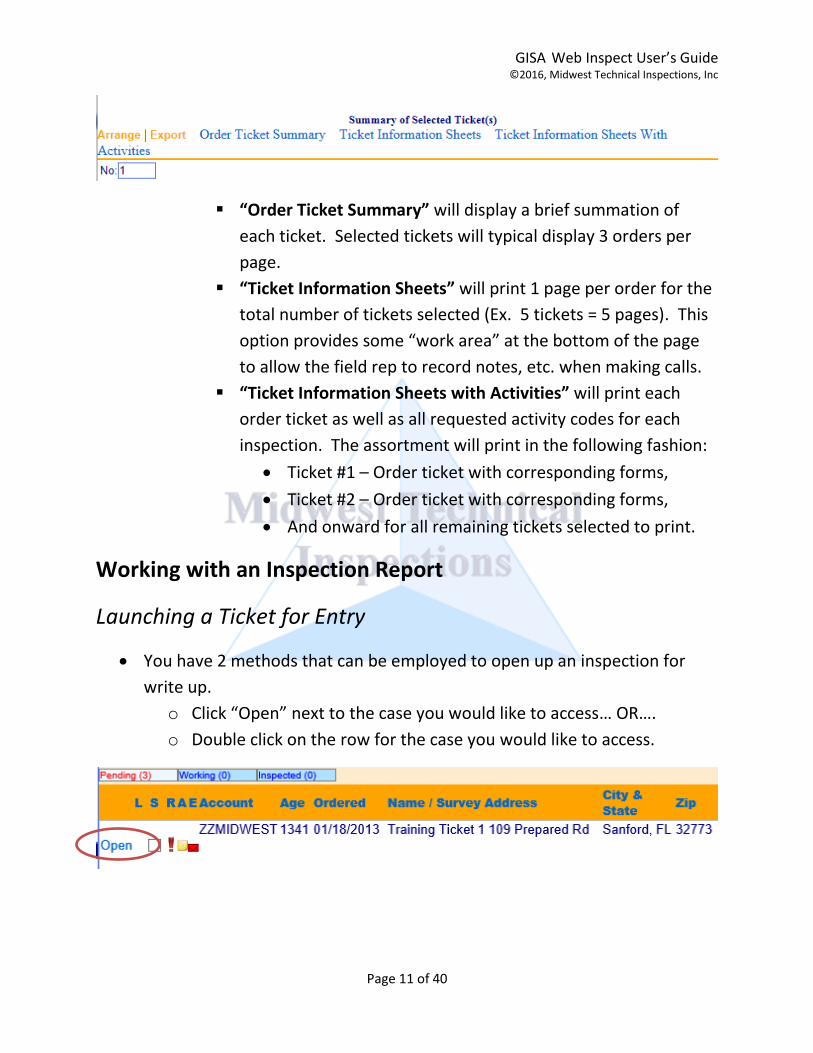
Launching a Ticket for Entry
You have 2 methods that can be employed to open up an inspection for
write up.
o Click “Open” next to the case you would like to access… OR….
o Double click on the row for the case you would like to access.
GISA Web Inspect User’s Guide ©2016, Midwest Technical Inspections, Inc
Page 12 of 40
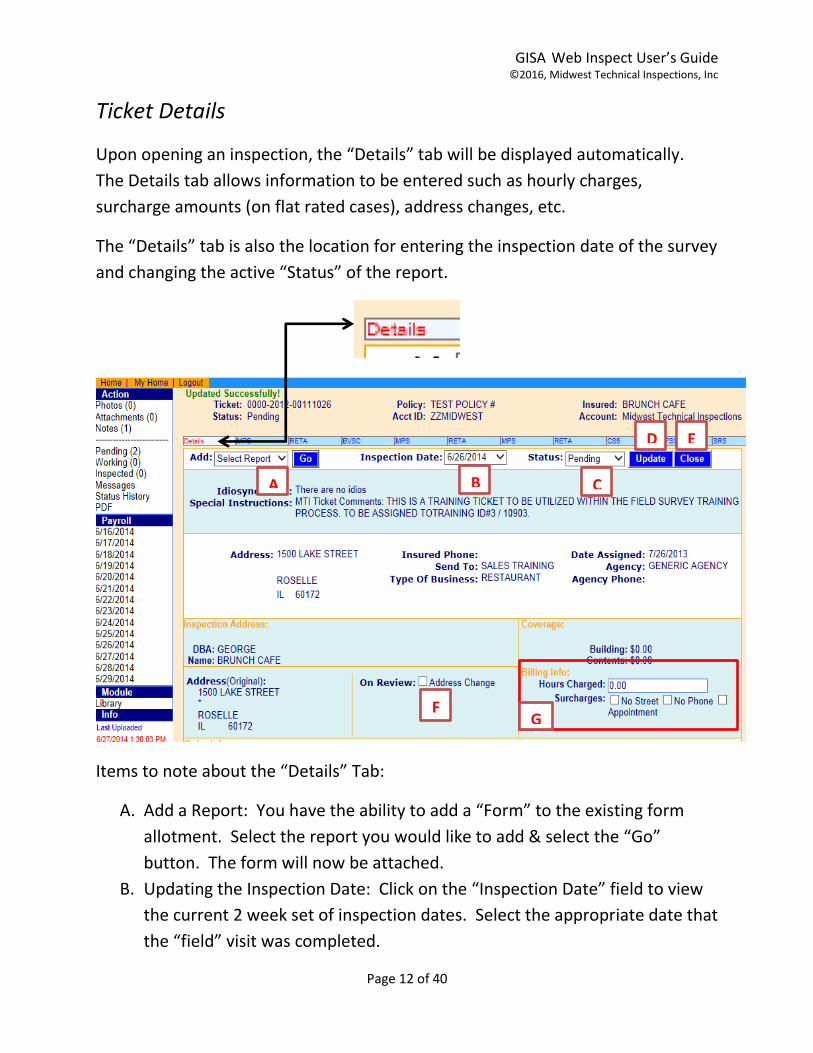
Ticket Details
Upon opening an inspection, the “Details” tab will be displayed automatically.
The Details tab allows information to be entered such as hourly charges,
surcharge amounts (on flat rated cases), address changes, etc.
The “Details” tab is also the location for entering the inspection date of the survey
and changing the active “Status” of the report.
Items to note about the “Details” Tab:
A. Add a Report: You have the ability to add a “Form” to the existing form
allotment. Select the report you would like to add & select the “Go”
button. The form will now be attached.
B. Updating the Inspection Date: Click on the “Inspection Date” field to view
the current 2 week set of inspection dates. Select the appropriate date that
the “field” visit was completed.
A
E
F G
D
C B
GISA Web Inspect User’s Guide ©2016, Midwest Technical Inspections, Inc
Page 13 of 40
C. Update the Inspection Status: Choose the desired status (Pending,
Working, or Inspected) from the list and click “Update” to change the status
of the report.
D. Update button: The “Update” button serves as a way of saving any changes
made to the page. The Update button can be selected at both the top &
bottom of the screen.
E. Closing the Inspection: The “Close” button will bring you back to your
“Workflow – Ticket List.”
F. Changing the Address: Click the “Address Change” checkbox to open a set
of input fields for entering address change information. When you develop
a corrected address, this feature allows for the updated address to be
returned with the survey.
G. Billing Info: For hourly reports, please enter a charge amount to the
nearest quarter hour.
a. Surcharges: For Flat rated reports, you can select options that
indicate difficulty in completion of the survey that we are to charge
the client for.
i. “No Street” – The provided address was incorrect in some
fashion (Rural route #, unworkable address, incorrect address
number, etc.).
ii. “No Phone” – If the inspection required an appointment to be
made, but the report was lacking a working phone number (or
one wasn’t supplied at all), select this option.
iii. “Appointment” – This option can be selected for 1 of 2
situations:
1. Commercial Inspections – Every report of this type
requires an appointment to be scheduled which is
already incorporated into the pricing of the survey….
Selecting “Appointment” would signify that a 2nd
appointment was required in order to complete this
survey (Common instances are cancellation of the
original appointment or reschedule off of a no-show).
GISA Web Inspect User’s Guide ©2016, Midwest Technical Inspections, Inc
Page 14 of 40
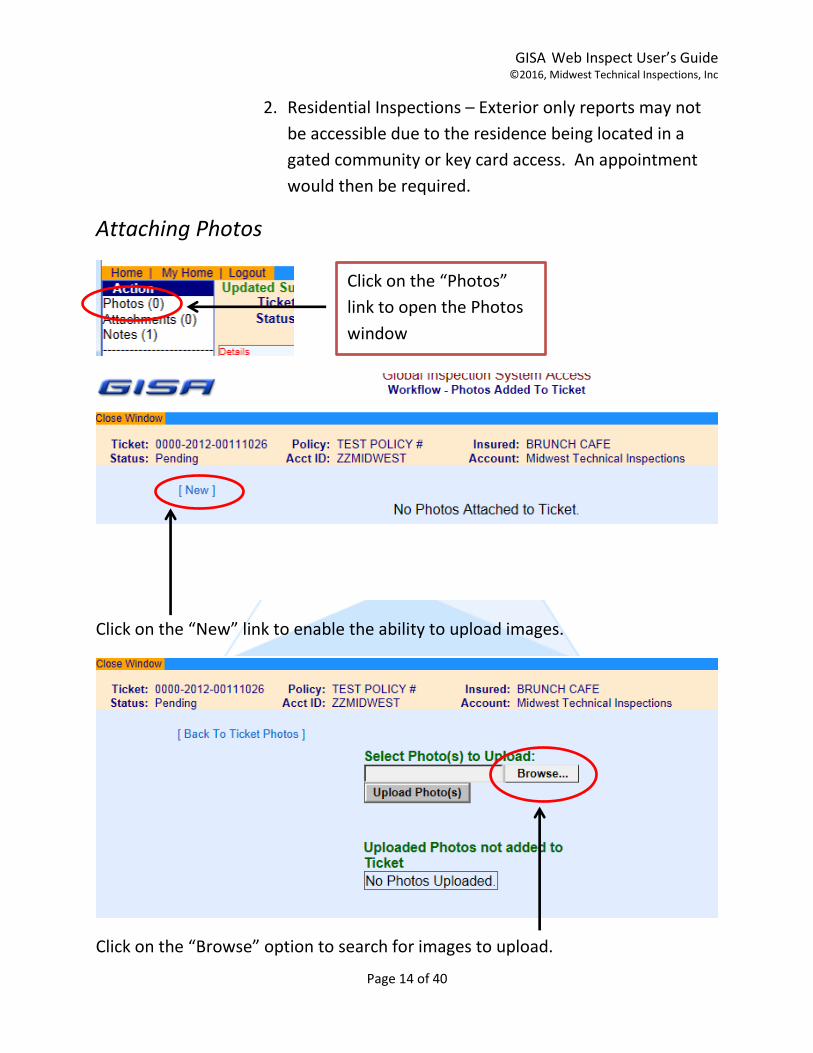
2. Residential Inspections – Exterior only reports may not
be accessible due to the residence being located in a
gated community or key card access. An appointment
would then be required.
Attaching Photos
Click on the “New” link to enable the ability to upload images.
Click on the “Browse” option to search for images to upload.
Click on the “Photos”
link to open the Photos
window
GISA Web Inspect User’s Guide ©2016, Midwest Technical Inspections, Inc
Page 15 of 40
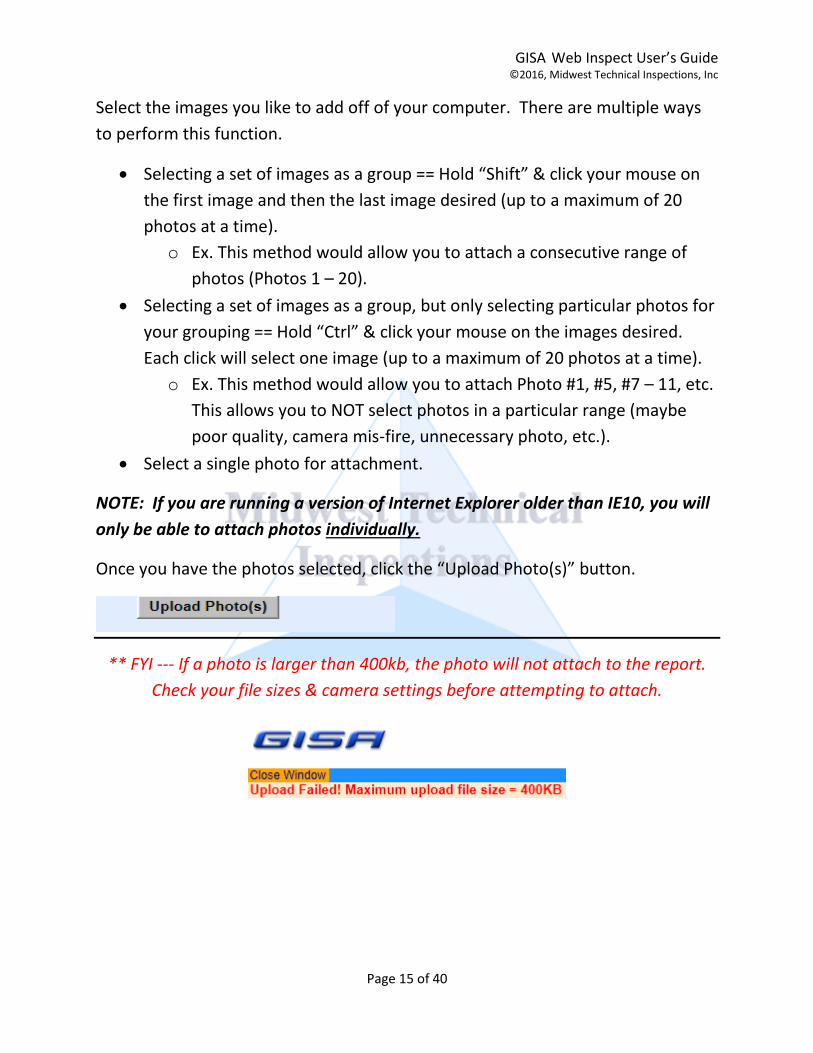
Select the images you like to add off of your computer. There are multiple ways
to perform this function.
Selecting a set of images as a group == Hold “Shift” & click your mouse on
the first image and then the last image desired (up to a maximum of 20
photos at a time).
o Ex. This method would allow you to attach a consecutive range of
photos (Photos 1 – 20).
Selecting a set of images as a group, but only selecting particular photos for
your grouping == Hold “Ctrl” & click your mouse on the images desired.
Each click will select one image (up to a maximum of 20 photos at a time).
o Ex. This method would allow you to attach Photo #1, #5, #7 – 11, etc.
This allows you to NOT select photos in a particular range (maybe
poor quality, camera mis-fire, unnecessary photo, etc.).
Select a single photo for attachment.
NOTE: If you are running a version of Internet Explorer older than IE10, you will
only be able to attach photos individually.
Once you have the photos selected, click the “Upload Photo(s)” button.
** FYI --- If a photo is larger than 400kb, the photo will not attach to the report.
Check your file sizes & camera settings before attempting to attach.

GISA Web Inspect User’s Guide ©2016, Midwest Technical Inspections, Inc
Page 16 of 40
Once uploading is complete, you will see a preview of each image that was
chosen. Now, we are to label each photo.
Click the “drop down list” arrow @ Type:. A list of pre-loaded photo titles
will be available for viewing (Front / Side, Rear / Side, Electrical Panel, etc.).
o If no pre-loaded “Title” fits your photo, please select “Other.”
Selecting “Other” requires the typing out of your own photo
label in the “Caption.”
GISA Web Inspect User’s Guide ©2016, Midwest Technical Inspections, Inc
Page 17 of 40
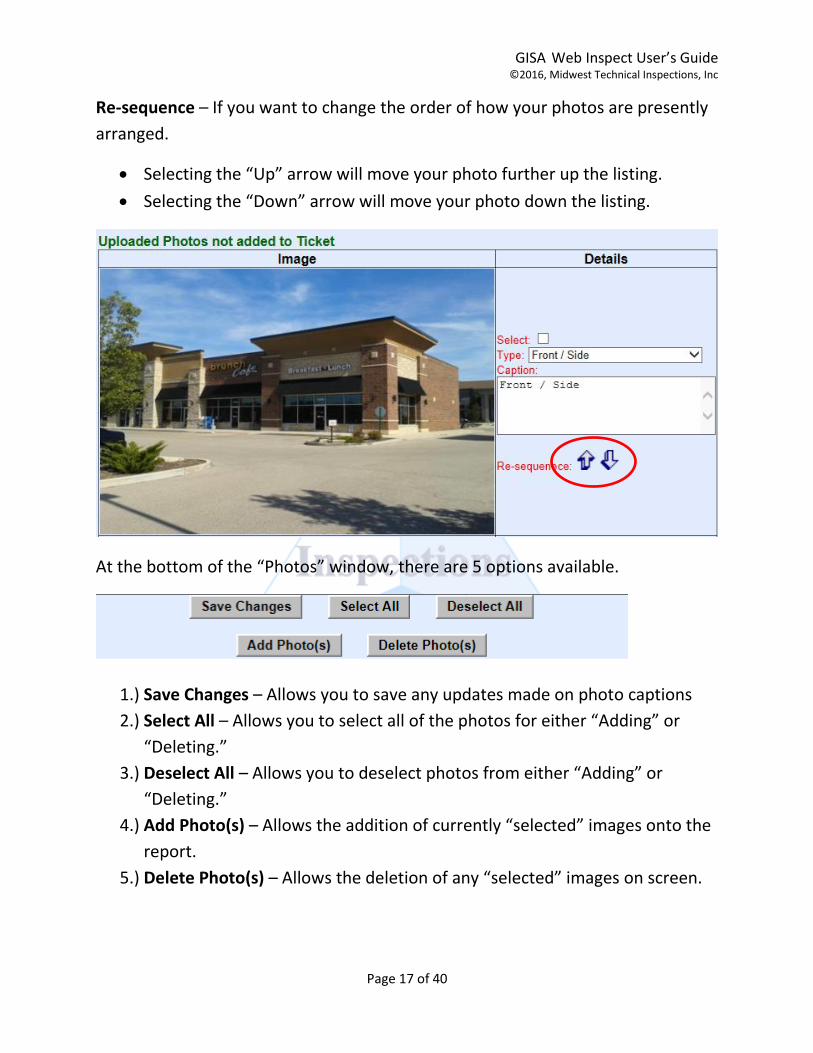
Re-sequence – If you want to change the order of how your photos are presently
arranged.
Selecting the “Up” arrow will move your photo further up the listing.
Selecting the “Down” arrow will move your photo down the listing.
At the bottom of the “Photos” window, there are 5 options available.
1.) Save Changes – Allows you to save any updates made on photo captions
2.) Select All – Allows you to select all of the photos for either “Adding” or
“Deleting.”
3.) Deselect All – Allows you to deselect photos from either “Adding” or
“Deleting.”
4.) Add Photo(s) – Allows the addition of currently “selected” images onto the
report.
5.) Delete Photo(s) – Allows the deletion of any “selected” images on screen.
GISA Web Inspect User’s Guide ©2016, Midwest Technical Inspections, Inc
Page 18 of 40
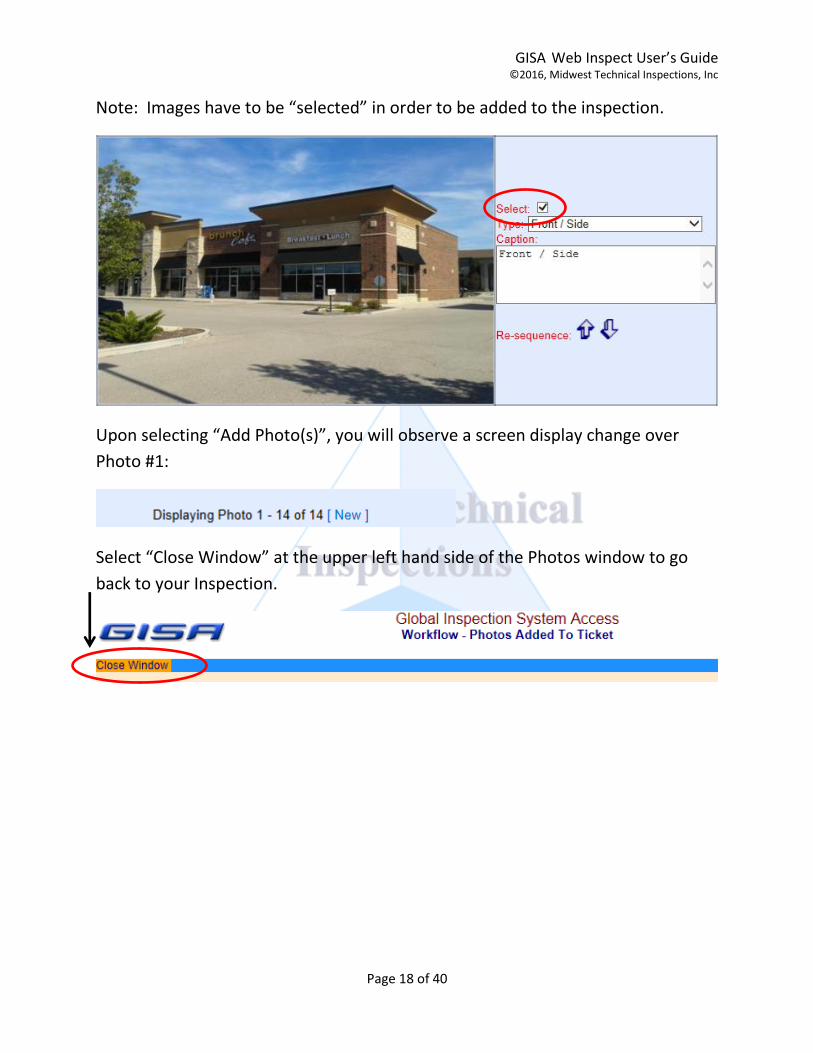
Note: Images have to be “selected” in order to be added to the inspection.
Upon selecting “Add Photo(s)”, you will observe a screen display change over
Photo #1:
Select “Close Window” at the upper left hand side of the Photos window to go
back to your Inspection.
GISA Web Inspect User’s Guide ©2016, Midwest Technical Inspections, Inc
Page 19 of 40
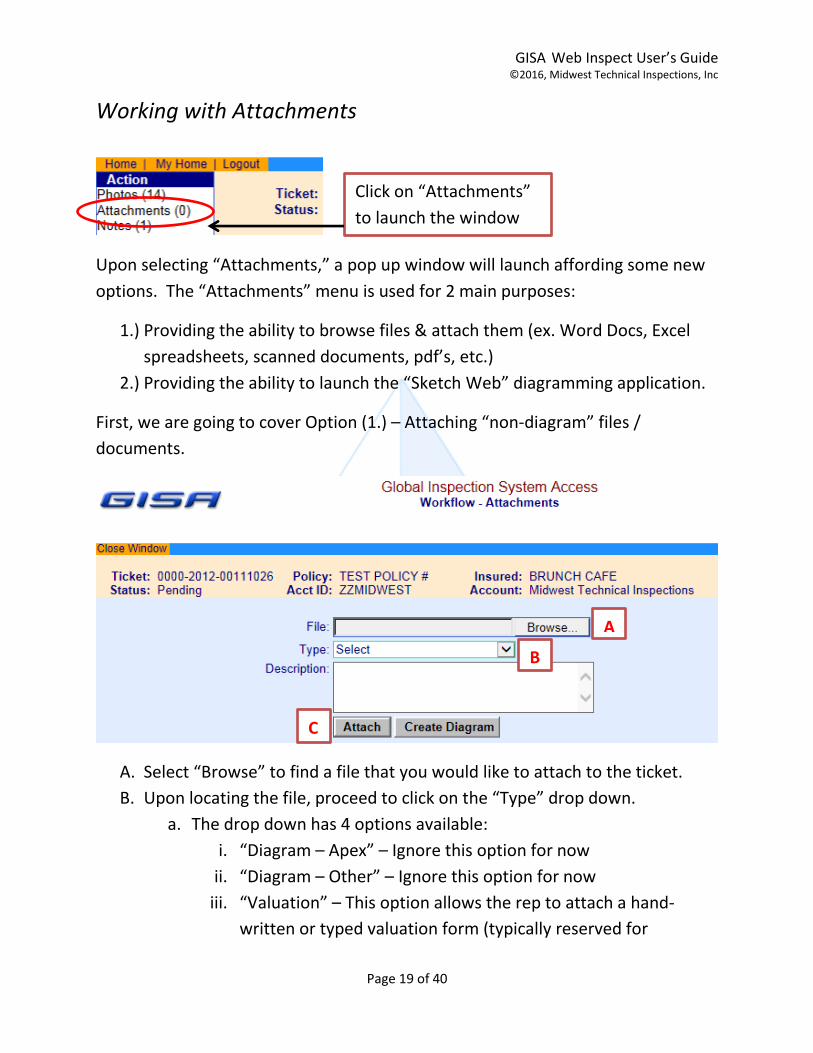
Working with Attachments
Upon selecting “Attachments,” a pop up window will launch affording some new
options. The “Attachments” menu is used for 2 main purposes:
1.) Providing the ability to browse files & attach them (ex. Word Docs, Excel
spreadsheets, scanned documents, pdf’s, etc.)
2.) Providing the ability to launch the “Sketch Web” diagramming application.
First, we are going to cover Option (1.) – Attaching “non-diagram” files /
documents.
A. Select “Browse” to find a file that you would like to attach to the ticket.
B. Upon locating the file, proceed to click on the “Type” drop down.
a. The drop down has 4 options available:
i. “Diagram – Apex” – Ignore this option for now
ii. “Diagram – Other” – Ignore this option for now
iii. “Valuation” – This option allows the rep to attach a hand-
written or typed valuation form (typically reserved for
Click on “Attachments”
to launch the window
A
B
C
GISA Web Inspect User’s Guide ©2016, Midwest Technical Inspections, Inc
Page 20 of 40
specialty clients that run valuations that are not part of our
automated processes).
iv. “Other” – This option allows the rep to attach any number of
file formats for attaching to the order.
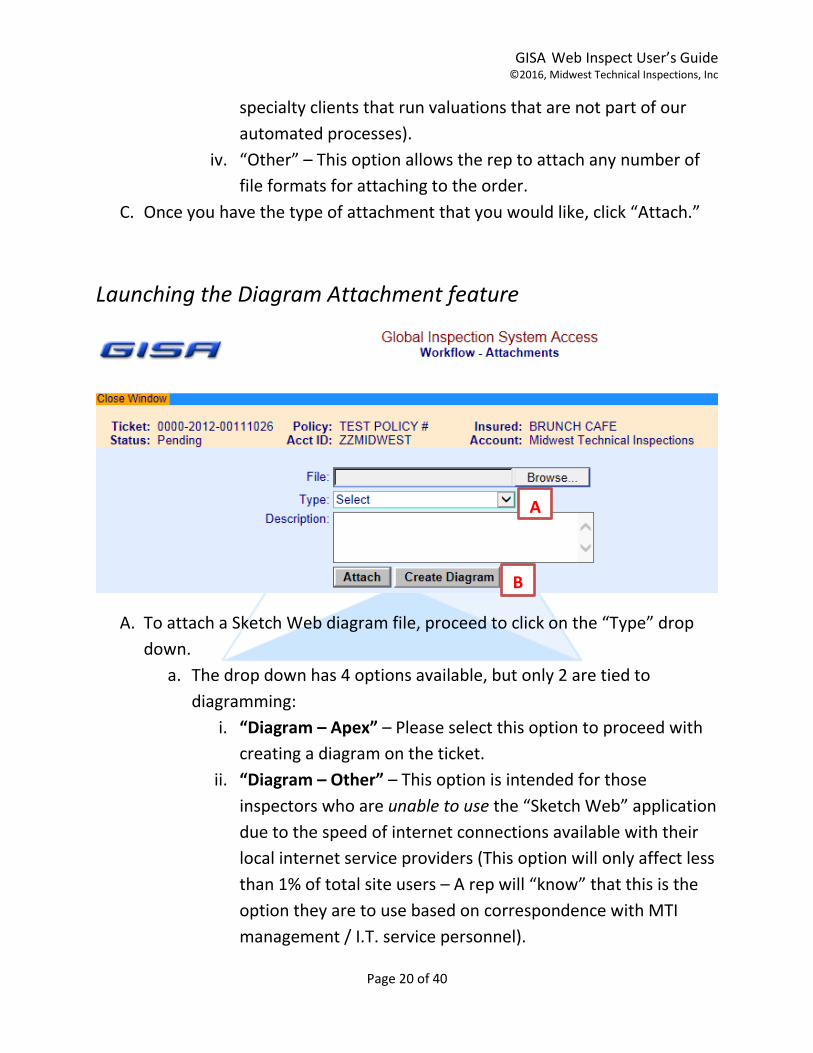
C. Once you have the type of attachment that you would like, click “Attach.”
Launching the Diagram Attachment feature
A. To attach a Sketch Web diagram file, proceed to click on the “Type” drop
down.
a. The drop down has 4 options available, but only 2 are tied to
diagramming:
i. “Diagram – Apex” – Please select this option to proceed with
creating a diagram on the ticket.
ii. “Diagram – Other” – This option is intended for those
inspectors who are unable to use the “Sketch Web” application
due to the speed of internet connections available with their
local internet service providers (This option will only affect less
than 1% of total site users – A rep will “know” that this is the
option they are to use based on correspondence with MTI
management / I.T. service personnel).
A
B

GISA Web Inspect User’s Guide ©2016, Midwest Technical Inspections, Inc
Page 21 of 40
B. Upon selection of the “Diagram-Apex” option, click on “Create Diagram.”
a. A “Diagram” file has now been attached to the report.
i. If you inadvertently attached a diagram in error, you can
delete the “attachment.”
1. Click your mouse under the “S” or “Select” column.
2. Click “Delete.”
b. To launch the “Diagram – Edit” Window, please click the Diagram file.
i. Click on the “Edit” button.
1 2

GISA Web Inspect User’s Guide ©2016, Midwest Technical Inspections, Inc
Page 22 of 40
1. The window will now state -- “Diagram: Opening
Sketch.” The diagram window will open in 5-20 seconds
(depending on your internet speed).
2. You will now be able to draw the property.
Using the Notes feature
Notes can be attached to tickets in order to facilitate communication between the
field inspector, management personnel and the Quality Control department.
Click here to launch “Notes.”
A
C B
GISA Web Inspect User’s Guide ©2016, Midwest Technical Inspections, Inc
Page 23 of 40
A. Under “Type,” you click the drop down list and are met with 2 options:
a. Review: If you want to add a comment for the report directed to the
review department, use this option.
i. NOTE: A comment added under the “Review” status is not
viewable by MTI personnel until the inspection is sent in as
“Inspected.” Comments added here are not tracked daily.
b. Status: This option is to be used for when recording your efforts to
schedule a given request.
i. NOTE: Field personnel are to be updating a report’s “Status”
once a week. Document your efforts here in scheduling, etc.
ii. Once an “Appointment” is scheduled for a given report, that
appointment date / time should be logged as a “Status.”
iii. Status notes are uploaded to MTI roughly every ½ hour and are
to be used as an inspection management tool.
B. “Spell” button: Any note entered can be spell-checked prior to being
added.
C. “Add” button: Info entered on the Notes is added to the inspection when
“Add” is selected.
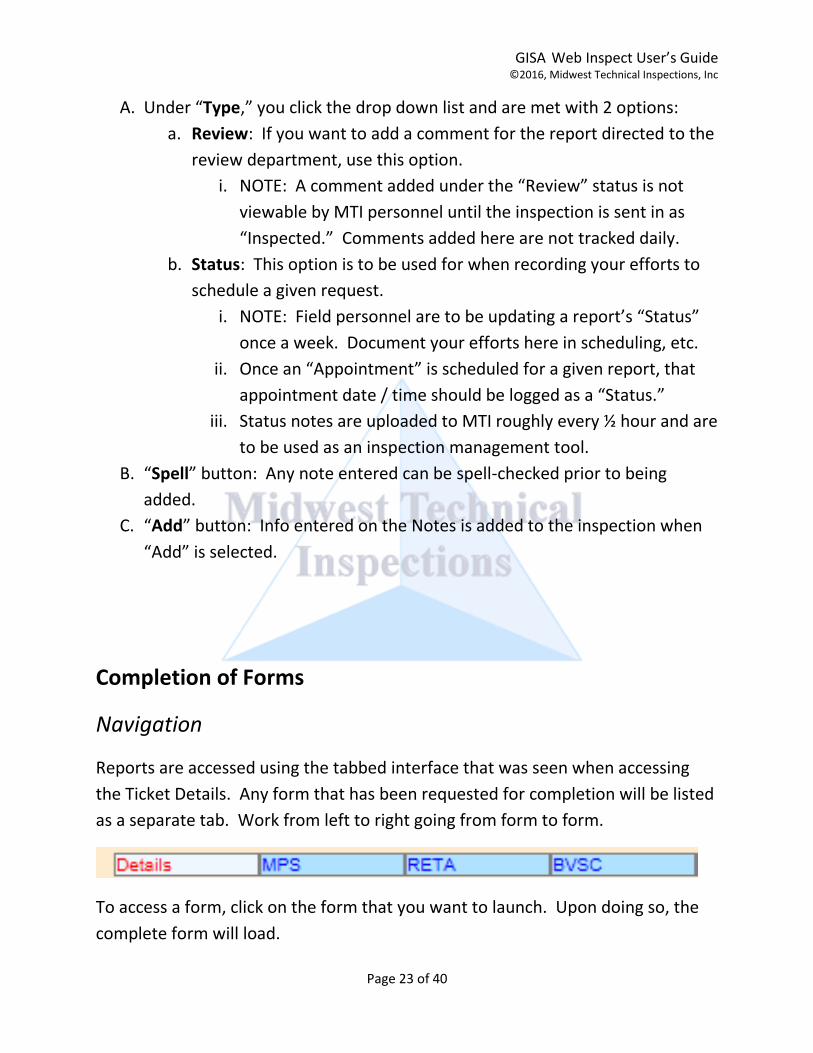
Completion of Forms
Navigation
Reports are accessed using the tabbed interface that was seen when accessing
the Ticket Details. Any form that has been requested for completion will be listed
as a separate tab. Work from left to right going from form to form.
To access a form, click on the form that you want to launch. Upon doing so, the
complete form will load.
GISA Web Inspect User’s Guide ©2016, Midwest Technical Inspections, Inc
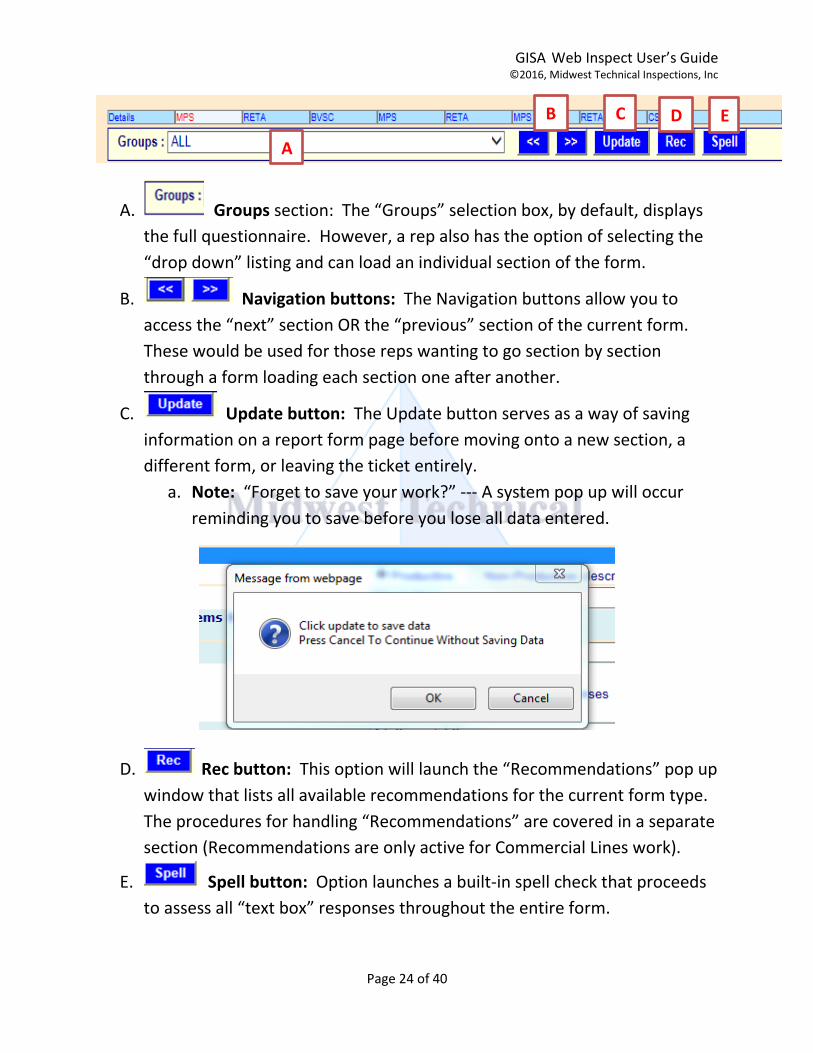
Page 24 of 40
A. Groups section: The “Groups” selection box, by default, displays
the full questionnaire. However, a rep also has the option of selecting the
“drop down” listing and can load an individual section of the form.
B. Navigation buttons: The Navigation buttons allow you to
access the “next” section OR the “previous” section of the current form.
These would be used for those reps wanting to go section by section
through a form loading each section one after another.
C. Update button: The Update button serves as a way of saving
information on a report form page before moving onto a new section, a
different form, or leaving the ticket entirely.
a. Note: “Forget to save your work?” --- A system pop up will occur
reminding you to save before you lose all data entered.
D. Rec button: This option will launch the “Recommendations” pop up
window that lists all available recommendations for the current form type.
The procedures for handling “Recommendations” are covered in a separate
section (Recommendations are only active for Commercial Lines work).
E. Spell button: Option launches a built-in spell check that proceeds
to assess all “text box” responses throughout the entire form.
A
B C D E
GISA Web Inspect User’s Guide ©2016, Midwest Technical Inspections, Inc
Page 25 of 40
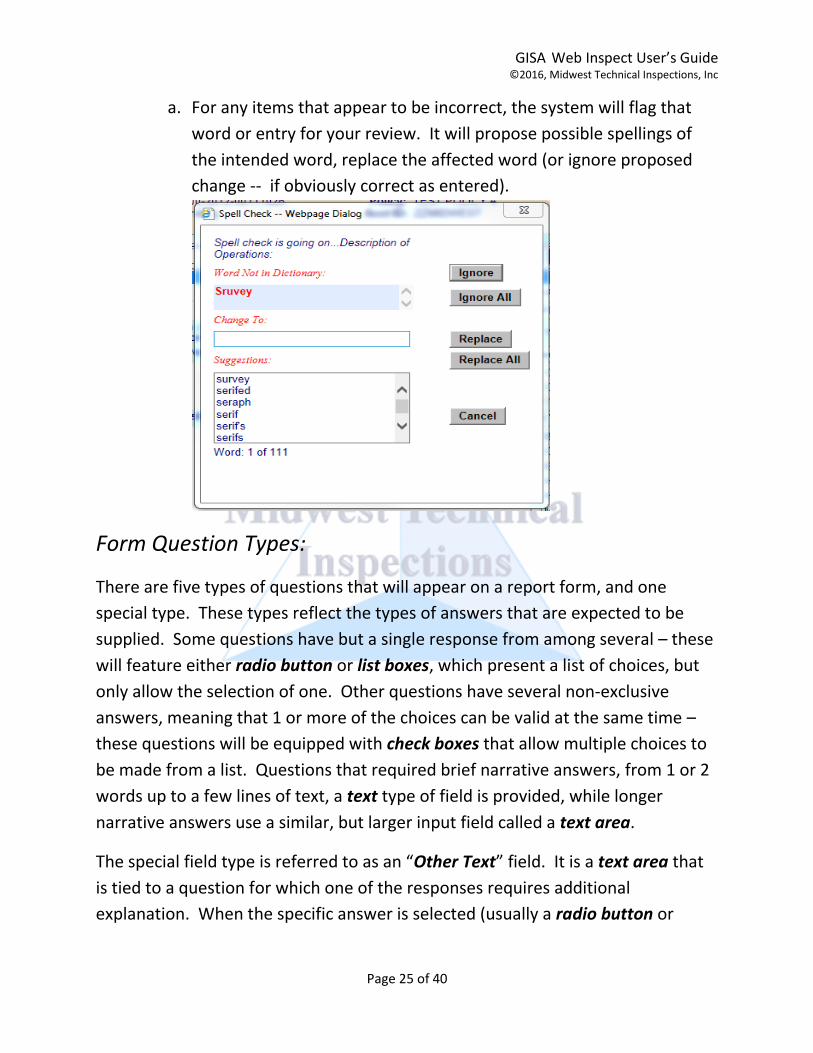
a. For any items that appear to be incorrect, the system will flag that
word or entry for your review. It will propose possible spellings of
the intended word, replace the affected word (or ignore proposed
change -- if obviously correct as entered).
Form Question Types:
There are five types of questions that will appear on a report form, and one
special type. These types reflect the types of answers that are expected to be
supplied. Some questions have but a single response from among several – these
will feature either radio button or list boxes, which present a list of choices, but
only allow the selection of one. Other questions have several non-exclusive
answers, meaning that 1 or more of the choices can be valid at the same time –
these questions will be equipped with check boxes that allow multiple choices to
be made from a list. Questions that required brief narrative answers, from 1 or 2
words up to a few lines of text, a text type of field is provided, while longer
narrative answers use a similar, but larger input field called a text area.
The special field type is referred to as an “Other Text” field. It is a text area that
is tied to a question for which one of the responses requires additional
explanation. When the specific answer is selected (usually a radio button or
GISA Web Inspect User’s Guide ©2016, Midwest Technical Inspections, Inc
Page 26 of 40
check box), the “Other Text” field automatically appears and requires entry
before proceeding to another question.
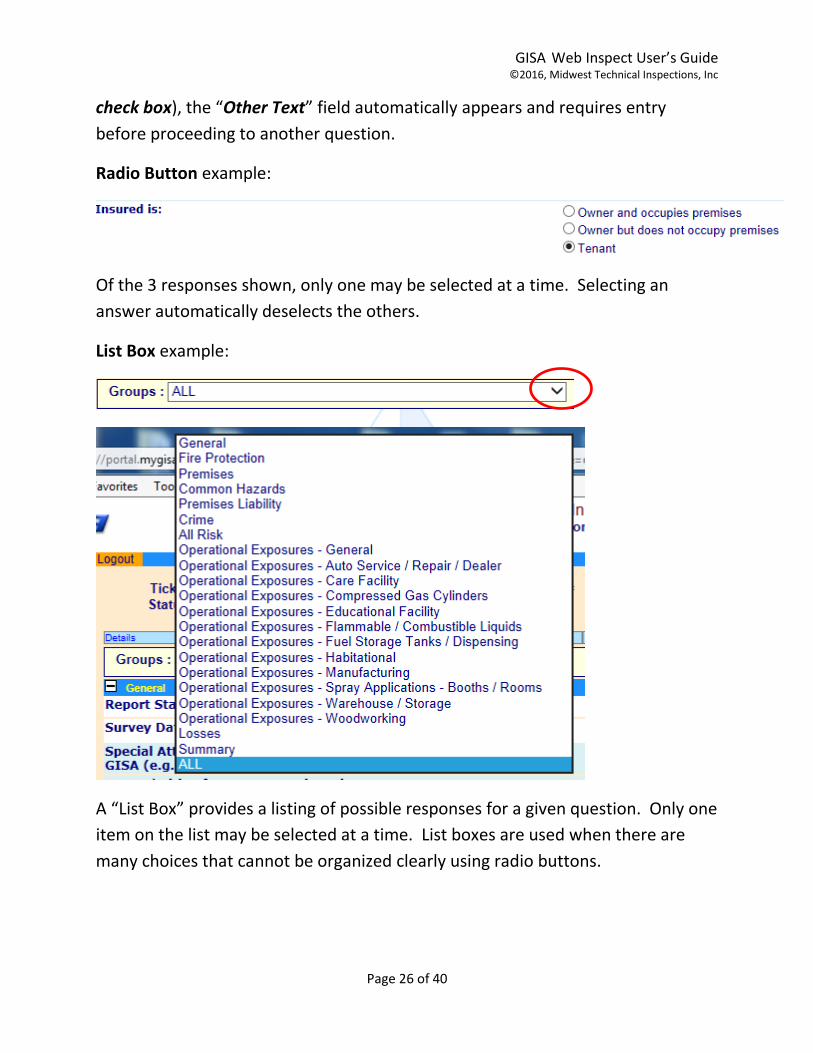
Radio Button example:
Of the 3 responses shown, only one may be selected at a time. Selecting an
answer automatically deselects the others.
List Box example:
A “List Box” provides a listing of possible responses for a given question. Only one
item on the list may be selected at a time. List boxes are used when there are
many choices that cannot be organized clearly using radio buttons.
GISA Web Inspect User’s Guide ©2016, Midwest Technical Inspections, Inc
Page 27 of 40
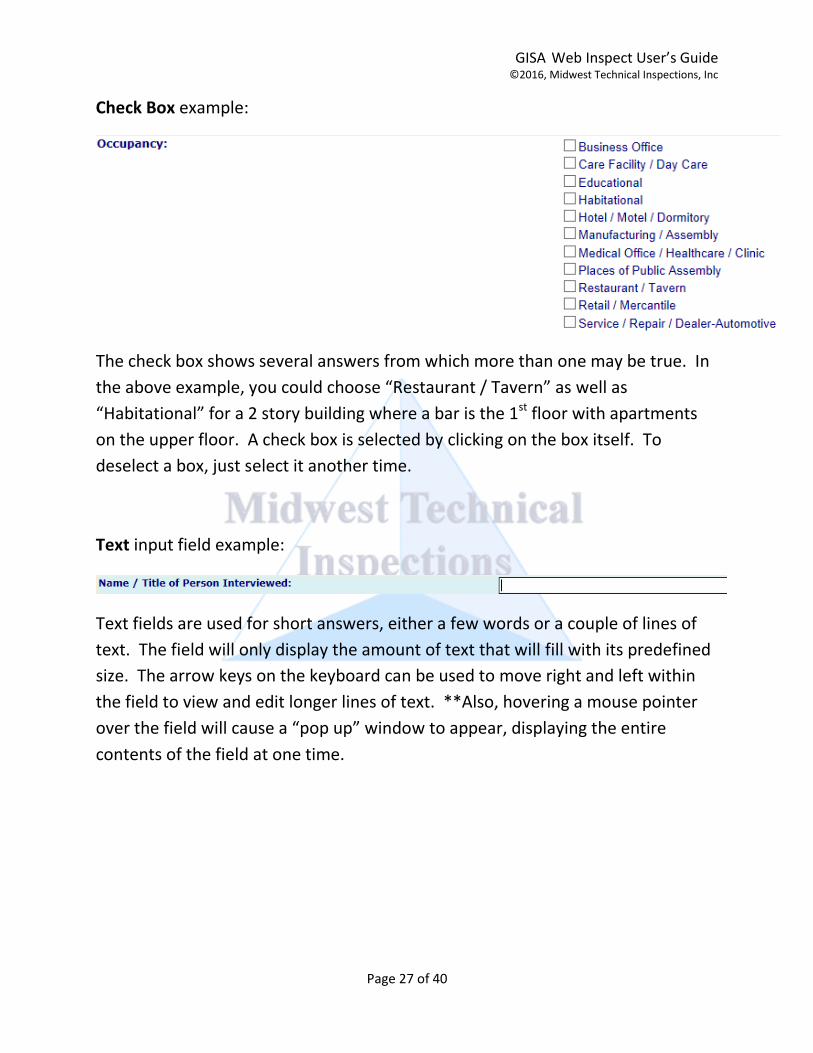
Check Box example:
The check box shows several answers from which more than one may be true. In
the above example, you could choose “Restaurant / Tavern” as well as
“Habitational” for a 2 story building where a bar is the 1st floor with apartments
on the upper floor. A check box is selected by clicking on the box itself. To
deselect a box, just select it another time.
Text input field example:
Text fields are used for short answers, either a few words or a couple of lines of
text. The field will only display the amount of text that will fill with its predefined
size. The arrow keys on the keyboard can be used to move right and left within
the field to view and edit longer lines of text. **Also, hovering a mouse pointer
over the field will cause a “pop up” window to appear, displaying the entire
contents of the field at one time.
GISA Web Inspect User’s Guide ©2016, Midwest Technical Inspections, Inc
Page 28 of 40
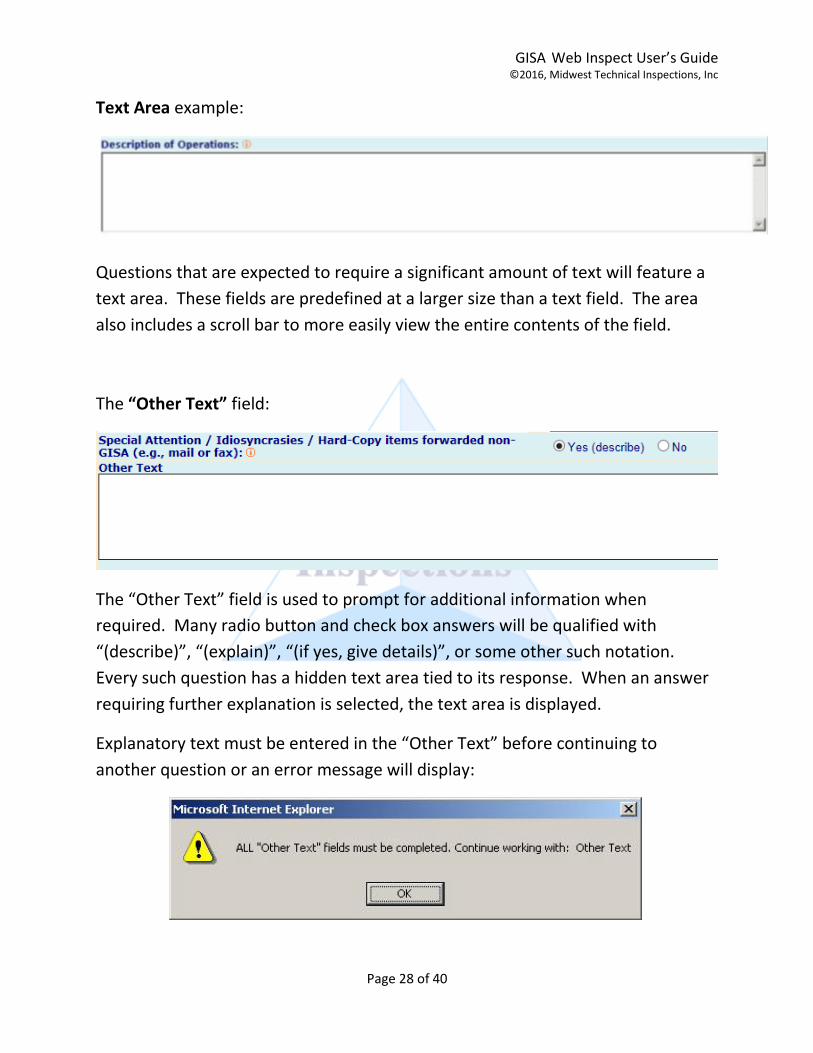
Text Area example:
Questions that are expected to require a significant amount of text will feature a
text area. These fields are predefined at a larger size than a text field. The area
also includes a scroll bar to more easily view the entire contents of the field.
The “Other Text” field:
The “Other Text” field is used to prompt for additional information when
required. Many radio button and check box answers will be qualified with
“(describe)”, “(explain)”, “(if yes, give details)”, or some other such notation.
Every such question has a hidden text area tied to its response. When an answer
requiring further explanation is selected, the text area is displayed.
Explanatory text must be entered in the “Other Text” before continuing to
another question or an error message will display:
GISA Web Inspect User’s Guide ©2016, Midwest Technical Inspections, Inc
Page 29 of 40
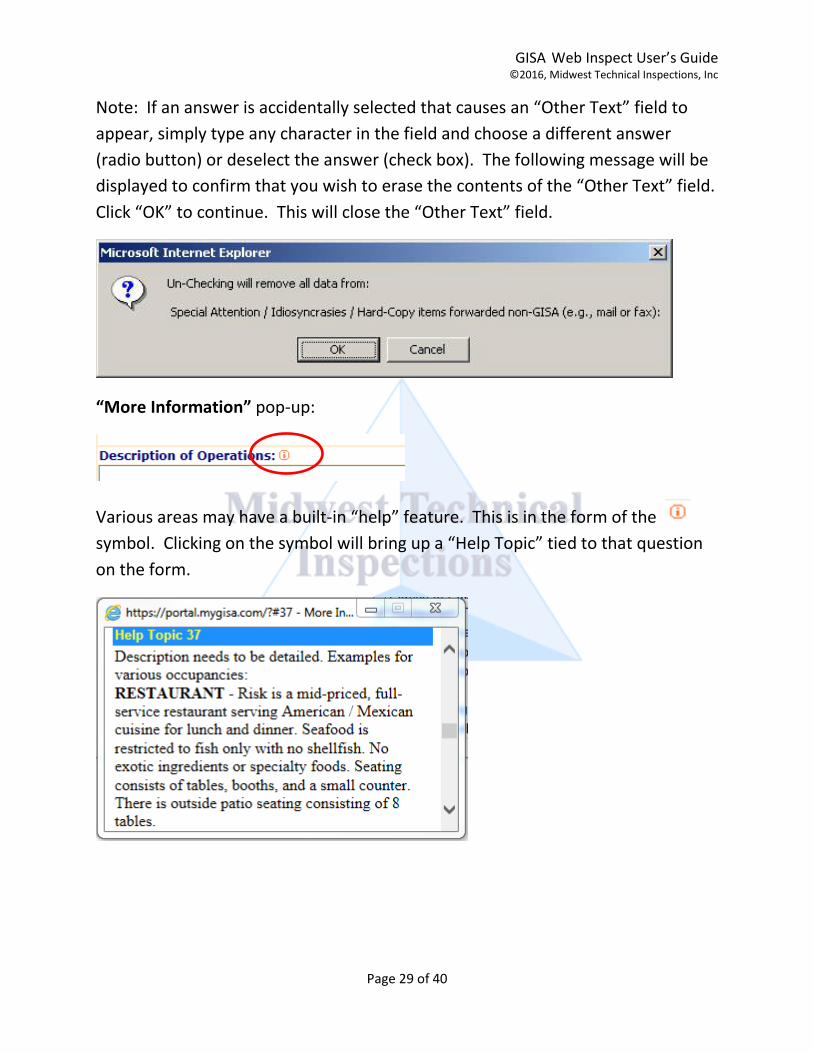
Note: If an answer is accidentally selected that causes an “Other Text” field to
appear, simply type any character in the field and choose a different answer
(radio button) or deselect the answer (check box). The following message will be
displayed to confirm that you wish to erase the contents of the “Other Text” field.
Click “OK” to continue. This will close the “Other Text” field.
“More Information” pop-up:
Various areas may have a built-in “help” feature. This is in the form of the
symbol. Clicking on the symbol will bring up a “Help Topic” tied to that question
on the form.
GISA Web Inspect User’s Guide ©2016, Midwest Technical Inspections, Inc
Page 30 of 40
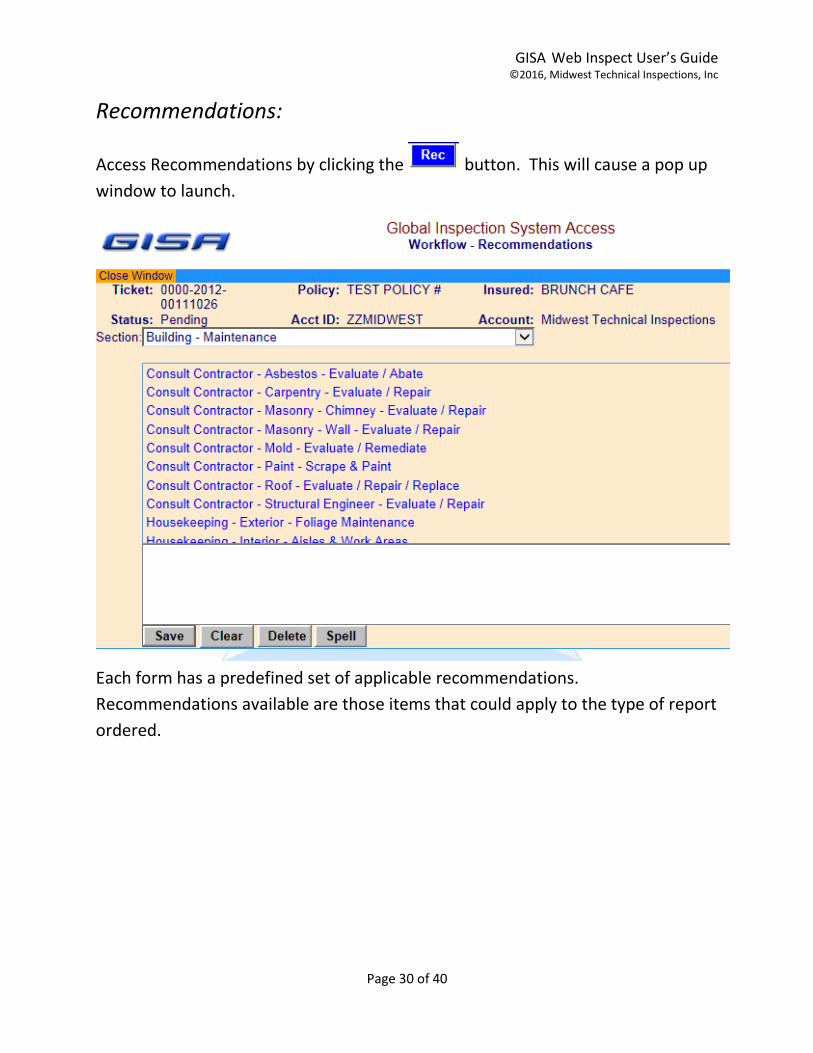
Recommendations:
Access Recommendations by clicking the button. This will cause a pop up
window to launch.
Each form has a predefined set of applicable recommendations.
Recommendations available are those items that could apply to the type of report
ordered.
GISA Web Inspect User’s Guide ©2016, Midwest Technical Inspections, Inc
Page 31 of 40
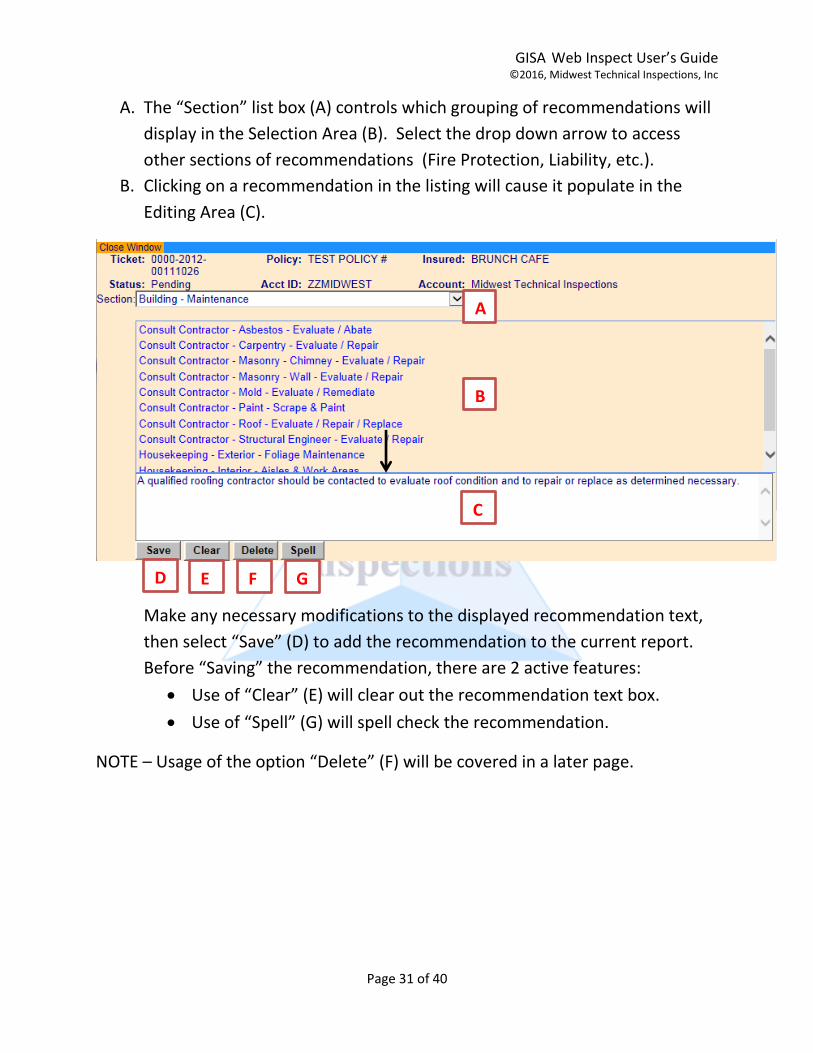
A. The “Section” list box (A) controls which grouping of recommendations will
display in the Selection Area (B). Select the drop down arrow to access
other sections of recommendations (Fire Protection, Liability, etc.).
B. Clicking on a recommendation in the listing will cause it populate in the
Editing Area (C).
Make any necessary modifications to the displayed recommendation text,
then select “Save” (D) to add the recommendation to the current report.
Before “Saving” the recommendation, there are 2 active features:
Use of “Clear” (E) will clear out the recommendation text box.
Use of “Spell” (G) will spell check the recommendation.
NOTE – Usage of the option “Delete” (F) will be covered in a later page.
B
C
D
E
F
G
A
GISA Web Inspect User’s Guide ©2016, Midwest Technical Inspections, Inc
Page 32 of 40
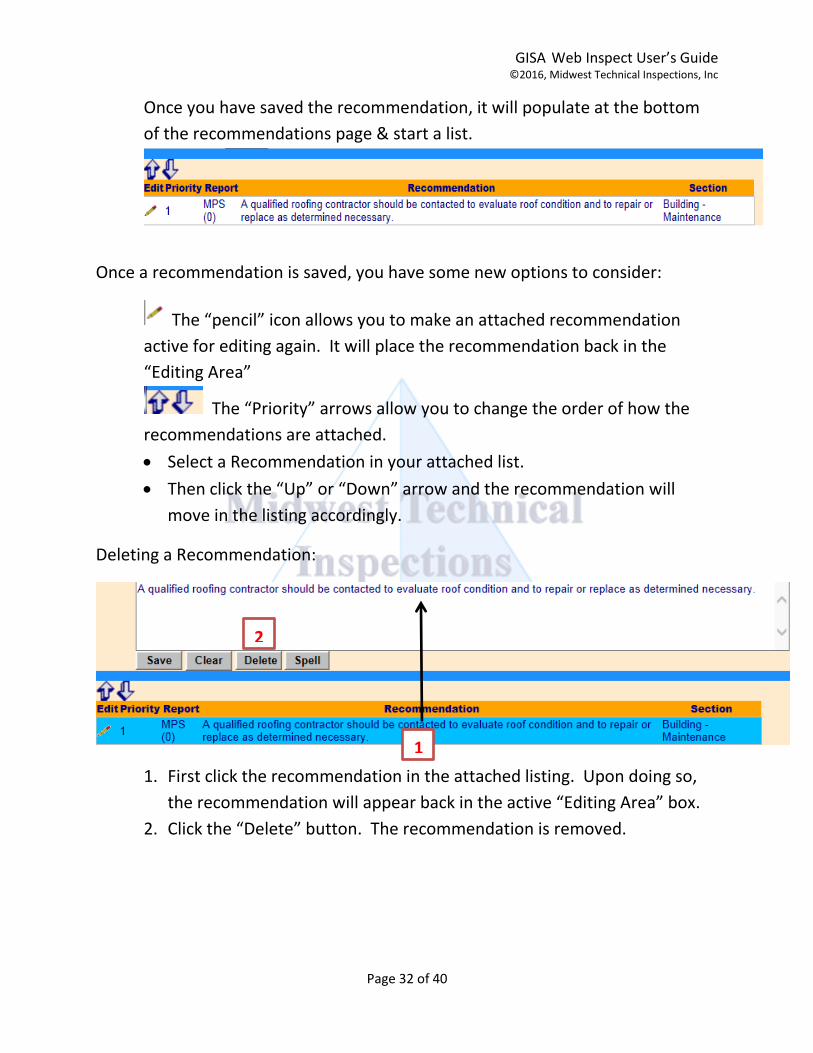
Once you have saved the recommendation, it will populate at the bottom
of the recommendations page & start a list.
Once a recommendation is saved, you have some new options to consider:
The “pencil” icon allows you to make an attached recommendation
active for editing again. It will place the recommendation back in the
“Editing Area”
The “Priority” arrows allow you to change the order of how the
recommendations are attached.
Select a Recommendation in your attached list.
Then click the “Up” or “Down” arrow and the recommendation will
move in the listing accordingly.
Deleting a Recommendation:
1. First click the recommendation in the attached listing. Upon doing so,
the recommendation will appear back in the active “Editing Area” box.
2. Click the “Delete” button. The recommendation is removed.
1
2
GISA Web Inspect User’s Guide ©2016, Midwest Technical Inspections, Inc
Page 33 of 40
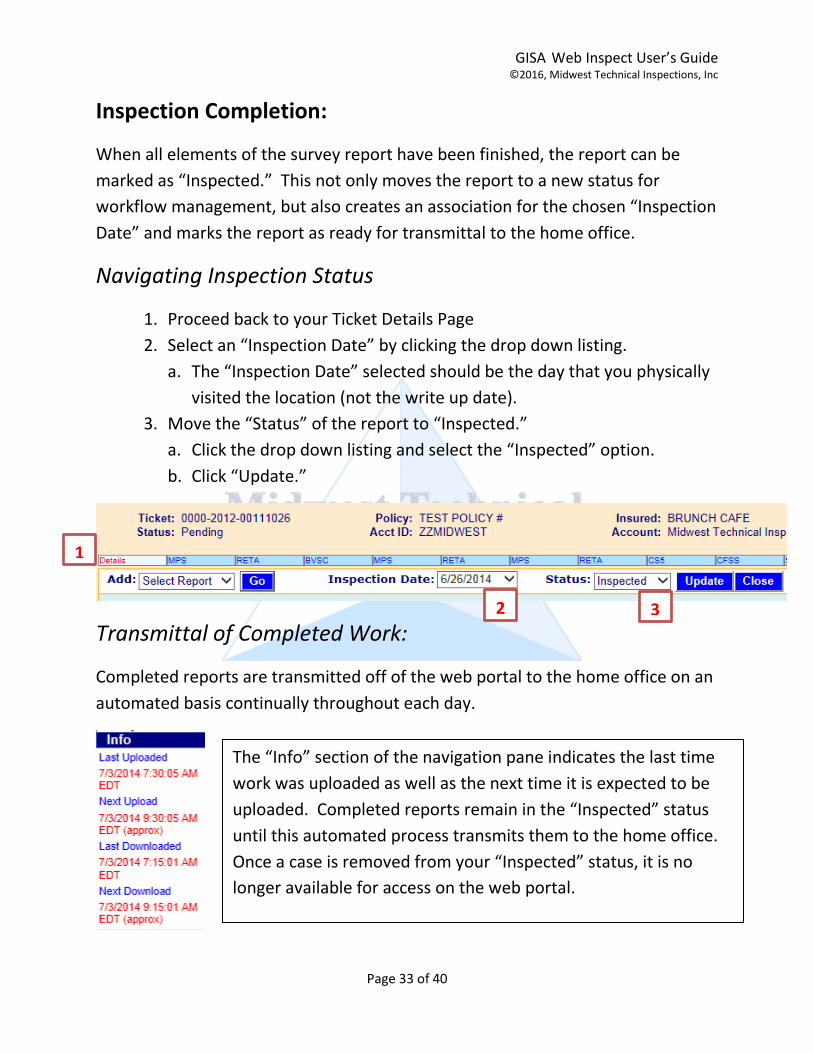
Inspection Completion:
When all elements of the survey report have been finished, the report can be
marked as “Inspected.” This not only moves the report to a new status for
workflow management, but also creates an association for the chosen “Inspection
Date” and marks the report as ready for transmittal to the home office.
Navigating Inspection Status
1. Proceed back to your Ticket Details Page
2. Select an “Inspection Date” by clicking the drop down listing.
a. The “Inspection Date” selected should be the day that you physically
visited the location (not the write up date).
3. Move the “Status” of the report to “Inspected.”
a. Click the drop down listing and select the “Inspected” option.
b. Click “Update.”
Transmittal of Completed Work:
Completed reports are transmitted off of the web portal to the home office on an
automated basis continually throughout each day.
1
2 3
The “Info” section of the navigation pane indicates the last time
work was uploaded as well as the next time it is expected to be
uploaded. Completed reports remain in the “Inspected” status
until this automated process transmits them to the home office.
Once a case is removed from your “Inspected” status, it is no
longer available for access on the web portal.
GISA Web Inspect User’s Guide ©2016, Midwest Technical Inspections, Inc
Page 34 of 40
Payroll Dates:
As independent contractors, you have no daily responsibility regarding the
“Payroll” feature.
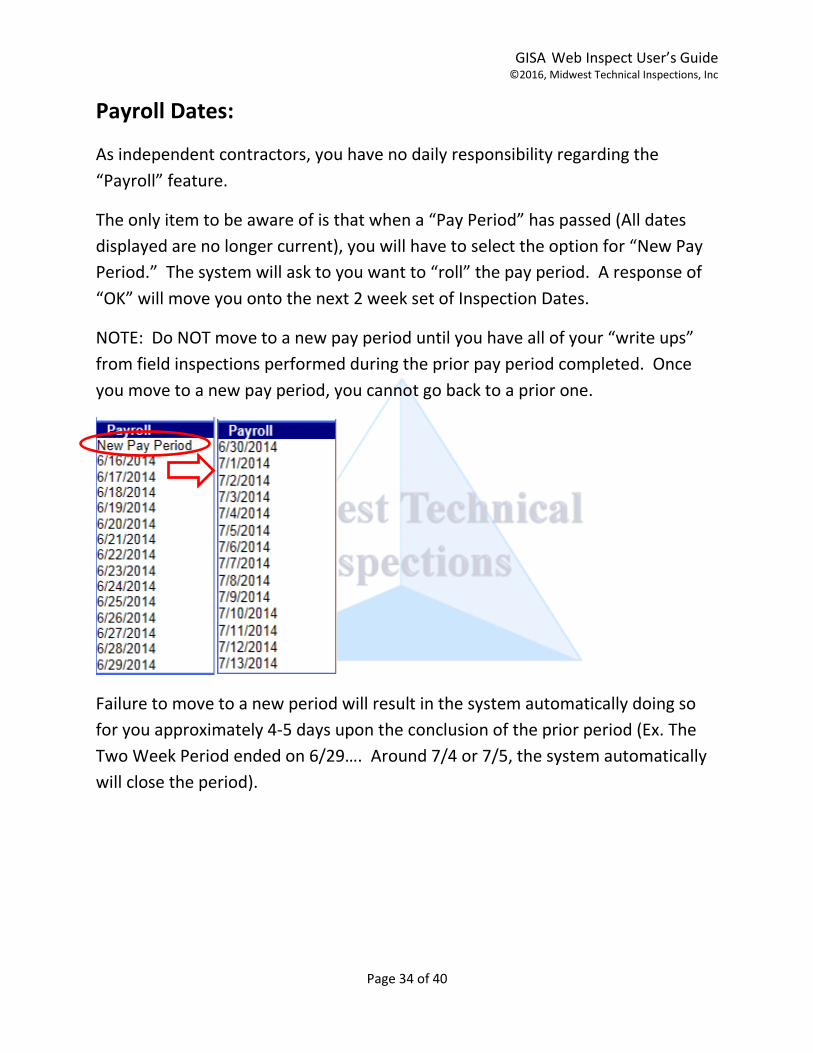
The only item to be aware of is that when a “Pay Period” has passed (All dates
displayed are no longer current), you will have to select the option for “New Pay
Period.” The system will ask to you want to “roll” the pay period. A response of
“OK” will move you onto the next 2 week set of Inspection Dates.
NOTE: Do NOT move to a new pay period until you have all of your “write ups”
from field inspections performed during the prior pay period completed. Once
you move to a new pay period, you cannot go back to a prior one.
Failure to move to a new period will result in the system automatically doing so
for you approximately 4-5 days upon the conclusion of the prior period (Ex. The
Two Week Period ended on 6/29…. Around 7/4 or 7/5, the system automatically
will close the period).
GISA Web Inspect User’s Guide ©2016, Midwest Technical Inspections, Inc
Page 35 of 40
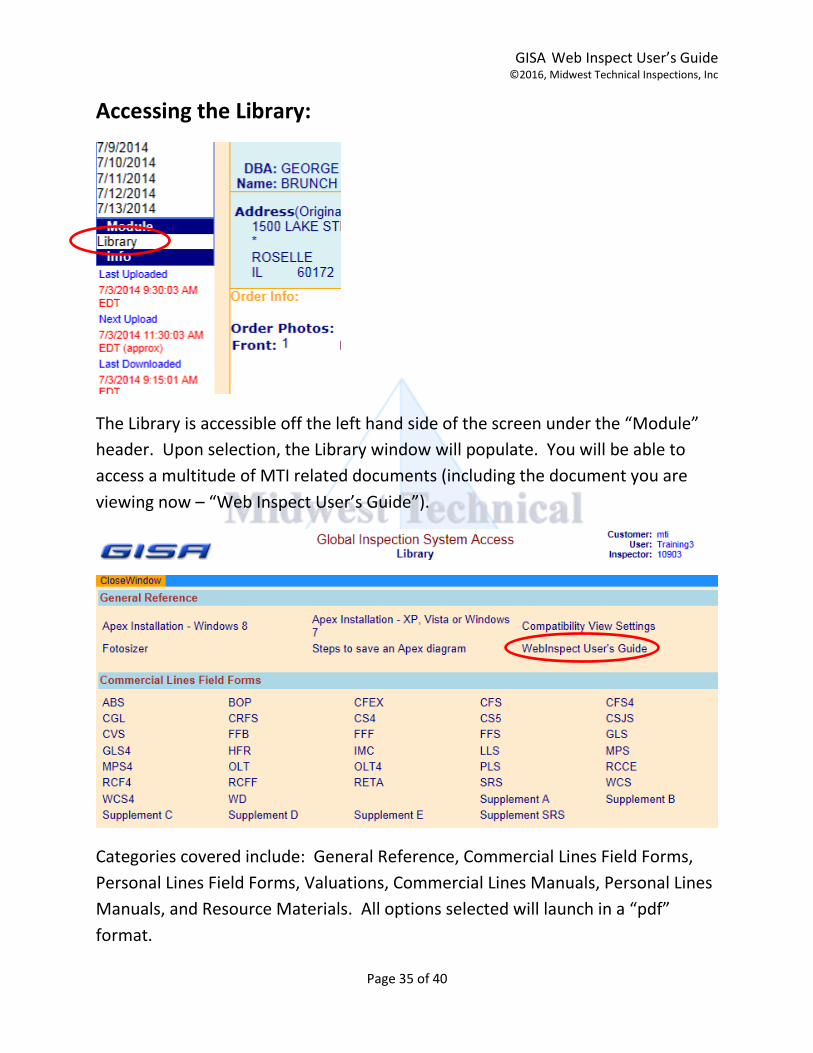
Accessing the Library:
The Library is accessible off the left hand side of the screen under the “Module”
header. Upon selection, the Library window will populate. You will be able to
access a multitude of MTI related documents (including the document you are
viewing now – “Web Inspect User’s Guide”).
Categories covered include: General Reference, Commercial Lines Field Forms,
Personal Lines Field Forms, Valuations, Commercial Lines Manuals, Personal Lines
Manuals, and Resource Materials. All options selected will launch in a “pdf”
format.
GISA Web Inspect User’s Guide ©2016, Midwest Technical Inspections, Inc
Page 36 of 40
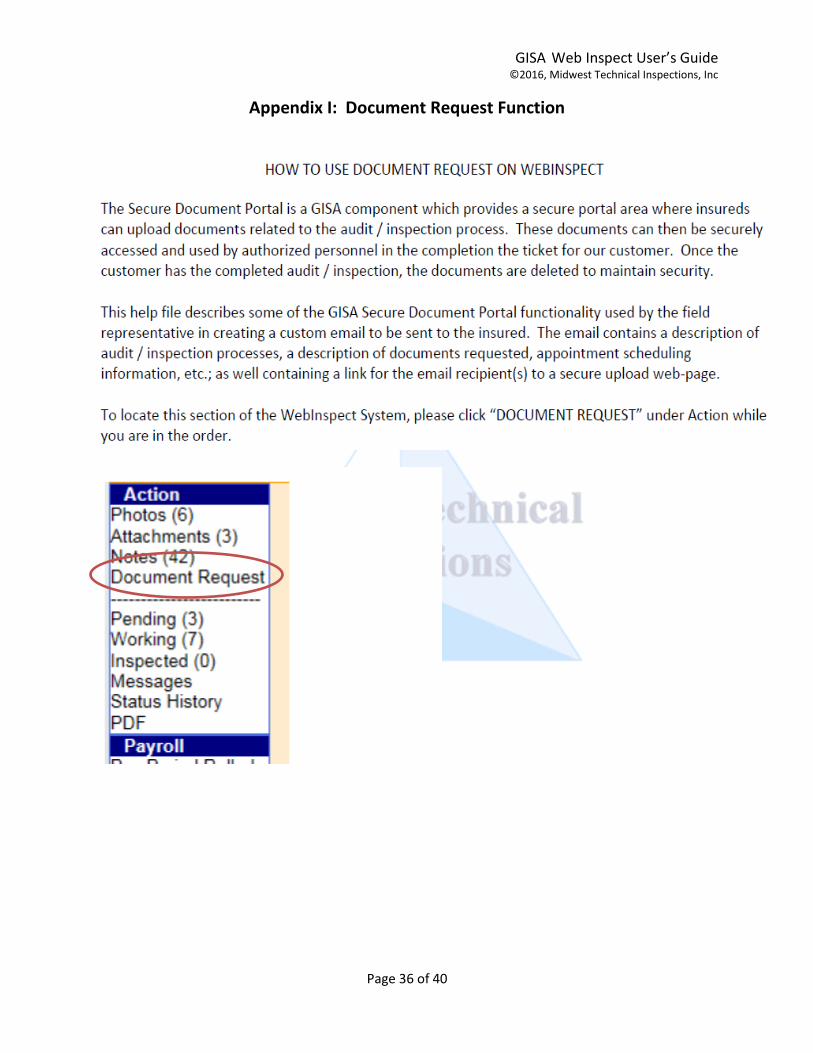
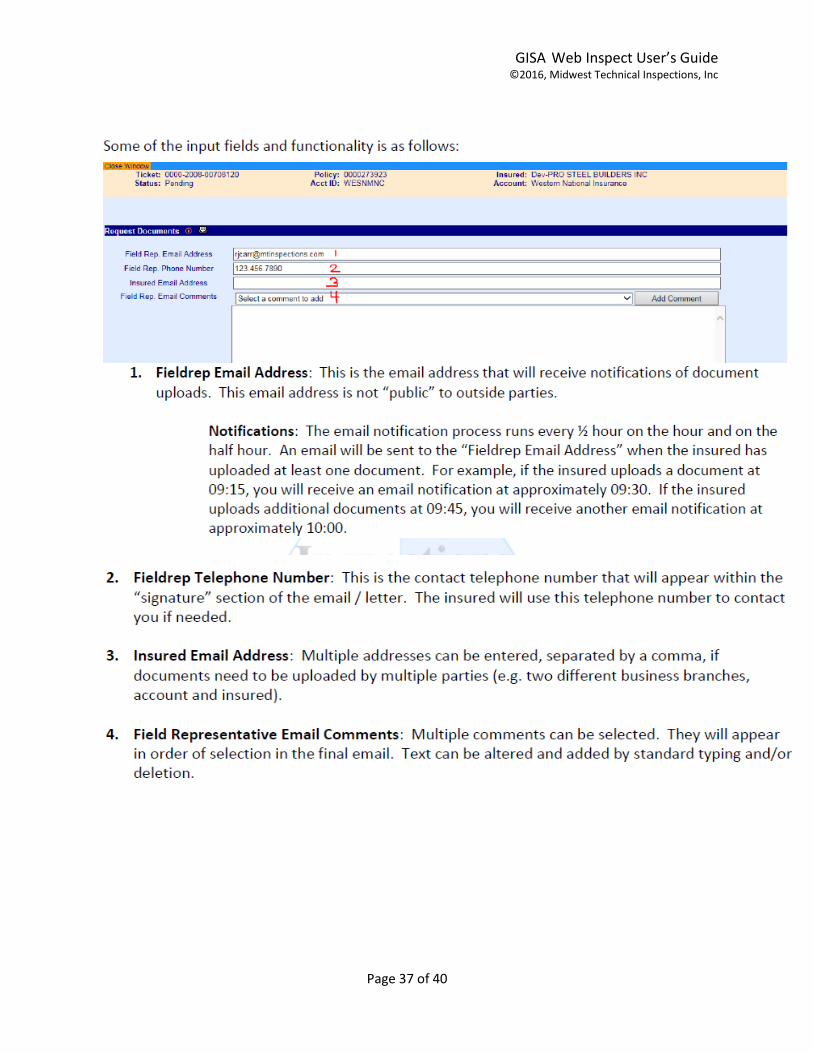
Appendix I: Document Request Function
GISA Web Inspect User’s Guide ©2016, Midwest Technical Inspections, Inc
Page 37 of 40
GISA Web Inspect User’s Guide ©2016, Midwest Technical Inspections, Inc
Page 38 of 40
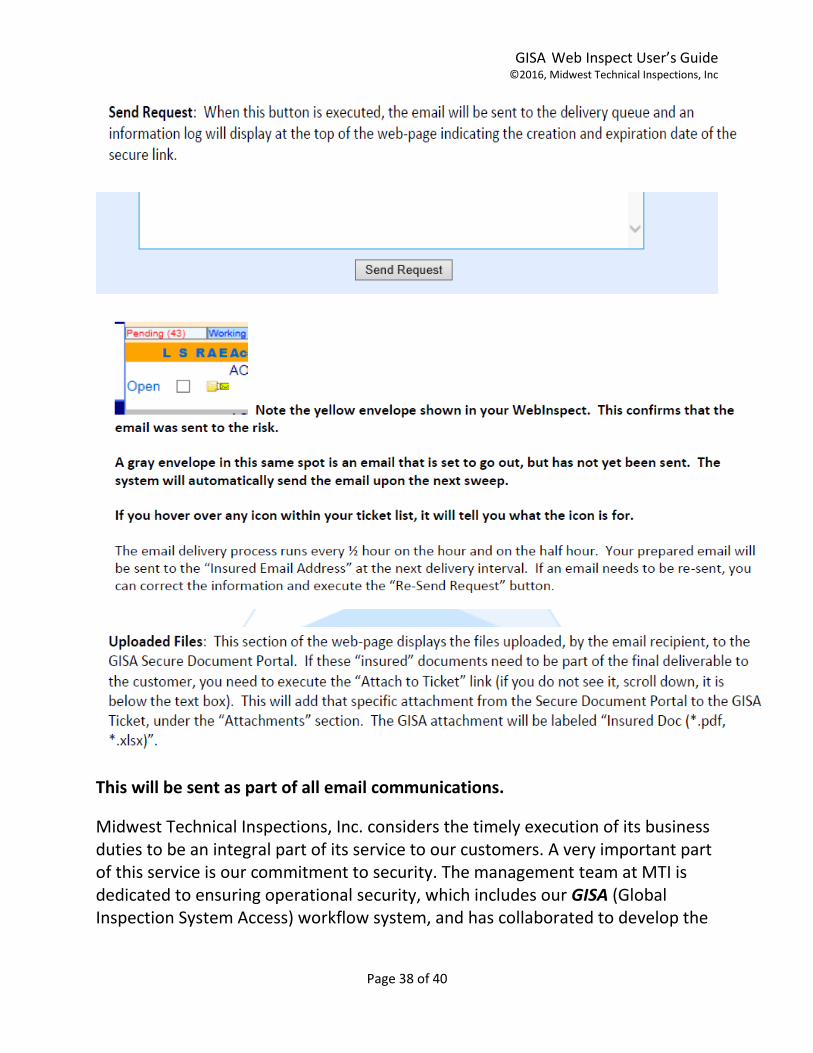
This will be sent as part of all email communications.
Midwest Technical Inspections, Inc. considers the timely execution of its business duties to be an integral part of its service to our customers. A very important part of this service is our commitment to security. The management team at MTI is dedicated to ensuring operational security, which includes our GISA (Global Inspection System Access) workflow system, and has collaborated to develop the
GISA Web Inspect User’s Guide ©2016, Midwest Technical Inspections, Inc
Page 39 of 40
ever-evolving plans necessary to achieve this goal. This reflects our commitment to Quality, Service and You.
Security Brief - Company In brief, our web-site content is protected by a 128-bit encryption key provided by VeriSign, an industry leader in data encryption. MTI utilizes industry-standard firewall protection to prevent unauthorized data access. Within the fire-walled environment, systems are further protected against viruses and spy-ware using the latest detection and prevention software methods. Data access by authorized users is regulated via role-based security so that users are only granted the level of access they need. GISA also has its own robust security module. Included in this module is the mechanism for system access which includes the use of three log-in parameters: an Account Code, User ID and Password. Most systems use only two parameters. The combination of these three parameters used in an encrypted format provides for an optimal security mechanism. MTI’s facilities and server co-location facilities are protected by access control and intruder detection mechanisms, and employees are educated in the importance of restricted access. As with the data environment, physical access within the facility is also restricted according to job function to protect against unauthorized physical access to sensitive areas. All access to our facility requires RFID cards.
Security Brief - GISA Secure Document Portal
Acceptable files include .pdf and .xlsx.
Why? These are the file types deemed “acceptable” for security purposes. Other file types may contain malicious code which might go undetected by our anti-virus scans. We are not implying that you would purposely upload files containing malicious software. Rather, we are accounting for the fact that you may not know if your system and files are compromised with malicious code.
GISA Web Inspect User’s Guide ©2016, Midwest Technical Inspections, Inc
Page 40 of 40
When you upload files, you will have access rights to delete them, but you will not be able to view them.
Why? We do not control or supply your email and we are not your email service provider. Therefore, we do not know if your email and/or email service has been compromised. If your service has been compromised, unknowingly our email to you, which contains the link to our GISA Secure Document Portal, may have been maliciously sent to other unintended, unauthorized recipients. By only providing any link user with the ability to upload and delete, your documents are secure from outside view.
The link to the GISA Secure Document Portal has an expiration date, past which, the link will not work. You will need to contact the field representative, listed on the email, by telephone, to request another link if this situation arises.
Why? Limiting the operational duration of the link is consistent with the above referenced assumption regarding possible email compromises. In addition, our workflow procedures demand consistent progress milestones which might be degraded with “in perpetuity” links.
All uploaded documents, not required by our customer (typically your insurance carrier) to be included in our final report to them, are deleted from our GISA Secure Document Portal servers 30 days after delivery of our report to our customer.
Why? Any documents you upload are treated with the utmost confidentiality they deserve. Authorized personnel within our company are required to view and work with your documents within the scope of the performance of our job duty, but when that job duty is complete, we believe we should not have access to this information. The 30 day duration before deletion allows our customers and us the time, after their receipt of our report, to efficiently make and answer report inquiries based upon your provided documentation.