Embed Size (px)
Citation preview

First Grade, Getting to Know My World 2003 Colorado Unit Writing Project 1
GETTING TO KNOW MY WORLD Grade Level: First Grade Written by: Nancy E. Silengo, Mountain View Core Knowledge School, Canon City, CO Length of Unit: 11 lessons (approximately 16 separate days; one day = 45-60 minutes) I. ABSTRACT
These hands-on lessons are not meant to be taught as a unit of study. In first grade, children study their place in the world around them: self, family, school, community, state, country, continent, and Earth. Each lesson is designed to be interwoven into one or more aspects of this study. Applying the use and knowledge of maps and globes will help them understand their immediate and “big picture” surroundings. You will definitely want to choose additional lessons to reinforce these content ideas. The concepts of spatial sense are mastered through regular review and are used throughout their school years.
II. OVERVIEW
A. Concept Objectives 1. Students will understand how to use maps, globes, and other geographic tools to
acquire, process, and report information from a spatial perspective. [Colorado State Std. Geography 1.1]
2. Students will develop knowledge of Earth to locate people, places, and environments. [Colorado State Std. Geography 1.2]
3. Students will understand the configuration of a town/city within a state, within a country, a continent, the Earth.
B. Content from the Core Knowledge Sequence 1. History and Geography: Geography: Spatial Sense [p. 27]
a. Name your continent, country, state, and community. b. Understand that maps have keys or legends with symbols and their uses. c. Find directions on a map: east, west, north, south. d. Identify major oceans: Pacific, Atlantic, Indian, Arctic. e. Review the seven continents: Asia, Europe, Africa, North America,
South America, Antarctica, Australia. f. Locate: Canada, United States, Mexico, Central America. g. Locate: the Equator, Northern Hemisphere, Southern Hemisphere, North
and South Poles. C. Skill Objectives
1. Students will understand what maps, globes and other geographic tools represent and how they are used. [CSS Geography 1.1]
2. Students will understand and find where North, South, East and West are located on maps and globes utilizing a compass rose. [CSS Geography 1.1]
3. Students will understand that maps contain legends/keys with symbols explaining various features and can explain various symbols. [CSS Geography 1.1]
4. Students will create a model and map of a familiar area. [CSS Geography 1.1] 5. Student will interpret simple unfamiliar maps. [CSS Geography 1.1] 6. Students will name and locate the city, state, country, and continent where they
live. [CSS Geography 1.2] 7. Students can name and locate all four oceans. [CSS Geography 1.2] 8. Students will locate the Equator, the Northern and Southern Hemispheres and the
North and South Poles. [CSS Geography 1.2] 9. Students will locate all the major countries in North America in relation to each
other. [CSS Geography 1.2]

First Grade, Getting to Know My World 2003 Colorado Unit Writing Project 2
III. BACKGROUND KNOWLEDGE A. For Teachers
1. Knowlton, Jack. Maps and Globes 2. Frazee, Bruce and Guardia, William. Helping Your Child With Maps and Globes 3. Jaeggi, Chris. I Know About Maps
B. For Students 1. Students can identify a map and globe plus have simple knowledge of what they
represent and how we use them from Kindergarten. 2. Students will know the seven continents from Kindergarten. 3. Students will know their city and state from Kindergarten. 4. Students can recognize North America and the United States from Kindergarten.
IV. RESOURCES A. I Know About Maps by Chris Jaeggi (Lesson One) B. Helping Your Child with Maps and Globes by Bruce Frazee and William Guardia
(Lesson Ten) C. Monopoly Game board (Lesson Nine) D. Compass (Lesson Nine) E. Globe (all lessons) F. Large world map (all lessons) G. Direction labels (North-South-East-West) posted in the classroom (all lessons)
V. LESSONS Lesson One: What are maps and globes? (45-60 minutes) (use this lesson as an introduction at the beginning of the year) A. Daily Objectives
1. Concept Objective(s) a. Students will understand how to use maps, globes, and other geographic
tools to acquire, process, and report information from a spatial perspective. [Colorado State Std. Geography 1.1]
2. Lesson Content a. Identify major oceans: Pacific, Atlantic, Indian, Arctic. b. Review the seven continents: Asia, Europe, Africa, North America,
South America, Antarctica, Australia. c. Locate: the Equator, Northern Hemisphere, Southern Hemisphere, North
and South Poles. 3. Skill Objective(s)
a. Students will understand what maps, globes and other geographic tools represent and how they are used. [CSS Geography 1.1]
b. Students will locate the Equator, the Northern and Southern Hemispheres and the North and South Poles. [CSS Geography 1.2]
c. Review from Kindergarten. (See Background Knowledge for Students) B. Materials
1. I Know About Maps by Chris Jaeggi 2. Optional – Maps and Globes by Jack Knowlton 3. Large map of the world 4. Globe 5. Optional – individual maps and/or globes 6. Pointer (if necessary) 7. Appendix A – Maps and Globes – one copy per student 8. Pencils
First Grade, Getting to Know My World 2003 Colorado Unit Writing Project 3
C. Key Vocabulary 1. Map – a flat representation or drawing of a place that shows where things are 2. Globe – a sphere that is a model of the Earth
D. Procedures/Activities 1. Tell the children that we are going to be doing a lot of work in First Grade with
maps and globes. 2. Read I Know About Maps. 3. Optional – Read Maps and Globes by Jack Knowlton (pgs. 1-17). 4. If #3 is not available tell the students about globes emphasizing that it is a model
of the Earth which is too big for the classroom. 5. Teacher should have a large classroom map and globe available in a place the
students can reach or can use a pointer. 6. Optional – Pass out individual maps and/or globes. 7. Do activities #8 - #18 as a whole group. Give every student a chance to come to
the front and answer. If individual maps and/or globes are available then all should try to do on their own also. This reviews background knowledge from Kindergarten.
8. On the globe, find some land and tell what color it is. 9. On the map, find an ocean and tell us its name. 10. On the globe, find some water. 11. On the map, find an island. 12. On a globe, find the equator. 13. On the map, find a continent and tell us its name. 14. On the globe, find the United States of America. 15. On the map, find Alaska. 16. On the map, find Hawaii. 17. On the globe, find the North Pole. 18. On the globe, find the South Pole. 19. Repeat #8 - #18 until all students have had a turn. You can change whether they
find it on a map or globe and you could have them find a specific continent or ocean.
20. Activities #5-19 can be repeated on many different days for reinforcement. 21. Pass out Appendix A. 22. Teacher will read the questions and choices and students will complete Appendix
A. E. Assessment/Evaluation
1. Students will participate in map and globe activity. 2. Students will complete Appendix A – Maps and Globes.
Lesson Two: Maps – A Bird’s Eye View (45-60 minutes) (use this lesson as a fun reinforcement activity for mapping) A. Daily Objectives
1. Concept Objective(s) a. Students will understand how to use maps, globes, and other geographic
tools to acquire, process, and report information from a spatial perspective. [Colorado State Std. Geography 1.1]
2. Lesson Content a. Review from Kindergarten (see Background Knowledge for Students)
3. Skill Objective(s) a. Students will understand what maps, globes and other geographic tools
represent and how they are used. [CSS Geography 1.1]
First Grade, Getting to Know My World 2003 Colorado Unit Writing Project 4
b. Students will create a model and map of a familiar area. [CSS Geography 1.1]
B. Materials 1. Large classroom world map 2. Optional – aerial photo 3. 4 ½” x 6” piece of paper – one per student 4. Six common 3-D items (i.e. shoe, small box, model car, ball, etc.) 5. Pencils 6. Appendix B – Bedroom Map
C. Key Vocabulary None
D. Procedures/Activities 1. Explain that maps are flat and are drawn from up above as if the map-maker was
a bird flying over whatever the map represents. 2. Show the classroom world map and explain that to see the world this way, we
would have to be out in space looking down. 3. Optional – pass around an aerial photo taken from an airplane 4. Place the six common 3-D objects on a table. Call the students’ attention to the
fact that we can see the total shape of each item. 5. Now place the six items on the floor and have the students file past looking down
on them. Tell them to notice that they can only see one flat surface of each item. 6. Pass out the 4 ½” x 6” papers. 7. Tell the students to draw the six items as they looked when they were looking
down on them. 8. Circulate and make sure each student has grasped the idea of a map being a flat
drawing of something from above. 9. Now have the students select an item in the room and draw a “bird’s eye view” of
that item. 10. Have the students break into groups of four. Have each student show his/her
drawing and allow the other members of the group to guess what it is. 11. Pass out Appendix B – Bedroom Map. 12. Tell the students that this will be completed for homework. 13. The teacher should demonstrate an example of how her bedroom would look –
making beds and dressers different sizes of rectangles. Tell them to draw it as if they were glued to their ceiling looking down. Emphasize that they are just mapping furniture and not toys, books, etc.
E. Assessment/Evaluation 1. Students will correctly complete Appendix B – Bedroom Map.
Lesson Three: Let’s Learn and Locate Our Oceans and Continents (45-60 minutes) (use this lesson as an introduction and to create a solid learning tool) A. Daily Objectives
1. Concept Objective(s) a. Students will understand how to use maps, globes, and other geographic
tools to acquire, process, and report information from a spatial perspective. [Colorado State Std. Geography 1.1]
b. Students will develop knowledge of Earth to locate people, places and environments. [Colorado State Std. Geography 1.2]
2. Lesson Content a. Identify major oceans: Pacific, Atlantic, Indian, Arctic.

First Grade, Getting to Know My World 2003 Colorado Unit Writing Project 5
b. Review the seven continents: Asia, Europe, Africa, North America, South America, Antarctica, Australia.
3. Skill Objective(s) a. Students will understand what maps, globes and other geographic tools
represent and how they are used. [CSS Geography 1.1] b. Students can name and locate all four oceans and seven continents. [CSS
Geography 1.2] B. Materials
1. Appendix C – World Map of Continents and Oceans – one copy on white tag board per student
2. Overhead copy of Appendix C 3. Overhead and overhead markers 4. Pencils 5. Crayons
C. Key Vocabulary 1. Continent – a large body of land 2. Ocean – the entire body of salt water that covers nearly three-quarters of the
Earth’s surface; any one of the four separate oceans D. Procedures/Activities
1. Share the definitions of a continent and ocean. Make sure the students understand that there really is only one big body of water even though we divide it into four areas and names.
2. Pass out Appendix C – World Map of Continents and Oceans. 3. Have students get out pencils and as a class fill in the names of all seven
continents and four oceans (put Pacific Ocean on both sides of the map). Demonstrate as you go on the overhead.
4. Check each student’s map to make sure labels are correct. 5. Have the students color each continent a different color. 6. Have the students color the oceans blue. 7. Have the students take home to study with a note telling parents that they need to
master this information. Give a due date if appropriate. E. Assessment/Evaluation
1. Students will correctly complete Appendix C.
Lesson Four: Continent and Ocean Windsock (45-60 minutes) (use this as a fun reinforcement activity after other review lessons) A. Daily Objectives
1. Concept Objective(s) a. Students will understand how to use maps, globes, and other geographic
tools to acquire, process, and report information from a spatial perspective. [Colorado State Std. Geography 1.1]
b. Students will develop knowledge of Earth to locate people, places and environments. [Colorado State Std. Geography 1.2]
2. Lesson Content a. Identify major oceans: Pacific, Atlantic, Indian, Arctic. b. Review the seven continents: Asia, Europe, Africa, North America,
South America, Antarctica, Australia. 3. Skill Objective(s)
a. Students will understand what maps, globes and other geographic tools represent and how they are used. [CSS Geography 1.1]

First Grade, Getting to Know My World 2003 Colorado Unit Writing Project 6
b. Students can name and locate all four oceans and seven continents. [CSS Geography 1.2]
B. Materials 1. 12” x 18” sheet of white or light blue construction paper (or poster board) – one
per student 2. 9” x 12” sheet of one color of construction paper (Asia) – four sheets 3. 9” x 6” sheet of construction paper (North America, Europe, Antarctica, Africa)
– 4 sheets each of four different colors 4. 4-1/2” x 6” sheet of construction paper (South America and Australia) – two
sheets each of two more different colors 5. Yarn – 4 sets of 3 – 15” strings 6. 1 1/2” x 12” strip of each of the seven colors of construction paper – four sets of
seven strips 7. Glue 8. Tape 9. Staples 10. One-hole punch 11. Individual and/or large world map (could copy Appendix C for each group)
C. Key Vocabulary 1. Continent – a large body of land 2. Ocean – the entire body of salt water that covers nearly three-quarters of the
Earth’s surface; any one of the four separate oceans D. Procedures/Activities
1. Divide the class into seven groups. Assign each group to be one of the continents.
2. Give each member of each group the appropriate color and size of construction paper.
3. Get out individual maps and/or large world map as a reference. 4. Tell the students to tear the sheet of paper into the shape of their continent. Tell
them to tear off the least amount of paper possible so continent is close to the original size of the sheet.
5. Mount the 12 x 18” paper or poster board where students can reach. 6. When finished tearing, call one child from each group to come on his/her own
and place his/her continent in the appropriate place on a 12 x 18” paper or poster board until one whole map is complete. Repeat until all four maps are finished.
7. Call on various students to point to where each ocean is and the teacher can fill in the name. Continue until all oceans are labeled on all four maps.
8. Pass out 12” strips of construction paper. 9. Instruct students to write the name of the continent that matches the color of the
strip of paper they received. 10. Teacher will fold the maps into a cylinder and tape closed. 11. Teacher will staple the strips to the bottom edge of each cylinder (seven different
colored strips per cylinder). 12. Teacher will punch three evenly-spaced holes near the top edge of each cylinder. 13. Teacher will tie a string of yarn through each hole then join them together in a
knot so the windsock can be suspended from the ceiling. 14. These windsocks make great classroom or hallway displays.
E. Assessment/Evaluation 1. Students will participate in their group and complete a continent and ocean
windsock.

First Grade, Getting to Know My World 2003 Colorado Unit Writing Project 7
Lesson Five: The Equator divides the Northern and Southern Hemispheres (45-60 minutes) (use this lesson as an introduction and to create a solid learning tool) A. Daily Objectives
1. Concept Objective(s) a. Students will understand how to use maps, globes, and other geographic
tools to acquire, process, and report information from a spatial perspective. [Colorado State Std. Geography 1.1]
2. Lesson Content a. Locate: the Equator, Northern Hemisphere, Southern Hemisphere, North
and South Poles. 3. Skill Objective(s)
a. Students will locate the Equator, the Northern and Southern Hemispheres and the North and South Poles. [CSS Geography 1.2]
B. Materials 1. Globe 2. Large world map 3. Appendix D – The Equator divides the Northern and Southern Hemispheres –
one copy per student run on tag board 4. Appendix D – one copy per student run on a variety of colored construction
paper (or run on colors that fit the season of the year) 5. Scissors 6. Glue 7. One or more round fruit (orange or grapefruit) or a small head of lettuce or
cabbage 8. Knife 9. Markers 10. Small foil stars or small stickers – one per student
C. Key Vocabulary 1. Equator – an imaginary circle around the middle of the Earth halfway between
the North and South Poles 2. Hemispheres – half of the Earth; horizontally divided form the northern and
southern hemispheres; vertically divided form the eastern and western hemispheres
D. Procedures/Activities 1. Explain to the children that sometimes we imaginarily divide the Earth into
sections to better describe or locate a certain place. 2. Point out the equator on both the globe and the world map. Ask how this divides
the world (in half). 3. Take a round fruit(s) or head of lettuce(s) and cut it horizontally in half. Explain
that the cut line is like the imaginary line of the equator. Each half is what is known as a hemisphere - “hemi” means half and a “sphere” is a round object.
4. Pass around the fruit(s) so students can see up close how the halves fit together. 5. Pass out the tag board copy of Appendix D and scissors. 6. Have the students cut out the circle (not on the dotted line) and the rectangular
piece on the bottom. 7. Pass out the colored copies of Appendix D and have the students cut out the
circle and also cut in half on the dotted line. 8. Have students exchange one half with a friend so that everyone has two different
colored halves. 9. Pass out the glue and have the children glue their two colored halves on to the tag
board circle making sure the halves meet at the dotted line.

First Grade, Getting to Know My World 2003 Colorado Unit Writing Project 8
10. Now glue the rectangular piece across where the two colors meet to form the equator.
11. Have the students get out a marker of their choice and label the EQUATOR. Write NORTH on the top half and SOUTH on the bottom half.
12. Discuss where North America is and decide as a group about where the United States and your state would be. Use the large world map to help.
13. Pass out stars and have each student place the star on the approximate place where he/she lives. Discuss which hemisphere they live in.
14. Review the continents and oceans one by one having the students name the hemisphere(s) that they are in. Repeat until all students have had a turn.
15. Finished activity can be taken home or hung to display. E. Assessment/Evaluation
1. Students will correctly complete Appendix D.
Lesson Six: Visit the North and South Poles (45-60 minutes) (use this lesson as an introduction and to create a solid learning tool) A. Daily Objectives
1. Concept Objective(s) a. Students will understand how to use maps, globes, and other geographic
tools to acquire, process, and report information from a spatial perspective. [Colorado State Std. Geography 1.1]
2. Lesson Content a. Locate: the Equator, Northern Hemisphere, Southern Hemisphere, North
and South Poles. 3. Skill Objective(s)
a. Students will locate the Equator, the Northern and Southern Hemispheres and the North and South Poles. [CSS Geography 1.2]
B. Materials 1. Globe 2. Large world map 3. Appendix E – North and South Poles – one copy per student run on tag board 4. Scissors 5. Glue 6. Markers 7. An orange 8. A brand new pencil 9. Knife
C. Key Vocabulary 1. Axis – the imaginary line that runs through the center of the Earth; the Earth
rotates on its axis 2. North Pole – the northern end of the Earth’s axis 3. South Pole – the southern end of the Earth’s axis
D. Procedures/Activities 1. Set out the globe and show the students where the imaginary axis runs through
the center of the Earth. Explain that in space the Earth spins or rotates in a slightly tilted manner on its axis. Spin the globe to demonstrate.
2. Show on the globe that the northern or top end of the axis comes out on top of the Earth in the Arctic Ocean. The southern or bottom end of the axis comes out in Antarctica.
3. Take an orange and show the navel at the bottom and the stem piece at the top. Tell the students that today this orange will represent the Earth.
First Grade, Getting to Know My World 2003 Colorado Unit Writing Project 9
4. Take a new unsharpened pencil and push it through the orange from the stem to the navel. (You may need to cut away some of the skin at each end.)
5. The pencil represents the axis going through the Earth. The eraser end is the North Pole and the unsharpened end is the South Pole.
6. Pass the orange around so students can see up close how the axis goes through the Earth.
7. Show the kids the world map and how the poles are not as easy to find on a flat map.
8. Pass out Appendix E. 9. Have the students cut out the circle (not the dotted line), the strip on the bottom,
and the two rectangular labels. 10. Pass out the glue and markers. 11. Have the children trace the dotted line with a marker and label it AXIS. 12. Have them glue the NORTH POLE label at the top of the axis and the SOUTH
POLE label at the bottom of the axis. 13. Have the students turn their circle over and glue the strip on the back so that each
end sticks out at the ends of the dotted lines. 14. Use a marker to write AXIS on the strip. Tell the students that it is glued to the
back to remind them that the axis runs inside the Earth. 15. Finished activity can be taken home or saved for other class discussions.
E. Assessment/Evaluation 1. Students will correctly complete Appendix E.
Lesson Seven: A Closer Look at North America (45-60 minutes) (use this lesson when you are covering the country and continent you live on) A. Daily Objectives
1. Concept Objective(s) a. Students will understand how to use maps, globes, and other geographic
tools to acquire, process, and report information from a spatial perspective. [Colorado State Std. Geography 1.1]
b. Students will develop knowledge of Earth to locate people, places and environments. [Colorado State Std. Geography 1.2]
c. Students will understand the configuration of a town/city within a state, within a country, a continent, the Earth. [Colorado State Std. Geography 4.5]
2. Lesson Content a. Locate: Canada, United States, Mexico, Central America. b. Name your continent, country, State and community.
3. Skill Objective(s) a. Students will locate all major countries in North America in relation to
each other. [CSS Geography 1.2] b. Students will name and locate the city, state, country, and continent
where they live. [CSS Geography 1.2] B. Materials
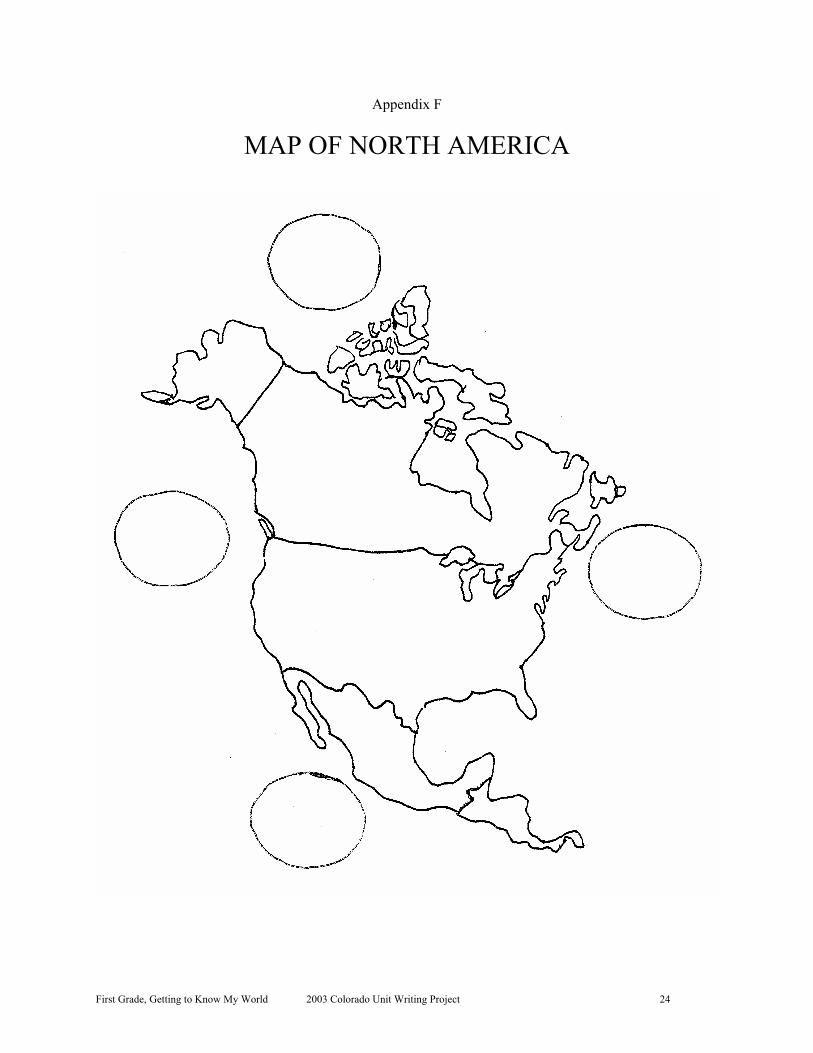
1. Appendix F – Map of North America – Enlarge on copier if possible and then run on 9” x 12” manila construction paper – one copy per student
2. A colored overhead copy of Appendix F 3. Overhead and overhead markers 4. Globe 5. Large world map 6. Small paper plate – one per student

First Grade, Getting to Know My World 2003 Colorado Unit Writing Project 10
7. Four colors of tempera paint 8. Paint brush – one per student 9. Pencils 10. Foil stars or stickers – one per student
C. Procedures/Activities 1. Ask the students what continent they live on. 2. Have one student find North America on the globe and another find it on the
large world map. 3. Now ask the students what country they live in. 4. Have one student find the United States on the globe and another find it on the
large world map. 5. Pass out Appendix F – Map of North America – and display the overhead copy. 6. Explain that North America is made up of many countries. Two countries are
very large – Canada and the United States of America. A third country is Mexico and then Central America is made up of many small countries.
7. Show that the order from the North down is Canada, United States, Mexico and Central America.
8. Tell the students that the countries that make up Central America are named that because they are in the “center” connecting North America to South America.
9. Pass out paper plates with small circles of four different colors of tempera paint. 10. Pass out paint brushes. 11. Make sure the students understand where the divisions between the countries are
by calling their attention to the colors on the overhead copy. 12. Allow time for the children to paint each of the four sections a separate color. 13. Collect to dry and have the children throw away the plates and clean the brushes. 14. After the paint is dry, each student should write in pencil a “C” on Canada, a
“USA” on both the lower 48 and Alaska, an “M” on Mexico, and a “CA” on Central America.
15. Write the directions of North, South, East and West in the ovals. 16. Add the names of the Arctic, Pacific and Atlantic oceans. 17. Look on large world map and have the students decide where their state is and
place a star or sticker on Appendix F approximately where the student lives. D. Assessment/Evaluation
1. Students will correctly complete Appendix F.
Lesson Eight: Design a Classroom Model and Map (THREE DAYS – 45-60 minutes/day) (use this lesson when you are covering the “school” the students go to) A. Daily Objectives
1. Concept Objective(s) a. Students will understand how to use maps, globes, and other geographic
tools to acquire, process, and report information from a spatial perspective. [Colorado State Std. Geography 1.1]
2. Lesson Content a. Review from Kindergarten. (See Background Knowledge for Students) b. Understand that maps have keys or legends with symbols and their uses. c. Find directions on a map: east, west, north, south.
3. Skill Objective(s) a. Students will understand what maps, globes and other geographic tools
represent and how they are used. [CSS Geography 1.1]

First Grade, Getting to Know My World 2003 Colorado Unit Writing Project 11
b. Students will understand and find where North, South, East and West are located on maps and globes utilizing a compass rose. [CSS Geography 1.1]
c. Students will understand that maps contain legends/keys with symbols explaining various features and can explain various symbols. [CSS Geography 1.1]
d. Students will create a model and map of a familiar area. [CSS Geography 1.1]
B. Materials DAY ONE – BUILD CLASSROOM MODELS 1. Three adult or older student volunteers 2. Four small tables (approx. 3’ x 3’) to build models on 3. A huge variety of small items that the students can use to represent furniture in
the classroom (i.e. popsicle sticks, poker chips, math counting items, paper clips, linking cubes, blocks, pattern blocks, coins, etc.)
4. A real car (outside) 5. A model or toy car 6. A picture of a car DAY TWO – CHANGE A MODEL INTO A MAP 7. One large poster board 8. A flat representation for every type of furniture in the classroom model – get
stickers, construction paper cut into different sizes of circles, rectangles, triangles or whatever else you have (i.e. 26 stickers to represent student desks, six rectangles to represent bookshelves, etc.)
9. Glue stick or glue 10. Tape DAY THREE – ADD KEY AND DIRECTIONS TO A MAP 11. A compass rose to use on the map or labels for North, South, East and West 12. One of each of the flat stickers and/or colored construction paper shapes for
every furniture type to use in making a key/legend 13. Glue 14. Dark colored pen 15. Optional – a 4” x 6” rectangle of poster board or an index card 16. Chalkboard and chalk 17. One other teacher, parent or older student 18. Optional – many road maps, simple maps with keys, or atlases
C. Key Vocabulary 1. Model – a small representation of something larger 2. Map – a flat representation or drawing of a place that shows where things are 3. Compass Rose – a star or flower-shaped symbol that indicates the directions of
North, South, East and West 4. Map Key/Legend – a listing which contains symbols, meanings of colors and
other information about a map 5. Symbols – something that stands for or represents real things
D. Procedures/Activities DAY ONE – BUILD CLASSROOM MODELS 1. Before class, ask three adults or older students to help with this project. Explain
to them that they will be overseeing a student group make a classroom model using small items to represent furniture.
2. Before class, divide the small items you have chosen so that each table group will have different items than the other groups.

First Grade, Getting to Know My World 2003 Colorado Unit Writing Project 12
3. Go outside and show the students a real car. Notice the size and that it would be too big to carry around or bring into the classroom to study.
4. Now show the students a model or toy car. Explain that this is a model or small representation of a much larger object.
5. Go back into the classroom and divide the students into four groups with a leader in each to oversee and guide the construction of a class model.
6. Explain that we are creating a model of the furniture only in the classroom – not people, pictures and small items.
7. Make sure they understand that the same item should be used to represent all furniture of that type (pennies for all student desks, tan popsicle sticks for all bookshelves, etc.)
8. Explain that they should decide which sides of the table are the front of the room, sides and back of the room.
9. Remind them to pay special attention to how the room is arranged and how many of each item are in the room.
10. Allow approximately 20 minutes for the groups to create their model classroom. 11. Have each group select a spokesperson(s) – this could be the older helper, a
single student or every person gets to share one or two things. 12. The spokesperson(s) should share with the class what they used to represent the
different furniture items in the classroom and why. Continue until each group has shared.
13. Tell the students that the teacher is going to take some items from each group and combine them into one classroom model to stay up for several days.
14. Encourage the students to bring in models and/or flat representations of larger things to share in the next class.
15. Before the next class, the teacher should take some items from each group and combine them into a single classroom model to use for Day Two.
DAY TWO – CHANGE A MODEL INTO A MAP 16. Before class have all the stickers and construction paper shapes cut and counted
out so that you have a flat representation for every different furniture type on the combined classroom model.
17. Ask any child who brought in a model and/or flat representation of larger things to share these with the class.
18. Explain to the children that the classroom is too big to take with us and study about the room. During the last class, we made a miniature model of our classroom and now at a glance we can see all the furniture. Review what each small item represents by asking a variety of students to point and describe.
19. Hang the poster board in a place that is visible to all students and still where the teacher can reach it.
20. Pick which side of the poster board represents the front of the room. Pick a furniture item - like student desks. Place the matching flat stickers on the poster board in the same arrangement as the classroom and as the model.
21. Continue this process one furniture type at a time until you have put a sticker or construction paper shape on the poster board for every item in the classroom and model. This will begin a student map of the classroom.
22. Ask the students to share what is easier about the classroom model and what is easier about the classroom map if you were studying the classroom arrangement.
23. Tell the students that during the next class we will add some final touches to let people who have not been in our classroom better understand our map.
DAY THREE – ADD KEY AND DIRECTIONS TO A MAP 24. Have the classroom map displayed so all can see and the teacher can reach it.

First Grade, Getting to Know My World 2003 Colorado Unit Writing Project 13
25. Have the children define and give examples of models and maps. 26. Explain that there is information that can be put on a map so that anyone can
understand what the map is describing. We use “symbols” to tell others what different things on a map stand for.
27. Tell the children that all maps tell us where something is by the directions of North, South, East, and West.
28. Glue the compass rose or the N-S-E-W direction labels onto the classroom map. Explain that this tells what direction the class faces and where it is positioned. The compass rose is a star or flower-shaped symbol you can find on maps to tell direction. Usually on maps of the Earth, North is at the top but it does not have to be.
29. If there is not enough room on the classroom map poster board for the key, then make the key on the 4” x 6” poster board or index card.
30. Remind the class that we chose stickers and colored construction paper shapes to represent the different furniture items. We know what each is because we all created the map and we are in the classroom and can see it. What if we showed our map to our parents at home? Would they understand it without an explanation?
31. Today we are going to add a “key” or “legend” to our map. Write these two words on the chalkboard. Write Key/Legend on the map or card.
32. Call on a student to choose one of the furniture items on the map. Place that symbol on the key and write the name of the furniture piece next to it. (i.e. if student desks are blue circle stickers on the map then place a blue circle sticker on the Key and label it “Student Desks”.)
33. Continue repeating procedure #32 until all furniture items have been chosen and added to the key. (If you are short on time, the symbols can already be glued on ahead of time and you can just fill in the description during class.)
34. Explain that now other people should be able to know what the map is all about. 35. Take your map to an outside person or invite them to the classroom and show the
students that any person can “read” the map we created by noticing the symbols. 36. Have the children ask the outside person several questions like “Do you know
what this is a map of?” or “What do the red squares represent?” 37. If available, have some road maps, simple maps with keys or atlases for the
students to look at and see what they can learn about each map from the key/legend provided.
38. Close with a general review of the Key Vocabulary asking the students to site examples of each.
E. Assessment/Evaluation 1. Students will participate in the making of the classroom model and map.
Lesson Nine: Learning about Directions (45-60 minutes) (use this lesson at any time to give practice in finding directions) A. Daily Objectives
1. Concept Objective(s) a. Students will understand how to use maps, globes, and other geographic
tools to acquire, process, and report information from a spatial perspective. [Colorado State Std. Geography 1.1]
2. Lesson Content a. Find directions on a map: east, west, north, south.

First Grade, Getting to Know My World 2003 Colorado Unit Writing Project 14
3. Skill Objective(s) a. Students will understand and find where North, South, East and West are
located on maps and globes utilizing a compass rose. [CSS Geography 1.1]
B. Materials 1. Compass 2. Several maps with different styles of compass roses 3. Monopoly Board(s) 4. Appendix G – Finding Directions – one copy per student 5. Pencils 6. Toy airplane or rocket
C. Key Vocabulary 1. Compass – an instrument for showing directions, consisting of a needle that
points to the north magnetic pole, which is near the North Pole 2. Compass Rose – a star or flower-shaped symbol that indicates the directions of
North, South, East and West D. Procedures/Activities
1. Define for the students compass rose and compass. Show them a real life example of each.
2. Explain that once a person knows where North is, they can easily figure out the other directions because South is opposite of North, East is to the right and West is to the left.
3. Have all the students stand up with their feet together and their arms spread out horizontally from their shoulders. Tell them to pretend they are a compass rose – their head is north, their feet are south, their right hand is east and their left hand is west.
4. The teacher and/or a student should call out the name of one of the directions. Have the students shake their head for north, stamp their feet for south, and wave the appropriate hand for east and west.
5. Have the students sit down and pass out Appendix G – Finding Directions. 6. Show them the drawings of the compass and compass rose and have them share
ideas of when you would use each. 7. Divide the class into three groups. 8. Give one group the real compass to look at and discuss. 9. Give one group a variety of maps and have them locate the different styles of
compass roses on each. 10. Have one group use the Monopoly Board to answer the eight questions on
Appendix G. 11. Rotate the groups as each group finishes the questions until all groups have
participated in each activity. 12. If your desks are not in rows, go to a place where the students can sit down in
rows. (i.e. five children across and five children down for a class of 25) 13. Get out a toy airplane or rocket and explain that the pilot must follow the
teacher’s directions to fly over the students’ heads. Tell the students which way is north.
14. Hand the airplane or rocket to one student and then give a direction like “Fly south over three people.” The student with the airplane will pass the plane overhead in direction of south to three people. Continue with similar directions until every student has “flown” the plane at least once.
15. This game can be repeated any day you have a few minutes to reinforce directions.
First Grade, Getting to Know My World 2003 Colorado Unit Writing Project 15
E. Assessment/Evaluation 1. Students will correctly complete Appendix G. 2. Students will participate in the airplane direction game.
Lesson Ten: Understanding Symbols, Keys and Legends (four 30 minute lessons or combine) (use these lessons over four consecutive days anytime after Lesson One) A. Daily Objectives
1. Concept Objective(s) a. Students will understand how to use maps, globes, and other geographic
tools to acquire, process, and report information from a spatial perspective. [Colorado State Std. Geography 1.1]
2. Lesson Content a. Understand that maps have keys or legends with symbols and their uses.
3. Skill Objective(s) a. Students will understand what maps, globes and other geographic tools
represent and how they are used. [CSS Geography 1.1] b. Students will understand that maps contain legends/keys with symbols
explaining various features and can explain various symbols. [CSS Geography 1.1]
c. Students will interpret simple unfamiliar maps. [CSS Geography 1.1] B. Materials
1. Helping Your Child with Maps and Globes by Bruce Frazee and William Guardia [pgs. 12-19] – one copy per student of pgs. 13, 15, and 19 – one overhead copy of pg. 17 – one teacher copy of pgs. 12, 14, 16 and 18
2. Overhead projector and markers 3. Pencils 4. Crayons or colored pencils
C. Key Vocabulary 1. Symbols – something that stands for or represents real things 2. Map Key/Legend – a listing which contains symbols, meanings of colors and
other information about a map D. Procedures/Activities
1. Start with pgs. 12 and 13. The detailed procedures for this lesson are listed on the teacher page.
2. Follow the teacher procedures. 3. Pass out the accompanying student page and give the students the directions. 4. Have the students complete the student page. 5. Repeat these procedures for pgs. 14 - 15, 16 - 17, and 18 – 19.
E. Assessment/Evaluation 1. Students will correctly complete student pages 13, 15, and 19 from Helping Your
Child with Maps and Globes.
Lesson Eleven: Our place in the world? (45-60 minutes) (use this lesson close to the end of your work on Spatial Sense and study of community) A. Daily Objectives
1. Concept Objective(s) a. Students will understand the configuration of a town/city within a state,
within a country, a continent, the Earth. [Colorado State Std. Geography 4.5]
2. Lesson Content a. Name your continent, country, state and community.

First Grade, Getting to Know My World 2003 Colorado Unit Writing Project 16
3. Skill Objective(s) a. Students will name and locate the city, state, country, and continent
where they live. [CSS Geography 1.2] B. Materials
1. 9” x 5 ½” blue construction paper rectangle – one per student 2. 6” x 4 ½” green construction paper rectangle – one per student 3. 4 ½” x 3 ¼” red construction paper rectangle – one per student 4. 3” x 2 ½” yellow construction paper rectangle – one per student 5. 2” x 1 ½” orange construction paper rectangle – one per student 6. Small smiley face dot sticker – one per student 7. Glue or glue sticks 8. Markers 9. Appendix H – Our Place in the World – one teacher copy 10. Chalk and chalkboard
C. Key Vocabulary 1. Earth – a huge sphere comprised of land and water masses 2. Continent – large bodies of land 3. Country – an area of land that has boundaries and a government; a nation 4. State – a group of people living in a unit that is part of a larger government 5. City – a large area where many people live and work
D. Procedures/Activities 1. Put together one each of items #1 through #6 on the materials list into a packet
per student or pass out one item at a time to each student. 2. Tell them that each item represents how we each fit in the world. Review the
definitions in key vocabulary and have the students name where they live for each.
3. Take the small orange rectangle and put the small smiley sticker in one corner. 4. Tell the students that this represents them in their city. Ask “What is the name of
your city?” 5. Glue the orange rectangle to the yellow one (see Appendix H) and ask “What is
the name of your state?” 6. Glue the yellow rectangle to the red one (see Appendix H) and ask “What is the
name of your country?” 7. Glue the red rectangle to the green one (see Appendix H) and ask “What is the
name of your continent?” 8. Finally, glue the green rectangle to the blue one (see Appendix H) and ask “What
is the name of your planet?” 9. Have the students get out a dark-colored marker. 10. Label each rectangle as follows and write the words on the chalkboard for them
to copy: a. Orange-City Yellow-State Red-Country Green-Continent Blue-
Earth 11. Have the students divide into small groups and practice naming their own city,
state, country and continent. 12. Have the students put their name on the back. Collect and keep for final
assessments in the Culminating Activity. E. Assessment/Evaluation
1. Students will correctly complete the tool shown in Appendix H.

First Grade, Getting to Know My World 2003 Colorado Unit Writing Project 17
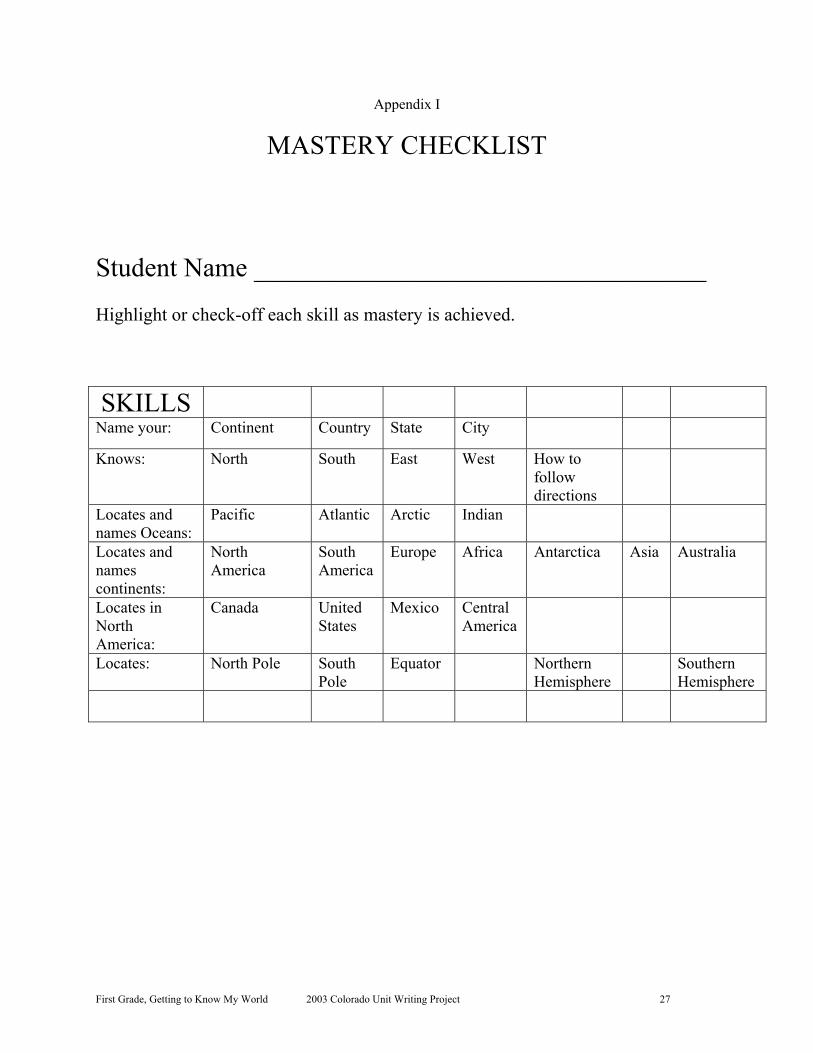
VI. CULMINATING ACTIVITY A. Spatial Sense has many skills that will be mastered over a period of time with much
review and practice. All skills should be mastered before the end of first grade but early mastery will help in the deeper understanding of other Core Knowledge Content. Included in this culminating activity are all the tools necessary to completely evaluate a student’s mastery of all skills. Teacher discretion will be used as to when to assess each child. Record mastery for each student on a copy of Appendix I. 1. Mastery Tool #1 – Take the tool created in Lesson Eleven (see Appendix H) and
have each student name their continent, country, state, and city. 2. Mastery Tool #2 – Use a copy of Appendix C or any world map with no labels
and have student name and point to each continent and ocean. 3. Mastery Tool #3 – Use the colored-in copy of Appendix F (from Lesson Seven)
and ask each student to point to Canada, United States, Mexico and Central America as you name them in random order. Then have the student name each of the four directions that would be printed in each oval.
4. Mastery Tool #4 – Using a globe, have the student point to the equator, North Pole, South Pole, Northern Hemisphere and Southern Hemisphere.
5. Mastery Tool #5 – Make a copy for each student of Appendix J – Direction Grid. Give the directions and check that each student colored in the correct space. You can vary the directions if you need to retest any student.
VII. HANDOUTS/WORKSHEETS
A. Appendix A: Maps and Globes B. Appendix B: Bedroom Map C. Appendix C: World Map of Continents and Oceans D. Appendix D: The Equator divides the Northern and Southern Hemispheres E. Appendix E: North and South Poles F. Appendix F: Map of North America G. Appendix G: Finding Directions H. Appendix H: Our Place in the World I. Appendix I: Mastery Checklist J. Appendix J: Direction Grid
VIII. BIBLIOGRAPHY
A. Broekel, Ray. A New True Book – Maps and Globes. Chicago, IL: Childrens Press, 1983. ISBN 0-516-01695-4.
B. Carratello, John and Patty. Beginning Map Skills. Huntington Beach, CA: Teacher Created Materials, Inc., 1990. ISBN 1-55734-167-2.
C. Endsley, Pat Tanabe and others. Families and Others – Map Skillsheets. Glenview, IL: Scott, Foresman and Co., 1988. ISBN 0-673-43178-9.
D. Frazee, Bruce and Guardia, William. Helping Your Child With Maps and Globes. Glenview, IL: GoodYearBooks, 1994. ISBN 0-673-36131-4.
E. Jaeggi, Chris. I Know About Maps. New York, New York: Rand McNally and Co., 1995. ISBN 0-528-83736-2.
F. Knowlton, Jack. Maps and Globes. New York, New York: HarperCollins Publishers, 1985. ISBN 0-06-446049-5.
G. Map Skills - The World. St. Louis, MO: Milliken Publishing Co., 1994. ISBN 1-55863-126-7.
H. Moore, Jo Ellen. Beginning Map Skills. Monterey, CA: Evan-Moor Corp., 1995. ISBN 1-55799-528-1.

First Grade, Getting to Know My World 2003 Colorado Unit Writing Project 18
I. Moore, Jo Ellen and Evans, Joy. Beginning Geography – How To Use a Map. Monterey, CA: Evan-Moor Corp., 1991. ISBN 1-55799-219-3.
J. Moore, Jo Ellen and Shipman, Gary. Beginning Geography – Land Forms and Bodies of Water. Monterey, CA: Evan-Moor Corp., 1993. ISBN 1-55799-253-3.
K. Moore, Jo Ellen and Shipman, Gary. Beginning Geography – Continents and Oceans. Monterey, CA: Evan-Moor Corp., 1993. ISBN 1-55799-254-1
L. Taylor, Barbara. Maps and Mapping. New York, New York: Larousse Kingfisher Chambers Inc., 1993. ISBN1-85697-628-9.

First Grade, Getting to Know My World 2003 Colorado Unit Writing Project 19
Appendix A
MAPS AND GLOBES
FIND THE WORD IN THE BOX THAT BEST COMPLETES THE SENTENCE. WRITE ITS LETTER IN THE BLANK.
A. Earth B. flat C. model D. globe E. map F. round
1. The Earth is ________ like a big ball. 2. A ________ is a model of the Earth. 3. A ________ is a drawing of a place. 4. A ________ is a small copy of something that is bigger. 5. The _______ is made up of land and water. 6. Maps are _________.

First Grade, Getting to Know My World 2003 Colorado Unit Writing Project 20
Appendix B
BEDROOM MAP
PRETEND YOU ARE ON THE CEILING OF YOUR BEDROOM LOOKING DOWN. DRAW A MAP OF THE FURNITURE ONLY.

First Grade, Getting to Know My World 2003 Colorado Unit Writing Project 21
Appendix C

First Grade, Getting to Know My World 2003 Colorado Unit Writing Project 22
Appendix D
THE EQUATOR DIVIDES THE NORTHERN AND SOUTHERN HEMISPHERES

First Grade, Getting to Know My World 2003 Colorado Unit Writing Project 23
Appendix E
NORTH AND SOUTH POLES
First Grade, Getting to Know My World 2003 Colorado Unit Writing Project 24
Appendix F
MAP OF NORTH AMERICA

First Grade, Getting to Know My World 2003 Colorado Unit Writing Project 25
Appendix G
FINDING DIRECTIONS
THIS IS A COMPASS. THIS IS A COMPASS ROSE. IT IS HELD IN YOUR HAND. IT IS FOUND ON A MAP.
MONOPOLY BOARD QUESTIONS Answer using North, South, East, or West. 1. The space for Reading Railroad is _________________ of GO. 2. The space for Electric Company is _________________ of the jail. 3. The space with the ring on it is _________________ of Short Line railroad. 4. Water Works is ________________ of B. & O. Railroad. 5. Free Parking is ________________ of B. & O. Railroad. 6. Boardwalk is ________________ of Park Place. 7. Free Parking is ________________ of Electric Company. 8. Income Tax is ________________ of Reading Railroad.

First Grade, Getting to Know My World 2003 Colorado Unit Writing Project 26
Appendix H
OUR PLACE IN THE WORLD
First Grade, Getting to Know My World 2003 Colorado Unit Writing Project 27
Appendix I
MASTERY CHECKLIST
Student Name __________________________________
Highlight or check-off each skill as mastery is achieved.
SKILLS Name your: Continent Country State City Knows: North South East West How to
follow directions
Locates and names Oceans:
Pacific Atlantic Arctic Indian Locates and names continents:
North America
South America
Europe Africa Antarctica Asia Australia
Locates in North America:
Canada United States
Mexico Central America
Locates: North Pole South Pole
Equator Northern Hemisphere Southern
Hemisphere

First Grade, Getting to Know My World 2003 Colorado Unit Writing Project 28
Appendix J
DIRECTION GRID
Student Name_______________________________
- N - START Place your finger on the start square. Move your finger 3 spaces south. Move your finger 6 spaces east. Move your finger 2 spaces south. Move your finger 3 spaces west. Move your finger 1 space north. Color that square.