Embed Size (px)
Citation preview

Getting started with your®
Getting Started with Silhouette Alta®1
Connecting Your Silhouette Alta®
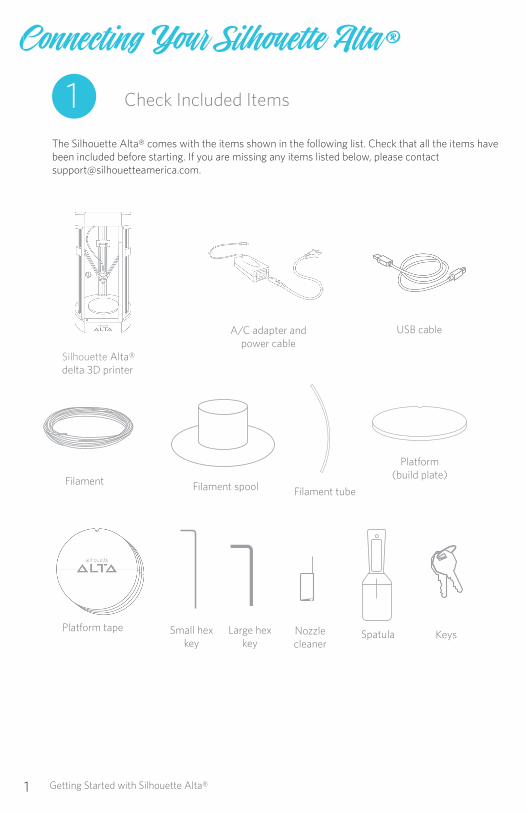
Silhouette Alta®delta 3D printer
A/C adapter and power cable
USB cable
1 Check Included Items
The Silhouette Alta® comes with the items shown in the following list. Check that all the items have been included before starting. If you are missing any items listed below, please contact [email protected].
Filament spool
Platform tape
Filament
Platform(build plate)
Small hex key
Large hex key
Nozzle cleaner
Spatula Keys
Filament tube
Getting Started with Silhouette Alta® 2
2
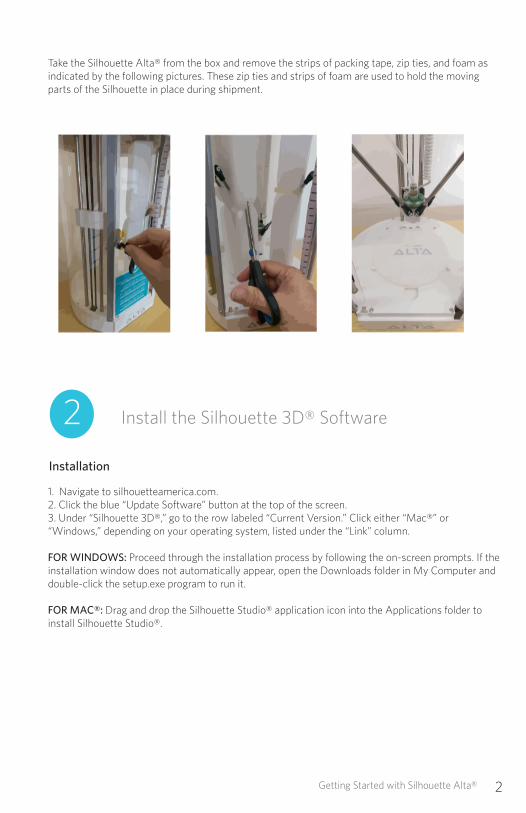
Take the Silhouette Alta® from the box and remove the strips of packing tape, zip ties, and foam as indicated by the following pictures. These zip ties and strips of foam are used to hold the moving parts of the Silhouette in place during shipment.
Install the Silhouette 3D® Software
Installation
1. Navigate to silhouetteamerica.com.2. Click the blue “Update Software” button at the top of the screen. 3. Under “Silhouette 3D®,” go to the row labeled “Current Version.” Click either “Mac®” or “Windows,” depending on your operating system, listed under the “Link” column.
FOR WINDOWS: Proceed through the installation process by following the on-screen prompts. If the installation window does not automatically appear, open the Downloads folder in My Computer and double-click the setup.exe program to run it.
FOR MAC®: Drag and drop the Silhouette Studio® application icon into the Applications folder to install Silhouette Studio®.
Getting Started with Silhouette Alta®3
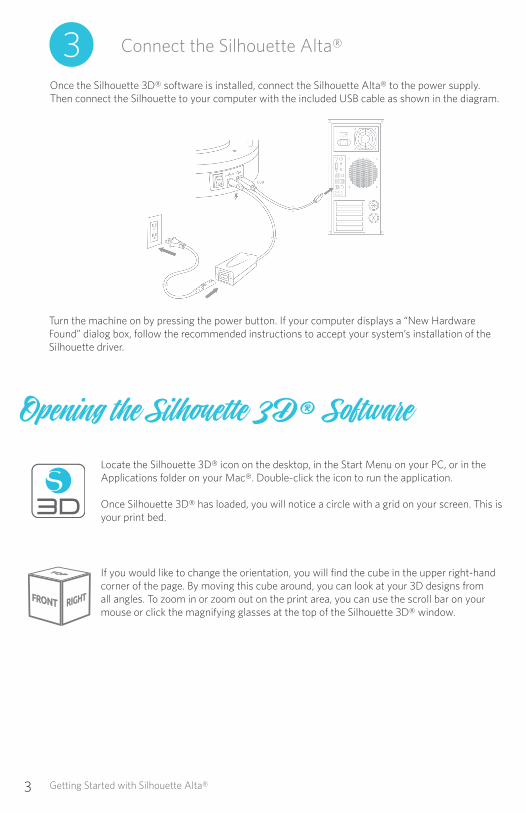
If you would like to change the orientation, you will find the cube in the upper right-hand corner of the page. By moving this cube around, you can look at your 3D designs from all angles. To zoom in or zoom out on the print area, you can use the scroll bar on your mouse or click the magnifying glasses at the top of the Silhouette 3D® window.
Opening the Silhouette 3D® Software
Locate the Silhouette 3D® icon on the desktop, in the Start Menu on your PC, or in the Applications folder on your Mac®. Double-click the icon to run the application.
Once Silhouette 3D® has loaded, you will notice a circle with a grid on your screen. This is your print bed.
3 Connect the Silhouette Alta®
Once the Silhouette 3D® software is installed, connect the Silhouette Alta® to the power supply. Then connect the Silhouette to your computer with the included USB cable as shown in the diagram.
Turn the machine on by pressing the power button. If your computer displays a “New Hardware Found” dialog box, follow the recommended instructions to accept your system’s installation of the Silhouette driver.
Getting Started with Silhouette Alta® 4
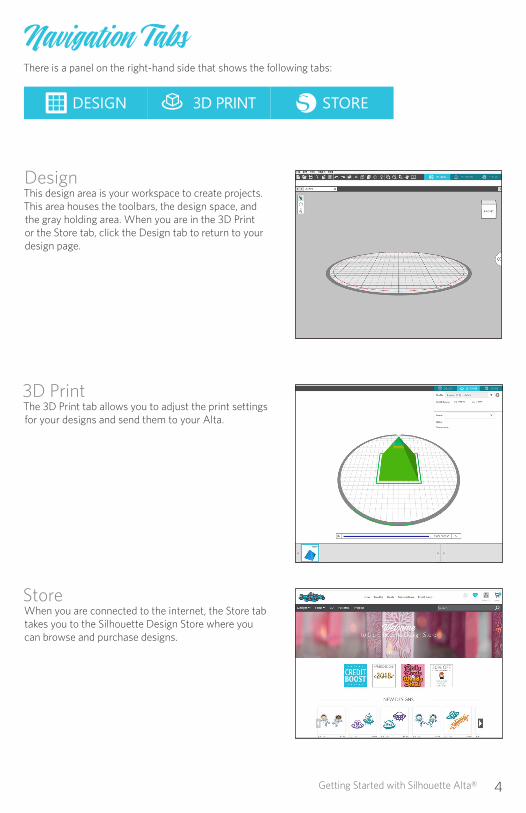
Navigation TabsThere is a panel on the right-hand side that shows the following tabs:
DesignThis design area is your workspace to create projects. This area houses the toolbars, the design space, and the gray holding area. When you are in the 3D Print or the Store tab, click the Design tab to return to your design page.
StoreWhen you are connected to the internet, the Store tab takes you to the Silhouette Design Store where you can browse and purchase designs.
3D PrintThe 3D Print tab allows you to adjust the print settings for your designs and send them to your Alta.
Getting Started with Silhouette Alta®5
1
7
8
2
3
9
4
5
6
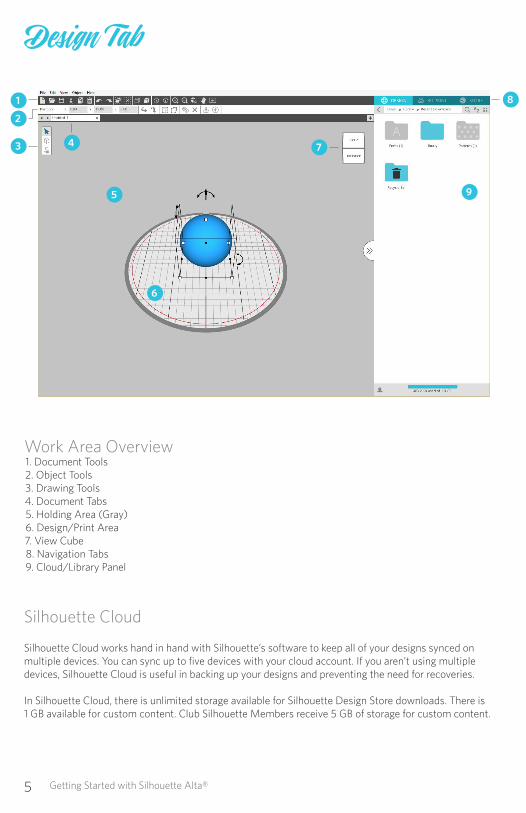
Work Area Overview1. Document Tools2. Object Tools3. Drawing Tools4. Document Tabs5. Holding Area (Gray)6. Design/Print Area7. View Cube8. Navigation Tabs9. Cloud/Library Panel
Design Tab
Silhouette Cloud
Silhouette Cloud works hand in hand with Silhouette’s software to keep all of your designs synced on multiple devices. You can sync up to five devices with your cloud account. If you aren’t using multiple devices, Silhouette Cloud is useful in backing up your designs and preventing the need for recoveries.
In Silhouette Cloud, there is unlimited storage available for Silhouette Design Store downloads. There is 1 GB available for custom content. Club Silhouette Members receive 5 GB of storage for custom content.
Getting Started with Silhouette Alta® 6
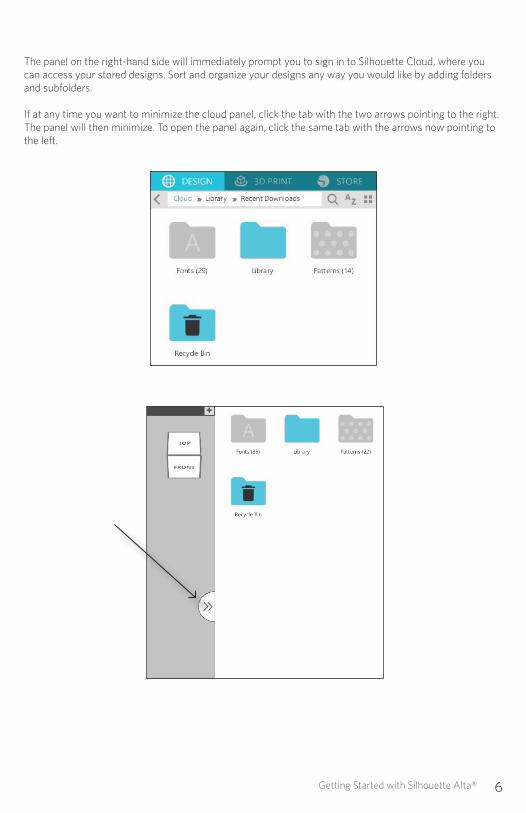
The panel on the right-hand side will immediately prompt you to sign in to Silhouette Cloud, where you can access your stored designs. Sort and organize your designs any way you would like by adding folders and subfolders.
If at any time you want to minimize the cloud panel, click the tab with the two arrows pointing to the right. The panel will then minimize. To open the panel again, click the same tab with the arrows now pointing to the left.
Getting Started with Silhouette Alta®7
Design/Print Area
There are two different sections in your workspace: the design space, or the printing area, and the gray holding area. Images and designs can be placed on both the gray holding area and the printing space. However, any designs that are in either the white design space or the gray holding area will be designated as prints when you go to the 3D print tab. You can toggle through the layers and decide which designs you want to keep and print. Keep in mind that each print must remain within the active print area (bound inside the red box on the white area). Any parts of the design outside of this area will not be printed.
Document Tabs
Your document tabs are located at the top of your workspace. When you open a new document while you already have a document open, a new tab will open. The document tab highlighted in white shows which document is open in your workspace. The other open documents are shown with grayed-out tabs.
Your document tabs allow you to move easily back and forth between multiple projects and let you know at a glance what projects you currently have open. When you save a file, the document tab automatically updates to the file name.
Creating Simple Shapes
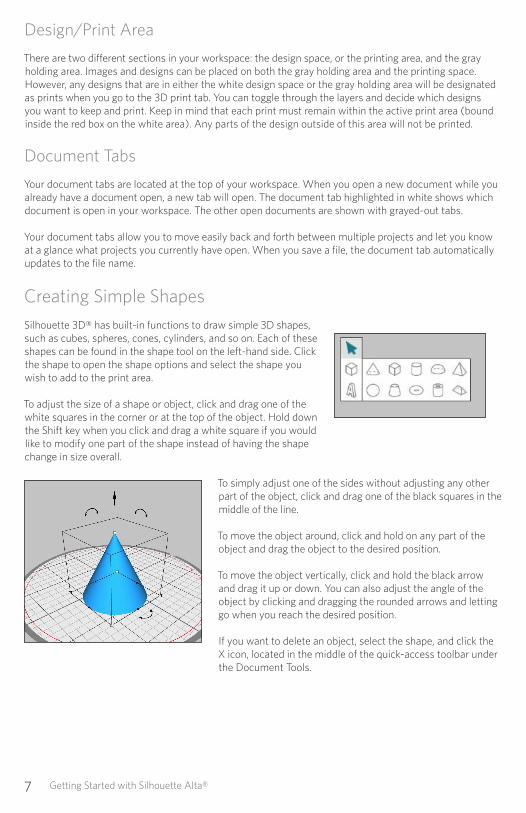
Silhouette 3D® has built-in functions to draw simple 3D shapes, such as cubes, spheres, cones, cylinders, and so on. Each of these shapes can be found in the shape tool on the left-hand side. Click the shape to open the shape options and select the shape you wish to add to the print area.
To adjust the size of a shape or object, click and drag one of the white squares in the corner or at the top of the object. Hold down the Shift key when you click and drag a white square if you would like to modify one part of the shape instead of having the shape change in size overall.
To simply adjust one of the sides without adjusting any other part of the object, click and drag one of the black squares in the middle of the line.
To move the object around, click and hold on any part of the object and drag the object to the desired position.
To move the object vertically, click and hold the black arrow and drag it up or down. You can also adjust the angle of the object by clicking and dragging the rounded arrows and letting go when you reach the desired position.
If you want to delete an object, select the shape, and click the X icon, located in the middle of the quick-access toolbar under the Document Tools.
Getting Started with Silhouette Alta® 8
Creating Text
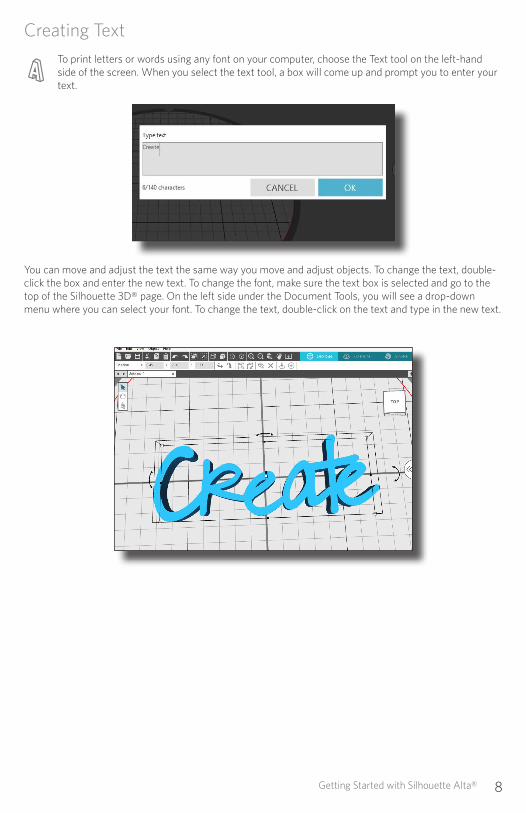
To print letters or words using any font on your computer, choose the Text tool on the left-hand side of the screen. When you select the text tool, a box will come up and prompt you to enter your text.
You can move and adjust the text the same way you move and adjust objects. To change the text, double-click the box and enter the new text. To change the font, make sure the text box is selected and go to the top of the Silhouette 3D® page. On the left side under the Document Tools, you will see a drop-down menu where you can select your font. To change the text, double-click on the text and type in the new text.
Getting Started with Silhouette Alta®9
Object Tools
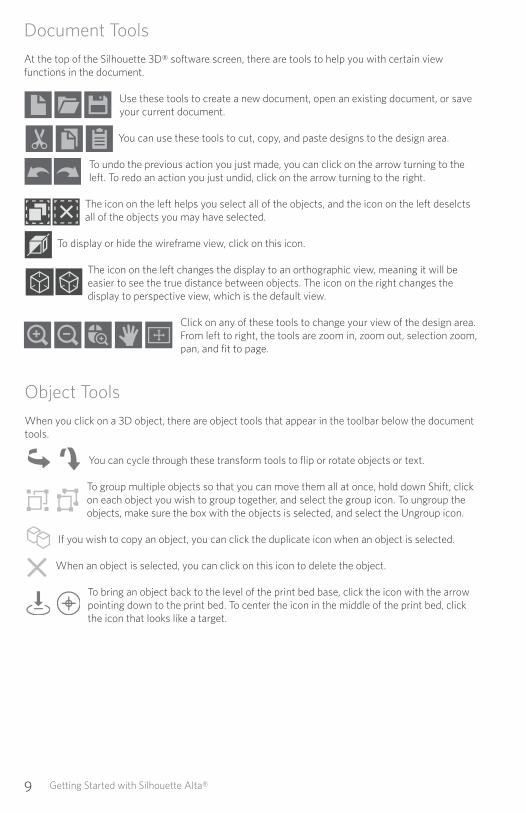
When you click on a 3D object, there are object tools that appear in the toolbar below the document tools.
You can cycle through these transform tools to flip or rotate objects or text.
To group multiple objects so that you can move them all at once, hold down Shift, click on each object you wish to group together, and select the group icon. To ungroup the objects, make sure the box with the objects is selected, and select the Ungroup icon.
If you wish to copy an object, you can click the duplicate icon when an object is selected.
When an object is selected, you can click on this icon to delete the object.
To bring an object back to the level of the print bed base, click the icon with the arrow pointing down to the print bed. To center the icon in the middle of the print bed, click the icon that looks like a target.
Document Tools
At the top of the Silhouette 3D® software screen, there are tools to help you with certain view functions in the document.
Use these tools to create a new document, open an existing document, or save your current document.
You can use these tools to cut, copy, and paste designs to the design area.
To undo the previous action you just made, you can click on the arrow turning to the left. To redo an action you just undid, click on the arrow turning to the right.
The icon on the left helps you select all of the objects, and the icon on the left deselcts all of the objects you may have selected.
To display or hide the wireframe view, click on this icon.
The icon on the left changes the display to an orthographic view, meaning it will be easier to see the true distance between objects. The icon on the right changes the display to perspective view, which is the default view.
Click on any of these tools to change your view of the design area. From left to right, the tools are zoom in, zoom out, selection zoom, pan, and fit to page.
Getting Started with Silhouette Alta® 10
Browsing Designs
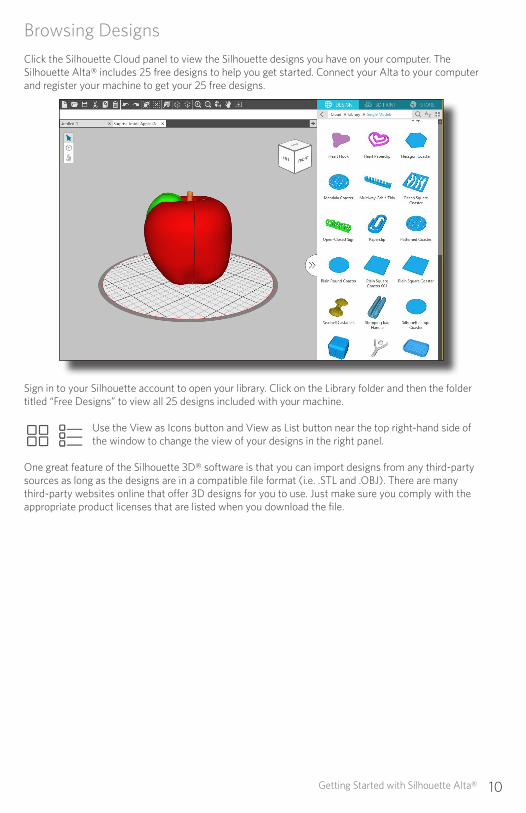
Click the Silhouette Cloud panel to view the Silhouette designs you have on your computer. The Silhouette Alta® includes 25 free designs to help you get started. Connect your Alta to your computer and register your machine to get your 25 free designs.
Sign in to your Silhouette account to open your library. Click on the Library folder and then the folder titled “Free Designs” to view all 25 designs included with your machine.
Use the View as Icons button and View as List button near the top right-hand side of the window to change the view of your designs in the right panel.
One great feature of the Silhouette 3D® software is that you can import designs from any third-party sources as long as the designs are in a compatible file format (i.e. .STL and .OBJ). There are many third-party websites online that offer 3D designs for you to use. Just make sure you comply with the appropriate product licenses that are listed when you download the file.
Getting Started with Silhouette Alta®11
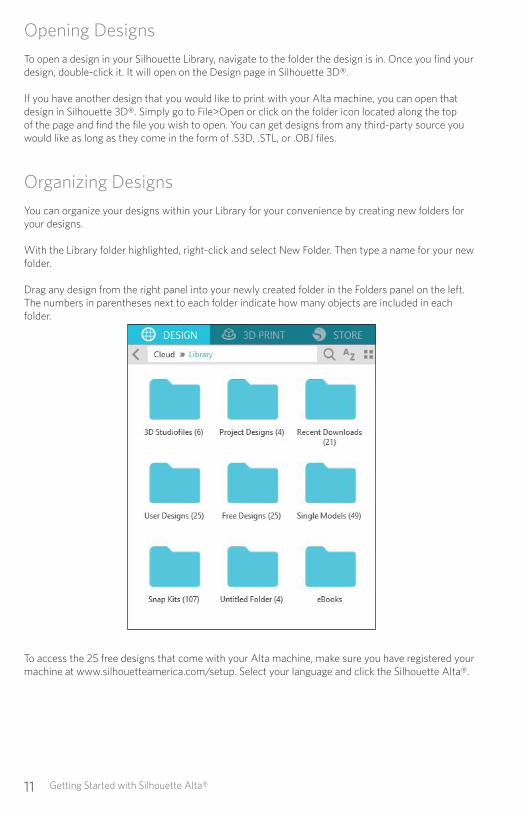
Organizing Designs
You can organize your designs within your Library for your convenience by creating new folders for your designs. With the Library folder highlighted, right-click and select New Folder. Then type a name for your new folder.
Drag any design from the right panel into your newly created folder in the Folders panel on the left. The numbers in parentheses next to each folder indicate how many objects are included in each folder.
To access the 25 free designs that come with your Alta machine, make sure you have registered your machine at www.silhouetteamerica.com/setup. Select your language and click the Silhouette Alta®.
Opening Designs
To open a design in your Silhouette Library, navigate to the folder the design is in. Once you find your design, double-click it. It will open on the Design page in Silhouette 3D®.
If you have another design that you would like to print with your Alta machine, you can open that design in Silhouette 3D®. Simply go to File>Open or click on the folder icon located along the top of the page and find the file you wish to open. You can get designs from any third-party source you would like as long as they come in the form of .S3D, .STL, or .OBJ files.
Getting Started with Silhouette Alta® 12
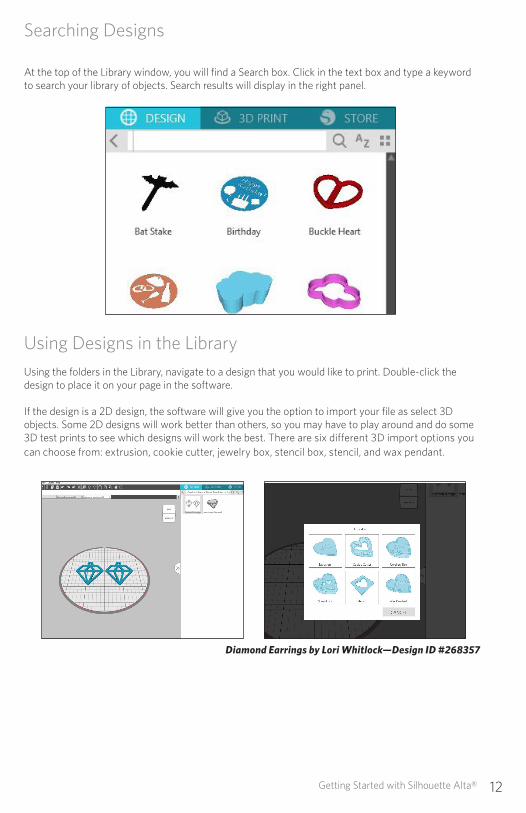
Searching Designs
At the top of the Library window, you will find a Search box. Click in the text box and type a keyword to search your library of objects. Search results will display in the right panel.
Using Designs in the Library
Using the folders in the Library, navigate to a design that you would like to print. Double-click the design to place it on your page in the software.
If the design is a 2D design, the software will give you the option to import your file as select 3D objects. Some 2D designs will work better than others, so you may have to play around and do some 3D test prints to see which designs will work the best. There are six different 3D import options you can choose from: extrusion, cookie cutter, jewelry box, stencil box, stencil, and wax pendant.
Diamond Earrings by Lori Whitlock—Design ID #268357
Getting Started with Silhouette Alta®13
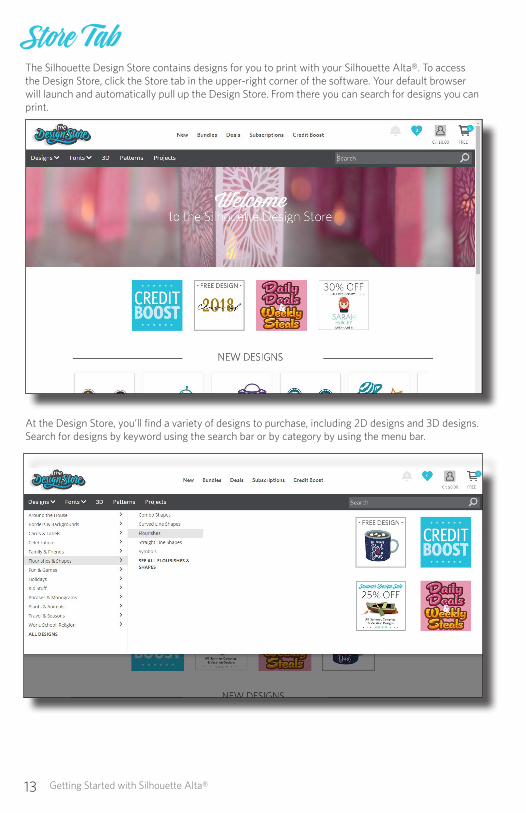
Store TabThe Silhouette Design Store contains designs for you to print with your Silhouette Alta®. To access the Design Store, click the Store tab in the upper-right corner of the software. Your default browser will launch and automatically pull up the Design Store. From there you can search for designs you can print.
At the Design Store, you’ll find a variety of designs to purchase, including 2D designs and 3D designs. Search for designs by keyword using the search bar or by category by using the menu bar.
Getting Started with Silhouette Alta® 14
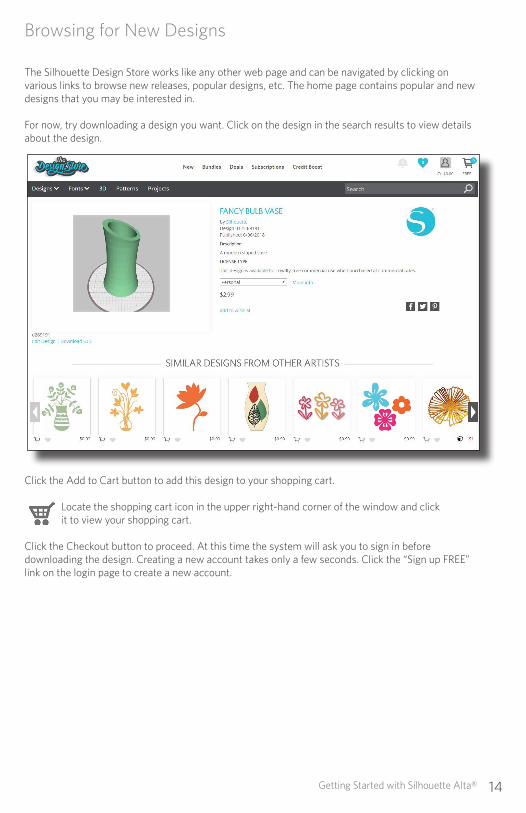
Browsing for New Designs
The Silhouette Design Store works like any other web page and can be navigated by clicking on various links to browse new releases, popular designs, etc. The home page contains popular and new designs that you may be interested in.
For now, try downloading a design you want. Click on the design in the search results to view details about the design.
Click the Add to Cart button to add this design to your shopping cart.
Locate the shopping cart icon in the upper right-hand corner of the window and click it to view your shopping cart.
Click the Checkout button to proceed. At this time the system will ask you to sign in before downloading the design. Creating a new account takes only a few seconds. Click the “Sign up FREE” link on the login page to create a new account.
Getting Started with Silhouette Alta®15
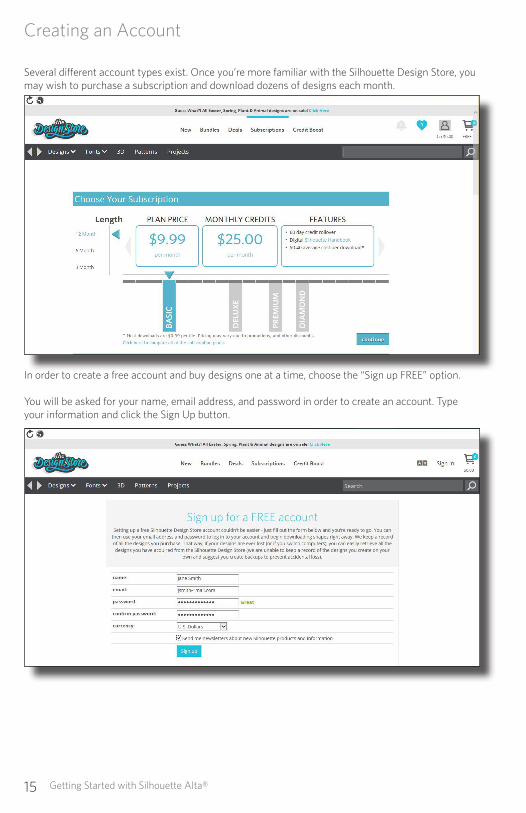
Creating an Account
Several different account types exist. Once you’re more familiar with the Silhouette Design Store, you may wish to purchase a subscription and download dozens of designs each month.
In order to create a free account and buy designs one at a time, choose the “Sign up FREE” option.
You will be asked for your name, email address, and password in order to create an account. Type your information and click the Sign Up button.
Getting Started with Silhouette Alta® 16
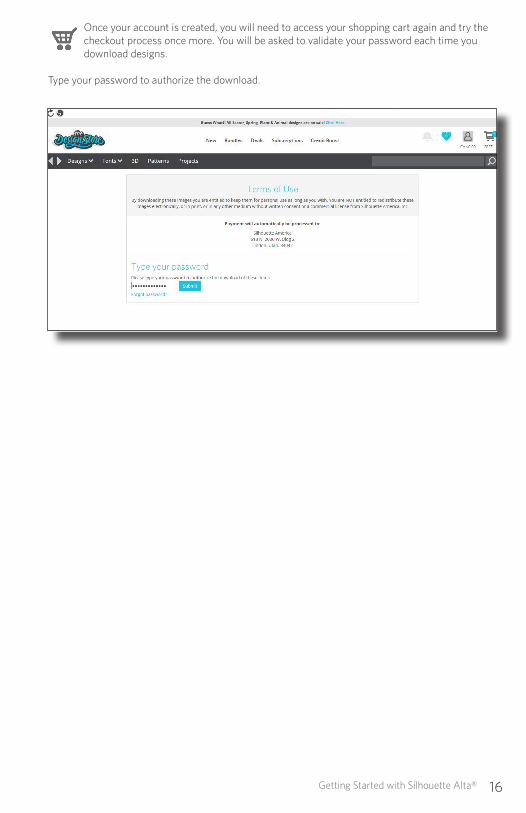
Once your account is created, you will need to access your shopping cart again and try the checkout process once more. You will be asked to validate your password each time you download designs.
Type your password to authorize the download.
Getting Started with Silhouette Alta®17
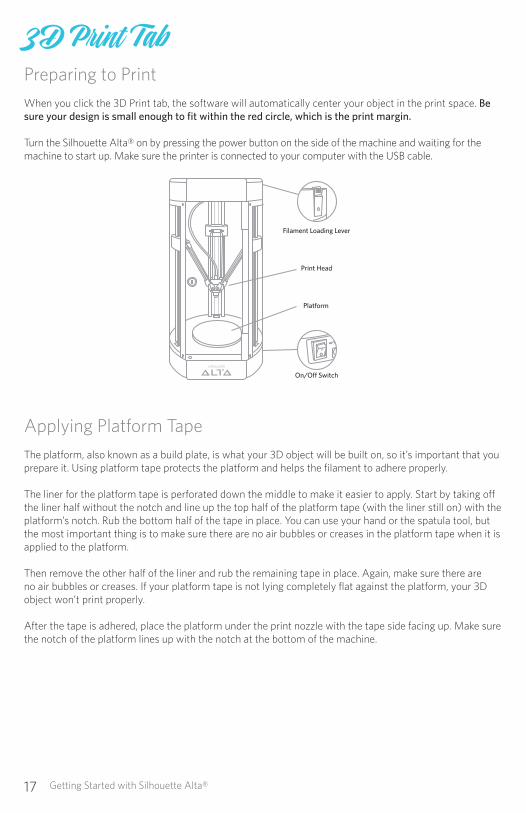
3D Print TabPreparing to Print
When you click the 3D Print tab, the software will automatically center your object in the print space. Be sure your design is small enough to fit within the red circle, which is the print margin.
Turn the Silhouette Alta® on by pressing the power button on the side of the machine and waiting for the machine to start up. Make sure the printer is connected to your computer with the USB cable.
Applying Platform Tape
The platform, also known as a build plate, is what your 3D object will be built on, so it’s important that you prepare it. Using platform tape protects the platform and helps the filament to adhere properly.
The liner for the platform tape is perforated down the middle to make it easier to apply. Start by taking off the liner half without the notch and line up the top half of the platform tape (with the liner still on) with the platform’s notch. Rub the bottom half of the tape in place. You can use your hand or the spatula tool, but the most important thing is to make sure there are no air bubbles or creases in the platform tape when it is applied to the platform.
Then remove the other half of the liner and rub the remaining tape in place. Again, make sure there are no air bubbles or creases. If your platform tape is not lying completely flat against the platform, your 3D object won’t print properly.
After the tape is adhered, place the platform under the print nozzle with the tape side facing up. Make sure the notch of the platform lines up with the notch at the bottom of the machine.
Filament Loading Lever
Print Head
Platform
On/Off Switch
Getting Started with Silhouette Alta® 18
Inserting the Filament
To load the filament in your Alta 3D printer, start by opening Silhouette 3D®, and power on your Alta. In the software, click on the 3D Print tab. In the upper right-hand corner, ensure that your machine has been selected. With the Alta selected, click on the Filament button. Next, click on Load Filament and go through the following steps to load your filament properly.
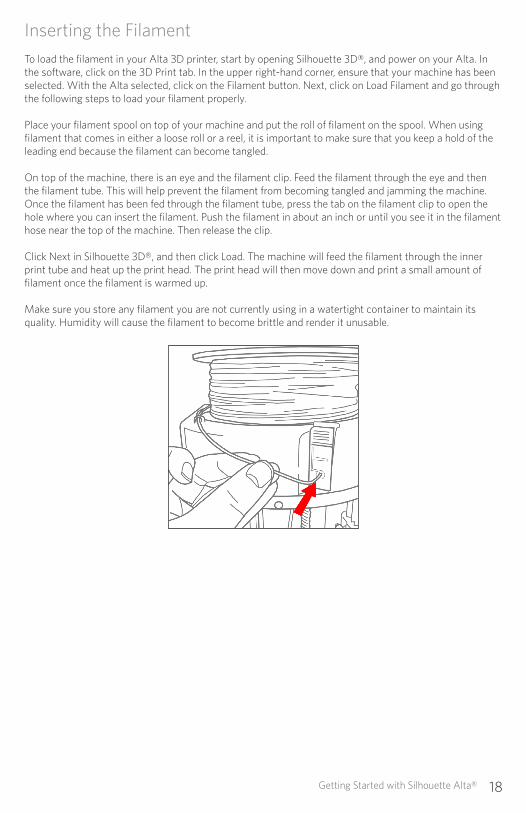
Place your filament spool on top of your machine and put the roll of filament on the spool. When using filament that comes in either a loose roll or a reel, it is important to make sure that you keep a hold of the leading end because the filament can become tangled.
On top of the machine, there is an eye and the filament clip. Feed the filament through the eye and then the filament tube. This will help prevent the filament from becoming tangled and jamming the machine. Once the filament has been fed through the filament tube, press the tab on the filament clip to open the hole where you can insert the filament. Push the filament in about an inch or until you see it in the filament hose near the top of the machine. Then release the clip.
Click Next in Silhouette 3D®, and then click Load. The machine will feed the filament through the inner print tube and heat up the print head. The print head will then move down and print a small amount of filament once the filament is warmed up.
Make sure you store any filament you are not currently using in a watertight container to maintain its quality. Humidity will cause the filament to become brittle and render it unusable.
Getting Started with Silhouette Alta®19
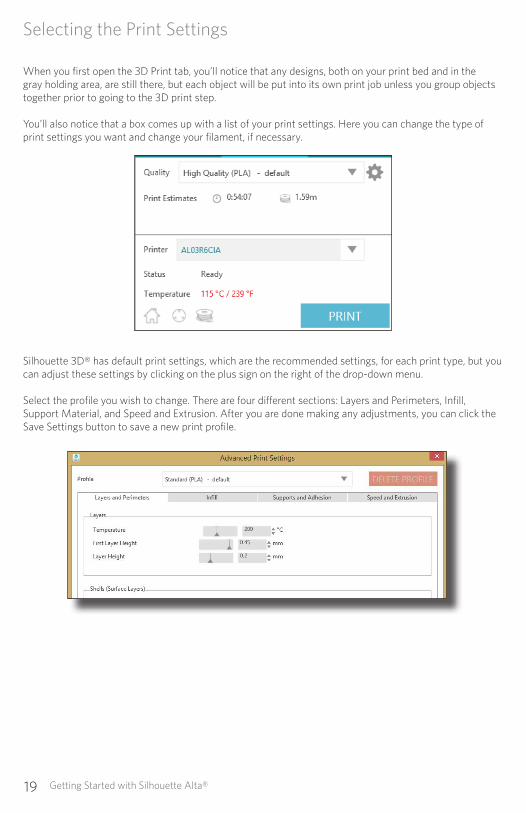
Selecting the Print Settings
When you first open the 3D Print tab, you’ll notice that any designs, both on your print bed and in the gray holding area, are still there, but each object will be put into its own print job unless you group objects together prior to going to the 3D print step.
You’ll also notice that a box comes up with a list of your print settings. Here you can change the type of print settings you want and change your filament, if necessary.
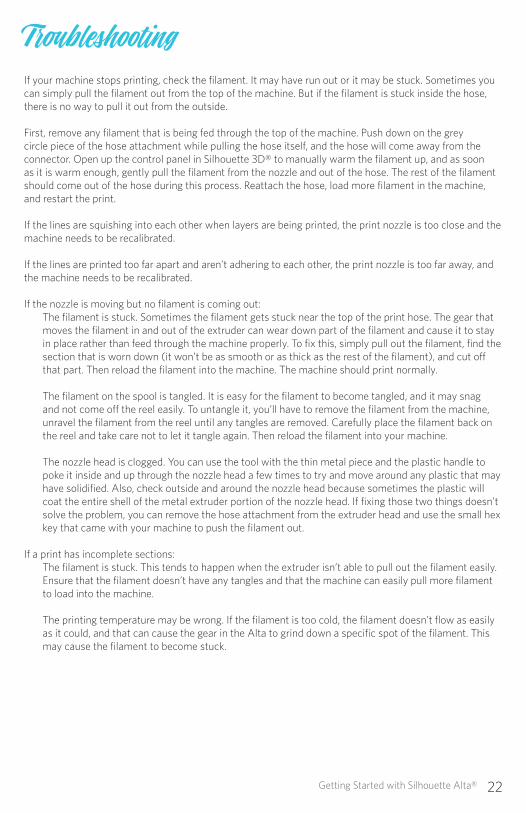
Silhouette 3D® has default print settings, which are the recommended settings, for each print type, but you can adjust these settings by clicking on the plus sign on the right of the drop-down menu.
Select the profile you wish to change. There are four different sections: Layers and Perimeters, Infill, Support Material, and Speed and Extrusion. After you are done making any adjustments, you can click the Save Settings button to save a new print profile.

Getting Started with Silhouette Alta® 20
Layers and Perimeters
» Temperature: the temperature of the filament layers of the 3D print. Often different filaments
have their own ideal printing temperatures. If you are having problems with prints with webbing
or prints that are brittle, you may need to adjust the temperature. Tip: A good printing range for
PLA filament is between 180°C and 210°C.
» First layer height: the height of the first layer of your printed image. Getting the right first layer
height in place is important because the first layer is the foundation of your print.
» Layer height: the height of each layer of filament. It’s similar to resolution in that a thicker layer
height will have less detail.
» Perimeter shells: how many layers will print around the infill (not part of the infill)
» Top-layer shells: how many layers will print on the top of the print. Tip: A good rule of thumb is to
have the thickness of the top layers be about 0.5 mm think to prevent gaps or holes in the top of
the print. So if you’re printing a layer height of .25 mm, you would need two top layer shells.
» Bottom-layer shells: how many layers will print at the bottom of the object.
Infill
» Infill Density: how thick the support material is in the middle of the design.
» Infill Overlap: can be adjusted to prevent gaps between the perimeter and top layers.
Supports and Adhesion
» Supports: allows you to print your design with support material if the object has any pieces that
will print at an angle greater than 45°.
» Brim Width: how many perimeter loops go around the first layer to help support the base and to
provide more surface area for prints to prevent warping
» Brim Distance: how far away the brim is from the first layer.
Speed
» You can change the speed in which each layer is printed. The speed is often dependent on the
quality of the print and the temperature of the filament. Generally, the faster the machine is
printing, the lower the quality. A good printing range for PLA filament is between 30 mm per
second and 90 mm per second.
» Tip: If you’re printing at a lower temperature you may want to increase your print speed.
Extrusion Width
» How thick each layer, such as the first layer or the perimeter layer, is when it is printed.
Filament Color Temperature Range
Black range 180–210°C, 185–195°C optimal
Glow-in-the-dark range 180–205°C, 190°C optimal
All other colors range 180–220°C, 190–215°C optimal

Getting Started with Silhouette Alta®21
Calibrating the Alta
Your Silhouette Alta comes precalibrated, but there may be an instance when you have to recalibrate it manually. To check the calibration, go to the 3D Print tab in Silhouette 3D®. Go to the box on the upper right-hand side and make sure your machine is selected. Then click on the circle icon with three dots in the left-hand corner of the box. The software will tell you to take a piece of copy paper, cut it in half length-wise, and place it on the print bed. The paper is what you will use to test the optimal position of the print head. Don’t use a folded up piece of paper. If the piece of paper you are using is too thick, the calibration will be off. When you’ve got a piece of paper ready, click Start in Silhouette 3D®.
Hold the paper on one end. The machine will move the print head to three different points: the front-left position, the front-right position, and the back position. When the print head goes to each position, attempt to slide the paper under the print head to see whether you can move it. The paper shouldn’t be too easy to move. You should feel some resistance when you try to move it, but the paper shouldn’t be so hard to move that you bend or damage it.
In the software, indicate whether moving the paper at each point is easy, normal, or hard and click Next. The software will then tell you which section needs to be adjusted.
Printing Your Design
After you are done making any adjustments to your print settings, save any changes. Silhouette 3D® will build a 3D model according to the print settings you input, and you’ll be able to see how the printer will construct and print your object. Click the Play button at the bottom of the page and watch to see how the printer will print your object.
In the upper right-hand corner, there is a box that shows you the status of the Silhouette Alta® as well as the estimate of the filament length in meters and an estimate of the total printing time.
When the machine has heated the filament to the indicated temperature set in the print settings, the machine will begin to print the design.
After your machine is done printing the design, give the design a few minutes to cool. Then gently remove the design from the platform. Begin to break away the first layer and any support or hanging pieces to reveal your printed design.
Getting Started with Silhouette Alta® 22
TroubleshootingIf your machine stops printing, check the filament. It may have run out or it may be stuck. Sometimes you can simply pull the filament out from the top of the machine. But if the filament is stuck inside the hose, there is no way to pull it out from the outside.
First, remove any filament that is being fed through the top of the machine. Push down on the grey circle piece of the hose attachment while pulling the hose itself, and the hose will come away from the connector. Open up the control panel in Silhouette 3D® to manually warm the filament up, and as soon as it is warm enough, gently pull the filament from the nozzle and out of the hose. The rest of the filament should come out of the hose during this process. Reattach the hose, load more filament in the machine, and restart the print.
If the lines are squishing into each other when layers are being printed, the print nozzle is too close and the machine needs to be recalibrated.
If the lines are printed too far apart and aren’t adhering to each other, the print nozzle is too far away, and the machine needs to be recalibrated.
If the nozzle is moving but no filament is coming out:The filament is stuck. Sometimes the filament gets stuck near the top of the print hose. The gear that moves the filament in and out of the extruder can wear down part of the filament and cause it to stay in place rather than feed through the machine properly. To fix this, simply pull out the filament, find the section that is worn down (it won’t be as smooth or as thick as the rest of the filament), and cut off that part. Then reload the filament into the machine. The machine should print normally.
The filament on the spool is tangled. It is easy for the filament to become tangled, and it may snag and not come off the reel easily. To untangle it, you’ll have to remove the filament from the machine, unravel the filament from the reel until any tangles are removed. Carefully place the filament back on the reel and take care not to let it tangle again. Then reload the filament into your machine.
The nozzle head is clogged. You can use the tool with the thin metal piece and the plastic handle to poke it inside and up through the nozzle head a few times to try and move around any plastic that may have solidified. Also, check outside and around the nozzle head because sometimes the plastic will coat the entire shell of the metal extruder portion of the nozzle head. If fixing those two things doesn’t solve the problem, you can remove the hose attachment from the extruder head and use the small hex key that came with your machine to push the filament out.
If a print has incomplete sections: The filament is stuck. This tends to happen when the extruder isn’t able to pull out the filament easily. Ensure that the filament doesn’t have any tangles and that the machine can easily pull more filament to load into the machine.
The printing temperature may be wrong. If the filament is too cold, the filament doesn’t flow as easily as it could, and that can cause the gear in the Alta to grind down a specific spot of the filament. This may cause the filament to become stuck.
Getting Started with Silhouette Alta®23
Where to Find More Information
Complete Software ManualView the complete, illustrated User’s Manual within Silhouette 3D® by clicking Help > User’s Manual.
WebsiteVisit the tutorials section of www.silhouetteamerica.com for help with specific features and step-by-step instructions on how to print objects with the Silhouette Alta®.
BlogVisit the official Silhouette blog at blog.silhouetteamerica.com for ideas of new projects you can create. Many blog posts contain step-by-step instructions for advanced uses of Silhouette products and software.
NewsletterSign up for the Silhouette newsletter at www.silhouetteamerica.com to receive product updates and special offers via email.
Customer ServiceIf you have any further questions, feel free to contact customer service:
Silhouette America, [email protected]://www.silhouetteamerica.com/contact