Embed Size (px)
Citation preview

Getting Started with Survey Solutions Page 1 of 43
Getting started with
Getting Started with Survey Solutions Page 2 of 43
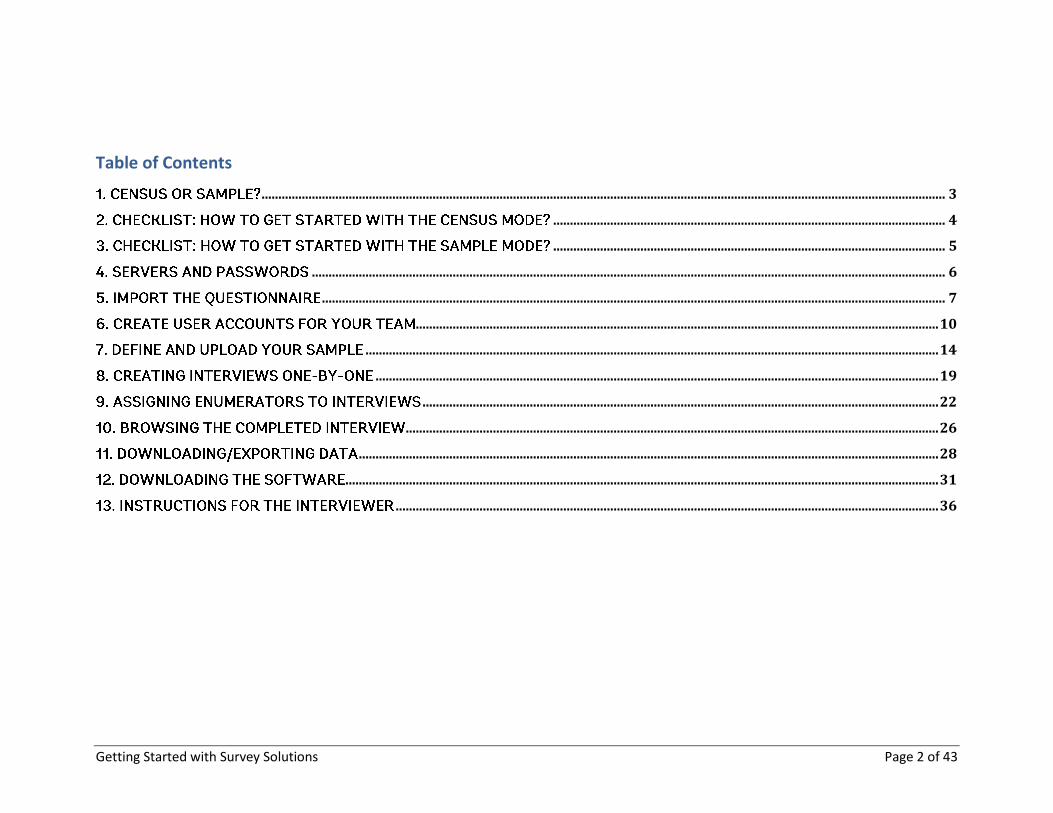
Table of Contents
............................................................................................................................................................................................................ 3
..................................................................................................................... 4
..................................................................................................................... 5
............................................................................................................................................................................................. 6
.......................................................................................................................................................................................... 7
............................................................................................................................................................ 10
........................................................................................................................................................................... 14
........................................................................................................................................................................ 19
.......................................................................................................................................................... 22
............................................................................................................................................................... 26
............................................................................................................................................................................. 28
................................................................................................................................................................................. 31
.................................................................................................................................................................. 36
Getting Started with Survey Solutions Page 3 of 43
Survey Solutions allows you to collect data in two modes
Census mode and the Sample mode
If you have a list of the households, enterprises or persons that your enumerators are going to interview, your best choice is the Sample mode.
On the other hand, if you are not sure whom you are going to be interviewing (for example during an exit poll) or you would like to list or survey
all the households from a particular area (for example during a census), you should choose the Census mode.
The set-up procedure for Census mode differs slightly from launching a survey with Sample mode. Most importantly, the census mode does not
require any sample definition file. You also do not have to assign cases to individual supervisors and interviewers—the census mode
questionnaires will be available to every user registered with your headquarter system (HQ).
Getting Started with Survey Solutions Page 4 of 43
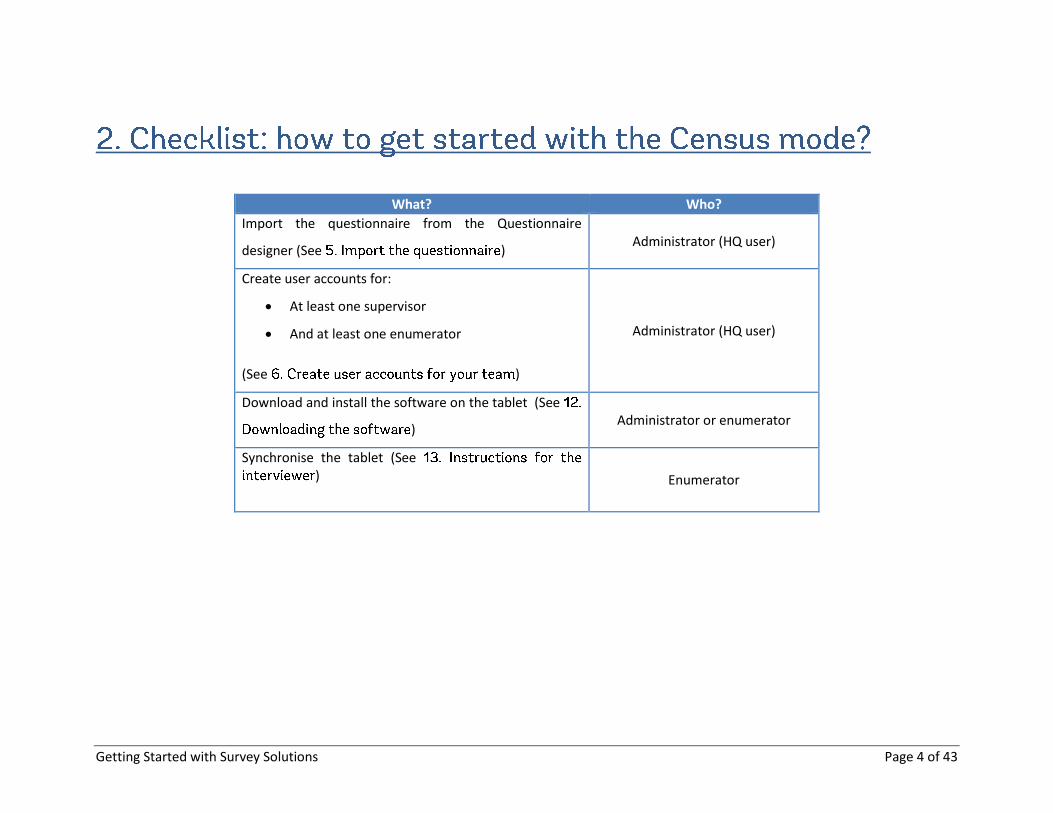
What? Who?
Import the questionnaire from the Questionnaire
designer (See ) Administrator (HQ user)
Create user accounts for:
At least one supervisor
And at least one enumerator
(See )
Administrator (HQ user)
Download and install the software on the tablet (See
) Administrator or enumerator
Synchronise the tablet (See )
Enumerator
Getting Started with Survey Solutions Page 5 of 43
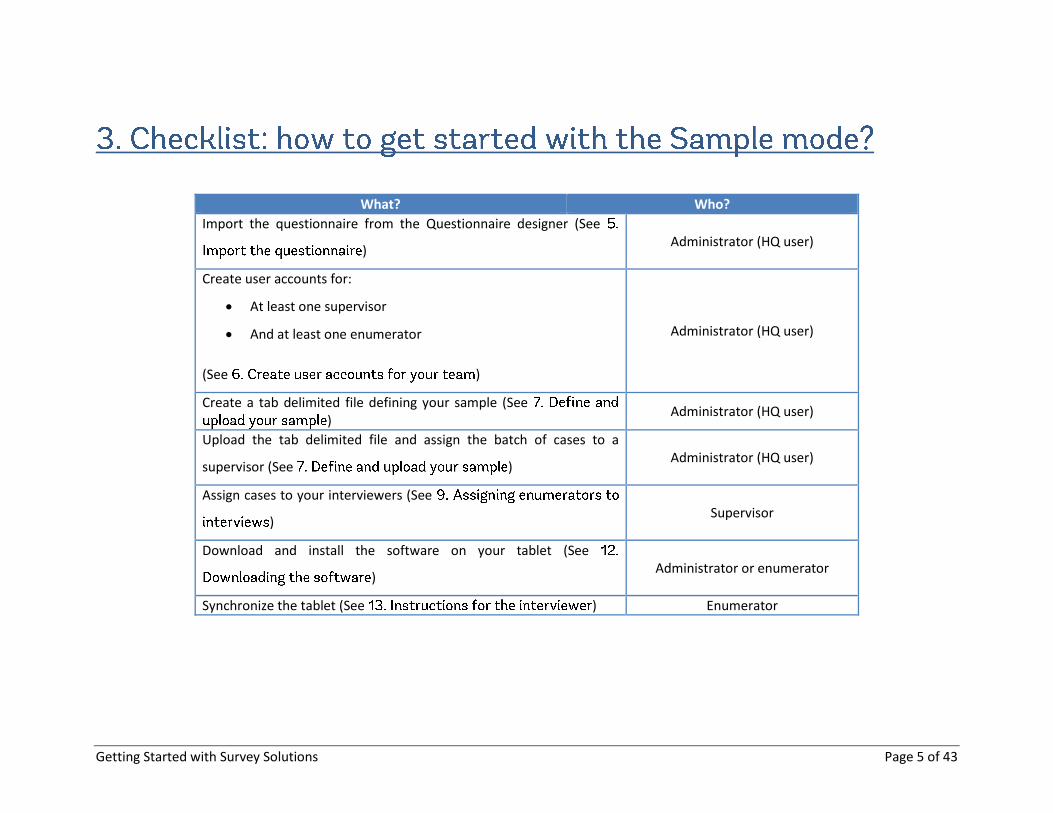
What? Who?
Import the questionnaire from the Questionnaire designer (See
) Administrator (HQ user)
Create user accounts for:
At least one supervisor
And at least one enumerator
(See )
Administrator (HQ user)
Create a tab delimited file defining your sample (See )
Administrator (HQ user)
Upload the tab delimited file and assign the batch of cases to a
supervisor (See ) Administrator (HQ user)
Assign cases to your interviewers (See
) Supervisor
Download and install the software on your tablet (See
) Administrator or enumerator
Synchronize the tablet (See ) Enumerator
Getting Started with Survey Solutions Page 6 of 43
Your server can be accessed at: https://demo.mysurvey.solutions Your headquarters username and password is: Username: Headquarters1 Password: Headquarters1 Note that each institution using Survey Solutions will utilize their own server. Consequently, the details listed above may not be applicable.
You may use the demo server and username (above) to test Survey Solutions.
Getting Started with Survey Solutions Page 7 of 43
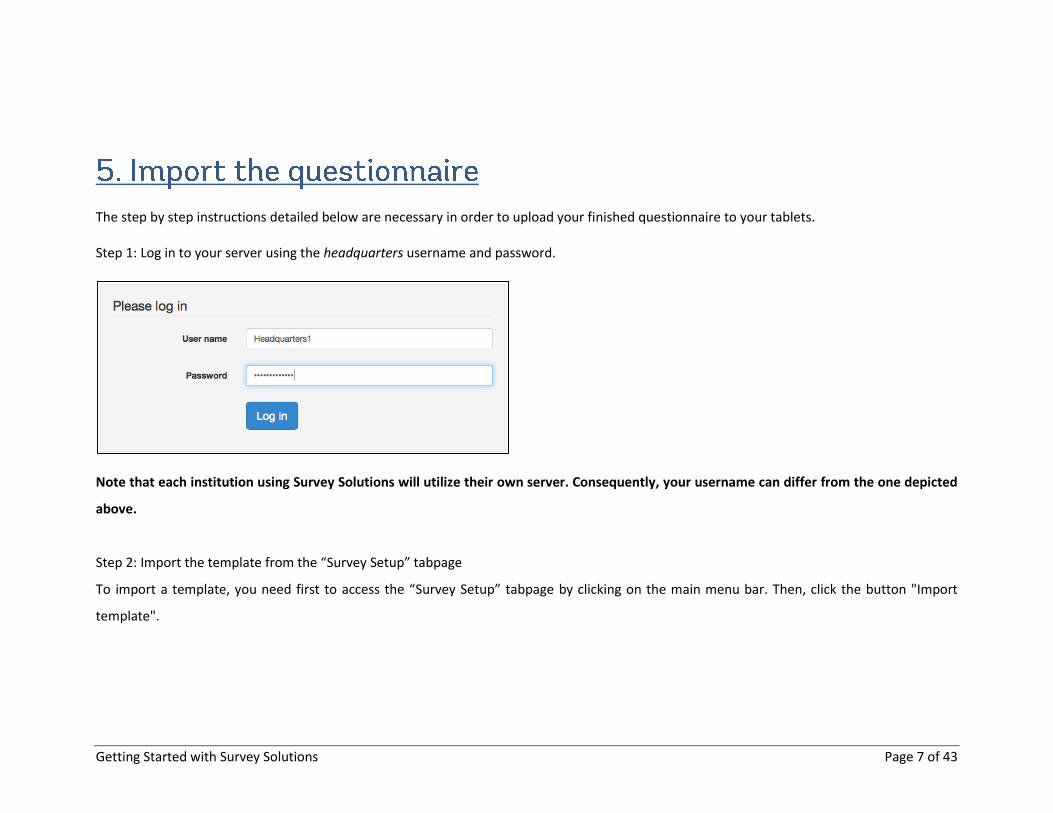
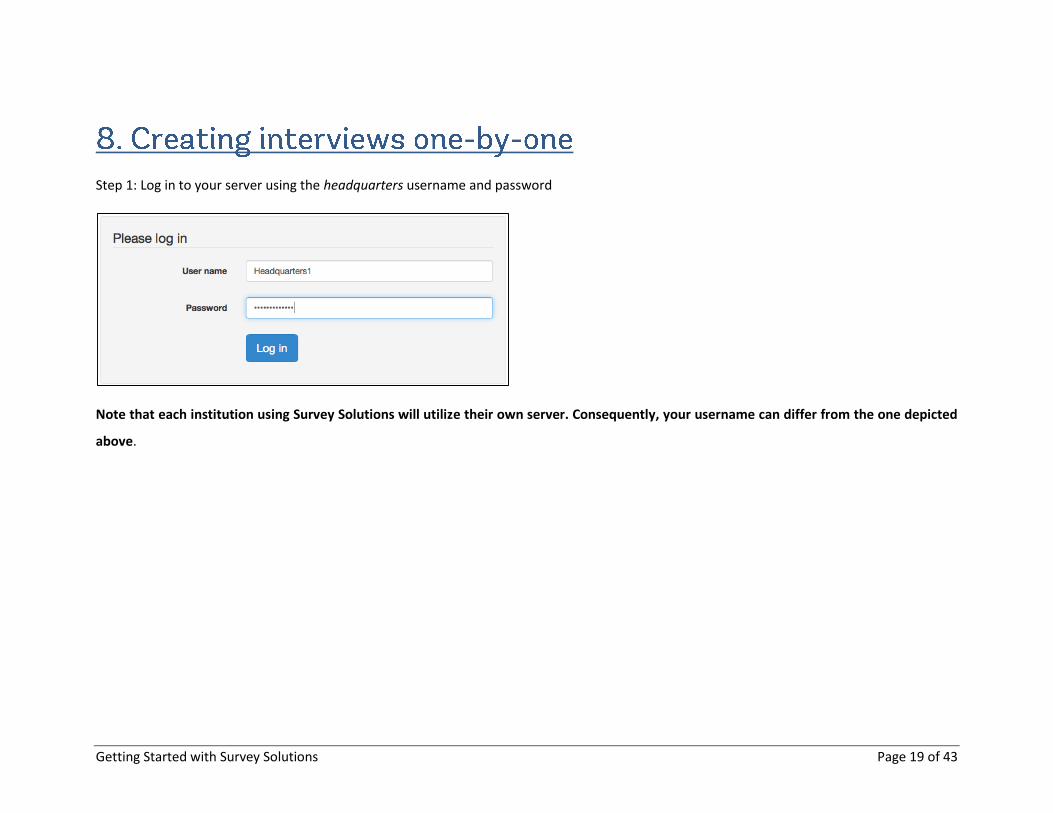
The step by step instructions detailed below are necessary in order to upload your finished questionnaire to your tablets. Step 1: Log in to your server using the headquarters username and password.
Note that each institution using Survey Solutions will utilize their own server. Consequently, your username can differ from the one depicted
above.
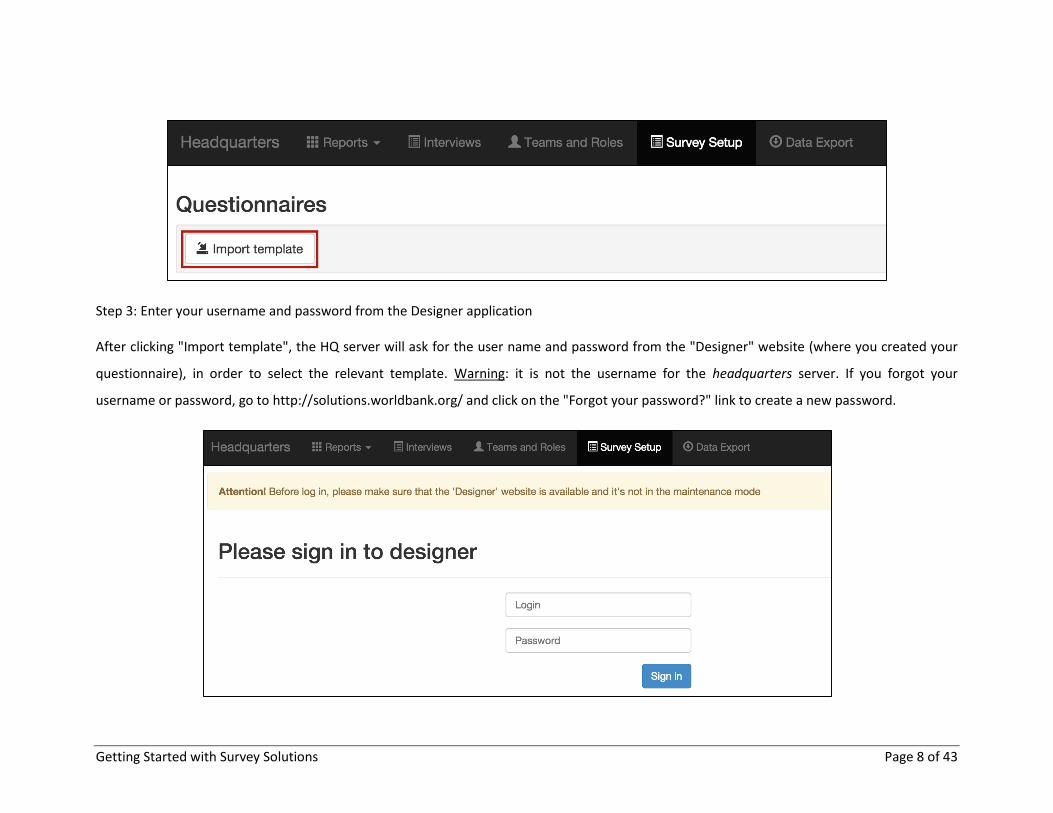
Step 2: Import the template from the “Survey Setup” tabpage
To import a template, you need first to access the “Survey Setup” tabpage by clicking on the main menu bar. Then, click the button "Import
template".
Getting Started with Survey Solutions Page 8 of 43
Step 3: Enter your username and password from the Designer application After clicking "Import template", the HQ server will ask for the user name and password from the "Designer" website (where you created your
questionnaire), in order to select the relevant template. Warning: it is not the username for the headquarters server. If you forgot your
username or password, go to http://solutions.worldbank.org/ and click on the "Forgot your password?" link to create a new password.
Getting Started with Survey Solutions Page 9 of 43
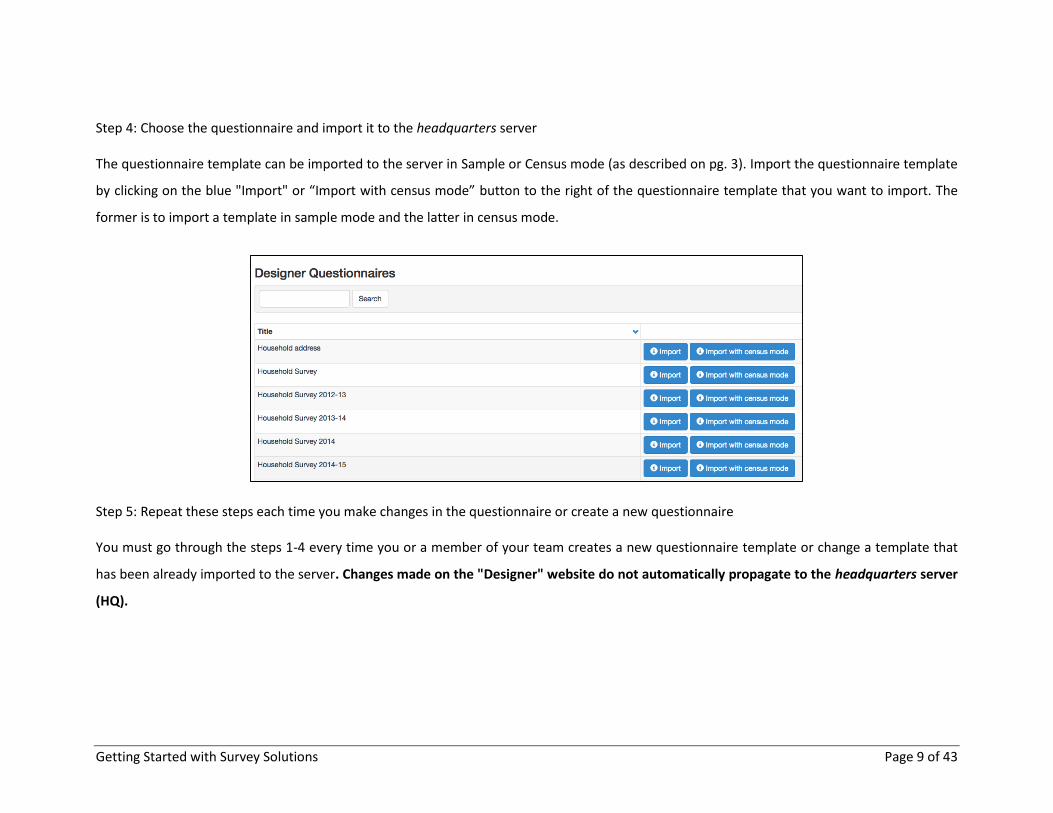
Step 4: Choose the questionnaire and import it to the headquarters server
The questionnaire template can be imported to the server in Sample or Census mode (as described on pg. 3). Import the questionnaire template
by clicking on the blue "Import" or “Import with census mode” button to the right of the questionnaire template that you want to import. The
former is to import a template in sample mode and the latter in census mode.
Step 5: Repeat these steps each time you make changes in the questionnaire or create a new questionnaire
You must go through the steps 1-4 every time you or a member of your team creates a new questionnaire template or change a template that
has been already imported to the server. Changes made on the "Designer" website do not automatically propagate to the headquarters server
(HQ).
Getting Started with Survey Solutions Page 10 of 43
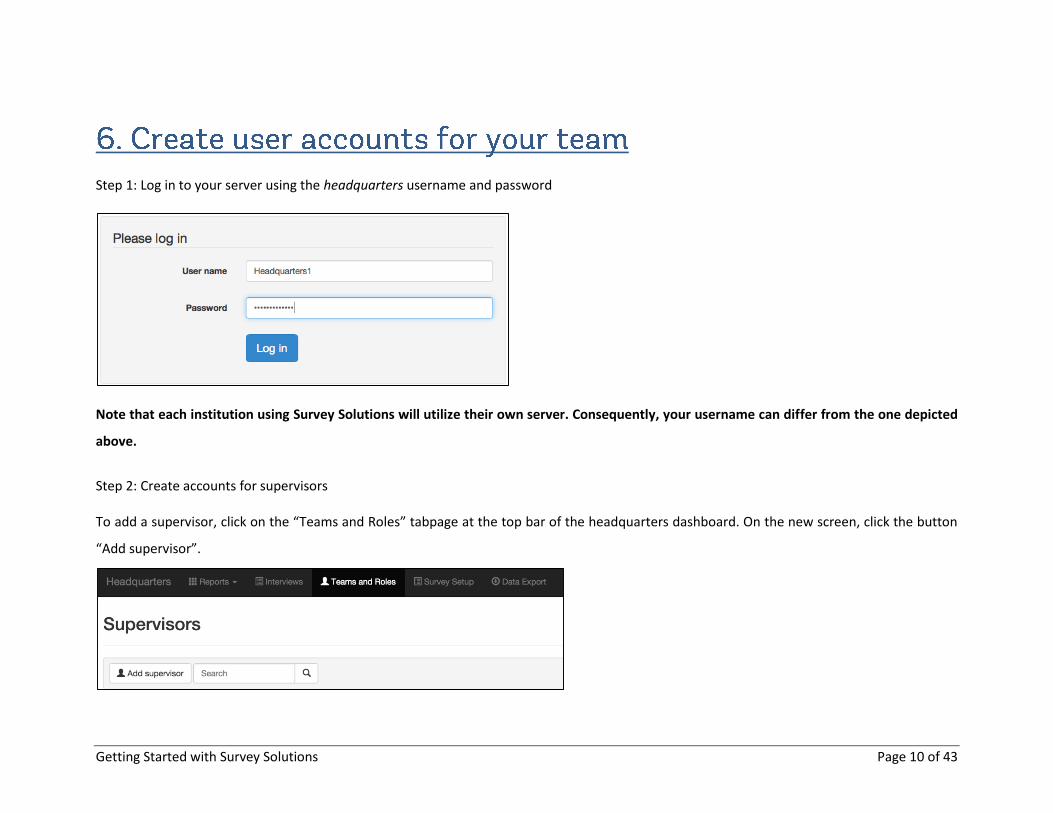
Step 1: Log in to your server using the headquarters username and password
Note that each institution using Survey Solutions will utilize their own server. Consequently, your username can differ from the one depicted
above.
Step 2: Create accounts for supervisors
To add a supervisor, click on the “Teams and Roles” tabpage at the top bar of the headquarters dashboard. On the new screen, click the button
“Add supervisor”.
Getting Started with Survey Solutions Page 11 of 43
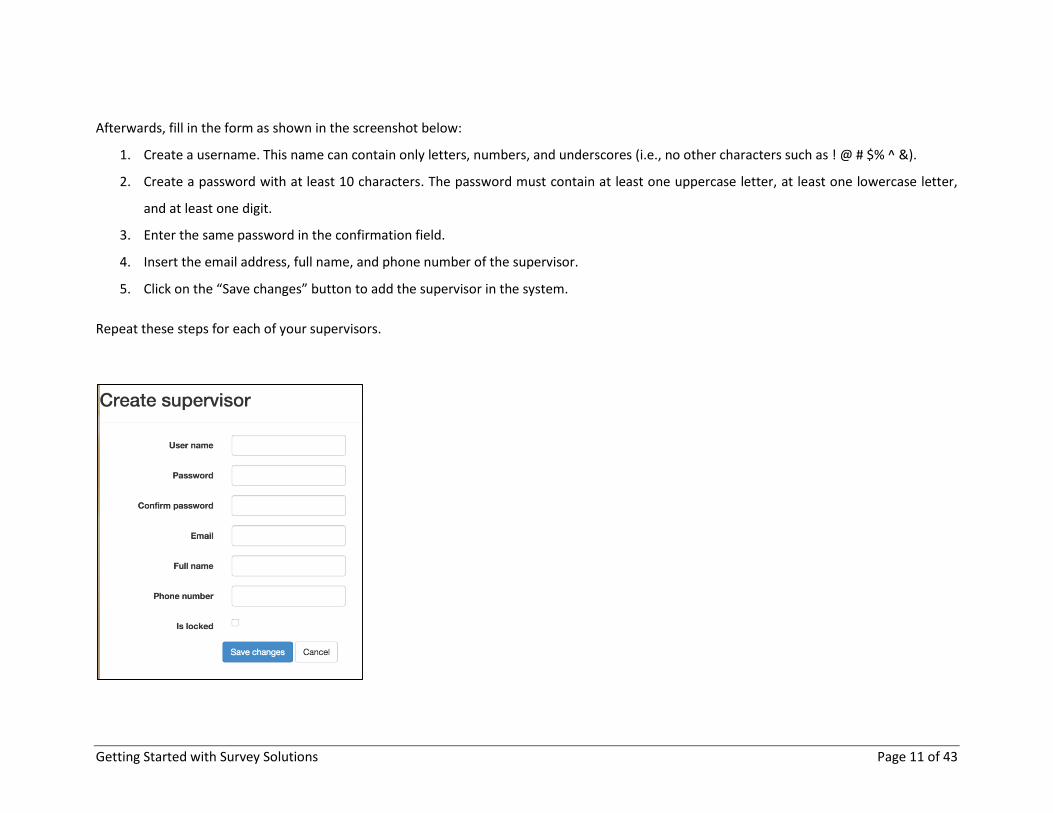
Afterwards, fill in the form as shown in the screenshot below:
1. Create a username. This name can contain only letters, numbers, and underscores (i.e., no other characters such as ! @ # $% ^ &).
2. Create a password with at least 10 characters. The password must contain at least one uppercase letter, at least one lowercase letter,
and at least one digit.
3. Enter the same password in the confirmation field.
4. Insert the email address, full name, and phone number of the supervisor.
5. Click on the “Save changes” button to add the supervisor in the system.
Repeat these steps for each of your supervisors.
Getting Started with Survey Solutions Page 12 of 43
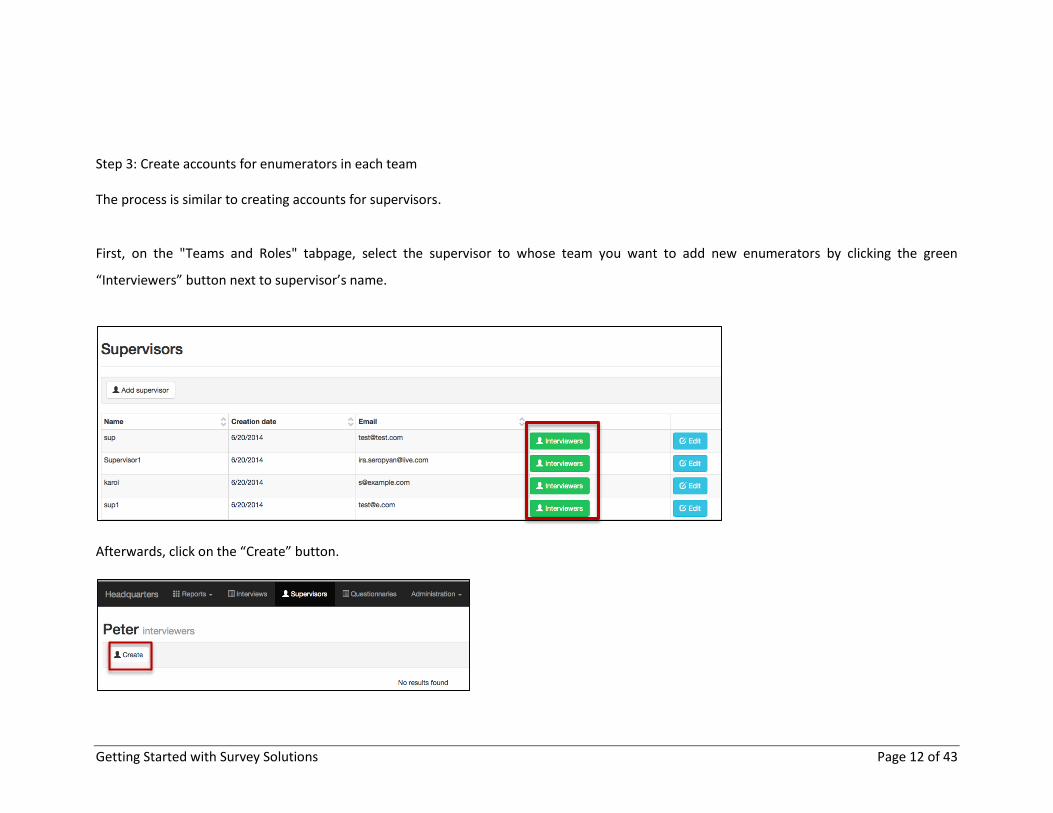
Step 3: Create accounts for enumerators in each team The process is similar to creating accounts for supervisors.
First, on the "Teams and Roles" tabpage, select the supervisor to whose team you want to add new enumerators by clicking the green
“Interviewers” button next to supervisor’s name.
Afterwards, click on the “Create” button.
Getting Started with Survey Solutions Page 13 of 43
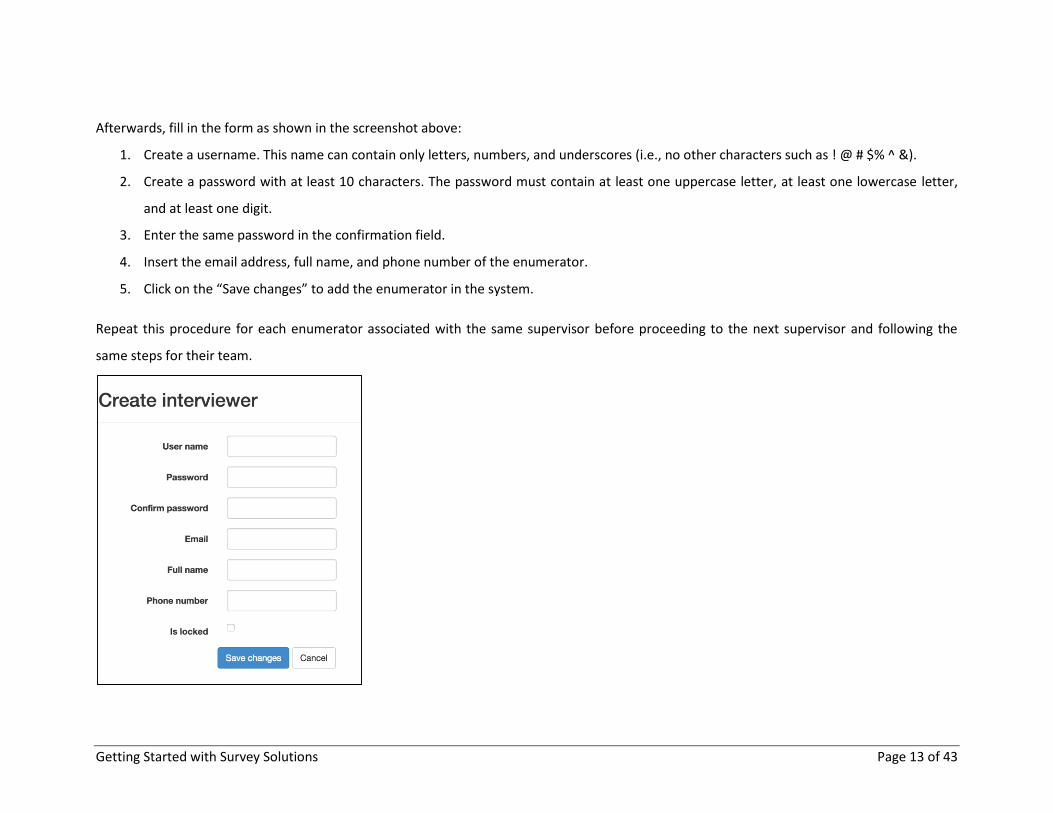
Afterwards, fill in the form as shown in the screenshot above:
1. Create a username. This name can contain only letters, numbers, and underscores (i.e., no other characters such as ! @ # $% ^ &).
2. Create a password with at least 10 characters. The password must contain at least one uppercase letter, at least one lowercase letter,
and at least one digit.
3. Enter the same password in the confirmation field.
4. Insert the email address, full name, and phone number of the enumerator.
5. Click on the “Save changes” to add the enumerator in the system.
Repeat this procedure for each enumerator associated with the same supervisor before proceeding to the next supervisor and following the
same steps for their team.
Getting Started with Survey Solutions Page 14 of 43
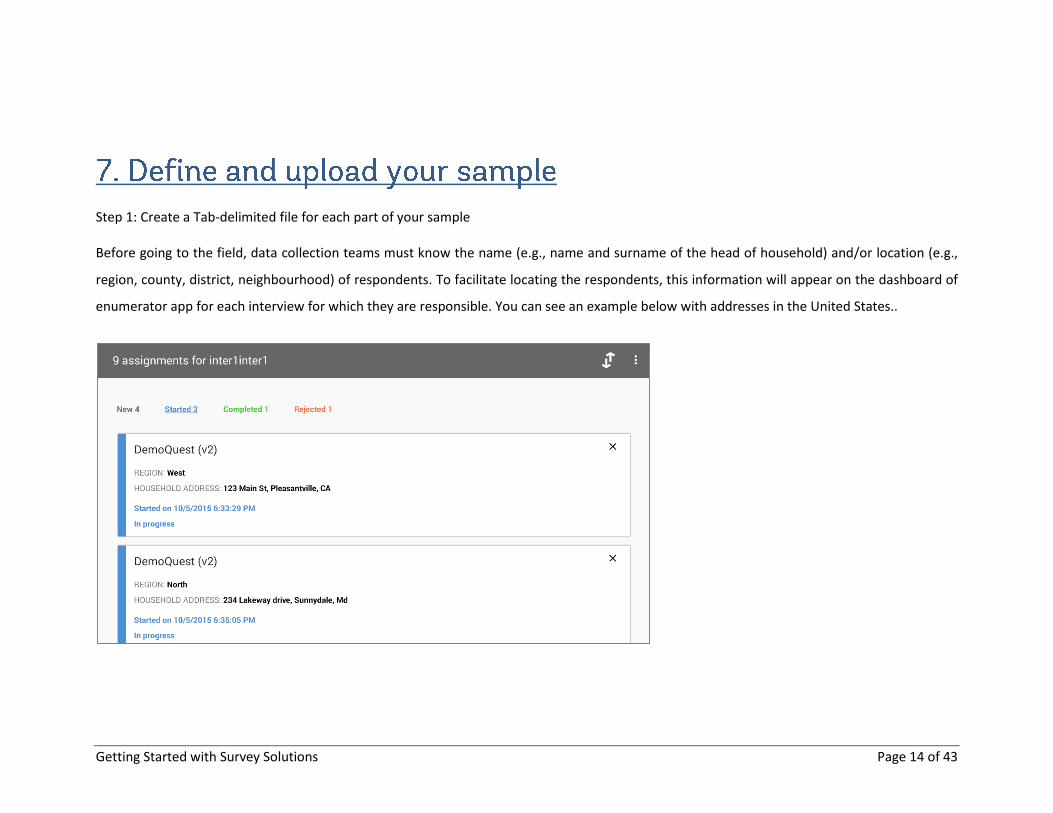
Step 1: Create a Tab-delimited file for each part of your sample Before going to the field, data collection teams must know the name (e.g., name and surname of the head of household) and/or location (e.g.,
region, county, district, neighbourhood) of respondents. To facilitate locating the respondents, this information will appear on the dashboard of
enumerator app for each interview for which they are responsible. You can see an example below with addresses in the United States..
Getting Started with Survey Solutions Page 15 of 43
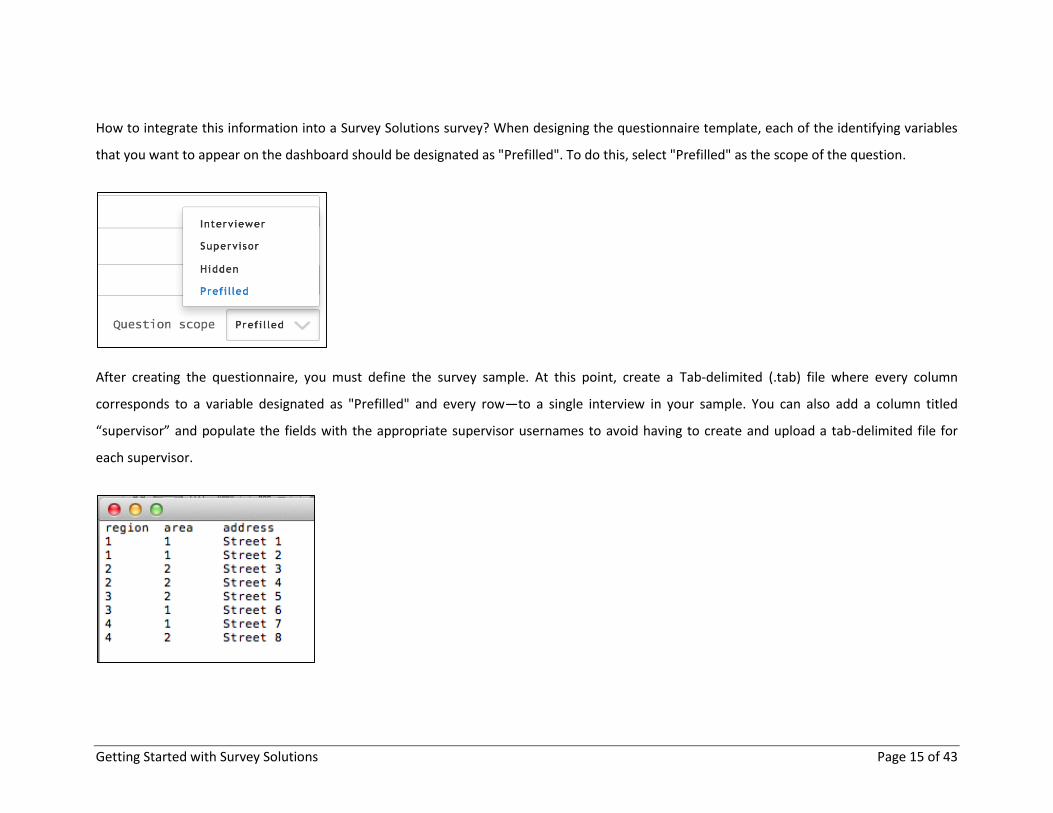
How to integrate this information into a Survey Solutions survey? When designing the questionnaire template, each of the identifying variables
that you want to appear on the dashboard should be designated as "Prefilled". To do this, select "Prefilled" as the scope of the question.
After creating the questionnaire, you must define the survey sample. At this point, create a Tab-delimited (.tab) file where every column
corresponds to a variable designated as "Prefilled" and every row—to a single interview in your sample. You can also add a column titled
“supervisor” and populate the fields with the appropriate supervisor usernames to avoid having to create and upload a tab-delimited file for
each supervisor.
Getting Started with Survey Solutions Page 16 of 43
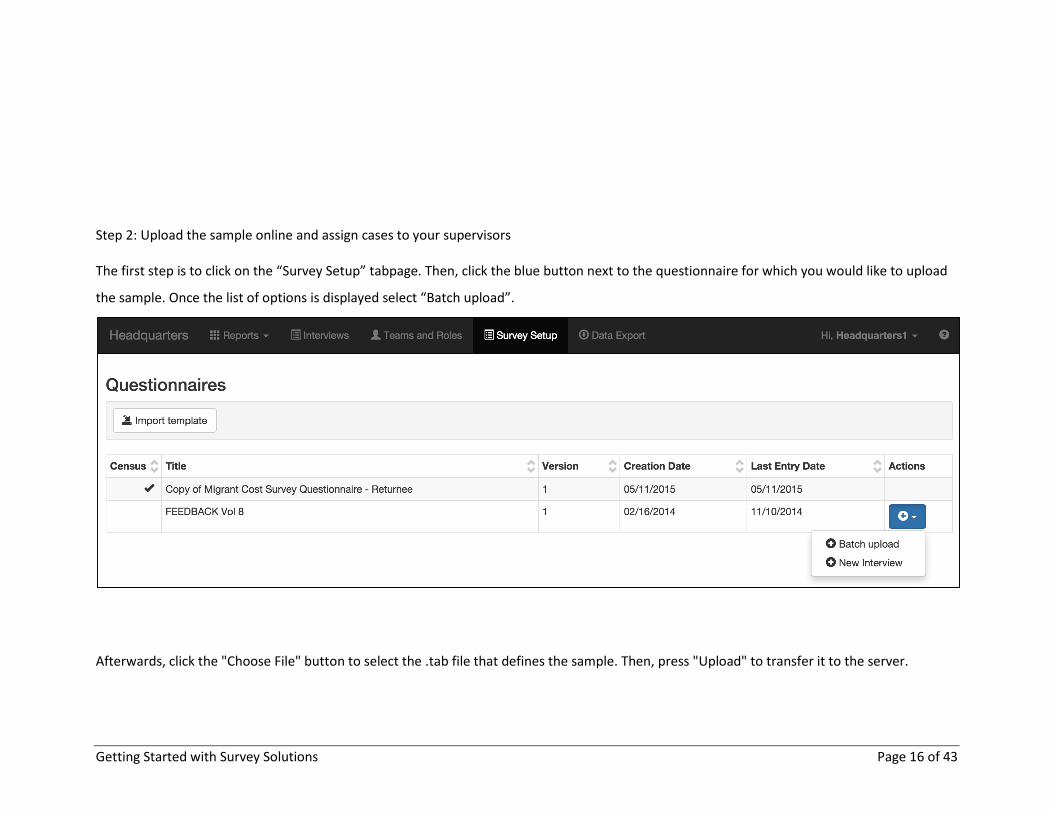
Step 2: Upload the sample online and assign cases to your supervisors The first step is to click on the “Survey Setup” tabpage. Then, click the blue button next to the questionnaire for which you would like to upload
the sample. Once the list of options is displayed select “Batch upload”.
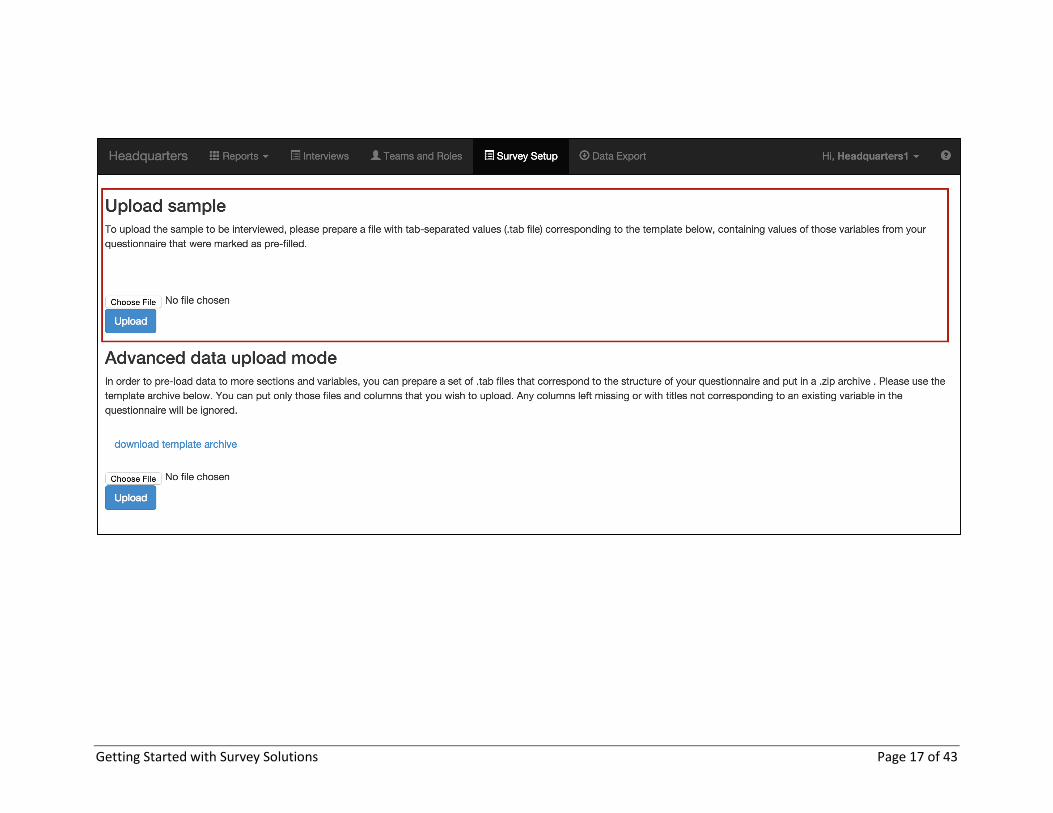
Afterwards, click the "Choose File" button to select the .tab file that defines the sample. Then, press "Upload" to transfer it to the server.
Getting Started with Survey Solutions Page 17 of 43
Getting Started with Survey Solutions Page 18 of 43
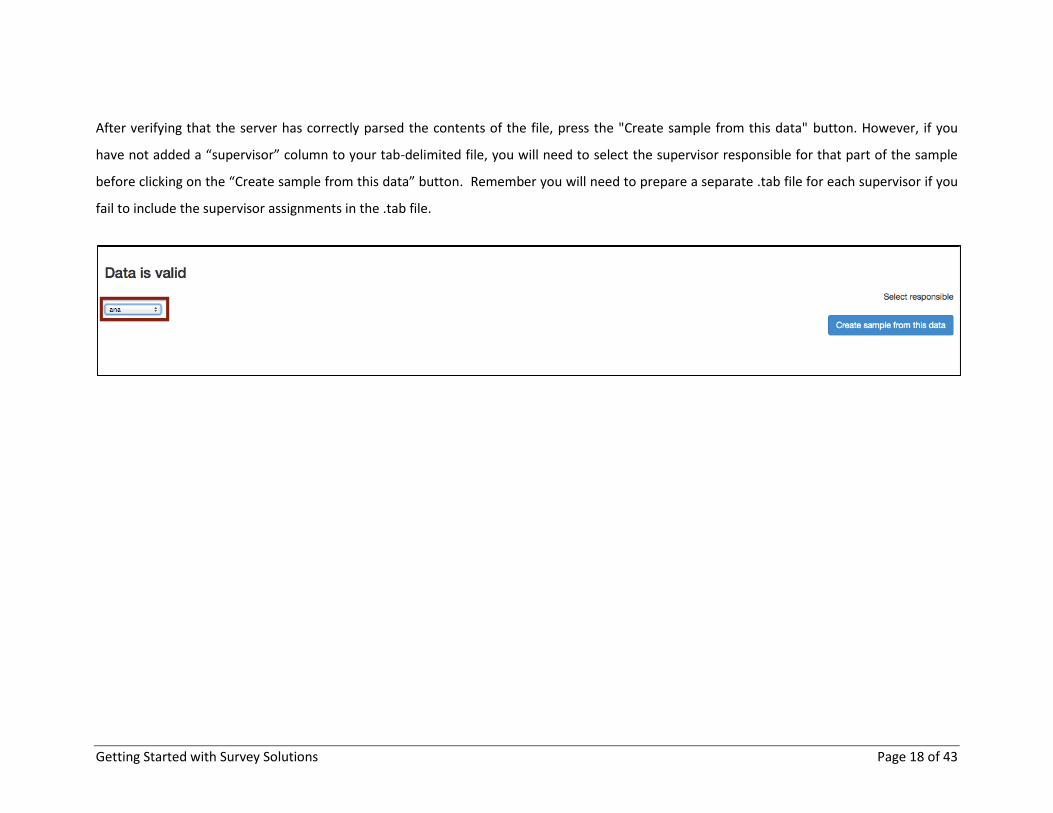
After verifying that the server has correctly parsed the contents of the file, press the "Create sample from this data" button. However, if you
have not added a “supervisor” column to your tab-delimited file, you will need to select the supervisor responsible for that part of the sample
before clicking on the “Create sample from this data” button. Remember you will need to prepare a separate .tab file for each supervisor if you
fail to include the supervisor assignments in the .tab file.
Getting Started with Survey Solutions Page 19 of 43
Step 1: Log in to your server using the headquarters username and password
Note that each institution using Survey Solutions will utilize their own server. Consequently, your username can differ from the one depicted
above.
Getting Started with Survey Solutions Page 20 of 43
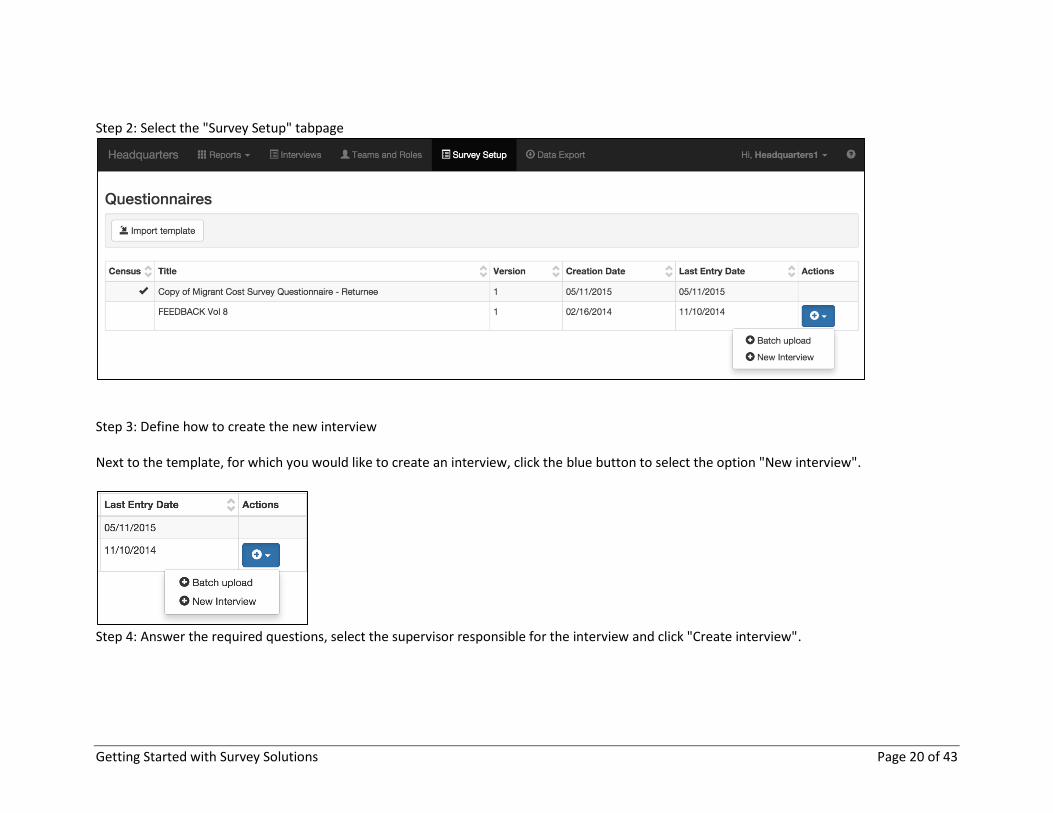
Step 2: Select the "Survey Setup" tabpage
Step 3: Define how to create the new interview Next to the template, for which you would like to create an interview, click the blue button to select the option "New interview".
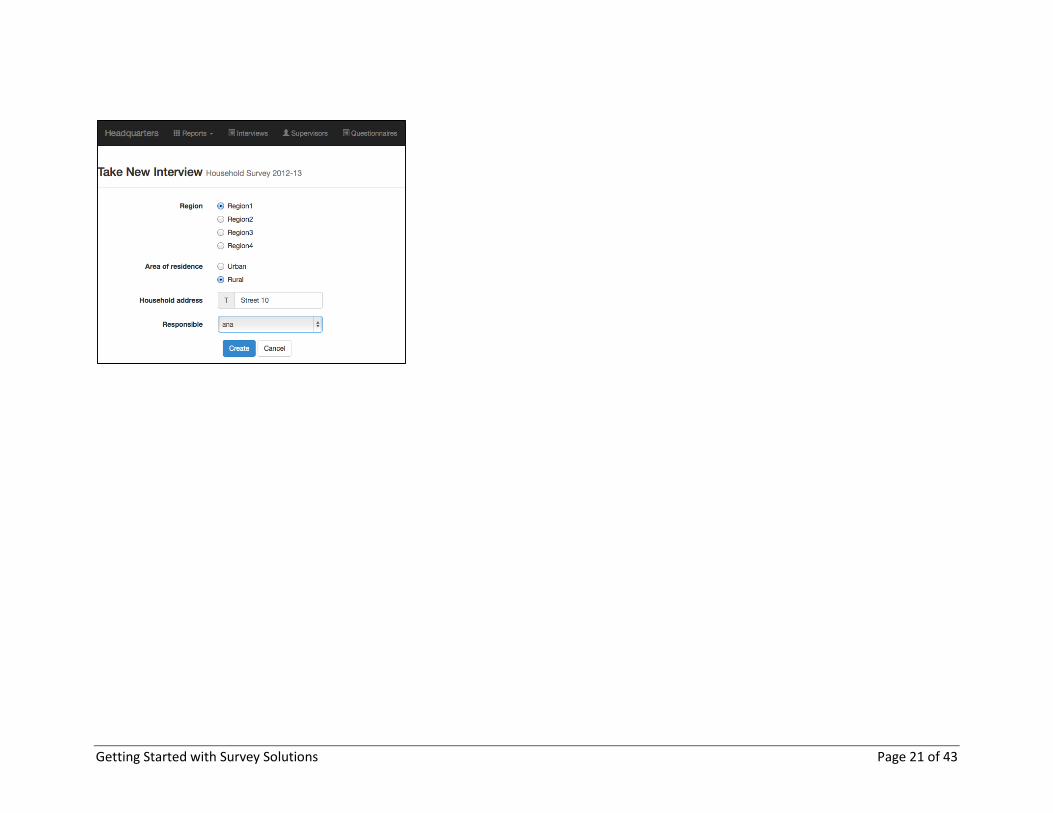
Step 4: Answer the required questions, select the supervisor responsible for the interview and click "Create interview".
Getting Started with Survey Solutions Page 21 of 43
Getting Started with Survey Solutions Page 22 of 43
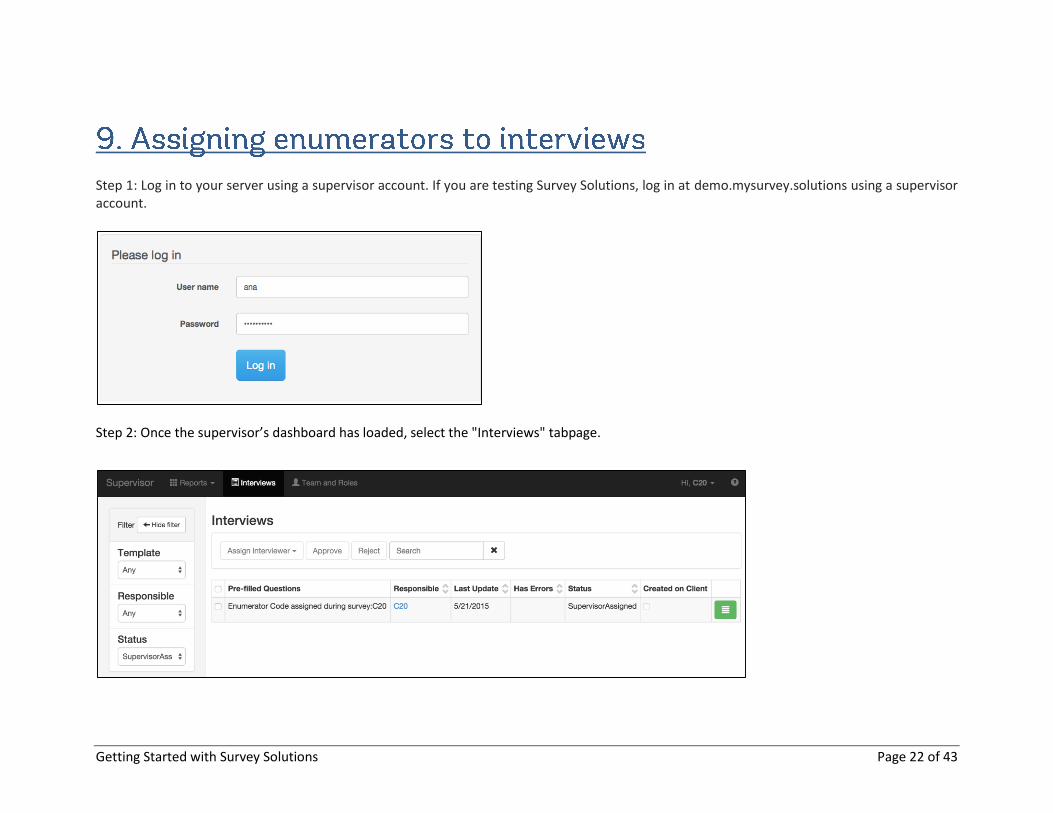
Step 1: Log in to your server using a supervisor account. If you are testing Survey Solutions, log in at demo.mysurvey.solutions using a supervisor account.
Step 2: Once the supervisor’s dashboard has loaded, select the "Interviews" tabpage.
Getting Started with Survey Solutions Page 23 of 43
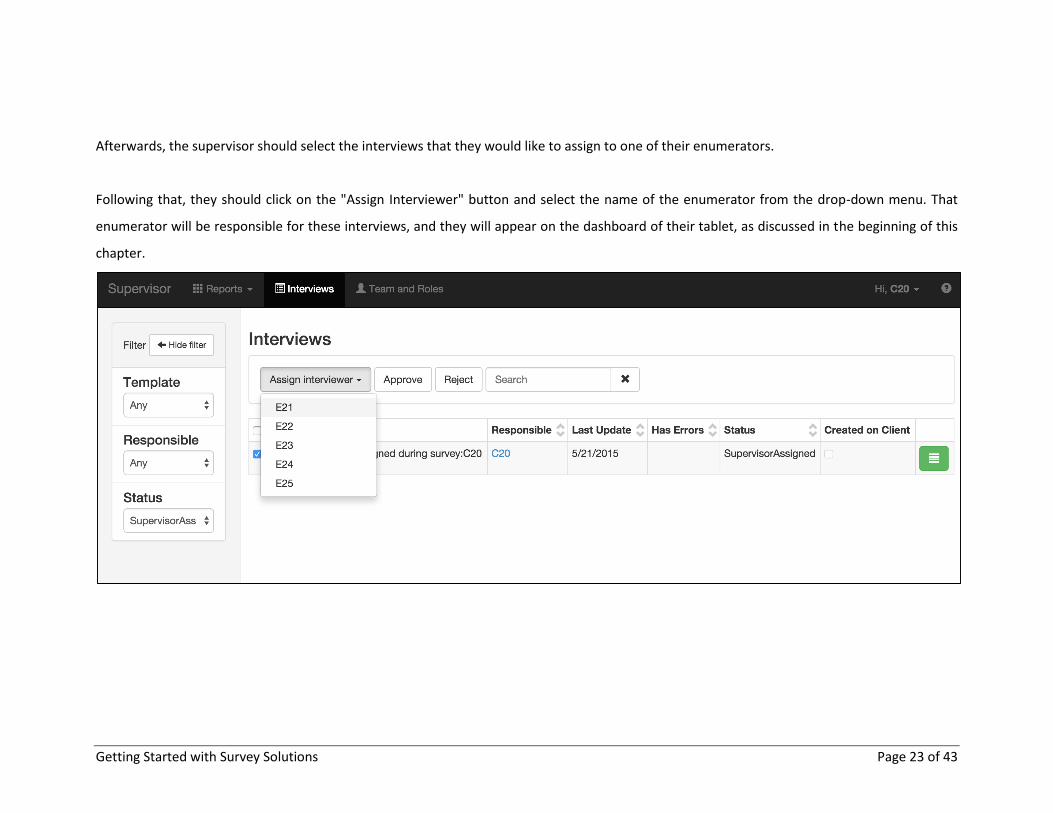
Afterwards, the supervisor should select the interviews that they would like to assign to one of their enumerators.
Following that, they should click on the "Assign Interviewer" button and select the name of the enumerator from the drop-down menu. That
enumerator will be responsible for these interviews, and they will appear on the dashboard of their tablet, as discussed in the beginning of this
chapter.
Getting Started with Survey Solutions Page 24 of 43
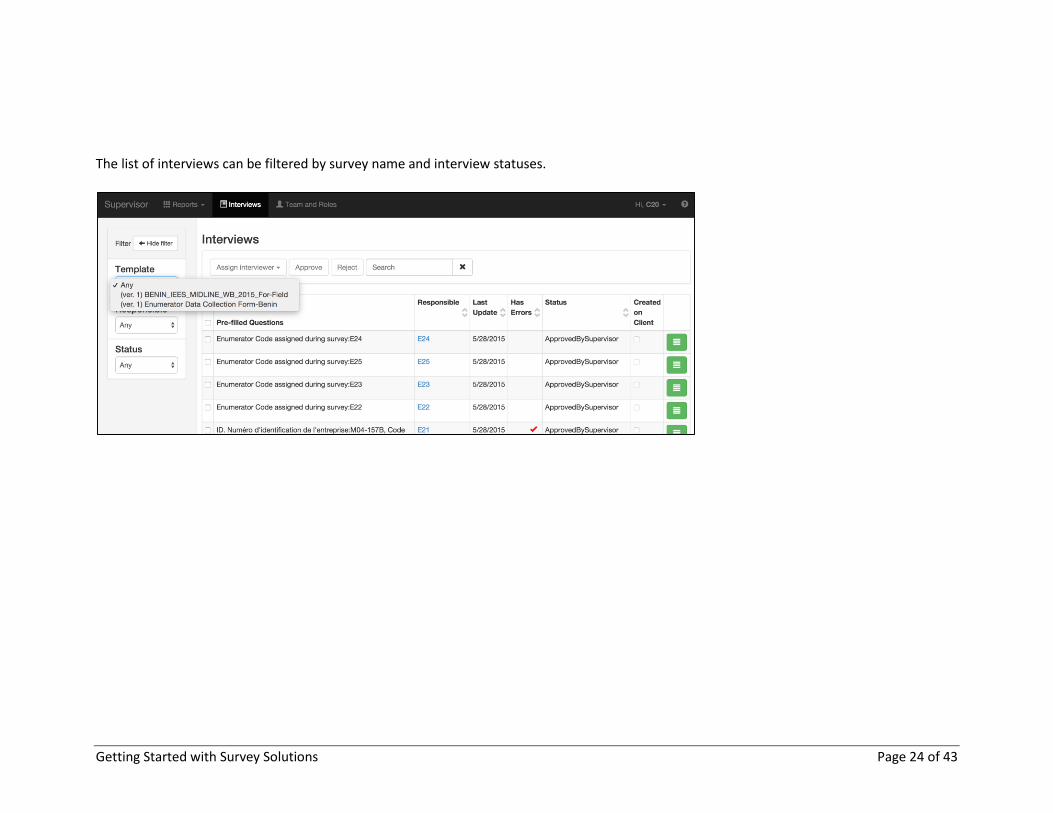
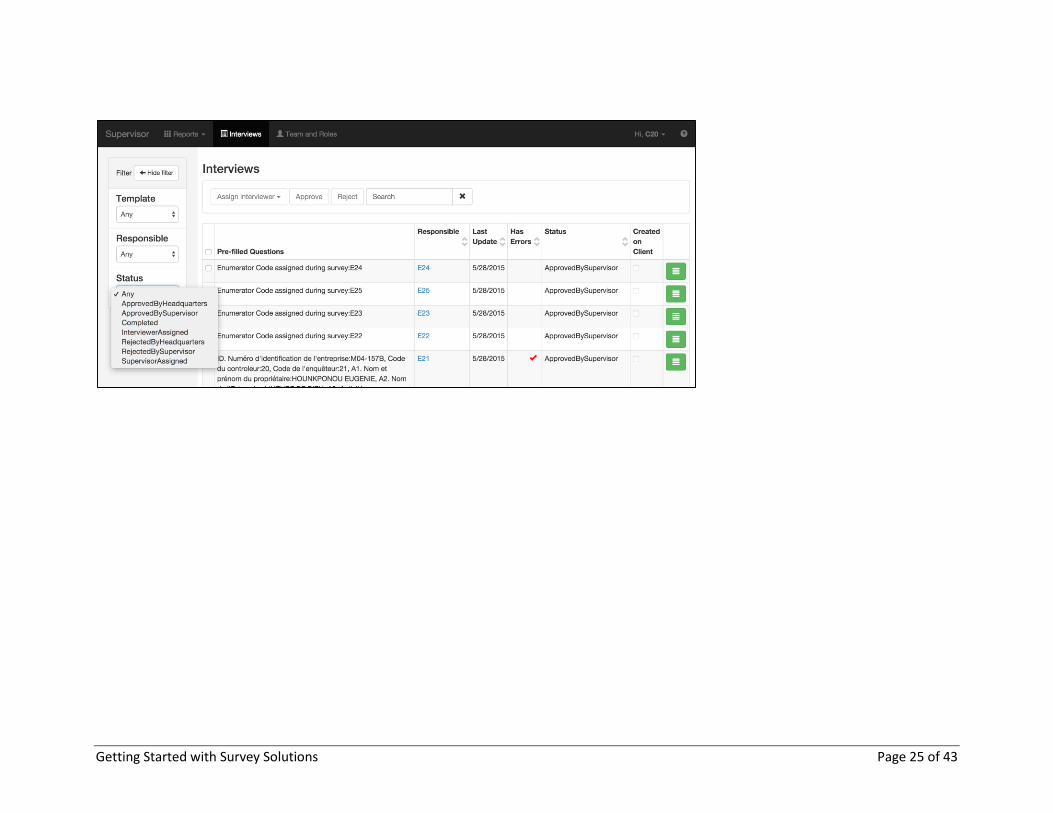
The list of interviews can be filtered by survey name and interview statuses.
Getting Started with Survey Solutions Page 25 of 43
Getting Started with Survey Solutions Page 26 of 43
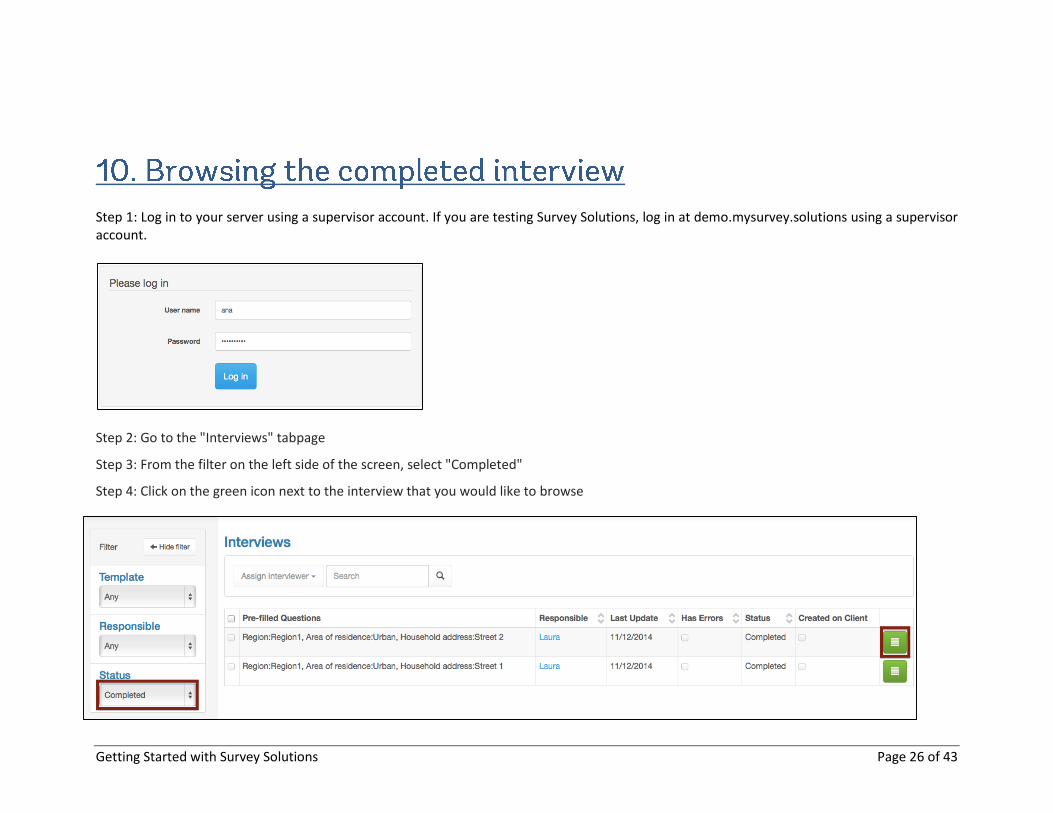
Step 1: Log in to your server using a supervisor account. If you are testing Survey Solutions, log in at demo.mysurvey.solutions using a supervisor account.
Step 2: Go to the "Interviews" tabpage
Step 3: From the filter on the left side of the screen, select "Completed"
Step 4: Click on the green icon next to the interview that you would like to browse
Getting Started with Survey Solutions Page 27 of 43
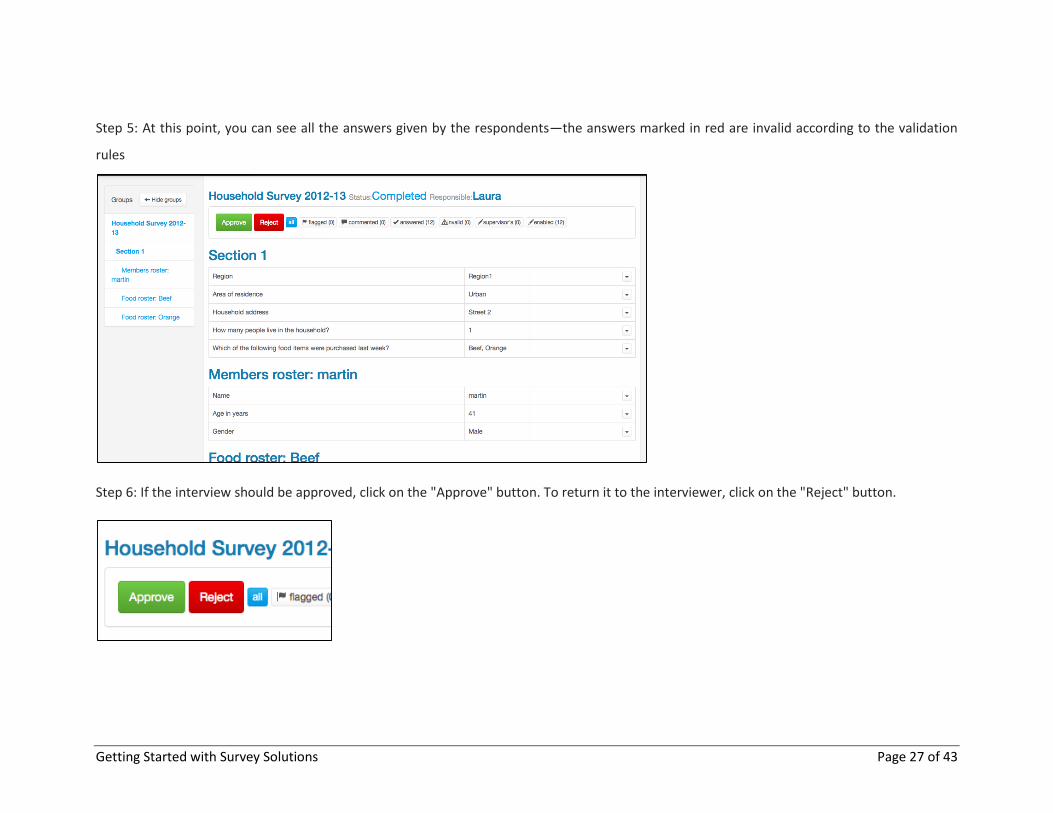
Step 5: At this point, you can see all the answers given by the respondents—the answers marked in red are invalid according to the validation
rules
Step 6: If the interview should be approved, click on the "Approve" button. To return it to the interviewer, click on the "Reject" button.
Getting Started with Survey Solutions Page 28 of 43
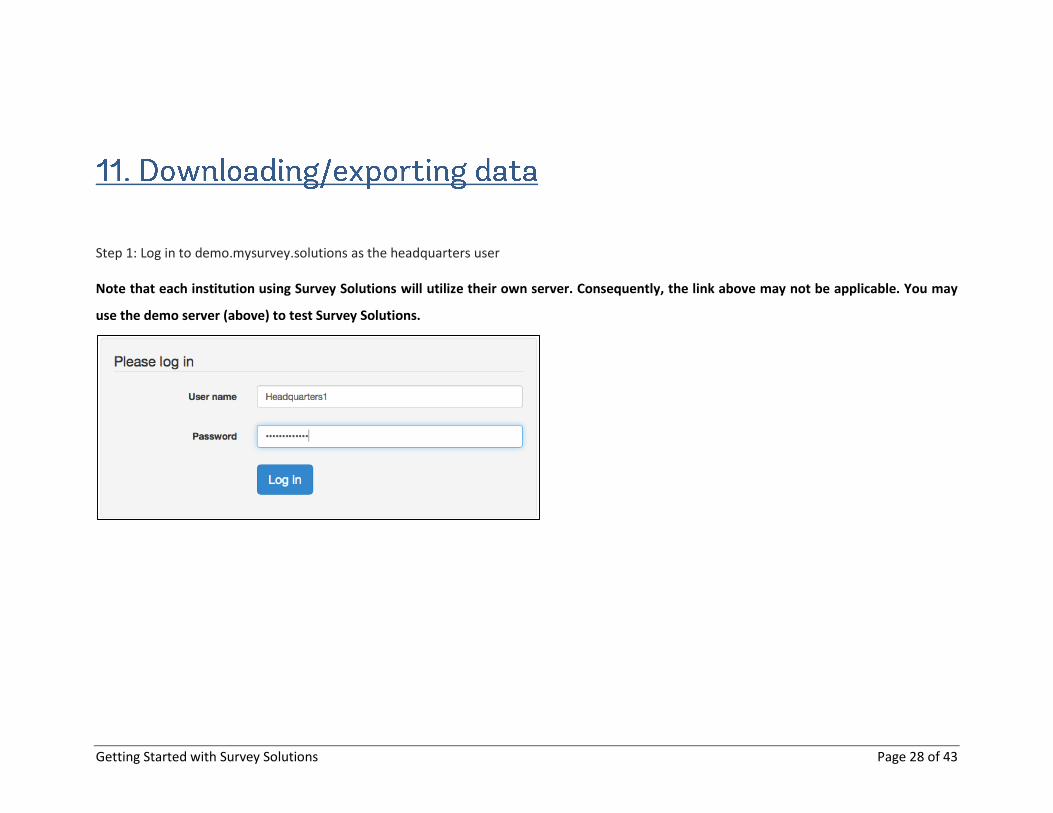
Step 1: Log in to demo.mysurvey.solutions as the headquarters user Note that each institution using Survey Solutions will utilize their own server. Consequently, the link above may not be applicable. You may
use the demo server (above) to test Survey Solutions.
Getting Started with Survey Solutions Page 29 of 43
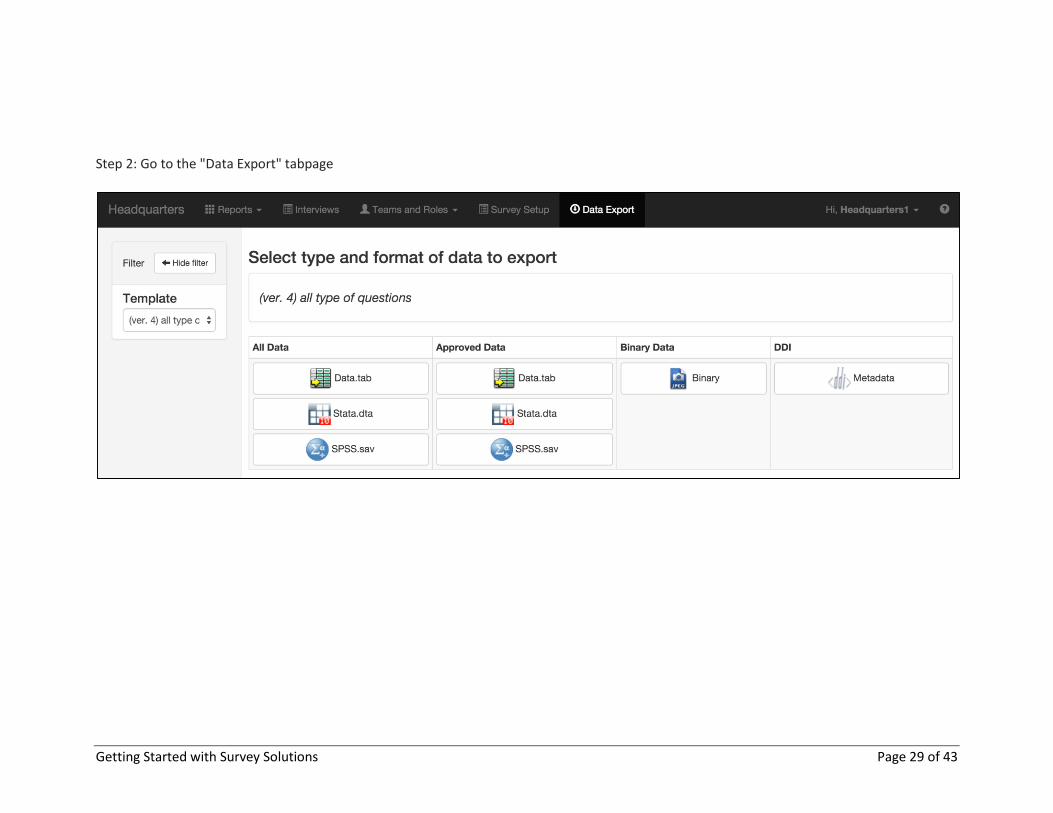
Step 2: Go to the "Data Export" tabpage
Getting Started with Survey Solutions Page 30 of 43
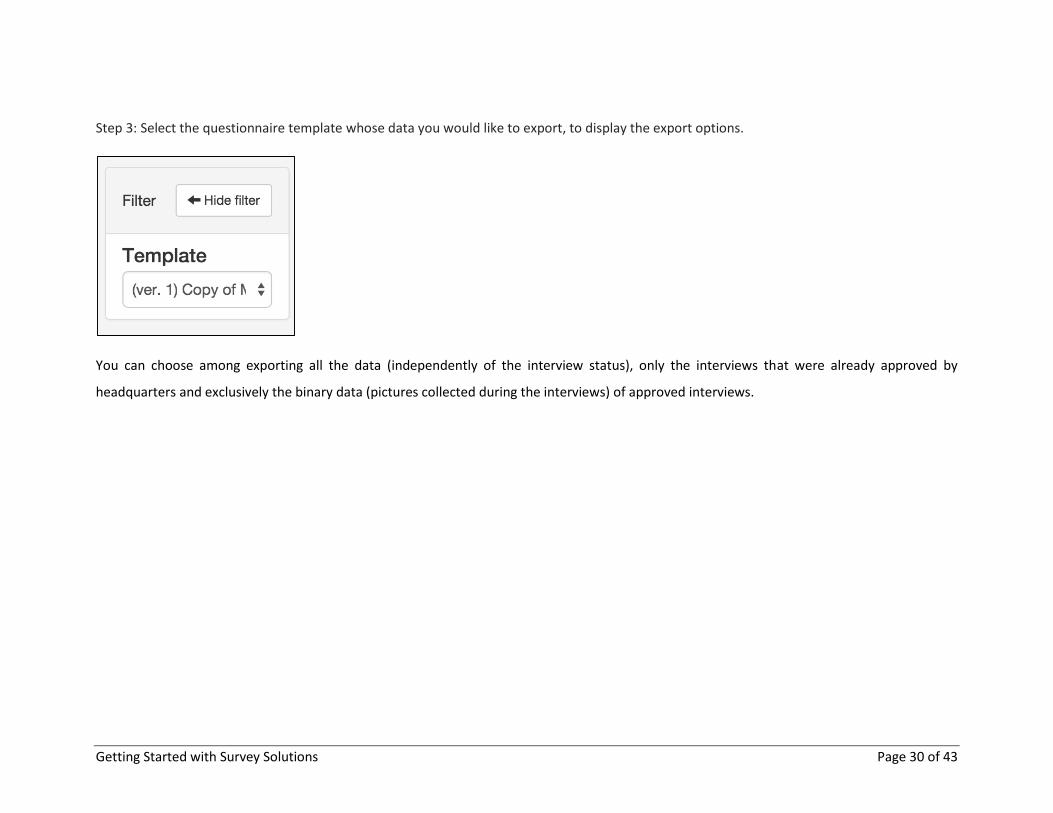
Step 3: Select the questionnaire template whose data you would like to export, to display the export options.
You can choose among exporting all the data (independently of the interview status), only the interviews that were already approved by
headquarters and exclusively the binary data (pictures collected during the interviews) of approved interviews.
Getting Started with Survey Solutions Page 31 of 43
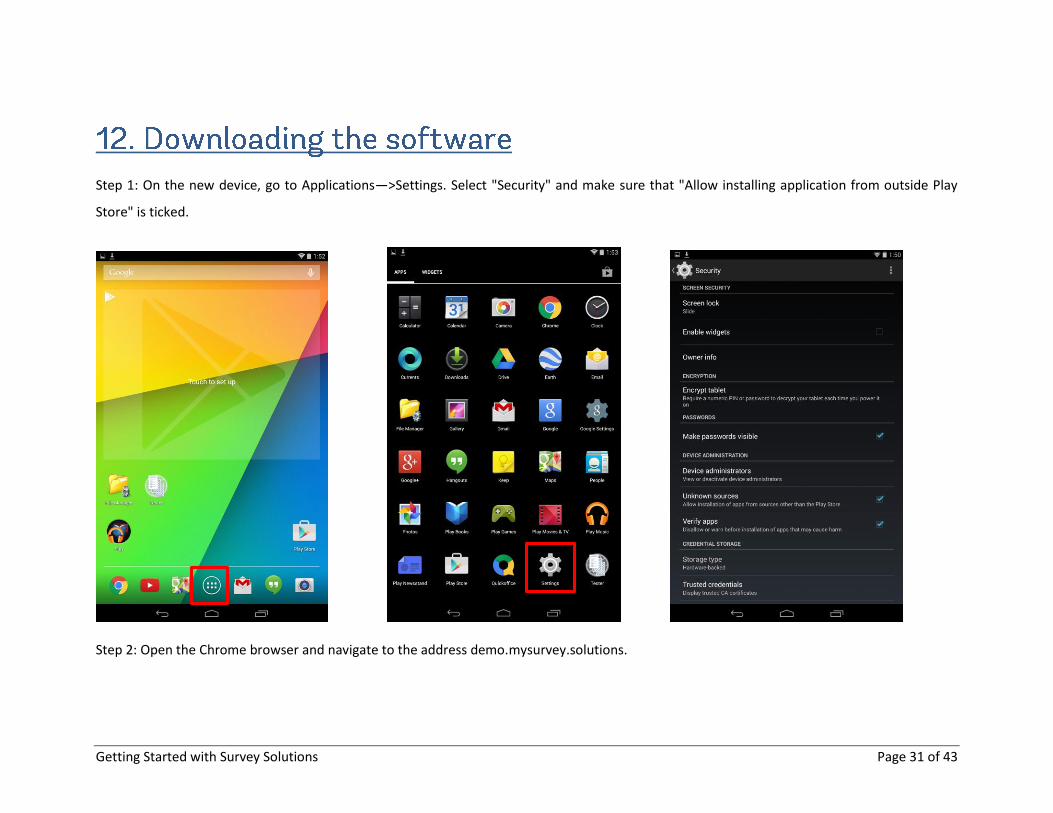
Step 1: On the new device, go to Applications—>Settings. Select "Security" and make sure that "Allow installing application from outside Play
Store" is ticked.
Step 2: Open the Chrome browser and navigate to the address demo.mysurvey.solutions.
Getting Started with Survey Solutions Page 32 of 43
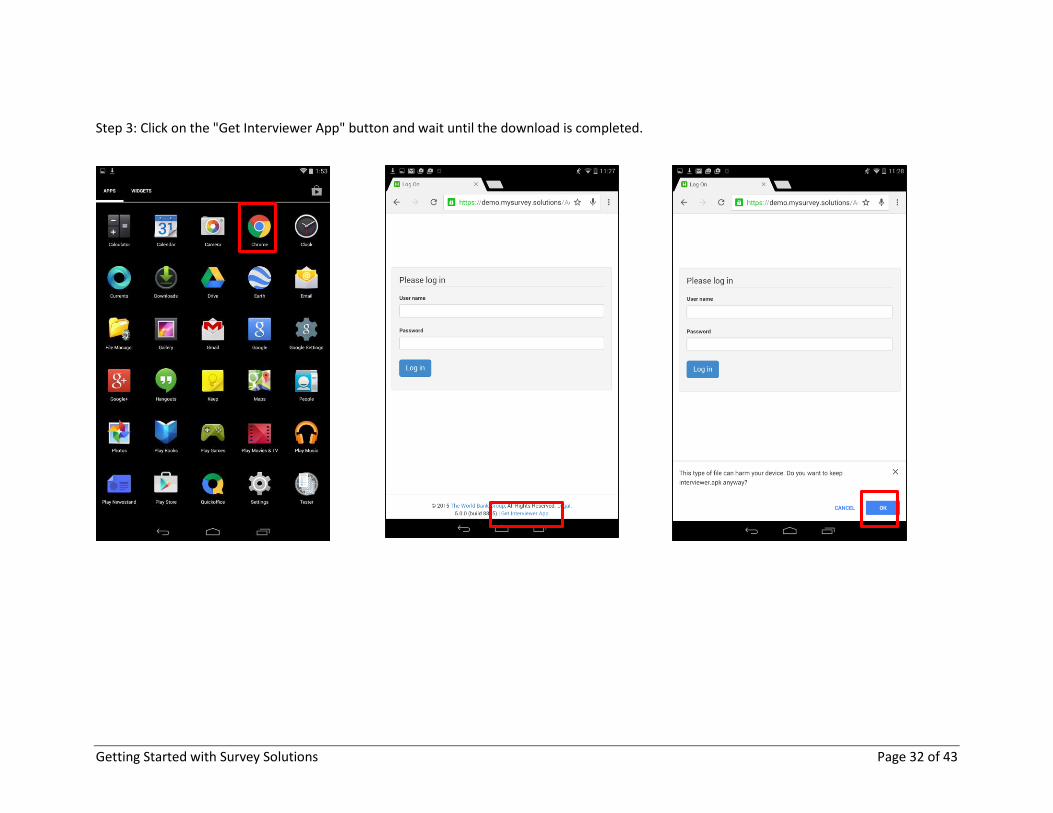
Step 3: Click on the "Get Interviewer App" button and wait until the download is completed.
Getting Started with Survey Solutions Page 33 of 43
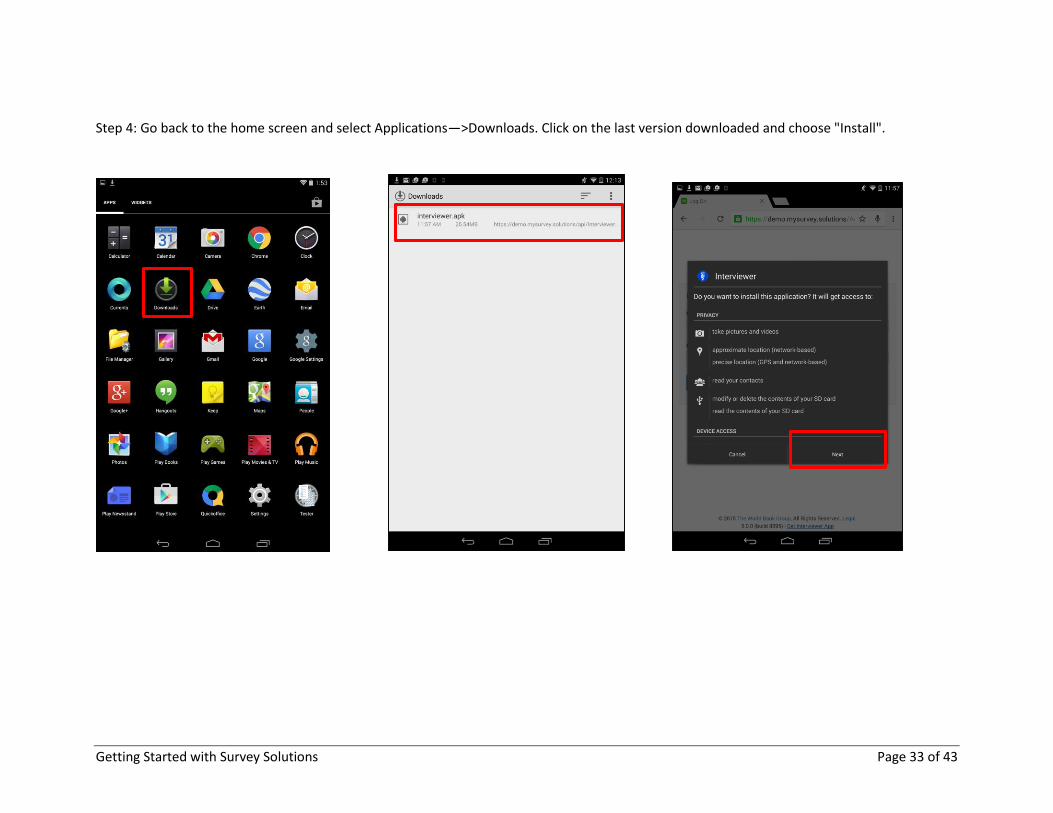
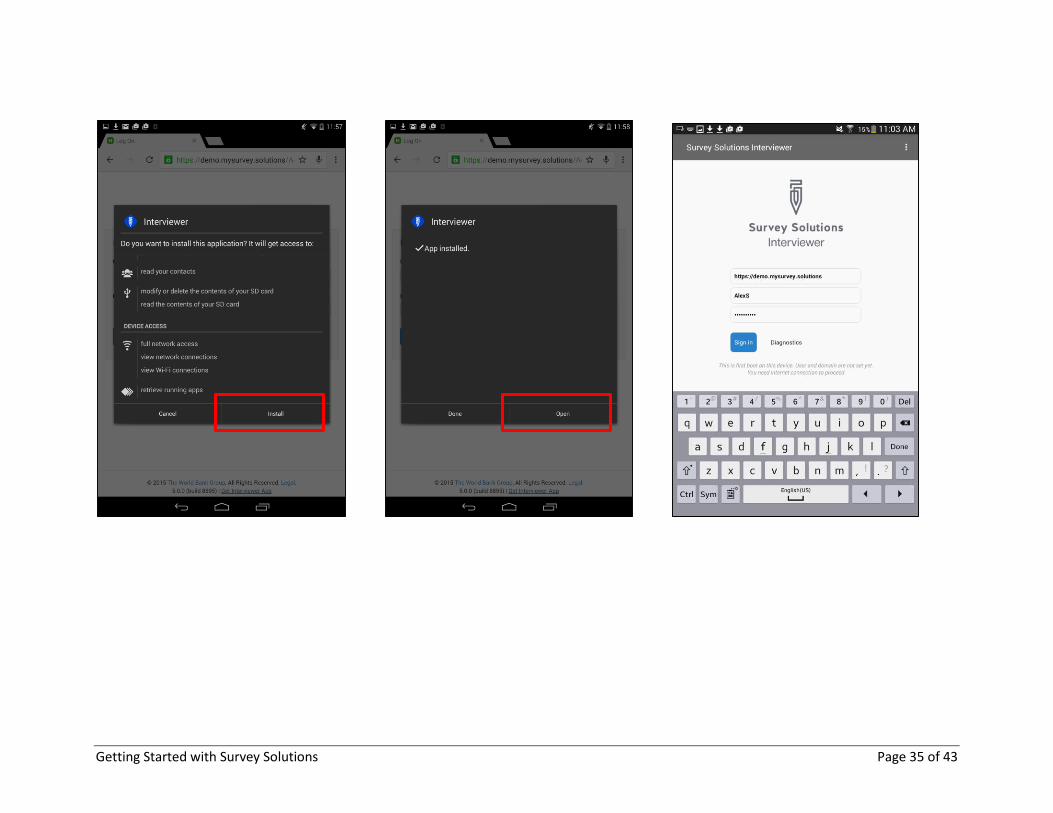
Step 4: Go back to the home screen and select Applications—>Downloads. Click on the last version downloaded and choose "Install".
Getting Started with Survey Solutions Page 34 of 43
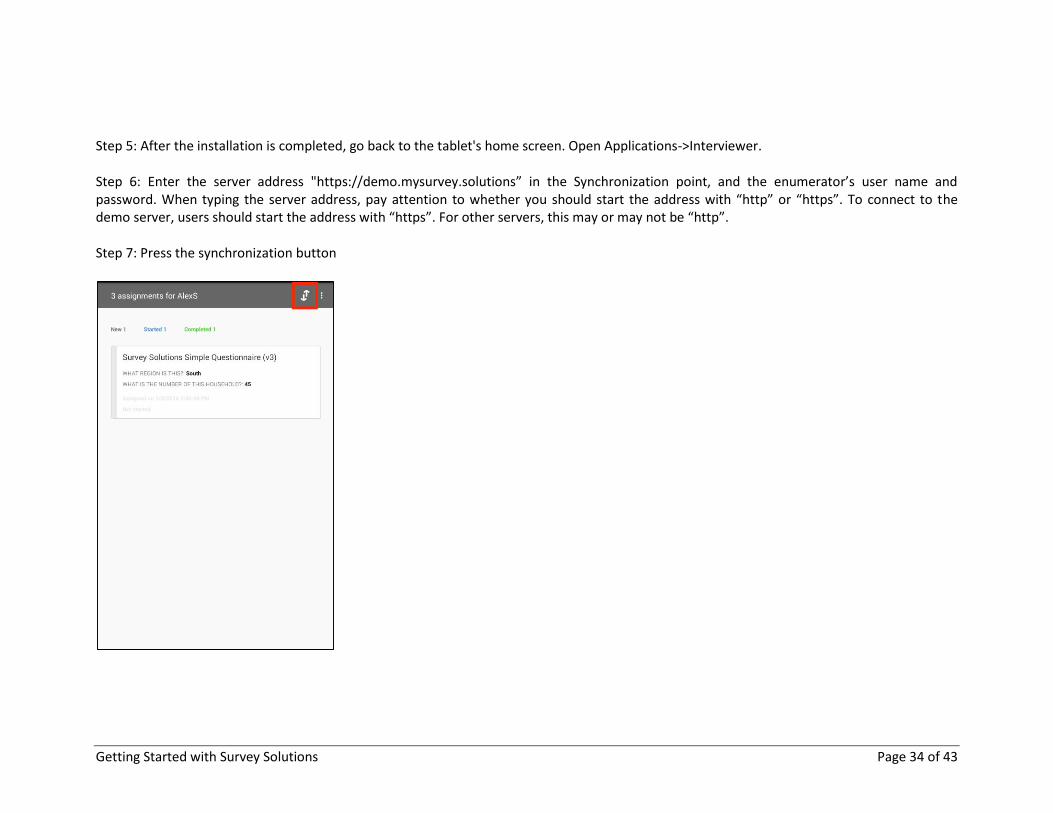
Step 5: After the installation is completed, go back to the tablet's home screen. Open Applications->Interviewer. Step 6: Enter the server address "https://demo.mysurvey.solutions” in the Synchronization point, and the enumerator’s user name and password. When typing the server address, pay attention to whether you should start the address with “http” or “https”. To connect to the demo server, users should start the address with “https”. For other servers, this may or may not be “http”. Step 7: Press the synchronization button
Getting Started with Survey Solutions Page 35 of 43
Getting Started with Survey Solutions Page 36 of 43
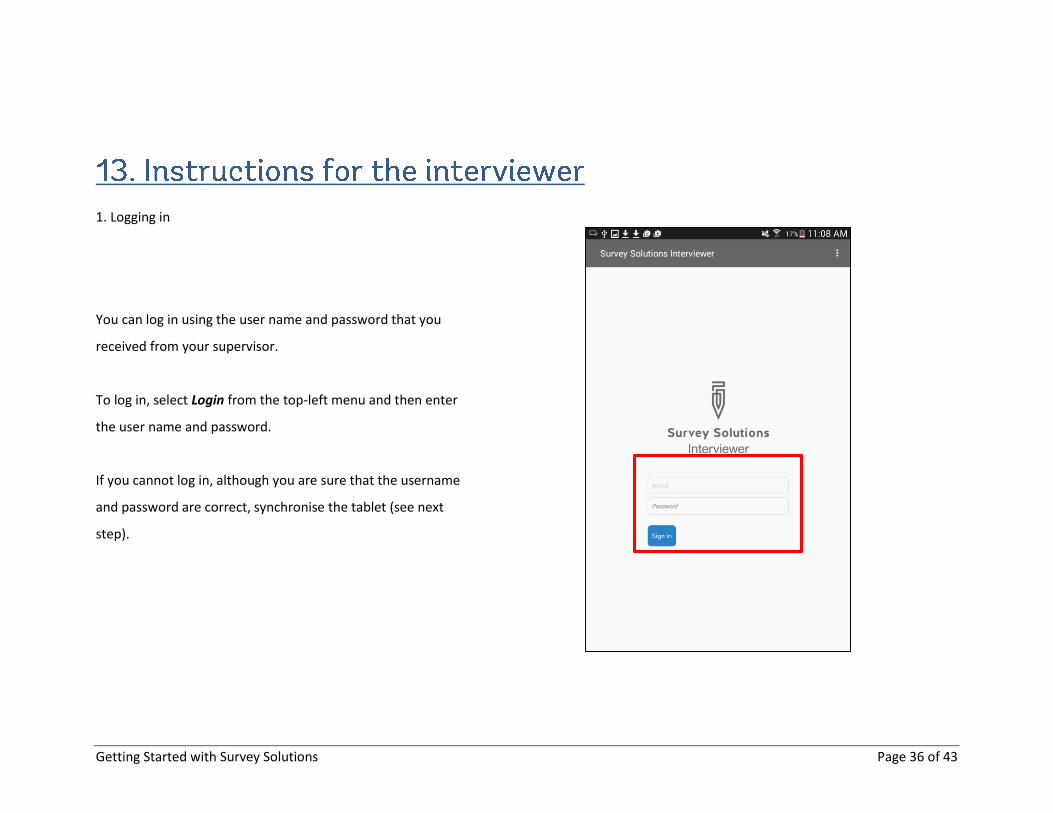
1. Logging in
You can log in using the user name and password that you
received from your supervisor.
To log in, select Login from the top-left menu and then enter
the user name and password.
If you cannot log in, although you are sure that the username
and password are correct, synchronise the tablet (see next
step).
Getting Started with Survey Solutions Page 37 of 43
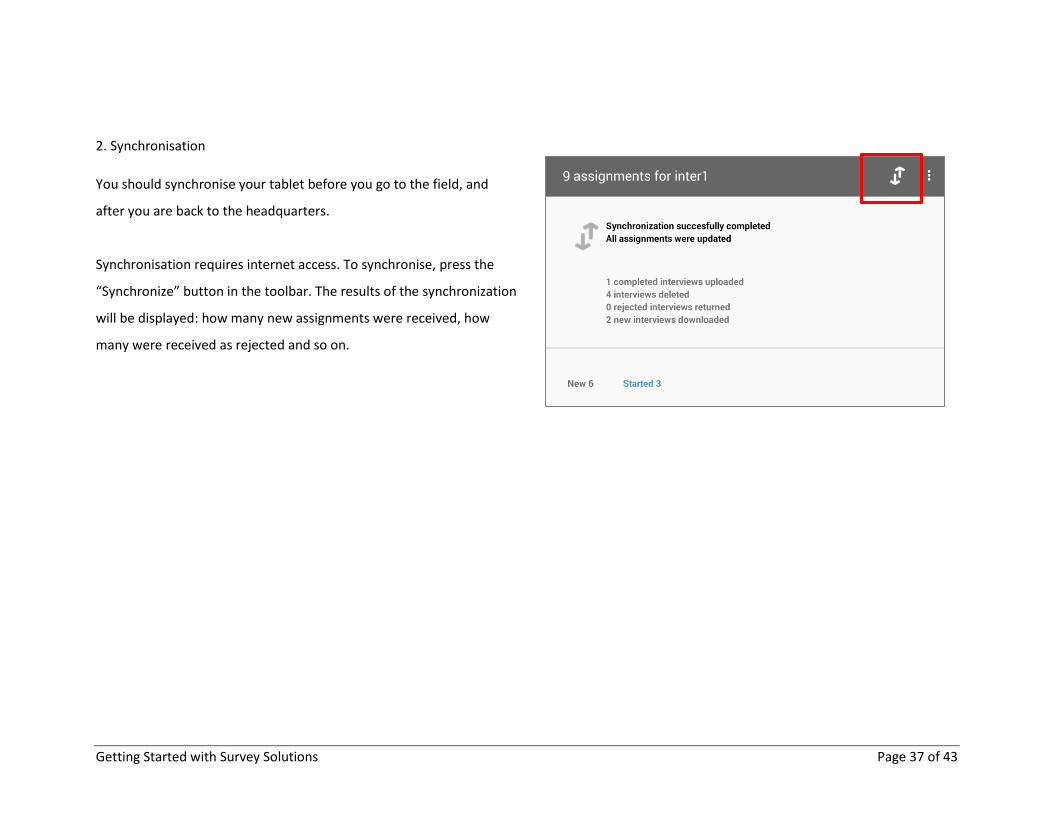
2. Synchronisation
You should synchronise your tablet before you go to the field, and
after you are back to the headquarters.
Synchronisation requires internet access. To synchronise, press the
“Synchronize” button in the toolbar. The results of the synchronization
will be displayed: how many new assignments were received, how
many were received as rejected and so on.
Getting Started with Survey Solutions Page 38 of 43
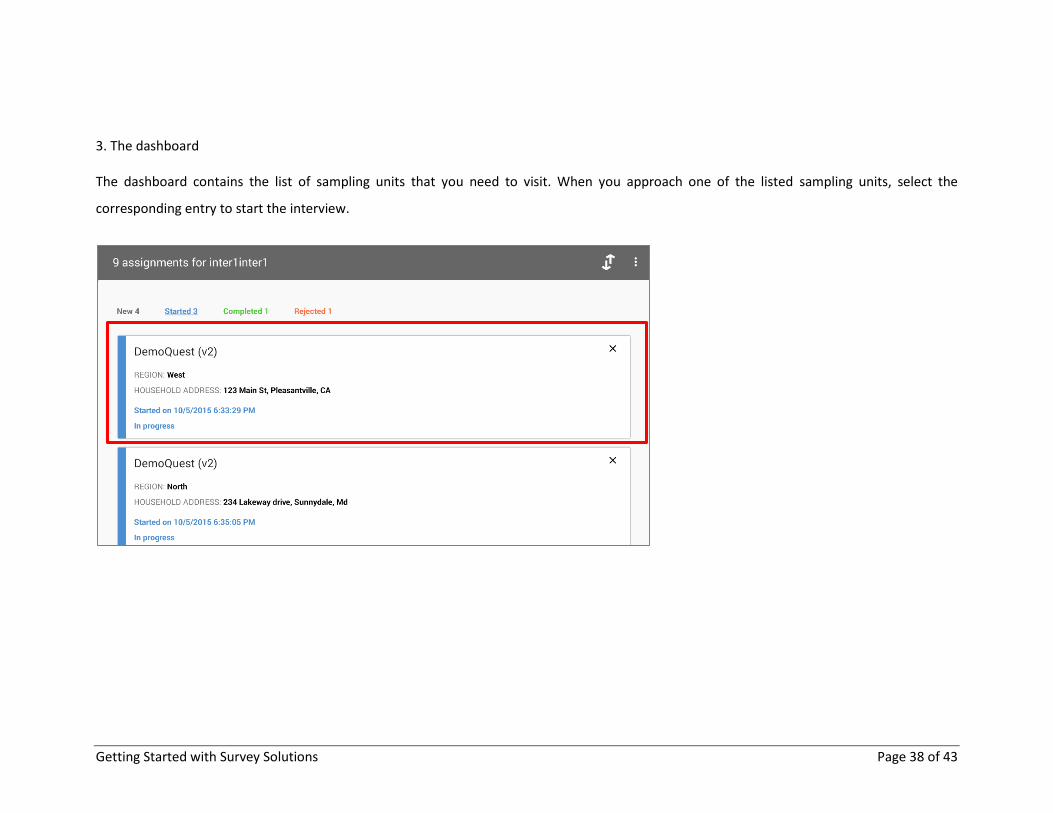
3. The dashboard The dashboard contains the list of sampling units that you need to visit. When you approach one of the listed sampling units, select the
corresponding entry to start the interview.
Getting Started with Survey Solutions Page 39 of 43
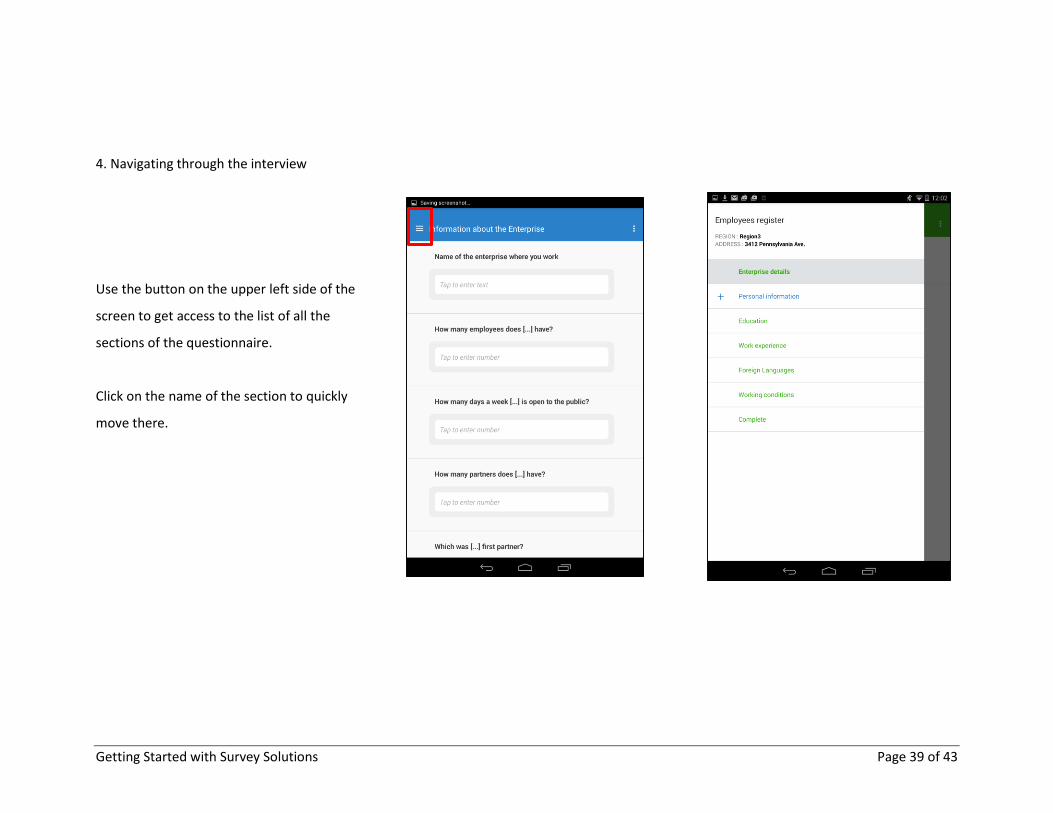
4. Navigating through the interview
Use the button on the upper left side of the
screen to get access to the list of all the
sections of the questionnaire.
Click on the name of the section to quickly
move there.
Getting Started with Survey Solutions Page 40 of 43
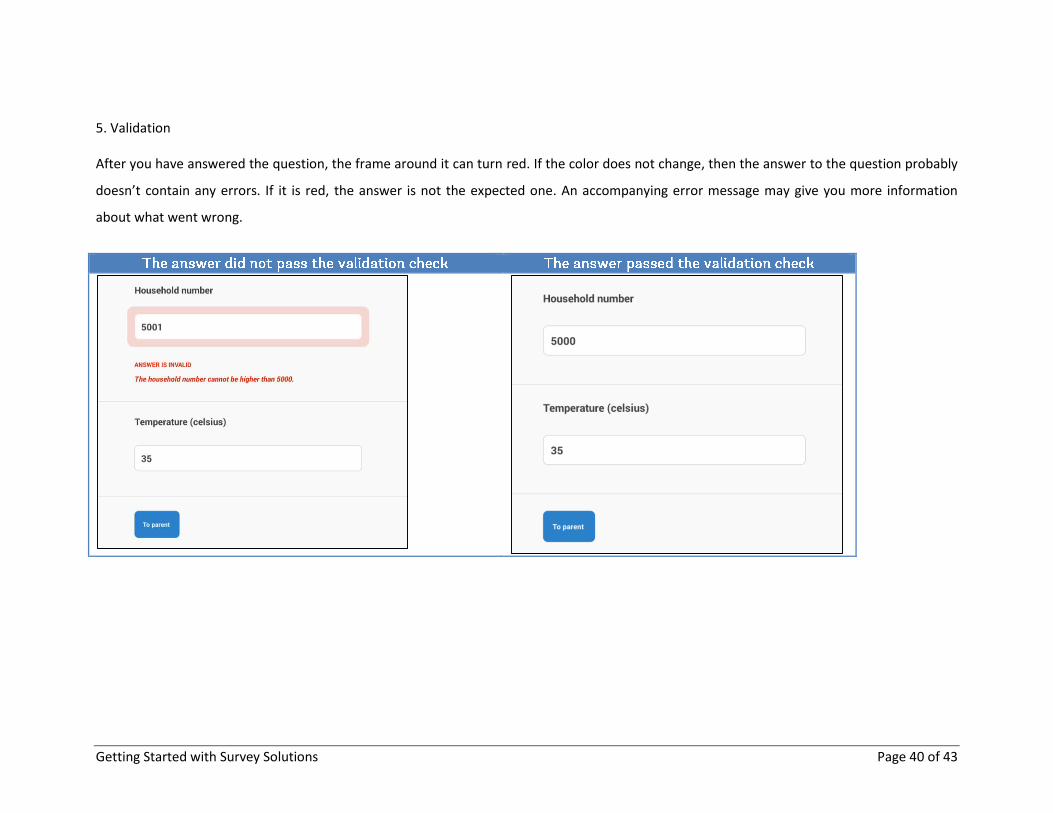
5. Validation After you have answered the question, the frame around it can turn red. If the color does not change, then the answer to the question probably
doesn’t contain any errors. If it is red, the answer is not the expected one. An accompanying error message may give you more information
about what went wrong.
Getting Started with Survey Solutions Page 41 of 43
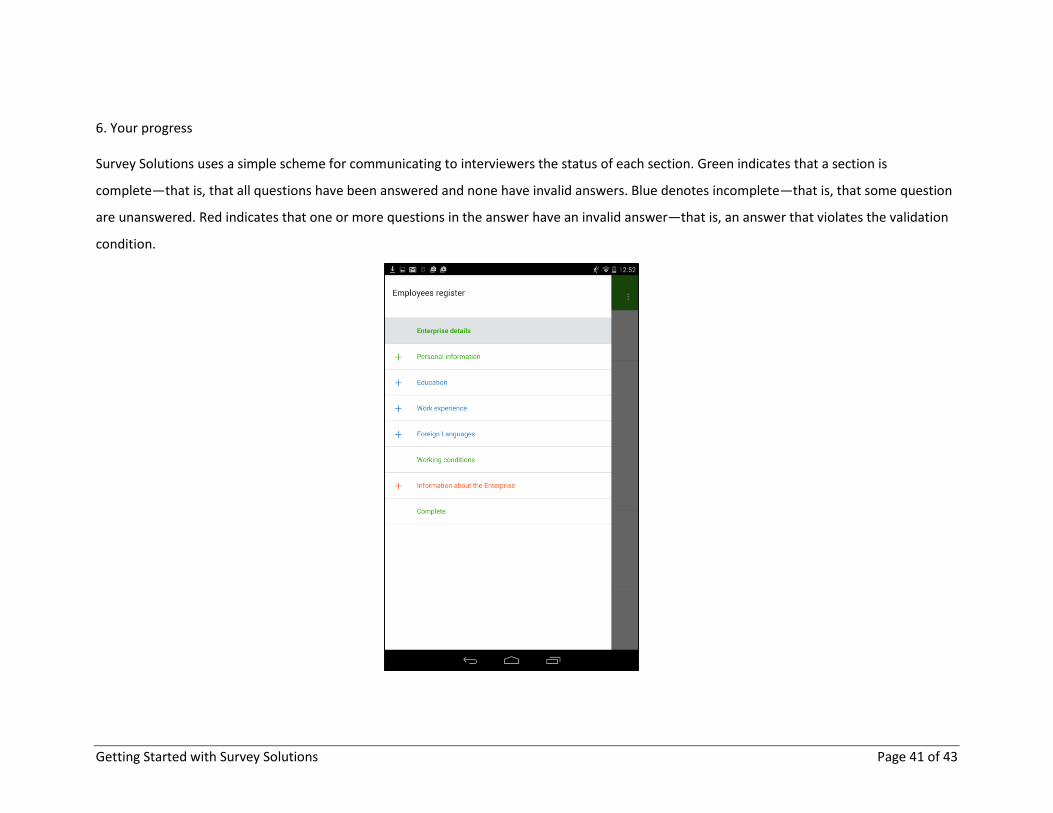
6. Your progress Survey Solutions uses a simple scheme for communicating to interviewers the status of each section. Green indicates that a section is
complete—that is, that all questions have been answered and none have invalid answers. Blue denotes incomplete—that is, that some question
are unanswered. Red indicates that one or more questions in the answer have an invalid answer—that is, an answer that violates the validation
condition.
Getting Started with Survey Solutions Page 42 of 43
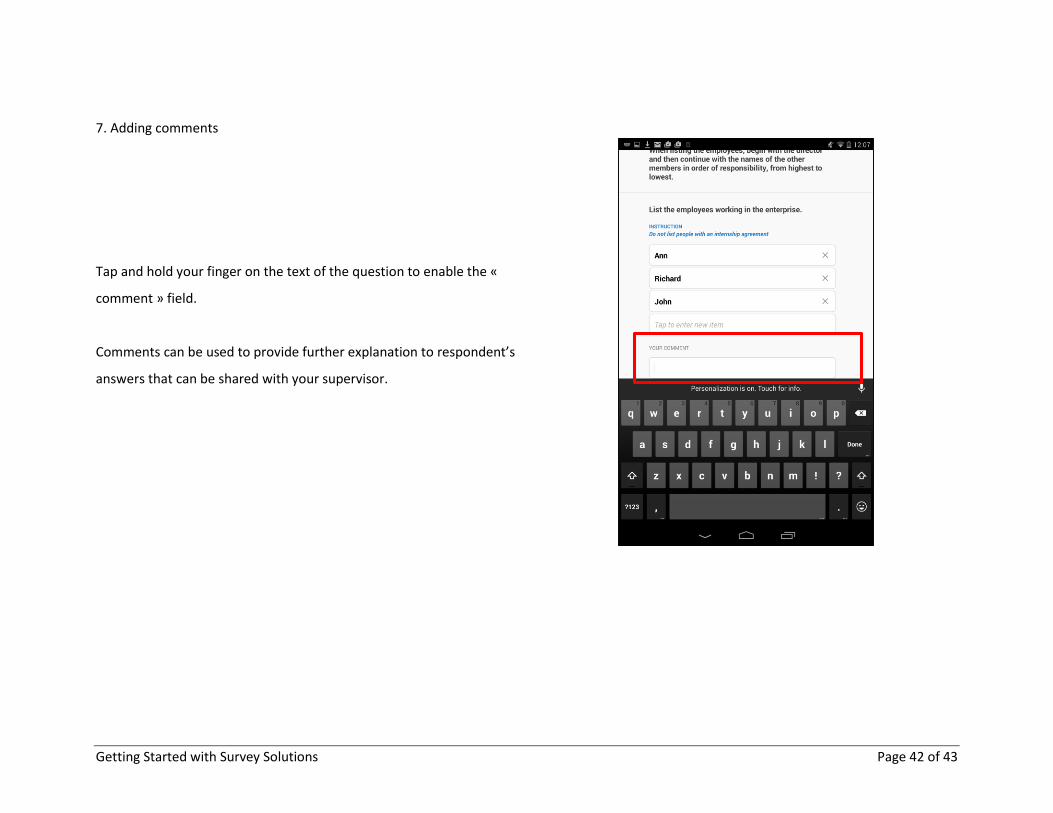
7. Adding comments
Tap and hold your finger on the text of the question to enable the «
comment » field.
Comments can be used to provide further explanation to respondent’s
answers that can be shared with your supervisor.
Getting Started with Survey Solutions Page 43 of 43
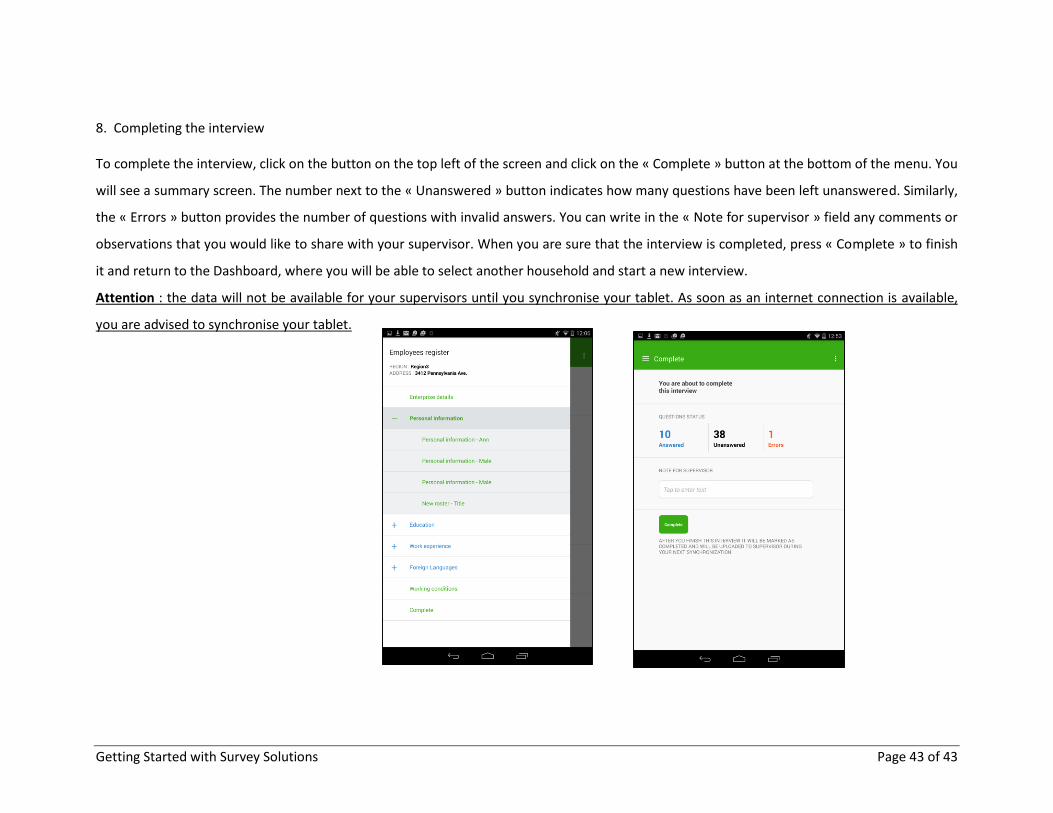
8. Completing the interview To complete the interview, click on the button on the top left of the screen and click on the « Complete » button at the bottom of the menu. You
will see a summary screen. The number next to the « Unanswered » button indicates how many questions have been left unanswered. Similarly,
the « Errors » button provides the number of questions with invalid answers. You can write in the « Note for supervisor » field any comments or
observations that you would like to share with your supervisor. When you are sure that the interview is completed, press « Complete » to finish
it and return to the Dashboard, where you will be able to select another household and start a new interview.
Attention : the data will not be available for your supervisors until you synchronise your tablet. As soon as an internet connection is available,
you are advised to synchronise your tablet.


![Skaffold - storage.googleapis.com · [getting-started getting-started] Hello world! [getting-started getting-started] Hello world! [getting-started getting-started] Hello world! 5](https://img.pdfslide.us/doc/110x75/5ec939f2a76a033f091c5ac7/skaffold-getting-started-getting-started-hello-world-getting-started-getting-started.jpg)