Embed Size (px)
Citation preview

C H A P T E R 1
Getting Started with Security ManagerThe following topics describe Cisco Security Manager, how to get started with the application, and how to complete its configuration.
• Product Overview, page 1-1
• Logging In to and Exiting Security Manager, page 1-10
• Using Configuration Manager - Overview, page 1-13
• Using the JumpStart to Learn About Security Manager, page 1-24
• Completing the Initial Security Manager Configuration, page 1-25
• Understanding Basic Security Manager Interface Features, page 1-29
• Accessing Online Help, page 1-52
Product Overview Cisco Security Manager (Security Manager) enables you to manage security policies on Cisco security devices. Security Manager supports integrated provisioning of firewall, IPS, and VPN (site-to-site, remote access, and SSL) services across:
• ASA and PIX security appliances.
• IPS appliances and various service modules for routers and ASA devices.
• IOS routers.
• Catalyst switches.
• Catalyst services modules related to firewall, VPN, and IPS.
Note For a complete list of devices and OS versions supported by Security Manager, please refer to Supported Devices and Software Versions for Cisco Security Manager on Cisco.com.
Security Manager also supports provisioning of many platform-specific settings, for example, interfaces, routing, identity, QoS, logging, and so on.
Security Manager efficiently manages a wide range of networks, from small networks consisting of a few devices to large networks with thousands of devices. Scalability is achieved through a rich feature set of shareable objects and policies and device grouping capabilities.
Security Manager supports multiple configuration views optimized around different task flows and use cases.
1-1User Guide for Cisco Security Manager 4.12
Chapter 1 Getting Started with Security ManagerProduct Overview
The following topics provide an overview of Security Manager:
• Primary Benefits of Cisco Security Manager, page 1-2
• Security Manager Policy Feature Sets, page 1-4
• Security Manager Applications Overview, page 1-6
• Device Monitoring Overview, page 1-7
• IPv6 Support in Security Manager, page 1-8
Primary Benefits of Cisco Security Manager These are the primary benefits of working with Security Manager:
• Scalable network management—Centrally administer security policies and device settings for either small networks or large scale networks consisting of thousands of devices. Define policies and settings once and then optionally assign them to individual devices, groups of devices or all the devices in the enterprise.
• Provisioning of multiple security technologies across different platforms—Manage VPN, firewall, and IPS technologies on routers, security appliances, Catalyst devices and service modules, and IPS devices.
• Provisioning of platform-specific settings and policies—Manage platform-specific settings on specific device types. For example: routing, 802.1x, EzSDD, and Network Admission Control on routers, and device access security, DHCP, AAA, and multicast on firewall devices.
• VPN wizards—Quickly and easily configure point-to-point, hub-and-spoke, full-mesh, and Extranet site-to-site VPNs across different VPN device types. Quickly and easily configure remote access IPsec and SSL VPNs on ASA, IOS, and PIX devices.
• Multiple management views—Device, policy, and map views enable you to manage your security in the environment that best suits your needs.
• Reusable policy objects—Create reusable objects to represent network addresses, device settings, VPN parameters, and so on, then use them instead of manually entering values.
• Device grouping capabilities—Create device groups to represent your organizational structure. Manage all devices in the groups concurrently.
• Policy inheritance—Centrally specify which policies are mandatory and enforced lower in the organization.
• Role-based administration—Enable appropriate access controls for different operators.
• Workflow—Optionally allow division of responsibility and workload between network operators and security operators and provide a change management approval and tracking mechanism.
• Ticket Management—Associate a ticket ID with policy changes, easily add and update comments pertaining to those changes, and quickly navigate to an external change management system from Security Manager.
• Single, consistent user interface for managing common firewall features—Single rule table for all platforms (router, PIX, ASA, and FWSM).
• Image management—Complete image management for ASA devices. Facilitates at every stage of image upgrade of devices by: downloading and maintaining image repository, evaluating images, analyzing impact of upgrades, preparing and planning reliable and stable device upgrades, and ensuring sufficient fallback and recovery mechanisms.
1-2User Guide for Cisco Security Manager 4.12
Chapter 1 Getting Started with Security ManagerProduct Overview
• Intelligent analysis of firewall policies—The conflict detection feature analyzes and reports rules that overlap or conflict with other rules. The ACL hit count feature checks in real-time whether specific rules are being hit or triggered by packets.
• Sophisticated rule table editing—In-line editing, ability to cut, copy, and paste rules and to change their order in the rule table.
• Discover firewall policies from device—Policies that exist on the device can be imported into Security Manager for future management.
• Flexible deployment options—Support for deployment of configurations directly to a device or to a configuration file. You can also use Auto-Update Server (AUS), Configuration Engine, or Token Management Server (TMS) for deployment.
• Rollback—Ability to roll back to a previous configuration if necessary.
• FlexConfig (template manager)—Intelligent CLI configlet editor to manage features available on a device but not natively supported by Security Manager.
• Integrated device monitoring and reporting—Features for monitoring events on IPS, ASA, and FWSM devices and correlating them to the related configuration policies, and for creating security and usage reports. These features include the following stand-alone Security Manager applications:
– Event Viewer—Event Viewer monitors your network for system log (syslog) events from ASA and FWSM devices, as well as security contexts and SDEE events from IPS devices and virtual sensors. Event Viewer collects these events and provides an interface by which you can view them, group them, and examine their details in near real time.
– Report Manager—Report Manager lets you collect, display and export a wide variety of network usage and security information for ASA and IPS devices, and for ASA-hosted remote-access IPsec and SSL VPNs. These reports aggregate security data such as top sources, destinations, attackers, victims, as well as security information such as top bandwidth, duration, and throughput users. Data is available for hourly, daily, and monthly periods. (Report Manager aggregates information collected from devices monitored by the Event Manager service. Thus, to view reports about a device, you must be monitoring that device in Event Viewer.)
Note Report Manager does not report FWSM events even though Event Viewer works with FWSM.
– Health and Performance Monitor—Health and Performance Monitor (HPM) periodically polls monitored ASA devices, IPS devices, and ASA-hosted VPN services for key health and performance data, including critical and non-critical issues, such as memory usage, interface status, dropped packets, tunnel status, and so on. This information is used for alert generation and email notification, and to display trends based on aggregated data, which is available for hourly, daily, and weekly periods.
Note Health and Performance Monitor does not monitor FWSM devices.
– Dashboard—The Dashboard is a configurable launch point for Security Manager that makes IPS and FW tasks more convenient for you. In addition to the original dashboard, you can create new, additional dashboards, and you can customize all dashboards. By using the dashboard, you can accomplish in one place many tasks that are found in several other areas of Security Manager, such as the IPS Health Monitor page, Report Manager, Health and Performance Monitor, and IP Intelligence Settings. For detailed information on the dashboard, see Dashboard Overview, page 71-1.
1-3User Guide for Cisco Security Manager 4.12
Chapter 1 Getting Started with Security ManagerProduct Overview
Additional features let you monitor devices from Security Manager using other closely related applications, including Cisco Security Monitoring, Analysis and Response System (CS-MARS), Cisco Performance Monitor, and device managers such as ASDM (read-only versions of which are included with Security Manager).
Security Manager Policy Feature SetsSecurity Manager provides the following primary feature sets for configuration policies:
• Firewall Services
Configuration and management of firewall policies across multiple platforms, including IOS routers, ASA/PIX devices, and Catalyst Firewall Service Modules (FWSMs). Features include:
– Access control rules—Permit or deny traffic on interfaces through the use of access control lists for both IPv4 and IPv6 traffic.
– Botnet Traffic Filter rules—(ASA only.) Filter traffic based on known malware sites and optionally drop traffic based on threat level.
– Inspection rules—Filter TCP and UDP packets based on application-layer protocol session information.
– AAA/Authentication Proxy rules—Filter traffic based on authentication and authorization for users who log into the network or access the Internet through HTTP, HTTPS, FTP, or Telnet sessions.
– Web filtering rules—Use URL filtering software, such as Websense, to deny access to specific web sites.
– ScanSafe Web Security—(Routers only.) Redirect HTTP/HTTPS traffic to the ScanSafe web security center for content scanning and malware protection services.
– Transparent firewall rules—Filter layer-2 traffic on transparent or bridged interfaces.
– Zone-based firewall rules—Configure access, inspection, and web filtering rules based on zones rather than on individual interfaces.
For more information, see Chapter 12, “Introduction to Firewall Services”.
• Site-to-Site VPN
Setup and configuration of IPsec site-to-site VPNs. Multiple device types can participate in a single VPN, including IOS routers, PIX/ASA devices, and Catalyst VPN Service Modules. Supported VPN topologies are:
– Point to point
– Hub and spoke
– Full mesh
– Extranet (a point-to-point connection to an unmanaged device)
Supported IPsec technologies are:
– Regular IPsec
– GRE
– GRE Dynamic IP
– DMVPN
– Easy VPN
1-4User Guide for Cisco Security Manager 4.12

Chapter 1 Getting Started with Security ManagerProduct Overview
– GET VPN
For more information, see Chapter 25, “Managing Site-to-Site VPNs: The Basics”.
• Remote Access VPN
Setup and configuration of IPsec and SSL VPNs between servers and mobile remote workstations running Cisco VPN client or AnyConnect client software. For more information, see Chapter 30, “Managing Remote Access VPNs: The Basics”.
• Intrusion Prevention System (IPS) Management
Management and configuration of Cisco IPS sensors (appliances and service modules) and IOS IPS devices (Cisco IOS routers with IPS-enabled images and Cisco Integrated Services Routers).
For more information, see Overview of IPS Configuration, page 36-5 and Overview of Cisco IOS IPS Configuration, page 45-4.
• Features Specific to Firewall Devices (PIX/ASA/FWSM)
Configuration of advanced platform-specific features and settings on PIX/ASA devices and Catalyst FWSMs. These features provide added value when managing security profiles and include:
– Interface configuration
– Identity-aware firewall settings
– Device administration settings
– Security
– Routing
– Multicast
– Logging
– NAT
– Bridging
– Failover
– Security contexts
For more information, see Chapter 46, “Managing Firewall Devices”.
• Features Specific to IOS Routers
Configuration of advanced platform-specific features and settings on IOS routers. These features provide added value when managing security profiles and include:
– Interface configuration
– Routing
– NAT
– 802.1x
– NAC
– QoS
– Dialer interfaces
– Secure device provisioning
For more information, see Chapter 60, “Managing Routers”.
• Features Specific to Catalyst 6500/7600 Devices and Catalyst Switches
1-5User Guide for Cisco Security Manager 4.12

Chapter 1 Getting Started with Security ManagerProduct Overview
Configuration of VLAN, network connectivity, and service module features and settings on Catalyst 6500/7600 devices and on other Catalyst switches.
For more information, Chapter 67, “Managing Cisco Catalyst Switches and Cisco 7600 Series Routers”.
• FlexConfigs
Flexconfig policies and policy objects enable you to provision features that are available on the device but not natively supported by Security Manager. They enable you to manually specify a set of CLI commands and to deploy them to devices using Security Manager’s provisioning mechanisms. These commands can be either prepended or appended to the commands generated by Security Manager to provision security policies.
For more information, see Chapter 7, “Managing FlexConfigs”.
Security Manager Applications OverviewThe Security Manager client has six main applications and one application designed for mobile devices:
• Configuration Manager—This is the primary application. You use Configuration Manager to manage the device inventory, create and edit local and shared policies, manage VPN configurations, and deploy policies to devices. Configuration Manager is the largest of the applications and most of the documentation addresses this application. If a procedure does not specifically mention an application, the procedure is using Configuration Manager. For an introduction to Configuration Manager, see Using Configuration Manager - Overview, page 1-13.
• Event Viewer—This is an event monitoring application, where you can view and analyze events generated from IPS, ASA, and FWSM devices that you have configured to send events to Security Manager. For information about using Event Viewer, see Chapter 68, “Viewing Events”.
• Report Manager—This is a reporting application, where you can view and create reports of aggregated information on device and VPN statistics. Much of the information is derived from events available through Event Viewer, but some of the VPN statistics are obtained by communicating directly with the device. For information about using Report Manager, see Chapter 69, “Managing Reports”.
• Health & Performance Monitor—The HPM application lets you monitor key health and performance data for ASA (including ASA-SM) devices, IPS devices, and VPN services by providing network-level visibility into device status and traffic information. This ability to monitor key network and device metrics lets you quickly detect and resolve device malfunctions and bottlenecks in the network. See Chapter 70, “Health and Performance Monitoring” for more information about this application.
• Image Manager—The Image Manager application provides complete image management of ASA devices. It facilitates downloading, evaluating, analyzing, preparing, and planning image updates. It assesses image availability, compatibility, and impact on devices and provides scheduling, grouping, and change management of device updates. In addition, Image Manager includes capabilities for maintaining an image repository as well as for ensuring stable fallback and recovery mechanisms for image updates on ASA devices. For information about using Image Manager, see Chapter 72, “Using Image Manager”.
• Dashboard—The Dashboard is a configurable launch point for Security Manager that makes IPS and FW tasks more convenient for you. In addition to the original dashboard, you can create new, additional dashboards, and you can customize all dashboards. By using the dashboard, you can accomplish in one place many tasks that are found in several other areas of Security Manager, such
1-6User Guide for Cisco Security Manager 4.12
Chapter 1 Getting Started with Security ManagerProduct Overview
as the IPS Health Monitor page, Report Manager, Health and Performance Monitor, and IP Intelligence Settings. For detailed information on the dashboard, see Dashboard Overview, page 71-1.
You can open any of these applications directly from the Windows Start menu or a desktop icon, or you can open them from within any of these applications through the application’s Launch menu. For information on opening applications, see Logging In to and Exiting the Security Manager Client, page 1-12.
The Security Manager client has an additional application, CSM Mobile, which is designed specifically for mobile devices:
• CSM Mobile—CSM Mobile allows you to access device health summary information from mobile devices. The information available to you in this way is the same as that available in the Device Health Summary widget in the Dashboard: current high or medium severity active alerts generated by HPM. Alerts can be grouped by Alert-Description, Predefined-Category, Device, or Alert Technology. For more information on CSM Mobile, see CSM Mobile, page 71-11. For more details on device health summary information, see Dashboard Overview, page 71-1. For information on enabling or disabling CSM Mobile, see CSM Mobile Page, page 11-9
Device Monitoring OverviewSecurity Manager includes several facilities for monitoring devices:
• Event Viewer—This integrated tool allows you to view events on ASA, FWSM, and IPS devices and correlate them to the related configuration policies. This helps you identify problems, troubleshoot configurations, and then fix the configurations and redeploy them. For more information, see Chapter 68, “Viewing Events”.
• Report Manager—This is a reporting application, where you can view and create reports of aggregated information on device and VPN statistics. Much of the information is derived from events available through Event Viewer, but some of the VPN statistics are obtained by communicating directly with the device. For information about using Report Manager, see Chapter 69, “Managing Reports”.
For information on all of the types of reports available in Security Manager, see Understanding the Types of Reports Available in Security Manager, page 69-2.
• Health & Performance Monitor—The HPM application lets you monitor key health and performance data for ASA (including ASA-SM) devices, IPS devices, and VPN services by providing network-level visibility into device status and traffic information. See Chapter 70, “Health and Performance Monitoring” for more information about this application.
• Dashboard—The Dashboard is a configurable launch point for Security Manager that makes IPS and FW tasks more convenient for you. In addition to the original dashboard, you can create new, additional dashboards, and you can customize all dashboards. By using the dashboard, you can accomplish in one place many tasks that are found in several other areas of Security Manager, such as the IPS Health Monitor page, Report Manager, Health and Performance Monitor, and IP Intelligence Settings. For detailed information on the dashboard, see Dashboard Overview, page 71-1.
• Packet Tracer—You can use this tool to test whether certain types of packets will be allowed to go through an ASA device. For more information, see Analyzing an ASA or PIX Configuration Using Packet Tracer, page 71-23.
1-7User Guide for Cisco Security Manager 4.12
Chapter 1 Getting Started with Security ManagerProduct Overview
• Ping, Trace route, and NS Lookup—You can use ping and traceroute on a managed device to check whether there is a route between the device and a specific destination. You can use NS lookup to resolve addresses to DNS names. For more information, see Analyzing Connectivity Issues Using the Ping, Trace Route, or NS Lookup Tools, page 71-25.
• Cisco Prime Security Manager (PRSM) Integration—You can “cross launch” PRSM from the Configuration Manager application. The PRSM application is used to configure and manage ASA CX devices. For more information, see Launching Cisco Prime Security Manager or FireSIGHT Management Center, page 71-20.
• Device Manager Integration—Security Manager includes read-only copies of the various device managers, such as Adaptive Security Device Manager (ASDM). You can use these tools to view device status, but not to change the device configuration. For more information, see Starting Device Managers, page 71-14.
• Cisco Security Monitoring, Analysis and Response System (CS-MARS) Integration—If you use the CS-MARS application, you can integrate it with Security Manager and view events in CS-MARS from Security Manager, and conversely, Security Manager policies related to events from CS-MARS. For more information, see Integrating CS-MARS and Security Manager, page 71-36.
IPv6 Support in Security Manager Security Manager provides increasing support for IPv6 configuration, monitoring, and reporting.
Beginning with version 4.12, Security Manager supports communication from Security Manager server to the managed devices over either IPv6 address or IPv4 address. This feature is available only for firewall devices, that is, those devices where the OS type is either ASA or FWSM. To enable communication over IPv6 addresses, you must first enable IPv6 address on the Security Manager server. See Configuring IPv6 on Security Manager Server, page 1-8 for more information.
Note The communication between Security Manager server and Security Manager client is over IPv4 address only. IPv6 address is not supported for server to client communication. Also, if ACS server is used for authentication, the ACS must have IPv4 address. IPv6 communication to ACS server is not supported. Auto Update Server (AUS) does not support IPv6 addresses.
For versions prior to 4.12, to manage a device that supports IPv6 addressing with Security Manager, you must configure the device’s management address as an IPv4 address. All communications between the device and Security Manager, such as policy discovery and deployment, use IPv4 transport. If the IPv6 policies are not appearing for a supported device, rediscover the device policies; if necessary, delete the device from the inventory and add it again.
Configuring IPv6 on Security Manager Server
Follow these steps to configure IPv6 on Security Manager server for communicating with a device over IPv6 address.
Step 1 On the Security Manager server, go to Start > Control panel > Network and Internet > Network Connections.
Step 2 Click the available Network Connection to open the Ethernet Status window. Click Properties. The Ethernet Properties window appears.
1-8User Guide for Cisco Security Manager 4.12
Chapter 1 Getting Started with Security ManagerProduct Overview
Step 3 On the Networking tab, check the Internet Protocol Version 6 (TCP/IPv6) check box, and then click Properties. The Internet Protocol Version 6 (TCP/IPv6) Properties window appears.
Step 4 Configure the IPv6 static address and DNS servers, and click OK.
Note You must configure Security Manager server hostname to resolve to IPv4 addresses only. The server hostname should not resolve to IPv6 address.
Configuring IPv6 Policies
In general, you can configure IPv6 policies on the following types of device. In addition, you can monitor IPv6 alerts generated by IPS, ASA, and FWSM devices. For other types of devices, use FlexConfig policies to configure IPv6 settings. For more specific information on IPv6 device support, see the Supported Devices and Software Versions for Cisco Security Manager document on Cisco.com.
• ASA—Release 7.0+ when running in router mode; release 8.2+ when running in transparent mode. Both single and multiple security context devices are supported.
• FWSM—Release 3.1+ when running in router mode. Not supported in transparent mode. Both single and multiple security context devices are supported.
• IPS—Release 6.1+.
Following is a summary of the Security Manager features that support IPv6 addressing:
• Policy Objects—The following policy objects support IPv6 addresses:
– Networks/Hosts. See Understanding Networks/Hosts Objects, page 6-79.
– Services. This object includes predefined services for ICMP6 and DHCPv6, which you can use only with IPv6 policies. The other services apply to both IPv4 and IPv6. For more information on service objects, see Understanding and Specifying Services and Service and Port List Objects, page 6-100.
• Firewall Services Policies—The following Firewall Services policies and tools support IPv6 configurations:
– AAA Rules. See Chapter 15, “Managing Firewall AAA Rules”.
– Access Rules. See Configuring Access Rules, page 16-7.
– Inspection Rules. See Chapter 17, “Managing Firewall Inspection Rules”.
– Settings > Access Control. See Configuring Settings for Access Control, page 16-23.
– Tools:
Hit Count. See Viewing Hit Count Details, page 16-36.
Find and Replace. See Finding and Replacing Items in Rules Tables, page 12-16.
• ASA and FWSM Policies—The following ASA and FWSM policies support IPv6 configurations:
– (ASA 7.0+ routed mode; ASA 8.2+ transparent mode; FWSM 3.1+ routed mode.) Interfaces: IPv6 tab of the Add Interface and Edit Interface dialog boxes. See Configuring IPv6 Interfaces (ASA/FWSM), page 46-46.
– (ASA only.) Platform > Bridging > IPv6 Neighbor Cache. See Managing the IPv6 Neighbor Cache, page 47-7.
– (ASA 5505 8.2/8.3 only.) Platform > Bridging > Management IPv6. See Management IPv6 Page (ASA 5505), page 47-10.
1-9User Guide for Cisco Security Manager 4.12
Chapter 1 Getting Started with Security ManagerLogging In to and Exiting Security Manager
– (ASA 8.4.2+ only.) Platform > Device Admin > Server Access > DNS. See DNS Page, page 52-14.
• FlexConfig Policies—There are two Firewall system variables that you can use to identify IPv6 ACLs on a device. For more information, see FlexConfig System Variables, page 7-7.
There is also a predefined FlexConfig policy object that uses these variables, ASA_add_IPv6_ACEs.
• Event Viewer—Events that include IPv6 addresses are supported, and the addresses are displayed in the same columns as IPv4 addresses: Source, Destination, and IPLog Address (for IPS alerts). However, you must configure the device to use IPv4 for sending events to the Security Manager server. All event communications use IPv4 transport. For more information on Event Viewer, see Chapter 68, “Viewing Events”.
• Dashboard—On the Dashboard, all the widgets that use IP addressing support IPv6 addresses. However, as is true elsewhere in Security Manager, you must configure the device to use IPv4 for sending events to the Security Manager server. All event communications use IPv4 transport. For more information on the Dashboard, see Dashboard Overview, page 71-1
• Report Manager—Reports include statistics for IPv6 events collected by Event Management. For more information on Report Manager, see Chapter 69, “Managing Reports”.
Policy Object Changes in Security Manager 4.4
Certain changes were made to a few policies and policy objects in Security Manager 4.4, in order to unify previously separate IPv4 and IPv6 elements. The most important of these changes are to the Networks/Hosts object (which itself represents a unification of the Networks/Hosts and the Networks/Hosts-IPv6 objects):
• The new Networks/Hosts object “All-IPv4-Addresses” replaces the IPv4 “any” network policy object. If you upgrade to Security Manager 4.4 from a previous version, all references to the IPv4 “any” network policy object will be changed to “All-IPv4-Addresses.”
• The new Networks/Hosts object “All-IPv6-Addresses” replaces the IPv6 “any” network policy object. If you upgrade to Security Manager 4.4 from a previous version, all references to the IPv6 “any” network policy object will be changed to “All-IPv6-Addresses.”
• The new Networks/Hosts object “All-Addresses” does not have a corresponding policy object in earlier versions of Security Manager. It is a new global “any” policy object, and it encompasses all IPv4 and IPv6 address ranges.
Other related changes include unification of IPv4 and IPv6 versions of device-specific policies such as Access Rules, Inspection Rules, and so on.
Further, when editing policies and objects, IPv4, IPv6, or mixed-mode (both IPv4 and IPv6) entries are automatically filtered in elements, such as dialog boxes, in which one or more of those entries is not appropriate to that element.
Related Topics
• Policy Object Manager, page 6-4
• Understanding Networks/Hosts Objects, page 6-79
Logging In to and Exiting Security ManagerSecurity Manager has two main interfaces:
1-10User Guide for Cisco Security Manager 4.12
Chapter 1 Getting Started with Security ManagerLogging In to and Exiting Security Manager
• Cisco Security Management Suite home page—Use this interface to install the Security Manager client and to manage the server. You can also access other CiscoWorks applications you installed, such as Resource Manager Essentials (RME).
• Security Manager clients—Use these interfaces to perform most Security Manager tasks. You can log directly into any of six client applications: Configuration Manager, Event Viewer, Report Manager, Health & Performance Monitor, Image Manager, and Dashboard.
These topics describe how to log in to and exit these interfaces:
• Understanding User Permissions, page 1-11
• Logging In to the Cisco Security Management Suite Server, page 1-11
• Logging In to and Exiting the Security Manager Client, page 1-12
Understanding User Permissions Cisco Security Manager authenticates your username and password before you can log in. After you are authenticated, Security Manager establishes your role within the application. This role defines your permissions (also called privileges), which are the set of tasks or operations that you are authorized to perform. If you are not authorized for certain tasks or devices, the related menu items, items in tables of contents, and buttons are hidden or disabled. In addition, a message tells you that you do not have permission to view the selected information or perform the selected operation.
Authentication and authorization for Security Manager is managed either by the CiscoWorks server or the Cisco Secure Access Control Server (ACS). By default, CiscoWorks manages authentication and authorization, but you can configure Security Manager to use your Cisco Secure ACS setup.
When using ACS, if all of the ACS servers become unavailable, you cannot perform tasks in Security Manager. If you are logged in, you might be abruptly logged out of the system (without an opportunity to save changes) if you try to perform a task that requires ACS authorization. If this happens, you get a message stating this is the reason you are getting logged off.
For more information about user permissions and AAA configuration, see the Installation Guide for Cisco Security Manager.
For more information about authorization control in the Event Viewer and Report Manager applications, see the following topics:
• Understanding Event Viewer Access Control, page 68-4
• Understanding Report Manager Access Control, page 69-5
Logging In to the Cisco Security Management Suite ServerUse the Cisco Security Management Suite home page, and CiscoWorks Common Services, to install the Security Manager client and to manage the server. You can also access other CiscoWorks applications you installed, such as RME.
Note The Software Center > Software Update feature in Common Services is not supported by Cisco Security Manager.
Step 1 In your web browser, open one of these URLs, where SecManServer is the name of the computer where Security Manager is installed. Click Yes on any Security Alert windows.
1-11User Guide for Cisco Security Manager 4.12
Chapter 1 Getting Started with Security ManagerLogging In to and Exiting Security Manager
• If you are not using SSL, open http://SecManServer:1741
• If you are using SSL, open https://SecManServer:443
The Cisco Security Management Suite login screen is displayed. Verify on the page that JavaScript and cookies are enabled and that you are running a supported version of the web browser. For information on configuring the browser to run Security Manager, see Installation Guide for Cisco Security Manager.
Step 2 Log in to the Cisco Security Management Suite server with your username and password. When you initially install the server, you can log in using the username admin and the password defined during product installation.
Step 3 On the Cisco Security Management Suite home page, you can access at least the following features. Other features might be available depending on how you installed the product.
• Cisco Security Manager Client Installer—Click this item to install the Security Manager client. The client is the main interface for using the product.
• Server Administration—Click this item to open the CiscoWorks Common Services Server page. CiscoWorks Common Services is the foundation software that manages the server. Use it to configure and manage back-end server features such as server maintenance and troubleshooting, local user definition, and so on.
• CiscoWorks link (in the upper right of the page)—Click this link to open the CiscoWorks Common Services home page.
Step 4 To exit the application, click Logout in the upper right corner of the screen. If you have both the home page and the Security Manager client open at the same time, exiting the browser connection does not exit the Security Manager client.
Logging In to and Exiting the Security Manager ClientUse the Security Manager client to perform most Security Manager tasks.
Tip You must log into the workstation using a Windows user account that has Administrator privileges to fully use the Security Manager client applications. If you try to operate the applications with lesser privileges, you might find that some features do not work correctly.
Before You Begin
Install the client on your computer. To install the client, log into the Security Manager server as described in Logging In to the Cisco Security Management Suite Server, page 1-11, and then click Cisco Security Manager Client Installer and follow the instructions in the installation wizard.
Step 1 Select one of the following applications from the Start > All Programs > Cisco Security Manager Client menu:
• Configuration Manager
• Event Viewer
• Report Manager
• Health & Performance Monitor
• Image Manager
1-12User Guide for Cisco Security Manager 4.12
Chapter 1 Getting Started with Security ManagerUsing Configuration Manager - Overview
• Dashboard
Tip If the client was installed on the workstation, but it does not appear in your Start menu, it probably was installed by another user. To make Security Manager Client visible in the Start menu for every user of the client station, copy the Cisco Security Manager Client folder from Documents and Settings\<user>\Start Menu\Programs\Cisco Security Manager to Documents and Settings\All Users\Start Menu\Programs\Cisco Security Manager.
Step 2 In the application’s login window, select the server to which you want to log in, and enter your Security Manager username and password. Click Login.
The client logs in to the server and opens the application you selected based on the following conditions. Note that these conditions are per application, for example, if you have Configuration Manager open on one workstation, opening Event Viewer from a different workstation has no implications for your Configuration Manager session unless or until you start Configuration Manager from Event Viewer.
• In both Workflow and non-Workflow mode, you cannot log into the same server from a single workstation and have more than one active session using the same user account. You are reminded that you are already logged in and asked to reuse the existing open application.
• In both workflow modes, you can log into different servers using the same (or different) user name from the same workstation.
• In non-Workflow mode, for a given server, if the user name is logged in on a different workstation, the client on the other workstation is automatically logged out, and any unsaved changes are lost. Thus, do not share user accounts, and if you must log in from different workstations to the same server, be sure to save your changes before leaving an active client.
• In Workflow mode, you can log in using the same user account multiple times but only from different workstations. However, you cannot open the same activity in Configuration Manager at the same time in more than one client; you must open different activities. Activities do not apply when using Event Viewer or Report Manager.
Tip The client automatically closes if it is idle for 120 minutes. To change the idle timeout, in Configuration Manager, select Tools > Security Manager Administration, select Customize Desktop from the table of contents, and enter the desired timeout period. You can also disable the feature so that the client does not close automatically. All applications use the same timeout setting, and working in one application resets the timer for all other applications.
Step 3 To exit the application, select File > Exit.
Using Configuration Manager - Overview These topics provide an overview of the different views in which you can work in Configuration Manager, the basic task flow for defining and deploying policies to devices, and some basic concepts:
• Configuration Manager Overview, page 1-14
• Task Flow for Configuring Security Policies, page 1-18
• Policy and Policy Object Overview, page 1-20
• Workflow and Activities Overview, page 1-20
1-13User Guide for Cisco Security Manager 4.12

Chapter 1 Getting Started with Security ManagerUsing Configuration Manager - Overview
Configuration Manager OverviewThe Configuration Manager application provides three views in which you can manage devices and policies: Device view, Policy view, and Map view. You can switch between these views according to your needs using toolbar buttons or the View menu.
• Device view—Provides a device-centric view, where you configure policies on specific devices. For more information, see Device View Overview, page 1-14.
• Policy view—Provides a policy-centric view, where you can create device-independent shared policies that you can assign to one or more devices. For more information, see Policy View Overview, page 1-16.
• Map view—Provides a visual representation of your network, which is primarily useful for visualizing and configuring site-to-site VPNs. For more information, see Map View Overview, page 1-17.
Each view presents a different way to access Configuration Manager functionality. What you can do, and how you do it, are determined by the view you select. In the Device and Policy views you see two selectors on the left and a work area on the right. In each of these, your selection in the upper selector determines what you can select in the lower selector. Your selection in the lower selector determines what you view in the work area. This design enables you to quickly and easily drill down to the network details that you want to view or edit.
Besides the main views, there are several additional tools used for configuring other items such as site-to-site VPNs and policy objects, or for monitoring devices. These tools are typically available from the Manage menu, although some are available on the Policy, Activities, Tools, or Launch menus. Some tools have related buttons in the toolbar. These tools open in a separate window so that you do not loose your place in the main view that you are currently using.
The following topics provide reference information about the basic features of the user interface:
• Menu Bar Reference for Configuration Manager, page 1-29
• Toolbar Reference (Configuration Manager), page 1-39
• Using Selectors, page 1-45
• Using Wizards, page 1-47
• Using Rules Tables, page 12-7
• Using Text Fields, page 1-49
• Accessing Online Help, page 1-52
Device View Overview
Device view in Configuration Manager enables you to add devices to the Security Manager inventory and to centrally manage device policies, properties, interfaces, and so on. The following figure identifies the functional areas of the Device view.
This is a device-centric view in which you can see all devices that you are managing and you can select specific devices to view their properties and define their settings and policies.
Note Security Manager also provides the ability to see the status of the devices in the Security Manager inventory. To access the Device Status View, select View > Device Status View or select one of the folder nodes in the Device selector. For more information, see Working with Device Status View, page 3-63.
1-14User Guide for Cisco Security Manager 4.12

Chapter 1 Getting Started with Security ManagerUsing Configuration Manager - Overview
In Device View, you can define security policies locally on specific devices. You can then share these policies to make them globally available to be assigned to other devices.
For more information, see Understanding the Device View, page 3-1.
Figure 1-1 Device View Overview
The title bar displays the following information about Security Manager:
• Your login name.
• The name of the Security Manager server to which you are connected.
• If Workflow mode is enabled, the name of the open activity.
1 Title bar 2 Menu bar (see Menu Bar Reference for Configuration Manager, page 1-29)
3 Toolbar (see Toolbar Reference (Configuration Manager), page 1-39)
4 Work area
5 Policy selector 6 Device selector (see Using Selectors, page 1-45)
1-15User Guide for Cisco Security Manager 4.12

Chapter 1 Getting Started with Security ManagerUsing Configuration Manager - Overview
Policy View Overview
Policy view in Configuration Manager enables you to create and manage reusable policies that can be shared among multiple devices. The following figure identifies the functional areas of the Policy view.
This is a policy-centric view in which you can see all the shareable policy types supported by Security Manager. You can select a specific policy type and create, view, or modify shared policies of that type. You can also see the devices to which each shared policy is assigned and change the assignments as required.
For more information, see Managing Shared Policies in Policy View, page 5-50.
1-16User Guide for Cisco Security Manager 4.12
Chapter 1 Getting Started with Security ManagerUsing Configuration Manager - Overview
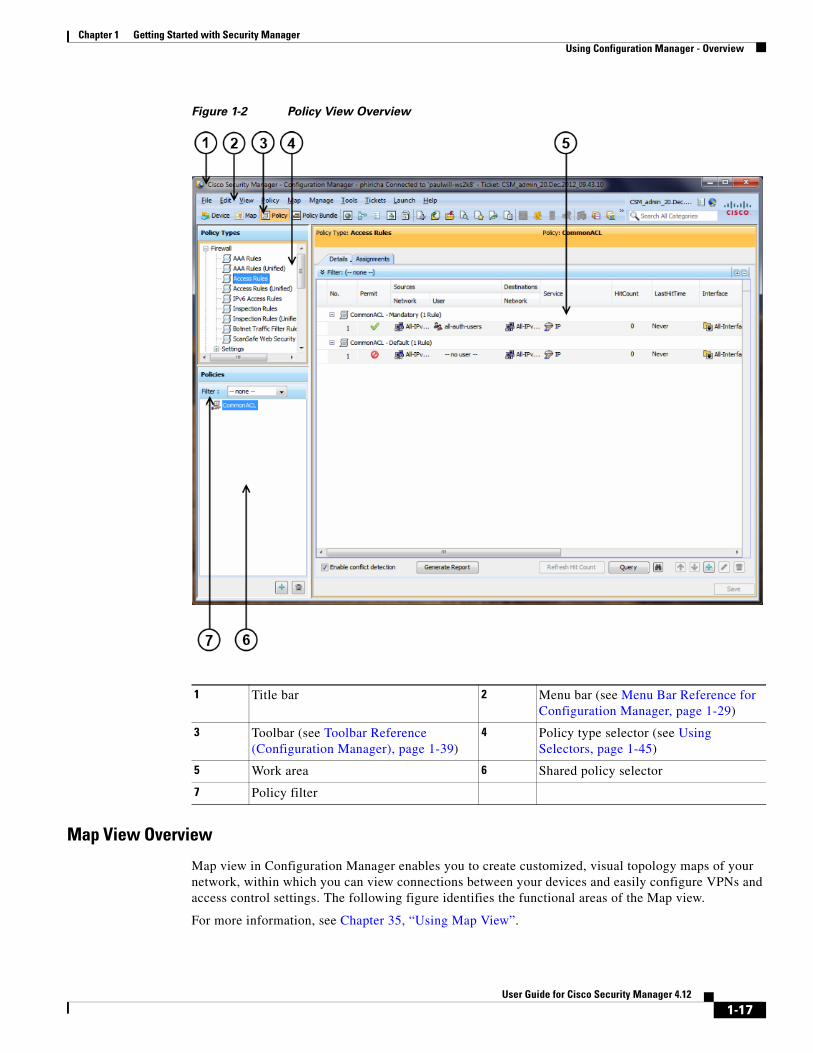
Figure 1-2 Policy View Overview
Map View Overview
Map view in Configuration Manager enables you to create customized, visual topology maps of your network, within which you can view connections between your devices and easily configure VPNs and access control settings. The following figure identifies the functional areas of the Map view.
For more information, see Chapter 35, “Using Map View”.
1 Title bar 2 Menu bar (see Menu Bar Reference for Configuration Manager, page 1-29)
3 Toolbar (see Toolbar Reference (Configuration Manager), page 1-39)
4 Policy type selector (see Using Selectors, page 1-45)
5 Work area 6 Shared policy selector
7 Policy filter
1-17User Guide for Cisco Security Manager 4.12
Chapter 1 Getting Started with Security ManagerUsing Configuration Manager - Overview
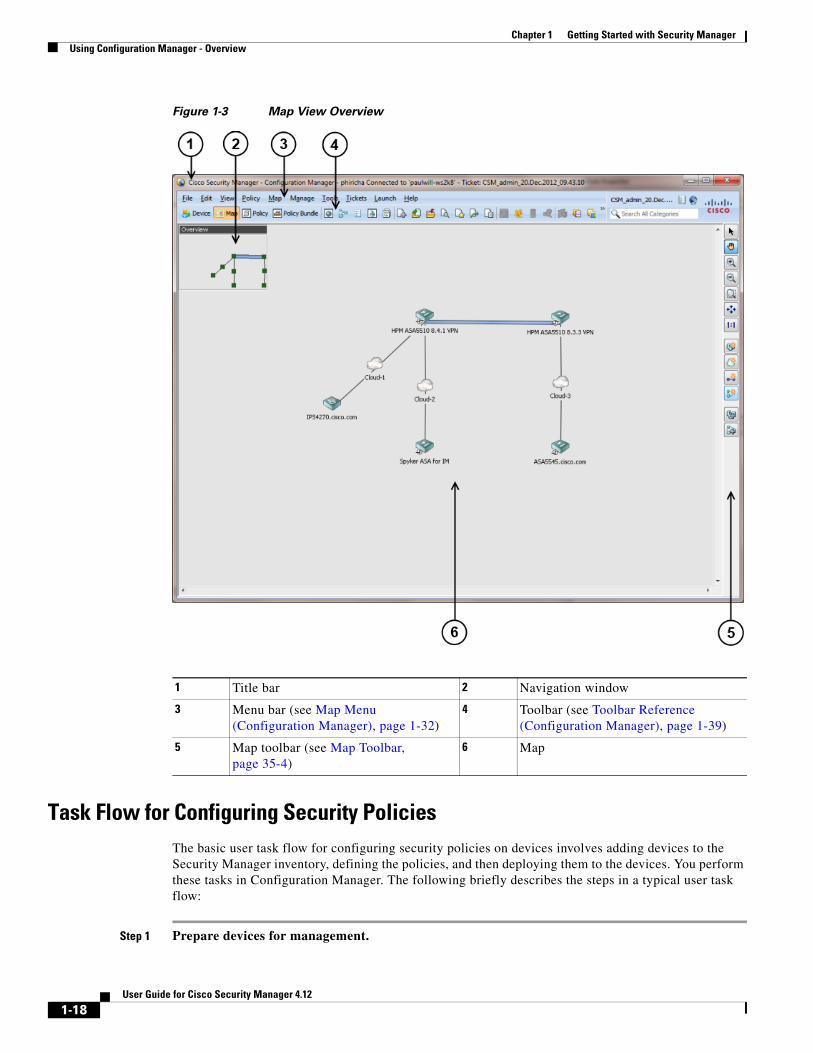
Figure 1-3 Map View Overview
Task Flow for Configuring Security Policies The basic user task flow for configuring security policies on devices involves adding devices to the Security Manager inventory, defining the policies, and then deploying them to the devices. You perform these tasks in Configuration Manager. The following briefly describes the steps in a typical user task flow:
Step 1 Prepare devices for management.
1 Title bar 2 Navigation window
3 Menu bar (see Map Menu (Configuration Manager), page 1-32)
4 Toolbar (see Toolbar Reference (Configuration Manager), page 1-39)
5 Map toolbar (see Map Toolbar, page 35-4)
6 Map
1-18User Guide for Cisco Security Manager 4.12
Chapter 1 Getting Started with Security ManagerUsing Configuration Manager - Overview
Before you can add a device to the Security Manager device inventory and manage it, you must configure some minimal settings on the device to enable Security Manager to contact it. For more information, see Chapter 2, “Preparing Devices for Management”.
Step 2 Add devices to the Security Manager device inventory.
To manage a device with Security Manager, you must first add it to the Security Manager inventory. Security Manager provides multiple methods to add devices: from the network (live devices), from an inventory file exported from another Security Manager server or CiscoWorks Common Services Device Credential Repository (DCR), or in Cisco Security Monitoring, Analysis and Response System (CS-MARS) format, or from a device configuration file. You can also add a device that does not yet exist in the network but which will be deployed in the future, by creating it in Security Manager.
When you add a device, you can also discover its interfaces and certain policies that were already configured on the device. Discovery brings the information into the Security Manager database for continued management with Security Manager in the future.
For more information, see Chapter 3, “Managing the Device Inventory”.
Step 3 Define security policies.
After you have added your devices, you can define the security policies you require. You can use Device view to define policies on specific devices. You can use Policy view to create and manage reusable policies that can be shared by any number of devices. When you make a change to a shared policy, the change is applied to all devices to which that policy is assigned.
To simplify and speed up policy definition, you can use policy objects, which are named, reusable representations of specific values. You can define an object once and then reference it in multiple policies instead of having to define the values individually in each policy.
Note If you are using Workflow mode, you must create an activity before you start defining policies. For more information, see Workflow and Activities Overview, page 1-20.
For more information, see these topics:
• Chapter 5, “Managing Policies”
• Chapter 6, “Managing Policy Objects”
Step 4 Submit and deploy your policy definitions.
Policy definition is done within your private view. Your definitions are not committed to the database and cannot be seen by other Security Manager users until you submit them. When you submit your policy definitions, the system validates their integrity. Errors or warnings are displayed to inform you of any problems that need to be addressed before the policies can be deployed to the devices.
Security Manager generates CLI commands according to your policy definitions and enables you to quickly and easily deploy them to your devices. You can deploy directly to live devices in the network (including dynamically addressed devices) through a secure connection, or to files that can be transferred to your devices at any time.
In non-Workflow mode, submitting and deploying your changes can be done in a single action. In Workflow mode, you first submit your activity and then you create a deployment job to deploy your changes.
For more information, see Chapter 8, “Managing Deployment”.
1-19User Guide for Cisco Security Manager 4.12

Chapter 1 Getting Started with Security ManagerUsing Configuration Manager - Overview
Policy and Policy Object OverviewA policy is a set of rules or parameters that define a particular aspect of network configuration. In Configuration Manager, you define policies that specify the security functionality you want on your devices. Security Manager translates your policies into CLI commands that can be deployed to the relevant devices.
Security Manager enables you to configure local policies and shared policies.
• Local policies are confined to the device on which they are configured; they are automatically assigned (applied) to the device when you configure them. Unconfigured policies (those whose default settings you do not change) are not considered to be assigned or configured. To remove a policy, you unassign it.
• Shared policies are named, reusable policies that can be assigned to multiple devices at once. Any changes you make to a shared policy are reflected on all devices to which that policy is assigned, so you do not have to make the change on each device.
When you add a device to the inventory, you can discover the existing policies configured on the device. Security Manager translates your device configuration into Security Manager policies, populates the relevant local policies, and assigns them to the device. Policy discovery ensures that you do not need to recreate your existing configurations in Security Manager terms. You can also rediscover policies on devices after you add them to the inventory if you change their configuration through the CLI.
When you create policies, you often have the option to use policy objects, which are reusable definitions of related sets of values. (Sometimes, you are required to use policy objects.) For example, you can define a network object called MyNetwork that contains a set of IP addresses in your network. Whenever you configure a policy requiring these addresses, you can simply refer to the MyNetwork network object rather than manually entering the addresses each time. Furthermore, you can make changes to policy objects in a central location and these changes will be reflected in all the policies that reference those objects.
For more detailed information, see Understanding Policies, page 5-1 and Chapter 6, “Managing Policy Objects”.
Workflow and Activities OverviewTo provide flexible, secure policy management while allowing your organization to implement change control processes, Security Manager provides three closely-related features in Configuration Manager:
• Workflow/Non-Workflow modes—Configuration Manager provides two modes of operation that scale to different organizational working environments: Workflow mode and non-Workflow mode (the default).
– Workflow Mode—Workflow mode is for organizations that have division of responsibility between users who define security policies and those who administer security policies. It imposes a formal change-tracking and management system by requiring all policy configuration to be done within the context of an explicitly-created activity. A user can create multiple activities so that a single activity contains only logically-related policy changes. You can configure Workflow mode to require a separate approver, so that configuration changes cannot be made without oversight. After approval, the user defines a separate deployment job to push the policy changes to the devices. For more information, see Working in Workflow Mode, page 1-21.
– Non-Workflow Mode—In non-Workflow mode, you do not explicitly create activities. When you log in, Configuration Manager creates an activity for you or opens the one you were previously using if it was not submitted. You can define and save your policies, and then submit
1-20User Guide for Cisco Security Manager 4.12
Chapter 1 Getting Started with Security ManagerUsing Configuration Manager - Overview
and deploy them in one step. For more information, see Working in Non-Workflow Mode, page 1-22.
For information on selecting a mode, see Changing Workflow Modes, page 1-27.
• Activities or Configuration Sessions—An activity (in non-Workflow mode, a configuration session), is essentially a private view of the Security Manager database. In Configuration Manager, you use activities to control changes made to policies and policy assignments. Adding devices to the inventory does not involve an activity, however, unless you discover policies that define security contexts (on multi-context firewall devices) or virtual sensors (on IPS devices). Isolating policy changes in activities helps prevent “work in progress” from accidentally making it into active device configurations. For more information about activities and configuration sessions, see Understanding Activities, page 4-1 and Working with Activities/Tickets, page 4-7.
• Ticket Management—Ticket management allows you to associate a Ticket ID with policy configuration changes made in Security Manager. Ticket management works in coordination with activities or configuration sessions depending on whether you have workflow mode enabled or not. If workflow mode is enabled, you can also enable ticket management so that a Ticket ID can optionally be associated with a specific activity. If workflow mode is not enabled, using ticket management makes it so that all changes must be done as part of a ticket and the ticket must be submitted before those changes can be deployed. In this respect, ticket management with workflow disabled is very similar to how activities function when workflow is enabled; however, no approval of submitted tickets is required.
For a comparison of the various modes of operation, see Comparing Workflow Modes, page 1-22.
Working in Workflow Mode
Workflow mode is an advanced mode of operation that imposes a formal change-tracking and change-management system. Workflow mode is suitable for organizations in which there is division of responsibility among security and network operators for defining policies and deploying those policies to devices. For example, a security operator might be responsible for defining security policies on devices, another security operator might be responsible for approving the policy definitions, and a network operator might be responsible for deploying the resulting configurations to a device. This separation of responsibility helps maintain the integrity of deployed device configurations.
You can use Workflow mode with or without an approver. When using Workflow mode with an approver, device management and policy configuration changes performed by one user are reviewed and approved by another user before being deployed to the relevant devices. When using Workflow mode without an approver, device and policy configuration changes can be created and approved by a single user, thus simplifying the change process.
Note Workflow mode works in the same manner whether Ticket Management is enabled or not. Enabling Ticket Management in Workflow mode simply enables the Ticket field for use with Activities. Entering a ticket ID is not required, but if one is used, the Ticket field can be configured to link to an external change management system. For more information, see Ticket Management.
For information about enabling or disabling Workflow mode or enabling or disabling Ticket Management, see Changing Workflow Modes, page 1-27.
In Workflow mode:
• A user must create an activity before defining or changing policy configurations in Configuration Manager. The activity is essentially a proposal to make configuration changes. The changes made within the activity are applied only after the activity is approved by a user with the appropriate
1-21User Guide for Cisco Security Manager 4.12
Chapter 1 Getting Started with Security ManagerUsing Configuration Manager - Overview
permissions. An activity can either be submitted to another user for review and approval, or it can be approved by the current user. For detailed information about the process of creating, submitting, and approving activities, see Chapter 4, “Managing Activities”.
• After the activity is approved, the configuration changes need to be deployed to the relevant devices. To do this, a user must create a deployment job. A deployment job defines the devices to which configurations will be deployed, and the deployment method to be used. A deployment job can either be submitted to another user for review and approval, or it can be approved by the current user. Deployment preferences can be configured with or without job approval. For more information, see Chapter 8, “Managing Deployment”
Working in Non-Workflow Mode
Some organizations have no division of responsibility between users when defining and administering their VPN and firewall policies. These organizations can work in non-Workflow mode. When using non-Workflow mode, you do not explicitly create activities. When you log in, Configuration Manager creates an activity for you, also called a configuration session, or opens the activity you were using when previously logged in (the configuration session is automatically closed when you log out of Security Manager). This activity is transparent to the user and does not need to be managed in any way. When you submit your configuration changes to the database, this is equivalent to submitting and approving the activity in Workflow mode. In addition, when you submit and deploy configuration changes, Security Manager creates a deployment job for you as well. Like activities, deployment jobs are transparent and do not need to be managed.
When using non-Workflow mode, multiple users with the same username and password cannot be logged into Security Manager at the same time. If another user logs in with the same username and password while you are working, your session will be terminated and you will have to log in again.
Ticket Management in Non-Workflow Mode
If your organization uses a change management system, Security Manager can associate the changes made to configurations with a ticket ID. Before making any configuration changes, you must open a ticket and the ticket must be submitted before the changes associated with that ticket are available to be deployed. Tickets can be opened and closed as needed, and you can discard a ticket if the changes associated with that ticket are no longer desired. Entering a ticket ID is not required, but if one is used, the Ticket field can be configured to link to an external change management system. For more information, see Ticket Management.
Non-Workflow mode with Ticket Management enabled is the default mode for Security Manager. For information about enabling or disabling Workflow mode or enabling or disabling Ticket Management, see Changing Workflow Modes, page 1-27.
Comparing Workflow Modes
The following table highlights the differences between the workflow modes.
Note Workflow mode works in the same manner whether Ticket Management is enabled or not. Enabling Ticket Management in Workflow mode simply enables the Ticket field for use with Activities. Entering a ticket ID is not required, but if one is used, the Ticket field can be configured to link to an external change management system. For more information, see Ticket Management.
1-22User Guide for Cisco Security Manager 4.12

Chapter 1 Getting Started with Security ManagerUsing Configuration Manager - Overview
Table 1-1 Comparison Between Workflow Mode and Non-Workflow Mode in Configuration
Manager
Question
Non-Workflow Mode with Ticket Management Enabled
Non-Workflow Mode with Ticket Management Disabled Workflow Mode
What is the default mode for Security Manager?
Default Not Default Not default
How do I know which mode is currently selected?
Select Tools > Security Manager Administration > Workflow. If the Enable Workflow check box is selected, you are in Workflow mode.
Select Tools > Security Manager Administration > Ticket Management. If the Enable Ticketing check box is selected, ticket management is enabled.
Must I explicitly create activities to make configuration changes?
You must explicitly create a Ticket before you can make configuration changes. Configuration Manager automatically creates an activity that is associated with that ticket.
No. Configuration Manager automatically creates an activity when you log in, or opens the previous session if you did not submit it before logging out.
Yes.
Must I explicitly create deployment jobs to deploy configurations to devices?
No. Configuration Manager creates a deployment job for you when you deploy configuration changes.
No. Configuration Manager creates a deployment job for you when you deploy configuration changes.
Yes.
How do I deploy my configuration changes to the devices?
Do one of the following:
• Select File > Deploy.
• Select Manage > Deployments and click Deploy on the Deployment Jobs tab.
Do one of the following:
• Click the Submit and Deploy Changes button in the Main toolbar.
• Select File > Submit and Deploy.
• Select Manage > Deployments and click Deploy on the Deployment Jobs tab.
Select Manage > Deployments and create a deployment job.
At what stage are the CLI commands for my configuration changes generated?
When initiating deployment.
When initiating deployment.
When creating a deployment job.
1-23User Guide for Cisco Security Manager 4.12

Chapter 1 Getting Started with Security ManagerUsing the JumpStart to Learn About Security Manager
Using the JumpStart to Learn About Security ManagerThe JumpStart is an introduction to Security Manager. It describes and illustrates the major concepts of using the product. Use the jumpstart to explore Security Manager features and capabilities.
The JumpStart opens automatically when you first launch Security Manager. To get to the JumpStart while you are working with Security Manager, select Help > JumpStart from the main menu in Configuration Manager.
The JumpStart contains the following navigation features:
• A table of contents, which is always visible in the upper right corner. Click an entry to open its page.
• Links in the page enable you to drill down to more detailed information in the JumpStart or to relevant information in the online help.
How do I delete my current changes?
Select Tickets > Discard Ticket to discard the currently-open ticket, or select the ticket in the Ticket Manager and click Discard.
If you have already started deploying devices, abort the deployment by selecting the job in the Deployment Manager and clicking Abort.
Select File > Discard.
If you have already started deploying devices, abort the deployment by selecting the job in the Deployment Manager and clicking Abort.
Select Activities > Discard Activity to discard the currently-open activity, or select the activity in the Activity Manager and click Discard.
If you already created a deployment job, select the job in the Deployment Manager and click Discard. If the job has already been deployed, you can abort the job by selecting Abort.
Can multiple users log into Security Manager at the same time?
Yes. Each user can open a different ticket and make configuration changes. A single user can log in multiple times, but the user must open separate tickets.
Yes, but only if each one has a different username. If a user with the same username logs into Security Manager, the first user is automatically logged out.
Yes. Each user can open a different activity and make configuration changes. A single user can log in multiple times, but the user must open separate activities.
What if another user is configuring the devices I want to configure?
You will receive a message indicating that the devices are locked. See Activities and Locking, page 4-3.
Table 1-1 Comparison Between Workflow Mode and Non-Workflow Mode in Configuration
Manager (Continued)
Question
Non-Workflow Mode with Ticket Management Enabled
Non-Workflow Mode with Ticket Management Disabled Workflow Mode
1-24User Guide for Cisco Security Manager 4.12
Chapter 1 Getting Started with Security ManagerCompleting the Initial Security Manager Configuration
Completing the Initial Security Manager ConfigurationAfter you install Security Manager, there are several configuration steps you might want to perform to complete the installation. Although most of the features you initially configure have default settings, you should familiarize yourself with the features and decide if the default settings are the best settings for your organization.
The following list explains the features you might want to initially configure, with pointers to topics that provide more detailed information where appropriate. You can configure these features in any order, or delay configuring those that you do not yet need to use.
• Configure an SMTP server and default e-mail addresses. Security Manager can send e-mail notifications for several actions that occur in the system. For example, you can get an e-mail when your deployment job finishes reconfiguring network devices. For e-mail notifications to work, you must configure an SMTP server.
For information on configuring an SMTP server and setting the default e-mail addresses, see Configuring an SMTP Server and Default Addresses for E-Mail Notifications, page 1-26
• Create user accounts. Users must log into Security Manager to use the product. However, if a user logs in with an account another user is already using, the first user is automatically disconnected. Thus, each user should have a unique account. You can create accounts local to the Security Manager server, or you can use your ACS system to manage user authentication. For more information, see the Installation Guide for Cisco Security Manager
• Configure default deployment settings. When users deploy configurations to devices, they can select how the configurations should be deployed and how Security Manager should handle anomalies. However, you can select system-default settings that make it easier for users to follow your organization’s recommendations. To set deployment defaults, in Configuration Manager, select Tools > Security Manager Administration, and then select Deployment from the table of contents to open the Deployment settings page (see Deployment Page, page 11-13).
The following deployment settings are of particular interest:
– Default Deployment Method—Whether configuration deployments should be written directly to the device or to a transport server, or if configuration files should be written to a specified directory on the Security Manager server. The default is to deploy configurations directly to the device or transport server, if one is configured for the device. However, if you have your own methods for deploying configuration files, you might want to select File as the default deployment method. For more information on deployment methods, see Understanding Deployment Methods, page 8-8
– When Out-of-Band Changes Detected—How to respond when Security Manager detects that configuration changes were made on the device through the CLI rather than through Security Manager. The default is to issue a warning and proceed with the deployment, overwriting the changes that were made through the CLI. However, you can change this behavior to simply skip the check for changes (which means Security Manager overwrites the changes but does not warn you), or to cancel the deployment, thus leaving the device in its current state. For more information about handling out-of-bound changes, see Understanding How Out-of-Band Changes are Handled, page 8-12.
– Allow Download on Error—Whether to allow deployment to continue if minor configuration errors are found. The default is to not allow deployment when minor errors are found.
• Select a workflow mode. The default mode is non-Workflow mode with Ticket Management enabled. In non-Workflow mode, users have more freedom to create and deploy configurations. However, if your organization requires a more transaction-oriented approach to network management, where separate individuals perform policy creation, approval, and deployment, you
1-25User Guide for Cisco Security Manager 4.12

Chapter 1 Getting Started with Security ManagerCompleting the Initial Security Manager Configuration
can enable Workflow mode to enforce your procedures. If you are using Workflow mode, ensure that you configure user permissions appropriately when you define user accounts to enforce your required division of labor. For information on the types of workflow you can use, see Workflow and Activities Overview, page 1-20. For information on how to change workflow modes, see Changing Workflow Modes, page 1-27.
Tip You can disable Ticket Management in non-Workflow mode to make most activity management tasks automatic.
• Configure default device communication settings. Security Manager uses the most commonly used methods for accessing devices based on the type of device. For example, Security Manager uses SSH by default when contacting Catalyst switches. If the default protocols work for the majority of your devices, you do not need to change them. For devices that should use a non-default protocol, you can change the protocol in the device properties for the specific devices. However, if you typically use a protocol that is not the Security Manager default (for example, if you use a token management server (TMS) for your routers), you should change the default setting. To change the default communication settings, in Configuration Manager, select Tools > Security Manager Administration, and select Device Communication from the table of contents. In the Device Connection Settings group, select the most appropriate protocols for each type of device. You can also change the default connection time out and retry settings. For more information about device communication settings, see Device Communication Page, page 11-21
• Select the types of router and firewall policies you will manage with Security Manager. When you manage IPS devices in Security Manager, you automatically manage the entire configuration. However, with routers and firewall devices (ASA, PIX, and FWSM), you can select which types of policies are managed by Security Manager. You can manage other parts of the device configuration using other tools (including the devices’s CLI). By default, all security-related policies are managed. To change which policies are managed, in Configuration Manager, select Tools > Security Manager Administration > Policy Management. For detailed information about changing these settings and what you should do before and after making the change, see Customizing Policy Management for Routers and Firewall Devices, page 5-11.
• Decide whether you want to use the Event Viewer to manage firewall and IPS events. You can configure the disk and location for collecting syslog events from devices, and the port number to use for syslog communication. If you do not want to use Security Manager for event management, you can turn off the feature, which is enabled by default. For more information on the configuration options, see Event Management Page, page 11-27.
• Configure Security Manager for communication with Cisco Security Monitoring, Analysis and Response System (CS-MARS). If you use CS-MARS for monitoring your network, you can identify the servers to Security Manager and then access CS-MARS event information from within Security Manager. For information on configuring this cross-communication, see Checklist for Integrating CS-MARS with Security Manager, page 71-36.
Configuring an SMTP Server and Default Addresses for E-Mail Notifications Security Manager can send e-mail notifications for several types of events such as deployment job completion, activity approval, or ACL rule expiration. To enable e-mail notifications, you must configure an SMTP server that Security Manager can use for sending the e-mails. Then, you can configure e-mail addresses and notification settings on these settings pages (in Configuration Manager, select Tools > Security Manager Administration and select the page from the table of contents):
1-26User Guide for Cisco Security Manager 4.12
Chapter 1 Getting Started with Security ManagerCompleting the Initial Security Manager Configuration
• Workflow page—For default e-mail addresses and notification settings for deployment jobs and activities. Users can override the defaults when managing deployment jobs and activities.
• Rules Expiration page—For default e-mail addresses and notification settings for ACL rule expiration. Rules expire only if you configure them with expiration dates.
• IPS Updates page—For the e-mail address that should be notified of IPS update availability.
• Server Security page—When you configure local user accounts (click Local User Setup), specify the user’s e-mail address. This address is used as the default target for some notifications such as deployment job completion.
• Event Management page—When you configure an extended data storage location, you must specify at least one e-mail address. The email addresses receive notifications if problems arise with the use of the extended storage location. Also, if you are using the Syslog Relay Service, you can configure e-mail addresses that should be notified when the syslog relay service enters or exits CPU throttling.
Tip If you are using ACS for user authorization, you might have already configured an SMTP server and system administrator e-mail address in the ACS integration procedure as described in the Installation Guide for Cisco Security Manager. Security Manager sends a notification to this address if all ACS servers become unavailable.
Step 1 Access CiscoWorks Common Services on the Security Manager server:
• If you are currently using the Security Manager client, the easiest way to do this is to select Tools > Security Manager Administration, select Server Security from the table of contents, and click any button on that page (for example, Local User Setup).
• You can use your web browser to log into the home page on the Security Manager server (https://servername/CSCOnm/servlet/login/login.jsp) and click Server Administration.
Step 2 Click Server > Admin and select System Preferences from the table of contents.
Step 3 On the System Preferences page, enter the host name or IP address of an SMTP server that Security Manager can use. The SMTP server cannot require user authentication for sending e-mail messages.
Also, enter an e-mail address that CiscoWorks can use for sending e-mails. This does not have to be the same e-mail address that you configure for Security Manager to use when sending notifications. If you are using ACS for authorization, Security Manager sends an e-mail message to this address if all ACS servers become unavailable. This can alert you to a problem that needs immediate attention. The administrator might also receive e-mail messages from Common Services for non-ACS-related events.
Step 4 Click Apply to save your changes.
Changing Workflow Modes You can change the workflow mode that Security Manager enforces if you have the appropriate administrator permissions. Changing the workflow mode has significant effects on users. Before making a change, be sure to understand the following:
• When you change the workflow mode, the change will take effect for all Security Manager users working from the same server.
1-27User Guide for Cisco Security Manager 4.12
Chapter 1 Getting Started with Security ManagerCompleting the Initial Security Manager Configuration
• Before you can change from Workflow mode to non-Workflow mode, all activities in editable states (Edit, Edit Open, Submit, or Submit Open) must be approved or discarded, and all generated jobs must be deployed, rejected, discarded, or aborted so that the locks on the devices can be released. You do not have to do anything to jobs that are in the failed state.
• Before you can disable Ticket Management in non-Workflow mode, all tickets in editable states (Edit or Edit Open) must be submitted or discarded.
• If you change from Workflow mode to non-Workflow mode and then restore an earlier version of the database, Security Manager automatically changes to Workflow mode if the restored database has any activities in an editable state (Edit, Edit Open, Submit, or Submit Open). Approve or delete the editable activities, and then turn Workflow mode off again.
• When changing from non-Workflow mode to Workflow mode or enabling Ticket Management in non-Workflow mode, current configuration sessions are listed as activities/tickets in the Edit_Open state, and these activities/tickets must now be explicitly managed.
• When Ticket Management is enabled or disabled, any other users logged into Security Manager are logged out.
For an explanation of workflow modes, see Workflow and Activities Overview, page 1-20.
Step 1 In Configuration Manager, select Tools > Security Manager Administration and select Workflow from the table of contents to open the Workflow page (see Workflow Page, page 11-74).
Step 2 Configure the workflow mode settings in the Workflow Control group. If you select Enable Workflow (to use Workflow mode), you can also select these options:
• Require Activity Approval—To enforce explicit approval of activities before policy changes are committed to the database.
• Submitter can Approve Activity— Instead of separating submission and approval roles, a submitter can also approve his/her own activity, when enabled.
• Require Deployment Approval—To enforce explicit approval of deployment jobs before they can be run.
• Submitter can Approve Deployment Job—When enabled, submitter can approve deployment jobs submitted by him/her.
Step 3 Configure the e-mail notification settings. These are the default e-mail addresses for the e-mail sender (that is, Security Manager), the approvers, and another person or e-mail alias who should be notified when deployment jobs are complete.
You also have the options to include the job deployer when sending notifications of job status, and to require that e-mail notifications are sent for deployment job status changes.
Step 4 Click Save to save and apply changes.
Step 5 Select Workflow from the table of contents to open the Ticket Management page (see Ticket Management Page, page 11-71).
Step 6 Configure the Ticket Management settings. If you select Enable Ticketing, you can also select these options:
Note See Ticket Management Page, page 11-71 for detailed information on these fields.
• Ticket System URL—To provide linking between a Ticket ID and an external ticket management system.
• Ticket History—Specify how long to keep information related to tickets.
1-28User Guide for Cisco Security Manager 4.12

Chapter 1 Getting Started with Security ManagerUnderstanding Basic Security Manager Interface Features
Step 7 Click Save to save and apply changes.
Understanding Basic Security Manager Interface FeaturesThe following topics provide information about some basic interface features such as descriptions of the menu commands, toolbar buttons, and how to use common user interface elements. Many of the features described are used only in Configuration Manager.
• Menu Bar Reference for Configuration Manager, page 1-29
• Toolbar Reference (Configuration Manager), page 1-39
• Using Selectors, page 1-45
• Using Wizards, page 1-47
• Using Tables, page 1-48
• Using Text Fields, page 1-49
• Selecting or Specifying a File or Directory in Security Manager, page 1-50
• Troubleshooting User Interface Problems, page 1-51
Menu Bar Reference for Configuration ManagerThe menu bar in Configuration Manager contains menus with commands for using Security Manager. Commands may become unavailable depending on the task you are performing.
The menus in the menu bar are described in the following topics:
• File Menu (Configuration Manager), page 1-29
• Edit Menu (Configuration Manager), page 1-31
• View Menu (Configuration Manager), page 1-31
• Policy Menu (Configuration Manager), page 1-32
• Map Menu (Configuration Manager), page 1-32
• Manage Menu (Configuration Manager), page 1-33
• Tools Menu (Configuration Manager), page 1-34
• Launch Menu (Configuration Manager), page 1-37
• Activities Menu (Configuration Manager), page 1-36
• Tickets Menu (Configuration Manager), page 1-36
• Help Menu (Configuration Manager), page 1-38
File Menu (Configuration Manager)
The following table describes the commands on the File menu in Configuration Manager. The menu items differ depending on the workflow mode.
1-29User Guide for Cisco Security Manager 4.12
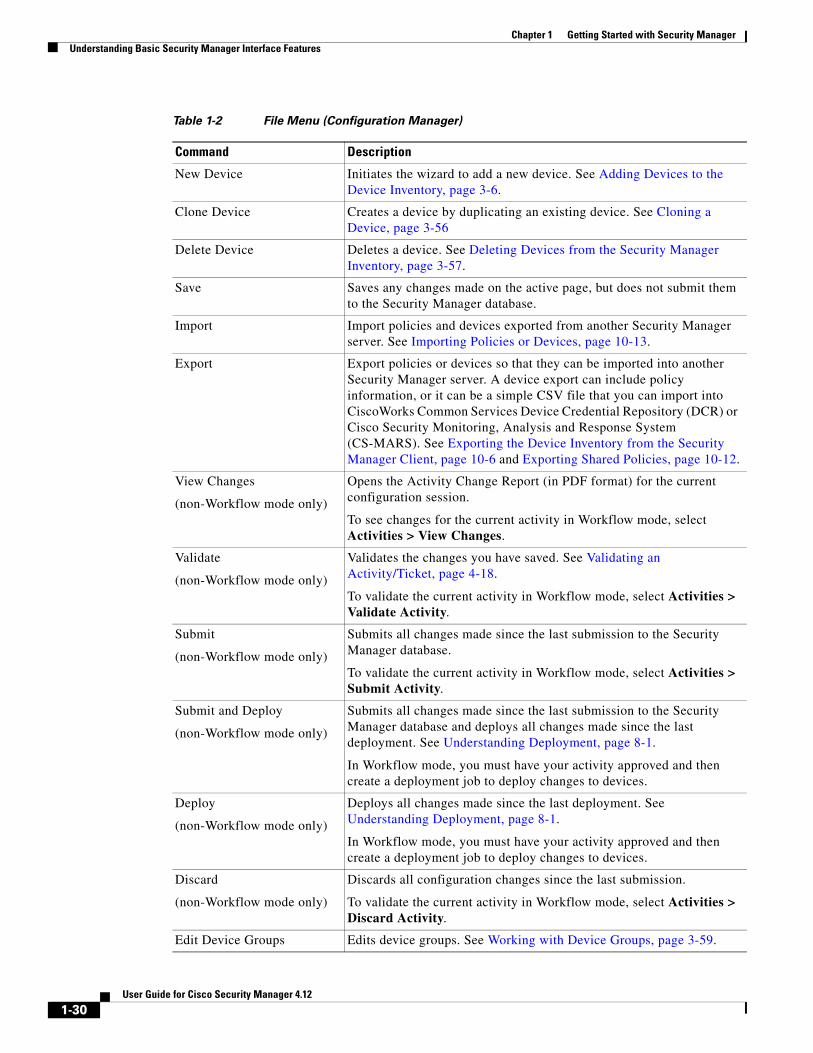
Chapter 1 Getting Started with Security ManagerUnderstanding Basic Security Manager Interface Features
Table 1-2 File Menu (Configuration Manager)
Command Description
New Device Initiates the wizard to add a new device. See Adding Devices to the Device Inventory, page 3-6.
Clone Device Creates a device by duplicating an existing device. See Cloning a Device, page 3-56
Delete Device Deletes a device. See Deleting Devices from the Security Manager Inventory, page 3-57.
Save Saves any changes made on the active page, but does not submit them to the Security Manager database.
Import Import policies and devices exported from another Security Manager server. See Importing Policies or Devices, page 10-13.
Export Export policies or devices so that they can be imported into another Security Manager server. A device export can include policy information, or it can be a simple CSV file that you can import into CiscoWorks Common Services Device Credential Repository (DCR) or Cisco Security Monitoring, Analysis and Response System (CS-MARS). See Exporting the Device Inventory from the Security Manager Client, page 10-6 and Exporting Shared Policies, page 10-12.
View Changes
(non-Workflow mode only)
Opens the Activity Change Report (in PDF format) for the current configuration session.
To see changes for the current activity in Workflow mode, select Activities > View Changes.
Validate
(non-Workflow mode only)
Validates the changes you have saved. See Validating an Activity/Ticket, page 4-18.
To validate the current activity in Workflow mode, select Activities > Validate Activity.
Submit
(non-Workflow mode only)
Submits all changes made since the last submission to the Security Manager database.
To validate the current activity in Workflow mode, select Activities > Submit Activity.
Submit and Deploy
(non-Workflow mode only)
Submits all changes made since the last submission to the Security Manager database and deploys all changes made since the last deployment. See Understanding Deployment, page 8-1.
In Workflow mode, you must have your activity approved and then create a deployment job to deploy changes to devices.
Deploy
(non-Workflow mode only)
Deploys all changes made since the last deployment. See Understanding Deployment, page 8-1.
In Workflow mode, you must have your activity approved and then create a deployment job to deploy changes to devices.
Discard
(non-Workflow mode only)
Discards all configuration changes since the last submission.
To validate the current activity in Workflow mode, select Activities > Discard Activity.
Edit Device Groups Edits device groups. See Working with Device Groups, page 3-59.
1-30User Guide for Cisco Security Manager 4.12

Chapter 1 Getting Started with Security ManagerUnderstanding Basic Security Manager Interface Features
Edit Menu (Configuration Manager)
The following table describes the commands on the Edit menu in Configuration Manager. You can typically use these commands only when you are working with a table in a policy, and some work only for rules tables (see Using Rules Tables, page 12-7).
View Menu (Configuration Manager)
The View menu in Configuration Manager contains commands to navigate within the user interface or to alter the toolbar.
New Device Group Adds a device group. See Creating Device Groups, page 3-62.
Add Devices to Group Adds a device to a group. See Adding Devices to or Removing Them From Device Groups, page 3-63.
Print Prints the active page.
Not all pages can be printed. If the Print command is not available, you cannot print the active page.
Exit Exits Security Manager.
Table 1-2 File Menu (Configuration Manager) (Continued)
Command Description
Table 1-3 Edit Menu (Configuration Manager)
Command Description
Cut Cuts the selected row in a rules table and saves it on the clipboard.
Copy Copies the selected row in a rules table and saves it on the clipboard.
Paste Pastes the rules table row from the clipboard to the into the rules table after the selected row.
Add Row Adds a row into the active table.
Edit Row Edits the selected table row.
Delete Row Deletes the selected table row.
Move Row Up
Move Row Down
Moves the selected row up or down in the rules table. For more information, see Moving Rules and the Importance of Rule Order, page 12-19.
Global Search Opens the Global Search window. For more information, see Using Global Search, page 1-42.
Table 1-4 View Menu
Menu Command Description
Device View Opens Device view. See Device View Overview, page 1-14.
Device Status View Opens the Device Status View window. See Working with Device Status View, page 3-63.
Map View Opens Map view. See Map View Overview, page 1-17.
1-31User Guide for Cisco Security Manager 4.12

Chapter 1 Getting Started with Security ManagerUnderstanding Basic Security Manager Interface Features
Policy Menu (Configuration Manager)
The Policy menu in Configuration Manager contains commands for managing policies.
Map Menu (Configuration Manager)
The Map menu in Configuration Manager contains commands for using the Map view. The commands in this menu are available only when the Map view is open. For more information, see Chapter 35, “Using Map View”.
Policy View Opens Policy view. See Policy View Overview, page 1-16.
Policy Bundle View Opens Policy Bundle view. See Managing Policy Bundles, page 5-57.
Customized Toolbar Allows you to add or remove some optional buttons on the toolbar. For information on all the buttons that can appear on the toolbar, see Toolbar Reference (Configuration Manager), page 1-39.
Table 1-4 View Menu (Continued)
Menu Command Description
Table 1-5 Policy Menu (Configuration Manager)
Menu Command Description
Share Policy Saves the active local policy as a shared policy. See Sharing a Local Policy, page 5-41.
Unshare Policy Saves the active shared policy as a local policy. See Unsharing a Policy, page 5-43.
Assign Shared Policy Assigns shared policies to devices. See Assigning a Shared Policy to a Device or VPN Topology, page 5-44.
Unassign Policy Unassigns the current policy from the selected device. See Unassigning a Policy, page 5-36.
Copy Policies Between Devices
Copies policies between devices. See Copying Policies Between Devices, page 5-33
Share Device Polices Enables you to share local device policies. See Sharing a Local Policy, page 5-41.
Edit Policy Assignments Edits assignment of shared policies to devices. See Modifying Policy Assignments in Policy View, page 5-54.
Clone Policy Creates a copy of a policy with a new name. See Cloning (Copying) a Shared Policy, page 5-47.
Rename Policy Renames a policy. See Renaming a Shared Policy, page 5-48.
Add Local Rules Adds local rules to a shared policy on a device. You must select a rule-based shared policy to use this command.
Inherit Rules Edits policy inheritance. See Inheriting or Uninheriting Rules, page 5-46
Discover Policies on Device Discovers policies on a device. See Discovering Policies, page 5-12
Discover VPN Policies Opens the Discover VPN Policies wizard. See Site-To-Site VPN Discovery, page 25-19.
1-32User Guide for Cisco Security Manager 4.12
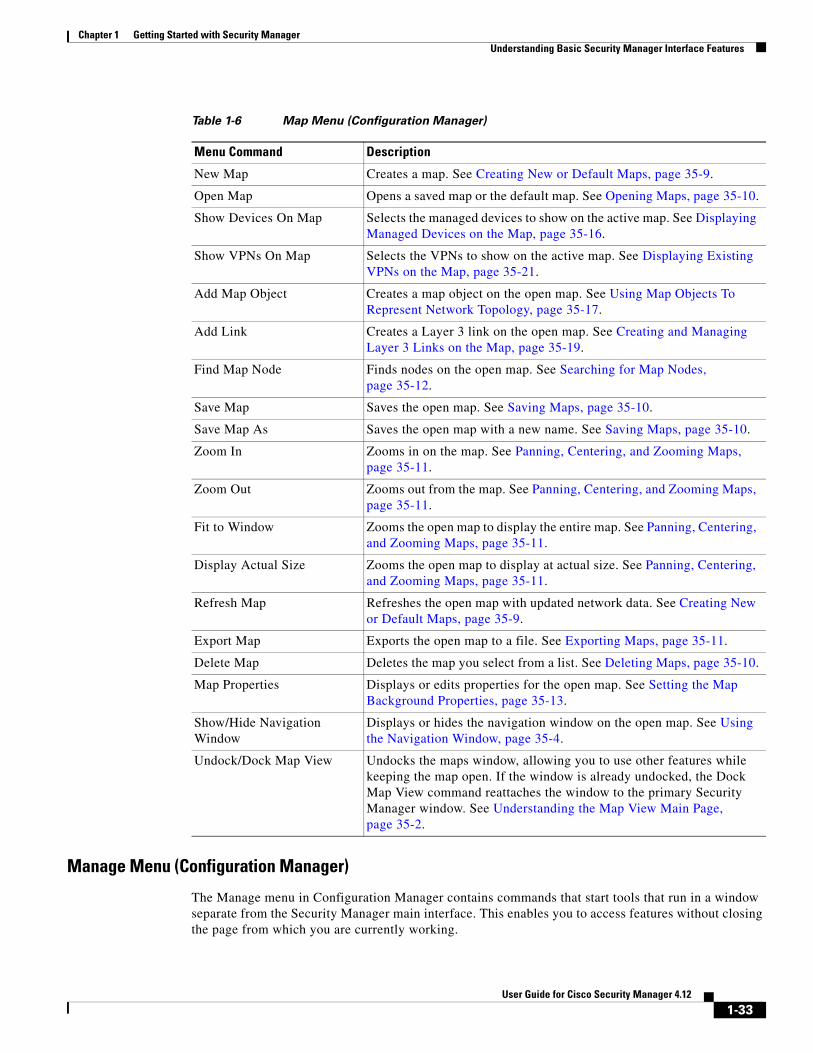
Chapter 1 Getting Started with Security ManagerUnderstanding Basic Security Manager Interface Features
Manage Menu (Configuration Manager)
The Manage menu in Configuration Manager contains commands that start tools that run in a window separate from the Security Manager main interface. This enables you to access features without closing the page from which you are currently working.
Table 1-6 Map Menu (Configuration Manager)
Menu Command Description
New Map Creates a map. See Creating New or Default Maps, page 35-9.
Open Map Opens a saved map or the default map. See Opening Maps, page 35-10.
Show Devices On Map Selects the managed devices to show on the active map. See Displaying Managed Devices on the Map, page 35-16.
Show VPNs On Map Selects the VPNs to show on the active map. See Displaying Existing VPNs on the Map, page 35-21.
Add Map Object Creates a map object on the open map. See Using Map Objects To Represent Network Topology, page 35-17.
Add Link Creates a Layer 3 link on the open map. See Creating and Managing Layer 3 Links on the Map, page 35-19.
Find Map Node Finds nodes on the open map. See Searching for Map Nodes, page 35-12.
Save Map Saves the open map. See Saving Maps, page 35-10.
Save Map As Saves the open map with a new name. See Saving Maps, page 35-10.
Zoom In Zooms in on the map. See Panning, Centering, and Zooming Maps, page 35-11.
Zoom Out Zooms out from the map. See Panning, Centering, and Zooming Maps, page 35-11.
Fit to Window Zooms the open map to display the entire map. See Panning, Centering, and Zooming Maps, page 35-11.
Display Actual Size Zooms the open map to display at actual size. See Panning, Centering, and Zooming Maps, page 35-11.
Refresh Map Refreshes the open map with updated network data. See Creating New or Default Maps, page 35-9.
Export Map Exports the open map to a file. See Exporting Maps, page 35-11.
Delete Map Deletes the map you select from a list. See Deleting Maps, page 35-10.
Map Properties Displays or edits properties for the open map. See Setting the Map Background Properties, page 35-13.
Show/Hide Navigation Window
Displays or hides the navigation window on the open map. See Using the Navigation Window, page 35-4.
Undock/Dock Map View Undocks the maps window, allowing you to use other features while keeping the map open. If the window is already undocked, the Dock Map View command reattaches the window to the primary Security Manager window. See Understanding the Map View Main Page, page 35-2.
1-33User Guide for Cisco Security Manager 4.12

Chapter 1 Getting Started with Security ManagerUnderstanding Basic Security Manager Interface Features
Tools Menu (Configuration Manager)
The Tools menu in Configuration Manager contains commands that start tools that run in a window separate from the Security Manager main interface. This enables you to access features without closing the page from which you are currently working.
Table 1-7 Manage Menu (Configuration Manager)
Menu Command Description
Policy Objects Opens the Policy Object Manager, where you can view all available objects grouped according to object type; create, copy, edit, and delete objects; and generate usage reports, which describe how selected objects are being used by other Security Manager objects and policies. For information see Policy Object Manager, page 6-4.
Site-to-Site VPNs Opens the Site-to-Site VPN Manager, where you can configure site-to-site VPNs. See Chapter 25, “Managing Site-to-Site VPNs: The Basics”
Activities
(Workflow mode only)
Opens the Activity Manager, where you can create and manage activities. See Activity/Ticket Manager Window, page 4-10.
Deployments Opens the Deployment Manager, where you can deploy configurations and manage deployment jobs. See Chapter 8, “Managing Deployment”
Configuration Archive Stores archived device configuration versions and allows you to view, compare, and roll back from one configuration to another. See Configuration Archive Window, page 8-23.
Policy Discovery Status Opens the Policy Discovery Status window, where you can see the status of policy discovery and device import. See Viewing Policy Discovery Task Status, page 5-22.
IPS Manage IPS device certificates, which are required for device communications.
Audit Report Generates an audit report according to parameters set in the audit report page. See Using the Audit Report Window, page 10-21.
Change Reports
(non-Workflow mode only)
Allows you to generate a report of changes to devices, shared policies, and policy objects for a previous configuration session. See Viewing Change Reports, page 4-16.
To view changes for the current configuration session, select File > View Changes.
Table 1-8 Tools Menu (Configuration Manager)
Menu Command Description
Device Properties Opens the Device Properties window, which provides general information about the device, including credentials, the group the device is assigned to, and policy object overrides. For more information, see Understanding Device Properties, page 3-6.
1-34User Guide for Cisco Security Manager 4.12

Chapter 1 Getting Started with Security ManagerUnderstanding Basic Security Manager Interface Features
Detect Out of Band Changes Analyzes devices to determine if their configurations have changed since the last time Security Manager deployed configurations. You can use this information to ensure that you do not loose important configuration changes. See Detecting and Analyzing Out of Band Changes, page 8-45.
Packet Capture Wizard Opens the Packet Capture wizard, where you can set up a packet capture on an ASA device.
Ping, TraceRoute and NSLookup
Opens the Ping, TraceRoute, and NSLookup tool, where you can use these troubleshooting commands. Ping and traceroute run on managed devices, whereas NSLookup runs on your client workstation. See Analyzing Connectivity Issues Using the Ping, Trace Route, or NS Lookup Tools, page 71-25.
IP Intelligence Opens the IP Intelligence tool, where you can access various pieces of information about an IPv4 address, such as the fully qualified domain name (FQDN), geographic location information, and WHOIS information. For more information on the IP Intelligence tool, see IP Intelligence, page 71-33.
Before you can use any of the IP Intelligence features, you must enable and configure those features on the IP Intelligence Settings page (see IP Intelligence Settings Page, page 11-41).
Wall Opens the Wall window, where you can send messages to all users who are logged in on the same Security Manager server. First, however, it must be enabled on the Wall Settings page. See Wall Settings Page, page 11-76.
Show Containment Shows security contexts or service modules for a device. See Showing Device Containment, page 3-56.
Inventory Status Shows device summary information for all devices. See Viewing Inventory Status, page 71-12.
Catalyst Summary Info Shows high-level system information, including any service modules, ports, and VLANs that Security Manager has discovered on the selected Catalyst switch. See Viewing Catalyst Summary Information, page 67-2.
Apply IPS Update Manually applies IPS image and signature updates. See Manually Applying IPS Updates, page 44-7.
Preview Configuration Displays the proposed changes, last deployed configuration, or current running configuration for specific devices. See Previewing Configurations, page 8-44.
Backup Backs up the Security Manager database using CiscoWorks Common Services. See Backing up and Restoring the Security Manager Database, page 10-24.
Table 1-8 Tools Menu (Configuration Manager) (Continued)
Menu Command Description
1-35User Guide for Cisco Security Manager 4.12

Chapter 1 Getting Started with Security ManagerUnderstanding Basic Security Manager Interface Features
Activities Menu (Configuration Manager)
The Activities menu in Configuration Manager contains commands for managing activities. It appears only when Workflow mode is enabled. For more detailed information about these commands, see Accessing Activity Functions in Workflow Mode, page 4-8.
Tickets Menu (Configuration Manager)
The Tickets menu in Configuration Manager contains commands for managing tickets. It appears only when Ticket Management is enabled in non-Workflow mode. For more detailed information about these commands, see Accessing Ticket Functions in Non-Workflow Mode, page 4-9.
Security Manager Diagnostics
Gathers troubleshooting information to send to the Technical Assistance Center (TAC) if they request it. See Creating Diagnostics Files for the Cisco Technical Assistance Center, page 10-28.
Tip Beginning with Version 4.7 of Cisco Security Manager, you can select "Light Diagnostics" instead of the existing "General Diagnostics."
Security Manager Administration
Configures system-wide settings that control the functioning of Security Manager. For information, see Chapter 11, “Configuring Security Manager Administrative Settings”.
Table 1-8 Tools Menu (Configuration Manager) (Continued)
Menu Command Description
Table 1-9 Activities Menu (Configuration Manager)
Menu Command Description
New Activity Creates a new activity. See Creating an Activity/Ticket, page 4-14.
Open Activity Opens an activity. See Opening an Activity/Ticket, page 4-15.
Close Activity Closes the open activity. See Closing an Activity/Ticket, page 4-16.
View Changes Opens the Activity Change Report (in PDF format). See Viewing Change Reports, page 4-16.
Validate Activity Validates the open activity. See Validating an Activity/Ticket, page 4-18.
Submit Activity Submits the open activity. See Submitting an Activity for Approval (Workflow Mode with Activity Approver), page 4-20.
Approve Activity Approves the open activity. See Approving or Rejecting an Activity (Workflow Mode), page 4-21.
Reject Activity Rejects the open activity. See Approving or Rejecting an Activity (Workflow Mode), page 4-21.
Discard Activity Discards the open activity. See Discarding an Activity/Ticket, page 4-22.
1-36User Guide for Cisco Security Manager 4.12
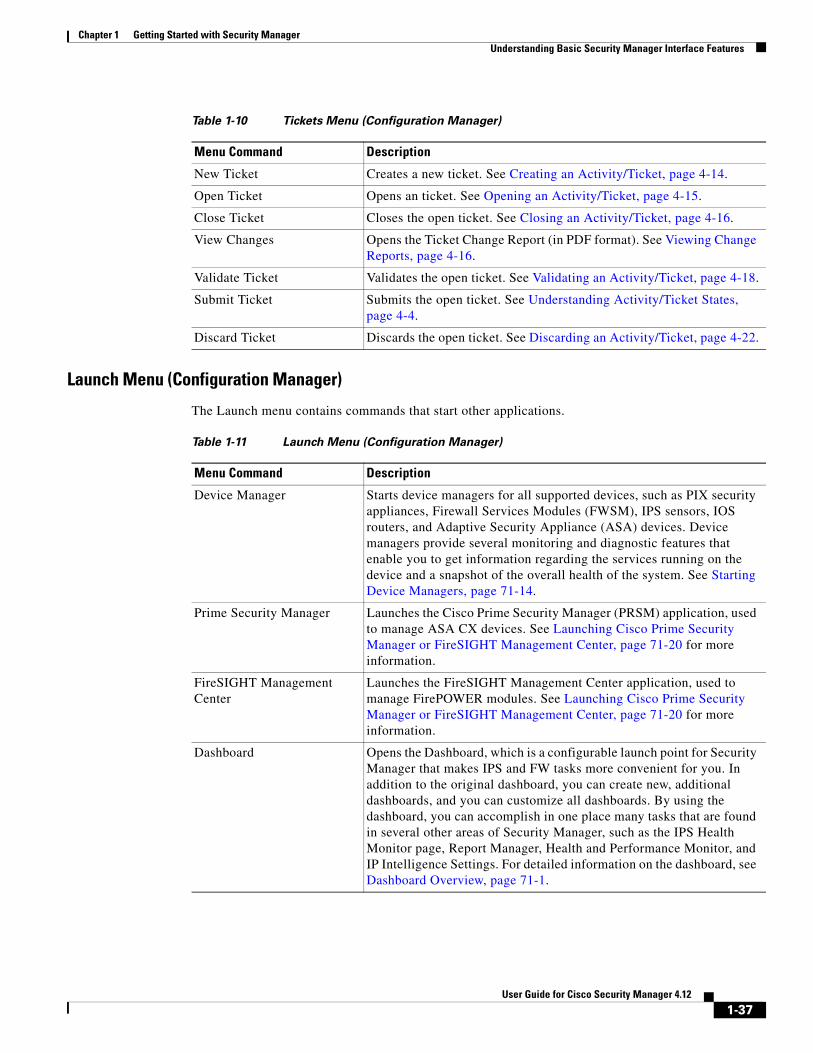
Chapter 1 Getting Started with Security ManagerUnderstanding Basic Security Manager Interface Features
Launch Menu (Configuration Manager)
The Launch menu contains commands that start other applications.
Table 1-10 Tickets Menu (Configuration Manager)
Menu Command Description
New Ticket Creates a new ticket. See Creating an Activity/Ticket, page 4-14.
Open Ticket Opens an ticket. See Opening an Activity/Ticket, page 4-15.
Close Ticket Closes the open ticket. See Closing an Activity/Ticket, page 4-16.
View Changes Opens the Ticket Change Report (in PDF format). See Viewing Change Reports, page 4-16.
Validate Ticket Validates the open ticket. See Validating an Activity/Ticket, page 4-18.
Submit Ticket Submits the open ticket. See Understanding Activity/Ticket States, page 4-4.
Discard Ticket Discards the open ticket. See Discarding an Activity/Ticket, page 4-22.
Table 1-11 Launch Menu (Configuration Manager)
Menu Command Description
Device Manager Starts device managers for all supported devices, such as PIX security appliances, Firewall Services Modules (FWSM), IPS sensors, IOS routers, and Adaptive Security Appliance (ASA) devices. Device managers provide several monitoring and diagnostic features that enable you to get information regarding the services running on the device and a snapshot of the overall health of the system. See Starting Device Managers, page 71-14.
Prime Security Manager Launches the Cisco Prime Security Manager (PRSM) application, used to manage ASA CX devices. See Launching Cisco Prime Security Manager or FireSIGHT Management Center, page 71-20 for more information.
FireSIGHT Management Center
Launches the FireSIGHT Management Center application, used to manage FirePOWER modules. See Launching Cisco Prime Security Manager or FireSIGHT Management Center, page 71-20 for more information.
Dashboard Opens the Dashboard, which is a configurable launch point for Security Manager that makes IPS and FW tasks more convenient for you. In addition to the original dashboard, you can create new, additional dashboards, and you can customize all dashboards. By using the dashboard, you can accomplish in one place many tasks that are found in several other areas of Security Manager, such as the IPS Health Monitor page, Report Manager, Health and Performance Monitor, and IP Intelligence Settings. For detailed information on the dashboard, see Dashboard Overview, page 71-1.
1-37User Guide for Cisco Security Manager 4.12
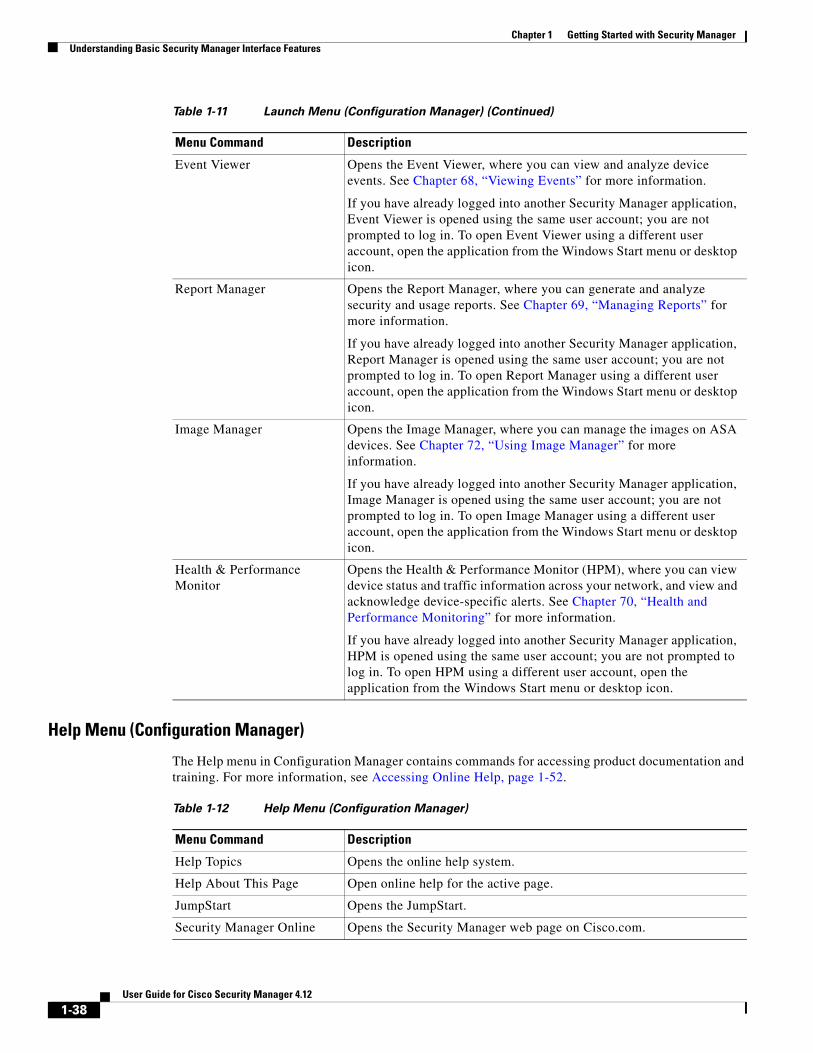
Chapter 1 Getting Started with Security ManagerUnderstanding Basic Security Manager Interface Features
Help Menu (Configuration Manager)
The Help menu in Configuration Manager contains commands for accessing product documentation and training. For more information, see Accessing Online Help, page 1-52.
Event Viewer Opens the Event Viewer, where you can view and analyze device events. See Chapter 68, “Viewing Events” for more information.
If you have already logged into another Security Manager application, Event Viewer is opened using the same user account; you are not prompted to log in. To open Event Viewer using a different user account, open the application from the Windows Start menu or desktop icon.
Report Manager Opens the Report Manager, where you can generate and analyze security and usage reports. See Chapter 69, “Managing Reports” for more information.
If you have already logged into another Security Manager application, Report Manager is opened using the same user account; you are not prompted to log in. To open Report Manager using a different user account, open the application from the Windows Start menu or desktop icon.
Image Manager Opens the Image Manager, where you can manage the images on ASA devices. See Chapter 72, “Using Image Manager” for more information.
If you have already logged into another Security Manager application, Image Manager is opened using the same user account; you are not prompted to log in. To open Image Manager using a different user account, open the application from the Windows Start menu or desktop icon.
Health & Performance Monitor
Opens the Health & Performance Monitor (HPM), where you can view device status and traffic information across your network, and view and acknowledge device-specific alerts. See Chapter 70, “Health and Performance Monitoring” for more information.
If you have already logged into another Security Manager application, HPM is opened using the same user account; you are not prompted to log in. To open HPM using a different user account, open the application from the Windows Start menu or desktop icon.
Table 1-11 Launch Menu (Configuration Manager) (Continued)
Menu Command Description
Table 1-12 Help Menu (Configuration Manager)
Menu Command Description
Help Topics Opens the online help system.
Help About This Page Open online help for the active page.
JumpStart Opens the JumpStart.
Security Manager Online Opens the Security Manager web page on Cisco.com.
1-38User Guide for Cisco Security Manager 4.12
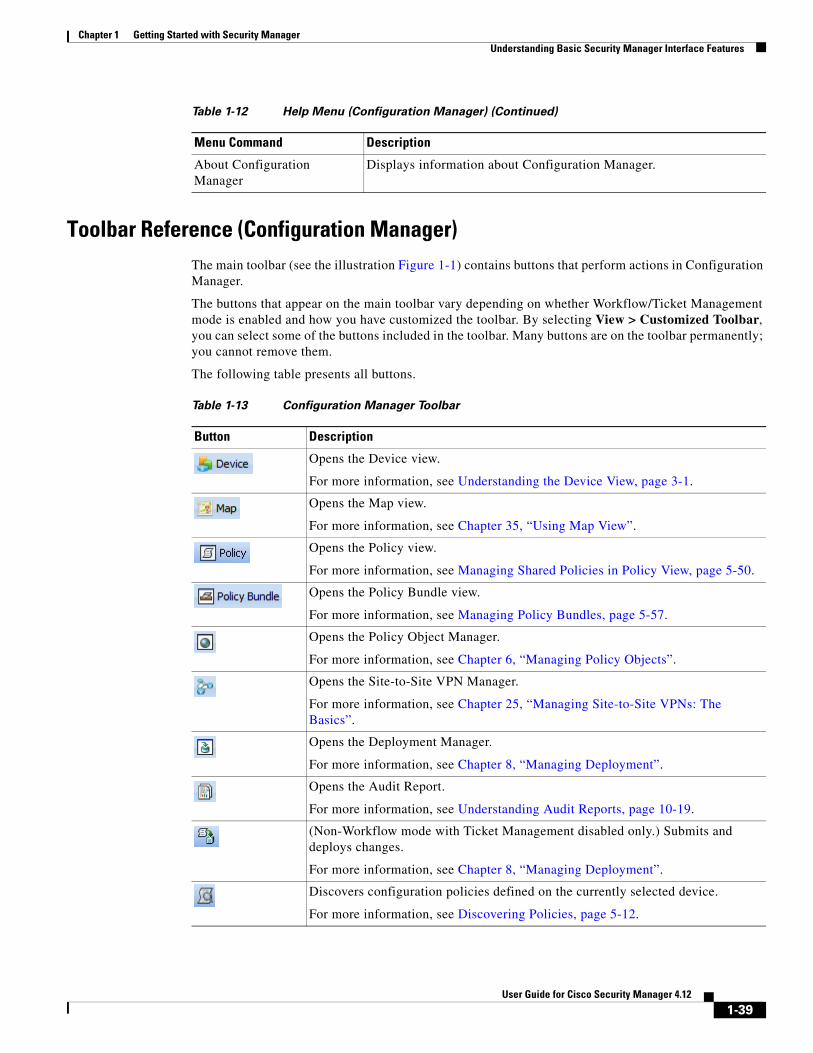
Chapter 1 Getting Started with Security ManagerUnderstanding Basic Security Manager Interface Features
Toolbar Reference (Configuration Manager)The main toolbar (see the illustration Figure 1-1) contains buttons that perform actions in Configuration Manager.
The buttons that appear on the main toolbar vary depending on whether Workflow/Ticket Management mode is enabled and how you have customized the toolbar. By selecting View > Customized Toolbar, you can select some of the buttons included in the toolbar. Many buttons are on the toolbar permanently; you cannot remove them.
The following table presents all buttons.
About Configuration Manager
Displays information about Configuration Manager.
Table 1-12 Help Menu (Configuration Manager) (Continued)
Menu Command Description
Table 1-13 Configuration Manager Toolbar
Button Description
Opens the Device view.
For more information, see Understanding the Device View, page 3-1.
Opens the Map view.
For more information, see Chapter 35, “Using Map View”.
Opens the Policy view.
For more information, see Managing Shared Policies in Policy View, page 5-50.
Opens the Policy Bundle view.
For more information, see Managing Policy Bundles, page 5-57.
Opens the Policy Object Manager.
For more information, see Chapter 6, “Managing Policy Objects”.
Opens the Site-to-Site VPN Manager.
For more information, see Chapter 25, “Managing Site-to-Site VPNs: The Basics”.
Opens the Deployment Manager.
For more information, see Chapter 8, “Managing Deployment”.
Opens the Audit Report.
For more information, see Understanding Audit Reports, page 10-19.
(Non-Workflow mode with Ticket Management disabled only.) Submits and deploys changes.
For more information, see Chapter 8, “Managing Deployment”.
Discovers configuration policies defined on the currently selected device.
For more information, see Discovering Policies, page 5-12.
1-39User Guide for Cisco Security Manager 4.12

Chapter 1 Getting Started with Security ManagerUnderstanding Basic Security Manager Interface Features
Detects out-of-band changes, those made to the device outside of Security Manager, for the currently selected devices.
For more information, see Detecting and Analyzing Out of Band Changes, page 8-45.
Opens the IP Intelligence tool, where you can access various pieces of information about an IPv4 address, such as the fully qualified domain name (FQDN), geographic location information, and WHOIS information. For more information on the IP Intelligence tool, see IP Intelligence, page 71-33.
Before you can use any of the IP Intelligence features, you must enable and configure those features on the IP Intelligence Settings page (see IP Intelligence Settings Page, page 11-41).
Opens the Wall window, where you can send messages to all users who are logged in on the same Security Manager server. First, however, it must be enabled on the Wall Settings page.
For more information, see Workflow Page, page 11-74.
Shows high-level system information, including any service modules, ports, and VLANs that Security Manager has discovered on the selected Catalyst switch.
For more information, see Viewing Catalyst Summary Information, page 67-2.
Previews the configuration for the currently selected device.
For more information, see Previewing Configurations, page 8-44.
Configures system-wide settings that control the functioning of Security Manager. For information, see Chapter 11, “Configuring Security Manager Administrative Settings”.
Opens the device manager for the currently selected device.
For more information, see Starting Device Managers, page 71-14.
Launches the Cisco Prime Security Manager (PRSM) application, used to manage ASA CX devices. See Launching Cisco Prime Security Manager or FireSIGHT Management Center, page 71-20 for more information.
Launches the FireSIGHT Management Center application, used to manage FirePOWER modules. See Launching Cisco Prime Security Manager or FireSIGHT Management Center, page 71-20 for more information.
Opens the Dashboard application.
For more information, see Dashboard Overview, page 71-1.
Opens the Event Viewer application.
For more information, see Chapter 68, “Viewing Events”.
Opens the Report Manager application.
For more information, see Chapter 69, “Managing Reports”.
Opens the Image Manager application.
For more information, see Chapter 72, “Using Image Manager”.
Table 1-13 Configuration Manager Toolbar (Continued)
Button Description
1-40User Guide for Cisco Security Manager 4.12
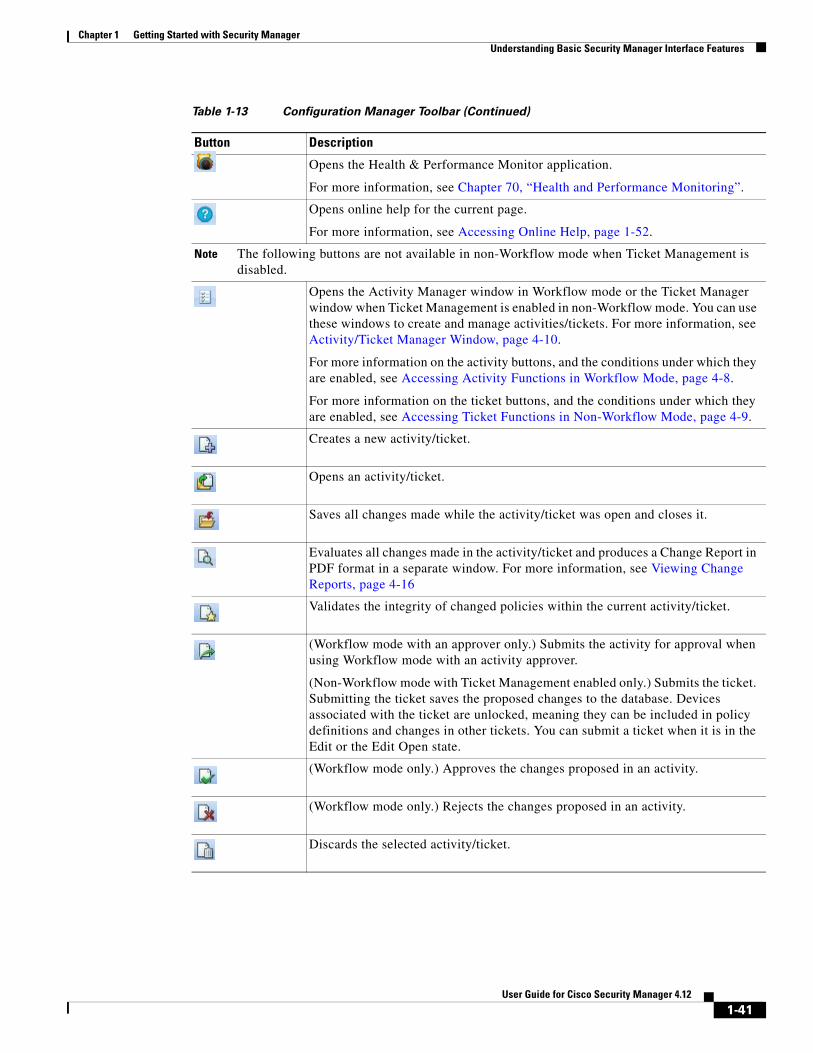
Chapter 1 Getting Started with Security ManagerUnderstanding Basic Security Manager Interface Features
Opens the Health & Performance Monitor application.
For more information, see Chapter 70, “Health and Performance Monitoring”.
Opens online help for the current page.
For more information, see Accessing Online Help, page 1-52.
Note The following buttons are not available in non-Workflow mode when Ticket Management is disabled.
Opens the Activity Manager window in Workflow mode or the Ticket Manager window when Ticket Management is enabled in non-Workflow mode. You can use these windows to create and manage activities/tickets. For more information, see Activity/Ticket Manager Window, page 4-10.
For more information on the activity buttons, and the conditions under which they are enabled, see Accessing Activity Functions in Workflow Mode, page 4-8.
For more information on the ticket buttons, and the conditions under which they are enabled, see Accessing Ticket Functions in Non-Workflow Mode, page 4-9.
Creates a new activity/ticket.
Opens an activity/ticket.
Saves all changes made while the activity/ticket was open and closes it.
Evaluates all changes made in the activity/ticket and produces a Change Report in PDF format in a separate window. For more information, see Viewing Change Reports, page 4-16
Validates the integrity of changed policies within the current activity/ticket.
(Workflow mode with an approver only.) Submits the activity for approval when using Workflow mode with an activity approver.
(Non-Workflow mode with Ticket Management enabled only.) Submits the ticket. Submitting the ticket saves the proposed changes to the database. Devices associated with the ticket are unlocked, meaning they can be included in policy definitions and changes in other tickets. You can submit a ticket when it is in the Edit or the Edit Open state.
(Workflow mode only.) Approves the changes proposed in an activity.
(Workflow mode only.) Rejects the changes proposed in an activity.
Discards the selected activity/ticket.
Table 1-13 Configuration Manager Toolbar (Continued)
Button Description
1-41User Guide for Cisco Security Manager 4.12
Chapter 1 Getting Started with Security ManagerUnderstanding Basic Security Manager Interface Features
Using Global SearchSecurity Manager provides a global search feature to make finding and working with information that you are interested in easier. The Global Search feature allows you to search for devices, policy objects, policies, and tickets that contain a particular search string. The scope of the search can be limited to just devices, policy objects, policies, or tickets.
Note Search is only performed using data that has been committed. Changes that have not yet been submitted to the database will not be included in search results.
Wildcard Matching
The search string supports the use of the following wildcard characters:
• Asterisk (*)—matches zero or more characters
• Question Mark (?)—matches a single character
Semantic Searching
If the search string that is entered is an IP address, Security Manager will perform a semantic search. For example, entering "192.168.0.0/16" in the search string will return items matching that subnet as well as any specific hosts or other subnets belonging to that subnet or to which that subnet belongs.
Global Search Scope
Global search is supported only within a set of policies and policy objects, not all. The supported policies and the policy objects are the most frequently used policies and objects in the customer deployments. The policies and policy objects supported are:
• Devices: All Devices
• Policy Objects:
– AAA Server Groups
– AAA Servers
– Access Control Lists
– As Path Policies
– ASA Group Policies
– BFD Template
– Categories
– Cisco Secure Desktop (Router)
– Community List Policies
– Credentials
– DHCPv6 Pool
– File Objects
– FlexConfigs
– Identity User Group
– IKE Proposals
– Interface Roles
1-42User Guide for Cisco Security Manager 4.12
Chapter 1 Getting Started with Security ManagerUnderstanding Basic Security Manager Interface Features
– IPSec Transform Sets
– LDAP Attribute Maps
– Networks/Hosts (IPv4 and IPv6)
– PKI Enrollments
– Policy List Policies
– Port Forwarding List
– Prefix List Policies
– Route List Policies
– Services
– Single Sign On Servers
– SLA Monitors
– SSL VPN Bookmarks
– SSL VPN Customizations
– SSL VPN Gateways
– SSL VPN Smart Tunnel Auto Signon Lists
– SSL VPN Smart Tunnels
– Text Objects
– Time Ranges
– Traffic Flows
– User Groups
– WINS Server Lists
• Policies:
– AAA Rules
– Access Rules
– IPv6 Access Rules
– Inspection Rules
– Translation Rules
– Web Filter Rules
– Zone Based Firewall Rules
• Tickets
– Configuration Manager
– Image Manager
Performing a Global Search
To perform a global search, do one of the following:
• Select Edit > Global Search or press Ctrl+F to open the Global Search window. Select the scope for the search in the drop-down list to the left of the search field, enter your search string in the search field, and then click Search.
1-43User Guide for Cisco Security Manager 4.12

Chapter 1 Getting Started with Security ManagerUnderstanding Basic Security Manager Interface Features
Note If you are currently viewing a rule table, pressing Ctrl+F will open the Find and Replace dialog box instead of the Global Search window. Use one of the other methods to access the Global Search feature instead of the Find and Replace feature.
• Using the search field in the upper-right corner of the Configuration Manager window, select the scope for the search by clicking on the Search icon, enter your search string in the search field, and then press Enter.
The Global Search window displays the results matching your search criteria. Select the desired data type from the Category selector tree to see results for that category.
Acting on Search Results
You can perform the following actions on the items returned from your search:
• Export Data (All)—Allows you to export the search results for the selected category in CSV format. Select the desired data type from the Category selector tree in the Global Search window to see results for that category, then click Export in the toolbar above the search results to export that table of data in CSV format.
• Print (All)—Allows you to print the search results for the selected category. Select the desired data type from the Category selector tree in the Global Search window to see results for that category, then click Print in the toolbar above the search results to print the table of data.
• Device Properties (Devices)—Allows you to view the device properties for devices returned in search results. Select the desired device group from the Category selector tree in the Global Search window to see results for that category. Select a device in the results table to highlight it, right-click the device, and then select Device Properties. The Device Properties dialog box for the selected device is displayed. For more information, see Viewing or Changing Device Properties, page 3-40.
• Go To (Policies)—Allows you to navigate to a policy from the search results. Select the desired policy type from the Category selector tree in the Global Search window to see results for that policy type. Select an item in the results table to highlight it, right-click the item, and then select Go To. The relevant policy for the selected item is displayed.
• Filter (Policies)—Allows you to filter the search results using the standard table filter. For more information, see Filtering Tables, page 1-48.
• View (Policy Objects)—Allows you to view the policy object details for an object in the search results. Select the desired policy object type from the Category selector tree in the Global Search window to see results for that object type. Select an object in the results table to highlight it, then click View in the toolbar above the search results (or right-click the object and select View). The relevant Edit dialog box for the selected policy object is displayed in read-only mode.
• Edit (Policy Objects)—Allows you to edit a policy object from the search results. Select the desired policy object type from the Category selector tree in the Global Search window to see results for that object type. Select an object in the results table to highlight it, then click Edit in the toolbar above the search results (or right-click the object and select Edit). The relevant Edit dialog box for the selected policy object is displayed.
Note If a ticket or activity is not currently open, you will be prompted to create one or open an existing one before you can edit the policy object.
• Find Usage (Policy Objects)—Allows you to find which policies, objects, VPNs, and devices are using an object in the search results. Select the desired policy object type from the Category selector tree in the Global Search window to see results for that object type. Select an object in the results
1-44User Guide for Cisco Security Manager 4.12
Chapter 1 Getting Started with Security ManagerUnderstanding Basic Security Manager Interface Features
table to highlight it, then click Find Usage in the toolbar above the search results (or right-click the object and select Find Usage). The Object Usage dialog box for the selected policy object is displayed. For more information, see Generating Object Usage Reports, page 6-15.
• Show Ticket (Tickets)—Allows you to navigate to the Ticket Manager window for a ticket returned in the search results. Select the desired ticket group from the Category selector tree in the Global Search window to see results for that category. Click the Ticket column in the results table for the ticket you want to view. The Ticket Manager window is displayed with the selected ticket highlighted. For more information, see Activity/Ticket Manager Window, page 4-10.
Using SelectorsSelectors appear in several places in the user interface; for example, the Device selector in Device view (see Figure 1-1). These tree structures enable you to select items (like devices) on which to perform actions. Several types of items can appear in a selector, depending on the task you are performing.
Items in selectors are presented in a hierarchy of folders. You can browse for items in a selector by expanding and collapsing folders, which can contain other folders, items, or a combination of folders and items. To expand and collapse a folder, click the +/- next to it.
To select an item, click it. If it is possible to perform actions on multiple items (for example, in a device selector), you can use Ctrl+click to select each item, or Shift+click on the first and last item to select all items between them. Many selectors support auto select, that is, when you type a single letter, the next folder or item in the selector that begins with that letter is selected.
You can right-click an item to see commands that you can use with the item. Some commands on the right-click menus are unique and not repeated on the regular menus.
Many times a device selector appears in a dialog box divided into two panes, Available Devices and Selected Devices. In these dialog boxes, you must select the devices in the available devices list and click >> to move them to the selected list to actually select the devices. To deselect the devices, you select them in the selected devices list and click <<.
If a selector contains a large number of items, you can filter it to view a subset of those items. For more information, see Filtering Items in Selectors, page 1-45.
Filtering Items in Selectors
To view a subset of the items in a selector, you can create filters to display only those items that match the criteria you specify. You can have a maximum of 10 filters per user for each selector. After that, when you create another filter, that new filter replaces the oldest filter. There is no duplication check for filters that are created. You cannot delete filters manually.
A filter list appears above all selectors that can be filtered. From this list, you can do the following:
• Select a filter that you created previously.
• Select None to see the tree without any filters applied to it.
• Select Create Filter to create a filter.
Each filter can contain several filter rules. Each filter rule specifies a rule type, criteria, and values. You select whether items must match any or all filter rules before they can be displayed in the selector.
When you create a filter, the fields that you can filter on depend on the types of items displayed in the filter. However, the general procedure is the same for all selectors.
For information on filtering tables, see Filtering Tables, page 1-48.
1-45User Guide for Cisco Security Manager 4.12
Chapter 1 Getting Started with Security ManagerUnderstanding Basic Security Manager Interface Features
Tip When you filter a selector, that filter might remain applied to the selector when you open another window that includes the selector. For example, when you apply a filter to the Device selector in Device view, that filter is applied to the selector if you open the New Device wizard. If you have problems finding an item in a selector, check the Filter field to see if a filter is being applied.
Step 1 Select Create Filter from the selector filter field to open the Create Filter dialog box.
Step 2 Select one of the radio buttons to determine the matching criteria. The choices are:
• Match Any of the Following—Creates an OR relationship among the filter criteria. Policies matching any of your criteria are included in the filter.
• Match All of the Following—Creates an AND relationship among the filter criteria. Only those policies matching all your criteria are included in the filter.
Step 3 Establish a filter rule by entering three criteria, as follows:
• From the first list, select the type to be filtered; for example, Name.
• From the next list, select the operating criteria for the filter; for example, contains.
• In the final field, enter or select a value on which to filter; for example Cisco.
Step 4 Click Add.
Tip If you make a mistake in forming the filter rule, select the rule and click Remove to delete it.
Step 5 Add any additional filter rules that you require. Click OK when you are finished.
The selector is filtered according to the new filter criteria, and the new filter is added to the filter list.
Create Filter Dialog Box
Use the Create Filter dialog box to filter and display a subset items in a selector or a table. Creating filters helps you find items more easily when viewing large lists.
For more information on filtering, see these topics:
• Filtering Items in Selectors, page 1-45
• Filtering Tables, page 1-48
Navigation Path
Do one of the following:
• Select Create Filter from the Filter field in a selector tree.
• Select Advanced Filter from the Filter field above a table.
1-46User Guide for Cisco Security Manager 4.12
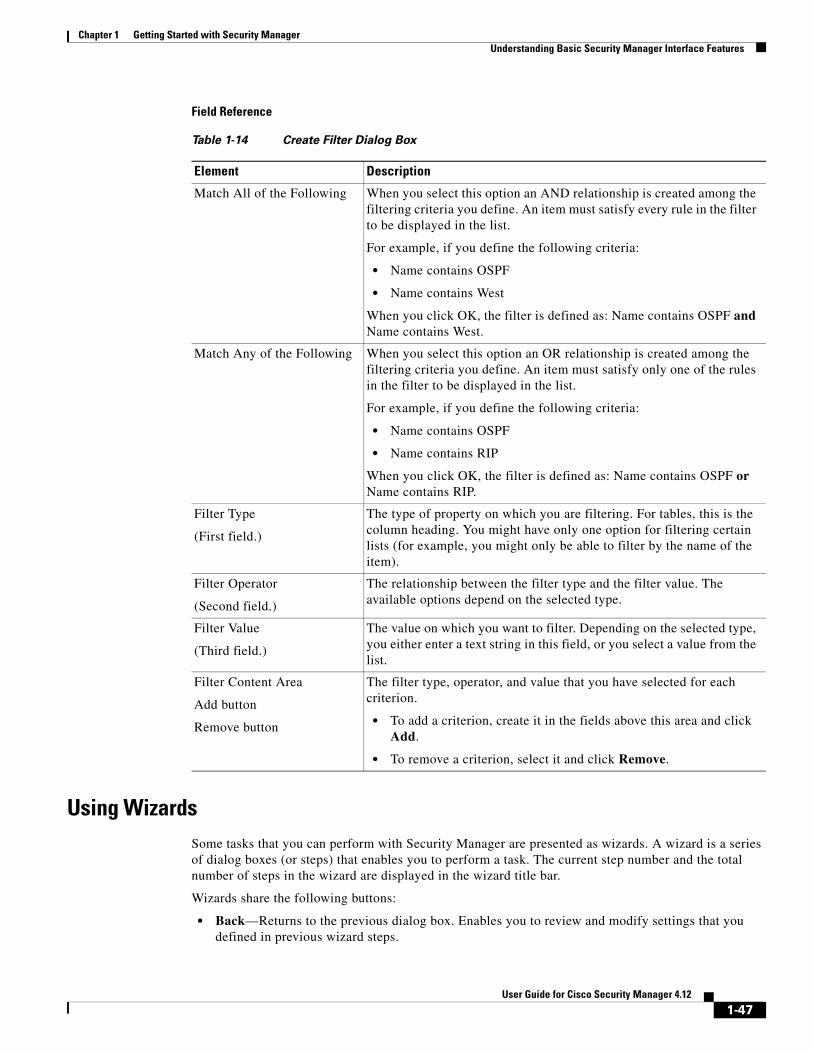
Chapter 1 Getting Started with Security ManagerUnderstanding Basic Security Manager Interface Features
Field Reference
Using WizardsSome tasks that you can perform with Security Manager are presented as wizards. A wizard is a series of dialog boxes (or steps) that enables you to perform a task. The current step number and the total number of steps in the wizard are displayed in the wizard title bar.
Wizards share the following buttons:
• Back—Returns to the previous dialog box. Enables you to review and modify settings that you defined in previous wizard steps.
Table 1-14 Create Filter Dialog Box
Element Description
Match All of the Following When you select this option an AND relationship is created among the filtering criteria you define. An item must satisfy every rule in the filter to be displayed in the list.
For example, if you define the following criteria:
• Name contains OSPF
• Name contains West
When you click OK, the filter is defined as: Name contains OSPF and Name contains West.
Match Any of the Following When you select this option an OR relationship is created among the filtering criteria you define. An item must satisfy only one of the rules in the filter to be displayed in the list.
For example, if you define the following criteria:
• Name contains OSPF
• Name contains RIP
When you click OK, the filter is defined as: Name contains OSPF or Name contains RIP.
Filter Type
(First field.)
The type of property on which you are filtering. For tables, this is the column heading. You might have only one option for filtering certain lists (for example, you might only be able to filter by the name of the item).
Filter Operator
(Second field.)
The relationship between the filter type and the filter value. The available options depend on the selected type.
Filter Value
(Third field.)
The value on which you want to filter. Depending on the selected type, you either enter a text string in this field, or you select a value from the list.
Filter Content Area
Add button
Remove button
The filter type, operator, and value that you have selected for each criterion.
• To add a criterion, create it in the fields above this area and click Add.
• To remove a criterion, select it and click Remove.
1-47User Guide for Cisco Security Manager 4.12

Chapter 1 Getting Started with Security ManagerUnderstanding Basic Security Manager Interface Features
• Next—Continues to the next dialog box. If this button is unavailable, you must define some required settings in the current dialog box before you can continue. Required settings are marked with an asterisk (*).
• Finish—Finishes the wizard, saving the settings you defined. You can finish the wizard whenever this button is available. If this button is not available, you must define more settings.
• Cancel—Closes the wizard without saving any settings.
• Help—Opens online help for the wizard.
Using Tables Many policies in Security Manager use tables. A small number of policies use a specialized type of table called a rules table. Rules tables have extra features compared to standard tables; for more information, see Using Rules Tables, page 12-7.
Standard tables include these basic features:
• Table filter—You can filter the rows displayed to help you find items in a large table. For more information, see Filtering Tables, page 1-48.
• Table column headings—You can sort by column and move, show, and hide columns. For more information, see Table Columns and Column Heading Features, page 1-49.
• Table buttons—Use the buttons below the table to do the following:
– Add Row button (+ icon)—Click this button to add an item to the table.
– Edit Row button (pencil icon)—Select a row and click this button to edit its properties.
– Delete Row button (trash can icon)—Select a row and click this button to delete it from the table.
Filtering Tables
You can filter the items in a table to view a subset that satisfies specific criteria. Filtering a table does not change the contents of the table, but allows you to focus on just those entries that currently interest you. This is helpful for tables that have hundreds of entries.
To filter a table, use the Filter fields above the table. With these controls, you can do the following:
• To do simple filtering, select the column name on which you want to filter, select the relationship you are looking for (such as “begins with”), enter the desired text string (or in some cases, select one of the pre-defined options), and click Apply.
You can filter the results by selecting another criteria and clicking Apply. Your filters are added together, showing the results that satisfy all criteria. For example, you could first enter “Service begins with IP,” click Apply, then enter “Source contains 10.100.10.10,” and click Apply. The result would be a table that shows all rows where the service is IP AND the source includes 10.100.10.10 (it might include other IP addresses as well).
• To do advanced filtering, select Advanced Filter from the left most menu (the one that contains the column headings). This opens the Create Filter dialog box. Using this dialog box, you can create multiple filter criteria just as you can with the regular filter controls. However, you also have the option to create a list of disjoined, OR’ed criteria, by selecting Match Any of the Following, where you can say “show me all rows that have IP for service or 10.100.10.10 for source address.”
– To add criteria, enter the criteria and click Add.
1-48User Guide for Cisco Security Manager 4.12

Chapter 1 Getting Started with Security ManagerUnderstanding Basic Security Manager Interface Features
– To remove criteria, select the undesired criteria and click Remove.
If you filter a table using the simple method, you can select Advanced Filter to alter your existing filter, adding or removing criteria as desired. The dialog box is filled with whatever filter criteria are currently applied to the table.
• The current filter is shown next to the Filter label in the filter control area. You can click Clear to remove the filter and show all rows.
• Any filter you apply is kept in the left most menu below the Advanced Filter entry. You can apply the filter by selecting it from the list. However, this list can have at most 10 entries. When you create your eleventh filter, your oldest filter is removed from the list. If you select a filter and add criteria, you are modifying that filter rather than creating a new one. You cannot delete the listed filters.
Tip Your filter is maintained for a given type of table even if you select another device or log out and subsequently log back in. For example, if you filter the Access Rules table for one device, it will be filtered the same way for other devices. When you clear the filter, it is cleared for the same type of table for all devices. Your filters do not affect what any other user sees.
Table Columns and Column Heading Features
Tables contain columns, each of which has a column heading in the heading row. These columns and their headings include the following features:
• Show/hide Columns—Right-click the table heading row to open the context menu and then select Show Columns. This menu enables you to select which columns appear. Showing or hiding columns does not affect the content of items defined in the table; it affects only your view.
By default, the tables for some policies do not display all available columns.
• Show Details/Show Summary—Right-click the table heading row to open the context menu and then select either Show Details or Show Summary. This toggling menu enables you to select whether to view detailed or summarized information in the table.
• Move columns—Click and drag a column heading to move the column to a new position.
• Resize columns—Click a column heading divider (when the cursor turns into an arrow) and drag it to resize the column.
• Sort by column headings—Click a column heading to sort the table by that column’s contents. Click the same column heading again to reverse the sort order. The sorted column has an arrow next to its heading.
Using Text FieldsText fields can be single- or multiple-line, depending on the purpose of the field. Text fields that can contain multiple text lines include several features to make them easier to use. The following topics describe limitations and features of text fields:
• Understanding ASCII Limitations for Text, page 1-50
• Finding Text in Text Boxes, page 1-50
• Navigating Within Text Boxes, page 1-50
1-49User Guide for Cisco Security Manager 4.12

Chapter 1 Getting Started with Security ManagerUnderstanding Basic Security Manager Interface Features
Understanding ASCII Limitations for Text
Devices typically restrict text to ASCII characters. If you include non-ASCII characters in Security Manager text fields that are used to generate commands in a device configuration file, the presence of those characters can prevent the configuration file from loading on the device. For example, a non-ASCII character in an interface description for an FWSM can prevent the device from loading the startup configuration when you restart the device.
The only places where you can include non-ASCII, non-English languages in device configurations is in the SSL VPN Bookmarks and SSL VPN Customization policy objects, which are used in configuring browser-based clientless SSL VPNs on ASA devices. For information on how you can support local languages for these objects, see Localizing SSL VPN Web Pages for ASA Devices, page 31-79.
Finding Text in Text Boxes
Use the Find dialog box to find text within a multiple line text field.
Step 1 Click in a multiple line text field.
Step 2 Press Ctrl+F. The Find dialog box opens.
Step 3 Enter text to search for in the Find what field.
Step 4 To specify the direction of the search, select either Up or Down in the Direction field.
Step 5 To match the case of the text you entered, select the Match Case check box.
Step 6 Click Find. The next occurrence of your search text is highlighted in the text field.
Navigating Within Text Boxes
Use the Goto line dialog box to navigate to a specific line in a multiple line text field.
Step 1 Click in a multiple line text field.
Step 2 Press Ctrl+G. The Goto line dialog box opens.
Step 3 Enter a line number in the Line number field.
Step 4 Click OK. The text field scrolls to the line number you entered.
Selecting or Specifying a File or Directory in Security ManagerCisco Security Manager uses a standard file system browser to let you select a directory or file or to specify a file.
You will be able to choose between client and server file systems when performing the following file operations:
• Installing Security Manager license files
• Importing/exporting device inventory files
• Importing/exporting shared policies
1-50User Guide for Cisco Security Manager 4.12
Chapter 1 Getting Started with Security ManagerUnderstanding Basic Security Manager Interface Features
• Creating the following file objects:
– Cisco Secure Desktop Package
– Plug-In—For browser plug-in files.
– AnyConnect Profile
– AnyConnect Image
– Hostscan Image
For all other file operations, you can create or select files only on the Security Manager server--you cannot use a drive mounted on the server, and you cannot use your client system.
Tip You can control whether file operations are allowed on the Security Manager client from Tools > Security Manager Administration > Customize Desktop. For more information, see Customize Desktop Page, page 11-10.
Typically, to create or select a file, you click a Browse button to open a dialog box that has a title related to the action you are performing (for example, Choose Files when selecting configuration files). The Browse button appears on various dialog boxes throughout the product.
In the dialog box, use the folder tree on the left to navigate to the folder you want:
• If client-side file browsing is enabled and you are performing a function that supports client-side browsing (see above), select the tab that corresponds to the system you want to import from or export to.
• If you are selecting a file, find it in the folder tree and select it in the right pane. If the action you are taking allows you to select multiple files, use Ctrl+click to select files individually, or Shift+click to select a range of files. You might also need to select a file type to view only those files that apply to your action.
• If you are specifying (creating) a file, navigate to the folder in which you want to create the file, enter a file name, and select the appropriate file type.
Note The path and file name are restricted to characters in the English alphabet. Japanese characters are not supported. When selecting files on a Windows Japanese OS system, the usual file separator character \ is supported, although you should be aware that it might appear as the Yen symbol (U+00A5).
Troubleshooting User Interface Problems The following tips might help you resolve general user interface problems that you might encounter:
• Interface appears to freeze—Occasionally, when you go from a Security Manager dialog box to some other application (for example, to check your e-mail), when you come back to Security Manager, nothing you click on responds. It appears the interface is frozen.
This might be caused by an open dialog box that is covered by another Security Manager window. Until you close the dialog box, you will not be able to use any other window in the application. To find the hidden dialog box, press Alt+Tab, which opens a Windows panel that has icons for all currently open windows. Keep holding Alt, then press Tab repeatedly to cycle through the icons until you find the right one (the icon might be a generic Java icon rather than the Security Manager icon). You can also use your mouse to click the desired icon rather than using Tab to cycle through them.
1-51User Guide for Cisco Security Manager 4.12
Chapter 1 Getting Started with Security ManagerAccessing Online Help
• Text and list elements missing, Java errors when clicking buttons—If you change your Windows color scheme while running the Security Manager client, you must close and then restart the client. Otherwise, the behavior of the client can be unpredictable.
If you are experiencing these problems and you did not change the color scheme, try closing and restarting the application.
• Dialog Box is too big for the screen—The minimum screen resolution for the Security Manager client is actually bigger than the best screen resolution available on many laptops (for screen resolution requirements, see the client system requirements in the Installation Guide for Cisco Security Manager). Because some dialog boxes are quite large, if you run the client on a laptop, you might find the occasional dialog box that is too big to fit on your screen.
Usually, you can reposition the dialog box to get access to the OK, Cancel, and Help buttons. However, if you cannot get those buttons on the screen, you can use the following techniques to perform the same actions:
– OK—Put your cursor in a field near the bottom of the dialog box, then press Tab to move from field to field. Typically, the first off-screen field is the OK button. When the cursor highlight moves off screen, press Enter.
You can also put the cursor in a field that does not allow carriage returns (for example, the typical Name field) and press Enter. In many cases, this is the equivalent of clicking OK.
– Cancel—Click the X on the right side of the window’s title bar.
– Help—Press F1.
Accessing Online HelpTo access online help for Security Manager, do one of the following:
• To open the main Security Manager online help page, select Help > Help Topics.
• To open context-sensitive online help for the active page, select Help > Help About This Page or click the ? button in the toolbar.
• To open context-sensitive online help for a dialog box, click Help in the dialog box.
Tip You must configure Internet Explorer to allow active content to run on your computer for the online help to open unblocked. In Internet Explorer, select Tools > Internet Options and click the Advanced tab. Scroll to the Security section, and select Allow active content to run in files on My Computer. Click OK to save the change. For a complete list of configuration requirements for Internet Explorer and Firefox browsers, see the Installation Guide for Cisco Security Manager.
1-52User Guide for Cisco Security Manager 4.12