Embed Size (px)
Citation preview
Getting Started with HTML
Please use speaker notes for additional information!
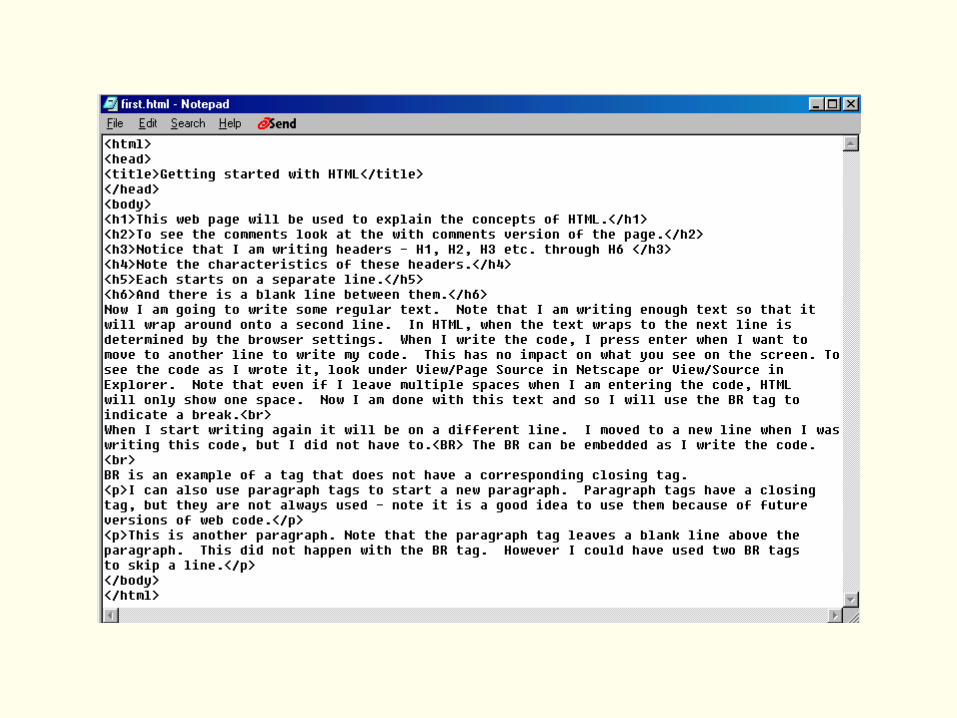

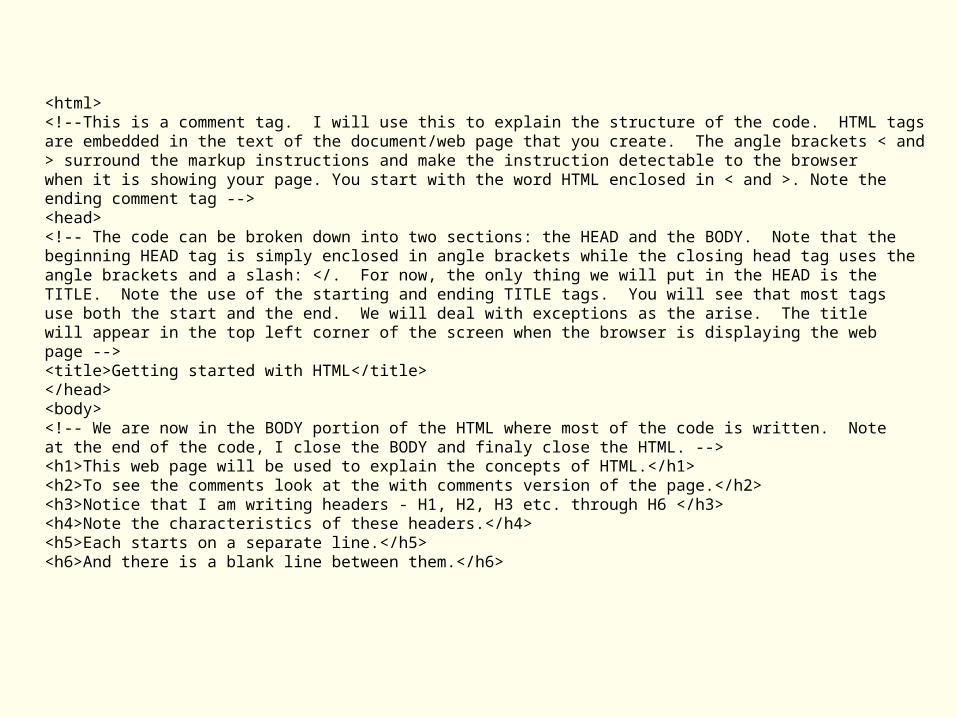
<html><!--This is a comment tag. I will use this to explain the structure of the code. HTML tagsare embedded in the text of the document/web page that you create. The angle brackets < and> surround the markup instructions and make the instruction detectable to the browserwhen it is showing your page. You start with the word HTML enclosed in < and >. Note the ending comment tag --><head><!-- The code can be broken down into two sections: the HEAD and the BODY. Note that thebeginning HEAD tag is simply enclosed in angle brackets while the closing head tag uses theangle brackets and a slash: </. For now, the only thing we will put in the HEAD is theTITLE. Note the use of the starting and ending TITLE tags. You will see that most tagsuse both the start and the end. We will deal with exceptions as the arise. The titlewill appear in the top left corner of the screen when the browser is displaying the webpage --><title>Getting started with HTML</title></head><body><!-- We are now in the BODY portion of the HTML where most of the code is written. Noteat the end of the code, I close the BODY and finaly close the HTML. --><h1>This web page will be used to explain the concepts of HTML.</h1><h2>To see the comments look at the with comments version of the page.</h2><h3>Notice that I am writing headers - H1, H2, H3 etc. through H6 </h3><h4>Note the characteristics of these headers.</h4><h5>Each starts on a separate line.</h5><h6>And there is a blank line between them.</h6>
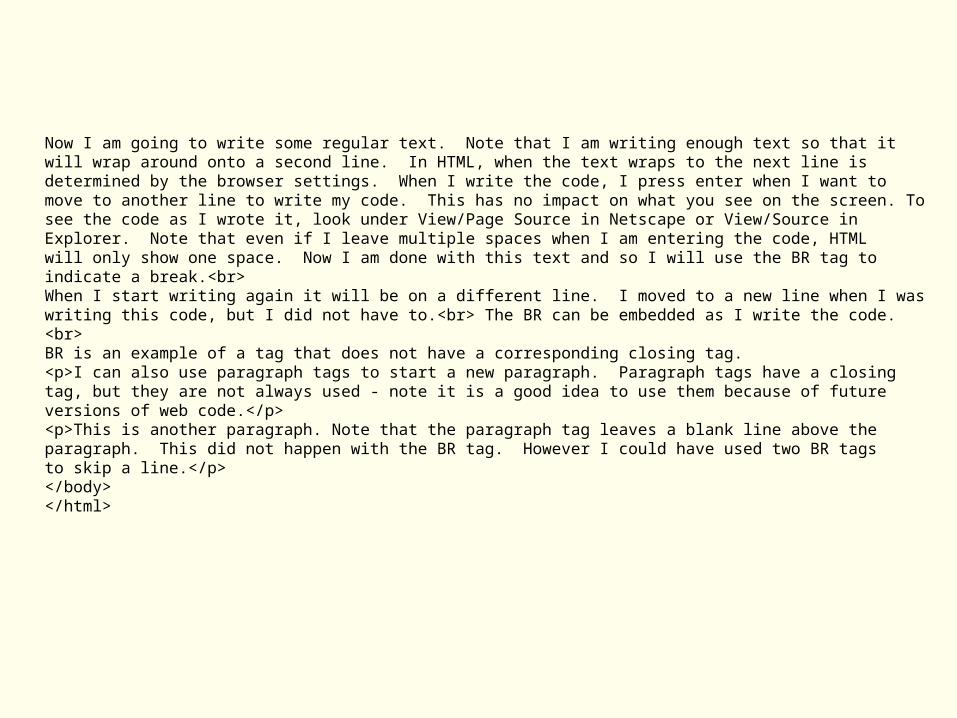
Now I am going to write some regular text. Note that I am writing enough text so that itwill wrap around onto a second line. In HTML, when the text wraps to the next line isdetermined by the browser settings. When I write the code, I press enter when I want tomove to another line to write my code. This has no impact on what you see on the screen. Tosee the code as I wrote it, look under View/Page Source in Netscape or View/Source inExplorer. Note that even if I leave multiple spaces when I am entering the code, HTML will only show one space. Now I am done with this text and so I will use the BR tag toindicate a break.<br>When I start writing again it will be on a different line. I moved to a new line when I waswriting this code, but I did not have to.<br> The BR can be embedded as I write the code.<br>BR is an example of a tag that does not have a corresponding closing tag.<p>I can also use paragraph tags to start a new paragraph. Paragraph tags have a closingtag, but they are not always used - note it is a good idea to use them because of futureversions of web code.</p><p>This is another paragraph. Note that the paragraph tag leaves a blank line above theparagraph. This did not happen with the BR tag. However I could have used two BR tagsto skip a line.</p> </body></html>
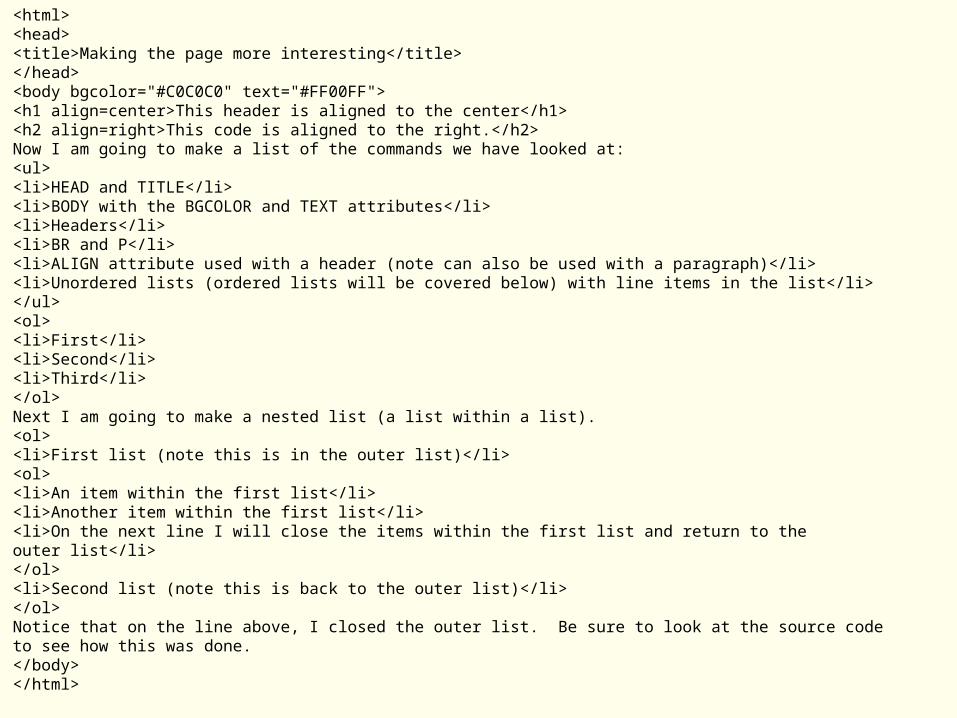
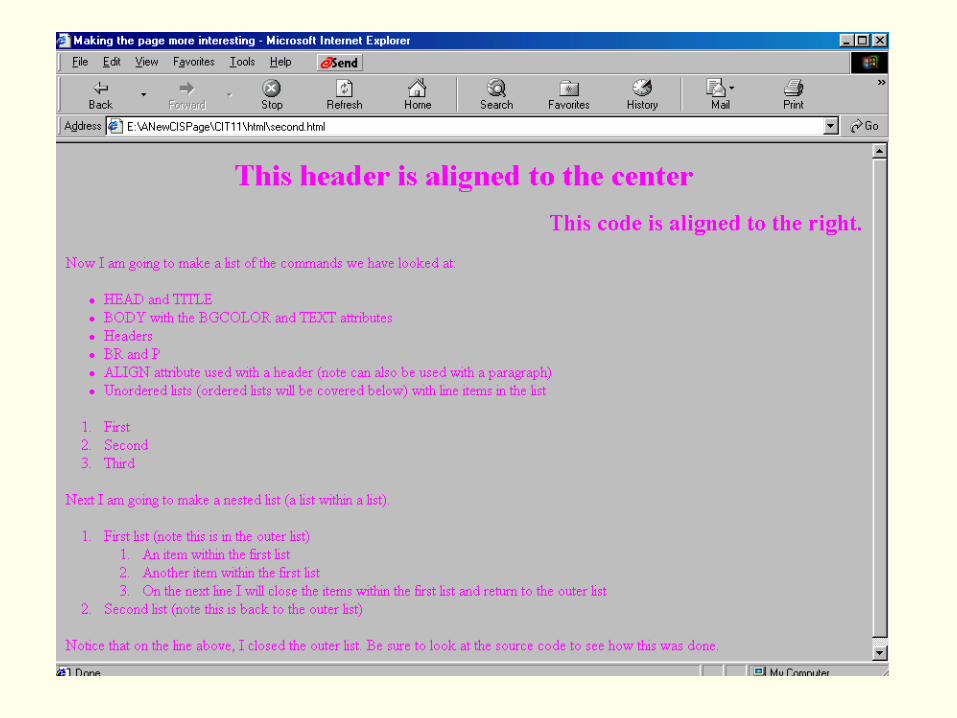
<html><head><title>Making the page more interesting</title></head><body bgcolor="#C0C0C0" text="#FF00FF"><h1 align=center>This header is aligned to the center</h1><h2 align=right>This code is aligned to the right.</h2>Now I am going to make a list of the commands we have looked at:<ul><li>HEAD and TITLE</li><li>BODY with the BGCOLOR and TEXT attributes</li><li>Headers</li><li>BR and P</li><li>ALIGN attribute used with a header (note can also be used with a paragraph)</li><li>Unordered lists (ordered lists will be covered below) with line items in the list</li></ul><ol><li>First</li><li>Second</li><li>Third</li></ol>Next I am going to make a nested list (a list within a list).<ol><li>First list (note this is in the outer list)</li><ol><li>An item within the first list</li><li>Another item within the first list</li><li>On the next line I will close the items within the first list and return to the outer list</li></ol><li>Second list (note this is back to the outer list)</li></ol>Notice that on the line above, I closed the outer list. Be sure to look at the source codeto see how this was done.</body></html>
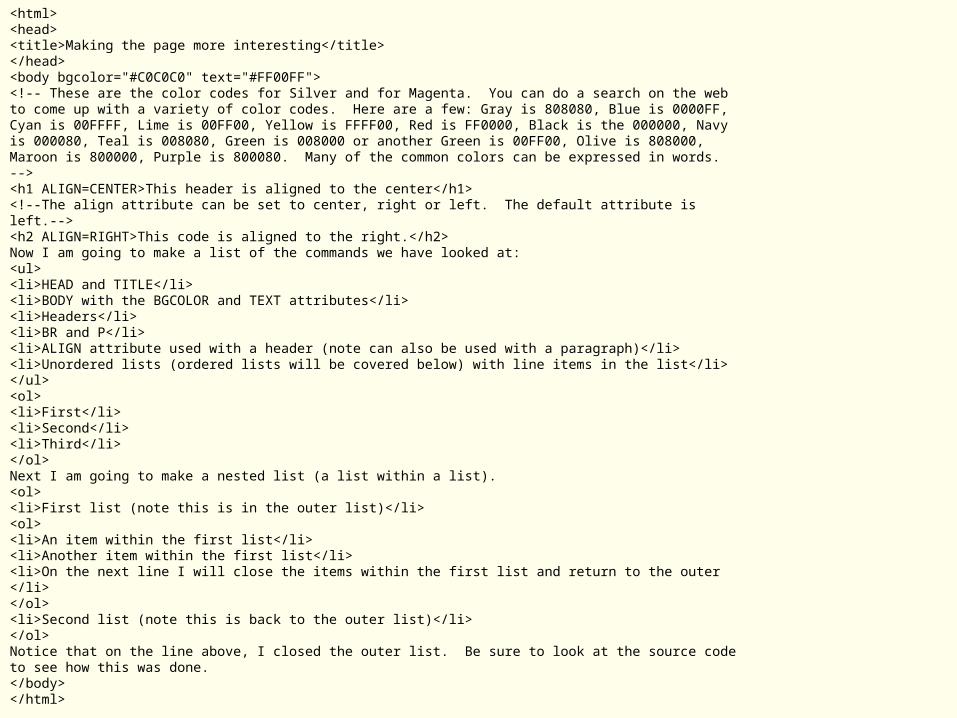
<html><head><title>Making the page more interesting</title></head><body bgcolor="#C0C0C0" text="#FF00FF"><!-- These are the color codes for Silver and for Magenta. You can do a search on the web to come up with a variety of color codes. Here are a few: Gray is 808080, Blue is 0000FF,Cyan is 00FFFF, Lime is 00FF00, Yellow is FFFF00, Red is FF0000, Black is the 000000, Navyis 000080, Teal is 008080, Green is 008000 or another Green is 00FF00, Olive is 808000, Maroon is 800000, Purple is 800080. Many of the common colors can be expressed in words.--><h1 ALIGN=CENTER>This header is aligned to the center</h1><!--The align attribute can be set to center, right or left. The default attribute isleft.--><h2 ALIGN=RIGHT>This code is aligned to the right.</h2>Now I am going to make a list of the commands we have looked at:<ul><li>HEAD and TITLE</li><li>BODY with the BGCOLOR and TEXT attributes</li><li>Headers</li><li>BR and P</li><li>ALIGN attribute used with a header (note can also be used with a paragraph)</li><li>Unordered lists (ordered lists will be covered below) with line items in the list</li></ul><ol><li>First</li><li>Second</li><li>Third</li></ol>Next I am going to make a nested list (a list within a list).<ol><li>First list (note this is in the outer list)</li><ol><li>An item within the first list</li><li>Another item within the first list</li><li>On the next line I will close the items within the first list and return to the outer </li></ol><li>Second list (note this is back to the outer list)</li></ol>Notice that on the line above, I closed the outer list. Be sure to look at the source codeto see how this was done.</body></html>
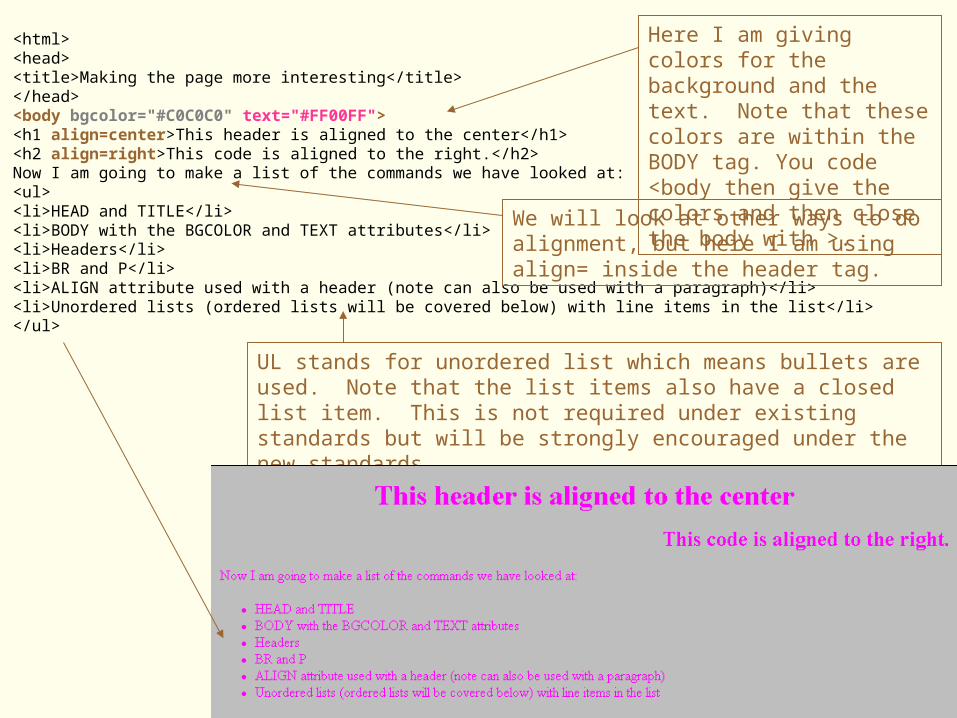
<html><head><title>Making the page more interesting</title></head><body bgcolor="#C0C0C0" text="#FF00FF"><h1 align=center>This header is aligned to the center</h1><h2 align=right>This code is aligned to the right.</h2>Now I am going to make a list of the commands we have looked at:<ul><li>HEAD and TITLE</li><li>BODY with the BGCOLOR and TEXT attributes</li><li>Headers</li><li>BR and P</li><li>ALIGN attribute used with a header (note can also be used with a paragraph)</li><li>Unordered lists (ordered lists will be covered below) with line items in the list</li></ul>
Here I am giving colors for the background and the text. Note that these colors are within the BODY tag. You code <body then give the colors and then close the body with >.
We will look at other ways to do alignment, but here I am using align= inside the header tag.
UL stands for unordered list which means bullets are used. Note that the list items also have a closed list item. This is not required under existing standards but will be strongly encouraged under the new standards.
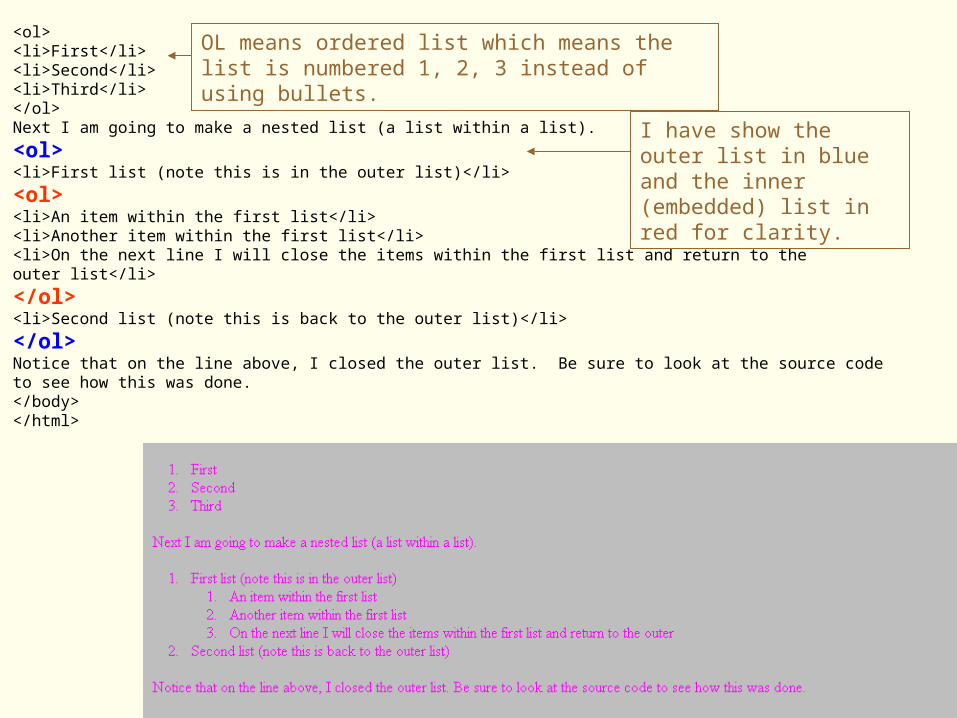
<ol><li>First</li><li>Second</li><li>Third</li></ol>Next I am going to make a nested list (a list within a list).
<ol><li>First list (note this is in the outer list)</li>
<ol><li>An item within the first list</li><li>Another item within the first list</li><li>On the next line I will close the items within the first list and return to the outer list</li>
</ol><li>Second list (note this is back to the outer list)</li>
</ol>Notice that on the line above, I closed the outer list. Be sure to look at the source codeto see how this was done.</body></html>
OL means ordered list which means the list is numbered 1, 2, 3 instead of using bullets.
I have show the outer list in blue and the inner (embedded) list in red for clarity.
<html><head><title>Images, Linking and Tables</title></head><body bgcolor="BEIGE" text="GREEN"><h1 align=center>Testing Images, Linking and Tables</h1><font color="RED" size = 6>This is in red and the font size is set to 6.</font> The rest ofthis is the default text and size since I closed the FONT tag.<BR><!--To put an image on a page, you should use .gif or .jpg (.jpeg) because these aresupported by all browsers. The image should be in the same directory as the page or apath to the image has to be provided.--><img src="image.gif">You can have text beside the image and as you will see the text aligns with the bottom of the image. You can change this using alignment. Notice that I havewritten enough text here to get wrap (at least on my screen).<br><div align=center><!-- Here I am using DIV for division to set the alignment to the center. Until I closethe DIV, everything will be aligned in the center. Notice I am also establishing adifferent height and width for the image. --><img src="image.gif" width="500" height="200"><br><br><br><table border=2><tr> <td>Top left</td> <td>Top right</td></tr><tr> <td>Bottom left</td> <td>Bottom right</td></tr></table><!--The code above establishes a table. Note that I have a border on the table with a widthof 2. If I eliminated border, the table would not have the cell structure. TR sets up arow and TD sets up an element in that row. Note that each needs to be opened and closed.You must also be very sure to close the table when you are done or problems will develop.Note that I had not closed the </DIV> until after the table so the table is also aligned to the center. --></div>
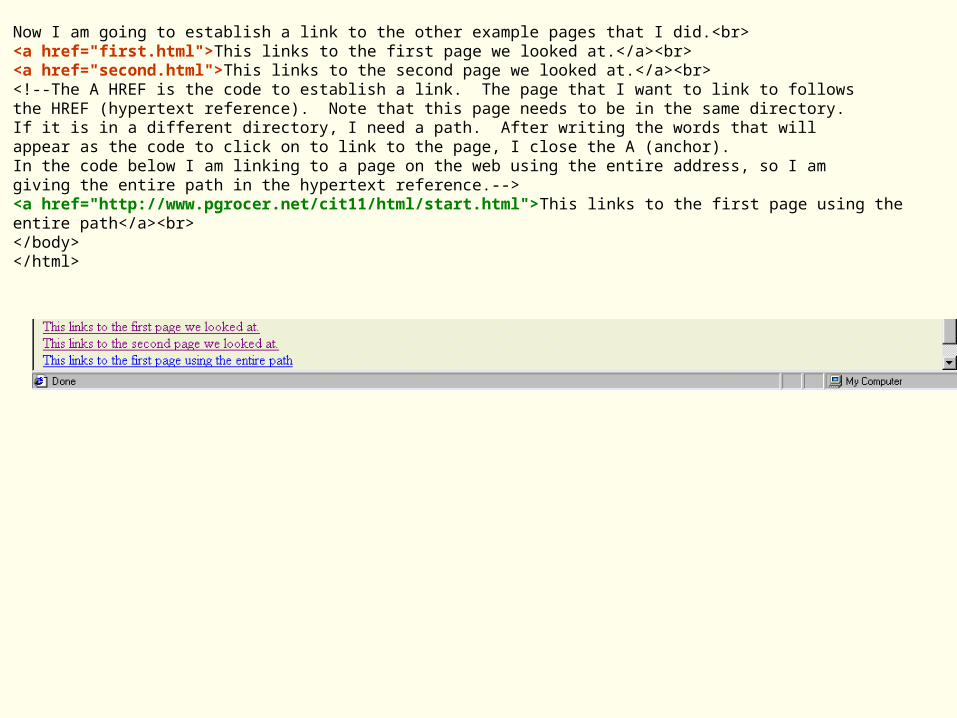
Now I am going to establish a link to the other example pages that I did.<br><a href="first.html">This links to the first page we looked at.</a><br><a href="second.html">This links to the second page we looked at.</a><br><!--The A HREF is the code to establish a link. The page that I want to link to followsthe HREF (hypertext reference). Note that this page needs to be in the same directory.If it is in a different directory, I need a path. After writing the words that willappear as the code to click on to link to the page, I close the A (anchor). In the code below I am linking to a page on the web using the entire address, so I am giving the entire path in the hypertext reference.--><a href="http://www.pgrocer.net/cit11/html/start.html">This links to the first page using theentire path</a><br></body></html>

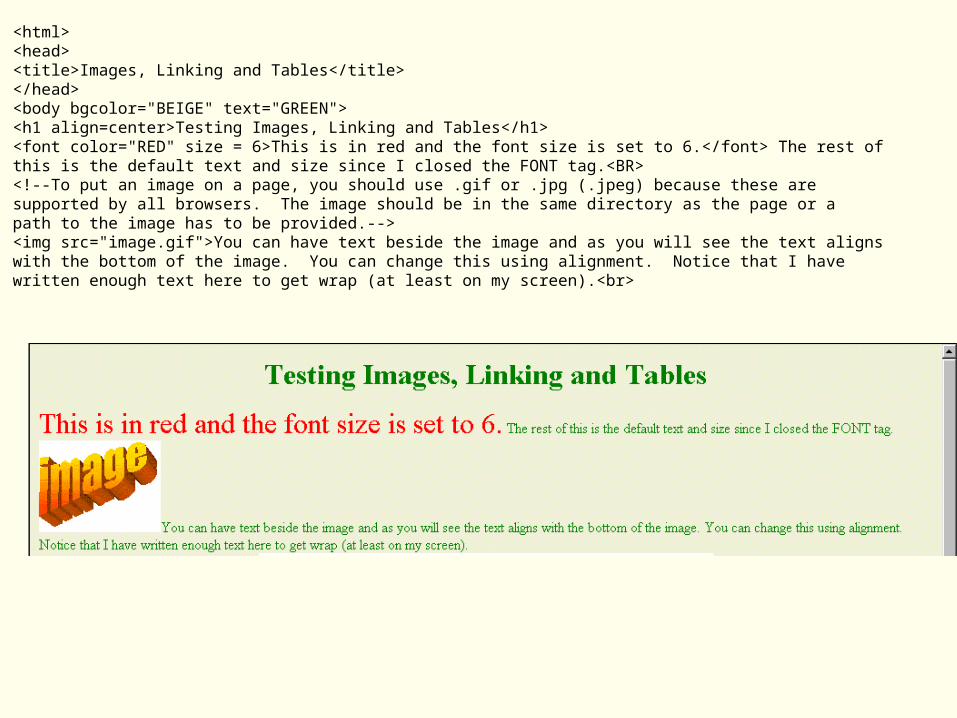
<html><head><title>Images, Linking and Tables</title></head><body bgcolor="BEIGE" text="GREEN"><h1 align=center>Testing Images, Linking and Tables</h1><font color="RED" size = 6>This is in red and the font size is set to 6.</font> The rest ofthis is the default text and size since I closed the FONT tag.<BR><!--To put an image on a page, you should use .gif or .jpg (.jpeg) because these aresupported by all browsers. The image should be in the same directory as the page or apath to the image has to be provided.--><img src="image.gif">You can have text beside the image and as you will see the text aligns with the bottom of the image. You can change this using alignment. Notice that I havewritten enough text here to get wrap (at least on my screen).<br>
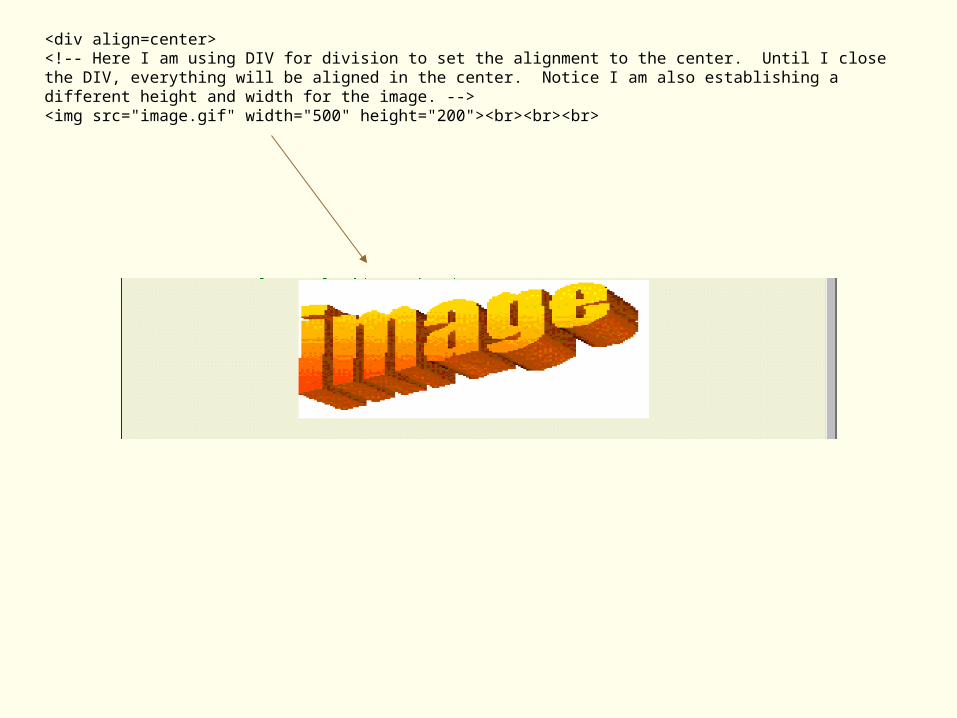
<div align=center><!-- Here I am using DIV for division to set the alignment to the center. Until I closethe DIV, everything will be aligned in the center. Notice I am also establishing adifferent height and width for the image. --><img src="image.gif" width="500" height="200"><br><br><br>
<table border=2><tr> <td>Top left</td> <td>Top right</td></tr><tr> <td>Bottom left</td> <td>Bottom right</td></tr></table><!--The code above establishes a table. Note that I have a border on the table with a widthof 2. If I eliminated border, the table would not have the cell structure. TR sets up arow and TD sets up an element in that row. Note that each needs to be opened and closed.You must also be very sure to close the table when you are done or problems will develop.Note that I had not closed the </DIV> until after the table so the table is also aligned to the center. --></div>
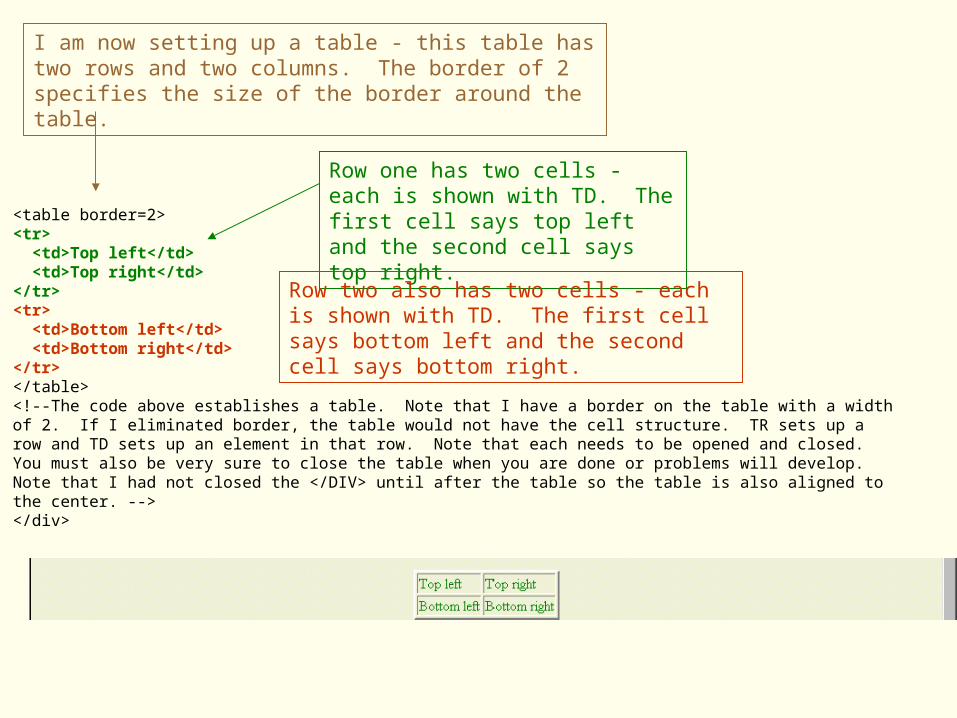
I am now setting up a table - this table has two rows and two columns. The border of 2 specifies the size of the border around the table.
Row one has two cells - each is shown with TD. The first cell says top left and the second cell says top right.
Row two also has two cells - each is shown with TD. The first cell says bottom left and the second cell says bottom right.
Now I am going to establish a link to the other example pages that I did.<br><a href="first.html">This links to the first page we looked at.</a><br><a href="second.html">This links to the second page we looked at.</a><br><!--The A HREF is the code to establish a link. The page that I want to link to followsthe HREF (hypertext reference). Note that this page needs to be in the same directory.If it is in a different directory, I need a path. After writing the words that willappear as the code to click on to link to the page, I close the A (anchor). In the code below I am linking to a page on the web using the entire address, so I am giving the entire path in the hypertext reference.--><a href="http://www.pgrocer.net/cit11/html/start.html">This links to the first page using theentire path</a><br></body></html>
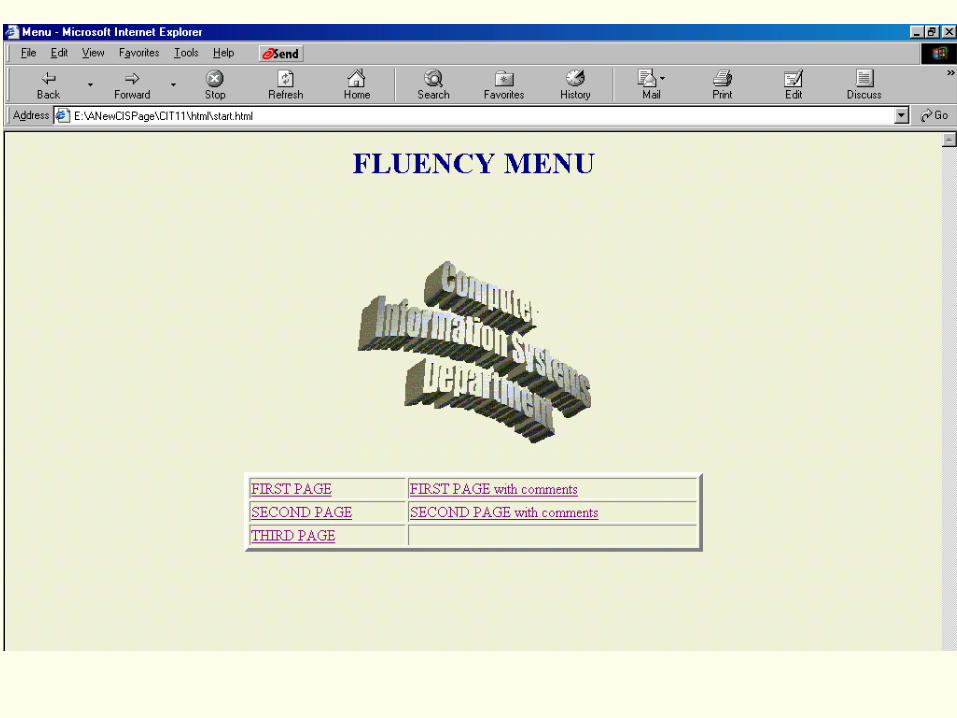
<html><head><title>Menu</title></head><BODY bgcolor="BEIGE" text="NAVY"><h1 align=center>FLUENCY MENU</h1><br><br><div align=center><img src="CISa.gif"><br><br><table border=4 width=50%><tr> <td><a href="first.html">FIRST PAGE</a></td> <td><a href="firstwcomments.html">FIRST PAGE with comments</a></td></tr><tr> <td><a href="second.html">SECOND PAGE</a></td> <td><a href="secondwcomments.html">SECOND PAGE with comments</a></td></tr><tr> <td><a href="third.html">THIRD PAGE</a></td> <td> </td></tr></table></div></body></html>
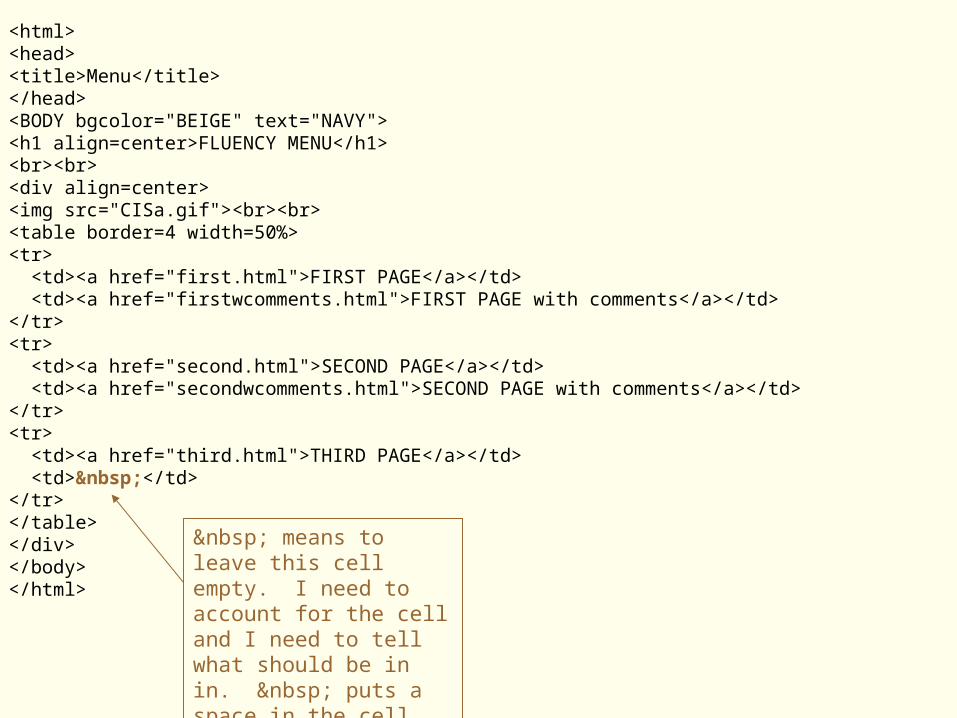
means to leave this cell empty. I need to account for the cell and I need to tell what should be in in. puts a space in the cell.