Embed Size (px)
Citation preview
Getting Started WithCommunities
Salesforce, Winter ’17
@salesforcedocsLast updated: December 20, 2016

© Copyright 2000–2016 salesforce.com, inc. All rights reserved. Salesforce is a registered trademark of salesforce.com, inc.,as are other names and marks. Other marks appearing herein may be trademarks of their respective owners.

CONTENTS
INTRODUCTION TO SALESFORCE COMMUNITIES . . . . . . . . . . . . . . . . . . . . . 1
PLAN YOUR IMPLEMENTATION . . . . . . . . . . . . . . . . . . . . . . . . . . . . . . . . . . . . . 2Prerequisites . . . . . . . . . . . . . . . . . . . . . . . . . . . . . . . . . . . . . . . . . . . . . . . . . . . . . . . . . 7Supported Browsers for Communities . . . . . . . . . . . . . . . . . . . . . . . . . . . . . . . . . . . . . . . . 7
Access Communities in Salesforce1 . . . . . . . . . . . . . . . . . . . . . . . . . . . . . . . . . . . . . . 8
SET UP YOUR FIRST COMMUNITY . . . . . . . . . . . . . . . . . . . . . . . . . . . . . . . . . . 10Enable Salesforce Communities . . . . . . . . . . . . . . . . . . . . . . . . . . . . . . . . . . . . . . . . . . . 10
Set the Default Number of Community Roles . . . . . . . . . . . . . . . . . . . . . . . . . . . . . . . 12Enable Super User Access in Communities . . . . . . . . . . . . . . . . . . . . . . . . . . . . . . . . 12Grant High-Volume Community Users Access to Records . . . . . . . . . . . . . . . . . . . . . . 13
Enable the Global Header for Communities . . . . . . . . . . . . . . . . . . . . . . . . . . . . . . . . . . . 16Create Communities . . . . . . . . . . . . . . . . . . . . . . . . . . . . . . . . . . . . . . . . . . . . . . . . . . . 17Add Members to Your Community . . . . . . . . . . . . . . . . . . . . . . . . . . . . . . . . . . . . . . . . . . 19
How do I update community membership using the API? . . . . . . . . . . . . . . . . . . . . . . 20Add Tabs to Your Community . . . . . . . . . . . . . . . . . . . . . . . . . . . . . . . . . . . . . . . . . . . . . 21
Tabs vs. Community Builder . . . . . . . . . . . . . . . . . . . . . . . . . . . . . . . . . . . . . . . . . . 22Choose a Landing Tab . . . . . . . . . . . . . . . . . . . . . . . . . . . . . . . . . . . . . . . . . . . . . . 23
Brand Your Community . . . . . . . . . . . . . . . . . . . . . . . . . . . . . . . . . . . . . . . . . . . . . . . . . 23Customize Login, Logout, and Self-Registration Pages in Your Community . . . . . . . . . . . . . . . 25
Brand Your Community’s Login Page . . . . . . . . . . . . . . . . . . . . . . . . . . . . . . . . . . . . 25Customize Your Community’s Login Experience . . . . . . . . . . . . . . . . . . . . . . . . . . . . . 26Redirect Community Members to a Custom URL on Logout . . . . . . . . . . . . . . . . . . . . . 29Use Custom Change Password and Forgot Password Pages in Your Community . . . . . . 29Set Up Self-Registration for Your Community . . . . . . . . . . . . . . . . . . . . . . . . . . . . . . . 30Create Person Accounts for Self-Registering Users . . . . . . . . . . . . . . . . . . . . . . . . . . . 33
Customize Email Sent from Communities . . . . . . . . . . . . . . . . . . . . . . . . . . . . . . . . . . . . . 33Determine User Visibility in Your Community . . . . . . . . . . . . . . . . . . . . . . . . . . . . . . . . . . . 35Show Nicknames Instead of Full Names in the Community . . . . . . . . . . . . . . . . . . . . . . . . . 36Enable Public Access to a Community . . . . . . . . . . . . . . . . . . . . . . . . . . . . . . . . . . . . . . . 37Use Custom Visualforce Error Pages for Authenticated Users . . . . . . . . . . . . . . . . . . . . . . . 38Limit Files in Your Community . . . . . . . . . . . . . . . . . . . . . . . . . . . . . . . . . . . . . . . . . . . . . 39Create a Custom Robots.txt File for Your Community . . . . . . . . . . . . . . . . . . . . . . . . . . . . . 40Create Communities Users . . . . . . . . . . . . . . . . . . . . . . . . . . . . . . . . . . . . . . . . . . . . . . . 41
Enable Cases for Communities Users . . . . . . . . . . . . . . . . . . . . . . . . . . . . . . . . . . . . 43Grant Super User Access to Partner Users in Your Community . . . . . . . . . . . . . . . . . . . 44Grant Super User Access to Customer Users in Your Community . . . . . . . . . . . . . . . . . 44
Activate Your Community . . . . . . . . . . . . . . . . . . . . . . . . . . . . . . . . . . . . . . . . . . . . . . . 45
Community Management . . . . . . . . . . . . . . . . . . . . . . . . . . . . . . . . . . . . . . . . . . . . . . . 46Manage Your Community . . . . . . . . . . . . . . . . . . . . . . . . . . . . . . . . . . . . . . . . . . . 46Dashboards and Insights . . . . . . . . . . . . . . . . . . . . . . . . . . . . . . . . . . . . . . . . . . . . 50Moderation . . . . . . . . . . . . . . . . . . . . . . . . . . . . . . . . . . . . . . . . . . . . . . . . . . . . . 62Topics . . . . . . . . . . . . . . . . . . . . . . . . . . . . . . . . . . . . . . . . . . . . . . . . . . . . . . . . . 73Recommendations . . . . . . . . . . . . . . . . . . . . . . . . . . . . . . . . . . . . . . . . . . . . . . . . 79Reputation . . . . . . . . . . . . . . . . . . . . . . . . . . . . . . . . . . . . . . . . . . . . . . . . . . . . . . 81
PLAN YOUR COMMUNITY DESIGN STRATEGY . . . . . . . . . . . . . . . . . . . . . . . 87Customize Community Pages . . . . . . . . . . . . . . . . . . . . . . . . . . . . . . . . . . . . . . . . . . . . 87
Choosing Between Community Builder and Force.com Sites . . . . . . . . . . . . . . . . . . . . 87Use Visualforce and Force.com Sites . . . . . . . . . . . . . . . . . . . . . . . . . . . . . . . . . . . . 89Use Community Builder with Templates . . . . . . . . . . . . . . . . . . . . . . . . . . . . . . . . . . 89Use Community Builder (Site.com) Without Templates . . . . . . . . . . . . . . . . . . . . . . . . . 98
Override Default Pages in Your Community with Custom Pages . . . . . . . . . . . . . . . . . . . . . 113Add the Global Search Box to Your Customized Community HTML Header . . . . . . . . . . . . . . 116Configure a Custom Domain for Your Community . . . . . . . . . . . . . . . . . . . . . . . . . . . . . . . 117Rename the Chatter Tab . . . . . . . . . . . . . . . . . . . . . . . . . . . . . . . . . . . . . . . . . . . . . . . . 118
SECURITY & AUTHENTICATION . . . . . . . . . . . . . . . . . . . . . . . . . . . . . . . . . . . . 119Authenticate Community Users . . . . . . . . . . . . . . . . . . . . . . . . . . . . . . . . . . . . . . . . . . . 119Configure SAML for Communities . . . . . . . . . . . . . . . . . . . . . . . . . . . . . . . . . . . . . . . . . . 119Configure Authentication Providers . . . . . . . . . . . . . . . . . . . . . . . . . . . . . . . . . . . . . . . . 122Configure Authentication Flows with OAuth . . . . . . . . . . . . . . . . . . . . . . . . . . . . . . . . . . . 122
ENABLE ADDITIONAL FEATURES . . . . . . . . . . . . . . . . . . . . . . . . . . . . . . . . . . . 124Enable Integrations in Your Community . . . . . . . . . . . . . . . . . . . . . . . . . . . . . . . . . . . . . 124Enable Chatter Questions in Your Community . . . . . . . . . . . . . . . . . . . . . . . . . . . . . . . . . 124Set Up Question-to-Case in Your Community . . . . . . . . . . . . . . . . . . . . . . . . . . . . . . . . . . 125Enable Chatter Answers in Your Community . . . . . . . . . . . . . . . . . . . . . . . . . . . . . . . . . . 128Enable Ideas in Your Community . . . . . . . . . . . . . . . . . . . . . . . . . . . . . . . . . . . . . . . . . . 129Enable Salesforce Knowledge in Your Community . . . . . . . . . . . . . . . . . . . . . . . . . . . . . . 131Set Up Approvals for External Users in Your Community . . . . . . . . . . . . . . . . . . . . . . . . . . 132Enable Leads for Partner Users . . . . . . . . . . . . . . . . . . . . . . . . . . . . . . . . . . . . . . . . . . . 133Set Up Report Management for External Users—Create and Edit Reports . . . . . . . . . . . . . . . 134
EDUCATE YOUR USERS ABOUT COMMUNITIES . . . . . . . . . . . . . . . . . . . . . 136Share Personal Contact Information Within Communities . . . . . . . . . . . . . . . . . . . . . . . . . . 136Navigate to Your Communities . . . . . . . . . . . . . . . . . . . . . . . . . . . . . . . . . . . . . . . . . . . 138Search Behavior in Communities . . . . . . . . . . . . . . . . . . . . . . . . . . . . . . . . . . . . . . . . . . 139Reset An External User's Password for Communities . . . . . . . . . . . . . . . . . . . . . . . . . . . . 140
APPENDICES . . . . . . . . . . . . . . . . . . . . . . . . . . . . . . . . . . . . . . . . . . . . . . . . . . . . . 141Who Can See What in Communities . . . . . . . . . . . . . . . . . . . . . . . . . . . . . . . . . . . . . . . . 141
Contents
Communities Limits . . . . . . . . . . . . . . . . . . . . . . . . . . . . . . . . . . . . . . . . . . . . . . . . . . . 149Maximum Number of Communities Limit . . . . . . . . . . . . . . . . . . . . . . . . . . . . . . . . . 149Communities Usage Limits . . . . . . . . . . . . . . . . . . . . . . . . . . . . . . . . . . . . . . . . . . 149Communities User Limits . . . . . . . . . . . . . . . . . . . . . . . . . . . . . . . . . . . . . . . . . . . 152Portal Roles Limit . . . . . . . . . . . . . . . . . . . . . . . . . . . . . . . . . . . . . . . . . . . . . . . . . 152Communities Groups Email Limit . . . . . . . . . . . . . . . . . . . . . . . . . . . . . . . . . . . . . . 152Person Account Communities User Limits . . . . . . . . . . . . . . . . . . . . . . . . . . . . . . . . 152Communities Report and Dashboard Limitations . . . . . . . . . . . . . . . . . . . . . . . . . . . 152Communities Moderation Limits . . . . . . . . . . . . . . . . . . . . . . . . . . . . . . . . . . . . . . . 153
INDEX . . . . . . . . . . . . . . . . . . . . . . . . . . . . . . . . . . . . . . . . . . . . . . . . . . . . . . . . . . 155
Contents

INTRODUCTION TO SALESFORCE COMMUNITIES
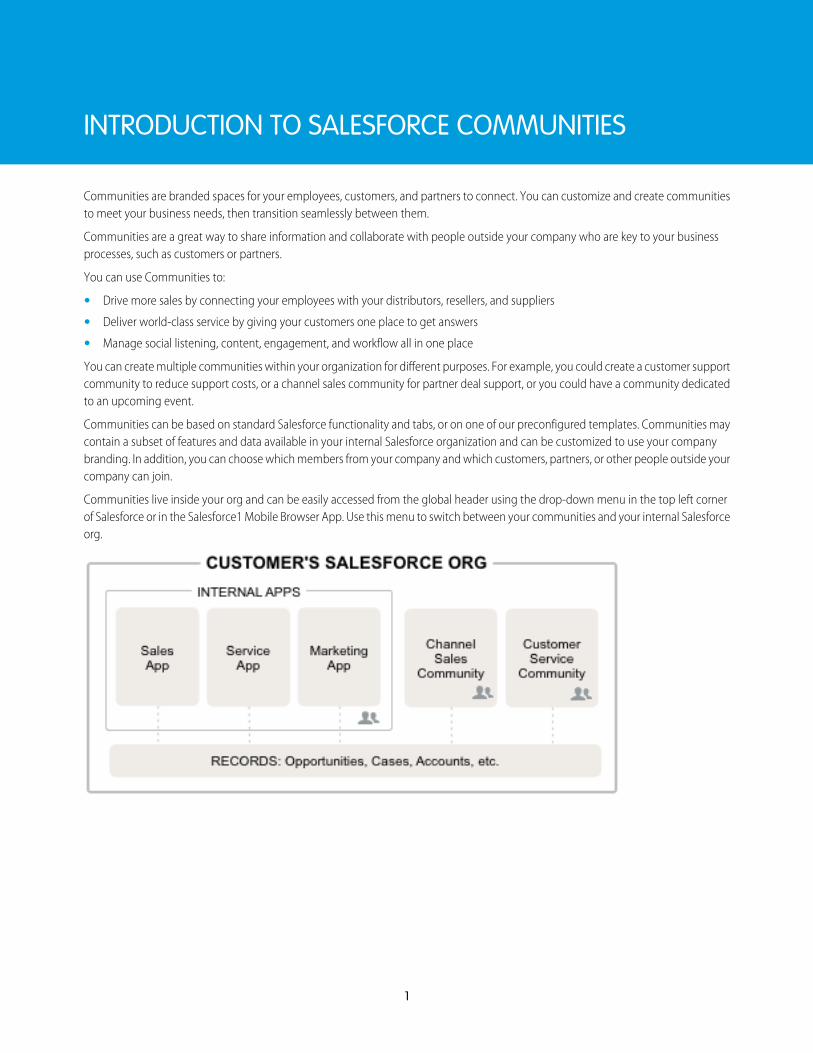
Communities are branded spaces for your employees, customers, and partners to connect. You can customize and create communitiesto meet your business needs, then transition seamlessly between them.
Communities are a great way to share information and collaborate with people outside your company who are key to your businessprocesses, such as customers or partners.
You can use Communities to:
• Drive more sales by connecting your employees with your distributors, resellers, and suppliers
• Deliver world-class service by giving your customers one place to get answers
• Manage social listening, content, engagement, and workflow all in one place
You can create multiple communities within your organization for different purposes. For example, you could create a customer supportcommunity to reduce support costs, or a channel sales community for partner deal support, or you could have a community dedicatedto an upcoming event.
Communities can be based on standard Salesforce functionality and tabs, or on one of our preconfigured templates. Communities maycontain a subset of features and data available in your internal Salesforce organization and can be customized to use your companybranding. In addition, you can choose which members from your company and which customers, partners, or other people outside yourcompany can join.
Communities live inside your org and can be easily accessed from the global header using the drop-down menu in the top left cornerof Salesforce or in the Salesforce1 Mobile Browser App. Use this menu to switch between your communities and your internal Salesforceorg.
1
PLAN YOUR IMPLEMENTATION
It helps to make a few key decisions well in advance of setting up your community and customizing it.
• Determine the business requirements of the community. What types of users are you creating the community for? You could startby identifying the main use cases you want to support, such as customer support, self-service, or marketing.
• Estimate the size of the community. This will help determine your licensing requirements.
• Decide if you want your community content to be publicly available to guest users without licenses
• Plan the look-and-feel of your community and then evaluate the available customization options. With Communities, you have thefollowing choices:
– Use Visualforce to customize the out-of-the-box community tabs: Communities comes with some out-of-the-box brandingthemes that you can use along with standard Salesforce tabs in your community. In addition, you can use Visualforce to extensivelycustomize your community’s appearance and leverage all the capabilities of the Force.com platform. This option requiresprogramming capabilities.
– Use Community Builder with templates: Community Builder comes with rich, stylized templates for communities targetedat customer support scenarios. Templates offer easy customization via an intuitive GUI and allow for a quick rollout of yourcommunity with minimal configuration in Site.com. This option doesn’t require programming experience or knowledge of theForce.com platform. Need help deciding on a template? Check out the template comparison.
For more information about these options, see Choosing Between Community Builder and Force.com Sites
• Determine if any of the community limits will affect your implementation.
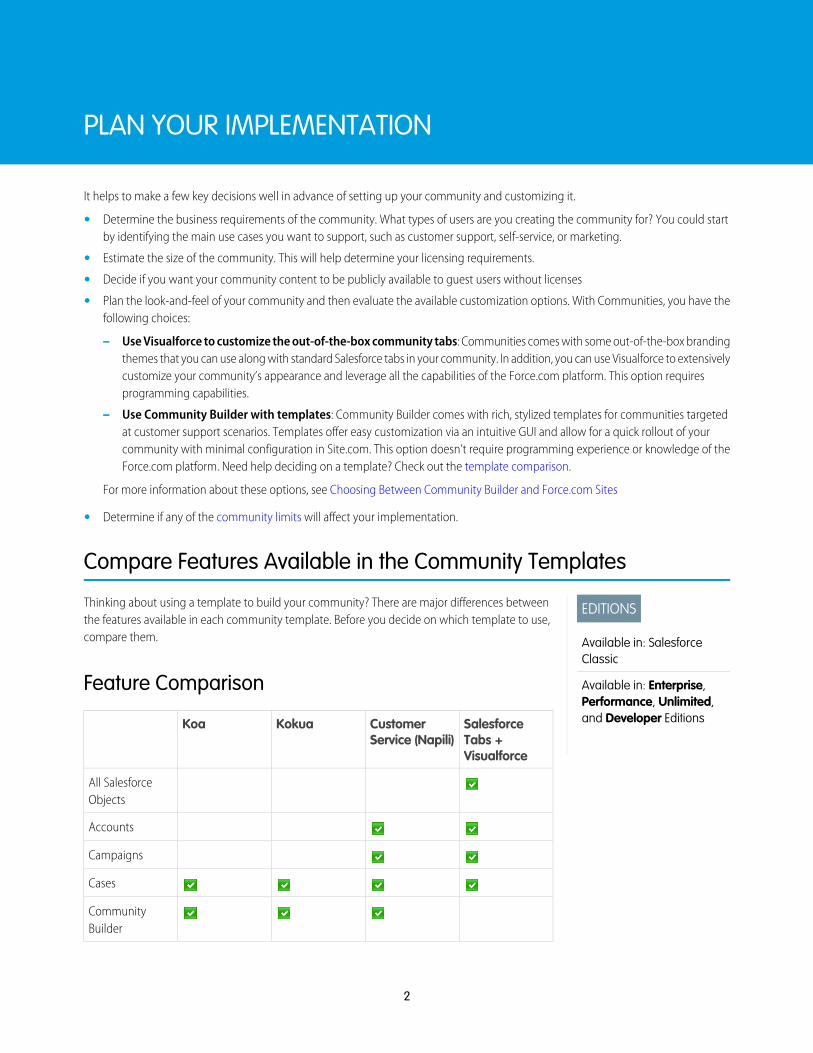
Compare Features Available in the Community Templates
EDITIONS
Available in: SalesforceClassic
Available in: Enterprise,Performance, Unlimited,and Developer Editions
Thinking about using a template to build your community? There are major differences betweenthe features available in each community template. Before you decide on which template to use,compare them.
Feature Comparison
SalesforceTabs +Visualforce
CustomerService (Napili)
KokuaKoa
All SalesforceObjects
Accounts
Campaigns
Cases
CommunityBuilder
2
Salesforce Tabs +Visualforce
Customer Service(Napili)
KokuaKoa
Community Discussions
Contacts and SharedContacts
Contacts to MultipleAccounts
Custom Objects
Customizations usingLightning Components
Customizations usingVisualforce
RecommendedRecommendedRequiredRequired
Salesforce Knowledge
Knowledgeable People
Leads
Notes
Opportunities
Optimized for Mobile
Orders
Question-to-Case
Recommendations
Reputation
Topics
Trending Articles
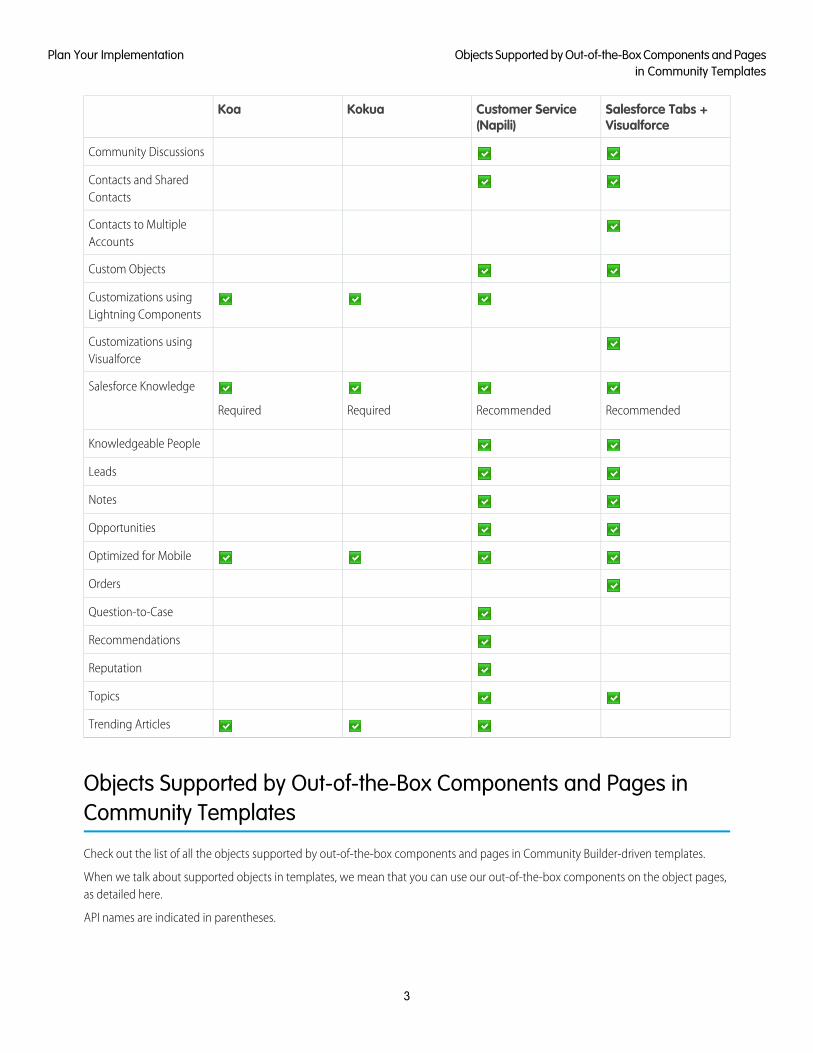
Objects Supported by Out-of-the-Box Components and Pages inCommunity Templates
Check out the list of all the objects supported by out-of-the-box components and pages in Community Builder-driven templates.
When we talk about supported objects in templates, we mean that you can use our out-of-the-box components on the object pages,as detailed here.
API names are indicated in parentheses.
3
Objects Supported by Out-of-the-Box Components and Pagesin Community Templates
Plan Your Implementation
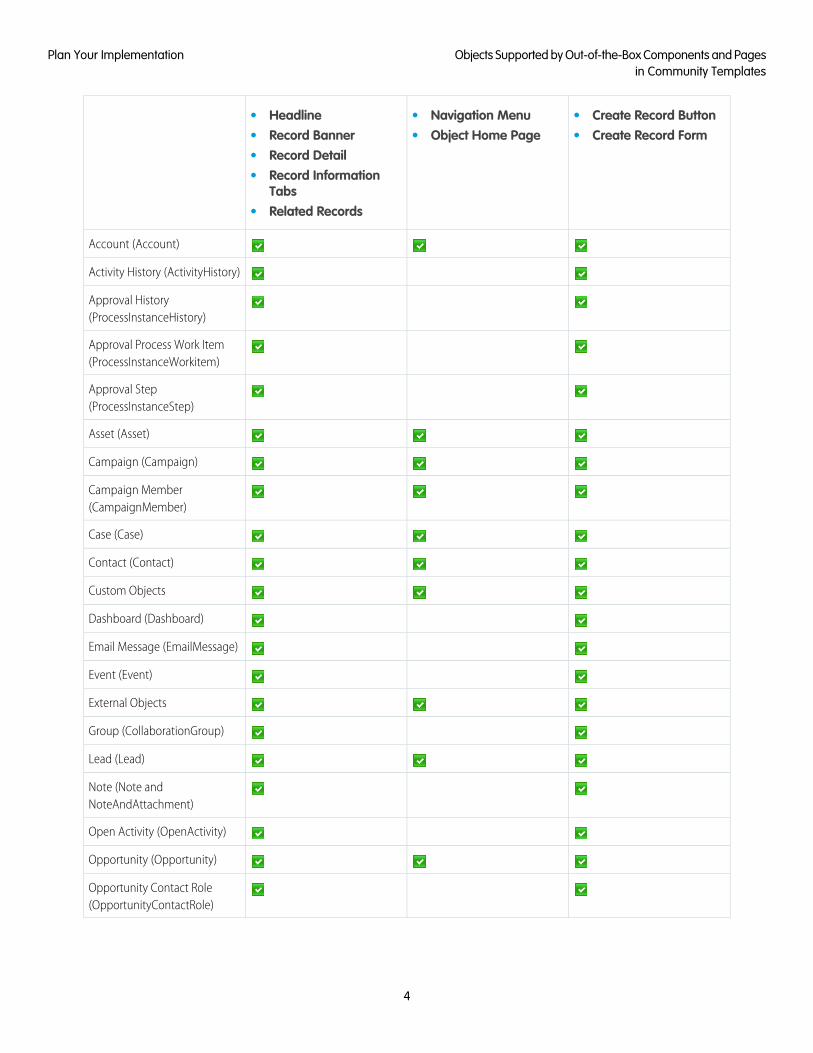
••• Create Record ButtonNavigation MenuHeadline• ••Record Banner Create Record FormObject Home Page• Record Detail• Record Information
Tabs• Related Records
Account (Account)
Activity History (ActivityHistory)
Approval History(ProcessInstanceHistory)
Approval Process Work Item(ProcessInstanceWorkitem)
Approval Step(ProcessInstanceStep)
Asset (Asset)
Campaign (Campaign)
Campaign Member(CampaignMember)
Case (Case)
Contact (Contact)
Custom Objects
Dashboard (Dashboard)
Email Message (EmailMessage)
Event (Event)
External Objects
Group (CollaborationGroup)
Lead (Lead)
Note (Note andNoteAndAttachment)
Open Activity (OpenActivity)
Opportunity (Opportunity)
Opportunity Contact Role(OpportunityContactRole)
4
Objects Supported by Out-of-the-Box Components and Pagesin Community Templates
Plan Your Implementation
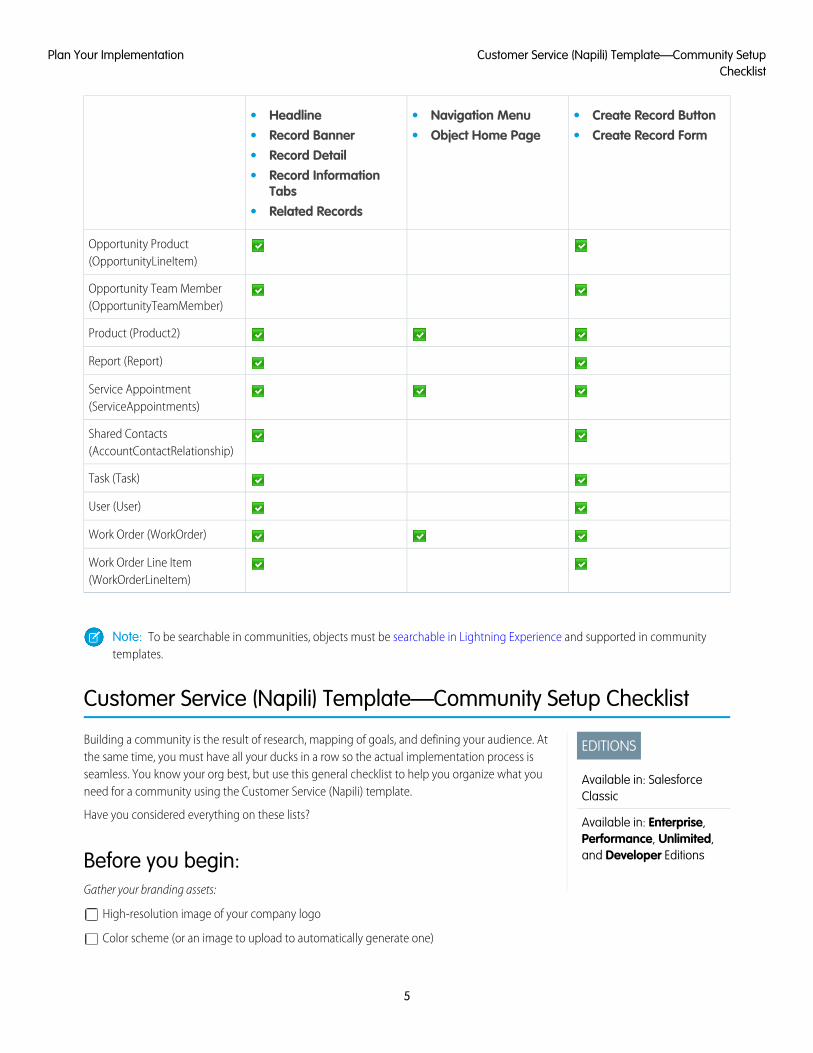
••• Create Record ButtonNavigation MenuHeadline• ••Record Banner Create Record FormObject Home Page• Record Detail• Record Information
Tabs• Related Records
Opportunity Product(OpportunityLineItem)
Opportunity Team Member(OpportunityTeamMember)
Product (Product2)
Report (Report)
Service Appointment(ServiceAppointments)
Shared Contacts(AccountContactRelationship)
Task (Task)
User (User)
Work Order (WorkOrder)
Work Order Line Item(WorkOrderLineItem)
Note: To be searchable in communities, objects must be searchable in Lightning Experience and supported in communitytemplates.
Customer Service (Napili) Template—Community Setup Checklist
EDITIONS
Available in: SalesforceClassic
Available in: Enterprise,Performance, Unlimited,and Developer Editions
Building a community is the result of research, mapping of goals, and defining your audience. Atthe same time, you must have all your ducks in a row so the actual implementation process isseamless. You know your org best, but use this general checklist to help you organize what youneed for a community using the Customer Service (Napili) template.
Have you considered everything on these lists?
Before you begin:Gather your branding assets:
High-resolution image of your company logo
Color scheme (or an image to upload to automatically generate one)
5
Customer Service (Napili) Template—Community SetupChecklist
Plan Your Implementation
Image to use as a header
Thumbnail images (385x385 pixels), if you’re using Featured Topics
In your internal Salesforce org:
Enable Salesforce Communities. Choose a unique URL that works for your business, because you can’t change it after it’s been set.
Set up email templates for any communication between the community and its members (welcome email, resetting passwordemail, and so on).
Enable the Global Header for Communities for the system administrator profile and any other profiles that can access your communityfrom the internal org.
Enable any Service Cloud features you plan to use in the community, such as Salesforce Knowledge.
Review profiles and add permission sets as needed.
Set up Web-to-Case.
If you’re using Salesforce Knowledge:
Review your data categories.
Enable feed tracking for your Knowledge article types.
As You’re Making Your Community:In your internal Salesforce org:
Add members to your community.
Configure the Guest User Profile (access using Community Management or the Community Builder):
Give read and create permissions for the case object.
If using Salesforce Knowledge, give guests access to your data categories.
In Community Management:
Set up navigational topics and subtopics, and associate articles to each topic.
Set up featured topics and associated images
Download the latest Salesforce Communities Management from the AppExchange.
Set up moderation criteria and rules.
Enable and set up reputation.
In Community Builder:
Customize your community to match your company’s branding.
Add standard and custom Lightning components to customize their design and content.
After Making Your Community Set up an internal Chatter group for feedback, and invite people to take a test drive while the community is still in preview mode.
Incorporate their feedback, and then publish your community.
Seed the community with some initial content: welcome posts, groups, and relevant or fun articles.
6
Customer Service (Napili) Template—Community SetupChecklist
Plan Your Implementation
Prerequisites
Before you enable Communities:
• Ensure that your organization has Communities licenses. From Setup, enter Company Information in the Quick Findbox, then select Company Information. Your licenses are listed near the bottom of the page.
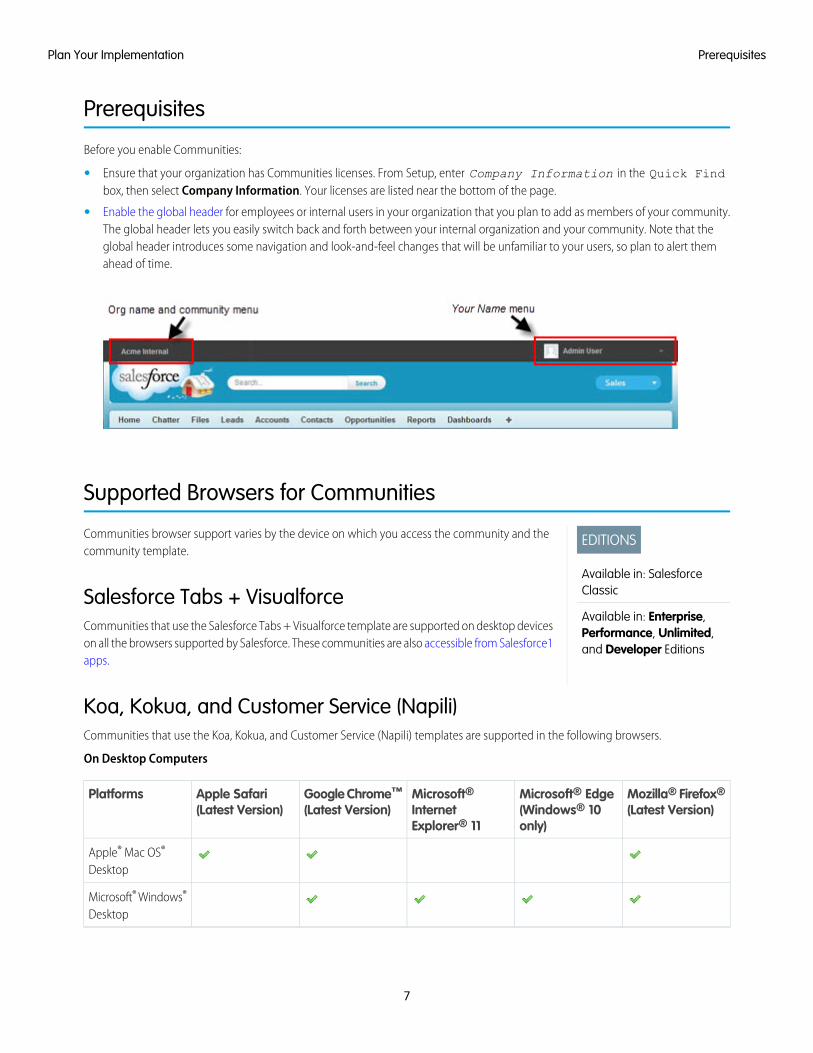
• Enable the global header for employees or internal users in your organization that you plan to add as members of your community.The global header lets you easily switch back and forth between your internal organization and your community. Note that theglobal header introduces some navigation and look-and-feel changes that will be unfamiliar to your users, so plan to alert themahead of time.
Supported Browsers for Communities
EDITIONS
Available in: SalesforceClassic
Available in: Enterprise,Performance, Unlimited,and Developer Editions
Communities browser support varies by the device on which you access the community and thecommunity template.
Salesforce Tabs + VisualforceCommunities that use the Salesforce Tabs + Visualforce template are supported on desktop deviceson all the browsers supported by Salesforce. These communities are also accessible from Salesforce1apps.
Koa, Kokua, and Customer Service (Napili)Communities that use the Koa, Kokua, and Customer Service (Napili) templates are supported in the following browsers.
On Desktop Computers
Mozilla® Firefox®
(Latest Version)Microsoft® Edge(Windows® 10only)
Microsoft®InternetExplorer® 11
Google Chrome™
(Latest Version)Apple Safari(Latest Version)
Platforms
Apple® Mac OS®
Desktop
Microsoft® Windows®
Desktop
7
PrerequisitesPlan Your Implementation
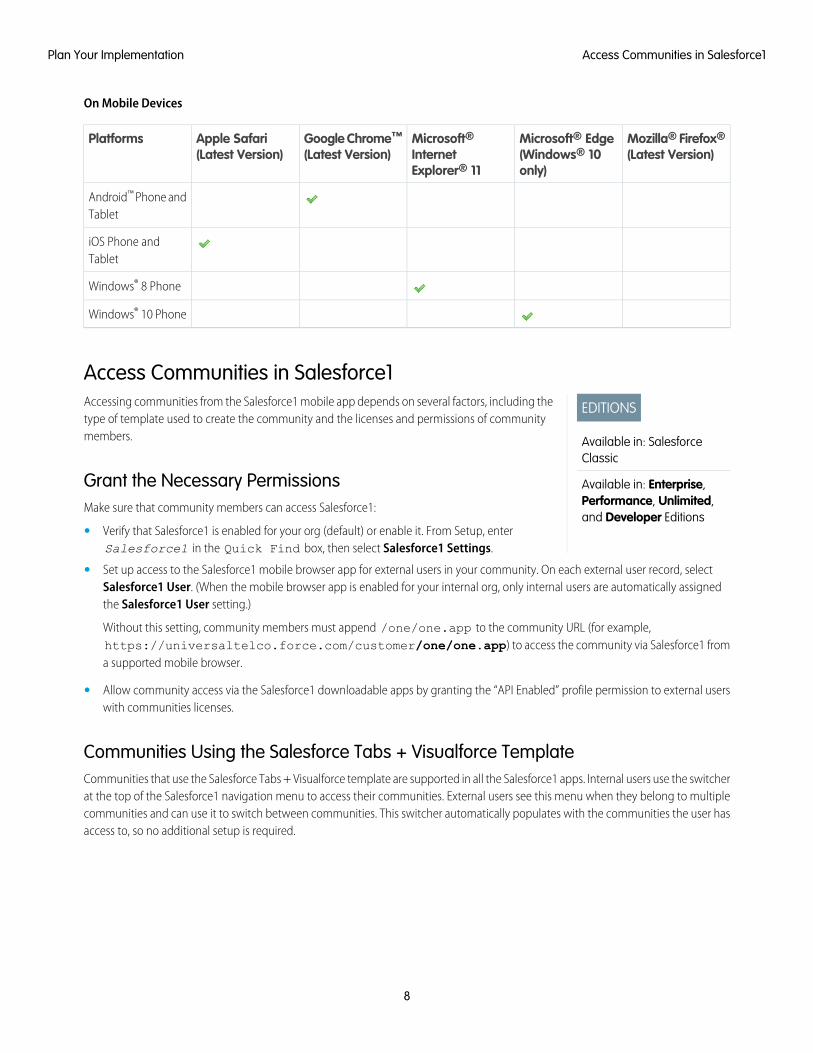
On Mobile Devices
Mozilla® Firefox®
(Latest Version)Microsoft® Edge(Windows® 10only)
Microsoft®InternetExplorer® 11
Google Chrome™
(Latest Version)Apple Safari(Latest Version)
Platforms
Android™ Phone andTablet
iOS Phone andTablet
Windows® 8 Phone
Windows® 10 Phone
Access Communities in Salesforce1
EDITIONS
Available in: SalesforceClassic
Available in: Enterprise,Performance, Unlimited,and Developer Editions
Accessing communities from the Salesforce1 mobile app depends on several factors, including thetype of template used to create the community and the licenses and permissions of communitymembers.
Grant the Necessary PermissionsMake sure that community members can access Salesforce1:
• Verify that Salesforce1 is enabled for your org (default) or enable it. From Setup, enterSalesforce1 in the Quick Find box, then select Salesforce1 Settings.
• Set up access to the Salesforce1 mobile browser app for external users in your community. On each external user record, selectSalesforce1 User. (When the mobile browser app is enabled for your internal org, only internal users are automatically assignedthe Salesforce1 User setting.)
Without this setting, community members must append /one/one.app to the community URL (for example,https://universaltelco.force.com/customer/one/one.app) to access the community via Salesforce1 froma supported mobile browser.
• Allow community access via the Salesforce1 downloadable apps by granting the “API Enabled” profile permission to external userswith communities licenses.
Communities Using the Salesforce Tabs + Visualforce TemplateCommunities that use the Salesforce Tabs + Visualforce template are supported in all the Salesforce1 apps. Internal users use the switcherat the top of the Salesforce1 navigation menu to access their communities. External users see this menu when they belong to multiplecommunities and can use it to switch between communities. This switcher automatically populates with the communities the user hasaccess to, so no additional setup is required.
8
Access Communities in Salesforce1Plan Your Implementation
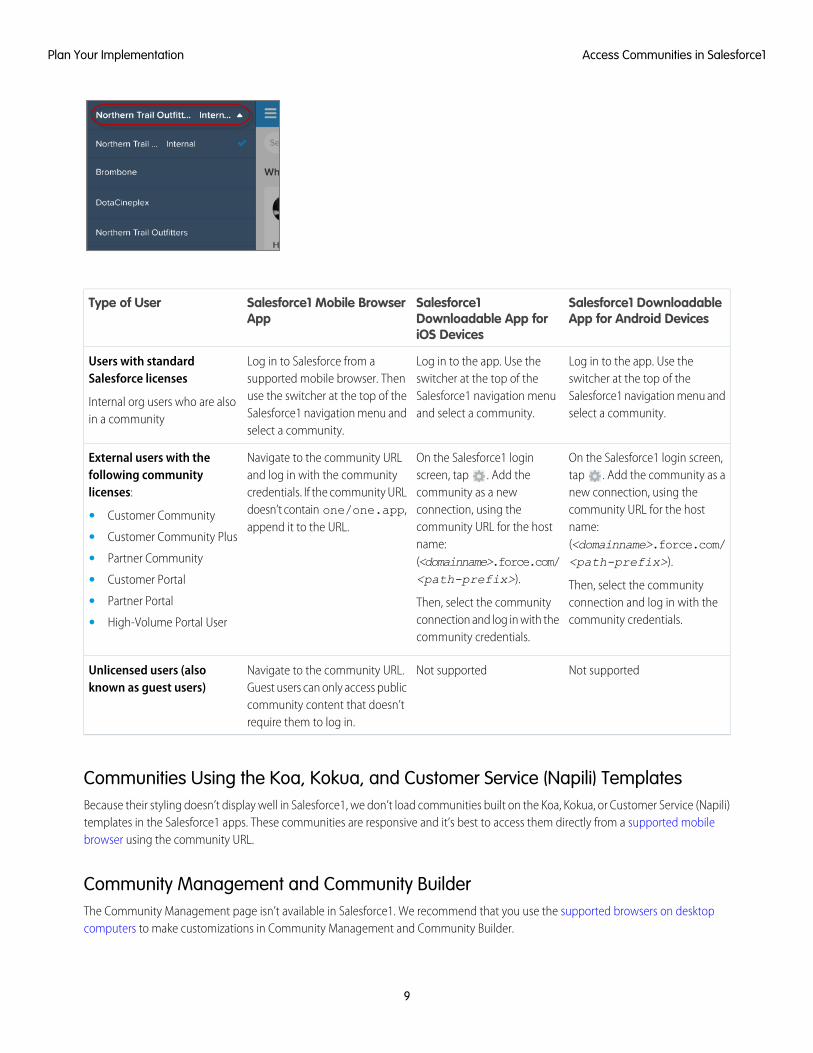
Salesforce1 DownloadableApp for Android Devices
Salesforce1Downloadable App foriOS Devices
Salesforce1 Mobile BrowserApp
Type of User
Log in to the app. Use theswitcher at the top of the
Log in to the app. Use theswitcher at the top of the
Log in to Salesforce from asupported mobile browser. Then
Users with standardSalesforce licenses
Internal org users who are alsoin a community
Salesforce1 navigation menu andselect a community.
Salesforce1 navigation menuand select a community.
use the switcher at the top of theSalesforce1 navigation menu andselect a community.
On the Salesforce1 login screen,tap . Add the community as a
On the Salesforce1 loginscreen, tap . Add the
Navigate to the community URLand log in with the community
External users with thefollowing communitylicenses: new connection, using the
community URL for the hostcommunity as a newconnection, using the
credentials. If the community URLdoesn’t contain one/one.app,append it to the URL.
• Customer Communityname:(<domainname>.force.com/<path-prefix>).
Then, select the communityconnection and log in with thecommunity credentials.
community URL for the hostname:(<domainname>.force.com/<path-prefix>).
Then, select the communityconnection and log in with thecommunity credentials.
• Customer Community Plus
• Partner Community
• Customer Portal
• Partner Portal
• High-Volume Portal User
Not supportedNot supportedNavigate to the community URL.Guest users can only access public
Unlicensed users (alsoknown as guest users)
community content that doesn’trequire them to log in.
Communities Using the Koa, Kokua, and Customer Service (Napili) TemplatesBecause their styling doesn’t display well in Salesforce1, we don’t load communities built on the Koa, Kokua, or Customer Service (Napili)templates in the Salesforce1 apps. These communities are responsive and it’s best to access them directly from a supported mobilebrowser using the community URL.
Community Management and Community BuilderThe Community Management page isn’t available in Salesforce1. We recommend that you use the supported browsers on desktopcomputers to make customizations in Community Management and Community Builder.
9
Access Communities in Salesforce1Plan Your Implementation
SET UP YOUR FIRST COMMUNITY
This list assumes you’re setting up a community using the Salesforce Tabs + Visualforce template. The steps may vary if you’re using adifferent template.
To get started using Communities, perform the following basic setup. Once you complete these steps, you can perform advancedcustomizations.
1. Enable Communities in your organization
2. Create a community
3. Add members
4. Add tabs so that members see the appropriate features1
5. Use out-of-the-box branding options to change the look-and-feel2
6. Customize the login page that external users see when accessing your community
7. Determine sender information, Chatter email branding, and templates for your community emails
8. Use Community Management to set up dashboards, reputation, and topics
9. Create community users
To learn more about using the Kokua, Koa, and Customer Service (Napili) templates, see the Using Templates to Build Communities.
To learn more about using the Aloha template, see the Getting Started with the Aloha Community Template for Salesforce Identity.
Enable Salesforce Communities
EDITIONS
Salesforce Communitiesavailable in: SalesforceClassic
Salesforce CommunitiesSetup available in:Salesforce Classic andLightning Experience
Available in: Enterprise,Performance, Unlimited,and Developer Editions
USER PERMISSIONS
To enable Communities:• “Customize Application”
Enabling Salesforce Communities is the first step to creating communities.
Enabling Communities enables the Salesforce Classic 2010 user interface theme, which updatesthe look and feel of Salesforce.
Note: Once you enable Communities, you can’t turn it off.
If your organization’s access to Communities is suspended for non-payment of fees due, allof your communities are deactivated, including those in Preview status. When Communitiesis enabled again, all communities are in Inactive status. You can activate thesecommunities, but can’t return them to Preview status.
1. From Setup, enter Communities Settings in the Quick Find box, then selectCommunities Settings.
Note: If you don’t see this menu, Communities may not be enabled for your organization.Contact your Salesforce account executive.
2. Select Enable communities.
1 Applies for Salesforce Tabs + Visualforce template and Salesforce1 only.2 Applies for Salesforce Tabs + Visualforce template and Salesforce1 only.
10
3. Select a domain name to use for your communities, then click Check Availability to make sure it’s not already being used.
We suggest that you use something recognizable to your users, such as your company name. Although the domain name is thesame for all communities, you create a unique URL for each community during the creation process. For example, if your domain isUniversalTelco.force.com and you’re creating a customer community, you can designate the URL asUniversalTelco.force.com/customers.
Important: Keep in mind that you can’t change the domain name after you save it.
You can designate a completely custom domain by entering it in on the Domain Management page. From Setup, enter Domainsin the Quick Find box, then select Domains.
4. Click Save.
You can now create communities.
The “Create and Set Up Communities” permission is required to create and customize communities. It also gives the user the ability tomanage the Site.com site associated with the community.
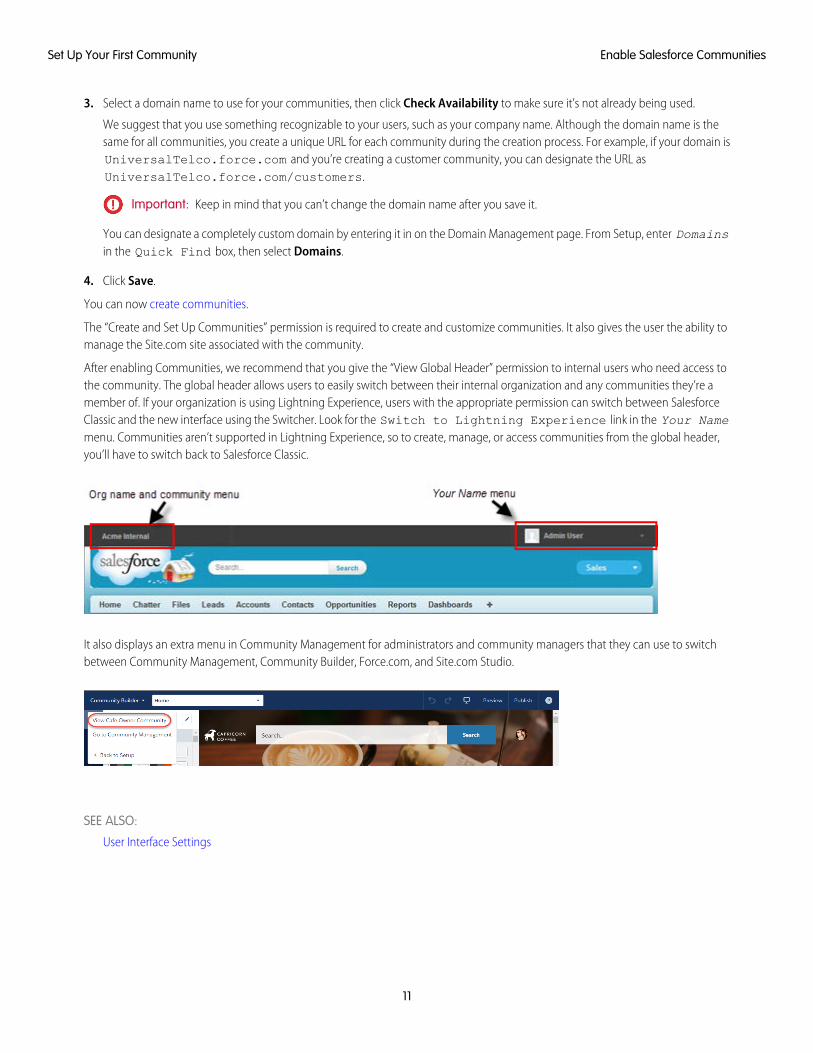
After enabling Communities, we recommend that you give the “View Global Header” permission to internal users who need access tothe community. The global header allows users to easily switch between their internal organization and any communities they’re amember of. If your organization is using Lightning Experience, users with the appropriate permission can switch between SalesforceClassic and the new interface using the Switcher. Look for the Switch to Lightning Experience link in the Your Namemenu. Communities aren’t supported in Lightning Experience, so to create, manage, or access communities from the global header,you’ll have to switch back to Salesforce Classic.
It also displays an extra menu in Community Management for administrators and community managers that they can use to switchbetween Community Management, Community Builder, Force.com, and Site.com Studio.
SEE ALSO:
User Interface Settings
11
Enable Salesforce CommunitiesSet Up Your First Community
Set the Default Number of Community Roles
EDITIONS
Salesforce Communitiesavailable in: SalesforceClassic
Salesforce CommunitiesSetup available in:Salesforce Classic andLightning Experience
Available in: Enterprise,Performance, Unlimited,and Developer Editions
USER PERMISSIONS
To set the number of defaultroles:• “Customize Application”
Set the default number of roles created when adding partner or customer accounts to communities.
These settings apply if your community is set up with Partner Community or Customer CommunityPlus user licenses. The limit is three roles; the system default is one.
For example, if three partner roles are currently created when an account is enabled for yourcommunity–Executive, Manager, and User–but you need only the User role for new accounts, youcan reduce the number to one role. For better performance, we recommend setting this value to1. You can then use Super User Access to grant specific users access to data owned by other usersin their account.
To set the number of roles:
1. From Setup, enter Communities Settings in the Quick Find box, then selectCommunities Settings.
2. Select the number of roles per account.
a. If you’re using Partner Community licenses, set the Number of partner roles.
b. If you’re using Customer Community Plus licenses, set the Number of customerroles.
3. Click Save.
The number of roles for existing accounts isn’t affected by this setting.
Enable Super User Access in Communities
EDITIONS
Salesforce Communitiesavailable in: SalesforceClassic
Salesforce CommunitiesSetup available in:Salesforce Classic andLightning Experience
Available in: Enterprise,Performance, Unlimited,and Developer Editions
USER PERMISSIONS
To enable Super UserAccess:• “Customize Application”
When you enable super user access, partner users in communities can access more records anddata.
If your community is set up with Partner Community user licenses, this setting applies. You can alsogrant super user access to users with Customer Community Plus licenses. For more information,see Grant Super User Access to Customer Users in Your Community on page 44.
Granting super user access to external users in your community lets them access more data andrecords, regardless of sharing rules and organization-wide defaults. Super users have access to dataowned by other partner users belonging to the same account who have the same role or a rolebelow them in the role hierarchy. Super user access applies to cases, leads, custom objects, andopportunities only. External users have access to these objects only if you exposed them usingprofiles or sharing and added the tabs to the community during setup.
1. From Setup, enter Communities Settings in the Quick Find box, then selectCommunities Settings.
2. Select Enable Partner Super User Access.
3. Click Save.
You can now assign super user access.
To disable super user access, deselect Enable Partner Super User Access. If youre-enable this feature, all users who were assigned super user access before the feature was disabledautomatically get super user access again.
12
Set the Default Number of Community RolesSet Up Your First Community
Grant High-Volume Community Users Access to Records
EDITIONS
Salesforce Communitiesavailable in: SalesforceClassic
Salesforce CommunitiesSetup available in:Salesforce Classic andLightning Experience
Available in: Enterprise,Performance, Unlimited,and Developer Editions
USER PERMISSIONS
To grant high-volumecommunity users access torecords:• “Customize Application”
Grant high-volume community users access to records using sharing sets.
A sharing set grants high-volume users access to any record associated with an account or contactthat matches the user’s account or contact. You can also grant access to records via access mappingin a sharing set, which supports indirect lookups from the user and target record to the account orcontact. For example, grant users access to all cases related to an account that’s identified on theusers’ contact records.
Sharing sets apply across all communities a high-volume community user is a member of.High-volume community users have either the Customer Community or High-Volume Portal Userlicense. For more information, see “Sharing Set Overview” in the Salesforce Help.
To grant users access to selected users in the same community, you would typically create a sharingset if you deselected the Community User Visibility checkbox on the Sharing Settingspage.
1. From Setup, enter Communities Settings in the Quick Find box, then selectCommunities Settings.
2. In the Sharing Sets related list, click New to create a sharing set, or click Edit next to an existingsharing set.
3. In the Sharing Set Edit page, fill in the Label and Sharing Set Name fields. Label is the sharingset label as it appears on the user interface. Sharing Set Name is the unique name used bythe API.
4. Enter a description.
5. Select the profiles of the users to whom you want to provide access.
6. Select the objects you want to grant access to.
The Available Objects list excludes:
• Objects with an organization-wide sharing setting of Public Read/Write
• Custom objects that don’t have an account or contact lookup field
7. In the Configure Access section, click Set Up or Edit next to an object name to configure access for the selected profiles, or click Delto remove access settings for an object.
Note: Objects with Set Up in the Action column aren’t configured for high-volume user access. Until you configure an object,high-volume users have limited or no access to its records.
8. Grant access based on an account or contact lookup:
• Select a value in the User drop-down list to determine the account or contact lookup on the user.
• Select a value in the Target Object field to determine the account or contact lookup on the target object.
For example, to grant access to all cases associated with an account identified on the user’s contact record, selectContact.Account and Account respectively.
Note: Both selected fields must point to either an account or contact. For example, Contact.Account andEntitlement.Account both point to an account.
9. Choose an access level of Read Only or Read/Write. (If the object’s organization-wide sharing setting is Public Read Only, then onlyRead/Write is available.)
10. Click Update, then click Save.
13
Grant High-Volume Community Users Access to RecordsSet Up Your First Community
After creating a sharing set, create share groups to give other users access to records created by high-volume community users.
SEE ALSO:
About High-Volume Community Users
Share Records Owned By High-Volume Community Users
EDITIONS
Available in: SalesforceClassic
Available in: Enterprise,Performance, Unlimited,and Developer Editions
USER PERMISSIONS
To share records owned byhigh-volume communityusers to other users:• “Customize Application”
Share groups allow you to share records owned by high-volume community users with internaland external users in your communities.
High-volume users are limited-access users intended for organizations with many thousands tomillions of external users. Unlike other external users, high-volume users don’t have roles, whicheliminates performance issues associated with role hierarchy calculations. Because high-volumecommunity users are not in the role hierarchy while Salesforce users are, a share group allows youto specify the Salesforce other external users who can access records owned by high-volumecommunity users.
Share groups apply across communities.
To set up share groups for your communities:
1. From Setup, enter Communities Settings in the Quick Find box, then selectCommunities Settings.
2. In the Sharing Settings for High-Volume Community Users related list, click Edit next to anexisting sharing set.
3. Click the Share Group Settings tab.
4. Click Activate to turn on the share group.
Activating the share group can take a while. An email is sent to you when the process finishes.
Note: Deactivating a share group removes all other users’ access to records owned by high-volume community users. Anemail isn’t sent to you when the deactivation process finishes.
5. Click Edit to add users to the share group. You can add both internal users from your organization as well as external users from thesame parent account as the high-volume user.
a. From the Search drop-down list, select the type of member to add.
b. If you don’t see the member you want to add, enter keywords in the search box and click Find.
c. Select members from the Available Members box, and click Add to add them to the group.
d. Click Save.
About High-Volume Community Users
EDITIONS
Available in: SalesforceClassic
Available in: Enterprise,Performance, Unlimited,and Developer Editions
High-volume community users are limited-access users intended for orgs that have thousands tomillions of communities users.
Unlike other community users, high-volume community users don’t have roles, which eliminatesperformance issues associated with role hierarchy calculations. High-volume community usersinclude the Customer Community, High Volume Customer Portal, and Authenticated Websitelicense types.
14
Grant High-Volume Community Users Access to RecordsSet Up Your First Community
CharacteristicsHigh-volume community users:
• Are contacts enabled to access a community.
• Are assigned to the Customer Community, High Volume Customer Portal, or Authenticated Website license.
• Only share the records they own with Salesforce users in sharing groups.
Access to RecordsHigh-volume community users can access records if any of the following conditions are met:
• They have “Update” access on the account they belong to.
• They own the record.
• They can access a record’s parent, and the organization-wide sharing setting for that record is Controlled by Parent.
• The organization-wide sharing setting for the object is Public Read Only or Public Read/Write.
Admins can create sharing sets to grant high-volume community users additional access to records; see Grant High-Volume CommunityUsers Access to Records.
Limitations
• High-volume community users can’t manually share records they own or have access to.
• You can’t transfer cases from non-high-volume community users to high-volume community users.
• High-volume community users can’t own accounts.
• You can’t add case teams to cases owned by high-volume community users.
• You can’t include high-volume community users in:
– Personal groups or public groups.
– Sharing rules.
– Account teams, opportunity teams, or case teams.
– Salesforce CRM Content libraries.
These limitations also apply to records owned by high-volume community users.
• You can’t assign high-volume community users to territories.
15
Grant High-Volume Community Users Access to RecordsSet Up Your First Community
Enable the Global Header for Communities
EDITIONS
Available in: SalesforceClassic
Available in: Enterprise,Performance, Unlimited,and Developer Editions
USER PERMISSIONS
To create permission sets:• “Manage Profiles and
Permission Sets”
To assign a permission setto a user:• “Assign Permission Sets”
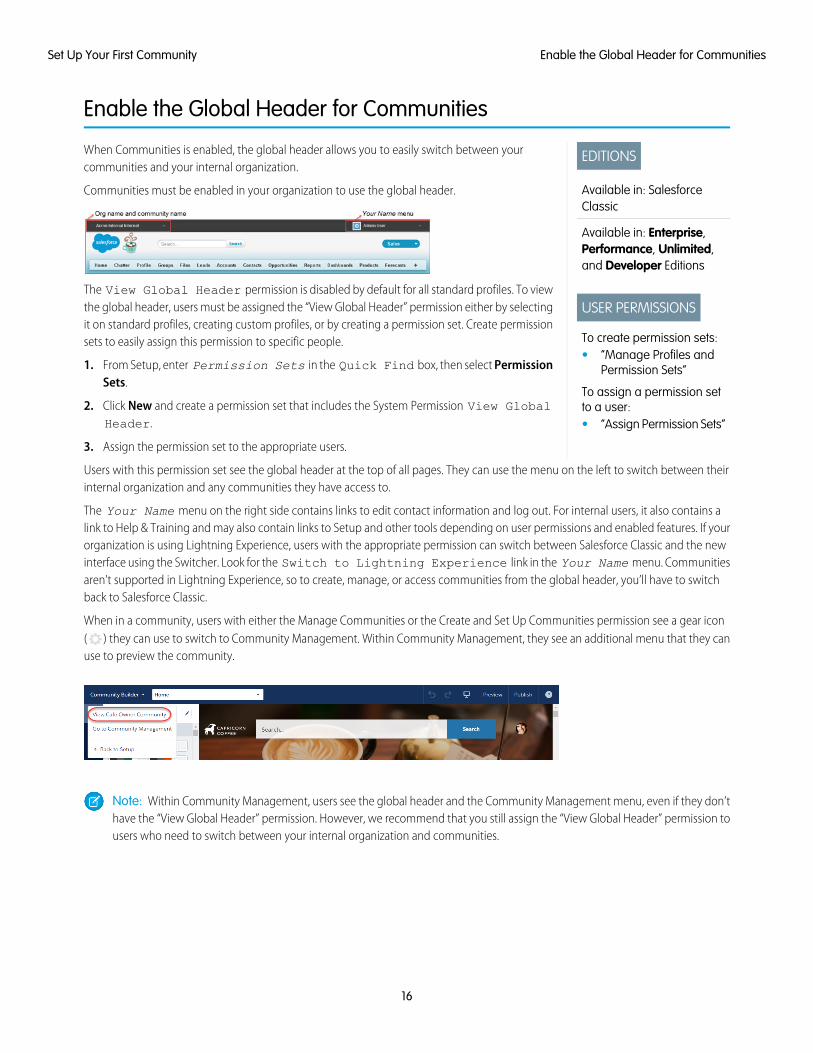
When Communities is enabled, the global header allows you to easily switch between yourcommunities and your internal organization.
Communities must be enabled in your organization to use the global header.
The View Global Header permission is disabled by default for all standard profiles. To viewthe global header, users must be assigned the “View Global Header” permission either by selectingit on standard profiles, creating custom profiles, or by creating a permission set. Create permissionsets to easily assign this permission to specific people.
1. From Setup, enter Permission Sets in the Quick Find box, then select PermissionSets.
2. Click New and create a permission set that includes the System Permission View GlobalHeader.
3. Assign the permission set to the appropriate users.
Users with this permission set see the global header at the top of all pages. They can use the menu on the left to switch between theirinternal organization and any communities they have access to.
The Your Name menu on the right side contains links to edit contact information and log out. For internal users, it also contains alink to Help & Training and may also contain links to Setup and other tools depending on user permissions and enabled features. If yourorganization is using Lightning Experience, users with the appropriate permission can switch between Salesforce Classic and the newinterface using the Switcher. Look for the Switch to Lightning Experience link in the Your Name menu. Communitiesaren’t supported in Lightning Experience, so to create, manage, or access communities from the global header, you’ll have to switchback to Salesforce Classic.
When in a community, users with either the Manage Communities or the Create and Set Up Communities permission see a gear icon( ) they can use to switch to Community Management. Within Community Management, they see an additional menu that they canuse to preview the community.
Note: Within Community Management, users see the global header and the Community Management menu, even if they don’thave the “View Global Header” permission. However, we recommend that you still assign the “View Global Header” permission tousers who need to switch between your internal organization and communities.
16
Enable the Global Header for CommunitiesSet Up Your First Community
Create Communities
EDITIONS
Available in: SalesforceClassic
Available in: Enterprise,Performance, Unlimited,and Developer Editions
USER PERMISSIONS
To create, customize, oractivate a community:• “Create and Set Up
Communities”
AND
Is a member of thecommunity whoseCommunityManagement pagethey’re trying to access.
Create communities using a wizard that helps you choose a community template that meets yourbusiness needs.
The number of communities you can create for your organization is listed on the All Communitiespage in Setup.
1. To start creating communities, from Setup, enter Communities in the Quick Find box,select All Communities, then click New Community.The Community Creation wizard appears, with different out-of-the-box template options foryou to choose from. If you have set up custom templates in your org, you see them in the wizardas well.
2. To see more information about a template, select it.
KokuaA graphic-based community ideal for handling simple customer interactions. Communitymembers can search for and view articles, and contact support.Requires Knowledge andsupports cases.
KoaA text-based community ideal for handling simple customer interactions. Communitymembers can search for and view articles, and contact support. Requires Knowledge andsupports cases.
Customer Service (Napili)A powerful, responsive self-service template that lets users post questions to the community,search for and view articles, collaborate, and contact support agents by creating cases.Supports Knowledge, Chatter Questions, and cases.
AlohaA configurable App Launcher template that lets users quickly find applications and access them using single sign-on authentication,including social logins.
Salesforce Tabs + VisualforceStandard Salesforce structure and tabs that you can customize using Visualforce. Allows full platform access with an extremelyflexible configuration. Requires developer experience and advanced setup skills. Supports most standard objects, custom objects,and Salesforce1. Keep in mind that the Salesforce Tabs + Visualforce template doesn’t work with Community Builder.
3. Select the template that you want to use.
4. Read the template description and key features, and click Get Started.
5. If you selected Koa or Kokua, specify the categories and Company Name for your template, then click Next.
Data Category Group NameThis is the unique name of the data category group that contains the data categories for your site. The name reflects the hierarchyof categories that you’ve set up for your community and is used throughout the site to organize articles.
Top Level CategoryThis is the highest-level category that you want to display. Only the children of this category appear in the community. You canhave several nested layers of categories above this category, but the page will show this category as the parent and show itssubcategories as children.
Company NameThis is the name of your company as you want it to appear in the community header.
17
Create CommunitiesSet Up Your First Community
6. Enter a community name.
Note: If you’re creating multiple communities, keep in mind that community names may be truncated in the global headerdrop-down menu. Users can see up to 32 characters of the name, and the Preview and Inactive status indicatorscount toward that number. Make sure that the visible part of the name is distinctive enough for users to distinguish betweenmultiple communities.
7. Enter a unique value at the end of the URL field.
This value is appended to the domain you entered when enabling communities to create a unique URL for this community. Forexample, if your domain is UniversalTelco.force.com and you’re creating a customer community, you can designatethe URL as UniversalTelco.force.com/customers.
Note: You can create one community in your organization that doesn’t have a custom URL.
You can change your community name and URL after the community is activated, but users won’t be redirected to the newURL. If these changes are necessary, be sure to inform your community members before making the change.
8. Click Create.The community is created in Preview status.
9. On the confirmation page, click Build & Customize to customize and build your community with Community Builder. Or clickManage & Moderate to go to Community Management to set topics, install community dashboards, or configure your community’ssettings.
When you create a community, default pages for login, self-registration, change password, forgot password, and your home page areset based on your community template. You can customize or change these default pages at any time in Community Management.
Important: After you create a community, your profile is automatically added to the list of profiles that have access. As a result,all users in your organization with this profile can log in to the community once it’s Active. If you don’t want all users with yourprofile to have access to the community, you can remove the profile and give yourself access through a different profile or permissionset.
Communities Statuses
EDITIONS
Available in: SalesforceClassic
Available in: Enterprise,Performance, Unlimited,and Developer Editions
Communities can have one of the following statuses.
DescriptionStatus
Customization of the community isn’t complete, and the community has neverbeen activated. Once you activate a community, you can’t go back to Previewstatus.
Users with “Create and Set Up Communities” can access communities in Previewstatus if their profile or permission set is associated with the community. They canalso share a link to these communities with users whose profiles or permission sets
Preview
are associated with the community. The link for sharing a Preview communityis located on the Community Management page.
No welcome emails are sent even if Send welcome email is selected.
Note: If your organization’s access to Communities is suspended fornon-payment of fees due, all of your communities are deactivated, includingthose in Preview status. When Communities is enabled again, all
18
Communities StatusesSet Up Your First Community
DescriptionStatus
communities are in Inactive status. You can activate these communities, but can’t return them toPreview status.
The community was previously Active but was deactivated.
You may want to deactivate a community if you need to:
Inactive
• Add or remove members
• Add, remove, or change the order of tabs
• Change the color scheme
• Change the community URL
When you deactivate a community , it no longer appears in the drop-down menu. Users with “Create and Set UpCommunities” can still access the setup for Inactive communities regardless of membership. If members tryto access Inactive communities using a direct link, they see an error page.
The community is active and available to members.
Welcome emails are sent to new members if Send welcome email is selected.
Active
Add Members to Your Community
EDITIONS
Available in: SalesforceClassic
Available in: Enterprise,Performance, Unlimited,and Developer Editions
USER PERMISSIONS
To create, customize, oractivate a community:• “Create and Set Up
Communities”
AND
Is a member of thecommunity whoseCommunityManagement pagethey’re trying to access.
Use profiles and permission sets to manage community membership during the setup process.
Using profiles and permission sets, you can:
• Grant or remove access for groups of users. Once you add a profile or permission set, all usersassigned to that profile or permission set become members of the community.
• Enforce a membership policy. New users added to a profile or permission set that is alreadyassociated with a community automatically gain access.
Permission sets allow added flexibility for adding members. You can grant community access to asubset of users from the same profile, without needing to clone the profile.
Standard, Chatter, and portal profiles can be added to communities; Chatter customers, from privategroups with customers, can’t be added to communities even if they’re assigned permission setsthat are associated with communities.
Note: Profiles and permission sets associated with communities can’t be deleted fromSalesforce. You must remove the profiles or permission sets from the communities first.
1. Access Community Management in one of the following ways.
• From the community:
– In Salesforce Tabs + Visualforce communities, click in the global header.
– In Community Builder-based communities, use the drop-down menu next to yourname and click Community Management.
• From Setup, enter All Communities in the Quick Find box, then select AllCommunities and click the Manage link next to a community.
19
Add Members to Your CommunitySet Up Your First Community
• From Community Builder, in the header, use the drop-down menu next to the name of your template and click CommunityManagement.
2. Click AdministrationMembers.
3. To add members using profiles:
a. To filter profiles, select a profile type from the drop-down menu. To search for a specific profile, enter a search term and clickFind.
Search returns profiles for the selected filter.
Note: Search results include profiles that are already part of the community.
b. Select the user profiles you want to allow access to your community. Press CTRL to select multiple profiles.
c. Click Add. To remove a profile, select it and click Remove.
If you remove a profile from a community, users with that profile lose access to the community, unless the users are assignedpermission sets or other profiles that are still part of the community. Their posts and comments still appear.
Important: If you’re an administrator and accidentally remove yourself from a community, you can’t access theAdministration settings in Community Management. To add yourself back to the community or make other membershipupdates, use the API.
4. To add members using permission sets:
a. To search for a specific permission set, enter a search term and click Find.
b. Select the permission sets you want to allow access to your community. Press CTRL to select multiple permission sets.
c. Click Add.
If you remove a permission set from a community, users with that permission set lose access to the community, unless the usersare associated with profiles or other permission sets that are still part of the community. Their posts and comments still appeareven after they lose access.
5. Click Save.
If the community is Active and welcome emails are enabled, users with the profiles or permission sets you added receive awelcome email. The welcome email includes a username and a change password link if it is sent to an external user who hasn’tlogged in to a portal or community yet.
When the community is Active, welcome emails are sent and the community is discoverable by members. When a community is inPreview status, only members with the login URL can view the community. If a community is Inactive, only users with the“Create and Set Up Communities“ permission can access it through the Community menu, regardless of membership.
There are additional options for granting access to your community:
• Enable self-registration so that external users can register on their own
• Enable authentication providers, such as Facebook, so that external users can log into the community without creating an account
For more information about these additional options, see Customize Login, Logout, and Self-Registration Pages in Your Community.
How do I update community membership using the API?If you aren’t a member of a community, you can’t access Community Management to update administration settings, includingmembership. As an alternative, you can use the API and Data Loader to add yourself and others to a community.
20
How do I update community membership using the API?Set Up Your First Community
Tip: You can also use other data loaders to update your community membership such as Workbench.
1. Get the networkId for your community.
From Setup, enter All Communities in the Quick Find box, select All Communities, and then right-click your communityURL and select Inspect. The data-networkId property provides your networkId.
2. Get the profileId or permissionsetId you want to add.
From Setup, enter Profiles in the Quick Find box, then select Profiles or Permission Sets. Click on the profile or permissionset that you want to add. The ID is the last part of the URL.
For example, at mycompany.salesforce.com/00aa11bb22, the ID is 00aa11bb22.
3. Create a .csv file with columns for networkId and parentId. For parentId, list the profileId or permissionsetIdyou want to add.
4. Open Data Loader and select the Network Member Group object. Specify the location of the .csv file you created and completethe Data Loader steps.
Once you have successfully added members using Data Loader, the members will be able to access Community Management from theManage link on the All Communities page in Setup.
Note: In order to access Community Management, the member must also have “Create and Set Up Communities” or “ManageCommunities” permission.
Add Tabs to Your Community
EDITIONS
Available in: SalesforceClassic
Available in: Enterprise,Performance, Unlimited,and Developer Editions
USER PERMISSIONS
To create, customize, oractivate a community:• “Create and Set Up
Communities”
AND
Is a member of thecommunity whoseCommunityManagement pagethey’re trying to access.
If you’re using the Salesforce Tabs + Visualforce template, you can add tabs to your community.
Tip: If you want to use all custom pages in your community, you can choose to hide tabs.Not sure which option works best for you? Check out Tabs vs. Community Builder on page22.
Before you begin, keep these things in mind:
• The tabs you enable should be required for the type of activity you’re performing in thiscommunity, whether it be sharing accounts and opportunities with your partners or sharingcases and solutions with customers who need support. Don’t clutter your community with tabsthat users don’t need.
• Profiles control access to tabs, so some tabs you choose may be hidden for profiles associatedwith the community. In that case, you must manually expose the tabs in the profiles for yourcommunity members so that they can see the tabs in the community.
• Lightning Component tabs aren’t supported in Communities.
• Chatter Free users in your community don’t see any tabs except the Chatter tab.
After you identify the features you want your community members to see, you can expose thosefeatures by choosing the corresponding tabs during setup. The tabs that you select also determinecommunity navigation in Salesforce1.
1. Access Community Management in one of the following ways.
• From the community:
– In Salesforce Tabs + Visualforce communities, click in the global header.
– In Community Builder-based communities, use the drop-down menu next to your name and click Community Management.
21
Add Tabs to Your CommunitySet Up Your First Community
• From Setup, enter All Communities in the Quick Find box, then select All Communities and click the Manage link nextto a community.
• From Community Builder, in the header, use the drop-down menu next to the name of your template and click CommunityManagement.
2. Click AdministrationTabs.
Tip: If you’re using one of the preconfigured templates instead of Salesforce Tabs + Visualforce, the Tabs page is hidden bydefault. To display the page, click AdministrationPreferences, then select Show all settings in Community Management.
3. Select the tabs to include in your community from the Available Tabs list. Press CTRL to select multiple tabs.
4. Click Add to add the tab. To remove a tab, select it in the Selected Tabs list and click Remove.
5. Click Up or Down to change the order that the tabs display.
The tab at the top of the list is the landing tab for the community. When members access the community, it is the first tab they see.
If members don't have access to the community landing tab, they see the first tab they have access to from the selected communitytabs. If they don’t have access to any of the tabs, they see the Home tab.
6. Click Save.
Important: Changing from the Salesforce Tabs + Visualforce template to a Community Builder-based template removes all tabsfrom your community.
Tabs vs. Community BuilderNot sure whether to use standard Salesforce tabs or the Community Builder when setting up your community? Here is some moreinformation about each option to help you decide.
TabsSelecting the Salesforce Tabs + Visualforce template when creating your community means you will use out-of-the-box Salesforce tabsor Visualforce pages.
Pros
• Some theming options available out-of-the-box for tabs
• Support for all sales, service, marketing, and platform features
• Full Force.com platform capability
Cons
• Visualforce is the preferred approach for better customization, yet Visualforce requires coding capability
• Requires some knowledge of the Force.com platform
Community BuilderSelecting one of the preconfigured templates when creating your community means that you will use the WYSIWYG user interface ofthe Community Builder.
Pros
• Out-of-box app targeted at self-service communities
• More CSS styles available
22
Tabs vs. Community BuilderSet Up Your First Community

• Great for a quick rollout of simple self-service community use case
Cons
• Limited to self-service functionality (cases, Salesforce Knowledge, and Chatter Questions)
• Doesn’t support other sales, service, or platform use cases
• Doesn’t have full platform capability
Choose a Landing TabIf you are using the Salesforce Tabs + Visualforce template, you can select a landing tab for your community. In CommunityManagement > Administration > Tabs, the first tab in Selected Tabs list is the landing page.
There are multiple options for the landing tab in your community, and you should select the one that best meets members’ needs.
• Chatter tab—If you select this tab, the feed is the first thing members see when they log in. This option is good for communitieswhere people will spend a lot of time in Chatter and won’t need a customized home page with additional components. You canalso rename the Chatter tab.
• Home tab—If you select this tab, the Salesforce Home tab for your organization is the first thing members see when they log in.The components that display on the tab were added in the Home Page by your administrator. This is a good option if you’re notusing Chatter or don’t want a feed-based home page view.
• Custom Visualforce tab—Selecting this option allows you to build a completely custom landing page.
Brand Your Community
EDITIONS
Available in: SalesforceClassic
Available in: Enterprise,Performance, Unlimited,and Developer Editions
USER PERMISSIONS
To create, customize, oractivate a community:• “Create and Set Up
Communities”
AND
Is a member of thecommunity whoseCommunityManagement pagethey’re trying to access.
If you are using the Salesforce Tabs + Visualforce template, you can customize the look and feel ofyour community in Community Management by adding your company logo, colors, and copyright.This ensures that your community matches your company’s branding and is instantly recognizableto your community members.
Important: If you are using a self-service template or choose to use the Community Builderto create custom pages instead of using standard Salesforce tabs, you can use the CommunityBuilder to design your community’s branding too.
1. Access Community Management in one of the following ways.
• From the community:
– In Salesforce Tabs + Visualforce communities, click in the global header.
– In Community Builder-based communities, use the drop-down menu next to yourname and click Community Management.
• From Setup, enter All Communities in the Quick Find box, then select AllCommunities and click the Manage link next to a community.
• From Community Builder, in the header, use the drop-down menu next to the name ofyour template and click Community Management.
2. Click AdministrationBranding.
3. Use the lookups to choose a header and footer for the community.
The files you’re choosing for header and footer must have been previously uploaded to theDocuments tab and must be publicly available. The header can be .html, .gif, .jpg, or .png. The footer must be an .html file. The
23
Choose a Landing TabSet Up Your First Community
maximum file size for .html files is 100 KB combined. The maximum file size for .gif, .jpg, or .png files is 20 KB. So, if you have a header.html file that is 70 KB and you want to use an .html file for the footer as well, it can only be 30 KB.
The header you choose replaces the Salesforce logo below the global header. The footer you choose replaces the standard Salesforcecopyright and privacy footer.
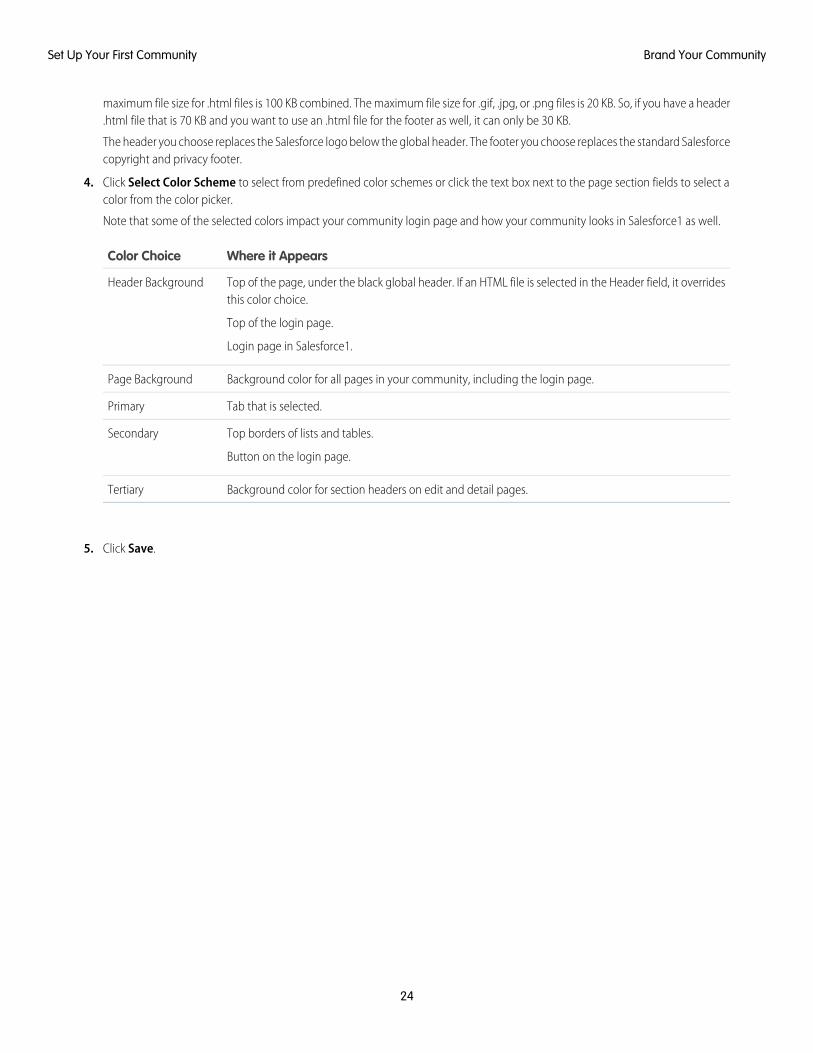
4. Click Select Color Scheme to select from predefined color schemes or click the text box next to the page section fields to select acolor from the color picker.
Note that some of the selected colors impact your community login page and how your community looks in Salesforce1 as well.
Where it AppearsColor Choice
Top of the page, under the black global header. If an HTML file is selected in the Header field, it overridesthis color choice.
Top of the login page.
Header Background
Login page in Salesforce1.
Background color for all pages in your community, including the login page.Page Background
Tab that is selected.Primary
Top borders of lists and tables.
Button on the login page.
Secondary
Background color for section headers on edit and detail pages.Tertiary
5. Click Save.
24
Brand Your CommunitySet Up Your First Community
Customize Login, Logout, and Self-Registration Pages in YourCommunity
EDITIONS
Available in: SalesforceClassic
Available in: Enterprise,Performance, Unlimited,and Developer Editions
USER PERMISSIONS
To create, customize, oractivate a community:• “Create and Set Up
Communities”
AND
Is a member of thecommunity whoseCommunityManagement pagethey’re trying to access.
Configure the standard login, logout, password management, and self-registration options for yourcommunity, or customize the behavior with Apex and Visualforce or Community Builder (Site.comStudio) pages.
By default, each community comes with default login, password management, and self-registrationpages and associated Apex controllers that drive this functionality under the hood. You can useVisualforce, Apex, or Community Builder (Site.com Studio) to create custom branding and changethe default behavior:
• Customize the branding of the default login page.
• Customize the login experience by modifying the default login page behavior, using a customlogin page, and supporting other authentication providers.
• Redirect users to a different URL on logout.
• Use custom Change Password and Forgot Password pages
• Set up self-registration for unlicensed guest users in your community.
Brand Your Community’s Login Page
EDITIONS
Available in: SalesforceClassic
Available in: Enterprise,Performance, Unlimited,and Developer Editions
USER PERMISSIONS
To create, customize, oractivate a community:• “Create and Set Up
Communities”
AND
Is a member of thecommunity whoseCommunityManagement pagethey’re trying to access.
If you selected the Salesforce Tabs + Visualforce template, you can add your company logo andcustom footer text to the standard login page that comes out-of-the-box with your community.
The header and page background colors used on the standard login page are inherited from thecommunity’s branding color scheme.
1. Access Community Management in one of the following ways.
• From the community:
– In Salesforce Tabs + Visualforce communities, click in the global header.
– In Community Builder-based communities, use the drop-down menu next to yourname and click Community Management.
• From Setup, enter All Communities in the Quick Find box, then select AllCommunities and click the Manage link next to a community.
• From Community Builder, in the header, use the drop-down menu next to the name ofyour template and click Community Management.
2. Click AdministrationLogin & Registration and make your changes in the Header and Footersection.
3. Upload a logo for the community login page header.
25
Customize Login, Logout, and Self-Registration Pages in YourCommunity
Set Up Your First Community

The file can be .gif, .jpg, or .png. The maximum file size is 100 KB. Images larger than 250 pixels wide or 125 pixels high aren’t accepted.Uploading a logo automatically creates a Communities Shared Document Folder on the Documents tab and saves the logo there.Once created, you can’t delete the folder.
The header logo displays at the top left of the standard login page. It is also used when you access the community in Salesforce1.The header logo doesn’t appear on custom login pages.
4. Enter custom text for the community login page footer, up to a maximum of 120 characters.
The footer displays at the bottom of the login page. This footer text doesn’t display on custom login pages.
5. Click Save.
The logo and custom footer text display to all users (internal, external, and unlicensed guest users) on the login page.
Customize Your Community’s Login Experience
EDITIONS
Available in: SalesforceClassic
Available in: Enterprise,Performance, Unlimited,and Developer Editions
USER PERMISSIONS
To create, customize, oractivate a community:• “Create and Set Up
Communities”
AND
Is a member of thecommunity whoseCommunityManagement pagethey’re trying to access.
Customize the default login process for external users in your community. You can also use a customCommunity Builder, Site.com Studio, or Visualforce login page, support multiple authenticationproviders, and configure single sign-on with any template.
External users are users with Community, Customer Portal, or partner portal licenses.
• The login page you select in Community Management overrides other login page assignmentsin the Site.com or Force.com site settings.
• If your community uses the Salesforce Tabs + Visualforce template, the login page assigned tothe community by default is called CommunitiesLogin. Use Visualforce to customize theappearance of this page.
• If your community uses the Customer Service (Napili) template, the login page assigned to thecommunity by default is called login. Use Community Builder (Site.com Studio) to customizeits appearance.
• To update the login behavior for both Visualforce and Community Builder pages, update theCommunitiesLoginController Apex controller.
• You must publish custom Community Builder pages before they can be assigned to acommunity. Before you use your custome login page, remember to modify theCommunitiesLoginController Apex controller and the Site.login() Apexmethod.
1. Access Community Management in one of the following ways.
• From the community:
– In Salesforce Tabs + Visualforce communities, click in the global header.
– In Community Builder-based communities, use the drop-down menu next to your name and click Community Management.
• From Setup, enter All Communities in the Quick Find box, then select All Communities and click the Manage link nextto a community.
• From Community Builder, in the header, use the drop-down menu next to the name of your template and click CommunityManagement.
2. Click AdministrationLogin & Registration and make your changes under the Login section.
3. Optionally, choose a custom login page for your community. Select the page type (Community Builder or Visualforce), enter the
name of the page in the search field, and click . In the search results window, click the name of the page to select it.
26
Customize Your Community’s Login ExperienceSet Up Your First Community
Tip: To revert to the default login page for your community’s template, select Default Page.
4. Optionally, select Allow internal users to log in directly to the community. This setting allows yourinternal users to use their internal username and password on the community login page.
Internal users must be members of the community to log in directly from the community login page. After your internal users login, they land on the community home page.
5. Select which login options you want to display.
By default, users log in to the community using the default community username and password. If you want to allow them to login with other credentials, such as their Facebook©, Janrain©, or Salesforce credentials from another organization, select those fromthe list.
Important: Configure these authentication provider options in advance to be able to use them for community logins. FromSetup, enter Auth. Providers in the Quick Find box, then select Auth. Providers.
6. Optionally, allow external users to log in with their SAML single-sign on identity.
This option is available only if your organization has successfully set up SAML for your community on page 119 including:
• SAML settings for single sign-on, which enables login to Salesforce using your corporate identity provider. Note that you mustenter an Identity Provider Login URL.
• A custom domain name, which changes the application URLs for all your pages, including login pages. Contact Support if youwant to enable My Domain.
To offer multiple SAML single sign-on options, enter Single Sign-On Settings in the Quick Find box, select SingleSign-On Settings, and then click Enable Multiple Configs. If you already had SAML enabled, and you then enable multiple SAMLconfigurations, your existing SAML configuration is automatically converted to work with multiple configurations.
Users see the option to Log In with Single Sign-On. If you have enabled multiple SAML single sign-on options, each login buttondisplays labeled with the SAML configuration’s Name field.
7. Click Save.
Note: Renaming or deleting the default login page can cause problems with the default community login flow.
Customize the Login Process with Apex
USER PERMISSIONS
To create and editVisualforce pages:• “Customize Application”
To edit Apex classes:• “Author Apex”
AND
“Customize Application”
You can provide community members outside your company with a completely custom login pagethat reflects your organization’s style and branding. Use Visualforce and Apex to either customizethe CommunitiesLogin page and CommunitiesLoginController, or create yourown Visualforce page.
To redirect from the default community login page to your custom login page:
1. From Setup, enter Apex Classes in the Quick Find box, then select Apex Classes.
2. Click Edit next to CommunitiesLoginController.
3. Add the following code:
global PageReference forwardToCustomAuthPage() {String startUrl = System.currentPageReference().getParameters().get('startURL');
return new PageReference(Site.getPathPrefix() + '/SiteLogin?startURL=' +
27
Customize Your Community’s Login ExperienceSet Up Your First Community
EncodingUtil.urlEncode(startURL, 'UTF-8'));}
4. If you created a completely custom login page, replace SiteLogin with the name of your Visualforce page.
5. Click Save.
6. Click Edit next to CommunitiesLandingController.
7. Add the following code:
public PageReference forwardToCustomAuthPage() {String startUrl = System.currentPageReference().getParameters().get('startURL');
return new PageReference(Site.getPathPrefix() + '/SiteLogin?startURL=' +EncodingUtil.urlEncode(startURL, 'UTF-8'));
}
8. If you created a completely custom login page, replace SiteLogin with the name of your Visualforce page.
9. Click Save.
10. From Setup, enter Visualforce Pages in the Quick Find box, then select Visualforce Pages.
11. Click Edit next to CommunitiesLogin.
12. In the first line of code, add the following:
action="{!forwardToCustomAuthPage}"
13. Click Save.
14. Click Edit next to CommunitiesLanding.
15. In the first line of code, add the following:
action="{!forwardToCustomAuthPage}"
16. Click Save.
28
Customize Your Community’s Login ExperienceSet Up Your First Community
Redirect Community Members to a Custom URL on Logout
EDITIONS
Available in: SalesforceClassic
Available in: Enterprise,Performance, Unlimited,and Developer Editions
USER PERMISSIONS
To create, customize, oractivate a community:• “Create and Set Up
Communities”
AND
Is a member of thecommunity whoseCommunityManagement pagethey’re trying to access.
Specify the URL that community members should be redirected to when they log out from yourcommunity.
When community members log out, they are taken to the community login page by default. Youcan choose to point them to a different location, such as your company web site for example.
1. Access Community Management in one of the following ways.
• From the community:
– In Salesforce Tabs + Visualforce communities, click in the global header.
– In Community Builder-based communities, use the drop-down menu next to yourname and click Community Management.
• From Setup, enter All Communities in the Quick Find box, then select AllCommunities and click the Manage link next to a community.
• From Community Builder, in the header, use the drop-down menu next to the name ofyour template and click Community Management.
2. Click AdministrationLogin & Registration.
3. In the Logout section, enter the URL you want to redirect community members to.
4. Click Save.
Use Custom Change Password and Forgot Password Pages in YourCommunity
EDITIONS
Available in: SalesforceClassic
Available in: Enterprise,Performance, Unlimited,and Developer Editions
USER PERMISSIONS
To create, customize, oractivate a community:• “Create and Set Up
Communities”
AND
Is a member of thecommunity whoseCommunityManagement pagethey’re trying to access.
Use a custom Community Builder or Visualforce page instead of the default Change Password andForgot Password pages.
The Forgot Password page can be customized in Community Builder or Visualforce. If you want touse a custom Community Builder Forgot Password page, first publish your page in CommunityBuilder.
The Change Password page can only be customized in Visualforce.
1. Access Community Management in one of the following ways.
• From the community:
– In Salesforce Tabs + Visualforce communities, click in the global header.
– In Community Builder-based communities, use the drop-down menu next to yourname and click Community Management.
• From Setup, enter All Communities in the Quick Find box, then select AllCommunities and click the Manage link next to a community.
• From Community Builder, in the header, use the drop-down menu next to the name ofyour template and click Community Management.
2. Click AdministrationLogin & Registration.
3. In the password section, select the Page Type: Community Builder or Visualforce.
29
Redirect Community Members to a Custom URL on LogoutSet Up Your First Community
4. Enter the name of the page or leave the field blank to search for all available pages.
5.Click , then click the name of the page in the search results to select it.
6. Click Save.
To revert to the default login page for your community’s template, select Default Page as the page type.
Set Up Self-Registration for Your Community
EDITIONS
Available in: SalesforceClassic
Available in: Enterprise,Performance, Unlimited,and Developer Editions
USER PERMISSIONS
To create, customize, oractivate a community:• “Create and Set Up
Communities”
AND
Is a member of thecommunity whoseCommunityManagement pagethey’re trying to access.
Enable self-registration to allow unlicensed guest users to join your community. You can chooseto save them as contacts under a business account or create a person account for each self-registeringuser.
When you enable self-registration, these Visualforce pages and Apex controllers are associated withyour community.
• CommunitiesSelfReg page and CommunitiesSelfRegController—Providethe form for partners or customers so they can register with your community. You can modifythe CommunitiesSelfRegController Apex controller to change the defaultself-registration process, but it is no longer required starting with the Spring ’15 release.
Note: Apex customizations for the self-registration process take precedence over thedefaults specified in Community Management. In organizations created prior to the Spring’15 release, existing Apex customizations for self-registration remain in effect as before.
• CommunitiesSelfRegConfirm page andCommunitiesSelfRegConfirmController—If a user doesn’t create a passwordduring self-registration—either because they left the password field blank or your organizationcustomized the self-registration form to omit the password field—this page confirms that apassword reset email has been sent. Users landing on this page can’t log in until they reset theirpassword.
The default self-registration pages and controllers are shared by all of your organization’scommunities. If you enable self-registration for multiple communities, you must further customizethe self-registration experience to direct users to different pages, assign different profiles orpermission sets for different communities, and so on.
Note: Renaming or deleting the default self-registration page can cause problems with the default self-registration flow.
1. Access Community Management in one of the following ways.
• From the community:
– In Salesforce Tabs + Visualforce communities, click in the global header.
– In Community Builder-based communities, use the drop-down menu next to your name and click Community Management.
• From Setup, enter All Communities in the Quick Find box, then select All Communities and click the Manage link nextto a community.
• From Community Builder, in the header, use the drop-down menu next to the name of your template and click CommunityManagement.
2. Click AdministrationLogin & Registration.
3. In the Registration section, select Allow external users to self-register.
30
Set Up Self-Registration for Your CommunitySet Up Your First Community
4. Optionally, choose a custom self-registration page for your community. Select the page type (Community Builder or Visualforce),
enter the name of the page in the search field, and click . In the search results window, click the name of the page to select it.To revert to the default self-registration page (CommunitiesSelfReg), select Default Page.
Community Builder pages must be published, else they aren’t included in the page lookup search results. Remember to modify theself-registration CommunitiesSelfRegController and CommunitiesSelfRegConfirmController Apexcontrollers if you use a custom page.
5. Select the default Profile to assign to self-registering users.
Note: You can only select portal profiles that are associated with the community. If a profile is selected as the default for userswho self-register, and you remove it from the community, the self-registration Profile is automatically reset to None.
6. Select the business Account that you want to assign self-registering users to.
The self-registering user is assigned as a contact of the account you specify. To create a person account (if enabled) for eachself-registering user, leave this field blank.
Ensure that the account you use is enabled as a partner. To do so, go to the account, click Manage External Account, then clickEnable as Partner.
7. Click Save.
After you set up self-registration, a Not a member? link directs external users to the self-registration page from the login page. Whena user self-registers to join your community:
• Salesforce creates a new user record with the information they provide on the self-registration page.
• The user is assigned the profile you specified when you set up self-registration.
• The user is associated with a business account or a person account, depending on how you set it up.
• Customer Community Plus and Partner Community licenses require user records to be associated with a role in your organization.If you don’t specify a role in the default self-registration profile, Salesforce assigns them the Worker role.
Note: Keep in mind that each time a user self-registers, they consume one of your Communities licenses. When setting up yourself-registration page, be sure to add some criteria to ensure that the right people are signing up. Additionally, to preventunauthorized form submissions, we recommend using a security mechanism, such as CAPTCHA or a hidden field, on yourself-registration page.
Customize the Community Self-Registration Process with ApexUpdate the CommunitiesSelfRegController to customize the default self-registration process for your community. You canuse the same controller for the default self-registration page (CommunitiesSelfReg) or a custom Visualforce or Community Builderself-registration page.
You can configure self-registration entirely in Community Management. This customization is recommended only if you want to modifythe self-registration behavior beyond the defaults, if you have more then one community in your organization, or if you are using acustom self-registration page.
Note: You can add, edit, or delete Apex using the Salesforce user interface only in a Developer Edition organization, a SalesforceEnterprise Edition trial organization, or sandbox organization. In a Salesforce production organization, you can only make changesto Apex by using the Metadata API deploy call, the Force.com IDE, or the Force.com Migration Tool. The Force.com IDE andForce.com Migration Tool are free resources provided by Salesforce to support its users and partners, but are not considered partof our Services for purposes of the Salesforce Master Subscription Agreement.
1. From Setup, enter Apex Classes in the Quick Find box, then select Apex Classes.
2. Click Edit next to CommunitiesSelfRegController.
31
Set Up Self-Registration for Your CommunitySet Up Your First Community
3. Optionally, enter a value for ProfileId to define the type of profile the user should be assigned.
If you selected a default profile while setting up self-registration in Community Management, the value in the Apex code will overridethat default.
Note: Note that regardless of which role you enter for the roleEnum, the role for new users will default to None. Once auser self-registers, you can update their role on the user detail page.
4. Enter the account ID for the partner or customer account that users who self register should be associated with.
If you selected a default account while setting up self-registration in Community Management, the value in the Apex code willoverride that default.
Ensure that the account you use is enabled as a partner. To do so, go to the account, click Manage External Account, then clickEnable as Partner.
5. If you’re enabling self-registration for multiple communities, add code to create appropriate types of users for each community, thatis, assigning the correct profile, role, and account ID per community.
6. Click Save.
7. Enable access to accounts and contacts for the guest profile. The guest profile is automatically associated with your community’sForce.com site.
a. From Setup, enter All Communities in the Quick Find box, then select All Communities and click the Manage link nextto a community.
b. From Community Management click AdministrationPages > Go to Force.com..
c. Click Public Access Settings.
d. Click Edit.
e. In the Standard Object Permissions section, select Read and Create next to Accounts and Contacts.
f. Click Save.
g. In the Enabled Apex Class Access related list, click Edit.
h. Add the CommunitiesSelfRegController and click Save.
i. In the Enabled Visualforce Page Access related list, click Edit.
j. Add the CommunitiesSelfReg and click Save.
8. Optionally, if you want to customize the contents of the default self-registration page, edit the CommunitiesSelfReg page.
a. From Setup, enter Visualforce Pages in the Quick Find box, then select Visualforce Pages.
b. Click Edit next to CommunitiesSelfReg.
c. Add code to customize the fields required for self-registration or the page’s look and feel.
In the default form, all fields except Password are required.
d. Click Save.
Once setup is complete, external users who submit the completed self-registration form (including a password) are logged in to thecommunity.
Note: If a user self-registers for a community with Chatter Answers enabled, the Chatter Answers User permission is not automaticallyset for the user.
32
Set Up Self-Registration for Your CommunitySet Up Your First Community
If you’re using a custom Visualforce self-registration page instead of the default CommunitiesSelfReg page, add the followingcode to CommunitiesSelfRegController. Replace CommunitiesCustomSelfRegPage with the name of the customself-registration page.Then add this to the first line of code in the CommunitiesSelfReg page.
Create Person Accounts for Self-Registering Users
EDITIONS
Available in: SalesforceClassic
Available in: Enterprise,Performance, Unlimited,and Developer Editions
If your business deals mostly with individuals, instead of creating them as contacts under a singlebusiness account, you can assign each self-registering user to a person account.
Important: You must have Person Accounts enabled in your organization. Only CustomerCommunity and Customer Community Plus licenses support the creation of person accounts.
In Community Management, under AdministrationLogin & Registration, enable self-registrationand leave the Account field blank. Specify a default profile to assign self-registering users to.
Salesforce creates separate person accounts for each self-registering user. Each user is assigned thedefault profile you specified while setting up self-registration, and a default role. If you don’t specifya role, either on the profile or via the self-registration Apex controller, Salesforce assigns the Worker role to the self-registering users.You can further customize this functionality by using the self-registration Apex controller (CommunitiesSelfRegController),but it’s not required.
You can also manually create person accounts and assign them to community users with Customer Community and Customer CommunityPlus licenses.
Customize Email Sent from Communities
EDITIONS
Available in: SalesforceClassic
Available in: Enterprise,Performance, Unlimited,and Developer Editions
USER PERMISSIONS
To create, customize, oractivate a community:• “Create and Set Up
Communities”
AND
Is a member of thecommunity whoseCommunityManagement pagethey’re trying to access.
You can customize email sender information, Chatter email branding, and templates in yourcommunity emails. You can perform customizations in either the user interface or the Networkobject in Salesforce APIs.
1. Access Community Management in one of the following ways.
• From the community:
– In Salesforce Tabs + Visualforce communities, click in the global header.
– In Community Builder-based communities, use the drop-down menu next to yourname and click Community Management.
• From Setup, enter All Communities in the Quick Find box, then select AllCommunities and click the Manage link next to a community.
• From Community Builder, in the header, use the drop-down menu next to the name ofyour template and click Community Management.
2. Click AdministrationEmails.
3. Enter custom values for the email sender’s name and address to replace the default values.
Note: If you change the sender’s email address, we send a verification email to the newaddress. The change is pending, and we continue to use the existing address while weawait verification. The requested address doesn’t take effect until you click the confirmationlink in the email. If verification is already pending for a new email address and you specifya different new address, we retain the latest value and use that for verification.
If you enter a custom value for the sender’s address and you have enabled mail relay, your Chatter emails will use the relay.
33
Create Person Accounts for Self-Registering UsersSet Up Your First Community
4. Customize what displays in the footer of Chatter emails.
Important: Both a logo and email footer text are required. Keep in mind that:
• All Chatter emails display the Chatter logo and Salesforce information by default unless you replace them with yourorganization’s own logo and information.
• If you previously customized the logo or footer text and want to restore the default values, use the API to set these fieldsto null.
a. Choose a logo to replace the default Chatter logo.
The logo must be an existing document in the Documents tab and must be marked Externally Available Image.Images with a maximum size of 150 x 50 pixels on a transparent background work best.
b. Enter custom text to replace the default footer text, up to a maximum of 1,000 characters.
The default text includes Salesforce’s name and physical address. We strongly recommend including your organization’s physicaladdress to comply with applicable anti-spam laws.
5. Select Send welcome email to send email to users when they’re added to the community.
Important: Welcome emails contain login information for external members. If you don’t select this option, you’ll have tomanually send external members their usernames and passwords.
The link provided in the welcome email is valid for 6 months.
Welcome emails are sent when:
• A community changes from Preview status to Active status. Emails are not sent when a community is in Preview orInactive status.
• An administrator adds a new profile or permission set to a Active community.
• A user is assigned a profile or permission set that is part of a Active community.
Note: If a profile or permission set is part of multiple communities, users with that profile or permission set receive a welcomeemail from each community. The first email contains login credentials, but emails from subsequent communities simply containa link to the community.
6. Use the default email templates or use the lookups to select different templates for welcome emails to new community members,forgotten password emails, and notification emails about reset passwords. If your organization uses email templates to submit casecomments, you can select a template (none is provided by default).
User-initiated password reset links expire in 24 hours. Administrator-initiated password reset links don’t expire. You can customizeany default template.
Note: If you customize the contents of an email template, we recommend that you use the {!Community_Url} mergefield. This custom merge field populates the unique URL for a community, ensuring that emails to users contain URLs with thecorrect parameters and direct users to the appropriate community to log in or change a password.
7. Click Save.
Emails sent as a result of approvals, workflows, and case comments are sent based on community membership. For example, if a workflowtriggers an email, all the recipients are grouped based on community membership and then one email is sent to each group. If the useris a member of multiple active communities, the email comes from the oldest active community.
Another way to customize community emails is to use these fields on the API Network object.
• CaseCommentEmailTemplateId—ID of the email template used when submitting a comment on a case.
34
Customize Email Sent from CommunitiesSet Up Your First Community
• ChangePasswordEmailTemplateId—ID of the email template used when notifying a user that their password has beenreset.
• EmailFooterLogoId—ID of the Document object that displays as an image in the footer of community Chatter emails.
• EmailFooterText—Text that displays in the footer of community Chatter emails.
• EmailSenderAddress—Read only. Email address from which community emails are sent.
• EmailSenderName—Name from which community emails are sent.
• ForgotPasswordEmailTemplateId—ID of the email template used when a user forgets their password.
• NewSenderAddress—Email address that has been entered as the new value for EmailSenderAddress but has not beenverified yet. After a user has requested to change the sender email address and has successfully responded to the verification email,the NewSenderAddress value overwrites the value in EmailSenderAddress. This becomes the email address from whichcommunity emails are sent.
– If verification is pending for a new email address and you set NewSenderAddress to null, this cancels the verificationrequest.
– NewSenderAddress is automatically set to null after EmailSenderAddress has been set to the new verified address.
– If verification is pending for a new email address and you specify a different new address for this field, only the latest value isretained and used for verification.
• OptionsSendWelcomeEmail—Determines whether a welcome email is sent when a new user is added to the community.
• WelcomeEmailTemplateId—ID of the email template used when sending welcome emails to new community members.
Determine User Visibility in Your Community
User sharing lets you decide whether all users in a community are visible to each other.
User sharing for external users is turned on by default when you enable Communities. This setting applies to all communities in yourorganization.
The default setting allows an external user to see other external users under the same account and users in common communities. Youcan change the organization-wide default for Users to make your communities more restrictive or open, depending on your use case.
If the you deselect Community User Visibility, external users can’t see each other. For example, John and Sally are external users. Johncan’t:
• Search for Sally
• Find Sally in the community People tab, even if Sally is a member of the community
• Add Sally to a group
• Share a file or record with Sally
If John and Sally are members of the same group or share the same record, then they can see each other’s conversations and updateswithin the group or on the record, but nowhere else.
If Sally belongs to the same account as John, and John has delegated external user administration privileges, then John can see Sally.Delegated External User Administration takes priority over user sharing.
Note: User sharing doesn’t apply to the Recently Viewed list on the People tab in Chatter or on user lookups. From that list, userscan view people they have viewed before, but who aren’t members of the community.
To view or change user sharing settings:
1. From Setup, enter Sharing Settings in the Quick Find box, then select Sharing Settings.
2. Click Edit in the Organization-Wide Defaults area.
35
Determine User Visibility in Your CommunitySet Up Your First Community
3. Deselect the Community User Visibility checkbox make external users visible only to themselves and their subordinates.
The setting applies to all communities in your organization.
4. Click Save.
For more information, on user sharing see the following topics in the Salesforce online help.
• Understanding User Sharing
• Controlling Who Community or Portal Users Can See
Show Nicknames Instead of Full Names in the Community
EDITIONS
Available in: SalesforceClassic
Available in: Enterprise,Performance, Unlimited,and Developer Editions
USER PERMISSIONS
To enable nickname display:• “Create and Set Up
Communities”
AND
Is a member of thecommunity whoseCommunityManagement pagethey’re trying to access.
Enabling nickname display in your community allows more privacy and protects member identities.This is especially helpful in a public community where unregistered visitors can access memberprofiles.
All users have nicknames by default, which they can modify by going to Your Name > EditContact Info in the global header or from their Chatter user profile.
1. Access Community Management in one of the following ways.
• From the community:
– In Salesforce Tabs + Visualforce communities, click in the global header.
– In Community Builder-based communities, use the drop-down menu next to yourname and click Community Management.
• From Setup, enter All Communities in the Quick Find box, then select AllCommunities and click the Manage link next to a community.
• From Community Builder, in the header, use the drop-down menu next to the name ofyour template and click Community Management.
2. Click AdministrationPreferences.
3. Select Enable nickname display, then click Save.
Nicknames are shown in place of first and last names in almost all locations in the community,including in feeds, list views, groups, search results, recommendations, and on user profiles andfiles. Additionally, Salesforce1 and any community sites activated using community templates show nicknames as well.
A few restrictions to keep in mind about nickname display:
• Private messages display full names. You can choose to turn off private messages to avoid this.
• Records and user lookups on records show full names. Keep in mind, though, that you can control record and user visibility withsharing rules.
• Mobile notifications in Salesforce1 show full names. You can turn off mobile notifications in Salesforce1 to avoid this.
• Searches by first, last, and full names aren’t restricted and return matches, but the search results display only nicknames. Theauto-complete recommendations in global search and the recent items list show any first, last, and full names that the user hasalready searched by or has accessed via a record or another location.
36
Show Nicknames Instead of Full Names in the CommunitySet Up Your First Community
Enable Public Access to a Community
EDITIONS
Available in: SalesforceClassic
Available in: Enterprise,Performance, Unlimited,and Developer Editions
USER PERMISSIONS
To enable public access tocommunity content:• “Create and Set Up
Communities”
AND
Is a member of thecommunity whoseCommunityManagement pagethey’re trying to access.
Enable access to communities for guest (unlicensed) users, without requiring them to log in orregister with the community.
Public communities lend themselves well to business-to-consumer (B2C) type scenarios and allowyou to reach a broader audience. Consider the example of a customer support community. Acommunity with public discussions, known issues, and solutions posted by other communitymembers or customer support allows existing and potential customers to view information withoutmaking costly support calls.
Public access to any community depends on the level of access you grant the guest user profile,enabling access to Chatter content via the API, and can also be controlled per page in CommunityBuilder.
Guest User Profiles
Whenever you make a community using the Community Creation wizard, Salesforce automaticallycreates a guest user profile for the community. To view or modify the guest user profile permissions,access the guest user profile in one of the following ways, and change its settings to open up orlimit access to your community.
• In Salesforce Tabs + Visualforce communities, access Community Management. From thedrop-down list, select Go to Force.com.
• In Community Builder-based templates, access Community Builder. Select the guest user profilename from Settings > General.
– If you have enabled profile-based rollout for Chatter in your organization, guest users can’taccess public communities until you enable Chatter access on the guest user profile. Formore information, see Control Chatter Access through User Profiles in the Salesforce Help.
– Also, page variations and page-level settings gate access to your community pages.
Enabling Public Access to Chatter Via the API
The following Lightning and Visualforce pages and components in communities need access to underlying Chatter capabilities to loadcorrectly for guest users.
• Case Feed
• Featured Topics & Feeds
• Feed
• Group
• Group Detail
• Headline
• Recommendations
• Record Information Tabs
• Related Lists
• Reputation
• Search & Post Publisher
To enable access to Chatter functionality, in Community Management:
1. Click AdministrationPreferences.
37
Enable Public Access to a CommunitySet Up Your First Community
2. Select Give access to public API requests on Chatter, then click Save.
Enabling public access via the guest user profile and the public API also allows you to expose groups, topics, user profiles, and feeds forguest users via Chatter in Apex. This is particularly helpful when you’re building your own community pages from scratch.
Use Custom Visualforce Error Pages for Authenticated Users
EDITIONS
Available in: SalesforceClassic
Available in: Enterprise,Performance, Unlimited,and Developer Editions
USER PERMISSIONS
To create, customize, oractivate a community:• “Create and Set Up
Communities”
AND
Is a member of thecommunity whoseCommunityManagement pagethey’re trying to access.
If you have customized Visualforce error pages, you can have those pages display for authenticatedcommunity users.
To assign or customize your Visualforce error pages, from Community Management, click theCommunity Management menu in the global header and select Go to Force.com. The Error Pagessection lists your current page selections.
When Use custom Visualforce error pages is selected, users who are logged in to the communitywill see your custom Visualforce error pages. When Use custom Visualforce error pages isn’tselected, users logged in to the community see the default Visualforce error pages. Guest userswho aren’t logged in to the community will always see the custom Visualforce error pages, regardlessof whether or not you select the checkbox.
1. Access Community Management in one of the following ways.
• From the community:
– In Salesforce Tabs + Visualforce communities, click in the global header.
– In Community Builder-based communities, use the drop-down menu next to yourname and click Community Management.
• From Setup, enter All Communities in the Quick Find box, then select AllCommunities and click the Manage link next to a community.
• From Community Builder, in the header, use the drop-down menu next to the name ofyour template and click Community Management.
2. Click AdministrationPreferences.
3. Select Use custom Visualforce error pages, then click Save.
38
Use Custom Visualforce Error Pages for Authenticated UsersSet Up Your First Community
Limit Files in Your Community
EDITIONS
Available in: SalesforceClassic
Available in: Enterprise,Performance, Unlimited,and Developer Editions
USER PERMISSIONS
To limit the files in yourcommunity:• “Manage Communities”
OR “Create and Set UpCommunities”
AND
Is a member of thecommunity whoseCommunityManagement pagethey’re trying to access.
Restrict the size and types of files that your community members can upload. This whitelist of filetypes lets you control what your community members upload and also prevents spammers frompolluting your community with inappropriate files.
Community file moderation must be enabled for your org before you can limit files in yourcommunity. If you don’t see the option to limit files in Community Management, contact Salesforce.
Your community file limits apply to files uploaded by community members anywhere in thecommunity—in posts and comments, directly in the Files tab, and also from Salesforce1. You canalso set community file limits using the SOAP API or Metadata API.
Files uploaded before setting your file limits are unaffected. However, newer versions of those filesmust meet the limits you specify.
Keep the following things in mind:
• A file must meet the file limits set in the community in which it’s uploaded. For example, if acustomer uploads a file on a case and then an agent uploads a newer version in your Salesforceinternal org, the limits from the customer community still apply.
• Files uploaded in your internal Salesforce org that are shared in a community aren’t subject tocommunity file limits.
1. Access Community Management in one of the following ways.
• From the community:
– In Salesforce Tabs + Visualforce communities, click in the global header.
– In Community Builder-based communities, use the drop-down menu next to yourname and click Community Management.
• From Setup, enter All Communities in the Quick Find box, then select All Communities and click the Manage link nextto a community.
• From Community Builder, in the header, use the drop-down menu next to the name of your template and click CommunityManagement.
2. Select AdministrationPreferences, then enter your limits in the Files section on the page.
• Maximum file size in MB—Enter a number between 3 MB and your org’s maximum file size. To use the default limitof 2 GB, leave this field empty or enter 0.
• Allow only these file types—Enter file extensions separated with a comma (for example: jpg,docx,txt).You can enter lowercase and uppercase letters. You can enter up to 1,000 characters. To allow all file types, leave this field empty.
3. Click Save.
After you set your community’s file limits, members receive an error message if their file is larger than the size you set or if their fileextension isn’t allowed.
When a member tries to upload multiple files at once and a file is found that doesn’t meet your limits, none of the files are uploaded.
39
Limit Files in Your CommunitySet Up Your First Community
Create a Custom Robots.txt File for Your Community
USER PERMISSIONS
To create a Visualforce pageand robots.txt file for yourcommunity:• “Create and Set Up
Communities”
The robots.txt file uses include and exclude rules to inform web spiders and robots aboutwhich areas of your community to index. To allow only specific areas of your community to beindexed, create a Visualforce page to host this information. After you specify your rules, searchengines use the file to index your community pages.
Available in: Salesforce Classic
Available in: Enterprise, Performance, and Unlimited Editions
Your custom robots.txt file must contain the path to the auto-generated site map—for example,https://<community_URL>/s/sitemap.xml. robots.txt is placed at the root level of your community.
Here’s an example of a Visualforce page with indexing rules for a community:
<apex:page contentType="text/plain">User-agent: *Disallow: / # hides everything from ALL botsAllow: /<path-prefix-1>/s # add path you want to open to botsAllow: /<path-prefix-2>/s # add path you want to open to botsSitemap: http://<community_URL>/s/sitemap.xmlSitemap: http://<community_URL>/<sub_path>/s/sitemap.xml</apex:page>
Note: You may have more than one community, each with various subpaths. Keep in mind that they all share the same file, sobe sure your indexing rules account for the pages in all your communities. The Visualforce page with the robots.txt info must bewithin the community that has no subpath name at all, so at the root level.
To create and use a custom robots.txt file:
1. Create a list of include and exclude rules for the different areas of your community that you want to expose or hide from searchengines. Save this information in a text file.
2. In Setup, enter Visualforce Pages in the Quick Find box, then select Visualforce Pages and click New to create aVisualforce page. Give it any name; you can even call it robots.
3. Paste the list of indexing rules in the Visualforce page. The final contents should look similar to the example above, with more rulesas required.
4. Click Save.
5. Back on the Community Management page for your community, click AdministrationPages > Go to Force.com and then Editon the Site Details page.
6.In the Site Robots.txt field, enter the name of the Visualforce page you created, or click to search for the file.
7. Click Save.
8. Optionally, submit your sitemap.xml file directly to search engines. For example, submit the file to Google™ Webmaster Toolsand Bing® Webmaster Tools to allow users of those search engines to discover content in your community.
To confirm that the robots.txt file is available for robots and spiders, navigate to https://<community_URL>/robots.txt.Similarly, to view the site map, navigate to https://<community_URL>/s/sitemap.xml.
40
Create a Custom Robots.txt File for Your CommunitySet Up Your First Community
Create Communities Users
EDITIONS
Available in: SalesforceClassic
Available in: Enterprise,Performance, Unlimited,and Developer Editions
USER PERMISSIONS
To create partner users:• “Manage External Users”
To create customer users:• “Manage External Users”
OR
“Edit Self-Service Users”
Important: Whencreating customerusers, theaccount that thenew contact isassociated withmust have anaccount ownerthat is assigned arole.
To log in as an external user:• “Manage Users”
AND
“Edit” on Accounts
To allow an external user to access your community, enable the user’s contact record as a customeruser or partner user, depending on the user’s license type. Your community can contain users withPartner Community, Customer Community, and Customer Community Plus licenses.
If your organization has person accounts, you can’t use them as partner accounts or create partnerusers that are associated with them. You can use only business accounts as partner accounts.
1. To create partner users:
a. View the external account you want to create a user for.
b. Create a contact. Click New Contact from the Contacts related list. Fill in theappropriate details, then click Save.
Note: A non-partner account can’t own a partner contact.
Person accounts can’t own partner users.
c. On the contact detail page, click Manage External User, then Enable Partner User.
Note: If you don’t see the Enable Partner User button, ask your administratorto check whether it’s included in the Contact page layout.
d. Edit the user record for this external user.
• Select the Partner Community user license.
• Select the appropriate profile. Remember that profiles give users access to tabsin your community, so be sure that you choose a profile that has the appropriatetabs exposed.
Note: The available profiles for external users are limited to the PartnerCommunity User profile or profiles cloned from it. Unlike a standard user,the partner user role is automatically assigned based on the account name.The partner user role is a subordinate of the account owner’s role. Therefore,all data for the partner user role rolls up to the partner account owner’srole. If you disable a partner user, the partner user role becomes obsolete,and the data no longer rolls up to the partner account role.
• Deselect Generate new password and notify user immediately so that usersdon’t receive a password before the community is activated. When you activatethe community, the user receives a welcome email with the login information, as long as the Send welcome emailoption is selected for the community.
Note: If you select this option but your organization doesn’t have Active communities that the user is a memberof, Salesforce doesn’t send the email.
If Send welcome email is disabled for your community, the user doesn’t receive an email with the usernameand password. You must manually send the information.
e. Click Save.
41
Create Communities UsersSet Up Your First Community
Note: Creating an external user with a Customer Community Plus license is similar to creating a partner user. On the contactrecord, select Manage External User, then Enable Partner User. Also, when editing the user record, you select the PartnerCommunity User profile or a profile cloned from it.
2. To create customer users:
a. Create a contact.
b. On the contact detail page, click Manage External User, then Enable Customer User.
Note: If you don’t see the Enable Customer User button, ask your administrator to check whether it’s included in theContact page layout.
c. Edit the user record for this external user.
• Select the appropriate profile. The available profiles are limited to the Customer Community User profile and any profilescloned from it.
Remember that profiles give users access to tabs in your community, so be sure that you choose a profile that has theappropriate tabs exposed.
• Deselect Generate new password and notify user immediately so that users don’t receive a password before thecommunity is activated. When you activate the community, the user receives a welcome email with the login information,as long as the Send welcome email option is selected for the community.
Note: If you select this option but your organization doesn’t have Active communities that the user is a memberof, Salesforce doesn’t send the email.
If Send welcome email is disabled for your community, the user doesn’t receive an email with the usernameand password. You must manually send the information.
d. Click Save.
Note: Customer Users don’t see the Notes & Attachments related list on accounts or contacts.
To troubleshoot issues or ensure that the community is configured appropriately, on the contact detail page, click Manage ExternalUser and choose Log in As Partner User or Log in as Customer User. You must have Edit permission on Accounts to log in as aPartner User or Customer User. A new browser window opens and you are logged in to the community on behalf of the external user.
When you log in as an external user, you see the behavior that the external user sees. For instance, external users only see the communitydrop-down menu if they have access to more than one Active community. Also, if an external user who is only a member of oneActive community is given the URL for Preview community, the user doesn’t see the drop-down menu when in the Previewcommunity.
Note: As a security measure, when administrators are logged in as another user, they can’t authorize OAuth data access for thatuser. For example, admins can’t authorize OAuth access to user accounts, including single sign-on to third-party applications.
Consider the following when creating external users.
• External users can’t be deleted. If you no longer want an external user to have access to a community, deactivate the user.
42
Create Communities UsersSet Up Your First Community
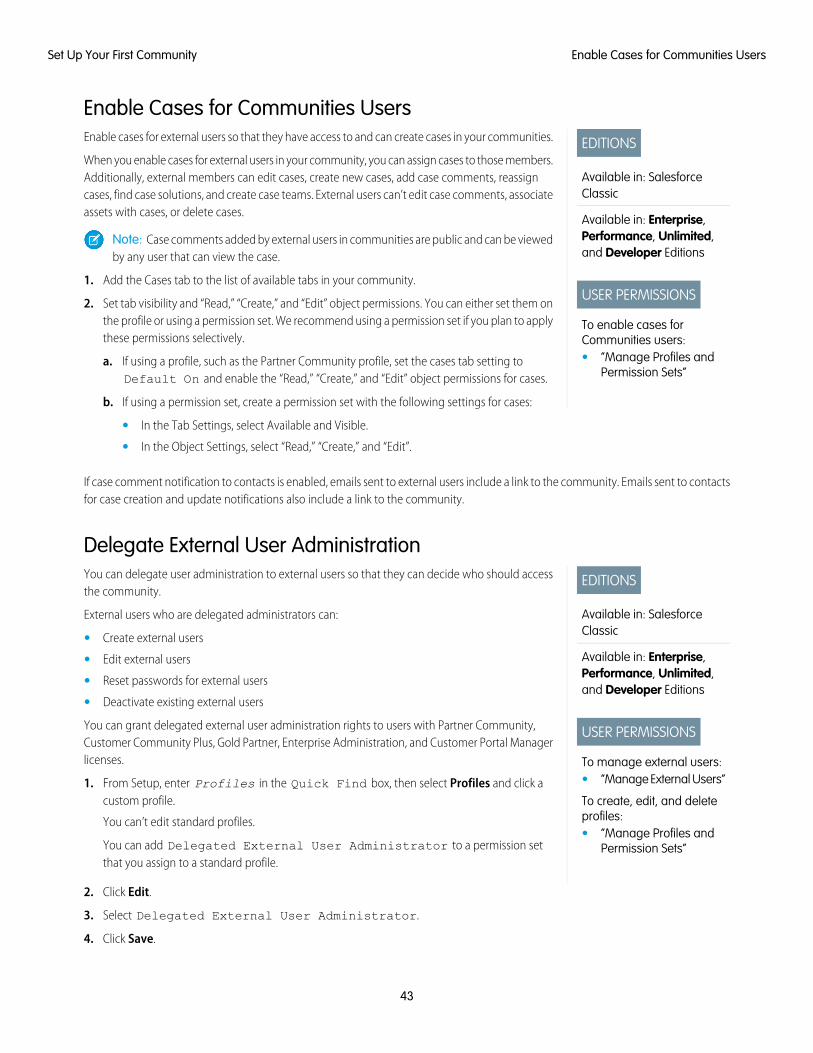
Enable Cases for Communities Users
EDITIONS
Available in: SalesforceClassic
Available in: Enterprise,Performance, Unlimited,and Developer Editions
USER PERMISSIONS
To enable cases forCommunities users:• “Manage Profiles and
Permission Sets”
Enable cases for external users so that they have access to and can create cases in your communities.
When you enable cases for external users in your community, you can assign cases to those members.Additionally, external members can edit cases, create new cases, add case comments, reassigncases, find case solutions, and create case teams. External users can’t edit case comments, associateassets with cases, or delete cases.
Note: Case comments added by external users in communities are public and can be viewedby any user that can view the case.
1. Add the Cases tab to the list of available tabs in your community.
2. Set tab visibility and “Read,” “Create,” and “Edit” object permissions. You can either set them onthe profile or using a permission set. We recommend using a permission set if you plan to applythese permissions selectively.
a. If using a profile, such as the Partner Community profile, set the cases tab setting toDefault On and enable the “Read,” “Create,” and “Edit” object permissions for cases.
b. If using a permission set, create a permission set with the following settings for cases:
• In the Tab Settings, select Available and Visible.
• In the Object Settings, select “Read,” “Create,” and “Edit”.
If case comment notification to contacts is enabled, emails sent to external users include a link to the community. Emails sent to contactsfor case creation and update notifications also include a link to the community.
Delegate External User Administration
EDITIONS
Available in: SalesforceClassic
Available in: Enterprise,Performance, Unlimited,and Developer Editions
USER PERMISSIONS
To manage external users:• “Manage External Users”
To create, edit, and deleteprofiles:• “Manage Profiles and
Permission Sets”
You can delegate user administration to external users so that they can decide who should accessthe community.
External users who are delegated administrators can:
• Create external users
• Edit external users
• Reset passwords for external users
• Deactivate existing external users
You can grant delegated external user administration rights to users with Partner Community,Customer Community Plus, Gold Partner, Enterprise Administration, and Customer Portal Managerlicenses.
1. From Setup, enter Profiles in the Quick Find box, then select Profiles and click acustom profile.
You can’t edit standard profiles.
You can add Delegated External User Administrator to a permission setthat you assign to a standard profile.
2. Click Edit.
3. Select Delegated External User Administrator.
4. Click Save.
43
Enable Cases for Communities UsersSet Up Your First Community
5. Click Edit in the Delegated External User Profiles related list.
6. Select the profiles you want users with this profile to be able to administer.
7. Click Save.
Consider the following when setting up delegated external user administration.
• You can also grant delegated administration rights using permission sets.
• On the profile you’re granting delegated administration rights to:
– Add the “Create” and “Edit” permissions on contacts so that delegated administrators can create and update contacts relatedto their account.
– Set the Accounts and Contacts tab settings to Default On so that delegated administrators can view the Accounts and Contactstabs and easily manage contacts related to their accounts.
• Add the Accounts and Contacts tabs to your community.
• Set field level security and page layouts so that delegated external user administrators can access only the account and contact fieldsyou specify.
Grant Super User Access to Partner Users in Your CommunityPartner Super User Access must be enabled in your Communities Settings before you can grant access to users. Use this information togrant super user access to users with Partner Community licenses. You can also grant super user access to users in your community withCustomer Community Plus licenses. To learn more, see Grant Super User Access to Customer Users in Your Community.
Granting super user access to external users in your community lets them access more data and records, regardless of sharing rules andorganization-wide defaults. Super users have access to data owned by other partner users belonging to the same account who havethe same role or a role below them in the role hierarchy. Super user access applies to cases, leads, custom objects, and opportunitiesonly. External users have access to these objects only if you exposed them using profiles or sharing and added the tabs to the communityduring setup.
1. View the contact record for the user.
2. Click Manage External Account, then choose Enable Super User Access.
3. Click OK.
Grant Super User Access to Customer Users in Your CommunityEnable super user access so that external users in communities can access additional records and data.
You can only grant customer super user access to users with Customer Community Plus licenses.
To grant super user access to users with Partner Community licenses, see Grant Super User Access to Partner Users in Your Community.
The “Portal Super User” permission lets delegated external user administrators do the following for their own account:
• View, edit, and transfer all cases
• Create cases for contacts
• View and edit all contacts, whether communities-related or not
• View account details when they’re the contact on a case
• Report on all contacts, whether portal enabled or not, if the Reports tab is added to your community and the user has the “RunReports” permission
Add the “Portal Super User” permission to a permission set and assign it to Customer Community Plus users so that they have access totheir account and can view and edit all of its cases and contacts without having the ability to manage other external users.
44
Grant Super User Access to Partner Users in Your CommunitySet Up Your First Community
1. From Setup, enter Permission Sets in the Quick Find box, then select Permission Sets.
2. Either create or clone a permission set.
3. In the App Permissions section, add the “Portal Super User” permission.
4. Click Save.
5. Assign the permission set to your Customer Community Plus users by clicking Manage Assignments and then adding the appropriateusers.
Activate Your Community
EDITIONS
Available in: SalesforceClassic
Available in: Enterprise,Performance, Unlimited,and Developer Editions
USER PERMISSIONS
To create, customize, oractivate a community:• “Create and Set Up
Communities”
AND
Is a member of thecommunity whoseCommunityManagement pagethey’re trying to access.
Activate your community to make it accessible to community members. The effect of activating acommunity differs by template.
• Salesforce Tabs + Visualforce: Activating the community makes the community URL activeand enables login access for community members. If welcome emails are enabled when youactivate, a welcome email is sent to all members. If any of those users are new portal users, theirwelcome email includes their username and password.
• Koa, Kokua, or Customer Service (Napili): Activating the community sends out a welcomeemail to all community members and registers the site with Brombone™, a search engineoptimization service. To make the community URL active and enable login access for communitymembers, publish the community.
1. Access Community Management in one of the following ways.
• From the community:
– In Salesforce Tabs + Visualforce communities, click in the global header.
– In Community Builder-based communities, use the drop-down menu next to yourname and click Community Management.
• From Setup, enter All Communities in the Quick Find box, then select AllCommunities and click the Manage link next to a community.
• From Community Builder, in the header, use the drop-down menu next to the name ofyour template and click Community Management.
2. Click AdministrationSettings.
3. Click Activate Community.
45
Activate Your CommunitySet Up Your First Community
Community Management
Manage Your Community
EDITIONS
Available in: SalesforceClassic
Available in: Enterprise,Performance, Unlimited,and Developer Editions
USER PERMISSIONS
To access CommunityManagement:
• “Access CommunityManagement” OR“Manage Communities”OR “Create and Set UpCommunities”
• AND is a member of thecommunity whoseCommunityManagement pagethey’re trying to access
To access moderation rulesand criteria:
• “Manage Communities”OR “Create and Set UpCommunities”
• AND is a member of thecommunity whoseCommunityManagement pagethey’re trying to access
To customize administrationsettings or use CommunityBuilder:
• “Create and Set UpCommunities”
• AND is a member of thecommunity whoseCommunityManagement pagethey’re trying to access
Community Management is your one-stop shop for setting up and monitoring your community.Administrators can manage basic setup information including membership and branding.Community managers can view dashboards about groups, members, feed activity, and licenseusage, and manage the community’s reputation system. Moderators can see which items havebeen flagged for review.
You can customize your community at any time, but if you plan on making major changes, werecommend deactivating the community first.
Important: The options available in Community Management are based on your communitytemplate selection, permissions, and preferences. For example, if your community does notuse topics, you don’t see the Topics section. Some of the options in the following list mightnot appear in your community. To display all sections, go to AdministrationPreferencesand enable Show all settings in Community Management.
Home
• View your community’s home page dashboard. If your home page still displays a messageto install the Salesforce Communities Management, your administrator hasn’t mapped adashboard yet.
• Preview the community or access your community’s settings in the Community Builder,Force.com, or Site.com Studio from the Community Management menu in the globalheader.
EngagementMonitor recent activity and take immediate action without leaving Community Management.
Insights are set up by the administrator. If the Engagement section doesn’t appear, theadministrator hasn’t mapped any Insights for your community.
DashboardsView dashboards and monitor information about groups, members, feed activity, moderation,topics, and license usage for this community.
Dashboards are set up by the administrator. If the Dashboards section doesn’t appear, theadministrator hasn’t mapped any dashboards for your community.
ModerationView reports for flagged posts, comments, messages, and files. You can also see a report of allposts that are pending review and set up moderation rules for your community.
Moderation is set up by the administrator.
TopicsCreate a navigation menu and showcase popular topics in your community.
Navigational topics and featured topics are set up by the administrator or in the case ofself-service templates, they are enabled by default. If the Topics section doesn’t appear, yourcommunity is not using topics.
46
Community ManagementSet Up Your First Community
RecommendationsRecommendations can help drive engagement in a community. They can be set up to encourage users to watch videos, take trainings,and more.
Recommendations are set up by the administrator. If the Recommendations section doesn’t appear, the administrator hasn’t set upany.
ReputationSet up reputation levels and points to reward members for activity in the community feed.
Reputation is set up by the administrator. If the Reputation section doesn’t appear, the administrator hasn’t enabled it.
AdministrationOn the Administration page, you can update basic setup for the community, including:
• Members—Add or remove members based on profiles or permission sets.
• Tabs—Select the tabs you want community members to see. Tabs are also used to determine community navigation in Salesforce1.Tab settings aren’t used if your community was created with one of the Self-Service templates.
• Branding—Select an out-of-box branding theme. This branding is only used if your community uses the Salesforce tabs +Visualforce template.
• Login & Registration—Select the default community login page and set up self-registration.
• Emails—You can customize email sender information, Chatter email branding, and templates in your community emails.
• Pages—Configure page assignments for your community and access the Force.com and Site.com settings for your community.
• Preferences—Update important settings such as flagging content, nickname display, public access to Chatter, and file limits.
• Settings—Edit your community name, description, and URL. You can also manage the status of your community and updateyour community template
Lookups in Community Management initially return the items you most recently viewed from within the community. If an objectyou’re looking for isn’t in the Recently Viewed Documents list, try typing all or part of the object name and searching again.
Important: If you’re an administrator and accidentally remove yourself from a community, you can’t access the Administrationsettings in Community Management. To add yourself back to the community or make other membership updates, use theAPI.
What’s a Community Manager?
EDITIONS
Available in: SalesforceClassic
Available in: Enterprise,Performance, Unlimited,and Developer Editions
Every community needs someone to take an active role in making sure that the community thrives.Community managers spend time every day encouraging member participation, keepingconversations going, and recognizing members for contributing.
Community managers must be employees of your organization; external community memberscan’t be community managers.
A community manager is a member of the community that takes on the extra responsibility ofmonitoring community engagement. Community managers need access to reports and dashboardsthat show trends in activity and membership. They also need to be aware if members aren’t loggingin as frequently as they should be. By monitoring community membership and activity, communitymanagers can figure out how to engage community members and ensure that they participate.
A powerful tool for a community manager is the ability to recognize individual members for their participation, because communitymanagers know that recognition and a little friendly competition usually lead to more active members. Community managers can setup a point system and reputation levels that reward members with points when they perform certain actions. Once members reach thetop of the level’s point threshold, they move up a level.
47
Manage Your CommunitySet Up Your First Community
Assign a Community Manager
EDITIONS
Available in: SalesforceClassic
Available in: Enterprise,Performance, Unlimited,and Developer Editions
USER PERMISSIONS
To assign permission sets:• “Assign Permission Sets”
To assign a user as a community manager, simply give them the “Manage Communities” permission.
Community managers must be employees of your organization; external community memberscan’t be community managers. To assign a user as a community manager, give them the “ManageCommunities” permission. With this permission, they can access the Community Managementpage.
1. From Setup, enter Permission Sets in the Quick Find box, then select PermissionSets, then click New.
2. Create a permission set that includes the “Manage Communities” permissions.
3. From Setup, enter Users in the Quick Find box, then select Users.
4. Find the user you want to be a community manager and add the permission set to theirPermission Set Assignments related list.
The user can now manage the community through Community Management.
48
Manage Your CommunitySet Up Your First Community
Access Community Management
EDITIONS
Available in: SalesforceClassic
Available in: Enterprise,Performance, Unlimited,and Developer Editions
USER PERMISSIONS
To access CommunityManagement:
• “Access CommunityManagement” OR“Manage Communities”OR “Create and Set UpCommunities”
• AND is a member of thecommunity whoseCommunityManagement pagethey’re trying to access
To access moderation rulesand criteria:
• “Manage Communities”OR “Create and Set UpCommunities”
• AND is a member of thecommunity whoseCommunityManagement pagethey’re trying to access
To customize administrationsettings or use CommunityBuilder:
• “Create and Set UpCommunities”
• AND is a member of thecommunity whoseCommunityManagement pagethey’re trying to access
Community administrators and managers use Community Management to monitor communityactivity, and set up other important management features.
1. Access Community Management in one of the following ways.
• From the community:
– In Salesforce Tabs + Visualforce communities, click in the global header.
– In Community Builder-based communities, use the drop-down menu next to yourname and click Community Management.
• From Setup, enter All Communities in the Quick Find box, then select AllCommunities and click the Manage link next to a community. To access this page, youneed the Create and Set Up Communities” permission.
• From Community Builder, in the header, use the drop-down menu next to the name ofyour template and click Community Management.
2. Choose the part of the community you want to manage:
• Preview the community or access your community’s settings in the Community Builder,Force.com, or Site.com Studio from the Community Management menu in the globalheader.
• In Engagement, you can view Insights reports and take action on activity in your community.
• In Dashboards, you can view community dashboards and reports.
• In Moderation, you can set up moderation rules and monitor flagged feed items.
• In Topics, you can manage navigational and featured topics.
• In Recommendations, you can set up custom recommendations to appear in yourcommunity.
• In Reputation, you can set up reputation levels and points.
• In Administration, you can customize your community properties, such as name, description,URL, status, and template. You can also update your community settings, such as members,tabs, branding, login and registration, and emails.
Important: The options available in Community Management are based on yourcommunity template selection, permissions, and preferences. For example, if yourcommunity does not use topics, you don’t see the Topics section. Some of the optionsin the following list might not appear in your community. To display all sections, go toAdministrationPreferences and enable Show all settings in CommunityManagement.
49
Manage Your CommunitySet Up Your First Community
Dashboards and Insights
Report on Communities with the Dashboards and Insights Package
EDITIONS
Available in: SalesforceClassic
Available in: Enterprise,Performance, Unlimited,and Developer Editions
USER PERMISSIONS
To install AppExchangepackages:• “Download
AppExchangePackages”
The Salesforce Communities Management package gives community managers an essential starterset of dashboards and reports to keep tabs on activity and engagement directly in CommunityManagement.
Use the Salesforce Communities Management package to:
• Take advantage of the newest features using preconfigured reports (use the latest packageversion)
• View the latest metrics and rapidly spot trends
• Determine how fast your community is growing
• Find out who your most engaged members are
• Discover which discussions people and groups are most excited about
• Identify areas in your community that need attention
• Take immediate action on recent activity with Insights reports
Note: To use the preconfigured Insights reports, your community must use Chatter.
Install one of the following versions from the AppExchange:
• Salesforce Communities Management (for Communities with Chatter)
• Salesforce Communities Management (for Communities without Chatter)
Tip: For installation instructions, detailed information about the reports, and upgrade instructions, see Get Started with theCommunities Management AppExchange Package.
During installation, dashboard and report folders are automatically installed in your internal org. You’ll also have the option to give yourcommunity managers access to the package contents so you don’t have to share the dashboard and report folders with them later. Ifyou have no previous Insights or dashboards mapped in Community Management, they are automatically mapped for you duringinstallation.
After the package is installed, you can access your new dashboards and reports alongside all your other Salesforce dashboards andreports. When you view the dashboards in Community Management, community-specific data is displayed. After installation, here’swhat you see in Community Management.
RequiresChatter
DescriptionPage NameNavigationSection
Stay informed about recent activity or membership. This dashboard is mapped to yourCommunity Management home page.
HomeDashboards
See the overall state of your communities at a glance. 90-day trending reports showtotal membership, newly joined members, and member logins. If you have Chatterenabled, 90-day snapshots show post and comment metrics.
Overview
See metrics about posts, comments, daily unique contributors, and which types ofmembers are contributing posts and comments.
Activity
50
Dashboards and InsightsSet Up Your First Community
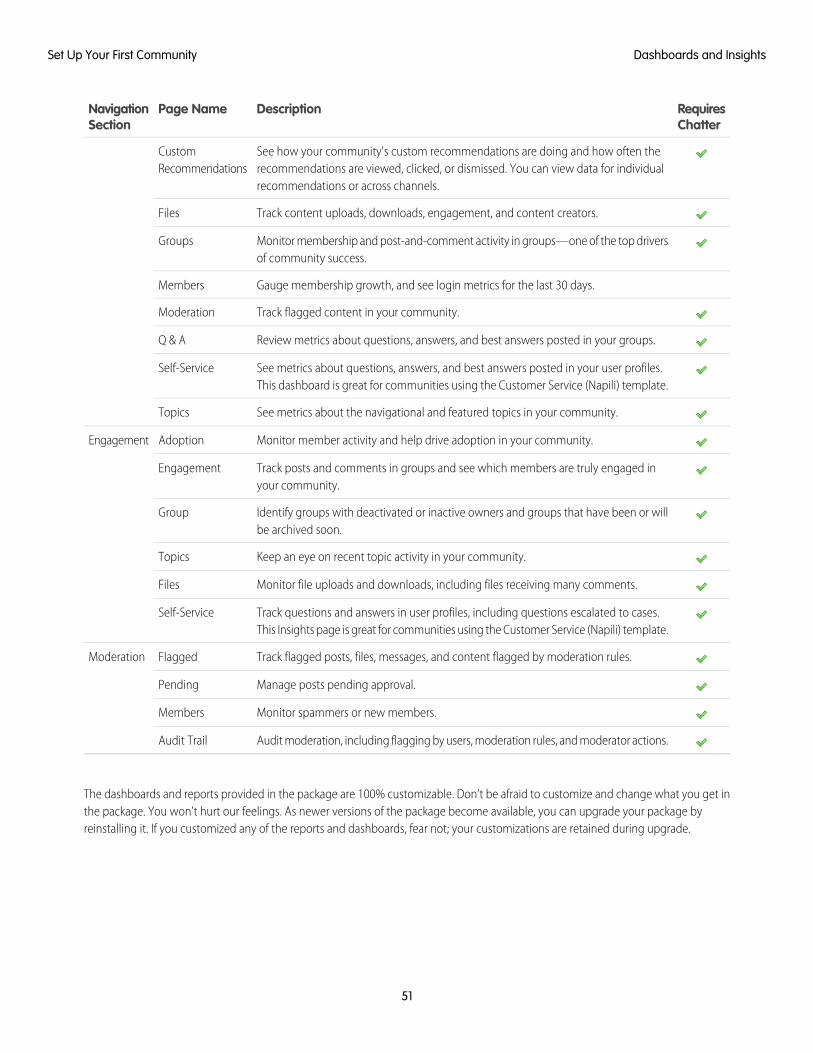
RequiresChatter
DescriptionPage NameNavigationSection
See how your community's custom recommendations are doing and how often therecommendations are viewed, clicked, or dismissed. You can view data for individualrecommendations or across channels.
CustomRecommendations
Track content uploads, downloads, engagement, and content creators.Files
Monitor membership and post-and-comment activity in groups—one of the top driversof community success.
Groups
Gauge membership growth, and see login metrics for the last 30 days.Members
Track flagged content in your community.Moderation
Review metrics about questions, answers, and best answers posted in your groups.Q & A
See metrics about questions, answers, and best answers posted in your user profiles.This dashboard is great for communities using the Customer Service (Napili) template.
Self-Service
See metrics about the navigational and featured topics in your community.Topics
Monitor member activity and help drive adoption in your community.AdoptionEngagement
Track posts and comments in groups and see which members are truly engaged inyour community.
Engagement
Identify groups with deactivated or inactive owners and groups that have been or willbe archived soon.
Group
Keep an eye on recent topic activity in your community.Topics
Monitor file uploads and downloads, including files receiving many comments.Files
Track questions and answers in user profiles, including questions escalated to cases.This Insights page is great for communities using the Customer Service (Napili) template.
Self-Service
Track flagged posts, files, messages, and content flagged by moderation rules.FlaggedModeration
Manage posts pending approval.Pending
Monitor spammers or new members.Members
Audit moderation, including flagging by users, moderation rules, and moderator actions.Audit Trail
The dashboards and reports provided in the package are 100% customizable. Don’t be afraid to customize and change what you get inthe package. You won’t hurt our feelings. As newer versions of the package become available, you can upgrade your package byreinstalling it. If you customized any of the reports and dashboards, fear not; your customizations are retained during upgrade.
51
Dashboards and InsightsSet Up Your First Community
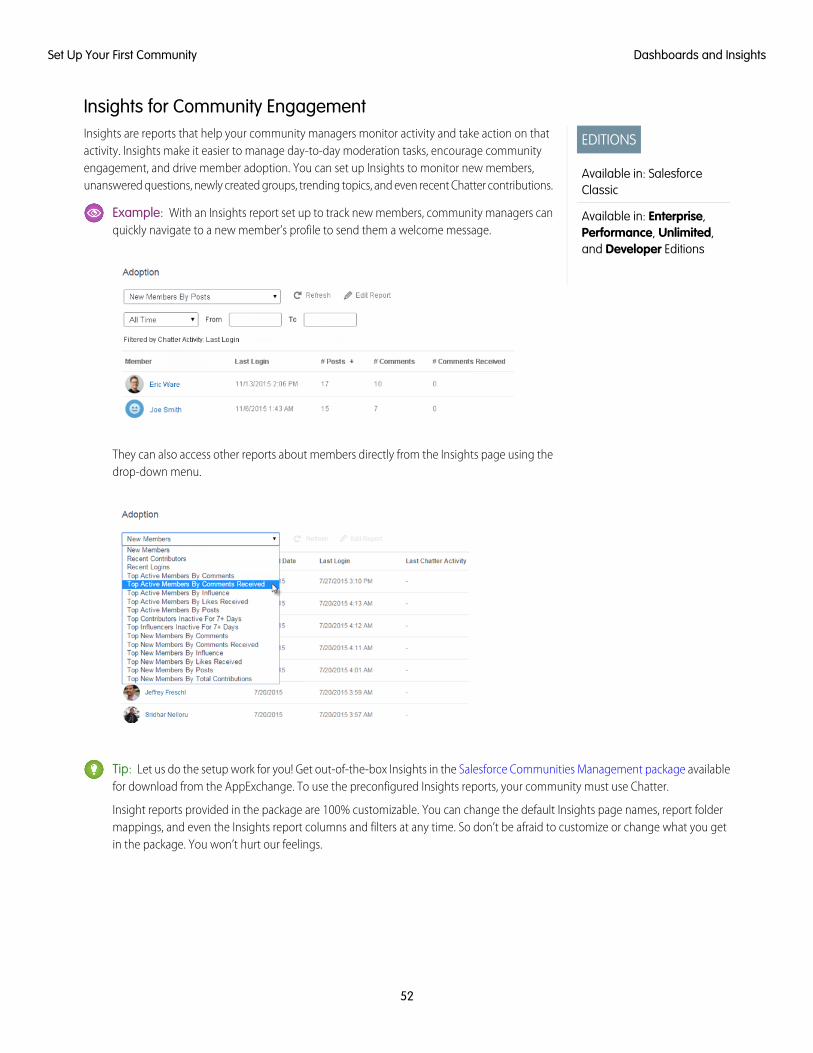
Insights for Community Engagement
EDITIONS
Available in: SalesforceClassic
Available in: Enterprise,Performance, Unlimited,and Developer Editions
Insights are reports that help your community managers monitor activity and take action on thatactivity. Insights make it easier to manage day-to-day moderation tasks, encourage communityengagement, and drive member adoption. You can set up Insights to monitor new members,unanswered questions, newly created groups, trending topics, and even recent Chatter contributions.
Example: With an Insights report set up to track new members, community managers canquickly navigate to a new member’s profile to send them a welcome message.
They can also access other reports about members directly from the Insights page using thedrop-down menu.
Tip: Let us do the setup work for you! Get out-of-the-box Insights in the Salesforce Communities Management package availablefor download from the AppExchange. To use the preconfigured Insights reports, your community must use Chatter.
Insight reports provided in the package are 100% customizable. You can change the default Insights page names, report foldermappings, and even the Insights report columns and filters at any time. So don’t be afraid to customize or change what you getin the package. You won’t hurt our feelings.
52
Dashboards and InsightsSet Up Your First Community
Enable and Map Insights for Community Managers
EDITIONS
Available in: SalesforceClassic
Available in: Enterprise,Performance, Unlimited,and Developer Editions
USER PERMISSIONS
To map Insights inCommunity Management:• “Manage Communities”
OR “Create and Set UpCommunities”
AND
“Manage Reports inPublic Folders”
AND
Is a member of thecommunity whoseCommunityManagement pagethey’re trying to access
Community managers can use Insights reports to monitor recent activity and take action on thatactivity. To get up and running quickly, use preconfigured Insights from an AppExchange package.You can also create and map your own. Each community can have their own Insights.
Insights pages map to report folders in your internal org. All the reports included in that folder aredisplayed in the drop-down menu on the Insights page. Adding or removing an Insights reportfrom the report folder in your internal org updates the Insights page in Community Management.On the Insights page, links are automatically created for report fields such as Created By orGroup Name. For posts, comments, and messages, you can even see the contents directly onthe page.
Tip: Get out-of-the-box Insights in the Salesforce Communities Management packageavailable for download from the AppExchange. To use the preconfigured Insights reports,your community must use Chatter.
When you install the package, report folders are automatically installed in your internal org.If you have no previous Insights mapped, the package automatically maps them for you. Youcan change the default mappings at any time.
Use the following steps to map or update your Insights in Community Management:
1. Open Community Management.
2. Click EngagementSettings.
3. Provide a name for each Insights page and then select the report folder you want to map tothe page.
You can have up to 10 Insights pages mapped in Community Management.
Make sure that you have shared the mapped report folder with your community managers orthey won’t be able to view the Insights reports.
4. Click Save.
Insights pages are visible to community managers when they expand the Engagement section of Community Management.
Go check out your changes. Click Engagement and then click each Insights page name. Use the drop-down menu to verify the reportsmapped to each page.
If you installed the Salesforce Communities Management package, moderation-related Insights reports are also mapped to pages in theModeration section of Community Management. Unlike the page names in the Engagement section, the page names in the Moderationsection can’t be renamed or unmapped.
53
Dashboards and InsightsSet Up Your First Community
Create Insights to Display in Community Management
EDITIONS
Available in: SalesforceClassic
Available in: Enterprise,Performance, Unlimited,and Developer Editions
USER PERMISSIONS
To create custom reporttypes:• “Manage Custom Report
Types”
To create, edit, and deletereports:• “Create and Customize
Reports”
To create and share reportfolders:• “Manage Reports in
Public Folders”
You can create your own Insights to display in Community Management. We recommend that youcreate your Insights reports based on custom report types available for communities.
Tip: Get out-of-the-box Insights in the Salesforce Communities Management packageavailable for download from the AppExchange. To use the preconfigured Insights reports,your community must use Chatter.
Use the following process to create Insights to display in Community Management:
1. Create custom report types based on the Networks object.
Only reports that are based on the Networks object show community-specific information inCommunity Management.
Note: You can create reports based on other objects and expose them in CommunityManagement. Just keep in mind that they show data from across your organization, notjust for the community in which you’re viewing them.
• Select Networks as the primary object.
• Select a child object:
– Chatter Messages
– Feed Revisions
– Groups
– Network Audits
– Network Activity Daily Metrics
– Network Feed Revisions
– Network Members
– Network Membership Daily Metrics
– Network Moderations
– Network Public Usage Daily Metrics
– Network Unique Contributor Daily Metrics
– Recommendation Metric
– Topic Assignments
– Topics
– Unpublished Feed Entities
2. Use the custom report type to create an Insights report.
Insights reports are just like any other report, except they must also meet the following requirements:
• The report can only be a tabular-based report.
• The report can’t include pagination.
• We recommended that your report only return 2,000 rows or less because only the first 2,000 rows are displayed in CommunityManagement.
• To view “Approve” and “Delete” comment actions, you must add the FeedCommentID column to your Insights report.
54
Dashboards and InsightsSet Up Your First Community
Be sure not to filter the report by Network ID to ensure that the report dynamically displays data for the community you view it from.Adding a Network ID filter causes the report to only show data for the community with that Network ID, regardless of which communityyou view it in.
3. Save the report to a new report folder that you’ll use for mapping in Community Management.
We recommend that you create a separate report folder for each of your Insights pages. For example, create one report folder calledInsights Members and another called Insights Moderation.
Insights pages map to report folders in your internal org. All the reports included in that folder are displayed in the drop-down menuon the Insights page. Adding or removing an Insights report from the report folder in your internal org updates the Insights page inCommunity Management.
4. Share your Insights report folder with your community managers.
5. In Community Management, click EngagementSettings to map Insights pages to your report folder.
When a community manager accesses Community Management, the Insights reports appear in the drop-down menu on the mappedEngagement page.
Note: Some Insights are not available in Developer Edition or sandbox orgs.
Create Custom Actions for Community Management Insights
EDITIONS
Available in: SalesforceClassic
Available in: Enterprise,Performance, Unlimited,and Developer Editions
USER PERMISSIONS
To create, edit, and setversion settings forVisualforce pages:• “Customize Application”
To edit custom Visualforcecontrollers:• “Author Apex”
Do more with community Insights reports with custom actions. Say a spammer attacks yourcommunity. You can create and use a custom action to remove all the spammer’s posts andcomments with just one click. Custom Insights actions work with standard objects and customobjects.
When you click an Insights action in the report, behind the scenes a Visualforce page drives theaction. The Visualforce page links to standard or custom objects using standard controllers orstandard list controllers.
Here are the high-level steps of how to create a custom Insights action:
1. Create a Visualforce page.
There are a few options you can use:
• Use a standard controller
Choose this option to create a Visualforce page that contains the same functionality andlogic used in standard Salesforce pages. For example, if you use the standard Accountscontroller, clicking a Save button in a Visualforce page results in the same behavior asclicking Save on a standard Account edit page.
• Use a standard list controller
Choose this option to create a Visualforce page that can display or act on a set of records.Examples of existing Salesforce pages that work with a set of records include: list pages, related lists, and mass action pages.
• Use a controller extension that uses Apex
Choose this option if you want to expose new functionality, customize the navigation through an application, use callouts orWeb services, or if you need finer control for how information is accessed for your page.
All options work with standard objects and custom objects.
For detailed information about these options, see the Visualforce Developer Guide.
55
Dashboards and InsightsSet Up Your First Community
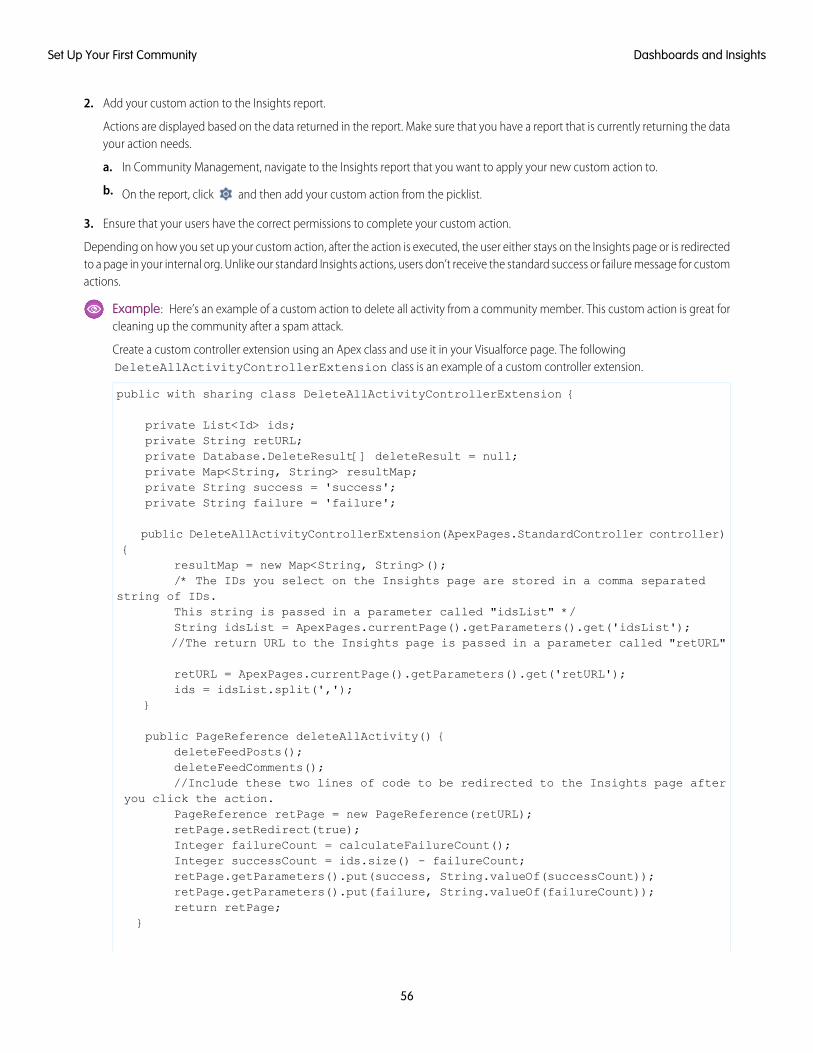
2. Add your custom action to the Insights report.
Actions are displayed based on the data returned in the report. Make sure that you have a report that is currently returning the datayour action needs.
a. In Community Management, navigate to the Insights report that you want to apply your new custom action to.
b. On the report, click and then add your custom action from the picklist.
3. Ensure that your users have the correct permissions to complete your custom action.
Depending on how you set up your custom action, after the action is executed, the user either stays on the Insights page or is redirectedto a page in your internal org. Unlike our standard Insights actions, users don’t receive the standard success or failure message for customactions.
Example: Here’s an example of a custom action to delete all activity from a community member. This custom action is great forcleaning up the community after a spam attack.
Create a custom controller extension using an Apex class and use it in your Visualforce page. The followingDeleteAllActivityControllerExtension class is an example of a custom controller extension.
public with sharing class DeleteAllActivityControllerExtension {
private List<Id> ids;private String retURL;private Database.DeleteResult[] deleteResult = null;private Map<String, String> resultMap;private String success = 'success';private String failure = 'failure';
public DeleteAllActivityControllerExtension(ApexPages.StandardController controller){
resultMap = new Map<String, String>();/* The IDs you select on the Insights page are stored in a comma separated
string of IDs.This string is passed in a parameter called "idsList" */String idsList = ApexPages.currentPage().getParameters().get('idsList');//The return URL to the Insights page is passed in a parameter called "retURL"
retURL = ApexPages.currentPage().getParameters().get('retURL');ids = idsList.split(',');
}
public PageReference deleteAllActivity() {deleteFeedPosts();deleteFeedComments();//Include these two lines of code to be redirected to the Insights page after
you click the action.PageReference retPage = new PageReference(retURL);retPage.setRedirect(true);Integer failureCount = calculateFailureCount();Integer successCount = ids.size() - failureCount;retPage.getParameters().put(success, String.valueOf(successCount));retPage.getParameters().put(failure, String.valueOf(failureCount));return retPage;
}
56
Dashboards and InsightsSet Up Your First Community
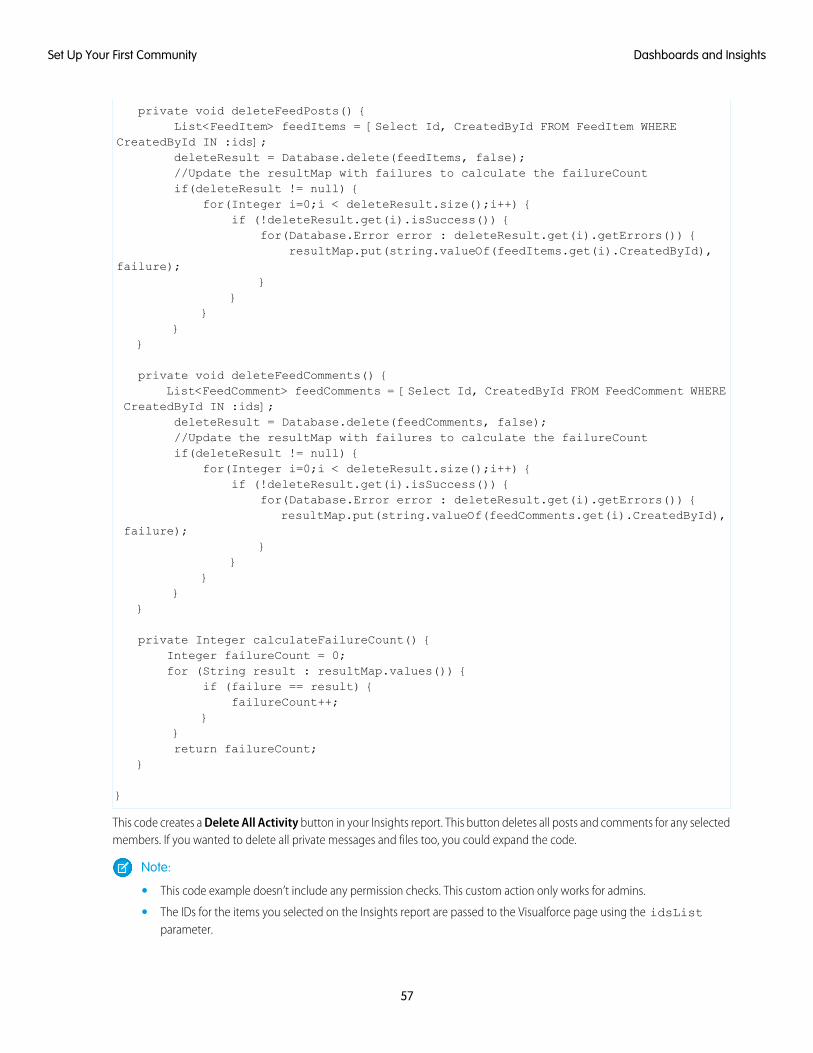
private void deleteFeedPosts() {List<FeedItem> feedItems = [Select Id, CreatedById FROM FeedItem WHERE
CreatedById IN :ids];deleteResult = Database.delete(feedItems, false);//Update the resultMap with failures to calculate the failureCountif(deleteResult != null) {
for(Integer i=0;i < deleteResult.size();i++) {if (!deleteResult.get(i).isSuccess()) {
for(Database.Error error : deleteResult.get(i).getErrors()) {resultMap.put(string.valueOf(feedItems.get(i).CreatedById),
failure);}
}}
}}
private void deleteFeedComments() {List<FeedComment> feedComments = [Select Id, CreatedById FROM FeedComment WHERE
CreatedById IN :ids];deleteResult = Database.delete(feedComments, false);//Update the resultMap with failures to calculate the failureCountif(deleteResult != null) {
for(Integer i=0;i < deleteResult.size();i++) {if (!deleteResult.get(i).isSuccess()) {
for(Database.Error error : deleteResult.get(i).getErrors()) {resultMap.put(string.valueOf(feedComments.get(i).CreatedById),
failure);}
}}
}}
private Integer calculateFailureCount() {Integer failureCount = 0;for (String result : resultMap.values()) {
if (failure == result) {failureCount++;
}}return failureCount;
}
}
This code creates a Delete All Activity button in your Insights report. This button deletes all posts and comments for any selectedmembers. If you wanted to delete all private messages and files too, you could expand the code.
Note:
• This code example doesn’t include any permission checks. This custom action only works for admins.
• The IDs for the items you selected on the Insights report are passed to the Visualforce page using the idsListparameter.
57
Dashboards and InsightsSet Up Your First Community
The following Visualforce markup shows how the custom controller extension can be used in a page:
<apex:page standardController="User"extensions="DeleteAllActivityControllerExtension" action="{!deleteAllActivity}"/>
Enable and Map Dashboards for Community Managers
EDITIONS
Available in: SalesforceClassic
Available in: Enterprise,Performance, Unlimited,and Developer Editions
USER PERMISSIONS
To map dashboards inCommunity Management:• “Create and Set Up
Communities” OR“Manage Communities”
AND
“Manage Dashboards inPublic Folders”
AND
Is a member of thecommunity whoseCommunityManagement pagethey’re trying to access.
Community managers can use dashboards to measure the success of their communities. You caneven map a dashboard to the Community Management Home page. You can map customdashboards or use ones provided in an AppExchange package. Each community can have its owndashboards.
You can choose to map any dashboard you have access to, but ensure that your communitymanagers have access as well.
All dashboards in Community Management display as Lightning dashboards, regardless of whattypes of dashboard you’re using or what interface your org is using. For example, a Salesforce Classicdashboard gets displayed as a Lightning dashboard in Community Management. Remember thatalthough dashboards render in a Lightning view in Community Management, the Communitiesproduct isn’t supported in Lightning Experience. Not all browsers support this Lightning view, somake sure you’re using a supported browser.
Tip: Keep in mind that you can get preconfigured dashboards in the Salesforce CommunitiesManagement package available for download on the AppExchange.
If the Salesforce Communities Management package is installed in your organization, each of thedashboard pages has a default mapping to a dashboard from the package. You can overwrite thesevalues as needed.
Use the following steps to map or update your dashboards in Community Management:
1. Open Community Management.
2. Click DashboardsSettings.
3. For each of the pages, select the dashboard you want to show to community managers. Tochange the name of the dashboard page, click inside the dashboard label.
The dashboard you map to Home displays on your Community Management Home page.
4. Click Save.
Dashboards are visible to community managers when they expand the Dashboards section or visit the home page in CommunityManagement.
Verify the dashboard mappings by clicking Dashboards and then clicking each page name. If you mapped a dashboard to the Homepage, check that out too.
58
Dashboards and InsightsSet Up Your First Community
Create a Dashboard to Display in Community Management
EDITIONS
Available in: SalesforceClassic
Available in: Enterprise,Performance, Unlimited,and Developer Editions
USER PERMISSIONS
To create custom reporttypes:• “Manage Custom Report
Types”
To create, edit, and deletereports:• “Create and Customize
Reports”
To create and sharedashboards:• “Manage Dashboards in
Public Folders”
While you can show any dashboard in Community Management, we recommend creating thembased on the custom report types available for communities.
Tip: Keep in mind that you can get preconfigured dashboards in the Salesforce CommunitiesManagement package available for download on the AppExchange.
All dashboards in Community Management display as Lightning dashboards, regardless of whattypes of dashboard you’re using or what interface your org is using. For example, a Salesforce Classicdashboard gets displayed as a Lightning dashboard in Community Management. Remember thatalthough dashboards render in a Lightning view in Community Management, the Communitiesproduct isn’t supported in Lightning Experience. Not all browsers support this Lightning view, somake sure you’re using a supported browser.
Use the following process to create dashboards to display in Community Management:
1. Create custom report types based on the Networks object.
Only reports that are based on the Networks object show community-specific information inCommunity Management.
Note: You can create reports based on other objects and expose them in CommunityManagement. Just keep in mind that they show data from across your organization, notjust for the community in which you’re viewing them.
• Select Networks as the primary object.
• Select a child object:
– Chatter Messages
– Feed Revisions
– Groups
– Network Audits
– Network Activity Daily Metrics
– Network Feed Revisions
– Network Members
– Network Membership Daily Metrics
– Network Moderations
– Network Public Usage Daily Metrics
– Network Unique Contributor Daily Metrics
– Recommendation Metric
– Topic Assignments
– Topics
– Unpublished Feed Entities
2. Use the custom report type to create a report.
Be sure not to filter the report by Network ID to ensure that the report dynamically displays data for the community you view it from.Adding a Network ID filter causes the report to only show data for the community with that Network ID, regardless of which communityyou view it in.
3. Create a dashboard with components. Select the report as your source type.
59
Dashboards and InsightsSet Up Your First Community
• Add a component for each report you want to include in your dashboard.
• Find your report on the Data Sources tab and add it to the component.
In order for a Salesforce Classic dashboard to optimally render in the Lightning view used in Community Management, make surethat your dashboard meets the following requirements:
• Includes only up to 20 reports arranged within three columns
• Doesn’t include unsupported charts, such as funnel, scatter, table, multi-metric, pie, and gauge
For a list of dashboard features not supported in the Lightning view, see Reports and Dashboards: Lightning Experience Limitations.
Note: Metrics are supported in the Lightning view, but they display as large tiles. We recommended that you don’t includemetrics in your dashboards.
4. Share the folder that you save your dashboard in with your community managers.
5. In Community Management, click DashboardsSettings to map your dashboard.
When a community manager accesses Community Management, the dashboard appears under Dashboards. If you mapped a dashboardto the Home page, the dashboard appears there.
Dashboards in Community Management are automatically refreshed every 24 hours. To see the latest data, click Refresh. If you accessthe dashboard after it has been recently refreshed, the dashboard displays the globally cached data from the last refresh. If the dashboardhasn’t been refreshed in 24 hours, it’s refreshed automatically when you access it in Community Management. All role-based externalusers in your community can refresh dashboards set up with “Run as specified user” and “Run as logged-in user” up to 1,000 times dailyper org. Scheduled and automatic refreshes don’t count against the limit. There is no refresh limit for internal users.
Remember that you can customize your dashboards at any time. To edit your dashboard, go to the DashboardsSettings page inCommunity Management. Click into the Label field to edit the page name and select the down arrow to the right of the Dashboardfield to map to a different dashboard. Click Edit dashboard to open the dashboard in your internal Salesforce org. If you’re using adashboard that was created in Lightning Experience, the edit link won’t work.
Track Community Activity
EDITIONS
Available in: SalesforceClassic
Available in: Enterprise,Performance, Unlimited,and Developer Editions
Create custom reports to track usage, moderation, and other community activity.
Tip: Keep in mind that you can get preconfigured dashboards in the Salesforce CommunitiesManagement package available for download on the AppExchange.
To monitor the health of your community, you can create custom report types and then create areport using that custom report type. If you want your community managers to see your report inCommunity Management, you can create or edit a dashboard to include your report and then mapthe updated dashboard in Community Management. To change the mapping of a dashboard, clickDashboardsSettings.
Note: Only reports that are based on the Networks object show community-specific information on the Community Managementpage. Using reports based on the Networks object, means you can create one custom report and use it across all your communities.
Use the following table to get started with reporting for communities:
DescriptionPrimary Object > B (Child Object) > C (ChildObject, If Applicable)
High-level usage
Create reports on the private message activity in yourcommunity.1
Networks > Chatter MessagesChatter Usage
60
Dashboards and InsightsSet Up Your First Community
DescriptionPrimary Object > B (Child Object) > C (ChildObject, If Applicable)
High-level usage
Create reports on posts and comments that yourmembers have edited.
Networks > Feed RevisionsChatter Usage
Create reports on the groups in your community.Networks > GroupsChatter Usage
Create reports on all moderation activity and historyin your community.
To report on moderation activity in private Chattermessages, filter the report by Audited Object
Networks > Network AuditsModeration
Type (on the Network Audits object) to equalChatter Message.
Create reports on members in your community whoeither flagged items or moderated a flagged item.
Networks > Network Members > Network Activity Audit— Moderators
Moderation
Create reports on the members in your communitywhose items were flagged, blocked, or replaced.
Networks > Network Members > Network Activity Audit— User
Moderation
Create reports on frozen members in yourcommunity.
Networks > Network Members > User LoginModeration
Create reports on content that is currently flagged inyour community. These reports allow you to see the
Networks > Network Moderations > ContentDocuments
Networks > Network Moderations > Feed Posts
Moderation
actual contents of the flagged item. For example, youcan see the contents of a flagged private message toeasily determine if the message is spam.Networks > Network Moderations > Feed Comments
Networks > Network Moderations > Private Messages
Create report on posts that are pending review andapproval.
Networks > Unpublished Feed Entities > Feed PostsModeration
Create reports on the daily public community pageviews and unique visitors.
Networks > Network Public Usage Daily MetricsPublic Activity
Create reports on custom recommendation usage inyour community.
Networks > Recommendation MetricRecommendations
Create reports on the topic activity in yourcommunity.
Networks > TopicsTopic Activity
Create reports on the topic assignments in yourcommunity.
Networks > Topic AssignmentsTopic Activity
Create reports on the daily number of posts andcomments by member type.
Networks > Network Activity Daily MetricsUser Activity
Create reports on community login activity. Thisreport only includes direct logins to the community.
Networks > Network Members > Login HistoryUser Activity
If a user logs in to an org and then switches to acommunity, their login activity isn't included.
61
Dashboards and InsightsSet Up Your First Community
DescriptionPrimary Object > B (Child Object) > C (ChildObject, If Applicable)
High-level usage
Create reports on the daily count of total activemembers, new members added, and externalmember logins by member type.
Networks > Network Membership Daily MetricsUser Activity
Create reports on the unique daily contributors inyour community. A member is counted as a
Networks > Network Unique Contributor Daily MetricsUser Activity
contributor if they posted or commented on a groupor a user profile.
To report on user profiles with or without photos,filter the report by Has Profile Photo (on
Networks > Network MembersUser Profile Photos
the Network Members object) to equal True orFalse.
1To report on Chatter Messages, you must have the “Moderate Communities Chatter Messages” permission.
Note: You can create reports based on other objects and expose them in Community Management. Just keep in mind that theyshow data from across your organization, not just for the community in which you’re viewing them.
Moderation
Community Moderation Strategies and Tools
EDITIONS
Available in: SalesforceClassic
Available in: Enterprise,Performance, Unlimited,and Developer Editions
Community moderation allows you to empower members of your community to monitor contentand ensure that it’s appropriate and relevant. Set up rules to automate moderation and do theheavy lifting for you.
Moderation is crucial for a community to thrive. You need active moderators who are willing tospend time ensuring that the members and content in your community are appropriate and helpful.You also need to empower members to speak up when they view something as inappropriate oroffensive.
With Communities moderation, you can:
• Designate specific users as moderators so that they can closely monitor the community
• Allow members to flag posts, comments, files, and messages that are inappropriate or spam
• Allow moderators to review and act on flagged items, such as deleting a post, comment, or file
• Allow group owners and managers to moderate within their groups
• Create rules and criteria to automatically block, flag, replace keywords in member-generated content, such as posts or comments
• Create rules to review and approve content from specific members
• Track flagging and moderation activity within your community
To limit the size and types of files allowed in your community, go to the AdministrationPreferences page.
To report on moderation activity in your communities, you can use the preconfigured Audit Trail Insights report provided in SalesforceCommunities Management package. You can also query the flagged content or activity using the API, or create a custom report type
62
ModerationSet Up Your First Community
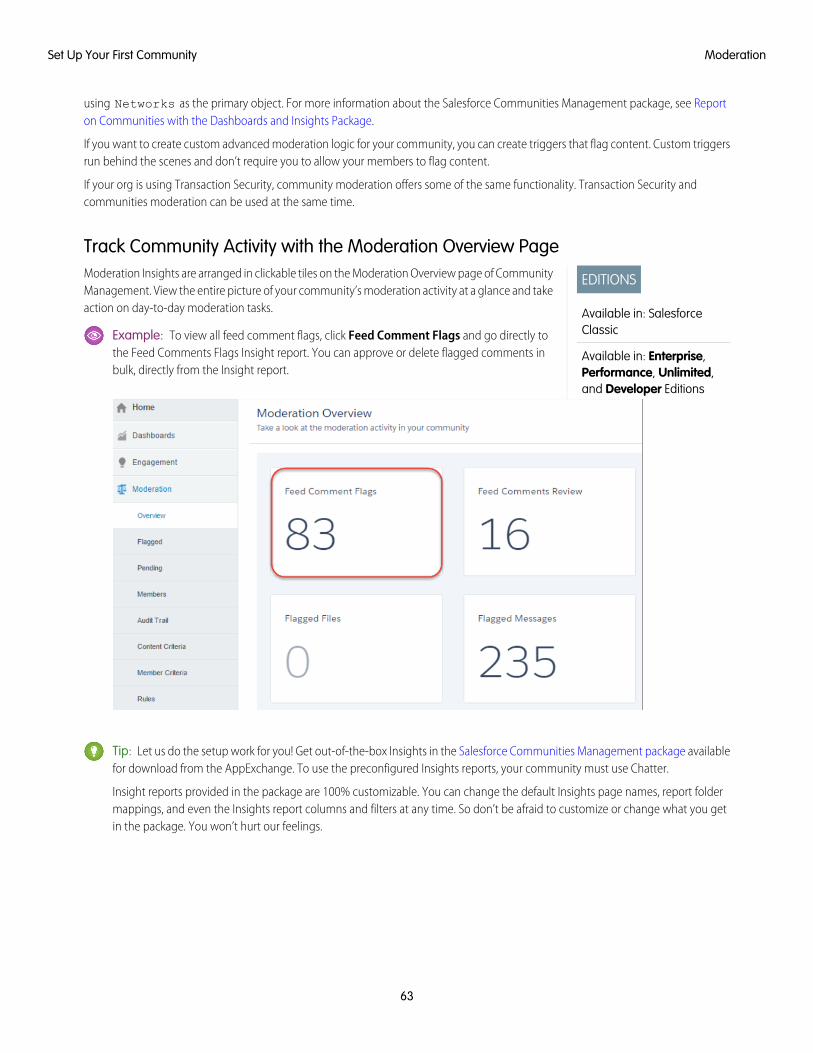
using Networks as the primary object. For more information about the Salesforce Communities Management package, see Reporton Communities with the Dashboards and Insights Package.
If you want to create custom advanced moderation logic for your community, you can create triggers that flag content. Custom triggersrun behind the scenes and don’t require you to allow your members to flag content.
If your org is using Transaction Security, community moderation offers some of the same functionality. Transaction Security andcommunities moderation can be used at the same time.
Track Community Activity with the Moderation Overview Page
EDITIONS
Available in: SalesforceClassic
Available in: Enterprise,Performance, Unlimited,and Developer Editions
Moderation Insights are arranged in clickable tiles on the Moderation Overview page of CommunityManagement. View the entire picture of your community’s moderation activity at a glance and takeaction on day-to-day moderation tasks.
Example: To view all feed comment flags, click Feed Comment Flags and go directly tothe Feed Comments Flags Insight report. You can approve or delete flagged comments inbulk, directly from the Insight report.
Tip: Let us do the setup work for you! Get out-of-the-box Insights in the Salesforce Communities Management package availablefor download from the AppExchange. To use the preconfigured Insights reports, your community must use Chatter.
Insight reports provided in the package are 100% customizable. You can change the default Insights page names, report foldermappings, and even the Insights report columns and filters at any time. So don’t be afraid to customize or change what you getin the package. You won’t hurt our feelings.
63
ModerationSet Up Your First Community
Assign a Community Moderator
EDITIONS
Available in: SalesforceClassic
Available in: Enterprise,Performance, Unlimited,and Developer Editions
USER PERMISSIONS
To assign permission sets:• “Assign Permission Sets”
Make one or more people moderators in your community so they can keep an eye on its content.
Moderators can be users from your internal organization or external users, but only internal userscan moderate from within Community Management. External users who are moderators canmoderate within context of the community, such as directly in the community feed.
You can assign moderators by assigning a permission set that includes one or more of followingmoderation permissions.
Allows Users ToPermission
Review flagged posts and comments and take action, such asremoving flags or deleting the post or comment. Moderatoroptions for feed content are available in the community feedand in Community Management.
Moderate Communities Feeds
Review flagged files they have access to and take action, suchas removing flags or deleting the file. Moderator options for
Moderate Communities Files
files are available on a file’s detail page and in CommunityManagement.
Review flagged messages and take action, such as removinga flag or deleting a message. This permission allows users access
Moderate Communities ChatterMessages
to only flagged messages in communities they’re a memberof.
Approve, delete, or edit posts and comments that are pendingreview.
Can Approve Feed Post andComment
Freeze external users who are members of the community.Moderators can freeze members on their user profile page orfrom an Insights report.
Moderate Community Users
Moderate community content in Community Management.Manage Communities
Access pages available in Community ManagementAccess Community Management
You can also add these permissions to a profile. These permissions are valid for all communities the user is a member of, but don’t applyin your internal organization.
1. From Setup, enter Permission Sets in the Quick Find box, then select Permission Sets, then click New.
2. Create a permission set that includes the appropriate permissions.
3. From Setup, enter Users in the Quick Find box, then select Users.
4. Find the user you want to be a community moderator and add the permission set to their Permission Set Assignments related list.
After you grant moderator permissions to a user, keep these things in mind:
• The user can now moderate any items they have access to in all communities they’re a member of.
• The user can flag items even if Allow members to flag content is disabled in a community.
• Moderators can receive an email notification when a post, comment, or file is flagged by selecting the Flag an item asinappropriate email notification.
64
ModerationSet Up Your First Community
Access to moderator functionality is slightly different depending on user permissions:
• In the community feed: Both internal and external users with the “Moderate Communities Feeds” permission can view flag indicatorsdirectly in the community feed for posts and comments and decide to either remove the flags or delete the content.
• In Community Management: Only internal users with the “Manage Communities” or “Create and Set Up Communities” permissioncan access the Moderation area in Community Management.
Enable Members to Flag Items in Your Community
EDITIONS
Available in: SalesforceClassic
Available in: Enterprise,Performance, Unlimited,and Developer Editions
USER PERMISSIONS
To enable users in yourcommunity to flag items:• “Create and Set Up
Communities”
AND
Is a member of thecommunity whoseCommunityManagement pagethey’re trying to access.
Turn on flagging for your community to empower members to flag posts, comments, files, andmessages that they deem inappropriate.
Community moderation must be enabled for your organization before you can allow members toflag content in the user interface. If you don’t see the option to allow flagged content, contact youradministrator.
This setting isn’t required to flag or moderate items using the API.
Once an item is flagged, your community moderator can review it and take action. Remember thatmoderators can continue to flag items even if flagging is disabled for community members.
1. Open Community Management.
2. Click AdministrationPreferences, then select Allow members to flag content.
3. Click Save.
With this setting enabled in a community:
• Members can flag posts, comments, and files using the Flag as inappropriate option.
• Members can flag messages from within the community on their My Messages page in Chatter.If a member has turned on email notification for messages, they can also flag the messagedirectly from their email. Members can only flag messages that are sent from communities theyare members of.
Note: Messages can’t be flagged in partner or customer portals, your internal organization,or from Salesforce1.
• Group owners and managers can moderate groups they own or manage.
If you want to create custom advanced moderation logic for your community, you can create triggers that flag content. Custom triggersrun behind the scenes and don’t require you to allow your members to flag content.
Community Moderation Criteria
EDITIONS
Available in: SalesforceClassic
Available in: Enterprise,Performance, Unlimited,and Developer Editions
Create criteria that define keywords or groups of members. Criteria are used in rules to moderatemember-generated content, such as posts and comments.
Plan Your Use-CasesBefore creating your member criteria, think about what you want to do.
• Do you want to protect your community from bots and spammers? Most spammers attackshortly after they’ve joined. Set up member criteria based on a user’s creation date.
• Do you want to review members’ first posts? Set up member criteria that targets userswithout community contributions.
• Do you want to moderate your internal users’ activity in your community? Set up membercriteria to include only your internal users.
65
ModerationSet Up Your First Community
• Do you want to be notified when a partner contributes for the first time? Set up member criteria to include only your partnerusers that don’t have community contributions.
Before creating content criteria, think about what you want to moderate.
• Do you want to moderate profanities and slang? Set up separate keyword lists for each group of related words.
• Do you want to replace competitor product names with asterisks? Create a keyword list just for your competitor products.
• Do you want to monitor content for HIPAA compliance? Create a keyword list that alerts of possible HIPAA violations.
Create Content Criteria to Moderate Your Community
EDITIONS
Available in: SalesforceClassic
Available in: Enterprise,Performance, Unlimited,and Developer Editions
USER PERMISSIONS
To view, create, edit, anddelete criteria:• “Manage Communities”
OR “Create and Set UpCommunities”
AND
Is a member of thecommunity whoseCommunityManagement pagethey’re trying to access.
Create and modify content criteria that define offensive language or inappropriate content thatyou don’t want in your community. Content criteria are used in rules to moderate member-generatedcontent, such as posts and comments.
You can also use the Metadata API or Tooling API to set up keyword lists.
Some things to keep in mind:
• Your org can have up to 30 keyword list criteria. This limit is per org, not per community.
• A keyword list can have up to 2,000 keywords.
• Capitalization and trailing punctuation are ignored when matching your keywords touser-generated content. For example, if your criteria includes BadWord, it’s matched whena user types BADWORD or badword.
Set up content criteria to use in your moderation rules:
1. Open Community Management.
2. Click ModerationContent Criteria, then click New.
3. Enter a name, unique name, and description for your criteria.
4. Click Save.
5. Update the keywords in your criteria.
To add keywords, click Add.
• Keywords can only be up to 100 characters and can include letters, numbers, spaces, andspecial characters.
• Wildcard characters aren’t supported.
• Separate keywords with commas or line breaks.
• When adding keywords, you can copy and paste up to 32,000 characters at a time.
Tip: To cover different variations of the same word, you can use special characters and spaces. For example:
bad-word
b@dword
b a d w o r d
To delete keywords, select the keywords you want to remove, then click Delete.
A message indicates how many keywords were added or failed to add, and the number of duplicates that were ignored. If yourentire entry failed to save, review the keyword requirements and then submit again. Don’t worry about adding duplicates becausethey’re ignored.
To delete criteria, click Del from the Content Criteria page. If criteria is being used by a rule, you can’t delete it.
66
ModerationSet Up Your First Community
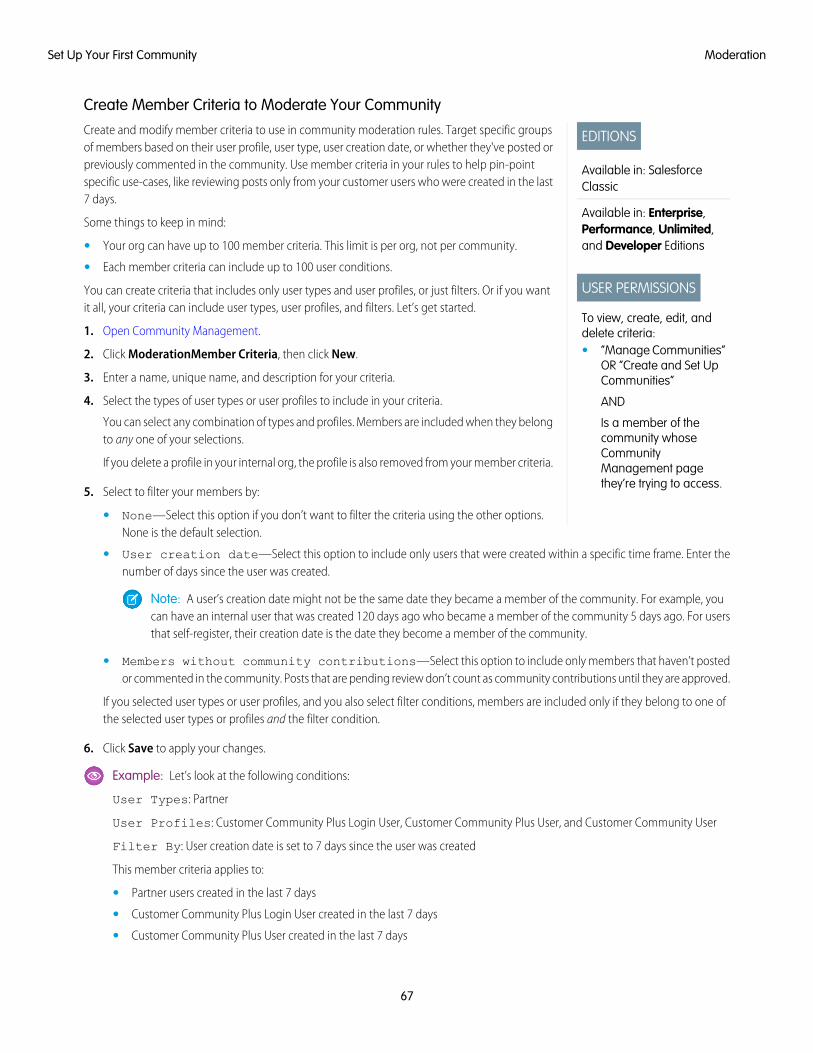
Create Member Criteria to Moderate Your Community
EDITIONS
Available in: SalesforceClassic
Available in: Enterprise,Performance, Unlimited,and Developer Editions
USER PERMISSIONS
To view, create, edit, anddelete criteria:• “Manage Communities”
OR “Create and Set UpCommunities”
AND
Is a member of thecommunity whoseCommunityManagement pagethey’re trying to access.
Create and modify member criteria to use in community moderation rules. Target specific groupsof members based on their user profile, user type, user creation date, or whether they've posted orpreviously commented in the community. Use member criteria in your rules to help pin-pointspecific use-cases, like reviewing posts only from your customer users who were created in the last7 days.
Some things to keep in mind:
• Your org can have up to 100 member criteria. This limit is per org, not per community.
• Each member criteria can include up to 100 user conditions.
You can create criteria that includes only user types and user profiles, or just filters. Or if you wantit all, your criteria can include user types, user profiles, and filters. Let’s get started.
1. Open Community Management.
2. Click ModerationMember Criteria, then click New.
3. Enter a name, unique name, and description for your criteria.
4. Select the types of user types or user profiles to include in your criteria.
You can select any combination of types and profiles. Members are included when they belongto any one of your selections.
If you delete a profile in your internal org, the profile is also removed from your member criteria.
5. Select to filter your members by:
• None—Select this option if you don’t want to filter the criteria using the other options.None is the default selection.
• User creation date—Select this option to include only users that were created within a specific time frame. Enter thenumber of days since the user was created.
Note: A user’s creation date might not be the same date they became a member of the community. For example, youcan have an internal user that was created 120 days ago who became a member of the community 5 days ago. For usersthat self-register, their creation date is the date they become a member of the community.
• Members without community contributions—Select this option to include only members that haven’t postedor commented in the community. Posts that are pending review don’t count as community contributions until they are approved.
If you selected user types or user profiles, and you also select filter conditions, members are included only if they belong to one ofthe selected user types or profiles and the filter condition.
6. Click Save to apply your changes.
Example: Let’s look at the following conditions:
User Types: Partner
User Profiles: Customer Community Plus Login User, Customer Community Plus User, and Customer Community User
Filter By: User creation date is set to 7 days since the user was created
This member criteria applies to:
• Partner users created in the last 7 days
• Customer Community Plus Login User created in the last 7 days
• Customer Community Plus User created in the last 7 days
67
ModerationSet Up Your First Community
• Customer Community User created in the last 7 days
You can use this member criteria in a rule to:
• Review and approve their posts
• Be notified of their contributions
• Flag all their contributions
To delete criteria, click Del from the Member Criteria page. If criteria is being used by a rule, you can’t delete it.
Community Moderation Rules
EDITIONS
Available in: SalesforceClassic
Available in: Enterprise,Performance, Unlimited,and Developer Editions
Create and modify rules for your community to moderate member-generated content. Each rulespecifies the member-generated content the rule applies to, the criteria to enforce the rule on, andthe moderation action to take. Moderation rules help protect your community from spammers,bots, and offensive or inappropriate content.
Create Content Rules to Moderate Your Community
EDITIONS
Available in: SalesforceClassic
Available in: Enterprise,Performance, Unlimited,and Developer Editions
USER PERMISSIONS
To view, create, edit, anddelete rules:• “Manage Communities”
OR “Create and Set UpCommunities”
AND
Is a member of thecommunity whoseCommunityManagement pagethey’re trying to access.
Create and modify rules for your community to moderate member-generated content. Contentrules protect your community from offensive language and inappropriate content created byspammers or malicious members. You can create content rules that block, replace, flag, or allowyou to review and approve member-generated content.
If your community uses the Customer Service (Napili) template, moderation rules apply to questionsand group posts created by your community members. If you community uses Salesforce Tabs +Visualforce, moderation rules can also run on publisher actions.
You can also use the Metadata API or Tooling API to set up content rules.
Some things to keep in mind:
• Your org can have up to 30 rules. This limit is per org, not per community. This limit includesboth content rules and rate rules.
• Each content rule can have up to 3 keyword criteria and 10 member criteria.
• Rules that block content run first, followed by rules to review and approve content, then rulesthat replace content, and last by rules that flag content. If two or more rules perform the sameaction, the oldest rule runs first, based on the date the rule was created. Rules to replace contentdon’t run when the content also applies to a review rule—we want community managers toreview the original content.
Tip: Before creating a rule, we recommend that you create criteria to use in the rule.
1. Open Community Management.
2. Click ModerationRules, then click New and select Content Rule.
3. Complete the following fields:
• Name—Enter a name for your rule.
• Unique Name—Enter a unique name for your rule. The unique name used by the API.
68
ModerationSet Up Your First Community

• Description—Optionally, enter a description.
• Activate Rule—If selected, the rule is activated.
• Applies To—Specify which types of member-generated content this rule applies to. Posts and comments only apply tocontent created in groups and user profiles. All feed types, such as polls and links, are supported.
• Moderation Action—Specify what you want to happen when the criteria is matched.
– Block prevents the content from being published.
– Review allows users with the “Can Approve Feed Post and Comment” permission to approve the content before it’spublished.
– Replace publishes the content with the keywords replaced as asterisks. For example, BadWord becomes *******.
– Flag publishes the content and then automatically flags the content as inappropriate.
• Message for Member—Specify the message that your member sees when their content is blocked. If you don’t specifya message, the member sees the standard message: “You can’t use %BLOCKED_KEYWORD% or other inappropriate words inthis community. Review your content and try again.” The %BLOCKED_KEYWORD% variable displays up to 5 blocked words.You can also use this variable in your own custom message.
Tip: For international communities, you can translate this message. From Setup, enter Translate in the Quick Findbox, then select Translate. To provide a translation for the message, select the Moderation Rule setup component andexpand the community the rule belongs to.
• Member Criteria—Specify member criteria to enforce this rule. Ask yourself, who should this rule apply to?
• Content Criteria—Specify the content criteria to enforce this rule. Ask yourself, what specific keywords should this ruleapply to?
Important: Keep the following things in mind:
• If you activate a content rule without specifying member criteria, the rule applies to all members.
• If you activate a content rule without specifying content criteria, the rule either:
– Prevents members from creating posts and comments entirely
– Sends all posts for review
– Flags all posts and comments
Yikes! Be careful.
• If you select member criteria and content criteria, the rule applies only when both criteria are met.
• Specifying criteria is optional. However, we recommend that you include criteria in your rules to target specific membersand content.
4. Click Save.
69
ModerationSet Up Your First Community
Create Rate Limit Rules to Moderate Your Community
EDITIONS
Available in: SalesforceClassic
Available in: Enterprise,Performance, Unlimited,and Developer Editions
USER PERMISSIONS
To view, create, edit, anddelete rules:• “Manage Communities”
OR “Create and Set UpCommunities”
AND
Is a member of thecommunity whoseCommunityManagement pagethey’re trying to access.
Create and modify rate rules to monitor and limit how frequently member-generated content iscreated in your community. Rate rules protect your community against spammers and bots thatattack your community by posting the same message multiple times in a row. You can create raterules to notify your moderators of suspicious spammer-like behavior or freeze a member on thespot.
Each rate rule controls two actions: notification and freeze. You can set up your rate rule for bothactions or just one. You can apply the rule to: posts, comments, files, and private messages. Incommunities that use the Customer Service (Napili) template, this includes questions and answers.
Some things to keep in mind:
• Your org can have up to 30 rules. This limit is per org, not per community. This limit includesboth content rules and rate rules.
• Each rate rule can have up to 10 member criteria.
Tip: Before creating a rule, we recommend that you create member criteria to use in therule.
1. Open Community Management.
2. Click ModerationModerationRules, then click New and select Rate Rule.
3. Complete the following fields:
• Name—Enter a name for your rule.
• Unique Name—Enter a unique name for your rule. The unique name used by the API.
• Description—Optionally, enter a description.
• Activate Rule—If selected, the rule is activated.
• Applies To—Specify which types of member-generated content this rule applies to. Posts and comments only apply tocontent created in groups and user profiles.
• Member Criteria—Specify the member criteria to enforce this rule. Ask yourself, who do I want this rule to apply to?
Spammers are typically new members. We recommend creating member criteria that only includes customer users that werecreated in the last 7 days.
Note:
– Rate rules don’t apply to internal users. You can use member criteria that includes internal users, but the rules don’tapply to them.
– If you activate a rate rule without specifying member criteria, the rule applies to all external users.
• Content Creation Time Frame—Select the time frame you want to use.
• Notify Moderators—Enter a number. Moderators are sent an email when a member creates this much content in yourset time frame.
• Freeze Members—Enter a number. Members are frozen when they create this much content in your set time frame.
Important: When members are frozen, they’re frozen in all communities that they’re a member of.
Emails are sent to users with the “Moderate Community Users” permission. Make sure that you assign your moderators this permission.Emails are sent even if a user has turned off Chatter emails.
4. Click Save to apply your changes.
70
ModerationSet Up Your First Community
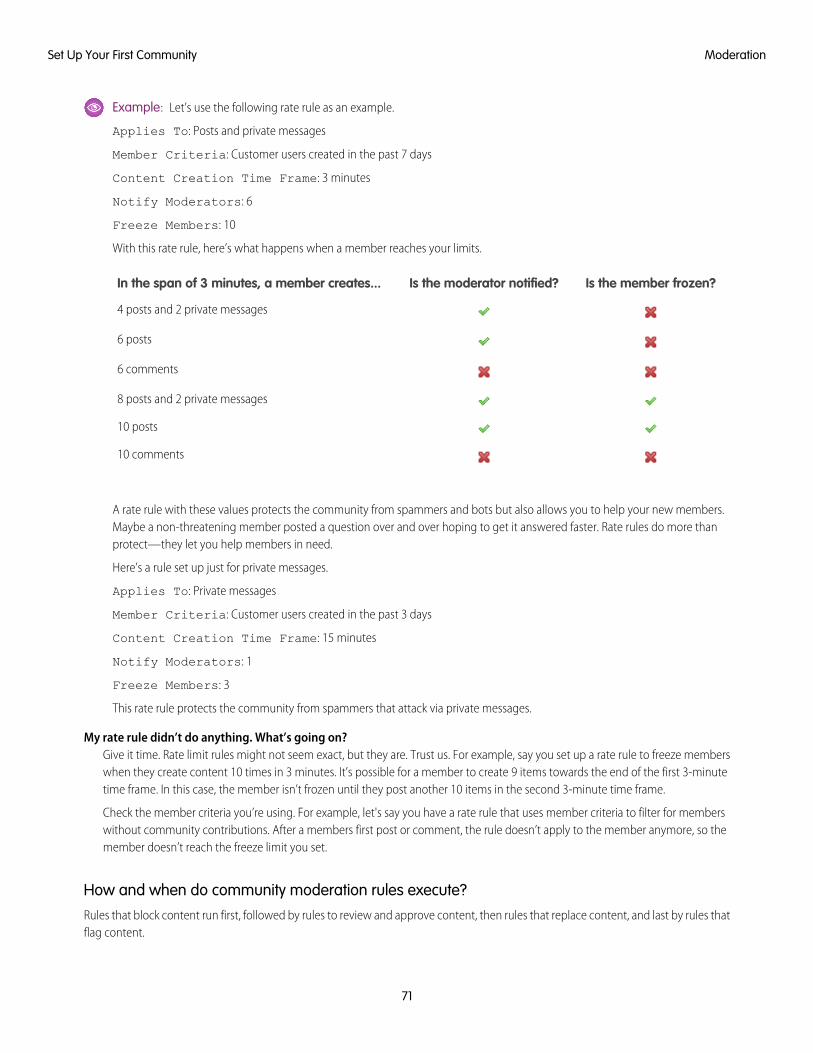
Example: Let’s use the following rate rule as an example.
Applies To: Posts and private messages
Member Criteria: Customer users created in the past 7 days
Content Creation Time Frame: 3 minutes
Notify Moderators: 6
Freeze Members: 10
With this rate rule, here’s what happens when a member reaches your limits.
Is the member frozen?Is the moderator notified?In the span of 3 minutes, a member creates...
4 posts and 2 private messages
6 posts
6 comments
8 posts and 2 private messages
10 posts
10 comments
A rate rule with these values protects the community from spammers and bots but also allows you to help your new members.Maybe a non-threatening member posted a question over and over hoping to get it answered faster. Rate rules do more thanprotect—they let you help members in need.
Here’s a rule set up just for private messages.
Applies To: Private messages
Member Criteria: Customer users created in the past 3 days
Content Creation Time Frame: 15 minutes
Notify Moderators: 1
Freeze Members: 3
This rate rule protects the community from spammers that attack via private messages.
My rate rule didn’t do anything. What’s going on?Give it time. Rate limit rules might not seem exact, but they are. Trust us. For example, say you set up a rate rule to freeze memberswhen they create content 10 times in 3 minutes. It’s possible for a member to create 9 items towards the end of the first 3-minutetime frame. In this case, the member isn’t frozen until they post another 10 items in the second 3-minute time frame.
Check the member criteria you’re using. For example, let's say you have a rate rule that uses member criteria to filter for memberswithout community contributions. After a members first post or comment, the rule doesn’t apply to the member anymore, so themember doesn’t reach the freeze limit you set.
How and when do community moderation rules execute?Rules that block content run first, followed by rules to review and approve content, then rules that replace content, and last by rules thatflag content.
71
ModerationSet Up Your First Community
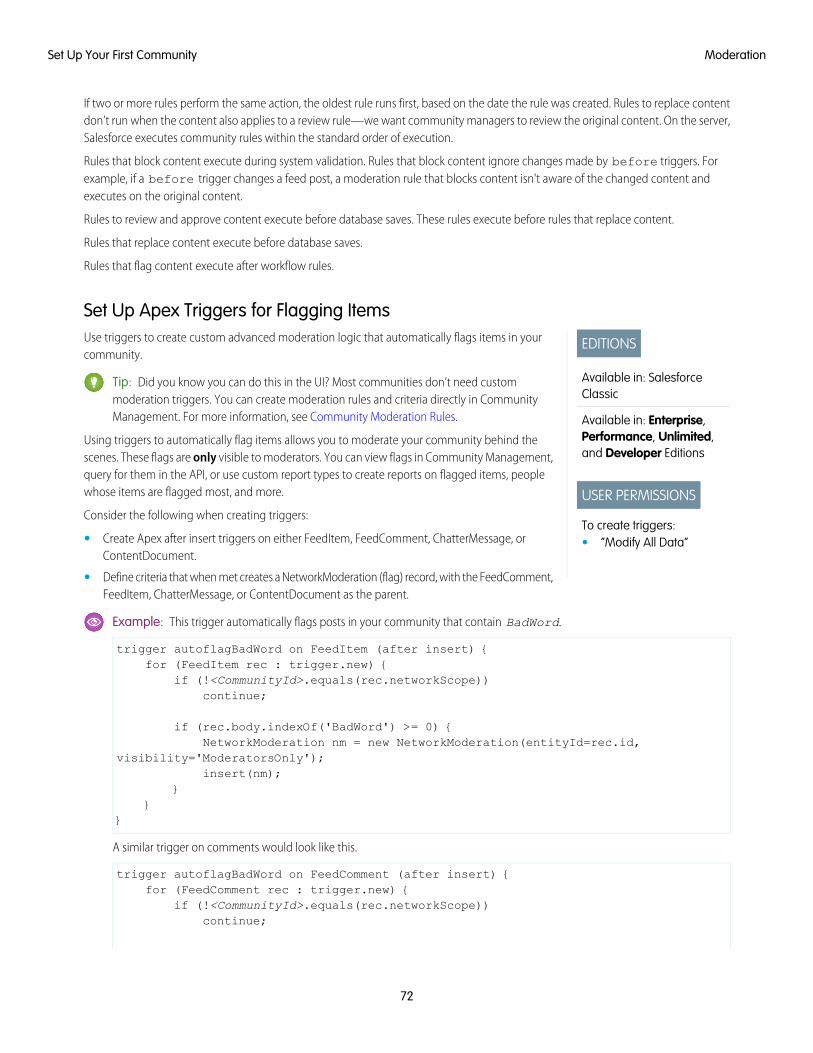
If two or more rules perform the same action, the oldest rule runs first, based on the date the rule was created. Rules to replace contentdon’t run when the content also applies to a review rule—we want community managers to review the original content. On the server,Salesforce executes community rules within the standard order of execution.
Rules that block content execute during system validation. Rules that block content ignore changes made by before triggers. Forexample, if a before trigger changes a feed post, a moderation rule that blocks content isn't aware of the changed content andexecutes on the original content.
Rules to review and approve content execute before database saves. These rules execute before rules that replace content.
Rules that replace content execute before database saves.
Rules that flag content execute after workflow rules.
Set Up Apex Triggers for Flagging Items
EDITIONS
Available in: SalesforceClassic
Available in: Enterprise,Performance, Unlimited,and Developer Editions
USER PERMISSIONS
To create triggers:• “Modify All Data”
Use triggers to create custom advanced moderation logic that automatically flags items in yourcommunity.
Tip: Did you know you can do this in the UI? Most communities don’t need custommoderation triggers. You can create moderation rules and criteria directly in CommunityManagement. For more information, see Community Moderation Rules.
Using triggers to automatically flag items allows you to moderate your community behind thescenes. These flags are only visible to moderators. You can view flags in Community Management,query for them in the API, or use custom report types to create reports on flagged items, peoplewhose items are flagged most, and more.
Consider the following when creating triggers:
• Create Apex after insert triggers on either FeedItem, FeedComment, ChatterMessage, orContentDocument.
• Define criteria that when met creates a NetworkModeration (flag) record, with the FeedComment,FeedItem, ChatterMessage, or ContentDocument as the parent.
Example: This trigger automatically flags posts in your community that contain BadWord.
trigger autoflagBadWord on FeedItem (after insert) {for (FeedItem rec : trigger.new) {
if (!<CommunityId>.equals(rec.networkScope))continue;
if (rec.body.indexOf('BadWord') >= 0) {NetworkModeration nm = new NetworkModeration(entityId=rec.id,
visibility='ModeratorsOnly');insert(nm);
}}
}
A similar trigger on comments would look like this.
trigger autoflagBadWord on FeedComment (after insert) {for (FeedComment rec : trigger.new) {
if (!<CommunityId>.equals(rec.networkScope))continue;
72
ModerationSet Up Your First Community
if (rec.commentBody.indexOf('BadWord') >= 0) {NetworkModeration nm = new NetworkModeration(entityId=rec.id,
visibility='ModeratorsOnly');insert(nm);
}}
}
Topics
Organize Self-Service Communities with TopicsNavigational and featured topics are a fantastic way to organize content in a community. Use topics to structure your community contentor highlight key discussions. You can create topics or use the topics that organically emerge from community member posts. You canuse topics in the communities built using the Customer Service (Napili) template.
In Community Management, choose navigational topics and subtopics to provide a consistent map of your community. Use featuredtopics to highlight current, popular conversations. In the community itself, member-created topics let users organize information foreach other, creating a personalized experience that boosts community engagement.
In a self-service community, the Customer Service (Napili) template specifies the layout and design of navigational, featured, andmember-created topics.
Tip: To add navigational and featured topics to other types of communities, Apex developers can use theConnectApi.ManagedTopics class in a Visualforce page.
Navigational topicsOn every page of a self-service community, navigational topics are available from the Topics menu at upper left. Community memberscan also see all the community’s navigational topics and subtopics in one place in the topic catalog.
When visitors choose a navigational topic, the banner image you selected for it appears at the top of the page.
73
TopicsSet Up Your First Community
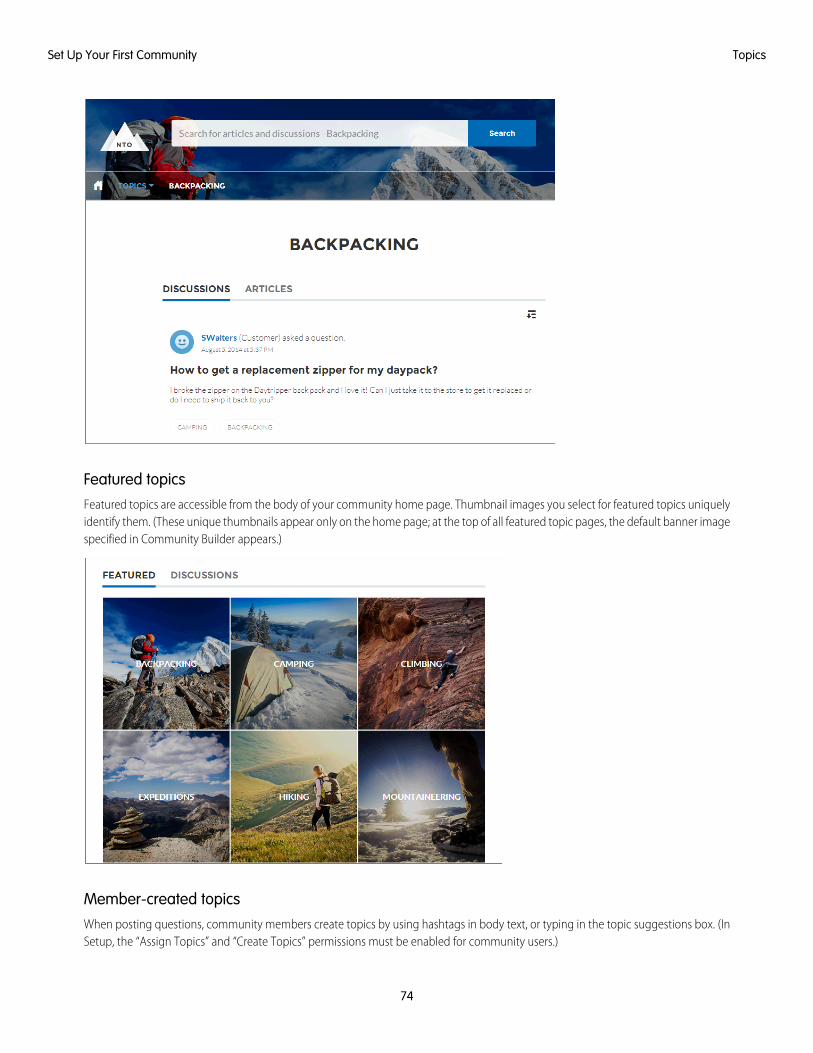
Featured topicsFeatured topics are accessible from the body of your community home page. Thumbnail images you select for featured topics uniquelyidentify them. (These unique thumbnails appear only on the home page; at the top of all featured topic pages, the default banner imagespecified in Community Builder appears.)
Member-created topicsWhen posting questions, community members create topics by using hashtags in body text, or typing in the topic suggestions box. (InSetup, the “Assign Topics” and “Create Topics” permissions must be enabled for community users.)
74
TopicsSet Up Your First Community
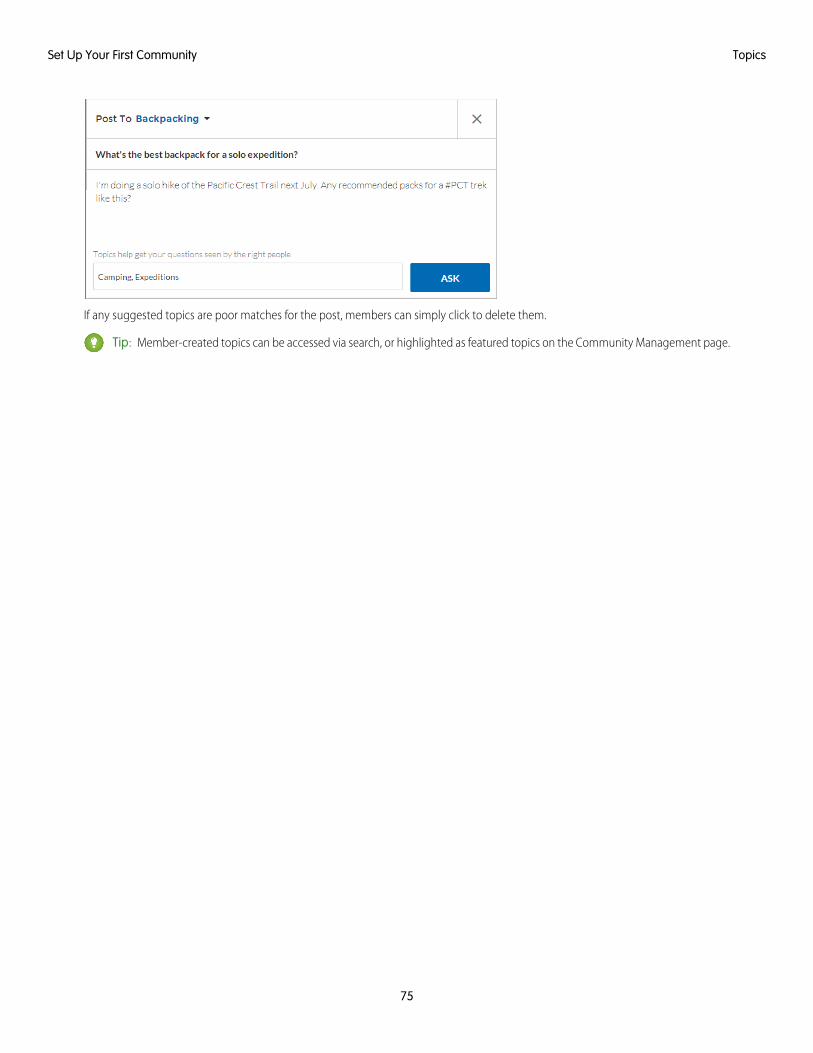
If any suggested topics are poor matches for the post, members can simply click to delete them.
Tip: Member-created topics can be accessed via search, or highlighted as featured topics on the Community Management page.
75
TopicsSet Up Your First Community
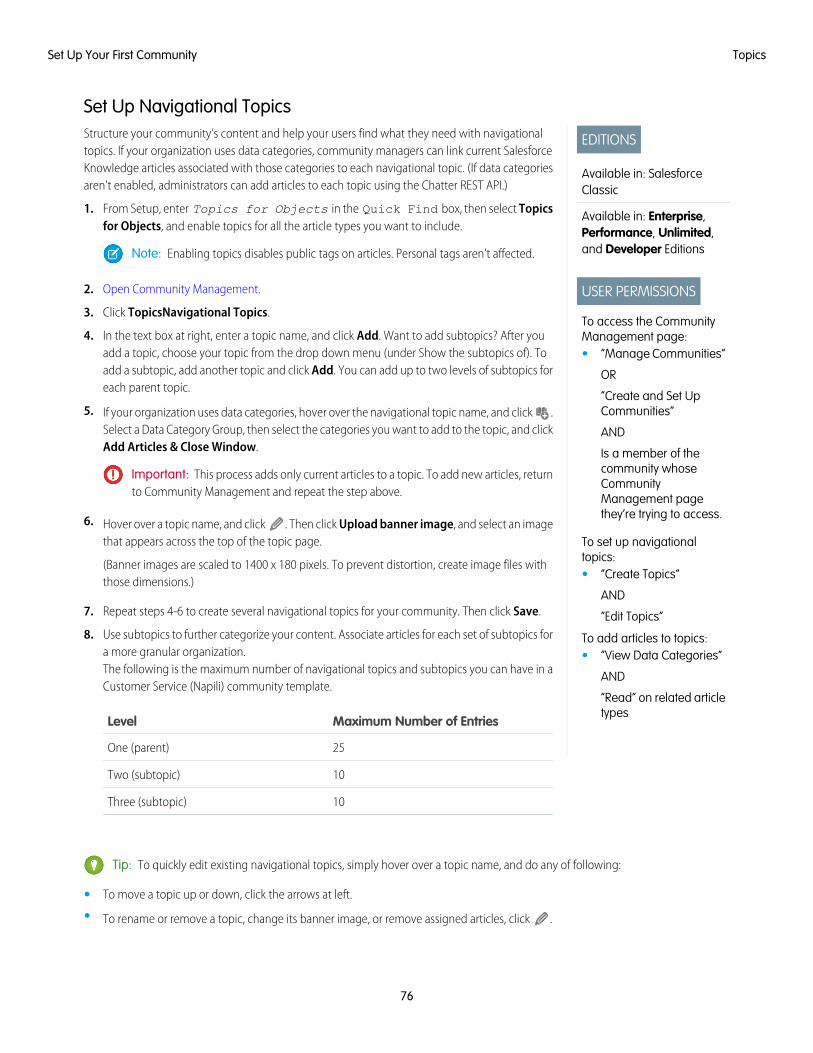
Set Up Navigational Topics
EDITIONS
Available in: SalesforceClassic
Available in: Enterprise,Performance, Unlimited,and Developer Editions
USER PERMISSIONS
To access the CommunityManagement page:• “Manage Communities”
OR
“Create and Set UpCommunities”
AND
Is a member of thecommunity whoseCommunityManagement pagethey’re trying to access.
To set up navigationaltopics:• “Create Topics”
AND
“Edit Topics”
To add articles to topics:• “View Data Categories”
AND
“Read” on related articletypes
Structure your community’s content and help your users find what they need with navigationaltopics. If your organization uses data categories, community managers can link current SalesforceKnowledge articles associated with those categories to each navigational topic. (If data categoriesaren’t enabled, administrators can add articles to each topic using the Chatter REST API.)
1. From Setup, enter Topics for Objects in the Quick Find box, then select Topicsfor Objects, and enable topics for all the article types you want to include.
Note: Enabling topics disables public tags on articles. Personal tags aren’t affected.
2. Open Community Management.
3. Click TopicsNavigational Topics.
4. In the text box at right, enter a topic name, and click Add. Want to add subtopics? After youadd a topic, choose your topic from the drop down menu (under Show the subtopics of). Toadd a subtopic, add another topic and click Add. You can add up to two levels of subtopics foreach parent topic.
5. If your organization uses data categories, hover over the navigational topic name, and click .Select a Data Category Group, then select the categories you want to add to the topic, and clickAdd Articles & Close Window.
Important: This process adds only current articles to a topic. To add new articles, returnto Community Management and repeat the step above.
6. Hover over a topic name, and click . Then click Upload banner image, and select an imagethat appears across the top of the topic page.
(Banner images are scaled to 1400 x 180 pixels. To prevent distortion, create image files withthose dimensions.)
7. Repeat steps 4-6 to create several navigational topics for your community. Then click Save.
8. Use subtopics to further categorize your content. Associate articles for each set of subtopics fora more granular organization.The following is the maximum number of navigational topics and subtopics you can have in aCustomer Service (Napili) community template.
Maximum Number of EntriesLevel
25One (parent)
10Two (subtopic)
10Three (subtopic)
Tip: To quickly edit existing navigational topics, simply hover over a topic name, and do any of following:
• To move a topic up or down, click the arrows at left.
• To rename or remove a topic, change its banner image, or remove assigned articles, click .
76
TopicsSet Up Your First Community

Set Up Featured Topics
EDITIONS
Available in: SalesforceClassic
Available in: Enterprise,Performance, Unlimited,and Developer Editions
USER PERMISSIONS
To access the CommunityManagement page:• “Manage Communities”
OR
“Create and Set UpCommunities”
AND
Is a member of thecommunity whoseCommunityManagement pagethey’re trying to access.
To set up featured topics:• “Edit Topics”
Featured topics highlight current, popular community conversations. Change them regularly tokeep community members up-to-date and engaged.
1. Open Community Management.
2. Click TopicsFeatured Topics.
3. Enter the first few letters of the topic name in the search box. Select a suggested topic and clickAdd. Use navigational or member-created topics.
Tip: Using the Chatter REST API, you can create unique featured topics, separate fromnavigational or member-created ones.
4. Hover over a topic name, and click . Then click Upload thumbnail image, and select animage that represents the featured topic on the community home page.
(Thumbnail images are scaled to 250 x 250 pixels. To prevent distortion, create image files withthose dimensions.)
5. Repeat steps 3 and 4 to create several featured topics for your community, up to a maximumof 25. Then click Save.
To quickly edit existing featured topics, simply hover over a topic name, and do any of following:
• To move topics up or down, click the arrows at left.
• To delete topics or change their thumbnail images, click .
Manage Topics in Communities
EDITIONS
Available in: SalesforceClassic
Available in: Enterprise,Performance, Unlimited,and Developer Editions
USER PERMISSIONS
“Manage Communities”
OR
“Create and Set Up Communities”
To access the Community Managementpage:
“Create Topics”To create topics:
“Merge Topics”To merge topics:
“Delete Topics”To delete topics:
“Edit Topics”To rename topics:
As the number of topics in a community grows, curate them to improve usability. In Community Management, you can create, merge,rename, and delete topics in one convenient location.
1. Open Community Management.
2. Click TopicsTopic Management.
77
TopicsSet Up Your First Community
3. Do any of the following:
• To create a topic (often with a plan to merge existing ones into it), click New. Add a name and a topic description, which willboost SEO.
• To combine existing topics, click Merge.
Merging a topic automatically redirects existing hashtags in posts. If you merge a navigational or featured topic, the topic type,image, and any subtopic relationships are discarded.
• To rename or delete an existing topic, or add a description to it, click .
If you don’t see a topic you want to rename or delete, either search for it or click Show More below the topic list.
Tip: For communities with a global audience, you can translate names and descriptions of navigational and featured topics. FromSetup, search for and select Translate. Then select the Managed Topic setup component, and expand a community tosee its master topic names.
Add Topics to Articles or Remove Them
EDITIONS
Available in: SalesforceClassic
Available in: Enterprise,Performance, Unlimited,and Developer Editions
USER PERMISSIONS
To access the CommunityManagement page:• “Manage Communities”
OR
“Create and Set UpCommunities”
To add or remove topics:• “Create Topics”
Easily add multiple topics of any type to specific articles, or quickly remove them as communityneeds change.
1. Open Community Management.
2. Click Topics > Article Management.
3. Use the search bar to look for articles. Filter your search by selecting a data category group,followed by a specific category.
4. Click an article, and then type to assign topics, or click existing ones to remove them.
Note: To automatically add the translated version of a topic to translated articles, thetranslated topics and articles must already be uploaded in the system. Otherwise, the translatedarticle is tagged with the English topic.
78
TopicsSet Up Your First Community
Recommendations
Customize Recommendations in Communities
EDITIONS
Available in: SalesforceClassic
Available in: Enterprise,Performance, Unlimited,and Developer Editions
USER PERMISSIONS
To access the CommunityManagement page:• “Manage Communities”
OR
“Create and Set UpCommunities”
Create recommendations to drive engagement for your community, encouraging users to watchvideos, take trainings, and more. Edit these recommendations in Community Management, whereyou can target specific audiences and use channels to specify locations for the recommendations.
1. Open Community Management.
2. Select RecommendationsRecommendations.
3. Select Default Channel or one of the custom channels.
A channel is a way to group recommendations together so you can determine where theyshow up in the community.
Default ChannelRecommendations in the default channel appear in predefined locations, such as directlyin the feed in the Salesforce1 mobile browser app and on the Home and Question Detailpages in communities using the Summer ’15 or later version of the Customer Service (Napili)template.
Custom ChannelYou choose the pages where you want these recommendations to appear. In CommunityBuilder, add the Recommendations component to the page where you want therecommendation to appear. Use the property editor to specify the custom channel withthe recommendation.
Using a custom channel, you could surface a recommendation to review specific knowledge articles on a product descriptionpage to guide customers to more information.
If you want to change the channel of a recommendation, delete the recommendation and recreate it in a different channel.
4. Click New.
5. Complete the following fields:
• Name—Enter a name for the recommendation in Community Management. This name doesn’t appear in the community.
• Image—Click Upload Image to include an image with your recommendation.
• Title—Optionally, enter header text that appears above the image.
• Description—Enter detailed text that suggests what users can do.
• Button text—Enter a label for the button in the recommendation.
• https://—Enter the URL that the button opens.
The URL can contain context variables to pass information about the user who clicked the recommendation and the context inwhich it was clicked. For example, include a {!userId} context variable in your URL,https://www.example.com/doSurvey?userId={!userId}. When a user clicks the button in therecommendation, Salesforce sends the ID of that user to your server in the HTTP request.
Recommendations support these context variables.
DescriptionContext Variable
The ID of the recommendation link that the user clicked.{!actionLinkId}
79
RecommendationsSet Up Your First Community

DescriptionContext Variable
The ID of the recommendation link group containing therecommendation that the user clicked.
{!actionLinkGroupId}
The ID of the community in which the user clicked therecommendation. The value for your internal Salesforce org isthe empty key, "000000000000000000".
{!communityId}
The ID of the org in which the user clicked therecommendation.
{!orgId}
The ID of the user that clicked the recommendation.{!userId}
• Audience—Select an audience for the recommendation. If you don’t select an audience, all members of the community seethe recommendation.
Tip: To create an audience that appears in this drop-down list, in Community Management selectRecommendationsAudiences and click New.
• Enabled—If checked, this recommendation is active and appears in communities.
When disabled, recommendations that exist in feeds in the Salesforce1 mobile browser app are not removed, but no newrecommendations appear. In communities using the Summer ’15 or later version of the Customer Service (Napili) template,disabled recommendations no longer appear.
6. Click Save.
Tip: To remove a recommendation, in Community Management, select RecommendationsRecommendations, and click therecommendation name. At the bottom of the recommendation details, click Delete.
SEE ALSO:
Update Your Community’s Template
80
RecommendationsSet Up Your First Community
Target Community Member Audiences for Your Recommendations
EDITIONS
Available in: SalesforceClassic
Available in: Enterprise,Performance, Unlimited,and Developer Editions
USER PERMISSIONS
To access the CommunityManagement page:• “Manage Communities”
OR
“Create and Set UpCommunities”
Create audiences of new community members, or use the API to manage customized lists ofaudience members.
1. Open Community Management.
2. Select RecommendationsAudiences.
3. Click New.
4. Complete the following fields.
• Name—Enter a name for the audience in Community Management.
• Audience Type
– Select New Members to create an audience based on how long users have beencommunity members.
Enter the number of days since registration for audience members.
– Select Custom List to create an audience based on any criteria you want.
Note: You can’t manage audience membership for custom lists through the UI.Add and remove members through the API.
5. Click Save.
Audiences you create appear in the Audience drop-down list when you create a recommendation.
Tip: To remove an audience, in Community Management, select RecommendationsAudiences, and click the audience name.At the bottom of the audience details, click Delete. If you remove an audience that is associated with a recommendation, therecommendation is disabled and the audience is set to the default (All community members).
SEE ALSO:
Chatter REST API Developer Guide
Apex Developer Guide
Reputation
Reputation Overview
EDITIONS
Available in: SalesforceClassic
Available in: Enterprise,Performance, Unlimited,and Developer Editions
Your reputation in the community directly corresponds to how active you are. The more you post,comment, and share, the higher your reputation level will be.
Your reputation level appears on your profile page and when any user hovers over your name. It’svisible to other community members so that they know how influential you are. When you startout in the community, you are at the lowest level. As you become more active in the community,you gain points and your reputation level increases. Increases in reputation levels are posted toyour feed. In other words, as people see you participating and sharing your knowledge, yourcredibility and influence grows.
These are the default actions that increase your reputation level. You increase your reputation by:
• Posting
81
ReputationSet Up Your First Community
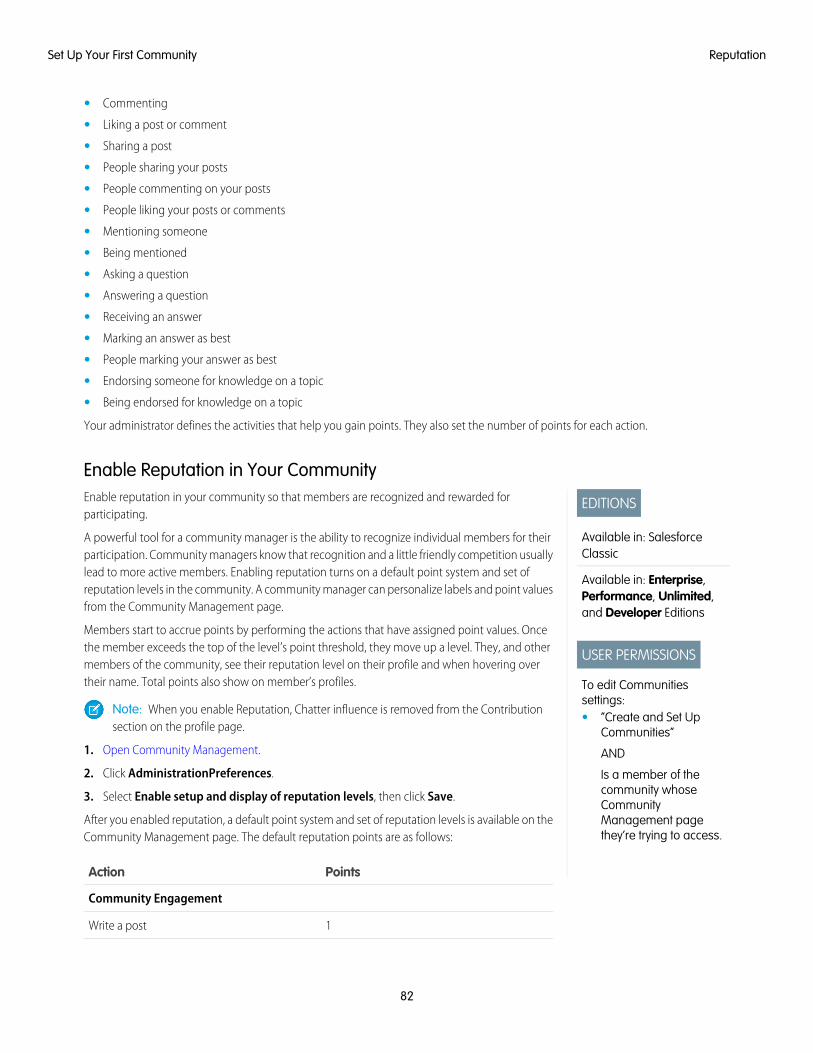
• Commenting
• Liking a post or comment
• Sharing a post
• People sharing your posts
• People commenting on your posts
• People liking your posts or comments
• Mentioning someone
• Being mentioned
• Asking a question
• Answering a question
• Receiving an answer
• Marking an answer as best
• People marking your answer as best
• Endorsing someone for knowledge on a topic
• Being endorsed for knowledge on a topic
Your administrator defines the activities that help you gain points. They also set the number of points for each action.
Enable Reputation in Your Community
EDITIONS
Available in: SalesforceClassic
Available in: Enterprise,Performance, Unlimited,and Developer Editions
USER PERMISSIONS
To edit Communitiessettings:• “Create and Set Up
Communities”
AND
Is a member of thecommunity whoseCommunityManagement pagethey’re trying to access.
Enable reputation in your community so that members are recognized and rewarded forparticipating.
A powerful tool for a community manager is the ability to recognize individual members for theirparticipation. Community managers know that recognition and a little friendly competition usuallylead to more active members. Enabling reputation turns on a default point system and set ofreputation levels in the community. A community manager can personalize labels and point valuesfrom the Community Management page.
Members start to accrue points by performing the actions that have assigned point values. Oncethe member exceeds the top of the level’s point threshold, they move up a level. They, and othermembers of the community, see their reputation level on their profile and when hovering overtheir name. Total points also show on member’s profiles.
Note: When you enable Reputation, Chatter influence is removed from the Contributionsection on the profile page.
1. Open Community Management.
2. Click AdministrationPreferences.
3. Select Enable setup and display of reputation levels, then click Save.
After you enabled reputation, a default point system and set of reputation levels is available on theCommunity Management page. The default reputation points are as follows:
PointsAction
Community Engagement
1Write a post
82
ReputationSet Up Your First Community
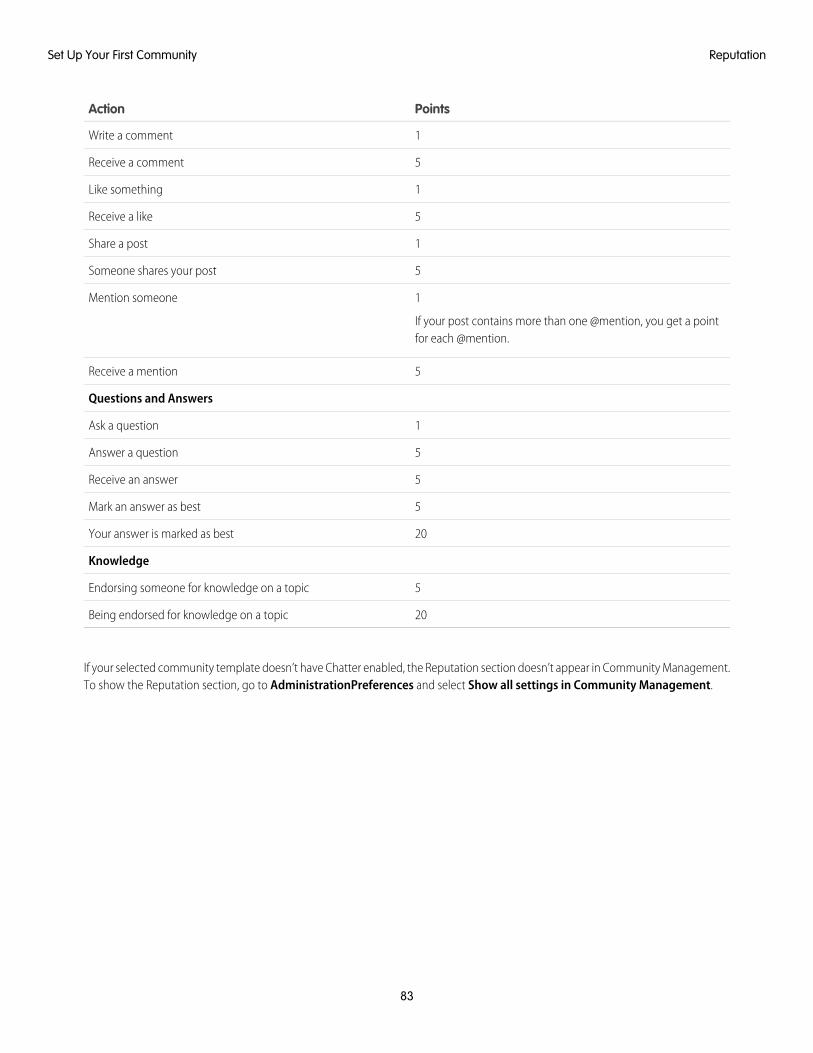
PointsAction
1Write a comment
5Receive a comment
1Like something
5Receive a like
1Share a post
5Someone shares your post
1
If your post contains more than one @mention, you get a pointfor each @mention.
Mention someone
5Receive a mention
Questions and Answers
1Ask a question
5Answer a question
5Receive an answer
5Mark an answer as best
20Your answer is marked as best
Knowledge
5Endorsing someone for knowledge on a topic
20Being endorsed for knowledge on a topic
If your selected community template doesn’t have Chatter enabled, the Reputation section doesn’t appear in Community Management.To show the Reputation section, go to AdministrationPreferences and select Show all settings in Community Management.
83
ReputationSet Up Your First Community
Set Up Reputation Levels
EDITIONS
Available in: SalesforceClassic
Available in: Enterprise,Performance, Unlimited,and Developer Editions
USER PERMISSIONS
To update reputation levels:• “Manage Communities”
AND
Is a member of thecommunity whoseCommunityManagement pagethey’re trying to access.
Update the default reputation levels to meet your community’s needs and help motivate yourmembers.
When reputation is enabled for a community, 10 default levels are added. You can add or removelevels, give each level a name, and update the point range and image for each level.
Note: A community must have at least three reputation levels and can have up to 50.
1. Open Community Management.
2. Click ReputationReputation Levels.
From here you can:
• Upload your own image for each reputation level. Click the default image to browse to animage file and upload a new image.
Note: You can’t revert to the default reputation level images from the Salesforceuser interface. Use the Salesforce Chatter REST API to do this.
• Give each level a name, such as “Beginner,” “Intermediate,” and “Expert.” If you don’t assigna name, the default is used. For example, “Level 1,” “Level 2,” “Level 3.”
• Edit the point range for a level.
When you update the higher value of a level’s point range, the lower value for the nextlevel is automatically adjusted when you save.
• Add more levels by clicking Add a level, located underneath the list of levels.
• Remove a level by clicking next to the level.
3. Click Save to apply your changes.
You can now update the point system for the community. The point system determines how many points a user gets when they performcertain actions or when others recognize their contributions by commenting, liking, or sharing their posts. Reputation level increasesare posted to member feeds.
You can translate reputation level names so that international community members can view their reputation levels in the appropriatelanguage. In Translation Workbench, select the Reputation Level setup component and then expand the node next to yourcommunity.
84
ReputationSet Up Your First Community
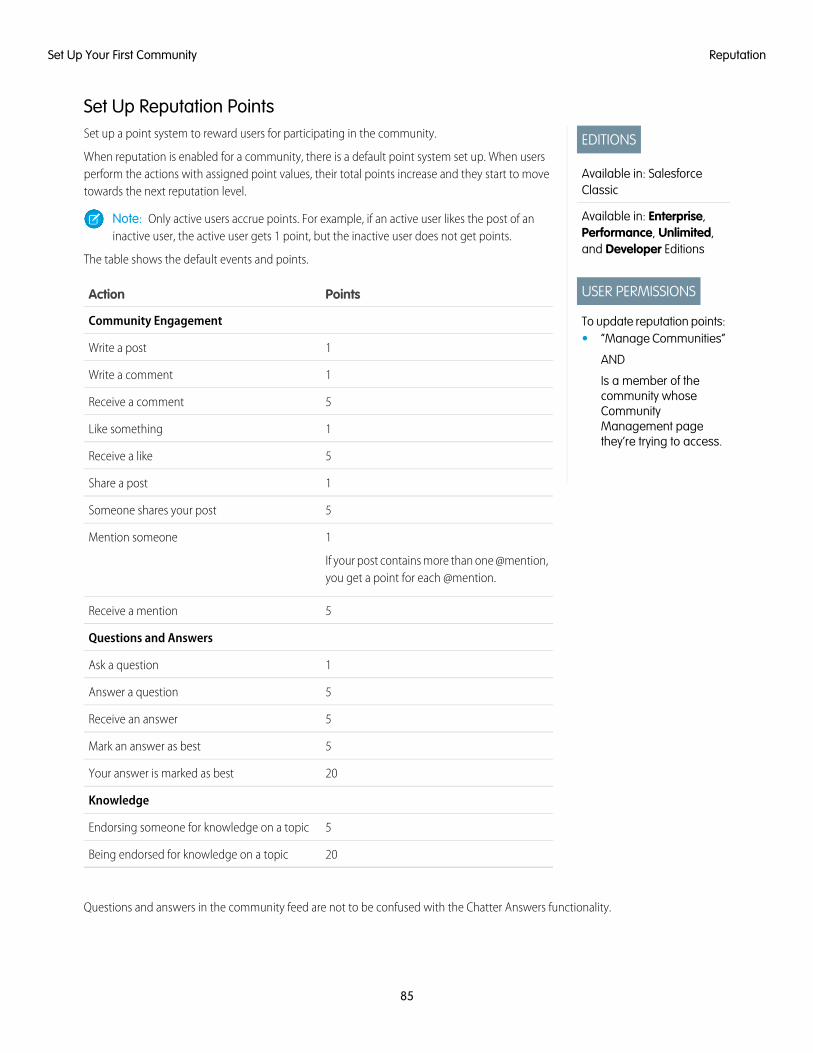
Set Up Reputation Points
EDITIONS
Available in: SalesforceClassic
Available in: Enterprise,Performance, Unlimited,and Developer Editions
USER PERMISSIONS
To update reputation points:• “Manage Communities”
AND
Is a member of thecommunity whoseCommunityManagement pagethey’re trying to access.
Set up a point system to reward users for participating in the community.
When reputation is enabled for a community, there is a default point system set up. When usersperform the actions with assigned point values, their total points increase and they start to movetowards the next reputation level.
Note: Only active users accrue points. For example, if an active user likes the post of aninactive user, the active user gets 1 point, but the inactive user does not get points.
The table shows the default events and points.
PointsAction
Community Engagement
1Write a post
1Write a comment
5Receive a comment
1Like something
5Receive a like
1Share a post
5Someone shares your post
1
If your post contains more than one @mention,you get a point for each @mention.
Mention someone
5Receive a mention
Questions and Answers
1Ask a question
5Answer a question
5Receive an answer
5Mark an answer as best
20Your answer is marked as best
Knowledge
5Endorsing someone for knowledge on a topic
20Being endorsed for knowledge on a topic
Questions and answers in the community feed are not to be confused with the Chatter Answers functionality.
85
ReputationSet Up Your First Community
Note: In organizations with reputation enabled prior to the Winter ’15 release, actions associated with questions and answerswill be available at the time of the release and their default point values will be set to 0. Existing user reputation points will not beaffected by the release, and users won’t accrue points from these actions until you configure point values for them.
1. Open Community Management.
2. Click ReputationReputation Points.
3. Update the points for each action. If you don’t want users to accrue points for a certain action, set the Points to 0.
4. Click Save.
Point totals show up on profile pages beneath the photo. Point totals are visible to anyone in the community.
Tip: You can directly update reputation points for a community member via the Salesforce API. You can also use Apex triggersto send custom notifications based on changes to reputation points.
86
ReputationSet Up Your First Community
PLAN YOUR COMMUNITY DESIGN STRATEGY
If you chose to use custom pages in your community instead of out-of-box tabs and branding, you need to decide whether to useCommunity Builder or Force.com. Once you make the decision, use the following sections to help you customize community pages:
• Use Visualforce and Force.com Sites
• Using Community Builder With Templates
• Use Community Builder (Site.com) Without Templates
You can also customize these other areas of your community:
• Add the Global Search Box to Your Customized Community HTML Header on page 116
• Configure a Custom Domain for Your Community
• Rename the Chatter Tab
Customize Community Pages
Choosing Between Community Builder and Force.com SitesIf you want to add new pages or customize existing pages in your community, you can use Force.com Sites or Community Builder. Witheither option, you can create branded, publicly available pages such as landing or marketing pages, and private custom pages that onlycommunity members can access.
So which option should you use to customize your community? Well, that depends on your skills and the needs of your organization.You can even use a mixture of Force.com pages and Community Builder pages for complete control over your customizations.
Community BuilderCommunity Builder is an intuitive, convenient tool for customizing your community. Community Builder lets you create a communitybased on a preconfigured template, and then apply branding, edit pages, update your template, and publish changes all from oneuser-friendly interface.
Here’s what you can achieve with Community Builder:
• Use one of the self-service templates—Koa, Kokua, or Customer Service (Napili)—to easily create a responsive self-service community.
• Use the Aloha template to create a configurable App Launcher.
• Design pixel-perfect, branded pages.
• Create public pages that anyone can access, or add private pages that you can add as a tab within your community.
• Build and iterate quickly using drag-and-drop reusable page elements.
• Use ready-made forms to create web-to-lead forms or gather customer feedback.
• Create data-driven pages, such as product catalogs or other listings, using your organization’s data.
• Set a home page and set up multilingual support for your community in Site.com Studio, a Web content management system thatprovides extra configuration options. Site.com Studio is easily accessible from Community Management.
87
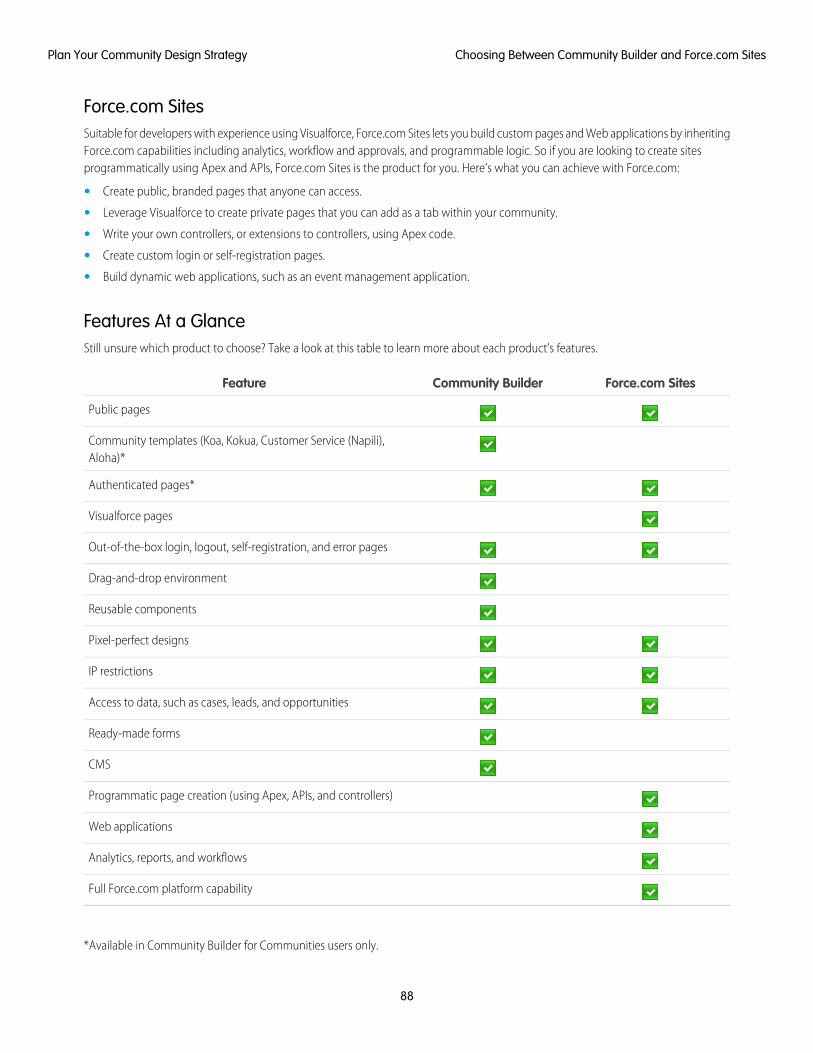
Force.com SitesSuitable for developers with experience using Visualforce, Force.com Sites lets you build custom pages and Web applications by inheritingForce.com capabilities including analytics, workflow and approvals, and programmable logic. So if you are looking to create sitesprogrammatically using Apex and APIs, Force.com Sites is the product for you. Here’s what you can achieve with Force.com:
• Create public, branded pages that anyone can access.
• Leverage Visualforce to create private pages that you can add as a tab within your community.
• Write your own controllers, or extensions to controllers, using Apex code.
• Create custom login or self-registration pages.
• Build dynamic web applications, such as an event management application.
Features At a GlanceStill unsure which product to choose? Take a look at this table to learn more about each product’s features.
Force.com SitesCommunity BuilderFeature
Public pages
Community templates (Koa, Kokua, Customer Service (Napili),Aloha)*
Authenticated pages*
Visualforce pages
Out-of-the-box login, logout, self-registration, and error pages
Drag-and-drop environment
Reusable components
Pixel-perfect designs
IP restrictions
Access to data, such as cases, leads, and opportunities
Ready-made forms
CMS
Programmatic page creation (using Apex, APIs, and controllers)
Web applications
Analytics, reports, and workflows
Full Force.com platform capability
*Available in Community Builder for Communities users only.
88
Choosing Between Community Builder and Force.com SitesPlan Your Community Design Strategy
To learn more about Community Builder, Force.com, and Site.com technologies, see:
• Community Builder Overview
• Force.com Sites Overview
• Site.com Overview
Use Visualforce and Force.com SitesEach community has one associated Force.com site that lets you make advanced customizations to your community. For example, withForce.com Sites you can:
• Add public pages to your community that don’t require login.
• Use branded self-registration and login pages to enable users to register for or log into your community.
• Customize out-of-the-box error pages to reflect the branding of your community, including “Authorization Required (401)” and“Page Not Found (404)” pages.
• Leverage Visualforce pages to create private pages that only community members can access.
For detailed information about using Force.com Sites, refer to the online help.
Tips and Considerations• Force.com Sites pages automatically include the branding styles you specify in the Create Community wizard. To disable these styles,
set the standardStylesheets attribute on the <apex:page> tag to false.
• Consider these limitations when using Force.com Sites with Communities:
– Out-of-the-box RSS feeds, analytics tracking, and custom portal profile pages aren’t available.
– Custom change-password pages aren’t available.
– Login to custom domains is only available with HTTPS.
• Because Force.com sites are served directly from the Force.com organization, a site’s availability is directly related to the organization'savailability. During your organization's maintenance window for major releases, your sites will be unavailable; users who try to accessa site will see a Force.com-branded maintenance page or your custom Service Not Available Page.
• You can redirect a community home page to its companion Site.com home page. To do this, set a URL Redirect on the Force.comsite detail page. Set the Source URL to /, which represents the home page for the community, and set the Target URL to s, whichrepresents the home page for the Site.com site.
Can I use the same domain name for my Force.com Sites and my Communities?No, you can’t use the same domain name.
Force.com Sites and Communities must each use a unique domain name. If you’re using a domain name for your Force.com site andyou want to use it for your communities instead, contact Salesforce Support for assistance with renaming the domain.
Use Community Builder with TemplatesCommunity Builder and community templates for self-service let you create, brand, and publish a custom community that looks greaton any mobile device! Choose a template to quickly start your community, and then style the pages to match your company’s branding.
With Community Builder and templates, you can:
• Quickly style the community to match your company’s branding.
89
Use Visualforce and Force.com SitesPlan Your Community Design Strategy
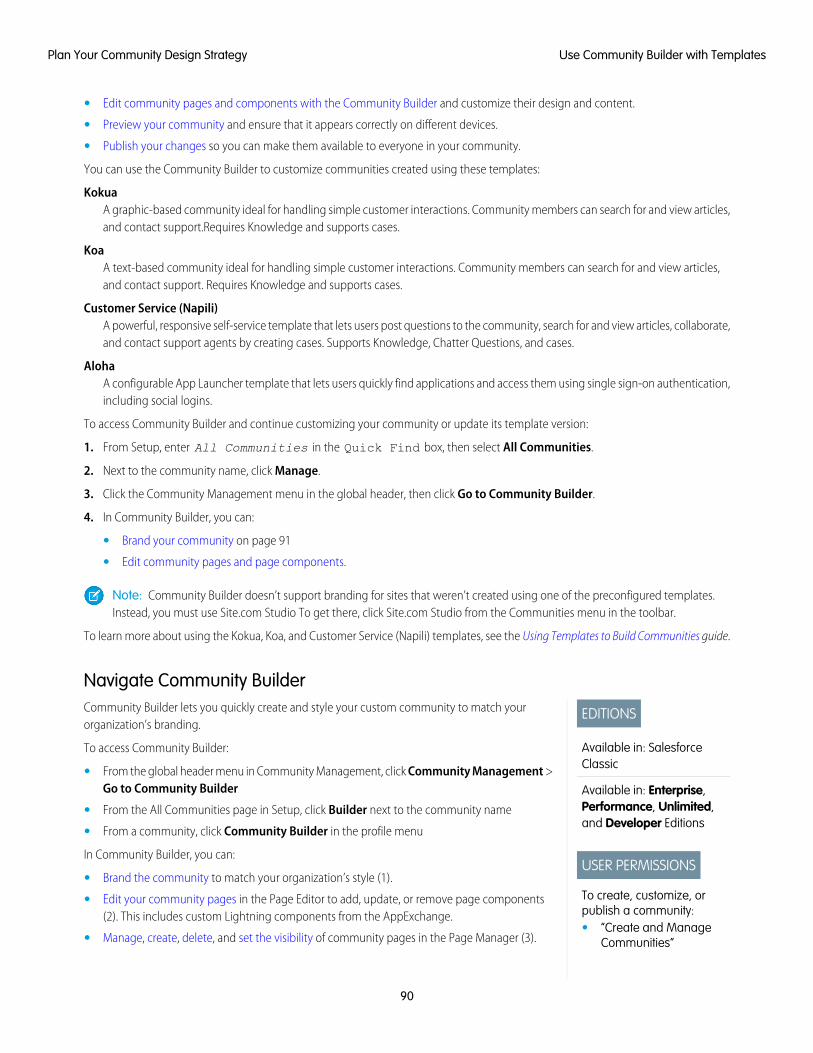
• Edit community pages and components with the Community Builder and customize their design and content.
• Preview your community and ensure that it appears correctly on different devices.
• Publish your changes so you can make them available to everyone in your community.
You can use the Community Builder to customize communities created using these templates:
KokuaA graphic-based community ideal for handling simple customer interactions. Community members can search for and view articles,and contact support.Requires Knowledge and supports cases.
KoaA text-based community ideal for handling simple customer interactions. Community members can search for and view articles,and contact support. Requires Knowledge and supports cases.
Customer Service (Napili)A powerful, responsive self-service template that lets users post questions to the community, search for and view articles, collaborate,and contact support agents by creating cases. Supports Knowledge, Chatter Questions, and cases.
AlohaA configurable App Launcher template that lets users quickly find applications and access them using single sign-on authentication,including social logins.
To access Community Builder and continue customizing your community or update its template version:
1. From Setup, enter All Communities in the Quick Find box, then select All Communities.
2. Next to the community name, click Manage.
3. Click the Community Management menu in the global header, then click Go to Community Builder.
4. In Community Builder, you can:
• Brand your community on page 91
• Edit community pages and page components.
Note: Community Builder doesn’t support branding for sites that weren’t created using one of the preconfigured templates.Instead, you must use Site.com Studio To get there, click Site.com Studio from the Communities menu in the toolbar.
To learn more about using the Kokua, Koa, and Customer Service (Napili) templates, see the Using Templates to Build Communities guide.
Navigate Community Builder
EDITIONS
Available in: SalesforceClassic
Available in: Enterprise,Performance, Unlimited,and Developer Editions
USER PERMISSIONS
To create, customize, orpublish a community:• “Create and Manage
Communities”
Community Builder lets you quickly create and style your custom community to match yourorganization’s branding.
To access Community Builder:
• From the global header menu in Community Management, click Community Management >Go to Community Builder
• From the All Communities page in Setup, click Builder next to the community name
• From a community, click Community Builder in the profile menu
In Community Builder, you can:
• Brand the community to match your organization’s style (1).
• Edit your community pages in the Page Editor to add, update, or remove page components(2). This includes custom Lightning components from the AppExchange.
• Manage, create, delete, and set the visibility of community pages in the Page Manager (3).
90
Use Community Builder with TemplatesPlan Your Community Design Strategy
• Edit community settings and accept updates to your community’s template (4).
• Use the Communities menu (5) to:
– Go to the community after it’s activated.
– Access Community Management to manage community analytics, login, registration, reputation, topics, and other settings.
– Return to Setup.
• Navigate to the community page that you want to edit using the Page menu, navigation menu items, and links (6).
• See how your community appears on different devices (7).
• Preview the community in a new browser window (8).
• Publish your changes to make your updates available to everyone in your community (9).
Brand Your Community with Community Builder
EDITIONS
Available in: SalesforceClassic
Available in: Enterprise,Performance, Unlimited,and Developer Editions
USER PERMISSIONS
To create, customize, orpublish a community:• “Create and Manage
Communities”
Use Community Builder’s enhanced Branding Editor to efficiently apply color and style to yourcommunity. Choose a color scheme with the color palette, which provides a wide range of colorizedtext elements for a personalized design. Match your colors precisely by uploading your own logoto automatically generate a custom color palette.
Each template includes predefined styles to control the appearance of the pages. These styles giveyou a head start with your community, and you can easily customize the styles further to suit yourneeds. After you’ve created a community, brand and style your pages with Community Builder’sBranding Editor.
Depending on the template that you select, you can use Community Builder to:
• Apply a color scheme that’s appropriate for your template with the color palette.
• Choose colors for text, borders, and button backgrounds.
• Upload your own company logo image to generate a custom color palette based on its maincolors.
• Maintain your own color palettes by saving or removing them as needed.
• Specify font family, style, and weight.
91
Use Community Builder with TemplatesPlan Your Community Design Strategy
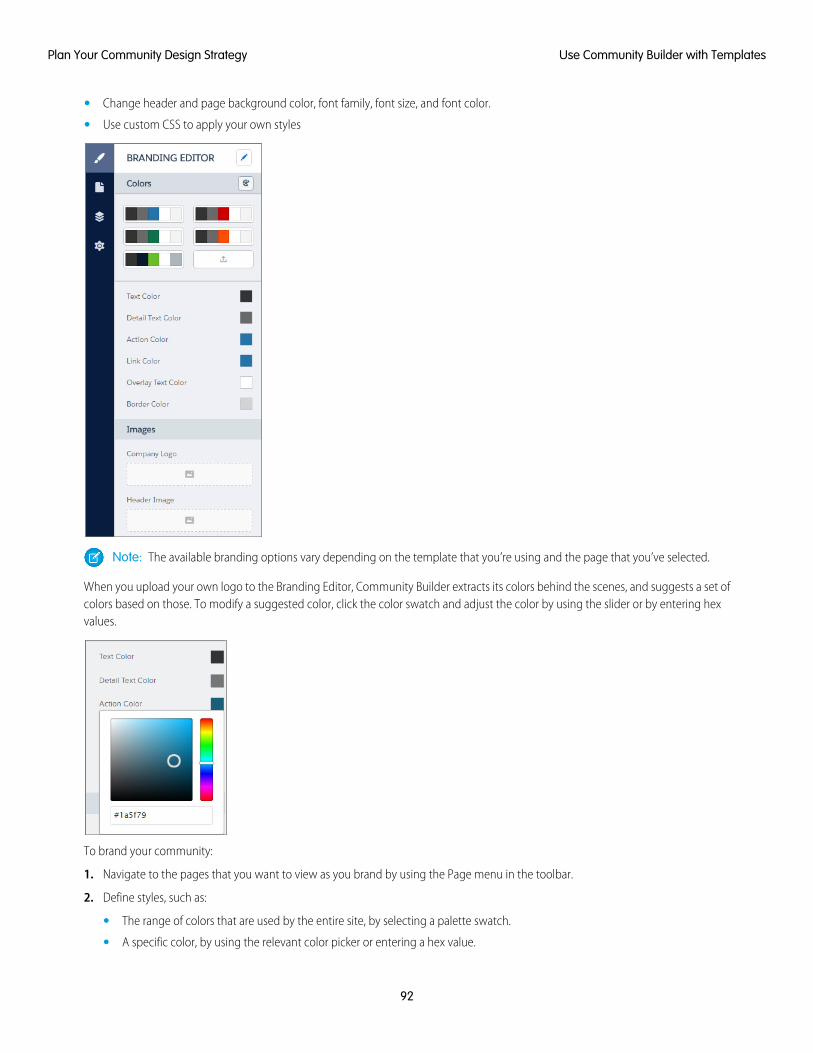
• Change header and page background color, font family, font size, and font color.
• Use custom CSS to apply your own styles
Note: The available branding options vary depending on the template that you’re using and the page that you’ve selected.
When you upload your own logo to the Branding Editor, Community Builder extracts its colors behind the scenes, and suggests a set ofcolors based on those. To modify a suggested color, click the color swatch and adjust the color by using the slider or by entering hexvalues.
To brand your community:
1. Navigate to the pages that you want to view as you brand by using the Page menu in the toolbar.
2. Define styles, such as:
• The range of colors that are used by the entire site, by selecting a palette swatch.
• A specific color, by using the relevant color picker or entering a hex value.
92
Use Community Builder with TemplatesPlan Your Community Design Strategy
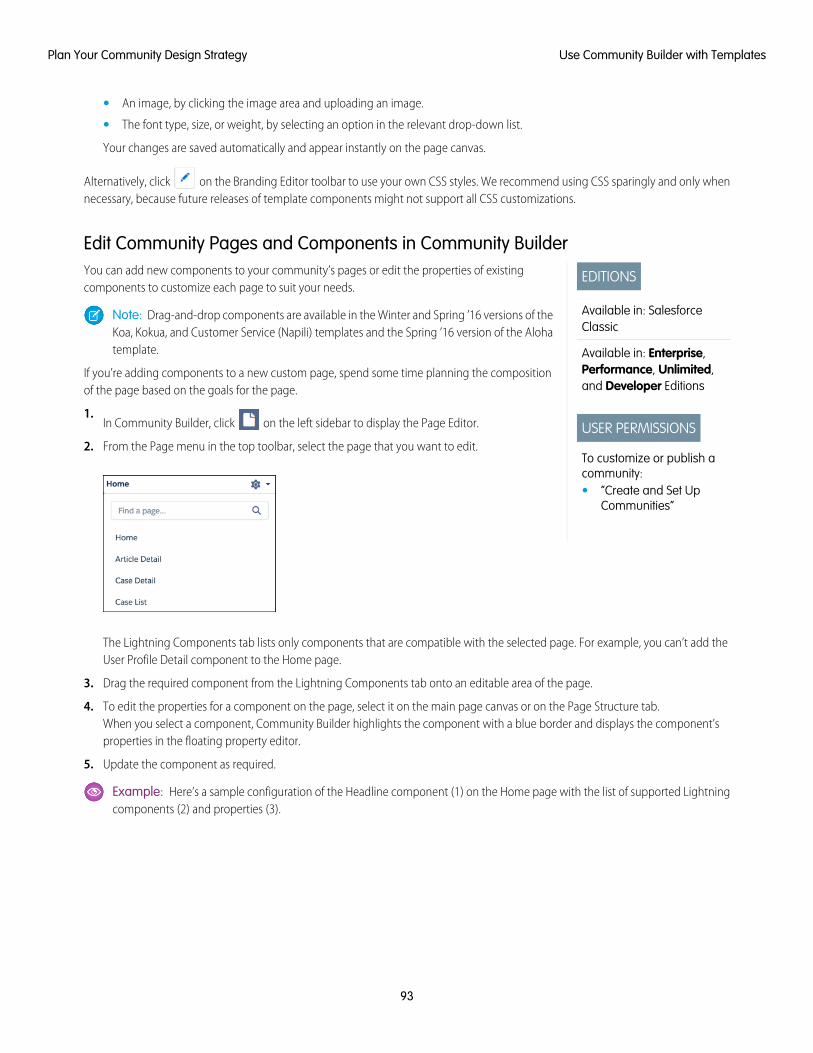
• An image, by clicking the image area and uploading an image.
• The font type, size, or weight, by selecting an option in the relevant drop-down list.
Your changes are saved automatically and appear instantly on the page canvas.
Alternatively, click on the Branding Editor toolbar to use your own CSS styles. We recommend using CSS sparingly and only whennecessary, because future releases of template components might not support all CSS customizations.
Edit Community Pages and Components in Community Builder
EDITIONS
Available in: SalesforceClassic
Available in: Enterprise,Performance, Unlimited,and Developer Editions
USER PERMISSIONS
To customize or publish acommunity:• “Create and Set Up
Communities”
You can add new components to your community’s pages or edit the properties of existingcomponents to customize each page to suit your needs.
Note: Drag-and-drop components are available in the Winter and Spring ’16 versions of theKoa, Kokua, and Customer Service (Napili) templates and the Spring ’16 version of the Alohatemplate.
If you’re adding components to a new custom page, spend some time planning the compositionof the page based on the goals for the page.
1.In Community Builder, click on the left sidebar to display the Page Editor.
2. From the Page menu in the top toolbar, select the page that you want to edit.
The Lightning Components tab lists only components that are compatible with the selected page. For example, you can’t add theUser Profile Detail component to the Home page.
3. Drag the required component from the Lightning Components tab onto an editable area of the page.
4. To edit the properties for a component on the page, select it on the main page canvas or on the Page Structure tab.When you select a component, Community Builder highlights the component with a blue border and displays the component’sproperties in the floating property editor.
5. Update the component as required.
Example: Here’s a sample configuration of the Headline component (1) on the Home page with the list of supported Lightningcomponents (2) and properties (3).
93
Use Community Builder with TemplatesPlan Your Community Design Strategy
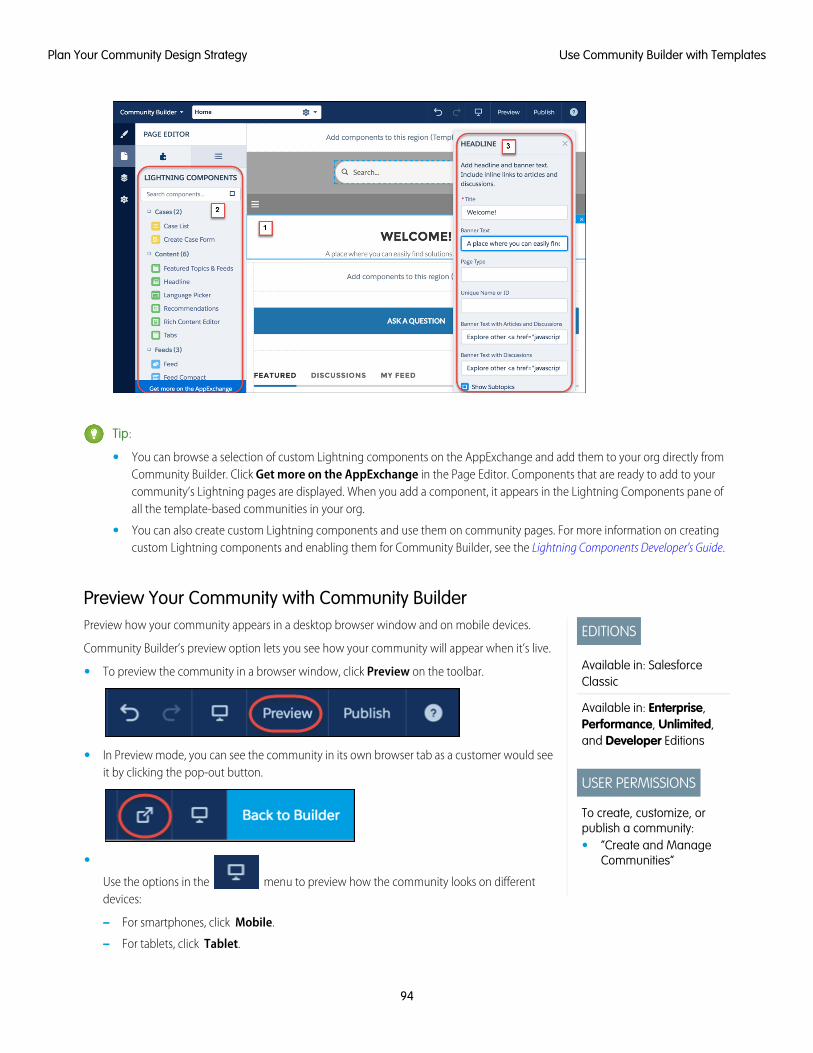
Tip:
• You can browse a selection of custom Lightning components on the AppExchange and add them to your org directly fromCommunity Builder. Click Get more on the AppExchange in the Page Editor. Components that are ready to add to yourcommunity’s Lightning pages are displayed. When you add a component, it appears in the Lightning Components pane ofall the template-based communities in your org.
• You can also create custom Lightning components and use them on community pages. For more information on creatingcustom Lightning components and enabling them for Community Builder, see the Lightning Components Developer's Guide.
Preview Your Community with Community Builder
EDITIONS
Available in: SalesforceClassic
Available in: Enterprise,Performance, Unlimited,and Developer Editions
USER PERMISSIONS
To create, customize, orpublish a community:• “Create and Manage
Communities”
Preview how your community appears in a desktop browser window and on mobile devices.
Community Builder’s preview option lets you see how your community will appear when it’s live.
• To preview the community in a browser window, click Preview on the toolbar.
• In Preview mode, you can see the community in its own browser tab as a customer would seeit by clicking the pop-out button.
•
Use the options in the menu to preview how the community looks on differentdevices:
– For smartphones, click Mobile.
– For tablets, click Tablet.
94
Use Community Builder with TemplatesPlan Your Community Design Strategy
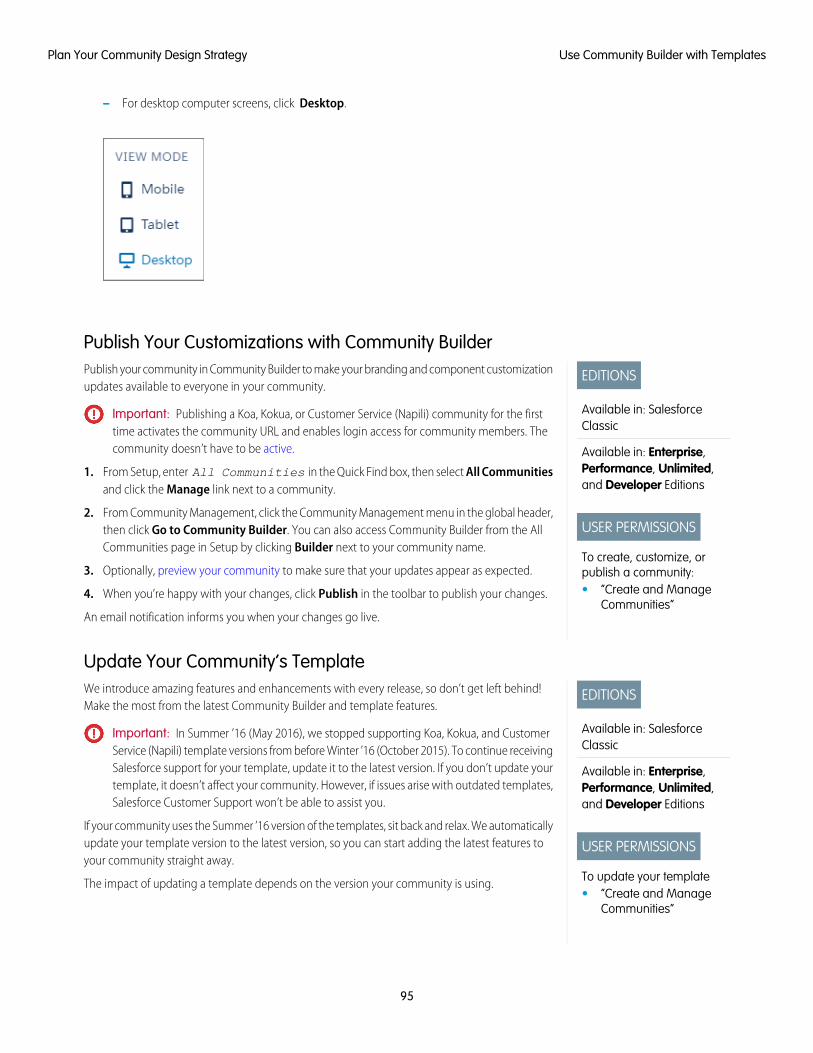
– For desktop computer screens, click Desktop.
Publish Your Customizations with Community Builder
EDITIONS
Available in: SalesforceClassic
Available in: Enterprise,Performance, Unlimited,and Developer Editions
USER PERMISSIONS
To create, customize, orpublish a community:• “Create and Manage
Communities”
Publish your community in Community Builder to make your branding and component customizationupdates available to everyone in your community.
Important: Publishing a Koa, Kokua, or Customer Service (Napili) community for the firsttime activates the community URL and enables login access for community members. Thecommunity doesn’t have to be active.
1. From Setup, enter All Communities in the Quick Find box, then select All Communitiesand click the Manage link next to a community.
2. From Community Management, click the Community Management menu in the global header,then click Go to Community Builder. You can also access Community Builder from the AllCommunities page in Setup by clicking Builder next to your community name.
3. Optionally, preview your community to make sure that your updates appear as expected.
4. When you’re happy with your changes, click Publish in the toolbar to publish your changes.
An email notification informs you when your changes go live.
Update Your Community’s Template
EDITIONS
Available in: SalesforceClassic
Available in: Enterprise,Performance, Unlimited,and Developer Editions
USER PERMISSIONS
To update your template• “Create and Manage
Communities”
We introduce amazing features and enhancements with every release, so don’t get left behind!Make the most from the latest Community Builder and template features.
Important: In Summer ’16 (May 2016), we stopped supporting Koa, Kokua, and CustomerService (Napili) template versions from before Winter ’16 (October 2015). To continue receivingSalesforce support for your template, update it to the latest version. If you don’t update yourtemplate, it doesn’t affect your community. However, if issues arise with outdated templates,Salesforce Customer Support won’t be able to assist you.
If your community uses the Summer ’16 version of the templates, sit back and relax. We automaticallyupdate your template version to the latest version, so you can start adding the latest features toyour community straight away.
The impact of updating a template depends on the version your community is using.
95
Use Community Builder with TemplatesPlan Your Community Design Strategy
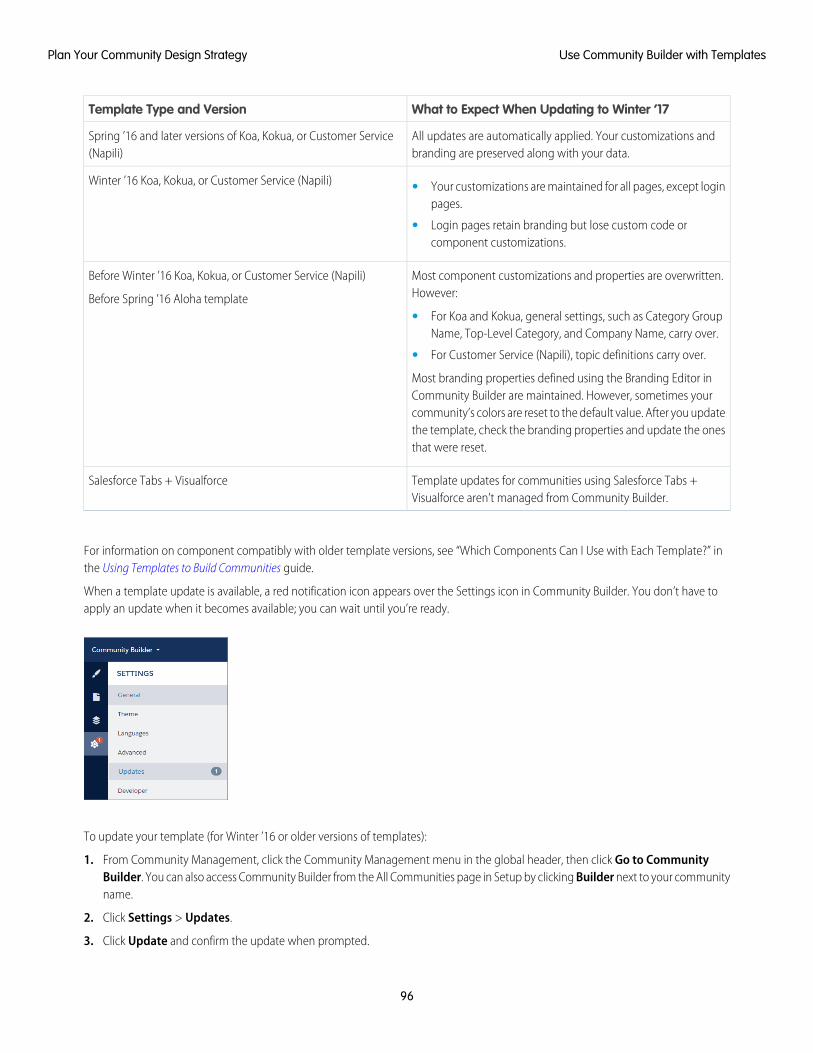
What to Expect When Updating to Winter ’17Template Type and Version
All updates are automatically applied. Your customizations andbranding are preserved along with your data.
Spring ’16 and later versions of Koa, Kokua, or Customer Service(Napili)
Winter ’16 Koa, Kokua, or Customer Service (Napili) • Your customizations are maintained for all pages, except loginpages.
• Login pages retain branding but lose custom code orcomponent customizations.
Most component customizations and properties are overwritten.However:
Before Winter ’16 Koa, Kokua, or Customer Service (Napili)
Before Spring ’16 Aloha template• For Koa and Kokua, general settings, such as Category Group
Name, Top-Level Category, and Company Name, carry over.
• For Customer Service (Napili), topic definitions carry over.
Most branding properties defined using the Branding Editor inCommunity Builder are maintained. However, sometimes yourcommunity’s colors are reset to the default value. After you updatethe template, check the branding properties and update the onesthat were reset.
Template updates for communities using Salesforce Tabs +Visualforce aren’t managed from Community Builder.
Salesforce Tabs + Visualforce
For information on component compatibly with older template versions, see “Which Components Can I Use with Each Template?” inthe Using Templates to Build Communities guide.
When a template update is available, a red notification icon appears over the Settings icon in Community Builder. You don’t have toapply an update when it becomes available; you can wait until you’re ready.
To update your template (for Winter ’16 or older versions of templates):
1. From Community Management, click the Community Management menu in the global header, then click Go to CommunityBuilder. You can also access Community Builder from the All Communities page in Setup by clicking Builder next to your communityname.
2. Click Settings > Updates.
3. Click Update and confirm the update when prompted.
96
Use Community Builder with TemplatesPlan Your Community Design Strategy
4. Review all community pages and make sure that your branding and styles are as you expect.
5. Publish your community to apply the template updates.
Change Your Community Template
EDITIONS
Available in: SalesforceClassic
Available in: Enterprise,Performance, Unlimited,and Developer Editions
USER PERMISSIONS
To create, customize, oractivate a community:• “Create and Set Up
Communities”
AND
Is a member of thecommunity whoseCommunityManagement pagethey’re trying to access.
If you use the Salesforce Tabs + Visualforce template, you can change your template to Koa, Kokua,or the Customer Service (Napili) template in Community Builder.
Note: Starting with Winter ’17, the ability to change templates is no longer supported forcommunities using the Koa, Kokua, and Customer Service (Napili) templates. The functionalityis still available for these templates, but we recommend that you start afresh with a newcommunity instead. If you do change your template from Koa, Kokua, or Customer Service(Napili) to another template type, Salesforce Customer Support will be unable to assist youif any problems arise.
Important: There is no data loss when you change templates, but some customizations arelost. Be sure to review Considerations for Changing Your Community Template before changingyour template.
1. Access Community Management in one of the following ways.
• From the community:
– In Salesforce Tabs + Visualforce communities, click in the global header.
– In Community Builder-based communities, use the drop-down menu next to yourname and click Community Management.
• From Setup, enter All Communities in the Quick Find box, then select AllCommunities and click the Manage link next to a community.
• From Community Builder, in the header, use the drop-down menu next to the name ofyour template and click Community Management.
2. Click AdministrationSettings.
3. Click Change Template.
4. Choose the template you want to switch to.
5. When prompted, select Change Template to confirm your changes.
After you change the template, you are taken back to Community Management.
Check to make sure your community pages, such as the Login page or Community Home page, are still the best choice for your updatedcommunity template. For example, if you previously had a Salesforce Tabs + Visualforce template and switch to the Customer Service(Napili) template, update your pages to use Community Builder pages instead of Visualforce pages. If necessary, customize your communityin Community Builder and publish any changes you make.
To learn more about using the Kokua, Koa, and Customer Service (Napili) templates, see the Using Templates to Build Communities.
To learn more about using the Aloha template, see the Getting Started with the Aloha Community Template for Salesforce Identity.
97
Use Community Builder with TemplatesPlan Your Community Design Strategy
Considerations for Changing Your Community Template
EDITIONS
Available in: SalesforceClassic
Available in: Enterprise,Performance, Unlimited,and Developer Editions
Changing your community template affects the community navigation, branding, andcustomizations.
Note: Starting with Winter ’17, the ability to change templates is no longer supported forcommunities using the Koa, Kokua, and Customer Service (Napili) templates. The functionalityis still available for these templates, but we recommend that you start afresh with a newcommunity instead. If you do change your template from Koa, Kokua, or Customer Service(Napili) to another template type, Salesforce Customer Support will be unable to assist youif any problems arise.
• When you change your template, Salesforce object data carries over, but some branding andcomponent customizations do not. Prepare to redo customizations as necessary.
• Changing the community template updates the navigation in Community Management. To view all available options in CommunityManagement, regardless of template selection, select AdministrationPreferences > Show all settings in CommunityManagement.
• Your community URL changes when switching from a Salesforce Tabs + Visualforce template to any other template type. Specifically,/s is appended to the community URL. Be sure to update any links to your community with the updated URL.
• In active communities
– When you switch over to the Koa, Kokua, or Customer Service (Napili) templates, your template change is saved in a draft version.Use the draft version to further customize your community in Community Builder. Your community is updated only after youpublish your changes.
– When you switch to the Salesforce Tabs + Visualforce template from any other template, your changes immediately reflect inyour active community. In this scenario, we recommend that you deactivate your community before you change your template.Once you’ve made all your changes, reactivate the community.
– If your template is listed as None, it means you’re not using a predefined template or you are using a modified version of oneof our templates.
To learn more about using the Kokua, Koa, and Customer Service (Napili) templates, see the Using Templates to Build Communities.
To learn more about using the Aloha template, see the Getting Started with the Aloha Community Template for Salesforce Identity.
Use Community Builder (Site.com) Without TemplatesEach community has one associated Site.com site that lets you add custom, branded pages to your community. By default, Site.compages are publicly available and don’t require login, but you can also create private pages that only community members can access.
For more detailed information about using Site.com, check out the online help.
Before You BeginCommunities users with the “Create and Set Up Communities” permission automatically have full site administrator access to a community’sSite.com site. To let Communities users without the permission edit the site, you must purchase and assign either a Site.com Publisheror a Site.com Contributor feature license, and assign a user role at the site level.
See About Site.com User Roles.
98
Use Community Builder (Site.com) Without TemplatesPlan Your Community Design Strategy
Tips and Considerations• Communities users with the “Create and Set Up Communities” permission are assigned the role of site administrator in a community’s
Site.com site. However, they don’t appear in the User Roles section on the Overview tab of Site.com Studio.
• You can’t create, delete, or duplicate community sites in Site.com.
• When working with data-bound components, such as data repeaters and forms, keep in mind that the objects listed may not beavailable to site visitors. For authenticated visitors, object access on public and private pages is controlled by their user profiles. Forunauthenticated visitors, object access on public pages is controlled by the site’s guest user profile.
• When adding forms to authenticated community pages in Site.com, set the current user for Salesforce objects that require the OwnerID field. Setting the current user (as opposed to the default guest user) lets you identify the authenticated user when the form issubmitted. To set the current user for the Owner ID field, select the field in the form, click Configure under Field Properties in theProperties pane, select Global Property as the source, and select Current userID as the value.
• The home page, 404 page, login page, and self-registration page that you specify for Site.com Community sites in Site Configurationset the default pages for the Site.com Community site. These default URLs are used unless you specify different URLs in CommunityManagement under AdministrationPages and AdministrationLogin & Registration. Community error pages are specified inForce.com Setup, under Error Pages.
• When your Site.com Community site is inactive, users are redirected to the Service Not Available page defined in CommunityManagement under Pages.
• The contributor’s view is not available by default for Site.com Community sites. However, you can use a Site.com Contributor licenseto grant contributor access to a specific user. See About Feature Licenses in the Site.com help for details. Alternatively, a user canpreview the Site.com Community site as a contributor by appending ?iscontrib to the site’s URL. For example:https://sitestudio.na1.force.com/?iscontrib
99
Use Community Builder (Site.com) Without TemplatesPlan Your Community Design Strategy

Use Site.com to Customize Your Community
EDITIONS
Available in: SalesforceClassic
Available for purchase in:Enterprise, Performance,and Unlimited Editions
Available (with limitations)in: Developer Edition
USER PERMISSIONS
To build, edit, and managea community’s custompages:• “Create and Set Up
Communities”
OR
Site.comPublisher Userfield enabled on the userdetail page
AND
Site administrator ordesigner role assignedat the site level
Communities users can use Site.com to build custom, branded pages for a community. There aremany approaches to building custom pages for your community, but these are some of the typicalstages involved:
• Import Assets—Collect the assets, images, and files you plan to use on your custom page.Import the assets into Site.com Studio, where they appear in the Assets section of the Overviewtab.
• Create Branded Pages—The quickest and easiest way to create branded pages is to use theCommunity Template, which is automatically included with all Site.com community sites. Whenyou create a new page based on the Community Template, the page includes all of the brandedstyles in your community, including the community’s header and footer. If you want even morecontrol over the look and feel of your community page, you can create your own page template,drag community headers and footers to it from the Widgets section of the Page Elements pane,and add other community styles.
Note: As of Spring ’15, the Community Template is no longer available for newcommunities. If you already have a Site.com community that’s based on the CommunityTemplate, it will continue to work. For information on creating a community, see CreateCommunities on page 17.
• Use Branded CommunityStyles—Develop the look and feel of your custom pages by usingthe CommunityBranding style sheet, or by creating branded community styles in your owncascading style sheets (CSS). If you're not completely up to speed with CSS, the Style paneprovides an easy, visual way to create and manage styles. Or if you're a CSS expert who likes toget straight into the code, you can hand-code community styles right in your own style sheets.
• Create Public Pages—Using the template as a base, you can quickly create pages, whichautomatically inherit all the elements of the page template. Or if you need a standalone pagethat doesn't follow the overall design, you can create a blank page instead.
• Make Pages Private—By default, any page you create in Site.com Studio is publicly available.However, you can make pages private so that only logged-in Communities users can accessthem.
• Add Features, Page Elements, and Community Widgets—Use Site.com's prebuilt page elements to add features such asnavigation menus, images, content blocks, and community widgets. Retrieve data from your organization’s objects and dynamicallydisplay it on your site pages using data repeaters and data tables. Alternatively, gather and submit data from visitors using forms.
• Add and Edit Content—At this stage, the page is usually ready for you to add and edit content such as text, images, videos, andhyperlinks. And as you work, you can upload any images or files you need.
• Review and Test the Page—Testing the changes to your page happens throughout the development cycle. You should alwayspreview your changes to ensure they display as expected in a browser. You can also send a preview link to reviewers so they canreview the finished product before it goes live.
• Publish the Page—After testing is complete, you're ready to make the page available to your community by publishing yourchanges.
• Add Authenticated Pages to Your Community’s Tab—Now that the page is tested and published, if you’re working withauthenticated pages, the final step is to add the page to a tab in your community.
• Use Site.com in Sandbox—Site.com is now available on sandbox. When you create a sandbox copy from a production organization,you can include your Site.com sites. You can also copy your sandbox site back to production using the overwrite feature.
100
Use Community Builder (Site.com) Without TemplatesPlan Your Community Design Strategy
Creating Branded Pages in Site.com
Create Branded Pages Overview
EDITIONS
Available in: SalesforceClassic
Available for purchase in:Enterprise, Performance,and Unlimited Editions
Available (with limitations)in: Developer Edition
When you create a Community site, Salesforce automatically creates a new Site.com site andassociates it with your community.
With Site.com Community sites you can:
• Use the branded Community template to create Site.com pages for your community.
Note: As of Spring ’15, the Community Template is no longer available for newcommunities. If you already have a Site.com community that’s based on the CommunityTemplate, it will continue to work. For information on creating a community, see CreateCommunities on page 17.
• Use the CommunityBranding style sheet to style Site.com pages by using CSS.
• Create your own community CSS styles using a number of available Network namespaceexpressions.
Create Branded Pages from the Community Template
EDITIONS
Available in: SalesforceClassic
Available for purchase in:Enterprise, Performance,and Unlimited Editions
Available (with limitations)in: Developer Edition
USER PERMISSIONS
To build, edit, and managea community’s custompages:• “Create and Set Up
Communities”
OR
Site.comPublisher Userfield enabled on the userdetail page
AND
Site administrator ordesigner role assignedat the site level
Site.com Community sites include a branded template that you can use to create new communitysite pages.
The styles for the Community Template come from the CommunityBranding stylesheet, which is automatically included for all new Site.com Community sites.
To create branded pages from the Community Template:
1. On the Site.com Overview tab, hover over Site Pages and click New.
2. Type the new community page name. Page names can’t include spaces or special characters,such as #, ?, or @.
3. Make sure Community Template is selected for the page template.
4. Click Create.
Note:
• Community branding options, such as headers, footers, and page colors, are set from theAdministration > Branding section on the Community Management page.
• Empty community headers and footers, or headers that contain only images, won’t workin Site.com. Be sure to specify customized HTML blocks for your community headers andfooters if you’re creating Site.com pages from the Community Template, or creatingcommunity headers and footers using Network namespace expressions.
• Community headers and footers are available as widgets in Site.com community pages.To add a community header or footer to a blank page, drag it to the page from the Widgetssection of the Page Elements pane.
101
Use Community Builder (Site.com) Without TemplatesPlan Your Community Design Strategy
Apply Community Styles from the CommunityBranding Style Sheet
EDITIONS
Available in: SalesforceClassic
Available for purchase in:Enterprise, Performance,and Unlimited Editions
Available (with limitations)in: Developer Edition
USER PERMISSIONS
To build, edit, and managea community’s custompages:• “Create and Set Up
Communities”
OR
Site.comPublisher Userfield enabled on the userdetail page
AND
Site administrator ordesigner role assignedat the site level
The CommunityBranding style sheet contains a set of CSS styles created from Networknamespace expressions.
The CommunityBranding style sheet is attached to the Community Template, and isresponsible for the template’s branded look and feel. You can access the styles in theCommunityBranding style sheet and apply them directly to elements on any page.
To apply community styles using the CommunityBranding style sheet:
1. Make sure the CommunityBranding style sheet is attached to the Site.com page youwant to brand. (See Creating and Using CSS Style Sheets.)
Note: All Site.com pages based on the Community Template automatically havethe CommunityBranding style sheet attached to them.
2. Select the element on the page you want to style.
3. Open the Style pane.
4. Select Class.
5. Start typing “brand”.A list of all of the available styles in the CommunityBranding styles sheet appears.
6. Select the style you want to apply.
102
Use Community Builder (Site.com) Without TemplatesPlan Your Community Design Strategy
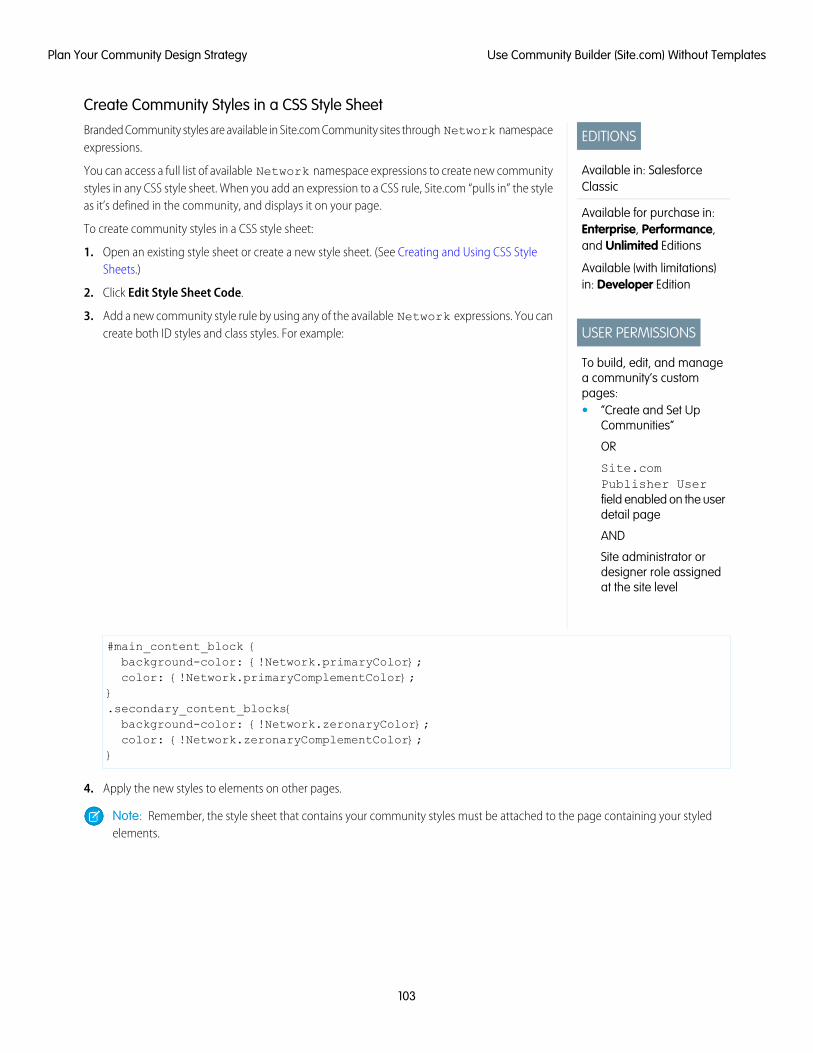
Create Community Styles in a CSS Style Sheet
EDITIONS
Available in: SalesforceClassic
Available for purchase in:Enterprise, Performance,and Unlimited Editions
Available (with limitations)in: Developer Edition
USER PERMISSIONS
To build, edit, and managea community’s custompages:• “Create and Set Up
Communities”
OR
Site.comPublisher Userfield enabled on the userdetail page
AND
Site administrator ordesigner role assignedat the site level
Branded Community styles are available in Site.com Community sites through Network namespaceexpressions.
You can access a full list of available Network namespace expressions to create new communitystyles in any CSS style sheet. When you add an expression to a CSS rule, Site.com “pulls in” the styleas it’s defined in the community, and displays it on your page.
To create community styles in a CSS style sheet:
1. Open an existing style sheet or create a new style sheet. (See Creating and Using CSS StyleSheets.)
2. Click Edit Style Sheet Code.
3. Add a new community style rule by using any of the available Network expressions. You cancreate both ID styles and class styles. For example:
#main_content_block {background-color: {!Network.primaryColor};color: {!Network.primaryComplementColor};
}.secondary_content_blocks{background-color: {!Network.zeronaryColor};color: {!Network.zeronaryComplementColor};
}
4. Apply the new styles to elements on other pages.
Note: Remember, the style sheet that contains your community styles must be attached to the page containing your styledelements.
103
Use Community Builder (Site.com) Without TemplatesPlan Your Community Design Strategy
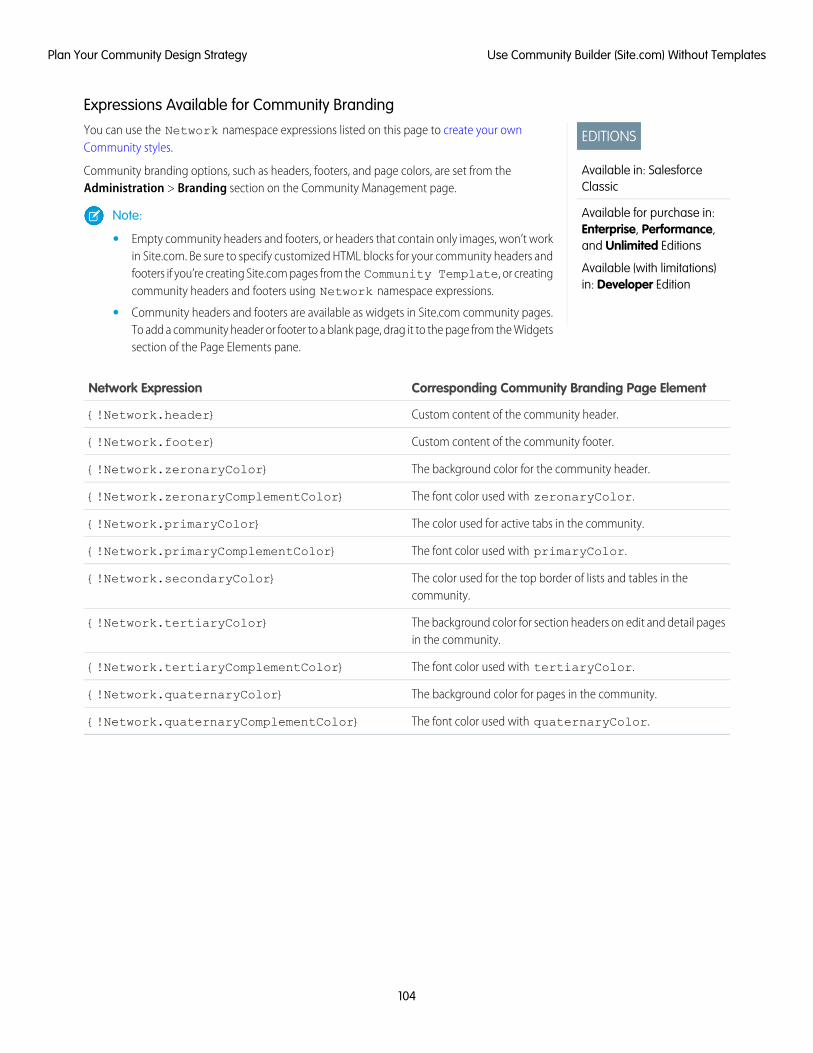
Expressions Available for Community Branding
EDITIONS
Available in: SalesforceClassic
Available for purchase in:Enterprise, Performance,and Unlimited Editions
Available (with limitations)in: Developer Edition
You can use the Network namespace expressions listed on this page to create your ownCommunity styles.
Community branding options, such as headers, footers, and page colors, are set from theAdministration > Branding section on the Community Management page.
Note:
• Empty community headers and footers, or headers that contain only images, won’t workin Site.com. Be sure to specify customized HTML blocks for your community headers andfooters if you’re creating Site.com pages from the Community Template, or creatingcommunity headers and footers using Network namespace expressions.
• Community headers and footers are available as widgets in Site.com community pages.To add a community header or footer to a blank page, drag it to the page from the Widgetssection of the Page Elements pane.
Corresponding Community Branding Page ElementNetwork Expression
Custom content of the community header.{!Network.header}
Custom content of the community footer.{!Network.footer}
The background color for the community header.{!Network.zeronaryColor}
The font color used with zeronaryColor.{!Network.zeronaryComplementColor}
The color used for active tabs in the community.{!Network.primaryColor}
The font color used with primaryColor.{!Network.primaryComplementColor}
The color used for the top border of lists and tables in thecommunity.
{!Network.secondaryColor}
The background color for section headers on edit and detail pagesin the community.
{!Network.tertiaryColor}
The font color used with tertiaryColor.{!Network.tertiaryComplementColor}
The background color for pages in the community.{!Network.quaternaryColor}
The font color used with quaternaryColor.{!Network.quaternaryComplementColor}
104
Use Community Builder (Site.com) Without TemplatesPlan Your Community Design Strategy
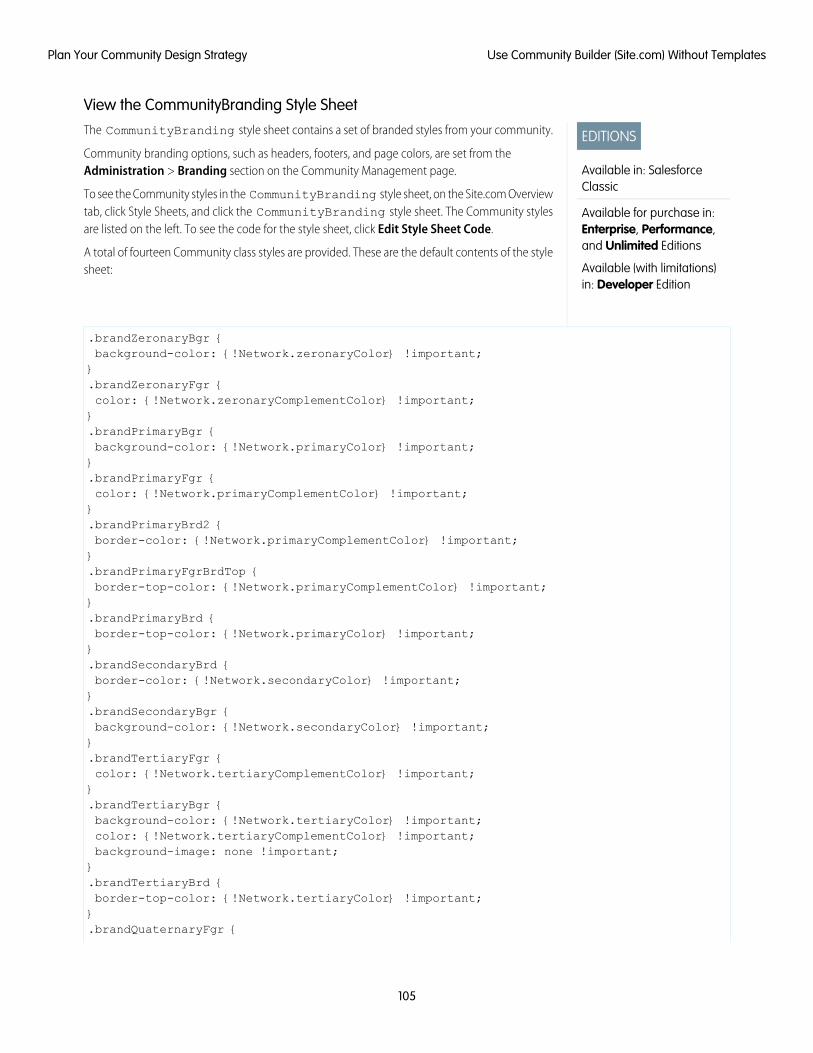
View the CommunityBranding Style Sheet
EDITIONS
Available in: SalesforceClassic
Available for purchase in:Enterprise, Performance,and Unlimited Editions
Available (with limitations)in: Developer Edition
The CommunityBranding style sheet contains a set of branded styles from your community.
Community branding options, such as headers, footers, and page colors, are set from theAdministration > Branding section on the Community Management page.
To see the Community styles in the CommunityBranding style sheet, on the Site.com Overviewtab, click Style Sheets, and click the CommunityBranding style sheet. The Community stylesare listed on the left. To see the code for the style sheet, click Edit Style Sheet Code.
A total of fourteen Community class styles are provided. These are the default contents of the stylesheet:
.brandZeronaryBgr {background-color: {!Network.zeronaryColor} !important;}.brandZeronaryFgr {color: {!Network.zeronaryComplementColor} !important;}.brandPrimaryBgr {background-color: {!Network.primaryColor} !important;}.brandPrimaryFgr {color: {!Network.primaryComplementColor} !important;}.brandPrimaryBrd2 {border-color: {!Network.primaryComplementColor} !important;}.brandPrimaryFgrBrdTop {border-top-color: {!Network.primaryComplementColor} !important;}.brandPrimaryBrd {border-top-color: {!Network.primaryColor} !important;}.brandSecondaryBrd {border-color: {!Network.secondaryColor} !important;}.brandSecondaryBgr {background-color: {!Network.secondaryColor} !important;}.brandTertiaryFgr {color: {!Network.tertiaryComplementColor} !important;}.brandTertiaryBgr {background-color: {!Network.tertiaryColor} !important;color: {!Network.tertiaryComplementColor} !important;background-image: none !important;}.brandTertiaryBrd {border-top-color: {!Network.tertiaryColor} !important;}.brandQuaternaryFgr {
105
Use Community Builder (Site.com) Without TemplatesPlan Your Community Design Strategy
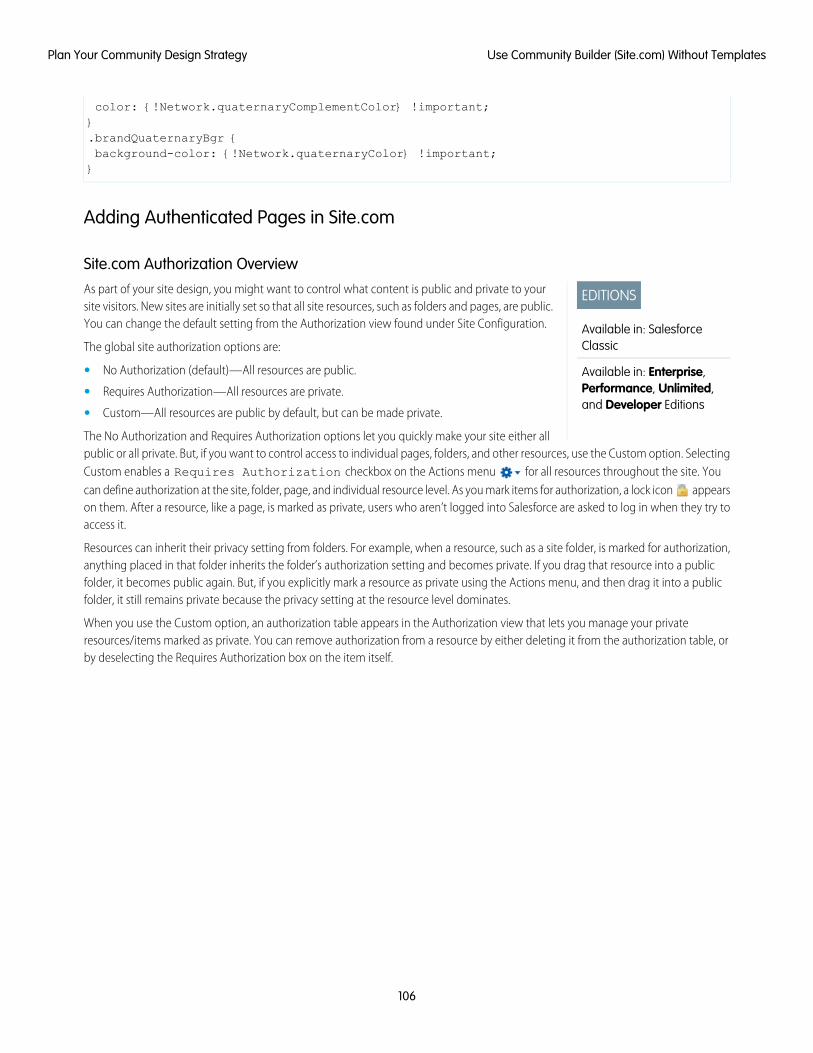
color: {!Network.quaternaryComplementColor} !important;}.brandQuaternaryBgr {background-color: {!Network.quaternaryColor} !important;}
Adding Authenticated Pages in Site.com
Site.com Authorization Overview
EDITIONS
Available in: SalesforceClassic
Available in: Enterprise,Performance, Unlimited,and Developer Editions
As part of your site design, you might want to control what content is public and private to yoursite visitors. New sites are initially set so that all site resources, such as folders and pages, are public.You can change the default setting from the Authorization view found under Site Configuration.
The global site authorization options are:
• No Authorization (default)—All resources are public.
• Requires Authorization—All resources are private.
• Custom—All resources are public by default, but can be made private.
The No Authorization and Requires Authorization options let you quickly make your site either allpublic or all private. But, if you want to control access to individual pages, folders, and other resources, use the Custom option. SelectingCustom enables a Requires Authorization checkbox on the Actions menu for all resources throughout the site. Youcan define authorization at the site, folder, page, and individual resource level. As you mark items for authorization, a lock icon appearson them. After a resource, like a page, is marked as private, users who aren’t logged into Salesforce are asked to log in when they try toaccess it.
Resources can inherit their privacy setting from folders. For example, when a resource, such as a site folder, is marked for authorization,anything placed in that folder inherits the folder’s authorization setting and becomes private. If you drag that resource into a publicfolder, it becomes public again. But, if you explicitly mark a resource as private using the Actions menu, and then drag it into a publicfolder, it still remains private because the privacy setting at the resource level dominates.
When you use the Custom option, an authorization table appears in the Authorization view that lets you manage your privateresources/items marked as private. You can remove authorization from a resource by either deleting it from the authorization table, orby deselecting the Requires Authorization box on the item itself.
106
Use Community Builder (Site.com) Without TemplatesPlan Your Community Design Strategy
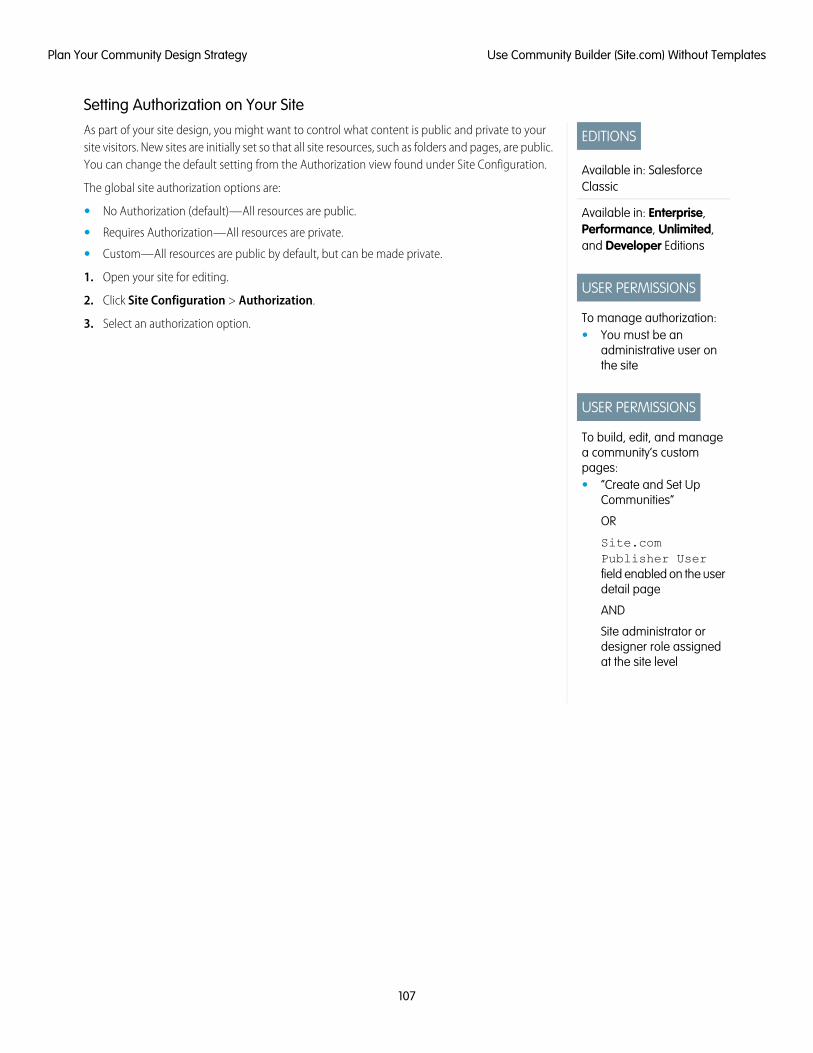
Setting Authorization on Your Site
EDITIONS
Available in: SalesforceClassic
Available in: Enterprise,Performance, Unlimited,and Developer Editions
USER PERMISSIONS
To manage authorization:• You must be an
administrative user onthe site
USER PERMISSIONS
To build, edit, and managea community’s custompages:• “Create and Set Up
Communities”
OR
Site.comPublisher Userfield enabled on the userdetail page
AND
Site administrator ordesigner role assignedat the site level
As part of your site design, you might want to control what content is public and private to yoursite visitors. New sites are initially set so that all site resources, such as folders and pages, are public.You can change the default setting from the Authorization view found under Site Configuration.
The global site authorization options are:
• No Authorization (default)—All resources are public.
• Requires Authorization—All resources are private.
• Custom—All resources are public by default, but can be made private.
1. Open your site for editing.
2. Click Site Configuration > Authorization.
3. Select an authorization option.
107
Use Community Builder (Site.com) Without TemplatesPlan Your Community Design Strategy
Setting Custom Authorization
EDITIONS
Available in: SalesforceClassic
Available in: Enterprise,Performance, Unlimited,and Developer Editions
USER PERMISSIONS
To manage authorization:• You must be an
administrative user onthe site
When you select Custom authorization, you get a great deal of flexibility in controlling access toyour site. Not only can you control who has access to top level resources, like folders and pages,but you can also set access at the individual resource level.
Using Custom authorization at the folder level is a great way to make a large number of resourcesprivate without having to mark them individually. Let’s say you periodically run sale offers for yourpaid users. If you drag all the sale pages into a special folder you mark for authorization, they instantlyinherit the folder’s setting. Users will need to log in to access them. Plus, if you decide to make oneof the sale pages available to everyone, you can simply drag it back into a public folder, or to theroot of the All Site Content area.
1. Open you site for editing.
2. Click Site Configuration > Authorization.
3. Select Custom.
4. Click All Site Content.
5. Create a folder to hold the private pages if it doesn’t already exist.
6. From the folder’s Actions menu, select Requires Authorization. You’ll see the lock appear on the folder. It is now private.
7. Drag any pages you want to make private into the folder. A lock appears on them too.
Example: Let’s take another example. If you have a page that you’d like to keep private no matter where it resides, you can setits authorization using the Actions menu. After you set it at the individual resource level, it remains private even if you drag it intoa folder that isn’t set to private. In other words, an resource marked private is always private until you deselect RequiresAuthorization on the Actions menu.
If you check the Authorization page, you’ll see all folders and resources marked private are listed in the authorization table where youcan view and delete them.
Removing Site.com Authorization
EDITIONS
Available in: SalesforceClassic
Available in: Enterprise,Performance, Unlimited,and Developer Editions
USER PERMISSIONS
To manage authorization:• You must be an
administrative user onthe site
You can remove authorization for a resource by either deleting it from the authorization table underSite Configuration, or by deselecting Requires Authorization from the menu.
1. Open your site for editing.
2. Click Site Configuration > Authorization.
3. From the authorization table, click Delete next to the item you want to remove. Alternatively,navigate to the All Site Content view. Select the resource. From the Actions menu, deselectRequires Authorization.
Example: If a resource is explicitly marked as private using the Actions menu, then you mustremove authorization from it using the Actions menu. For example, if a page marked privateis dragged into a folder that’s public, it remains private. Likewise, if you drag it into a folderthat’s already private, and remove the authorization on that folder, the page will still be private.
Add Custom Pages That Don’t Require LoginWithin a community, you can have publicly available pages that are accessible without requiringlogin, making them ideal for landing or marketing pages.
108
Use Community Builder (Site.com) Without TemplatesPlan Your Community Design Strategy
Communities leverage Force.com Sites technology to set a custom domain for your organization and a URL prefix for each communitycreated in your organization. If you want to further customize your communities beyond what’s available in setup, you can use Force.comSites or Site.com to create completely customized pages.
Tip: Communities can have a combination of Visualforce and Site.com pages. By default, the pages you create don’t require login,but you can add authenticated pages if needed.
1. Access Community Management in one of the following ways.
• From the community:
– In Salesforce Tabs + Visualforce communities, click in the global header.
– In Community Builder-based communities, use the drop-down menu next to your name and click Community Management.
• From Setup, enter All Communities in the Quick Find box, then select All Communities and click the Manage link nextto a community.
• From Community Builder, in the header, use the drop-down menu next to the name of your template and click CommunityManagement.
2. Click AdministrationPages and then in the Advanced Customizations area, click either:
• Go to Force.com to create pages that don’t require login or edit out-of-the-box error pages.
• Go to Site.com Studio to open Site.com Studio, where you can create public, branded pages. (You can also create authenticatedpages that require login.)
3. After you create a public page in Site.com Studio, you must publish the Site.com site to allow users to access the page.
For more information about creating pages, refer to these resources:
• Creating Site.com Pages
• Managing Force.com Site Visualforce Pages
• Managing Force.com Site Standard Pages
SEE ALSO:
Determine the URL of a Site.com Page
Create Branded Pages from the Community Template
Setting Custom Authorization
109
Use Community Builder (Site.com) Without TemplatesPlan Your Community Design Strategy
Display Current Community User Information in Site.com
Display Current Community User Information
EDITIONS
Available in: SalesforceClassic
Available for purchase in:Enterprise, Performance,and Unlimited Editions
Available (with limitations)in: Developer Edition
USER PERMISSIONS
To build, edit, and managea community’s custompages:• “Create and Set Up
Communities”
OR
Site.comPublisher Userfield enabled on the userdetail page
AND
Site administrator ordesigner role assignedat the site level
Site.com designers creating authenticated pages for a community site can display the current user’sinformation by accessing CurrentUser namespace expressions.
1. Open the page on which you want to display the current community user's information.
2. From the Page Elements pane, drag a Content Block or Custom Code page element ontothe page.
3. Type {!CurrentUser. and the value that you want to display.For example, {!CurrentUser.firstName}.
Check the list of available expressions for displaying current user information.
4. Add any additional text you require.For example, Welcome back {!CurrentUser.firstName}!.
5. If you’re in a Content Block, click Save. If you’re in a Custom Code element, click Save andClose.
Note: If an unauthenticated user views a page that contains CurrentUser expressions,the current user information does not appear. For example, if an unauthenticated user vieweda page that contained the above example, the user would see “Welcome back !” as thewelcome message.
Expressions Available for Displaying Current User Information
EDITIONS
Available in: SalesforceClassic
Available for purchase in:Enterprise, Performance,and Unlimited Editions
Available (with limitations)in: Developer Edition
Use these CurrentUser namespace expressions to display authenticated user information ona Site.com community page.
DisplaysCurrentUser Expression
Combined first and last name of the user, asdisplayed on the user detail page.
{!CurrentUser.name}
First name of the user, as displayed on the useredit page.
{!CurrentUser.firstName}
Last name of the user, as displayed on the useredit page.
{!CurrentUser.lastName}
Administrative field that defines the user’s login.{!CurrentUser.userName}
110
Use Community Builder (Site.com) Without TemplatesPlan Your Community Design Strategy
DisplaysCurrentUser Expression
Email address of the user.{!CurrentUser.email}
Name used to identify the user in a community.{!CurrentUser.communityNickname}
Determine the URL of a Site.com Page
EDITIONS
Available in: SalesforceClassic
Available in: Enterprise,Performance, Unlimited,and Developer Editions
USER PERMISSIONS
To build, edit, and managea community’s custompages:• “Create and Set Up
Communities”
OR
Site.comPublisher Userfield enabled on the userdetail page
AND
Site administrator ordesigner role assignedat the site level
After you create a Site.com page, you can determine the page’s URL to:
• Provide your users with a URL that lets them access a public page directly.
• Create a link to the page from other pages, including Force.com Sites and Visualforce pages.
• Make it the home page for your community using a URL redirect in Force.com Sites.
• Add a private page to a web tab in your community.
1. To determine the correct URL for the page:
• From the Create Community wizard, click Customize.
• If you navigated away from the Create Community wizard, click Customize >Communities > All Communities, then click the Manage button next to the communityname.
2. Click AdministrationSettings.
3. Copy the URL displayed on the page and paste it into a text editor.
4. To create a URL that points to:
• The Site.com site’s home page, append /s/ to the URL. For example,https://mydomain.force.com/mycommunity/s/.
• A specific Site.com page, append /s/<page_name>, where <page_name> is thename of the Site.com page. For example,https://mydomain.force.com/mycommunity/s/promotion.
The URL is case-sensitive and “s” must be lowercase.
SEE ALSO:
Add Authenticated Site.com Pages to Community Tabs
111
Use Community Builder (Site.com) Without TemplatesPlan Your Community Design Strategy
Add Authenticated Site.com Pages to Community Tabs
EDITIONS
Available in: SalesforceClassic
Available in: Enterprise,Performance, Unlimited,and Developer Editions
USER PERMISSIONS
To build, edit, and managea community’s custompages:• “Create and Set Up
Communities”
OR
Site.comPublisher Userfield enabled on the userdetail page
AND
Site administrator ordesigner role assignedat the site level
After you create a private Site.com page, you can add the page to a tab in your community.
In this case, you need to create a Web tab that points to your Site.com page.
1. In the Properties pane for your page, select Show Salesforce Header.
Selecting this option ensures that you see tabs in your community.
2. Enter the tab name as it should appear on the tab in your community.
The web tab you create must have the same name.
3. Determine the correct URL for the page.
The URL must be in the following formathttps://mydomain.force.com/mycommunity/s/<pagename>, wherepagename matches the name of your page.
4. From Setup, enter Tabs in the Quick Find box, then select Tabs.
5. In Web Tabs, click New and enter the name of the tab as it appears in the Tab Name field inyour page properties.
6. On the Step 3 screen, paste the URL you created in the Button or Link URL text box.
7. Return to the Create Community wizard and add the new tab to your community.
To preview the private page in your community, you must publish your Site.com site.
Note: You can’t publish your site from sandbox.
SEE ALSO:
Add Tabs to Your Community
112
Use Community Builder (Site.com) Without TemplatesPlan Your Community Design Strategy
Override Default Pages in Your Community with Custom Pages
EDITIONS
Available in: SalesforceClassic
Available in: Enterprise,Performance, Unlimited,and Developer Editions
USER PERMISSIONS
To create, customize, oractivate a community:• “Create and Set Up
Communities”
AND
Is a member of thecommunity whoseCommunityManagement pagethey’re trying to access.
Use company-branded Community Home and Service Not Available pages by overriding thestandard pages in your community.
• Use a Custom Community Home Page
• Use a Custom Page for Service Unavailability
You can override other default community pages in the Site.com or Force.com settings for thecommunity. To do this, click the Community Management menu in the global header and thenclick Go to Force.com or Go to Site.com Studio. Page selections in Community Managementautomatically override any previously specified page selections in the Site.com or Force.com settings.
Use a Custom Community Home Page
EDITIONS
Available in: SalesforceClassic
Available in: Enterprise,Performance, Unlimited,and Developer Editions
USER PERMISSIONS
To create, customize, oractivate a community:• “Create and Set Up
Communities”
AND
Is a member of thecommunity whoseCommunityManagement pagethey’re trying to access.
Personalize the standard community home page with company branding by using a customCommunity Builder (Site.com Studio) or Visualforce page.
The community home page is shown to unauthenticated users in a public community and it allowsyou to specify a landing page for guest users without setting up redirects. This page is also knownas your Active Site Home page.
1. Access Community Management in one of the following ways.
• From the community:
– In Salesforce Tabs + Visualforce communities, click in the global header.
– In Community Builder-based communities, use the drop-down menu next to yourname and click Community Management.
• From Setup, enter All Communities in the Quick Find box, then select AllCommunities and click the Manage link next to a community.
• From Community Builder, in the header, use the drop-down menu next to the name ofyour template and click Community Management.
2. Click AdministrationPages.
3. For the Community Home page:
a. Select the page type: Community Builder or Visualforce).
b. Enter the name of the page or leave the field blank to get a list of available options.
113
Override Default Pages in Your Community with CustomPages
Plan Your Community Design Strategy
c.Click , then click the name of the page in the search results to select it.
Note: Only published Community Builder (Site.com Studio) pages are included in the search results.
4. Click Save.
Page selections in Community Management automatically override any previously specified page selections in the Site.com or Force.comsite properties.
Configure the Default Community Login Page to Use a Custom Home Page
EDITIONS
Available in: SalesforceClassic
Available in: Enterprise,Performance, Unlimited,and Developer Editions
USER PERMISSIONS
To access CommunityManagement:
• “Access CommunityManagement” OR“Manage Communities”OR “Create and Set UpCommunities”
• AND is a member of thecommunity whoseCommunityManagement pagethey’re trying to access
To customize administrationsettings:
• “Create and Set UpCommunities”
• AND is a member of thecommunity whoseCommunityManagement pagethey’re trying to access
To edit Apex classes:• “Author Apex”
If you’re using external authentication providers and a custom home page, ensure that users areaccessing the correct home page.
To do so, edit the CommunitiesLandingController so that it has the correct startURLfor your community. The CommunitiesLandingPage is the Active Site Home Page for yourcommunity, meaning that it is shown when someone enters a direct URL to your community. Forinstance, if your domain is universaltelco.force.com and your community URL iscustomers, the CommunitiesLandingPage is shown when someone entershttp://universaltelco.force.com/customers.
There are 2 methods for using a custom home page:
• Update the CommunitiesLandingController code to redirect to the new page:
1. From Setup, enter Apex Classes in the Quick Find box, then select Apex Classes.
2. Click Edit next to CommunitiesLandingController.
3. Replace the code so that it reads:
public with sharing class CommunitiesLandingController {// Code we will invoke on page load.
public PageReference forwardToStartPage() {
114
Use a Custom Community Home PagePlan Your Community Design Strategy
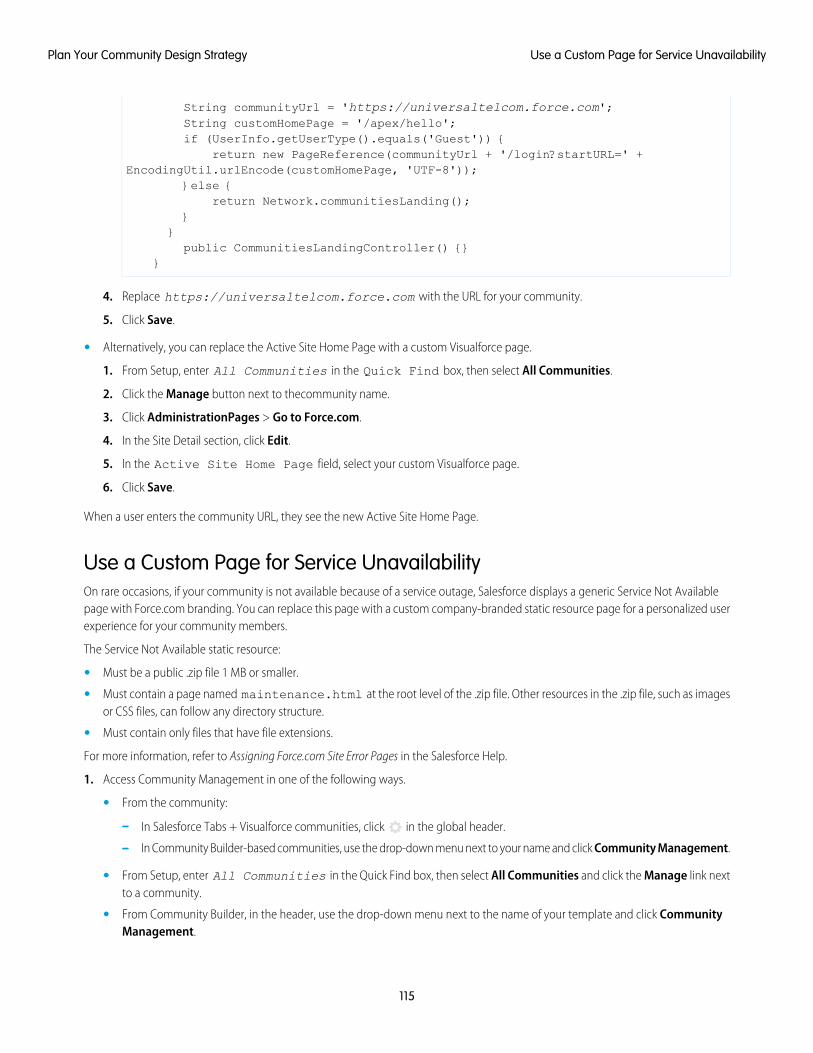
String communityUrl = 'https://universaltelcom.force.com';String customHomePage = '/apex/hello';if (UserInfo.getUserType().equals('Guest')) {
return new PageReference(communityUrl + '/login?startURL=' +EncodingUtil.urlEncode(customHomePage, 'UTF-8'));
}else {return Network.communitiesLanding();
}}public CommunitiesLandingController() {}
}
4. Replace https://universaltelcom.force.com with the URL for your community.
5. Click Save.
• Alternatively, you can replace the Active Site Home Page with a custom Visualforce page.
1. From Setup, enter All Communities in the Quick Find box, then select All Communities.
2. Click the Manage button next to thecommunity name.
3. Click AdministrationPages > Go to Force.com.
4. In the Site Detail section, click Edit.
5. In the Active Site Home Page field, select your custom Visualforce page.
6. Click Save.
When a user enters the community URL, they see the new Active Site Home Page.
Use a Custom Page for Service UnavailabilityOn rare occasions, if your community is not available because of a service outage, Salesforce displays a generic Service Not Availablepage with Force.com branding. You can replace this page with a custom company-branded static resource page for a personalized userexperience for your community members.
The Service Not Available static resource:
• Must be a public .zip file 1 MB or smaller.
• Must contain a page named maintenance.html at the root level of the .zip file. Other resources in the .zip file, such as imagesor CSS files, can follow any directory structure.
• Must contain only files that have file extensions.
For more information, refer to Assigning Force.com Site Error Pages in the Salesforce Help.
1. Access Community Management in one of the following ways.
• From the community:
– In Salesforce Tabs + Visualforce communities, click in the global header.
– In Community Builder-based communities, use the drop-down menu next to your name and click Community Management.
• From Setup, enter All Communities in the Quick Find box, then select All Communities and click the Manage link nextto a community.
• From Community Builder, in the header, use the drop-down menu next to the name of your template and click CommunityManagement.
115
Use a Custom Page for Service UnavailabilityPlan Your Community Design Strategy
2. Navigate to AdministrationPages.
3.Click next to Service Not Available to search for and select your custom page.
4. Click Save.
If there is a service outage at any time, your community displays your selected page. A couple things to keep in mind:
• This page selection doesn’t affect communities that use Site.com Studio pages.
• The Service Not Available page, once customized, is available for all communities in the same domain. Depending on the needs ofyour organization, this might not be desirable. To avoid using the same page for all the communities in your domain, create andassign separate Service Not Available pages for each community.
For example, consider a scenario where you have two communities in your domain: a customer community(universaltelco.force.com/customer) and a partner community (universaltelco.force.com/partner).If you use a custom Service Not Available page for only the customer community, then the partner community will display the samepage during a service outage, unless you create and assign a separate Service Not Available page to the partner community.
Add the Global Search Box to Your Customized Community HTMLHeader
EDITIONS
Available in: SalesforceClassic
Available in: Enterprise,Performance, Unlimited,and Developer Editions
If you customize your Salesforce Communities with an HTML header, you hide the global searchbox. To take advantage of this search functionality, add a form to your custom header.
1. In your customized HTML header, embed a form similar to this one.
<form action="/<community name>/search/SmartSearch" method="get"><input id="phSearchInput" type="text" name="str"/><input type="submit" value="Search"/>
</form>
2. Replace <community name> with the unique value you used for the URL when creating the community.
For example, if you entered customers as the unique value for your community URL, the form would look like this example:
<form action="/customers/search/SmartSearch" method="get"><input id="phSearchInput" type="text" name="str"/><input type="submit" value="Search"/>
</form>
116
Add the Global Search Box to Your Customized CommunityHTML Header
Plan Your Community Design Strategy
Configure a Custom Domain for Your Community
USER PERMISSIONS
To view domains:• “View Setup and
Configuration”
To add domains:• “Customize Application”
or “View Setup andConfiguration” pluseither a Site.comPublisher license or“Create and Set UpCommunities”
To edit or delete domains:• “Customize Application”
To associate certificates witha domain:• Contact Salesforce if you
aren’t usingCommunities.Organization withCommunities canassociate certificateswith a domain.
Set up a custom domain so that your community URLs reflect your company brand.
Note: Custom domains are supported only in non-sandbox instances. You can configure acustom domain in a sandbox instance and then migrate it to a production instance, but thecustom domain is only active in production.
When you add a domain, you also have the option of attaching a certificate and key for connectionsecurity. If you’re going to use a certificate, make sure you’ve already added it using Certificate andKey Management before you try to attach it to your domain. Only CA-signed certificates aresupported, and they must be 2048 bits in length. To support all domains that are hosted by sitesin your organization, use a wildcard or Subject Alternative Name certificate.
1. From Setup, enter Domains in the Quick Find box, then select Domains.
2. Click Add a Domain.
3. Enter the Domain Name.
4. Add a certificate if you have already set up a CA-signed certificate that supports this domain.
5. Click Save. Alternatively, click Save & New to add multiple domains.
If you plan to host more than one community on a domain, you’ll need to set up custom URLs foreach site. Custom URLs are the way to uniquely distinguish the communities within that domain.From Setup, enter Custom URLs in the Quick Find box, then select Custom URLs.
Before you switch the CNAME of your domain name to point to a new target name, ensure thatthe new target name exists in the DNS by using dig or nslookup. When you created yourdomain names affects the target of your CNAME:
• Domain names that were added before Summer ‘13, typically need to have their CNAME adjustedto point to the fully qualified domain followed by .live.siteforce.com instead of to the organization’s force.comsub-domain. For example, if your pre-Summer ‘13 domain is www.example.com, then the target of its CNAME will need to bewww.example.com.live.siteforce.com instead of example.force.com before HTTPS will work.
• Domain names that were added in or before Summer ‘13, don’t have the 18-character organization ID in the CNAME target.
• Domain names that were added in or after Summer ‘13, already point to the proper place for setting up HTTPS in a custom domain.
• Domain names that were added in or after Winter ‘14, use a CNAME that points to the fully qualified domain followed by yourorganization’s 18-character ID and .live.siteforce.com. For example, if your domain name is www.example.com andyour 18-character organization ID is 00dxx0000001ggxeay, then the target of its CNAME will need to bewww.example.com.00dxx0000001ggxeay.live.siteforce.com.
117
Configure a Custom Domain for Your CommunityPlan Your Community Design Strategy
Rename the Chatter Tab
EDITIONS
Available in: SalesforceClassic
Available in: Enterprise,Performance, Unlimited,and Developer Editions
USER PERMISSIONS
To rename the Chatter tab:• “Customize Application”
OR
“View Setup andConfiguration”
AND
Be designated as atranslator
Most likely, many of your community members will use the Chatter tab as their home base. Youcan customize it to meet your company’s branding.
The Chatter tab is the fastest way for your community members to see what’s most important tothem: activity feeds, groups, bookmarks, files, and more. Many of your community members willmost likely use the Chatter tab as their home base. Customize the name of the Chatter tab in yourcommunity to match your company branding—for example, you can use your company’s nameor any other name that would be recognizable to your members.
1. From Setup, enter Rename Tabs and Labels in the Quick Find box, then selectRename Tabs and Labels.
2. Select your default language from the Select Language drop-down list at the top of thepage.
3. Under Chatter Tabs in Communities, click Edit next to the community you want to edit.
4. Type the singular and plural versions of your preferred tab name, for example, Partner andPartners. Select Starts with a vowel sound if appropriate.
5. Click Save.
118
Rename the Chatter TabPlan Your Community Design Strategy
SECURITY & AUTHENTICATION
Authenticate Community Users
You have several options for authenticating users in your community. By default, external users authenticate by logging in with theusername and password that Salesforce assigns them for the community. (External users are users with Community, Customer Portal,or partner portal licenses.) Your organization’s internal users just follow the employee login flow using their Salesforce username andpassword.
Note: All authentication options also work with custom HTTPS web addresses.
SEE ALSO:
Customize Login, Logout, and Self-Registration Pages in Your Community
Configure SAML for Communities
EDITIONS
Available in: SalesforceClassic
Available in: Enterprise,Performance, Unlimited,and Developer Editions
If your organization uses an existing single sign-on capability to simplify and standardize your userauthentication, you can extend this capability to communities.
The following information assumes that you are already familiar with Security Assertion MarkupLanguage (SAML) authentication protocols and know how to work with your identity provider toconfigure single sign-on for your organization. When implementing SAML for communities, thekey is to use the community URL associated with login for the single sign-on flow. Also make surethat the community URL in the SAML assertion POST includes /login.
Here is a summary of how SAML requests and responses are processed between the user’s browser,the community, and your identity provider.
119
This table compares what’s required for community SAML assertions to what’s required for other types of Salesforce domains.
CommunityForce.com SitesPortalStandardRequirement
community URLlogin.salesforce.comlogin.salesforce.comlogin.salesforce.comURL where SAMLassertion POST is made.
NoYes–passed as anattribute
Yes–passed as anattribute
NoAreorganization_idand portal_idrequired in assertion?
Note: Required if usingJust-in-Time provisioning tocreate portal users in thecommunity.Community-specific portalusers can be provisioned withportal_id excluded.
NoYes–passed as anattribute
NoNoIs siteUrl required inassertion?
120
Configure SAML for CommunitiesSecurity & Authentication
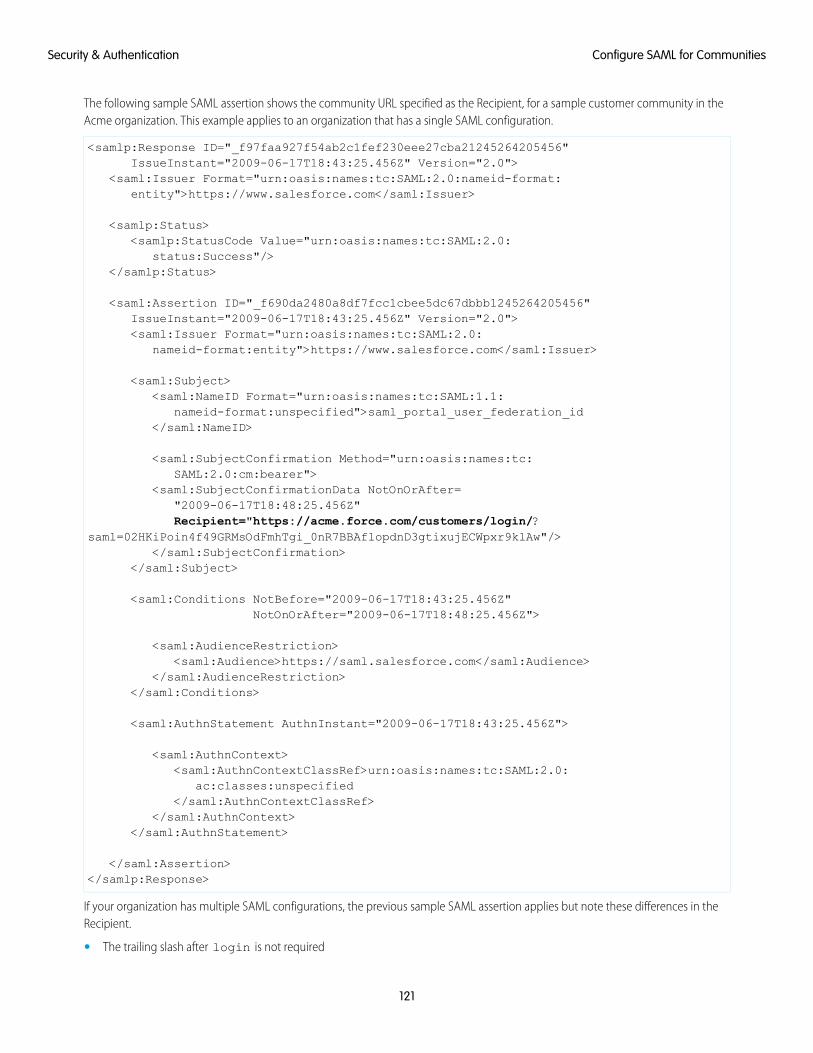
The following sample SAML assertion shows the community URL specified as the Recipient, for a sample customer community in theAcme organization. This example applies to an organization that has a single SAML configuration.
<samlp:Response ID="_f97faa927f54ab2c1fef230eee27cba21245264205456"IssueInstant="2009-06-17T18:43:25.456Z" Version="2.0">
<saml:Issuer Format="urn:oasis:names:tc:SAML:2.0:nameid-format:entity">https://www.salesforce.com</saml:Issuer>
<samlp:Status><samlp:StatusCode Value="urn:oasis:names:tc:SAML:2.0:
status:Success"/></samlp:Status>
<saml:Assertion ID="_f690da2480a8df7fcc1cbee5dc67dbbb1245264205456"IssueInstant="2009-06-17T18:43:25.456Z" Version="2.0"><saml:Issuer Format="urn:oasis:names:tc:SAML:2.0:
nameid-format:entity">https://www.salesforce.com</saml:Issuer>
<saml:Subject><saml:NameID Format="urn:oasis:names:tc:SAML:1.1:
nameid-format:unspecified">saml_portal_user_federation_id</saml:NameID>
<saml:SubjectConfirmation Method="urn:oasis:names:tc:SAML:2.0:cm:bearer">
<saml:SubjectConfirmationData NotOnOrAfter="2009-06-17T18:48:25.456Z"Recipient="https://acme.force.com/customers/login/?
saml=02HKiPoin4f49GRMsOdFmhTgi_0nR7BBAflopdnD3gtixujECWpxr9klAw"/></saml:SubjectConfirmation>
</saml:Subject>
<saml:Conditions NotBefore="2009-06-17T18:43:25.456Z"NotOnOrAfter="2009-06-17T18:48:25.456Z">
<saml:AudienceRestriction><saml:Audience>https://saml.salesforce.com</saml:Audience>
</saml:AudienceRestriction></saml:Conditions>
<saml:AuthnStatement AuthnInstant="2009-06-17T18:43:25.456Z">
<saml:AuthnContext><saml:AuthnContextClassRef>urn:oasis:names:tc:SAML:2.0:
ac:classes:unspecified</saml:AuthnContextClassRef>
</saml:AuthnContext></saml:AuthnStatement>
</saml:Assertion></samlp:Response>
If your organization has multiple SAML configurations, the previous sample SAML assertion applies but note these differences in theRecipient.
• The trailing slash after login is not required
121
Configure SAML for CommunitiesSecurity & Authentication
• The so parameter is required and must specify the organization ID
The Recipient would look like this:
Recipient="https://acme.force.com/customers/login?so=00DD0000000JsCM"
When logging out of a community, external users authorized using SAML for single sign-on are redirected to the Identity ProviderLogout URL, if one is set in the community’s SAML settings. To access the SAML settings, from Setup, enter Single Sign-OnSettings in the Quick Find box, then select Single Sign-On Settings.
SEE ALSO:
Example SAML Assertions
Best Practices for Implementing Single Sign-On
Single Sign-On with SAML on Force.com
Configure Authentication Providers
External users can log in using their credentials from Facebook©, Janrain©, or another Salesforce organization if you set up authenticationproviders on the Auth. Providers page in Setup and choose to display them on the community login page.
Note: The following information assumes that you are familiar with the use of authentication providers for single sign-on.
If you’re using a custom Visualforce login page instead of the default login page, use the Single Sign-On InitializationURL from an Auth. Provider detail page as the target URL of a custom login button. For example:https://login.salesforce.com/services/auth/sso/orgID/URLsuffix?community=https://acme.force.com/support
If you’re using Janrain as the authentication provider you can pass the following to the Janrain login widget that’s deployed on yoursite.
janrain.settings.tokenUrl='https://login.salesforce.com/services/authcallback/orgID/URLsuffix'+'?flowtype=sso&community='+encodeURIComponent('https://acme.force.com/customers');
SEE ALSO:
About External Authentication Providers
Using Request Parameters with Client Configuration URLs
Customize Login, Logout, and Self-Registration Pages in Your Community
Configure Authentication Flows with OAuth
EDITIONS
Available in: SalesforceClassic
Available in: Enterprise,Performance, Unlimited,and Developer Editions
If your organization wants to build integrations between communities and custom-branded apps,such as mobile or desktop apps, you can use OAuth to create a branded login page.
The following information assumes that you’re familiar with OAuth protocols and authenticationflows for remote access applications. Communities support all available authentication flows, exceptfor the username-password OAuth authentication flow and the SAML assertion flow. Whenimplementing branded OAuth flows for communities, you configure the authorize URL to use thecommunity URL. The authentication flow then directs users to the application approval page.
122
Configure Authentication ProvidersSecurity & Authentication
Note: As a security measure, when administrators are logged in as another user, they can’t authorize OAuth data access for thatuser. For example, admins can’t authorize OAuth access to user accounts, including single sign-on to third-party applications.
For example, to authenticate a user using an authorize URL like the following:
https://login.salesforce.com/services/oauth2/authorize?response_type=token&client_id=your_app_id&redirect_uri=your_redirect_uri
Replace the login.salesforce.com host name with the full path to the community URL:
https://acme.force.com/customers/services/oauth2/authorize?response_type=token&client_id=your_app_id&redirect_uri=your_redirect_uri
When implemented successfully, this URL directs users to the community login page. After they authorize the app, you then set a useraccess token and refresh token for future authentication. In requests for the token endpoint, replace the host with the community, likethis:
https://acme.force.com/customers/services/oauth2/token
Note: After you acquire the access_token you can pass it as a Bearer token in the Authorization header request. Followingis an example of a REST API call to communities: https://acme.force.com/customers/services/data/v32.0/-H "Authorization: Bearer00D50000000IehZ\!AQcAQH0dMHZfz972Szmpkb58urFRkgeBGsxL_QJWwYMfAbUeeG7c1E6LYUfiDUkWe6H34r1AAwOR8B8fLEz6n04NPGRrq0FM"
SEE ALSO:
Authenticating Apps with OAuth
Digging Deeper into OAuth 2.0 on Force.com
Using OAuth to Authorize External Applications
“Step Three: Connect to Chatter REST API Using OAuth” in the Chatter REST API Developer Guide
123
Configure Authentication Flows with OAuthSecurity & Authentication
ENABLE ADDITIONAL FEATURES
Enable Integrations in Your Community
You can enable additional integrations, such as the community case feed, Chatter Questions, Question-to-Case, Ideas, and SalesforceKnowledge, in your community to increase collaboration and optimize the network between your internal community members andyour customers.
After you have implemented your community, consider integrating other Salesforce features to expand your reach.
• Enable Chatter Questions in Your Community
• Set Up Question-to-Case in Your Community
• Set Up the Community Case Feed
• Enable Chatter Answers in Your Community
• Enable Ideas in Your Community
• Enable Salesforce Knowledge in Your Community
• Set Up Approvals for External Users in Your Community
• Enable Leads for Partner Users
• Set Up Report Management for External Users—Create and Edit Reports
Enable Chatter Questions in Your Community
EDITIONS
Available in: SalesforceClassic
Chatter Questions isavailable in: Group,Professional, Developer,Performance, Enterprise,and Unlimited Editions.
USER PERMISSIONS
To edit the global publisherlayout:• “Customize Application”
Chatter Questions helps you promote community engagement by giving users the ability to askand answer questions in their Chatter feed, in groups, and in records. Members in your users’ groupsand communities can answer questions in Chatter just as they would comment on a Chatter post.Users in communities built on the Customer Service (Napili) template can also attach files toquestions.
To set up Chatter Questions in your community, simply add the Question action to the globalpublisher layout. In organizations created after Summer ‘14, the Question action is automaticallyadded, but we recommend dragging it to the far left to increase its visibility.
Note: Chatter Questions is not available in communities built on the Koa and Kokuacommunity templates.
124
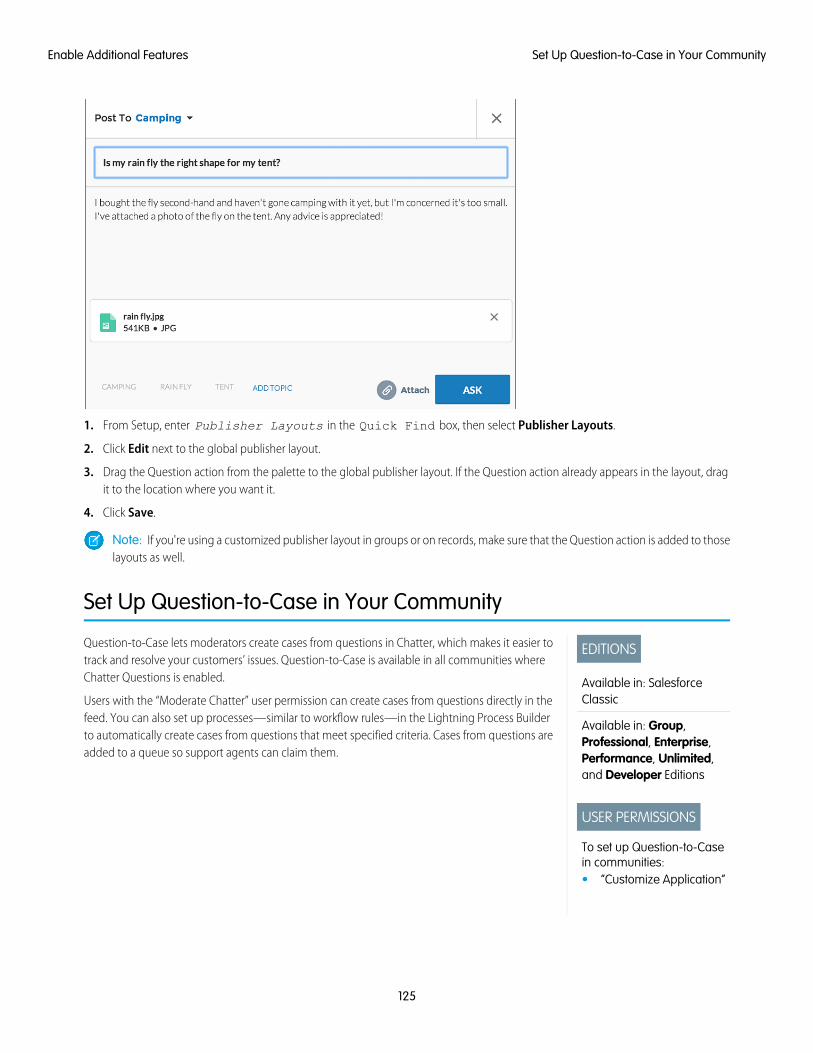
1. From Setup, enter Publisher Layouts in the Quick Find box, then select Publisher Layouts.
2. Click Edit next to the global publisher layout.
3. Drag the Question action from the palette to the global publisher layout. If the Question action already appears in the layout, dragit to the location where you want it.
4. Click Save.
Note: If you're using a customized publisher layout in groups or on records, make sure that the Question action is added to thoselayouts as well.
Set Up Question-to-Case in Your Community
EDITIONS
Available in: SalesforceClassic
Available in: Group,Professional, Enterprise,Performance, Unlimited,and Developer Editions
USER PERMISSIONS
To set up Question-to-Casein communities:• “Customize Application”
Question-to-Case lets moderators create cases from questions in Chatter, which makes it easier totrack and resolve your customers’ issues. Question-to-Case is available in all communities whereChatter Questions is enabled.
Users with the “Moderate Chatter” user permission can create cases from questions directly in thefeed. You can also set up processes—similar to workflow rules—in the Lightning Process Builderto automatically create cases from questions that meet specified criteria. Cases from questions areadded to a queue so support agents can claim them.
125
Set Up Question-to-Case in Your CommunityEnable Additional Features
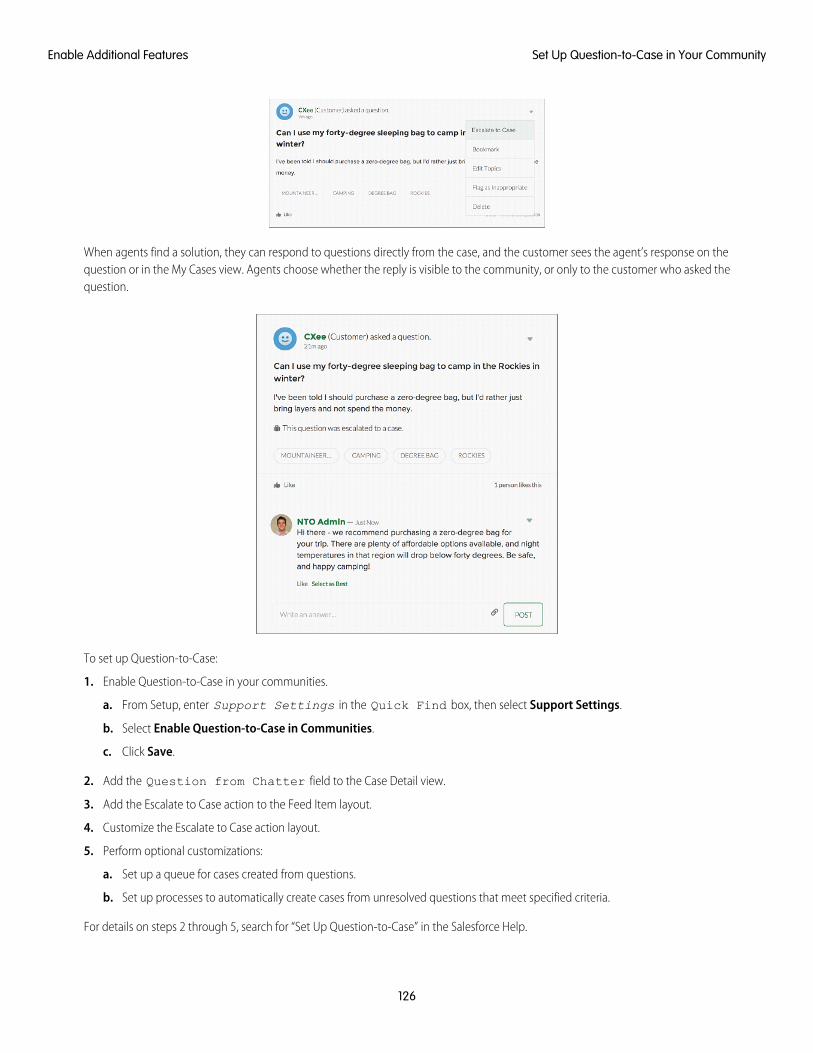
When agents find a solution, they can respond to questions directly from the case, and the customer sees the agent’s response on thequestion or in the My Cases view. Agents choose whether the reply is visible to the community, or only to the customer who asked thequestion.
To set up Question-to-Case:
1. Enable Question-to-Case in your communities.
a. From Setup, enter Support Settings in the Quick Find box, then select Support Settings.
b. Select Enable Question-to-Case in Communities.
c. Click Save.
2. Add the Question from Chatter field to the Case Detail view.
3. Add the Escalate to Case action to the Feed Item layout.
4. Customize the Escalate to Case action layout.
5. Perform optional customizations:
a. Set up a queue for cases created from questions.
b. Set up processes to automatically create cases from unresolved questions that meet specified criteria.
For details on steps 2 through 5, search for “Set Up Question-to-Case” in the Salesforce Help.
126
Set Up Question-to-Case in Your CommunityEnable Additional Features
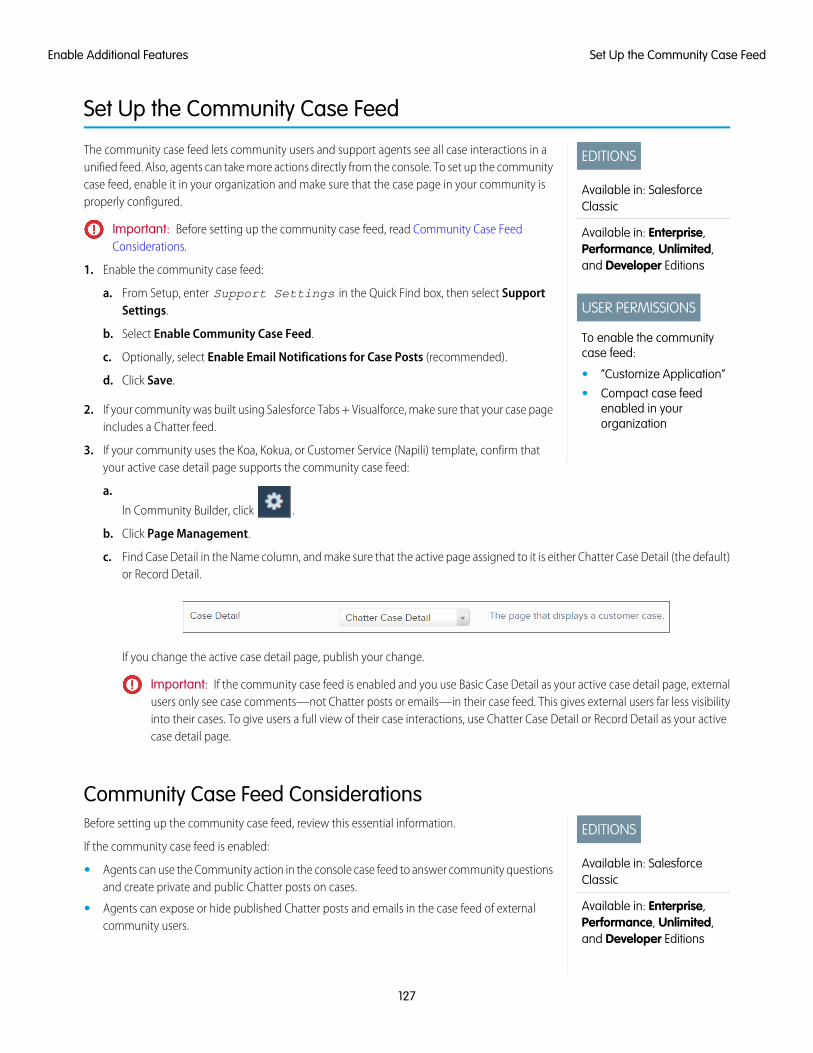
Set Up the Community Case Feed
EDITIONS
Available in: SalesforceClassic
Available in: Enterprise,Performance, Unlimited,and Developer Editions
USER PERMISSIONS
To enable the communitycase feed:
• “Customize Application”
• Compact case feedenabled in yourorganization
The community case feed lets community users and support agents see all case interactions in aunified feed. Also, agents can take more actions directly from the console. To set up the communitycase feed, enable it in your organization and make sure that the case page in your community isproperly configured.
Important: Before setting up the community case feed, read Community Case FeedConsiderations.
1. Enable the community case feed:
a. From Setup, enter Support Settings in the Quick Find box, then select SupportSettings.
b. Select Enable Community Case Feed.
c. Optionally, select Enable Email Notifications for Case Posts (recommended).
d. Click Save.
2. If your community was built using Salesforce Tabs + Visualforce, make sure that your case pageincludes a Chatter feed.
3. If your community uses the Koa, Kokua, or Customer Service (Napili) template, confirm thatyour active case detail page supports the community case feed:
a.
In Community Builder, click .
b. Click Page Management.
c. Find Case Detail in the Name column, and make sure that the active page assigned to it is either Chatter Case Detail (the default)or Record Detail.
If you change the active case detail page, publish your change.
Important: If the community case feed is enabled and you use Basic Case Detail as your active case detail page, externalusers only see case comments—not Chatter posts or emails—in their case feed. This gives external users far less visibilityinto their cases. To give users a full view of their case interactions, use Chatter Case Detail or Record Detail as your activecase detail page.
Community Case Feed Considerations
EDITIONS
Available in: SalesforceClassic
Available in: Enterprise,Performance, Unlimited,and Developer Editions
Before setting up the community case feed, review this essential information.
If the community case feed is enabled:
• Agents can use the Community action in the console case feed to answer community questionsand create private and public Chatter posts on cases.
• Agents can expose or hide published Chatter posts and emails in the case feed of externalcommunity users.
127
Set Up the Community Case FeedEnable Additional Features
• External community users with access to a case see associated Chatter posts, questions, and emails in their case feed.
If email notifications for case posts are enabled:
• When someone makes an externally visible post on a case, all case contacts are notified by email. They can comment on the postby replying to the email.
• If you’re already using custom email notification settings, such as those triggered by workflows, selecting this preference can createduplicate email notifications.
• In communities built on the Customer Service (Napili) template or Salesforce Tabs + Visualforce, you can turn off these notifications.In your email notification settings, deselect Posts on one of my cases under “Email me when someone...”.
Enable Chatter Answers in Your Community
EDITIONS
Available in: SalesforceClassic
Available in: Enterprise,Performance, Unlimited,and Developer Editions
USER PERMISSIONS
To enable Chatter Answersin Salesforce Communities:• “Customize Application”
Chatter Answers is a self-service support community where users can post questions and receiveanswers and comments from other users or your support agents.
To set up Chatter Answers in Salesforce Communities, follow these high-level steps:
1. Enable Chatter Answers.
a. From Setup, enter Chatter Answers Settings in the Quick Find box, thenselect Chatter Answers Settings.
b. Select Enable Chatter Answers.
2. Ensure that your community members have access to the following objects within yourorganization:
• Questions
• Knowledge Articles
• Data Categories
3. Create a zone for Chatter Answers.
a. Enable the zone for Chatter Answers.
b. Set the Visible In setting to the community that you want the zone shown in.
c. As a best practice, select a public group from your organization to designate as a Customer Support Agents Group.
4. Add the Q&A tab to your community.
a. From Setup, enter All Communities in the Quick Find box, then select All Communities and click the Manage link nextto a community.
b. Click AdministrationTabs.
c. Add the Q&A tab to the Selected Tabs list.
d. Click Save.
e. Click Close.
5. Make the Q&A tab visible on profiles that need access to it.
a. From Setup, enter Profiles in the Quick Find box, then select Profiles.
b. Click Edit for the profile that you want to make the Q&A tab visible for.
c. Under Standard Tab Settings, set the Q&A tab to Default On.
128
Enable Chatter Answers in Your CommunityEnable Additional Features
d. Click Save.
After you have enabled Chatter Answers in your community, consider the following extra deployment options:
• A public-facing Force.com site with or without a portal.
• A Visualforce tab, which provides branding, a customized landing page, and custom access to Chatter Answers within your community.
If a user self-registers for a community with Chatter Answers enabled, the Chatter Answers User permission is not automatically set forthe user. Set permissions for Chatter Answers on the community user.
Enable Ideas in Your Community
EDITIONS
Available in: SalesforceClassic
Available in: Enterprise,Performance, Unlimited,and Developer Editions
USER PERMISSIONS
To customize Ideas settings:• “Customize Application”
Ideas enable a group of users to post, vote for, and comment on ideas. Enabling Ideas in a communityprovides an online, transparent way for you to attract, manage, and showcase innovation.
To manage organization-wide settings for Ideas, follow these high-level steps:
1. From Setup, enter Ideas Settings in the Quick Find box, then select Ideas Settings
a. To enable Ideas for your organization, select the Enable Ideas checkbox.
b. Optionally, select Enable Text-Formatting, Images and Links to enablethe Ideas HTML editor, which gives users WYSIWYG HTML editing and image referencingcapabilities when they post or comment on ideas.
Once you enable the HTML editor, you can’t disable it.
c. Ensure that the multi-select Categories field is enabled by clicking the Enable buttonlocated below the Categories message at the top of the page. This button is not displayedif your organization already has the Categories field enabled.
d. To let Ideas members associate more than one category with an idea, select Enable Categories. Once you enablemulti-select categories, you can’t disable it.
e. To let users earn points and ratings based on their activity in each zone, select Enable Reputations.
f. In the Half-Life (in Days) field, enter the number of days.
The half-life setting determines how quickly old ideas drop in ranking on the Popular Ideas subtab, to make room for ideas withmore recent votes. A shorter half-life moves older ideas down the page faster than a longer half-life.
2. Define and customize fields for Ideas:
a. Define picklist values for the Categories and Status fields.
Make sure that you add the categories and statuses to the zones you’ll be including in the community.
b. Set field-level security for standard and custom fields.
c. Create custom fields and set validation rules on them.
Custom fields appear in the Additional Information section on the Post Idea and Idea Detail pages.
d. Optionally, add the Attachment field to the layout and set field-level security to enable users to add files to their ideas.
3. To enable experts within your zones, create a public group that includes these users.
4. Optionally, enable Idea Themes in your organization.
5. Create one or more zones to organize ideas into logical groups, and associate the zones with the community.
6. Customize your Ideas page layouts to display the information you want to see.
129
Enable Ideas in Your CommunityEnable Additional Features
7. Create validation rules that prevent offensive language from being used in the zone
8. Set up Apex triggers and validation rules for comments on ideas.
9. Enable user profiles for community members and moderators and ensure the profiles can access Ideas.
10. Add the Ideas tab and the Idea Themes tab to the community.
130
Enable Ideas in Your CommunityEnable Additional Features
Enable Salesforce Knowledge in Your Community
EDITIONS
Available in: SalesforceClassic
Communities is available in:Enterprise, Performance,Unlimited, and DeveloperEditions.
Salesforce Knowledge isavailable in Performanceand Developer Editions andin Unlimited Edition with theService Cloud.
Salesforce Knowledge isavailable for an additionalcost in Enterprise andUnlimited Edition.
USER PERMISSIONS
To create, customize, oractivate a community:• “Create and Set Up
Communities”
AND is a member of thecommunity they’re tryingto update
To set up SalesforceKnowledge, create articletypes and article actions,and modify category groupsassignments:• “Customize Application”
AND
“Manage SalesforceKnowledge”
To assign user licenses:• “Manage Internal Users”
To create data categories:• “Manage Data
Categories”
Enable Salesforce Knowledge to let community users view Knowledge articles.
You can use Communities to access your knowledge base articles if your Salesforce organizationhas a Salesforce Knowledge license. Once Salesforce Knowledge is enabled, complete the followingsteps to view articles in your communities.
1. Update profiles:
• Clone the Customer Community User, Customer Community Plus User, or PartnerCommunity User profiles and enable the “Read” permission for article types you want toshare with community users.
• Verify that the tab visibility for the Articles (or Knowledge) tab is Default On.
• Remember to click Edit Profiles, at the bottom of the detail page, and activate the newprofile.
2. Add the Knowledge tab to each community.
Note: Community members without the Knowledge One permission cannot accessKnowledge through Communities. They also can’t access Knowledge in communities viathe Salesforce1 mobile browser and downloadable apps.
3. If you want your community users to have different category group visibility settings, changethe visibility settings by permission set, profile, or role. For example, you can prohibit users withthe Customer Community User profile from seeing articles in a certain category group bychanging the data category visibility for that profile.
4. Notify users who create articles that they must select Customer for users with CustomerCommunity or Customer Community Plus licenses, or Partner for users with Partner Communitylicenses, as a channel option when creating or modifying an article. If the appropriate channelis not selected, the article is not published in the community.
131
Enable Salesforce Knowledge in Your CommunityEnable Additional Features
Set Up Approvals for External Users in Your Community
EDITIONS
Available in: SalesforceClassic
Available in: Enterprise,Performance, Unlimited,and Developer Editions
USER PERMISSIONS
To create, edit, delete, orclone approval processes:• “Customize Application”
To create or change queues:• “Customize Application”
AND
“Manage Public ListViews”
Customer and partner users in your community can be assigned as approvers on records or addeddirectly to queues. They can see and take action through the My Approvals and Approval Historyrelated lists on the record. Approvals can also be triggered directly from the Chatter feed.
An approval process automates how records are approved in Salesforce. An approval processspecifies each step of approval, including who to request approval from and what to do at eachpoint of the process.
Note:
• Users with high-volume licenses, such as High Volume Customer Portal and AuthenticatedWebsite, can’t approve records.
• External users with legacy portal licenses can approve records in communities, but notin portals.
When setting up approvals or queues, use the lookup fields to find customer and partner users.
For example, when setting up an approval, if you want to automatically assign a customer user asan approver use the lookup list to find and specify the user.
If you set up email notifications for your approval workflows, emails are sent based on community membership. If the user is a memberof multiple active communities, the email comes from the oldest active community. Any links included in the email point users directlyto the approval within the community.
In Salesforce1, users can see and take action from the Approval History related list, but they can’t submit requests for approval. To submitrequests for approvals, the user must do so from the full Salesforce site.
132
Set Up Approvals for External Users in Your CommunityEnable Additional Features
Enable Leads for Partner Users
EDITIONS
Available in: SalesforceClassic
Available in: Enterprise,Performance, Unlimited,and Developer Editions
USER PERMISSIONS
To enable leads for partnerusers:• “Manage Profiles and
Permission Sets”
Enable leads for partner users so that they have access to and can create leads in your communities.
When you enable leads for partner users in your community, you can assign leads to those members.Additionally, partner users can edit leads, create leads, import leads, and also mass update leads ina list view.
1. In Community Management, click AdministrationTabs, and add the Leads tab to the list ofavailable tabs in your community.
2. In Setup, set tab visibility and object permissions. You can either set them on the profile orusing a permission set. We recommend using a permission set if you plan to apply thesepermissions selectively.
a. If using a permission set, use the following settings for leads:
• In the Tab Settings, select Available and Visible.
• In the Object Settings, select “Read,” “Create,” and “Edit.”
b. If using a profile, such as the Partner User profile, set the leads tab setting to DefaultOn and enable the “Read,” “Create,” and “Edit” object permissions for leads.
3. Optionally, you can assign extra permissions that enable advanced features for your partners. If you plan to apply these permissionsto only some of your partner users, we recommend creating separate permissions sets.
Note: Partner users with legacy portal licenses can use these advanced features in communities, but not in portals.
Partner User Permission NeededFeature
“Import Leads”
AND
To import leads using the Import Leads link on the Leads tab in your community.
If your partner user is importing leads, it might also make sense to allow them to importaccounts and contacts using the Import My Organization’s Accounts & Contactslink on the Accounts and Contacts tabs in your community.
Optionally, “Import Personal Contacts”
“Manage Leads”To change the status of multiple leads via the Change Status button.
“Transfer Leads”To change the owner of multiple leads via the Change Owner button.
133
Enable Leads for Partner UsersEnable Additional Features
Set Up Report Management for External Users—Create and Edit Reports
EDITIONS
Available in: SalesforceClassic
Available in: Enterprise,Performance, Unlimited,and Developer Editions
USER PERMISSIONS
To create permission sets orenable custom permissionsin profiles:• “Manage Profiles and
Permission Sets”
To assign a permission setto a user:• “Assign Permission Sets”
To share a report folder withexternal users:• “Manager” folder access
or “Manage Reports inPublic Folders”
Community partner and customer users can create and edit reports in their own personal folder orin a privately shared folder if they have sufficient permissions. You can grant partner and customerusers permissions to create and edit reports through their profiles or by using permission sets. Afteryou grant the required permissions, they can use the drag-and-drop Report Builder tool.
Important: If your organization existed before the Summer ’13 release, you must first turnon enhanced sharing for reports and dashboards before granting external users permissions.See Analytics Folder Sharing.
To create, customize, and delete reports, external users must use the Report Builder tool.
Data visibility is based on two main things: the user role the partner or customer belongs to andyour organization’s sharing rules. Your organization’s field-level security is respected, meaning thatif a field is not visible for external users, a partner or customer user won’t see it in Report Builder.
1. To allow external users to create and edit reports, turn on the “Create and Customize Reports,”“Report Builder,” and “Edit My Reports” permissions through custom profiles or permission sets.If you want external users to export report data, also assign them “Export Reports” permission.
In Setup, enter Permission Sets in the Quick Find box, then select PermissionSets or Profiles. Assign the following permissions:
External User Permissions Needed to Create and Edit Reports
“Create and Customize Reports”
AND
“Report Builder”
To create, customize, and delete reports in a personalfolder:
“Edit My Reports”
AND
To create, customize and delete their own reportsin a privately shared folder with Viewer access:
“Report Builder”
“Export Reports”To export report data:
You can give permission to create and edit reports to all role-based external users with licenses such as Customer Community Plusand Partner Community. You can also give permission to all legacy role-based portal licenses such as Customer Portal and GoldPartner.
Note:
• These permissions aren’t available to high-volume user licenses, such as Customer Community, High Volume CustomerPortal, Service Cloud Portal, and Authenticated Website.
• External users with legacy portal licenses can create and edit reports in communities, but not in portals.
2. If you want your external users to create or edit reports in a privately shared folder, grant them “Viewer” access on the folder.
On the Reports tab in the Folders view, click next to the folder you want to share, then select Share.
Note: Partner and customer users can’t create, edit, or view reports in the Unfiled Public Reports folder.
134
Set Up Report Management for External Users—Create andEdit Reports
Enable Additional Features
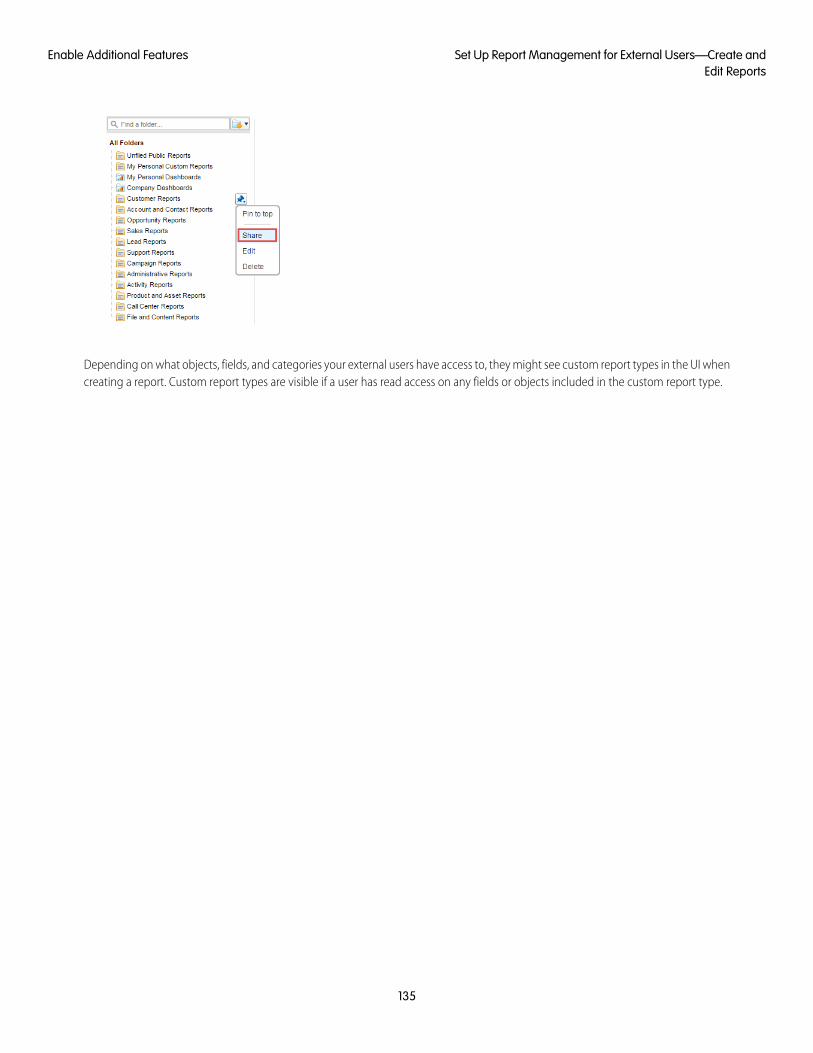
Depending on what objects, fields, and categories your external users have access to, they might see custom report types in the UI whencreating a report. Custom report types are visible if a user has read access on any fields or objects included in the custom report type.
135
Set Up Report Management for External Users—Create andEdit Reports
Enable Additional Features
EDUCATE YOUR USERS ABOUT COMMUNITIES
Share Personal Contact Information Within Communities
Users can specify which information from their profile is visible to external users, such as customers and partners, and guests viewingpublicly accessible pages that don’t require login.
When interacting with other community members, it’s important to balance being visible and accessible with protecting your personalcontact information. You may not want to show your job title, phone numbers, and other contact details outside of your internalorganization. Your customers and partners may not want other customers and partners viewing all their contact information.
Use either the user interface or API to control visibility. You can choose to expose fields to employees only, members of the communityfrom outside your company, or guest users who aren’t required to log in. Some fields are always visible to everyone accessing thecommunity. Some fields allow up to three levels of visibility, while others allow fewer.
• Employees—Only members from the internal organization can view.
• External—Members from the internal organization and external members, such as customers and partners, can view. External usersare users with Community, Customer Portal, or partner portal licenses.
• Public—Anyone can view, including guest users viewing publicly accessible pages that don’t require login. Guest users can accesspublic pages in communities via the Guest User license associated with each site or community.
In the API, setting a field to true on the User object makes it visible to the type of user indicated in the field name (external or guestusers).
Consider these tips about the visibility of your contact information.
• Your chosen settings apply to every community you’re a member of.
• When a user is restricted from viewing a contact information field, there are differences in what’s displayed in the user interfaceversus the API.
– In the user interface, the restricted field is hidden from your profile everywhere that it usually displays in a community. If yourorganization displays your profile information on custom Visualforce pages, the field still displays, but with the value #N/A.
– In the API, a field set to false returns the value #N/A.
• Information in hidden fields on a profile is not searchable by other partners and customers in the community, but is searchable byusers in the company’s internal organization.
Default Visibility Settings for Contact InformationThis table summarizes the default visibility settings for contact information and your options for restricting visibility.
API Controls on User ObjectOptions forRestrictingVisibility
Where to Set inUser Interface
DefaultVisibility
ContactInformation
N/AEveryone see thesefields unless your
Go to YourName > Edit
PublicFirst Name
Last NameadministratorContact Info, then
click AboutNickname
136
API Controls on User ObjectOptions forRestrictingVisibility
Where to Set inUser Interface
DefaultVisibility
ContactInformation
About Me enables nicknamedisplay or creates acustom page thatdisplays thisinformation. If youradministrator hasenabled nicknamedisplay, yournickname displaysin place of yourfirst and last namesin most locations.
UserPreferencesShowTitleToExternalUsers
UserPreferencesShowTitleToGuestUsers
Employees,external, or public
Go to YourName > EditContact Info, thenclick About
ExternalTitle
Note: When the guest user preference is set to true,the job title field is visible to external members evenif the external member preference is set to false.
UserPreferencesShowProfilePicToGuestUsersExternal or publicOn your profilepage, click Update
External.Users
Profile photo
under your photowithout(or Add Photo ifaccessyou haven’t addedsee thea photo yet), thenstock
photo. select Show incommunitieswithpubliclyaccessiblepages
Employees,external, or public
Go to YourName > EditContact Info, thenclick Contact
EmployeesCity
Country
Fax
Note: For each pair of preferences controlling thevisibility of a field, when the guest user preference isset to true, the field is visible to external memberseven if the external member preference is set tofalse.
Mobile PhoneUserPreferencesShowCityToExternalUsers
UserPreferencesShowCityToGuestUsersState
Street AddressUserPreferencesShowCountryToExternalUsers
Work PhoneUserPreferencesShowCountryToGuestUsers
Zip/Postal CodeUserPreferencesShowEmailToExternalUsers
UserPreferencesShowEmailToGuestUsers
137
Share Personal Contact Information Within CommunitiesEducate Your Users About Communities
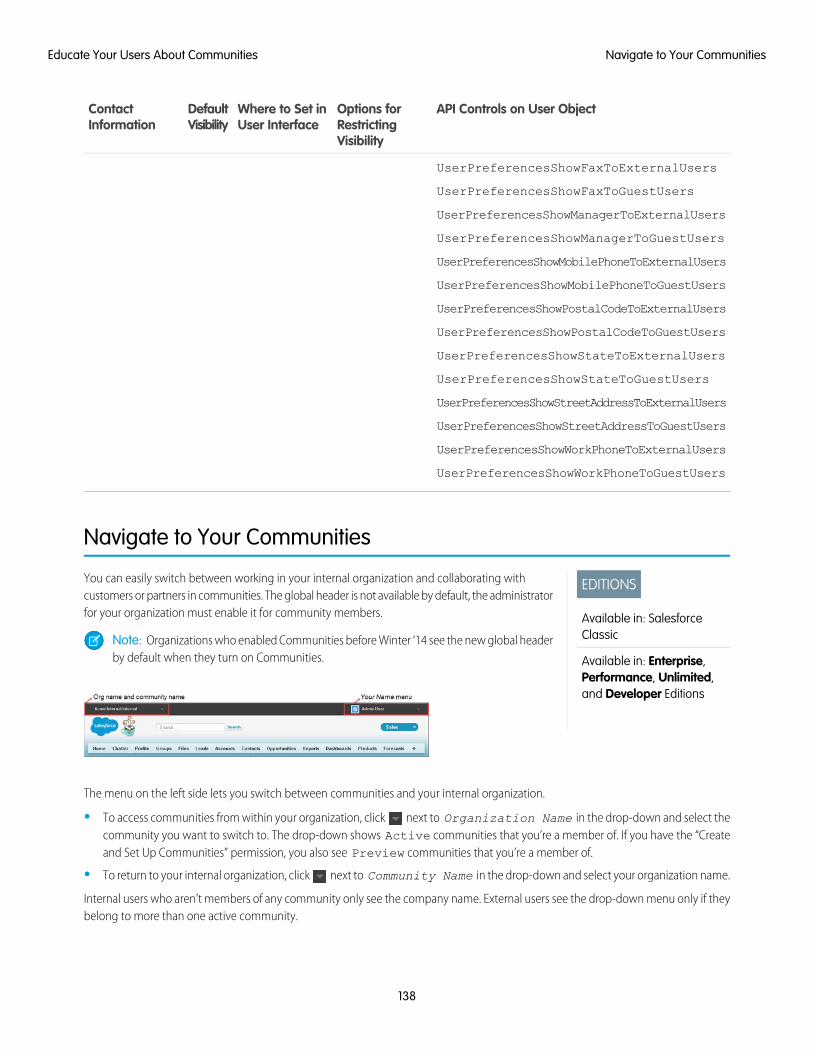
API Controls on User ObjectOptions forRestrictingVisibility
Where to Set inUser Interface
DefaultVisibility
ContactInformation
UserPreferencesShowFaxToExternalUsers
UserPreferencesShowFaxToGuestUsers
UserPreferencesShowManagerToExternalUsers
UserPreferencesShowManagerToGuestUsers
UserPreferencesShowMobilePhoneToExternalUsers
UserPreferencesShowMobilePhoneToGuestUsers
UserPreferencesShowPostalCodeToExternalUsers
UserPreferencesShowPostalCodeToGuestUsers
UserPreferencesShowStateToExternalUsers
UserPreferencesShowStateToGuestUsers
UserPreferencesShowStreetAddressToExternalUsers
UserPreferencesShowStreetAddressToGuestUsers
UserPreferencesShowWorkPhoneToExternalUsers
UserPreferencesShowWorkPhoneToGuestUsers
Navigate to Your Communities
EDITIONS
Available in: SalesforceClassic
Available in: Enterprise,Performance, Unlimited,and Developer Editions
You can easily switch between working in your internal organization and collaborating withcustomers or partners in communities. The global header is not available by default, the administratorfor your organization must enable it for community members.
Note: Organizations who enabled Communities before Winter ‘14 see the new global headerby default when they turn on Communities.
The menu on the left side lets you switch between communities and your internal organization.
• To access communities from within your organization, click next to Organization Name in the drop-down and select thecommunity you want to switch to. The drop-down shows Active communities that you’re a member of. If you have the “Createand Set Up Communities” permission, you also see Preview communities that you’re a member of.
• To return to your internal organization, click next to Community Name in the drop-down and select your organization name.
Internal users who aren’t members of any community only see the company name. External users see the drop-down menu only if theybelong to more than one active community.
138
Navigate to Your CommunitiesEducate Your Users About Communities
Note: If an external user who is only a member of one Active community is given the URL for a Preview community, theydon’t see the drop-down menu in the Preview community.
You can work in more than one community at a time if you open each one in a different browser tab.
Switching between your internal organization and your communities doesn’t have to disrupt your workflow. We automatically returnyou to the page where you were last working, so you can pick up right where you left off.
Note: If your organization is setting up My Domain but hasn’t finished deployment of the new custom domain, switching froma community to your internal organization directs you to the Salesforce login page instead. This can happen when you’ve loggedin using a My Domain URL that has been registered but not yet deployed. Once your domain is deployed, selecting your organizationin the drop-down directs you to the internal organization as expected.
The Your Name menu on the right side contains links to edit contact information and log out. For internal users, it also contains alink to Help & Training and may also contain links to Setup and other tools depending on user permissions and enabled features. If yourorganization is using Lightning Experience, users with the appropriate permission can switch between Salesforce Classic and the newinterface using the Switcher. Look for the Switch to Lightning Experience link in the Your Name menu. Communitiesaren’t supported in Lightning Experience, so to create, manage, or access communities from the global header, you’ll have to switchback to Salesforce Classic.
Search Behavior in Communities
EDITIONS
Available in: SalesforceClassic
Available in: Enterprise,Performance, Unlimited,and Developer Editions
Search capabilities in communities can make or break a member’s experience. Search in communitiesis different depending on whether your community is using a Community Builder-based templateor a Salesforce Tabs + Visualforce template. In general, searches within a community return resultsspecific to that community.
Note: To be searchable in communities, objects must be searchable in Lightning Experienceand supported in community templates.
For all communities:Search behavior in communities is different from searches in the internal org:
• In general, searches within a community return matches from within the community. To find items from a different community,members must leave the current community and search from within the other community.
• In community search results, members can see what they have access to through their profiles and permission sets. In addition,they can also view data that is explicitly shared with them in the community context. This can include internal company contentand records not explicitly shared with the rest of the community. For example, if the user’s profile allows access to accounts, butthe accounts tab isn’t exposed in the community, the member can still view account data in their search results.
• For user searches performed by external users of a community, global search and enhanced lookup search (with the All Fieldsoption selected) query the following limited set of fields:
– Name
– Username
– User ID
– Body
– Phone
– Custom fields
For example, say an external community member searches for a user, John Doe, by his alias jdoe. If that term isn’t containedin any of the searchable fields in the user object, John Doe’s record isn’t included in search results.
139
Search Behavior in CommunitiesEducate Your Users About Communities
• Search results include all the records and files that a community member has access to. This includes records not explicitlyexposed in the community or records and files they have access to in the internal Salesforce organization. In file searches, userscan see:
– Files they own
– Files shared with them directly
– Files they have access to in a library
– Files that are posted to a record they have access to
– Files that are posted to groups or shared with that community
• The admin must enable search result filters for an object in the internal org for it to be searchable in a community. To makecustom objects searchable, the object must be associated to a tab in the internal org.
For communities using the Koa and Kokua templates:
• The Featured Search component lets community members search for articles within a specific data category.
• The Article List component shows the search results based on the search term entered in Featured Search.
For communities using the Customer Service (Napili) template:
• The Search Publisher component lets community members enter search terms in the community.
• The Search Results component shows a list of search results limited to articles and discussions.
Note: Only articles that have a topic associated to them in Community Management populate in the Search Resultscomponent.
• The Global Search Results component lets members see search results in one tab (All), or in separate tabs for cases, accounts,contacts, and any other object exposed in the community (including custom objects) to which they have access.
Note: Admins must associate a tab to a custom object to make it searchable in global search.
For communities using Salesforce Tabs + Visualforce:
• If Chatter is enabled in your org, global search and contextual feed search are enabled by default in all communities.
– With global search, members can search for records, files, people, groups, topics, and feed posts and comments.
–Feed search ( ) is helpful when members want to look for information in a specific feed context. Groups, user profiles,records, and the community feed support feed search.
• If Chatter isn’t enabled, sidebar search is enabled in all communities.
– Sidebar search doesn’t support searches for items specific to Chatter, such as feeds, groups, files, topics, and user profiles.
Reset An External User's Password for Communities
An external user’s password can be reset either by the user or by the administrator of the organization hosting the community.
In either case, when someone initiates a reset of an external user’s password, an email is sent to the user with a link to reset their password.User-initiated password reset links expire in 24 hours. Administrator-initiated password reset links don’t expire. When the user clicks thelink, they will be required to reset their password before proceeding.
If a user-initiated password reset request can’t be processed, they receive an email telling them why. Password reset requests fail if auser’s account is temporarily or permanently locked due to too many unsuccessful login attempts or if the request was sent outsideapproved login hours, IP ranges, or network locations.
140
Reset An External User's Password for CommunitiesEducate Your Users About Communities
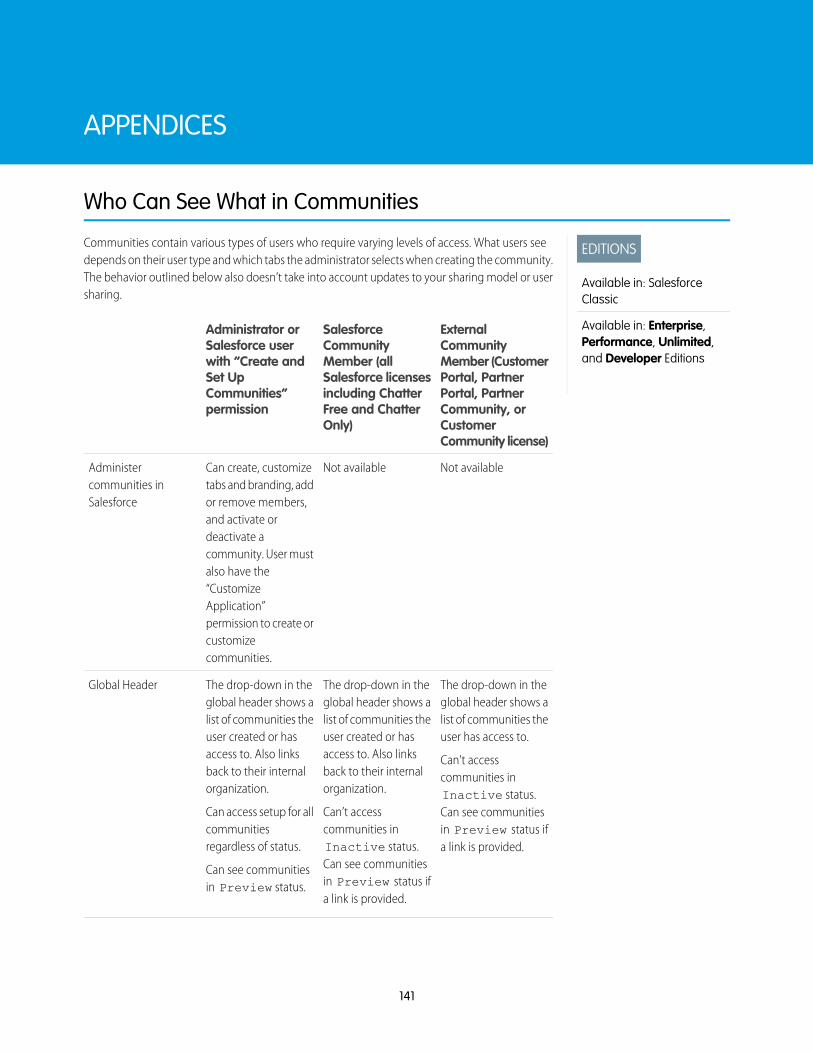
APPENDICES
Who Can See What in Communities
EDITIONS
Available in: SalesforceClassic
Available in: Enterprise,Performance, Unlimited,and Developer Editions
Communities contain various types of users who require varying levels of access. What users seedepends on their user type and which tabs the administrator selects when creating the community.The behavior outlined below also doesn’t take into account updates to your sharing model or usersharing.
ExternalCommunityMember (CustomerPortal, PartnerPortal, PartnerCommunity, orCustomerCommunity license)
SalesforceCommunityMember (allSalesforce licensesincluding ChatterFree and ChatterOnly)
Administrator orSalesforce userwith “Create andSet UpCommunities”permission
Not availableNot availableCan create, customizetabs and branding, add
Administercommunities inSalesforce or remove members,
and activate ordeactivate acommunity. User mustalso have the“CustomizeApplication”permission to create orcustomizecommunities.
The drop-down in theglobal header shows a
The drop-down in theglobal header shows a
The drop-down in theglobal header shows a
Global Header
list of communities theuser has access to.
Can’t accesscommunities in
list of communities theuser created or hasaccess to. Also linksback to their internalorganization.
Can’t accesscommunities in
list of communities theuser created or hasaccess to. Also linksback to their internalorganization.
Can access setup for allcommunitiesregardless of status.
Inactive status.Can see communitiesin Preview status ifa link is provided.Inactive status.
Can see communitiesCan see communitiesin Preview status. in Preview status if
a link is provided.
141
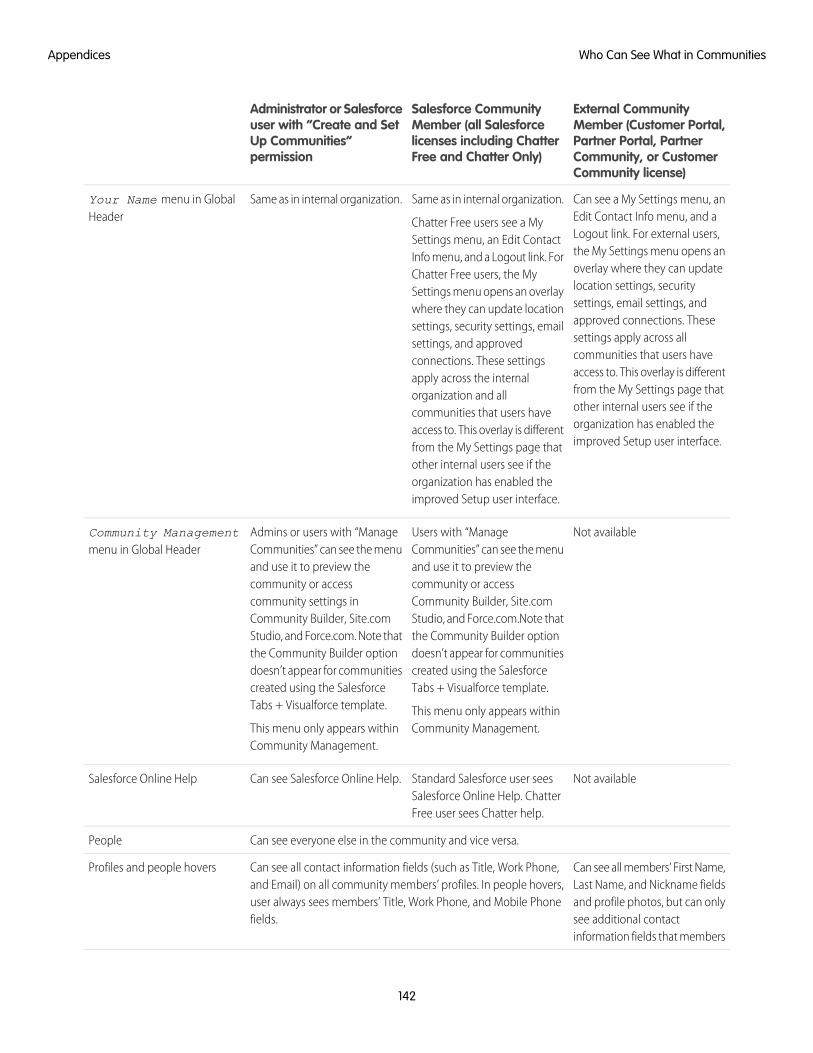
External CommunityMember (Customer Portal,Partner Portal, PartnerCommunity, or CustomerCommunity license)
Salesforce CommunityMember (all Salesforcelicenses including ChatterFree and Chatter Only)
Administrator or Salesforceuser with “Create and SetUp Communities”permission
Can see a My Settings menu, anEdit Contact Info menu, and a
Same as in internal organization.
Chatter Free users see a MySettings menu, an Edit Contact
Same as in internal organization.Your Name menu in GlobalHeader
Logout link. For external users,the My Settings menu opens anInfo menu, and a Logout link. Foroverlay where they can updateChatter Free users, the Mylocation settings, securitySettings menu opens an overlaysettings, email settings, andwhere they can update locationapproved connections. Thesesettings, security settings, emailsettings apply across allsettings, and approvedcommunities that users haveconnections. These settingsaccess to. This overlay is differentapply across the internalfrom the My Settings page thatorganization and allother internal users see if thecommunities that users haveorganization has enabled theimproved Setup user interface.
access to. This overlay is differentfrom the My Settings page thatother internal users see if theorganization has enabled theimproved Setup user interface.
Not availableUsers with “ManageCommunities” can see the menu
Admins or users with “ManageCommunities” can see the menu
Community Managementmenu in Global Header
and use it to preview theand use it to preview thecommunity or accesscommunity or accessCommunity Builder, Site.comcommunity settings inStudio, and Force.com.Note thatCommunity Builder, Site.comthe Community Builder optionStudio, and Force.com. Note thatdoesn’t appear for communitiesthe Community Builder optioncreated using the SalesforceTabs + Visualforce template.
This menu only appears withinCommunity Management.
doesn’t appear for communitiescreated using the SalesforceTabs + Visualforce template.
This menu only appears withinCommunity Management.
Not availableStandard Salesforce user seesSalesforce Online Help. ChatterFree user sees Chatter help.
Can see Salesforce Online Help.Salesforce Online Help
Can see everyone else in the community and vice versa.People
Can see all members’ First Name,Last Name, and Nickname fields
Can see all contact information fields (such as Title, Work Phone,and Email) on all community members’ profiles. In people hovers,
Profiles and people hovers
and profile photos, but can onlyuser always sees members’ Title, Work Phone, and Mobile Phonefields. see additional contact
information fields that members
142
Who Can See What in CommunitiesAppendices
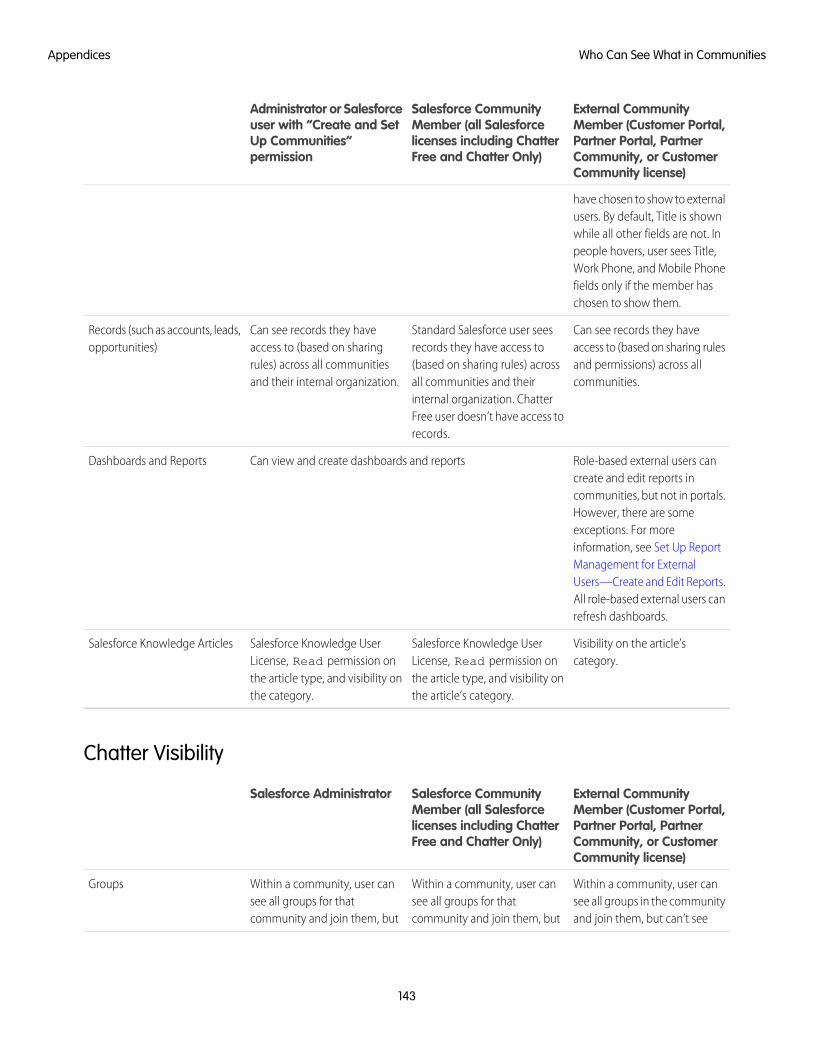
External CommunityMember (Customer Portal,Partner Portal, PartnerCommunity, or CustomerCommunity license)
Salesforce CommunityMember (all Salesforcelicenses including ChatterFree and Chatter Only)
Administrator or Salesforceuser with “Create and SetUp Communities”permission
have chosen to show to externalusers. By default, Title is shownwhile all other fields are not. Inpeople hovers, user sees Title,Work Phone, and Mobile Phonefields only if the member haschosen to show them.
Can see records they haveaccess to (based on sharing rules
Standard Salesforce user seesrecords they have access to
Can see records they haveaccess to (based on sharing
Records (such as accounts, leads,opportunities)
and permissions) across allcommunities.
(based on sharing rules) acrossall communities and theirinternal organization. Chatter
rules) across all communitiesand their internal organization.
Free user doesn’t have access torecords.
Role-based external users cancreate and edit reports in
Can view and create dashboards and reportsDashboards and Reports
communities, but not in portals.However, there are someexceptions. For moreinformation, see Set Up ReportManagement for ExternalUsers—Create and Edit Reports.All role-based external users canrefresh dashboards.
Visibility on the article’scategory.
Salesforce Knowledge UserLicense, Read permission onthe article type, and visibility onthe article’s category.
Salesforce Knowledge UserLicense, Read permission onthe article type, and visibility onthe category.
Salesforce Knowledge Articles
Chatter Visibility
External CommunityMember (Customer Portal,Partner Portal, PartnerCommunity, or CustomerCommunity license)
Salesforce CommunityMember (all Salesforcelicenses including ChatterFree and Chatter Only)
Salesforce Administrator
Within a community, user cansee all groups in the community
Within a community, user cansee all groups for that
Within a community, user cansee all groups for that
Groups
and join them, but can’t seecommunity and join them, butcommunity and join them, but
143
Who Can See What in CommunitiesAppendices
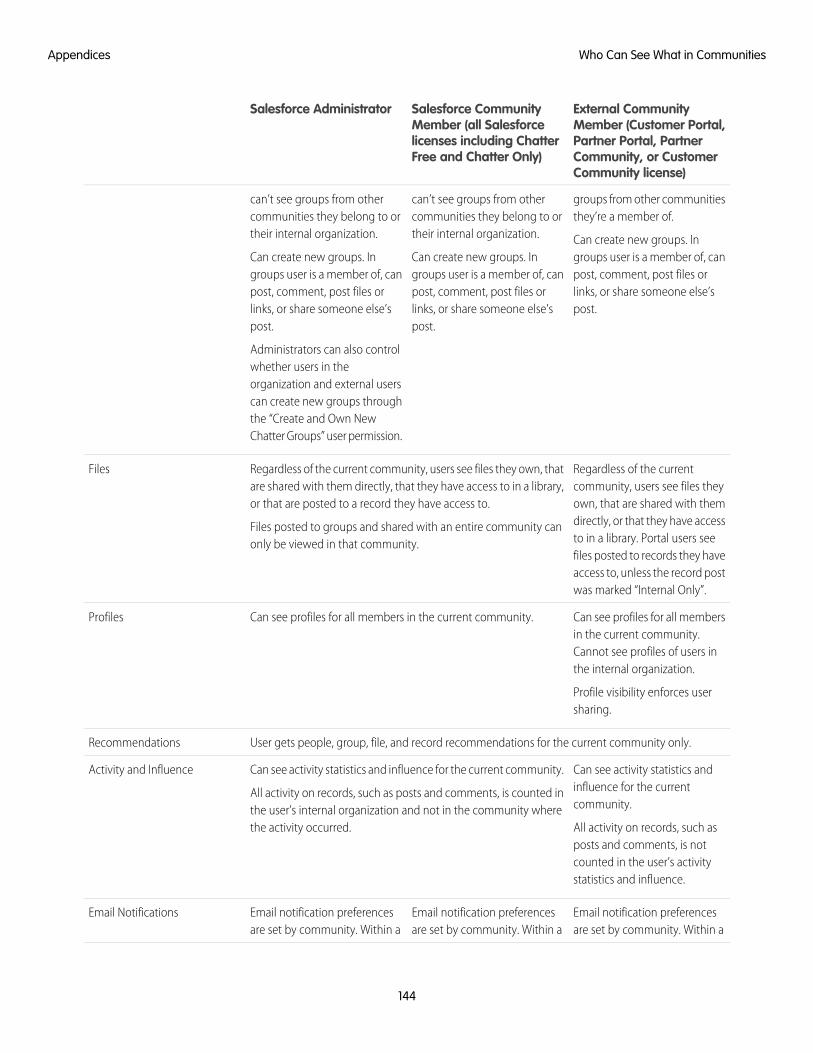
External CommunityMember (Customer Portal,Partner Portal, PartnerCommunity, or CustomerCommunity license)
Salesforce CommunityMember (all Salesforcelicenses including ChatterFree and Chatter Only)
Salesforce Administrator
can’t see groups from othercommunities they belong to ortheir internal organization.
Can create new groups. Ingroups user is a member of, can
groups from other communitiesthey’re a member of.
Can create new groups. Ingroups user is a member of, canpost, comment, post files or
can’t see groups from othercommunities they belong to ortheir internal organization.
Can create new groups. Ingroups user is a member of, can
post, comment, post files or links, or share someone else’spost.
post, comment, post files orlinks, or share someone else’spost.
links, or share someone else’spost.
Administrators can also controlwhether users in theorganization and external userscan create new groups throughthe “Create and Own NewChatter Groups” user permission.
Regardless of the currentcommunity, users see files they
Regardless of the current community, users see files they own, thatare shared with them directly, that they have access to in a library,or that are posted to a record they have access to.
Files posted to groups and shared with an entire community canonly be viewed in that community.
Files
own, that are shared with themdirectly, or that they have accessto in a library. Portal users seefiles posted to records they haveaccess to, unless the record postwas marked “Internal Only”.
Can see profiles for all membersin the current community.
Can see profiles for all members in the current community.Profiles
Cannot see profiles of users inthe internal organization.
Profile visibility enforces usersharing.
User gets people, group, file, and record recommendations for the current community only.Recommendations
Can see activity statistics andinfluence for the currentcommunity.
All activity on records, such asposts and comments, is not
Can see activity statistics and influence for the current community.
All activity on records, such as posts and comments, is counted inthe user’s internal organization and not in the community wherethe activity occurred.
Activity and Influence
counted in the user’s activitystatistics and influence.
Email notification preferencesare set by community. Within a
Email notification preferencesare set by community. Within a
Email notification preferencesare set by community. Within a
Email Notifications
144
Who Can See What in CommunitiesAppendices
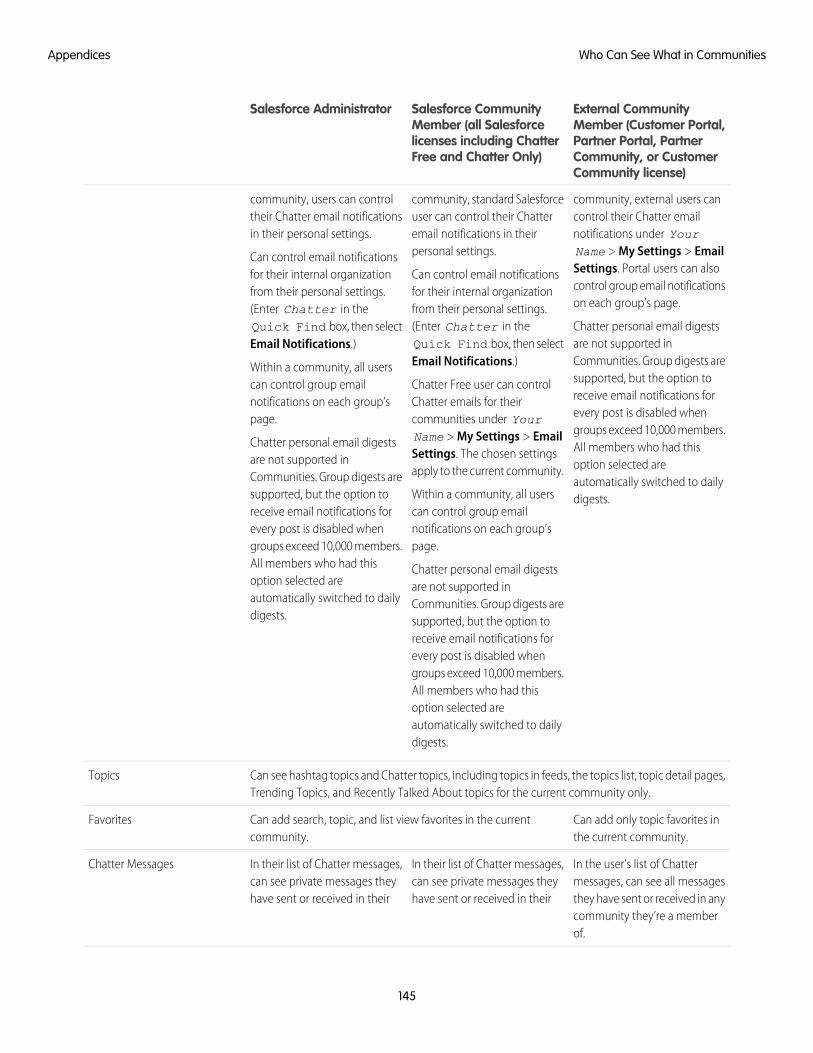
External CommunityMember (Customer Portal,Partner Portal, PartnerCommunity, or CustomerCommunity license)
Salesforce CommunityMember (all Salesforcelicenses including ChatterFree and Chatter Only)
Salesforce Administrator
community, external users cancontrol their Chatter email
community, standard Salesforceuser can control their Chatter
community, users can controltheir Chatter email notificationsin their personal settings.
Can control email notificationsfor their internal organization
notifications under YourName > My Settings > EmailSettings. Portal users can alsocontrol group email notificationson each group’s page.
Chatter personal email digestsare not supported in
email notifications in theirpersonal settings.
Can control email notificationsfor their internal organizationfrom their personal settings.(Enter Chatter in theQuick Find box, then selectEmail Notifications.)
from their personal settings.(Enter Chatter in theQuick Find box, then selectEmail Notifications.)
Within a community, all userscan control group email
Communities. Group digests aresupported, but the option toreceive email notifications for
Chatter Free user can controlChatter emails for theirnotifications on each group’s
page. every post is disabled whengroups exceed 10,000 members.
communities under YourName > My Settings > EmailChatter personal email digests
are not supported inAll members who had thisoption selected are
Settings. The chosen settingsapply to the current community.Communities. Group digests are automatically switched to daily
digests.Within a community, all userscan control group email
supported, but the option toreceive email notifications for
notifications on each group’spage.
every post is disabled whengroups exceed 10,000 members.All members who had this Chatter personal email digests
are not supported inoption selected areautomatically switched to dailydigests.
Communities. Group digests aresupported, but the option toreceive email notifications forevery post is disabled whengroups exceed 10,000 members.All members who had thisoption selected areautomatically switched to dailydigests.
Can see hashtag topics and Chatter topics, including topics in feeds, the topics list, topic detail pages,Trending Topics, and Recently Talked About topics for the current community only.
Topics
Can add only topic favorites inthe current community.
Can add search, topic, and list view favorites in the currentcommunity.
Favorites
In the user’s list of Chattermessages, can see all messages
In their list of Chatter messages,can see private messages they
In their list of Chatter messages,can see private messages they
Chatter Messages
they have sent or received in anyhave sent or received in theirhave sent or received in theircommunity they’re a memberof.
145
Who Can See What in CommunitiesAppendices
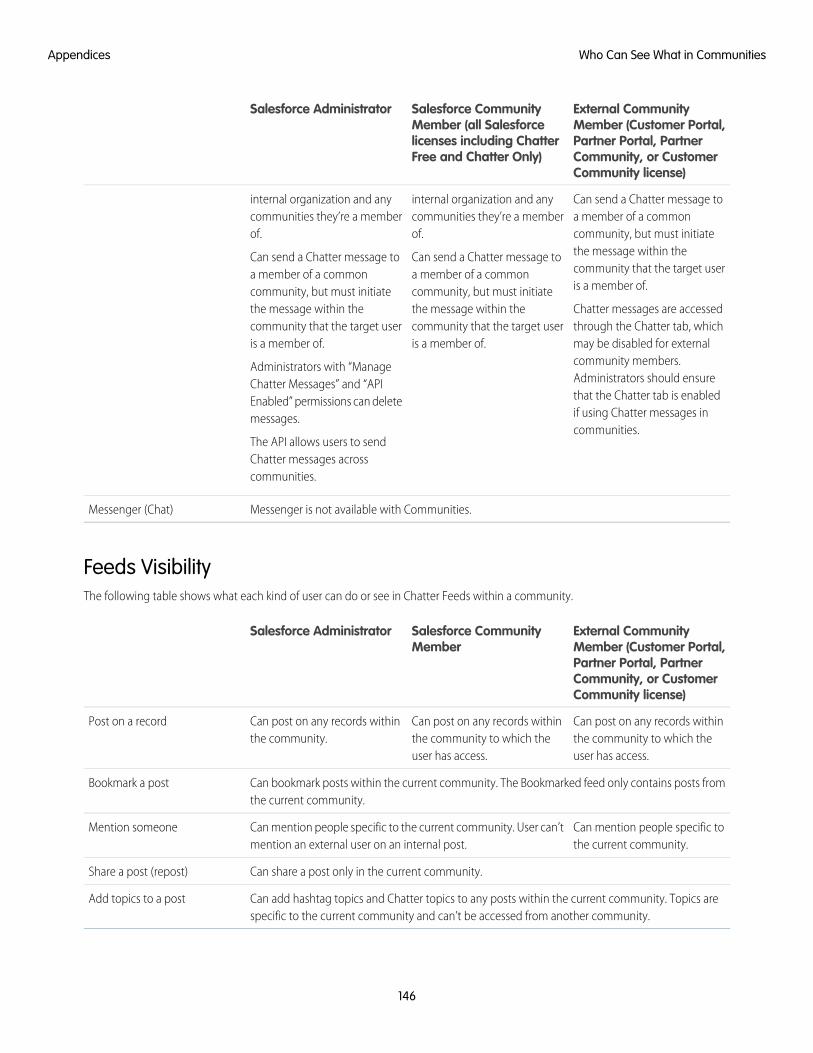
External CommunityMember (Customer Portal,Partner Portal, PartnerCommunity, or CustomerCommunity license)
Salesforce CommunityMember (all Salesforcelicenses including ChatterFree and Chatter Only)
Salesforce Administrator
Can send a Chatter message toa member of a common
internal organization and anycommunities they’re a memberof.
Can send a Chatter message toa member of a common
internal organization and anycommunities they’re a memberof.
Can send a Chatter message toa member of a common
community, but must initiatethe message within thecommunity that the target useris a member of.community, but must initiatecommunity, but must initiate
the message within thethe message within the Chatter messages are accessedthrough the Chatter tab, whichcommunity that the target user
is a member of.community that the target useris a member of.
Administrators with “ManageChatter Messages” and “API
may be disabled for externalcommunity members.Administrators should ensurethat the Chatter tab is enabledEnabled” permissions can delete
messages. if using Chatter messages incommunities.
The API allows users to sendChatter messages acrosscommunities.
Messenger is not available with Communities.Messenger (Chat)
Feeds VisibilityThe following table shows what each kind of user can do or see in Chatter Feeds within a community.
External CommunityMember (Customer Portal,Partner Portal, PartnerCommunity, or CustomerCommunity license)
Salesforce CommunityMember
Salesforce Administrator
Can post on any records withinthe community to which theuser has access.
Can post on any records withinthe community to which theuser has access.
Can post on any records withinthe community.
Post on a record
Can bookmark posts within the current community. The Bookmarked feed only contains posts fromthe current community.
Bookmark a post
Can mention people specific tothe current community.
Can mention people specific to the current community. User can’tmention an external user on an internal post.
Mention someone
Can share a post only in the current community.Share a post (repost)
Can add hashtag topics and Chatter topics to any posts within the current community. Topics arespecific to the current community and can’t be accessed from another community.
Add topics to a post
146
Who Can See What in CommunitiesAppendices
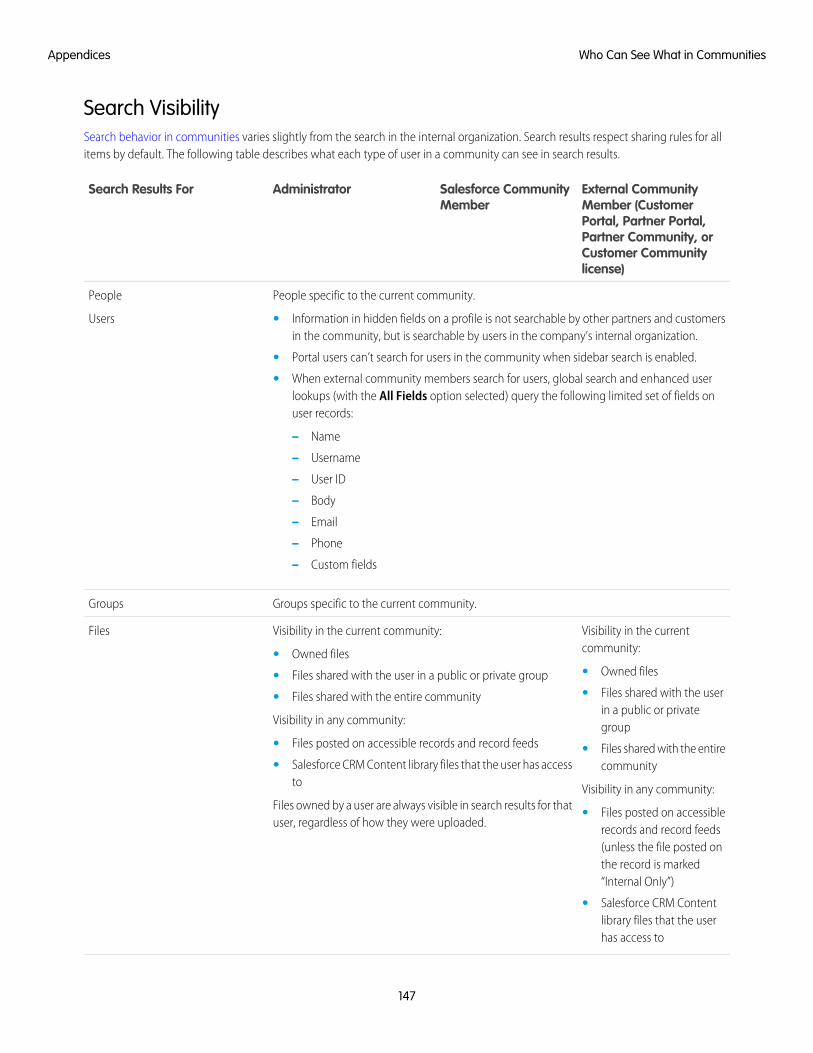
Search VisibilitySearch behavior in communities varies slightly from the search in the internal organization. Search results respect sharing rules for allitems by default. The following table describes what each type of user in a community can see in search results.
External CommunityMember (CustomerPortal, Partner Portal,Partner Community, orCustomer Communitylicense)
Salesforce CommunityMember
AdministratorSearch Results For
People specific to the current community.People
Users • Information in hidden fields on a profile is not searchable by other partners and customersin the community, but is searchable by users in the company’s internal organization.
• Portal users can’t search for users in the community when sidebar search is enabled.
• When external community members search for users, global search and enhanced userlookups (with the All Fields option selected) query the following limited set of fields onuser records:
– Name
– Username
– User ID
– Body
– Phone
– Custom fields
Groups specific to the current community.Groups
Visibility in the currentcommunity:
Visibility in the current community:Files
• Owned files• Owned files• Files shared with the user in a public or private group• Files shared with the user
in a public or privategroup
• Files shared with the entire community
Visibility in any community:
• Files posted on accessible records and record feeds • Files shared with the entirecommunity• Salesforce CRM Content library files that the user has access
to Visibility in any community:Files owned by a user are always visible in search results for thatuser, regardless of how they were uploaded.
• Files posted on accessiblerecords and record feeds(unless the file posted onthe record is marked“Internal Only”)
• Salesforce CRM Contentlibrary files that the userhas access to
147
Who Can See What in CommunitiesAppendices
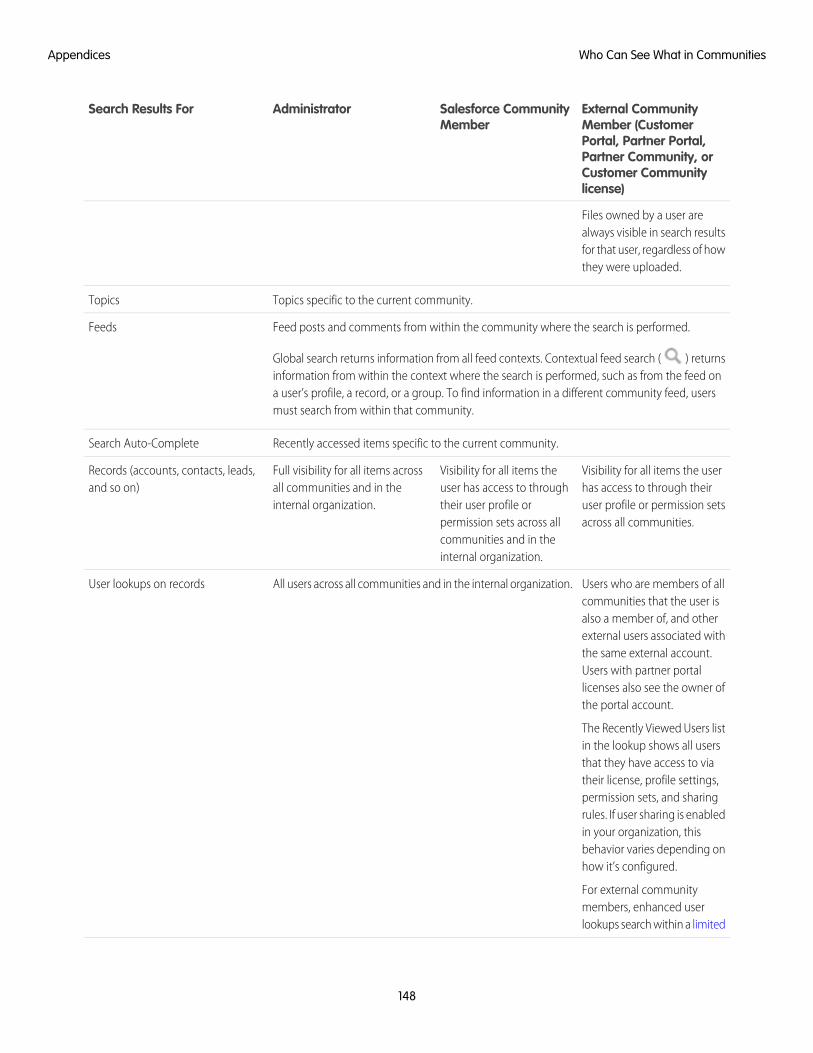
External CommunityMember (CustomerPortal, Partner Portal,Partner Community, orCustomer Communitylicense)
Salesforce CommunityMember
AdministratorSearch Results For
Files owned by a user arealways visible in search resultsfor that user, regardless of howthey were uploaded.
Topics specific to the current community.Topics
Feed posts and comments from within the community where the search is performed.
Global search returns information from all feed contexts. Contextual feed search ( ) returnsinformation from within the context where the search is performed, such as from the feed on
Feeds
a user’s profile, a record, or a group. To find information in a different community feed, usersmust search from within that community.
Recently accessed items specific to the current community.Search Auto-Complete
Visibility for all items the userhas access to through their
Visibility for all items theuser has access to through
Full visibility for all items acrossall communities and in theinternal organization.
Records (accounts, contacts, leads,and so on)
user profile or permission setsacross all communities.
their user profile orpermission sets across allcommunities and in theinternal organization.
Users who are members of allcommunities that the user is
All users across all communities and in the internal organization.User lookups on records
also a member of, and otherexternal users associated withthe same external account.Users with partner portallicenses also see the owner ofthe portal account.
The Recently Viewed Users listin the lookup shows all usersthat they have access to viatheir license, profile settings,permission sets, and sharingrules. If user sharing is enabledin your organization, thisbehavior varies depending onhow it’s configured.
For external communitymembers, enhanced userlookups search within a limited
148
Who Can See What in CommunitiesAppendices
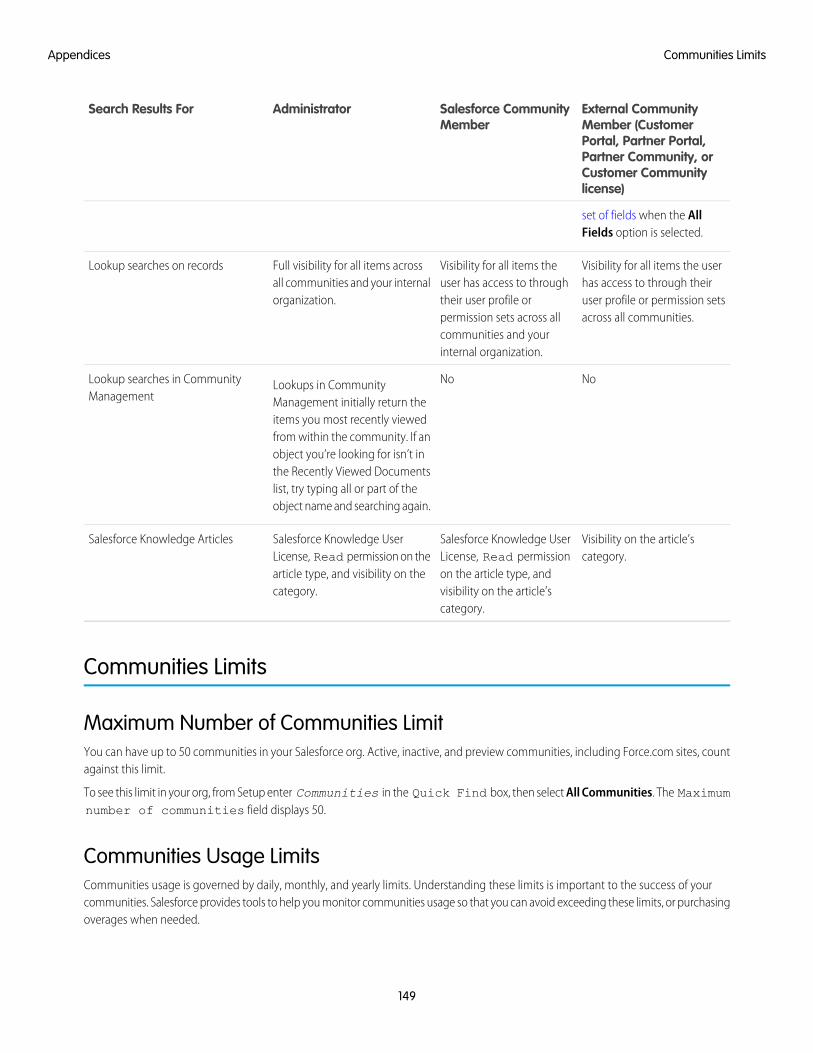
External CommunityMember (CustomerPortal, Partner Portal,Partner Community, orCustomer Communitylicense)
Salesforce CommunityMember
AdministratorSearch Results For
set of fields when the AllFields option is selected.
Visibility for all items the userhas access to through their
Visibility for all items theuser has access to through
Full visibility for all items acrossall communities and your internalorganization.
Lookup searches on records
user profile or permission setsacross all communities.
their user profile orpermission sets across allcommunities and yourinternal organization.
NoNoLookups in CommunityManagement initially return the
Lookup searches in CommunityManagement
items you most recently viewedfrom within the community. If anobject you’re looking for isn’t inthe Recently Viewed Documentslist, try typing all or part of theobject name and searching again.
Visibility on the article’scategory.
Salesforce Knowledge UserLicense, Read permissionon the article type, and
Salesforce Knowledge UserLicense, Read permission on thearticle type, and visibility on thecategory.
Salesforce Knowledge Articles
visibility on the article’scategory.
Communities Limits
Maximum Number of Communities LimitYou can have up to 50 communities in your Salesforce org. Active, inactive, and preview communities, including Force.com sites, countagainst this limit.
To see this limit in your org, from Setup enter Communities in the Quick Find box, then select All Communities. The Maximumnumber of communities field displays 50.
Communities Usage LimitsCommunities usage is governed by daily, monthly, and yearly limits. Understanding these limits is important to the success of yourcommunities. Salesforce provides tools to help you monitor communities usage so that you can avoid exceeding these limits, or purchasingoverages when needed.
149
Communities LimitsAppendices
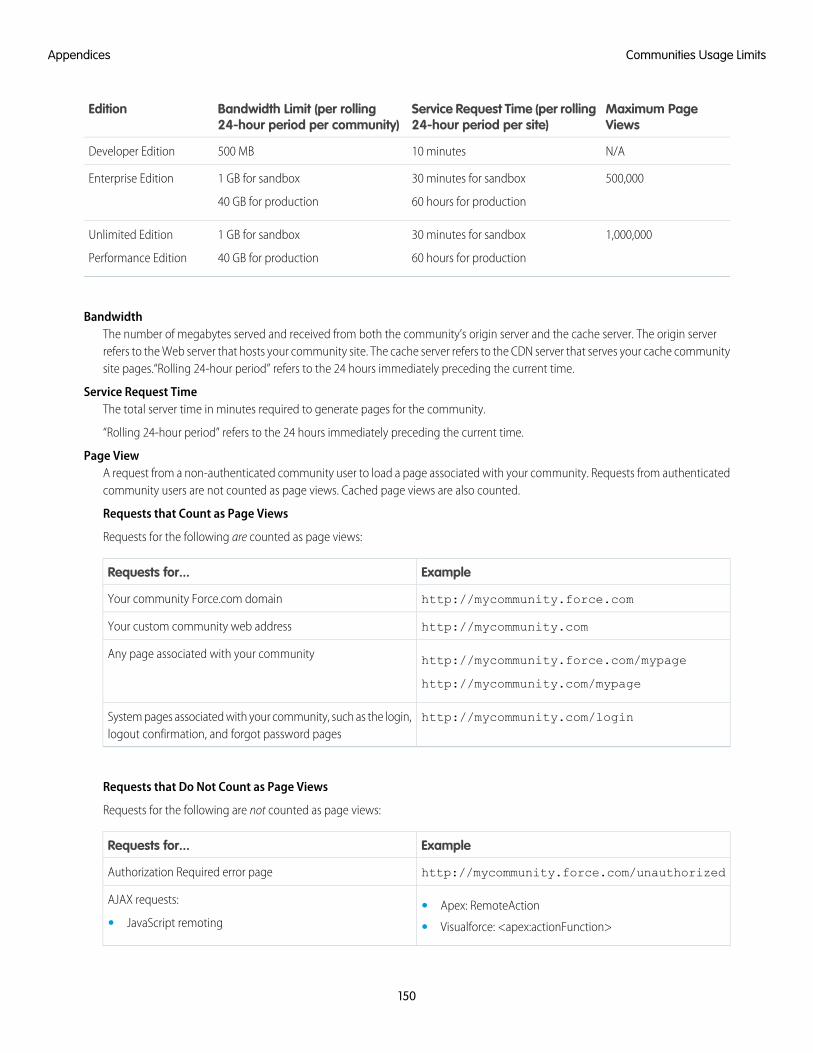
Maximum PageViews
Service Request Time (per rolling24-hour period per site)
Bandwidth Limit (per rolling24-hour period per community)
Edition
N/A10 minutes500 MBDeveloper Edition
500,00030 minutes for sandbox
60 hours for production
1 GB for sandbox
40 GB for production
Enterprise Edition
1,000,00030 minutes for sandbox
60 hours for production
1 GB for sandbox
40 GB for production
Unlimited Edition
Performance Edition
BandwidthThe number of megabytes served and received from both the community’s origin server and the cache server. The origin serverrefers to the Web server that hosts your community site. The cache server refers to the CDN server that serves your cache communitysite pages.“Rolling 24-hour period” refers to the 24 hours immediately preceding the current time.
Service Request TimeThe total server time in minutes required to generate pages for the community.
“Rolling 24-hour period” refers to the 24 hours immediately preceding the current time.
Page ViewA request from a non-authenticated community user to load a page associated with your community. Requests from authenticatedcommunity users are not counted as page views. Cached page views are also counted.
Requests that Count as Page Views
Requests for the following are counted as page views:
ExampleRequests for...
http://mycommunity.force.comYour community Force.com domain
http://mycommunity.comYour custom community web address
http://mycommunity.force.com/mypageAny page associated with your community
http://mycommunity.com/mypage
http://mycommunity.com/loginSystem pages associated with your community, such as the login,logout confirmation, and forgot password pages
Requests that Do Not Count as Page Views
Requests for the following are not counted as page views:
ExampleRequests for...
http://mycommunity.force.com/unauthorizedAuthorization Required error page
AJAX requests: • Apex: RemoteAction• JavaScript remoting • Visualforce: <apex:actionFunction>
150
Communities Usage LimitsAppendices
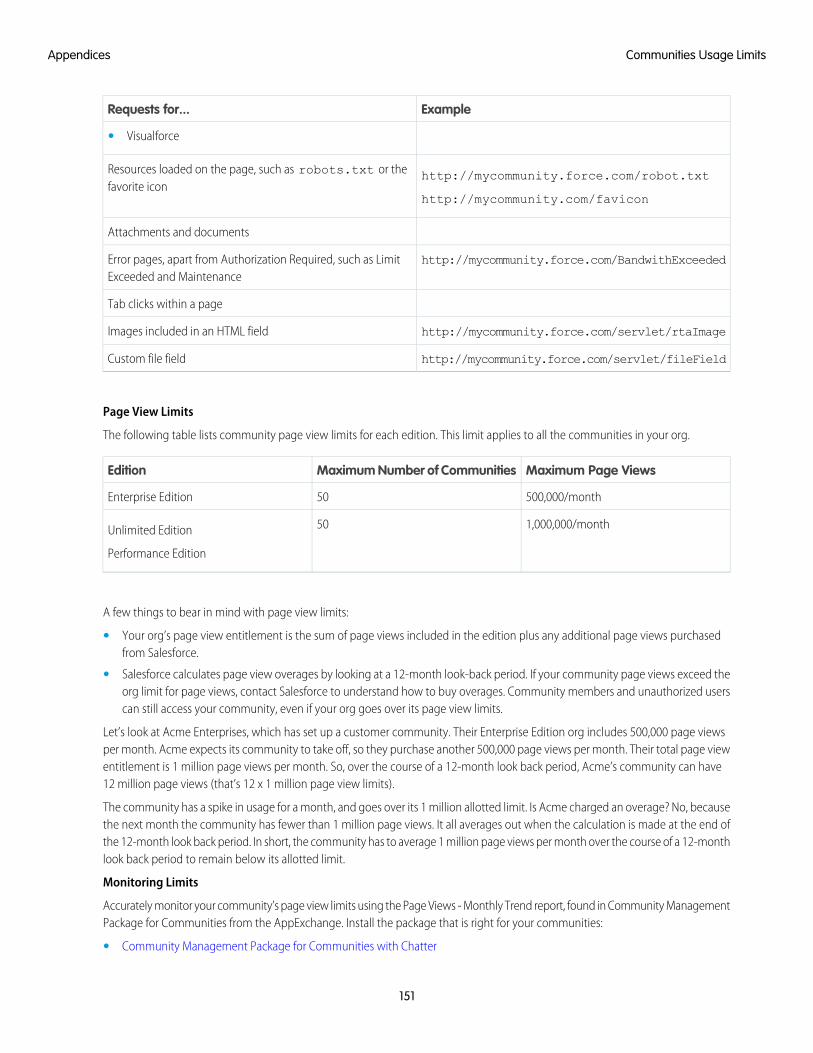
ExampleRequests for...
• Visualforce
http://mycommunity.force.com/robot.txtResources loaded on the page, such as robots.txt or thefavorite icon
http://mycommunity.com/favicon
Attachments and documents
http://mycommunity.force.com/BandwithExceededError pages, apart from Authorization Required, such as LimitExceeded and Maintenance
Tab clicks within a page
http://mycommunity.force.com/servlet/rtaImageImages included in an HTML field
http://mycommunity.force.com/servlet/fileFieldCustom file field
Page View Limits
The following table lists community page view limits for each edition. This limit applies to all the communities in your org.
Maximum Page ViewsMaximum Number of CommunitiesEdition
500,000/month50Enterprise Edition
1,000,000/month50Unlimited Edition
Performance Edition
A few things to bear in mind with page view limits:
• Your org’s page view entitlement is the sum of page views included in the edition plus any additional page views purchasedfrom Salesforce.
• Salesforce calculates page view overages by looking at a 12-month look-back period. If your community page views exceed theorg limit for page views, contact Salesforce to understand how to buy overages. Community members and unauthorized userscan still access your community, even if your org goes over its page view limits.
Let’s look at Acme Enterprises, which has set up a customer community. Their Enterprise Edition org includes 500,000 page viewsper month. Acme expects its community to take off, so they purchase another 500,000 page views per month. Their total page viewentitlement is 1 million page views per month. So, over the course of a 12-month look back period, Acme’s community can have12 million page views (that’s 12 x 1 million page view limits).
The community has a spike in usage for a month, and goes over its 1 million allotted limit. Is Acme charged an overage? No, becausethe next month the community has fewer than 1 million page views. It all averages out when the calculation is made at the end ofthe 12-month look back period. In short, the community has to average 1 million page views per month over the course of a 12-monthlook back period to remain below its allotted limit.
Monitoring Limits
Accurately monitor your community’s page view limits using the Page Views - Monthly Trend report, found in Community ManagementPackage for Communities from the AppExchange. Install the package that is right for your communities:
• Community Management Package for Communities with Chatter
151
Communities Usage LimitsAppendices
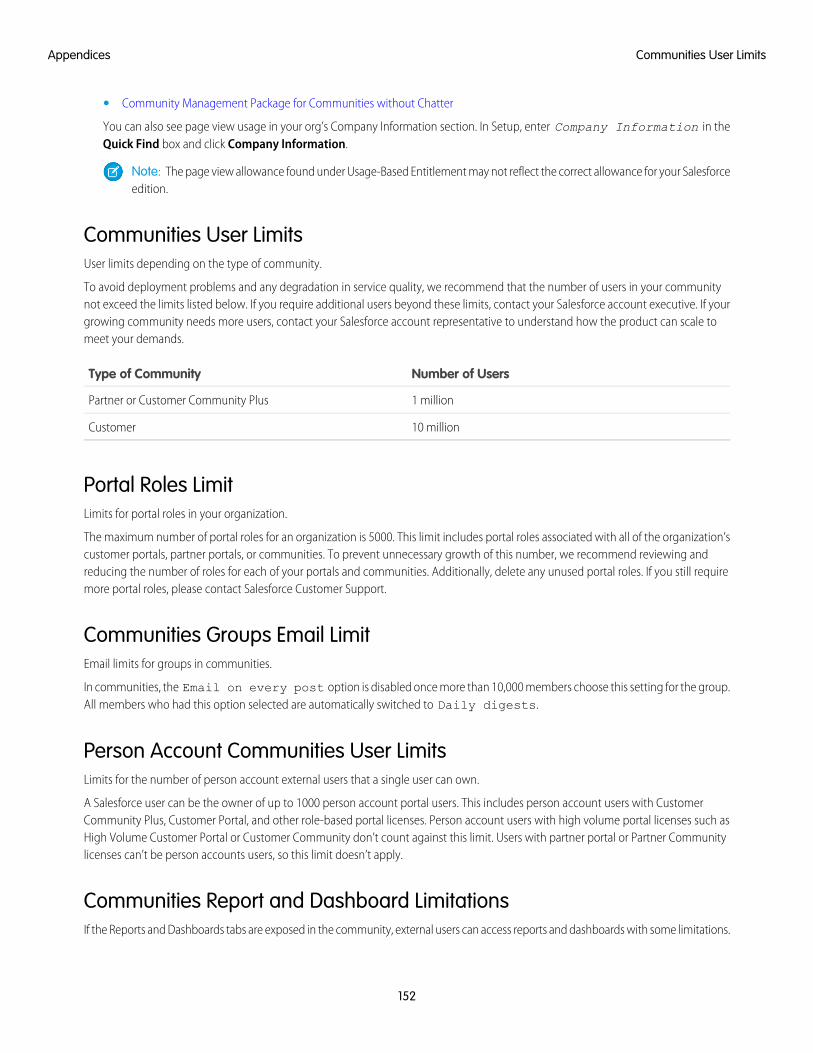
• Community Management Package for Communities without Chatter
You can also see page view usage in your org’s Company Information section. In Setup, enter Company Information in theQuick Find box and click Company Information.
Note: The page view allowance found under Usage-Based Entitlement may not reflect the correct allowance for your Salesforceedition.
Communities User LimitsUser limits depending on the type of community.
To avoid deployment problems and any degradation in service quality, we recommend that the number of users in your communitynot exceed the limits listed below. If you require additional users beyond these limits, contact your Salesforce account executive. If yourgrowing community needs more users, contact your Salesforce account representative to understand how the product can scale tomeet your demands.
Number of UsersType of Community
1 millionPartner or Customer Community Plus
10 millionCustomer
Portal Roles LimitLimits for portal roles in your organization.
The maximum number of portal roles for an organization is 5000. This limit includes portal roles associated with all of the organization’scustomer portals, partner portals, or communities. To prevent unnecessary growth of this number, we recommend reviewing andreducing the number of roles for each of your portals and communities. Additionally, delete any unused portal roles. If you still requiremore portal roles, please contact Salesforce Customer Support.
Communities Groups Email LimitEmail limits for groups in communities.
In communities, the Email on every post option is disabled once more than 10,000 members choose this setting for the group.All members who had this option selected are automatically switched to Daily digests.
Person Account Communities User LimitsLimits for the number of person account external users that a single user can own.
A Salesforce user can be the owner of up to 1000 person account portal users. This includes person account users with CustomerCommunity Plus, Customer Portal, and other role-based portal licenses. Person account users with high volume portal licenses such asHigh Volume Customer Portal or Customer Community don’t count against this limit. Users with partner portal or Partner Communitylicenses can’t be person accounts users, so this limit doesn’t apply.
Communities Report and Dashboard LimitationsIf the Reports and Dashboards tabs are exposed in the community, external users can access reports and dashboards with some limitations.
152
Communities User LimitsAppendices
Important: To allow external users to create and edit reports, your organization must use the enhanced sharing model. SeeAnalytics Folder Sharing.
You can give permission to create and edit reports to communities users with the following licenses:
Community licenses
• Customer Community Plus
• Customer Community Plus Login
• Partner Community
• Partner Community Login
Portal licenses
• Customer Portal Manager
• Customer Portal Manager Custom (for Enterprise Administration users)
• Customer Portal Manager Standard
• Customer Portal Manager User
• Gold Partner
• Ideas Only Portal
• Overage Customer Portal Manager Custom
• Overage Customer Portal Manager Standard
• Partner
• Silver Partner (”Export Reports” permission isn’t available to this license)
Note:
• These permissions aren’t available to high-volume user licenses, such as Customer Community, High Volume Customer Portal,Service Cloud Portal, and Authenticated Website.
• External users with legacy portal licenses can create and edit reports in communities, but not in portals.
After you grant permission to your external users, they still can’t:
• Schedule reports or dashboards for email and refresh at a specific date and time
• Create, edit, or view reports in the Unfiled Public Reports folder
All role-based external users in your community can refresh dashboards set up with “Run as specified user” and “Run as logged-in user”up to 1,000 times daily per org. Scheduled and automatic refreshes don’t count against the limit. There is no refresh limit for internalusers.
All role-based external users can be selected for the “Run as specified user” option.
Communities Moderation LimitsCommunity moderation limits ensure that your community performs optimally.
Criteria Limits• Your org can have up to 30 keyword list criteria. This limit is per org, not per community.
• Your org can have up to 100 member criteria. This limit is per org, not per community.
153
Communities Moderation LimitsAppendices
Rule LimitsYour org can have up to 30 rules. This limit is per org, not per community. This limit includes both content rules and rate rules.
154
Communities Moderation LimitsAppendices
INDEX
AAuthentication
Communities 119
CChatter Answers
enabling in Communities 128Chatter Questions
enable in Communities 124communities
feed search 139global search 139planning 2search 139sidebar search 139
Communitiesabout high-volume community users 14actionable Insights 55activating 45adding a global search box 116adding Site.com pages to tabs 112approvals for external users 132authentication 119, 122branding 23, 25branding Site.com pages 101–105Chatter tab 118Community Builder 89Community Management home dashboard 59creating 17creating users 41custom pages 25Customer Service (Napili) template 5customizing with Force.com Sites 89customizing with Site.com 98, 100dashboards, create 59dashboards, enable and map 58default roles 12determining the URL of Site.com pages 111displaying current user information on Site.com pages 110displaying current user information onSite.com pages 110email 33email limits 152enabling 10enabling cases for external users 43enabling leads for partner users 133
Communities (continued)enabling nickname display 36enabling reputation 82error pages 38external user passwords 140
External users140
resetting community passwords 140file limits 39global header 16, 138group email limits 152Insights 52, 54, 63Insights, creating 54Insights, creating actions 55Insights, enabling 53Limitations for external users 152limits 152Limits for moderation 153login 25logout 25, 29, 113management 46, 49manager 48managing high-volume users 13members 19moderation 62, 65moderation content criteria 66moderation criteria 65moderation execution 71moderation member criteria 67moderation rate rules 70moderation rules 68moderation triggers 72moderator 64navigating to 138number of communities in an org limit 149person accounts 33portal role maximum 152public access 37rate limiting 70rate rules 70recommendation audiences 81recommendations 79reporting 60reporting for external users 134reports, create 134reputation 81
155
Communities (continued)reputation levels 84reputation points 85Salesforce Knowledge 131search engine optimization 40security 119, 122self-registration 25, 30, 33SEO 40set up Chatter Questions 124setting up Chatter Answers 128setting up Ideas 129share groups 14Sharing high-volume portal user records 14sharing personal contact information 136Site.com authorization 106statuses 18super user access 12, 44super user access for customer users 44supported 3supported browsers 7tabs 21template, changing 97template, considerations 98templates 2tips for using Site.com 98topics 73, 76–78tracking activity 60usage limits 149user sharing 35User Visibility 35who can see what 141
Communities Landing pagecustom 114
Communities loginauthentication providers 26customize 26SAML 26single sign-on 26
Communities Moderationdefining triggers for flagging items 72
Communities Setupchoosing between tabs and the Community Builder 22
Communities userscreating 41enabling cases for 43enabling leads for 133
Community Builderbrand 91device presets 94
Community Builder (continued)edit pages 93navigate 90Page Editor 93preview 94publish 95
Community case feed 127Community Management 46Community Manager 47Community Managers
dashboards, create 59dashboards, enable and map 58Insights, creating 54Insights, creating actions 55Insights, enabling 53
Community membersupdating with the API 20
Community Reputationenabling 82
community self-registrationcreate person accounts 33
Community template 95Community users
delegating administration 43content criteria 66criteria
content 66member 67
Custom Domain 117Custom URL 117customize pages 115
Ddelegated administration
community users 43
EExternal users
limitations for reports and dashboards 152
Ffile limits
Communities 39Force.com Sites
using with Communities 89
GGlobal Header
for Communities 16
156
Index
HHigh-Volume Community Users
granting access to records 13managing users 13sharing records 14sharing sets 13
Home tabchoosing 23
IIdeas
enabling in Communities 129Insights
actions 55create 54
Integrationsenabling 124
LLimits
Communities 149, 152Login page
adding custom 27
MManager
Communities 48member criteria 67Moderating
Communities 65Moderator
Communities 64
Nnicknames
enabling 36
Oobjects 3
PPartner Community users
limitations for reports and dashboards 152Public pages 108
QQuestion-to-Case 125
SSalesforce Communities Management package
install 50upgrade 50
Salesforce KnowledgeCommunities 131
Salesforce1recommendation audiences 81recommendations in feed 79
Self-RegistrationApex controller 31
SEOCommunities 40
service not available 115Share groups
Communities 14Sharing
high-volume community user records 14Sharing sets
creating 13editing 13
Site.comadding pages to Communities tabs 112authorization overview 106authorization table 106branding Site.com pages 101–105Communities 101–105, 110–112custom authorization 106, 108deleting authorization 108determining the page URL 111displaying current user information 110no authorization 106private resources 106public resources 106requires authorization 106setting site authorization 107tips for Communities 98using with Communities 98, 100
TTemplate, updating 95Topics
adding to articles 78merging 77
157
Index


![Skaffold - storage.googleapis.com · [getting-started getting-started] Hello world! [getting-started getting-started] Hello world! [getting-started getting-started] Hello world! 5](https://img.pdfslide.us/doc/110x75/5ec939f2a76a033f091c5ac7/skaffold-getting-started-getting-started-hello-world-getting-started-getting-started.jpg)