Embed Size (px)
DESCRIPTION
Getting Started With Adobe Flex p2
Citation preview


G E T T I N G S T A R T E D W I T H
Adobe Flex
Amitava Kundu, Charu Agarwal, Anushka Chandrababu, Mukul Kumar, Karthik Ramanarayanan, Raul F. Chong
F I R S T E D I T I O N
A book for the community by the community

4 Getting Started with Adobe Flex
First Edition (May 2010)
© Copyright IBM Corporation 2010. All rights reserved.
IBM Canada 8200 Warden Avenue Markham, ON L6G 1C7 Canada
Notices This information was developed for products and services offered in the U.S.A.
IBM may not offer the products, services, or features discussed in this document in other countries. Consult your local IBM representative for information on the products and services currently available in your area. Any reference to an IBM product, program, or service is not intended to state or imply that only that IBM product, program, or service may be used. Any functionally equivalent product, program, or service that does not infringe any IBM intellectual property right may be used instead. However, it is the user's responsibility to evaluate and verify the operation of any non-IBM product, program, or service.
IBM may have patents or pending patent applications covering subject matter described in this document. The furnishing of this document does not grant you any license to these patents. You can send license inquiries, in writing, to:
IBM Director of Licensing IBM Corporation North Castle Drive Armonk, NY 10504-1785 U.S.A.
For license inquiries regarding double-byte character set (DBCS) information, contact the IBM Intellectual Property Department in your country or send inquiries, in writing, to:
Intellectual Property Licensing Legal and Intellectual Property Law IBM Japan, Ltd. 3-2-12, Roppongi, Minato-ku, Tokyo 106-8711
The following paragraph does not apply to the United Kingdom or any other country where such provisions are inconsistent with local law: INTERNATIONAL BUSINESS MACHINES CORPORATION PROVIDES THIS PUBLICATION "AS IS" WITHOUT WARRANTY OF ANY KIND, EITHER EXPRESS OR IMPLIED, INCLUDING, BUT NOT LIMITED TO, THE IMPLIED WARRANTIES OF NON-INFRINGEMENT, MERCHANTABILITY OR FITNESS FOR A PARTICULAR PURPOSE. Some states do not allow disclaimer of express or implied warranties in certain transactions, therefore, this statement may not apply to you.
This information could include technical inaccuracies or typographical errors. Changes are periodically made to the information herein; these changes will be incorporated in new editions of the publication. IBM may make improvements and/or changes in the product(s) and/or the program(s) described in this publication at any time without notice.
Any references in this information to non-IBM Web sites are provided for convenience only and do not in any manner serve as an endorsement of those Web sites. The materials at those Web sites are not part of the materials for this IBM product and use of those Web sites is at your own risk.
IBM may use or distribute any of the information you supply in any way it believes appropriate without incurring any obligation to you.
6 Getting Started with Adobe Flex
The licensed program described in this document and all licensed material available for it are provided by IBM under terms of the IBM Customer Agreement, IBM International Program License Agreement or any equivalent agreement between us.
Any performance data contained herein was determined in a controlled environment. Therefore, the results obtained in other operating environments may vary significantly. Some measurements may have been made on development-level systems and there is no guarantee that these measurements will be the same on generally available systems. Furthermore, some measurements may have been estimated through extrapolation. Actual results may vary. Users of this document should verify the applicable data for their specific environment.
Information concerning non-IBM products was obtained from the suppliers of those products, their published announcements or other publicly available sources. IBM has not tested those products and cannot confirm the accuracy of performance, compatibility or any other claims related to non-IBM products. Questions on the capabilities of non-IBM products should be addressed to the suppliers of those products.
All statements regarding IBM's future direction or intent are subject to change or withdrawal without notice, and represent goals and objectives only.
This information contains examples of data and reports used in daily business operations. To illustrate them as completely as possible, the examples include the names of individuals, companies, brands, and products. All of these names are fictitious and any similarity to the names and addresses used by an actual business enterprise is entirely coincidental.
COPYRIGHT LICENSE:
This information contains sample application programs in source language, which illustrate programming techniques on various operating platforms. You may copy, modify, and distribute these sample programs in any form without payment to IBM, for the purposes of developing, using, marketing or distributing application programs conforming to the application programming interface for the operating platform for which the sample programs are written. These examples have not been thoroughly tested under all conditions. IBM, therefore, cannot guarantee or imply reliability, serviceability, or function of these programs. The sample programs are provided "AS IS", without warranty of any kind. IBM shall not be liable for any damages arising out of your use of the sample programs.
References in this publication to IBM products or services do not imply that IBM intends to make them available in all countries in which IBM operates.
If you are viewing this information softcopy, the photographs and color illustrations may not appear.
Adobe product screenshot(s) reprinted with permission from Adobe Systems Incorporated.

Trademarks
IBM, the IBM logo, and ibm.com are trademarks or registered trademarks of International Business Machines Corp., registered in many jurisdictions worldwide. Other product and service names might be trademarks of IBM or other companies. A current list of IBM trademarks is available on the Web at “Copyright and trademark information” at www.ibm.com/legal/copytrade.shtml.
Adobe, the Adobe logo, Flex, Flex Builder, PostScript, and the PostScript logo are either registered trademarks or trademarks of Adobe Systems Incorporated in the United States, and/or other countries.
Java and all Java-based trademarks are trademarks of Sun Microsystems, Inc. in the United States, other countries, or both.
Microsoft and Windows are trademarks of Microsoft Corporation in the United States, other countries, or both.
Linux is a registered trademark of Linus Torvalds in the United States, other countries, or both.
UNIX is a registered trademark of The Open Group in the United States and other countries.
Other company, product, or service names may be trademarks or service marks of others.

9
Table of Contents Preface ............................................................................................................................. 14
Who should read this book? ........................................................................................ 14 How is this book structured? ........................................................................................ 14 A book for the community ............................................................................................ 15 Conventions ................................................................................................................. 15 What’s next? ................................................................................................................ 15
About the Authors ........................................................................................................... 17 Contributors .................................................................................................................... 19 Acknowledgements ........................................................................................................ 19 Chapter 1 – Introduction to Adobe Flex........................................................................ 20
1.1 A brief history of Adobe Flex .................................................................................. 20 1.2 Pros and cons of Flex applications ........................................................................ 25 1.3 Versions and editions of Adobe Flex ..................................................................... 26
1.3.1 Adobe Flex 3 SDK .......................................................................................... 26 1.3.2 Adobe Flex Builder 3 ...................................................................................... 26 1.3.3 Adobe Data Services ...................................................................................... 27
1.4 The Flex Community .............................................................................................. 27 1.4.1 Developer Resources ..................................................................................... 27 1.4.2 Discussion Forums ......................................................................................... 28 1.4.3 Adobe Flex Blogs ............................................................................................ 28
1.5 Comparing Adobe Flex with similar products ........................................................ 28 1.5.1 Adobe Flex and HTML/JavaScript/Ajax .......................................................... 28 1.5.2 Adobe Flex and Flash IDE .............................................................................. 29 1.5.3 Adobe Flex and Java/JavaFX ......................................................................... 29 1.5.4 Adobe Flex and Java Server Faces (JSF) ...................................................... 29 1.5.5 Adobe Flex and Microsoft Silverlight .............................................................. 30
1.6 Summary ................................................................................................................ 30 1.7 Review questions ................................................................................................... 30
Chapter 2 – Installing Flex ............................................................................................. 32 2.1 Installing Flex: The big picture ............................................................................... 32 2.2 Installing Flex using the setup wizard .................................................................... 33
2.2.1 Installing Eclipse ............................................................................................. 33 2.2.2 Installing Flex Builder ...................................................................................... 33
2.3 Launching Flex Builder .......................................................................................... 38 2.4 Developing your first Flex application .................................................................... 40
2.4.1 Building and running the "Hello Flex" application ........................................... 40 2.4.2 Debugging the Flex application ...................................................................... 50
2.5 Exercises ............................................................................................................... 53 2.6 Summary ................................................................................................................ 53 2.7 Review questions ................................................................................................... 53
Chapter 3 - Introduction to MXML and ActionScript ................................................... 55 3.1 MXML and ActionScript – the Big Picture .............................................................. 55 3.2 MXML ..................................................................................................................... 57
10 Getting Started with Adobe Flex
3.2.1 XML ................................................................................................................. 57 3.2.2 Anatomy of an XML tag .................................................................................. 58 3.2.3 Namespaces in MXML .................................................................................... 59
3.3 ActionScript 3 ......................................................................................................... 59 3.3.1 Inline ActionScript ........................................................................................... 59 3.3.2 MXML Scripts ................................................................................................. 60 3.3.3 ActionScript Variables and data types ............................................................ 60 3.3.4 ActionScript Classes and Objects .................................................................. 61 3.3.5 Functions and Access modifiers ..................................................................... 63 3.3.6 [Bindable] Tag ................................................................................................. 64 3.3.7 MXML and ActionScript mapping ................................................................... 65 3.3.8 Events ............................................................................................................. 67
3.4 Exercises ............................................................................................................... 69 3.5 Summary ................................................................................................................ 72 3.6 Review Questions .................................................................................................. 72
Chapter 4 - Working with Flex components ................................................................. 75 4.1 Working with Flex components: The big picture .................................................... 75 4.2 Components ........................................................................................................... 78 4.3 Containers .............................................................................................................. 79
4.3.1 Application containers ..................................................................................... 79 4.3.2 Layout containers ........................................................................................... 80 4.3.3 Navigation containers ..................................................................................... 81
4.4 Controls .................................................................................................................. 83 4.4.1 Text-based controls ........................................................................................ 83 4.4.2 Basic controls ................................................................................................. 85 4.4.3 Menu-based controls ...................................................................................... 89 4.4.4 Data-driven controls ........................................................................................ 89
4.5 Exercises ............................................................................................................... 90 4.6 Summary ................................................................................................................ 94 4.7 Review questions ................................................................................................... 94
Chapter 5 - Binding data between controls .................................................................. 97 5.1 Data binding – The big picture ............................................................................... 97 5.2 Ways to achieve data binding ................................................................................ 98
5.2.1 Curly braces ({}) syntax .................................................................................. 98 5.2.2 ActionScript expressions in curly braces ({}) .................................................. 98 5.2.3 <mx:binding> tag in MXML ............................................................................. 99 5.2.4 Bindings in ActionScript .................................................................................. 99
5.3 Data storage structures and mechanisms ........................................................... 100 5.3.1 Array ............................................................................................................. 100 5.3.2 XML ............................................................................................................... 101 5.3.3 XMLList ......................................................................................................... 101 5.3.4 Flex data management classes .................................................................... 102
5.4 Data Driven UI Controls ....................................................................................... 103 5.4.1 Scrolling List controls .................................................................................... 104 5.4.2 DataGrid control ............................................................................................ 106
11
5.4.3 AdvancedDataGrid control ............................................................................ 107 5.4.4 Hierarchical Data Controls ............................................................................ 109
5.5 Item renderer controls .......................................................................................... 111 5.5.1 Drop-In item renderer ................................................................................... 112 5.5.2 Inline item renderer ....................................................................................... 112 5.5.2 Custom item renderer ................................................................................... 113
5.6 Summary .............................................................................................................. 113 5.7 Review questions ................................................................................................. 113
Chapter 6 - Working with view states, transitions and filters .................................. 115 6.1 Working with view states, transitions and filters: The big picture ........................ 115 6.2 View states ........................................................................................................... 116
6.2.1 Creating States ............................................................................................. 116 6.2.2 State properties, style and events ................................................................ 120 6.2.3 Adding components ...................................................................................... 121
6.3 Behaviors ............................................................................................................. 122 6.3.1 Common Effects ........................................................................................... 122 6.3.2 Using Effects ................................................................................................. 123 6.3.3 Customizing Effects ...................................................................................... 124
6.4 Transitions ........................................................................................................... 124 6.4.1 Making states more interesting ..................................................................... 125 6.4.2 Using Action Effects ...................................................................................... 125
6.5 Filters ................................................................................................................... 126 6.5.1 Common Filters ............................................................................................ 127 6.5.2 Applying Filters ............................................................................................. 127
6.6 Exercises ............................................................................................................. 128 6.7 Summary .............................................................................................................. 134 6.8 Review questions ................................................................................................. 134
Chapter 7 - Working with the server ........................................................................... 137 7.1 Working with the server: The big picture ............................................................. 137 7.2 Working with Web services .................................................................................. 138
7.2.1 The <mx:WebService> tag ........................................................................... 140 7.2.2. The send() method ...................................................................................... 140 7.2.3 The ResultEvent object ................................................................................. 140 7.2.4 The FaultEvent object ................................................................................... 141 7.2.5 The result property ........................................................................................ 141 7.2.6 The fault property .......................................................................................... 141 7.2.7 The service property ..................................................................................... 141 7.2.8 The <mx:operation> tag ................................................................................ 141 7.2.9 The <mx:request> tag ................................................................................... 141 7.2.10 Sample Application ..................................................................................... 142
7.3 Using Remote object ............................................................................................ 144 7.3.1 The <mx:RemoteObject> tag........................................................................ 144 7.3.2 <mx:method> tag .......................................................................................... 145 7.3.3 <mx:arguments> tag ..................................................................................... 145
7.4 Using HTTPService ............................................................................................. 145
12 Getting Started with Adobe Flex
7.4.1 The <mx:HTTPService> tag ......................................................................... 146 7.4.2 The send ( ) method ..................................................................................... 146 7.4.3 The <mx:Request> tag ................................................................................. 147 7.4.4 The LastResult property ............................................................................... 147 7.4.5 Sample application that uses HTTPService ................................................. 147 7.4.6 Using the result and fault events .................................................................. 149 7.4.7 Using the E4X Format .................................................................................. 149
7.5 Working with databases ....................................................................................... 150 7.5.1 Sample Flex application accessing a DB2 database ................................... 150
7.6 Exercises ............................................................................................................. 171 7.6.1 Exercise 1 - Obtaining weather forecast information .................................... 171 7.6.2 Exercise 2 - Desktop application to translate text ........................................ 175
7.7 Summary .............................................................................................................. 178 7.8 Review questions ................................................................................................. 178
Chapter 8 - Data Visualization ..................................................................................... 181 8.1 Flex Charting: The big picture .............................................................................. 181 8.2 Different Charts in Flex 3 ..................................................................................... 182
8.2.1 Area Chart [AreaChart] ........................................................................... 182 8.2.2 Bar Chart [BarChart] ............................................................................... 182 8.2.3 Bubble Chart [BubbleChart] .................................................................. 183 8.2.4 Candle Stick Chart [CandlestickChart] .................................................. 183 8.2.5 Column Chart [ColumnChart] ................................................................ 183 8.2.6 Legend Control [Legend] ........................................................................ 183 8.2.7 High Low Open Close Chart [HLOCChart] ............................................. 183 8.2.8 Line Chart [LineChart] ............................................................................ 183 8.2.9 Pie Chart [PieChart] ............................................................................... 184 8.2.10 Plot Chart [PlotChart] ............................................................................ 184
8.3 Column chart example ......................................................................................... 185 8.4 Bar chart example ................................................................................................ 186 8.5 Line chart example .............................................................................................. 187 8.6 Area chart example .............................................................................................. 189 8.7 Pie chart example ................................................................................................ 190 8.8 Chart style ............................................................................................................ 192
8.8.1 Stroke............................................................................................................ 192 8.8.2 Stacking ........................................................................................................ 192 8.8.3 Fill ................................................................................................................. 193
8.9 Exercises ............................................................................................................. 193 8.9 Summary .............................................................................................................. 197 8.10 Review questions ............................................................................................... 197
Appendix A – Solutions to review questions ............................................................. 201 Appendix B – Up and running with DB2 ..................................................................... 211
B.1 DB2: The big picture ............................................................................................ 211
13
B.2 DB2 Packaging .................................................................................................... 212 B.2.1 DB2 servers .................................................................................................. 212 B.2.2 DB2 Clients and Drivers ............................................................................... 213
B.3 Installing DB2 ...................................................................................................... 214 B.3.1 Installation on Windows ................................................................................ 214 B.3.2 Installation on Linux ...................................................................................... 215
B.4 DB2 Tools ............................................................................................................ 215 B.4.1 Control Center .............................................................................................. 215 B.4.2 Command Line Tools ................................................................................... 217
B.5 The DB2 environment.......................................................................................... 220 B.6 DB2 configuration ................................................................................................ 221 B.7 Connecting to a database ................................................................................... 222 B.8 Basic sample programs ....................................................................................... 223 B.9 DB2 documentation ............................................................................................. 225
References ..................................................................................................................... 227 Resources ...................................................................................................................... 229
Web sites ................................................................................................................... 229 Contact emails ........................................................................................................... 232
14
Preface Keeping your skills current in today's world is becoming increasingly challenging. There are too many new technologies being developed, and little time to learn them all. The DB2® on Campus Book Series has been developed to minimize the time and effort required to learn many of these new technologies.
Who should read this book? This book is intended for anyone who works or intends to work with Web application design and development using the Web 2.0 paradigm such as application developers, software architects, consultants, instructors and students.
How is this book structured? Chapter 1 - Introduction to Adobe® Flex®, provides a brief history of Adobe Flex, introduces various resources related to Flex, and compares it with other competitive products.
Chapter 2 - Installing Flex, discusses Flex installation options, the Eclipse Plugin for Flex® Builder™, and how to start working with a Flex program.
Chapter 3 - Introduction to MXML™ and ActionScript®, introduces you to MXML basics, ActionScript fundamentals, the relationship between MXML and ActionScript, and also provides an introduction to events.
Chapter 4 - Working with Flex components, introduces you to Flex containers and controls.
Chapter 5 - Binding data between controls, explains what is data binding and the methods to achieve data binding. It also discusses about data storage structures and mechnisms, and UI controls driven by data.
Chapter 6 - Working with view states, transitions and filters explains how to work with states, properties, style and events, behaviors, effects, transitions, and filters.
Chapter 7 - Working with the server, teaches you how to invoke Web services, how to work with remote objects, and how to use the HTTPService from a Flex application. It also provides a sample Flex application that accesses a DB2 database.
Chapter 8 - Data Visualization, talks about Flex charting, how to work with different charts and their common usage.
Appendix A contains the solutions to the review questions at the end of each chapter.
Appendix B contains information that can get you started with DB2 in minutes.
Exercises are provided with most chapters; any input files required for these labs are provided in the zip file Exercise_Files_AdobeFlex.zip accompanying this book.
15
A book for the community This book was created by the community; a community consisting of university professors, students, and professionals (including IBM employees). The online version of this book is released to the community at no-charge. Numerous members of the community from around the world have participated in developing this book, which will also be translated to several languages by the community. If you would like to provide feedback, contribute new material, improve existing material, or help with translating this book to another language, please send an email of your planned contribution to [email protected] with the subject “Adobe Flex book feedback.”
Conventions Many examples of commands, SQL statements, and code are included throughout the book. Specific keywords are written in uppercase bold. For example: A NULL value represents an unknown state. Commands are shown in lowercase bold. For example: The dir command lists all files and subdirectories on Windows. SQL statements are shown in upper case bold. For example: Use the SELECT statement to retrieve information from a table.
Object names used in our examples are shown in bold italics. For example: The flights table has five columns.
Italics are also used for variable names in the syntax of a command or statement. If the variable name has more than one word, it is joined with an underscore. For example: CREATE TABLE table_name
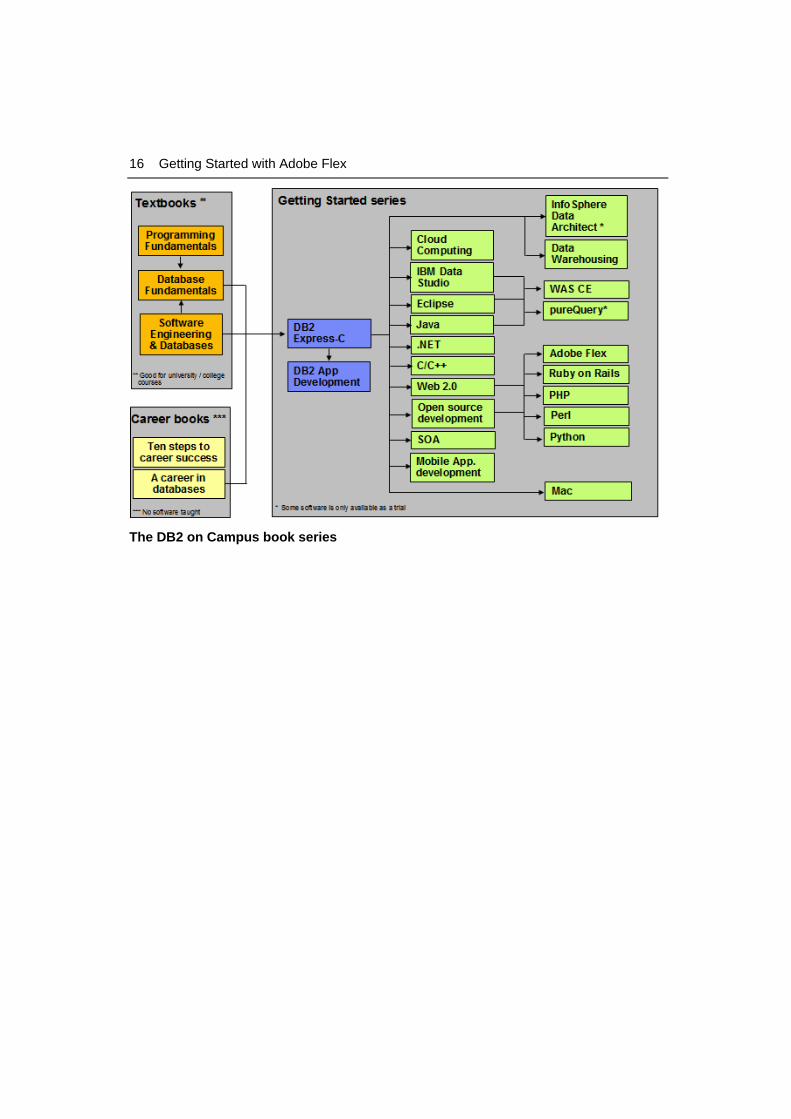
What’s next? We recommend you to review the following books in this book series for more details about related topics:
Getting started with DB2 Express-C
Getting started with IBM Data Studio for DB2
Getting started with Eclipse
Getting started with Web 2.0
The following figure shows all the different ebooks in the DB2 on Campus book series available for free at db2university.com
16 Getting Started with Adobe Flex
The DB2 on Campus book series
17
About the Authors Amitava Kundu is a Senior Software Engineer and architect based at India Software Lab, Bangalore, India. His main responsibility is in the area of tools related to performance monitoring, tuning and management for various data servers and application stacks. As a technical lead, he’s involved with suit of product developments using Adobe Flex. Prior to this role, he’s part of IBM Rational group, where he was leading the functional and technical team for Project Portfolio Management (PPM) team. Amitava has more than 16 year of IT experience and he’s with IBM since 2005.
Karthik Ramanarayanan is an Advisory Software Engineer based at India Software Lab, Bangalore, India. He is currently involved with product development in the area of tools related to performance monitoring and management using Adobe Flex along with other technologies. Prior to this role, He was a part of IBM Rational group where he was involved with the Project Portfolio Management team working with DB2 and Oracle technologies. Karthik has more than 12 years of IT Experience and he has been with IBM Since 2007.
Charu Agarwal is a System Software Engineer with India Software Labs, IBM, Bangalore. She is currently involved in developing tools related to performance monitoring and optimization using Adobe Flex with other server-side technologies. Prior to this role, she was involved in developing applications for the healthcare domain and has significant experience in database internals and Web 2.0 application development. She has more than 4 years of IT Experience and has been with IBM since 2008.
Mukul Kumar is working as System Software Engineer with India Software Lab, IBM. Out of a total work experience of 4 years and 6 months, he spent more than 3 years developing Web applications using Java™, J2EE and related technologies and framework. He is currenlty working with OPM development team where OSGi and Flex are the main stream of interest and developement.
Anushka Chandrabau is working as System Software Engineer in India Software Lab, Bangalore, India. She has a Bachelor Degree in Computer Sceince and Engineering and a Masters in Information Technolgy. Since Joining IBM in 2008, Anushka has been working as a developer for Optim Data Studio suite of products. She’s a key designer and developer using Flex technologies for the new web based product development.
Raul F. Chong is the DB2 on Campus program manager based at the IBM Toronto Laboratory, and a DB2 technical evangelist. His main responsibility is to grow the DB2 community around the world, helping members interact with one another, and contributing to the DB2 forums. Raul joined IBM in 1997 and has held numerous positions in the company. As a DB2 consultant, Raul helped IBM business partners with migrations from other relational database management systems to DB2, as well as with database performance and application design issues. As a DB2 technical support specialist, Raul has helped resolve DB2® problems on the OS/390®, z/OS®, Linux®, UNIX® and Windows® platforms. Raul has also worked as an information developer for the Application Development Solutions team where he was responsible for the CLI guide and Web services material. Raul has taught many DB2 workshops, has published numerous articles,

18 Getting Started with Adobe Flex
and has contributed to the DB2 Certification exam tutorials. Raul has summarized many of his DB2 experiences through the years in his book Understanding DB2 - Learning Visually with Examples 2nd Edition (ISBN-10: 0131580183) for which he is the lead author. He has also co-authored the book DB2 SQL PL Essential Guide for DB2 UDB on Linux, UNIX, Windows, i5/OS, and z/OS (ISBN 0131477005), and is the project lead and co-author of the books in the DB2 on Campus Book Series.
19
Contributors The following people edited, reviewed, and contributed significantly to this book.
Contributor Company/University Position/Occupation Contribution
Leon Katsnelson
IBM Toronto Lab Program Director, IBM Data Servers
Technical review
Acknowledgements We greatly thank the following individuals for their assistance in developing materials referenced in this book:
Natasha Tolub and Natasha Maxim for designing the cover of this book.
Susan Visser for assistance with publishing this book.
1 Chapter 1 – Introduction to Adobe Flex Adobe® Flex® is a free open source framework for developing rich Web applications that deploy consistently on all major browsers, desktops, and operating systems. Essentially, it is a software development kit (SDK) released by Adobe Systems that allows Web developers to rapidly and easily build Rich Internet Applications (RIAs) on the Flash® Platform.
Adobe Flex aims to provide a client-side Flash-based rich client that can run on the desktop as well as embedded in a Web page. Its focus is targeted on the client only, exchanging data asynchronously with the any server technology supporting HTTP. Data interchange is XML-based, so the product is not tied to any particular communication framework or technology. The server-supported technologies include Java™ EE, Microsoft .NET framework, PHP, Web Services, and any other framework capable of sending and receiving XML data
In this chapter you will learn about:
A brief history of Adobe Flex
Versions and releases of Adobe Flex
The Adobe Flex community and resources
Products competing with Adobe Flex
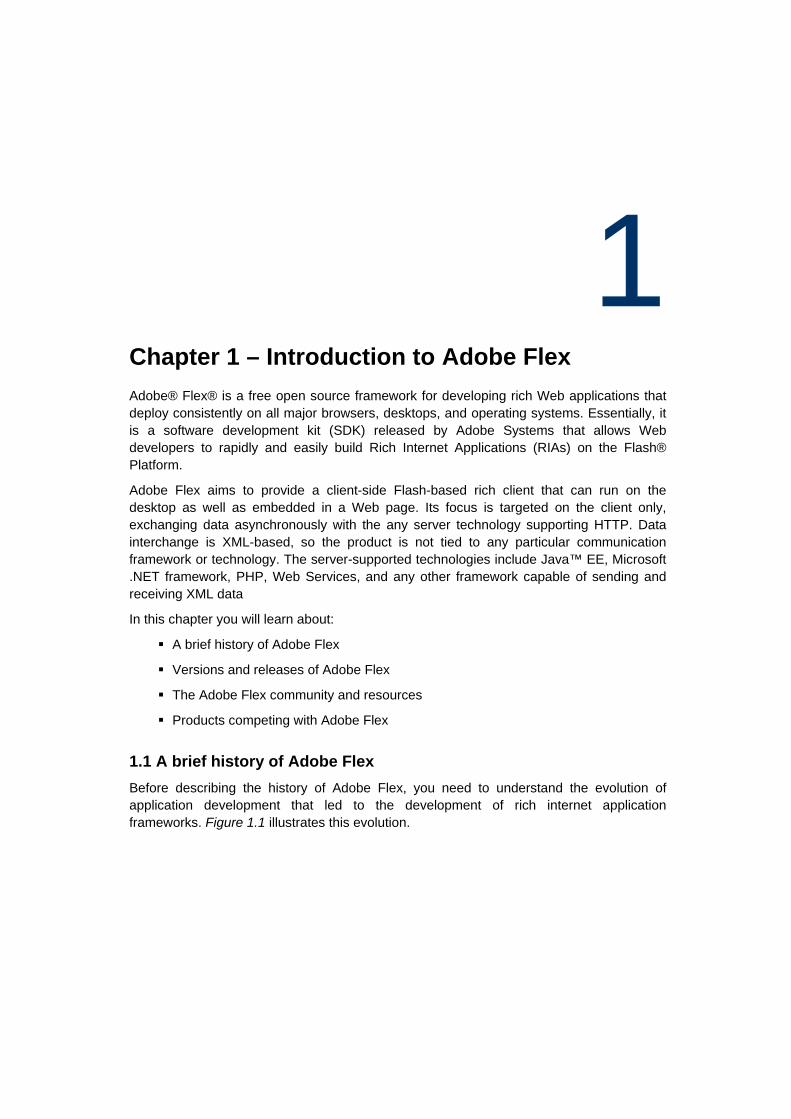
1.1 A brief history of Adobe Flex Before describing the history of Adobe Flex, you need to understand the evolution of application development that led to the development of rich internet application frameworks. Figure 1.1 illustrates this evolution.
Chapter 1 – Introduction to Adobe Flex 21
Figure 1.1 – Evolution of application development
Note:
Since this book focuses on the distributed platforms such as Linux, UNIX, Windows and the Mac; mainframe applications are not discussed.
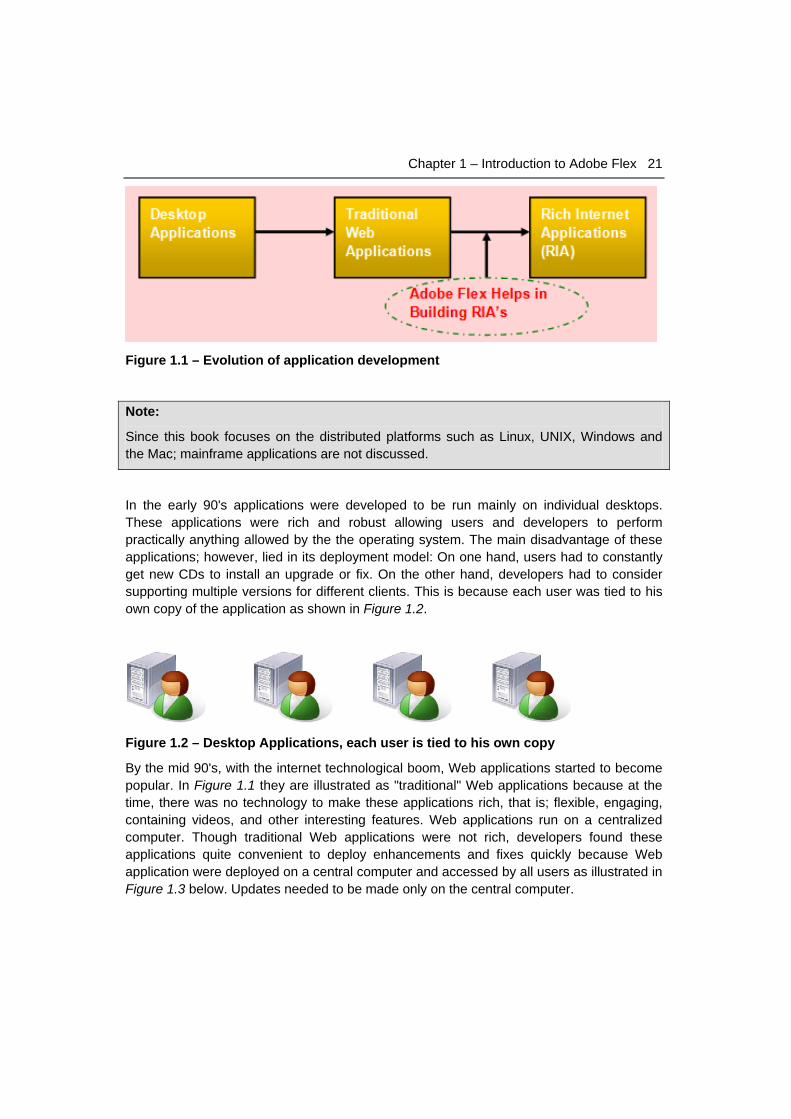
In the early 90's applications were developed to be run mainly on individual desktops. These applications were rich and robust allowing users and developers to perform practically anything allowed by the the operating system. The main disadvantage of these applications; however, lied in its deployment model: On one hand, users had to constantly get new CDs to install an upgrade or fix. On the other hand, developers had to consider supporting multiple versions for different clients. This is because each user was tied to his own copy of the application as shown in Figure 1.2.
Figure 1.2 – Desktop Applications, each user is tied to his own copy
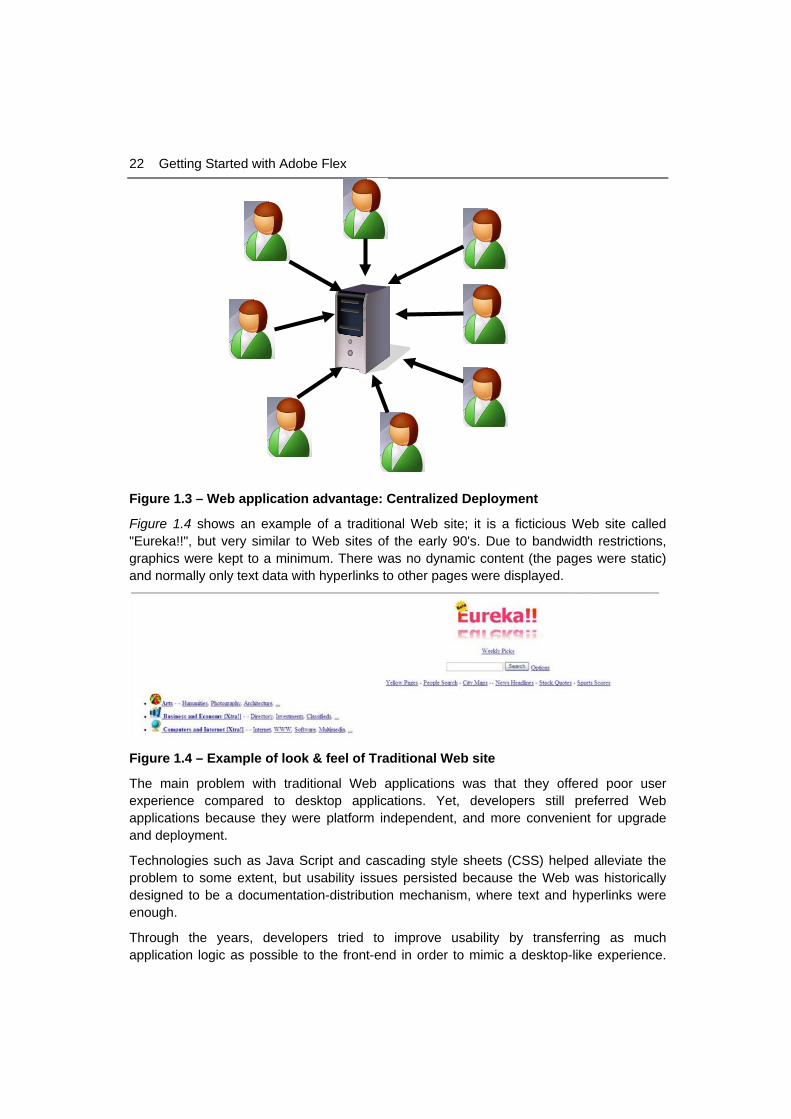
By the mid 90's, with the internet technological boom, Web applications started to become popular. In Figure 1.1 they are illustrated as "traditional" Web applications because at the time, there was no technology to make these applications rich, that is; flexible, engaging, containing videos, and other interesting features. Web applications run on a centralized computer. Though traditional Web applications were not rich, developers found these applications quite convenient to deploy enhancements and fixes quickly because Web application were deployed on a central computer and accessed by all users as illustrated in Figure 1.3 below. Updates needed to be made only on the central computer.
22 Getting Started with Adobe Flex
Figure 1.3 – Web application advantage: Centralized Deployment
Figure 1.4 shows an example of a traditional Web site; it is a ficticious Web site called "Eureka!!", but very similar to Web sites of the early 90's. Due to bandwidth restrictions, graphics were kept to a minimum. There was no dynamic content (the pages were static) and normally only text data with hyperlinks to other pages were displayed.
Figure 1.4 – Example of look & feel of Traditional Web site
The main problem with traditional Web applications was that they offered poor user experience compared to desktop applications. Yet, developers still preferred Web applications because they were platform independent, and more convenient for upgrade and deployment.
Technologies such as Java Script and cascading style sheets (CSS) helped alleviate the problem to some extent, but usability issues persisted because the Web was historically designed to be a documentation-distribution mechanism, where text and hyperlinks were enough.
Through the years, developers tried to improve usability by transferring as much application logic as possible to the front-end in order to mimic a desktop-like experience.
Chapter 1 – Introduction to Adobe Flex 23
However, the more application logic was pushed to the client side, the more browser incompatibilities started to arise. This was ironically what Web development wanted to prevent with platform-independent applications.
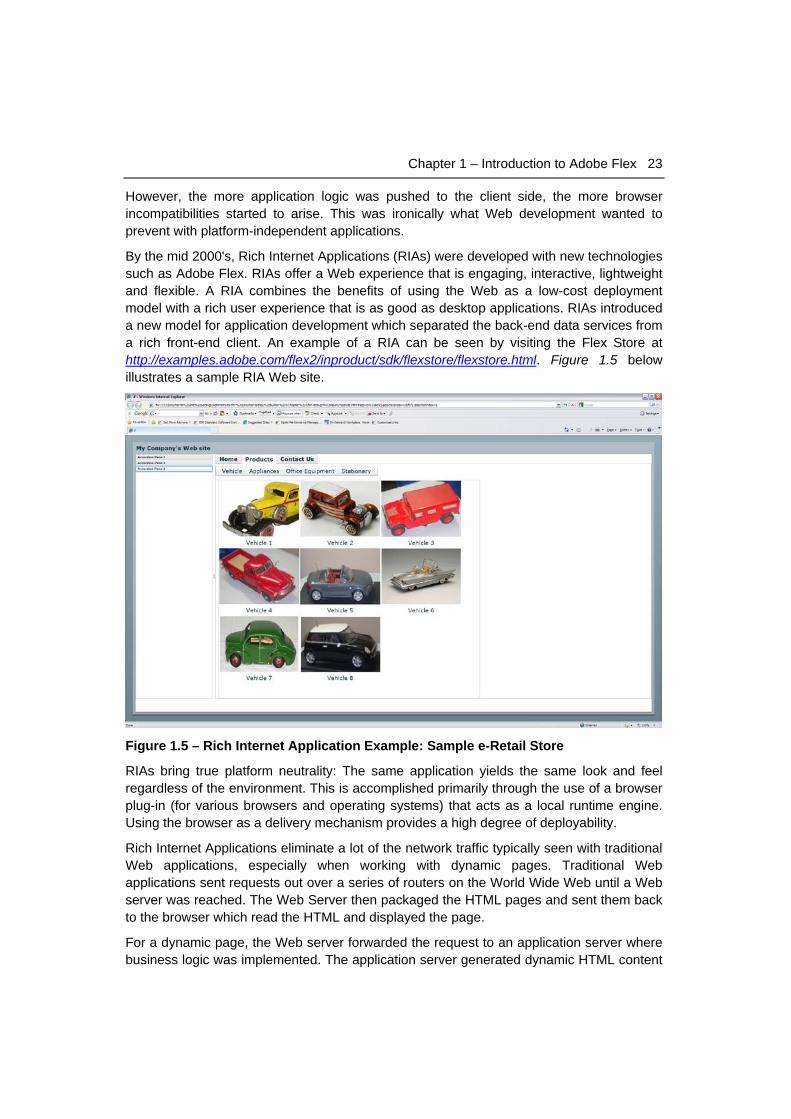
By the mid 2000's, Rich Internet Applications (RIAs) were developed with new technologies such as Adobe Flex. RIAs offer a Web experience that is engaging, interactive, lightweight and flexible. A RIA combines the benefits of using the Web as a low-cost deployment model with a rich user experience that is as good as desktop applications. RIAs introduced a new model for application development which separated the back-end data services from a rich front-end client. An example of a RIA can be seen by visiting the Flex Store at http://examples.adobe.com/flex2/inproduct/sdk/flexstore/flexstore.html. Figure 1.5 below illustrates a sample RIA Web site.
Figure 1.5 – Rich Internet Application Example: Sample e-Retail Store
RIAs bring true platform neutrality: The same application yields the same look and feel regardless of the environment. This is accomplished primarily through the use of a browser plug-in (for various browsers and operating systems) that acts as a local runtime engine. Using the browser as a delivery mechanism provides a high degree of deployability.
Rich Internet Applications eliminate a lot of the network traffic typically seen with traditional Web applications, especially when working with dynamic pages. Traditional Web applications sent requests out over a series of routers on the World Wide Web until a Web server was reached. The Web Server then packaged the HTML pages and sent them back to the browser which read the HTML and displayed the page.
For a dynamic page, the Web server forwarded the request to an application server where business logic was implemented. The application server generated dynamic HTML content
24 Getting Started with Adobe Flex
and would send this back to the Web Server which forwarded it to the browser for display. The implementation of dynamic Web pages was not very efficient because a lot of network traffic was involved.
With RIAs system performance is substantially improved by doing a lot more of the processing on the client than a thin client Web Application. RIAs are stateful and they are not a set of pages controlled by the server as in traditional Web applications but they are actual applications running on the clients’ computer and only communicate with servers to process and exchange data.
In March of 2004 Adobe Flex made its debut with version 1.0. This version, as well as version 1.5 of Adobe Flex, were expensive server-based products. They were based on Flash® Player 7.0 and ActionScript 2.0, and they even had their own Dreamweaver®-like development tool called Flex Builder. These versions never gained popularity due to the limitations of ActionScript 2.0.
With the release of Adobe Flex 2 in June 2006, Flex became an entirely client-side product. Adobe rewrote the entire Flex framework and IDE from scratch. Central to the change was the introduction of ActionScript 3.0. Flex 2 was based on Flash Player 9.0 and Action Script 3.0. Adobe decided not to upgrade the Dreamweaver-like Flex Builder 1.0 but rather start using Eclipse and providing a Flex Builder plug-in for Eclipse. Adobe Flex 2.0 offered a way to create RIAs without incurring expensive licensing fees.
In February 2008 Adobe Flex 3 was released. Adobe Flex 3 added more functionality to Flex Builder, such as refactoring and enhanced styling support as well as new data visualization components in the Flex Framework. Adobe Flex 3 is also the official open-source release of the Flex SDK and Flex compiler. As of the time of writing, Adobe Flex 3 is the most current version of Flex, and this is the version we will use in this book.
Adobe Flex 3 comes with a lot of new, key features including:
The profiler, to monitor memory and CPU Consumption
Refactoring, which makes it easy to rename almost anything, such as functions, variables, and classes.
The Adobe Integrated Runtime (AIR®) framework that supports building cross-OS rich internet application that can access local desktop resources.
Persistent Caching, which reduces the SWF File Size.
Wizards, to generate code thus reducing the hand coding effort.
Charting enhancements
A DataGrid component to display tabular data. The Advanced DataGrid provides additional abilities such as multicolumn sorting and column spanning.
Flex Data Services which has been renamed to LiveCycle® Data Services now has Support for Ajax Data Servers.
Memory and Performance Profilers.
Chapter 1 – Introduction to Adobe Flex 25
1.2 Pros and cons of Flex applications Today, Web developers have a vast array of choices to develop RIAs, AJAX being one. So why use Adobe Flex? One reason is the fact that Adobe Flex separates the presentation and data access layers. This means that the Flex application is independent of the back-end: You can use any server technology that meets your requirements -- ColdFusion, J2EE, PHP, .NET, etc. Because so much of Adobe Flex is designed around XML (even the MXML document), you can use something as basic as an HTTPService call to read and write data to your data store.
The other main reason is that Adobe Flex is an ideal technology when you want to create highly interactive, expressive Web site applications using and visualizing data. Adobe Flex allows you to break out of the usual static web page and embed mini-applications without the complexity and compatibility issues of alternatives like Java applets.
Listed below are the some other reasons to consider Adobe Flex for your Web site:
It helps build robust applications that attractively display complex data sets.
It is visually engaging to the visitors of your site.
It works on all the major platforms and users don’t need to install anything other than a Flash player.
Audio and video allow for even greater interaction.
Data Synchronization allows for real-time data to be used more efficiently
On the other hand, Adobe Flex may not be the answer to all your needs. For example, if you are planning to develop small applications with simple animation without writing much code, Flash may be the best choice on a timeline based animation utility. Flex applications are limited by the constraints of the Flash player. Also, a Flex application may be large in size because it is based upon several libraries. Fortunately, Adobe Flex doesn’t force you to use all of the Flex components (or even MXML) and allows an Action Script project to be compiled on a free Flex compiler.
If you are planning a Web site that requires vast amount of rich text, or need only simple user interaction, one might be better off using HTML/Ajax. Though Adobe Flex provides great support for HTML, few projects may suffer a bit of performance lag if there is a lot of text. However in case you want to deploy your applications to AIR, Adobe Flex is a good choice as AIR provides native support for HTML. Using Flash or Flash along with HTML is a good bet for Web sites with loads of text, animations and bits of interactivity.
In a Multitier model, Flex applications can serve as the presentation tier. Flex applications are Web-based, but provide good levels of interactivity and rich media experiences that make them look more like computer desktop programs.
26 Getting Started with Adobe Flex
1.3 Versions and editions of Adobe Flex As indicated in an earlier section, Adobe Flex started with version 1.0, then it moved to 1.5, 2.0 and 3.0. In this book we focus on Adobe Flex 3.0. There are multiple components which make up Adobe Flex 3.0.
1.3.1 Adobe Flex 3 SDK
You can create and deploy Flex applications using only the Open Source Flex 3 SDK or the Free Adobe Flex 3 SDK. The free Adobe Flex 3 SDK includes the Flex framework, compilers, and debuggers, enabling you to develop Flex applications using an IDE of your choice. The Open Source Flex 3 SDK contains the majority of the Flex SDK (compilers, framework, debugger) but does not include anything that is not open source like the Adobe Flash Player, Adobe AIR, or the advanced font encoding libraries.
1.3.2 Adobe Flex Builder 3
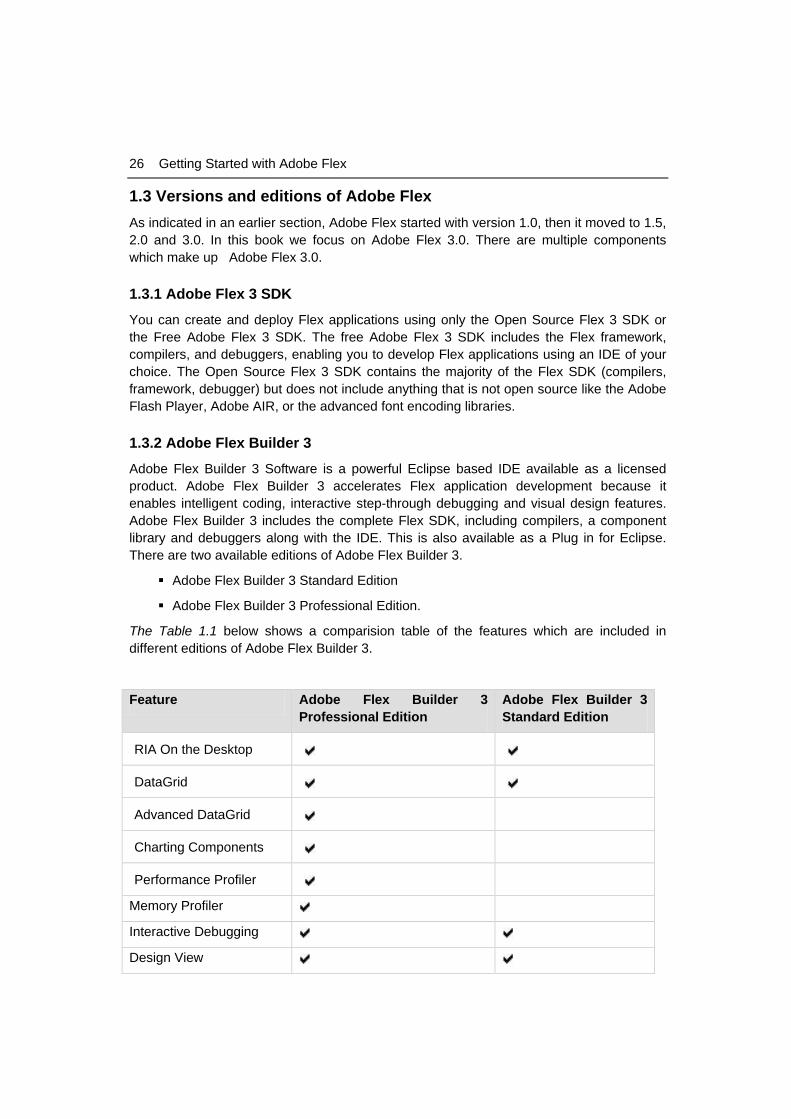
Adobe Flex Builder 3 Software is a powerful Eclipse based IDE available as a licensed product. Adobe Flex Builder 3 accelerates Flex application development because it enables intelligent coding, interactive step-through debugging and visual design features. Adobe Flex Builder 3 includes the complete Flex SDK, including compilers, a component library and debuggers along with the IDE. This is also available as a Plug in for Eclipse. There are two available editions of Adobe Flex Builder 3.
Adobe Flex Builder 3 Standard Edition
Adobe Flex Builder 3 Professional Edition.
The Table 1.1 below shows a comparision table of the features which are included in different editions of Adobe Flex Builder 3.
Feature Adobe Flex Builder 3 Professional Edition
Adobe Flex Builder 3 Standard Edition
RIA On the Desktop
DataGrid
Advanced DataGrid
Charting Components
Performance Profiler
Memory Profiler
Interactive Debugging
Design View
Chapter 1 – Introduction to Adobe Flex 27
Coding Tools
Working with Data
Browser Integration
Table 1.1 – Feature Comparision for different Editions of Adobe Flex
Note: In this book all the examples and code snippets are created and tested using Adobe Flex Builder 3.0 Professional Edition and Eclipse SDK version 3.3.2.
1.3.3 Adobe Data Services
Adobe offers two data services solutions to resolve various needs.
BlazeDS: This is an open source offering that providies Flex Remoting and Messaging to all developers. Flex Remoting makes it fast and easy for developers to connect to back-end business logic and data.
Adobe LiveCycle Data Services: This is a full featured framework for developing enterprise RIA Solutions. This is a licensed product available for purchases
1.4 The Flex Community Adobe Flex is a fairly new technology; however, in a short span of time the Flex community has grown considerably, and this is reflected by the number of resources available to learn Adobe Flex. As a Flex developer, you can take advantage of many of these resources, both online and in the real world that can sharpen your Flex skills and offer great tips and tricks for your application. Adobe provides good documentation for Adobe Flex which can help you in getting started. This documentation can be accessed at http://www.adobe.com/support/documentation/en/flex/ .
1.4.1 Developer Resources
The following list provides popular developer resources for Adobe Flex:
Flex.org – http://flex.org/.
Adobe Flex Developer Center –
This is the community site for Flex Developers and has links to great resources for developers.
http://www.adobe.com/devnet/flex/. This is the official Adobe Flex Community center and has tons of articles and great information.
Flex Search – http://flexsearch.org: This is a custom Flex search engine for the Flex community.
28 Getting Started with Adobe Flex
1.4.2 Discussion Forums
The following list is a list of discussion forums for Adobe Flex. These discussion forums can help in resolving issues which are commonly faced.
Flex Coders – http://www.adobe.com/go/flexcoders
Flex Component Development –http://tech.groups.yahoo.com/group/flexcomponents
Flex Support Forums – http://www.adobe.com/cfusion/webforums/forum/index.cfm?forumid=60
Flex Components – http://www.adobe.com/go/flexcomponents
Flex Builder 3 Adobe Forum – http://www.adobe.com/cfusion/webforums/forum/categories.cfm?forumid=72&catid=651&entercat=y
1.4.3 Adobe Flex Blogs
With the number of Flex developers growing significantly in recent years, and the wealth of their knowledge increasing dramatically, many Flex developers have started to share Flex information on their blogs. These blogs often contain information such as workarounds to existing bugs in the Flex framework, workflow improvement tips, performance and memory management tips, and general thought-provoking questions about Adobe Flex, the future of Flex and the Flex community. Here is a list of some of the most common-read blogs:
Flex Team Blog – http://blogs.adobe.com/flex/. This is the official blog from the Flex team at Adobe.
Mike Moreartys Blog – http://www.morearty.com/blog/ Mike is the brains behind the debugging portion of Adobe Flex Builder. His Blog keeps you up-to-date on what’s happening in the world of Flex.
Chet Haase’s Blog – http://graphics-geek.blogspot.com/ Chet’s blog specializes in Flex/Flash graphics techniques.
1.5 Comparing Adobe Flex with similar products This section provides a brief comparison between Adobe Flex and other similar technologies available in the market today.
1.5.1 Adobe Flex and HTML/JavaScript/Ajax
It is easy and powerful to write interactive UI applications using Adobe Flex. Flex has two main components:
MXML, an XML based markup language, and
ActionScript, a scripting language that is an implementation of ECMA script, a JavaScript standard.
Chapter 1 – Introduction to Adobe Flex 29
Adobe Flex allows developers to build RIAs by compiling MXML to create Swiff files (.swf) that can be executed in Flash player.
Programmers well versed with XML and JavaScript will find it easy to work with MXML and ActionScript. Though, under the hood MXML and ActionScript are not related to each other the way HTML and JavaScript are, on the surface the interaction will make sense to most of Web developers.
With Adobe Flex you can also develop most of the trivial and complex things that can be done with Ajax. With contribution from the open source community, Ajax libraries have really grown recently, and working with Ajax is no longer as difficult as it used to be. Nonetheless, the fact that Flex is a framework provides an advantage as it makes it easier to write and maintain MXML/ActionScript code compared to writing code in Ajax.
1.5.2 Adobe Flex and Flash IDE Though Adobe Flex applications are compiled and turned into .swf files, that can be run by a Flash player, Flex is quite different from Flash. Flash, at its core, is an animation and drawing editor; development features were added later. On the other hand, Adobe Flex is an open source component library to develop applications. Adobe Flex, in comparison to Flash IDE, is a more flexible development framework that has support for easily moving data around, styling and skinning, advance controls for interactivity and lot more.
1.5.3 Adobe Flex and Java/JavaFX
Today, Flash players are present on almost all computers. Flex applications use the Flash player like a virtual machine for Flex applications; therefore, Flex applications can run on most computers. Java is also a popular language, and most computers include a Java Virtual Machine (JVM) as part of the Java Runtime Environment (JRE) or it is easily downloadable. JavaFX is a software platform to build RIAs, similar to Adobe Flex. With Adobe Flex, we can still use Java as the backend and use the more popular Flash for the frontend.
Being familiar with XML and JavaScript, Web Developers will find it easy to work with Adobe Flex. Java developers familiar with Eclipse should also find it easy to work with Adobe Flex builder as it is based on Eclipse. Java, like Flex, allows an application to be deployed either on the Web or to the desktop.
1.5.4 Adobe Flex and Java Server Faces (JSF)
Flex applications are focused on the client-side, either for deployment on desktops or Web pages. Data exchange with servers uses XML On the other hand, Java Server Faces technology works on the server side, generally rendering its output in terms of HTML pages with or without AJAX support. JSF technology offers a clean separation between behavior and presentation. Using JSF the client-generated events are mapped to server side objects as methods, generating a response and sending it back to the client. This response can be synchronous (regular components, in which the page reloads completely) or asynchronous (with AJAX, where just the component is updated with the response data).
30 Getting Started with Adobe Flex
Adobe Flex requires a Plugin on the client side (Flash) which is now present on almost 99% of the computers. JSF does not require any client side plugin. JSF is very complicated to develop because the basic implementation is pretty basic and for complicated UI, we need to have additional component libraries. For Enterprise wide Applications with very complicated UI, Adobe Flex would be the better tool to use.
1.5.5 Adobe Flex and Microsoft Silverlight
Microsoft Silverlight is a framework that provides support for rich Web content development by compiling XAML, an XML based interface description language. Silverlight framework is complied and turned into XAP file to be executed by the Silverlight plug-in. It also offers cross platform compatibility.
Flex applications work in a similar way using the Flash plug-in. However, Adobe Flex is an open source framework, while Silverlight is owned by Microsoft. This poses the same arguments of working with a proprietary versus and open source software. In the case of Adobe Flex, the numbers of third party Flex components are increasing quickly with contributions from the open source community.
1.6 Summary In this chapter you learned about the brief history of Adobe Flex, pros and cons of using Adobe Flex and different editions and versions of Adobe Flex. The goal of this chapter was to introduce this new technology and provide a brief overview of the same.
Later on in the chapter, you also learned about the competitive products that are in the market along with a short comparison.
1.7 Review questions 1. What is a RIA and what is it good for?
2. What is MVC and how do you relate it to Flex Apps?
3. What kinds of applications can be built with Adobe Flex 3?
4. What is the difference between Flex and Flash?
5. What are the new key features that were introduced in Adobe Flex 3.0?
6. Which of the following benefits is not possible with Adobe Flex?
A. Enhanced user experience
B. A complete development environment
C. Supports any object oriented languages for client side development
D. Enterprise-class features
E. Cross browser compatibility
7. What are the main competitive products for Adobe Flex?
Chapter 1 – Introduction to Adobe Flex 31
A. Google code
B. Microsoft SilverLight
C. Ajax
D. JSF
E. None of the above
8. Which of the following are NOT included in Free Version of Adobe Flex 3 SDK?
A. Flex Framework
B. Compiler
C. Debugger
D. Design View
E. IDE
9. What are the features that are made available only in Adobe Flex Builder 3.0 Professional Edition?
A. Advanced DataGrid
B. Charting Components
C. Interactive Debugging
D. Performance Profiler
E. Design View
10. Which of the following are characteristics of a Rich Internet Application (RIA)?
A. It provides real time interactivity
B. It hides the communcation between the client and the server from the end user
C. It automatically installs the latest version of the application on the client machine
D. All of the above
E. None of the above
2 Chapter 2 – Installing Flex Flex® Builder™ is an advanced IDE to develop Flex applications. You can download and install Flex Builder trial for 30 days. After the trial period you can purchase a licensed version from Adobe. Though, Flex Builder is not the only software that can be used to write MXML™ and ActionScript®, Flex Builder can speed up the entire development process.
In this chapter you will learn about:
The Flex Builder components
How to install the Eclipse Flex Builder Plug-in on Windows
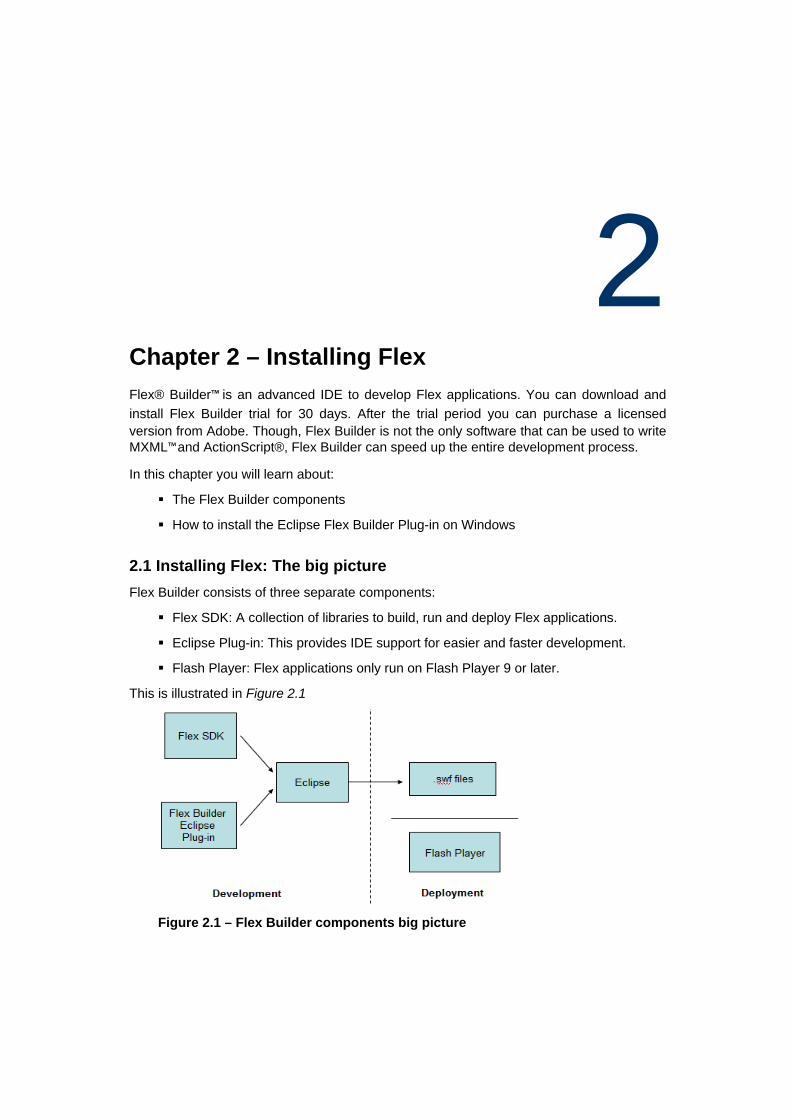
2.1 Installing Flex: The big picture Flex Builder consists of three separate components:
Flex SDK: A collection of libraries to build, run and deploy Flex applications.
Eclipse Plug-in: This provides IDE support for easier and faster development.
Flash Player: Flex applications only run on Flash Player 9 or later.
This is illustrated in Figure 2.1
Figure 2.1 – Flex Builder components big picture
Chapter 2 – Installing Flex 33
As illustrated in the figure, with the Flex Builder Eclipse plug-in installed onto Eclipse as well as the Flex SDK libraries, you can develop a RIA compiled as a .swf file and run from Flash Player.
Flex Builder can be installed in either of following two configurations:
Stand Alone IDE: If you are not an Eclipse user, you can install this version of Flex Builder. It comes with a compatible version of Eclipse.
Plug-in: If you are using Eclipse, you can install the plug-in version of Flex Builder. During the installation it will prompt you for the location of Eclipse.
Note: Both aforementioned installation methods will end up doing the same thing, with only one difference: If you install the stand alone version of Flex Builder, the default perspective will be Flex development, while If you install the plug-in version, the default perspective will be Java development.
In this book, you will learn installing the plug-in version of Flex Builder on Windows. Using the stand alone version will not be discussed in the current scope of the book.
2.2 Installing Flex using the setup wizard Installing the Flex builder plug-in is a two-step process. The first step requires installation of Eclipse and the second step is to install the Flex Builder plug-in.
2.2.1 Installing Eclipse
Follow these steps to install Eclipse on Windows:
1. Go to http://archive.eclipse.org/eclipse/downloads/drops/R-3.3.2-200802211800/index.php and download Eclipse RCP (Rich Client Platform) SDK version that corresponds to your computer's operating system.
2. Unzip the downloaded file into a directory, for example you can unzip this to c:\eclipse.
3. Navigate to the directory where you have unzipped/installed Eclipse and create a desktop shortcut for Eclipse.
Note: For more information about Eclipse, refer to the free ebook Getting Started with Eclipse, which is also part of this book series.
2.2.2 Installing Flex Builder
Follow these steps to install Flex Builder:
1. You can either install Flex Builder plug-in from the setup CD/DVD or download the 60 days trial version from
34 Getting Started with Adobe Flex
http://www.adobe.com/cfusion/entitlement/index.cfm?e=flexbuilder3.To install Flex Builder plug-in, launch the InstallAnywhere wizard by executing setup.exe.
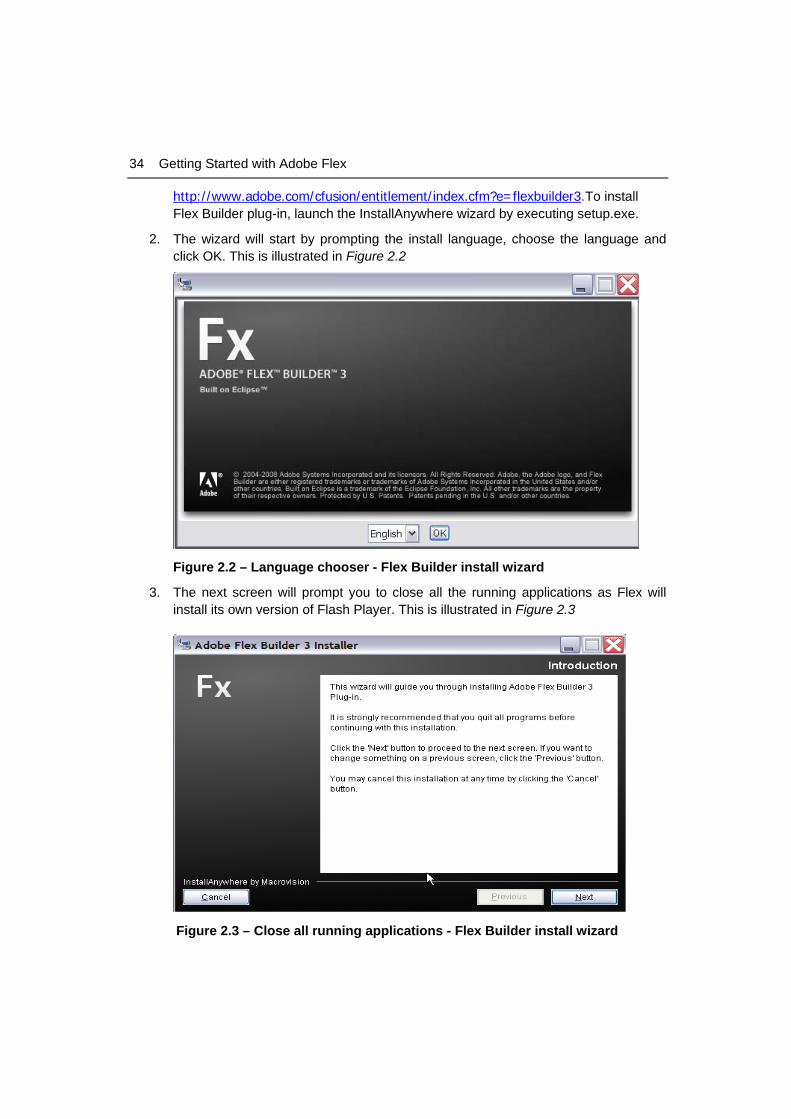
2. The wizard will start by prompting the install language, choose the language and click OK. This is illustrated in Figure 2.2
Figure 2.2 – Language chooser - Flex Builder install wizard
3. The next screen will prompt you to close all the running applications as Flex will install its own version of Flash Player. This is illustrated in Figure 2.3
Figure 2.3 – Close all running applications - Flex Builder install wizard
Chapter 2 – Installing Flex 35
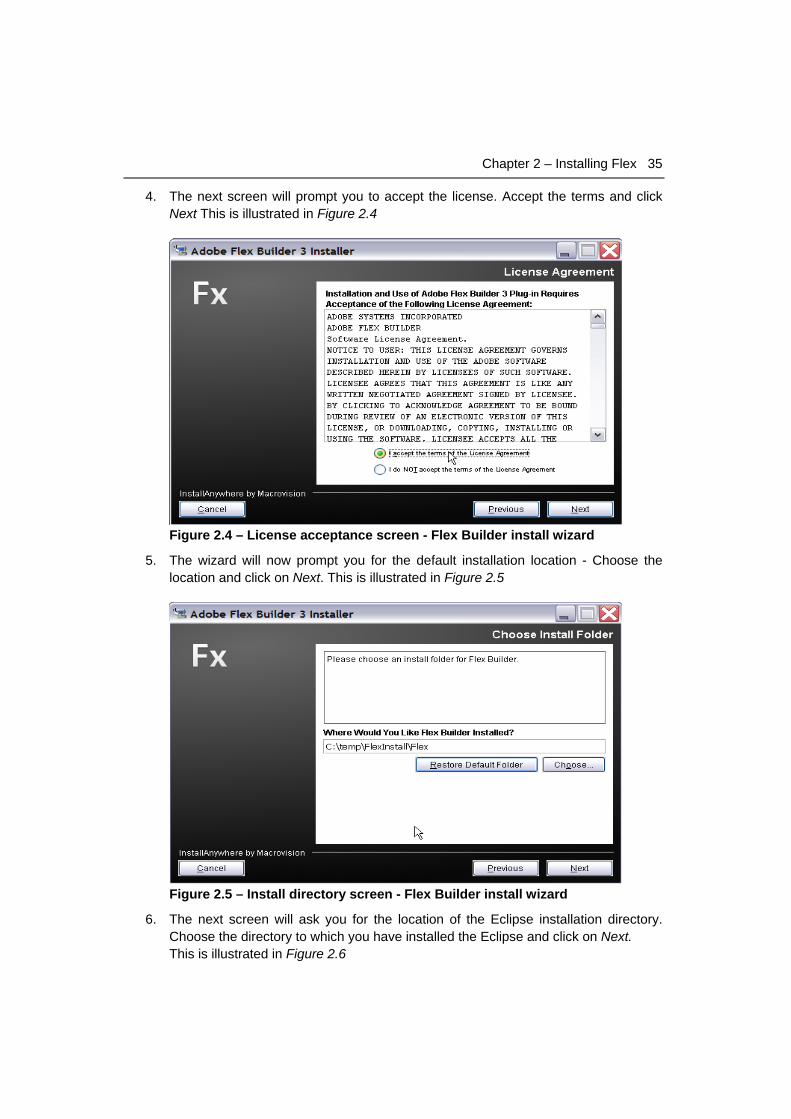
4. The next screen will prompt you to accept the license. Accept the terms and click Next This is illustrated in Figure 2.4
Figure 2.4 – License acceptance screen - Flex Builder install wizard
5. The wizard will now prompt you for the default installation location - Choose the location and click on Next. This is illustrated in Figure 2.5
Figure 2.5 – Install directory screen - Flex Builder install wizard
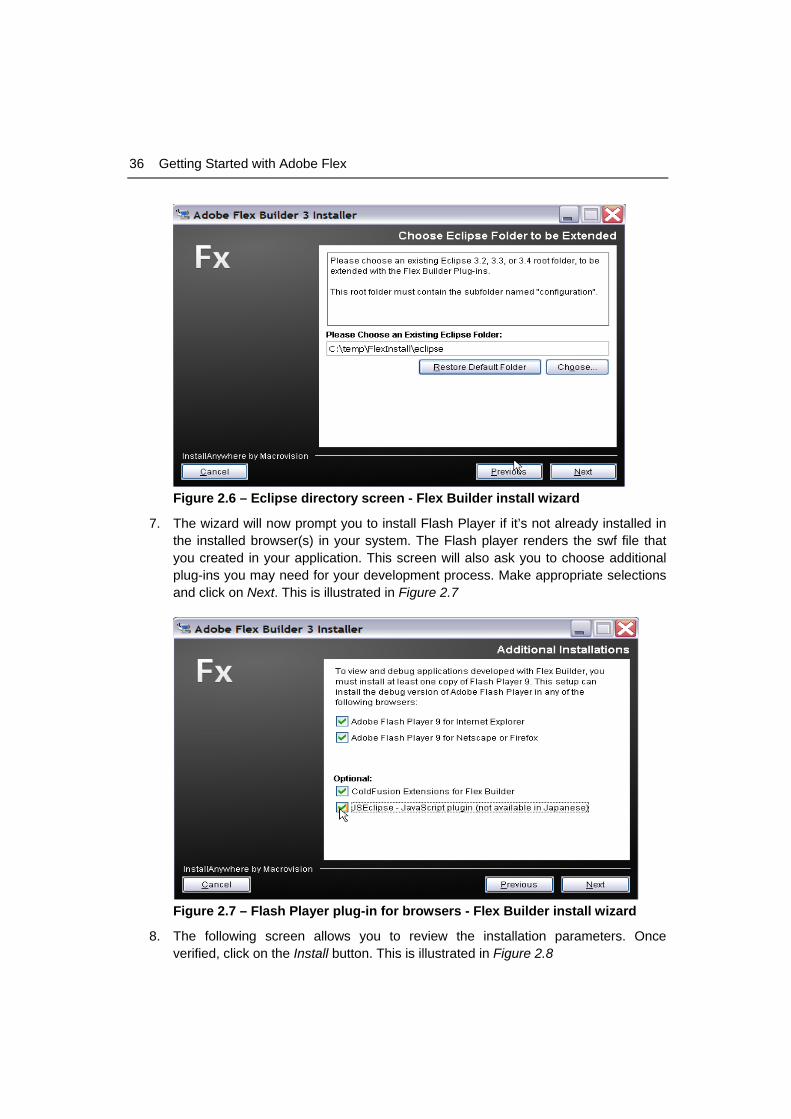
6. The next screen will ask you for the location of the Eclipse installation directory. Choose the directory to which you have installed the Eclipse and click on Next. This is illustrated in Figure 2.6
36 Getting Started with Adobe Flex
Figure 2.6 – Eclipse directory screen - Flex Builder install wizard
7. The wizard will now prompt you to install Flash Player if it’s not already installed in the installed browser(s) in your system. The Flash player renders the swf file that you created in your application. This screen will also ask you to choose additional plug-ins you may need for your development process. Make appropriate selections and click on Next. This is illustrated in Figure 2.7
Figure 2.7 – Flash Player plug-in for browsers - Flex Builder install wizard
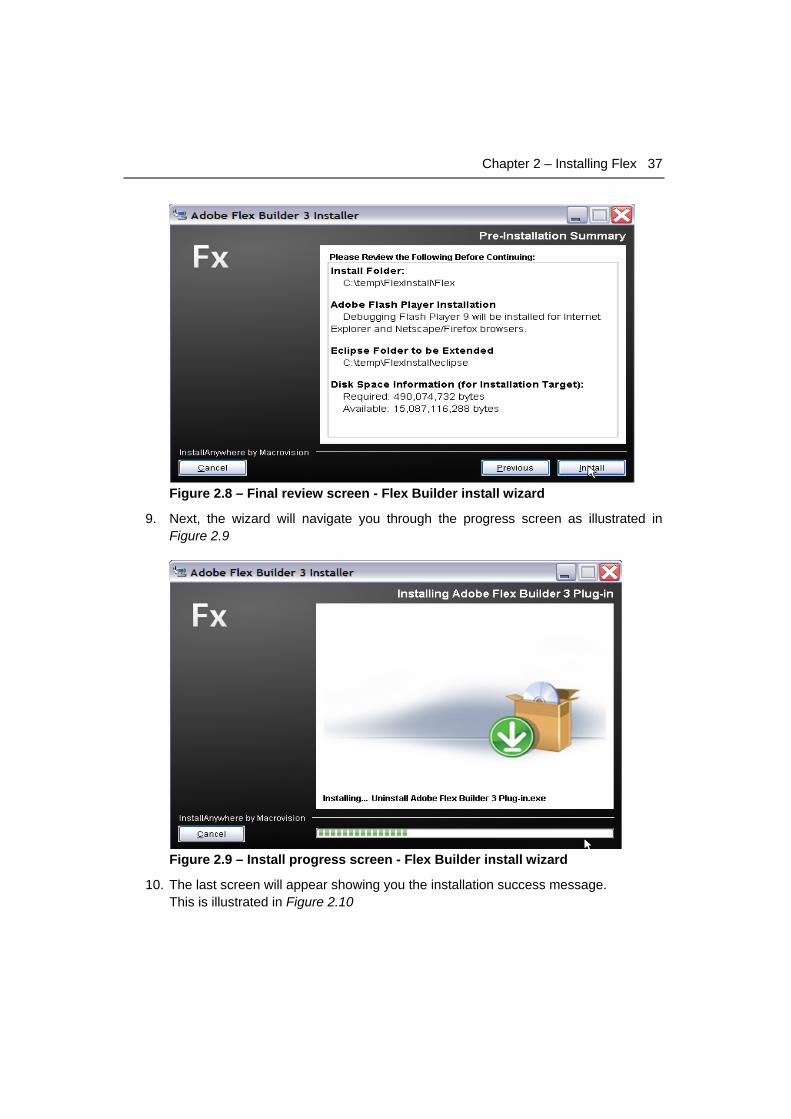
8. The following screen allows you to review the installation parameters. Once verified, click on the Install button. This is illustrated in Figure 2.8
Chapter 2 – Installing Flex 37
Figure 2.8 – Final review screen - Flex Builder install wizard
9. Next, the wizard will navigate you through the progress screen as illustrated in Figure 2.9
Figure 2.9 – Install progress screen - Flex Builder install wizard
10. The last screen will appear showing you the installation success message. This is illustrated in Figure 2.10
38 Getting Started with Adobe Flex
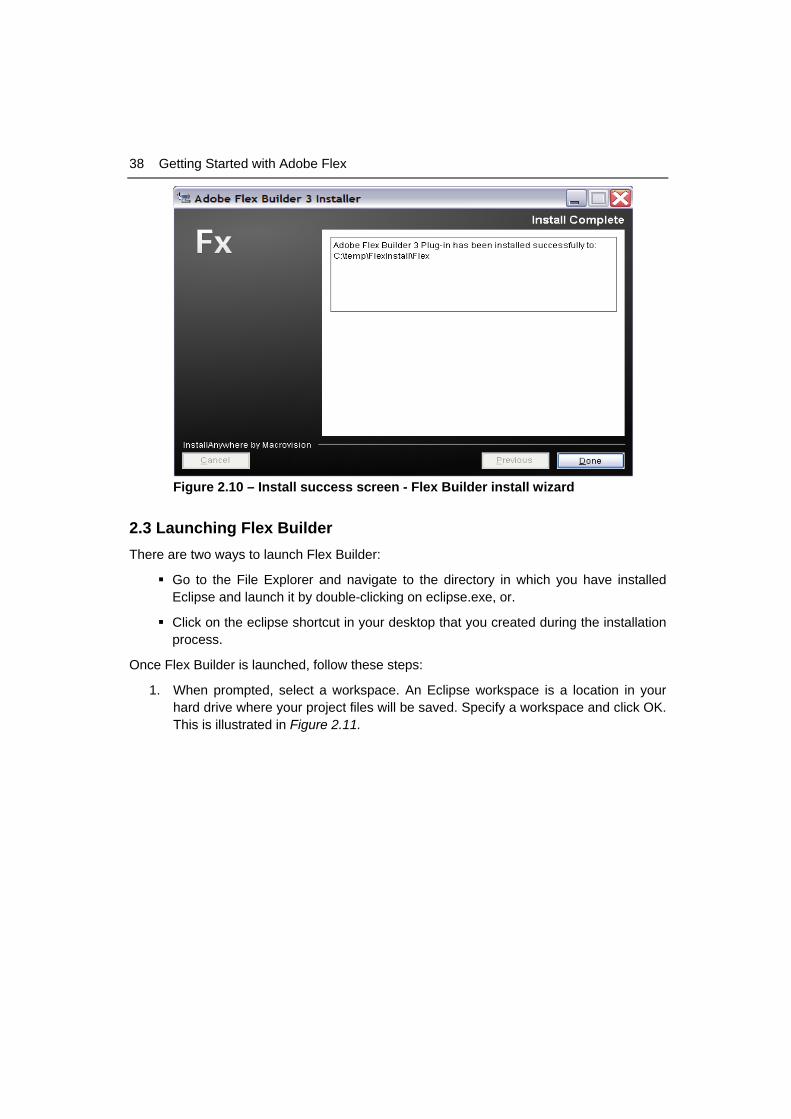
Figure 2.10 – Install success screen - Flex Builder install wizard
2.3 Launching Flex Builder There are two ways to launch Flex Builder:
Go to the File Explorer and navigate to the directory in which you have installed Eclipse and launch it by double-clicking on eclipse.exe, or.
Click on the eclipse shortcut in your desktop that you created during the installation process.
Once Flex Builder is launched, follow these steps:
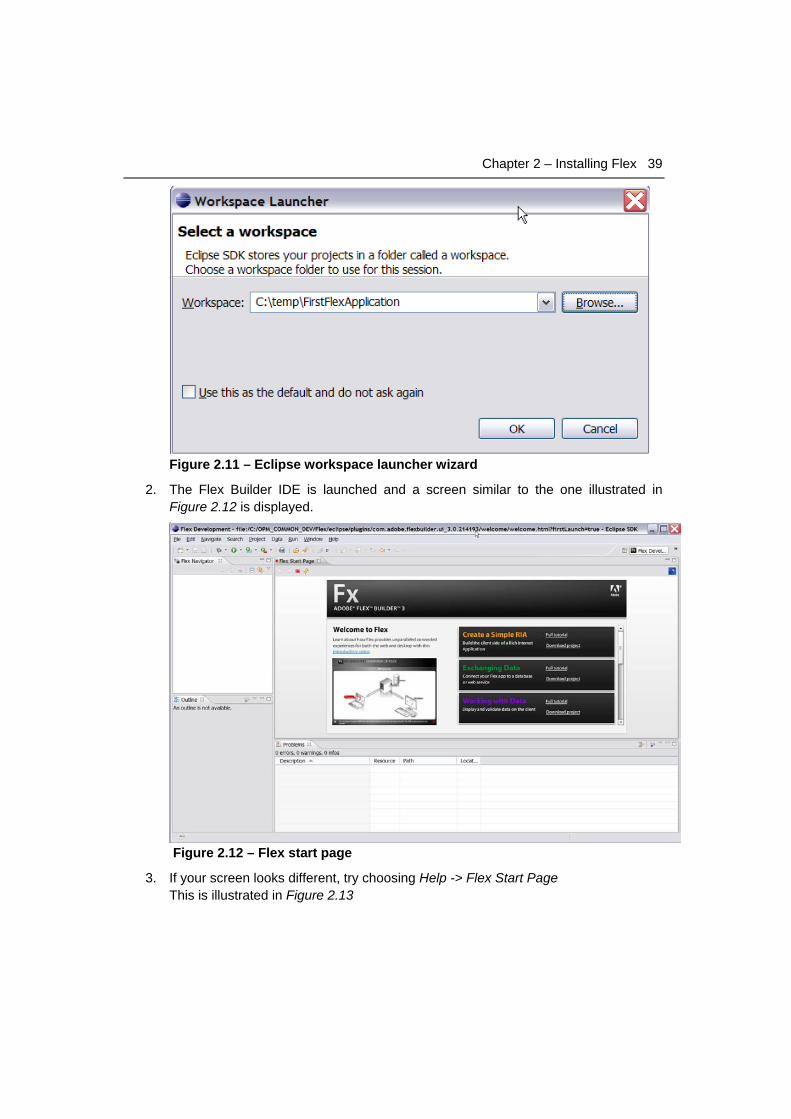
1. When prompted, select a workspace. An Eclipse workspace is a location in your hard drive where your project files will be saved. Specify a workspace and click OK. This is illustrated in Figure 2.11.
Chapter 2 – Installing Flex 39
Figure 2.11 – Eclipse workspace launcher wizard
2. The Flex Builder IDE is launched and a screen similar to the one illustrated in Figure 2.12 is displayed.
Figure 2.12 – Flex start page
3. If your screen looks different, try choosing Help -> Flex Start Page This is illustrated in Figure 2.13
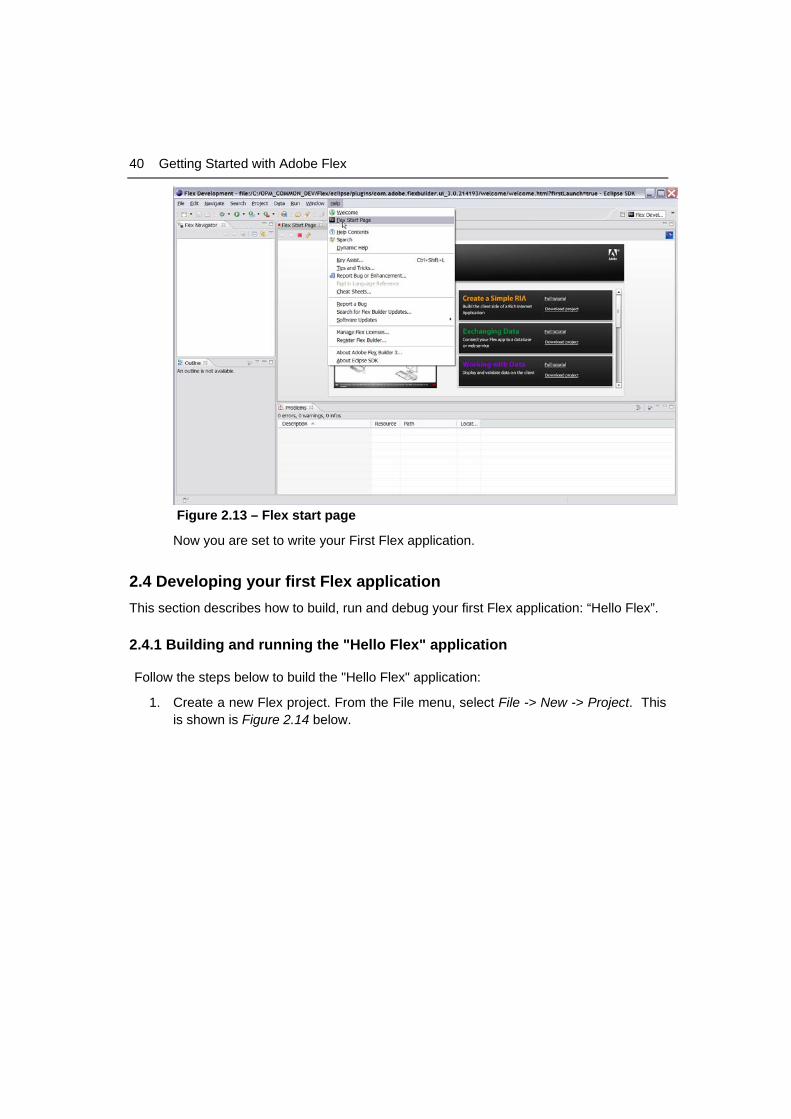
40 Getting Started with Adobe Flex
Figure 2.13 – Flex start page
Now you are set to write your First Flex application.
2.4 Developing your first Flex application This section describes how to build, run and debug your first Flex application: “Hello Flex”.
2.4.1 Building and running the "Hello Flex" application
Follow the steps below to build the "Hello Flex" application:
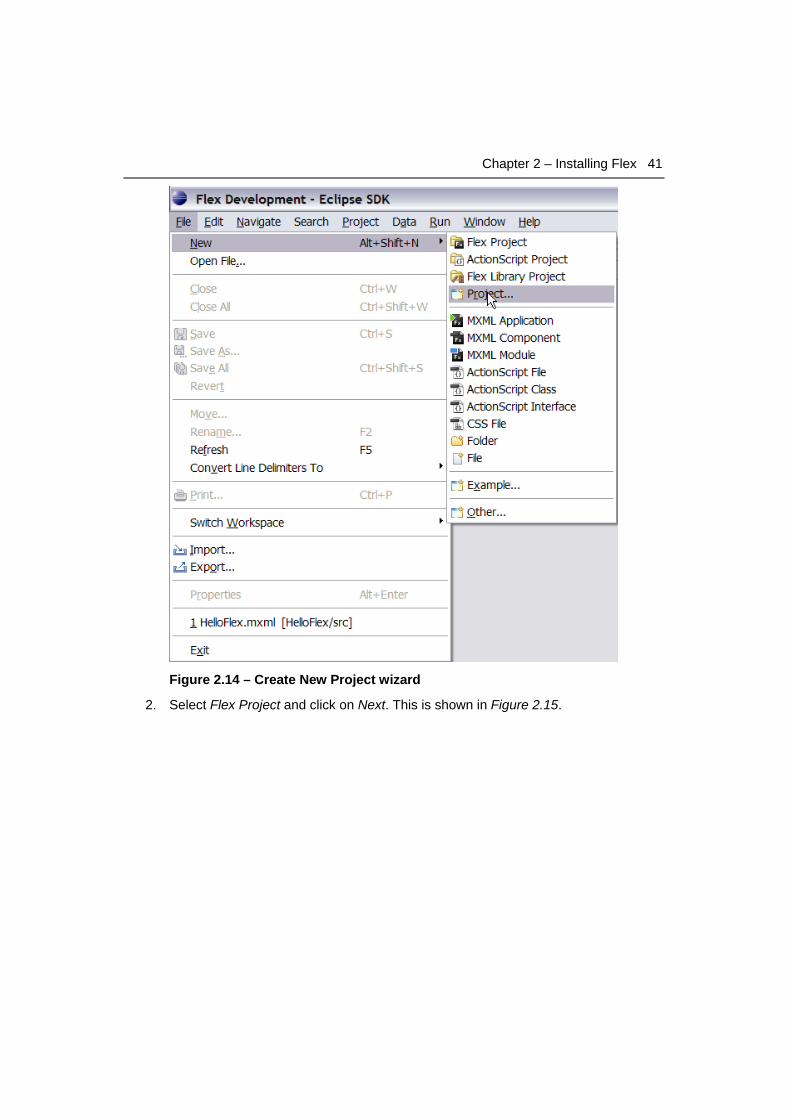
1. Create a new Flex project. From the File menu, select File -> New -> Project. This is shown is Figure 2.14 below.
Chapter 2 – Installing Flex 41
Figure 2.14 – Create New Project wizard
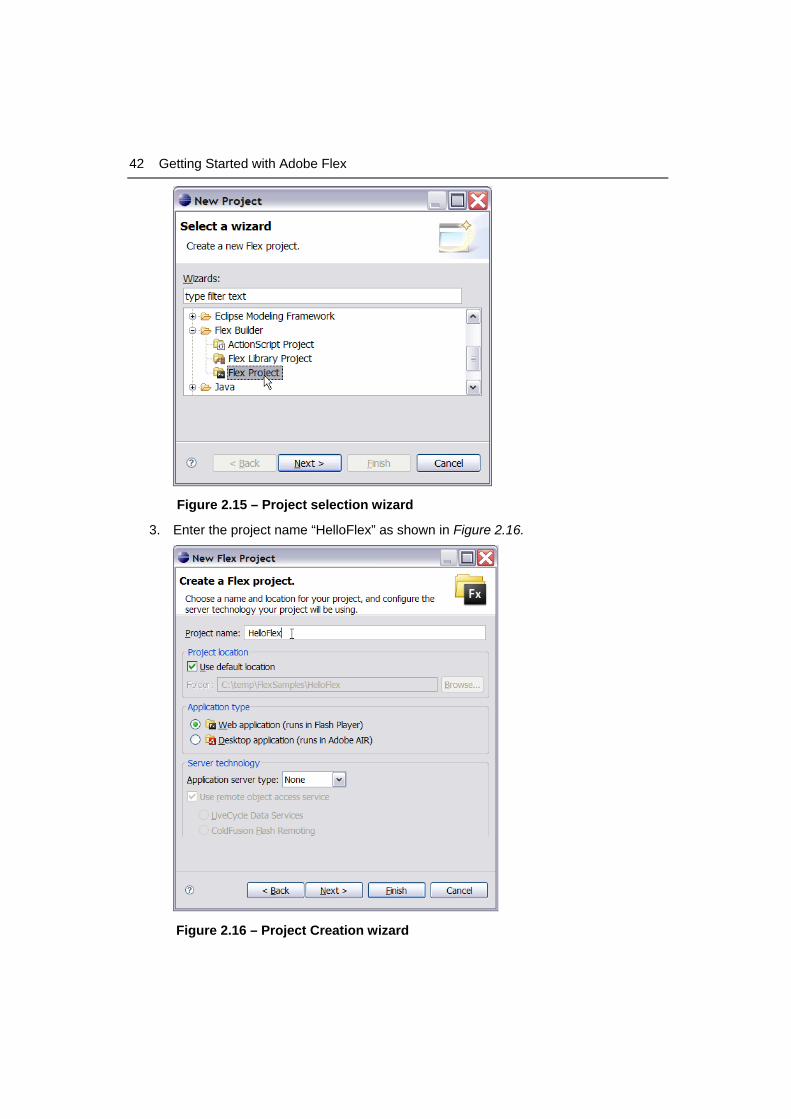
2. Select Flex Project and click on Next. This is shown in Figure 2.15.
42 Getting Started with Adobe Flex
Figure 2.15 – Project selection wizard
3. Enter the project name “HelloFlex” as shown in Figure 2.16.
Figure 2.16 – Project Creation wizard
Chapter 2 – Installing Flex 43
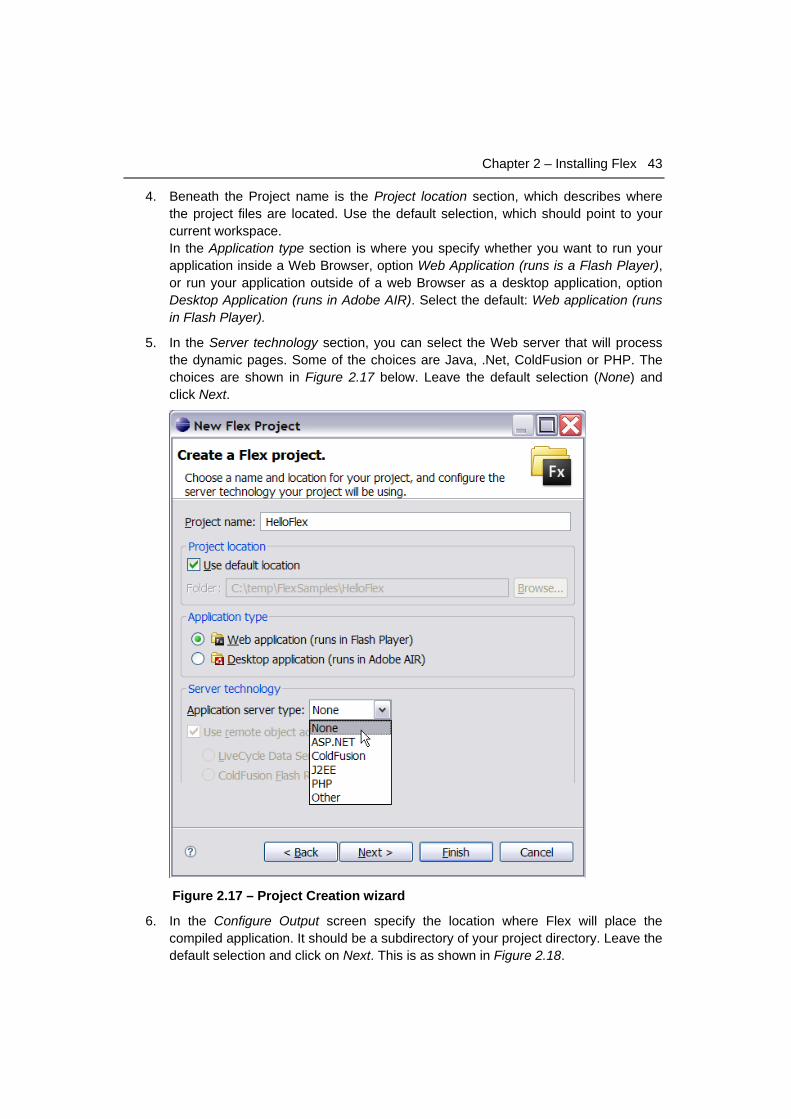
4. Beneath the Project name is the Project location section, which describes where the project files are located. Use the default selection, which should point to your current workspace. In the Application type section is where you specify whether you want to run your application inside a Web Browser, option Web Application (runs is a Flash Player), or run your application outside of a web Browser as a desktop application, option Desktop Application (runs in Adobe AIR). Select the default: Web application (runs in Flash Player).
5. In the Server technology section, you can select the Web server that will process the dynamic pages. Some of the choices are Java, .Net, ColdFusion or PHP. The choices are shown in Figure 2.17 below. Leave the default selection (None) and click Next.
Figure 2.17 – Project Creation wizard
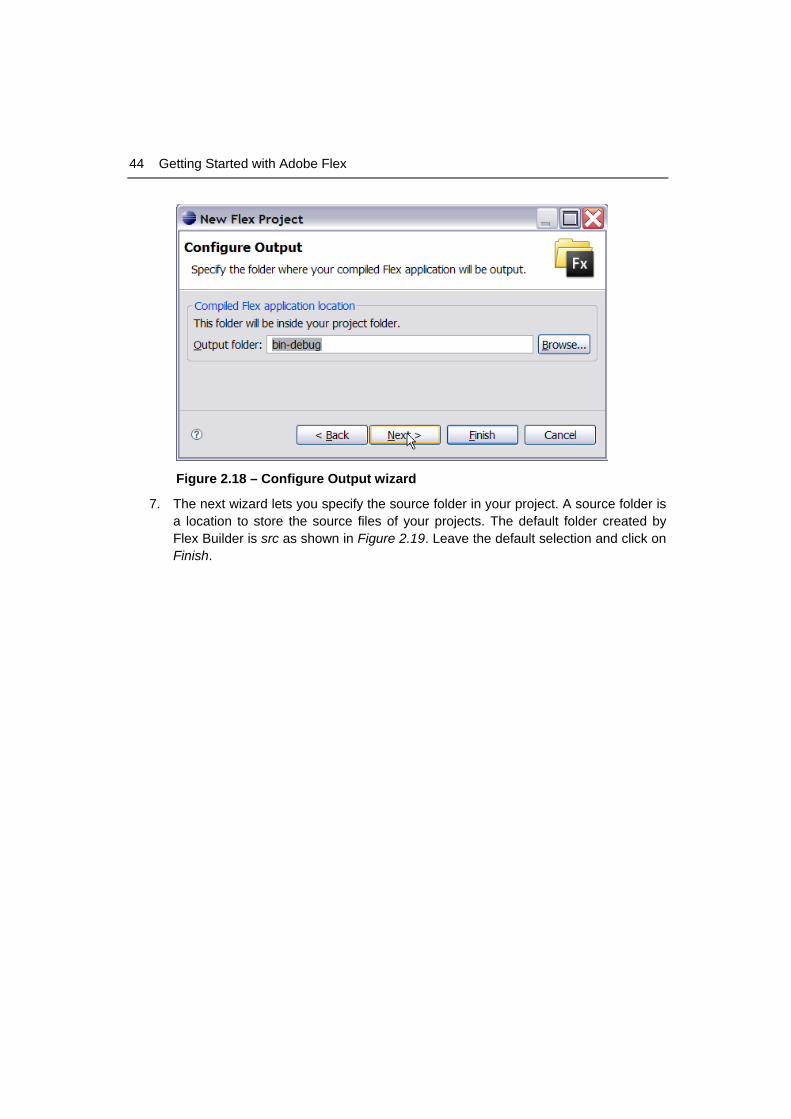
6. In the Configure Output screen specify the location where Flex will place the compiled application. It should be a subdirectory of your project directory. Leave the default selection and click on Next. This is as shown in Figure 2.18.
44 Getting Started with Adobe Flex
Figure 2.18 – Configure Output wizard
7. The next wizard lets you specify the source folder in your project. A source folder is a location to store the source files of your projects. The default folder created by Flex Builder is src as shown in Figure 2.19. Leave the default selection and click on Finish.

Chapter 2 – Installing Flex 45
Figure 2.19 – Main source folder and Main application file wizard
8. The next dialog, as shown in Figure 2.20, asks you to switch to the Flex Development Perspective, click on Yes.
Figure 2.20 – Perspective Switch wizard
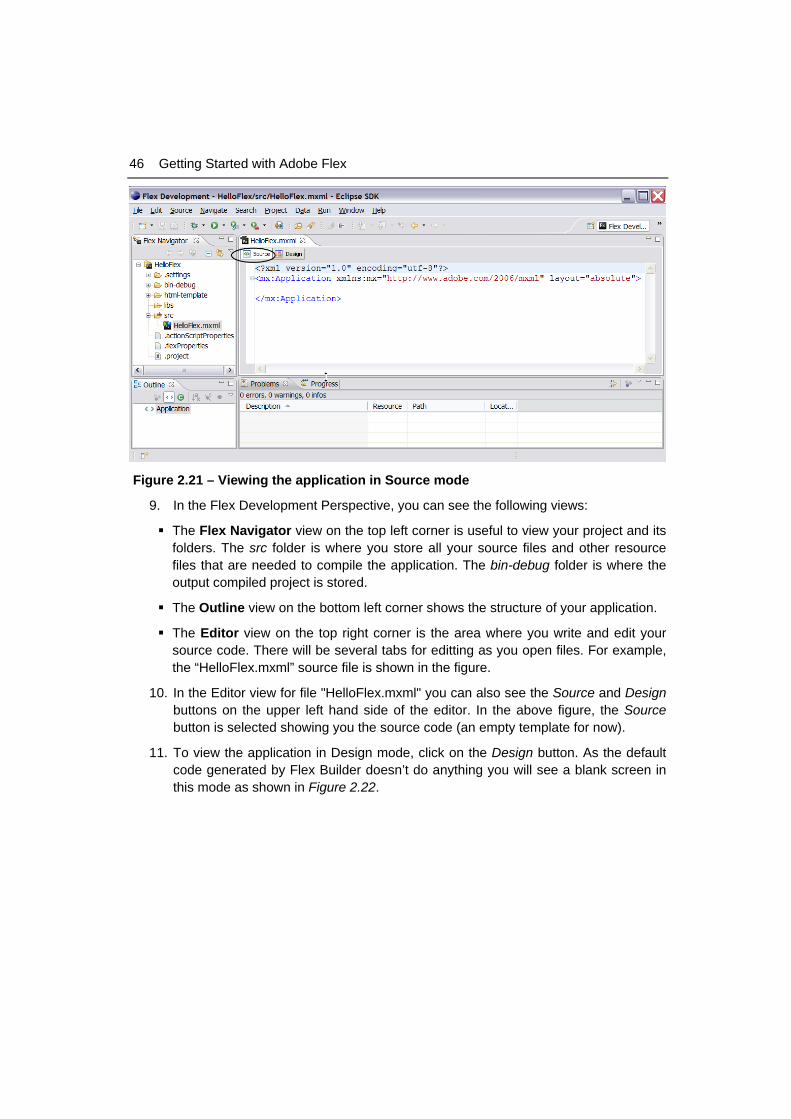
The Flex Builder will now launch the “HelloFlex” Application as shown in Figure 2.21.
46 Getting Started with Adobe Flex
Figure 2.21 – Viewing the application in Source mode
9. In the Flex Development Perspective, you can see the following views:
The Flex Navigator view on the top left corner is useful to view your project and its folders. The src folder is where you store all your source files and other resource files that are needed to compile the application. The bin-debug folder is where the output compiled project is stored.
The Outline view on the bottom left corner shows the structure of your application.
The Editor view on the top right corner is the area where you write and edit your source code. There will be several tabs for editting as you open files. For example, the “HelloFlex.mxml” source file is shown in the figure.
10. In the Editor view for file "HelloFlex.mxml" you can also see the Source and Design buttons on the upper left hand side of the editor. In the above figure, the Source button is selected showing you the source code (an empty template for now).
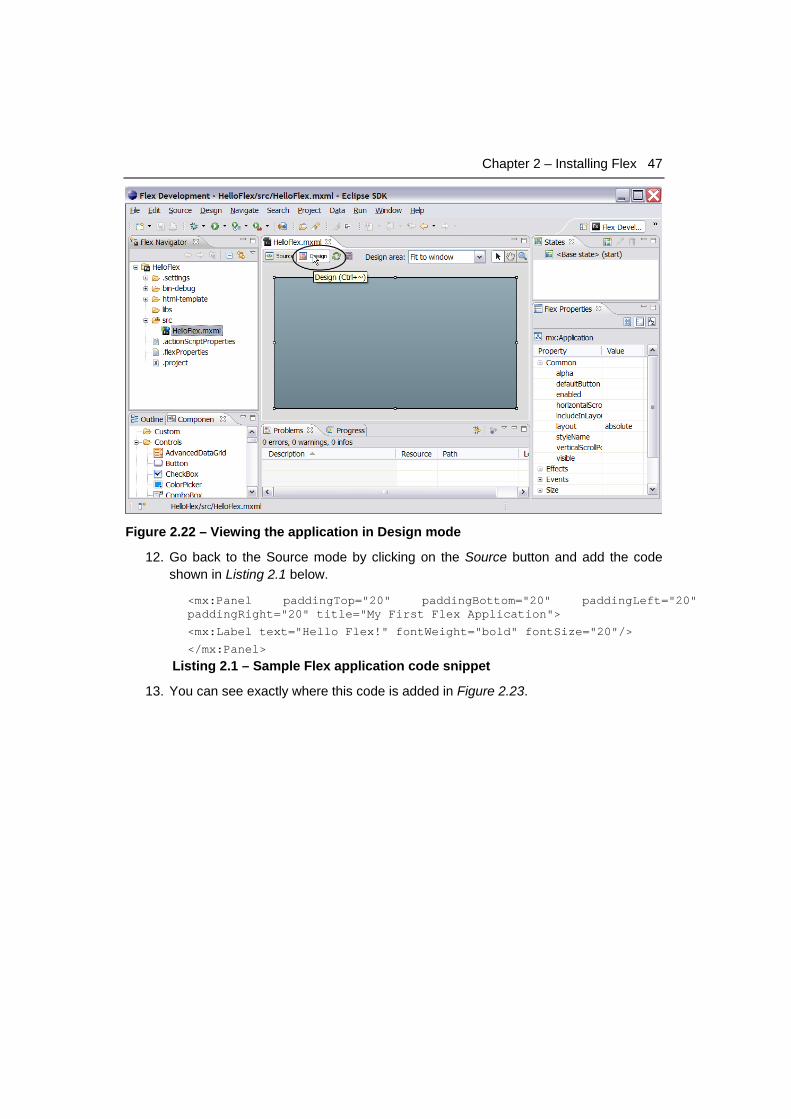
11. To view the application in Design mode, click on the Design button. As the default code generated by Flex Builder doesn’t do anything you will see a blank screen in this mode as shown in Figure 2.22.
Chapter 2 – Installing Flex 47
Figure 2.22 – Viewing the application in Design mode
12. Go back to the Source mode by clicking on the Source button and add the code shown in Listing 2.1 below.
<mx:Panel paddingTop="20" paddingBottom="20" paddingLeft="20" paddingRight="20" title="My First Flex Application">
<mx:Label text="Hello Flex!" fontWeight="bold" fontSize="20"/>
</mx:Panel>
Listing 2.1 – Sample Flex application code snippet
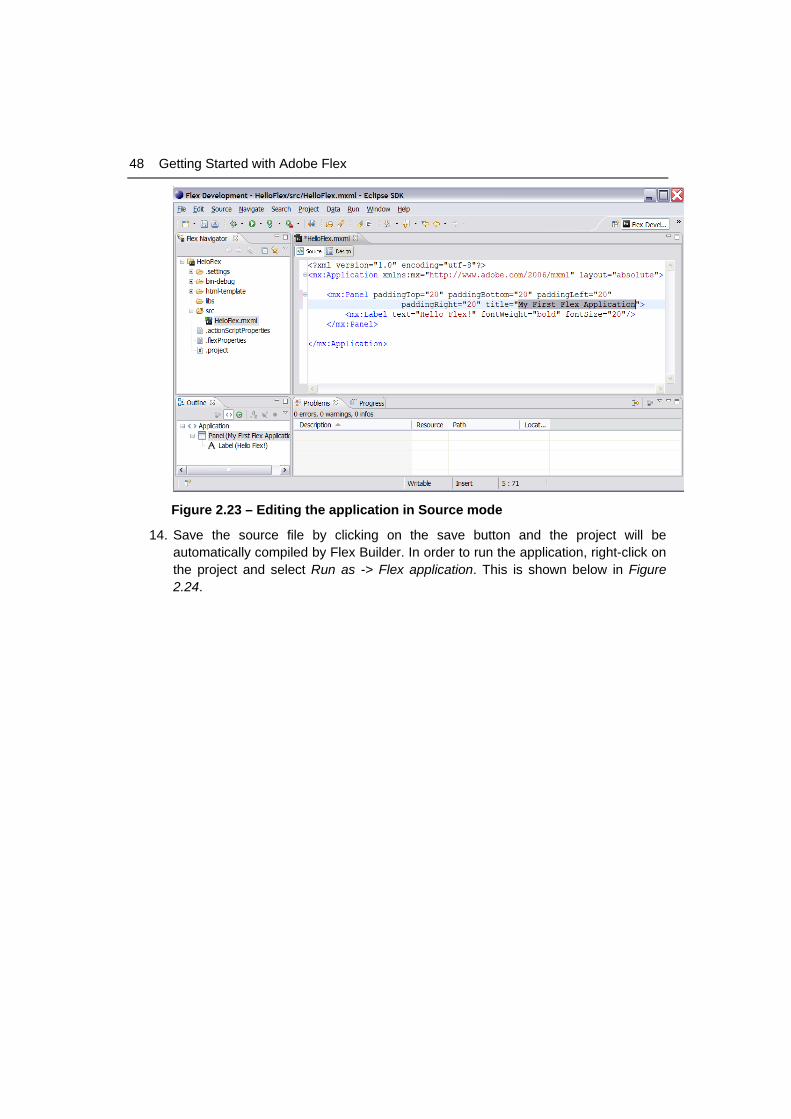
13. You can see exactly where this code is added in Figure 2.23.
48 Getting Started with Adobe Flex
Figure 2.23 – Editing the application in Source mode
14. Save the source file by clicking on the save button and the project will be automatically compiled by Flex Builder. In order to run the application, right-click on the project and select Run as -> Flex application. This is shown below in Figure 2.24.
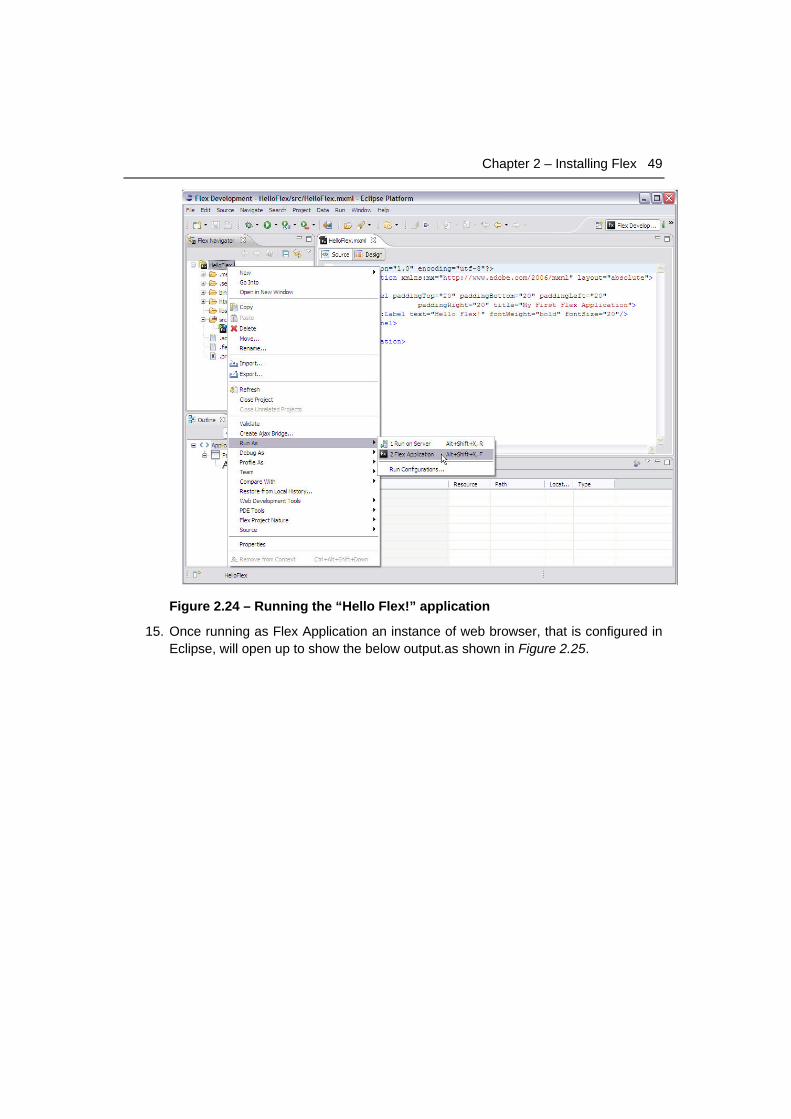
Chapter 2 – Installing Flex 49
Figure 2.24 – Running the “Hello Flex!” application
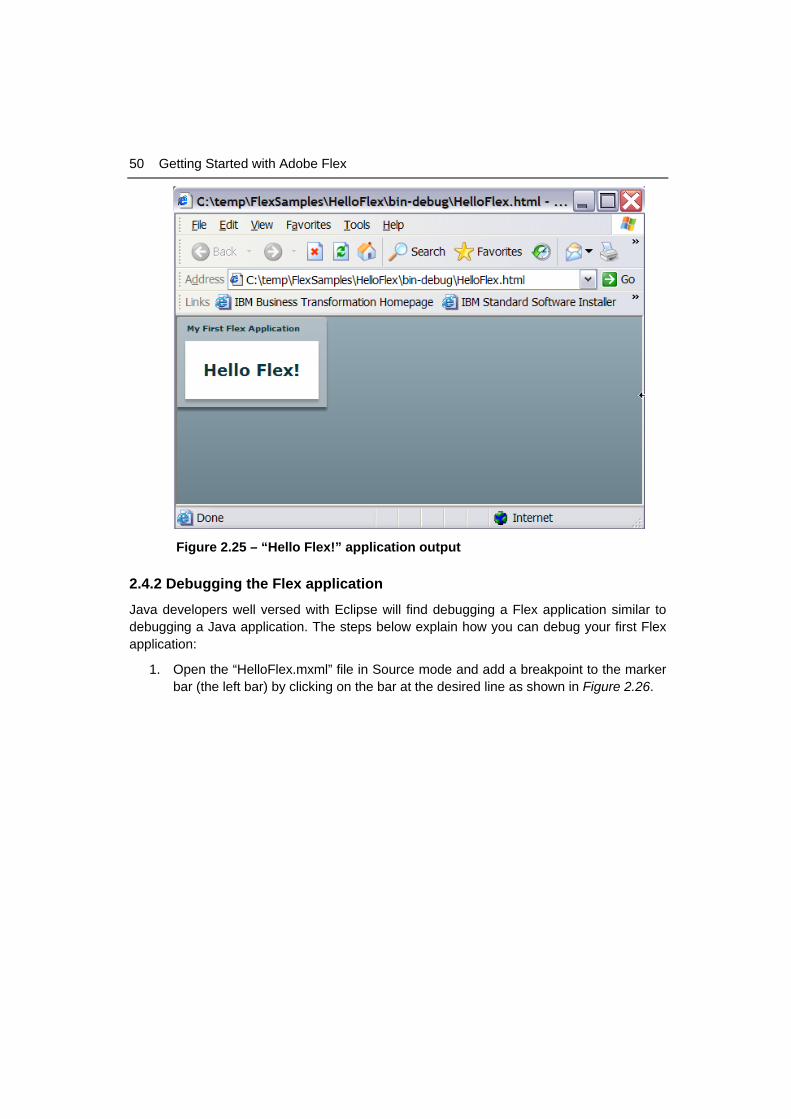
15. Once running as Flex Application an instance of web browser, that is configured in Eclipse, will open up to show the below output.as shown in Figure 2.25.
50 Getting Started with Adobe Flex
Figure 2.25 – “Hello Flex!” application output
2.4.2 Debugging the Flex application
Java developers well versed with Eclipse will find debugging a Flex application similar to debugging a Java application. The steps below explain how you can debug your first Flex application:
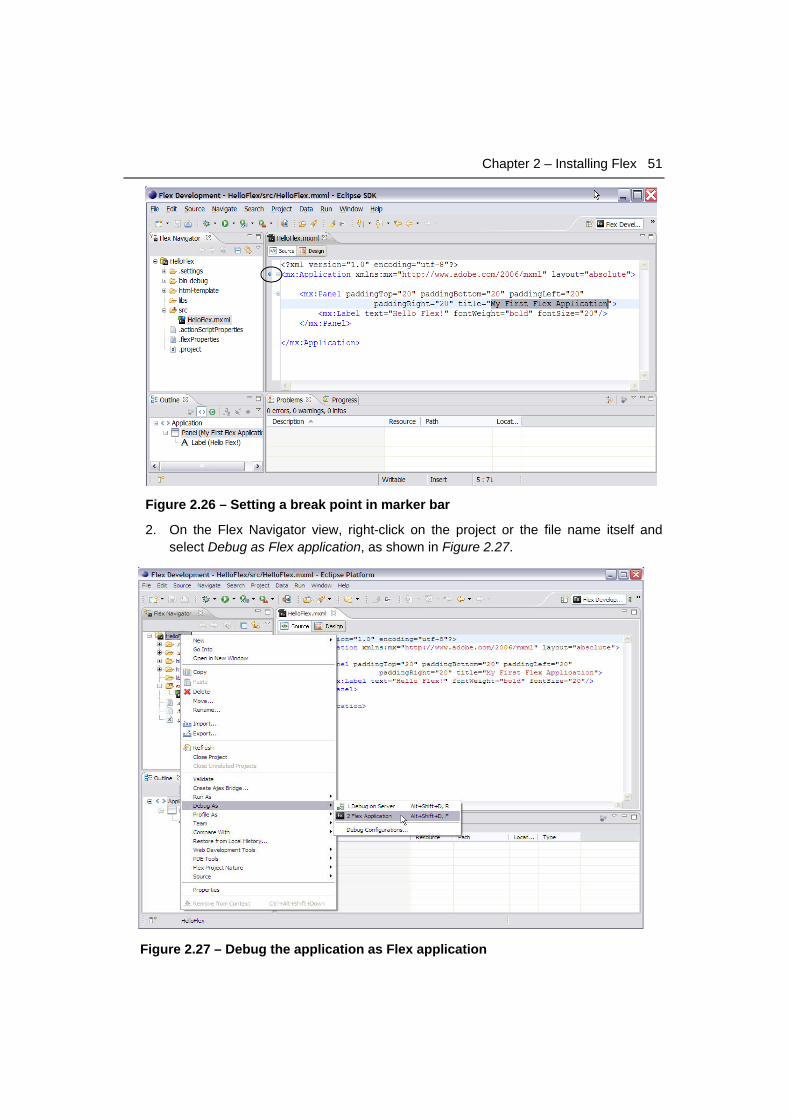
1. Open the “HelloFlex.mxml” file in Source mode and add a breakpoint to the marker bar (the left bar) by clicking on the bar at the desired line as shown in Figure 2.26.
Chapter 2 – Installing Flex 51
Figure 2.26 – Setting a break point in marker bar
2. On the Flex Navigator view, right-click on the project or the file name itself and select Debug as Flex application, as shown in Figure 2.27.
Figure 2.27 – Debug the application as Flex application
52 Getting Started with Adobe Flex
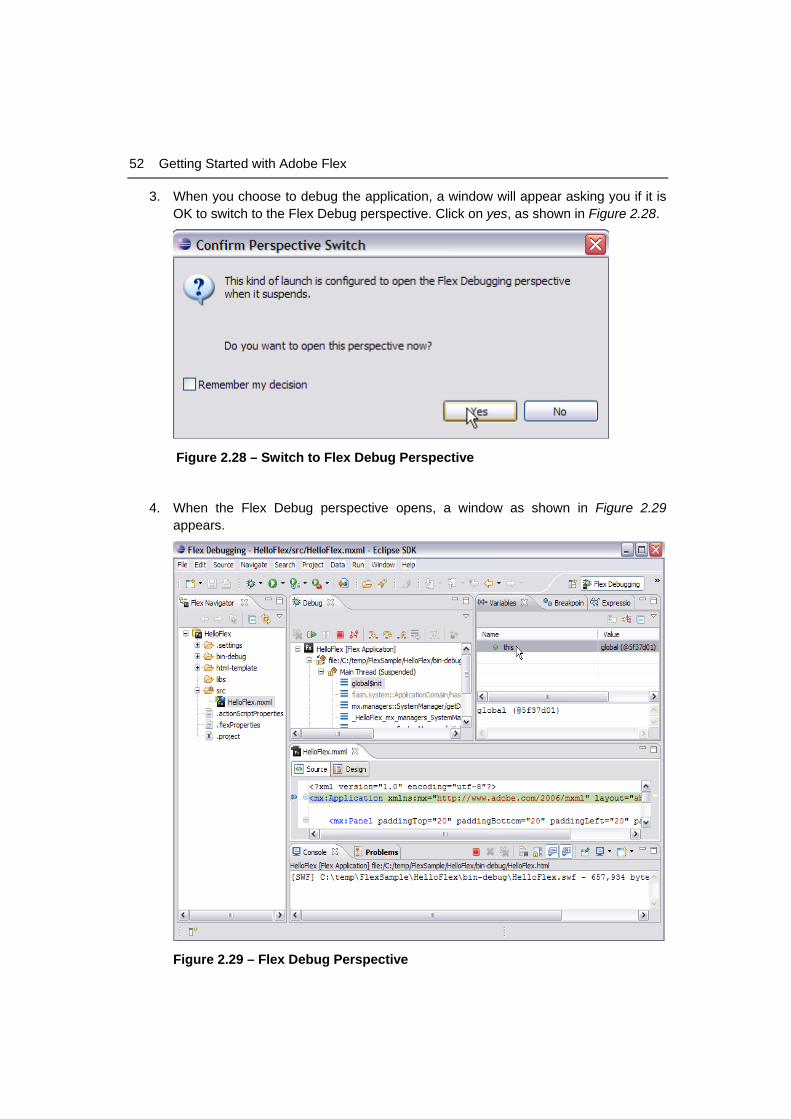
3. When you choose to debug the application, a window will appear asking you if it is OK to switch to the Flex Debug perspective. Click on yes, as shown in Figure 2.28.
Figure 2.28 – Switch to Flex Debug Perspective
4. When the Flex Debug perspective opens, a window as shown in Figure 2.29 appears.
Figure 2.29 – Flex Debug Perspective
Chapter 2 – Installing Flex 53
5. You can now start debugging by making use of F5 (step into), F6 (step over) and F8 (resume) keys.Refer to the ebook Getting Started with Data Studio which has a section about debugging stored procedures. Because Data Studio is based on Eclipse, the same key strokes and instructions can be used.
2.5 Exercises Create a new Flex application and call it "Hello world!". It should do exactly the same as the Hello Flex! application illustrated in this chapter, but this time it will output "Hello World!". This simple exercise will help you recap what you have learned in the chapter.
2.6 Summary This chapter explained the various steps to install the Eclipse Flex Builder plug-in. Flex Builder comes with a packaged Flex SDK. It also explained how to build, run and debug a simple Flex application.
2.7 Review questions 1. Is a Flex application an HTML application?
2. What are the Flex limitations with respect to HTML?
3. How does a Flex application outbenefit an HTML application?
4. How can one change the properties of a component added to a Flex application?
5. How can we see the various properties associated with the components?
6. Choose the free Flex components mentioned in the below list:
A. Flex SDK
B. Flex Framework
C. Flex Builder
D. Life Cycle Data Services
E. None of the above
7. Choose the licensed Flex components mentioned in the below list:
A. Flex SDK
B. Flex Framework
C. Flex Builder
D. Life Cycle Data Services
E. None of the above
54 Getting Started with Adobe Flex
8. In which of the following windows you can see the components used in a particular application?
A. Console
B. Component
C. Problems
D. Outline
E. None of the above
9. Which type of projects can be created in Flex?
A. Flex
B. ActionScript
C. MXML
D. Library
E. All of the above
10. What are the software languages one needs to know before writing the Flex application?
A. C++
B. Java
C. MXML
D. ActionScript
E. All of the above

3 Chapter 3 - Introduction to MXML and ActionScript MXML is the heart of the Flex framework. MXML is a markup language based on XML (Extensible Markup Language), created by Adobe to be used with the Flex platform. It is easy to read and write like HTML (Hyper Text Markup Language) and provides the extensibility of XML.
ActionScript is the glue that holds a Flex application together. While MXML is usually used for layout and structuring, ActionScript is used to make things happen. The key to building powerful Flex application depends upon the right usage of scripts, creating reusable code, knowing the basics of ActionScripts, and above all, understanding how MXML and ActionScript work together.
In this chapter you will learn about:
MXML
ActionScript
3.1 MXML and ActionScript – the Big Picture Figure 3.1 below provides the big picture of MXML and ActionScript and their relationship.

56 Getting Started with Adobe Flex
Figure 3.1 – Flex Framework Architecture – The Big Picture
As you can see from the figure, the Flex Framework makes use of two languages, ActionScript and MXML.The Class Libraries provide the APIs for both, visual components like controls and containers, and faceless components like remote service objects.
Figure 3.2 illustrates the releationship between MXML and ActionScript by showing the MXML compilation process.
Figure 3.2 – MXML Compilation process
As shown in the figure, every MXML created by a developer gets converted first into an ActionScript class (.as extension). This .as file is then taken by the Flex compiler, which converts it into a .swf (Macromedia’s Small Web Format, pronounced swiff). This file is referred to as the bytecode and can be embedded in any HTML or JSP file, etc. In order to view these files in the browser, Flash Player must be pre-installed.
Chapter 3 – Introduction to MXML and ActionScript 57
3.2 MXML In this section we discuss the relationship between MXML and XML, how to code MXML effectively, and namespaces. Adobe has not provided an official meaning for the MXML acronym; however, since Macromedia (acquired by Adobe) developed this language some people suggest it stands for Macromedia Extensible Markup Language, while others prefer to say that it stands for Magic Extensible Markup Language.
3.2.1 XML
XML stands for Extensible Markup Language. It is a language that describes data and is ideal for exchanging information, no matter the platform. For simplicity, you can think of an XML document as a text document with tags. For example, <telephone>90542334</telephone> is an XML document.
Note:
Today you can find a vast amount of resources about XML. In this book we provide a very short introduction given that XML is the foundation for MXML.
While HTML is a language used to describe how to display data, XML is used to describe what the data is. Below are two simple examples, the first one is HTML, and the second one is XML:
<b>Raul</b>
<name>Raul</name>
Can you see the difference with respect to the tags? In the first case (HTML), the tag <b> is used to indicate that the name Raul should be displayed in bold. In the second case (XML), the tag <name> is used to describe what Raul is, a name.
XML uses a Document Type Definition (DTD) or XML Schema Definition (XSD) document to describe the rules for the tags. For example a rule can be that the tag <name> can only contain characters. These are also used to verify the document follows a predefined structure; this process is called XML validation.
The extensibility in XML comes from the ability to create your own tags. This means that you can create your own vocabulary based on XML. This is what happens with MXML, it is basically an XML vocabulary where specific tags have been created by Adobe to provide structure for Flex applications.
With respect to syntax, an XML document is a well-formed XML document when it follows the right syntax as defined by the World Wide Web Consortium (W3C) XML standard. For example, some of these rules state the following:
All that is opened must be closed – All the tags that are opened like <mx:Button> must be closed with the closing tag like </mx:Button>. If there is no content within the opening and ending tag as in <mx:Button> </mx:Button> then you can simply use one tag as in <mx:Button />.

58 Getting Started with Adobe Flex
XML is case-sensitive – This is to say that upper-case and lower-case letters are not considered the same. So <mx:Label> and <mx:label> are both different.
With respect to presentation, given an XML document, you can easily transform it to a format which the media knows how to present. For example, use XSLT (eXtensible Stylesheet Language Transformation) to transform XML documents into HTML documents so that data can be accurately displayed on a Web browser. Simply apply a different XML stylesheet to the same XML document, and you can present the content data on a browser in a different look and feel.
In terms of navigation, when you want to search for a specific content in an XML document you can use different languages such as XQuery, XPath, and SQL/XML.
3.2.2 Anatomy of an XML tag
A tag can contain information in two ways, either by content or in the way of attributes. Content is nothing but the text enclosed between the opening and the closing tag. On the other hand, an attribute is text enclosed in quotes that exists in the opening tag only and describe the tag further. For example:
<mx:Label id=”myLabel” >
<mx:text> Hello World!! </mx:text>
</mx:Label>
In the above example id is an attribute of the tag <mx:Label>, and <mx:text>, (yes you can nest one tag within another tag as with HTML) is the content of the tag <mx:Label>.
The same can be written as
<mx:Label id=”myLabel” text=”Hello World!!”/>
So, an attribute can provide a more compact and readable way to represent the same information.
Though, attributes are more compact, nested tags allow you to represent more complex content. They are useful for plugging data that can’t be represented by using attributes as in the example shown in Listing 3.1
<mx:DataGrid>
<mx:columns>
<mx:DataGridColumn headerText="Column 1" dataField="col1"/>
<mx:DataGridColumn headerText="Column 2" dataField="col2"/>
<mx:DataGridColumn headerText="Column 3" dataField="col3"/>
</mx:columns>
</mx:DataGrid>
Listing 3.1 - An XML document with nested tags
Chapter 3 – Introduction to MXML and ActionScript 59
3.2.3 Namespaces in MXML In MXML every tag is prefixed with an mx followed by a colon. This is an XML namespace, stating that a tag belongs to the namespace mx. Namespaces are used for providing uniquely named elements and attributes in an XML instance. An XML can have more than one vocabulary and if each vocabulary is given a distinct name, then the ambiguity between the elements of different vocabulary with same name can be resolved by using the namespace. A namespace is declared using a URI (Universal Resource Identifier) as in the following
<mx:Application xmlns:mx="http://www.adobe.com/2006/mxml">
Here the namespace is mx and from there on, all the components defined in this namespace will be prefixed with mx followed by a colon.
3.3 ActionScript 3 ActionScript has evolved over the years from being used as a language for Flash animation routines to a full-fledged object oriented programming language in the form of ActionScript 3.0. This book assumes that the user is already familiar with the fundamentals of OOP (Object Oriented Programming) concepts.
Note: For more information about OOP, refer to the free ebook Programming Fundamentals, which is also a part of this book series.
ActionScript is the foundation upon which the entire Flex Framework is based. This book discusses the ActionScript APIs used for Flex.
3.3.1 Inline ActionScript
Inline ActionScript is used within the MXML tag. For example:
<mx:Button id=”myButton” label=”Display alert” click= ”mx.control.Alert.show(‘Hello World!’)”/>
In the above example, a button is being defined. When someone presses this button, the text Hello World!, should be displayed. The ActionScript usage is illustrated in the sentence:
click= ”mx.control.Alert.show(‘Hello World!’)”
This is an assignment statement for the click event. The show() method of the ActionScript class Alert is being assigned to this click event to display the alert dialog with the text Hello World!.
60 Getting Started with Adobe Flex
For data binding, as in the following example, curly braces are used. Curly braces cause the expression placed within it to be evaluated and the result gets assigned to the attribute of the MXML tag.
<mx:TextInput id=”myText1” />
<mx:Text id=”myText2” text=”{myText1.text}” />
3.3.2 MXML Scripts The other way in which ActionScript can be used in MXML is by using the <mx:Script> element:
<mx:Script>
</mx:Script>
The contents of <mx:Script> block must be enclosed within the CDATA construct, shown in the Listing 3.2, as this prevents the compiler from interpreting the content as XML and thus helping in proper generation of ActionScript code.
<mx:Script>
<![CDATA[
import mx.controls.Alert;
private function result(evt:ResultEvent):void {
Alert.show(“Hello World!!!!”);
}
]]>
</mx:Script>
Listing 3.2 – ActionScript using <mx:Script/> tag
The ActionScript code blocks can also be placed in a separate file with a .as extension. In this case the <mx:Script> element is used as shown below.
<mx:Script source=”example.as” />
3.3.3 ActionScript Variables and data types Variables are declared in ActionScript using the var keyword. The following syntax is used: var <var name>:<data type>;
The data types supported in ActionScript are listed in Table 3.1 below. Every data type has certain properties and methods. You can also assign a value as you declare the variable. This is shown in the examples provided with Table 3.1.
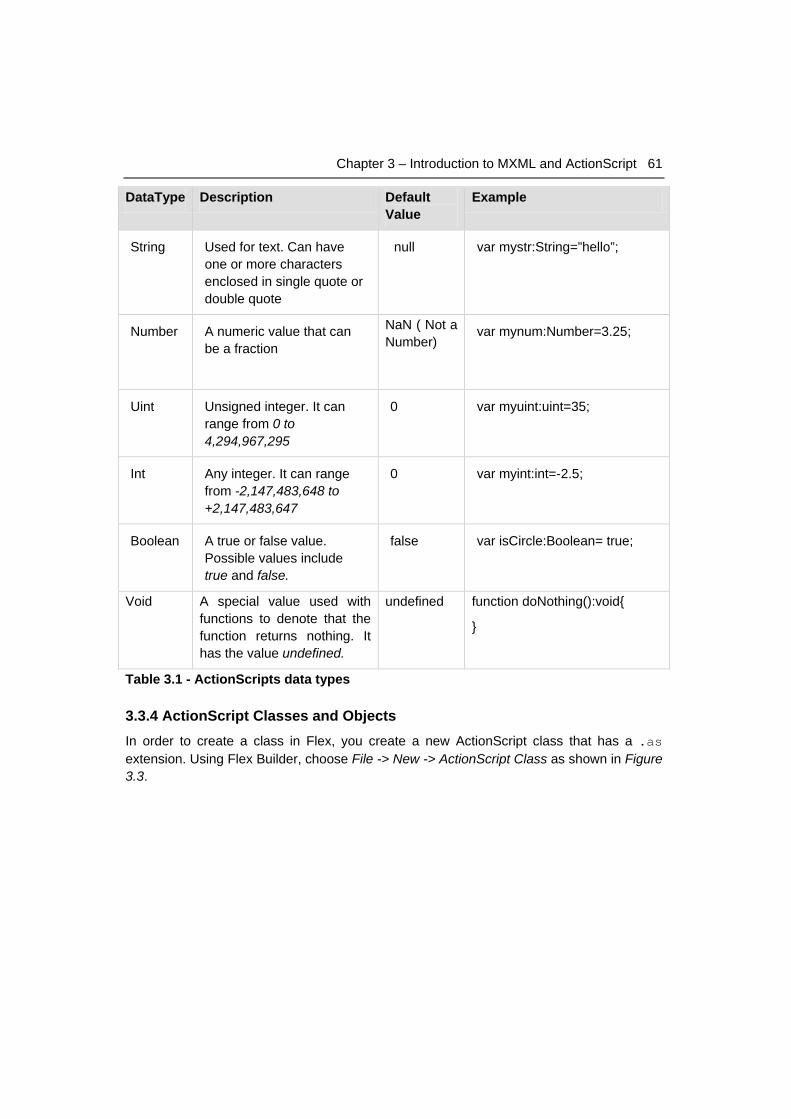
Chapter 3 – Introduction to MXML and ActionScript 61
DataType Description Default Value
Example
String Used for text. Can have one or more characters enclosed in single quote or double quote
null var mystr:String=”hello”;
Number A numeric value that can be a fraction
NaN ( Not a Number)
var mynum:Number=3.25;
Uint Unsigned integer. It can range from 0 to 4,294,967,295
0 var myuint:uint=35;
Int Any integer. It can range from -2,147,483,648 to +2,147,483,647
0 var myint:int=-2.5;
Boolean A true or false value. Possible values include true and false.
false var isCircle:Boolean= true;
Void A special value used with functions to denote that the function returns nothing. It has the value undefined.
undefined function doNothing():void{
}
Table 3.1 - ActionScripts data types
3.3.4 ActionScript Classes and Objects In order to create a class in Flex, you create a new ActionScript class that has a .as extension. Using Flex Builder, choose File -> New -> ActionScript Class as shown in Figure 3.3.
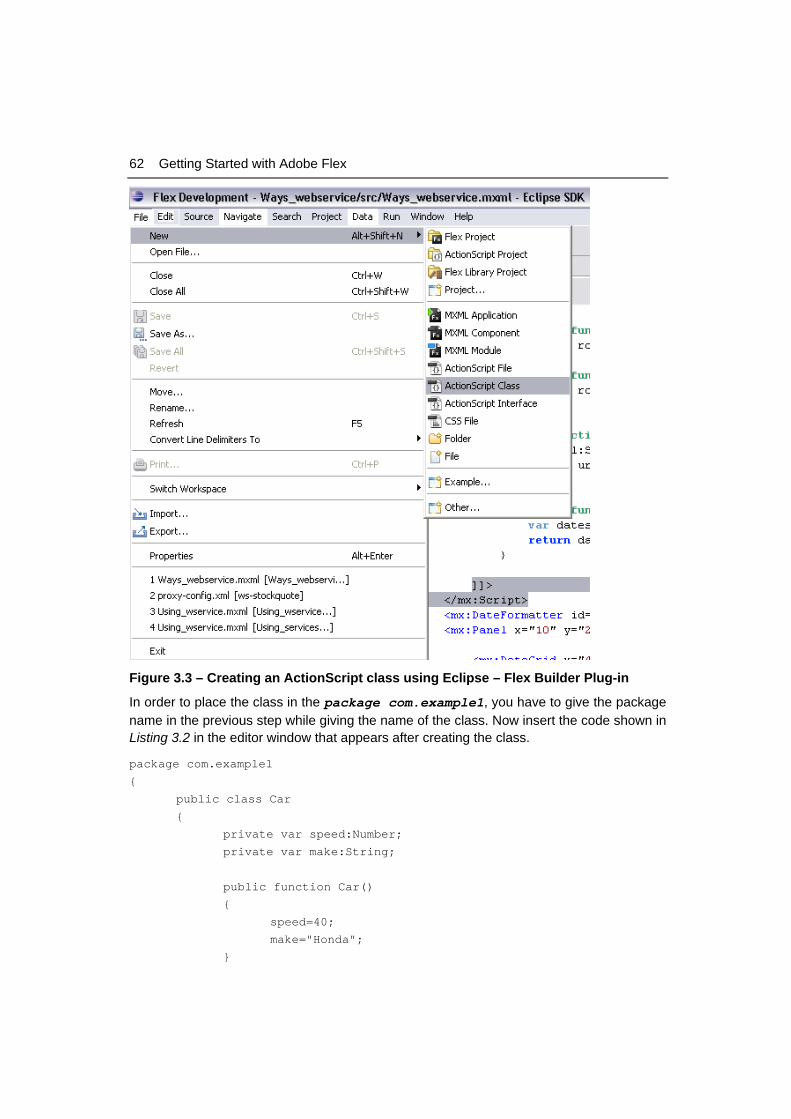
62 Getting Started with Adobe Flex
Figure 3.3 – Creating an ActionScript class using Eclipse – Flex Builder Plug-in
In order to place the class in the package com.example1, you have to give the package name in the previous step while giving the name of the class. Now insert the code shown in Listing 3.2 in the editor window that appears after creating the class.
package com.example1
{
public class Car
{
private var speed:Number;
private var make:String;
public function Car()
{
speed=40;
make="Honda";
}
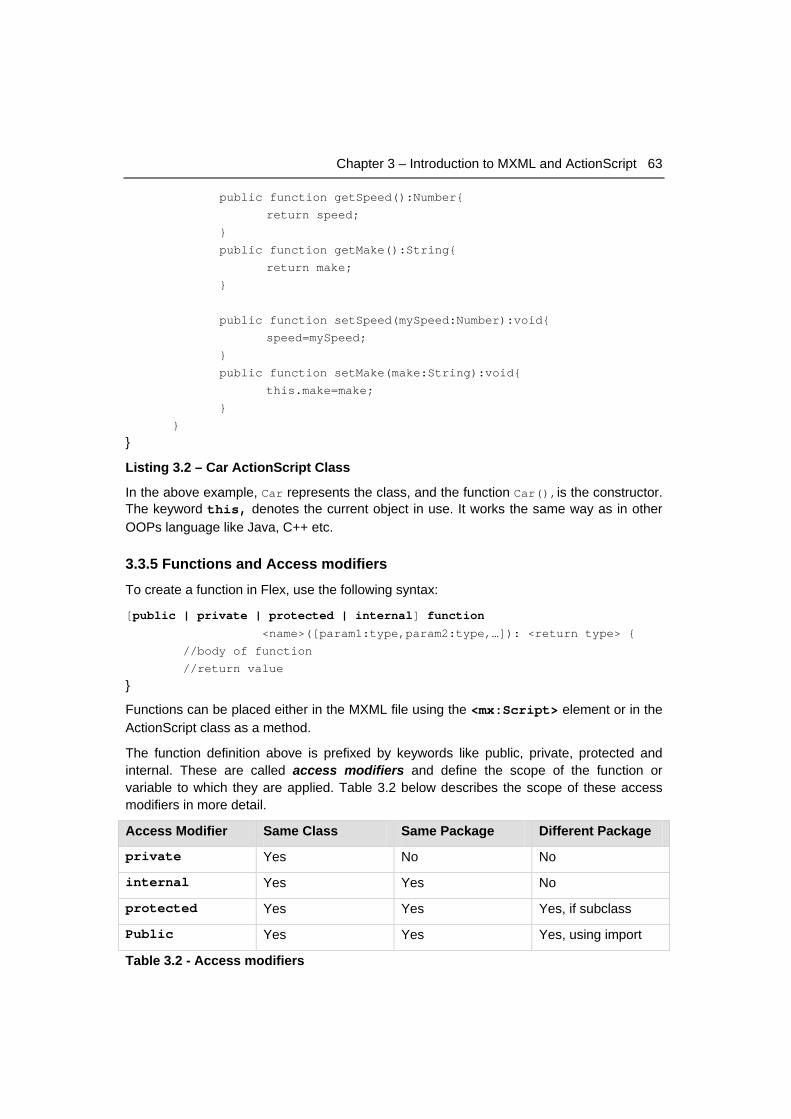
Chapter 3 – Introduction to MXML and ActionScript 63
public function getSpeed():Number{
return speed;
}
public function getMake():String{
return make;
}
public function setSpeed(mySpeed:Number):void{
speed=mySpeed;
}
public function setMake(make:String):void{
this.make=make;
}
}
}
Listing 3.2 – Car ActionScript Class
In the above example, Car represents the class, and the function Car(),is the constructor. The keyword this, denotes the current object in use. It works the same way as in other OOPs language like Java, C++ etc.
3.3.5 Functions and Access modifiers
To create a function in Flex, use the following syntax:
[public | private | protected | internal] function
<name>([param1:type,param2:type,…]): <return type> {
//body of function
//return value
}
Functions can be placed either in the MXML file using the <mx:Script> element or in the ActionScript class as a method.
The function definition above is prefixed by keywords like public, private, protected and internal. These are called access modifiers and define the scope of the function or variable to which they are applied. Table 3.2 below describes the scope of these access modifiers in more detail.
Access Modifier Same Class Same Package Different Package
private Yes No No
internal Yes Yes No
protected Yes Yes Yes, if subclass
Public Yes Yes Yes, using import
Table 3.2 - Access modifiers
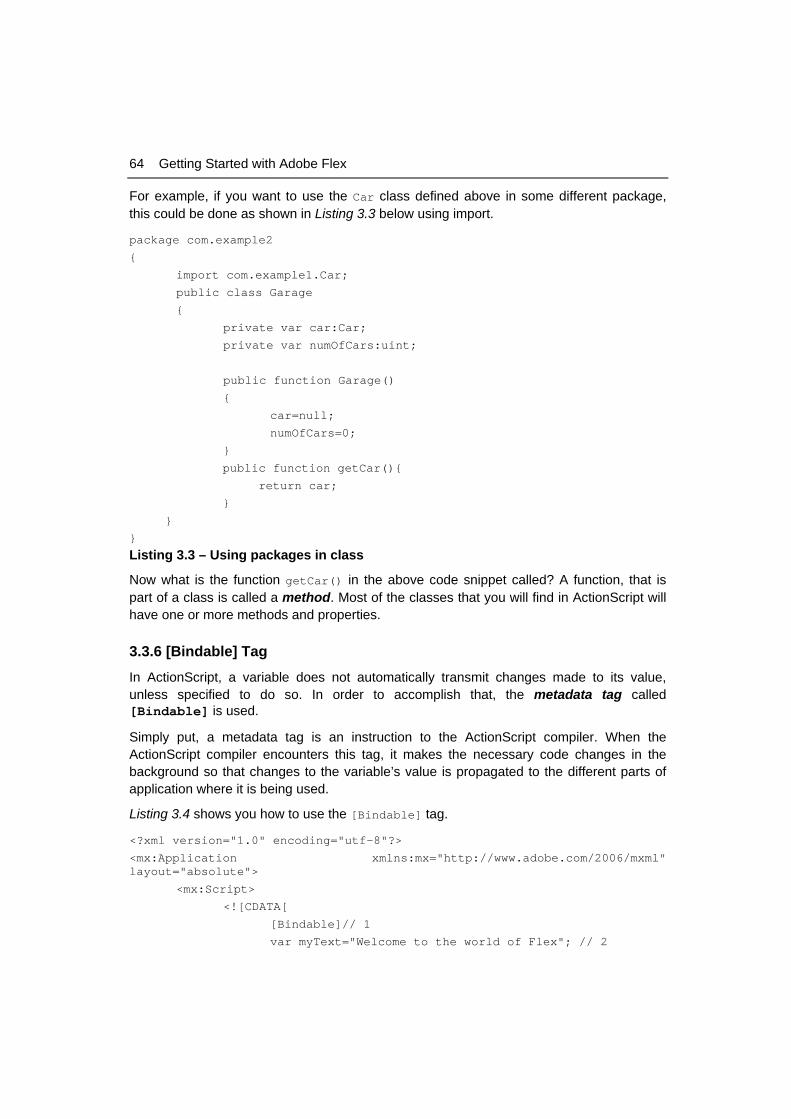
64 Getting Started with Adobe Flex
For example, if you want to use the Car class defined above in some different package, this could be done as shown in Listing 3.3 below using import.
package com.example2
{
import com.example1.Car;
public class Garage
{
private var car:Car;
private var numOfCars:uint;
public function Garage()
{
car=null;
numOfCars=0;
}
public function getCar(){
return car;
}
}
} Listing 3.3 – Using packages in class
Now what is the function getCar() in the above code snippet called? A function, that is part of a class is called a method. Most of the classes that you will find in ActionScript will have one or more methods and properties.
3.3.6 [Bindable] Tag
In ActionScript, a variable does not automatically transmit changes made to its value, unless specified to do so. In order to accomplish that, the metadata tag called [Bindable] is used.
Simply put, a metadata tag is an instruction to the ActionScript compiler. When the ActionScript compiler encounters this tag, it makes the necessary code changes in the background so that changes to the variable’s value is propagated to the different parts of application where it is being used.
Listing 3.4 shows you how to use the [Bindable] tag.
<?xml version="1.0" encoding="utf-8"?>
<mx:Application xmlns:mx="http://www.adobe.com/2006/mxml" layout="absolute">
<mx:Script>
<![CDATA[
[Bindable]// 1
var myText="Welcome to the world of Flex"; // 2
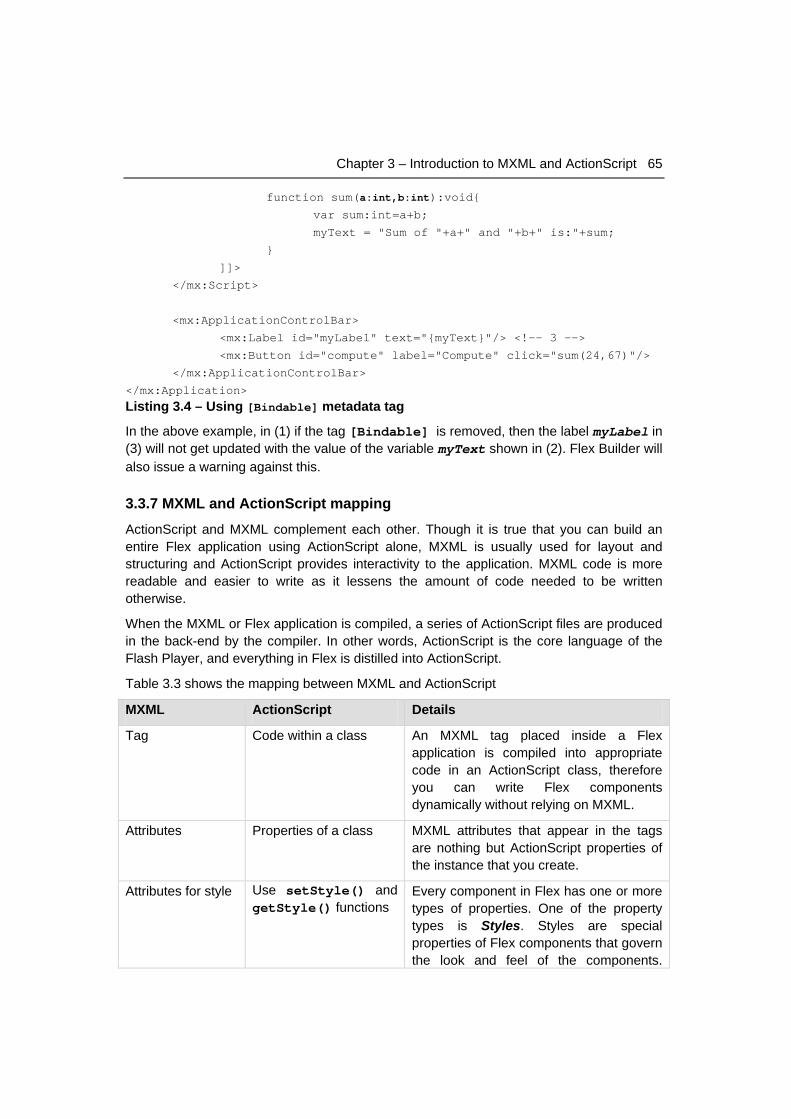
Chapter 3 – Introduction to MXML and ActionScript 65
function sum(a:int,b:int):void{
var sum:int=a+b;
myText = "Sum of "+a+" and "+b+" is:"+sum;
}
]]>
</mx:Script>
<mx:ApplicationControlBar>
<mx:Label id="myLabel" text="{myText}"/> <!-- 3 -->
<mx:Button id="compute" label="Compute" click="sum(24,67)"/>
</mx:ApplicationControlBar>
</mx:Application> Listing 3.4 – Using [Bindable] metadata tag
In the above example, in (1) if the tag [Bindable] is removed, then the label myLabel in (3) will not get updated with the value of the variable myText shown in (2). Flex Builder will also issue a warning against this.
3.3.7 MXML and ActionScript mapping
ActionScript and MXML complement each other. Though it is true that you can build an entire Flex application using ActionScript alone, MXML is usually used for layout and structuring and ActionScript provides interactivity to the application. MXML code is more readable and easier to write as it lessens the amount of code needed to be written otherwise.
When the MXML or Flex application is compiled, a series of ActionScript files are produced in the back-end by the compiler. In other words, ActionScript is the core language of the Flash Player, and everything in Flex is distilled into ActionScript.
Table 3.3 shows the mapping between MXML and ActionScript
MXML ActionScript Details
Tag Code within a class An MXML tag placed inside a Flex application is compiled into appropriate code in an ActionScript class, therefore you can write Flex components dynamically without relying on MXML.
Attributes Properties of a class MXML attributes that appear in the tags are nothing but ActionScript properties of the instance that you create.
Attributes for style Use setStyle() and getStyle() functions
Every component in Flex has one or more types of properties. One of the property types is Styles. Styles are special properties of Flex components that govern the look and feel of the components.
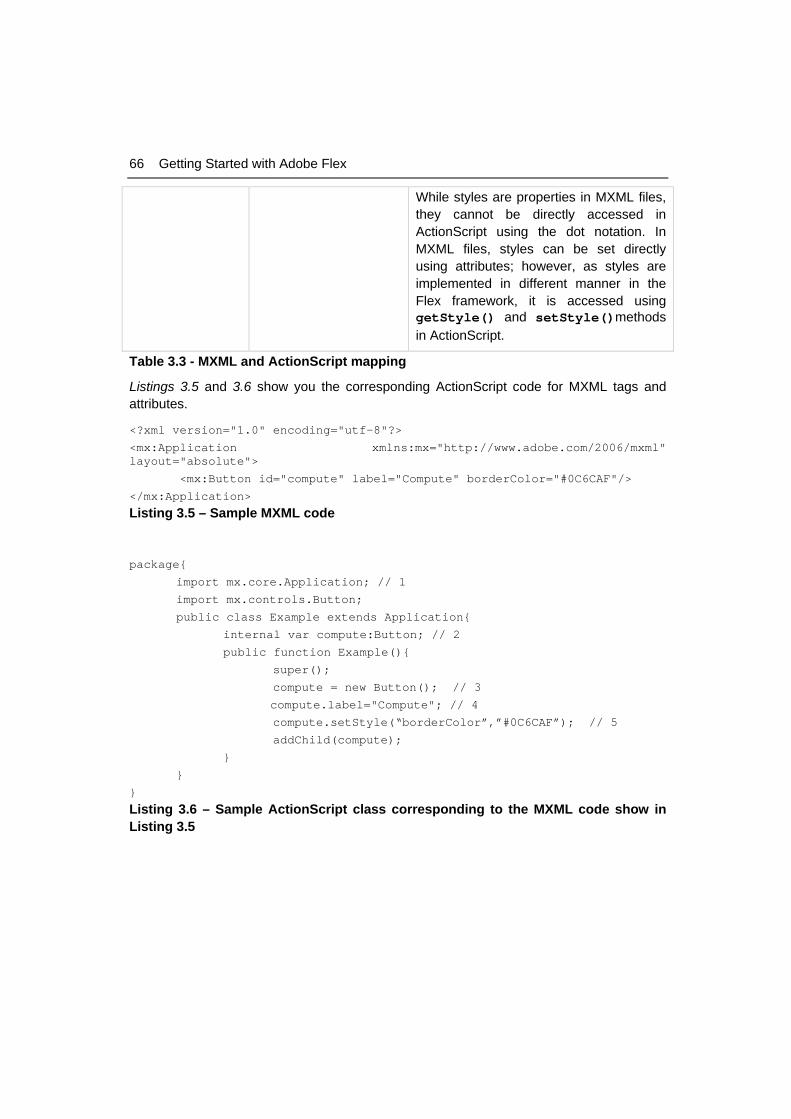
66 Getting Started with Adobe Flex
While styles are properties in MXML files, they cannot be directly accessed in ActionScript using the dot notation. In MXML files, styles can be set directly using attributes; however, as styles are implemented in different manner in the Flex framework, it is accessed using getStyle() and setStyle()methods in ActionScript.
Table 3.3 - MXML and ActionScript mapping
Listings 3.5 and 3.6 show you the corresponding ActionScript code for MXML tags and attributes.
<?xml version="1.0" encoding="utf-8"?>
<mx:Application xmlns:mx="http://www.adobe.com/2006/mxml" layout="absolute">
<mx:Button id="compute" label="Compute" borderColor="#0C6CAF"/>
</mx:Application>
Listing 3.5 – Sample MXML code
package{
import mx.core.Application; // 1
import mx.controls.Button;
public class Example extends Application{
internal var compute:Button; // 2
public function Example(){
super();
compute = new Button(); // 3
compute.label="Compute"; // 4
compute.setStyle(“borderColor”,”#0C6CAF”); // 5
addChild(compute);
}
}
} Listing 3.6 – Sample ActionScript class corresponding to the MXML code show in Listing 3.5
Chapter 3 – Introduction to MXML and ActionScript 67
This example is a simplified version of the ActionScript code that is generated. In the above code snippet, in (1), the import tells the compiler that the application needs the mentioned classes ready for use in the future.
In (2), a button is declared, compute. It is similar to the id attribute in MXML. This can be used to refer this button later in your code.
In (3), an instance of the button compute is created. This is done by using new keyword. It is followed by the constructor of the object that initiates the object creation.
In (4), the attribute label is assigned a value using the dot notation. This signifies that label is a property of Button class.
In (5), the mapping between MXML attributes for styles to ActionScript can be seen.
The method setStyle() takes two parameter and is used to set a style for a component. The first is the name of the style, in this case borderColor and the second is the value for that style.
The method getStyle() takes a single parameter and returns the value set for the style sent as parameter to the method for a component.
3.3.8 Events
An event is a runtime occurrence that has a potential to trigger a response in a program. In ActionScript, there are two kinds of events: built-in events and custom events. Built-in events describe changes to state of the runtime environment like the clicking of a mouse and custom events describes changes to the state of program like the end of program.
Note:
ActionScript event architecture is based upon the W3C DOM (Document Object Model) Level 3 Event Specification.
For event handling in ActionScript, event listeners are used. An event listener is a function that executes when a given event occurs. It listens continuously for a given event to occur. To notify the program when an event occurs, ActionScript executes all the event listeners that are registered to execute for that event. This notification process is called event dispatch. The piece of code that executes when an event occurs is called the event handler.
3.3.8.1 Event Object
When an event occurs in ActionScript, an event object is created. Every event has two properties, target and type. The target property specifies the target object which caused the event and the type property specifies the type of event, for example, a click, a mouse move, etc.
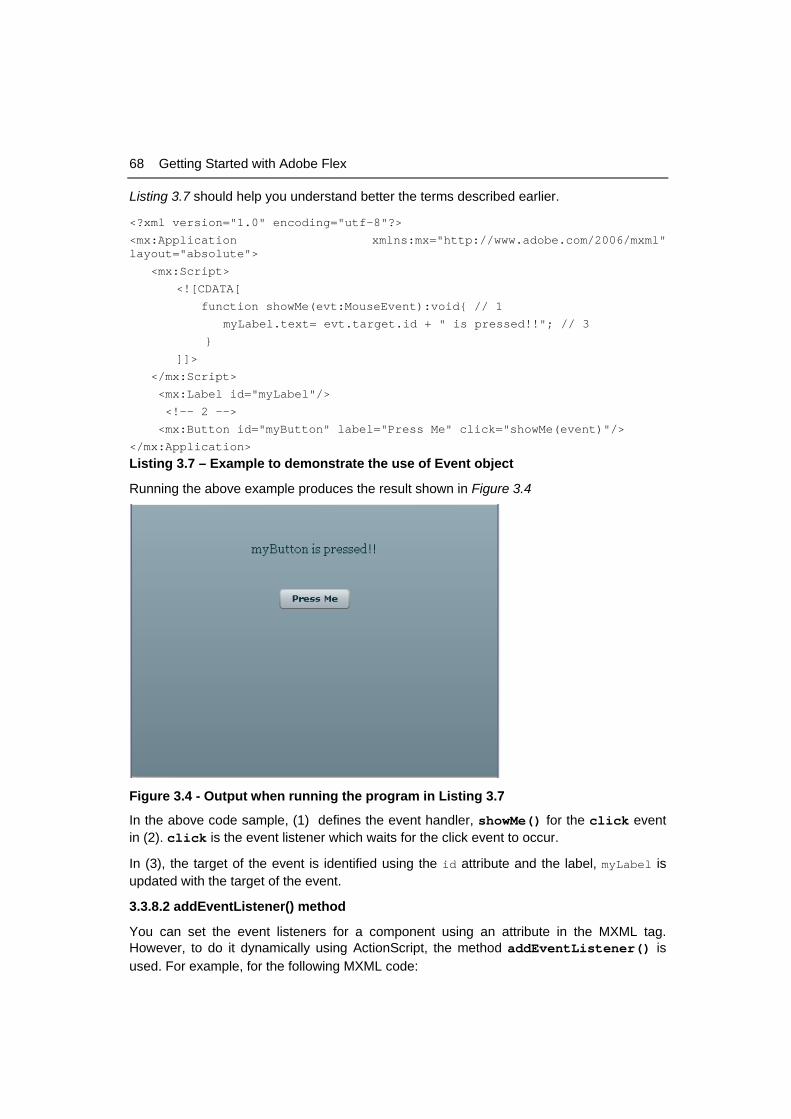
68 Getting Started with Adobe Flex
Listing 3.7 should help you understand better the terms described earlier.
<?xml version="1.0" encoding="utf-8"?>
<mx:Application xmlns:mx="http://www.adobe.com/2006/mxml" layout="absolute">
<mx:Script>
<![CDATA[
function showMe(evt:MouseEvent):void{ // 1
myLabel.text= evt.target.id + " is pressed!!"; // 3
}
]]>
</mx:Script>
<mx:Label id="myLabel"/>
<!-- 2 -->
<mx:Button id="myButton" label="Press Me" click="showMe(event)"/>
</mx:Application>
Listing 3.7 – Example to demonstrate the use of Event object
Running the above example produces the result shown in Figure 3.4
Figure 3.4 - Output when running the program in Listing 3.7
In the above code sample, (1) defines the event handler, showMe() for the click event in (2). click is the event listener which waits for the click event to occur.
In (3), the target of the event is identified using the id attribute and the label, myLabel is updated with the target of the event.
3.3.8.2 addEventListener() method
You can set the event listeners for a component using an attribute in the MXML tag. However, to do it dynamically using ActionScript, the method addEventListener() is used. For example, for the following MXML code:
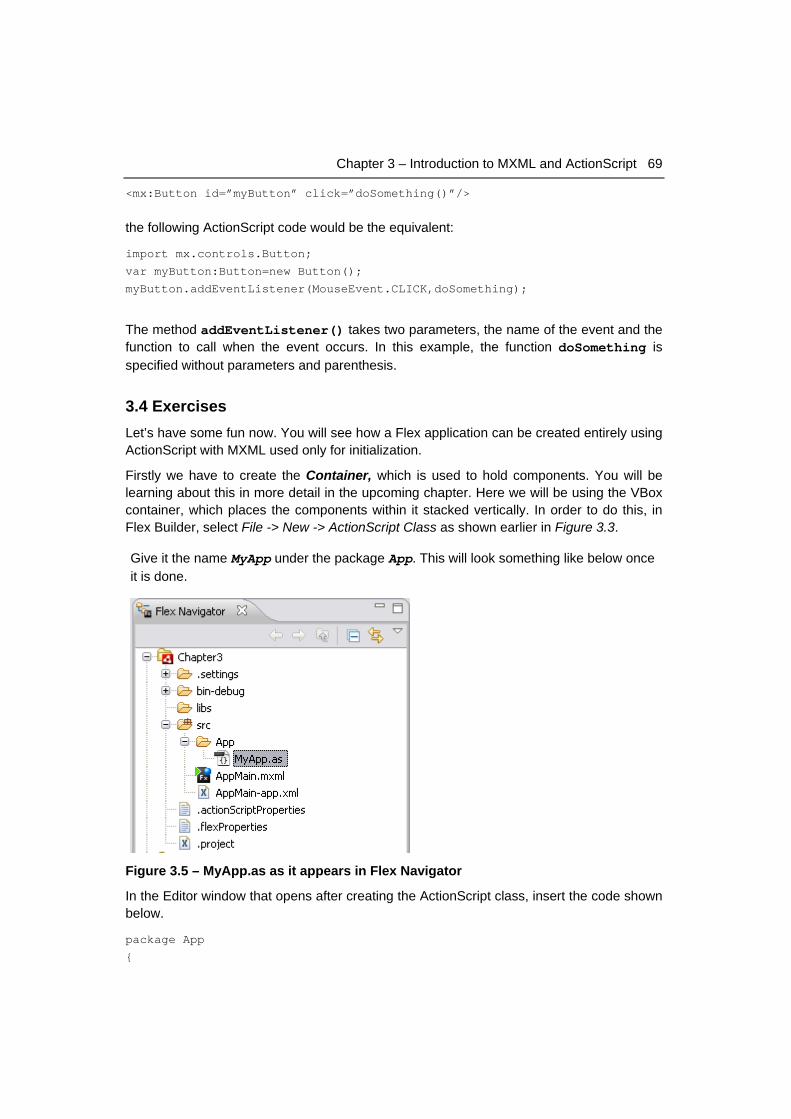
Chapter 3 – Introduction to MXML and ActionScript 69
<mx:Button id=”myButton” click=”doSomething()”/>
the following ActionScript code would be the equivalent:
import mx.controls.Button;
var myButton:Button=new Button();
myButton.addEventListener(MouseEvent.CLICK,doSomething);
The method addEventListener() takes two parameters, the name of the event and the function to call when the event occurs. In this example, the function doSomething is specified without parameters and parenthesis.
3.4 Exercises Let’s have some fun now. You will see how a Flex application can be created entirely using ActionScript with MXML used only for initialization.
Firstly we have to create the Container, which is used to hold components. You will be learning about this in more detail in the upcoming chapter. Here we will be using the VBox container, which places the components within it stacked vertically. In order to do this, in Flex Builder, select File -> New -> ActionScript Class as shown earlier in Figure 3.3.
Give it the name MyApp under the package App. This will look something like below once it is done.
Figure 3.5 – MyApp.as as it appears in Flex Navigator
In the Editor window that opens after creating the ActionScript class, insert the code shown below.
package App
{
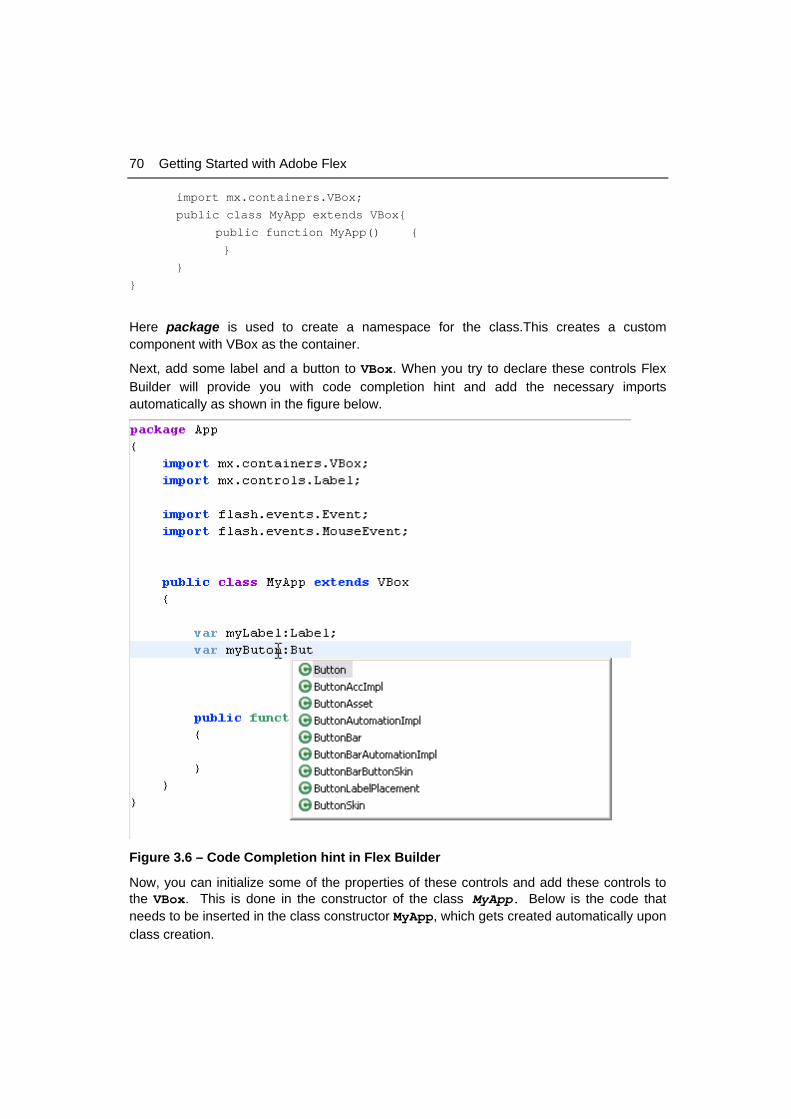
70 Getting Started with Adobe Flex
import mx.containers.VBox;
public class MyApp extends VBox{
public function MyApp() {
}
}
}
Here package is used to create a namespace for the class.This creates a custom component with VBox as the container.
Next, add some label and a button to VBox. When you try to declare these controls Flex Builder will provide you with code completion hint and add the necessary imports automatically as shown in the figure below.
Figure 3.6 – Code Completion hint in Flex Builder
Now, you can initialize some of the properties of these controls and add these controls to the VBox. This is done in the constructor of the class MyApp. Below is the code that needs to be inserted in the class constructor MyApp, which gets created automatically upon class creation.
Chapter 3 – Introduction to MXML and ActionScript 71
super();
myLabel=new Label();
addChild(myLabel);
myButton = new Button();
myButton.label="Hello";
addChild(myButton);
You can also add an event listener for mouse click to the button which will cause the label to be updated.
Add the next line of code to the constructor and create a new method to handle the event, with the name sayHello().
myButton.addEventListener(MouseEvent.CLICK,sayHello);
private function sayHello(evt:Event):void{
myLabel.text=" Hello from the Flex World!";
}
Now your ActionScript class is ready. Next create an MXML file and initialize the class just created above, with the following code:
<?xml version="1.0" encoding="utf-8"?>
<mx:WindowedApplication xmlns:mx="http://www.adobe.com/2006/mxml" layout="absolute" initialize="initApp()">
<mx:Script>
<![CDATA[
import App.MyApp;
var myApp:MyApp;
public function initApp():void{
myApp=new MyApp();
addChild(myApp);
}
]]>
</mx:Script>
</mx:WindowedApplication>
The initialize event is dispatched when a component has finished its construction and its initialization properties have been set. At this point, all of the component's immediate children have been created, but they have not been laid out.
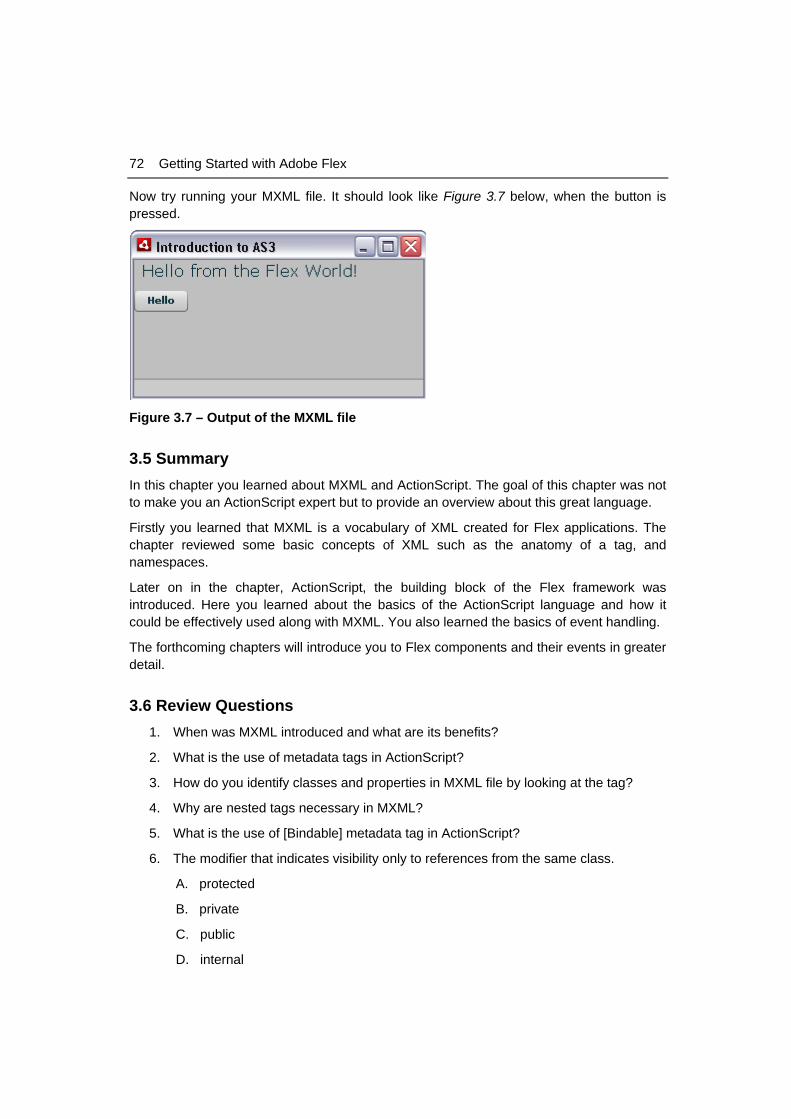
72 Getting Started with Adobe Flex
Now try running your MXML file. It should look like Figure 3.7 below, when the button is pressed.
Figure 3.7 – Output of the MXML file
3.5 Summary In this chapter you learned about MXML and ActionScript. The goal of this chapter was not to make you an ActionScript expert but to provide an overview about this great language.
Firstly you learned that MXML is a vocabulary of XML created for Flex applications. The chapter reviewed some basic concepts of XML such as the anatomy of a tag, and namespaces.
Later on in the chapter, ActionScript, the building block of the Flex framework was introduced. Here you learned about the basics of the ActionScript language and how it could be effectively used along with MXML. You also learned the basics of event handling.
The forthcoming chapters will introduce you to Flex components and their events in greater detail.
3.6 Review Questions 1. When was MXML introduced and what are its benefits?
2. What is the use of metadata tags in ActionScript?
3. How do you identify classes and properties in MXML file by looking at the tag?
4. Why are nested tags necessary in MXML?
5. What is the use of [Bindable] metadata tag in ActionScript?
6. The modifier that indicates visibility only to references from the same class.
A. protected
B. private
C. public
D. internal
Chapter 3 – Introduction to MXML and ActionScript 73
E. static
7. The different ways of adding ActionScript to an MXML file include
A. Inline ActionScript
B. Using <mx:Script> tag
C. Importing an ActionScript file using <mx:Script source=”<file_name>”>
D. Using the include directive within <mx:Script> tag
E. All the above
8. The properties of event object include
A. target
B. type
C. name
D. B & C
E. A & B
9. Which of the following is not an ActionScript 3.0 datatype
A. String
B. short
C. int
D. uint
E. Number
10. Which of the following properties do not describe an ActionScript accessor?
A. A cross between a method and a property
B. Also called a getter/setter
C. Make it possible to override properties that are inherited from a super class
D. All of the above
E. None of the above

74 Getting Started with Adobe Flex
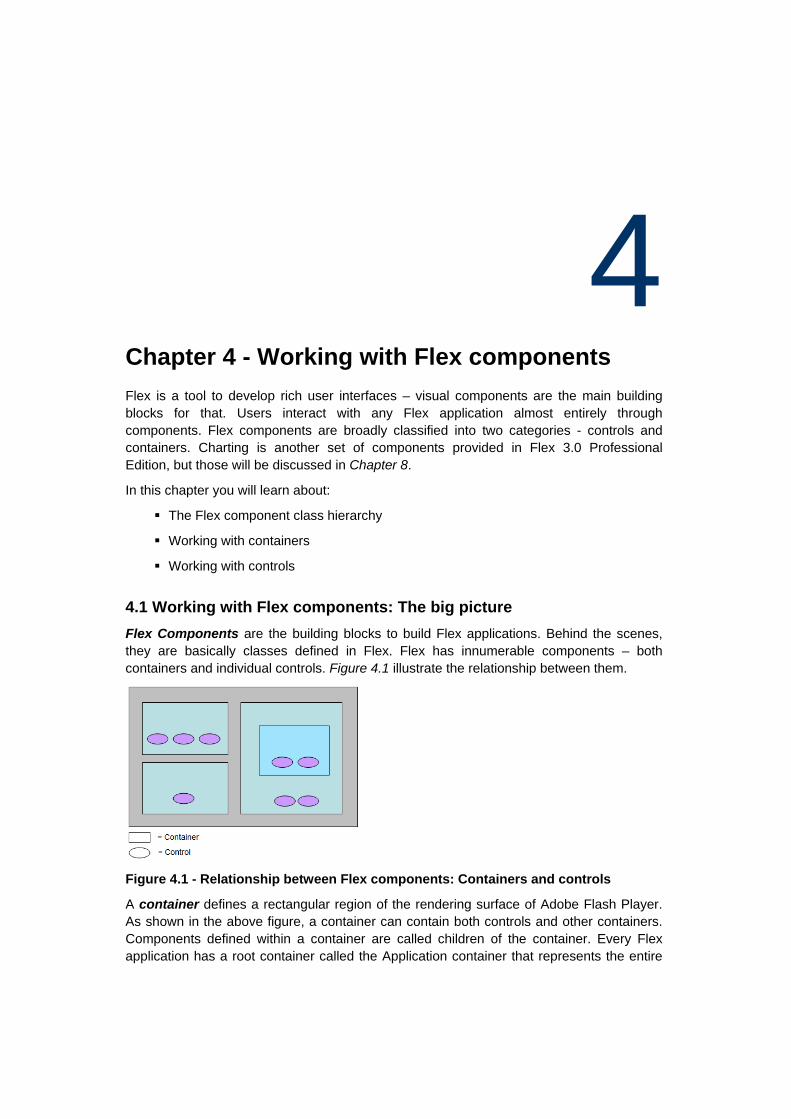
4 Chapter 4 - Working with Flex components Flex is a tool to develop rich user interfaces – visual components are the main building blocks for that. Users interact with any Flex application almost entirely through components. Flex components are broadly classified into two categories - controls and containers. Charting is another set of components provided in Flex 3.0 Professional Edition, but those will be discussed in Chapter 8.
In this chapter you will learn about:
The Flex component class hierarchy
Working with containers
Working with controls
4.1 Working with Flex components: The big picture Flex Components are the building blocks to build Flex applications. Behind the scenes, they are basically classes defined in Flex. Flex has innumerable components – both containers and individual controls. Figure 4.1 illustrate the relationship between them.
Figure 4.1 - Relationship between Flex components: Containers and controls
A container defines a rectangular region of the rendering surface of Adobe Flash Player. As shown in the above figure, a container can contain both controls and other containers. Components defined within a container are called children of the container. Every Flex application has a root container called the Application container that represents the entire
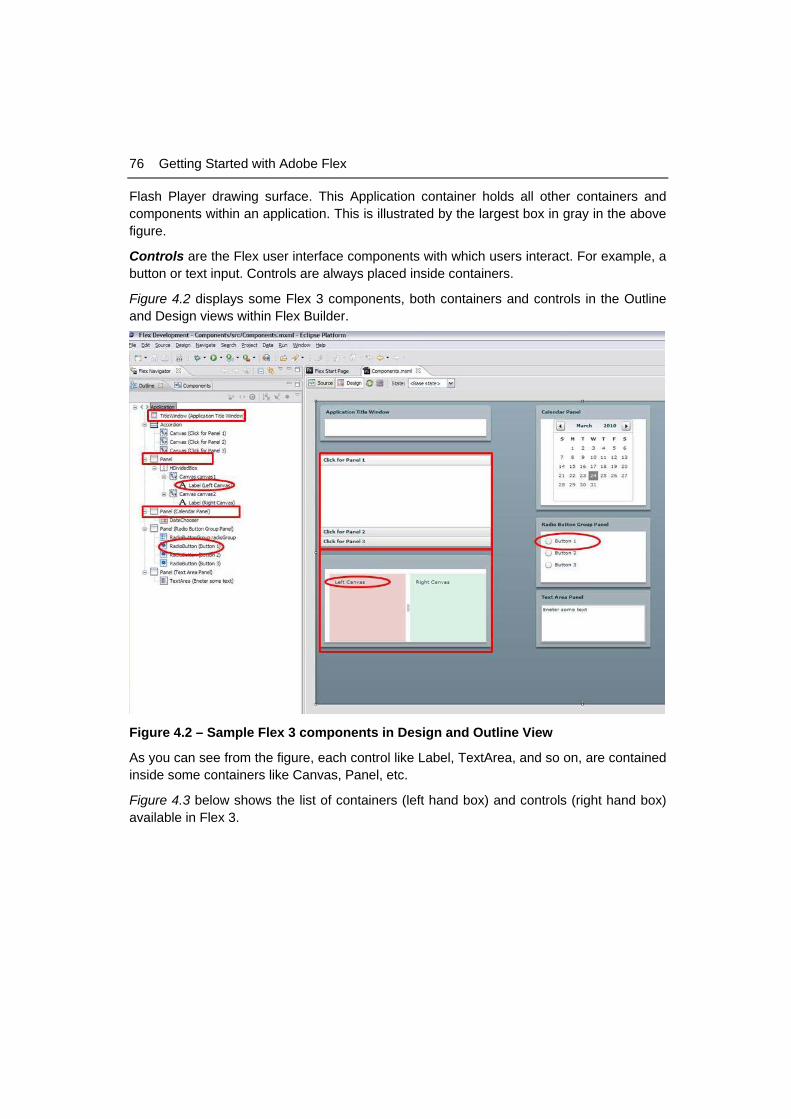
76 Getting Started with Adobe Flex
Flash Player drawing surface. This Application container holds all other containers and components within an application. This is illustrated by the largest box in gray in the above figure.
Controls are the Flex user interface components with which users interact. For example, a button or text input. Controls are always placed inside containers.
Figure 4.2 displays some Flex 3 components, both containers and controls in the Outline and Design views within Flex Builder.
Figure 4.2 – Sample Flex 3 components in Design and Outline View
As you can see from the figure, each control like Label, TextArea, and so on, are contained inside some containers like Canvas, Panel, etc.
Figure 4.3 below shows the list of containers (left hand box) and controls (right hand box) available in Flex 3.

Chapter 4 – Working with Flex components 77
Figure 4.3 – List of containers (left box) and controls (right box) in Flex 3
From the above picture you can imagine that Flex provide developers all the components to develop rich and serious applications. In case you find that default functionality is not enough for you, you can always create your custom components by extending the existing ones through ActionScript.
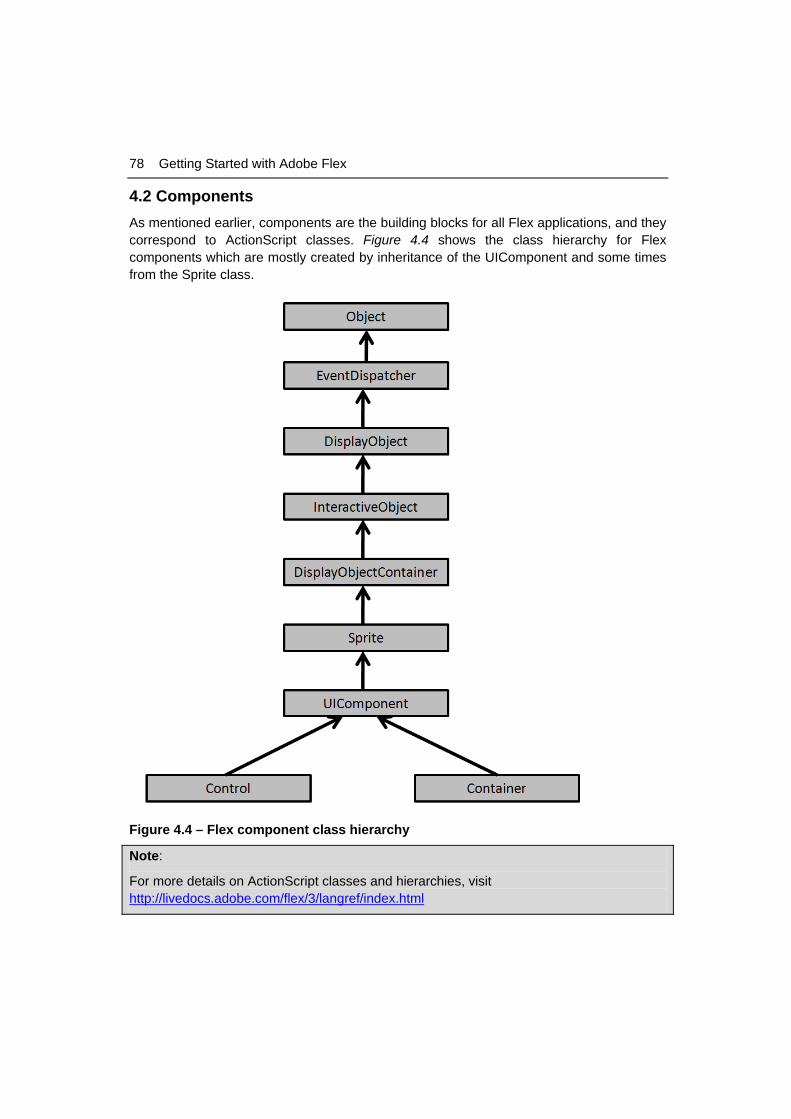
78 Getting Started with Adobe Flex
4.2 Components As mentioned earlier, components are the building blocks for all Flex applications, and they correspond to ActionScript classes. Figure 4.4 shows the class hierarchy for Flex components which are mostly created by inheritance of the UIComponent and some times from the Sprite class.
Figure 4.4 – Flex component class hierarchy
Note:
For more details on ActionScript classes and hierarchies, visit http://livedocs.adobe.com/flex/3/langref/index.html
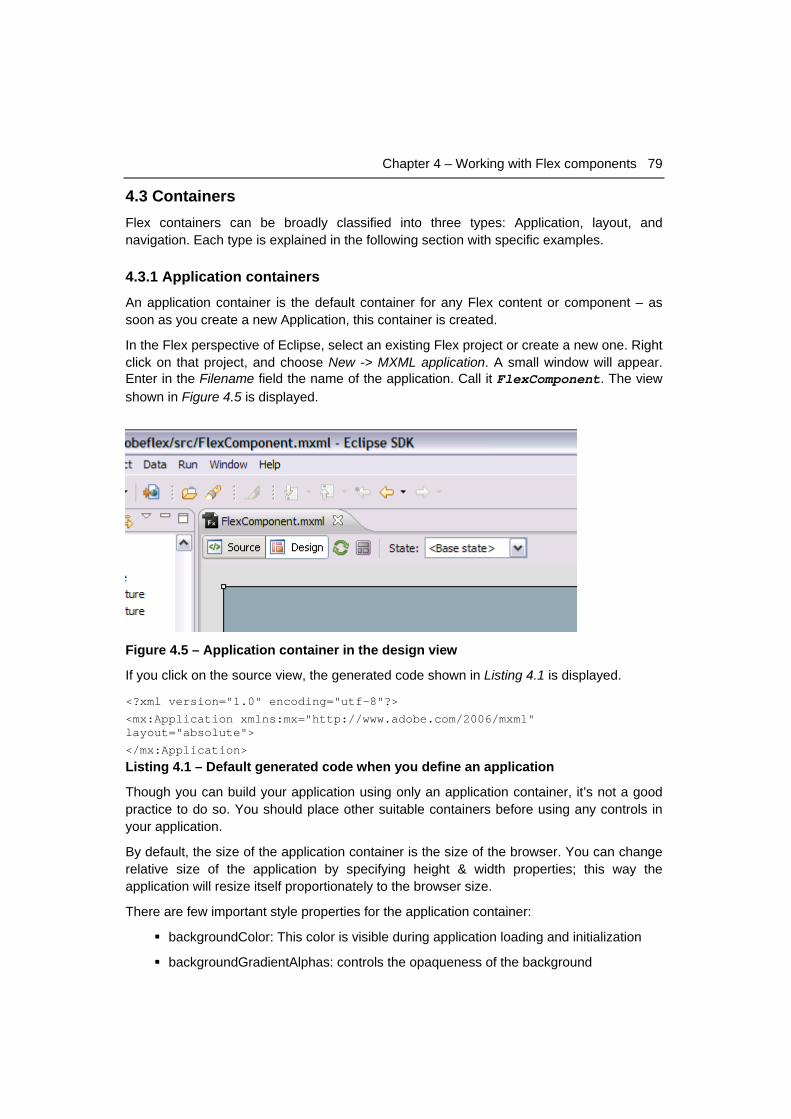
Chapter 4 – Working with Flex components 79
4.3 Containers Flex containers can be broadly classified into three types: Application, layout, and navigation. Each type is explained in the following section with specific examples.
4.3.1 Application containers
An application container is the default container for any Flex content or component – as soon as you create a new Application, this container is created.
In the Flex perspective of Eclipse, select an existing Flex project or create a new one. Right click on that project, and choose New -> MXML application. A small window will appear. Enter in the Filename field the name of the application. Call it FlexComponent. The view shown in Figure 4.5 is displayed.
Figure 4.5 – Application container in the design view
If you click on the source view, the generated code shown in Listing 4.1 is displayed.
<?xml version="1.0" encoding="utf-8"?>
<mx:Application xmlns:mx="http://www.adobe.com/2006/mxml" layout="absolute">
</mx:Application>
Listing 4.1 – Default generated code when you define an application
Though you can build your application using only an application container, it’s not a good practice to do so. You should place other suitable containers before using any controls in your application.
By default, the size of the application container is the size of the browser. You can change relative size of the application by specifying height & width properties; this way the application will resize itself proportionately to the browser size.
There are few important style properties for the application container:
backgroundColor: This color is visible during application loading and initialization
backgroundGradientAlphas: controls the opaqueness of the background
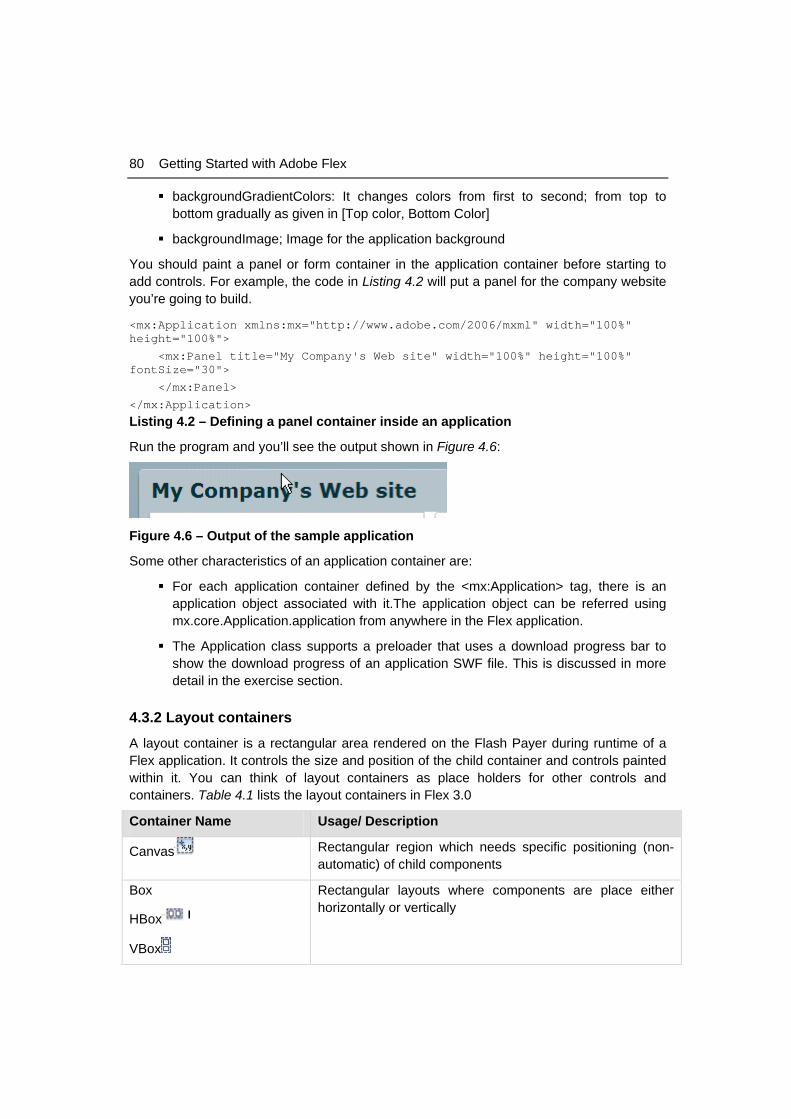
80 Getting Started with Adobe Flex
backgroundGradientColors: It changes colors from first to second; from top to bottom gradually as given in [Top color, Bottom Color]
backgroundImage; Image for the application background
You should paint a panel or form container in the application container before starting to add controls. For example, the code in Listing 4.2 will put a panel for the company website you’re going to build.
<mx:Application xmlns:mx="http://www.adobe.com/2006/mxml" width="100%" height="100%">
<mx:Panel title="My Company's Web site" width="100%" height="100%" fontSize="30">
</mx:Panel>
</mx:Application>
Listing 4.2 – Defining a panel container inside an application
Run the program and you’ll see the output shown in Figure 4.6:
Figure 4.6 – Output of the sample application
Some other characteristics of an application container are:
For each application container defined by the <mx:Application> tag, there is an application object associated with it.The application object can be referred using mx.core.Application.application from anywhere in the Flex application.
The Application class supports a preloader that uses a download progress bar to show the download progress of an application SWF file. This is discussed in more detail in the exercise section.
4.3.2 Layout containers
A layout container is a rectangular area rendered on the Flash Payer during runtime of a Flex application. It controls the size and position of the child container and controls painted within it. You can think of layout containers as place holders for other controls and containers. Table 4.1 lists the layout containers in Flex 3.0
Container Name Usage/ Description
Canvas Rectangular region which needs specific positioning (non-automatic) of child components
Box
HBox
VBox
Rectangular layouts where components are place either horizontally or vertically
Chapter 4 – Working with Flex components 81
ControlBar Container used in Panel or TitleWindow which holds components shared with other children in parent component
ApplicationControlBar Container holds components which provides access to application navigation controls
DividedBox
HDividedBox
VDividedBox
These containers lays out its children components horizontally or vertically and inserts a divider between each child components
Form
FormHeading
FormItem
Form is the most commonly used container which allows validation, data binding and usage of style sheets. FormHeading is an optional heading group of FormItem Components. FormItem is a specific form element with a single label and one or more child components
Grid Grid layout container arranges its child components as rows and columns – similar to an HTML table
Panel Panel layout container consists of title bar, title, a border, content area and a status area
Tile Tile layout container which lays out child components in horizontal or vertical alignments. All containing cells are of same size.
TitleWindow TitleWindow layout container optimized for usage as pop-up window
Table 4.1 – Layout containers in Flex
Note:
In the above and following tables, there are some containers that do not have an icon associated to it. For example, Box]. – Usually they are by default takes the replaced by one if the sub-classes [e.g. HBox in this case]. In some cases, few controls can only be rendered by ActionScript – no MXML equivalent-like Menu. In summary, you can’t drag and drop those controls – you can create them using ActionScript only.
4.3.3 Navigation containers
Navigation containers hold other containers so that you can navigate among its children. Table 2.2 contains the list of Navigation containers in Flex 3.
Container Name Usage/ Description
ViewStack This container is made of a collection of child containers which are stacked on top of each other. Only one child can be visible or active at a time.
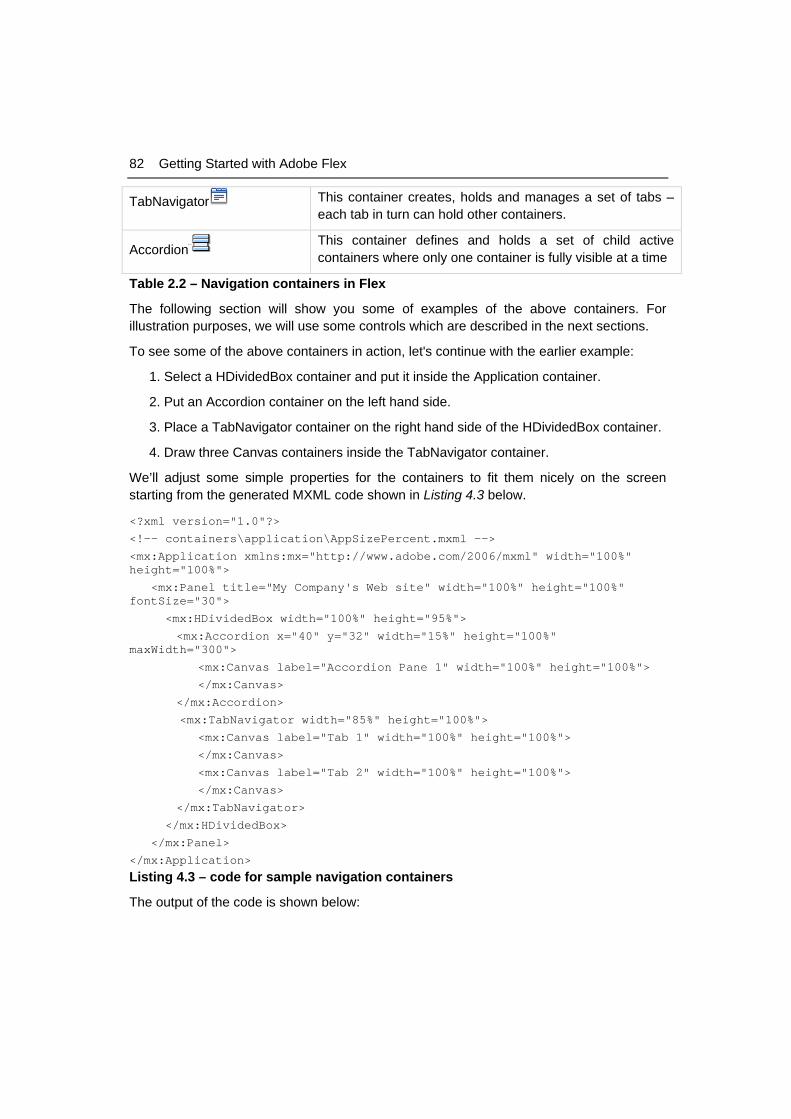
82 Getting Started with Adobe Flex
TabNavigator This container creates, holds and manages a set of tabs – each tab in turn can hold other containers.
Accordion This container defines and holds a set of child active containers where only one container is fully visible at a time
Table 2.2 – Navigation containers in Flex
The following section will show you some of examples of the above containers. For illustration purposes, we will use some controls which are described in the next sections.
To see some of the above containers in action, let's continue with the earlier example:
1. Select a HDividedBox container and put it inside the Application container.
2. Put an Accordion container on the left hand side.
3. Place a TabNavigator container on the right hand side of the HDividedBox container.
4. Draw three Canvas containers inside the TabNavigator container.
We’ll adjust some simple properties for the containers to fit them nicely on the screen starting from the generated MXML code shown in Listing 4.3 below.
<?xml version="1.0"?>
<!-- containers\application\AppSizePercent.mxml -->
<mx:Application xmlns:mx="http://www.adobe.com/2006/mxml" width="100%" height="100%">
<mx:Panel title="My Company's Web site" width="100%" height="100%" fontSize="30">
<mx:HDividedBox width="100%" height="95%">
<mx:Accordion x="40" y="32" width="15%" height="100%" maxWidth="300">
<mx:Canvas label="Accordion Pane 1" width="100%" height="100%">
</mx:Canvas>
</mx:Accordion>
<mx:TabNavigator width="85%" height="100%">
<mx:Canvas label="Tab 1" width="100%" height="100%">
</mx:Canvas>
<mx:Canvas label="Tab 2" width="100%" height="100%">
</mx:Canvas>
</mx:TabNavigator>
</mx:HDividedBox>
</mx:Panel>
</mx:Application>
Listing 4.3 – code for sample navigation containers
The output of the code is shown below:
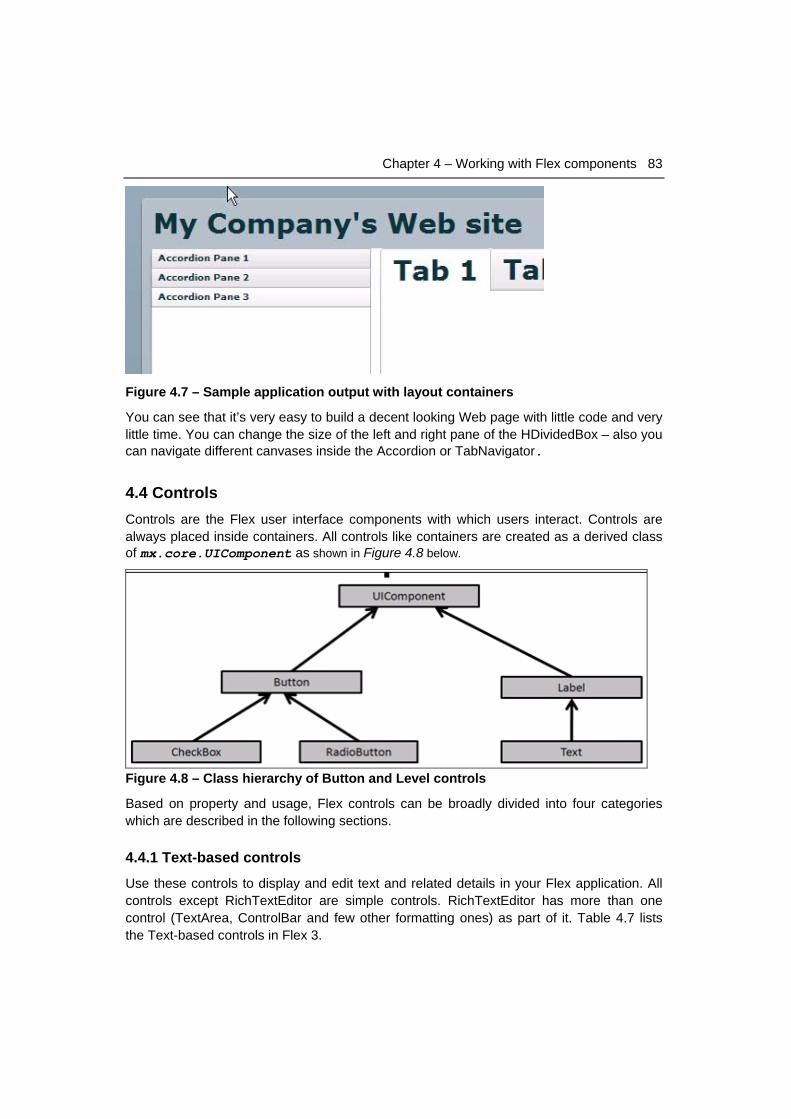
Chapter 4 – Working with Flex components 83
Figure 4.7 – Sample application output with layout containers
You can see that it’s very easy to build a decent looking Web page with little code and very little time. You can change the size of the left and right pane of the HDividedBox – also you can navigate different canvases inside the Accordion or TabNavigator.
4.4 Controls Controls are the Flex user interface components with which users interact. Controls are always placed inside containers. All controls like containers are created as a derived class of mx.core.UIComponent as shown in Figure 4.8 below.
Figure 4.8 – Class hierarchy of Button and Level controls
Based on property and usage, Flex controls can be broadly divided into four categories which are described in the following sections.
4.4.1 Text-based controls
Use these controls to display and edit text and related details in your Flex application. All controls except RichTextEditor are simple controls. RichTextEditor has more than one control (TextArea, ControlBar and few other formatting ones) as part of it. Table 4.7 lists the Text-based controls in Flex 3.
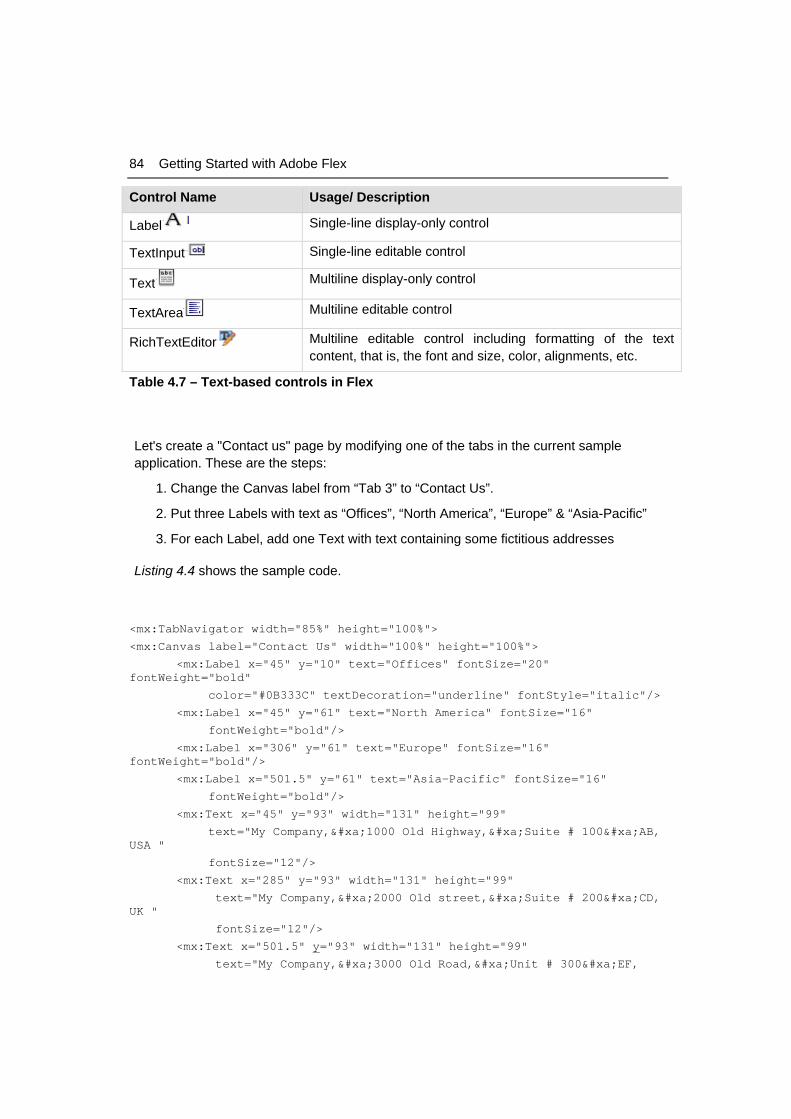
84 Getting Started with Adobe Flex
Control Name Usage/ Description
Label Single-line display-only control
TextInput Single-line editable control
Text Multiline display-only control
TextArea Multiline editable control
RichTextEditor Multiline editable control including formatting of the text content, that is, the font and size, color, alignments, etc.
Table 4.7 – Text-based controls in Flex
Let's create a "Contact us" page by modifying one of the tabs in the current sample application. These are the steps:
1. Change the Canvas label from “Tab 3” to “Contact Us”.
2. Put three Labels with text as “Offices”, “North America”, “Europe” & “Asia-Pacific”
3. For each Label, add one Text with text containing some fictitious addresses
Listing 4.4 shows the sample code.
<mx:TabNavigator width="85%" height="100%">
<mx:Canvas label="Contact Us" width="100%" height="100%">
<mx:Label x="45" y="10" text="Offices" fontSize="20" fontWeight="bold"
color="#0B333C" textDecoration="underline" fontStyle="italic"/>
<mx:Label x="45" y="61" text="North America" fontSize="16"
fontWeight="bold"/>
<mx:Label x="306" y="61" text="Europe" fontSize="16" fontWeight="bold"/>
<mx:Label x="501.5" y="61" text="Asia-Pacific" fontSize="16"
fontWeight="bold"/>
<mx:Text x="45" y="93" width="131" height="99"
text="My Company,
1000 Old Highway,
Suite # 100
AB, USA "
fontSize="12"/>
<mx:Text x="285" y="93" width="131" height="99"
text="My Company,
2000 Old street,
Suite # 200
CD, UK "
fontSize="12"/>
<mx:Text x="501.5" y="93" width="131" height="99"
text="My Company,
3000 Old Road,
Unit # 300
EF,
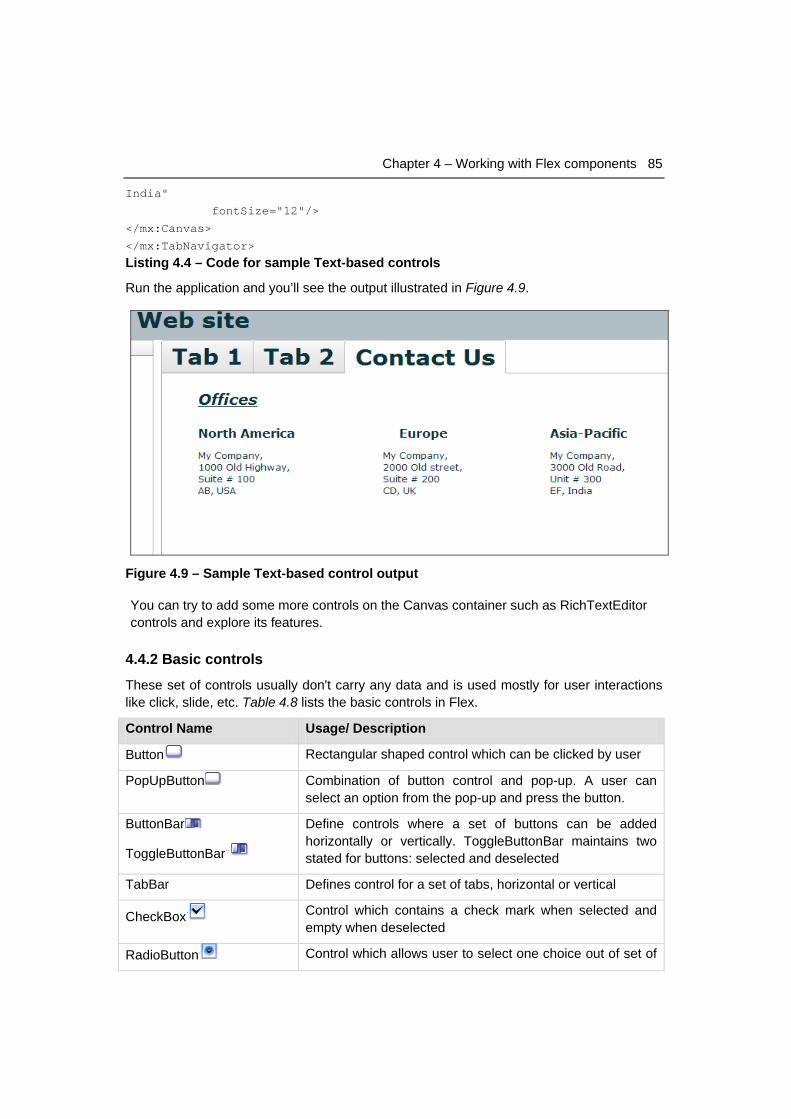
Chapter 4 – Working with Flex components 85
India"
fontSize="12"/>
</mx:Canvas>
</mx:TabNavigator>
Listing 4.4 – Code for sample Text-based controls
Run the application and you’ll see the output illustrated in Figure 4.9.
Figure 4.9 – Sample Text-based control output
You can try to add some more controls on the Canvas container such as RichTextEditor controls and explore its features.
4.4.2 Basic controls
These set of controls usually don't carry any data and is used mostly for user interactions like click, slide, etc. Table 4.8 lists the basic controls in Flex.
Control Name Usage/ Description
Button Rectangular shaped control which can be clicked by user
PopUpButton Combination of button control and pop-up. A user can select an option from the pop-up and press the button.
ButtonBar
ToggleButtonBar
Define controls where a set of buttons can be added horizontally or vertically. ToggleButtonBar maintains two stated for buttons: selected and deselected
TabBar Defines control for a set of tabs, horizontal or vertical
CheckBox Control which contains a check mark when selected and empty when deselected
RadioButton Control which allows user to select one choice out of set of
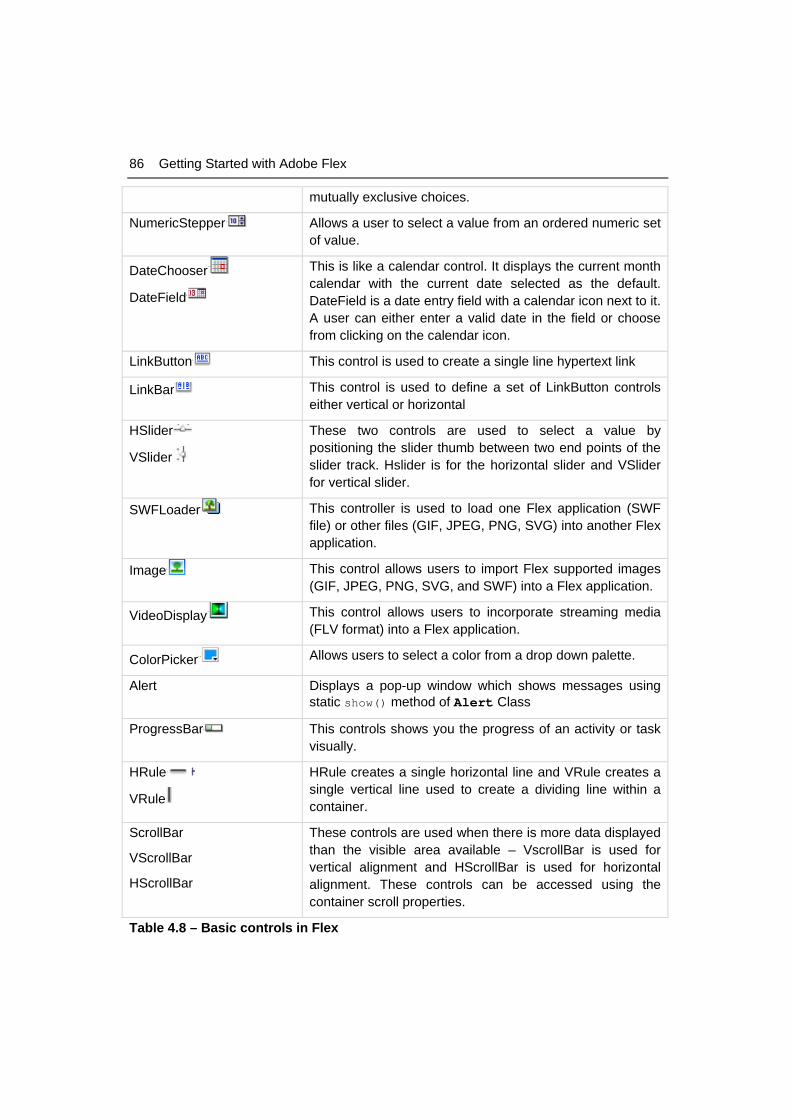
86 Getting Started with Adobe Flex
mutually exclusive choices.
NumericStepper Allows a user to select a value from an ordered numeric set of value.
DateChooser
DateField
This is like a calendar control. It displays the current month calendar with the current date selected as the default. DateField is a date entry field with a calendar icon next to it. A user can either enter a valid date in the field or choose from clicking on the calendar icon.
LinkButton This control is used to create a single line hypertext link
LinkBar This control is used to define a set of LinkButton controls either vertical or horizontal
HSlider
VSlider
These two controls are used to select a value by positioning the slider thumb between two end points of the slider track. Hslider is for the horizontal slider and VSlider for vertical slider.
SWFLoader This controller is used to load one Flex application (SWF file) or other files (GIF, JPEG, PNG, SVG) into another Flex application.
Image This control allows users to import Flex supported images (GIF, JPEG, PNG, SVG, and SWF) into a Flex application.
VideoDisplay This control allows users to incorporate streaming media (FLV format) into a Flex application.
ColorPicker Allows users to select a color from a drop down palette.
Alert Displays a pop-up window which shows messages using static show() method of Alert Class
ProgressBar This controls shows you the progress of an activity or task visually.
HRule
VRule
HRule creates a single horizontal line and VRule creates a single vertical line used to create a dividing line within a container.
ScrollBar
VScrollBar
HScrollBar
These controls are used when there is more data displayed than the visible area available – VscrollBar is used for vertical alignment and HScrollBar is used for horizontal alignment. These controls can be accessed using the container scroll properties.
Table 4.8 – Basic controls in Flex
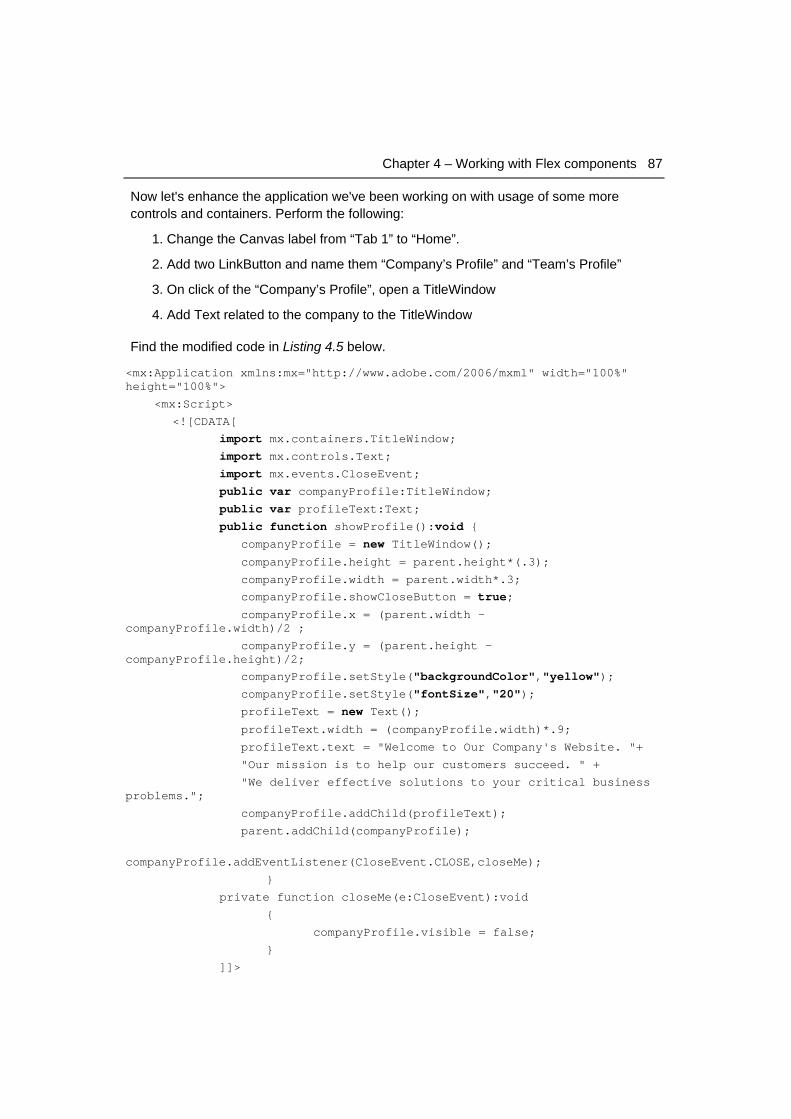
Chapter 4 – Working with Flex components 87
Now let's enhance the application we've been working on with usage of some more controls and containers. Perform the following:
1. Change the Canvas label from “Tab 1” to “Home”.
2. Add two LinkButton and name them “Company’s Profile” and “Team’s Profile”
3. On click of the “Company’s Profile”, open a TitleWindow
4. Add Text related to the company to the TitleWindow
Find the modified code in Listing 4.5 below.
<mx:Application xmlns:mx="http://www.adobe.com/2006/mxml" width="100%" height="100%">
<mx:Script>
<![CDATA[
import mx.containers.TitleWindow;
import mx.controls.Text; import mx.events.CloseEvent; public var companyProfile:TitleWindow; public var profileText:Text;
public function showProfile():void { companyProfile = new TitleWindow();
companyProfile.height = parent.height*(.3);
companyProfile.width = parent.width*.3;
companyProfile.showCloseButton = true;
companyProfile.x = (parent.width - companyProfile.width)/2 ;
companyProfile.y = (parent.height - companyProfile.height)/2;
companyProfile.setStyle("backgroundColor","yellow"); companyProfile.setStyle("fontSize","20"); profileText = new Text();
profileText.width = (companyProfile.width)*.9;
profileText.text = "Welcome to Our Company's Website. "+
"Our mission is to help our customers succeed. " +
"We deliver effective solutions to your critical business problems.";
companyProfile.addChild(profileText);
parent.addChild(companyProfile);
companyProfile.addEventListener(CloseEvent.CLOSE,closeMe);
}
private function closeMe(e:CloseEvent):void
{
companyProfile.visible = false;
}
]]>

88 Getting Started with Adobe Flex
</mx:Script>
..
..
<mx:Canvas label="Home" width="100%" height="100%">
<mx:LinkButton x="10" y="40" label="Company's Profile" textDecoration="underline" color="#636EB1" fontStyle="italic" click="showProfile()"/>
<mx:LinkButton x="10" y="146" label="Team's Profile" textDecoration="underline" color="#636EB1" fontStyle="italic"/>
</mx:Canvas>
Listing 4.5 – Code for sample with basic controls
There are 2 parts in above code listing. The top part has 2 functions,
showProfile() creates TitleWindow and shows the company related text.
closeMe() closes the TitleWindow.
The bottom part creates 2 LinkButton. On click of the first LinkButton, showProfile is invoked. When you run the program, you see the 2 Link buttons on the first tab as shown in Figure 4.10.
Figure 4.10 – Output of the sample Basic controls
On clicking the "Company's Profile", a title Window opens as shown in Figure 4.11 below.
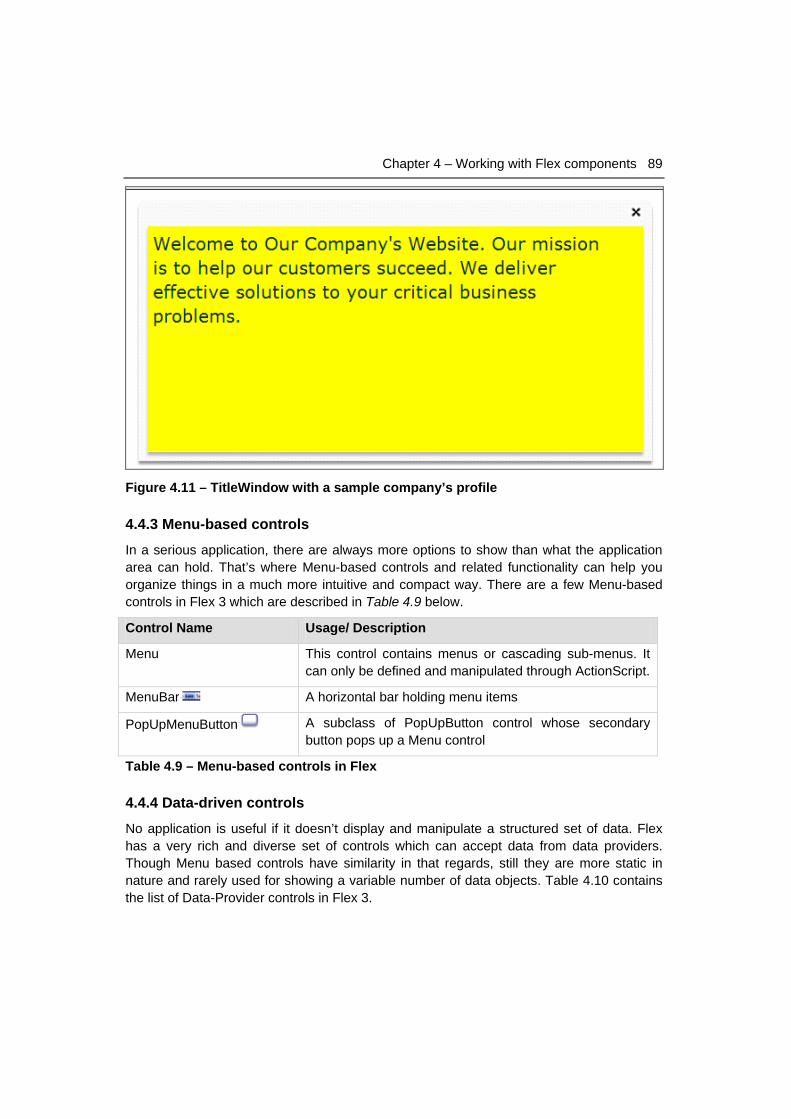
Chapter 4 – Working with Flex components 89
Figure 4.11 – TitleWindow with a sample company’s profile
4.4.3 Menu-based controls
In a serious application, there are always more options to show than what the application area can hold. That’s where Menu-based controls and related functionality can help you organize things in a much more intuitive and compact way. There are a few Menu-based controls in Flex 3 which are described in Table 4.9 below.
Control Name Usage/ Description
Menu This control contains menus or cascading sub-menus. It can only be defined and manipulated through ActionScript.
MenuBar A horizontal bar holding menu items
PopUpMenuButton A subclass of PopUpButton control whose secondary button pops up a Menu control
Table 4.9 – Menu-based controls in Flex
4.4.4 Data-driven controls
No application is useful if it doesn’t display and manipulate a structured set of data. Flex has a very rich and diverse set of controls which can accept data from data providers. Though Menu based controls have similarity in that regards, still they are more static in nature and rarely used for showing a variable number of data objects. Table 4.10 contains the list of Data-Provider controls in Flex 3.
90 Getting Started with Adobe Flex
Control Name Usage/ Description
List A control which contains menus or cascading sub-menus.
HorizontalList A horizontal bar holding menu items.
TileList A subclass of PopUpButton control whose secondary button pops up a Menu control.
ComboBox A drop down list of values from which a single value can be selected.
DataGrid Equivalent to tables having multiple rows and columns. This is one of the mostly used data-driven controls.
Tree This control helps to handle data in a hierarchical way. Each node can have it’s own sub-tree.
Table 4.10 – Data-driven controls in Flex
In the next section, you will be shown some example of usage of both Menu-based and Data-Provider controls.
4.5 Exercises We’ll enhance the same application we've been working on in this chapter by putting more functionality in the middle tab. First we’ll create a MenuBar control for different categories of products being offered by the company. Next we’ll show details of category using a TileList control.
Follow these steps:
1. Rename “Tab 2” as “Products”
2. Define an XMLListCollection and create an XMLList to contain the data for the MenuBar. Initialize the menuBarCollection with menubarXML. The required code is shown below in Listing 4.6.
[Bindable]
public var menuBarCollection:XMLListCollection;
[Bindable]
private var menubarXML:XMLList =<>
<menuitem label="Vehicle">
<menuitem label="Sedan" data="Sedan"/>
<menuitem label="Truck" data="Truck"/>
<menuitem label="Van" data="Van"/> </menuitem>
<menuitem label="Appliances">
<menuitem label="TV" data="TV"/>
<menuitem label="Freeze" data="Freeze"/>
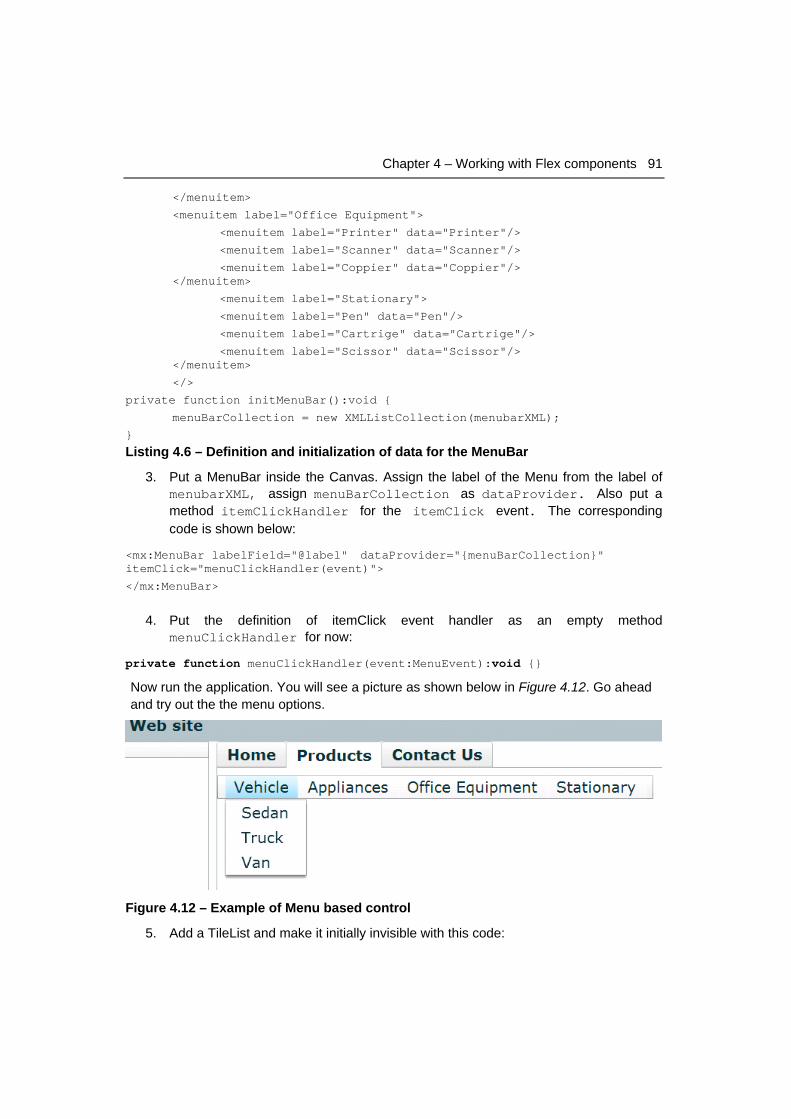
Chapter 4 – Working with Flex components 91
</menuitem>
<menuitem label="Office Equipment">
<menuitem label="Printer" data="Printer"/>
<menuitem label="Scanner" data="Scanner"/>
<menuitem label="Coppier" data="Coppier"/> </menuitem>
<menuitem label="Stationary">
<menuitem label="Pen" data="Pen"/>
<menuitem label="Cartrige" data="Cartrige"/>
<menuitem label="Scissor" data="Scissor"/> </menuitem>
</>
private function initMenuBar():void {
menuBarCollection = new XMLListCollection(menubarXML);
}
Listing 4.6 – Definition and initialization of data for the MenuBar
3. Put a MenuBar inside the Canvas. Assign the label of the Menu from the label of menubarXML, assign menuBarCollection as dataProvider. Also put a method itemClickHandler for the itemClick event. The corresponding code is shown below:
<mx:MenuBar labelField="@label" dataProvider="{menuBarCollection}" itemClick="menuClickHandler(event)">
</mx:MenuBar>
4. Put the definition of itemClick event handler as an empty method menuClickHandler for now:
private function menuClickHandler(event:MenuEvent):void {}
Now run the application. You will see a picture as shown below in Figure 4.12. Go ahead and try out the the menu options.
Figure 4.12 – Example of Menu based control
5. Add a TileList and make it initially invisible with this code:
92 Getting Started with Adobe Flex
<mx:TileList id ="myTileList" x="10" y="47" width="60%" visible="false" height="95%"> </mx:TileList>
6. Add the data along with some pictures for the TileList control. Also bind the tileListArray to ArrayCollection TileListDataProvider. The required code is shown in Listing 4.7.
[Bindable]
public var TileListDataProvider:ArrayCollection;
[Bindable]
[Embed(source="vehicle 1.png")]
public var vehicle1:Class;
[Bindable]
[Embed(source="vehicle 2.png")]
public var vehicle2:Class;
[Bindable]
[Embed(source="vehicle 3.png")]
public var vehicle3:Class;
[Bindable]
[Embed(source="vehicle 4.png")]
public var vehicle4:Class;
[Bindable]
[Embed(source="vehicle 5.png")]
public var vehicle5:Class;
[Bindable]
[Embed(source="vehicle 6.png")]
public var vehicle6:Class;
[Bindable]
[Embed(source="vehicle 7.png")]
public var vehicle7:Class;
[Bindable]
[Embed(source="vehicle 8.png")]
public var vehicle8:Class;
private var tileListArray:Array=[
{label: "Vehicle 1", data: 0, icon: "vehicle1"},{label: "Vehicle 2", data: 1, icon: "vehicle2"},
{label: "Vehicle 3", data: 2, icon: "vehicle3"},{label: "Vehicle 4", data: 3, icon: "vehicle4"},
{label: "Vehicle 5", data: 4, icon: "vehicle5"},{label: "Vehicle 6", data: 5, icon: "vehicle6"},
{label: "Vehicle 7", data: 6, icon: "vehicle7"},{label: "Vehicle 8", data: 7, icon: "vehicle8"},
];
[Bindable]
public var menuBarCollection:XMLListCollection;
Listing 4.7 – Definition and initialization of data for TileList
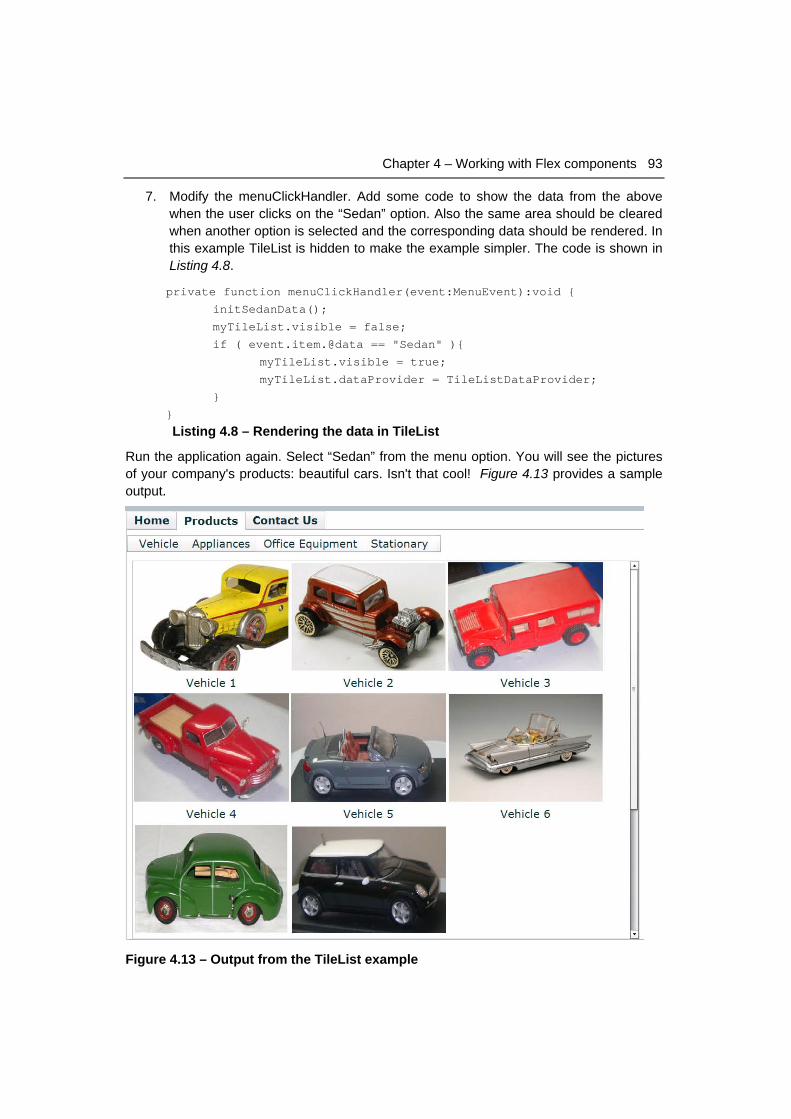
Chapter 4 – Working with Flex components 93
7. Modify the menuClickHandler. Add some code to show the data from the above when the user clicks on the “Sedan” option. Also the same area should be cleared when another option is selected and the corresponding data should be rendered. In this example TileList is hidden to make the example simpler. The code is shown in Listing 4.8.
private function menuClickHandler(event:MenuEvent):void {
initSedanData();
myTileList.visible = false;
if ( event.item.@data == "Sedan" ){
myTileList.visible = true;
myTileList.dataProvider = TileListDataProvider;
}
}
Listing 4.8 – Rendering the data in TileList
Run the application again. Select “Sedan” from the menu option. You will see the pictures of your company's products: beautiful cars. Isn't that cool! Figure 4.13 provides a sample output.
Figure 4.13 – Output from the TileList example
94 Getting Started with Adobe Flex
4.6 Summary In this chapter you learned about the basics of components, the building blocks of a Flex application. First you learned about the class hierarchy of components; next you were introduced to Containers – placeholders for other Containers and Controls. The Application Container is the first component of any Flex application and it has some specific properties and attributes. The chapter then covered the other type of containers: Layout and Navigational.
The last section covered Controls. Controls are the means through which users interact with the application. There are different types of controls such as Text, Basic, Menu-Based and Data-Driven. The chapter showed some examples in detail from each category.
At this point, you should be more comfortable to build and work with Flex. In the next chapters we will work with more complex Flex applications.
4.7 Review questions 1. Name the ActionScript class name(s) which are superclass of most of the Flex
components.
2. By default, size of an Application container is bigger than the contained components – why?
3. Can you place a control outside the visible area of the controller? How?
4. What is the HTML equivalent of the Grid Layout container?
5. What ActionScript method can be used to set the style of a component dynamically?
6. What is the default loading duration during Flex application after which the progress bar appears:
A. 100 millisecond
B. 1000 millisecond
C. 700 millisecond
D. 5 second
E. None of the above
7. Which of the following controls can be rendered using ActionScript only?
A. Label
B. Image
C. Menu
D. All of the above
E. None of the above
Chapter 4 – Working with Flex components 95
8. What is the name of the static method in Alert class used to display data?
A. display()
B. show()
C. init()
D. render()
E. None of the above
9. What are ways data can be provided to Flex control?
A. ArrayCollection object
B. XMLListCollection object
C. Both A & B
D. XMLText object
E. None of the above
10. You want to create a field where a user can choose his current state of residence as part of the address file – which of the following Data-driven controls should you use?
A. DataGrid
B. ComboBox
C. Tree
D. Any of the above
E. None of the above

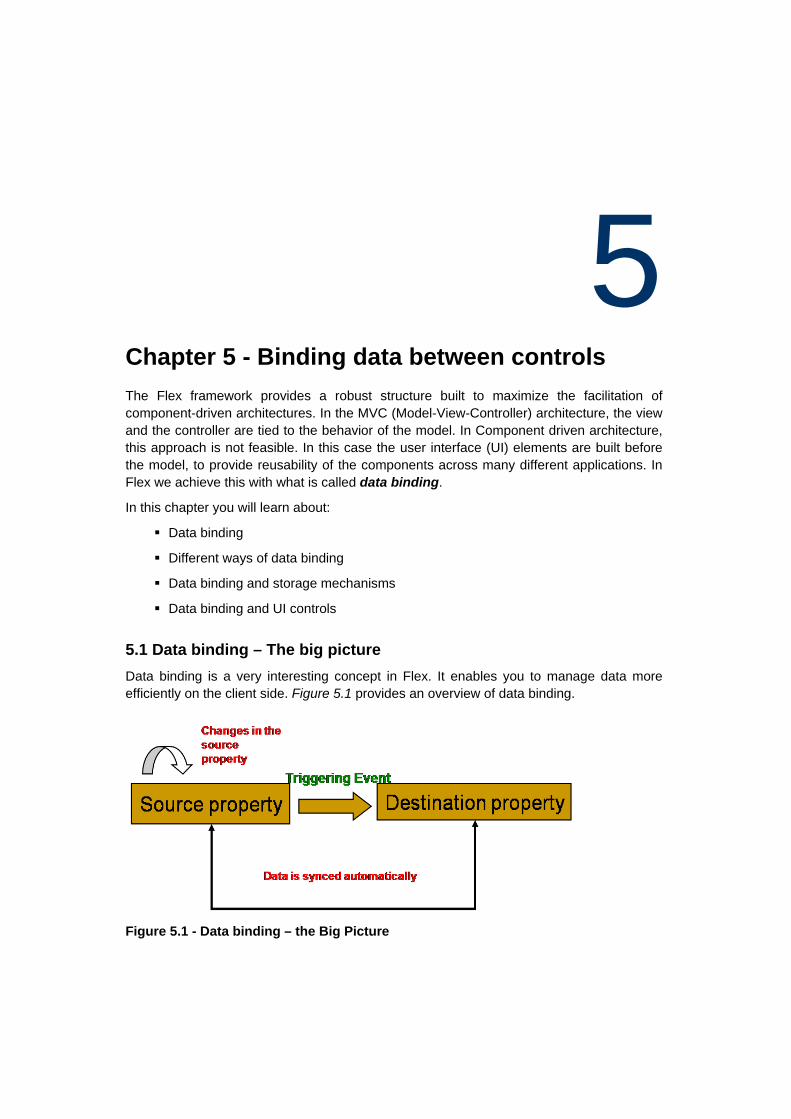
5 Chapter 5 - Binding data between controls The Flex framework provides a robust structure built to maximize the facilitation of component-driven architectures. In the MVC (Model-View-Controller) architecture, the view and the controller are tied to the behavior of the model. In Component driven architecture, this approach is not feasible. In this case the user interface (UI) elements are built before the model, to provide reusability of the components across many different applications. In Flex we achieve this with what is called data binding.
In this chapter you will learn about:
Data binding
Different ways of data binding
Data binding and storage mechanisms
Data binding and UI controls
5.1 Data binding – The big picture Data binding is a very interesting concept in Flex. It enables you to manage data more efficiently on the client side. Figure 5.1 provides an overview of data binding.
Figure 5.1 - Data binding – the Big Picture
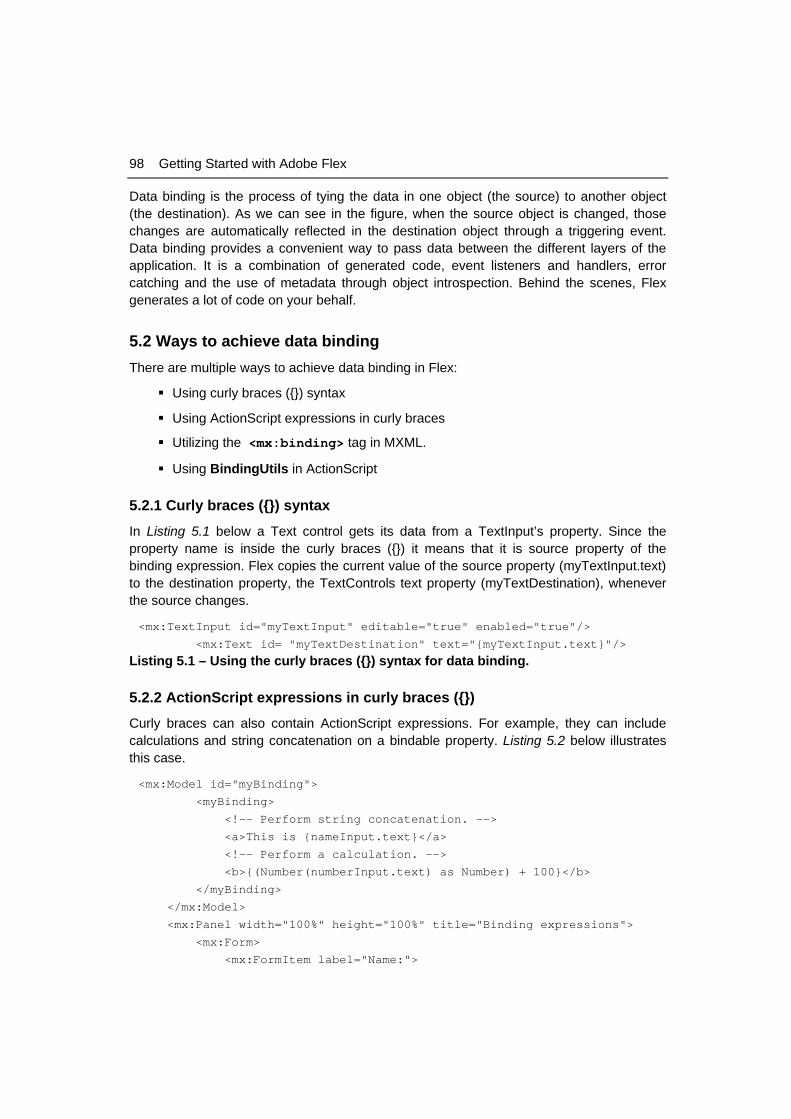
98 Getting Started with Adobe Flex
Data binding is the process of tying the data in one object (the source) to another object (the destination). As we can see in the figure, when the source object is changed, those changes are automatically reflected in the destination object through a triggering event. Data binding provides a convenient way to pass data between the different layers of the application. It is a combination of generated code, event listeners and handlers, error catching and the use of metadata through object introspection. Behind the scenes, Flex generates a lot of code on your behalf.
5.2 Ways to achieve data binding There are multiple ways to achieve data binding in Flex:
Using curly braces ({}) syntax
Using ActionScript expressions in curly braces
Utilizing the <mx:binding> tag in MXML.
Using BindingUtils in ActionScript
5.2.1 Curly braces ({}) syntax
In Listing 5.1 below a Text control gets its data from a TextInput’s property. Since the property name is inside the curly braces ({}) it means that it is source property of the binding expression. Flex copies the current value of the source property (myTextInput.text) to the destination property, the TextControls text property (myTextDestination), whenever the source changes.
<mx:TextInput id="myTextInput" editable="true" enabled="true"/>
<mx:Text id= "myTextDestination" text="{myTextInput.text}"/>
Listing 5.1 – Using the curly braces ({}) syntax for data binding.
5.2.2 ActionScript expressions in curly braces ({})
Curly braces can also contain ActionScript expressions. For example, they can include calculations and string concatenation on a bindable property. Listing 5.2 below illustrates this case.
<mx:Model id="myBinding">
<myBinding>
<!-- Perform string concatenation. -->
<a>This is {nameInput.text}</a>
<!-- Perform a calculation. -->
<b>{(Number(numberInput.text) as Number) + 100}</b>
</myBinding>
</mx:Model>
<mx:Panel width="100%" height="100%" title="Binding expressions">
<mx:Form>
<mx:FormItem label="Name:">
Chapter 5 – Binding data between controls 99
<mx:TextInput id="nameInput"/>
</mx:FormItem>
<mx:FormItem label="Enter a number:">
<mx:TextInput id="numberInput" text="0"/>
</mx:FormItem>
</mx:Form>
<mx:Text text="{'Concatenation: '+myBinding.a}"/>
<mx:Text text="{'Calculation: 100 +' +numberInput.text+' = '+myBinding.b}"/>
</mx:Panel>
Listing 5.2 – Using ActionScript within curly braces ({}) for data binding.
5.2.3 <mx:binding> tag in MXML
The <mx:Binding> tag can be used as an alternative to the curly braces syntax. The source property can be provided using the source property of the <mx:binding> tag and the destination property is used for the destination. The <mx:binding> tag also lets you bind a single source property to multiple destination properties, or multiple source properties to a single destination property. We could also have curly braces ({}) inside the source property of an <mx:binding> tag. Listing 5.3 below provides an example of using the <mx:binding> tag in MXML.
<mx:Panel title="Data Binding Using mx Binding Tag">
mx:TextInput id="myTextInput" editable="true" enabled="true"/>
mx:Text id="myText" />
</mx:Panel>
<mx:Binding
source="myTextInput.text"
destination="myText.text"
/> Listing 5.3 – Using the <mx:binding> tag for data binding.
5.2.4 Bindings in ActionScript
Data binding can also be implemented in ActionScipt by using the mx.binding.utils.BindingUtils class. We can use the bindProperty() method of the bindSetter() method to accomplish data binding. This is illustrated in Listing 5.4 below..
<?xml version="1.0" encoding="utf-8"?>
<mx:Application xmlns:mx="http://www.adobe.com/2009/mxml" width="200" height="200" initialize="initializeHandler();" >
<mx:Script>
<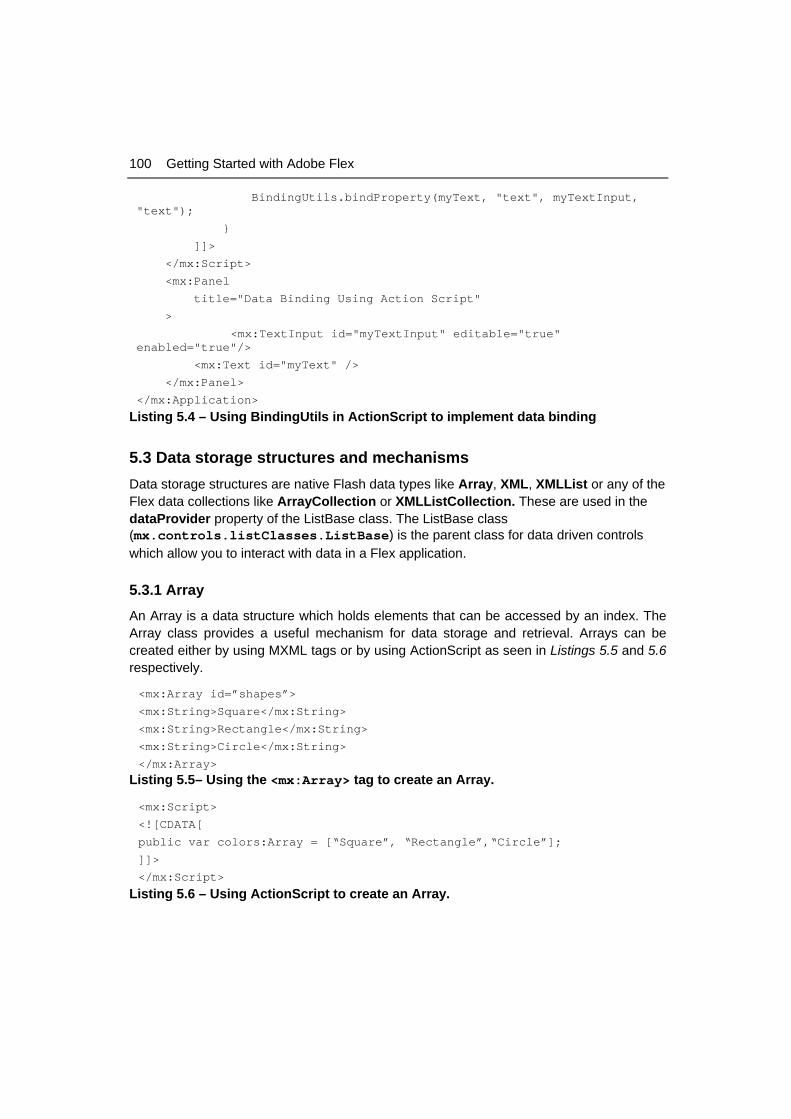
100 Getting Started with Adobe Flex
BindingUtils.bindProperty(myText, "text", myTextInput, "text");
}
]]>
</mx:Script>
<mx:Panel
title="Data Binding Using Action Script"
>
<mx:TextInput id="myTextInput" editable="true" enabled="true"/>
<mx:Text id="myText" />
</mx:Panel>
</mx:Application>
Listing 5.4 – Using BindingUtils in ActionScript to implement data binding
5.3 Data storage structures and mechanisms Data storage structures are native Flash data types like Array, XML, XMLList or any of the Flex data collections like ArrayCollection or XMLListCollection. These are used in the dataProvider property of the ListBase class. The ListBase class (mx.controls.listClasses.ListBase) is the parent class for data driven controls which allow you to interact with data in a Flex application.
5.3.1 Array
An Array is a data structure which holds elements that can be accessed by an index. The Array class provides a useful mechanism for data storage and retrieval. Arrays can be created either by using MXML tags or by using ActionScript as seen in Listings 5.5 and 5.6 respectively.
<mx:Array id=”shapes”>
<mx:String>Square</mx:String>
<mx:String>Rectangle</mx:String>
<mx:String>Circle</mx:String>
</mx:Array> Listing 5.5– Using the <mx:Array> tag to create an Array.
<mx:Script>
<![CDATA[
public var colors:Array = [“Square”, “Rectangle”,“Circle”];
]]>
</mx:Script>
Listing 5.6 – Using ActionScript to create an Array.
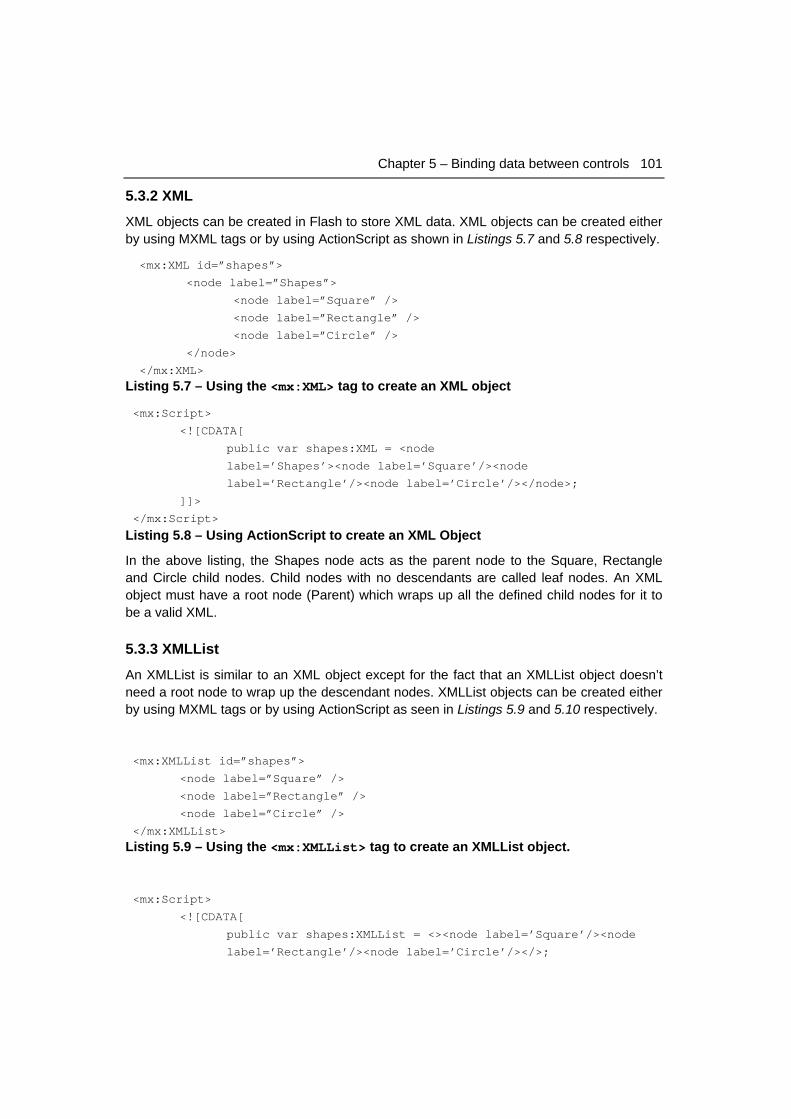
Chapter 5 – Binding data between controls 101
5.3.2 XML
XML objects can be created in Flash to store XML data. XML objects can be created either by using MXML tags or by using ActionScript as shown in Listings 5.7 and 5.8 respectively.
<mx:XML id=”shapes”>
<node label=”Shapes”>
<node label=”Square” />
<node label=”Rectangle” />
<node label=”Circle” />
</node>
</mx:XML> Listing 5.7 – Using the <mx:XML> tag to create an XML object
<mx:Script>
<![CDATA[
public var shapes:XML = <node
label=’Shapes’><node label=’Square’/><node
label=’Rectangle’/><node label=’Circle’/></node>;
]]>
</mx:Script>
Listing 5.8 – Using ActionScript to create an XML Object
In the above listing, the Shapes node acts as the parent node to the Square, Rectangle and Circle child nodes. Child nodes with no descendants are called leaf nodes. An XML object must have a root node (Parent) which wraps up all the defined child nodes for it to be a valid XML.
5.3.3 XMLList
An XMLList is similar to an XML object except for the fact that an XMLList object doesn’t need a root node to wrap up the descendant nodes. XMLList objects can be created either by using MXML tags or by using ActionScript as seen in Listings 5.9 and 5.10 respectively.
<mx:XMLList id=”shapes”>
<node label=”Square” />
<node label=”Rectangle” />
<node label=”Circle” />
</mx:XMLList> Listing 5.9 – Using the <mx:XMLList> tag to create an XMLList object.
<mx:Script>
<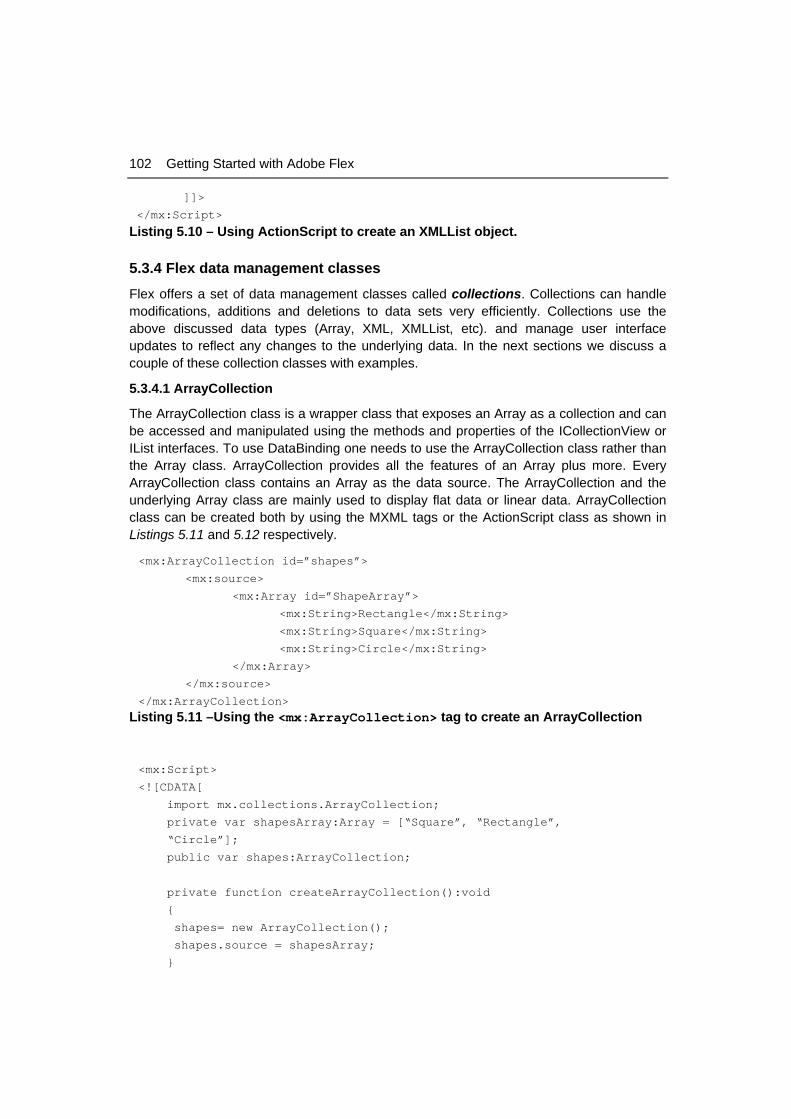
102 Getting Started with Adobe Flex
]]>
</mx:Script>
Listing 5.10 – Using ActionScript to create an XMLList object.
5.3.4 Flex data management classes
Flex offers a set of data management classes called collections. Collections can handle modifications, additions and deletions to data sets very efficiently. Collections use the above discussed data types (Array, XML, XMLList, etc). and manage user interface updates to reflect any changes to the underlying data. In the next sections we discuss a couple of these collection classes with examples.
5.3.4.1 ArrayCollection
The ArrayCollection class is a wrapper class that exposes an Array as a collection and can be accessed and manipulated using the methods and properties of the ICollectionView or IList interfaces. To use DataBinding one needs to use the ArrayCollection class rather than the Array class. ArrayCollection provides all the features of an Array plus more. Every ArrayCollection class contains an Array as the data source. The ArrayCollection and the underlying Array class are mainly used to display flat data or linear data. ArrayCollection class can be created both by using the MXML tags or the ActionScript class as shown in Listings 5.11 and 5.12 respectively.
<mx:ArrayCollection id=”shapes”>
<mx:source>
<mx:Array id=”ShapeArray”>
<mx:String>Rectangle</mx:String>
<mx:String>Square</mx:String>
<mx:String>Circle</mx:String>
</mx:Array>
</mx:source>
</mx:ArrayCollection> Listing 5.11 –Using the <mx:ArrayCollection> tag to create an ArrayCollection
<mx:Script>
<![CDATA[
import mx.collections.ArrayCollection;
private var shapesArray:Array = [“Square”, “Rectangle”,
“Circle”];
public var shapes:ArrayCollection;
private function createArrayCollection():void
{
shapes= new ArrayCollection();
shapes.source = shapesArray;
}
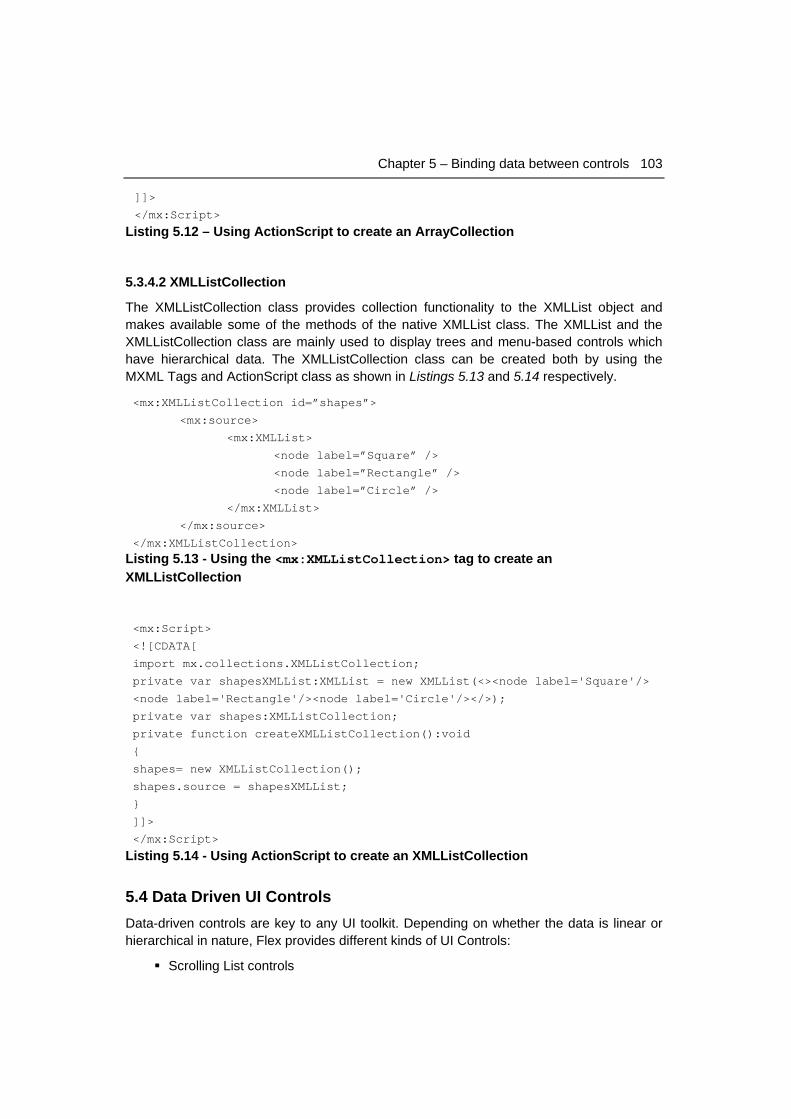
Chapter 5 – Binding data between controls 103
]]>
</mx:Script>
Listing 5.12 – Using ActionScript to create an ArrayCollection
5.3.4.2 XMLListCollection
The XMLListCollection class provides collection functionality to the XMLList object and makes available some of the methods of the native XMLList class. The XMLList and the XMLListCollection class are mainly used to display trees and menu-based controls which have hierarchical data. The XMLListCollection class can be created both by using the MXML Tags and ActionScript class as shown in Listings 5.13 and 5.14 respectively.
<mx:XMLListCollection id=”shapes”>
<mx:source>
<mx:XMLList>
<node label=”Square” />
<node label=”Rectangle” />
<node label=”Circle” />
</mx:XMLList>
</mx:source>
</mx:XMLListCollection> Listing 5.13 - Using the <mx:XMLListCollection> tag to create an XMLListCollection
<mx:Script>
<![CDATA[
import mx.collections.XMLListCollection;
private var shapesXMLList:XMLList = new XMLList(<><node label='Square'/>
<node label='Rectangle'/><node label='Circle'/></>);
private var shapes:XMLListCollection;
private function createXMLListCollection():void
{
shapes= new XMLListCollection();
shapes.source = shapesXMLList;
}
]]>
</mx:Script>
Listing 5.14 - Using ActionScript to create an XMLListCollection
5.4 Data Driven UI Controls Data-driven controls are key to any UI toolkit. Depending on whether the data is linear or hierarchical in nature, Flex provides different kinds of UI Controls:
Scrolling List controls

104 Getting Started with Adobe Flex
DataGrid controls
Hierarchical controls (Tree, Menu)
5.4.1 Scrolling List controls
The Flex framework provides a simple set of List controls that display items either vertically or horizontally with built-in scrolling. These controls also provide single or multi-selection capabilities. The List controls are often used to show numerous items in an organized fashion.
There are three main types of Scrolling List controls:
List control
HorizontalList control
TileList control
5.4.1.1 List Control
The List control is the simplest data-driven UI control that the Flex Framework provides. The mx.controls.List class can be used in a Flex application by using the <mx:List /> MXML tag. The list control displays a vertical list of items and provides a scrollbar if the full height of the list items is unlikely to fit. The horizontal scrollbar is also optional. The user can select one or more items from the list. Listing 5.15 shows an example of creating a list control using the <mx:List> tag in combination with the ArrayCollection that we discussed earlier.
<?xml version="1.0"?>
<mx:Application xmlns:mx="http://www.adobe.com/2006/mxml">
<mx:ArrayCollection id="shapes">
<mx:source>
<mx:Array id="ShapeArray">
<mx:String>Rectangle</mx:String>
<mx:String>Square</mx:String>
<mx:String>Circle</mx:String>
<mx:String>Octagon</mx:String>
<mx:String>Hexagon</mx:String>
<mx:String>Triangle</mx:String>
</mx:Array>
</mx:source>
</mx:ArrayCollection>
<mx:List id="myList" width="200" height="100" dataProvider="{shapes}"/>
</mx:Application>
Listing 5.15 - Code snippet to create a List control
Figure 5.2 below shows the List control that is created. The ArrayCollection class acts as the data provider for the List control.
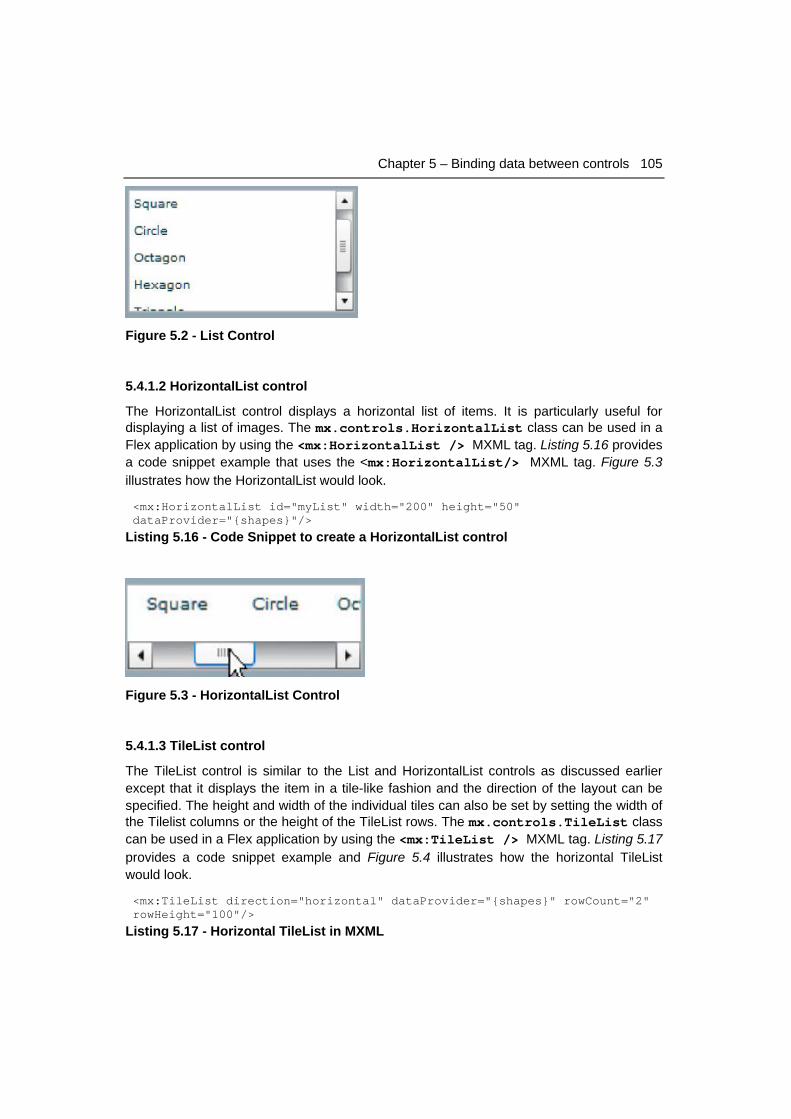
Chapter 5 – Binding data between controls 105
Figure 5.2 - List Control
5.4.1.2 HorizontalList control
The HorizontalList control displays a horizontal list of items. It is particularly useful for displaying a list of images. The mx.controls.HorizontalList class can be used in a Flex application by using the <mx:HorizontalList /> MXML tag. Listing 5.16 provides a code snippet example that uses the <mx:HorizontalList/> MXML tag. Figure 5.3 illustrates how the HorizontalList would look.
<mx:HorizontalList id="myList" width="200" height="50" dataProvider="{shapes}"/>
Listing 5.16 - Code Snippet to create a HorizontalList control
Figure 5.3 - HorizontalList Control
5.4.1.3 TileList control
The TileList control is similar to the List and HorizontalList controls as discussed earlier except that it displays the item in a tile-like fashion and the direction of the layout can be specified. The height and width of the individual tiles can also be set by setting the width of the Tilelist columns or the height of the TileList rows. The mx.controls.TileList class can be used in a Flex application by using the <mx:TileList /> MXML tag. Listing 5.17 provides a code snippet example and Figure 5.4 illustrates how the horizontal TileList would look.
<mx:TileList direction="horizontal" dataProvider="{shapes}" rowCount="2" rowHeight="100"/>
Listing 5.17 - Horizontal TileList in MXML
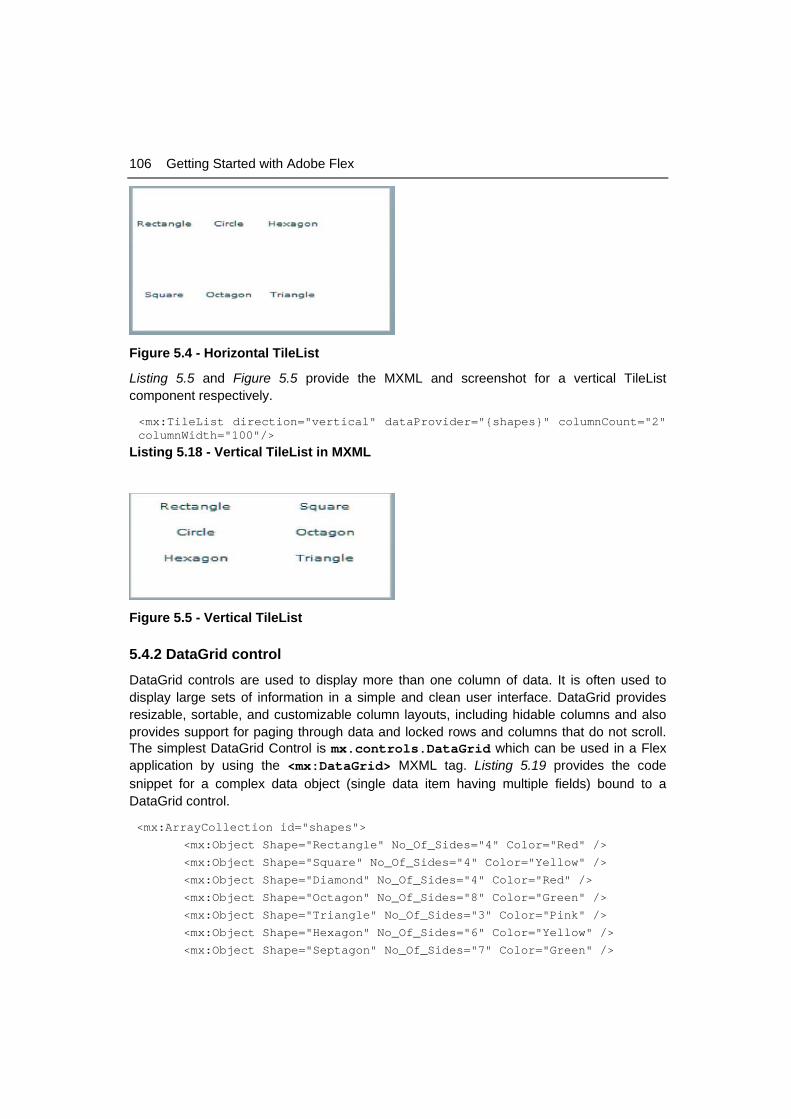
106 Getting Started with Adobe Flex
Figure 5.4 - Horizontal TileList
Listing 5.5 and Figure 5.5 provide the MXML and screenshot for a vertical TileList component respectively.
<mx:TileList direction="vertical" dataProvider="{shapes}" columnCount="2" columnWidth="100"/>
Listing 5.18 - Vertical TileList in MXML
Figure 5.5 - Vertical TileList
5.4.2 DataGrid control
DataGrid controls are used to display more than one column of data. It is often used to display large sets of information in a simple and clean user interface. DataGrid provides resizable, sortable, and customizable column layouts, including hidable columns and also provides support for paging through data and locked rows and columns that do not scroll. The simplest DataGrid Control is mx.controls.DataGrid which can be used in a Flex application by using the <mx:DataGrid> MXML tag. Listing 5.19 provides the code snippet for a complex data object (single data item having multiple fields) bound to a DataGrid control.
<mx:ArrayCollection id="shapes">
<mx:Object Shape="Rectangle" No_Of_Sides="4" Color="Red" />
<mx:Object Shape="Square" No_Of_Sides="4" Color="Yellow" />
<mx:Object Shape="Diamond" No_Of_Sides="4" Color="Red" />
<mx:Object Shape="Octagon" No_Of_Sides="8" Color="Green" />
<mx:Object Shape="Triangle" No_Of_Sides="3" Color="Pink" />
<mx:Object Shape="Hexagon" No_Of_Sides="6" Color="Yellow" />
<mx:Object Shape="Septagon" No_Of_Sides="7" Color="Green" />
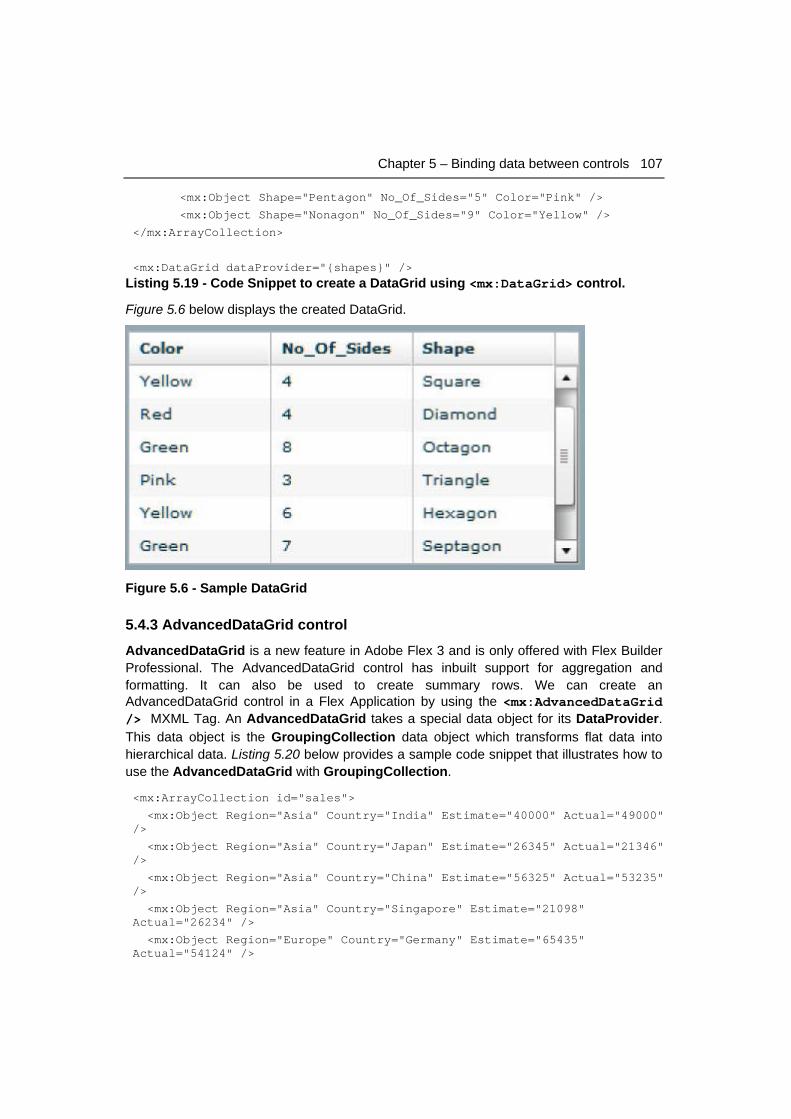
Chapter 5 – Binding data between controls 107
<mx:Object Shape="Pentagon" No_Of_Sides="5" Color="Pink" />
<mx:Object Shape="Nonagon" No_Of_Sides="9" Color="Yellow" />
</mx:ArrayCollection>
<mx:DataGrid dataProvider="{shapes}" /> Listing 5.19 - Code Snippet to create a DataGrid using <mx:DataGrid> control.
Figure 5.6 below displays the created DataGrid.
Figure 5.6 - Sample DataGrid
5.4.3 AdvancedDataGrid control
AdvancedDataGrid is a new feature in Adobe Flex 3 and is only offered with Flex Builder Professional. The AdvancedDataGrid control has inbuilt support for aggregation and formatting. It can also be used to create summary rows. We can create an AdvancedDataGrid control in a Flex Application by using the <mx:AdvancedDataGrid /> MXML Tag. An AdvancedDataGrid takes a special data object for its DataProvider. This data object is the GroupingCollection data object which transforms flat data into hierarchical data. Listing 5.20 below provides a sample code snippet that illustrates how to use the AdvancedDataGrid with GroupingCollection.
<mx:ArrayCollection id="sales">
<mx:Object Region="Asia" Country="India" Estimate="40000" Actual="49000" />
<mx:Object Region="Asia" Country="Japan" Estimate="26345" Actual="21346" />
<mx:Object Region="Asia" Country="China" Estimate="56325" Actual="53235" />
<mx:Object Region="Asia" Country="Singapore" Estimate="21098" Actual="26234" />
<mx:Object Region="Europe" Country="Germany" Estimate="65435" Actual="54124" />
108 Getting Started with Adobe Flex
<mx:Object Region="Europe" Country="Switzerland" Estimate="42316" Actual="31245" />
<mx:Object Region="Europe" Country="France" Estimate="21356" Actual="12345" />
<mx:Object Region="North America" Country="USA" Estimate="121098" Actual="126234" />
<mx:Object Region="North America" Country="Canada" Estimate="14356" Actual="12345" />
<mx:Object Region="South America" Country="Brazil" Estimate="27312" Actual="4213" />
<mx:Object Region="South America" Country="Chile" Estimate="1234" Actual="346" />
</mx:ArrayCollection>
<mx:AdvancedDataGrid id="adg" width="500" height="400" initialize="gc.refresh();">
<mx:dataProvider>
<mx:GroupingCollection id="gc" source="{sales}">
<mx:Grouping>
<mx:GroupingField name="Region"/>
</mx:Grouping>
</mx:GroupingCollection>
</mx:dataProvider>
<mx:columns>
<mx:AdvancedDataGridColumn dataField="Region" headerText="Region"/>
<mx:AdvancedDataGridColumn dataField="Country" headerText="Country"/>
<mx:AdvancedDataGridColumn dataField="Estimate" headerText="Estimate"/>
<mx:AdvancedDataGridColumn dataField="Actual" headerText="Actual"/>
</mx:columns>
</mx:AdvancedDataGrid> Listing 5.20 - Creating an AdvancedDataGrid using <mx:AdvancedDataGrid> control
Figure 5.7 displays the created AdvancedDataGrid.
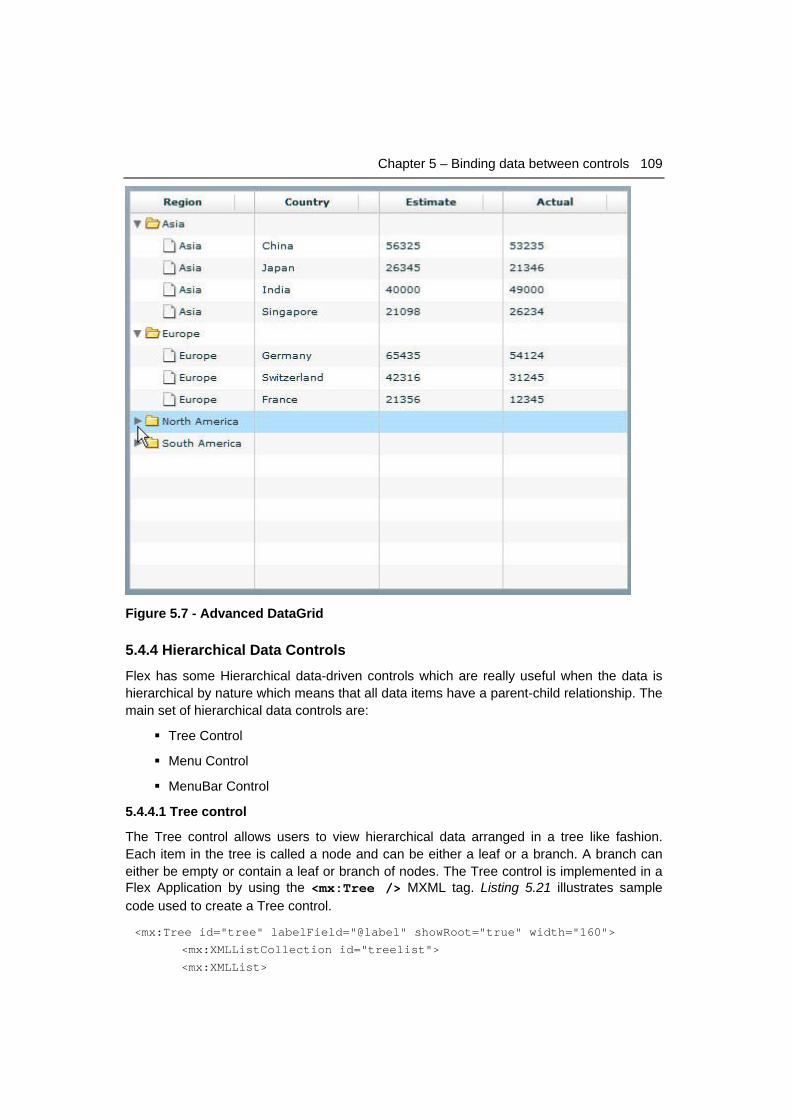
Chapter 5 – Binding data between controls 109
Figure 5.7 - Advanced DataGrid
5.4.4 Hierarchical Data Controls
Flex has some Hierarchical data-driven controls which are really useful when the data is hierarchical by nature which means that all data items have a parent-child relationship. The main set of hierarchical data controls are:
Tree Control
Menu Control
MenuBar Control
5.4.4.1 Tree control
The Tree control allows users to view hierarchical data arranged in a tree like fashion. Each item in the tree is called a node and can be either a leaf or a branch. A branch can either be empty or contain a leaf or branch of nodes. The Tree control is implemented in a Flex Application by using the <mx:Tree /> MXML tag. Listing 5.21 illustrates sample code used to create a Tree control.
<mx:Tree id="tree" labelField="@label" showRoot="true" width="160">
<mx:XMLListCollection id="treelist">
<mx:XMLList>
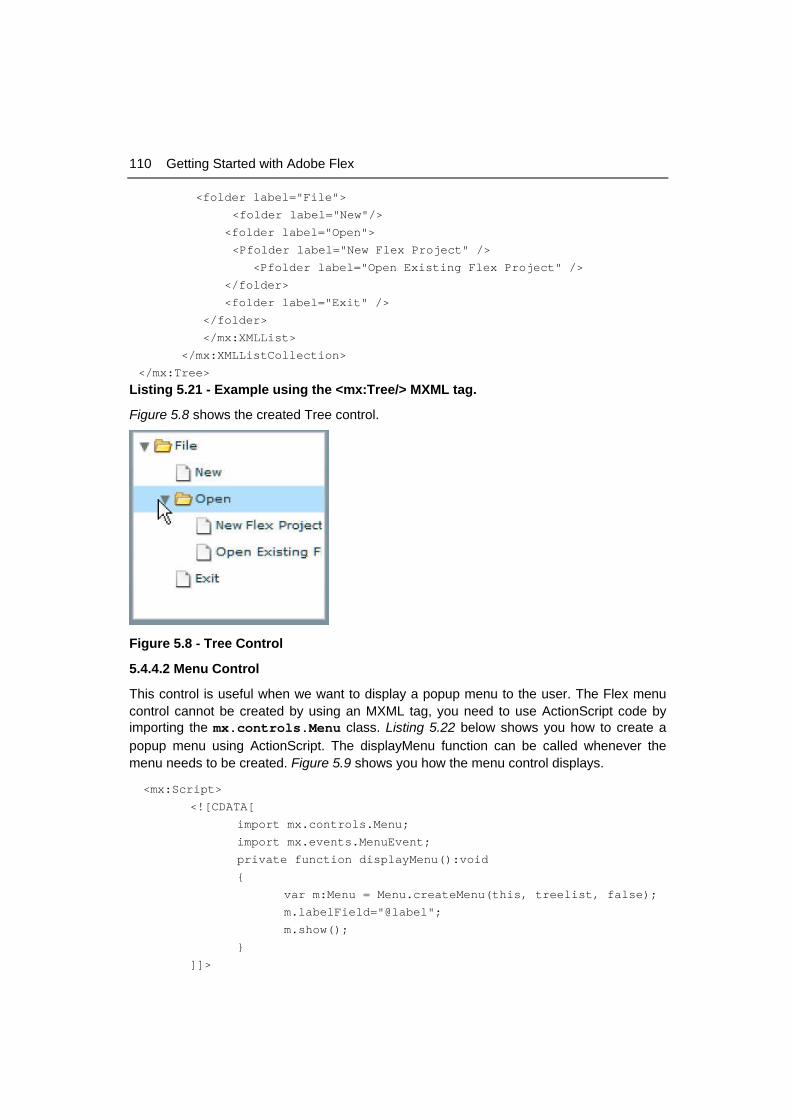
110 Getting Started with Adobe Flex
<folder label="File">
<folder label="New"/>
<folder label="Open">
<Pfolder label="New Flex Project" />
<Pfolder label="Open Existing Flex Project" />
</folder>
<folder label="Exit" />
</folder>
</mx:XMLList>
</mx:XMLListCollection>
</mx:Tree>
Listing 5.21 - Example using the <mx:Tree/> MXML tag.
Figure 5.8 shows the created Tree control.
Figure 5.8 - Tree Control
5.4.4.2 Menu Control
This control is useful when we want to display a popup menu to the user. The Flex menu control cannot be created by using an MXML tag, you need to use ActionScript code by importing the mx.controls.Menu class. Listing 5.22 below shows you how to create a popup menu using ActionScript. The displayMenu function can be called whenever the menu needs to be created. Figure 5.9 shows you how the menu control displays.
<mx:Script>
<![CDATA[
import mx.controls.Menu;
import mx.events.MenuEvent;
private function displayMenu():void
{
var m:Menu = Menu.createMenu(this, treelist, false);
m.labelField="@label";
m.show();
}
]]>
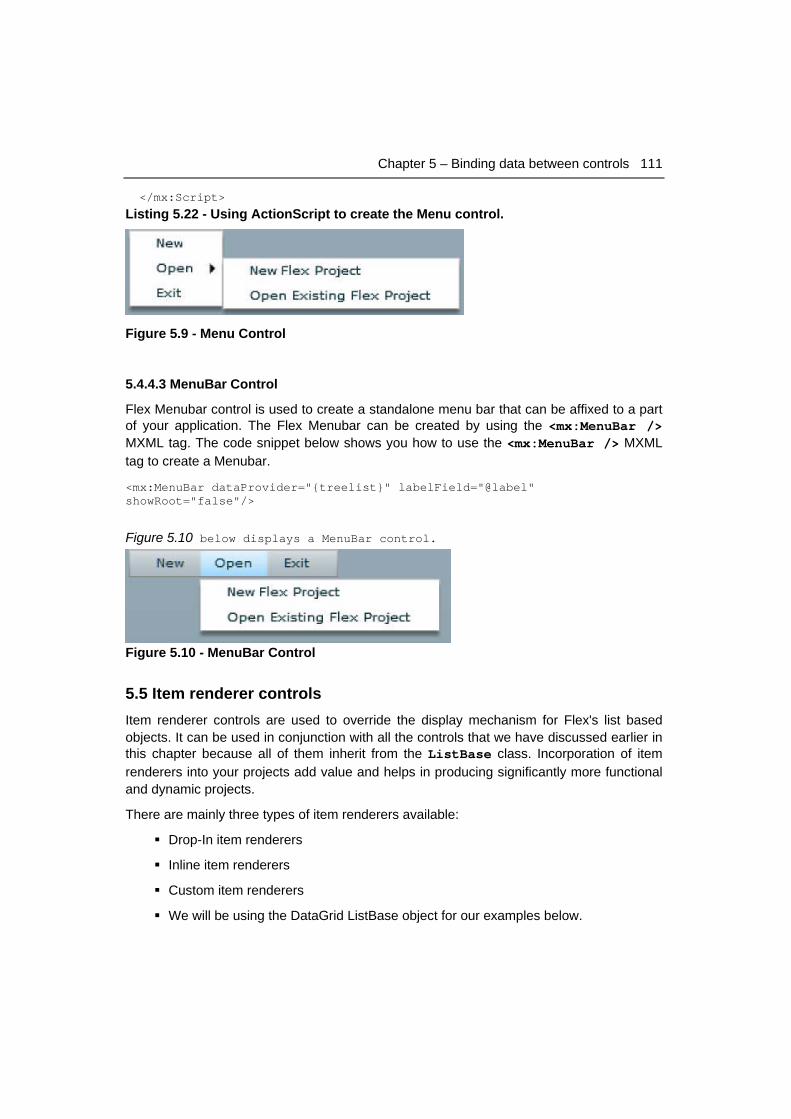
Chapter 5 – Binding data between controls 111
</mx:Script>
Listing 5.22 - Using ActionScript to create the Menu control.
Figure 5.9 - Menu Control
5.4.4.3 MenuBar Control
Flex Menubar control is used to create a standalone menu bar that can be affixed to a part of your application. The Flex Menubar can be created by using the <mx:MenuBar /> MXML tag. The code snippet below shows you how to use the <mx:MenuBar /> MXML tag to create a Menubar.
<mx:MenuBar dataProvider="{treelist}" labelField="@label" showRoot="false"/>
Figure 5.10 below displays a MenuBar control.
Figure 5.10 - MenuBar Control
5.5 Item renderer controls Item renderer controls are used to override the display mechanism for Flex's list based objects. It can be used in conjunction with all the controls that we have discussed earlier in this chapter because all of them inherit from the ListBase class. Incorporation of item renderers into your projects add value and helps in producing significantly more functional and dynamic projects.
There are mainly three types of item renderers available:
Drop-In item renderers
Inline item renderers
Custom item renderers
We will be using the DataGrid ListBase object for our examples below.
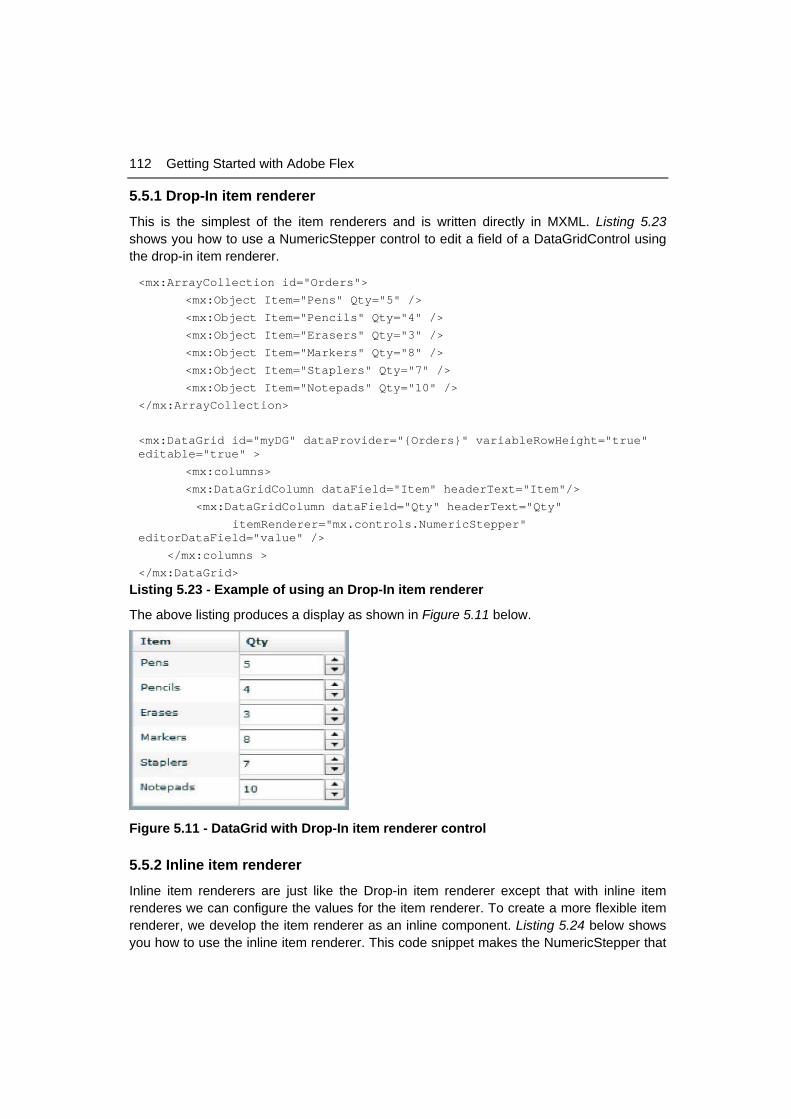
112 Getting Started with Adobe Flex
5.5.1 Drop-In item renderer
This is the simplest of the item renderers and is written directly in MXML. Listing 5.23 shows you how to use a NumericStepper control to edit a field of a DataGridControl using the drop-in item renderer.
<mx:ArrayCollection id="Orders">
<mx:Object Item="Pens" Qty="5" />
<mx:Object Item="Pencils" Qty="4" />
<mx:Object Item="Erasers" Qty="3" />
<mx:Object Item="Markers" Qty="8" />
<mx:Object Item="Staplers" Qty="7" />
<mx:Object Item="Notepads" Qty="10" />
</mx:ArrayCollection>
<mx:DataGrid id="myDG" dataProvider="{Orders}" variableRowHeight="true" editable="true" >
<mx:columns>
<mx:DataGridColumn dataField="Item" headerText="Item"/>
<mx:DataGridColumn dataField="Qty" headerText="Qty"
itemRenderer="mx.controls.NumericStepper" editorDataField="value" />
</mx:columns >
</mx:DataGrid>
Listing 5.23 - Example of using an Drop-In item renderer
The above listing produces a display as shown in Figure 5.11 below.
Figure 5.11 - DataGrid with Drop-In item renderer control
5.5.2 Inline item renderer
Inline item renderers are just like the Drop-in item renderer except that with inline item renderes we can configure the values for the item renderer. To create a more flexible item renderer, we develop the item renderer as an inline component. Listing 5.24 below shows you how to use the inline item renderer. This code snippet makes the NumericStepper that

Chapter 5 – Binding data between controls 113
we discussed in the earlier example configurable. As you can see we have provided the minimum, maximum and step values for the NumericStepper.
<mx:DataGridColumn dataField="Qty" headerText="Qty" editorDataField="value" >
<mx:itemRenderer>
<mx:Component>
<mx:NumericStepper stepSize="5" minimum="10" maximum="50"/>
</mx:Component>
</mx:itemRenderer>
</mx:DataGridColumn>
Listing 5.24 - Example of using an inline item renderer
5.5.2 Custom item renderer
A custom item renderer offers the most in flexibility, both is ease of reuse and in separation. The ItemRenderer can be in a separate MXML file so that the class can be reused multiple times and if a change needs to happen, it needs to be done only once. We can use the custom renderer as shown in the code snippet below. The class custom.Renderer is a custom Flex file which can created separately.
<mx:DataGridColumn dataField="Qty" headerText="Qty" editorDataField="value" itemRenderer="custom.Renderer">
5.6 Summary This chapter discussed about data binding and the different ways in which it can be accomplished. It also discussed about the different data storage mechanism that Flex provides and also the data-driven UI controls. You learned how Flex makes it very easy to work with data. The goal of this chapter was to give you a very basic understanding of data binding and how the UI data-driven controls use data binding inherently. The chapter also looked at how item renderers are used to customize the display in the data-driven UI controls.
5.7 Review questions 1. What is the difference between MVC Architecture and Component Driven
Architecture?
2. What is the parent class for all the UI based data-driven controls?
3. What is required for an object to be valid XML?
4. What property of the tile list control helps in determining whether it is a horizontal tile list or a vertical tile list?
5. What collection class is specifically used for the advanced data grid control?
6. Which of the follwing are ways of doing data binding in Flex?
114 Getting Started with Adobe Flex
A. The Curly Braces ({}) Syntax
B. ActionScript expressions
C. <mx:binding> tag in MXML.
D. BindingUtils in ActionScript
E. All of the above
7. Which of the following are the different types of Item Renderers?
A. Drop-In item renderers
B. Inline item renderers
C. Custom item renderers
D. All of the above
E. None of the above
8. Which of the following is NOT a basic data storage mechanism in Flex?
A. Array
B. XML
C. XMLList
D. XMLArray
E. XMLListCollection
9. Which of the following is Not a scrolling Control in Flex?
A. List Control
B. HorizontalList Control
C. TileList Control
D. DataGrid Control
E. None of the above
10. Which of the following are the hierarchical controls that Flex provides?
A. Menu Control
B. Tree Control
C. DataGrid Control
D. MenuBar Control
E. All of the above
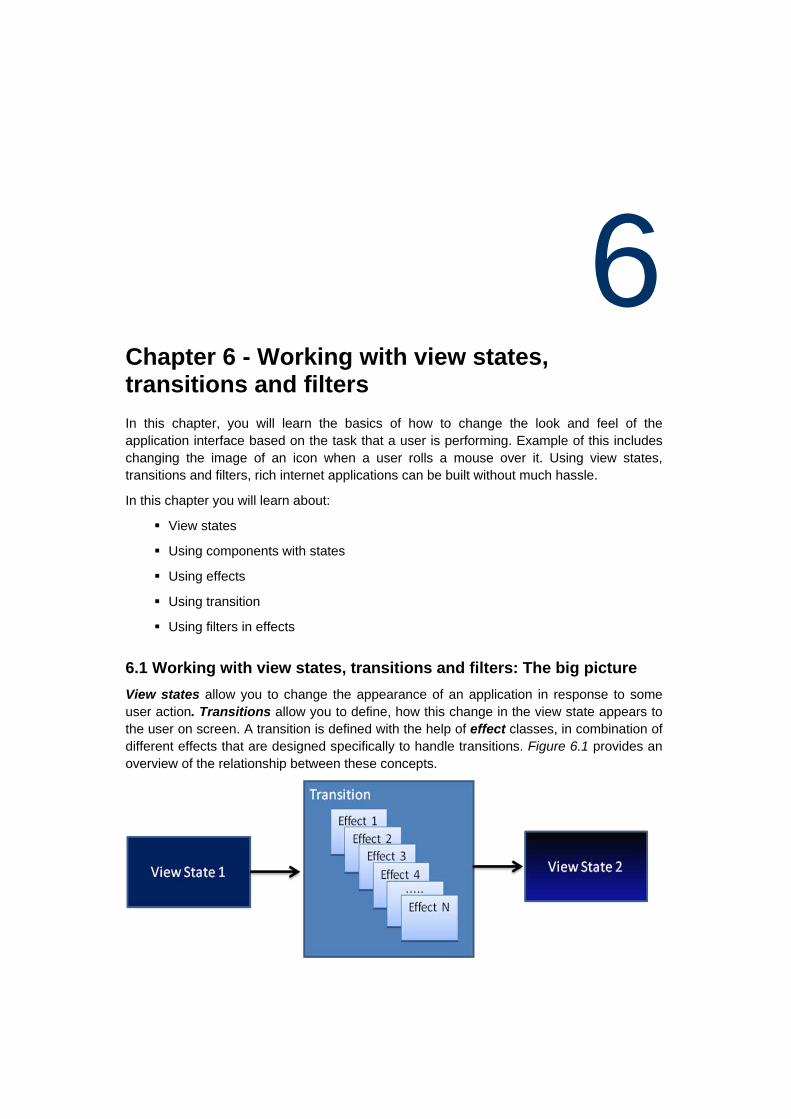
6 Chapter 6 - Working with view states, transitions and filters In this chapter, you will learn the basics of how to change the look and feel of the application interface based on the task that a user is performing. Example of this includes changing the image of an icon when a user rolls a mouse over it. Using view states, transitions and filters, rich internet applications can be built without much hassle.
In this chapter you will learn about:
View states
Using components with states
Using effects
Using transition
Using filters in effects
6.1 Working with view states, transitions and filters: The big picture View states allow you to change the appearance of an application in response to some user action. Transitions allow you to define, how this change in the view state appears to the user on screen. A transition is defined with the help of effect classes, in combination of different effects that are designed specifically to handle transitions. Figure 6.1 provides an overview of the relationship between these concepts.
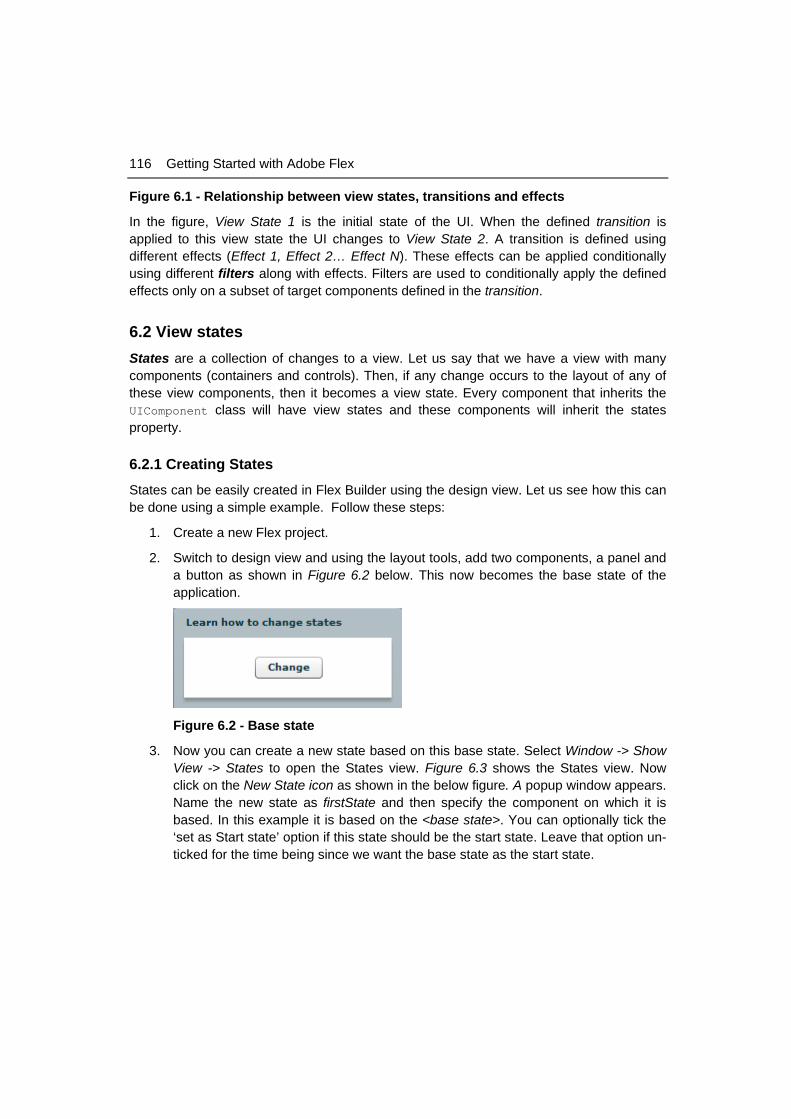
116 Getting Started with Adobe Flex
Figure 6.1 - Relationship between view states, transitions and effects
In the figure, View State 1 is the initial state of the UI. When the defined transition is applied to this view state the UI changes to View State 2. A transition is defined using different effects (Effect 1, Effect 2… Effect N). These effects can be applied conditionally using different filters along with effects. Filters are used to conditionally apply the defined effects only on a subset of target components defined in the transition.
6.2 View states States are a collection of changes to a view. Let us say that we have a view with many components (containers and controls). Then, if any change occurs to the layout of any of these view components, then it becomes a view state. Every component that inherits the UIComponent class will have view states and these components will inherit the states property.
6.2.1 Creating States
States can be easily created in Flex Builder using the design view. Let us see how this can be done using a simple example. Follow these steps:
1. Create a new Flex project.
2. Switch to design view and using the layout tools, add two components, a panel and a button as shown in Figure 6.2 below. This now becomes the base state of the application.
Figure 6.2 - Base state
3. Now you can create a new state based on this base state. Select Window -> Show View -> States to open the States view. Figure 6.3 shows the States view. Now click on the New State icon as shown in the below figure. A popup window appears. Name the new state as firstState and then specify the component on which it is based. In this example it is based on the <base state>. You can optionally tick the ‘set as Start state’ option if this state should be the start state. Leave that option un-ticked for the time being since we want the base state as the start state.
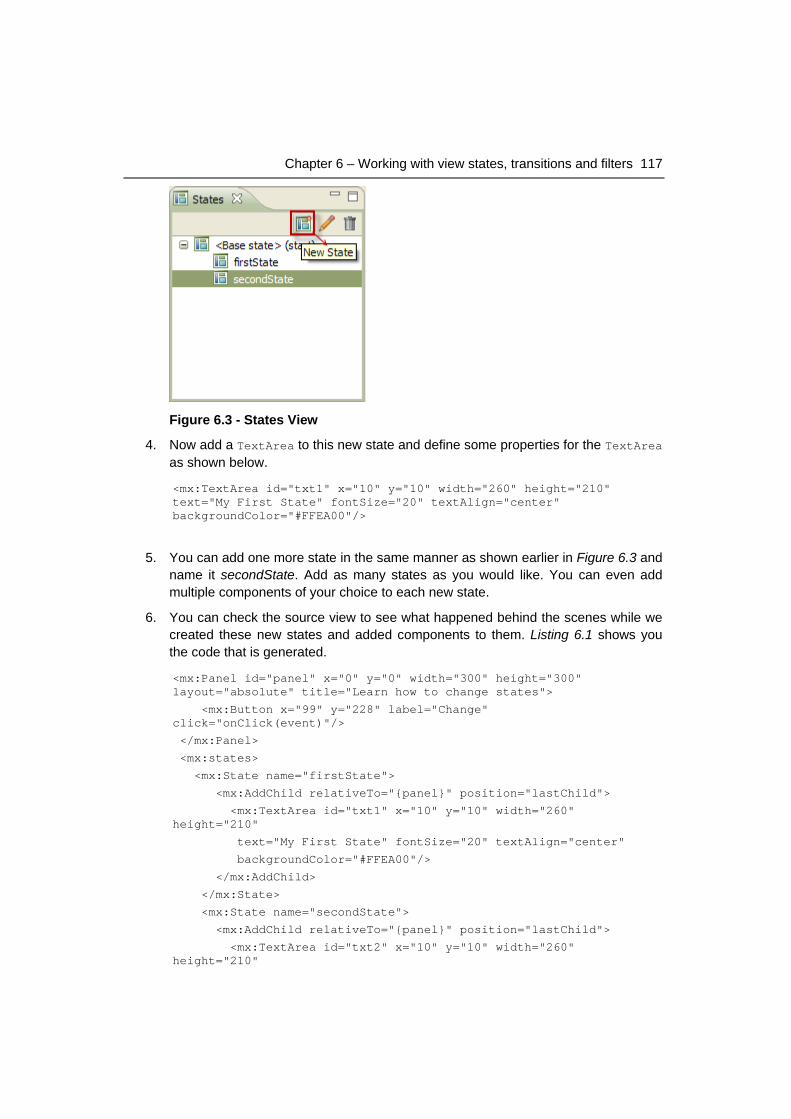
Chapter 6 – Working with view states, transitions and filters 117
Figure 6.3 - States View
4. Now add a TextArea to this new state and define some properties for the TextArea as shown below.
<mx:TextArea id="txt1" x="10" y="10" width="260" height="210" text="My First State" fontSize="20" textAlign="center" backgroundColor="#FFEA00"/>
5. You can add one more state in the same manner as shown earlier in Figure 6.3 and name it secondState. Add as many states as you would like. You can even add multiple components of your choice to each new state.
6. You can check the source view to see what happened behind the scenes while we created these new states and added components to them. Listing 6.1 shows you the code that is generated.
<mx:Panel id="panel" x="0" y="0" width="300" height="300" layout="absolute" title="Learn how to change states">
<mx:Button x="99" y="228" label="Change" click="onClick(event)"/>
</mx:Panel>
<mx:states>
<mx:State name="firstState">
<mx:AddChild relativeTo="{panel}" position="lastChild">
<mx:TextArea id="txt1" x="10" y="10" width="260" height="210"
text="My First State" fontSize="20" textAlign="center"
backgroundColor="#FFEA00"/>
</mx:AddChild>
</mx:State>
<mx:State name="secondState">
<mx:AddChild relativeTo="{panel}" position="lastChild">
<mx:TextArea id="txt2" x="10" y="10" width="260" height="210"
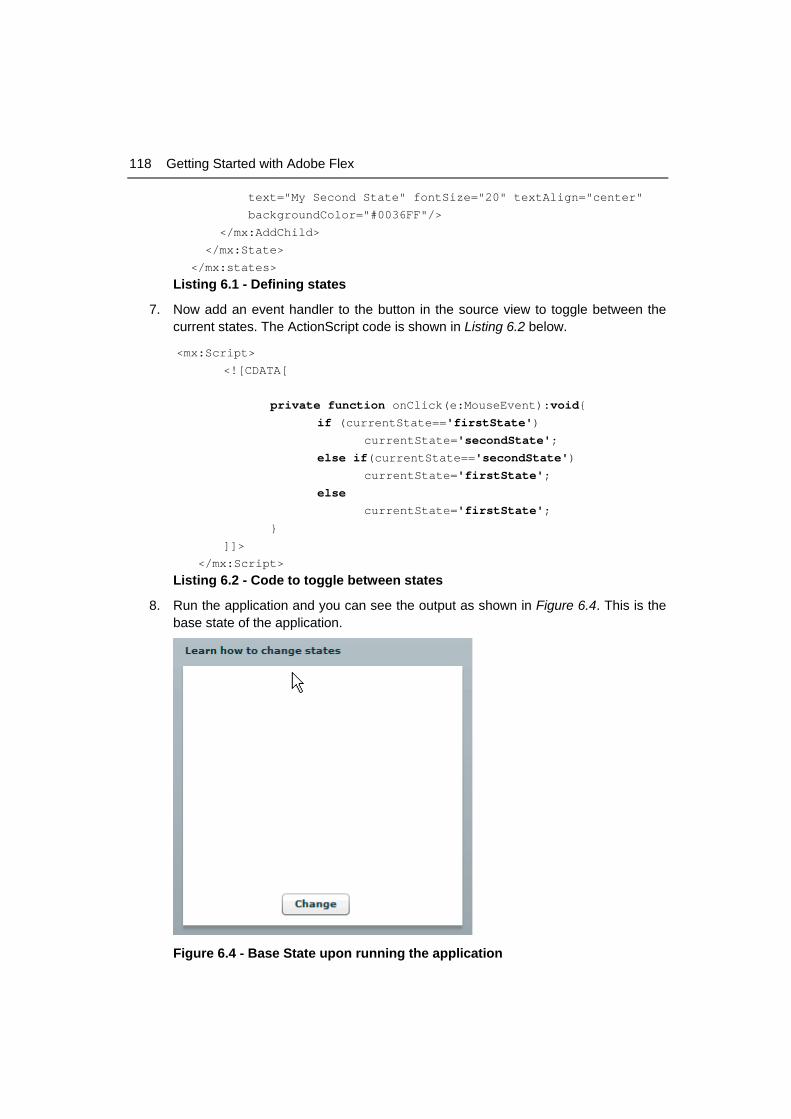
118 Getting Started with Adobe Flex
text="My Second State" fontSize="20" textAlign="center"
backgroundColor="#0036FF"/>
</mx:AddChild>
</mx:State>
</mx:states>
Listing 6.1 - Defining states
7. Now add an event handler to the button in the source view to toggle between the current states. The ActionScript code is shown in Listing 6.2 below.
<mx:Script>
<![CDATA[
private function onClick(e:MouseEvent):void{ if (currentState=='firstState') currentState='secondState'; else if(currentState=='secondState') currentState='firstState'; else currentState='firstState';
}
]]>
</mx:Script>
Listing 6.2 - Code to toggle between states
8. Run the application and you can see the output as shown in Figure 6.4. This is the base state of the application.
Figure 6.4 - Base State upon running the application
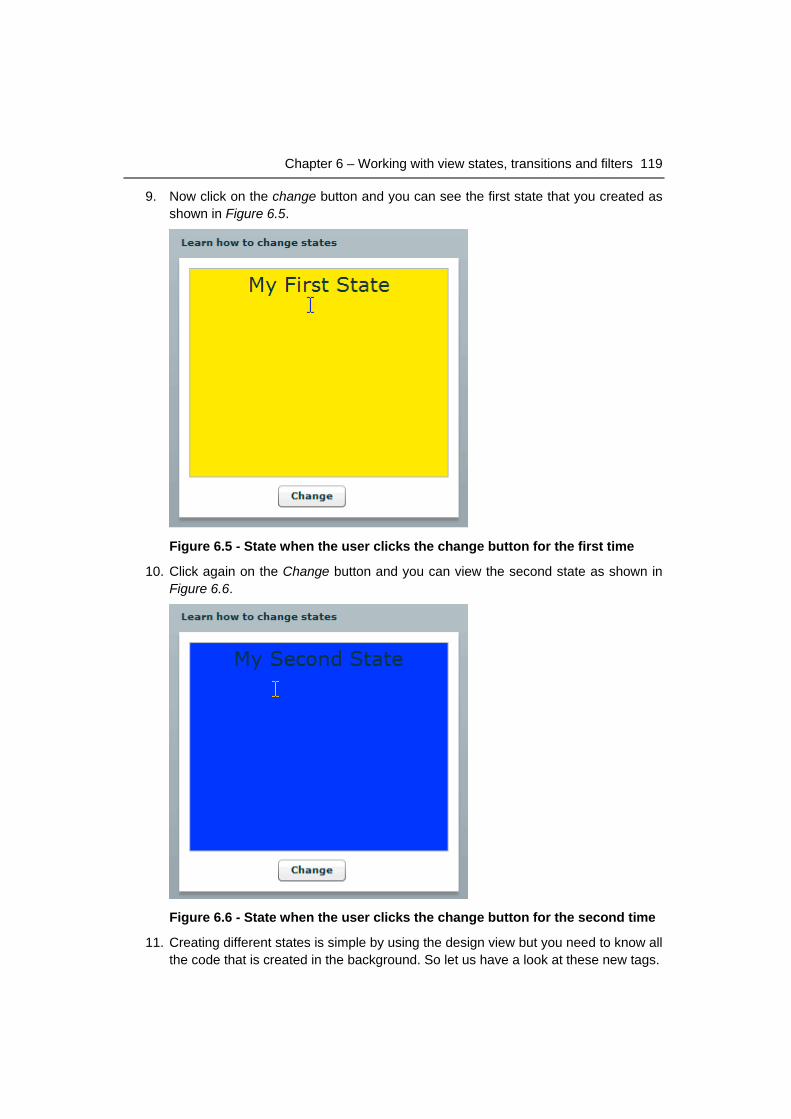
Chapter 6 – Working with view states, transitions and filters 119
9. Now click on the change button and you can see the first state that you created as shown in Figure 6.5.
Figure 6.5 - State when the user clicks the change button for the first time
10. Click again on the Change button and you can view the second state as shown in Figure 6.6.
Figure 6.6 - State when the user clicks the change button for the second time
11. Creating different states is simple by using the design view but you need to know all the code that is created in the background. So let us have a look at these new tags.
120 Getting Started with Adobe Flex
6.2.1.1 The <mx:states> tag
The states property defines an array of view states for a view component. Every view component will have a base state, which is the first state. The base state is the default state of any Flex application. The states property cannot be specified on any child controls. It can only be specified on the root of a custom control or application.
6.2.1.2 The <mx:State> tag
A State object can be added to the state property of the component. Adding so, will create new view states for that component.
Syntax of the <mx:State> tag:
<mx:State basedOn="null" name="null" overrides="null"/>
The basedOn attribute specifies the view state on which it is based on and the name attribute specifies the name of the current State object. The purpose of a state is to alter the appearance of a component in response to a user or system-initiated event, for example, the click of a button. Altering the appearance of a component involves the use of overrides via a state. Valid overrides include:
AddChild
RemoveChild
SetEventHandler
SetProperty
SetStyle
6.2.2 State properties, style and events
In order to further customize a state in terms of look and feel and behavior, the following tags can be used.
6.2.2.1 The <mx:SetEventHandler> tag
The <mx:SetEventHandler> tag allows you to create event listeners that are active only during a specific state. This is made possible by using the handler event type or the handlerFunction property.
In the handler event type, you can specify more than one parameter for the event listener function. You can even add ActionScript code within the tag instead of providing an event listener function. This is shown in the example below:
<mx:SetEventHandler target="{Button}" name="ButtonClick" handler = "buttonHandler(event, linkButtonID)"/>
Chapter 6 – Working with view states, transitions and filters 121
However, if the handlerFunction property is used, the event listener function will only take one event object as parameter as shown below.
<mx:SetEventHandler target="{Button}" name="ButtonClick" handlerFunction="buttonHandler"/>
6.2.2.2 The <mx:setProperty> tag
The <mx:setProperty> tag is used to set the value of some property that will hold for a particular view state:
<mx:SetProperty target="{container}" name="alpha" value="0.5"/>
Here, target specifies the object containing the property to change, name is the property whose value needs to be changed and value is the new value for the property.
6.2.2.3 The <mx:setStyle> tag
The <mx:setStyle> tag is used to set the value of some style that will hold only for a particular view state:
<mx:SetStyle target="{this}" name="backgroundColor" value="#ffcccc"/>
Here target specifies the object whose style is to be changed, name is the style that needs to be changed and value is the new value for the style.
6.2.3 Adding components
Not only the behavior or look and feel of an existing component can be changed during a state, but also new components can be added or existing components can be removed. This is done as defined below.
6.2.3.1 The <mx:AddChild> tag
This tag tells Flex that when the application is in this state, a child needs to be added. The child can be any component such as a button or textarea. Listing 6.3 shows an example of using this tag.
<mx:AddChild relativeTo="{panel1}" position=”lastChild”
creationPolicy=”all”>
<mx:TextArea id="t1" text="New State"/>
</mx:AddChild>
Listing 6.3 - Using the <mx:AddChild> tag
In the above listing, the relativeTo attribute specifies the object relative to which this child is added and the position attribute specifies the position of the child relative to the object specified in the relativeTo attribute. The creationPolicy attribute decides when the child container should be created. The default value of auto means that the child is created when the state is activated, all value means it is created when the application is started
122 Getting Started with Adobe Flex
and the none value means that the child will not be created until a method, createInstance() is called to create it.
6.2.3.2 The <mx:RemoveChild> tag
This tag tells Flex that when the application is in this state, a child needs to be removed.
The child can be any component such as a button or TextArea.
<mx:RemoveChild target=”{linkButton1}”/>
6.3 Behaviors An effect is some visible change to a component that operates over a predetermined duration which is measured in milliseconds. Examples of Flex effects include wipedown effect, blur effect, dissolve effect etc. A trigger is an action such as a mouse click. However, it should not be confused with an event. A trigger causes an effect to occur and an event makes a call to an Actionscript function or object. For example, a component can have a focusOut event and a FocusOutEffect trigger. An effect when registered with a trigger creates a behavior. A behavior lets you add motion, sound and animation to the application.
6.3.1 Common Effects
Table 6.1 lists the effects that Flex supports.
Effect Description
AnimateProperty Used to animate a numeric property of a component, such as height, width, scaleX, or scaleY.
Blur Used to apply a blur visual effect to a component.
Dissolve Used for modifying the alpha property of an overlay to gradually have to target component appear or disappear.
Fade Used to animate a component from transparent to opaque, or from opaque to transparent.
Glow To apply aglow visual effect to a component.
Iris Used to animate the effect target by expanding or contracting a rectangular mask centered on the target.
Move Used to change the position of a component over a specified time interval.
Pause Does nothing for a given period of time.
Chapter 6 – Working with view states, transitions and filters 123
Resize Changes the width and height of a component over a specified time frame.
Rotate Rotates a component around a specific point.
SoundEffect Used to play an MP3 audio file.
WipeLeft, WipeRight, WipeUp, WipeDown
Used to define a bar Wipe effect.
Zoom Used to zoom a component in or out from its center point.
Table 6.1 - Common Effects
6.3.2 Using Effects You can alter how to play effects by calling the pause(), resume(), or end() methods. The pause() method pauses an effect, the resume() method allows you to resume a paused effect and the end() method ends an effect that is being played.
When an effect starts, a startEffect event is dispatched and when it ends, an endEffect event is dispatched. You can use these events and perform specific functions if required.
Effects can be played in sequence or parallel using the <mx:sequence> and <mx:parallel> tags respectively. Effects defined in a sequence are played one after the other and those defined in parallel are played at the same time.
You will get a better idea about using effects with an example. So let us create an image that blurs when a user clicks it. Follow these steps:
1. Create a new Flex project.
2. Add an images folder in the src folder and add an image in this folder. For this example we have an image named rambutan.jpg that is included in the accompanying zip file (Exercise_Files_AdobeFlex.zip) under sub-directory Chapter 6.
3. Go to the design view. Drag and drop a panel and add an image on the panel. You can choose the properties for the panel, or use the ones shown in Listing 6.4 below.
<mx:Panel title="Blur Effect" layout="vertical" color="0xffffff" borderAlpha="0.15" width="500" paddingTop="10" paddingRight="10" paddingBottom="10" paddingLeft="10" horizontalAlign="center">
<mx:Image id="fruit"
source="@Embed('images/fruit.jpg')"/>
</mx:Panel>
Listing 6.4: Adding Panel to the application
4. Now you can define the Blur effect along with its properties as shown in Listing 6.5 below.
<mx:Blur id="blurImage" duration="1000"
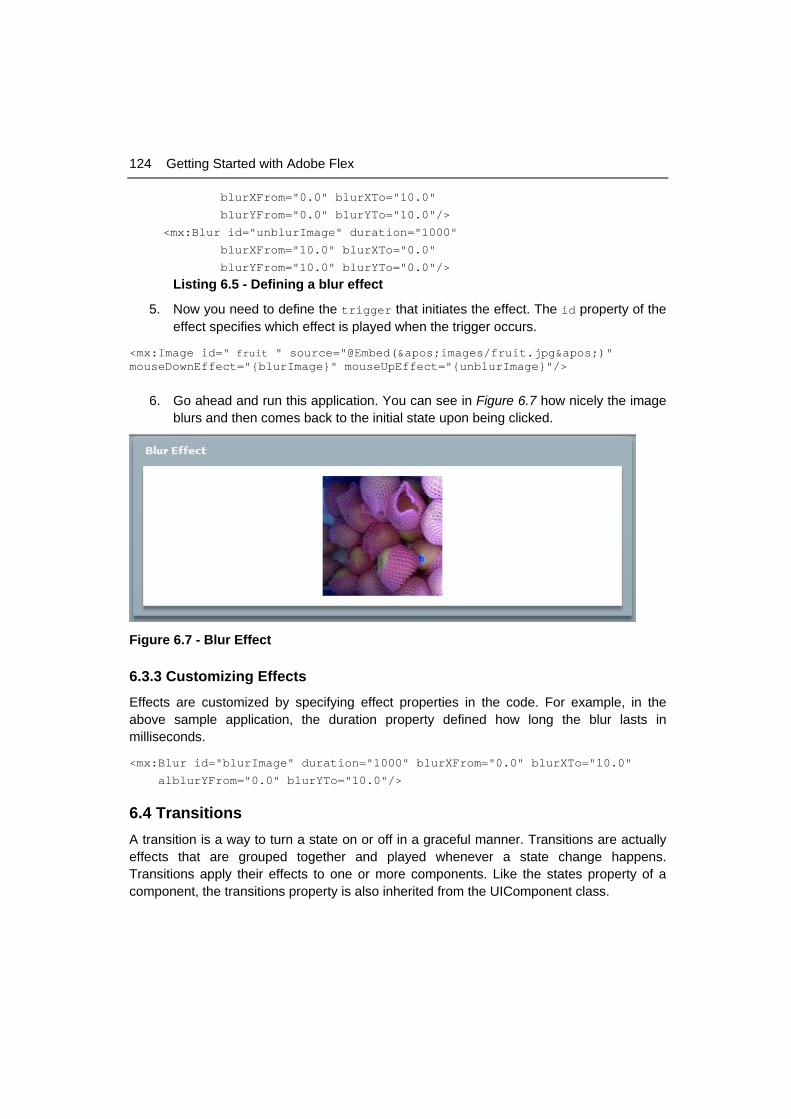
124 Getting Started with Adobe Flex
blurXFrom="0.0" blurXTo="10.0"
blurYFrom="0.0" blurYTo="10.0"/>
<mx:Blur id="unblurImage" duration="1000"
blurXFrom="10.0" blurXTo="0.0"
blurYFrom="10.0" blurYTo="0.0"/>
Listing 6.5 - Defining a blur effect
5. Now you need to define the trigger that initiates the effect. The id property of the effect specifies which effect is played when the trigger occurs.
<mx:Image id=" fruit " source="@Embed('images/fruit.jpg')" mouseDownEffect="{blurImage}" mouseUpEffect="{unblurImage}"/>
6. Go ahead and run this application. You can see in Figure 6.7 how nicely the image blurs and then comes back to the initial state upon being clicked.
Figure 6.7 - Blur Effect
6.3.3 Customizing Effects
Effects are customized by specifying effect properties in the code. For example, in the above sample application, the duration property defined how long the blur lasts in milliseconds.
<mx:Blur id="blurImage" duration="1000" blurXFrom="0.0" blurXTo="10.0"
alblurYFrom="0.0" blurYTo="10.0"/>
6.4 Transitions A transition is a way to turn a state on or off in a graceful manner. Transitions are actually effects that are grouped together and played whenever a state change happens. Transitions apply their effects to one or more components. Like the states property of a component, the transitions property is also inherited from the UIComponent class.
Chapter 6 – Working with view states, transitions and filters 125
6.4.1 Making states more interesting
Transitions and states are very much interrelated. The State class defines all the actions that will change from the base state. This includes adding or removing components from the base view state, setting properties, setting styles or setting event handlers. In the transitions class you define the order of all of those actions. The changes that occur in the state are declared again in the transitions definition. If you do not apply a transition to a state, the changes of that state are applied instantly and no transition occurs.
You can have different transitions from different states. The <mx:transitions> tag defines an array of transition objects. The <mx:Transition> tag defines a transition. It has the toState and fromState properties, which specify the states to which the transition has to be applied. By default, both the fromState and toState properties are set to "*", i.e., apply the transition from any state to any state. The fromState property specifies the view state that you are changing from, and the toState property specifies the view state that you are changing to. With transitions you can specify to apply the changes in Parallel or Sequence order. The syntax is:
<mx:Transition id="ID" fromState="*" toState="*" />
6.4.2 Using Action Effects
Flex defines several action effects to control the order of view state changes when a transition takes place. When a view state is created, there are four classes that are used to define the view state. Each of these classes has a corresponding action effect that is used to control when a change, defined by the view state property occurs in a transition.
Table 6.2 describes the action effects
Action Effect Corresponding view state Class
Use
SetPropertyAction SetProperty Used to set a property value as part of a transition.
SetStyleAction SetStyle Used to set a style to a value as part of a transition.
AddChildAction AddChild Used to add a child as part of a transition.
RemoveChildAction RemoveChild Used to remove a child as part of a transition.
Table 6.2 - Action Effects
Let us now add some transitions to the previous example on States to see how it works.
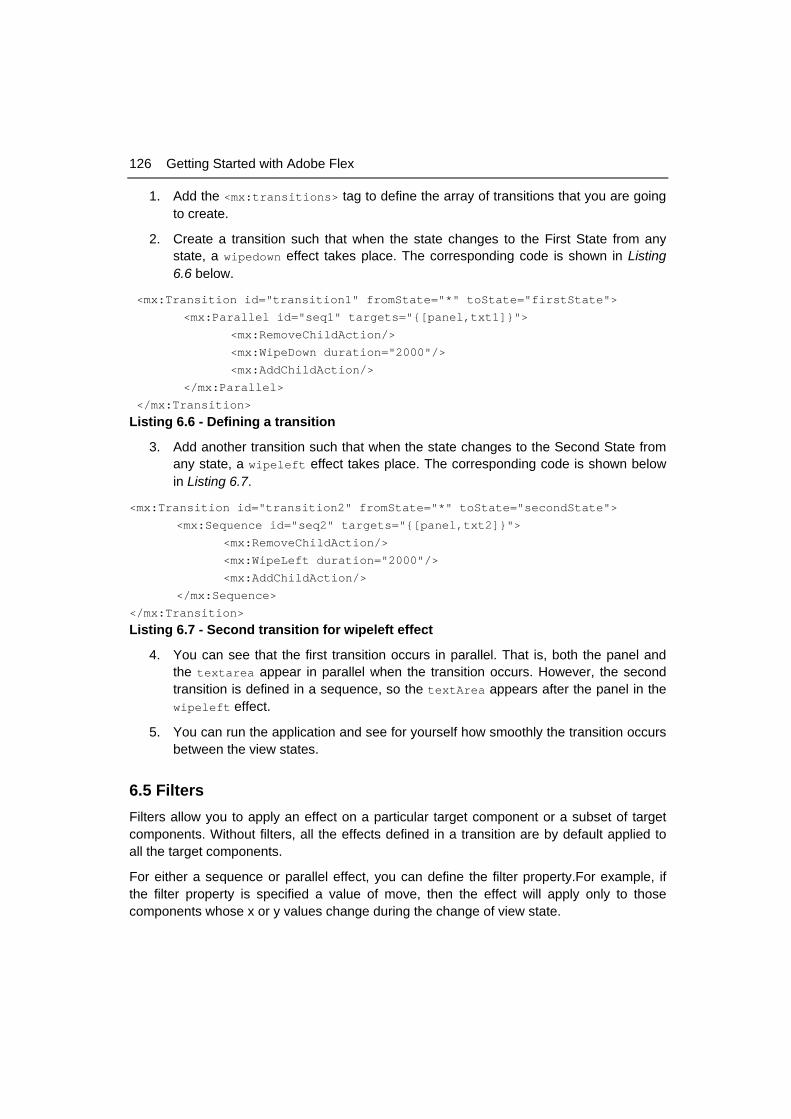
126 Getting Started with Adobe Flex
1. Add the <mx:transitions> tag to define the array of transitions that you are going to create.
2. Create a transition such that when the state changes to the First State from any state, a wipedown effect takes place. The corresponding code is shown in Listing 6.6 below.
<mx:Transition id="transition1" fromState="*" toState="firstState">
<mx:Parallel id="seq1" targets="{[panel,txt1]}">
<mx:RemoveChildAction/>
<mx:WipeDown duration="2000"/>
<mx:AddChildAction/>
</mx:Parallel>
</mx:Transition>
Listing 6.6 - Defining a transition
3. Add another transition such that when the state changes to the Second State from any state, a wipeleft effect takes place. The corresponding code is shown below in Listing 6.7.
<mx:Transition id="transition2" fromState="*" toState="secondState">
<mx:Sequence id="seq2" targets="{[panel,txt2]}">
<mx:RemoveChildAction/>
<mx:WipeLeft duration="2000"/>
<mx:AddChildAction/>
</mx:Sequence>
</mx:Transition>
Listing 6.7 - Second transition for wipeleft effect
4. You can see that the first transition occurs in parallel. That is, both the panel and the textarea appear in parallel when the transition occurs. However, the second transition is defined in a sequence, so the textArea appears after the panel in the wipeleft effect.
5. You can run the application and see for yourself how smoothly the transition occurs between the view states.
6.5 Filters Filters allow you to apply an effect on a particular target component or a subset of target components. Without filters, all the effects defined in a transition are by default applied to all the target components.
For either a sequence or parallel effect, you can define the filter property.For example, if the filter property is specified a value of move, then the effect will apply only to those components whose x or y values change during the change of view state.
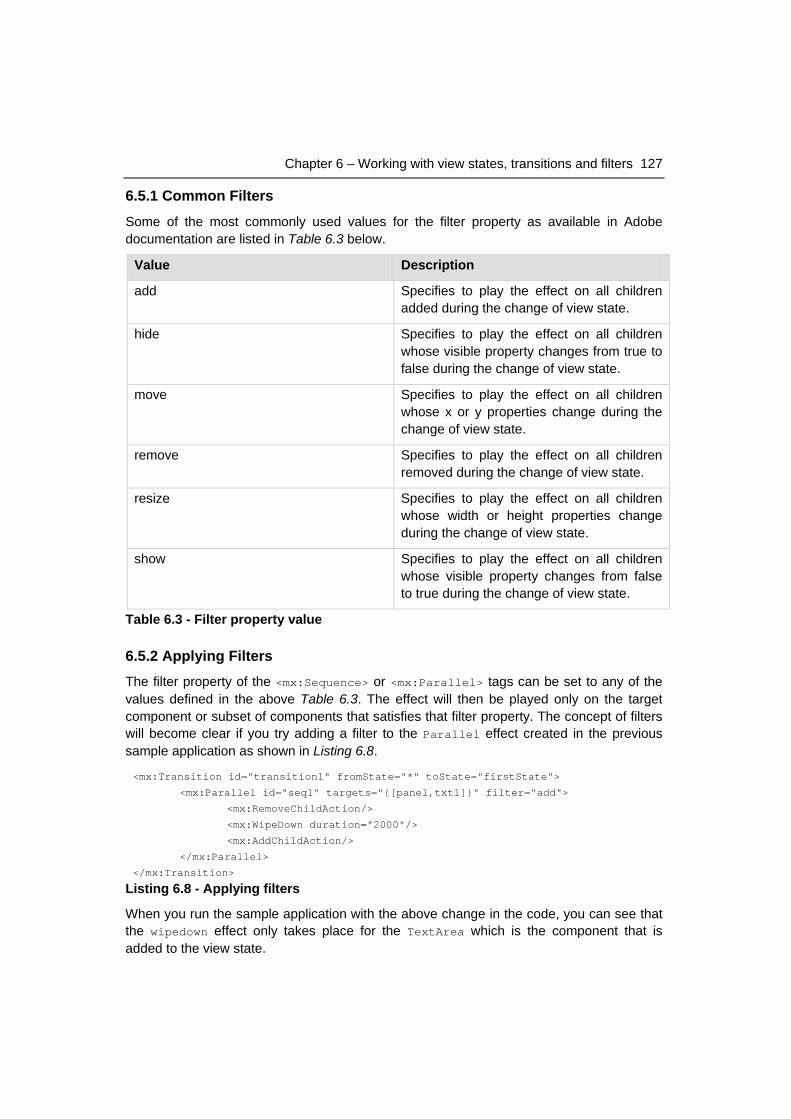
Chapter 6 – Working with view states, transitions and filters 127
6.5.1 Common Filters
Some of the most commonly used values for the filter property as available in Adobe documentation are listed in Table 6.3 below.
Value Description
add Specifies to play the effect on all children added during the change of view state.
hide Specifies to play the effect on all children whose visible property changes from true to false during the change of view state.
move Specifies to play the effect on all children whose x or y properties change during the change of view state.
remove Specifies to play the effect on all children removed during the change of view state.
resize Specifies to play the effect on all children whose width or height properties change during the change of view state.
show Specifies to play the effect on all children whose visible property changes from false to true during the change of view state.
Table 6.3 - Filter property value
6.5.2 Applying Filters The filter property of the <mx:Sequence> or <mx:Parallel> tags can be set to any of the values defined in the above Table 6.3. The effect will then be played only on the target component or subset of components that satisfies that filter property. The concept of filters will become clear if you try adding a filter to the Parallel effect created in the previous sample application as shown in Listing 6.8.
<mx:Transition id="transition1" fromState="*" toState="firstState">
<mx:Parallel id="seq1" targets="{[panel,txt1]}" filter="add">
<mx:RemoveChildAction/>
<mx:WipeDown duration="2000"/>
<mx:AddChildAction/>
</mx:Parallel>
</mx:Transition>
Listing 6.8 - Applying filters
When you run the sample application with the above change in the code, you can see that the wipedown effect only takes place for the TextArea which is the component that is added to the view state.
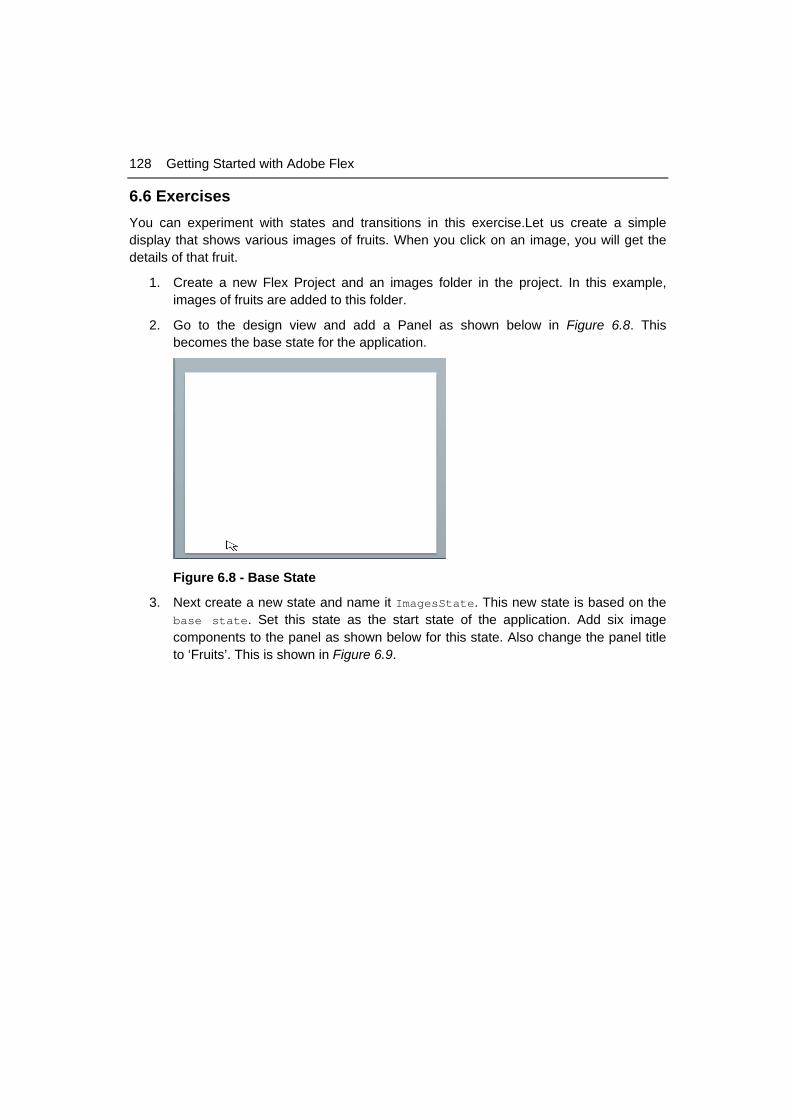
128 Getting Started with Adobe Flex
6.6 Exercises You can experiment with states and transitions in this exercise.Let us create a simple display that shows various images of fruits. When you click on an image, you will get the details of that fruit.
1. Create a new Flex Project and an images folder in the project. In this example, images of fruits are added to this folder.
2. Go to the design view and add a Panel as shown below in Figure 6.8. This becomes the base state for the application.
Figure 6.8 - Base State
3. Next create a new state and name it ImagesState. This new state is based on the base state. Set this state as the start state of the application. Add six image components to the panel as shown below for this state. Also change the panel title to ‘Fruits’. This is shown in Figure 6.9.
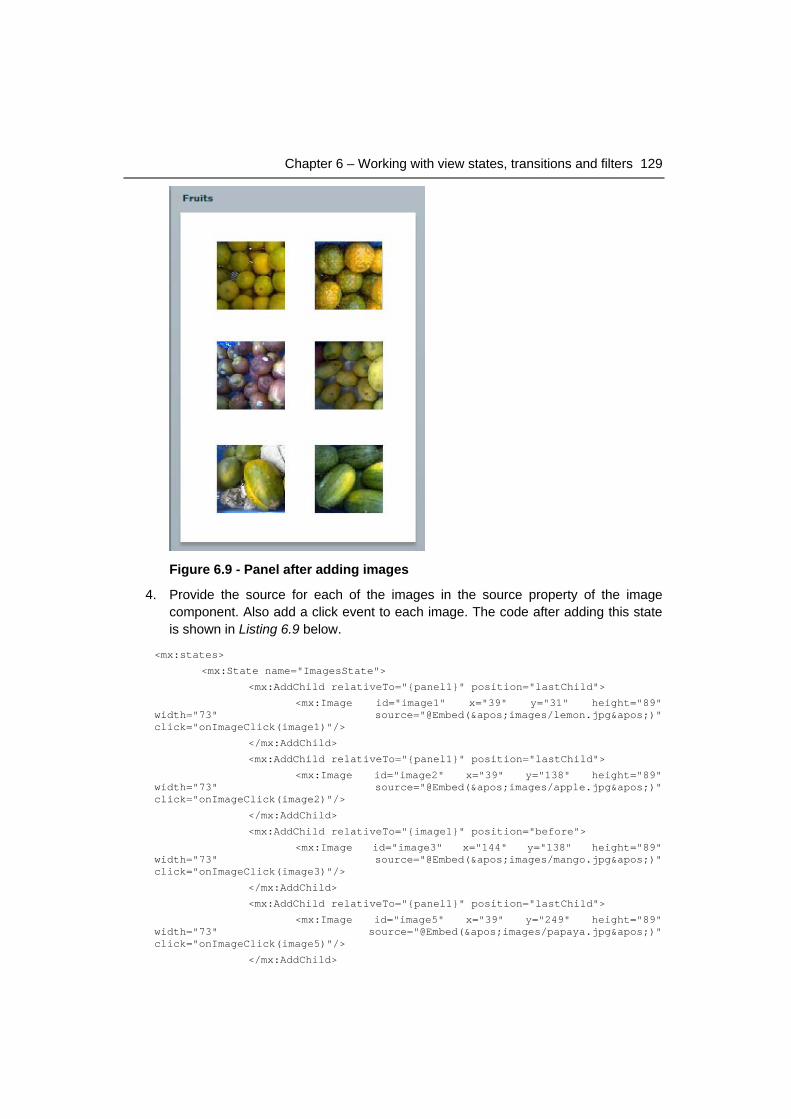
Chapter 6 – Working with view states, transitions and filters 129
Figure 6.9 - Panel after adding images
4. Provide the source for each of the images in the source property of the image component. Also add a click event to each image. The code after adding this state is shown in Listing 6.9 below.
<mx:states>
<mx:State name="ImagesState">
<mx:AddChild relativeTo="{panel1}" position="lastChild">
<mx:Image id="image1" x="39" y="31" height="89" width="73" source="@Embed('images/lemon.jpg')" click="onImageClick(image1)"/>
</mx:AddChild>
<mx:AddChild relativeTo="{panel1}" position="lastChild">
<mx:Image id="image2" x="39" y="138" height="89" width="73" source="@Embed('images/apple.jpg')" click="onImageClick(image2)"/>
</mx:AddChild>
<mx:AddChild relativeTo="{image1}" position="before">
<mx:Image id="image3" x="144" y="138" height="89" width="73" source="@Embed('images/mango.jpg')" click="onImageClick(image3)"/>
</mx:AddChild>
<mx:AddChild relativeTo="{panel1}" position="lastChild">
<mx:Image id="image5" x="39" y="249" height="89" width="73" source="@Embed('images/papaya.jpg')" click="onImageClick(image5)"/>
</mx:AddChild>
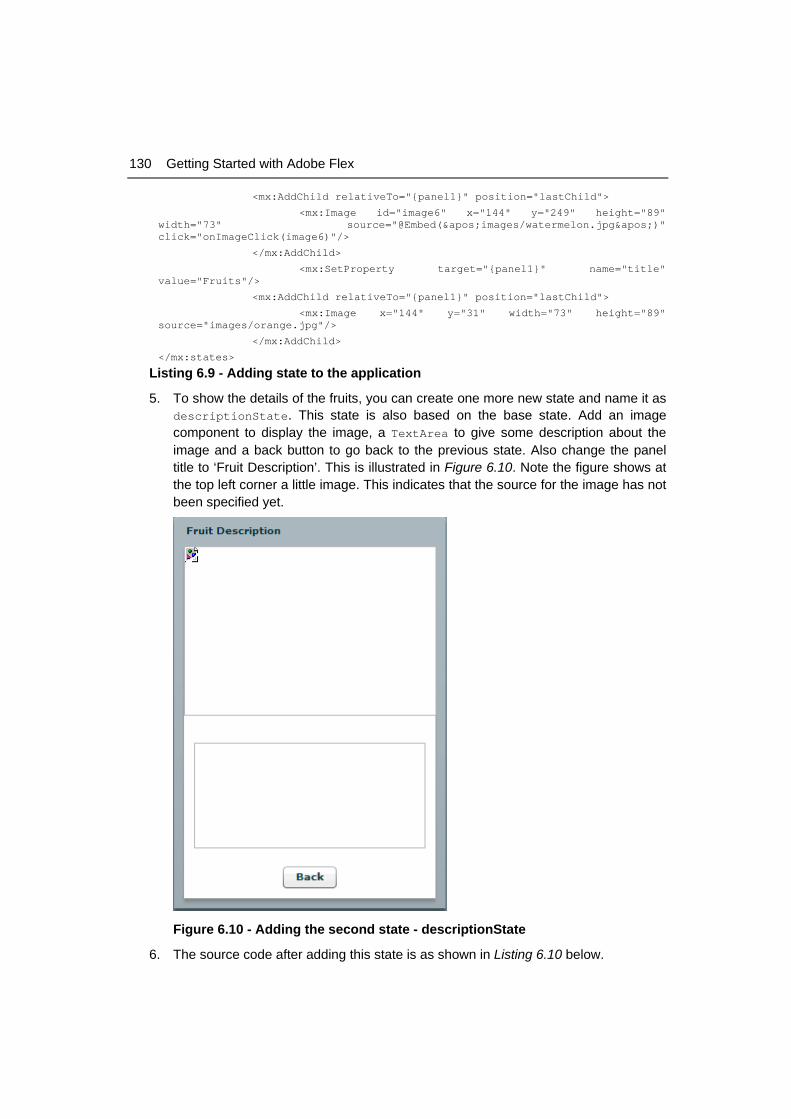
130 Getting Started with Adobe Flex
<mx:AddChild relativeTo="{panel1}" position="lastChild">
<mx:Image id="image6" x="144" y="249" height="89" width="73" source="@Embed('images/watermelon.jpg')" click="onImageClick(image6)"/>
</mx:AddChild>
<mx:SetProperty target="{panel1}" name="title" value="Fruits"/>
<mx:AddChild relativeTo="{panel1}" position="lastChild">
<mx:Image x="144" y="31" width="73" height="89" source="images/orange.jpg"/>
</mx:AddChild>
</mx:states>
Listing 6.9 - Adding state to the application
5. To show the details of the fruits, you can create one more new state and name it as descriptionState. This state is also based on the base state. Add an image component to display the image, a TextArea to give some description about the image and a back button to go back to the previous state. Also change the panel title to ‘Fruit Description’. This is illustrated in Figure 6.10. Note the figure shows at the top left corner a little image. This indicates that the source for the image has not been specified yet.
Figure 6.10 - Adding the second state - descriptionState
6. The source code after adding this state is as shown in Listing 6.10 below.
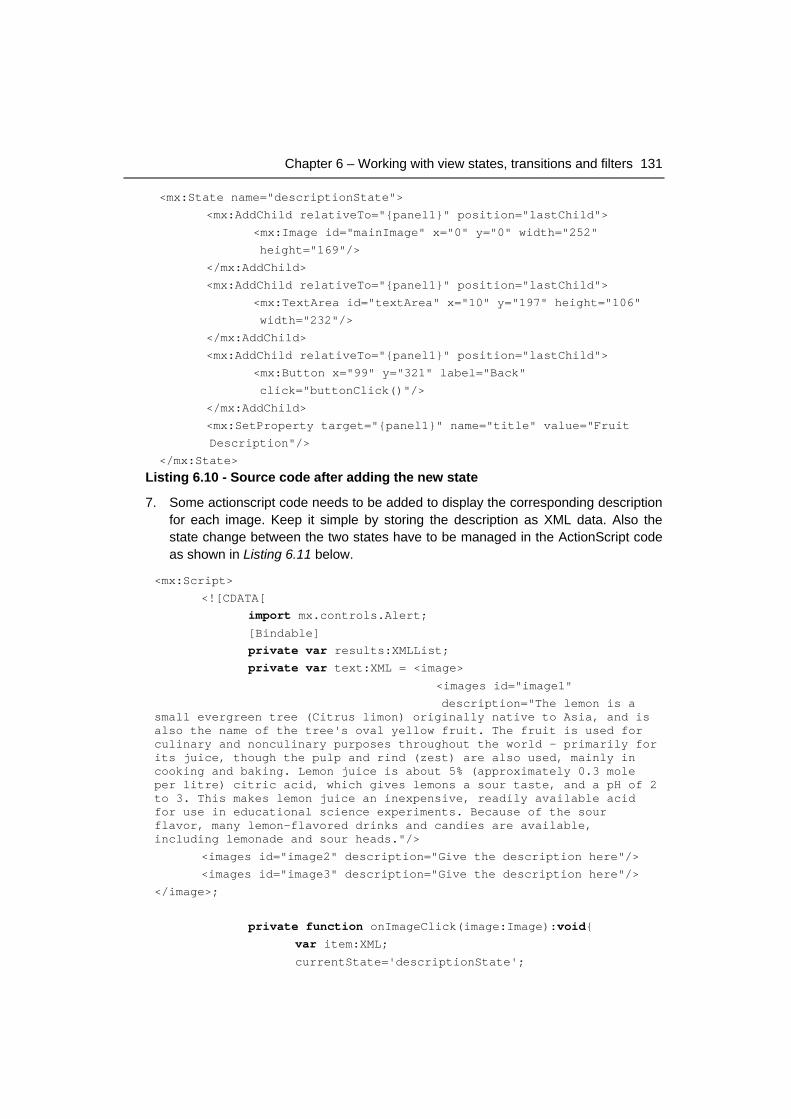
Chapter 6 – Working with view states, transitions and filters 131
<mx:State name="descriptionState">
<mx:AddChild relativeTo="{panel1}" position="lastChild">
<mx:Image id="mainImage" x="0" y="0" width="252"
height="169"/>
</mx:AddChild>
<mx:AddChild relativeTo="{panel1}" position="lastChild">
<mx:TextArea id="textArea" x="10" y="197" height="106"
width="232"/>
</mx:AddChild>
<mx:AddChild relativeTo="{panel1}" position="lastChild">
<mx:Button x="99" y="321" label="Back"
click="buttonClick()"/>
</mx:AddChild>
<mx:SetProperty target="{panel1}" name="title" value="Fruit
Description"/>
</mx:State>
Listing 6.10 - Source code after adding the new state
7. Some actionscript code needs to be added to display the corresponding description for each image. Keep it simple by storing the description as XML data. Also the state change between the two states have to be managed in the ActionScript code as shown in Listing 6.11 below.
<mx:Script>
<![CDATA[
import mx.controls.Alert;
[Bindable]
private var results:XMLList;
private var text:XML = <image>
<images id="image1"
description="The lemon is a small evergreen tree (Citrus limon) originally native to Asia, and is also the name of the tree's oval yellow fruit. The fruit is used for culinary and nonculinary purposes throughout the world – primarily for its juice, though the pulp and rind (zest) are also used, mainly in cooking and baking. Lemon juice is about 5% (approximately 0.3 mole per litre) citric acid, which gives lemons a sour taste, and a pH of 2 to 3. This makes lemon juice an inexpensive, readily available acid for use in educational science experiments. Because of the sour flavor, many lemon-flavored drinks and candies are available, including lemonade and sour heads."/>
<images id="image2" description="Give the description here"/>
<images id="image3" description="Give the description here"/>
</image>;
private function onImageClick(image:Image):void{ var item:XML;
currentState='descriptionState';
132 Getting Started with Adobe Flex
mainImage.source=image.source;
results=text.images.(@id==image.id).@description;
textArea.text=results;
}
private function buttonClick():void{ currentState='ImagesState';
}
]]>
</mx:Script>
Listing 6.11 - ActionScript code to manage states
8. Provide simple transitions with wipeDown and wipeRight effects when the state changes. Try providing transition effects of your choice to make it look better. Listing 6.12 shows the code for transitions.
<mx:transitions>
<mx:Transition id="transition1" fromState="ImagesState" toState="descriptionState">
<mx:Parallel id="seq1" targets="{[panel1]}">
<mx:RemoveChildAction/>
<mx:WipeDown duration="2000"/>
<mx:AddChildAction/>
</mx:Parallel>
</mx:Transition>
<mx:Transition id="transition2" fromState="descriptionState" toState="ImagesState">
<mx:Sequence id="seq2" targets="{[panel1]}">
<mx:RemoveChildAction/>
<mx:WipeRight duration="2000"/>
<mx:AddChildAction/>
</mx:Sequence>
</mx:Transition>
</mx:transitions>
Listing 6.12 - Adding transitions
9. Run the application and you can view the images in the first state as shown in Figure 6.11 below.
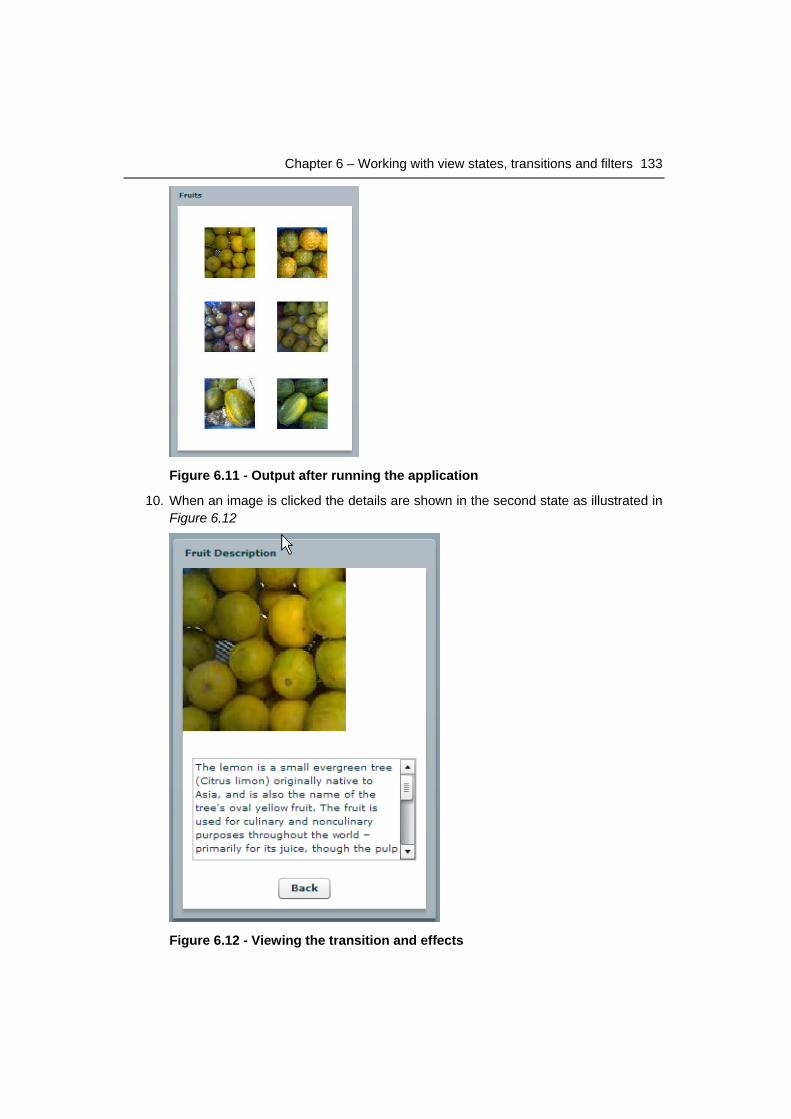
Chapter 6 – Working with view states, transitions and filters 133
Figure 6.11 - Output after running the application
10. When an image is clicked the details are shown in the second state as illustrated in Figure 6.12
Figure 6.12 - Viewing the transition and effects
134 Getting Started with Adobe Flex
6.7 Summary In this chapter, you learned how view states and transition from one state to another.You also learned how Flex provides you with various visual and audio effects to use in your application, right out of box, and to work with filters. Flex allows you to provide a rich user experience with minimal code.
6.8 Review questions 1. What is the difference between a trigger and an event?
2. Explain what a filter is using an example.
3. What is the use of the handler property in the <mx:SetEventHandler> tag?
4. Write the code to apply the zoom effect for text.
5. Write the code to rotate an image indefinitely until the ‘stop’ button is pressed.
6. Which among the following is not an effect
A. Blur
B. Dissolve
C. Fade
D. Glow
E. Zoomin
7. Which of the following BlendMode is used for animating a lightening dissolve between two objects -
A. BlendMode.SUBTRACT
B. BlendMode.ADD
C. BlendMode.LIGHTEN
D. BlendMode.INVERT
E. None of the above
8. Which of the following is not a type of blend mode from the BlendMode class? .
A. BlendMode.DIFFERENCE
B. BlendMode.SOFTLIGHT
C. BlendMode.HARDLIGHT
D. BlendMode.MULTIPLY
E. None of the above
9. Which of the following is not a type of filter in the flash.filter.* package?
A. BevelFilter
Chapter 6 – Working with view states, transitions and filters 135
B. DropShadowFilter
C. DisplacementMapFilter
D. ShadowFilter
E. None of the above
10. Which method will allow you to change view states in your application.
1) Using the currentState property.
2) Using the stateChanged event
3) Using the newState property
4) Using the setCurrentState() method of the UIComponent.
A. 1 and 4
B. 2 and 3
C. 1 and 3
D. 2 and 4
E. None of the above

7 Chapter 7 - Working with the server Most applications in real life need to retrieve, manipulate, and store data. Because of many reasons including performance, it is desirable to process data close to its storage as much as possible. For these reasons Flex applications need to interact with backend servers frequently. In the current context, the term “server” primarily implies application server.
In this chapter you will learn about:
Different ways of communicating with a remote Web server
Working with Web services
Using a remote object
Using the HTTPService object
Working with databases
7.1 Working with the server: The big picture Most Flex applications need to access a Web server. Flex makes this job easy with the RPC (Remote Procedure Call) services that it provides. The RPC services provide a call-and-response model to access remote data and expose components based on service-oriented architecture. There are three RPC classes in Flex:
The WebService class allows you to access Web services or software modules that set remote operations.
The RemoteObject class allows you to access public methods of remote classes
The HTTPService class helps you to carry out Http requests in GET or POST to specific URLs.
You will soon learn each of these in detail along with examples on how they are used in Flex. Figure 7.1 provides an overview of a Flex application communicating to a server.
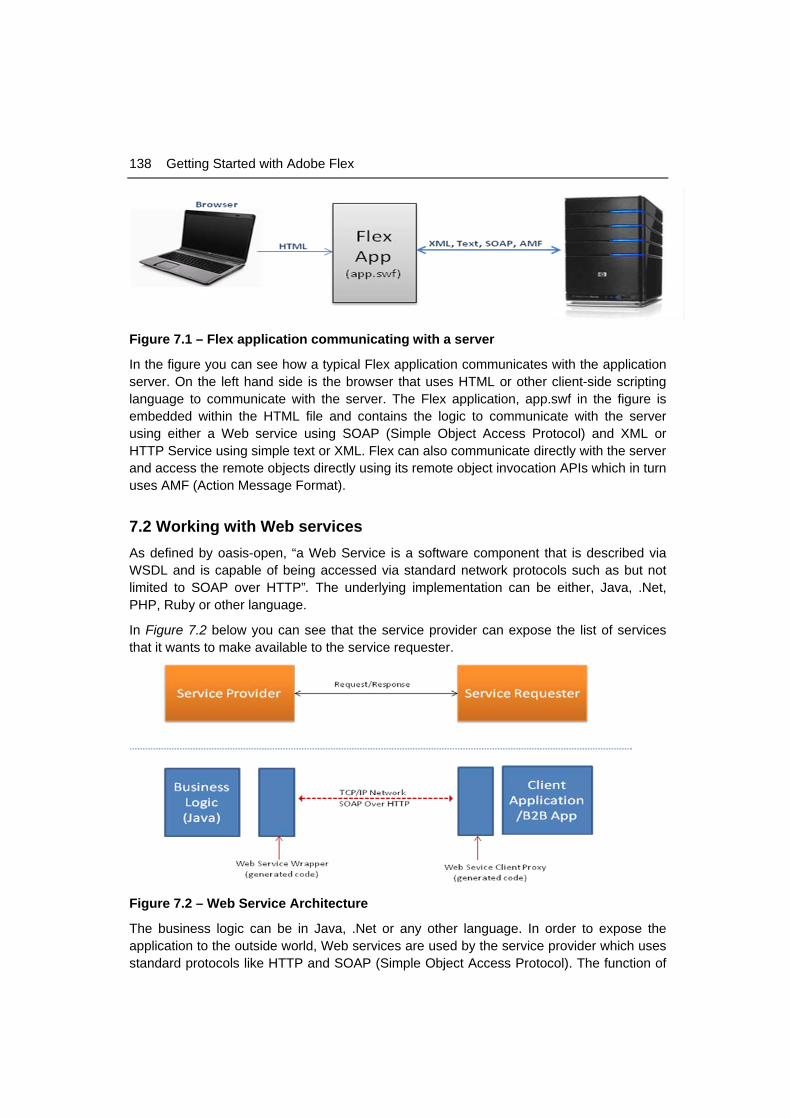
138 Getting Started with Adobe Flex
Figure 7.1 – Flex application communicating with a server
In the figure you can see how a typical Flex application communicates with the application server. On the left hand side is the browser that uses HTML or other client-side scripting language to communicate with the server. The Flex application, app.swf in the figure is embedded within the HTML file and contains the logic to communicate with the server using either a Web service using SOAP (Simple Object Access Protocol) and XML or HTTP Service using simple text or XML. Flex can also communicate directly with the server and access the remote objects directly using its remote object invocation APIs which in turn uses AMF (Action Message Format).
7.2 Working with Web services As defined by oasis-open, “a Web Service is a software component that is described via WSDL and is capable of being accessed via standard network protocols such as but not limited to SOAP over HTTP”. The underlying implementation can be either, Java, .Net, PHP, Ruby or other language.
In Figure 7.2 below you can see that the service provider can expose the list of services that it wants to make available to the service requester.
Figure 7.2 – Web Service Architecture
The business logic can be in Java, .Net or any other language. In order to expose the application to the outside world, Web services are used by the service provider which uses standard protocols like HTTP and SOAP (Simple Object Access Protocol). The function of
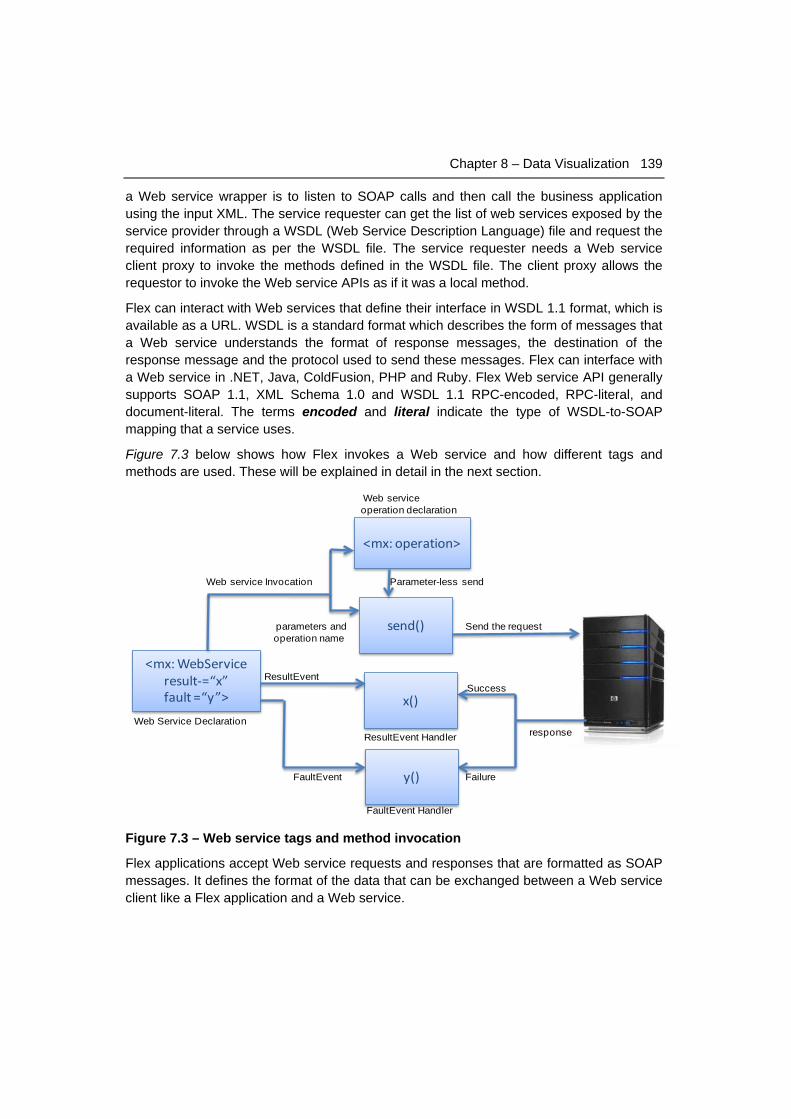
Chapter 8 – Data Visualization 139
a Web service wrapper is to listen to SOAP calls and then call the business application using the input XML. The service requester can get the list of web services exposed by the service provider through a WSDL (Web Service Description Language) file and request the required information as per the WSDL file. The service requester needs a Web service client proxy to invoke the methods defined in the WSDL file. The client proxy allows the requestor to invoke the Web service APIs as if it was a local method.
Flex can interact with Web services that define their interface in WSDL 1.1 format, which is available as a URL. WSDL is a standard format which describes the form of messages that a Web service understands the format of response messages, the destination of the response message and the protocol used to send these messages. Flex can interface with a Web service in .NET, Java, ColdFusion, PHP and Ruby. Flex Web service API generally supports SOAP 1.1, XML Schema 1.0 and WSDL 1.1 RPC-encoded, RPC-literal, and document-literal. The terms encoded and literal indicate the type of WSDL-to-SOAP mapping that a service uses.
Figure 7.3 below shows how Flex invokes a Web service and how different tags and methods are used. These will be explained in detail in the next section.
<mx: WebServiceresult-=“x”fault =“y”>
Web Service Declaration
send()
<mx: operation>
x()
y()
ResultEvent Handler
FaultEvent Handler
ResultEvent
FaultEvent
Web service Invocation
Web service operation declaration
Parameter-less send
parameters and operation name
Send the request
response
Success
Failure
Figure 7.3 – Web service tags and method invocation
Flex applications accept Web service requests and responses that are formatted as SOAP messages. It defines the format of the data that can be exchanged between a Web service client like a Flex application and a Web service.
140 Getting Started with Adobe Flex
7.2.1 The <mx:WebService> tag Flex provide the <mx:WebService> tag to use in MXML file. The Flex compiler reads the WSDL referenced in the tag and compiles it into a corresponding ActionScript code with the desired behavior. The wsdl property specifies the location of WSDL file over HTTP. Optionally, the property showBusyCursor, can be used to show a busy cursor unless a result is received from the service provider. Listing 7.1 illustrates the <mx:WebService> tag including the showBusyCursor property
<mx:WebService concurrency="multiple|single|last" fault="No default." id="No default." load="No default." port="No default." protocol="http|https" result="No default." service="No default." serviceName="No default." showBusyCursor="false|true" wsdl="No default."/>
Listing 7.1 - The <mx:WebService> tag
7.2.2. The send() method The Web service does not get invoked unless a call to the send() method is made. Parameters for the operation can be specified in the send() method itself. Below is an example where send() is called:
service.GetLocationInfoForPhoneNumber.send(areaCode.text,
threeDigits.text);
7.2.3 The ResultEvent object
This event indicates that the operation has successfully returned the result. It has a result property which holds the result returned by the service provider. Listing 7.2 illustrates the usage of ResultEvent.
import mx.rpc.events.ResultEvent;
private function onResult(event:ResultEvent):void{
searching=false;
if(event.result.ServiceResult.Count==0){
output.text =
event.result.ServiceResult.StatusDescription;
return;
} }
Listing 7.2 –Using ResultEvent
In the above code listing, the ServiceResult.Count is customary to the example being used and is not used in all the cases. Here it checks if any information is available for a given area code and prefix. The complete code listing is available in section 7.2.10.
Chapter 8 – Data Visualization 141
7.2.4 The FaultEvent object
This event is dispatched when the Web service call has a fault. The fault property holds the information about the cause for failure.
Listing 7.3 illustrates the usage of the FaultEvent handler.
import mx.rpc.events.FaultEvent;
private function onFault(event:FaultEvent):void{
isSearching = false;
info.text = event.fault.message.toString();
}
Listing 7.3 –Using FaultEvent
The above code listing shows the piece of code that gets executed when a FaultEvent is raised by the Web service call. Here the client is presented with the reason for the FaultEvent.
7.2.5 The result property
The result property specifies the operation to be performed when the Web service sends the response back to the client. For example:
<mx:WebService id="ws" result="onResult(event)" />
7.2.6 The fault property
The fault property specifies the operation to be performed when the Web service returns an exception as response to the client. For example:
<mx:WebService id="ws" result="onFault(event)" />
7.2.7 The service property
The user can alternatively specify the serviceName instead of using the wsdl property. In this case the WSDL related information can be stored on the server in the flex-config.xml
7.2.8 The <mx:operation> tag The <mx:WebService> tag can optionally have <mx:operation> tags that represent Web service operations. Below is the syntax for the <mx:operation> tag.
<mx:operation concurrency="multiple|single|last" fault="No default." name="No default, required" result="No default." resultFormat="object|xml" />
7.2.9 The <mx:request> tag The <mx:operation> tag can have a single <mx:request> child tag which looks like this:
142 Getting Started with Adobe Flex
<mx:request format=”object|xml”>
This tag can have child tags. If the format specified is object then, the child tags represent the named parameters sent to the service, where the order of the parameters is not important, and if the format specified is xml then, the body represents the SOAP message sent to the service.
7.2.10 Sample Application
Let us now develop an AIR application that sits on your desktop and gives you information about the caller if you provide the area code and the first three digits of the phone number.
Create a new Flex project and select the application type as Desktop Application.
You will find the new MXML file created under the src folder having the same name as the project name. The file will look like the following:
<?xml version="1.0" encoding="utf-8"?>
<mx:WindowedApplication xmlns:mx="http://www.adobe.com/2009/mxml" layout="absolute">
</mx:WindowedApplication>
This shows that the application type is a desktop application because it's using the tag <mx:WindowedApplication>.
Now define the graphical interface for this application using the code in Listing 7.4 below.
<mx:ApplicationControlBar dock="true" verticalAlign="middle">
<mx:Label text="Area Code:" fontWeight="bold"/>
<mx:TextInput id="areaCode" text="301" maxChars="3"/>
<mx:Label text="First Three Digits:" fontWeight="bold"/>
<mx:TextInput id="threeDigits" text="929" maxChars="3"/>
<mx:Button label="Search" click="startSearch()"
enabled="{!isSearching}" useHandCursor="true" buttonMode="true"/>
</mx:ApplicationControlBar>
<mx:TextArea id="info" editable="false" width="100%" height="513"/>
Listing 7.4 - Defining the graphical interface for the sample application
After adding the graphical interface, provide the Web service details to which the call needs to be made as illustrated in Listing 7.5
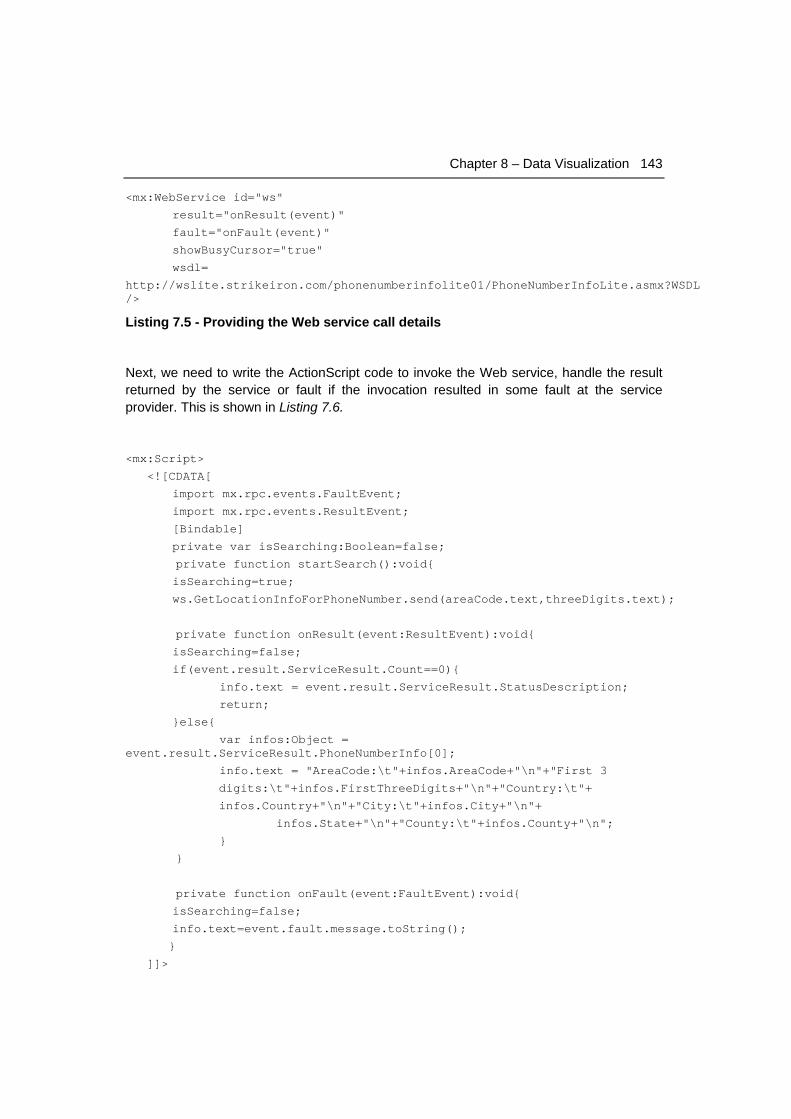
Chapter 8 – Data Visualization 143
<mx:WebService id="ws"
result="onResult(event)"
fault="onFault(event)"
showBusyCursor="true"
wsdl=
http://wslite.strikeiron.com/phonenumberinfolite01/PhoneNumberInfoLite.asmx?WSDL />
Listing 7.5 - Providing the Web service call details
Next, we need to write the ActionScript code to invoke the Web service, handle the result returned by the service or fault if the invocation resulted in some fault at the service provider. This is shown in Listing 7.6.
<mx:Script>
<![CDATA[
import mx.rpc.events.FaultEvent;
import mx.rpc.events.ResultEvent;
[Bindable]
private var isSearching:Boolean=false;
private function startSearch():void{
isSearching=true;
ws.GetLocationInfoForPhoneNumber.send(areaCode.text,threeDigits.text);
private function onResult(event:ResultEvent):void{
isSearching=false;
if(event.result.ServiceResult.Count==0){
info.text = event.result.ServiceResult.StatusDescription;
return;
}else{
var infos:Object = event.result.ServiceResult.PhoneNumberInfo[0];
info.text = "AreaCode:\t"+infos.AreaCode+"\n"+"First 3
digits:\t"+infos.FirstThreeDigits+"\n"+"Country:\t"+
infos.Country+"\n"+"City:\t"+infos.City+"\n"+
infos.State+"\n"+"County:\t"+infos.County+"\n";
}
}
private function onFault(event:FaultEvent):void{
isSearching=false;
info.text=event.fault.message.toString();
}
]]>
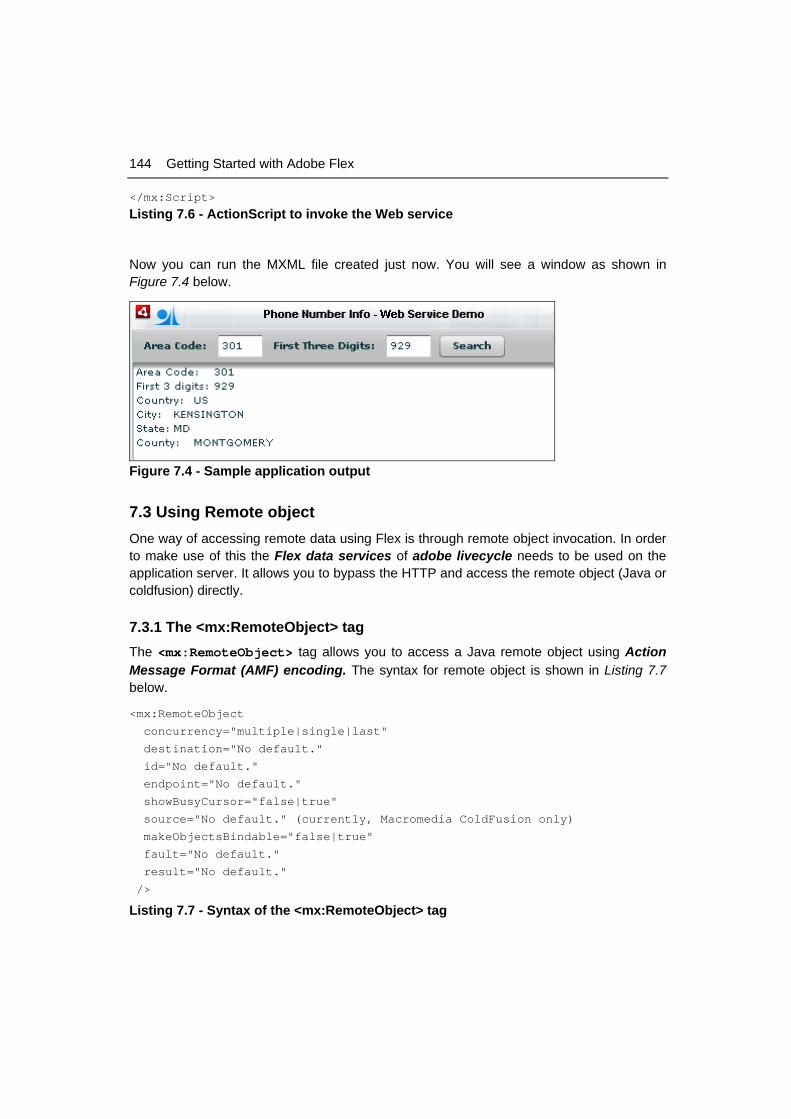
144 Getting Started with Adobe Flex
</mx:Script>
Listing 7.6 - ActionScript to invoke the Web service
Now you can run the MXML file created just now. You will see a window as shown in Figure 7.4 below.
Figure 7.4 - Sample application output
7.3 Using Remote object One way of accessing remote data using Flex is through remote object invocation. In order to make use of this the Flex data services of adobe livecycle needs to be used on the application server. It allows you to bypass the HTTP and access the remote object (Java or coldfusion) directly.
7.3.1 The <mx:RemoteObject> tag The <mx:RemoteObject> tag allows you to access a Java remote object using Action Message Format (AMF) encoding. The syntax for remote object is shown in Listing 7.7 below.
<mx:RemoteObject
concurrency="multiple|single|last"
destination="No default."
id="No default."
endpoint="No default."
showBusyCursor="false|true"
source="No default." (currently, Macromedia ColdFusion only)
makeObjectsBindable="false|true"
fault="No default."
result="No default."
/>
Listing 7.7 - Syntax of the <mx:RemoteObject> tag

Chapter 8 – Data Visualization 145
7.3.2 <mx:method> tag An <mx:RemoteObject> can have multiple <mx:method> tags as child tags. The <mx:method> tag specifies the operations or methods pertaining to the remote object. The syntax for this tag is shown in Listing 7.8 below.
<mx:method
concurrency="multiple|single|last"
name="No default, required."
makeObjectsBindable="false|true"
fault="No default."
result="No default."
/>
Listing 7.8 - Syntax of the <mx:method> tag
7.3.3 <mx:arguments> tag
An <mx:method> tag can have a single <mx:arguments> tag as child tag. This tag represents an array of objects to be sent as parameter to the remote object’s method in an order.
<mx:arguments></mx:arguments>
Note:
It is beyond the scope of this book to discuss the usage of remote object in Flex applications as it uses the Flex Data Services.
7.4 Using HTTPService Another tool that Flex provides for accessing remote data is the HttpService Request Object. The flex application will send an HttpService request to access remote data. Since Flex does not directly interact with the database, a Web server will respond to the Http Service Request by querying the database and returning the results. Figure 7.5 shows how Flex uses HttpService for communicating with the data server.
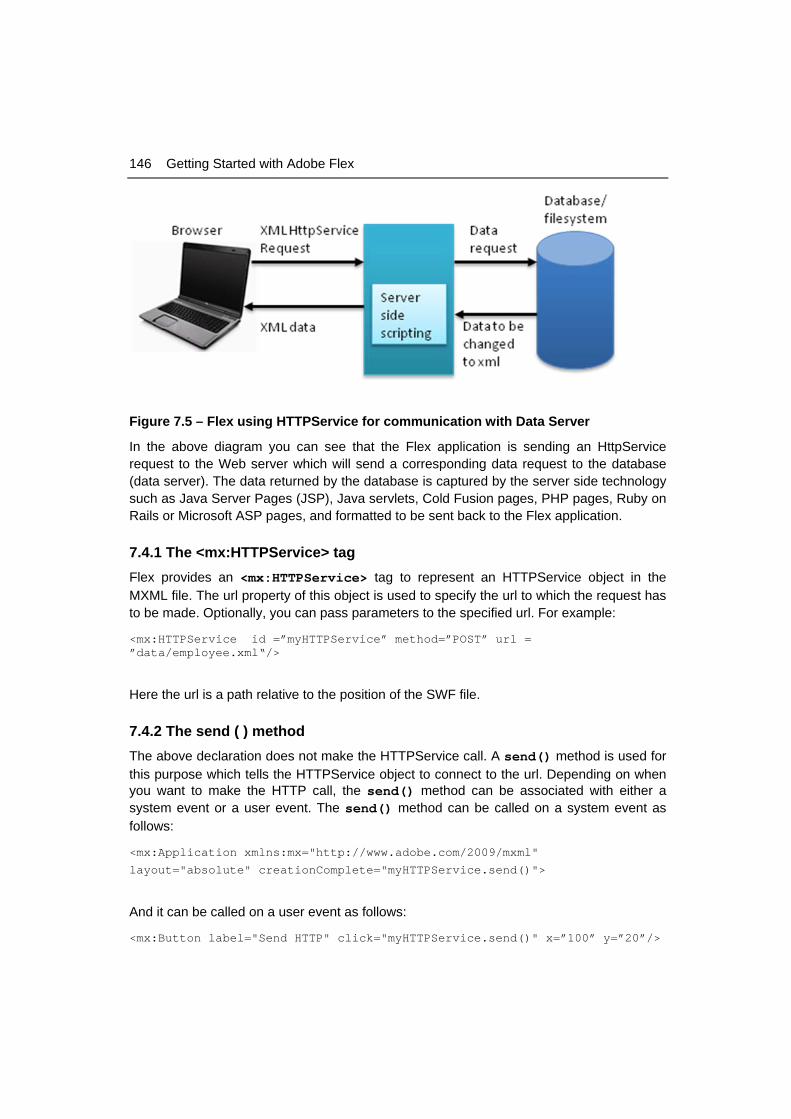
146 Getting Started with Adobe Flex
Figure 7.5 – Flex using HTTPService for communication with Data Server
In the above diagram you can see that the Flex application is sending an HttpService request to the Web server which will send a corresponding data request to the database (data server). The data returned by the database is captured by the server side technology such as Java Server Pages (JSP), Java servlets, Cold Fusion pages, PHP pages, Ruby on Rails or Microsoft ASP pages, and formatted to be sent back to the Flex application.
7.4.1 The <mx:HTTPService> tag Flex provides an <mx:HTTPService> tag to represent an HTTPService object in the MXML file. The url property of this object is used to specify the url to which the request has to be made. Optionally, you can pass parameters to the specified url. For example:
<mx:HTTPService id =”myHTTPService” method=”POST” url = ”data/employee.xml“/>
Here the url is a path relative to the position of the SWF file.
7.4.2 The send ( ) method The above declaration does not make the HTTPService call. A send() method is used for this purpose which tells the HTTPService object to connect to the url. Depending on when you want to make the HTTP call, the send() method can be associated with either a system event or a user event. The send() method can be called on a system event as follows:
<mx:Application xmlns:mx="http://www.adobe.com/2009/mxml"
layout="absolute" creationComplete="myHTTPService.send()">
And it can be called on a user event as follows:
<mx:Button label="Send HTTP" click="myHTTPService.send()" x=”100” y=”20”/>
Chapter 8 – Data Visualization 147
7.4.3 The <mx:Request> tag An <mx:Request> tag can be placed inside a <mx:HTTPService> tag to specify the values for any parameters the Web service requires. Nested inside the <mx:Request> tag will be the tags that have the name of the parameter and these tags will have the value.
<mx:HTTPService>
<mx:Request>
<deptId>{dept.selectedItem.data}</deptId>
</mx:Request>
</mx:HTTPService>
Listing 7.9 - <mx:Request> tag
7.4.4 The LastResult property
The response of the request will be returned to the lastResult property of the HTTPService object. This response contains the entire object returned by the Web server. The lastResult property can be data binded to a data grid or the result can be converted to an ArrayCollection which can then be bound to the data grid.
7.4.5 Sample application that uses HTTPService
You can now use what you have learned until now to create a Flex application that makes an HTTPService request and receives xml data that will be binded to a data grid. Follow these steps:
1. Create a Flex project and create a new MXML file.
2. Add a data folder to the project and create an xml file with the contents shown in Listing 7.10
<?xml version="1.0" encoding="UTF-8”?>
<data>
<employee>
<employee_id> 3456</employee_id>
<employee_name>Peter Sand</employee_name>
<designation>Software Engineer</designation>
</employee>
<employee>
<employee_id> 5368</employee_id>
<employee_name>Maria Rachell</employee_name>
<designation>Lead Architect</designation>
</employee>
<employee>
<employee_id> 8245</employee_id>
<employee_name>Renuka Sharma</employee_name>

148 Getting Started with Adobe Flex
<designation>Associate Software engineer</designation>
</employee>
</data>
Listing 7.10 – data.xml file
3. Now to start with, add the <mx:HTTPService> tag below the Application tag and specify the relative path of the xml file as shown below:
<mx:HTTPService id="myHTTPService" url="data/employee.xml" />
4. Define a graphical user interface by adding a DataGrid to the application after the HTTPService tag as shown in Listing 7.11 below.
<mx:Panel x="389" y="195" width="350" height="333" layout="absolute">
<mx:DataGrid id="myDataGrid"
dataProvider="{myHTTPService.lastResult.data.employee}" x="0" y="0"
height="293" width="330">
<mx:columns>
<mx:DataGridColumn headerText="Employee id"
dataField="employee_id" />
<mx:DataGridColumn headerText=”Name" dataField="employee_name"
/>
<mx:DataGridColumn headerText="Designation"
dataField="designation" />
</mx:columns>
</mx:DataGrid>
</mx:Panel>
Listing 7.11 – Defining the user interface
The dataProvider of the DataGrid is linked to the lastResult property, which contains the xml structure that is returned by the call.
5. Invoke the send() method on the creationComplete event of the application as shown below.
<mx:Application xmlns:mx="http://www.adobe.com/2009/mxml"
layout="absolute" creationComplete="myHTTPService.send()">
6. Now you can save and run the application and see how with such less code, you can make http service requests and display the data in the xml file in the data grid as shown in Figure 7.6 below.
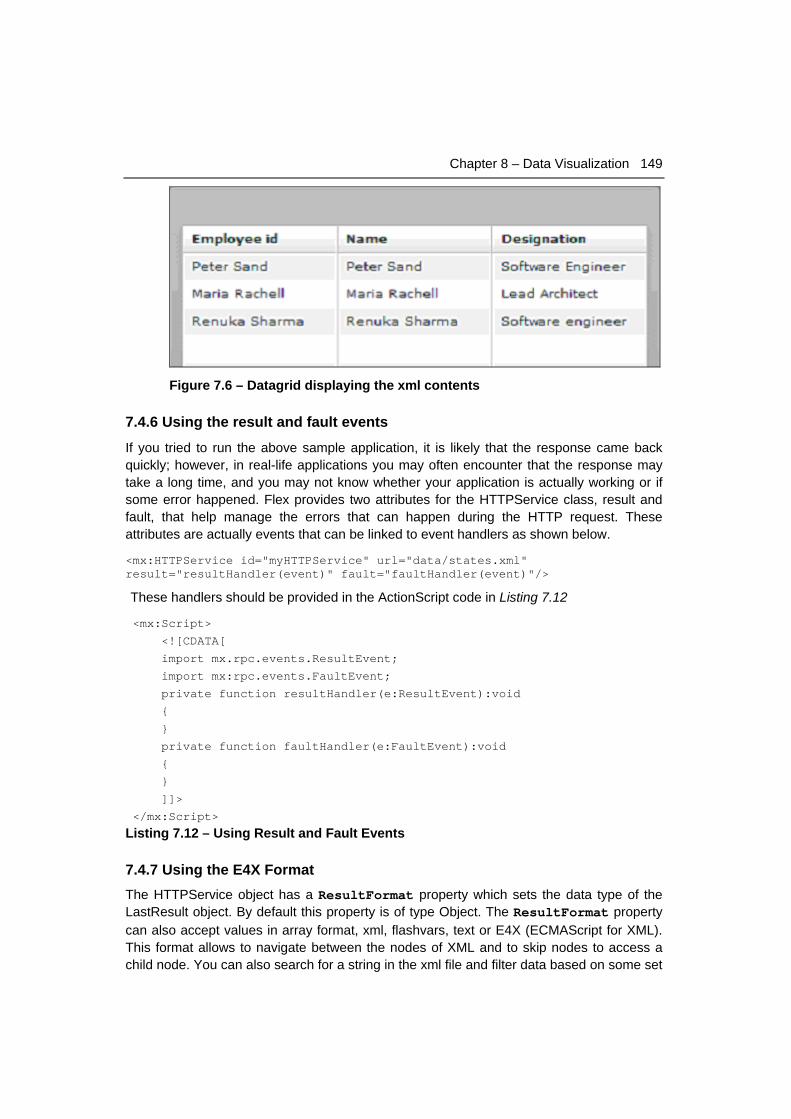
Chapter 8 – Data Visualization 149
Figure 7.6 – Datagrid displaying the xml contents
7.4.6 Using the result and fault events
If you tried to run the above sample application, it is likely that the response came back quickly; however, in real-life applications you may often encounter that the response may take a long time, and you may not know whether your application is actually working or if some error happened. Flex provides two attributes for the HTTPService class, result and fault, that help manage the errors that can happen during the HTTP request. These attributes are actually events that can be linked to event handlers as shown below.
<mx:HTTPService id="myHTTPService" url="data/states.xml" result="resultHandler(event)" fault="faultHandler(event)"/>
These handlers should be provided in the ActionScript code in Listing 7.12
<mx:Script>
<![CDATA[
import mx.rpc.events.ResultEvent;
import mx:rpc.events.FaultEvent;
private function resultHandler(e:ResultEvent):void
{
}
private function faultHandler(e:FaultEvent):void
{
}
]]>
</mx:Script>
Listing 7.12 – Using Result and Fault Events
7.4.7 Using the E4X Format The HTTPService object has a ResultFormat property which sets the data type of the LastResult object. By default this property is of type Object. The ResultFormat property can also accept values in array format, xml, flashvars, text or E4X (ECMAScript for XML). This format allows to navigate between the nodes of XML and to skip nodes to access a child node. You can also search for a string in the xml file and filter data based on some set
150 Getting Started with Adobe Flex
criteria. While using the E4X format, the data type of the variable which contains the response data should be of type XMLList or XML.
7.5 Working with databases Flex cannot directly access a database; however, you can use Flex facilities to send and receive data from a database such as DB2. Using RPC-based services discussed earlier in the chapter, you can exchange data with the remote data servers.
For example, you can develop a front-end Flex application that uses an HTTP service call to a JSP in an application server. The JSP invokes a Java class which uses JDBC to access the DB2 data. This example is illustrated in more detail in the next section.
Another way to work with a data server is by creating a Data Web Service. A data Web service is a Web service where the information is taken from a database. This can be created in few minutes using a free tool like IBM Data Studio. Once the data Web service is created, you can invoke it from a Flex application using the <mx:WebService> tag in MXML.
Note:
This chapter uses DB2 Express-C, the free version of the DB2 data server for the examples and exercises. If you would like to follow along, download and install DB2 Express-C from ibm.com/db2/express. For more information about DB2, refer to Appendix B, Up and running with DB2 or review the ebook Getting started with DB2 Express-C. For more information about Data Web Services and IBM Data Studio, refer to the ebook Getting started with IBM Data Studio for DB2. Both books are part of the DB2 on Campus book series.
7.5.1 Sample Flex application accessing a DB2 database Let's develop a simple Flex application called Employee Portal that is connected to a database using HTTPService and some JSPs. The application architecture looks like Figure 7.7 below.

Chapter 8 – Data Visualization 151
Java
JSP
DB2
1. HTTPServicecall
2. Get Data
3. Fetch data
4. ResultSet
5. Employee data
5. XML data
Tomcat Server
Flex Application
Figure 7.7 - Architecture of a sample Flex application that accesses a DB2 database
As shown in the figure, the application flow is as follows:
1. The Flex application makes an HTTPService call to the JSP residing on the Tomcat Server.
2. This JSP in turn makes a call to the Java class that contains the business logic to access the data from the database.
3. The Java class accesses the data from the database by sending the query for execution to the database.
4. The database returns a result set back to the invoker.
5. The Java class returns the data formatted as an Employee object or a list of Employee objects.
6. The JSP now formats the data received from the Java class as XML and sends it back to the Flex application.
Note:
This section assumes the reader has working knowledge of Java, JSP, and JDBC. For more information about these topics refer to the ebook Getting started with Java which is part of the DB2 on Campus book series.
The application uses the Flex front-end to perform the following tasks:
Display the list of employees
Display details of a particular employee selected.
When the application development is completed, it will look like in Figure 7.8.
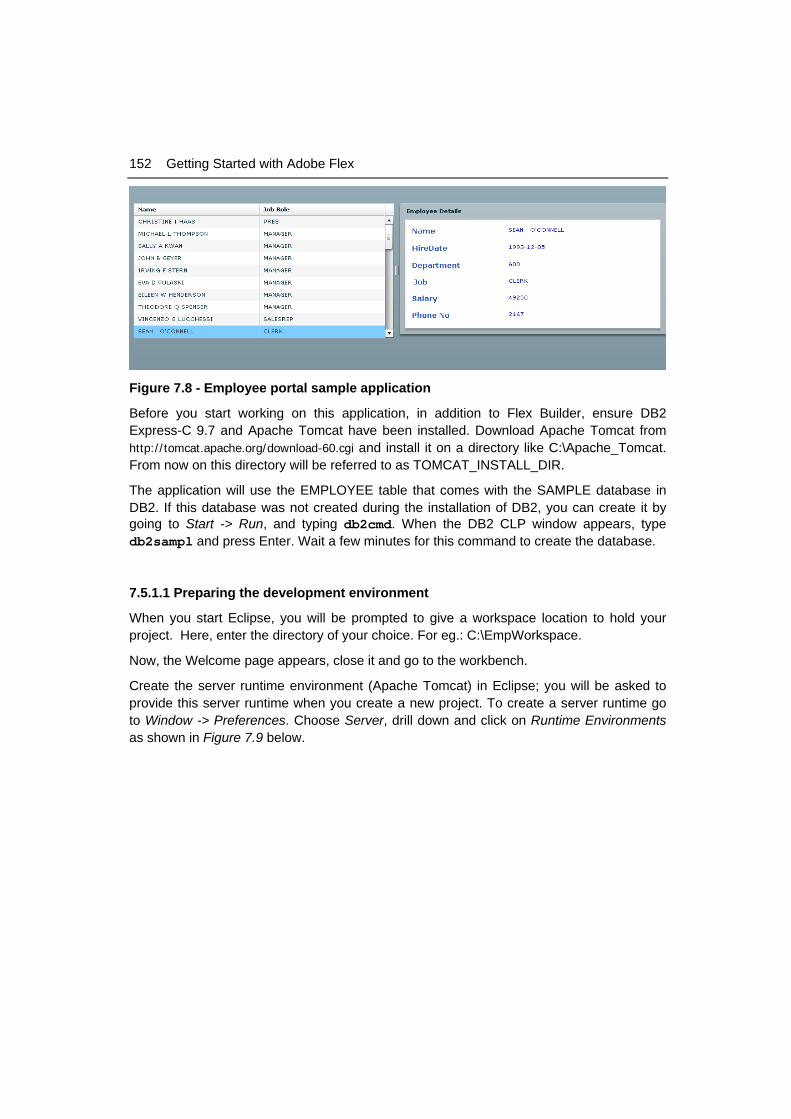
152 Getting Started with Adobe Flex
Figure 7.8 - Employee portal sample application
Before you start working on this application, in addition to Flex Builder, ensure DB2 Express-C 9.7 and Apache Tomcat have been installed. Download Apache Tomcat from http://tomcat.apache.org/download-60.cgi and install it on a directory like C:\Apache_Tomcat. From now on this directory will be referred to as TOMCAT_INSTALL_DIR.
The application will use the EMPLOYEE table that comes with the SAMPLE database in DB2. If this database was not created during the installation of DB2, you can create it by going to Start -> Run, and typing db2cmd. When the DB2 CLP window appears, type db2sampl and press Enter. Wait a few minutes for this command to create the database.
7.5.1.1 Preparing the development environment
When you start Eclipse, you will be prompted to give a workspace location to hold your project. Here, enter the directory of your choice. For eg.: C:\EmpWorkspace.
Now, the Welcome page appears, close it and go to the workbench.
Create the server runtime environment (Apache Tomcat) in Eclipse; you will be asked to provide this server runtime when you create a new project. To create a server runtime go to Window -> Preferences. Choose Server, drill down and click on Runtime Environments as shown in Figure 7.9 below.
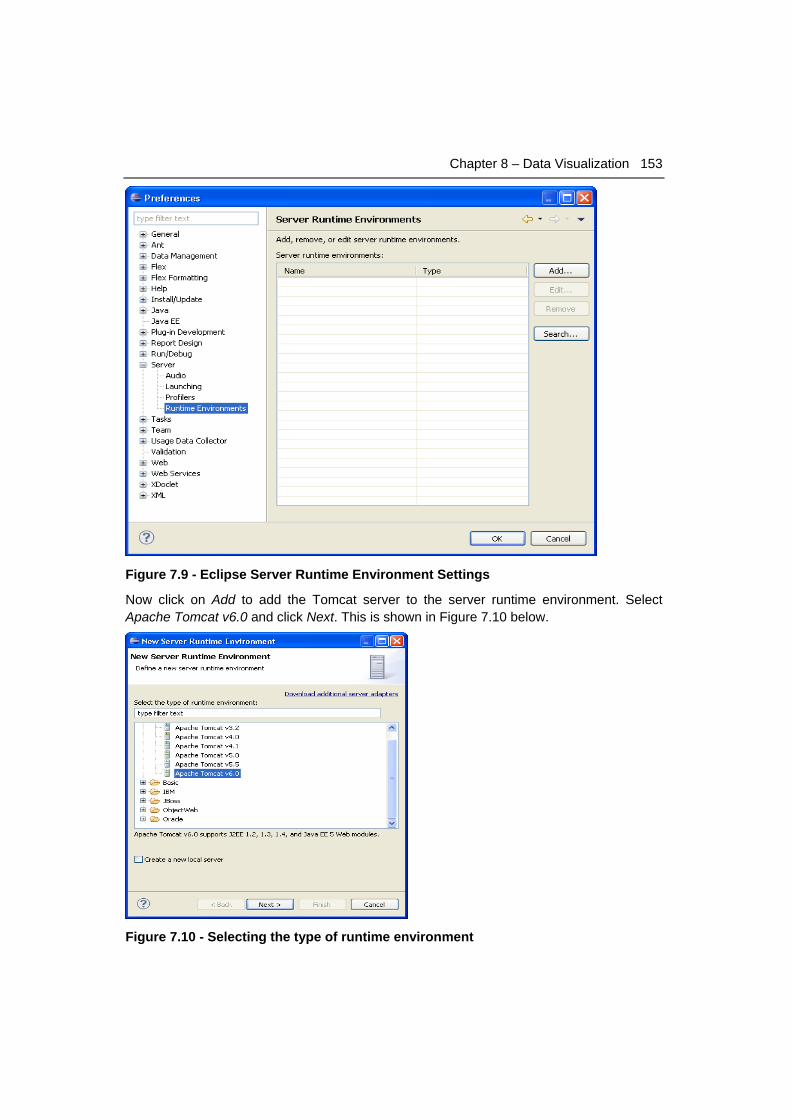
Chapter 8 – Data Visualization 153
Figure 7.9 - Eclipse Server Runtime Environment Settings
Now click on Add to add the Tomcat server to the server runtime environment. Select Apache Tomcat v6.0 and click Next. This is shown in Figure 7.10 below.
Figure 7.10 - Selecting the type of runtime environment
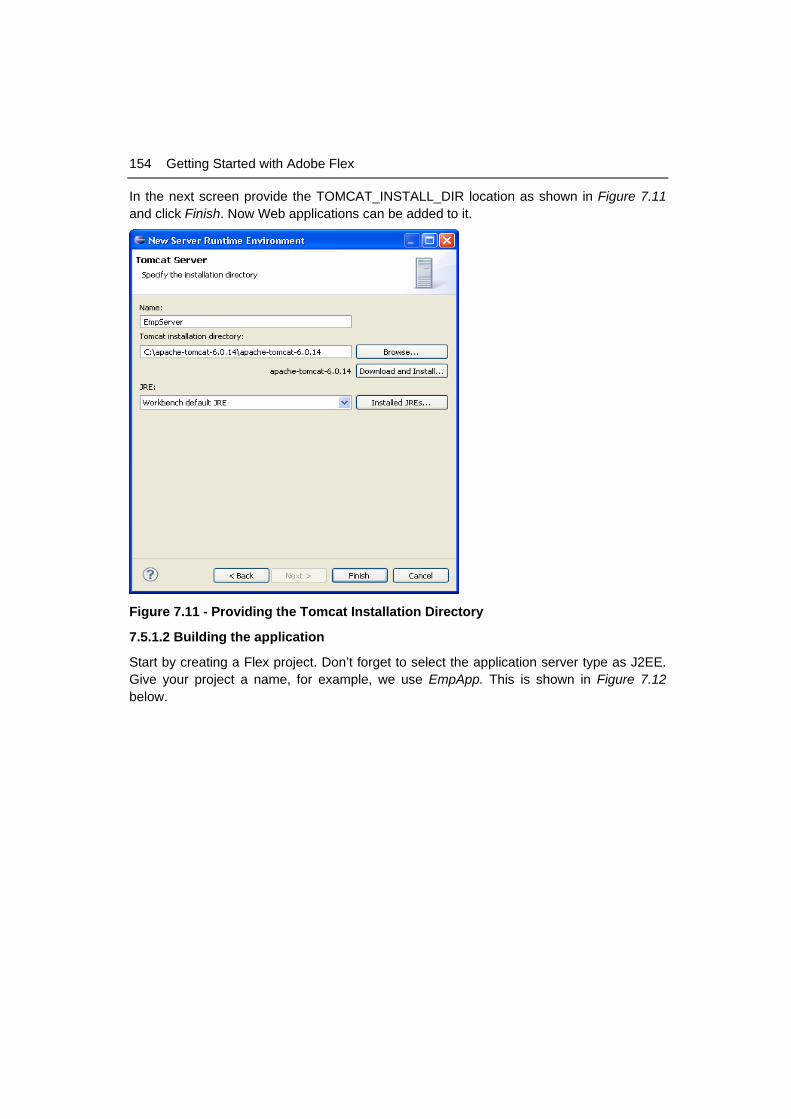
154 Getting Started with Adobe Flex
In the next screen provide the TOMCAT_INSTALL_DIR location as shown in Figure 7.11 and click Finish. Now Web applications can be added to it.
Figure 7.11 - Providing the Tomcat Installation Directory
7.5.1.2 Building the application
Start by creating a Flex project. Don’t forget to select the application server type as J2EE. Give your project a name, for example, we use EmpApp. This is shown in Figure 7.12 below.
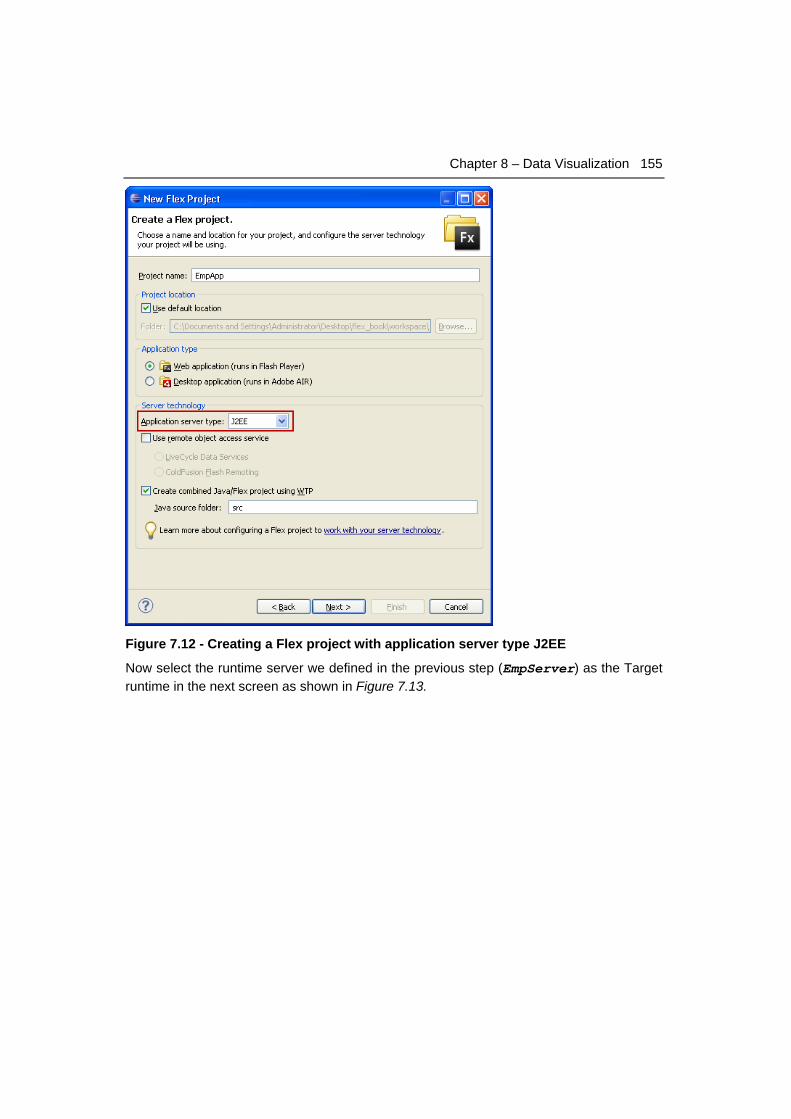
Chapter 8 – Data Visualization 155
Figure 7.12 - Creating a Flex project with application server type J2EE
Now select the runtime server we defined in the previous step (EmpServer) as the Target runtime in the next screen as shown in Figure 7.13.

156 Getting Started with Adobe Flex
Figure 7.13 - Selecting the target runtime at the time of project creation
Click Finish and you will be asked if you want to switch to the Flex development perspective. Select Yes and now your Flex Navigator should look like in Figure 7.14 below.
Figure 7.14 - Project structure after creating the project
Flex creates a default MXML application with the same name as the Project name EmpApp. Right click the project name and select Properties. In this screen select the Flex Build Path and change the output folder to Webcontent as shown in Figure 7.15 below.
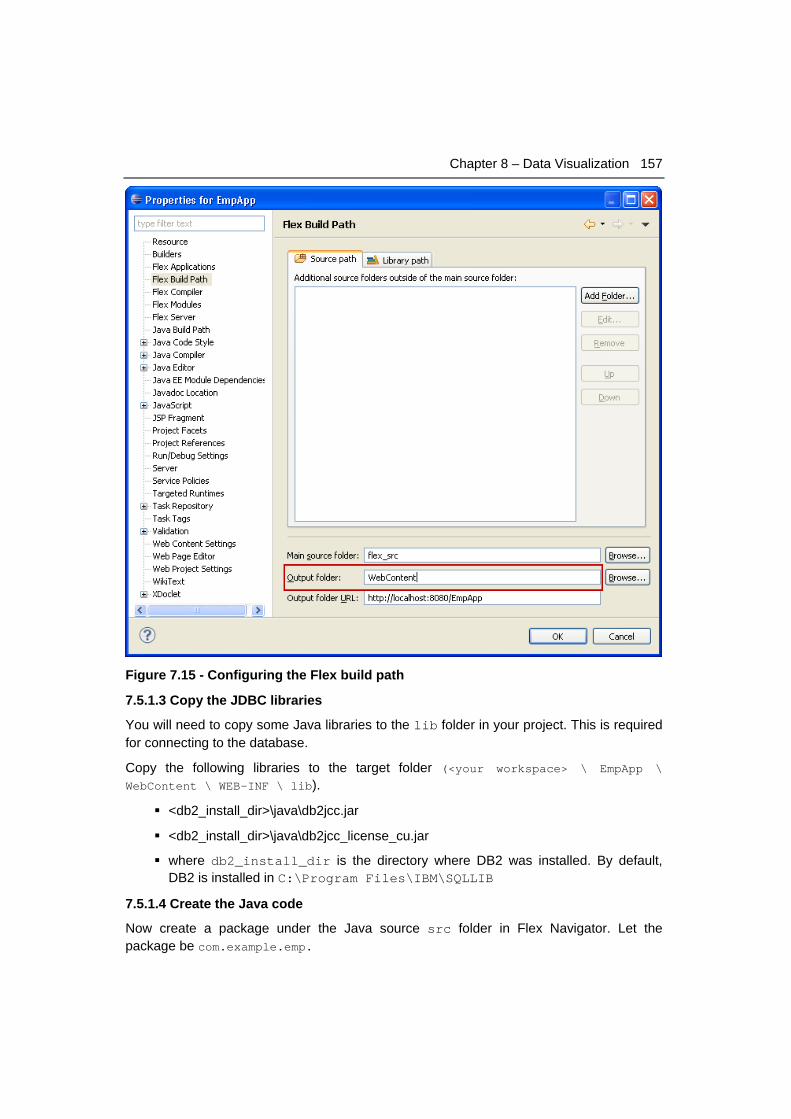
Chapter 8 – Data Visualization 157
Figure 7.15 - Configuring the Flex build path
7.5.1.3 Copy the JDBC libraries
You will need to copy some Java libraries to the lib folder in your project. This is required for connecting to the database.
Copy the following libraries to the target folder (<your workspace> \ EmpApp \
WebContent \ WEB-INF \ lib).
<db2_install_dir>\java\db2jcc.jar
<db2_install_dir>\java\db2jcc_license_cu.jar
where db2_install_dir is the directory where DB2 was installed. By default, DB2 is installed in C:\Program Files\IBM\SQLLIB
7.5.1.4 Create the Java code
Now create a package under the Java source src folder in Flex Navigator. Let the package be com.example.emp.
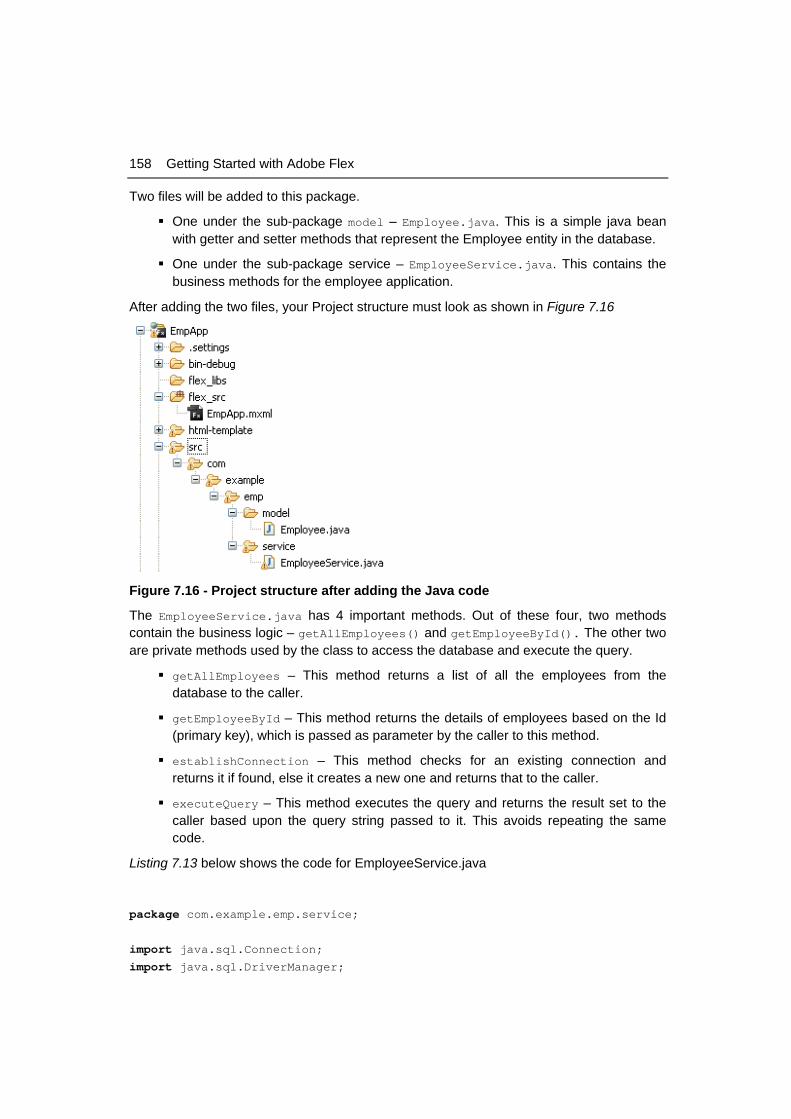
158 Getting Started with Adobe Flex
Two files will be added to this package.
One under the sub-package model – Employee.java. This is a simple java bean with getter and setter methods that represent the Employee entity in the database.
One under the sub-package service – EmployeeService.java. This contains the business methods for the employee application.
After adding the two files, your Project structure must look as shown in Figure 7.16
Figure 7.16 - Project structure after adding the Java code
The EmployeeService.java has 4 important methods. Out of these four, two methods contain the business logic – getAllEmployees() and getEmployeeById(). The other two are private methods used by the class to access the database and execute the query.
getAllEmployees – This method returns a list of all the employees from the database to the caller.
getEmployeeById – This method returns the details of employees based on the Id (primary key), which is passed as parameter by the caller to this method.
establishConnection – This method checks for an existing connection and returns it if found, else it creates a new one and returns that to the caller.
executeQuery – This method executes the query and returns the result set to the caller based upon the query string passed to it. This avoids repeating the same code.
Listing 7.13 below shows the code for EmployeeService.java
package com.example.emp.service;
import java.sql.Connection; import java.sql.DriverManager;
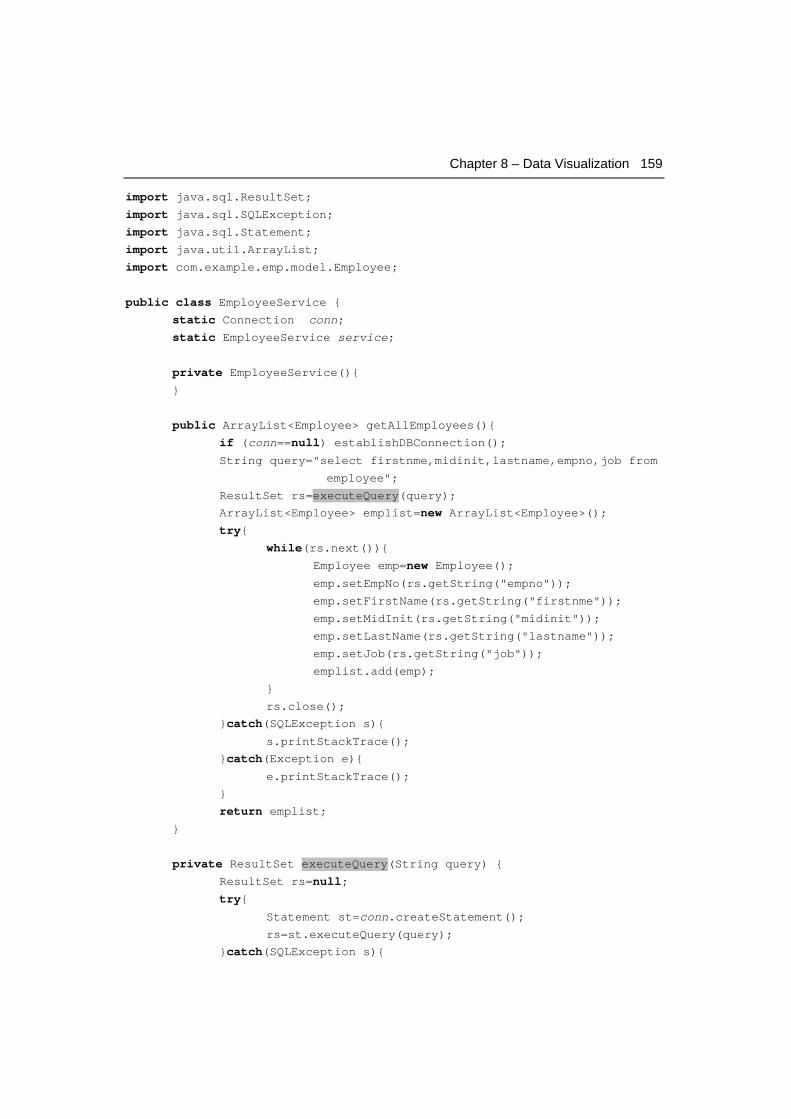
Chapter 8 – Data Visualization 159
import java.sql.ResultSet; import java.sql.SQLException; import java.sql.Statement; import java.util.ArrayList; import com.example.emp.model.Employee;
public class EmployeeService { static Connection conn; static EmployeeService service;
private EmployeeService(){
}
public ArrayList<Employee> getAllEmployees(){ if (conn==null) establishDBConnection();
String query="select firstnme,midinit,lastname,empno,job from
employee";
ResultSet rs=executeQuery(query);
ArrayList<Employee> emplist=new ArrayList<Employee>(); try{ while(rs.next()){ Employee emp=new Employee();
emp.setEmpNo(rs.getString("empno"));
emp.setFirstName(rs.getString("firstnme"));
emp.setMidInit(rs.getString("midinit"));
emp.setLastName(rs.getString("lastname"));
emp.setJob(rs.getString("job"));
emplist.add(emp);
}
rs.close();
}catch(SQLException s){
s.printStackTrace();
}catch(Exception e){
e.printStackTrace();
}
return emplist;
}
private ResultSet executeQuery(String query) { ResultSet rs=null; try{
Statement st=conn.createStatement();
rs=st.executeQuery(query);
}catch(SQLException s){

160 Getting Started with Adobe Flex
s.printStackTrace();
}catch(Exception e){
e.printStackTrace();
}
return rs;
}
public Employee getEmployeeById(String empNo){ if (conn==null) establishDBConnection();
String query="SELECT EMPNO,FIRSTNME,MIDINIT,LASTNAME"
+ ",WORKDEPT,PHONENO,SALARY,SEX,HIREDATE,JOB FROM
EMPLOYEE";
query += " WHERE EMPNO ='" + empNo + "'";
ResultSet rs=executeQuery(query);
Employee e=new Employee(); try{ for(int i=0;rs.next();i++)
{
e.setEmpNo(rs.getString(1));
e.setFirstName(rs.getString(2));
e.setMidInit(rs.getString(3));
e.setLastName(rs.getString(4));
e.setWorkDept(rs.getString(5));
e.setPhoneNumber(rs.getString(6));
e.setSalary(rs.getDouble(7));
e.setSex(rs.getString(8));
e.setHireDate(rs.getDate(9));
e.setJob(rs.getString(10));
}
}catch(SQLException s){
s.printStackTrace();
}catch(Exception ex){
ex.printStackTrace();
}
return e;
}
private void establishDBConnection(){
String dburl = "jdbc:db2://localhost:50000/SAMPLE";
String userid = "<userid>"; //your db userid
String password = "<password>"; //your db password
try{
Class.forName("com.ibm.db2.jcc.DB2Driver").newInstance();
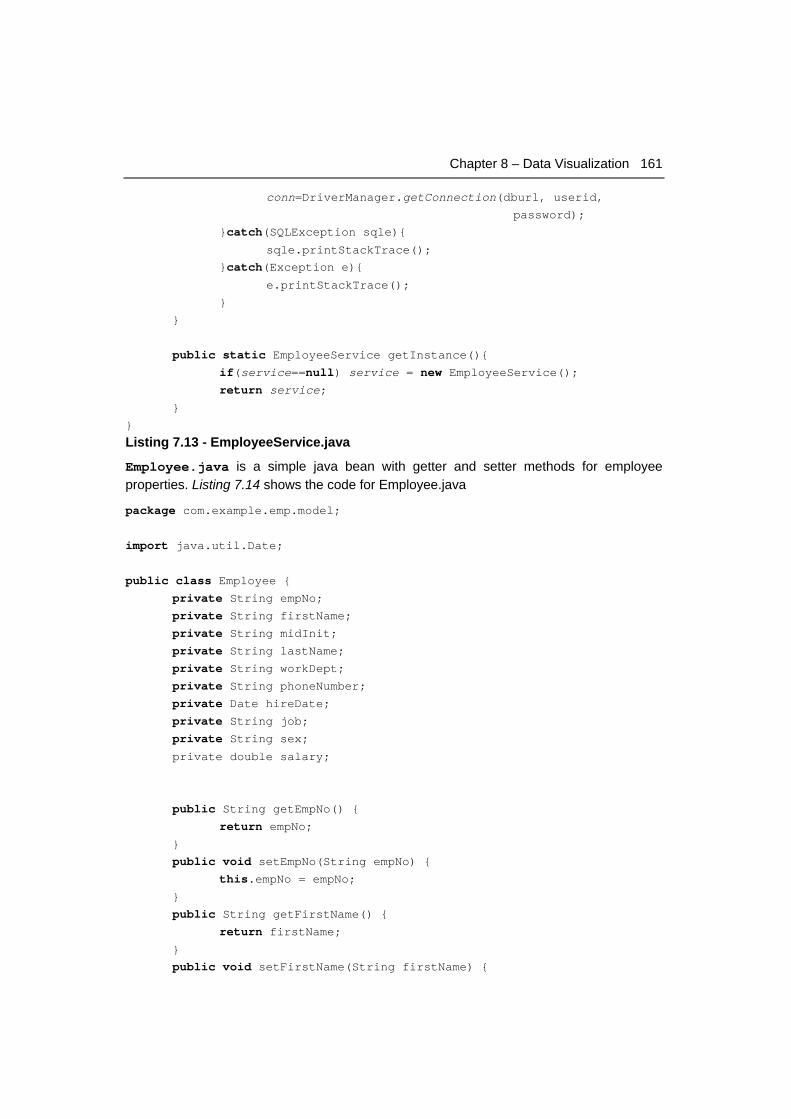
Chapter 8 – Data Visualization 161
conn=DriverManager.getConnection(dburl, userid,
password);
}catch(SQLException sqle){
sqle.printStackTrace();
}catch(Exception e){
e.printStackTrace();
}
}
public static EmployeeService getInstance(){ if(service==null) service = new EmployeeService(); return service;
}
}
Listing 7.13 - EmployeeService.java
Employee.java is a simple java bean with getter and setter methods for employee properties. Listing 7.14 shows the code for Employee.java
package com.example.emp.model;
import java.util.Date;
public class Employee { private String empNo; private String firstName; private String midInit; private String lastName; private String workDept; private String phoneNumber; private Date hireDate; private String job; private String sex;
private double salary;
public String getEmpNo() { return empNo;
}
public void setEmpNo(String empNo) { this.empNo = empNo;
}
public String getFirstName() { return firstName;
}
public void setFirstName(String firstName) {
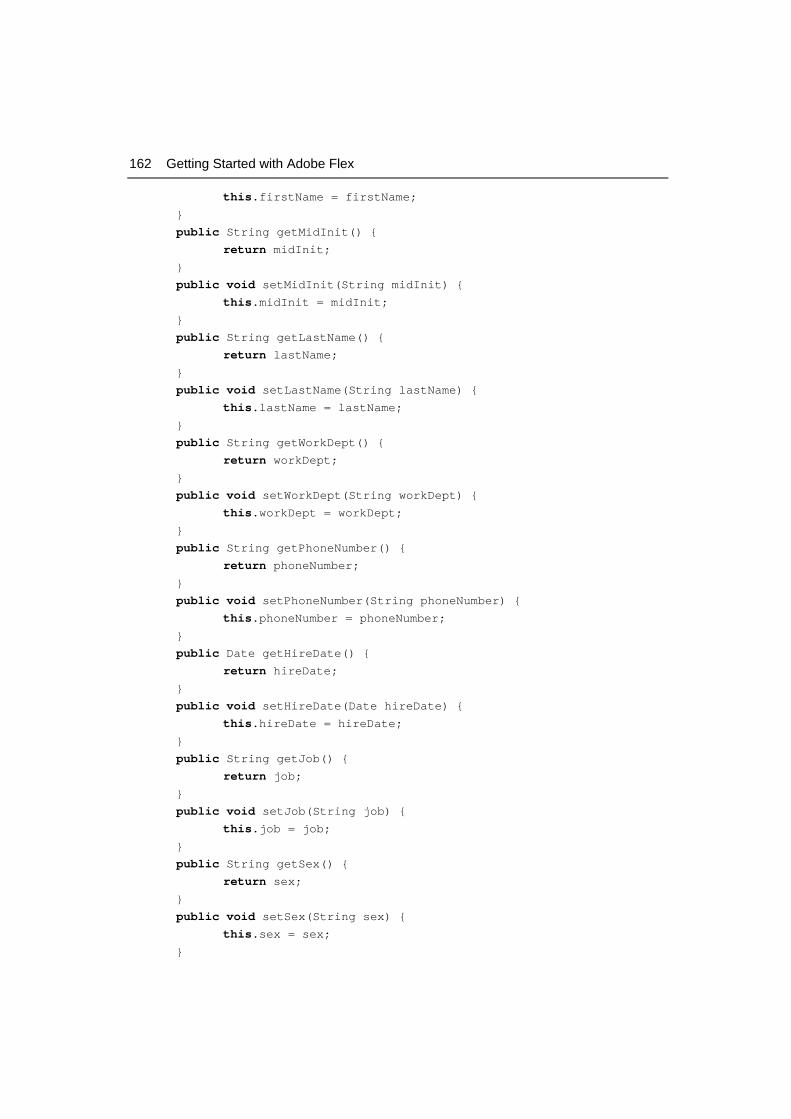
162 Getting Started with Adobe Flex
this.firstName = firstName;
}
public String getMidInit() { return midInit;
}
public void setMidInit(String midInit) { this.midInit = midInit;
}
public String getLastName() { return lastName;
}
public void setLastName(String lastName) { this.lastName = lastName;
}
public String getWorkDept() { return workDept;
}
public void setWorkDept(String workDept) { this.workDept = workDept;
}
public String getPhoneNumber() { return phoneNumber;
}
public void setPhoneNumber(String phoneNumber) { this.phoneNumber = phoneNumber;
}
public Date getHireDate() { return hireDate;
}
public void setHireDate(Date hireDate) { this.hireDate = hireDate;
}
public String getJob() { return job;
}
public void setJob(String job) { this.job = job;
}
public String getSex() { return sex;
}
public void setSex(String sex) { this.sex = sex;
}
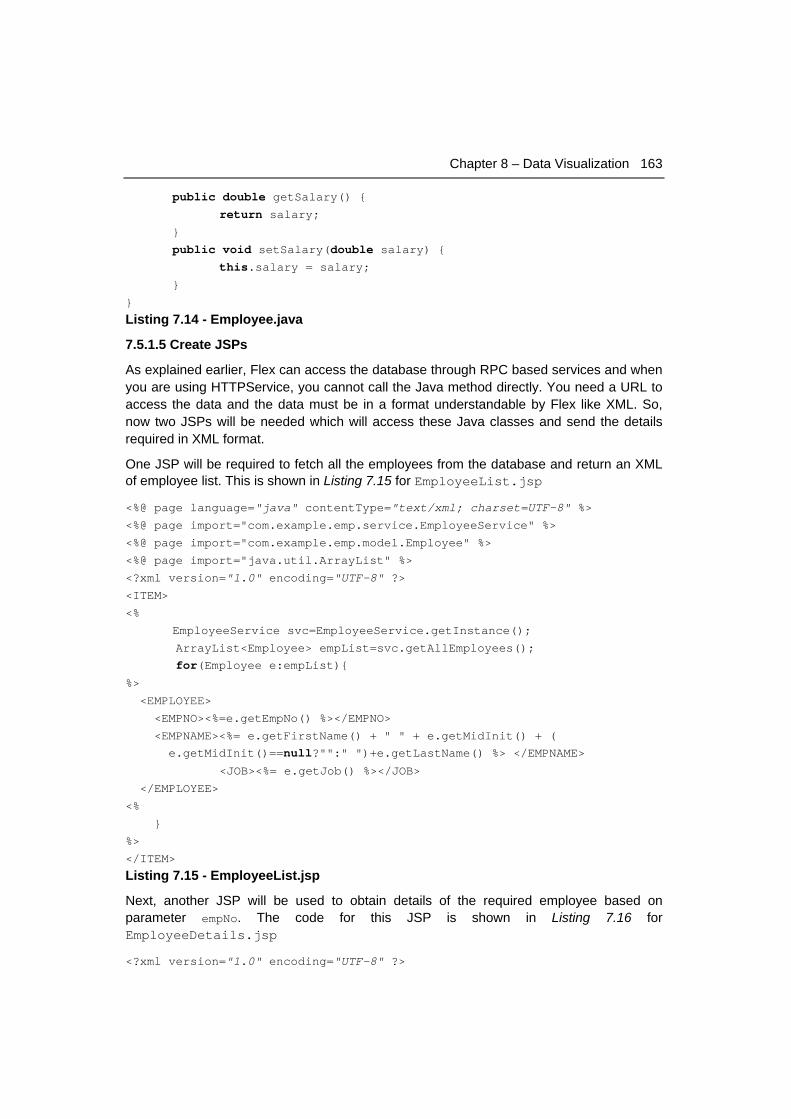
Chapter 8 – Data Visualization 163
public double getSalary() { return salary;
}
public void setSalary(double salary) { this.salary = salary;
}
}
Listing 7.14 - Employee.java
7.5.1.5 Create JSPs
As explained earlier, Flex can access the database through RPC based services and when you are using HTTPService, you cannot call the Java method directly. You need a URL to access the data and the data must be in a format understandable by Flex like XML. So, now two JSPs will be needed which will access these Java classes and send the details required in XML format.
One JSP will be required to fetch all the employees from the database and return an XML of employee list. This is shown in Listing 7.15 for EmployeeList.jsp
<%@ page language="java" contentType="text/xml; charset=UTF-8" %>
<%@ page import="com.example.emp.service.EmployeeService" %>
<%@ page import="com.example.emp.model.Employee" %>
<%@ page import="java.util.ArrayList" %>
<?xml version="1.0" encoding="UTF-8" ?>
<ITEM>
<%
EmployeeService svc=EmployeeService.getInstance();
ArrayList<Employee> empList=svc.getAllEmployees();
for(Employee e:empList){
%>
<EMPLOYEE>
<EMPNO><%=e.getEmpNo() %></EMPNO>
<EMPNAME><%= e.getFirstName() + " " + e.getMidInit() + (
e.getMidInit()==null?"":" ")+e.getLastName() %> </EMPNAME>
<JOB><%= e.getJob() %></JOB>
</EMPLOYEE>
<%
}
%>
</ITEM>
Listing 7.15 - EmployeeList.jsp
Next, another JSP will be used to obtain details of the required employee based on parameter empNo. The code for this JSP is shown in Listing 7.16 for EmployeeDetails.jsp
<?xml version="1.0" encoding="UTF-8" ?>
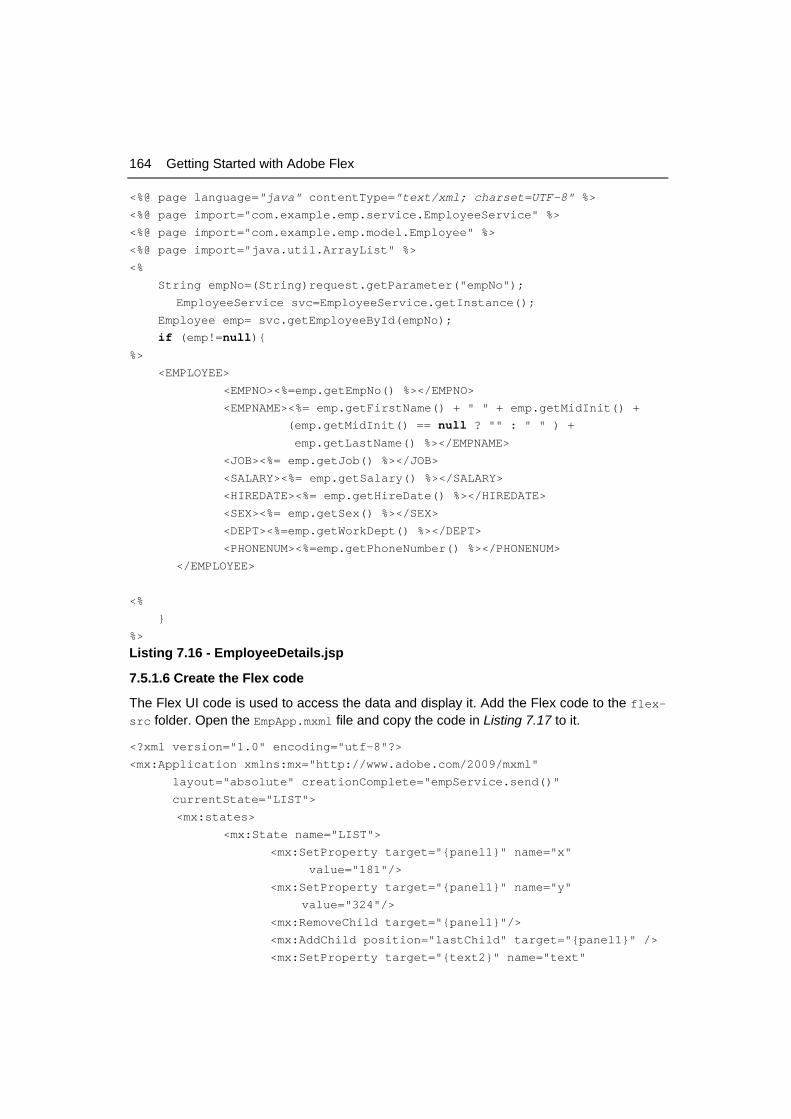
164 Getting Started with Adobe Flex
<%@ page language="java" contentType="text/xml; charset=UTF-8" %>
<%@ page import="com.example.emp.service.EmployeeService" %>
<%@ page import="com.example.emp.model.Employee" %>
<%@ page import="java.util.ArrayList" %>
<%
String empNo=(String)request.getParameter("empNo");
EmployeeService svc=EmployeeService.getInstance();
Employee emp= svc.getEmployeeById(empNo);
if (emp!=null){
%>
<EMPLOYEE>
<EMPNO><%=emp.getEmpNo() %></EMPNO>
<EMPNAME><%= emp.getFirstName() + " " + emp.getMidInit() +
(emp.getMidInit() == null ? "" : " " ) +
emp.getLastName() %></EMPNAME>
<JOB><%= emp.getJob() %></JOB>
<SALARY><%= emp.getSalary() %></SALARY>
<HIREDATE><%= emp.getHireDate() %></HIREDATE>
<SEX><%= emp.getSex() %></SEX>
<DEPT><%=emp.getWorkDept() %></DEPT>
<PHONENUM><%=emp.getPhoneNumber() %></PHONENUM>
</EMPLOYEE>
<%
}
%>
Listing 7.16 - EmployeeDetails.jsp
7.5.1.6 Create the Flex code
The Flex UI code is used to access the data and display it. Add the Flex code to the flex-src folder. Open the EmpApp.mxml file and copy the code in Listing 7.17 to it.
<?xml version="1.0" encoding="utf-8"?>
<mx:Application xmlns:mx="http://www.adobe.com/2009/mxml"
layout="absolute" creationComplete="empService.send()"
currentState="LIST">
<mx:states>
<mx:State name="LIST">
<mx:SetProperty target="{panel1}" name="x"
value="181"/>
<mx:SetProperty target="{panel1}" name="y"
value="324"/>
<mx:RemoveChild target="{panel1}"/>
<mx:AddChild position="lastChild" target="{panel1}" />
<mx:SetProperty target="{text2}" name="text"
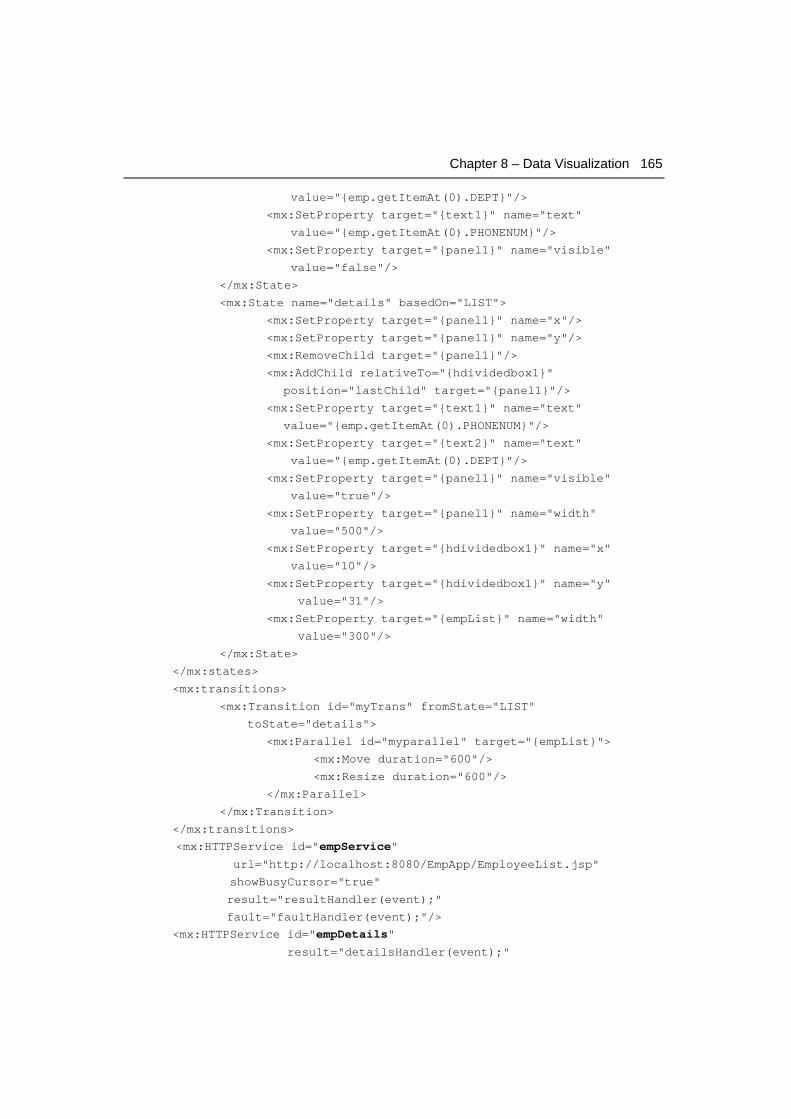
Chapter 8 – Data Visualization 165
value="{emp.getItemAt(0).DEPT}"/>
<mx:SetProperty target="{text1}" name="text"
value="{emp.getItemAt(0).PHONENUM}"/>
<mx:SetProperty target="{panel1}" name="visible"
value="false"/>
</mx:State>
<mx:State name="details" basedOn="LIST">
<mx:SetProperty target="{panel1}" name="x"/>
<mx:SetProperty target="{panel1}" name="y"/>
<mx:RemoveChild target="{panel1}"/>
<mx:AddChild relativeTo="{hdividedbox1}"
position="lastChild" target="{panel1}"/>
<mx:SetProperty target="{text1}" name="text"
value="{emp.getItemAt(0).PHONENUM}"/>
<mx:SetProperty target="{text2}" name="text"
value="{emp.getItemAt(0).DEPT}"/>
<mx:SetProperty target="{panel1}" name="visible"
value="true"/>
<mx:SetProperty target="{panel1}" name="width"
value="500"/>
<mx:SetProperty target="{hdividedbox1}" name="x"
value="10"/>
<mx:SetProperty target="{hdividedbox1}" name="y"
value="31"/>
<mx:SetProperty target="{empList}" name="width"
value="300"/>
</mx:State>
</mx:states>
<mx:transitions>
<mx:Transition id="myTrans" fromState="LIST"
toState="details">
<mx:Parallel id="myparallel" target="{empList}">
<mx:Move duration="600"/>
<mx:Resize duration="600"/>
</mx:Parallel>
</mx:Transition>
</mx:transitions>
<mx:HTTPService id="empService"
url="http://localhost:8080/EmpApp/EmployeeList.jsp"
showBusyCursor="true"
result="resultHandler(event);"
fault="faultHandler(event);"/>
<mx:HTTPService id="empDetails"
result="detailsHandler(event);"
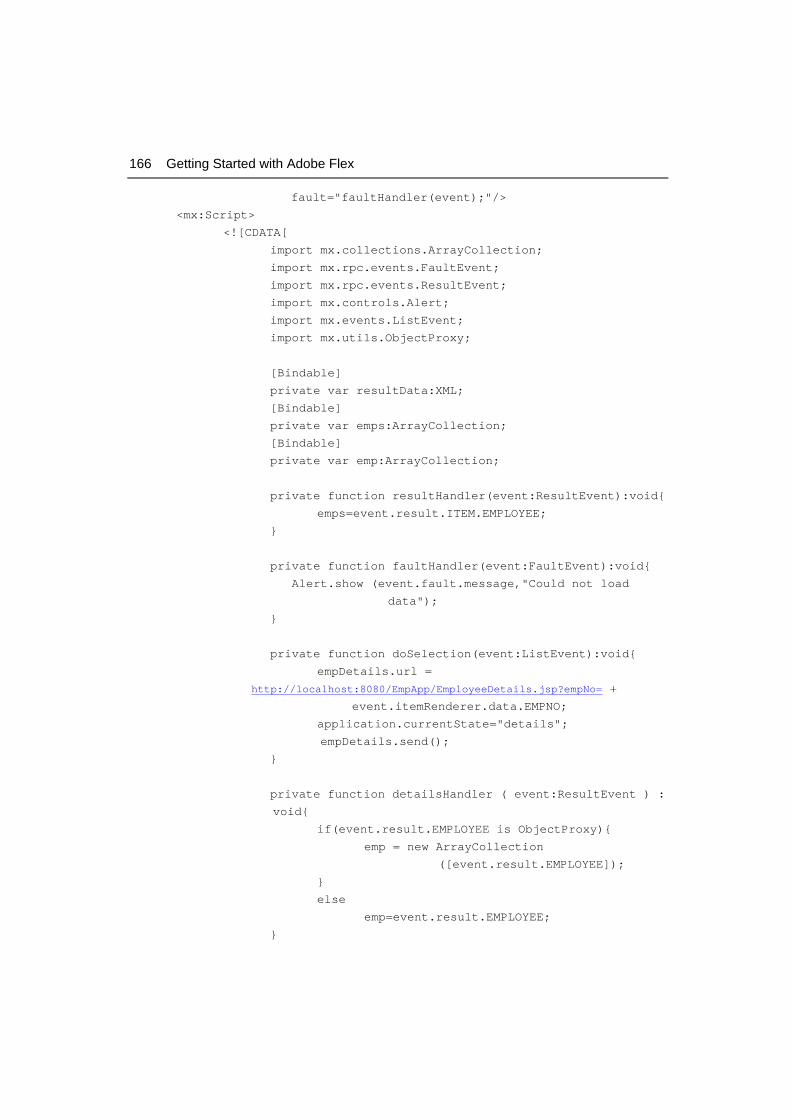
166 Getting Started with Adobe Flex
fault="faultHandler(event);"/>
<mx:Script>
<![CDATA[
import mx.collections.ArrayCollection;
import mx.rpc.events.FaultEvent;
import mx.rpc.events.ResultEvent;
import mx.controls.Alert;
import mx.events.ListEvent;
import mx.utils.ObjectProxy;
[Bindable]
private var resultData:XML;
[Bindable]
private var emps:ArrayCollection;
[Bindable]
private var emp:ArrayCollection;
private function resultHandler(event:ResultEvent):void{
emps=event.result.ITEM.EMPLOYEE;
}
private function faultHandler(event:FaultEvent):void{
Alert.show (event.fault.message,"Could not load
data");
}
private function doSelection(event:ListEvent):void{
empDetails.url =
http://localhost:8080/EmpApp/EmployeeDetails.jsp?empNo= +
event.itemRenderer.data.EMPNO;
application.currentState="details";
empDetails.send();
}
private function detailsHandler ( event:ResultEvent ) :
void{
if(event.result.EMPLOYEE is ObjectProxy){
emp = new ArrayCollection
([event.result.EMPLOYEE]);
}
else
emp=event.result.EMPLOYEE;
}

Chapter 8 – Data Visualization 167
]]>
</mx:Script>
<mx:HDividedBox
y="29"
width="100%" id="hdividedbox1">
<!-- List of employees -->
<mx:DataGrid id="empList"
width="30%"
dataProvider="{emps}"
itemClick="doSelection(event);"
rowCount="10">
<mx:columns>
<mx:DataGridColumn id="empno" dataField="EMPNO"
visible="false"/>
<mx:DataGridColumn id="empname" dataField="EMPNAME"
headerText="Name"/>
<mx:DataGridColumn id="job" dataField="JOB"
headerText="Job Role"/>
</mx:columns>
</mx:DataGrid>
</mx:HDividedBox>
<mx:Panel width="390" height="236" layout="absolute" title="Employee
Details" x="183" y="289" id="panel1">
<!-- Detail information of selected employee -->
<mx:Grid x="10" y="10" width="340" height="176">
<mx:GridRow width="100%" height="100%">
<mx:GridItem width="100%" height="100%">
<mx:Label text="Name" id="ename" fontStyle="normal"
fontWeight="bold" fontSize="13" color="#2553BB"
textAlign="right"/>
</mx:GridItem>
<mx:GridItem width="100%" height="100%">
<mx:Text id="nameTxt" text =
"{emp.getItemAt(0).EMPNAME}" width="161"
height="24" fontFamily="Verdana"
color="#060EAF"/>
</mx:GridItem>
</mx:GridRow>
<mx:GridRow width="100%" height="100%">
<mx:GridItem width="100%" height="100%">
<mx:Label text="HireDate" fontWeight="bold"
fontStyle="normal" fontSize="13"
color="#2553BB" textAlign="right"/>
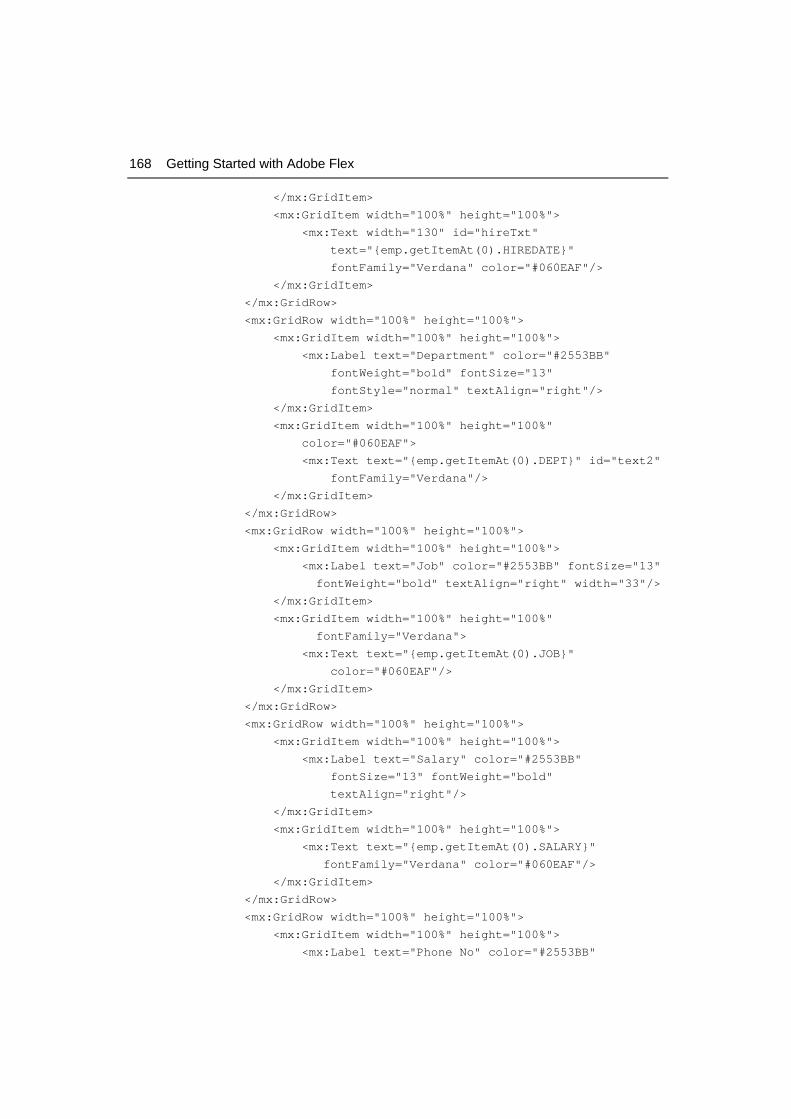
168 Getting Started with Adobe Flex
</mx:GridItem>
<mx:GridItem width="100%" height="100%">
<mx:Text width="130" id="hireTxt"
text="{emp.getItemAt(0).HIREDATE}"
fontFamily="Verdana" color="#060EAF"/>
</mx:GridItem>
</mx:GridRow>
<mx:GridRow width="100%" height="100%">
<mx:GridItem width="100%" height="100%">
<mx:Label text="Department" color="#2553BB"
fontWeight="bold" fontSize="13"
fontStyle="normal" textAlign="right"/>
</mx:GridItem>
<mx:GridItem width="100%" height="100%"
color="#060EAF">
<mx:Text text="{emp.getItemAt(0).DEPT}" id="text2"
fontFamily="Verdana"/>
</mx:GridItem>
</mx:GridRow>
<mx:GridRow width="100%" height="100%">
<mx:GridItem width="100%" height="100%">
<mx:Label text="Job" color="#2553BB" fontSize="13"
fontWeight="bold" textAlign="right" width="33"/>
</mx:GridItem>
<mx:GridItem width="100%" height="100%"
fontFamily="Verdana">
<mx:Text text="{emp.getItemAt(0).JOB}"
color="#060EAF"/>
</mx:GridItem>
</mx:GridRow>
<mx:GridRow width="100%" height="100%">
<mx:GridItem width="100%" height="100%">
<mx:Label text="Salary" color="#2553BB"
fontSize="13" fontWeight="bold"
textAlign="right"/>
</mx:GridItem>
<mx:GridItem width="100%" height="100%">
<mx:Text text="{emp.getItemAt(0).SALARY}"
fontFamily="Verdana" color="#060EAF"/>
</mx:GridItem>
</mx:GridRow>
<mx:GridRow width="100%" height="100%">
<mx:GridItem width="100%" height="100%">
<mx:Label text="Phone No" color="#2553BB"

Chapter 8 – Data Visualization 169
fontSize="13" fontWeight="bold"
textAlign="right"/>
</mx:GridItem>
<mx:GridItem width="100%" height="100%">
<mx:Text text="{emp.getItemAt(0).PHONENUM}"
id="text1" fontFamily="Verdana"
color="#060EAF"/>
</mx:GridItem>
</mx:GridRow>
</mx:Grid>
</mx:Panel>
</mx:Application>
Listing 7.17 - EmpApp.mxml
As this is a Web application the root tag is the <mx:Application> tag. The creationComplete function declared within this tag, invokes the HttpService’s send() function to fetch the data from the URL specified in the <mx:HTTPService> tag with the id empService.
This in turn invokes the concerned JSP which returns an XML of employee list back to Flex and it is then rendered in the data grid.
The data grid tag <mx:DataGrid> with id empList specifies a function doSelection which gets called upon selecting any of the items or rows in the data grid.
The doSelection() function gets the selected employee’s employee number (EMPNO) and creates a URL out of it which is then invoked by the second HTTPService tag. When the XML is received, the result handler method for this service, detailsHandler gets triggered.
The detailsHandler() method checks if the XML received has a single row by reviewing the result with the ObjectProxy type. If found, it manually creates an array collection out of it.
The faultHandler() method is triggered if the call made by the HTTPService is unsuccessful. This method displays an alert to the user, letting them know that the call was unsuccessful.
The rest of the MXML code, deals with defining the look and feel of the application which you can further customize later.
7.5.1.7 Preparing to run the Application
In order to run the application, check the web.xml under the WEB-INF folder. It must contain the file EmpApp.html in the <welcome-file> tag. If not found, then add the following line to it, as shown in Listing 7.18.
<?xml version="1.0" encoding="UTF-8"?>
<web-app id="WebApp_ID" version="2.4"
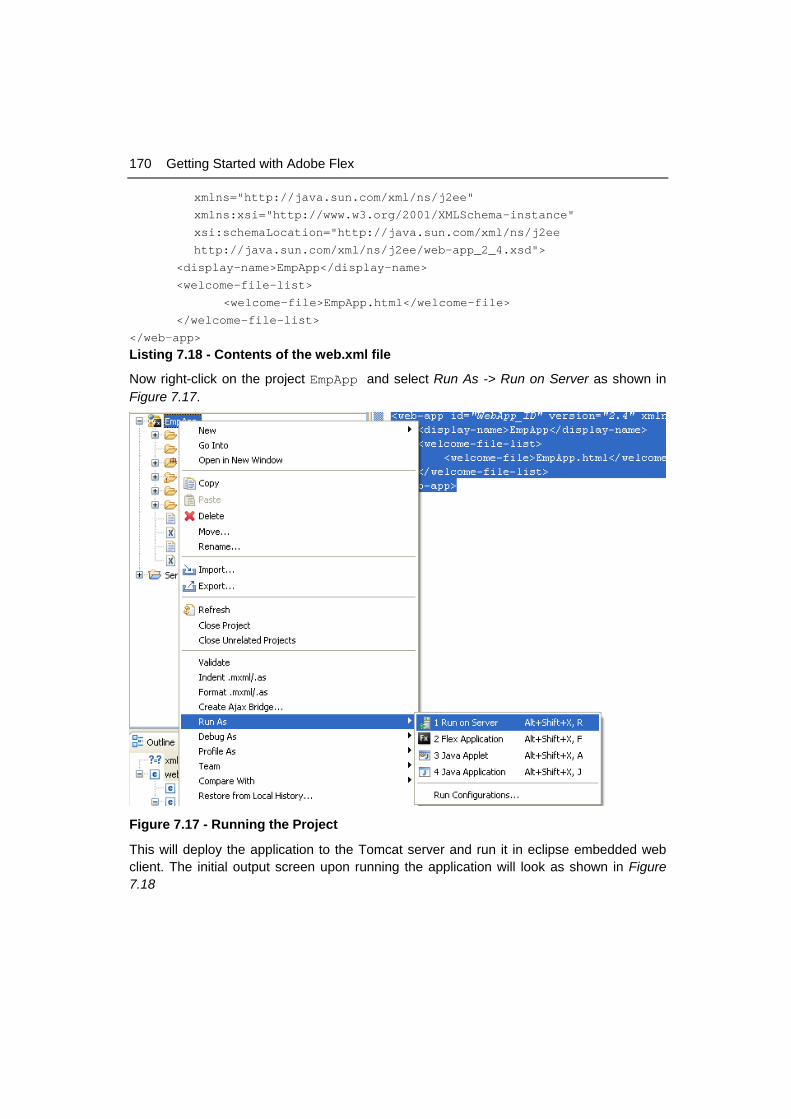
170 Getting Started with Adobe Flex
xmlns="http://java.sun.com/xml/ns/j2ee"
xmlns:xsi="http://www.w3.org/2001/XMLSchema-instance"
xsi:schemaLocation="http://java.sun.com/xml/ns/j2ee
http://java.sun.com/xml/ns/j2ee/web-app_2_4.xsd">
<display-name>EmpApp</display-name>
<welcome-file-list>
<welcome-file>EmpApp.html</welcome-file>
</welcome-file-list>
</web-app>
Listing 7.18 - Contents of the web.xml file
Now right-click on the project EmpApp and select Run As -> Run on Server as shown in Figure 7.17.
Figure 7.17 - Running the Project
This will deploy the application to the Tomcat server and run it in eclipse embedded web client. The initial output screen upon running the application will look as shown in Figure 7.18
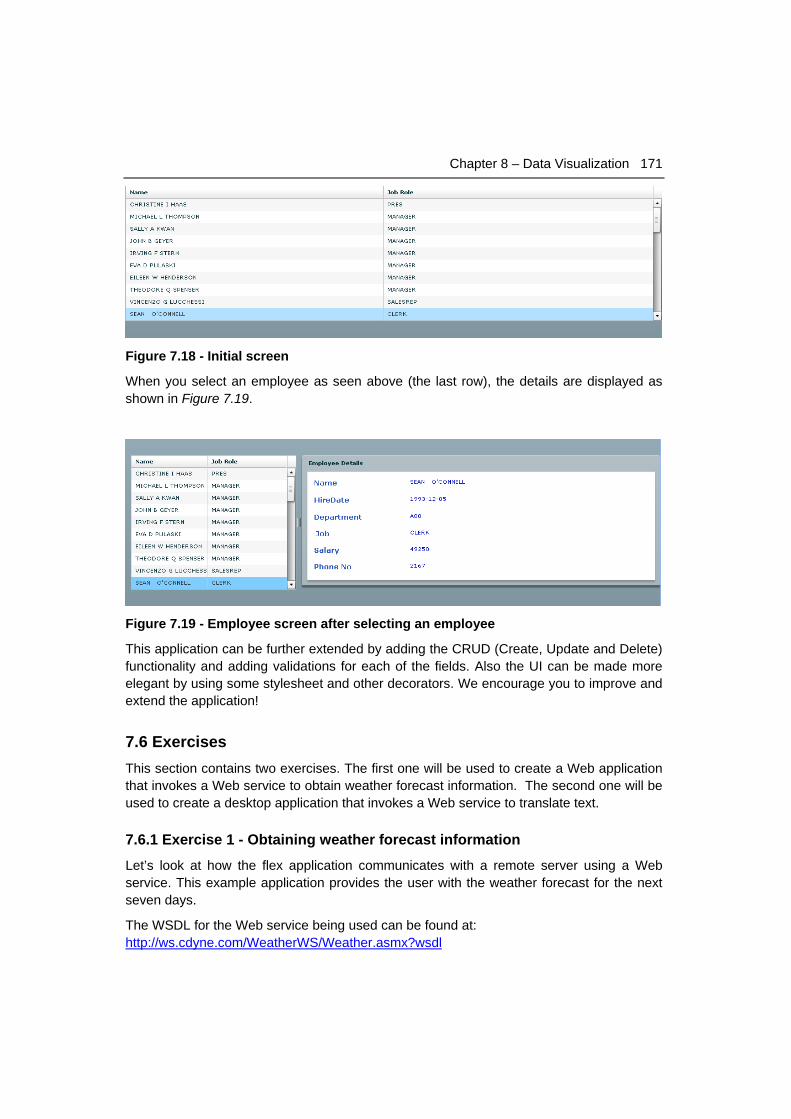
Chapter 8 – Data Visualization 171
Figure 7.18 - Initial screen
When you select an employee as seen above (the last row), the details are displayed as shown in Figure 7.19.
Figure 7.19 - Employee screen after selecting an employee
This application can be further extended by adding the CRUD (Create, Update and Delete) functionality and adding validations for each of the fields. Also the UI can be made more elegant by using some stylesheet and other decorators. We encourage you to improve and extend the application!
7.6 Exercises This section contains two exercises. The first one will be used to create a Web application that invokes a Web service to obtain weather forecast information. The second one will be used to create a desktop application that invokes a Web service to translate text.
7.6.1 Exercise 1 - Obtaining weather forecast information
Let’s look at how the flex application communicates with a remote server using a Web service. This example application provides the user with the weather forecast for the next seven days.
The WSDL for the Web service being used can be found at: http://ws.cdyne.com/WeatherWS/Weather.asmx?wsdl
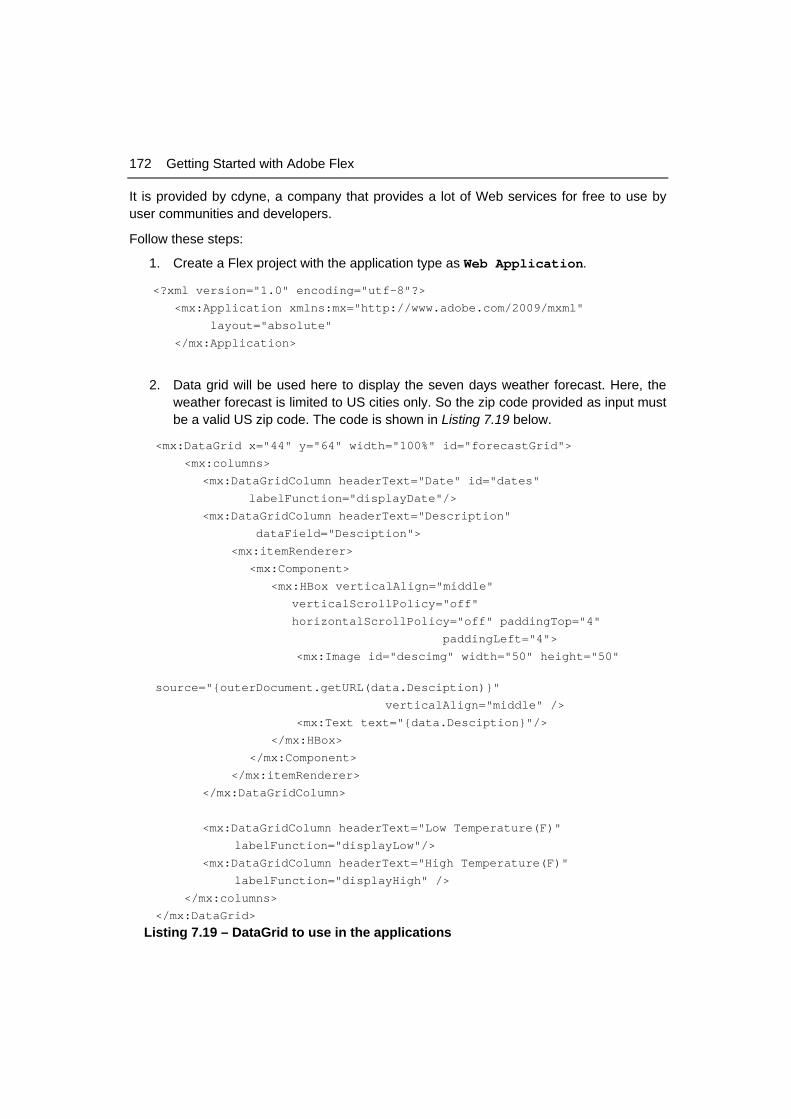
172 Getting Started with Adobe Flex
It is provided by cdyne, a company that provides a lot of Web services for free to use by user communities and developers.
Follow these steps:
1. Create a Flex project with the application type as Web Application.
<?xml version="1.0" encoding="utf-8"?>
<mx:Application xmlns:mx="http://www.adobe.com/2009/mxml"
layout="absolute"
</mx:Application>
2. Data grid will be used here to display the seven days weather forecast. Here, the weather forecast is limited to US cities only. So the zip code provided as input must be a valid US zip code. The code is shown in Listing 7.19 below.
<mx:DataGrid x="44" y="64" width="100%" id="forecastGrid">
<mx:columns>
<mx:DataGridColumn headerText="Date" id="dates"
labelFunction="displayDate"/>
<mx:DataGridColumn headerText="Description"
dataField="Desciption">
<mx:itemRenderer>
<mx:Component>
<mx:HBox verticalAlign="middle"
verticalScrollPolicy="off"
horizontalScrollPolicy="off" paddingTop="4"
paddingLeft="4">
<mx:Image id="descimg" width="50" height="50"
source="{outerDocument.getURL(data.Desciption)}"
verticalAlign="middle" />
<mx:Text text="{data.Desciption}"/>
</mx:HBox>
</mx:Component>
</mx:itemRenderer>
</mx:DataGridColumn>
<mx:DataGridColumn headerText="Low Temperature(F)"
labelFunction="displayLow"/>
<mx:DataGridColumn headerText="High Temperature(F)"
labelFunction="displayHigh" />
</mx:columns>
</mx:DataGrid>
Listing 7.19 – DataGrid to use in the applications
Chapter 8 – Data Visualization 173
In the above listing, it can be seen that in some of the data grid columns, labelFunction, is used instead of dataField. labelFunction provides the user with a function to handle the formatting of data to be displayed in that particular column.
Also, in order to display the date in a more readable format, the dateFormatter is used.
3. The displayLow() function is called in the data grid for the data grid column. It contains a reference to the row object, which contains the data of the current row. This allows the user to perform formatting, namespace and other XML related tasks before displaying the information in the corresponding column. Listing 7.20 shows the code for this function.
protected function displayLow(row:Object,column:DataGridColumn):
String{
return row.Temperatures.MorningLow;
}
protected function displayHigh(row:Object,column:DataGridColumn):
String{
return row.Temperatures.DaytimeHigh;
}
public function getURL(desciption:String):String{
var url:String="images/"+desciption+".gif";
return url;
}
protected function displayDate(row:Object,column:DataGridColumn):
String{
var dates:String=dateFormatter.format(row.Date);
return dates;
}
Listing 7.20 – The displayLow function
4. In order to invoke the Web service, the server has to have an appropriate entry in the crossdomain.xml file, to allow the Web service call. Here, the Web service must be invoked at run time and so ActionScript is used to call the Web service at run time. The WSDL is loaded at runtime using the method shown in Listing 7.21.
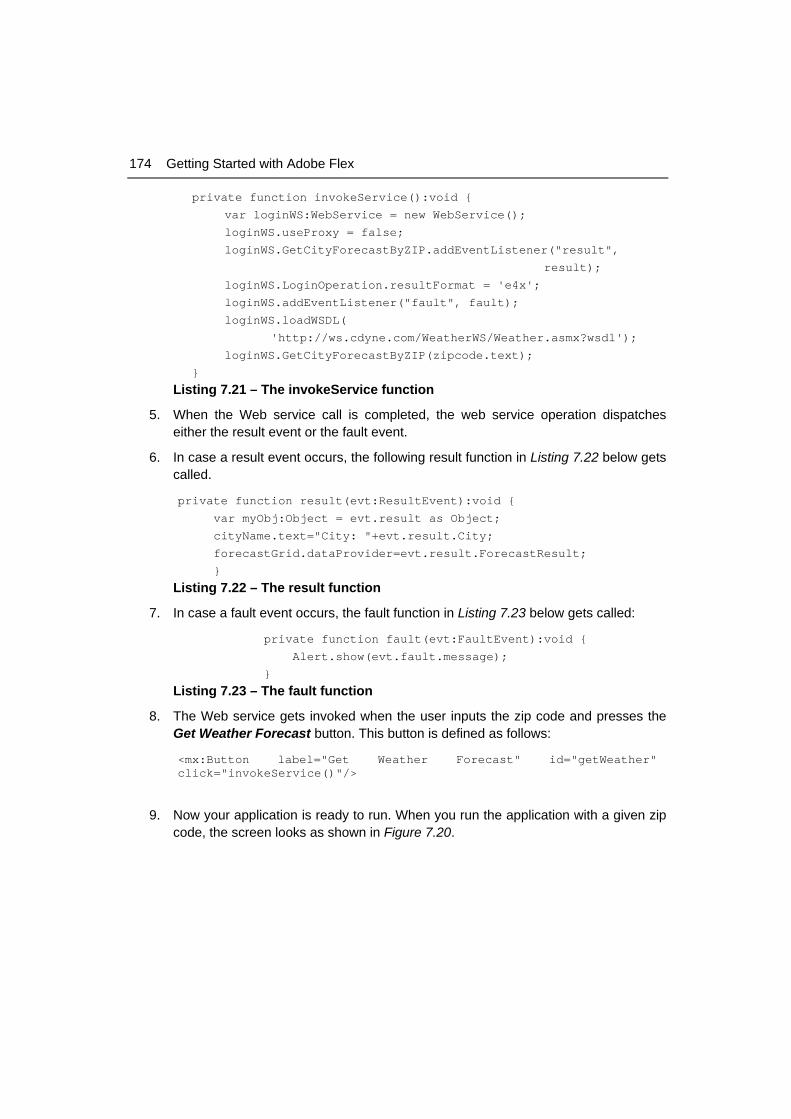
174 Getting Started with Adobe Flex
private function invokeService():void {
var loginWS:WebService = new WebService();
loginWS.useProxy = false;
loginWS.GetCityForecastByZIP.addEventListener("result",
result);
loginWS.LoginOperation.resultFormat = 'e4x';
loginWS.addEventListener("fault", fault);
loginWS.loadWSDL(
'http://ws.cdyne.com/WeatherWS/Weather.asmx?wsdl');
loginWS.GetCityForecastByZIP(zipcode.text);
}
Listing 7.21 – The invokeService function
5. When the Web service call is completed, the web service operation dispatches either the result event or the fault event.
6. In case a result event occurs, the following result function in Listing 7.22 below gets called.
private function result(evt:ResultEvent):void {
var myObj:Object = evt.result as Object;
cityName.text="City: "+evt.result.City;
forecastGrid.dataProvider=evt.result.ForecastResult;
}
Listing 7.22 – The result function
7. In case a fault event occurs, the fault function in Listing 7.23 below gets called:
private function fault(evt:FaultEvent):void {
Alert.show(evt.fault.message);
}
Listing 7.23 – The fault function
8. The Web service gets invoked when the user inputs the zip code and presses the Get Weather Forecast button. This button is defined as follows:
<mx:Button label="Get Weather Forecast" id="getWeather" click="invokeService()"/>
9. Now your application is ready to run. When you run the application with a given zip code, the screen looks as shown in Figure 7.20.
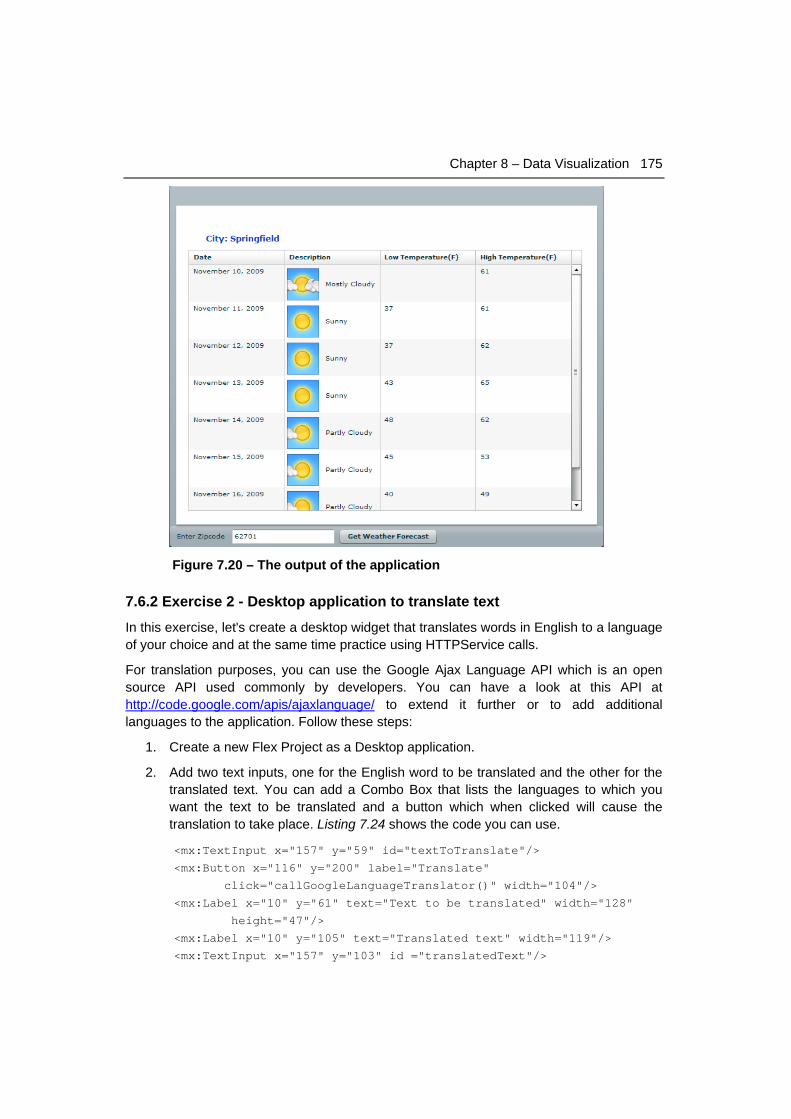
Chapter 8 – Data Visualization 175
Figure 7.20 – The output of the application
7.6.2 Exercise 2 - Desktop application to translate text
In this exercise, let's create a desktop widget that translates words in English to a language of your choice and at the same time practice using HTTPService calls.
For translation purposes, you can use the Google Ajax Language API which is an open source API used commonly by developers. You can have a look at this API at http://code.google.com/apis/ajaxlanguage/ to extend it further or to add additional languages to the application. Follow these steps:
1. Create a new Flex Project as a Desktop application.
2. Add two text inputs, one for the English word to be translated and the other for the translated text. You can add a Combo Box that lists the languages to which you want the text to be translated and a button which when clicked will cause the translation to take place. Listing 7.24 shows the code you can use.
<mx:TextInput x="157" y="59" id="textToTranslate"/>
<mx:Button x="116" y="200" label="Translate"
click="callGoogleLanguageTranslator()" width="104"/>
<mx:Label x="10" y="61" text="Text to be translated" width="128"
height="47"/>
<mx:Label x="10" y="105" text="Translated text" width="119"/>
<mx:TextInput x="157" y="103" id ="translatedText"/>
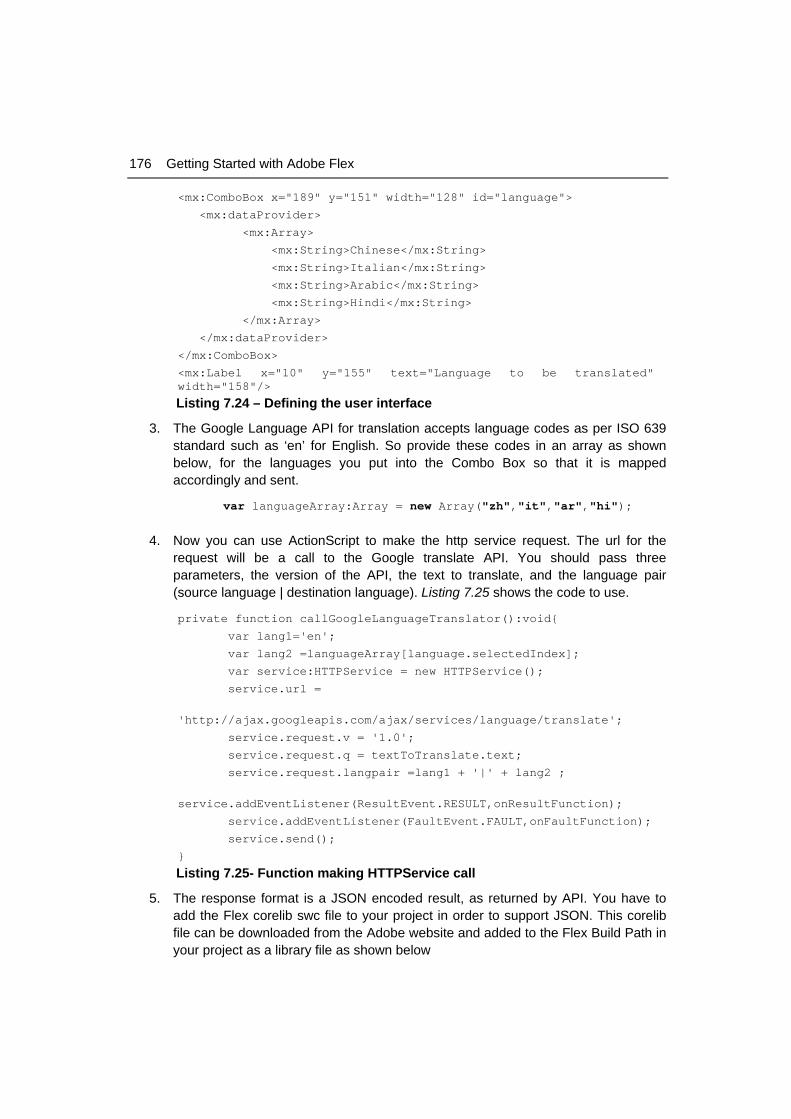
176 Getting Started with Adobe Flex
<mx:ComboBox x="189" y="151" width="128" id="language">
<mx:dataProvider>
<mx:Array>
<mx:String>Chinese</mx:String>
<mx:String>Italian</mx:String>
<mx:String>Arabic</mx:String>
<mx:String>Hindi</mx:String>
</mx:Array>
</mx:dataProvider>
</mx:ComboBox>
<mx:Label x="10" y="155" text="Language to be translated" width="158"/>
Listing 7.24 – Defining the user interface
3. The Google Language API for translation accepts language codes as per ISO 639 standard such as ‘en’ for English. So provide these codes in an array as shown below, for the languages you put into the Combo Box so that it is mapped accordingly and sent.
var languageArray:Array = new Array("zh","it","ar","hi");
4. Now you can use ActionScript to make the http service request. The url for the request will be a call to the Google translate API. You should pass three parameters, the version of the API, the text to translate, and the language pair (source language | destination language). Listing 7.25 shows the code to use.
private function callGoogleLanguageTranslator():void{
var lang1='en';
var lang2 =languageArray[language.selectedIndex];
var service:HTTPService = new HTTPService();
service.url =
'http://ajax.googleapis.com/ajax/services/language/translate';
service.request.v = '1.0';
service.request.q = textToTranslate.text;
service.request.langpair =lang1 + '|' + lang2 ;
service.addEventListener(ResultEvent.RESULT,onResultFunction);
service.addEventListener(FaultEvent.FAULT,onFaultFunction);
service.send();
}
Listing 7.25- Function making HTTPService call
5. The response format is a JSON encoded result, as returned by API. You have to add the Flex corelib swc file to your project in order to support JSON. This corelib file can be downloaded from the Adobe website and added to the Flex Build Path in your project as a library file as shown below
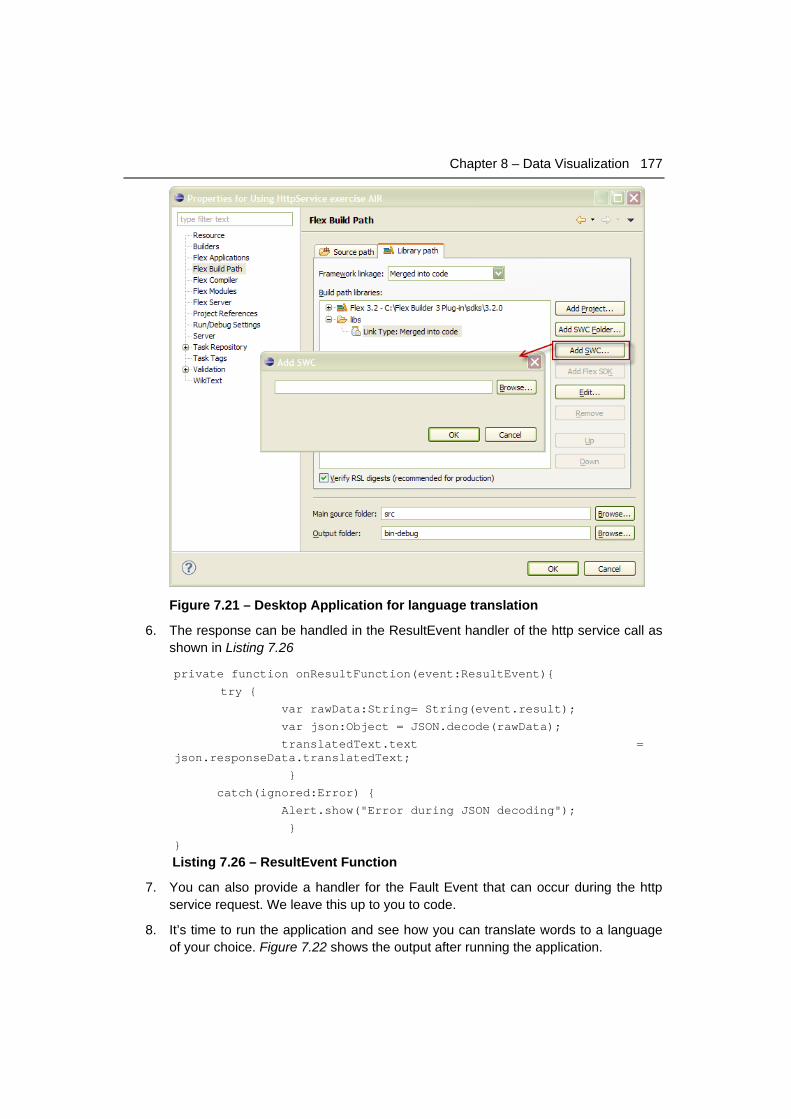
Chapter 8 – Data Visualization 177
Figure 7.21 – Desktop Application for language translation
6. The response can be handled in the ResultEvent handler of the http service call as shown in Listing 7.26
private function onResultFunction(event:ResultEvent){
try {
var rawData:String= String(event.result);
var json:Object = JSON.decode(rawData);
translatedText.text = json.responseData.translatedText;
}
catch(ignored:Error) {
Alert.show("Error during JSON decoding");
}
}
Listing 7.26 – ResultEvent Function
7. You can also provide a handler for the Fault Event that can occur during the http service request. We leave this up to you to code.
8. It’s time to run the application and see how you can translate words to a language of your choice. Figure 7.22 shows the output after running the application.

178 Getting Started with Adobe Flex
Figure 7.22 – Desktop Application for language translation
9. You can create a distributable package of this cool widget and give it to your friends who can install it on their desktops.
7.7 Summary In this chapter, you have learned how easy it can be to communicate with a remote server irrespective of the protocols being used.
First, you learned that if the remote server uses SOAP for communication then, a Web service can be used to communicate with it. If the protocol being used is HTTP, then the HttpService can be used. To access a remote object sitting on the server, you can bypass any gateway using RemoteObject with the AMF protocol.
Then you learned that the result obtained from the server can be dealt with irrespective of the type since Flex provides us with various means to deal with them (object or XML).
Finally, the chapter discussed how to work with databases such as DB2, and provided an extensive example.
From here on you will be using the concepts learned to build real-time dashboards with charts and data grids.
7.8 Review questions 1. What is the difference between HttpService and Dataservice?
2. When will you use the RemoteObject service?
3. What are the other alternatives to Adobe LifeCycle dataservices?
Chapter 8 – Data Visualization 179
4. What is the advantage of using E4X?
5. How will HttpService know the format of the result returned?
6. What is the default method for sending a request via the HttpService MXML tag?
A. GET
B. POST
C. PUT
D. HEAD
E. None of the above
7. You have the following http service tag in an MXML document.
<mx:HTTPService id=”myHS” url=”data/fruits.xml” useProxy=false/>
Which of the following options would you choose to make the remote data call somewhere else in your code?.
A. myHS.getData()
B. myHS.getRemote()
C. myHS.send()
D. myHS.sendAndReceive()
E. None of the above
8. You have implemented a <mx:WebService> tag in your application. Which MXML tag below could you insert inside the Web service tag to enable the calling of multiple methods of the remote server and separate the results accordingly?
A. <mx:method>
B. <mx:operation>
C. <mx:RemoteObject>
D. <mx:request>
E. None of the above
9. The different resultFormat that can be specified on a WebService include
A. object
B. xml
C. e4x
D. All of the above
E. None of the above
180 Getting Started with Adobe Flex
10. For which of the following remote services you can specify the result and fault event handlers on the component itself?
A. HttpService
B. WebService
C. RemoteObject
D. All of the above
E. None of the above
8 Chapter 8 - Data Visualization In this chapter you will learn how to create nice and useful charts using Flex 3 SDK. Though charting is considered more of an advanced topic, in this chapter you will be introduced to this feature to show its power and potential.
In this chapter you will learn about:
Different charts in Flex 3
Creating popular Flex charts
Chart Styles
Note:
Charting is one of the key features which users get when they buy Flex Builder Professional - it is not part of the free Flex SDK or Flex Builder Standard.
8.1 Flex Charting: The big picture A chart is a drawing that shows the relationship between changing items. Common graphs use bars, lines, or parts of a circle to display data.
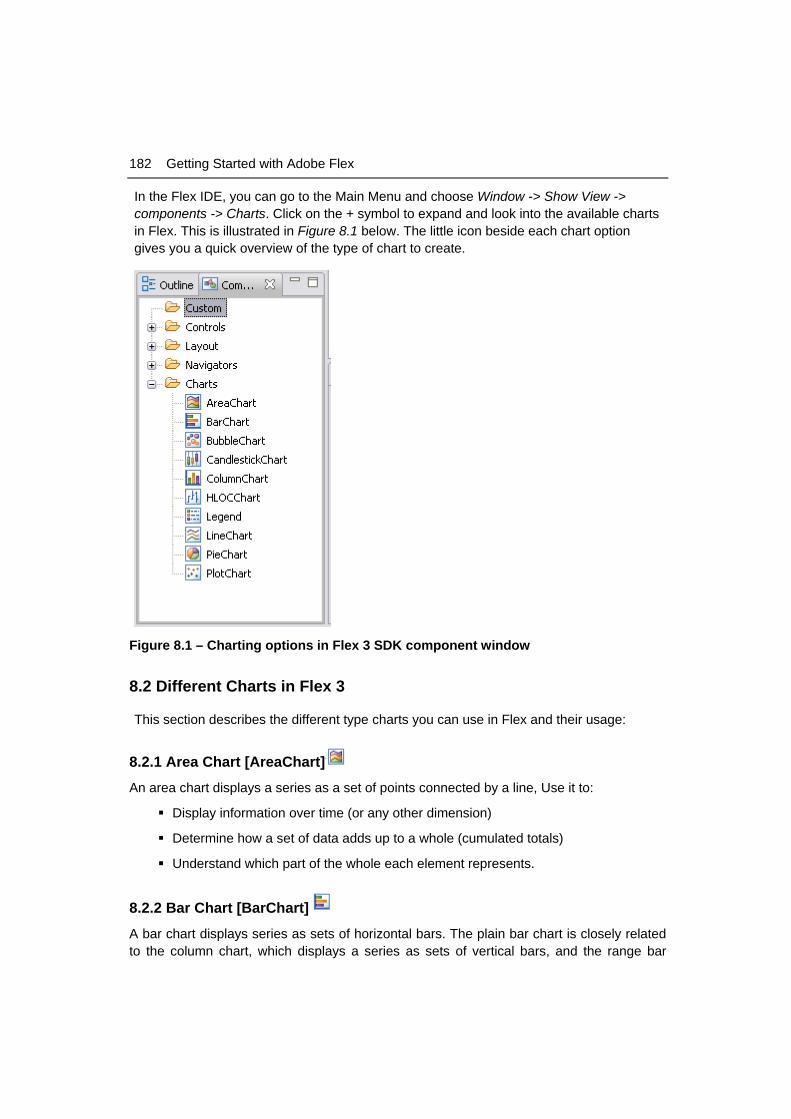
182 Getting Started with Adobe Flex
In the Flex IDE, you can go to the Main Menu and choose Window -> Show View -> components -> Charts. Click on the + symbol to expand and look into the available charts in Flex. This is illustrated in Figure 8.1 below. The little icon beside each chart option gives you a quick overview of the type of chart to create.
Figure 8.1 – Charting options in Flex 3 SDK component window
8.2 Different Charts in Flex 3
This section describes the different type charts you can use in Flex and their usage:
8.2.1 Area Chart [AreaChart]
An area chart displays a series as a set of points connected by a line, Use it to:
Display information over time (or any other dimension)
Determine how a set of data adds up to a whole (cumulated totals)
Understand which part of the whole each element represents.
8.2.2 Bar Chart [BarChart]
A bar chart displays series as sets of horizontal bars. The plain bar chart is closely related to the column chart, which displays a series as sets of vertical bars, and the range bar
Chapter 8 – Data Visualization 183
chart, which displays series as sets of horizontal bars with varying beginning and end points. Use it to
Present observations over time or under different conditions (e.g. countries, testing conditions)
Provide interval scaling (e.g. time).
8.2.3 Bubble Chart [BubbleChart]
In a bubble chart values are represented by the position of the bubble on the vertical and horizontal axis, and the size of the bubble. Extra categories can be introduced by using different colored bubbles in the chart.
8.2.4 Candle Stick Chart [CandlestickChart]
A candle stick chart is a style of bar-chart used primarily to describe price movements of an equity over time. It is a combination of a line-chart and a bar-chart, in that each bar represents the range of price movement over a given time interval. It is most often used in technical analysis of equity and currency price patterns.
8.2.5 Column Chart [ColumnChart]
A column chart displays a series as a set of vertical bars that are grouped by category. Column charts are useful for showing data changes over a period of time or for illustrating comparisons among items. The plain column chart is closely related to the bar chart, which displays series as sets of horizontal bars.
8.2.6 Legend Control [Legend]
Legend is not a chart type by itself - when the data appearing in a chart contains multiple data series, the chart may include a legend. A legend contains a list of the data series appearing in the chart and an example of their appearance. This information allows the data from data series to be identified in the chart.
8.2.7 High Low Open Close Chart [HLOCChart]
A HighLowOpenClose chart is specifically designed for financial or scientific data that uses up to four values per data point. These values align with the high, low, open and close values that are used to plot financial stock data.
8.2.8 Line Chart [LineChart]
A line chart displays a series as a set of points connected by a single line. Line charts are used to represent large amounts of data that occur over a continuous period of time. Use it
To display long data rows
184 Getting Started with Adobe Flex
To interpolate between data points
To extrapolate beyond known data values (forecast)
To compare different graphs
8.2.9 Pie Chart [PieChart]
Pie charts and doughnut charts that display data as a proportion of the whole. Pie charts are most commonly used to make comparisons between groups. Use it to
Convey approximate proportional relationships (relative amounts) at a point in time
Compare part of a whole at a given point in time
Exploded: emphasize a small proportion of parts
8.2.10 Plot Chart [PlotChart]
Use a Plot Chart to
Show measurements over time (one-dimensional scatterplot)
Convey an overall impression of the relation between two variables (Two-dimensional scatterplot)
Let's examine how to create some popular charts using sample static data. The same data will be used for most charts, and for each chart, the data has to be enclosed within the code shown in Listing 8.1 below.
<mx:Script>
<![CDATA[
import mx.collections.ArrayCollection;
[Bindable]
..
..
]]>
</mx:Script>
Listing 8.1 – Place holder for chart data
For each type of chart, you should create a panel and place the code inside the panel as shown in Listing 8.2 below. Flex will generate the same code when you drag and drop a chart to the design view.
<mx:Panel title="Title of My Chart" height="100%" width="100%">
..
..
</mx:Panel>
Listing 8.2 – Panel for a chart
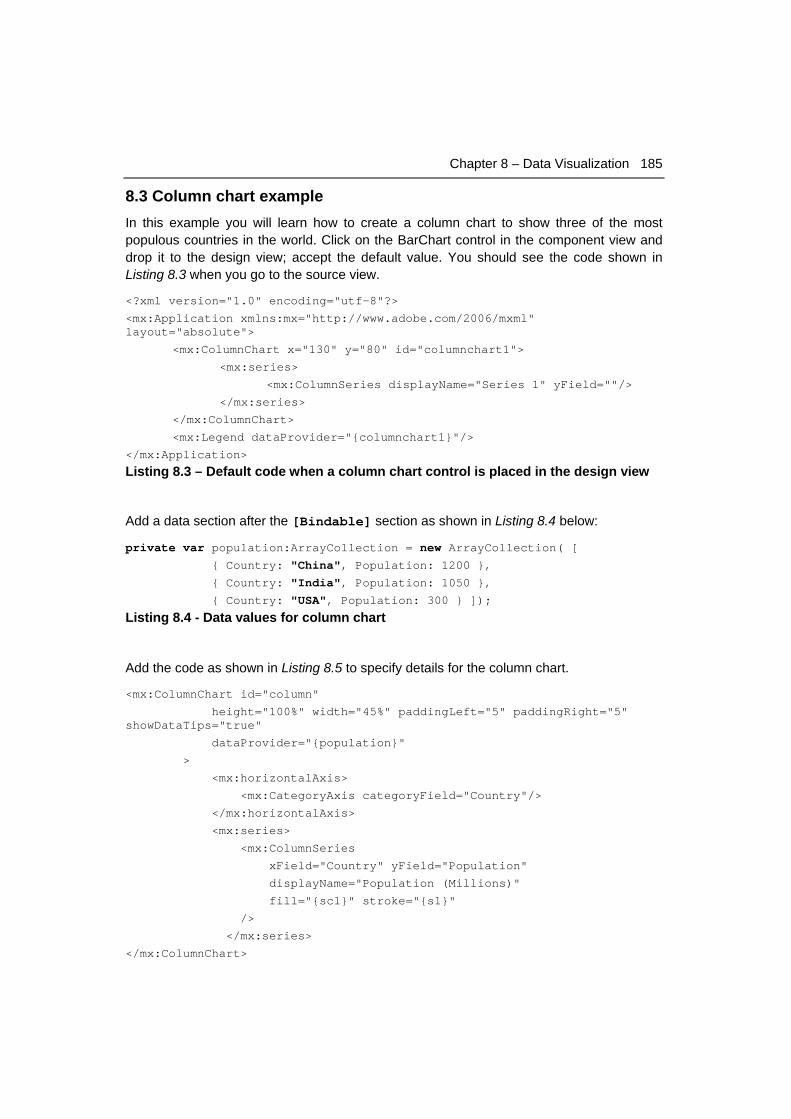
Chapter 8 – Data Visualization 185
8.3 Column chart example In this example you will learn how to create a column chart to show three of the most populous countries in the world. Click on the BarChart control in the component view and drop it to the design view; accept the default value. You should see the code shown in Listing 8.3 when you go to the source view.
<?xml version="1.0" encoding="utf-8"?>
<mx:Application xmlns:mx="http://www.adobe.com/2006/mxml" layout="absolute">
<mx:ColumnChart x="130" y="80" id="columnchart1">
<mx:series>
<mx:ColumnSeries displayName="Series 1" yField=""/>
</mx:series>
</mx:ColumnChart>
<mx:Legend dataProvider="{columnchart1}"/>
</mx:Application>
Listing 8.3 – Default code when a column chart control is placed in the design view
Add a data section after the [Bindable] section as shown in Listing 8.4 below:
private var population:ArrayCollection = new ArrayCollection( [ { Country: "China", Population: 1200 }, { Country: "India", Population: 1050 }, { Country: "USA", Population: 300 } ]);
Listing 8.4 - Data values for column chart
Add the code as shown in Listing 8.5 to specify details for the column chart.
<mx:ColumnChart id="column"
height="100%" width="45%" paddingLeft="5" paddingRight="5" showDataTips="true"
dataProvider="{population}"
>
<mx:horizontalAxis>
<mx:CategoryAxis categoryField="Country"/>
</mx:horizontalAxis>
<mx:series>
<mx:ColumnSeries
xField="Country" yField="Population"
displayName="Population (Millions)"
fill="{sc1}" stroke="{s1}"
/>
</mx:series>
</mx:ColumnChart>
186 Getting Started with Adobe Flex
<mx:Legend dataProvider="{column}"/>
Listing 8.5 – Main code for the column chart creation
Run the program and you will see the column chart shown in Figure 8.2.
Figure 8.2 – Output of the column chart example
Take a close look into the ColumnSeries chart series with the ColumnChart control to define the data for the chart. Most of the chart will have similar chart series associated with the chart control.
8.4 Bar chart example With the same data as in the previous example, change the code as shown in Listing 8.6 below.
<mx:BarChart id="bar" height="100%" width="45%"
paddingLeft="5" paddingRight="5"
showDataTips="true" dataProvider="{population}">
<mx:verticalAxis>
<mx:CategoryAxis categoryField="Country"/>
</mx:verticalAxis>
<mx:series>
<mx:BarSeries
yField="Country"
xField="Population"
displayName="Population (Millions)"
fill="{sc1}"
stroke="{s1}"
/>
</mx:series>
</mx:BarChart>

Chapter 8 – Data Visualization 187
<mx:Legend dataProvider="{bar}"/>
Listing 8.6 - Main code for the Bar chart creation
The output of the Bar chart example is shown in Figure 8.3.
Figure 8.3 – Output of the bar chart example
As you can see, converting from the column chart to the bar chart is very simple. They have similar properties; only the axis need be changed to render data properly.
8.5 Line chart example In this example you will see how to format the line chart using the form property. This property can have the following values:
segment: Draws lines as connected segments that are angled to connect at each data point in the series. This is the default.
step: Draws lines as horizontal and vertical segments. At the first data point, draws a horizontal line, and then a vertical line to the second point. Repeats this for each data point.
reverseStep: Draws lines as horizontal and vertical segments. At the first data point, draws a vertical line, and then a horizontal line to the second point. Repeats this for each data point.
Vertical: Draws the vertical line only from the y-coordinate of the first point to the y-coordinate of the second point at the x-coordinate of the second point. Repeats this for each data point.
Horizontal: Draws the horizontal line only from the x-coordinate of the first point to the x-coordinate of the second point at the y-coordinate of the first point. Repeats this for each data point.
Curve: Draws curves between data points.
Add a data section after the [Bindable] section as shown in Listing 8.7 below.
public var lineChartDemo:ArrayCollection = new ArrayCollection([
{Time:"1:30", "Line chart (segment)":100, "Line chart
188 Getting Started with Adobe Flex
(step)":85, "Line chart (curve)":40 },
{Time:"1:30", "Line chart (segment)":60, "Line chart (step)":70, "Line chart (curve)":20 },
{Time:"1:30", "Line chart (segment)":80, "Line chart (step)":40, "Line chart (curve)":40 },
{Time:"1:30", "Line chart (segment)":50, "Line chart (step)":20, "Line chart (curve)":60},
{Time:"1:30", "Line chart (segment)":60, "Line chart (step)":60, "Line chart (curve)":40 }
])
Listing 8.7 - Data values for a line chart
Listing 8.8 shows the main code needed to create the line chart.
<mx:LineChart x="103" y="90" id="linechart1"
dataProvider="{lineChartDemo}"
showDataTips="true"
>
<mx:horizontalAxis>
<mx:CategoryAxis
dataProvider="{lineChartDemo}"
categoryField="Time"
/>
</mx:horizontalAxis>
<mx:series>
<mx:LineSeries yField="Line chart (segment)" displayName="Line chart (segment)" >
</mx:LineSeries>
<mx:LineSeries
yField="Line chart (step)"
displayName="Line chart (step)"
form = "step"
/>
<mx:LineSeries
yField="Line chart (curve)"
displayName="Line chart (curve)"
form = "curve"
/>
</mx:series>
</mx:LineChart>
<mx:Legend dataProvider="{linechart1}"/>
Listing 8.8 - Main code for the line chart creation
The output of the program is shown in Figure 8.4.
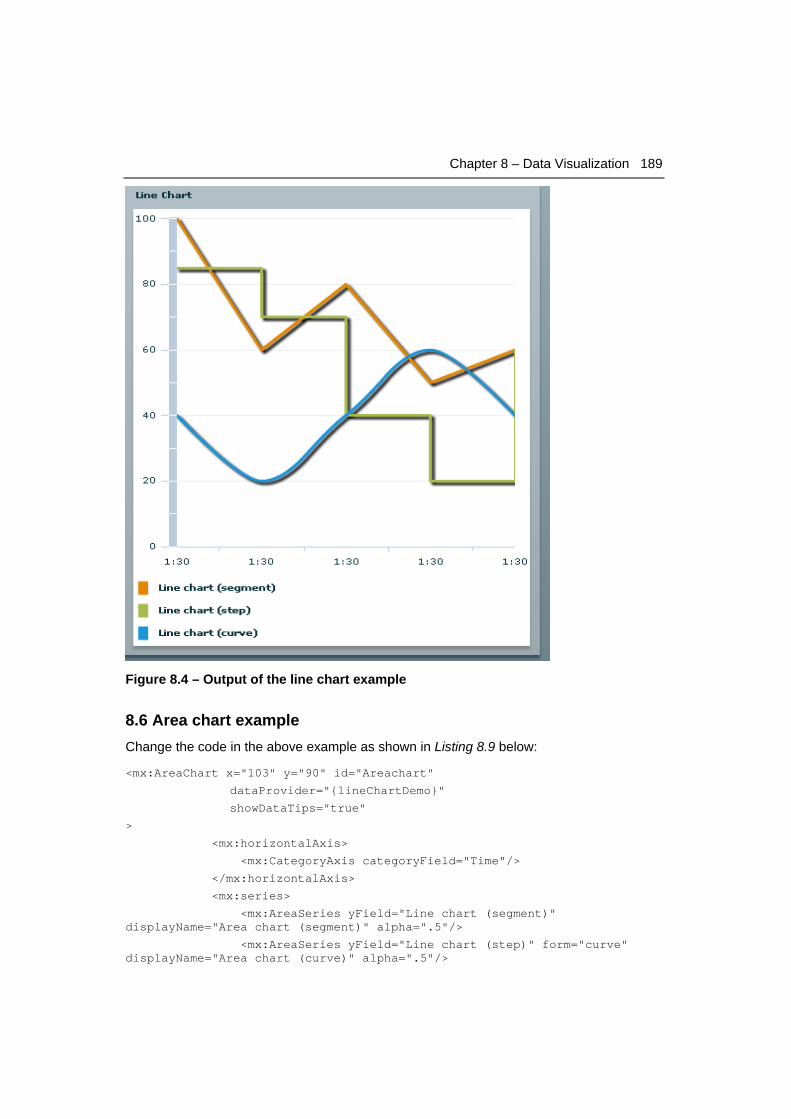
Chapter 8 – Data Visualization 189
Figure 8.4 – Output of the line chart example
8.6 Area chart example Change the code in the above example as shown in Listing 8.9 below:
<mx:AreaChart x="103" y="90" id="Areachart"
dataProvider="{lineChartDemo}"
showDataTips="true"
>
<mx:horizontalAxis>
<mx:CategoryAxis categoryField="Time"/>
</mx:horizontalAxis>
<mx:series>
<mx:AreaSeries yField="Line chart (segment)" displayName="Area chart (segment)" alpha=".5"/>
<mx:AreaSeries yField="Line chart (step)" form="curve" displayName="Area chart (curve)" alpha=".5"/>
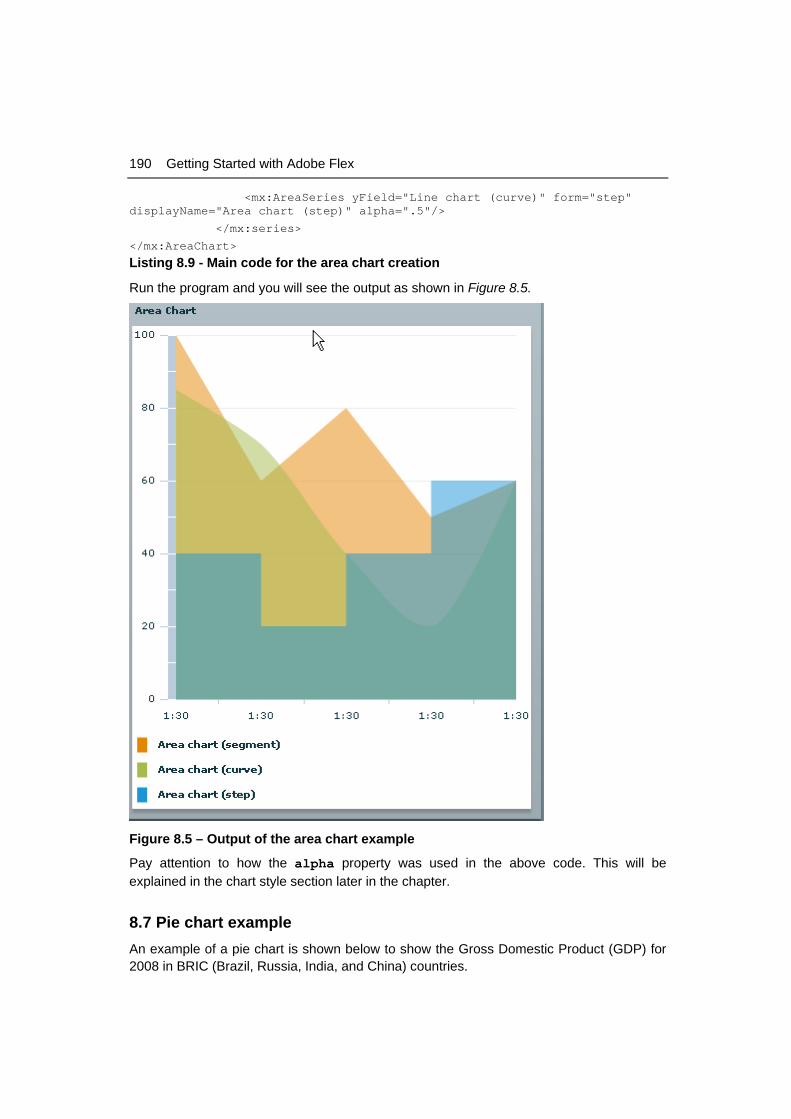
190 Getting Started with Adobe Flex
<mx:AreaSeries yField="Line chart (curve)" form="step" displayName="Area chart (step)" alpha=".5"/>
</mx:series>
</mx:AreaChart>
Listing 8.9 - Main code for the area chart creation
Run the program and you will see the output as shown in Figure 8.5.
Figure 8.5 – Output of the area chart example
Pay attention to how the alpha property was used in the above code. This will be explained in the chart style section later in the chapter.
8.7 Pie chart example An example of a pie chart is shown below to show the Gross Domestic Product (GDP) for 2008 in BRIC (Brazil, Russia, India, and China) countries.
Chapter 8 – Data Visualization 191
Add a data section after the [Bindable] section as shown in Listing 8.10 below.
private var bricGDP:ArrayCollection = new ArrayCollection( [ { Country: "Brazil", GDP: 78 }, { Country: "China", GDP: 300 }, { Country: "India", GDP: 150}, { Country: "Russia", GDP: 277}
]);
Listing 8.10 – Data values for the pie chart example
Add a function after the above data section to show a details label as shown in Listing 8.11 below.
private function displayGDP(data:Object, field:String, index:Number, percentValue:Number):String {
var temp:String= (" " + percentValue).substr(0,6); return data.Country + ": " + '\n' + "Total GDP: " + data.GDP + " Billion $" + '\n' + temp + "%";
}
Listing 8.11 – Function to show a label for the pie chart
Now add the code to create the pie chart as shown in Listing 8.12 below.
<mx:PieChart id="chart" height="100%" width="100%"
paddingRight="5" paddingLeft="5" showDataTips="true"
dataProvider="{bricGDP}"
>
<mx:series>
<mx:PieSeries
nameField="Country" labelPosition="callout"
field="GDP" labelFunction="displayGDP"
fills="{[sc1, sc2, sc3, sc4]}"
>
</mx:PieSeries>
</mx:series>
</mx:PieChart>
<mx:Legend dataProvider="{chart}"/>
Listing 8.12 - Main code for the pie chart creation
Notice the use of the fills attribute which is used to define to use of SolidColor styling property and defined as shown in Listing 8.13 below.
<mx:SolidColor id="sc1" color="green" alpha=".6"/>
<mx:SolidColor id="sc2" color="yellow" alpha=".6"/>
<mx:SolidColor id="sc3" color="blue" alpha=".6"/>
<mx:SolidColor id="sc4" color="red" alpha=".6"/> }
Listing 8.13 – Styling of the pie chart
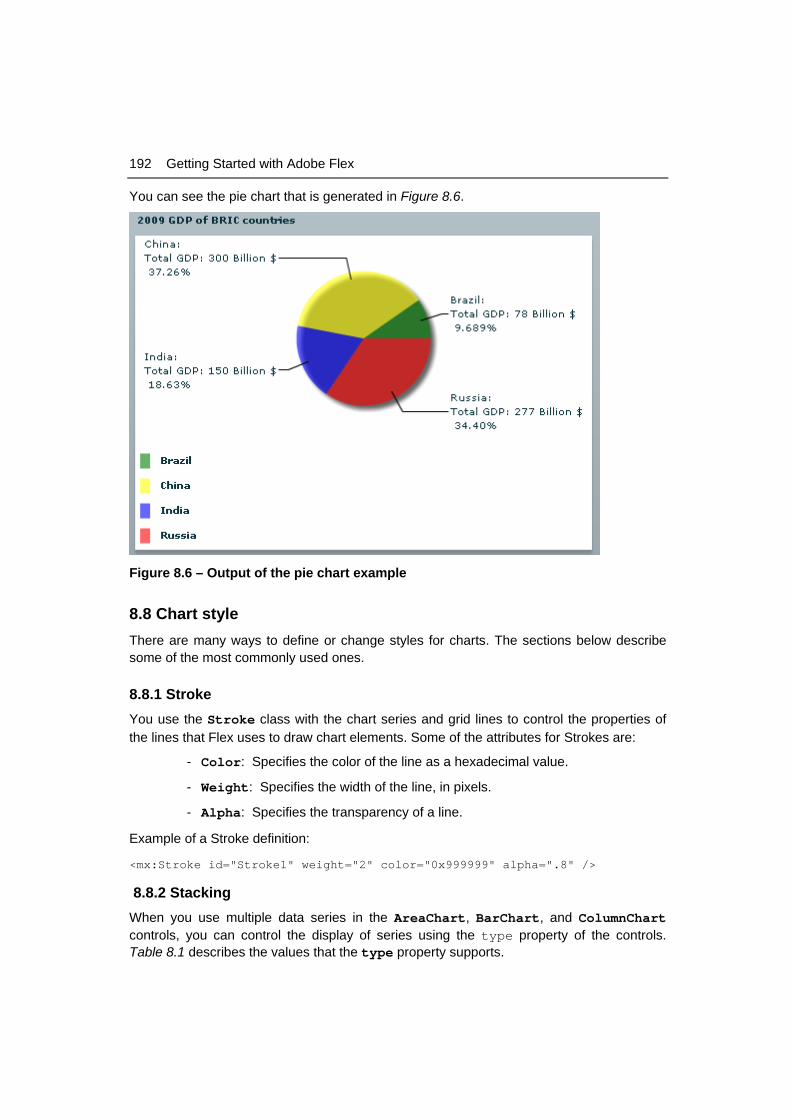
192 Getting Started with Adobe Flex
You can see the pie chart that is generated in Figure 8.6.
Figure 8.6 – Output of the pie chart example
8.8 Chart style There are many ways to define or change styles for charts. The sections below describe some of the most commonly used ones.
8.8.1 Stroke You use the Stroke class with the chart series and grid lines to control the properties of the lines that Flex uses to draw chart elements. Some of the attributes for Strokes are:
- Color: Specifies the color of the line as a hexadecimal value.
- Weight: Specifies the width of the line, in pixels.
- Alpha: Specifies the transparency of a line.
Example of a Stroke definition:
<mx:Stroke id="Stroke1" weight="2" color="0x999999" alpha=".8" />
8.8.2 Stacking When you use multiple data series in the AreaChart, BarChart, and ColumnChart controls, you can control the display of series using the type property of the controls. Table 8.1 describes the values that the type property supports.
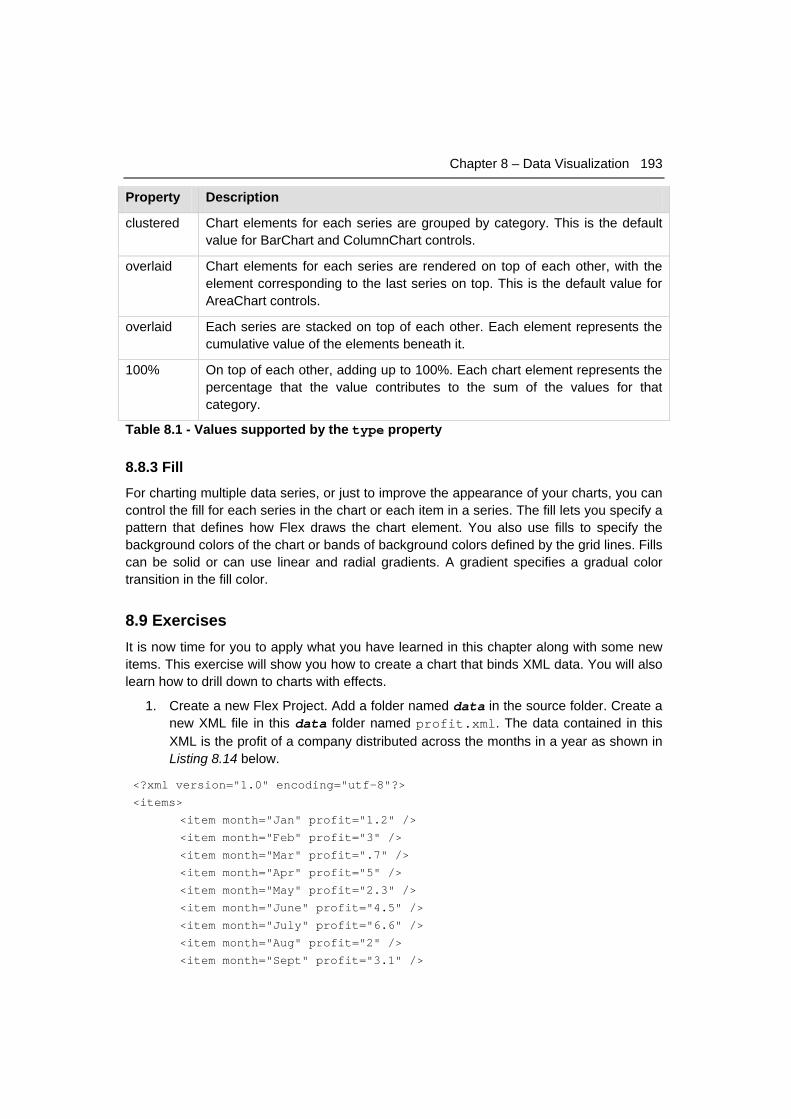
Chapter 8 – Data Visualization 193
Property Description
clustered Chart elements for each series are grouped by category. This is the default value for BarChart and ColumnChart controls.
overlaid Chart elements for each series are rendered on top of each other, with the element corresponding to the last series on top. This is the default value for AreaChart controls.
overlaid Each series are stacked on top of each other. Each element represents the cumulative value of the elements beneath it.
100% On top of each other, adding up to 100%. Each chart element represents the percentage that the value contributes to the sum of the values for that category.
Table 8.1 - Values supported by the type property
8.8.3 Fill
For charting multiple data series, or just to improve the appearance of your charts, you can control the fill for each series in the chart or each item in a series. The fill lets you specify a pattern that defines how Flex draws the chart element. You also use fills to specify the background colors of the chart or bands of background colors defined by the grid lines. Fills can be solid or can use linear and radial gradients. A gradient specifies a gradual color transition in the fill color.
8.9 Exercises It is now time for you to apply what you have learned in this chapter along with some new items. This exercise will show you how to create a chart that binds XML data. You will also learn how to drill down to charts with effects.
1. Create a new Flex Project. Add a folder named data in the source folder. Create a new XML file in this data folder named profit.xml. The data contained in this XML is the profit of a company distributed across the months in a year as shown in Listing 8.14 below.
<?xml version="1.0" encoding="utf-8"?>
<items>
<item month="Jan" profit="1.2" />
<item month="Feb" profit="3" />
<item month="Mar" profit=".7" />
<item month="Apr" profit="5" />
<item month="May" profit="2.3" />
<item month="June" profit="4.5" />
<item month="July" profit="6.6" />
<item month="Aug" profit="2" />
<item month="Sept" profit="3.1" />
194 Getting Started with Adobe Flex
<item month="Oct" profit="4" />
<item month="Nov" profit="6" />
<item month="Dec" profit="5.5" />
</items>
Listing 8.14 – Contents of profit.xml
2. You need to graphically display this data. So add a panel and a column chart to the application. By now you should know that an Http Request has to be sent to get the XML data as shown below.
<mx:HTTPService id="ChartData" url="data/profit.xml"/>
3. Bind the data to the data provider of the chart as shown in Listing 8.15 below
<mx:ColumnChart id="ProfitChart" width="100%" height="100%"
dataProvider="{ChartData.lastResult.items.item}" showDataTips="true"/>
Listing 8.15 – binding chart data provider
4. Since the profit of the company needs to be shown on the y-axis, you can define the yField attribute of the ColumnSeries property to the profit field of the dataprovider as shown in Listing 8.16 below.
<mx:series>
<mx:ColumnSeries id ="series" displayName="Series 1"
yField="value"/>
</mx:series>
Listing 8.16 – Defining the y-axis
5. In order to display the months on the x-axis, you should provide the <mx:horizontalAxis> tag and specify the categoryField as shown in Listing 8.17 below.
<mx:horizontalAxis>
<mx:CategoryAxis id="axis" categoryField="month" />
</mx:horizontalAxis>
Listing 8.17 – Defining the x-axis
6. You can now run this application to view the chart. The output is shown in Figure 8.7.
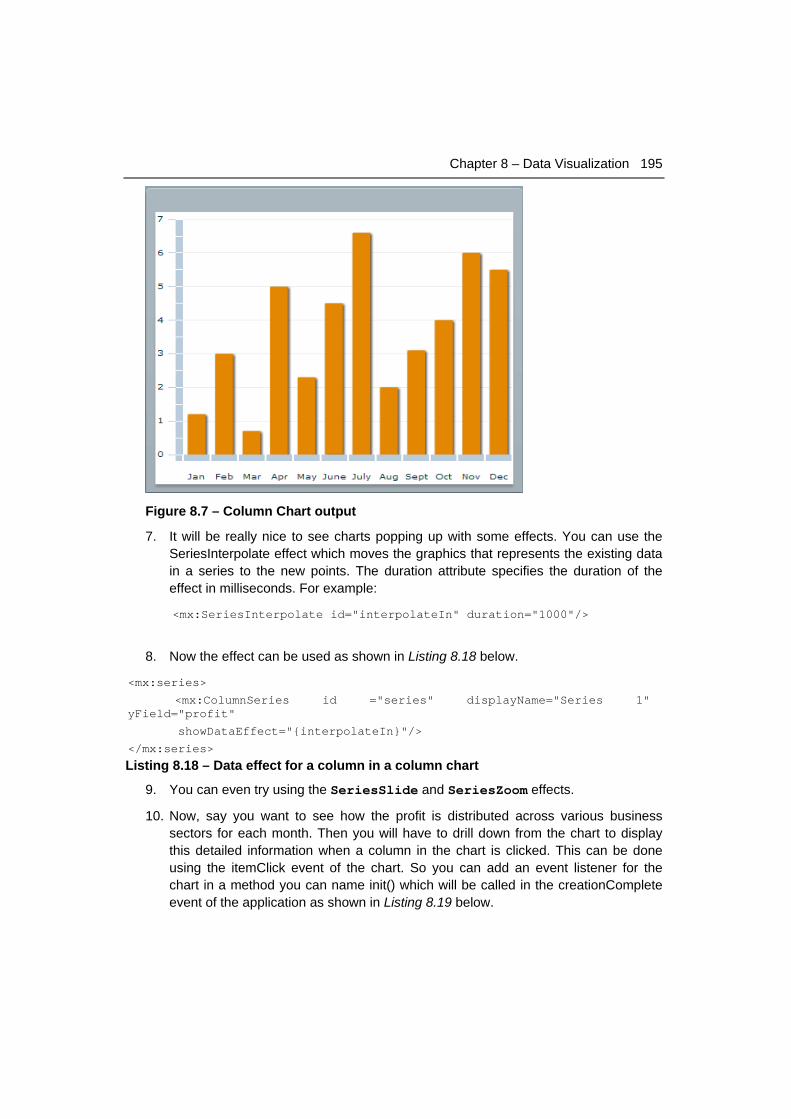
Chapter 8 – Data Visualization 195
Figure 8.7 – Column Chart output
7. It will be really nice to see charts popping up with some effects. You can use the SeriesInterpolate effect which moves the graphics that represents the existing data in a series to the new points. The duration attribute specifies the duration of the effect in milliseconds. For example:
<mx:SeriesInterpolate id="interpolateIn" duration="1000"/>
8. Now the effect can be used as shown in Listing 8.18 below.
<mx:series>
<mx:ColumnSeries id ="series" displayName="Series 1" yField="profit"
showDataEffect="{interpolateIn}"/>
</mx:series>
Listing 8.18 – Data effect for a column in a column chart
9. You can even try using the SeriesSlide and SeriesZoom effects.
10. Now, say you want to see how the profit is distributed across various business sectors for each month. Then you will have to drill down from the chart to display this detailed information when a column in the chart is clicked. This can be done using the itemClick event of the chart. So you can add an event listener for the chart in a method you can name init() which will be called in the creationComplete event of the application as shown in Listing 8.19 below.
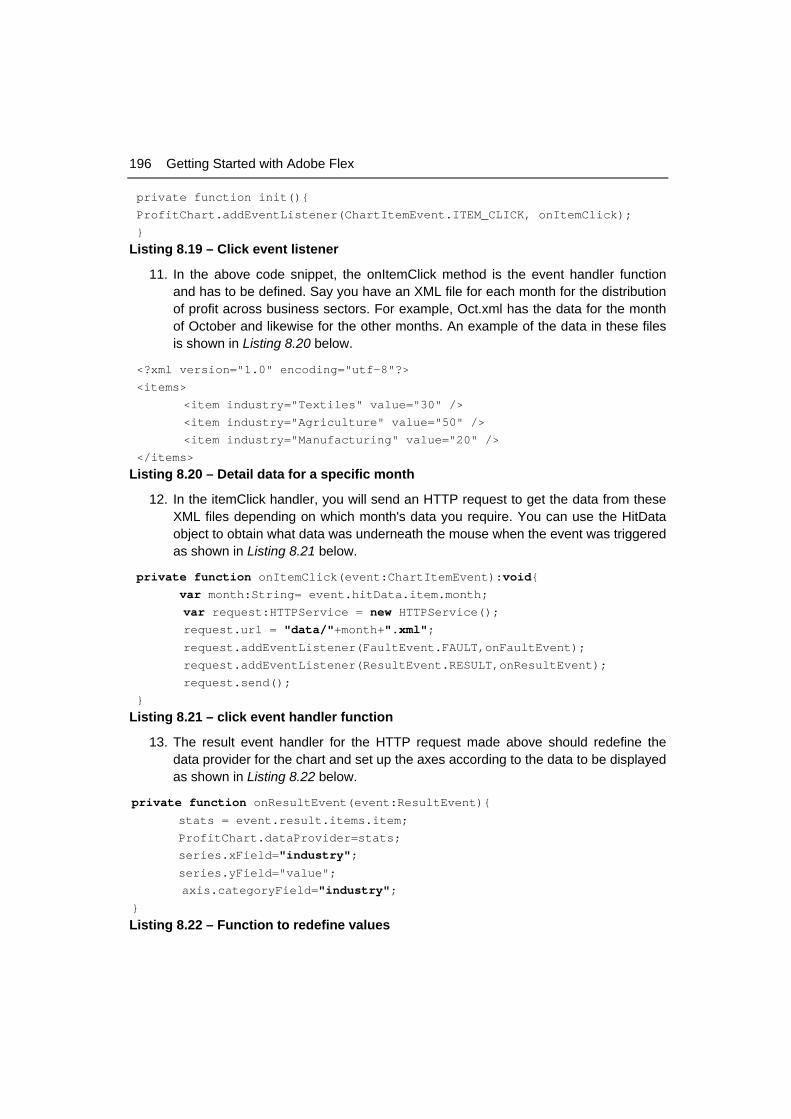
196 Getting Started with Adobe Flex
private function init(){
ProfitChart.addEventListener(ChartItemEvent.ITEM_CLICK, onItemClick);
}
Listing 8.19 – Click event listener
11. In the above code snippet, the onItemClick method is the event handler function and has to be defined. Say you have an XML file for each month for the distribution of profit across business sectors. For example, Oct.xml has the data for the month of October and likewise for the other months. An example of the data in these files is shown in Listing 8.20 below.
<?xml version="1.0" encoding="utf-8"?>
<items>
<item industry="Textiles" value="30" />
<item industry="Agriculture" value="50" />
<item industry="Manufacturing" value="20" />
</items>
Listing 8.20 – Detail data for a specific month
12. In the itemClick handler, you will send an HTTP request to get the data from these XML files depending on which month's data you require. You can use the HitData object to obtain what data was underneath the mouse when the event was triggered as shown in Listing 8.21 below.
private function onItemClick(event:ChartItemEvent):void{ var month:String= event.hitData.item.month; var request:HTTPService = new HTTPService(); request.url = "data/"+month+".xml";
request.addEventListener(FaultEvent.FAULT,onFaultEvent);
request.addEventListener(ResultEvent.RESULT,onResultEvent);
request.send();
}
Listing 8.21 – click event handler function
13. The result event handler for the HTTP request made above should redefine the data provider for the chart and set up the axes according to the data to be displayed as shown in Listing 8.22 below.
private function onResultEvent(event:ResultEvent){
stats = event.result.items.item;
ProfitChart.dataProvider=stats;
series.xField="industry";
series.yField="value";
axis.categoryField="industry";
}
Listing 8.22 – Function to redefine values
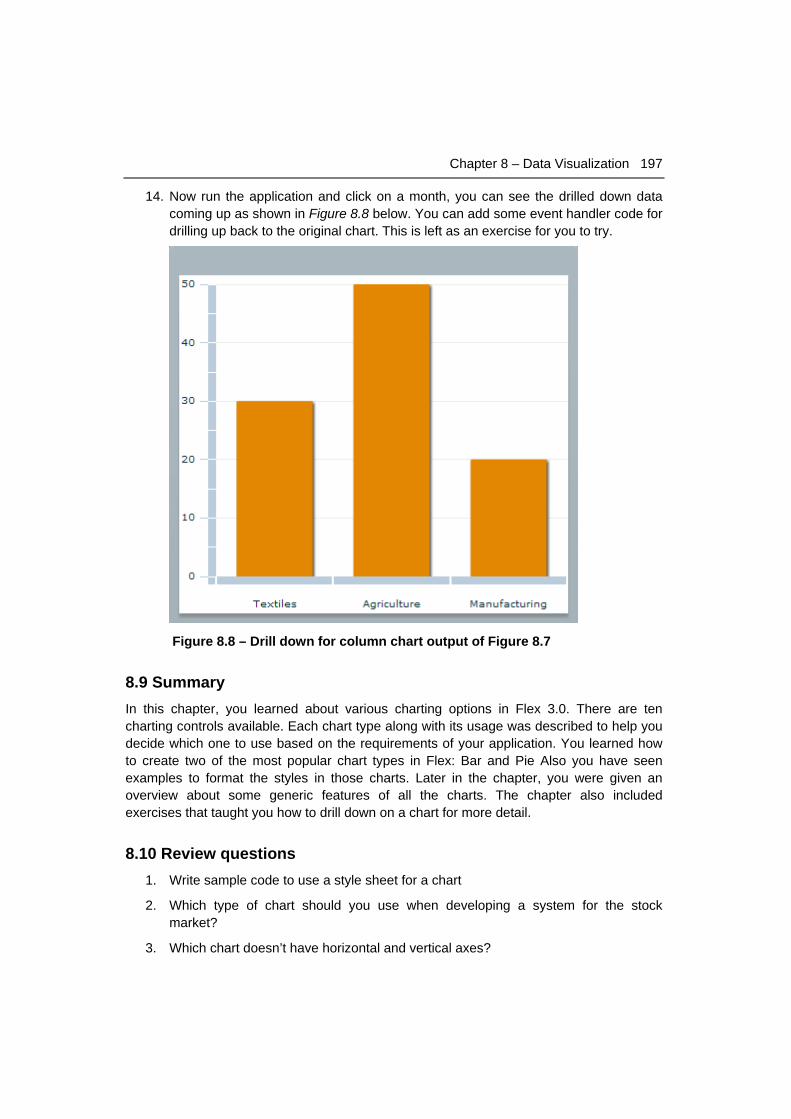
Chapter 8 – Data Visualization 197
14. Now run the application and click on a month, you can see the drilled down data coming up as shown in Figure 8.8 below. You can add some event handler code for drilling up back to the original chart. This is left as an exercise for you to try.
Figure 8.8 – Drill down for column chart output of Figure 8.7
8.9 Summary In this chapter, you learned about various charting options in Flex 3.0. There are ten charting controls available. Each chart type along with its usage was described to help you decide which one to use based on the requirements of your application. You learned how to create two of the most popular chart types in Flex: Bar and Pie Also you have seen examples to format the styles in those charts. Later in the chapter, you were given an overview about some generic features of all the charts. The chapter also included exercises that taught you how to drill down on a chart for more detail.
8.10 Review questions 1. Write sample code to use a style sheet for a chart
2. Which type of chart should you use when developing a system for the stock market?
3. Which chart doesn’t have horizontal and vertical axes?

198 Getting Started with Adobe Flex
4. What is a doughnut chart?
5. What are the important packages required to create charts using ActionScript?
6. Which chart control represents data with three values for each data point:
A. Pie Chart
B. Bubble Chart
C. Plot Chart
D. HighLowOpenClose Chart
E. None of the above
7. Which of the followings are possible source for Chart data?
A. Define it in a <mx:Script> block
B. Define it in an external XML, ActionScript, or text file
C. Return it by using a WebService call
D. Option A & B
E. All of the above
8. What are the ways you can supply data to chart a data provider?
A. Define it in a <mx:Script> block
B. Return it by using a WebService call
C. Define it in MXML
D. All of the above
E. None of the above
9. How many data values are required to denote a BubbleChart control data point?
A. Zero
B. Two
C. Three
D. Four
E. None of the above
10. Pie Chart is a sub-class of
A. PolarChart
B. CartesianChart
C. SpatialChart
D. All of the above

Chapter 8 – Data Visualization 199
E. None of the above

A Appendix A – Solutions to review questions Chapter 1
1. Rich Internet applications (RIA) are Web applications that have the features and functionality of traditional desktop applications. RIA can also be defined as a mix of three things: desktop-like UI online, offline applications that look like online applications, and online applications that can go offline whenever they are required to store the state of the program.
2. The goal of the Model-View-Controller (MVC) architecture is to create components that are well-defined and with limited scope in the application. This increases reusability of the components and improves maintainability of the overall system. Using Flex, we partition the view Component which defines the applications' user interface.
3. You can use Flex 3 to create a wide range of highly interactive, expressive applications. For example, a data visualization application built in Flex can pull data from multiple back-end sources and display it visually. Business users can drill down into the data for deeper insight and even change the data and have it automatically updated on the back end.
4. Flex is a suite of tools and an environment to build bigger. more reliable and more complex Flash Applications. You can do anything in Flash that can be done in Flex but it is harder. Flex provides the ability to create SWF files that run on Adobe Flash Player in any browser.
5. The main features that were introduced in Flex 3.0 are listed below:
Profilter to Monitor Memory and CPU Consumption
Refactoring
Persistent Caching
Wizards to generate Code
Charting Enhancements
DataGrid Component
6. C – supported languages ActionScript and MXML
7. B - Microsoft SilverLight, C - Ajax, D - JSF.
202 Getting Started with Adobe Flex
8. D and E. IDE and Design View are not included.
9. A, B and D
10. A & B
Chapter 2
1. Flex applications are, by nature, Flash applications. That means upon building the Flex application the output produced is .swf (swiff) format and that is executed by Flash Player.
2. Flash player is not very good at displaying HTML contents. Diaplauing capabilities of Flash Player are limited to the boundaries of the player’s scope Within a web page. Since Flex applications are run on Flash Player, for the obvious reason, Flex applications deployed on web server are not good at displaying HTML content either. On the other hand AIR ( Adobe Integrated Runtime ) applications support AIR player wherein a full built-in browser diaplays HTML content nicely. Moreover, unlike HTML files, there is a delay in loading .swf files.
3. Since Flex applications produce .swf files those are run on top of Flash Player, Flex provides cross platform support that is not dependent on web browser’s environment. Most of the today’s web browsers provide seamless support for Flash Player plug-in.
4. Once the component is added to the label, one can view the application in Design mode and then can change the properties of the component using the “Flex Properties” View. For example, below Figure A.1 shows the properties, in Standard View, of the text component:
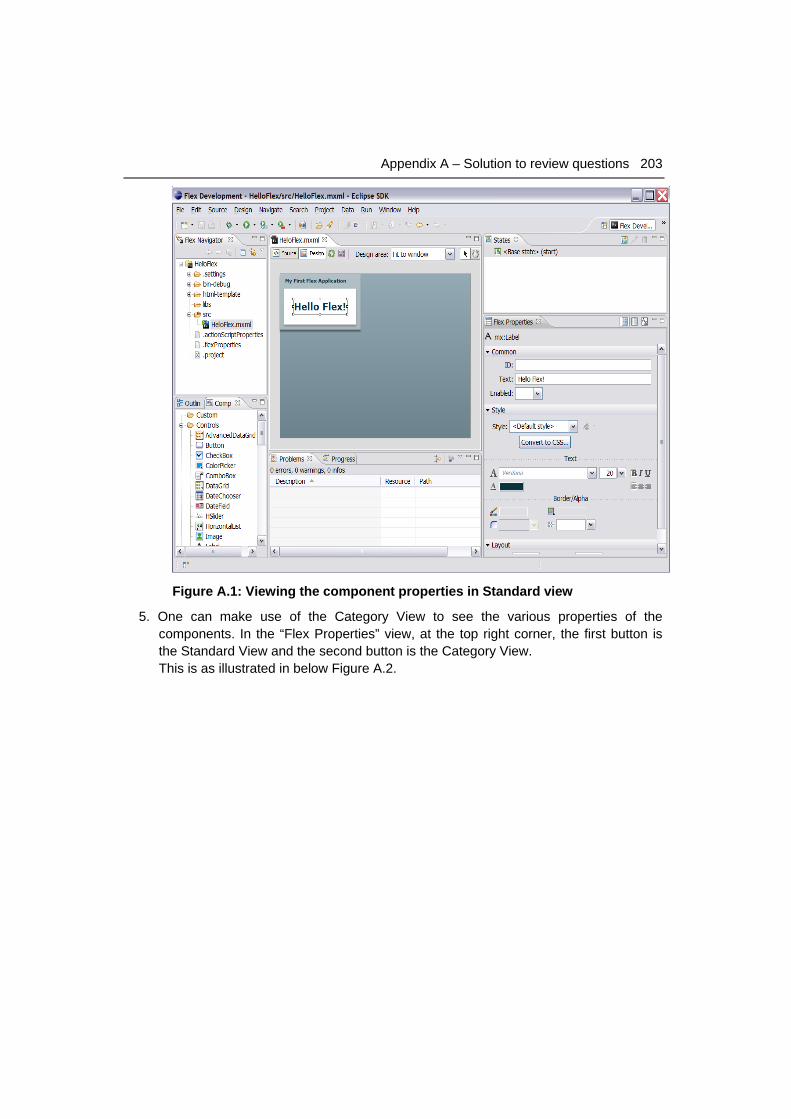
Appendix A – Solution to review questions 203
Figure A.1: Viewing the component properties in Standard view
5. One can make use of the Category View to see the various properties of the components. In the “Flex Properties” view, at the top right corner, the first button is the Standard View and the second button is the Category View. This is as illustrated in below Figure A.2.
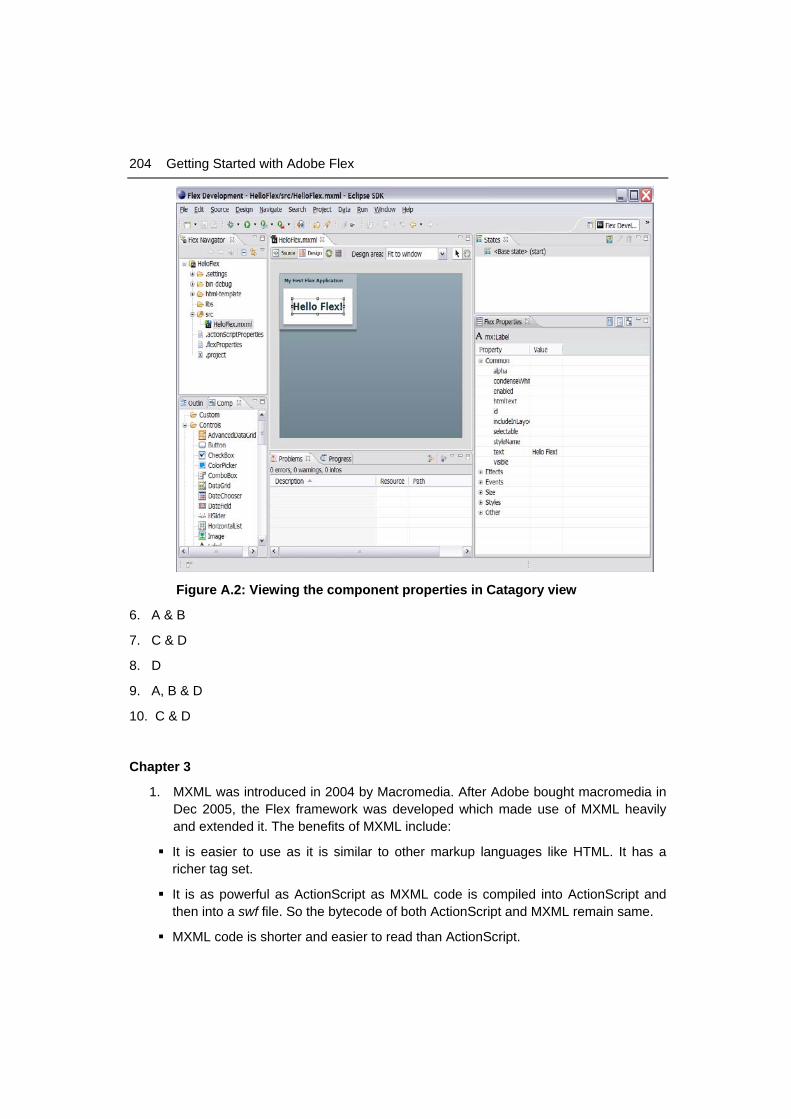
204 Getting Started with Adobe Flex
Figure A.2: Viewing the component properties in Catagory view
6. A & B
7. C & D
8. D
9. A, B & D
10. C & D
Chapter 3
1. MXML was introduced in 2004 by Macromedia. After Adobe bought macromedia in Dec 2005, the Flex framework was developed which made use of MXML heavily and extended it. The benefits of MXML include:
It is easier to use as it is similar to other markup languages like HTML. It has a richer tag set.
It is as powerful as ActionScript as MXML code is compiled into ActionScript and then into a swf file. So the bytecode of both ActionScript and MXML remain same.
MXML code is shorter and easier to read than ActionScript.
Appendix A – Solution to review questions 205
2. Metadata tags do not get compiled into executable code, but provide information to control how portions of your code get compiled
3. Tags are classes and attributes of the tags are its properties.
4. Nested tags become necessary when the value of attribute is not a simple string. For example, the <mx:dataProvider> tag has to be represented in a nested manner as it takes a collection as its value.
5. When a property is a source of data binding, Flex automatically copies the value of the source property to the destination property when the source property changes. To let Flex know about this, you must use [Bindable] metadata tag to register this property with Flex.
6. B
7. E
8. E
9. B
10. E. None of the above. They all describe accessors. Getter and setter act and can be accessed like properties. They are often referred to as getters and setters. They make it possible to override properties that are inherited from a super class. This is not possible using class member variables declared using the var keyword. Class member variables cannot be overridden in subcases.
Chapter 4
1. UIComponent & Sprite.
2. Because Application container has a default padding of 24 pixels.
3. You can use negative value for X and Y positions to place a control outside the visible area of the container. Make them positive using ActionScript whenever needed.
4. Form container
5. setStyle()
6. C – 700 millisecond
7. C - Menu
8. B - show()
9. C – both A& B
10. B - ComboBox
206 Getting Started with Adobe Flex
Chapter 5
1. In the MVC model, both the view and the controller and very tightly tied to the behaviour of the model. In the Component Driven architecture, the UI elements are built before the model in order to provide reusability.
2. mx.controls.listClasses.ListBase
3. The object must have a root node (parent) which wraps up all the descendant child nodes (leaf nodes).
4. The direction property of the TileListControl is used to determine whether it is a horizontalTileList or a VerticalTileList. The height and width of the individual tiles can also be set by setting the width of the Tilelist columns or the height of the TileList rows.
5. The GroupingCollection is used specifically in conjunction with mx:dataprovider tag to transform flat data into hierarchical data.
6. E – Zoomin is not an effect, though there is an effect by name zoom to appy zoom to the target component.
7. D – All of the Above
8. D, E – XMLArray and XMLListCollection are not valid ones.
9. D – DataGrid Control is not a scrolling List Control.
10. A, C and D. DataGrid is not one of the hierarchical controls.
Chapter 6
1. As explained in the chapter, a trigger causes an effect to occur and an event makes a call to an Actionscript function or object. For example, a component can have a focusOut event and a FocusOutEffect trigger
2. One of the most common filters applied to components in Flex is the BevelFilter. It is used to give a three-dimensional chiseled look to a component. For example:
<?xml version="1.0" encoding="utf-8"?>
<mx:Application xmlns:mx="http://www.adobe.com/2006/mxml"
backgroundColor="0xFFFFFF" layout="absolute">
<mx:BevelFilter id="bevel" angle="45" highlightColor="0x0000ff"
shadowColor="0x00ff00" shadowAlpha="0.8" strength="15"
quality="3" distance="7" highlightAlpha="0.7"/>
<mx:Image source="@Embed(source='../location of imagae/image.jpg')"
filters="{[bevel]}"/>
</mx:Application>
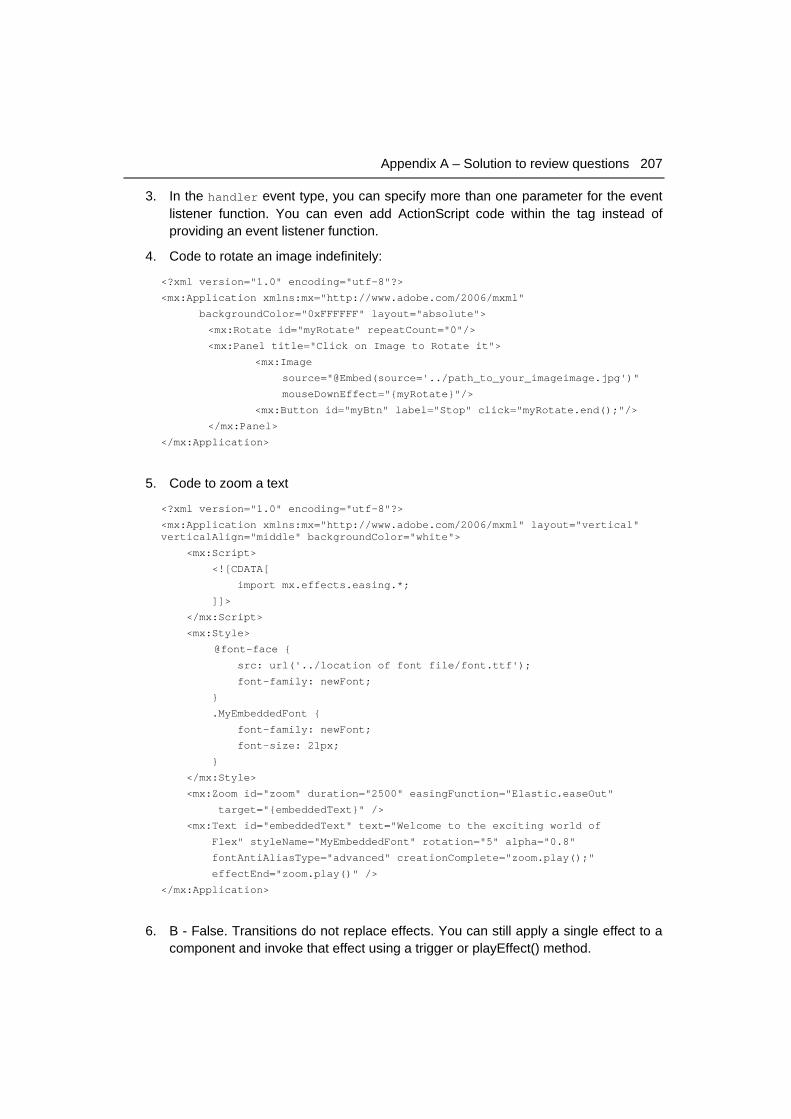
Appendix A – Solution to review questions 207
3. In the handler event type, you can specify more than one parameter for the event listener function. You can even add ActionScript code within the tag instead of providing an event listener function.
4. Code to rotate an image indefinitely:
<?xml version="1.0" encoding="utf-8"?>
<mx:Application xmlns:mx="http://www.adobe.com/2006/mxml"
backgroundColor="0xFFFFFF" layout="absolute">
<mx:Rotate id="myRotate" repeatCount="0"/>
<mx:Panel title="Click on Image to Rotate it">
<mx:Image
source="@Embed(source='../path_to_your_imageimage.jpg')"
mouseDownEffect="{myRotate}"/>
<mx:Button id="myBtn" label="Stop" click="myRotate.end();"/>
</mx:Panel>
</mx:Application>
5. Code to zoom a text
<?xml version="1.0" encoding="utf-8"?>
<mx:Application xmlns:mx="http://www.adobe.com/2006/mxml" layout="vertical" verticalAlign="middle" backgroundColor="white">
<mx:Script>
<![CDATA[
import mx.effects.easing.*;
]]>
</mx:Script>
<mx:Style>
@font-face {
src: url('../location of font file/font.ttf');
font-family: newFont;
}
.MyEmbeddedFont {
font-family: newFont;
font-size: 21px;
}
</mx:Style>
<mx:Zoom id="zoom" duration="2500" easingFunction="Elastic.easeOut"
target="{embeddedText}" />
<mx:Text id="embeddedText" text="Welcome to the exciting world of
Flex" styleName="MyEmbeddedFont" rotation="5" alpha="0.8"
fontAntiAliasType="advanced" creationComplete="zoom.play();"
effectEnd="zoom.play()" />
</mx:Application>
6. B - False. Transitions do not replace effects. You can still apply a single effect to a component and invoke that effect using a trigger or playEffect() method.

208 Getting Started with Adobe Flex
7. B. The ADD mode is used to create a lightening dissolve and SUBTRACT is used to create darkening dissolve.
8. B. There is no SOFTLIGHT mode available.
9. D. ShadowFilter is not valid. There is a ShaderFilter and DropShadowFilter but no ShadowFilter.
10. A. Either the currentState property or the setCurrentState() method can be used to change view states in your application.
Chapter 7
1. Flex Data Service is used to communicate with the business layer of a multi-tier application. They are used to send and receive data from Web services, Http services, and remote objects. Thus HttpService is a part of data services which is used to send an http request to a url.
2. RemoteObject service is used when you need to access the business logic directly in its native format. As the data is serialized in binary format, it results in less data going over the wire, resulting in faster communication.
3. An alternative to Adobe LifeCycle data services is BlazeDS, an open-source dataservice provided by Adobe that needs to be installed on the application or Web server to allow your Flex files communicate with Java classes on the server.
4. The E4X format allows to navigate between the nodes of XML and to skip nodes to access a child node. You can also search for a string in the xml file and filter data based on some set criteria.
5. The resultFormat property of the HttpService specifies the format of the result returned.
6. A – GET
7. C - myHS.send()
8. B - <mx:operation>
9. D- All of the above.
10.
A - HttpService
B - WebService
C - .RemoteObject

Appendix A – Solution to review questions 209
Chapter 8
1. <mx:Style source="styles/myexternal.css" /> – where “mxexternal.css” is the style sheet inside “styles” folder
2. “Candle Stick Chart” or “High Low Open Close Chart”
3. Pie Chart
4. Doughnut chart is all the same as Pie chart with an hole in the center
5. mx.collections.*, mx.charts.*; mx.charts.series.*; mx.charts.renderers.*; mx.charts.events.*;
6. C – Plot chart
7. E - All of the above
8. D – All of the above
9. D - Three
10. A - PolarChart

B Appendix B – Up and running with DB2 This appendix is a good foundation for learning about DB2. This appendix is streamlined to help you get up and running with DB2 quickly and easily.
In this appendix you will learn about:
DB2 packaging
DB2 installation
DB2 Tools
The DB2 environment
DB2 configuration
Connecting to a database
Basic sample programs
DB2 documentation
Note:
For more information about DB2, refer to the free e-book Getting Started with DB2 Express-C that is part of this book series.
B.1 DB2: The big picture DB2 is a data server that enables you to safely store and retrieve data. DB2 commands, XQuery statements, and SQL statements are used to interact with the DB2 server allowing you to create objects, and manipulate data in a secure environment. Different tools can be used to input these commands and statements as shown in Figure B.1. This figure provides an overview of DB2 and has been extracted from the Getting Started with DB2 Express-C e-book.
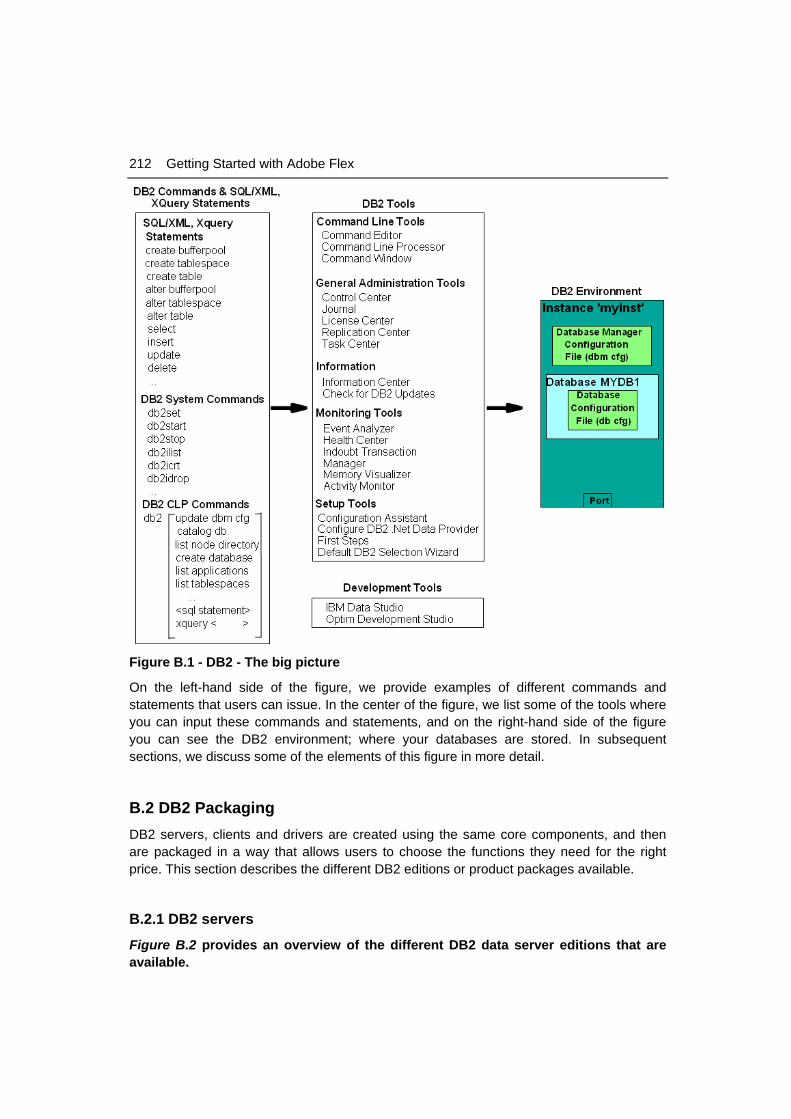
212 Getting Started with Adobe Flex
Figure B.1 - DB2 - The big picture
On the left-hand side of the figure, we provide examples of different commands and statements that users can issue. In the center of the figure, we list some of the tools where you can input these commands and statements, and on the right-hand side of the figure you can see the DB2 environment; where your databases are stored. In subsequent sections, we discuss some of the elements of this figure in more detail.
B.2 DB2 Packaging DB2 servers, clients and drivers are created using the same core components, and then are packaged in a way that allows users to choose the functions they need for the right price. This section describes the different DB2 editions or product packages available.
B.2.1 DB2 servers
Figure B.2 provides an overview of the different DB2 data server editions that are available.
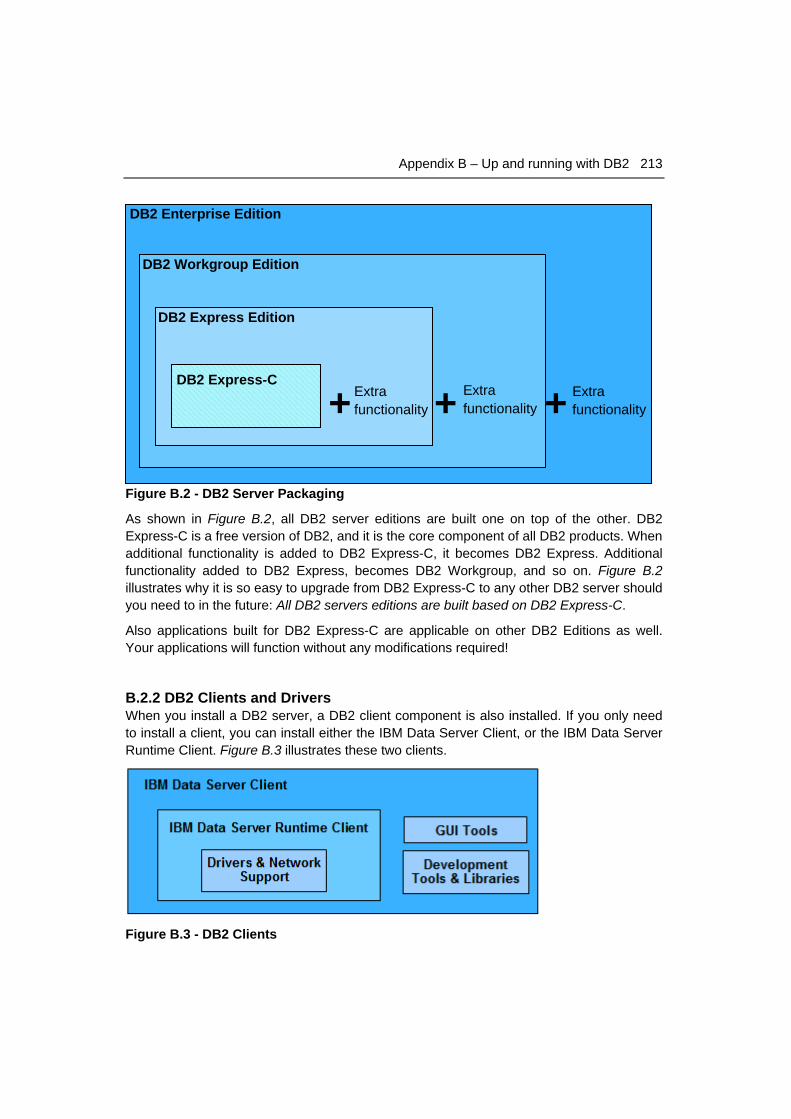
Appendix B – Up and running with DB2 213
DB2 Enterprise Edition
DB2 Express-CExtrafunctionality
Extrafunctionality
DB2 Express Edition
DB2 Workgroup Edition
Extrafunctionality+ + +
Figure B.2 - DB2 Server Packaging
As shown in Figure B.2, all DB2 server editions are built one on top of the other. DB2 Express-C is a free version of DB2, and it is the core component of all DB2 products. When additional functionality is added to DB2 Express-C, it becomes DB2 Express. Additional functionality added to DB2 Express, becomes DB2 Workgroup, and so on. Figure B.2 illustrates why it is so easy to upgrade from DB2 Express-C to any other DB2 server should you need to in the future: All DB2 servers editions are built based on DB2 Express-C.
Also applications built for DB2 Express-C are applicable on other DB2 Editions as well. Your applications will function without any modifications required!
B.2.2 DB2 Clients and Drivers When you install a DB2 server, a DB2 client component is also installed. If you only need to install a client, you can install either the IBM Data Server Client, or the IBM Data Server Runtime Client. Figure B.3 illustrates these two clients.
Figure B.3 - DB2 Clients
214 Getting Started with Adobe Flex
From the above figure, you can see the IBM Data Server Runtime client has all the components you need (driver and network support) to connect and work with a DB2 Data Server. The IBM Data Server client has this same support and also includes GUI Tools and libraries for application development.
In addition to these clients, provided are these other clients and drivers:
DB2 Runtime Client Merge Modules for Windows: mainly used to embed a DB2 runtime client as part of a Windows application installation
IBM Data Server Driver for JDBC and SQLJ: allows Java applications to connect to DB2 servers without having to install a client
IBM Data Server Driver for ODBC and CLI: allows ODBC and CLI applications to connect to a DB2 server without having to install a client
IBM Data Server Driver Package: includes a Windows-specific driver with support for .NET environments in addition to ODBC, CLI and open source. This driver was previously known as the IBM Data Server Driver for ODBC, CLI and .NET.
There is no charge to use DB2 clients or drivers.
B.3 Installing DB2
In this section we explain how to install DB2 using the DB2 setup wizard.
B.3.1 Installation on Windows
DB2 installation on Windows is straight-forward and requires the following basic steps:
1. Ensure you are using a local or domain user that is part of the Administrator group on the server where you are installing DB2.
2. After downloading and unzipping DB2 Express-C for Windows from ibm.com/db2/express, look for the file setup.exe, and double-click on it.
3. Follow the self- explanatory instructions from the wizard. Choosing default values is normally sufficient.
4. The following is performed by default during the installation:
- DB2 is installed in C:\Program Files\IBM\SQLLIB
- The DB2ADMNS and DB2USERS Windows operating system groups are created.
- The instance DB2 is created under C:\Program Files\IBM\SQLLIB\DB2
- The DB2 Administration Server (DAS) is created
- Installation logs are stored in: My Documents\DB2LOG\db2.log My Documents\DB2LOG\db2wi.log
Appendix B – Up and running with DB2 215
- Several Windows services are created.
B.3.2 Installation on Linux DB2 installation on Linux is straight-forward and requires the following basic steps:
1. Log on as the root user to install DB2.
2. After downloading DB2 Express-C for Linux from ibm.com/db2/express, look for the file db2setup, and execute it: ./db2setup
3. Follow the self-explanatory instructions from the wizard. Choosing default values is normally sufficient.
4. The following is performed by default during installation:
- DB2 is installed in /opt/ibm/db2/V9.7
- Three user IDs are created. The default values are listed below: db2inst1 (instance owner) db2fenc1 (Fenced user for fenced routines) dasusr1 (DAS user)
- Three user groups are created corresponding to the above user IDs: db2iadm1 db2fadm1 dasadm1
- Instance db2inst1 is created
- The DAS dasusr1 is created
- Installation logs are stored in: /tmp/db2setup.his /tmp/db2setup.log /tmp/db2setup.err
B.4 DB2 Tools There are several tools that are included with a DB2 data server such as the DB2 Control Center, the DB2 Command Editor, and so on. Starting with DB2 version 9.7 however; most of these tools are deprecated (that is, they are still supported but no longer enhanced) in favor of IBM Data Studio. IBM Data Studio is provided as a separate package not included with DB2. For more information, refer to the eBook Getting started with IBM Data Studio for DB2.
B.4.1 Control Center
Prior to DB2 9.7, the primary DB2 tool for database administration was the Control Center, as illustrated in Figure B.4. This tool is now deprecated, but still included with DB2 servers.
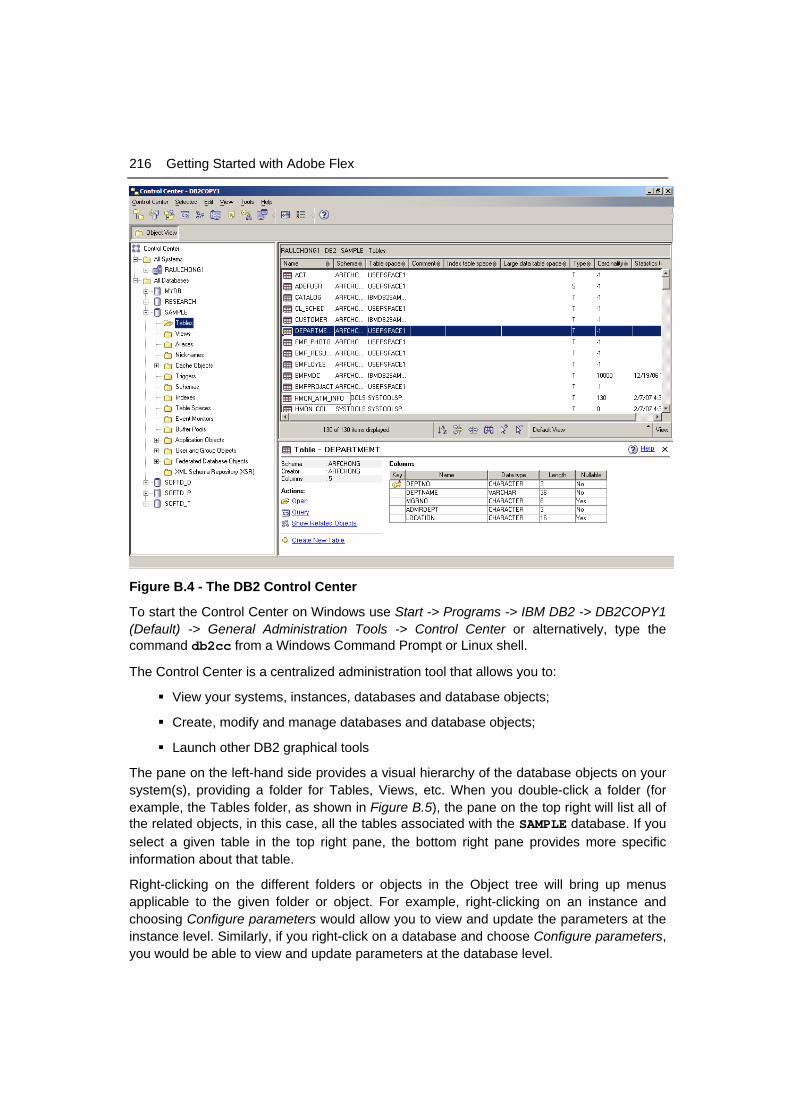
216 Getting Started with Adobe Flex
Figure B.4 - The DB2 Control Center
To start the Control Center on Windows use Start -> Programs -> IBM DB2 -> DB2COPY1 (Default) -> General Administration Tools -> Control Center or alternatively, type the command db2cc from a Windows Command Prompt or Linux shell.
The Control Center is a centralized administration tool that allows you to:
View your systems, instances, databases and database objects;
Create, modify and manage databases and database objects;
Launch other DB2 graphical tools
The pane on the left-hand side provides a visual hierarchy of the database objects on your system(s), providing a folder for Tables, Views, etc. When you double-click a folder (for example, the Tables folder, as shown in Figure B.5), the pane on the top right will list all of the related objects, in this case, all the tables associated with the SAMPLE database. If you select a given table in the top right pane, the bottom right pane provides more specific information about that table.
Right-clicking on the different folders or objects in the Object tree will bring up menus applicable to the given folder or object. For example, right-clicking on an instance and choosing Configure parameters would allow you to view and update the parameters at the instance level. Similarly, if you right-click on a database and choose Configure parameters, you would be able to view and update parameters at the database level.
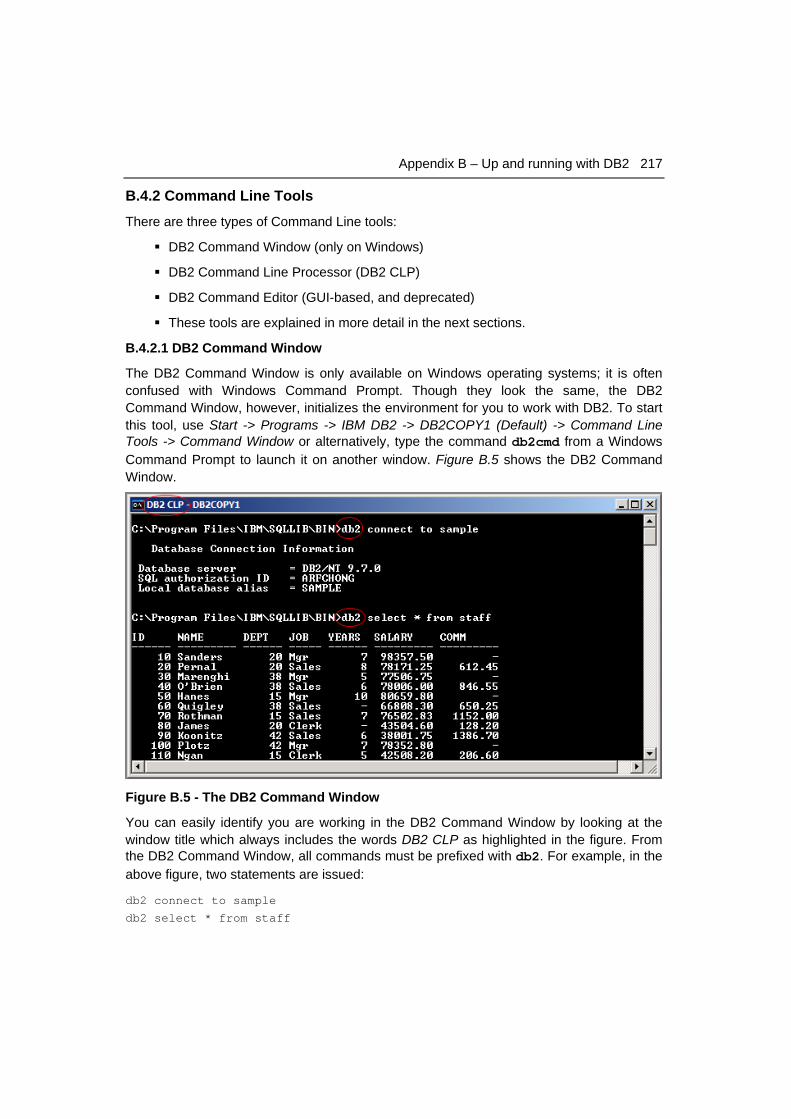
Appendix B – Up and running with DB2 217
B.4.2 Command Line Tools
There are three types of Command Line tools:
DB2 Command Window (only on Windows)
DB2 Command Line Processor (DB2 CLP)
DB2 Command Editor (GUI-based, and deprecated)
These tools are explained in more detail in the next sections.
B.4.2.1 DB2 Command Window
The DB2 Command Window is only available on Windows operating systems; it is often confused with Windows Command Prompt. Though they look the same, the DB2 Command Window, however, initializes the environment for you to work with DB2. To start this tool, use Start -> Programs -> IBM DB2 -> DB2COPY1 (Default) -> Command Line Tools -> Command Window or alternatively, type the command db2cmd from a Windows Command Prompt to launch it on another window. Figure B.5 shows the DB2 Command Window.
Figure B.5 - The DB2 Command Window
You can easily identify you are working in the DB2 Command Window by looking at the window title which always includes the words DB2 CLP as highlighted in the figure. From the DB2 Command Window, all commands must be prefixed with db2. For example, in the above figure, two statements are issued:
db2 connect to sample
db2 select * from staff
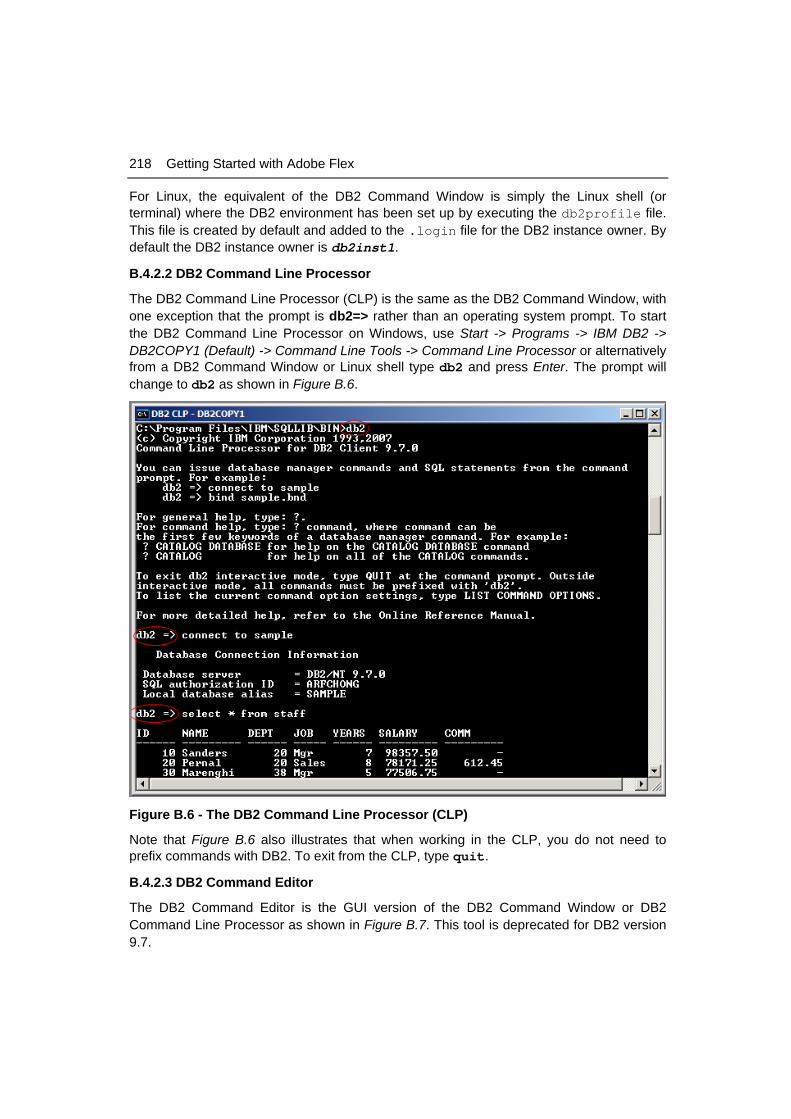
218 Getting Started with Adobe Flex
For Linux, the equivalent of the DB2 Command Window is simply the Linux shell (or terminal) where the DB2 environment has been set up by executing the db2profile file. This file is created by default and added to the .login file for the DB2 instance owner. By default the DB2 instance owner is db2inst1.
B.4.2.2 DB2 Command Line Processor
The DB2 Command Line Processor (CLP) is the same as the DB2 Command Window, with one exception that the prompt is db2=> rather than an operating system prompt. To start the DB2 Command Line Processor on Windows, use Start -> Programs -> IBM DB2 -> DB2COPY1 (Default) -> Command Line Tools -> Command Line Processor or alternatively from a DB2 Command Window or Linux shell type db2 and press Enter. The prompt will change to db2 as shown in Figure B.6.
Figure B.6 - The DB2 Command Line Processor (CLP)
Note that Figure B.6 also illustrates that when working in the CLP, you do not need to prefix commands with DB2. To exit from the CLP, type quit.
B.4.2.3 DB2 Command Editor
The DB2 Command Editor is the GUI version of the DB2 Command Window or DB2 Command Line Processor as shown in Figure B.7. This tool is deprecated for DB2 version 9.7.
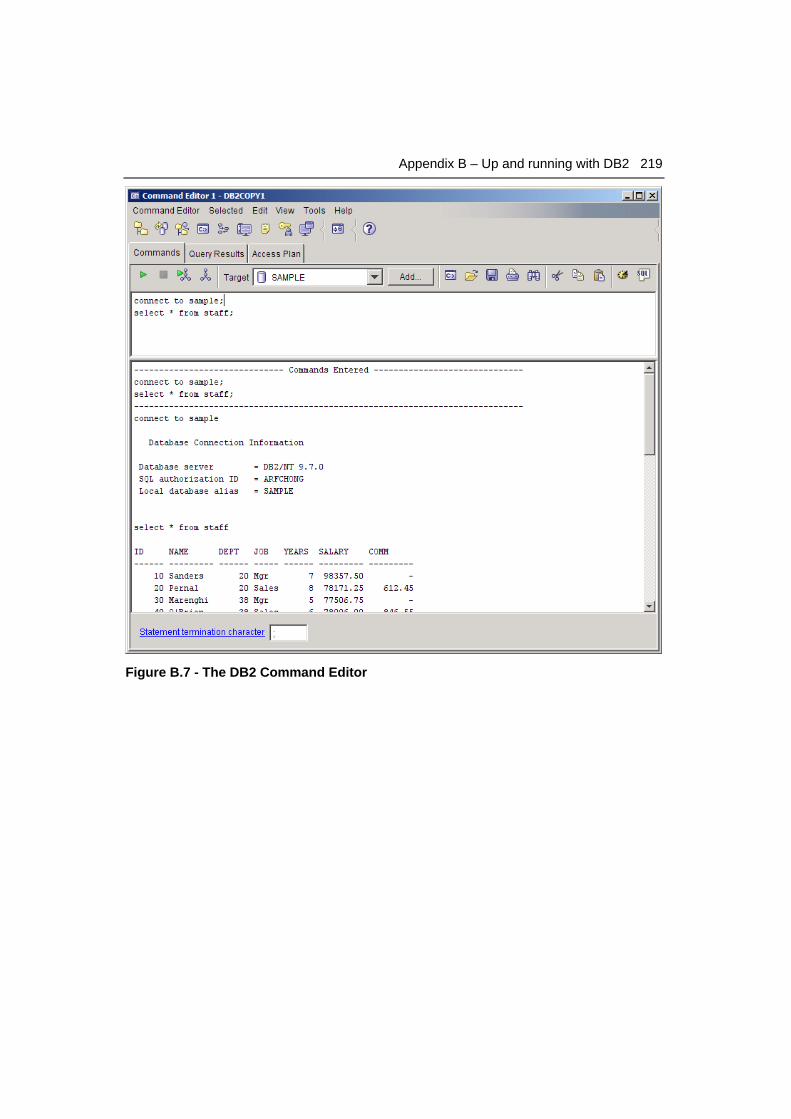
Appendix B – Up and running with DB2 219
Figure B.7 - The DB2 Command Editor
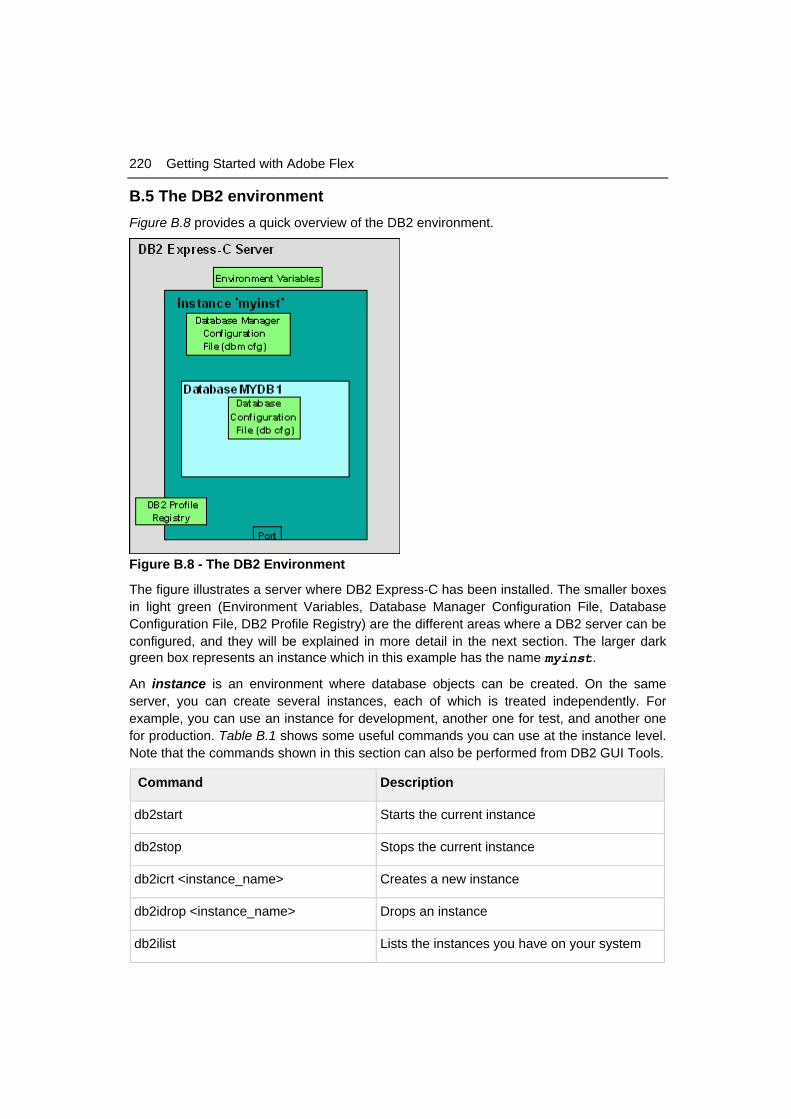
220 Getting Started with Adobe Flex
B.5 The DB2 environment Figure B.8 provides a quick overview of the DB2 environment.
Figure B.8 - The DB2 Environment
The figure illustrates a server where DB2 Express-C has been installed. The smaller boxes in light green (Environment Variables, Database Manager Configuration File, Database Configuration File, DB2 Profile Registry) are the different areas where a DB2 server can be configured, and they will be explained in more detail in the next section. The larger dark green box represents an instance which in this example has the name myinst.
An instance is an environment where database objects can be created. On the same server, you can create several instances, each of which is treated independently. For example, you can use an instance for development, another one for test, and another one for production. Table B.1 shows some useful commands you can use at the instance level. Note that the commands shown in this section can also be performed from DB2 GUI Tools.
Command Description
db2start Starts the current instance
db2stop Stops the current instance
db2icrt <instance_name> Creates a new instance
db2idrop <instance_name> Drops an instance
db2ilist Lists the instances you have on your system
Appendix B – Up and running with DB2 221
db2 get instance Lists the current active instance
Table B.1 - Useful instance-level DB2 commands
Within an instance you can create many databases. A database is a collection of objects such as tables, views, indexes, and so on. For example, in Figure B.8, the database MYDB1 has been created within instance myinst. Table B.2 shows some commands you can use at the database level.
Command/SQL statement Description
create database <database_name> Creates a new database
drop database <database_name> Drops a database
connect to <database_name> Connects to a database
create table/create view/create index SQL statements to create table, views, and indexes respectively
Table B.2 - Commands and SQL Statements at the database level
B.6 DB2 configuration DB2 parameters can be configured using the Configuration Advisor GUI tool. The Configuration Advisor can be accessed through the Control Center by right clicking on a database and choosing Configuration Advisor. Based on your answers to some questions about your system resources and workload, the configuration advisor will provide a list of DB2 parameters that would operate optimally using the suggested values. If you would like more detail about DB2 configuration, keep reading. Otherwise, use the Configuration Advisor and you are ready to work with DB2!
A DB2 server can be configured at four different levels as shown earlier in Figure B.8:
Environment variables are variables set at the operating system level. The main environment variable to be concerned about is DB2INSTANCE. This variable indicates the current instance you are working on, and for which your DB2 commands will apply.
Database Manager Configuration File (dbm cfg) includes parameters that affect the instance and all the databases it contains. Table B.3 shows some useful commands to manage the dbm cfg.
Command Description
get dbm cfg Retrieves information about the dbm cfg
222 Getting Started with Adobe Flex
update dbm cfg using <parameter_name> <value> Updates the value of a dbm cfg parameter
Table B.3 - Commands to manipulate the dbm cfg
Database Configuration File (db cfg) includes parameters that affect the particular database in question. Table B.4 shows some useful commands to manage the db cfg.
Command Description
get db cfg for <database_name> Retrieves information about the db cfg for a given database
update db cfg for <database_name>
using <parameter_name> <value> Updates the value of a db cfg parameter
Table B.4 - Commands to manipulate the db cfg
DB2 Profile Registry variables includes parameters that may be platform specific and can be set globally (affecting all instances), or at the instance level (affecting one particular instance). Table B.5 shows some useful commands to manipulate the DB2 profile registry.
Command Description
db2set -all Lists all the DB2 profile registry variables that are set
db2set <parameter>=<value> Sets a given parameter with a value
Table B.5 - Commands to manipulate the DB2 profile registry
B.7 Connecting to a database If your database is local, that is, it resides on the same system where you are performing your database operation; the connection setup is performed automatically when the database is created. You can simply issue a connect to database_name statement to connect to the database.
If your database is remote, the simplest method to set up database connectivity is by using the Configuration Assistant GUI tool following these steps:
1. Start the Configuration Assistant from the system where you want to connect to the database. To start this tool, use the command db2ca from a Windows command prompt or Linux shell. Figure B.9 shows the Configuration Assistant.
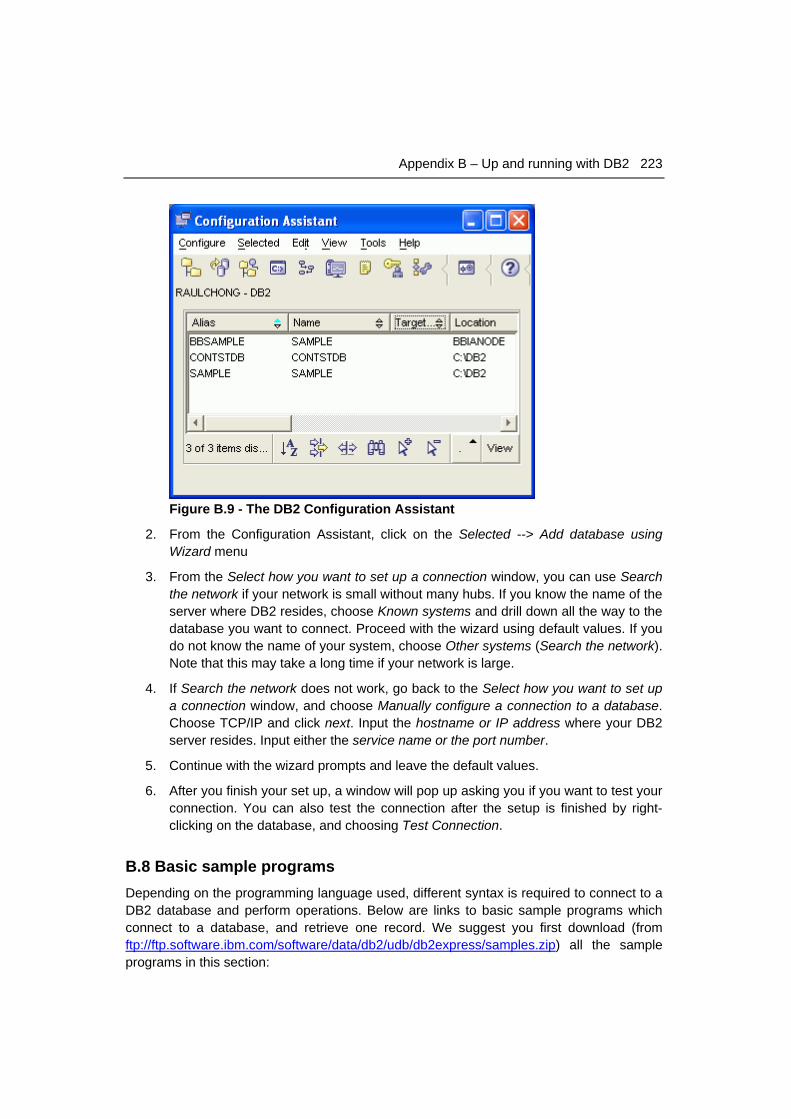
Appendix B – Up and running with DB2 223
Figure B.9 - The DB2 Configuration Assistant
2. From the Configuration Assistant, click on the Selected --> Add database using Wizard menu
3. From the Select how you want to set up a connection window, you can use Search the network if your network is small without many hubs. If you know the name of the server where DB2 resides, choose Known systems and drill down all the way to the database you want to connect. Proceed with the wizard using default values. If you do not know the name of your system, choose Other systems (Search the network). Note that this may take a long time if your network is large.
4. If Search the network does not work, go back to the Select how you want to set up a connection window, and choose Manually configure a connection to a database. Choose TCP/IP and click next. Input the hostname or IP address where your DB2 server resides. Input either the service name or the port number.
5. Continue with the wizard prompts and leave the default values.
6. After you finish your set up, a window will pop up asking you if you want to test your connection. You can also test the connection after the setup is finished by right-clicking on the database, and choosing Test Connection.
B.8 Basic sample programs Depending on the programming language used, different syntax is required to connect to a DB2 database and perform operations. Below are links to basic sample programs which connect to a database, and retrieve one record. We suggest you first download (from ftp://ftp.software.ibm.com/software/data/db2/udb/db2express/samples.zip) all the sample programs in this section:
224 Getting Started with Adobe Flex
CLI program
http://www.ibm.com/developerworks/db2/library/techarticle/dm-0401chong/index.html#scenario1
ODBC program
http://www.ibm.com/developerworks/db2/library/techarticle/dm-0401chong/index.html#scenario2
C program with embedded SQL
http://www.ibm.com/developerworks/db2/library/techarticle/dm-0401chong/index.html#scenario3
JDBC program using Type 2 Universal (JCC) driver
http://www.ibm.com/developerworks/db2/library/techarticle/dm-0401chong/index.html#scenario6
JDBC program using Type 4 Universal (JCC) driver
http://www.ibm.com/developerworks/db2/library/techarticle/dm-0401chong/index.html#scenario8
Visual Basic and C++ ADO program - Using the IBM OLE DB provider for DB2 (IBMDADB2)
http://www.ibm.com/developerworks/db2/library/techarticle/dm-0402chong2/index.html#scenario1
Visual Basic and C++ ADO program - Using the Microsoft OLE DB Provider for ODBC (MSDASQL)
http://www.ibm.com/developerworks/db2/library/techarticle/dm-0402chong2/index.html#scenario2
Visual Basic and C# ADO.Net using the IBM DB2 .NET Data Provider
http://www.ibm.com/developerworks/db2/library/techarticle/dm-0402chong2/index.html#scenario3
Visual Basic and C# ADO.Net using the Microsoft OLE DB .NET Data Provider
http://www.ibm.com/developerworks/db2/library/techarticle/dm-0402chong2/index.html#scenario4
Visual Basic and C# ADO.Net using the Microsoft ODBC .NET Data Provider
http://www.ibm.com/developerworks/db2/library/techarticle/dm-0402chong2/index.html#scenario5
Appendix B – Up and running with DB2 225
B.9 DB2 documentation
The DB2 Information Center provides the most up-to-date online DB2 documentation. The DB2 Information Center is a web application. You can access the DB2 Information Center online (http://publib.boulder.ibm.com/infocenter/db2luw/v9r7/index.jsp), or you can download and install the DB2 Information Center to your local computer. Links to the online DB2 Information Center as well as downloadable versions are available at http://www.ibm.com/software/data/db2/9/download.html?S_TACT=download&S_CMP=expcsite

References 227
References [1] Adobe Flex Developer Center - http://www.adobe.com/devnet/flex/
[2] Community Web site for Flex Developers - http://flex.org
[3] IBM on-demand Web site, http://www.ibm.com/ondemand
[4] SARACCO, C. Understanding pureXML, developerWorks article, 2006 http://www.ibm.com/developerworks/articles/saracco1

Resources 229
Resources
Web sites
Flex
1. Flex Search: http://flexsearch.org
This is a custome Flex search engine for the community
2. Flex Coders: http://www.adobe.com/go/flexcoders
flexcoders mailing list is for software developers
3. Flex Search: http://flexsearch.org:
This is a custome Flex search engine for the community
4. Flex Component Development: http://tech.groups.yahoo.com/group/flexcomponents
5. Flex Support Forums: http://www.adobe.com/cfusion/webforums/forum/index.cfm?forumid=60
6. Flex Components – http://www.adobe.com/go/flexcomponents
7. Flex Builder 3 Adobe Forum http://www.adobe.com/cfusion/webforums/forum/categories.cfm?forumid=72&catid=651&entercat=y
8. Flex Team Blog
http://blogs.adobe.com/flex/ This is the official blog from the Flex team at Adobe.
9. Mike Moreartys Blog
http://www.morearty.com/blog/
Mike is the brains behind the debugging portion of Flex Builder. His Blog keeps you up-to-date on what’s happening in the world of Flex.
10. Chet Haase’s Blog: http://graphics-geek.blogspot.com/
Chet’s blog specializes in Flex/Flash graphics techniques.
DB2
11. DB2 Express-C web site:
ibm.com/db2/express
Use this web site to download the image for DB2 Express-C servers, DB2 clients, DB2 drivers, manuals, access to the team blog, mailing list sign up, etc.
12. DB2 Express-C forum: www.ibm.com/developerworks/forums/dw_forum.jsp?forum=805&cat=19
230 Getting Started with Adobe Flex
Use the forum to post technical questions when you cannot find the answers in the manuals yourself.
13. DB2 Information Center
http://publib.boulder.ibm.com/infocenter/db2luw/v9/index.jsp
The information center provides access to the online manuals. It is the most up to date source of information.
14. developerWorks
http://www-128.ibm.com/developerworks/db2
This Web site is an excellent resource for developers and DBAs providing access to current articles, tutorials, etc. for free.
15. alphaWorks
http://www.alphaworks.ibm.com/
This Web site provides direct access to IBM's emerging technology. It is a place where one can find the latest technologies from IBM Research.
16. planetDB2
www.planetDB2.com
This is a blog aggregator from many contributors who blog about DB2.
17. DB2 Technical Support
If you purchased the 12 months subscription license of DB2 Express-C, you can download fixpacks from this Web site.
http://www.ibm.com/software/data/db2/support/db2_9/
18. ChannelDB2
ChannelDB2 is a social network for the DB2 community. It features content such as DB2 related videos, demos, podcasts, blogs, discussions, resources, etc. for Linux, UNIX, Windows, z/OS, and i5/OS.
http://www.ChannelDB2.com/
Books
1. Adobe® Flex® 3.0 For Dummies®.
Doug McCune, Deepa Subramaniam
Published by Wiley Publishing, Inc ISBN: 978-0-470-27792-8
2. Essential ActionScript 3.0

Resources 231
Colin Moock
Published by O’Reilly Media, Inc.
ISBN-13: 978-0-596-52694-8
3. Foundation Flex for Designers
Greg Goralski, LordAlex Leon
Published by Springer-Verlag New York, Inc.
ISBN-13 (pbk): 978-1-59059-877-1
4. Free Redbook: DB2 Express-C: The Developer Handbook for XML, PHP, C/C++, Java, and .NET
Whei-Jen Chen, John Chun, Naomi Ngan, Rakesh Ranjan, Manoj K. Sardana,
August 2006 - SG24-7301-00
http://www.redbooks.ibm.com/abstracts/sg247301.html?Open
5. Understanding DB2 – Learning Visually with Examples V9.5
Raul F. Chong, et all. January 2008
ISBN-10: 0131580183
6. DB2 9: pureXML overview and fast start by Cynthia M. Saracco, Don Chamberlin, Rav Ahuja June 2006 SG24-7298
http://www.redbooks.ibm.com/abstracts/sg247298.html?Open
7. DB2® SQL PL: Essential Guide for DB2® UDB on Linux™, UNIX®, Windows™, i5/OS™, and z/OS®, 2nd Edition
Zamil Janmohamed, Clara Liu, Drew Bradstock, Raul Chong, Michael Gao, Fraser McArthur, Paul Yip
ISBN: 0-13-100772-6
8. Free Redbook: DB2 pureXML Guide Whei-Jen Chen, Art Sammartino, Dobromir Goutev, Felicity Hendricks, Ippei Komi, Ming-Pang Wei, Rav Ahuja, Matthias Nicola. August 2007 http://www.redbooks.ibm.com/abstracts/sg247315.html?Open
232 Getting Started with Adobe Flex
9. Information on Demand - Introduction to DB2 9 New Features
Paul Zikopoulos, George Baklarz, Chris Eaton, Leon Katsnelson
ISBN-10: 0071487832
ISBN-13: 978-0071487832
Contact emails General DB2 Express-C mailbox: [email protected]
General DB2 on Campus program mailbox: [email protected]

Resources 233

Getting started with Adobe Flex couldn't be easier. Read this book to: Understand how to build rich internet applications using Adobe Flex Learn how to work with Flex Builder to create, run and debug Flex
applications Understand how Adobe Flex works with Web services and
databases Learn about the Flex programming basics using MXML and
ActionScript Get up to speed with powerful features like data binding, view
states, and charting Practice with hands-on exercises
Adobe Flex is the technology of the future; it takes you to the next level of Web application development by providing a free open source framework to develop Rich Internet Applications (RIAs). Flex Builder Software, an Eclipse-based IDE, can be used to accelerate your application development since it includes many rich features. With this highly productive, free open source framework you can start building and maintaining very interactive and intuitive Web applications that deploy across all browsers and desktops in no time!
Using the Flex framework, you can build enterprise-class software that can be used in combination with other server side technologies such as PHP, J2EE, ColdFusion, .NET, and so on. You can also work with other free software such as DB2 Express-C, the free edition of the DB2 database server; or IBM Data Studio, a free eclipse-based IDE that can help you develop data Web services in minutes.
To learn more or download Adobe Flex Builder 3.0 (which includes the framework) for a 90 day trial, visit www.adobe.com/products/flex/flexdownloads. You also can download free Flex SDK – this has all the features of Flex Builder except Flex Charting.
To learn more or download DB2 Express-C, visit ibm.com/db2/express
To socialize and watch Flex and DB2 videos, visit channelDB2.com
This book is part of the DB2 on Campus book series, free ebooks for the community. Learn more at db2university.com
Price: 24.99 USD