Embed Size (px)
Citation preview

Getting Started
Logging into the System
1. Browse to the Service Desk ticketing Website, choose Operator Login.
2. Login with your UUID and password. (The UUID and password is the same one you
use for myMemphis Portal and all other campus resources.) Click Login. Next,
authenticate with DUO.

The opening screen is your personal TOPdesk workspace.
Note: This is the default view; the workspace can be customized.
Add Items to Your Quick Launch Bar You can add buttons to the Side Launch bar to include links to internal or external
web pages. It is also possible to add links to frequent activities.
1. Click on the Edit icon at the bottom left and bottom of the Quick Launch Bar.
2. To add a new Shortcut, A) click Preliminary Request for Change form to create a
new shortcut icon and B) click arrow to move to right hand column. C) Click Save.

3. The shortcut will be created and displayed as .
Note: Shortcuts created can be edited at any time.
Creating Preliminary Request for Change Preliminary Request for Change can be created from a variety of locations within
TOPdesk. The Quick Launch Bar is one way (and probably the fastest, if you have the
shortcut). If you do not have the shortcut, see: Add Items to Your Quick Launch Bar.
Click on the Preliminary Request for Change ( ) icon.
A new tab will then display the relevant Preliminary Request for Change:
Red areas indicate required fields.

New Request for Change: Tabs
Each New Request for Change card contains a series of tabs (any that are bold need to
have information entered or updated):
General: Contains the main request information.
Route: Displays approval history.
Links: This option allows the operator to link additional users to the request. Linked
users can then be sent an email as part of the request process.
Project: Allows one to place University Strategies and executive priority to the
request. These can be chosen from a drop-down menu.
Attachments: Gives a document overview of any attachments associated with the
change.
Preliminary Request for Change: Toolbar
Key options which you may need to use on an incident/ticket:
A. Click to save a request
B. Click to Bookmark a request
C. Click to reload data on a page
D. Create button allows you to create the following
• Create a new Request for Change using the current request as a template.

• Create a new First Line Incident or Second Line Incident using the current
request as a template.
E. More:
• Print – To print a request
• Add to cart – This option is not used
• Archive – Click to archive the current request
• Delete – Click to delete the current request
Caller Area
1. Name: Simply type the client’s UUID (in this example, ttiger is used to find
Tom Tiger).
This is entered as First Name, Last Name—if you begin typing the name TOPdesk will
complete. If there are a number of people with similar names you can use the drop
down to select the correct person.

TOPdesk will pre-populate location, user name, and telephone number where available. This information is taken from LDAP; if it is incorrect, users should make changes in myMemphis portal.
Note: If the caller does not have an LDAP record, the ticket can be created as an unregistered caller; click the right arrow and select Unregistered caller.
In this case you will need to fill in the caller details/contact information manually.
Unregistered callers are not saved in the database, so if the same caller needs to log further tickets the information will need to be re-entered.
Emails coming into TOPdesk from unregistered users will use the ‘name’ associated with their email account.
Details Area
1. Template: Choose from templates in the drop-down menu.
Type: Categorizes requests from the following options within drop-down menu.
• Emergency Change: A change that is available for all to see.
• Linux Patching Production
• Linux Patching in Test Banner Production
• Server OS Patching
• Planned Change Request: A change that will only be seen in-house to
operators within the TOPDesk system.

2. Brief Description: Provide a summary of the request.
3. Category: Choose the most appropriate category for the affected service.
Choose the category from the drop-down menu.
Sub Category: Sub category is based on by the Category chosen. Choose the most
appropriate for the affected service.
External Number: An alternative number that is not listed as your contact in LDAP.

Planning
1. Emergency Change: This is a change that needs to be implemented
immediately and should be selected by the template.
2. Impact: Choose from the following options: Low, Medium, High.
3. Benefit: Choose from the following option: Low, Medium, High.
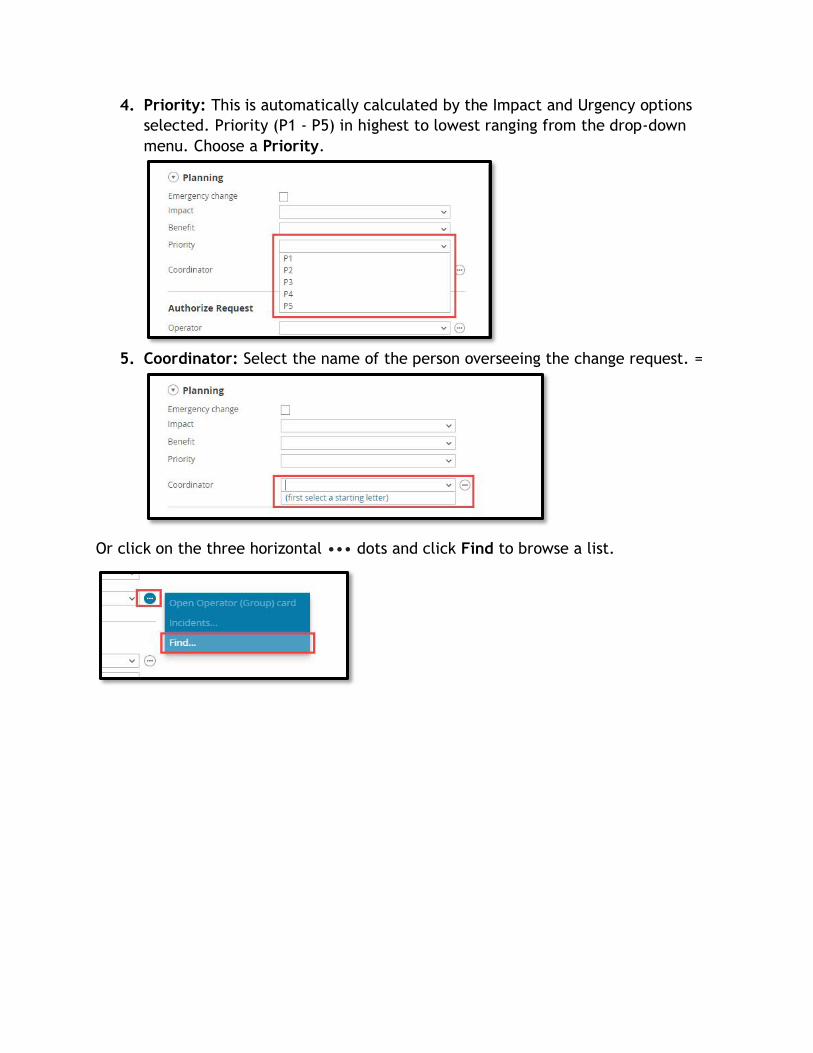
4. Priority: This is automatically calculated by the Impact and Urgency options
selected. Priority (P1 - P5) in highest to lowest ranging from the drop-down
menu. Choose a Priority.
5. Coordinator: Select the name of the person overseeing the change request. =
Or click on the three horizontal ••• dots and click Find to browse a list.

6. Authorize Preliminary Request for Change
Define who is approving the change request.
7. Operator: Begin typing the name of person who will approve the request.
Or click on the three horizontal ••• dots and click Find to browse a list.
Note: If you have allocated a request to yourself but become unavailable, another
operator may pick up the request and reassign it to themselves.

8. Status: Status of the request, choose from:
• Accepted – Indicates the manager has accepted the change request.
• In Progress – Indicates that the change request is in progress.
• Logged – Refers to the hours worked on a change request.
• Pending approval – Indicates that for the change request to continue, someone
must approve.
• Pending user – Indicates that for the change request to continue, another
person must complete a task.
• Rejected – Sends project back to change request initiator.
9. Approval Status: Enter approval status.
10. Request Area
Use this area to give a detailed description of the request. You can attach a file in
this area using the attachment icon .
11. Action Area

Use this area to record the actions you have taken to resolve the Incident. Insert text
into your response. You can attach a file in this area using the attachment icon .
Make Invisible for caller: This can be used to make notes within the Incident for
either yourself or another operator group.
Use the formatting bar located to the right and above the Action area, to A) format
text, B) include an attachment, C) include a link, D) create default text or E) enlarge
Action area.

Saving the Request
The request can be saved by clicking , the request is then assigned a request
number. For example, “C1811-028”: this is made up of “C” indicating this is a Change
Request, “18” which shows the year logged, “11” shows the month logged, and “028”
which is the request number.
Once the request has been saved, the actions are date and time stamped and
displayed with the most recent action appearing just under the New Action area.
TOPdesk will automatically create an email to the appropriate group or manager with
details of the information you entered in the Action Area.
The message can be edited and added to before sending if needed. Just below To:
you can select CC, BCC or Reply to information. The Attachments tab can be used to
attach files, media, etc. to the message.

Attaching Files to an Email
You can attach files to an email by selecting the Browse button. This will upload any
file on your device and attach it to the email.
Note: To attach a file to an Email, you must choose to do so as you compose the
email.
When composing an email, TOPdesk presents you with an email window.
1. Click on the Attachments tab to see the available attachments (those already
uploaded).
2. Select the attachment you wish to use by clicking the check box next to it. When
you send the email, the file will be attached to it. Once satisfied with the email,
click . If for any reason you do not wish to send the email, click .
Note: Even if you have checked the Make Invisible to Caller box TOPdesk will still
attempt to send the caller an email—however, the email will contain the last Action
Information that was visible to the caller rather than the invisible comment. You
also have the capability to discard.

Handy Hints:
• Red Fields: Indicate mandatory fields.
• Caller Name: Enter the person’s UUID in the Network Login Name field rather
than entering their name.
• Changing Caller Name: If you select the incorrect person, click in the name
field and retype the correct name.
• Contact Information: Caller details should not be edited as they will be over
written by the next import. Instead, alternative contact information should be
recorded in the Request Area.
• Make Invisible to Caller: Can be used to make notes within the incident and
will not be visible to the caller.
• Emails: Can be edited before sending. Actions added using the Make Invisible
feature will not be sent. Instead, TOPdesk will send the last visible action.
Example of Emergency Change Email:
Example of Planned Change:


