Embed Size (px)
Citation preview
arted Tutorial
Getting St
Welcome—2
WeWelcMYOaccou
You cAccoprodthis t
Wor
We etutorHowon thsequ(Recebankto it saved
ng this tutorial
e navigation buttons at the bottom of every page to move h the tutorial. Use the Front button to move to the age, the Back button to move to the previous page and me button to go to the beginning of the tutorial. You o go directly to an exercise or topic by using the contents n Acrobat Reader.
creenshots are not clear, try selecting 200% as the zoom in lbar.
onitor’s screen resolution and colour settings determine e screenshots will appear.
ng this tutorial
this tutorial has been designed to be viewed on screen, n also print it. You should be able to fit two tutorial pages A4 page (portrait orientation) if your printer has this .
lcomeome! This tutorial will give you a quick introduction to your B accounting software, and help you understand a few nting concepts along the way.
an use this tutorial with the most recent versions of MYOB unting, MYOB Accounting Plus, and MYOB Premier; these ucts will be referred to as ‘your MYOB software’ throughout utorial.
king through this tutorial
ncourage you to set aside some time to complete this ial. You don’t need to complete all the exercises in one go. ever, keep in mind that most exercises in this tutorial build e ones before them, and therefore must be completed
entially. For example, you need to complete Exercise 1 ive Money) before completing Exercise 3 (Reconcile your account). You can stop the tutorial at any time and return later. The changes you make to the company file will be automatically.
Viewi
Use ththrougnext pthe Hocan alspanel i
If the sthe too
Your mhow th
Printi
While you caon an feature

The Company File—3
The
Intro
The fcomp
Youryourfoldesavedrecor
Prot
As yoinforUnfoand d
Use tfile is
p your company file Use MYOB’s Backup command larly make copies of your company file to a floppy or zip your company file gets corrupted or is stolen, you will recent copy of your file to continue from.
your company file for errors You should routinely your company file for data corruption. Depending on your nce setting, you will be prompted to run the Verify any File command each time you open your company file so before backing up data.
ise your company file Over time, your company file ow considerably in size. As you enter transactions, then e or purge them, the file will have unused areas that once ned these transactions; these unused areas can affect the cy with which your MYOB software works with the
ny file. Use the Optimisation Assistant to remove the areas in your company file and keep your software g in top form.
Company File
duction
irst step to using your MYOB software is to create a any file, give it a name and save it on your computer.
company file contains all the information that you enter in MYOB software. While some information is stored in other rs on your hard drive (for example, customised reports are in the Custom sub-folder on your hard drive), the actual ds and transactions are stored in your company file.
ecting your company file
ur company file contains your important accounting mation, it is vital that you protect it accordingly. rtunately, hard disk failure, data corruption and theft can oes happen.
he tools in your MYOB software to ensure your company protected and that it is running in peak form.
Back uto regudisk. Ifhave a
Checkcheck prefereCompand al
Optimwill grremovcontaiefficiencompaunusedrunnin
The Company File—4
The
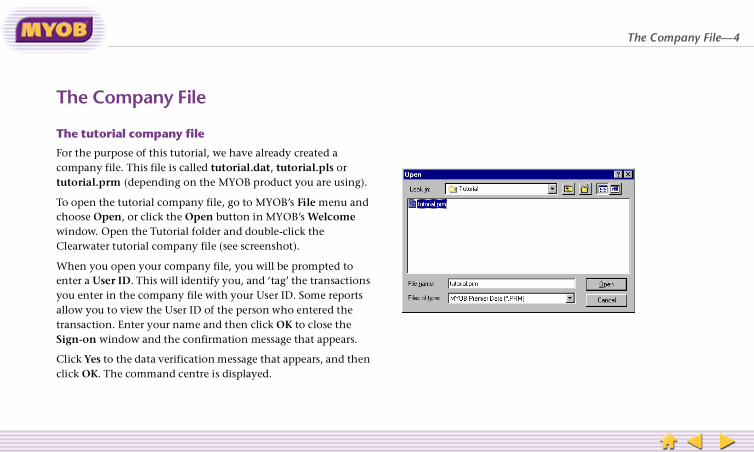
The
For tcomptutor
To opchoowindClear
Wheenteryou eallowtransSign
Clickclick
Company File
tutorial company file
he purpose of this tutorial, we have already created a any file. This file is called tutorial.dat, tutorial.pls or ial.prm (depending on the MYOB product you are using).
en the tutorial company file, go to MYOB’s File menu and se Open, or click the Open button in MYOB’s Welcome ow. Open the Tutorial folder and double-click the water tutorial company file (see screenshot).
n you open your company file, you will be prompted to a User ID. This will identify you, and ‘tag’ the transactions nter in the company file with your User ID. Some reports you to view the User ID of the person who entered the action. Enter your name and then click OK to close the -on window and the confirmation message that appears.
Yes to the data verification message that appears, and then OK. The command centre is displayed.

The Company File—5
The
The
The csuch
The icommone cSales
Noticcomm
The cList,
Company File
command centre
ommand centre is the central location for MYOB functions, as sales, purchases, banking and accounts.
cons at the top of the window represent the various and centres in your MYOB software. You can move from
ommand centre to another by clicking these icons. The command centre is shown here.
e when you click an icon, the functions of that particular and centre appear in the flowchart below the icons.
ommand centre also gives you quick access to the To Do reports, and analysis and transaction locating tools.
The Company File—6
The
Navi
Usinwithaccou
Tab the nfield.
EnteyourSetuptab).
ShoryourCTRL+
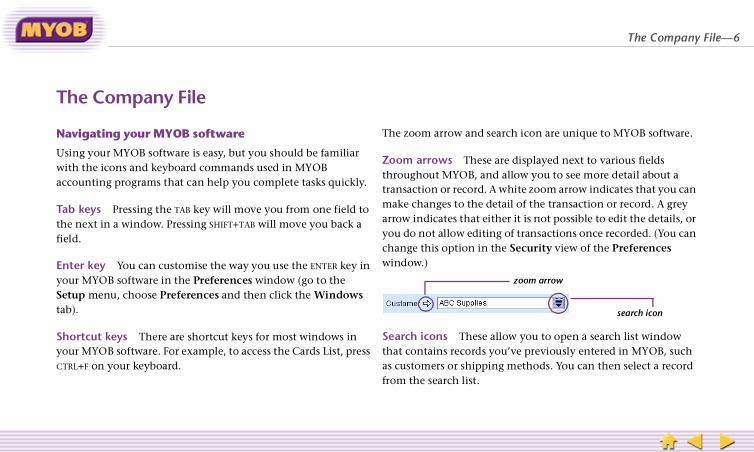
om arrow and search icon are unique to MYOB software.
arrows These are displayed next to various fields hout MYOB, and allow you to see more detail about a tion or record. A white zoom arrow indicates that you can hanges to the detail of the transaction or record. A grey
indicates that either it is not possible to edit the details, or not allow editing of transactions once recorded. (You can
e this option in the Security view of the Preferences w.)
icons These allow you to open a search list window ntains records you’ve previously entered in MYOB, such omers or shipping methods. You can then select a record he search list.
zoom arrow
search icon
Company File
gating your MYOB software
g your MYOB software is easy, but you should be familiar the icons and keyboard commands used in MYOB nting programs that can help you complete tasks quickly.
keys Pressing the TAB key will move you from one field to ext in a window. Pressing SHIFT+TAB will move you back a
r key You can customise the way you use the ENTER key in MYOB software in the Preferences window (go to the
menu, choose Preferences and then click the Windows
tcut keys There are shortcut keys for most windows in MYOB software. For example, to access the Cards List, press
F on your keyboard.
The zo
Zoomthrougtransacmake carrow you dochangwindo
Searchthat coas custfrom t
Your Company File—7
You
The
Yourof cabusin
Wheimpofromlists paddinlikely
You cgoinList.
r Company File
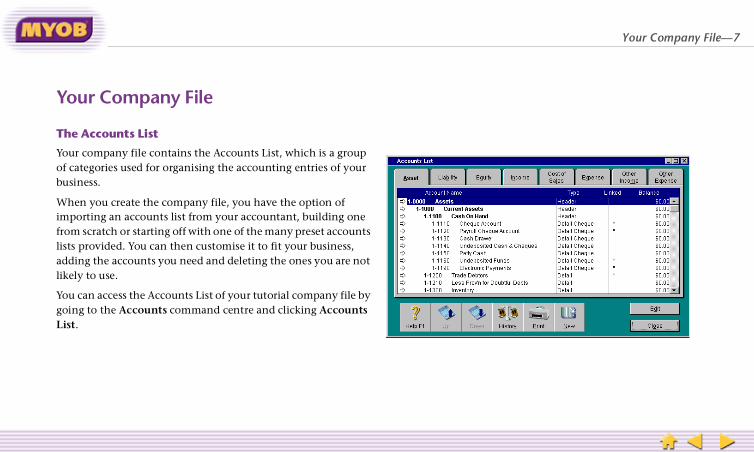
Accounts List
company file contains the Accounts List, which is a group tegories used for organising the accounting entries of your ess.
n you create the company file, you have the option of rting an accounts list from your accountant, building one scratch or starting off with one of the many preset accounts rovided. You can then customise it to fit your business, g the accounts you need and deleting the ones you are not to use.
an access the Accounts List of your tutorial company file by g to the Accounts command centre and clicking Accounts
Your Company File—8
You
Acco
YourLiabi(6-),
EachAccowherowneaccou1-111deter
Clicksimiloptiobuttobudg
r Company File
unts
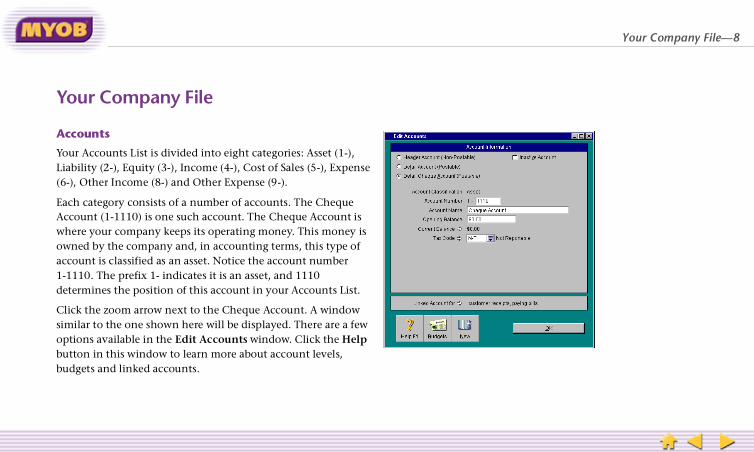
Accounts List is divided into eight categories: Asset (1-), lity (2-), Equity (3-), Income (4-), Cost of Sales (5-), Expense Other Income (8-) and Other Expense (9-).
category consists of a number of accounts. The Cheque unt (1-1110) is one such account. The Cheque Account is e your company keeps its operating money. This money is d by the company and, in accounting terms, this type of nt is classified as an asset. Notice the account number 0. The prefix 1- indicates it is an asset, and 1110 mines the position of this account in your Accounts List.
the zoom arrow next to the Cheque Account. A window ar to the one shown here will be displayed. There are a few ns available in the Edit Accounts window. Click the Help n in this window to learn more about account levels, ets and linked accounts.

Spending and Receiving Money—9
Spe
Intro
It’s siMYOfunc
You cbetwmisc
You cpurch(usinand o
To encan rthe Rcomm
nding and Receiving Money
duction
mple to track the money you spend and receive in your B software. The Spend Money and Receive Money
tions can be found in the Banking command centre.
an use the Receive Money window to transfer money een your bank accounts, record interest or the ellaneous cash receipts you receive.
an use the Spend Money window to record cheques for ases or expenses you won’t be entering purchase orders for
g the Purchases command centre), such as postage, rent wner drawings.
sure you have accurately entered your transactions, you econcile MYOB’s accounts with your bank statement using econcile Accounts function also found in the Banking and centre.
Spending and Receiving Money—10
Spe
Exer
Let’s cheq
To re
1 GM
2 Cc
3 ENt
4 TeTc
5 T
nding and Receiving Money
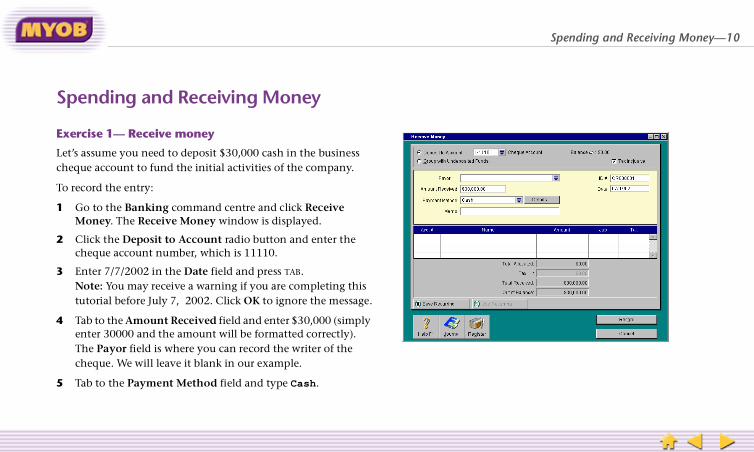
cise 1— Receive money
assume you need to deposit $30,000 cash in the business ue account to fund the initial activities of the company.
cord the entry:
o to the Banking command centre and click Receive oney. The Receive Money window is displayed.
lick the Deposit to Account radio button and enter the heque account number, which is 11110.
nter 7/7/2002 in the Date field and press TAB. ote: You may receive a warning if you are completing this
utorial before July 7, 2002. Click OK to ignore the message.
ab to the Amount Received field and enter $30,000 (simply nter 30000 and the amount will be formatted correctly).he Payor field is where you can record the writer of the heque. We will leave it blank in our example.
ab to the Payment Method field and type Cash.

Spending and Receiving Money—11
Spe
Exer
6 Tc
7 TctIyatP
8 ItwCM
nding and Receiving Money
cise 1—Receive money
ab to the Memo field and type Initial funding of theompany.
ab to the Account # field. Here you specify an account that an explain the increase in the cheque account selected at he top of the window. n our example, we can explain the increase as a deposit by ou, the owner, into the business. In accounting terms, you re increasing the equity or your share of the business; herefore, the appropriate account to use would be the artner A Capital account.
f you can’t recall the account number you need to enter in he Account # field, press TAB to display the Select from List indow. Double-click the Equity account named Partner A apital, which is account number 3-1110. The Receive oney window is updated.
Spending and Receiving Money—12
Spe
Exer
9 C
10 C
CongTuto
Let’s
��
er words, your company now has $30,000 worth of assets, ur contribution to the company (equity) has increased by 0.
that there are two entries for this transaction. You could these entries by saying, ‘As a result of increasing the
e Account balance, my share of the company (Partner A l) has increased’. Accountants call this double-entry ting.
nding and Receiving Money
cise 1—Receive money
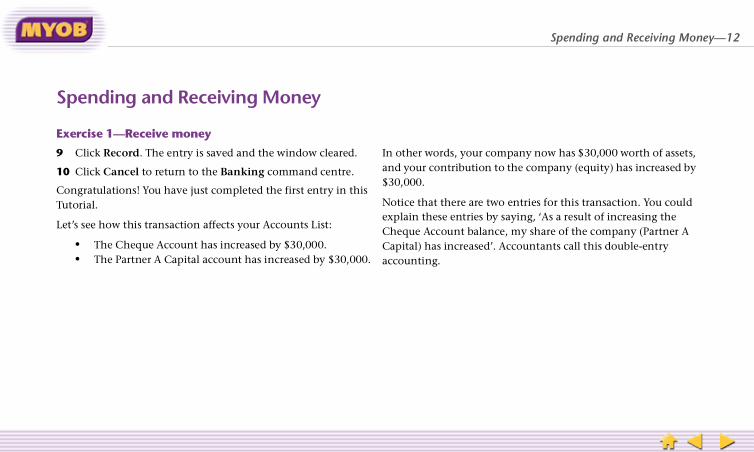
lick Record. The entry is saved and the window cleared.
lick Cancel to return to the Banking command centre.
ratulations! You have just completed the first entry in this rial.
see how this transaction affects your Accounts List:
The Cheque Account has increased by $30,000.The Partner A Capital account has increased by $30,000.
In othand yo$30,00
NoticeexplainChequCapitaaccoun

Spending and Receiving Money—13
Spe
Exer
We ndesksSupp
We ccentrMon
To re
1 GM
2 E
3 E
nding and Receiving Money
cise 2—Spend money
ow have money to buy furniture and equipment. We buy , chairs and a photocopier for $5,500 from Acme Business lies.
ould record this purchase using the Purchases command e, but since this is a one-time purchase, we’ll use the Spend ey window instead.
cord the purchase:
o to the Banking command centre and click Spend oney.
nter 7/7/2002 in the Date field and press TAB.
nter 5,500 in the Amount field and press TAB.

Spending and Receiving Money—14
Spe
Exer
4 TT
S
5 Cd
6 CaBpf
7 CA
8 CSd
nding and Receiving Money
cise 2—Spend money
ype Acme Business Supplies in the Card field and press AB. Since you don’t have a record for Acme Business upplies, the Select from List window is displayed.
lick the New button. The Card Information window is isplayed.
omplete the Profile view of the Card Information window s shown here. Make sure the card type is set to Supplier.y creating a card for Acme Business Supplies, we can track ayments made to them, and easily enter another payment or them in the future.
lick the Buying Details tab and enter 12345678000 in the BN field, which is Acme Business Supplies’ ABN.
lick OK to close this window and then press TAB in the pend Money window. Note that the Payee field now isplays the name and address of Acme Business Supplies.
Spending and Receiving Money—15
Spe
Exer
9 Tt
10 Taisaw
11 Tinwc
12 C
13 C
nding and Receiving Money
cise 2—Spend money
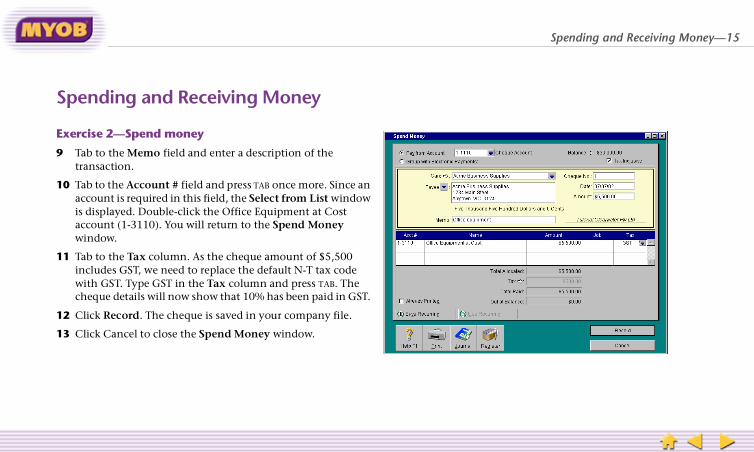
ab to the Memo field and enter a description of the ransaction.
ab to the Account # field and press TAB once more. Since an ccount is required in this field, the Select from List window displayed. Double-click the Office Equipment at Cost ccount (1-3110). You will return to the Spend Money indow.
ab to the Tax column. As the cheque amount of $5,500 cludes GST, we need to replace the default N-T tax code ith GST. Type GST in the Tax column and press TAB. The
heque details will now show that 10% has been paid in GST.
lick Record. The cheque is saved in your company file.
lick Cancel to close the Spend Money window.
Spending and Receiving Money—16
Spe
Exer
It is gwithwhictrans
Recoenterreconbank
DispBank
NOTEbank deposhave comp
nding and Receiving Money
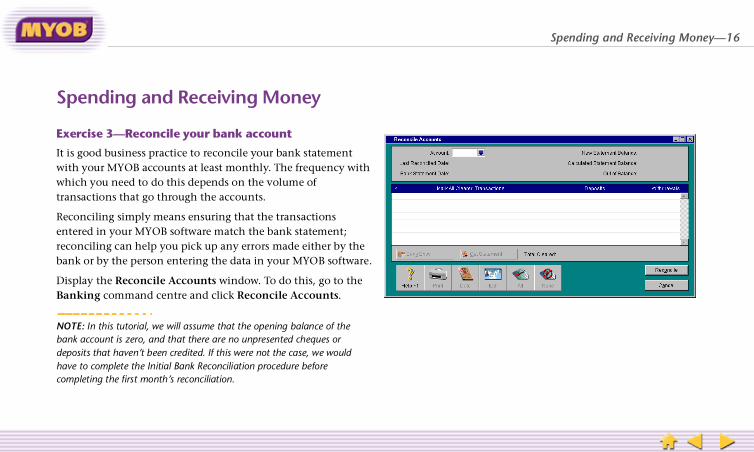
cise 3—Reconcile your bank account
ood business practice to reconcile your bank statement your MYOB accounts at least monthly. The frequency with h you need to do this depends on the volume of actions that go through the accounts.
nciling simply means ensuring that the transactions ed in your MYOB software match the bank statement; ciling can help you pick up any errors made either by the
or by the person entering the data in your MYOB software.
lay the Reconcile Accounts window. To do this, go to the ing command centre and click Reconcile Accounts.
: In this tutorial, we will assume that the opening balance of the account is zero, and that there are no unpresented cheques or its that haven’t been credited. If this were not the case, we would to complete the Initial Bank Reconciliation procedure before leting the first month’s reconciliation.

Spending and Receiving Money—17
Spe
Exer
Let’s Althoas anaccouwill a
Let’s closiThe s
���
To re
1 Sf
2 T
ter 8/8/02 in the Bank Statement Date field. Press TAB.tice that the out of balance amount is –$24,495, and that two transactions we have entered appear in the scrolling . (Only transactions dated on or before the Bank tement Date will appear.)
nding and Receiving Money
cise 3—Reconcile your bank account
reconcile the cheque account used so far in this tutorial. ugh we have entered only two transactions, this will serve example of how spending and receiving cash relate to nt reconciliation. To make the example more realistic, we lso add a bank charge to the bank statement.
assume we received a bank statement dated 8/8/2002. The ng balance appearing on the statement is $24,495. tatement shows three transactions:
A deposit of $30,000A cheque for $5,500A bank charge of $5
concile your cheque account:
elect the Cheque Account by typing 1-1110 in the Account ield.
ab to the New Statement Balance field and enter $24,495.
3 EnNothelistSta

Spending and Receiving Money—18
Spe
Exer
Nbw
4 Cc$Tda$c
5 Ca
6 Eea
nding and Receiving Money
cise 3—Reconcile your bank account
ow we need to match the transactions appearing on the ank statement with those listed in the Reconcile Accounts indow.
lick in the column to the left of the transactions, and a ross will appear. The Out of Balance figure should reduce to 5.he $5 out of balance amount suggests that there is a ifference of $5 between the bank statement and the cheque ccount in your company file. In our case, the difference of 5 is due to the bank charge not being entered in the ompany file.
lick the Bank Entry button. The Record Service Charges nd Interest Earned window is displayed.
nter the service charge of $5, and select the Bank Charges xpense account (6-1900). Type Bank Fee in the Memo field nd click Record.

Spending and Receiving Money—19
Spe
Exer
Ttcy
7 CRahs
8 C
NOTEMYOBthe baowe ybasic decrea
nding and Receiving Money
cise 3—Reconcile your bank account
he Out of Balance amount should now be $0. This means hat MYOB’s records match the bank’s records. We can be onfident that the Cheque Account transactions entered in our MYOB software are accurate.
lick Reconcile. A dialog appears. You can print the econciliation report for your records or just click Reconcile gain to finish. (If we didn’t reconcile the account, we may ave missed the bank charge and our chequebook would how the incorrect balance.)
lick Cancel to return to the Banking command centre.
A debit in your bank statement is shown as a credit in your accounts. This is because your bank statement is shown from nk’s perspective, who consider your bank account a liability (they ou), while you consider it to be an asset (if it’s not overdrawn!). A accounting principle is that a debit increases an asset or ses a liability; a credit decreases an asset or increases a liability.

Purchasing Items and Services—20
Pur
Intro
Purchin th
AlthoMonpurchabilitexpir
The Pcentrtranshave
chasing Items and Services
duction
ases and the payments you make to suppliers are handled e Purchases command centre.
ugh you can enter some of your purchases using the Spend ey window in the Banking command centre, creating a ase through the Purchases command centre gives you the
y to track your payables or trade creditors, your discount y dates, and the ageing of your outstanding purchases.
urchases Register is located in the Purchases command e, and gives you quick access to all your purchase actions, including closed bills and any debit notes you may received for returned or damaged goods and refunds.

Purchasing Items and Services—21
Pur
Purc
Whecommfor y
You c
You cestim
Thenchan
The oreceipay t
chasing Items and Services
hase statuses
n you click the Enter Purchases function in the Purchases and centre, a new Purchases window is displayed, ready
ou to record your purchase.
an record a purchase transaction as a Quote, Order or Bill.
an enter a quote in your MYOB software to easily store an ate or quote you received from one of your suppliers.
, when you are ready to make the purchase, you can simply ge the quote to an order with a click of a button.
rder can then as easily be changed to a bill when you have ved the items or services you ordered and are required to he supplier.

Purchasing Items and Services—22
Pur
Purc
Depechoo
� IaMqp
� Sfsin
� Ptin
� Mdn
nge the layout of a purchase, simply click the Layout before you start completing the Purchases window.
chasing Items and Services
hase layouts
nding on the type of purchase you are making, you can se from four purchase layouts:
tem—Use this layout for stock items you buy regularly nd for which you have created item records in your YOB software. You can choose to have MYOB track the
uantity on hand and the average cost of the items you urchase.ervice—Use this layout to purchase services (or items) or which you don’t have a record in your MYOB oftware. Examples of such services include repairs,
surance and consultation.rofessional—Use this layout for services you want to rack over a certain period. You can include the date each
dividual service was provided, all on one purchase.iscellaneous—Use this format for purchases that you
on’t need to print, for example adjustments and debit otes you receive.
To chabutton
Purchasing Items and Services—23
Pur
Exer
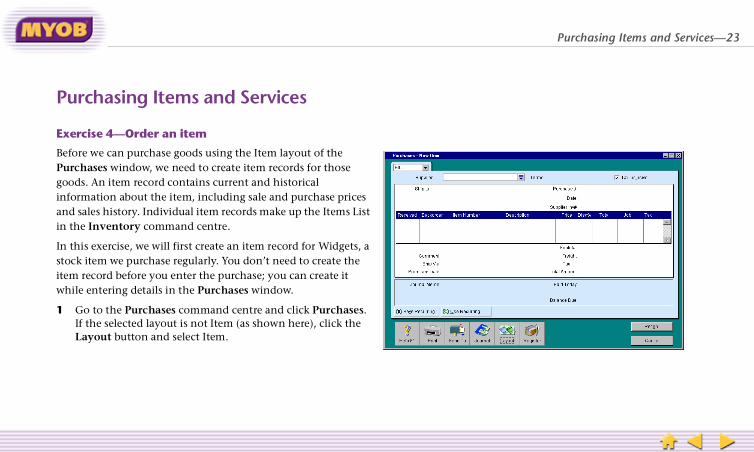
BeforPurcgoodinforand sin th
In thstockitemwhile
1 GIL
chasing Items and Services
cise 4—Order an item
e we can purchase goods using the Item layout of the hases window, we need to create item records for those s. An item record contains current and historical mation about the item, including sale and purchase prices ales history. Individual item records make up the Items List e Inventory command centre.
is exercise, we will first create an item record for Widgets, a item we purchase regularly. You don’t need to create the
record before you enter the purchase; you can create it entering details in the Purchases window.
o to the Purchases command centre and click Purchases. f the selected layout is not Item (as shown here), click the ayout button and select Item.

Purchasing Items and Services—24
Pur
Exer
W$t
2 Ccy
3 Tpt
4 Pmf
5 Tp
6 Tit
chasing Items and Services
cise 4—Order an item
e need to purchase 100 Widgets from World of Gadgets at 5.50 each. In this exercise we will be placing an order with he supplier.
lick the tab in the upper left corner of the window and hoose Order. (Notice the colour of the window change to ellow.)
ype World of Gadgets Pty Ltd in the Supplier field and ress TAB. The name will be matched with the card set up for his supplier in the Cards List.
ress TAB twice to move to the Tax Inclusive checkbox, and ark it (if it is not marked already). Then tab to the Date
ield and type 8/8/02.
ab to the Received column and type 100 because we are urchasing 100 widgets. Press TAB.
ype 100-101A5 in the Item Number column. This is the em code we want to use for Widgets.

Purchasing Items and Services—25
Pur
Exer
7 PS
8 C1
9 T
10 MT
11 CS
WMoo
chasing Items and Services
cise 4—Order an item
ress TAB. As this item does not exist in our Items List, the elect from List window is displayed.
lick New. The Item Information window is displayed with 00-101A5 appearing in the Item Number field. Press TAB.
ype Widgets in the Name field.
ark the I Buy This Item, I Sell This Item and I Inventory his Item checkboxes.
ontinue to complete the Profile, Buying Details and elling Details views as shown here.
e recommend that you read the Inventory chapter of your YOB User Guide before you set up item records in your
wn company file. (If you are using MYOB Premier, check ut your advanced inventory options.)

Purchasing Items and Services—26
Pur
Exer
12 C
13 Tp
14 PmwdAne
15 C
16 C
chasing Items and Services
cise 4—Order an item
lick OK to return to the Purchases window.
ab to the Price column and type 5.50, which is the urchase price of a widget.
ress TAB and then the down arrow key on your keyboard to ove to the Comment field. Type Please deliver toarehouse. In the Promised Date field, type 20/8/02 (the ate we expect to receive the goods).s we are only placing an order, our inventory levels have ot changed. When we receive the goods (in the next xercise), we can convert the order to a bill.
lick Record to record the order.
lick Cancel to return to the Purchases command centre.

Purchasing Items and Services—27
Pur
Exer
Let’s suppin go
Follo
1 GR
2 C
3 SGpa
4 HP
5 Cin
ck Record. Then close the windows and return to the rchases command centre.u have completed your first purchase, and now have 100 dgets in stock showing in the Items List (accessed from the ventory command centre).
chasing Items and Services
cise 5—Receive the item
assume that the 100 widgets arrive with an invoice from the lier some days later. You check that the widgets have arrived od condition and that the invoice matches your order.
w these steps to convert the order we created earlier to a bill.
o to the Purchases command centre and click Purchases egister.
lick the Orders tab.
elect Supplier from the Search By list and type World ofadgets Pty Ltd. Enter 8/8/02 in the Date fields and ress TAB. Any orders made to this supplier on this date will ppear in the scrolling list.
ighlight the order and click the Change to Bill button. The urchases window is displayed.
hange the date to 20/8/02. Enter 88943 as the supplier’s voice number.
6 CliPuYowiIn

Purchasing Items and Services—28
Pur
Exer
We nbill imPurcwe ncheq
1 G
2 Pco
3 E
4 Ttin
5 Ca
chasing Items and Services
cise 6—Pay the bill
ow have a bill that is ‘payable’ or due. If we had paid this mediately, we could have used the Paid Today field in the
hases window. However, since we are paying it a week later, eed to use the Pay Bills function. We are paying $550 by ue.
o to the Purchases command centre and click Pay Bills.
ress TAB to display the Select from List window and double-lick World of Gadgets. The supplier details appear and the utstanding payables for the supplier are listed.
nter 27/8/02 as the date and $550 as the amount.
ab to the Amount Applied column to allocate the payment o the bill and then press TAB. (It is important that the figures
the Amount field and the Amount Applied fields match.)
lick Record. The bill is settled in full, and the cheque ccount selected in the Pay Bills window is reduced by $550.

Entering Sales and Payments—29
Ent
Intro
MYOpaym
YourMiscdescrPremlayouthat prov
As winvoto anthe oclick
er payments for invoices recorded in the Sales command need to be entered through the Receive Payments w, and not through the Receive Money window.
les Register gives you quick access to all your sales, ing closed sales and credits given to customers.
ering Sales and Payments
duction
B’s Sales command centre has very flexible invoicing and ent options available for your business needs.
sales can be entered in the Service, Item, Professional and ellaneous layout windows (similar to the purchase layouts ibed earlier), and if you are using MYOB Accounting Plus or ier, you can also bill customers using the Time Billing t. Time Billing is appropriate for service based businesses
bill for time (and materials) and miscellaneous services ided to clients.
ith purchases, you can enter a sale as a quote, order or ice. This way, you can send a quote to a customer, change it order when the customer decides to buy, and then change rder to an invoice when the goods are sent—all with a few s of the mouse.
Customcentrewindo
The Sainclud

Entering Sales and Payments—30
Ent
Exer
We whaveto m
1 GS
2 Cc
3 TT
d
4 Cd
5 C
ering Sales and Payments
cise 7—Make a sale
ill make a sale to Widget Eaters Limited for 65 widgets. We already purchased 100 widgets, so we have enough in stock ake this sale.
o to the Sales command centre and click Enter Sales. The ales window is displayed.
lick the tab in the upper left corner of the window and hoose Invoice.
ype Widget Eaters Limited in the Customer field and press AB. The Select from List window. A record for this customer oes not exist and we need to create one.
lick the New button. The Card Information window is isplayed. Complete the fields in the Profile view as shown.
lick OK to return to the Sales window.

Entering Sales and Payments—31
Ent
Exer
6 P
7 Cs
8 M
9 E
10 Ta
11 TtT
12 Tkfif
13 WR
ering Sales and Payments
cise 7—Make a sale
ress TAB to fill in the customer’s details automatically.
lick the Layout button and select the Item layout, as we are elling items from our inventory.
ark the Tax Inclusive checkbox if it’s not already marked.
nter 9/9/02 in the Date field.
ab to the Ship field and enter 65 (the number of widgets we re selling).
ab to the Item Number field and press TAB. As Widgets is he only item on our Items List, it is selected automatically. he Price, Total and Tax fields are completed for you.
o move out of the body of the invoice, press the down arrow ey on your keyboard. (We won’t complete the optional ields below the body of the invoice, but these can be useful you need to show this information on the printed invoice.)
e have all the information we need on the invoice, so click ecord.

Entering Sales and Payments—32
Ent
Exer
Let’s sale.
Go toEntecredi
The fand Gto yo
The n
The fcolleOffic
The fWidgtrans
t (which keeps track of costs incurred in making sales). ofit and Loss statement will be updated at this point.
ering Sales and Payments
cise 7—Make a sale
have a quick look at the entries MYOB has made for this
the Sales command centre and click Transaction Journal. r 9/9/02 in both Date fields and press TAB. The debits and ts of the sale we just entered will be displayed.
irst two lines debit the Trade Debtors account for the sale ST amounts. This account keeps track of the money owed
u by your customers.
ext entry reflects the proceeds of the sale, exclusive of GST.
ourth entry is a credit to the account used to track GST cted on sales, that is now payable to the Australian Taxation e.
inal two entries reflect the purchase value of the widgets (65 ets x the purchase price of $5.50 = $325.00). This amount is ferred from our Inventory account to the Cost of Sales
accounThe Pr
Entering Sales and Payments—33
Ent
Cred
Let’s Limicusto
You gwhic
Creasale, nega
If gooresellinven
case, the goods were damaged, which means we won’t be g them back in our inventory. The cost of the damaged will be allocated to an income account called Sales s, and the Miscellaneous layout will be used.
les Returns account will offset the total sales value in the & Loss Statement.
ering Sales and Payments
it notes
assume that the widgets were shipped to Widget Eaters ted, but five were damaged before they reached the mer.
ive the customer a credit note for the five damaged widgets, h will be applied against their outstanding invoice.
ting a credit note follows the same procedure as making a except that the values in the invoice are entered astive (-) amounts.
ds are returned and placed back in our inventory for ing, we would need to use the Item layout so that our tory is readjusted for the returns.
In thisplacingoods Return
The SaProfit

Entering Sales and Payments—34
Ent
Exer
1 G
2 S
3 C
4 E
5 Tf
6 TAr
7 TGYccwb
ering Sales and Payments
cise 8—Create a credit note
o to the Sales command centre and click Enter Sales.
elect Widget Eaters Limited as the customer.
lick the Layout button and select the Miscellaneous layout.
nter the date as 15/9/02.
ab to the Description field and type Credit note forive damaged Widgets.
ab to the Account # column and press TAB to display your ccounts List. Select the Sales Returns income account and
eturn to the Sales window.
ype -55 in the Amount column and change the tax code to ST.ou have just created a credit note. After clicking Record you an choose how to settle it—by applying it against the ustomer’s existing account or refunding the amount. We ill apply this credit against Widget Eaters’ outstanding alance in the next exercise.

Entering Sales and Payments—35
Ent
Exer
1 G
2 C
3 CWT
4 HaSc
5 EapTin
6 Cr
ering Sales and Payments
cise 9—Settle a credit note
o to the Sales command centre and click Sales Register.
lick the Returns & Credits tab.
hoose Customer from the Search By drop-down list, type idget Eaters Limited in the adjacent field and press AB. The credit we just created appears in the scrolling list.
ighlight the credit and click the Apply to Sale button to pply this credit to the customer’s account balance. The ettle Returns and Credits window is displayed with the ustomer’s unpaid invoice.
nter the date as 15/9/02. Press TAB until the $55.00 credit mount appears in the Amount Applied column and then ress TAB again.his tells MYOB that the outstanding balance for that voice needs to be reduced by the credit amount applied.
lick Record to apply the credit. The invoice balance is educed by $55.00.

Entering Sales and Payments—36
Ent
Exer
You rpaym
1 GT
2 ET
3 Maw
4 E
5 E
6 EDw
ering Sales and Payments
cise 10—Receive customer payment
eceive a cheque for $670 from Widget Eaters Limited as ent for the widgets.
o to Sales command centre and click Receive Payments. he Receive Payments window is displayed.
nter Widget Eaters Limited in the Customer field and press AB. The customer’s unpaid invoice appears.
ake sure the Deposit to Account radio button is selected nd that account 1-1110 appears in the adjacent field. We ant to deposit the payment to our cheque account.
nter 20/9/02 as the date.
nter the amount of $670 in the Amount Received field.
nter Cheque in the Payment Method field and click the etails button. You can record details of the payment in this indow. Complete these fields if you want and click OK.
Entering Sales and Payments—37
Ent
Exer
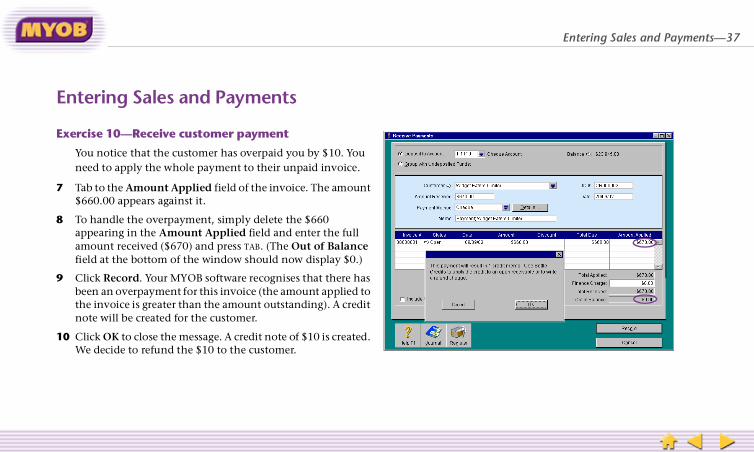
Yn
7 T$
8 Taaf
9 Cbtn
10 CW
ering Sales and Payments
cise 10—Receive customer payment
ou notice that the customer has overpaid you by $10. You eed to apply the whole payment to their unpaid invoice.
ab to the Amount Applied field of the invoice. The amount 660.00 appears against it.
o handle the overpayment, simply delete the $660 ppearing in the Amount Applied field and enter the full mount received ($670) and press TAB. (The Out of Balance ield at the bottom of the window should now display $0.)
lick Record. Your MYOB software recognises that there has een an overpayment for this invoice (the amount applied to he invoice is greater than the amount outstanding). A credit ote will be created for the customer.
lick OK to close the message. A credit note of $10 is created. e decide to refund the $10 to the customer.

Entering Sales and Payments—38
Ent
Exer
1 GtISa
2 S
3 C
4 C
ering Sales and Payments
cise 11—Pay refund
o to the Sales Register and click the Returns & Credits ab.The credit note of $10 appears in the scrolling list.f the credit note doesn’t appear here, enter Customer in the earch By field and enter Widget Eaters Limited in the djacent field.
elect the credit note and click Pay Refund.
hange the date of the cheque to 20/09/02.
lick Record.
Working with Jobs—39
Wo
Intro
You caccur
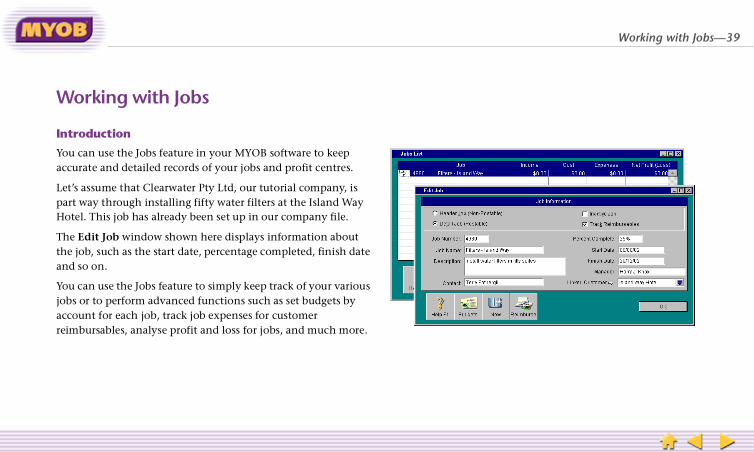
Let’s part Hote
The Ethe joand s
You cjobs accoureim
rking with Jobs
duction
an use the Jobs feature in your MYOB software to keep ate and detailed records of your jobs and profit centres.
assume that Clearwater Pty Ltd, our tutorial company, is way through installing fifty water filters at the Island Way l. This job has already been set up in our company file.
dit Job window shown here displays information about b, such as the start date, percentage completed, finish date o on.
an use the Jobs feature to simply keep track of your various or to perform advanced functions such as set budgets by nt for each job, track job expenses for customer
bursables, analyse profit and loss for jobs, and much more.
Working with Jobs—40
Wo
Exer
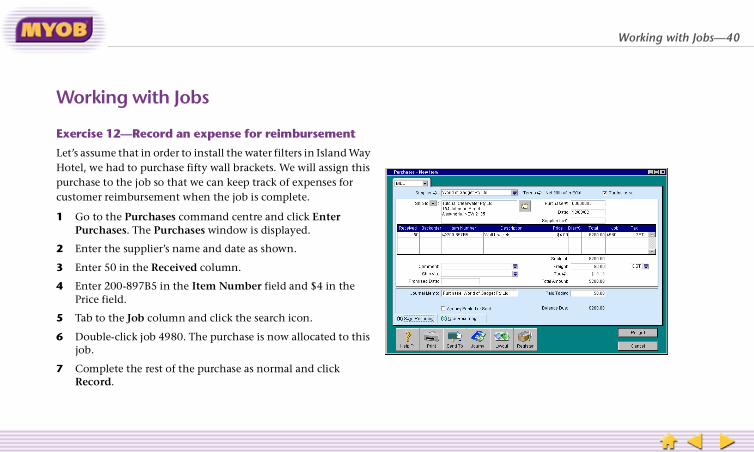
Let’s Hotepurchcusto
1 GP
2 E
3 E
4 EP
5 T
6 Djo
7 CR
rking with Jobs
cise 12—Record an expense for reimbursement
assume that in order to install the water filters in Island Way l, we had to purchase fifty wall brackets. We will assign this ase to the job so that we can keep track of expenses for mer reimbursement when the job is complete.
o to the Purchases command centre and click Enter urchases. The Purchases window is displayed.
nter the supplier’s name and date as shown.
nter 50 in the Received column.
nter 200-897B5 in the Item Number field and $4 in the rice field.
ab to the Job column and click the search icon.
ouble-click job 4980. The purchase is now allocated to this b.
omplete the rest of the purchase as normal and click ecord.

Working with Jobs—41
W
Ex
Anreun
Unyoanwlis
1
2
u can view the progress of this job broken down by account. u can also view any budgets you have entered for this job, and mpare it with the actual expenses.
orking with Jobs
ercise 13—Analyse job activity
important part of managing your job activity revolves around viewing the data that you’ve entered for your jobs and derstanding its effects on your overall financial picture.
derstanding the “big picture” of your job activity will help u identify income trends, recognise possible cost overruns and ticipate your company’s future revenues. The Analyse Jobs
indow will help you perform this important task by providing ts of your job activity.
Display the Analyse Jobs window. To do this, from any command centre, click the Analysis down arrow and choose Jobs.
Enter 4980 in the Job Number field and press TAB. Detailed information about this job appears in the Analyse Job window.
YoYoco
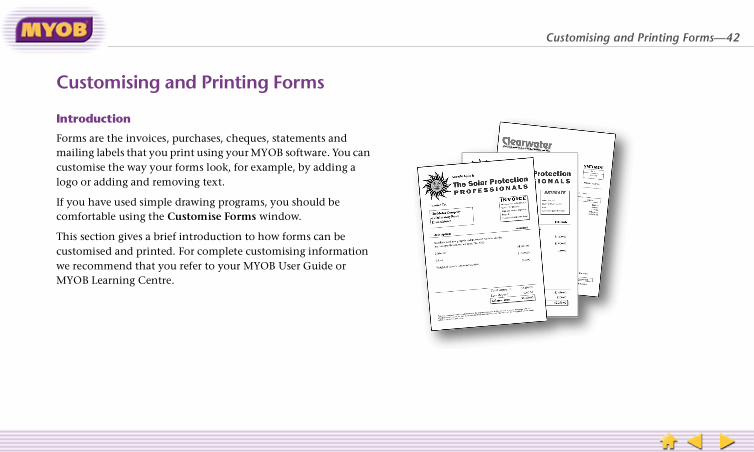
Customising and Printing Forms—42
C
In
Fomculo
If co
ThcuwM
ustomising and Printing Forms
troduction
rms are the invoices, purchases, cheques, statements and ailing labels that you print using your MYOB software. You can stomise the way your forms look, for example, by adding a go or adding and removing text.
you have used simple drawing programs, you should be mfortable using the Customise Forms window.
is section gives a brief introduction to how forms can be stomised and printed. For complete customising information
e recommend that you refer to your MYOB User Guide or YOB Learning Centre.

Customising and Printing Forms—43
Cu
Acce
FormFormMYO
You cexamand a
You ccommtempthe F
Let’s invobeen
In thform
ck Print Invoices in the Sales command centre. Make the ections shown below in the Forms Selection window.
ck the Selected Form for Sale search icon. Select MYOB’s in Paper Invoice and click Use Form. This template has
en pre-customised to fit on plain A4 paper.
stomising and Printing Forms
ssing forms
‘templates’ are saved on your hard drive in a folder called s. This folder must always be located within the folder your B software has been installed into.
an have a number of templates for each form type—for ple, you could have one invoice form template for quotes nother for standard invoices.
an access the templates from the Print functions in the and centres. For example, to access your Invoice form
lates, click Print Invoices in the Sales command centre and orms Selection window is displayed.
assume customer Widget Eaters Limited has requested an ice for their records showing that their previous sale has paid in full.
e following exercises, we will be customising the invoice and then printing a closed invoice for Widget Eaters.
1 Clisel
2 CliPlabe

Customising and Printing Forms—44
Cu
Exer
ClickThe C
We w
� R� I
a� A
stomising and Printing Forms
cise 14—Customise a form
the Customise button in the Forms Selection window. ustomise Item Sales window is displayed.
ill customise the form by doing the following:
esize, move and format the Company Address field.nactivate the Company Name field that currently ppears on the invoice.dd the Clearwater logo.

Customising and Printing Forms—45
Cu
Exer
Text tool them
Dataautomcustonamdoub
ActivinactCustText
Formper pForm
Data field
ool palette
Text field field
Inactive field
stomising and Printing Forms
cise 14—Customise a form
fields—These are fields that you can ‘create’ using the Text in the Tool palette, or edit directly by double-clicking
.
fields—These are preset fields on the invoice that are atically filled when the invoice is printed. At the
mising stage, data fields appear with brackets and the field e. You can change the font, size and position of the fields by le-clicking them.
e and inactive fields—Active fields are printed on the form; ive fields are not printed and appear in dim text in the omise window. Data fields can be made active or inactive. fields cannot be made inactive—they can only be deleted.
Size—You can change how many forms you want printed age and set the page size using the Forms Info option in the menu that appears in the menu bar during customisation.
T
Active
Customising and Printing Forms—46
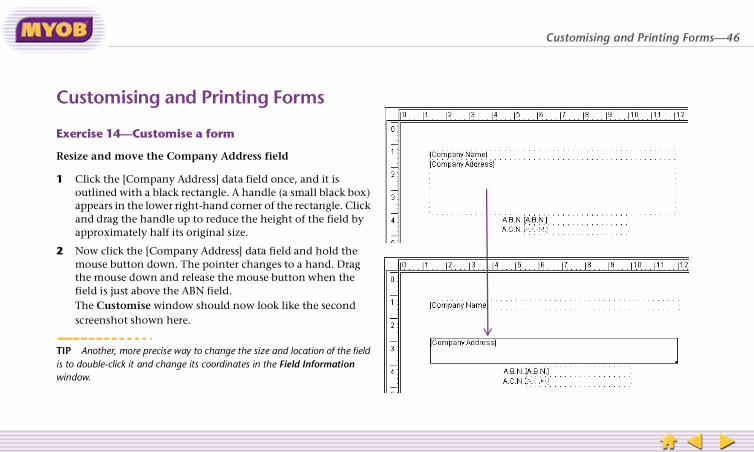
Cu
Exer
Resiz
1 Coaaa
2 NmtfTs
TIPis to dwindo
stomising and Printing Forms
cise 14—Customise a form
e and move the Company Address field
lick the [Company Address] data field once, and it is utlined with a black rectangle. A handle (a small black box) ppears in the lower right-hand corner of the rectangle. Click nd drag the handle up to reduce the height of the field by pproximately half its original size.
ow click the [Company Address] data field and hold the ouse button down. The pointer changes to a hand. Drag
he mouse down and release the mouse button when the ield is just above the ABN field.he Customise window should now look like the second creenshot shown here.
Another, more precise way to change the size and location of the field ouble-click it and change its coordinates in the Field Information w.
Customising and Printing Forms—47
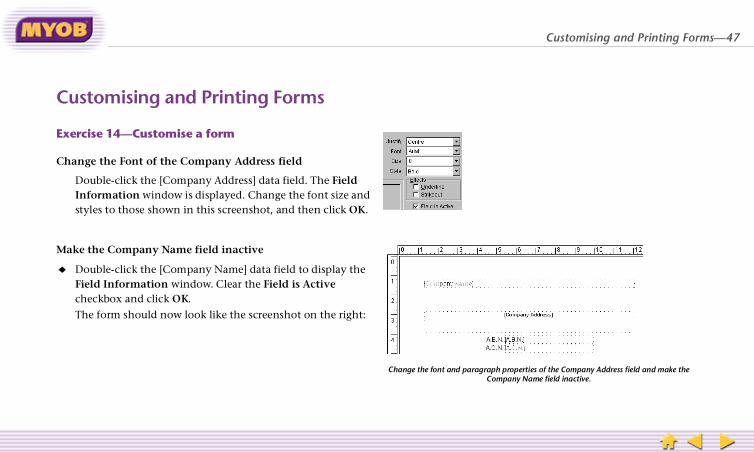
Cu
Exer
Chan
DIs
Mak
� DFc
T
the font and paragraph properties of the Company Address field and make the Company Name field inactive.
stomising and Printing Forms
cise 14—Customise a form
ge the Font of the Company Address field
ouble-click the [Company Address] data field. The Field nformation window is displayed. Change the font size and tyles to those shown in this screenshot, and then click OK.
e the Company Name field inactive
ouble-click the [Company Name] data field to display the ield Information window. Clear the Field is Active heckbox and click OK.
he form should now look like the screenshot on the right:
Change
Customising and Printing Forms—48
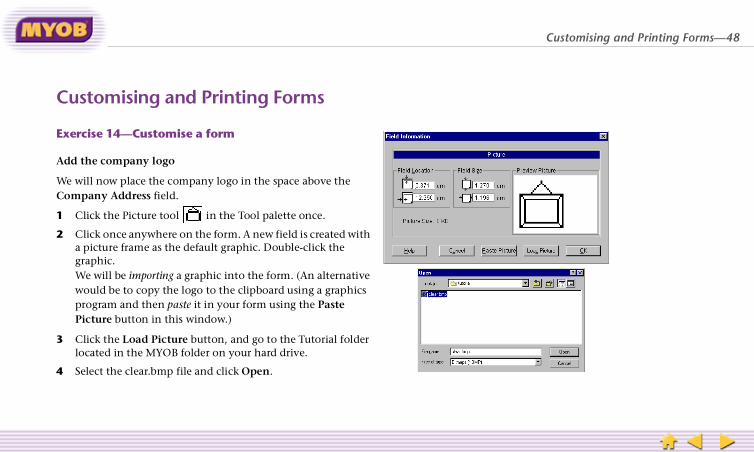
Cu
Exer
Add
We wCom
1 C
2 CagWwpP
3 Clo
4 S
stomising and Printing Forms
cise 14—Customise a form
the company logo
ill now place the company logo in the space above the pany Address field.
lick the Picture tool in the Tool palette once.
lick once anywhere on the form. A new field is created with picture frame as the default graphic. Double-click the raphic.e will be importing a graphic into the form. (An alternative ould be to copy the logo to the clipboard using a graphics rogram and then paste it in your form using the Paste icture button in this window.)
lick the Load Picture button, and go to the Tutorial folder cated in the MYOB folder on your hard drive.
elect the clear.bmp file and click Open.

Customising and Printing Forms—49
Cu
Exer
Add
Ws
5 Cc0chTcCe
form to your hard drive. It will now appear in the Selected Form for Sale list in the lection window.
stomising and Printing Forms
cise 14—Customise a form
the company logo
hen you return to the File Information window, you hould see a preview of the image we are importing.
hange the Field Size to approximately 2.15 cm high by 6.45 m wide (the graphic’s size), and set the Field Location to .50 cm from the top and 3.50 cm from the left. (If your omputer is set up to use inches, use the dimensions shown ere in the first screenshot). Click OK. he form should now appear as shown. That’s it! You have ustomised a form, and should now be familiar with the ustomise window, and how to work with the various lements on a form.
Save the Forms Se
Customising and Printing Forms—50
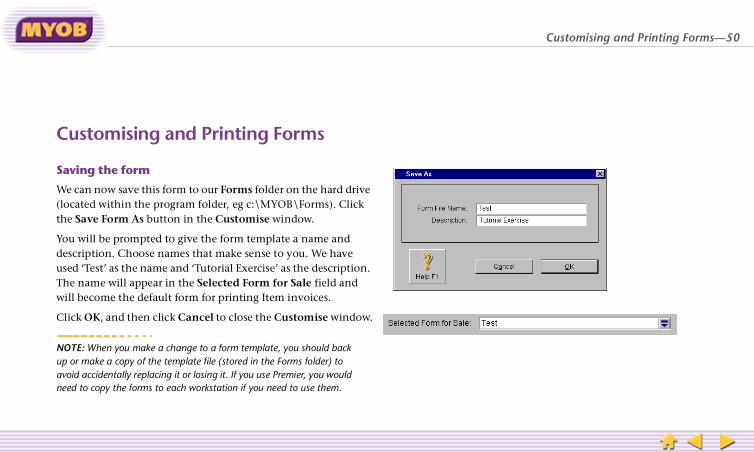
Cu
Savi
We c(locathe S
You wdescrusedThe nwill b
Click
NOTEup or avoidneed
stomising and Printing Forms
ng the form
an now save this form to our Forms folder on the hard drive ted within the program folder, eg c:\MYOB\Forms). Click ave Form As button in the Customise window.
ill be prompted to give the form template a name and iption. Choose names that make sense to you. We have ‘Test’ as the name and ‘Tutorial Exercise’ as the description.
ame will appear in the Selected Form for Sale field and ecome the default form for printing Item invoices.
OK, and then click Cancel to close the Customise window.
: When you make a change to a form template, you should back make a copy of the template file (stored in the Forms folder) to accidentally replacing it or losing it. If you use Premier, you would to copy the forms to each workstation if you need to use them.
Customising and Printing Forms—51
Cu
Prin
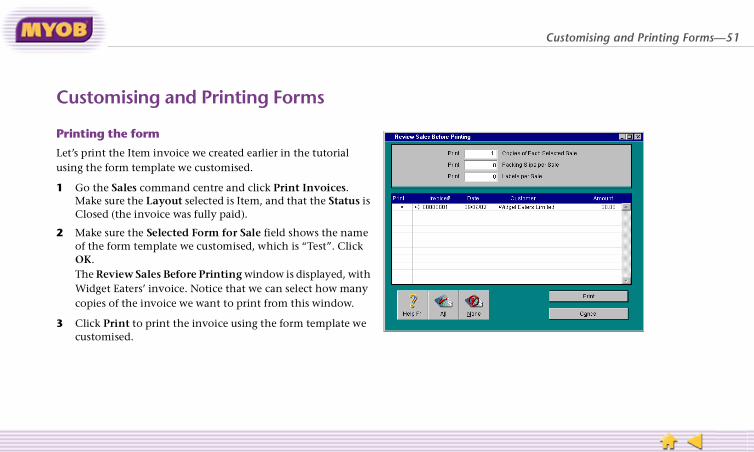
Let’s using
1 GMC
2 MoOTWc
3 Cc
stomising and Printing Forms
ting the form
print the Item invoice we created earlier in the tutorial the form template we customised.
o the Sales command centre and click Print Invoices. ake sure the Layout selected is Item, and that the Status is losed (the invoice was fully paid).
ake sure the Selected Form for Sale field shows the name f the form template we customised, which is “Test”. Click K.he Review Sales Before Printing window is displayed, with idget Eaters’ invoice. Notice that we can select how many
opies of the invoice we want to print from this window.
lick Print to print the invoice using the form template we ustomised.

Congratulations!—52
CoYou hable wher
Whe
WellcontMYO
For dyourcompCent
need further assistance, call MYOB’s expert Technical rt team. See your Getting Started guide for more ation on getting technical support.
imes you may need assistance that cannot be reasonably eted on the phone with a support representative.
ber that you can contact an MYOB Certified Consultant you onsite. We have included a Certified Consultants ry with your software—contact them and find out more
how they can help you Mind Your Own Business!
ngratulations!ave now completed this tutorial. By now you should be
to find your way around the command centres and know e to enter your daily transactions.
re do you go from here?
, start by having a look at your MYOB User Guide, which ains the basic information you need to set up and run your B system on a day to day basis.
etailed information about every task you can perform using MYOB software, use the MYOB Learning Centre, the rehensive online help system. You can access the Learning
re from the Help menu.
If you Suppoinform
SometcomplRememto helpdirectoabout