Embed Size (px)
Citation preview
Getting Started – Programming
Arduino Yún Microcontroller Application Note
Zhihong Qian
ECE 480 Team 3
November 9, 2015
Abstract: Arduino is an open-source prototyping platform based on easy-to-use hardware and
software.Arduino boards are able to read inputs - light on a sensor, a finger on a button, or a
Twitter message - and turn it into an output - activating a motor, turning on an LED, publishing
something online. You can tell your board what to do by sending a set of instructions to the
microcontroller on the board.The Yún can be programmed with the Arduino Arduino Software
(IDE).
1
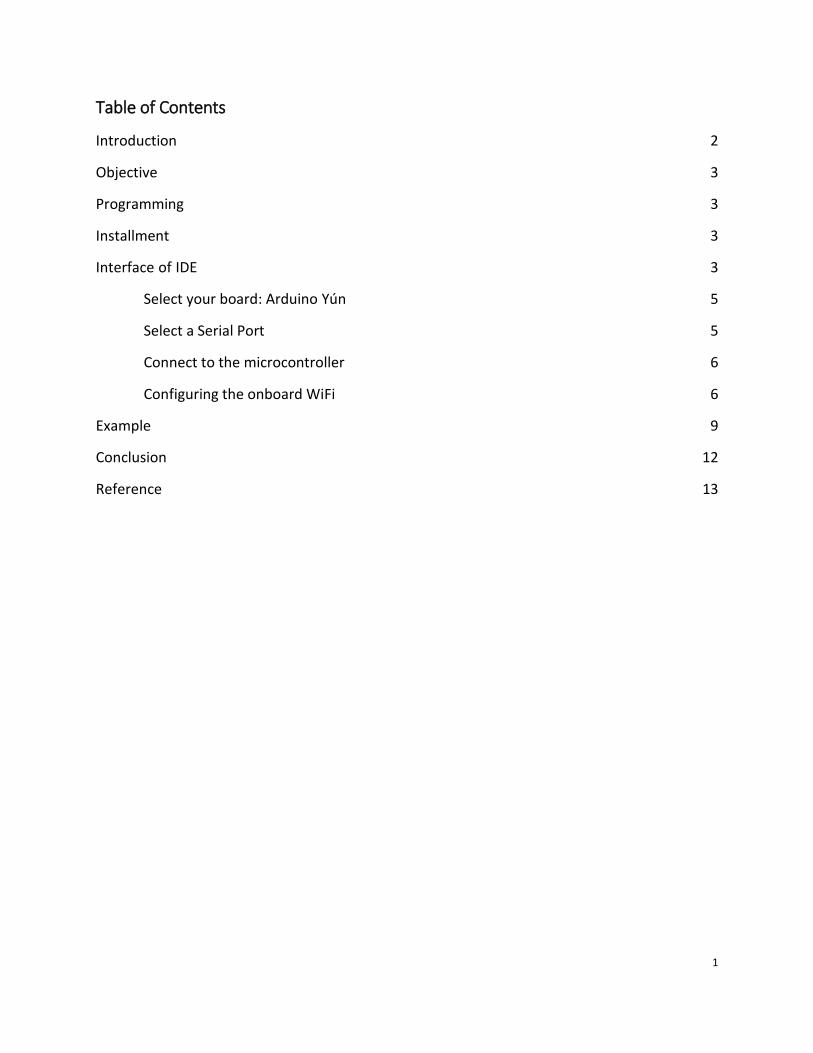
Table of Contents
Introduction 2
Objective 3
Programming 3
Installment 3
Interface of IDE 3
Select your board: Arduino Yún 5
Select a Serial Port 5
Connect to the microcontroller 6
Configuring the onboard WiFi 6
Example 9
Conclusion 12
Reference 13

2
Introduction
The Arduino Yún is a microcontroller board based on the ATmega32u4 and the Atheros AR9331.
The Atheros processor supports a Linux distribution based on OpenWrt named OpenWrt-Yun.
The board has built-in Ethernet and WiFi support, a USB-A port, micro-SD card slot, 20 digital
input/output pins (of which 7 can be used as PWM outputs and 12 as analog inputs), a 16 MHz
crystal oscillator, a micro USB connection, an ICSP header, and a 3 reset buttons.
The Yún distinguishes itself from other Arduino boards in that it can communicate with the
Linux distribution onboard, offering a powerful networked computer with the ease of Arduino.
In addition to Linux commands like cURL, you can write your own shell and python scripts for
robust interactions.
The Yún is similar to the Leonardo in that the ATmega32u4 has built-in USB communication,
eliminating the need for a secondary processor. This allows the Yún to appear to a connected
computer as a mouse and keyboard, in addition to a virtual (CDC) serial / COM port.
3
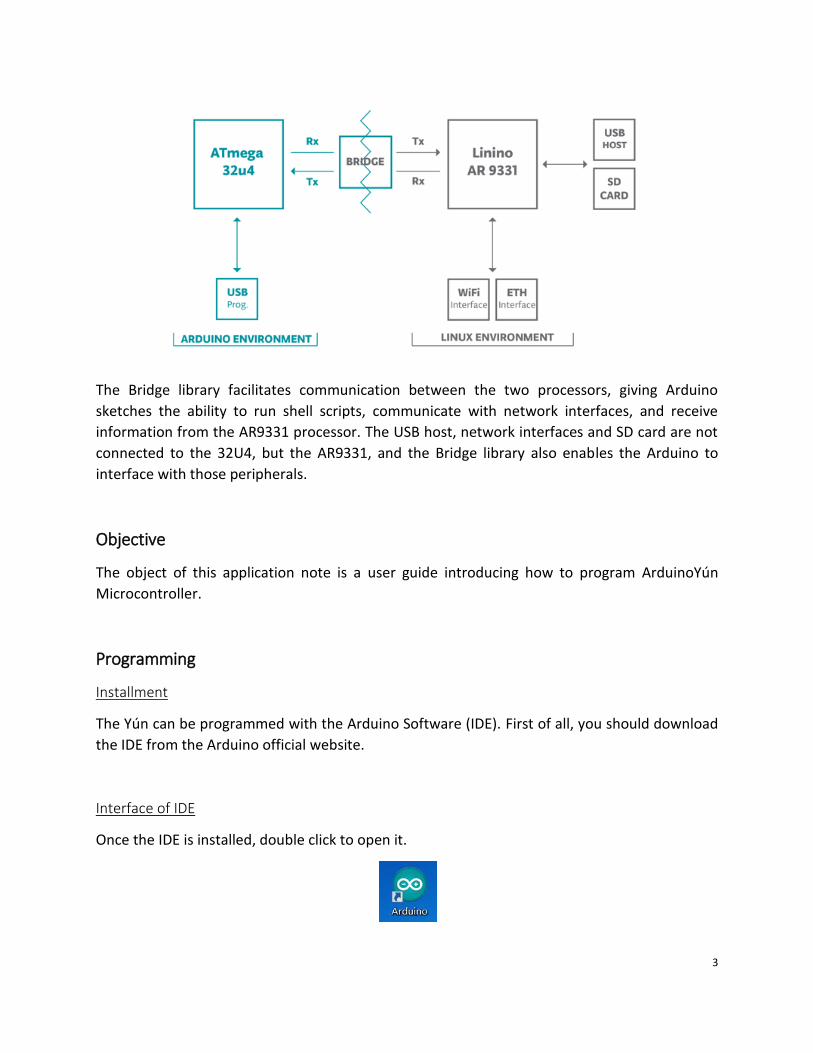
The Bridge library facilitates communication between the two processors, giving Arduino
sketches the ability to run shell scripts, communicate with network interfaces, and receive
information from the AR9331 processor. The USB host, network interfaces and SD card are not
connected to the 32U4, but the AR9331, and the Bridge library also enables the Arduino to
interface with those peripherals.
Objective
The object of this application note is a user guide introducing how to program ArduinoYún
Microcontroller.
Programming
Installment
The Yún can be programmed with the Arduino Software (IDE). First of all, you should download
the IDE from the Arduino official website.
Interface of IDE
Once the IDE is installed, double click to open it.
4
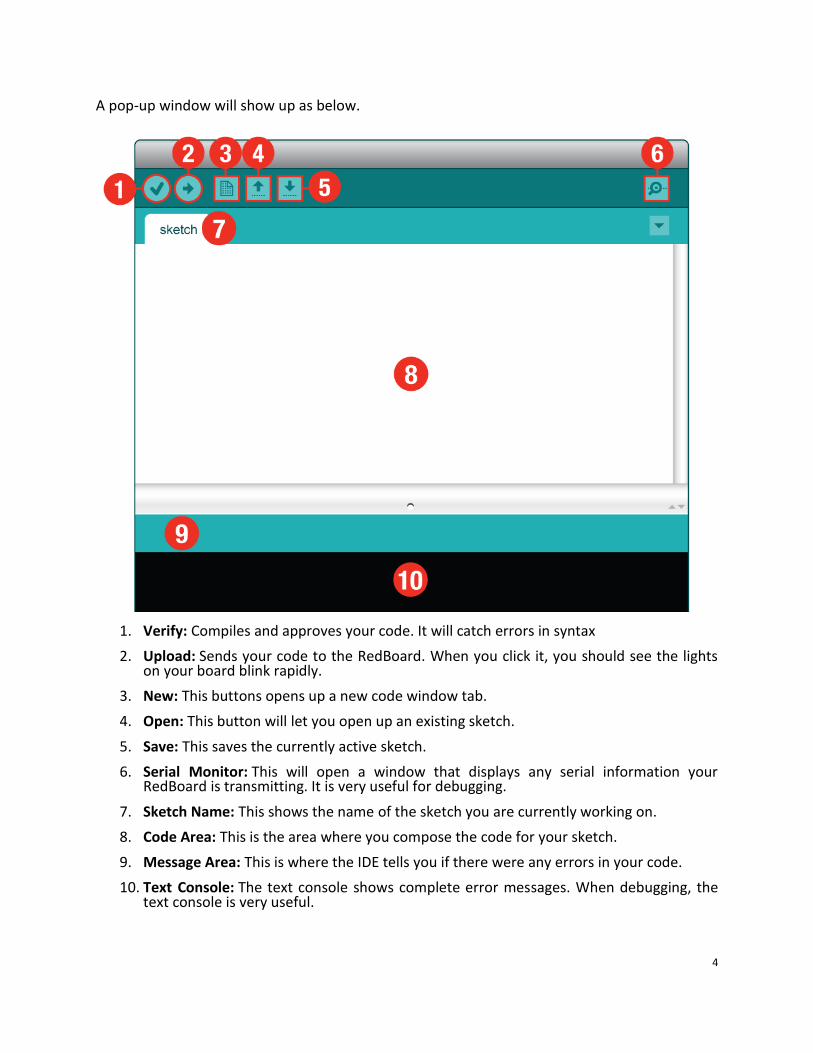
A pop-up window will show up as below.
1. Verify: Compiles and approves your code. It will catch errors in syntax
2. Upload: Sends your code to the RedBoard. When you click it, you should see the lights on your board blink rapidly.
3. New: This buttons opens up a new code window tab.
4. Open: This button will let you open up an existing sketch.
5. Save: This saves the currently active sketch.
6. Serial Monitor: This will open a window that displays any serial information your RedBoard is transmitting. It is very useful for debugging.
7. Sketch Name: This shows the name of the sketch you are currently working on.
8. Code Area: This is the area where you compose the code for your sketch.
9. Message Area: This is where the IDE tells you if there were any errors in your code.
10. Text Console: The text console shows complete error messages. When debugging, the text console is very useful.
5
Select your board: Arduino Yún
Before we starting jumping into the experiments, there are a couple adjustments you need to
make. This step is required to tell the Arduino IDEwhich of the many Arduino boards is used. Go
up to the Tools menu. Then hover over Board and make sure Arduino Yún is selected.
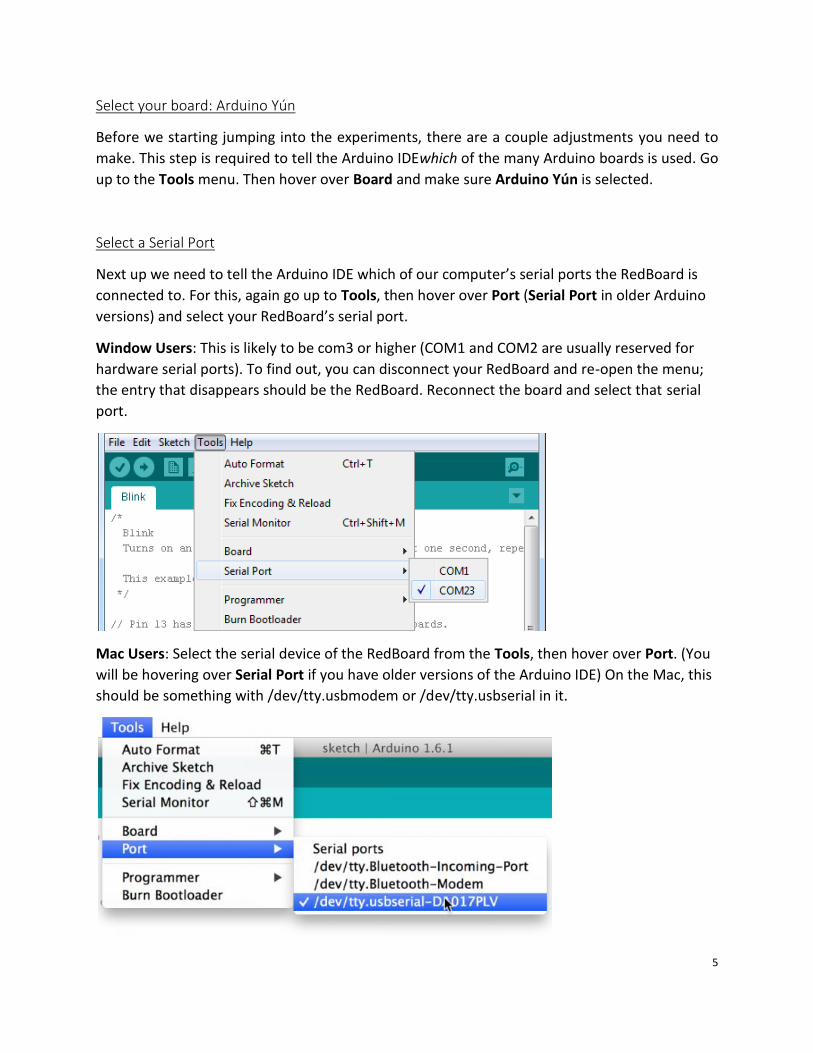
Select a Serial Port
Next up we need to tell the Arduino IDE which of our computer’s serial ports the RedBoard is
connected to. For this, again go up to Tools, then hover over Port (Serial Port in older Arduino
versions) and select your RedBoard’s serial port.
Window Users: This is likely to be com3 or higher (COM1 and COM2 are usually reserved for
hardware serial ports). To find out, you can disconnect your RedBoard and re-open the menu;
the entry that disappears should be the RedBoard. Reconnect the board and select that serial
port.
Mac Users: Select the serial device of the RedBoard from the Tools, then hover over Port. (You
will be hovering over Serial Port if you have older versions of the Arduino IDE) On the Mac, this
should be something with /dev/tty.usbmodem or /dev/tty.usbserial in it.
6
After finishing all the set up, you can begin writing your code!
Verify your code and ensure the code is correct, you need to connect your microcontroller to
your computer and upload it.
Connect to theArduino Yún
To connect the Arduino Yún to your computer, you'll need a Micro-B USB cable. This USB cable
provides power and data to the board. When programming the Yún, you must choose Arduino
Yún from the Tools > Board menu in the Arduino IDE. The Yún is only supported by Arduino IDE
1.5.4 and later.
Alternatively, Yún allows you to program without using USB cable, if you configure the onboard
Wifi.
Configuring the onboard WiFi
The Yún has the ability to act as an Access Point, but it can also connect to an existing network.
These instructions walk you through connecting your Yún to a wireless network. The Yún can
connect to unencrypted networks, as well as networks that support WEP, WPA, and WPA2
encryption.
When you first power on the Yún, it will create a WiFi network called ArduinoYun-XXXXXXXXX.
Connect your computer to this network.
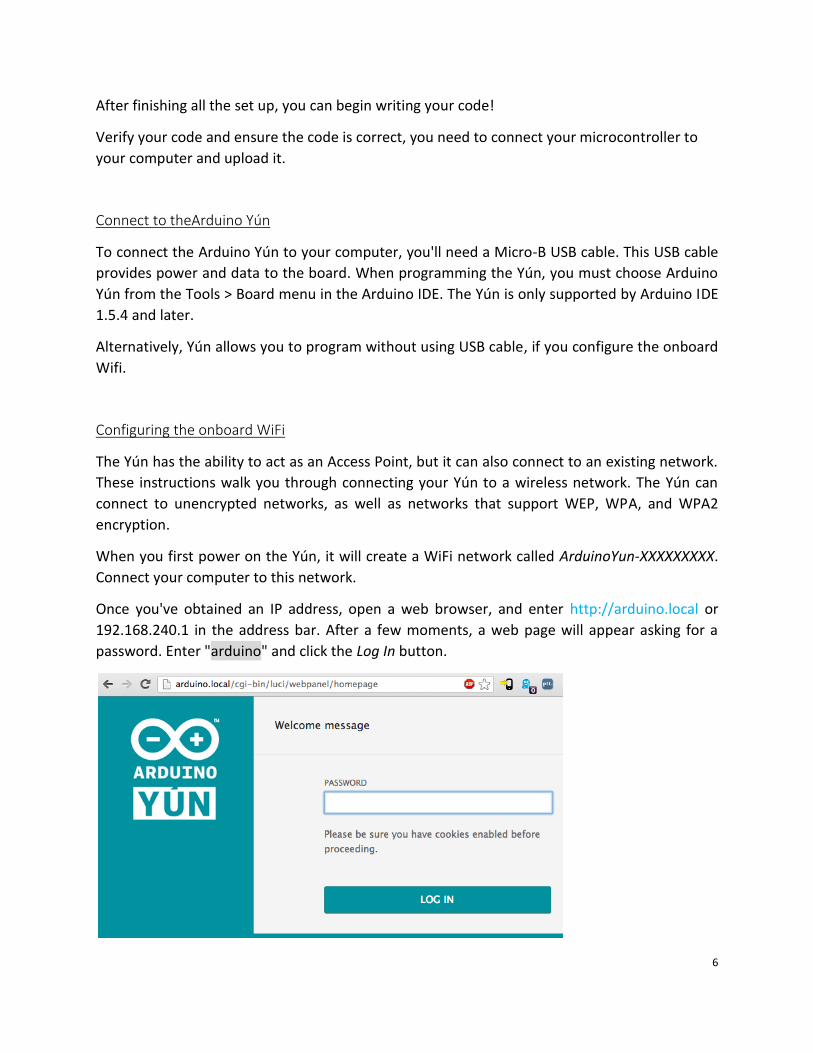
Once you've obtained an IP address, open a web browser, and enter http://arduino.local or
192.168.240.1 in the address bar. After a few moments, a web page will appear asking for a
password. Enter "arduino" and click the Log In button.
7
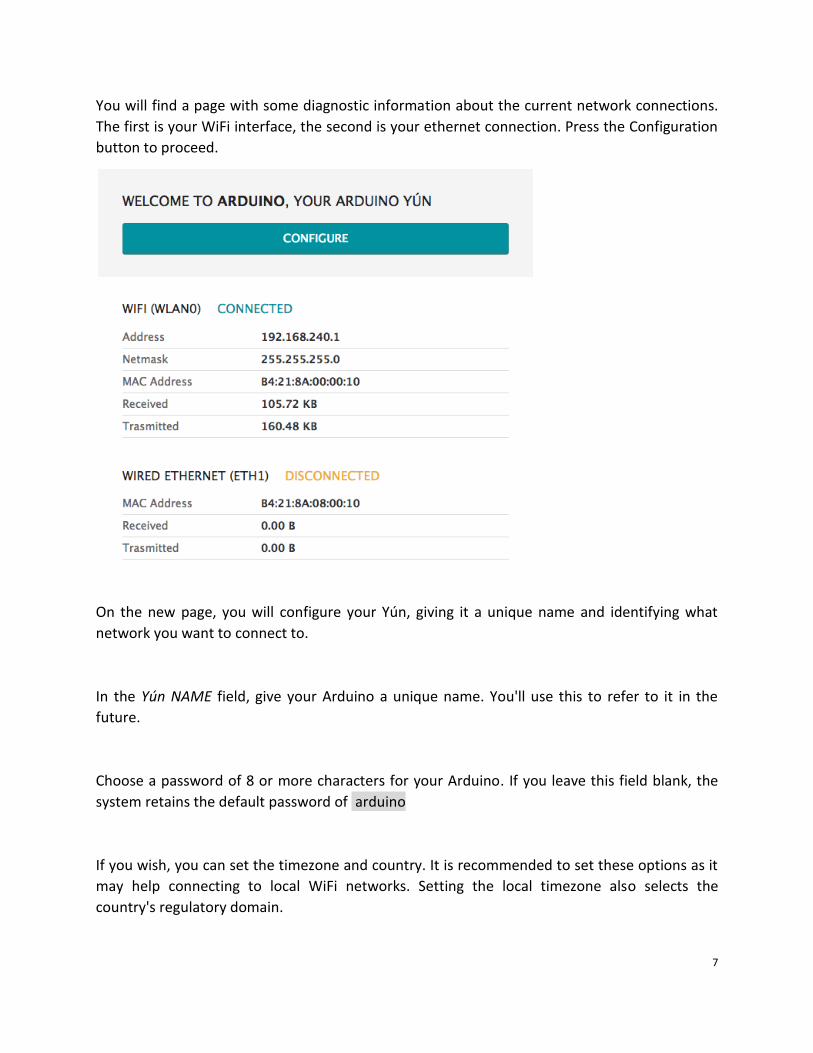
You will find a page with some diagnostic information about the current network connections.
The first is your WiFi interface, the second is your ethernet connection. Press the Configuration
button to proceed.
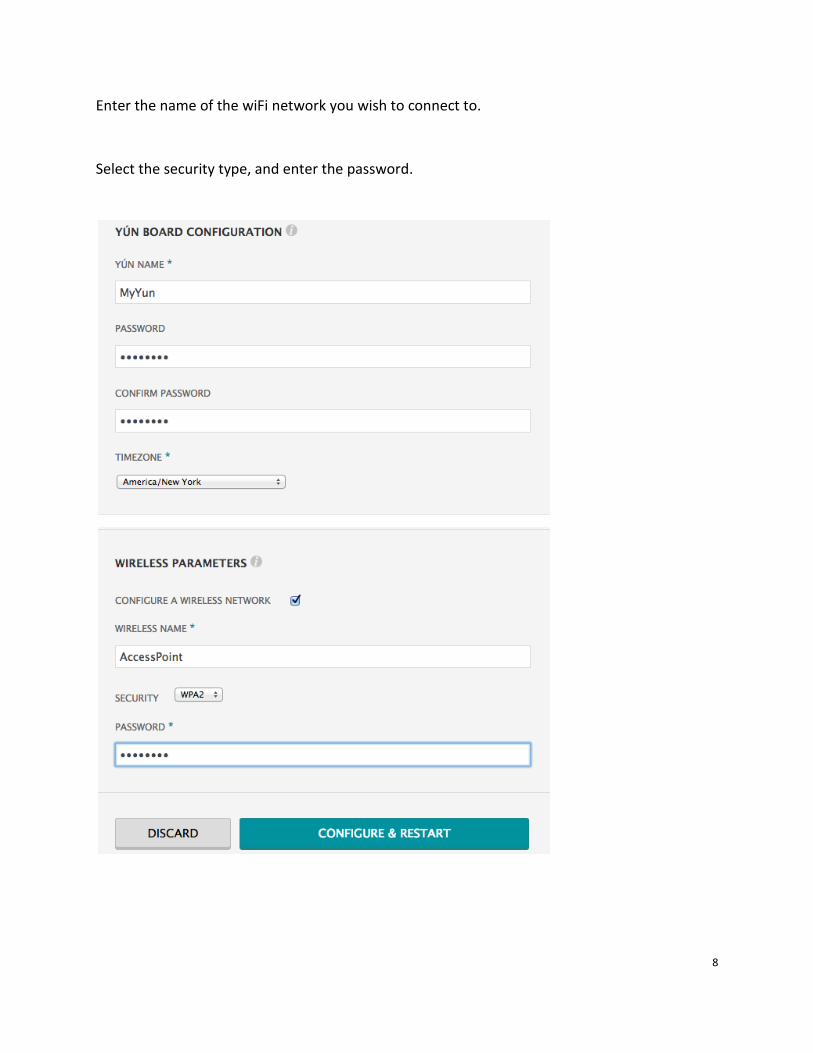
On the new page, you will configure your Yún, giving it a unique name and identifying what
network you want to connect to.
In the Yún NAME field, give your Arduino a unique name. You'll use this to refer to it in the
future.
Choose a password of 8 or more characters for your Arduino. If you leave this field blank, the
system retains the default password of arduino
If you wish, you can set the timezone and country. It is recommended to set these options as it
may help connecting to local WiFi networks. Setting the local timezone also selects the
country's regulatory domain.
8
Enter the name of the wiFi network you wish to connect to.
Select the security type, and enter the password.

9
When you press the Configure & Restart button, the Arduino will reset itself and join the
specified network. The Arduino network will shut down after a few moments.
You can now join the network you assigned to the Yún.
Examples
"Hello World!"
The LiquidCrystal library allows you to control LCD displays that are compatible with the Hitachi
HD44780 driver. There are many of them out there, and you can usually tell them by the 16-pin
interface.
This example sketch prints "Hello World!" to the LCD and shows the time in seconds since the
Arduino was reset..
10
Hardware Required
Arduino or Genuino Board
LCD Screen (compatible with Hitachi HD44780 driver)
pin headers to solder to the LCD display pins
10k ohm potentiometer
220 ohm resistor
hook-up wires
breadboard
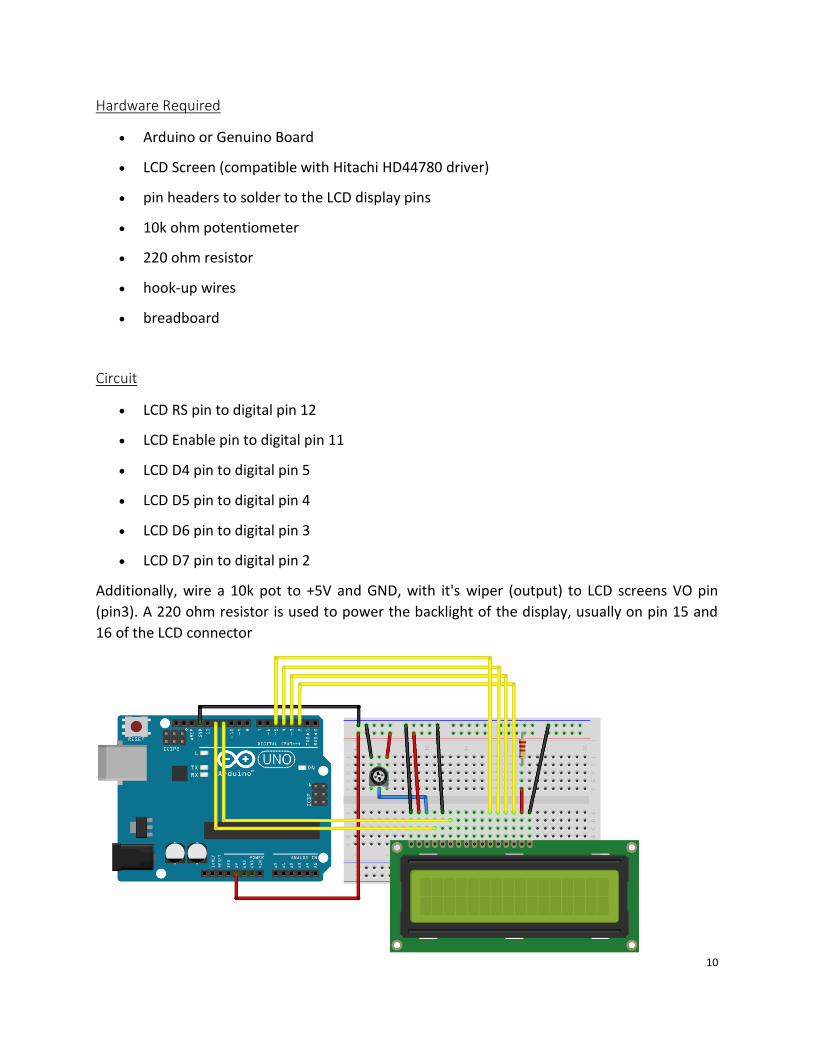
Circuit
LCD RS pin to digital pin 12
LCD Enable pin to digital pin 11
LCD D4 pin to digital pin 5
LCD D5 pin to digital pin 4
LCD D6 pin to digital pin 3
LCD D7 pin to digital pin 2
Additionally, wire a 10k pot to +5V and GND, with it's wiper (output) to LCD screens VO pin
(pin3). A 220 ohm resistor is used to power the backlight of the display, usually on pin 15 and
16 of the LCD connector
11
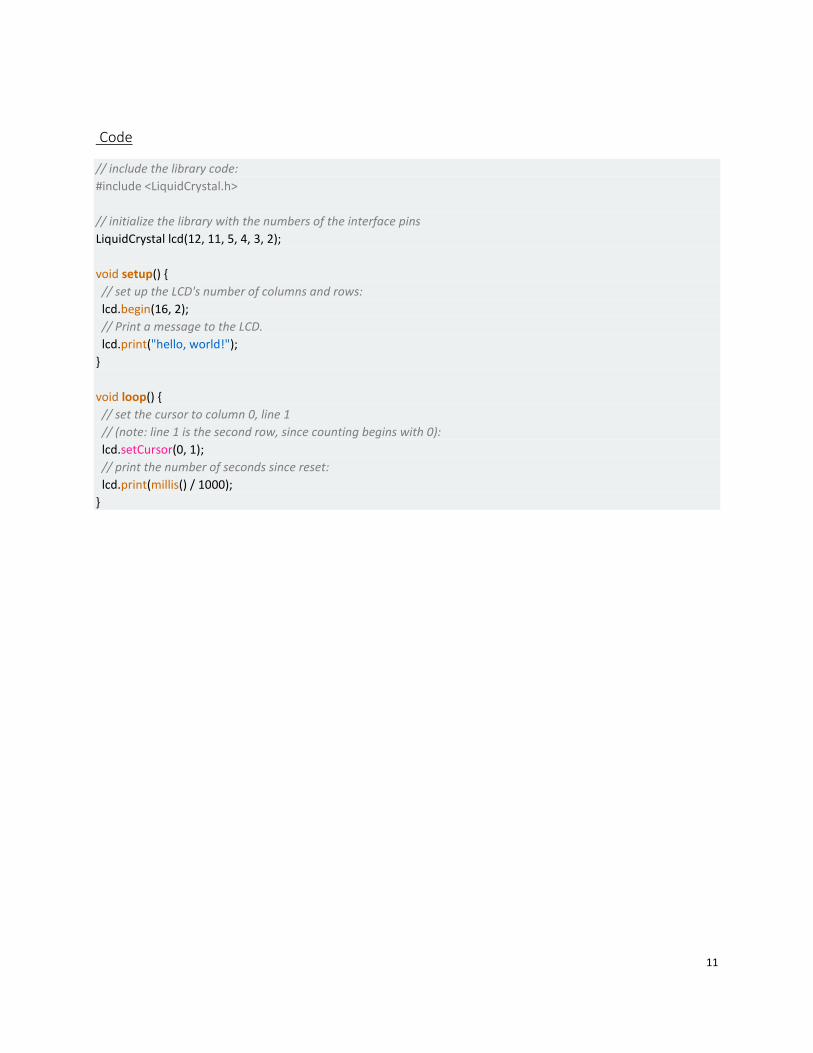
Code
// include the library code:
#include <LiquidCrystal.h>
// initialize the library with the numbers of the interface pins
LiquidCrystal lcd(12, 11, 5, 4, 3, 2);
void setup() {
// set up the LCD's number of columns and rows:
lcd.begin(16, 2);
// Print a message to the LCD.
lcd.print("hello, world!");
}
void loop() {
// set the cursor to column 0, line 1
// (note: line 1 is the second row, since counting begins with 0):
lcd.setCursor(0, 1);
// print the number of seconds since reset:
lcd.print(millis() / 1000);
}
12
Conclusion
This application note gives brief introduction to the Arduino Yún microcontroller, including its
components and structure. Also, it demonstrates the steps of setting up the Arduino Software
(IDE) and programming with IDE. An example is provided which displays "Hello World!" on a
LCD screen. Arduino is an open-source prototyping platform based on easy-to-use hardware
and software. Arduino platform is a very user-friendly software tool especially for the beginner.
Its built-in Ethernet and WiFi support, a USB-A port and micro-SD card slot satisfy different
need of the developer.
13
Reference
ArduinoYún User's Manual
https://cdn.sparkfun.com/assets/learn_tutorials/3/1/0/Arduino_IDE_1_06_01.png
https://www.arduino.cc/en/Guide/Introduction
https://www.arduino.cc/en/Guide/ArduinoYun
https://www.arduino.cc/en/Main/ArduinoBoardYun
https://www.arduino.cc/en/Tutorial/HelloWorld