Embed Size (px)
Citation preview

Getting Started Guide
Getting Started as a Pro Reseller

Getting Started as a Pro ResellerVersion 1.2 (12.01.08)© Copyright 2008. All rights reserved.
Distribution of this work or derivative of this work is prohibited unless prior written permission is obtained from the copyright holder.
Trademarks Used in This BookAll other trademarks and copyrights are the property of their respective owners.

Table of Contents 1
© Copyright 2008. All rights reserved.
1 Introduction/Logging In 4Logging in to your Account 4
To Log In to Your Account 4Establishing Your Payee Account 4
To Set up Your Payee Account 4Linking Your Payee Account to Your Storefront 5
To Specify a Payee for your Storefront 5
2 Setting Up Your Pro Reseller Plan 6Setup Wizard 6
Contact Information 6To Add Your Contact Information 6
Legal Contact Information 7To Add Legal Contact Information 7
Commission Payment Information 7To Set Commission Payment Information 7
Product Pricing 7To Set Product Pricing 8
Storefront Options 8To Set Storefront Options 8
Email Marketing 8To Set Email Marketing Options 8
3 Managing Your Reseller Customers 10Purchase Confirmation Email 10
To Set the Purchase Confirmation Email Address 10Event Notification 10
To Enable Event Notification 11Support Options 11
To Specify Support Options 11Default Nameservers 12
To Select Default Nameservers 12Discount Customer List 13
To View the Discount Customer List 13Customer Search 13
To Use the Customer Search Tool 13
4 Designing Your Reseller Storefront 15Design Wizard 15
Default Settings 15To Apply and Publish a Default Web Site 16
Home Page 16
Main Settings 17To Customize Your Main Settings 17
Upper Panel Settings 18

Table of Contents 2
© Copyright 2008. All rights reserved.
To Customize Your Upper Panel Settings 18Lower Panel Settings 19
To Customize Your Lower Panel Settings 19Left Side Bar Menu Settings 20
To Customize Your Left Side Bar Menu Settings 20Slider Bar Settings 20
To Select Slider Products and Colors 21Domains 21
To Select a Main Image 22Header 22
To Customize Your Header 23Menu Bar 24
Menu Bar 24To Customize Your Menu Bar 24
Custom Links 25To Set Custom Links 25
Footer 25To Enable a Custom Footer 25
Logo 26To Customize Your Storefront’s Logo 27
Customizing Your Reseller Plan 27
Company Info Page 27To Create a Company Info Page 28
Receipt Info 28To Customize Your Receipt Info 28
Custom Product Offerings 29
Selecting Products 29To Add Top Level Domains to Your Product Portfolio 30To Add Products to Your Product Portfolio 31
Product Pricing 31To Change the Pricing on a Product 32
Current Promotions 32To View Current Promotions 33
Merchant Accounts 33To Offer Merchant Accounts 33
5 Working with Reports 34Commission Reports 34
To View Commission Reports 34Sales Reports 34
To View a Customer Sales Report 35To View a Product Sales Report 35To View a Renewal Report 36To View a Refund Report 36
Domain Lookup 37To Use Domain Lookup 37

Table of Contents 3
© Copyright 2008. All rights reserved.
Domain Registration 37To View Domain Registration Details 37
Pending Transfer Report 37To View Pending Transfers 37
Marketing Source Code Reports 38To View Marketing Source Code Reports 38
6 Marketing Your Reseller Storefront 39Internal Marketing Resources 39
Email Marketing 39To Opt in to Email Marketing 39
Marketing Source Codes 39To Set Up Marketing Source Codes 40
Express Email Marketing 40To Set Up Express Email Marketing 40
Press Releases 40
Newsletters/Announcements 41
Reseller Roundup Blog and Forum 41
Reseller Roundup Blog 41
Reseller Roundup Forum 41
Live Chat 41
Other Marketing Resources 42
Traffic Facts 42To Configure Traffic Facts 42
Google® Analytics/AdWords® 42
Google® Analytics 42To Enable Google® Analytics 42
Google® AdWords 42
Forums 43
Banner Ads and Links 43To Use Banner Ads and HTML Links 43
Affiliate Programs 43
Getting Help 44To Access the Reseller Control Center FAQ 44

Congratulations on your new business venture! As a Pro Reseller, the possiblities are end-less and getting started is a cinch. This guide takes you through the steps to set up your account details and reseller site. At the end of this process, you will have a live, profes-sional reseller site ready to attract customers.
LOGGING IN TO YOUR ACCOUNTThe first step in setting up your reseller plan is logging in.
To Log In to Your Account
1. In the Customer # or Login name field, enter your account login information.
2. In the Password field, enter your account password (remember that all passwords are case sensitive).
3. Click Secure Login.
ESTABLISHING YOUR PAYEE ACCOUNTYour Payee Account tells us how you want to receive your commission payments. Payee accounts include contact information, tax information, and preferred method of payment. Your storefront cannot be made until your Payee Account is set up.
To Set up Your Payee Account
1. Log in to your Account Manager.
1. Introduction/Logging In
The Account Manager is where you manage account adminis-trative functions and details. This is also where you launch any applications or manage products that were purchased in this account.
The Reseller Control Center is where you manage your site content and activity.

Introduction/Logging In 5
2. In the My Account section, click Account Settings.
3. On the Account Settings page, select Payee Accounts.
4. On the Payee Accounts page, click Create Payee.
5. Enter your payee details and click Continue.
6. Review the payee details, and click Submit.
Linking Your Payee Account to Your Storefront
Now that you have specified how you want to receive your commissions, you need to link those details to your Reseller plan and storefront. You manage your Reseller plan settings in the Reseller Control Center.
To Specify a Payee for your Storefront
1. Log in to your account at www.resellercontrolcenter.com.
2. From the My Settings menu, select Payment & Tax Information.
3. Select the name of the Payee Account and click Apply.

Your Pro Reseller plan is now ready for customization. To finish setting up your plan, com-plete the Setup Wizard as described below.
SETUP WIZARDYou can exit the Setup Wizard at any time with or without saving the information.
Contact Information
This information is used if we need to contact you about your reseller plan. You will spec-ify sales and product support contact information in the Storefront Options section.
This contact information is not available to your customers.
To Add Your Contact Information
1. Expand the contact information section.
2. Enter your business contact information in each field as labeled.
3. Select Yes or No for each of the reseller notification options.
4. Select HTML or Text for your preferred email format.
2. Setting Up Your Pro Reseller Plan

Setting Up Your Pro Reseller Plan 7
5. Click Next to move to the next section.
Legal Contact Information
Legal agreements to which your customers agree when purchasing products from your reseller store must include a mailing address to which your customers can send notices. We recommend that you use our business address (provided in the fields by default). If you choose to use this address, we will contact you with any legal issues that require your attention.
However, you may enter a different address or post office box as your legal contact infor-mation. If you purchased privacy for your domain name, you may also use the applicable privacy address here.
To Add Legal Contact Information
1. Expand the legal contact information section.
2. Enter your legal contact information in each field as labeled.
3. Click Next to move to the next section.
Commission Payment Information
In order to receive commission payments from your reseller storefront, you must associ-ate a payee account with this reseller plan.
If you do not have any payee accounts, or you need to create additional one(s), see Establishing Your Payee Account on page 4; then return to the Payment & Tax Informa-tion screen and select your payee account.
To Set Commission Payment Information
On the Payment & Tax Information page, select your payee account from the list and click Apply.
Product Pricing
The Setup Wizard allows you to quickly and easily set the pricing for all of the products in your reseller store.
Using this feature requires that:
1) You intend to offer all products available in your reseller store, AND
All fields marked with an asterisk (*) are required.

Setting Up Your Pro Reseller Plan 8
2) You want to set the pricing for all of your products as a dollar amount or percentage above suggested retail pricing.
If you prefer to manually compile your product selections and define the product pricing, click Next. When you have completed the Setup Wizard, you can go to the Products & Pricing page to customize your product selections and pricing.
To Set Product Pricing
1. From the Price Point list, select your preferred price position.
2. Enter a percentage or dollar amount to set your price above or below the suggested retail price, and click Set Pricing.
3. To move to the next section, click Next.
Storefront Options
You can customize the following options relating to information that your customers will see on your storefront.
The options currently default to our recommended settings and information, but you may customize any of these options to suit your business.
To Set Storefront Options
1. In the Display Name field, enter the company name you want to display on your storefront.
2. Under Support Options, select your preferred method for handling support requests.
3. In the Support Email field, enter the the email address that you want support emails sent to, or leave the default email address to let us handle support requests for your store.
4. Under Default Name Servers, select the option you want to display as the default.
5. To move to the next section, click Next.
Email Marketing
You can customize the following options for sending email communications from your storefront. These settings control how and from where your email messages are sent.
To Set Email Marketing Options
1. In the “From” Email Address field, enter the email address that you want purchase confirmation email messages to come from or leave the default address to ensure consistency with your support email options.
2. In the Event Notification Emails section, enter the email addresses at which you want to receive notifications of orders or transfer events.

Setting Up Your Pro Reseller Plan 9
3. Under Marketing Emails, select Yes or No to allow us to send marketing promotions to your customers on your behalf.
4. To confirm all your storefront settings, click Save.

You’ve got your reseller account created, so now it’s time to make sure that you will have everything you need to monitor your customers’ needs and make sure that they’re met.
Purchase Confirmation Email
After each purchase, your customers will receive a receipt via email, containing informa-tion about the purchase for their records. You can set the ‘From’ address that appears in this email.
To Set the Purchase Confirmation Email Address
1. From the My Customers menu, select AutoResponder Email.
2. To use the default address of [email protected], click Use Default.
3. To specify a different email address, enter the full email address in the text field.
4. Click Apply.
Event Notification
In addition to using your Reseller Control Center to track your customers’ purchases, you can also opt to have notifications sent via email indicating when customers complete pur-chase, or choose to transfer a domain from your storefront to another registrar.
3. Managing Your Reseller Customers

Managing Your Reseller Customers 11
To Enable Event Notification
1. From the My Customers menu, select Event Notification.
2. To enable email notification for completed orders, check the box under the Notify? heading, then in the Email Address field, enter the destination email address.
3. To enable email notification for transfer away requests, check the box under the Notify? heading, then in the Email Address field, enter the destination email address.
4. Click Apply.
Support Options
Part of the responsibility of having customers is making sure they’re taken care of. In the Support Options section, you’ll choose whether you’d like us to handle your support, or if you’d prefer to provide it yourself.
To Specify Support Options
1. From the My Customers menu, select Support Options.
2. If you want us to handle your support requests, select Let us handle all support requests.

Managing Your Reseller Customers 12
3. If want us to handle support for transfers, check Enable Transfer Concierge to handle support.
4. If you want your company to handle support, select I would like my company to handle all support requests.
To use your contact email address and phone number as provided during setup, check Use my contact Email and Phone number. Your information will display to con-firm it is correct.
In the Support URL field, enter the full email address for the Web site where you will be providing support.
5. Click Apply.
Default Nameservers
When your reseller customers purchase domains through your storefront, you can choose the default option offered to them for setting their nameservers. Parked nameservers mean that the domain points to a parked page, which indicates that the domain is regis-tered, but not yet pointing to an actual site. Hosting nameservers mean that the domain will point to an established Web site (for example, “google.com” is set with hosting nameservers that link the domain with the actual Google® Web site).
To Select Default Nameservers
1. From the My Customers menu, select Default Nameservers.
2. Select the default status of the nameservers for newly registered/transferred domains.
3. Click Apply.
You can still specify that you want to handle hosting support for your store-front by checking I would like to handle hosting support.

Managing Your Reseller Customers 13
Discount Customer List
As you develop your customer base, you can opt to provide some of them with discounted pricing. You can enable or disable this option at any time through your Reseller Control Center.
To View the Discount Customer List
1. From the My Customers menu, select Discount Customer List.
2. The list of customers currently receiving discounted pricing displays.
3. To remove a customer from the list, click Deactivate Discounted Rates.
Customer Search
Through the Reseller Control Center, you’ll be able to search your customer database for specific customers based on a variety of criteria. You can even look up a customer by the receipt number of their purchase.
To Use the Customer Search Tool
1. From the My Customers menu, select Customer Search.

Managing Your Reseller Customers 14
2. You can search using any or all of the following criteria:
Company Name
Customer Number
Receipt Number
First Name
Last Name
City
State
Zip
3. Click Lookup Customer.
Now it’s time for the fun part - designing your reseller storefront!
You can also display your entire customer list by leaving all of the fields blank, then clicking Lookup Customer.

Now that your account details are defined, it’s time to design your storefront. In this chapter, you’ll learn how to set the colors of your Pro Reseller storefront Web site, add custom content to headers and footers, and change other storefront settings.
Once you have completed customizing your storefront, just click Go Live to publish your site.
DESIGN WIZARDTo customize your Reseller Storefront, access the Design Wizard by logging into your account, and from the Design & Layout menu, select Design Wizard.
Default Settings
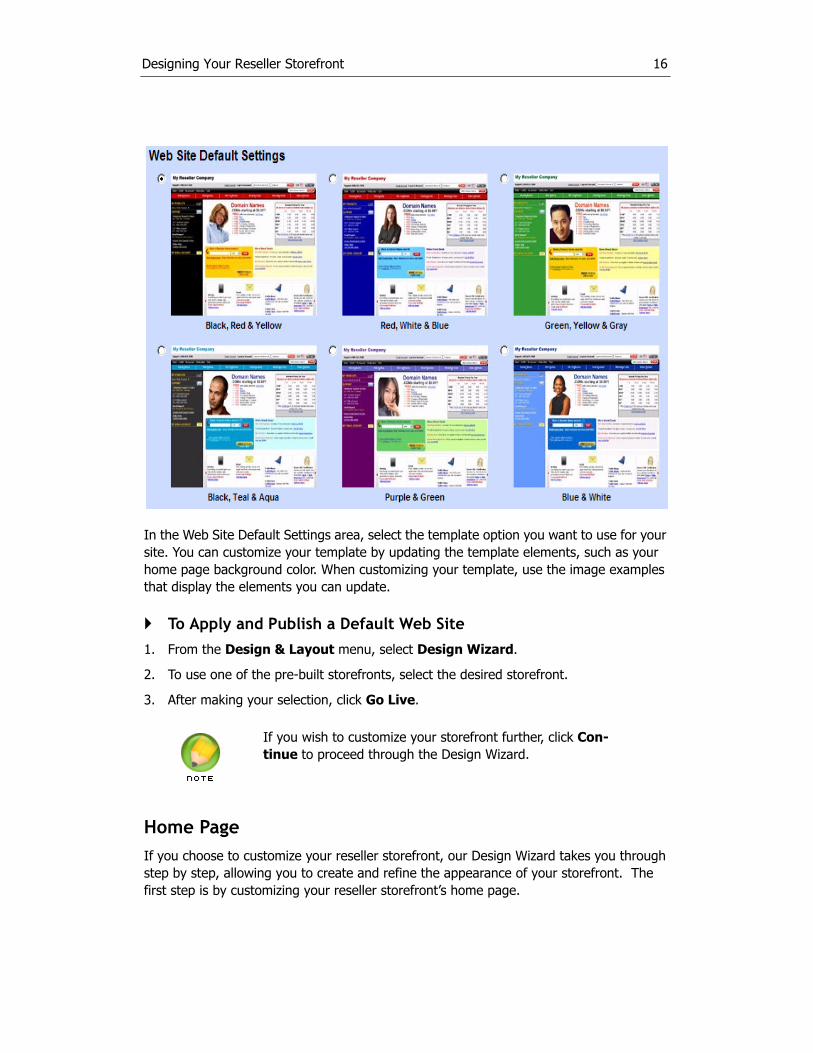
When creating your Reseller storefront, you can use one of the pre-built templates to get your site active as soon as possible, just by picking the one you like best and making it live!
4. Designing Your Reseller Storefront
Designing Your Reseller Storefront 16
In the Web Site Default Settings area, select the template option you want to use for your site. You can customize your template by updating the template elements, such as your home page background color. When customizing your template, use the image examples that display the elements you can update.
To Apply and Publish a Default Web Site
1. From the Design & Layout menu, select Design Wizard.
2. To use one of the pre-built storefronts, select the desired storefront.
3. After making your selection, click Go Live.
Home Page
If you choose to customize your reseller storefront, our Design Wizard takes you through step by step, allowing you to create and refine the appearance of your storefront. The first step is by customizing your reseller storefront’s home page.
If you wish to customize your storefront further, click Con-tinue to proceed through the Design Wizard.

Designing Your Reseller Storefront 17
Main Settings
In the Main Settings section, you select the primary product that you’d like to advertise on the home page, as well as the border color and trim color.
To Customize Your Main Settings
1. From the Design & Layout menu, select Design Wizard.
2. Click Home Page.
3. Expand the Main Settings section.
4. In the Primary Product section, select the main product you want to sell from your home page.
5. In the Attention Grabbing Banners section, specify whether you want to use a promotional banner on your landing page.
6. In the Panel Trim Color section, select the panel trim color.
7. In the Border Color section, select the border color.
You can further customize your color sections by either clicking the Color Palette icon and selecting a color or by entering a hexidecimal color code.

Designing Your Reseller Storefront 18
Upper Panel Settings
You can further refine the color scheme of your home page through the Upper Panel’s title, subtitle, strong text, regular text, and background.
To Customize Your Upper Panel Settings
1. From the Design & Layout menu, select Design Wizard.
2. Click Home Page.
3. Expand the Upper Panel Settings section.
4. Click Back or Next to scroll through the available images.
5. To upload your own image, click Browse, select the image you want to upload, then click Upload.
6. Expand the Upper Panel Settings - Colors section.
7. Select the following:
Title color
Strong text color
Text color
Subtitle color
Your image should be 164x214 pixels in size. Animated GIFs are currently not supported.
You can further customize your color sections by either clicking the Color Palette icon and selecting a color or by entering a hexadecimal color code.

Designing Your Reseller Storefront 19
Lower Panel Settings
Next, you can further refine the color scheme of your home page’s Lower Panel sections.
To Customize Your Lower Panel Settings
1. From the Design & Layout menu, select Design Wizard.
2. Click Home Page.
3. Expand the Lower Panel Settings section.
4. Select the following:
Background color
Title color
Text color
5. Expand the Lower Panel Settings - Bottom Section section.
6. Select the following:
Background color
Title color
Strong Text Color
Text color
Link color
7. To add your own text, select Enable custom details, and then enter the Title and Description. You can use HTML to format your text.
You can further customize your color sections by either clicking the Color Palette icon and selecting a color, or by entering a hexadecimal color code.

Designing Your Reseller Storefront 20
Left Side Bar Menu Settings
You can set the color scheme for the Left Side Bar and specify whether to display icons or use a gradient color for the background.
To Customize Your Left Side Bar Menu Settings
1. From the Design & Layout menu, select Design Wizard.
2. Click Home Page.
3. Expand the Left Side Bar Menu section.
4. Select the following:
Primary Color
Secondary Color
Background color
5. To set the background color to be black gradient, select Display Black Gradient Sidebar.
6. To display sidebar items in the menu, select Display Sidebar Icons.
Slider Bar Settings
The last part to customize on the home page is your Slider Bar. Here you can customize background, text, and link colors, and even add custom items to the panel!

Designing Your Reseller Storefront 21
To Select Slider Products and Colors
1. From the Design & Layout menu, select Design Wizard.
2. Click Home Page.
3. Expand the Select Slider Products and Colors section.
4. Select the products you want to display in the slider bar, specify the order in which you want them to display, and then click Reorder.
5. To add a custom item, select Custom item 1-5, order it as needed, complete the following, and then click Add Product:
In the Title field, enter a title for the item.
In the Content field, enter the text or HTML you want to use for that item.
6. Click Continue.
Domains
The next step in the Design Wizard is to customize your domain landing page by selecting the image you’d like to appear here. You can either use one of the ones provided, or upload your own graphic.

Designing Your Reseller Storefront 22
To Select a Main Image
1. From the Design & Layout menu, select Design Wizard.
2. Click Domains.
3. To use one of the provided images, click Back or Next to scroll through the images.
4. To upload your own image, click Browse, select the image you want to upload, then click Upload.
5. Click Continue.
Header
You can display your company name or logo in the header on every page of your store-front. The header of your reseller storefront makes a statement about your site, so cus-tomize your header with your colors, your logo, and your name, and even a link!
Your image should be 112x88 pixels in size. Animated GIFs are currently not supported.

Designing Your Reseller Storefront 23
To Customize Your Header
1. From the Design & Layout menu, select Design Wizard.
2. Click Header.
3. Select a background color.
4. In the Enter URL Link field, to link your header to a Web site, enter the full URL.
5. Select a header type:
Text
Uses your company display name as a header. Select a text color, then select a text font from the list.
Graphic
Uses a custom image as a header. Click Browse to locate and select your graphic, then click Upload.
Custom Text/HTML
Uses custom text/HTML as a header. In the Select Custom Text field, enter your custom HTML or text.
SWF
Custom images must be 780 pixels in width or smaller, and in .jpg or .gif format.
Only certain HTML tags are allowed in the header. The list is displayed just above the Select Custom Text field.

Designing Your Reseller Storefront 24
Uses a SWF file as a header. In the Width and Height fields, enter a width and height for your SWF file, click Browse to locate and select your SWF file, then click Upload.
Animated GIF
Uses an animated GIF file as a header. Click Browse to locate and select your ani-mated GIF, then click Upload.
6. Click Continue.
Menu Bar
Along with the header and footer of your reseller storefront, you can also customize the navigation menu bar to create a coordinated look.
Menu Bar
To Customize Your Menu Bar
1. From the Design & Layout menu, select Design Wizard.
2. Click Menu Bar.
3. Expand the Customize Menu Bar section.
4. Select the Menu Bar Color you want to use.
Custom images must be 780 pixels in width or smaller.
You can further customize your color sections by either clicking the Color Palette icon and selecting a color, or by entering a hexadecimal color code.
Designing Your Reseller Storefront 25
Custom Links
To Set Custom Links
1. From the Design & Layout menu, select Design Wizard.
2. Click Menu Bar.
3. Expand the Set Custom Links section.
4. In the Custom Link Text field, enter the text you want displayed in the lower portion of the Menu Bar. (Do not enter HTML here.)
5. In the Custom Link URL field, enter the full URL for your link.
6. If you are not planning on using the provided home page, in the Custom Home URL field, enter the full URL of your custom home page.
7. Click Continue.
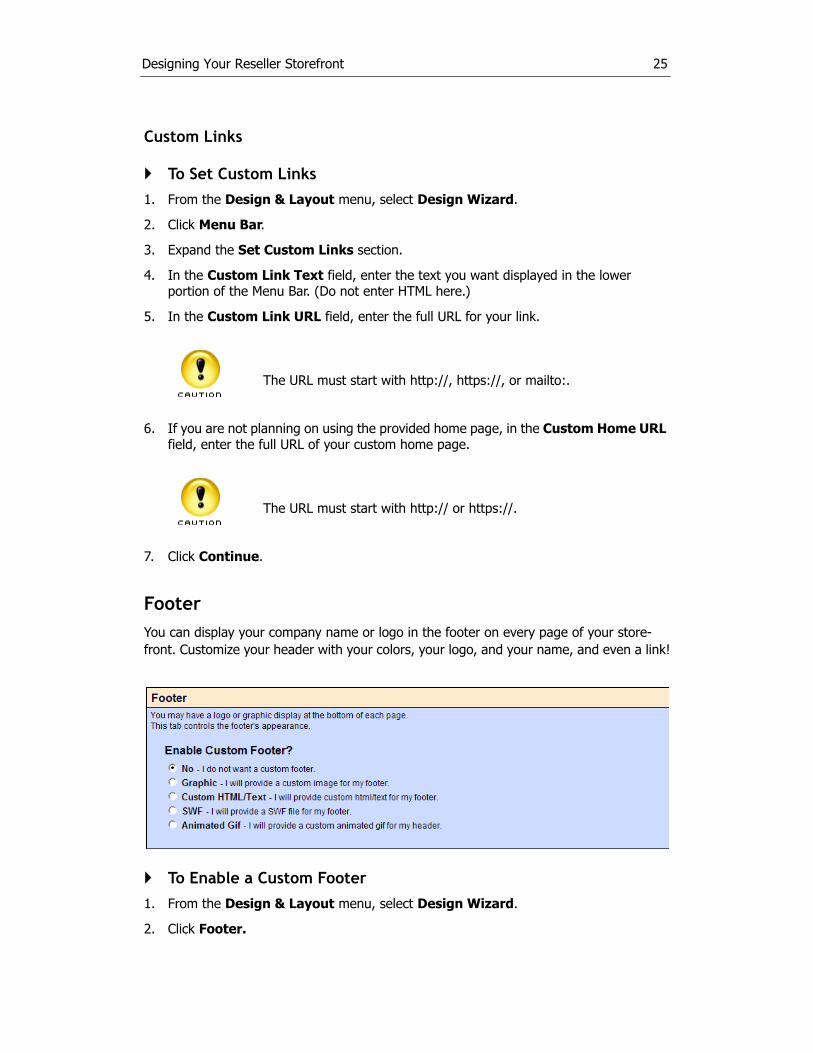
Footer
You can display your company name or logo in the footer on every page of your store-front. Customize your header with your colors, your logo, and your name, and even a link!
To Enable a Custom Footer
1. From the Design & Layout menu, select Design Wizard.
2. Click Footer.
The URL must start with http://, https://, or mailto:.
The URL must start with http:// or https://.

Designing Your Reseller Storefront 26
3. Select a background color.
4. In the Enter URL Link field, to link your footer to a Web site, enter the full URL.
5. Select a footer type:
Text
Uses your company display name as a footer. Select a text color, then select a text font from the list.
Graphic
Uses a custom image as a footer. Click Browse to locate and select your graphic, then click Upload.
Custom Text/HTML
Uses custom text/HTML as a footer. In the Select Custom Text field, enter your custom HTML or text.
SWF
Uses a SWF file as a footer. In the Width and Height fields, enter a width and height for your SWF file, click Browse to locate and select your SWF file, then click Upload.
Animated GIF
Uses an animated GIF file as a footer. Click Browse to locate and select your ani-mated GIF, then click Upload.
6. Click Continue.
Logo
Your logo is often the most immediately noticed and/or recognized part of your company’s total image. Now you can add your logo not only to your storefront, but also to the appli-cations that your customers purchase through your storefront (such as Web-based Email).
Custom images must be 780 pixels in width or smaller, and in .jpg or .gif format.
Only certain HTML tags are allowed in the footer. The list is dis-played just above the Select Custom Text field.
Custom images must be 780 pixels in width or smaller.

Designing Your Reseller Storefront 27
To Customize Your Storefront’s Logo
1. From the Design & Layout menu, select Design Wizard.
2. Click Logo.
3. To locate the graphic file for your logo, click Browse.
4. Select the file, then click Upload.
5. To preview the changes you’ve made to your reseller storefront, click Preview Changes. If you’re satisfied, click Go Live.
CUSTOMIZING YOUR RESELLER PLANYou’ve designed your storefront, and now it’s time to decide what specific products and services you’re going to offer, how much you’re going to charge, and the support options for your customers.
Company Info Page
As part of your reseller storefront, you can create a page containing information such as your company’s contact information, and a description of your company.
When uploading your logo, it should be sized to 160x68 pixels or less, and must be in either .jpg or .gif format.

Designing Your Reseller Storefront 28
To Create a Company Info Page
1. From the Design & Layout menu, select Company Info Page.
2. To add a free Company Info page to your storefront, check the box next to Yes!.
3. In the Company Description field, enter your description, or click Use Default. This field supports both text and HTML.
4. To use the default contact information for your Company Info page, check the box.
5. Click Apply.
Receipt Info
Part of your reseller storefront’s image includes your receipt information. You can cus-tomize the appearance of the receipts that your customers receive upon completing pur-chases through your storefront. Also, receipt information is a great way to monitor conversion tracking (how many people visit your site from a given source and actually make purchases).
To Customize Your Receipt Info
1. From the Design & Layout menu, select Receipt Info Page.
2. To enable conversion tracking for your customers’ order confirmation pages, check the boxes next to any or all of the following:
Google AdWord Conversions
Yahoo!/Overture Conversions
MSN adCenter Conversions

Designing Your Reseller Storefront 29
3. Select the receipt information you want to use:
Default Receipt
Custom Message
Custom Text
4. Click Apply.
Custom Product Offerings
These next two sections take you through selecting individual products and services to sell through your storefront, how to set individual pricing, and feature add-ons with your product offerings.
Selecting Products
The product offerings are divided into two sections - top level domains, or TLDs (such as .com, .net, .org, etc), and then products and services. Here, you’ll also choose what free products you want to make available when customers purchase domains, default domain registration length, as well as choosing if you’d like to opt in to new products and services as they’re made available.

Designing Your Reseller Storefront 30
To Add Top Level Domains to Your Product Portfolio
1. From the Products & Pricing menu, select Product Offerings.
2. Check the boxes for the domain TLDs you want to make available for sale and/or transfer.
3. Click on a link to set pricing for that TLD.
4. Check the boxes for the items you want to offer free with each purchased domain.
5. Click Apply.
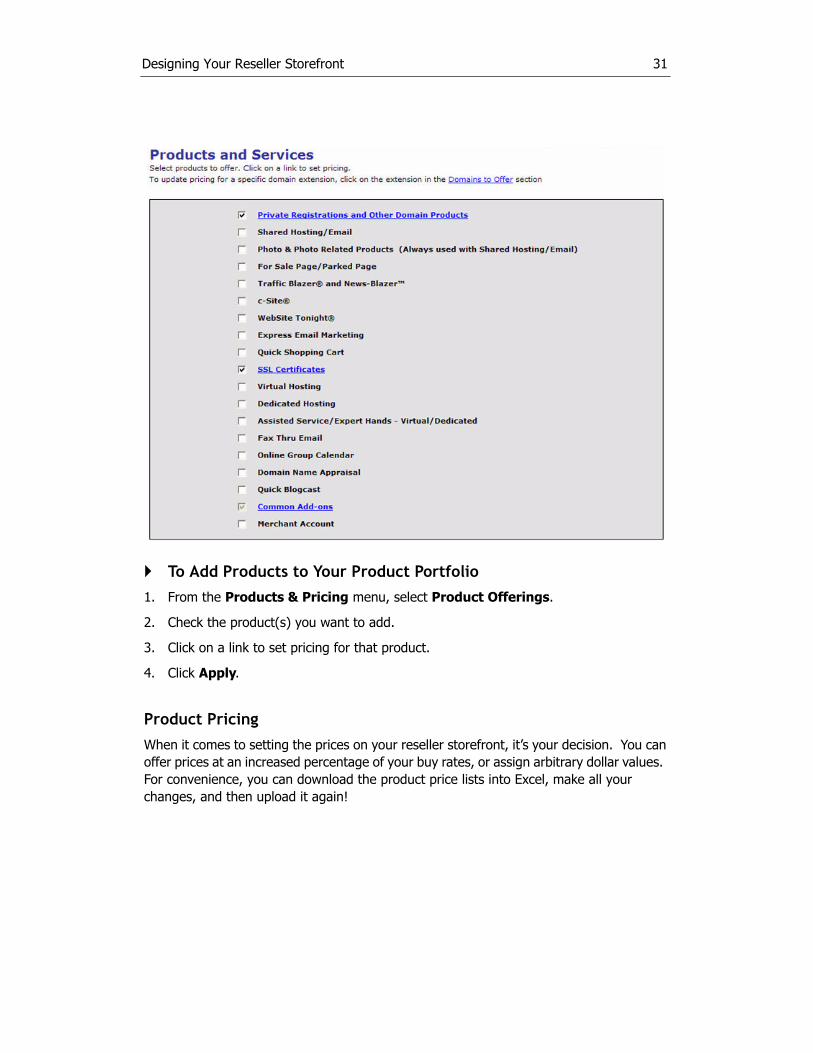
In addition to the many domains you can sell, there are a variety of products and services that you can offer. You can customize your storefront to include all products or only those that you want to sell.
Designing Your Reseller Storefront 31
To Add Products to Your Product Portfolio
1. From the Products & Pricing menu, select Product Offerings.
2. Check the product(s) you want to add.
3. Click on a link to set pricing for that product.
4. Click Apply.
Product Pricing
When it comes to setting the prices on your reseller storefront, it’s your decision. You can offer prices at an increased percentage of your buy rates, or assign arbitrary dollar values. For convenience, you can download the product price lists into Excel, make all your changes, and then upload it again!

Designing Your Reseller Storefront 32
To Change the Pricing on a Product
1. From the Products & Pricing menu, select Product Offerings.
2. Click on the product whose pricing you want to adjust.
3. Enter the desired price and click Apply.
4. Click Save to confirm all your storefront settings.
Current Promotions
To increase sales, boost commissions and customer loyalty, and improve your client base, take advantage of the Current Promotions options. Here, you can set starting and ending dates, decide which promotion(s) you’d like to offer, and even link them to Marketing Source Codes (which allow you to track which promotions are most popular).
When setting your pricing, you can also download the price list to Excel, make your modifications, then re-upload the file. See the graphic below to view the Import/Export option.

Designing Your Reseller Storefront 33
To View Current Promotions
1. From the Products & Pricing menu, select Current Promotions.
2. Check the boxes for the promotion(s) you want to offer.
Merchant Accounts
To begin offering merchant accounts to your reseller customers, you’re required to com-plete the merchant account sign-up wizard. There’s no additional cost, and you’ll be paid directly by FastTransact on a monthly basis.
To Offer Merchant Accounts
1. From the Products & Pricing menu, select Merchant Accounts.
2. Click the Sign Up with FastTransact link, and proceed through the steps to configure your merchant account settings.

As you build your reseller storefront’s client base, reports are available to you for a variety of things, including tracking your commission, monitoring product sales, assessing renew-als, and more.
Commission Reports
An important part of your reseller plan is earning commission on your storefront’s sales. The commission report allows you to see how much you’ve earned from your storefront.
To View Commission Reports
1. From the My Reports menu, select Commission Report.
2. In the Start field, enter the starting date for your report. (If necessary, click the Calendar icon to open a separate popup window with a calendar, then select the starting date.)
3. In the End field, enter the ending date for your report. (If necessary, click the Calendar icon to open a separate popup window with a calendar, then select the ending date.)
4. Click Go.
Sales Reports
Customer sales reports show you which customers are purchasing, and how much they’re spending. You can narrow it down by product type, customer type, and order type.
Product sales reports are available as well, and allow you the additional option of compar-ing two separate sales periods.
Two other reports available are renewal reports (which show what customers are renew-ing which products), and refund reports (which products customers have cancelled).
5. Working with Reports
You can also display a printer-friendly version by clicking Dis-play Printable Version.
Working with Reports 35
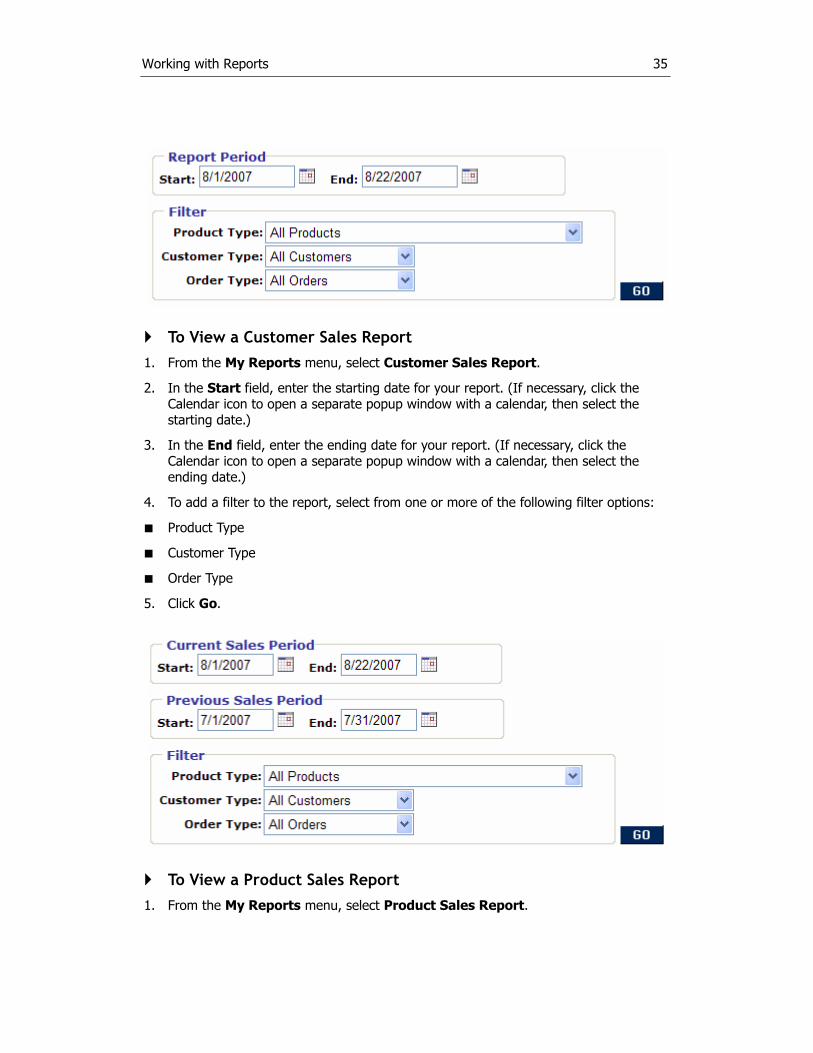
To View a Customer Sales Report
1. From the My Reports menu, select Customer Sales Report.
2. In the Start field, enter the starting date for your report. (If necessary, click the Calendar icon to open a separate popup window with a calendar, then select the starting date.)
3. In the End field, enter the ending date for your report. (If necessary, click the Calendar icon to open a separate popup window with a calendar, then select the ending date.)
4. To add a filter to the report, select from one or more of the following filter options:
Product Type
Customer Type
Order Type
5. Click Go.
To View a Product Sales Report
1. From the My Reports menu, select Product Sales Report.

Working with Reports 36
2. Under Current Sales Period, in the Start field, enter the starting date for your report. (If necessary, click the Calendar icon to open a separate popup window with a calendar, then select the starting date.)
3. Under Current Sales Period, in the End field, enter the ending date for your report. (If necessary, click the Calendar icon to open a separate popup window with a calendar, then select the ending date.)
4. To compare one sales period with another, in the Start and End fields under the Previous Sales Period heading, enter a different set of starting and ending dates.
5. To add a filter to the report, select from one or more of the following filter options:
Product Type
Customer Type
Order Type
6. Click Go.
To View a Renewal Report
1. From the My Reports menu, select Renewal Report.
2. In the Start field, enter the starting date for your report. (If necessary, click the Calendar icon to open a separate popup window with a calendar, then select the starting date.)
3. In the End field, enter the starting date for your report. (If necessary, click the Calendar icon to open a separate popup window with a calendar, then select the ending date.)
4. Click Go.
To View a Refund Report
1. From the My Reports menu, select Refund Report.
2. In the Start field, enter the starting date for your report. (If necessary, click the Calendar icon to open a separate popup window with a calendar, then select the starting date.)
3. In the End field, enter the ending date for your report. (If necessary, click the Calendar icon to open a separate popup window with a calendar, then select the ending date.)
4. Click Go.

Working with Reports 37
Domain Lookup
The Domain Lookup tool allows you to search domains to see which customer has regis-tered the domain name.
To Use Domain Lookup
1. From the My Reports menu, select Domain Lookup.
2. In the Domain Name field, enter the first part of the domain name you want to look for (for example, coolexample.com).
3. From the dropdown menu, select the TLD you want to look for.
4. Click Go.
Domain Registration
The Domain Registration Details allow you to select a report period, and view which domains have been registered during that time.
To View Domain Registration Details
1. From the My Reports menu, select Domain Registrations.
2. In the Start field, enter the starting date for your report. (If necessary, click the Calendar icon to open a separate popup window with a calendar, then select the starting date.)
3. In the End field, enter the ending date for your report. (If necessary, click the Calendar icon to open a separate popup window with a calendar, then select the ending date.)
4. Click Go.
Pending Transfer Report
When customers purchase transfer orders, you can see what domain transfer was ordered, when the transfer was initiated, and its current transfer status.
To View Pending Transfers
From the My Reports menu, select Domain Registrations.

Working with Reports 38
Marketing Source Code Reports
Part of marketing your reseller storefront is tracking the response from certain sources. By using marketing source codes, you can see where your customers are coming from, which campaign they’re following, and how many hits each campaign is drawing.
To View Marketing Source Code Reports
1. From the My Reports menu, select Marketing Source Codes Report.
2. From the Report dropdown menu, select the type of report.
3. In the Start field, enter the starting date for your report. (If necessary, click the Calendar icon to open a separate popup window with a calendar, then select the starting date.)
4. In the End field, enter the ending date for your report. (If necessary, click the Calendar icon to open a separate popup window with a calendar, then select the ending date.)
5. From the Vendor dropdown menu, select a vendor.
6. From the Campaign dropdown menu, select a campaign.
7. From the Source Code dropdown menu, select a source code.
8. Click Go.

There are many resources and marketing tools for promoting your reseller storefront.
INTERNAL MARKETING RESOURCESWe put you in contact with other resellers to share ideas and openly discuss what works.
Email Marketing
We can send promotional email messages on your behalf and with your branding, so that the messages appear to be sent from your storefront. Your customers will learn about new products or special promotions and you don’t have to do a thing.
Each time we send a marketing email, we’ll let you know the details and provide the source code so you can measure results.
To Opt in to Email Marketing
1. Log in to your account at www.resellercontrolcenter.com.
2. From the Marketing Tools menu, select Marketing Emails.
3. On the Email Marketing page, select the checkbox to automatically opt in and click Apply.
Marketing Source Codes
Marketing Source Codes allow you to track the origins of traffic to your site, as well as purchases made on your site.
You can create your own Marketing Source Codes for use with your various ads. When vis-itors click on those ads to arrive at your site, the source code recognizes the ad they clicked on.
6. Marketing Your Reseller Storefront

Marketing Your Reseller Storefront 40
To Set Up Marketing Source Codes
1. Log in to your account at www.resellercontrolcenter.com.
2. From the Marketing Tools menu, select Marketing Source Codes.
3. Expand the Advertising Vendors section.
4. Enter the vendor’s name and description, and then click Apply.
5. Expand the Advertising Campaigns section.
6. Enter the campaign’s name and description, and then click Apply.
7. Expand the Advertising Codes section.
8. Enter the source code you want to use, its description.
9. Assign the source code to a campaign and vendor, and then click Apply.
Express Email Marketing
Express Email Marketing is an online service that helps you connect with your customers through permission-based email marketing. Express Email Marketing helps you build and maintain a 100% permission-based subscriber list, nurture customer relationships, and grow your business through the scheduled delivery of email newsletters, announcements, promotions, and other targeted email campaigns.
Express Email Marketing is already connected to your customer list, and can be used with the Marketing Source Codes available to you.
To Set Up Express Email Marketing
1. Log in to your account at www.resellercontrolcenter.com.
2. From the Marketing Tools menu, select Express Email Marketing.
3. Click the How to Synchronize hyperlink.
Press Releases
Press Releases are used by businesses to bring attention to new products or changes that they want to make public. With the help of the Internet, even small businesses can now use press releases to send promotions for free or at minimal prices.
Through the Reseller Control Center, you can download prewritten press releases to send as your own. Simply enter your business information in the designated areas and send it out.
To access the press release templates, get tips on writing your own successful press releases, and find examples of PR services, go to Marketing Tools>Press Releases.

Marketing Your Reseller Storefront 41
Newsletters/Announcements
Every month, a new eSeller Newsletter is posted in the Reseller Control Center. Newslet-ters contain updates and new information pertaining to your reseller storefront.
Announcements are periodically posted for updates or new email marketing templates.
You can view current and past newsletters and announcements in the Reseller Control Center by going to Marketing Tools>Newsletters/Announcements.
Reseller Roundup Blog and Forum
Reseller Roundup Blog
The Reseller Roundup Blog offers in-depth articles on marketing, price testing, promotions and special offers, how to use your free software, and more. The blog provides you with an environment to communicate directly with the reseller support and design team.
You can read helpful information, ask questions and get answers, express concerns or needs, and read other resellers’ comments.
To access the Reseller Roundup Blog from the Reseller Control Center, go to Marketing Tools>Reseller Roundup Blog.
Reseller Roundup Forum
Similar to a bulletin board, the Reseller Roundup Forum is a Web site where members can start discussion threads on topics related to the reseller community. You can browse the many messages already posted or start your own message thread on a specific topic.
The Reseller Roundup Forum is packed with useful information and tips for resellers. To get started using the forum, from the Reseller Control Center, go to Marketing Tools>Reseller Roundup Forum.
Live Chat
Get the most up-to-date reseller information and tips every week. Join our resident reseller gurus, fellow resellers, and other guests in a live chat.
You can ask questions, get tips and advice, and test your marketing ideas on new and experienced resellers.
Check in the Reseller Control Center for current dates and times to tune in or review past logs. In your account, go to Marketing Tools>Live Chat.

Marketing Your Reseller Storefront 42
OTHER MARKETING RESOURCESThere are a number of outside resources that you can use to promote your Web site. We provide information about several of your options, but there are many others out there.
Traffic Facts
Track traffic to your Web site by configuring Traffic Facts with your reseller account. You can use the traffic results to target the audience to which you advertise.
To Configure Traffic Facts
1. In the Reseller Control Center, from the My Settings menu, select Traffic Facts.
2. In the Login field, enter the login name you want to use to access your Traffic Facts account.
3. In the Password and Confirm Password fields, enter the password you want to use to access your Traffic Facts account.
4. Select Enable Traffic Facts.
We automatically update your sales site with the Traffic Facts code. You can copy and paste the Custom Storefront Code into any other HTML pages you want to track. We rec-ommend adding the code to the header or footer of your Web site.
Google® Analytics/AdWords®
Google® Analytics
This free service enables you to track your Web site visitors and interactions. The informa-tion you gather can help you gear your marketing campaigns and storefront towards your customers. Google® Analytics statistics are available in a number of easy-to-use formats.
To Enable Google® Analytics
1. In the Reseller Control Center, from the Marketing Tools menu, select Google Analytics/AdWords.
2. Select Enable Google Analytics.
3. Click Apply.
Google® AdWords
Google® AdWords allows you to create ads and have them promoted on Google®. You can use keywords to target a specific audience. You only pay for the Adwords service when someone clicks on your ads.

Marketing Your Reseller Storefront 43
For more information, see the Google® Analytics/AdWords section in your Reseller Con-trol Center.
To sign up for Google® AdWords, you need to go directly to the Google® site.
Forums
The domain and hosting reseller industry is always on the move and very competitive. It is important that you stay on top of things. One way to do that is to read and participate in forums. Discussion forums link you to affiliates and provide information on the latest news and trends of the industry.
For more information on forums, see the Forums section under Marketing Tools in your Reseller Control Center.
Banner Ads and Links
You can provide banner ads and links that other sites can post to direct users to your storefront. Upload your ads and links now, so visitors to your site can start sending cus-tomers your way.
To Use Banner Ads and HTML Links
1. In the Reseller Control Center, from the Marketing Tools menu, select Upload Banner Ads & Links.
2. Select Enable ‘Link to Us’ option in your site footer.
3. Upload your images or enter HTML text.
4. Preview changes and click Apply.
Affiliate Programs
An affiliate program is a site that directs people to your site through specific links that generate commissions for any sales they help you get. Many successful Web stores use affiliate sites to generate sales and promote their sites.
All you have to do is select an affiliate provider, launch your program, and they’ll handle the technical and financial aspects of all sales.
Once you set up your affiliate program, simply enter the tracking URL in the Affiliate Program Tracking URL Parameter Data field, and then click Apply.
For more information on affiliate programs, see the Affiliate Programs section under Marketing Tools.

Marketing Your Reseller Storefront 44
GETTING HELPIn addition to the resources mentioned above, there are other ways you can get help regarding your reseller plan.
Reseller Control Center FAQ
To Access the Reseller Control Center FAQ
1. Log in to your reseller account at www.resellercontrolcenter.com.
2. From the Support menu, select FAQs.
Now start reselling!


![Skaffold - storage.googleapis.com · [getting-started getting-started] Hello world! [getting-started getting-started] Hello world! [getting-started getting-started] Hello world! 5](https://img.pdfslide.us/doc/110x75/5ec939f2a76a033f091c5ac7/skaffold-getting-started-getting-started-hello-world-getting-started-getting-started.jpg)