Embed Size (px)
Citation preview
Getting Started
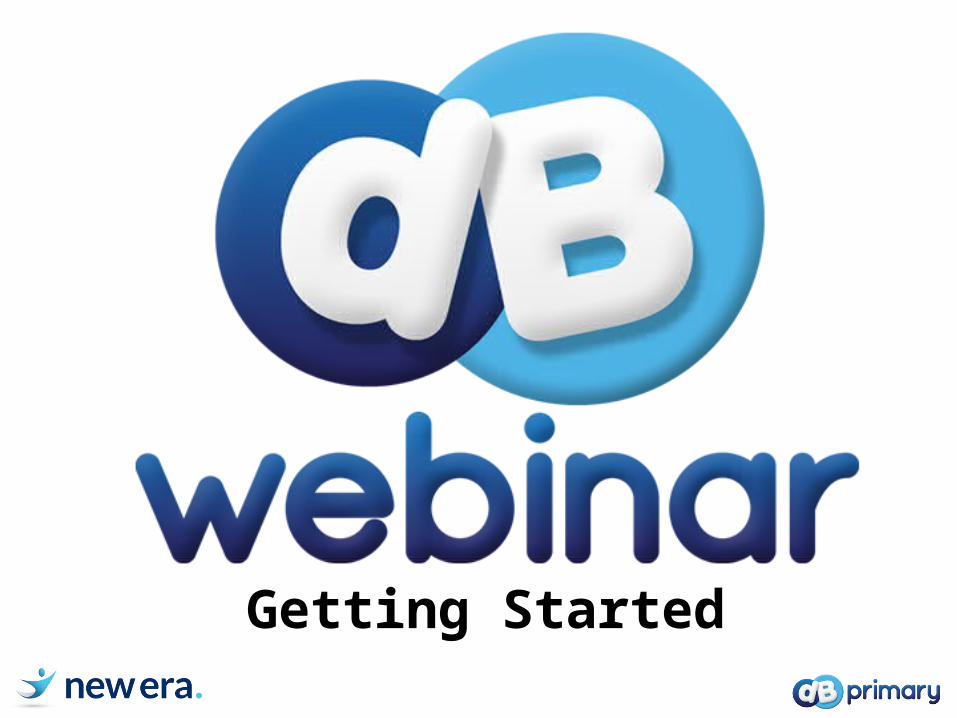
Objectives that will be covered:
1.Homepage walkthrough.2.Setting up your class community3.Styling your class community 4.Adding in additional members to the community5.Changing the community to suit your Key Stage6.Why should I have a class community?
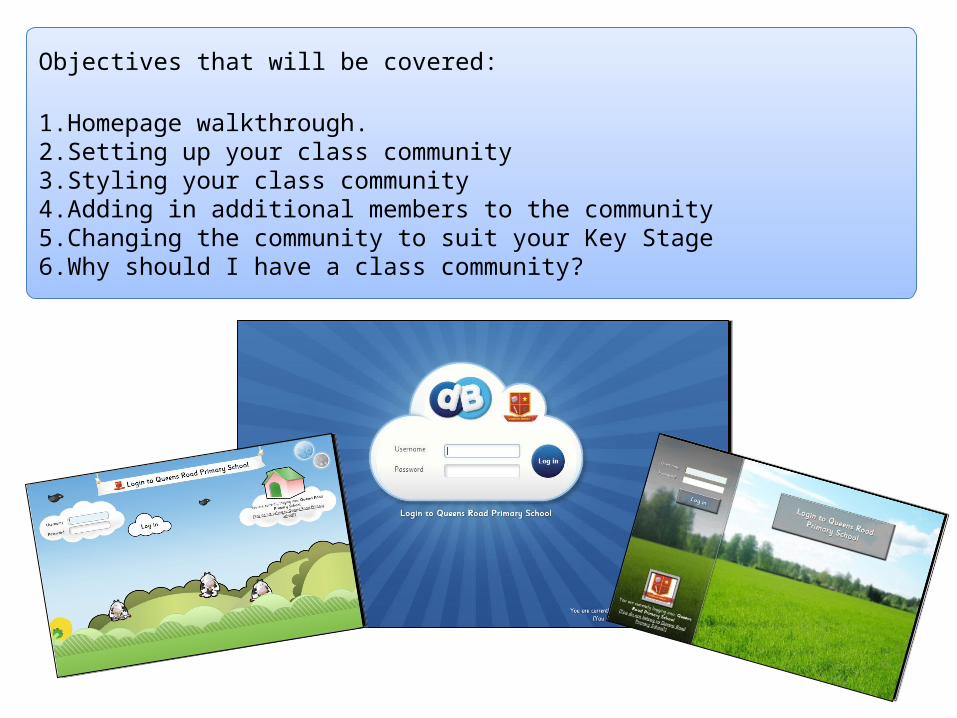
Objective 1: Homepage walkthrough
Quick Links PanelQuick Links Panel
NoticeboardNoticeboard
My ClassMy Class Class ActivityClass Activity
Tool barTool bar
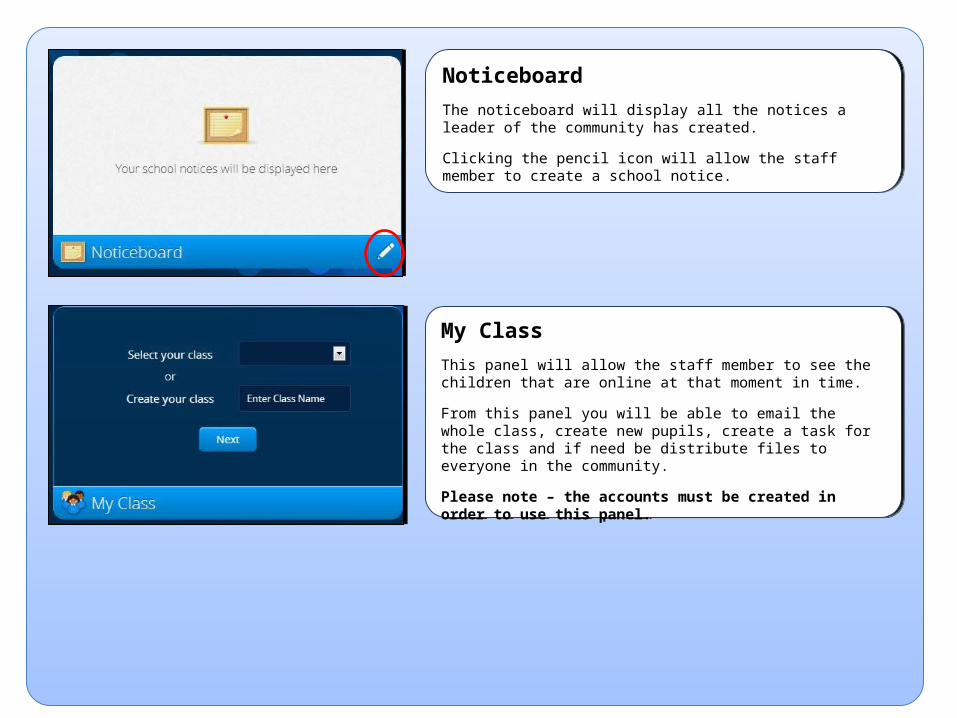
NoticeboardThe noticeboard will display all the notices a leader of the community has created.
Clicking the pencil icon will allow the staff member to create a school notice.
NoticeboardThe noticeboard will display all the notices a leader of the community has created.
Clicking the pencil icon will allow the staff member to create a school notice.
My ClassThis panel will allow the staff member to see the children that are online at that moment in time.
From this panel you will be able to email the whole class, create new pupils, create a task for the class and if need be distribute files to everyone in the community.
Please note – the accounts must be created in order to use this panel.
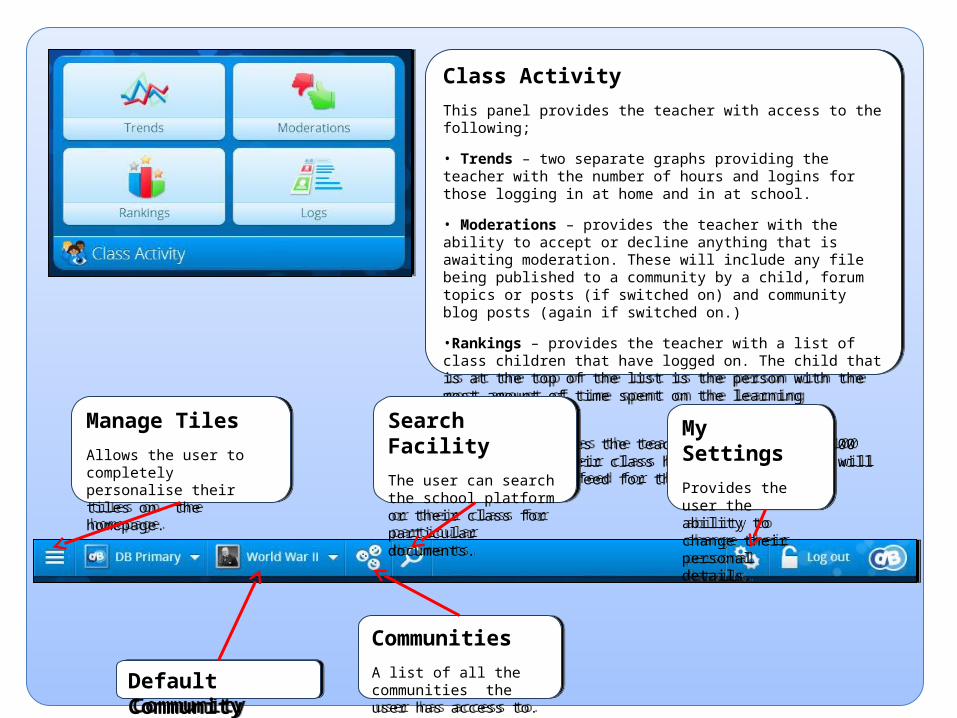
Class ActivityThis panel provides the teacher with access to the following;
• Trends – two separate graphs providing the teacher with the number of hours and logins for those logging in at home and in at school.
• Moderations – provides the teacher with the ability to accept or decline anything that is awaiting moderation. These will include any file being published to a community by a child, forum topics or posts (if switched on) and community blog posts (again if switched on.)
•Rankings – provides the teacher with a list of class children that have logged on. The child that is at the top of the list is the person with the most amount of time spent on the learning platform.
• Logs – Provides the teacher with the last 100 actions that their class has completed. This will provide a news feed for the teacher to their class.
Manage TilesAllows the user to completely personalise their tiles on the homepage.
Manage TilesAllows the user to completely personalise their tiles on the homepage.
Search FacilityThe user can search the school platform or their class for particular documents.
Search FacilityThe user can search the school platform or their class for particular documents.
My SettingsProvides the user the ability to change their personal details.
My SettingsProvides the user the ability to change their personal details.
Default CommunityDefault Community
CommunitiesA list of all the communities the user has access to.
CommunitiesA list of all the communities the user has access to.
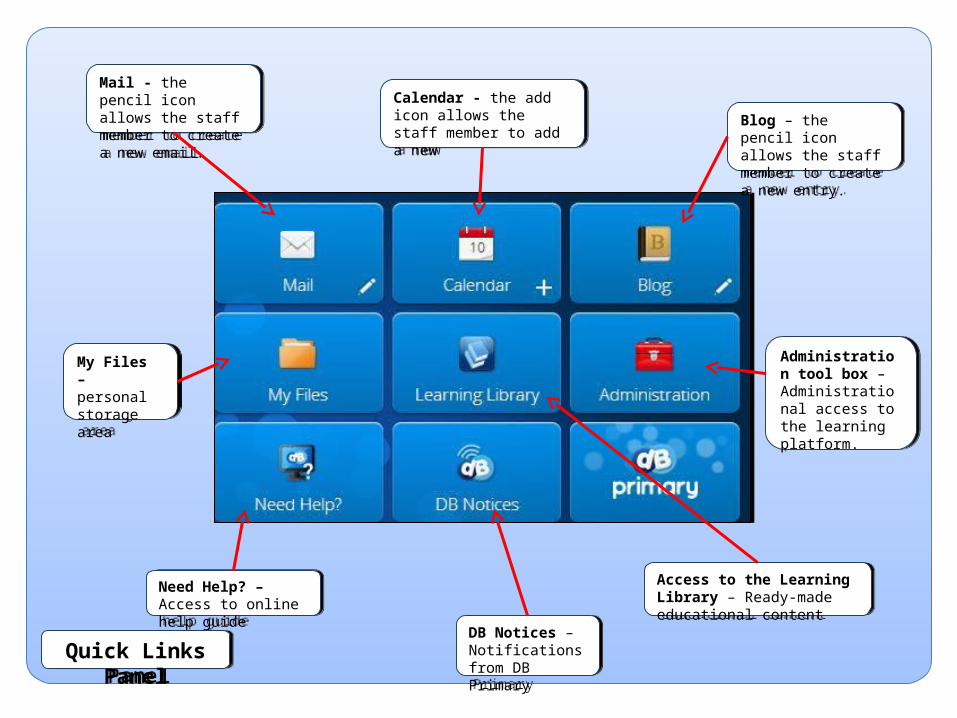
Blog – the pencil icon allows the staff member to create a new entry.
Blog – the pencil icon allows the staff member to create a new entry.
Mail - the pencil icon allows the staff member to create a new email.
Mail - the pencil icon allows the staff member to create a new email.
Calendar - the add icon allows the staff member to add a new
Calendar - the add icon allows the staff member to add a new
My Files – personal storage area
My Files – personal storage area
Administration tool box – Administrational access to the learning platform.
Administration tool box – Administrational access to the learning platform.
Access to the Learning Library – Ready-made educational content
Access to the Learning Library – Ready-made educational content
DB Notices – Notifications from DB Primary
DB Notices – Notifications from DB Primary
Need Help? – Access to online help guide
Need Help? – Access to online help guide
Quick Links PanelQuick Links Panel
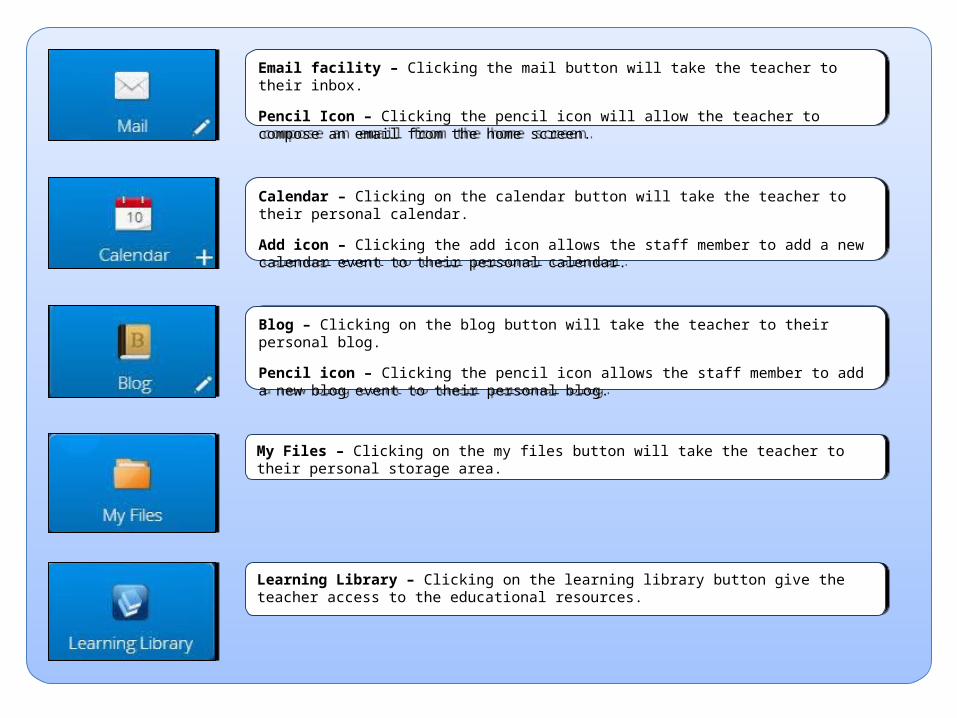
Email facility – Clicking the mail button will take the teacher to their inbox.
Pencil Icon – Clicking the pencil icon will allow the teacher to compose an email from the home screen.
Email facility – Clicking the mail button will take the teacher to their inbox.
Pencil Icon – Clicking the pencil icon will allow the teacher to compose an email from the home screen.
Calendar – Clicking on the calendar button will take the teacher to their personal calendar.
Add icon – Clicking the add icon allows the staff member to add a new calendar event to their personal calendar.
Calendar – Clicking on the calendar button will take the teacher to their personal calendar.
Add icon – Clicking the add icon allows the staff member to add a new calendar event to their personal calendar.
Blog – Clicking on the blog button will take the teacher to their personal blog.
Pencil icon – Clicking the pencil icon allows the staff member to add a new blog event to their personal blog.
Blog – Clicking on the blog button will take the teacher to their personal blog.
Pencil icon – Clicking the pencil icon allows the staff member to add a new blog event to their personal blog.
My Files – Clicking on the my files button will take the teacher to their personal storage area. My Files – Clicking on the my files button will take the teacher to their personal storage area.
Learning Library – Clicking on the learning library button give the teacher access to the educational resources.
Learning Library – Clicking on the learning library button give the teacher access to the educational resources.
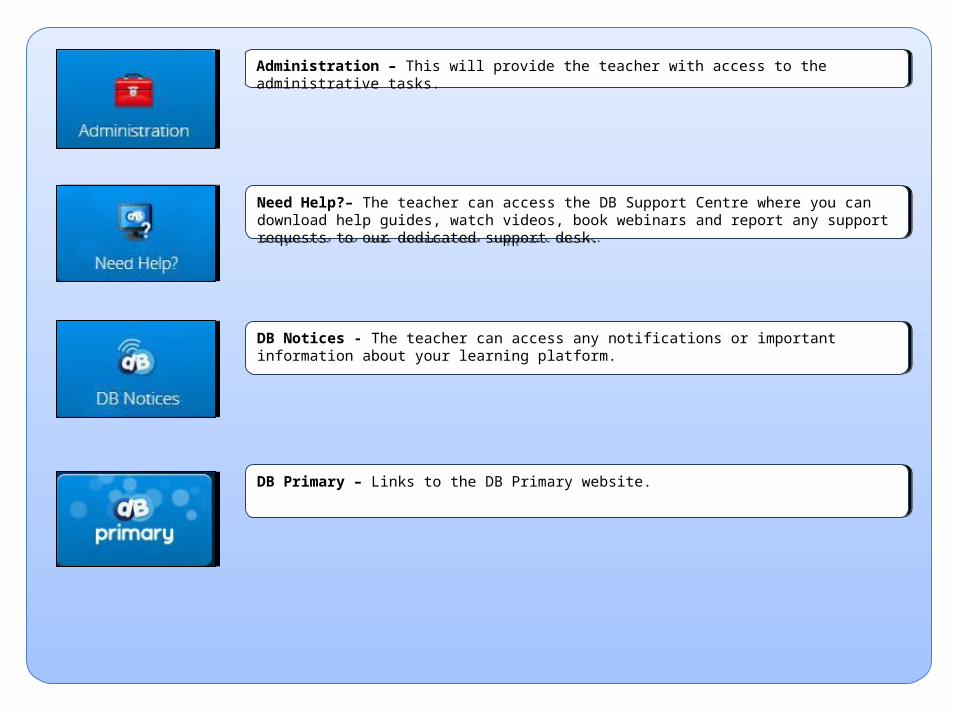
Administration – This will provide the teacher with access to the administrative tasks.Administration – This will provide the teacher with access to the administrative tasks.
Need Help?– The teacher can access the DB Support Centre where you can download help guides, watch videos, book webinars and report any support requests to our dedicated support desk.
Need Help?– The teacher can access the DB Support Centre where you can download help guides, watch videos, book webinars and report any support requests to our dedicated support desk.
DB Notices - The teacher can access any notifications or important information about your learning platform.
DB Notices - The teacher can access any notifications or important information about your learning platform.
DB Primary – Links to the DB Primary website.DB Primary – Links to the DB Primary website.
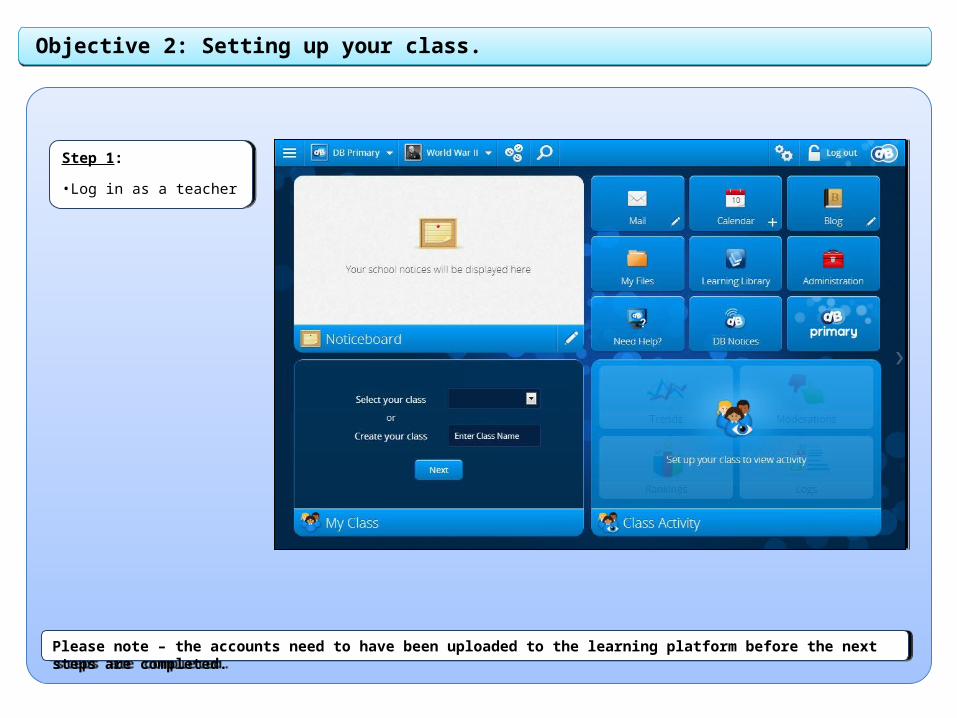
Step 1:
•Log in as a teacher
Step 1:
•Log in as a teacher
Objective 2: Setting up your class.
Please note – the accounts need to have been uploaded to the learning platform before the next steps are completed. Please note – the accounts need to have been uploaded to the learning platform before the next steps are completed.
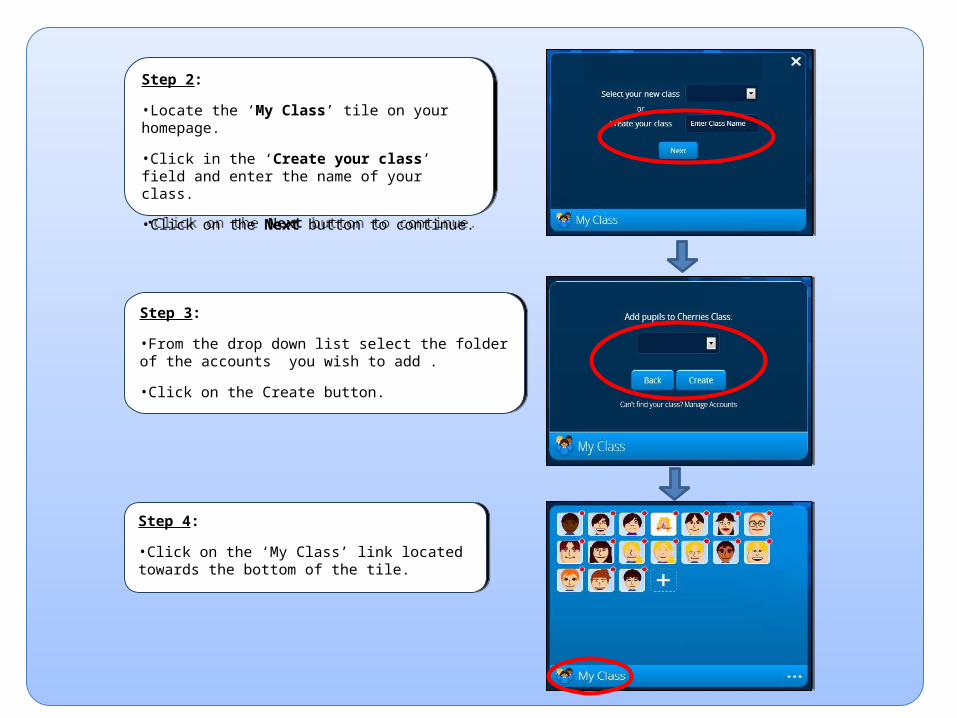
Step 2:
•Locate the ‘My Class’ tile on your homepage.
•Click in the ‘Create your class’ field and enter the name of your class.
•Click on the Next button to continue.
Step 2:
•Locate the ‘My Class’ tile on your homepage.
•Click in the ‘Create your class’ field and enter the name of your class.
•Click on the Next button to continue.
Step 3:
•From the drop down list select the folder of the accounts you wish to add .
•Click on the Create button.
Step 3:
•From the drop down list select the folder of the accounts you wish to add .
•Click on the Create button.
Step 4:
•Click on the ‘My Class’ link located towards the bottom of the tile.
Step 4:
•Click on the ‘My Class’ link located towards the bottom of the tile.
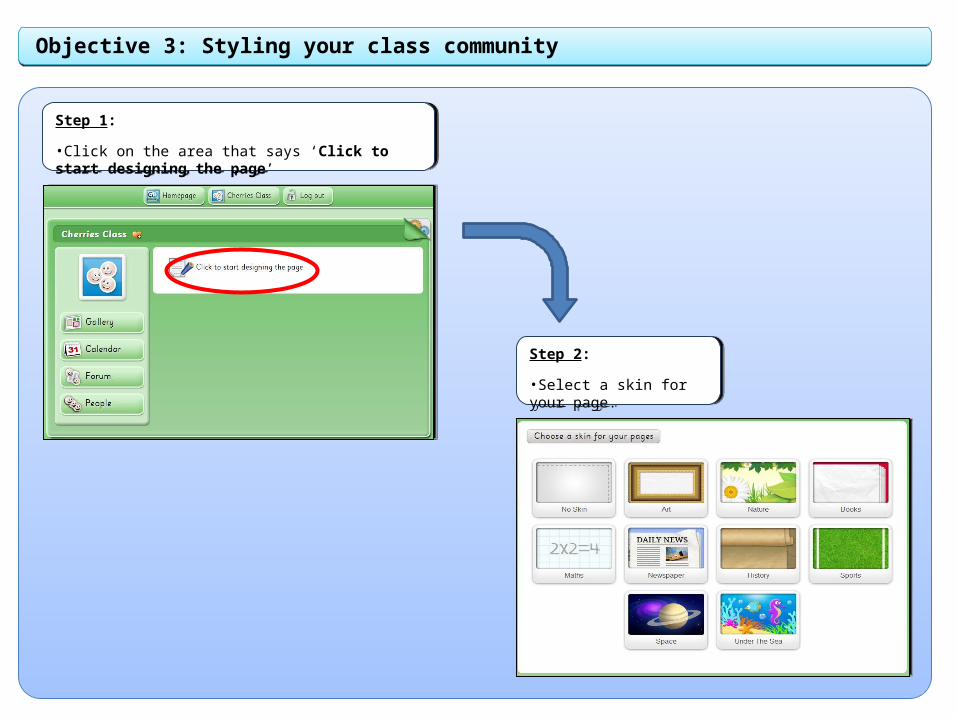
Step 1:
•Click on the area that says ‘Click to start designing the page’
Step 1:
•Click on the area that says ‘Click to start designing the page’
Objective 3: Styling your class community
Step 2:
•Select a skin for your page.
Step 2:
•Select a skin for your page.
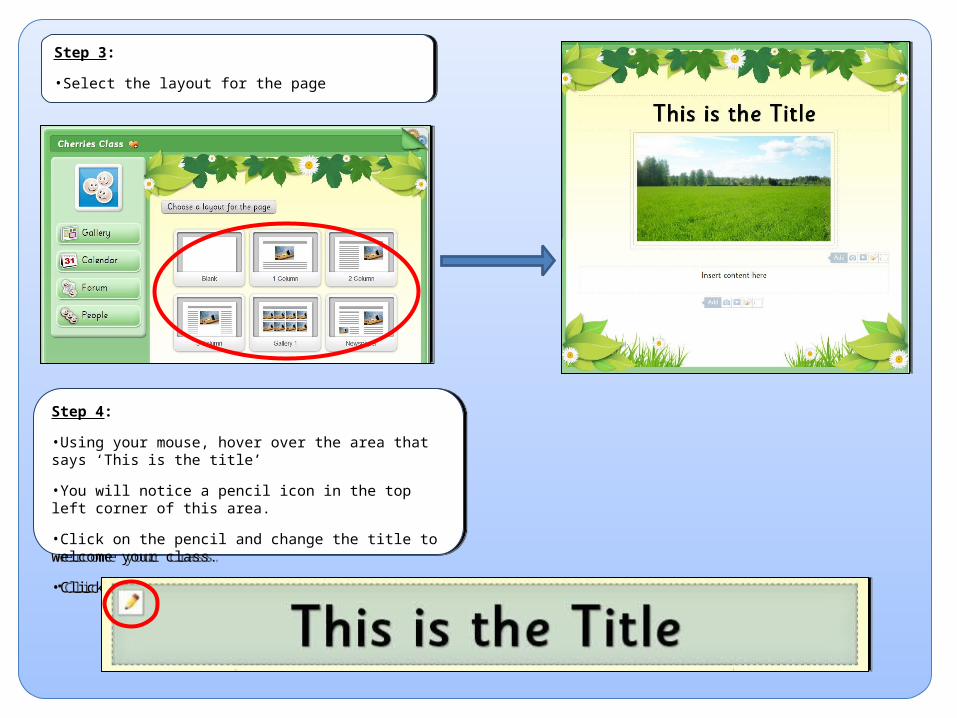
Step 3:
•Select the layout for the page
Step 3:
•Select the layout for the page
Step 4:
•Using your mouse, hover over the area that says ‘This is the title’
•You will notice a pencil icon in the top left corner of this area.
•Click on the pencil and change the title to welcome your class.
•Click outside of this title area.
Step 4:
•Using your mouse, hover over the area that says ‘This is the title’
•You will notice a pencil icon in the top left corner of this area.
•Click on the pencil and change the title to welcome your class.
•Click outside of this title area.
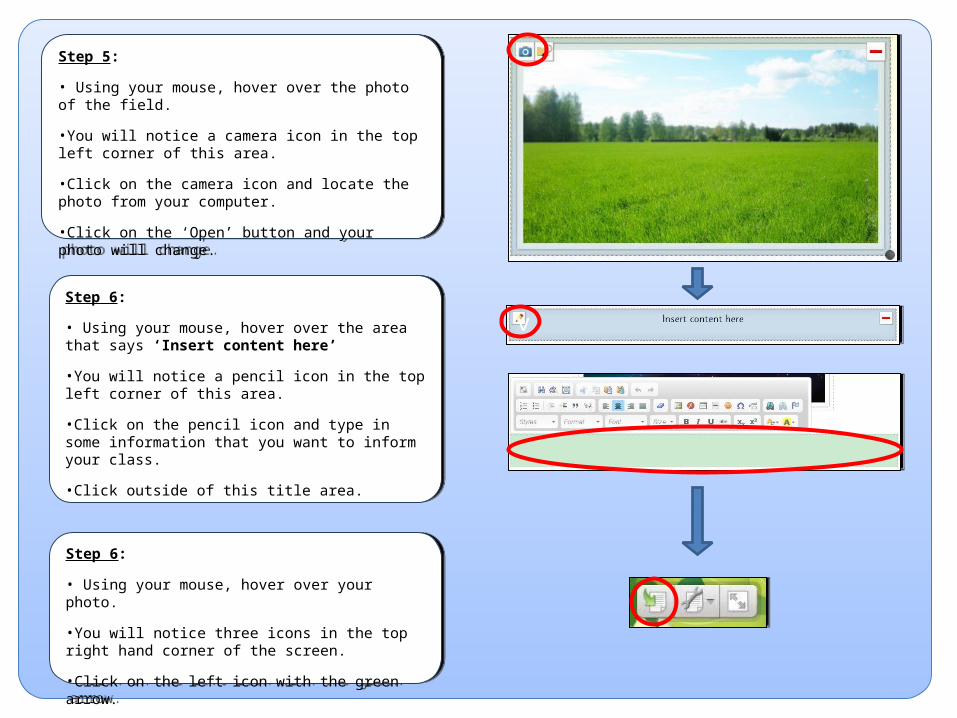
Step 5:
• Using your mouse, hover over the photo of the field.
•You will notice a camera icon in the top left corner of this area.
•Click on the camera icon and locate the photo from your computer.
•Click on the ‘Open’ button and your photo will change.
Step 5:
• Using your mouse, hover over the photo of the field.
•You will notice a camera icon in the top left corner of this area.
•Click on the camera icon and locate the photo from your computer.
•Click on the ‘Open’ button and your photo will change.
Step 6:
• Using your mouse, hover over the area that says ‘Insert content here’
•You will notice a pencil icon in the top left corner of this area.
•Click on the pencil icon and type in some information that you want to inform your class.
•Click outside of this title area.
Step 6:
• Using your mouse, hover over the area that says ‘Insert content here’
•You will notice a pencil icon in the top left corner of this area.
•Click on the pencil icon and type in some information that you want to inform your class.
•Click outside of this title area.
v
Step 6:
• Using your mouse, hover over your photo.
•You will notice three icons in the top right hand corner of the screen.
•Click on the left icon with the green arrow.
Step 6:
• Using your mouse, hover over your photo.
•You will notice three icons in the top right hand corner of the screen.
•Click on the left icon with the green arrow.
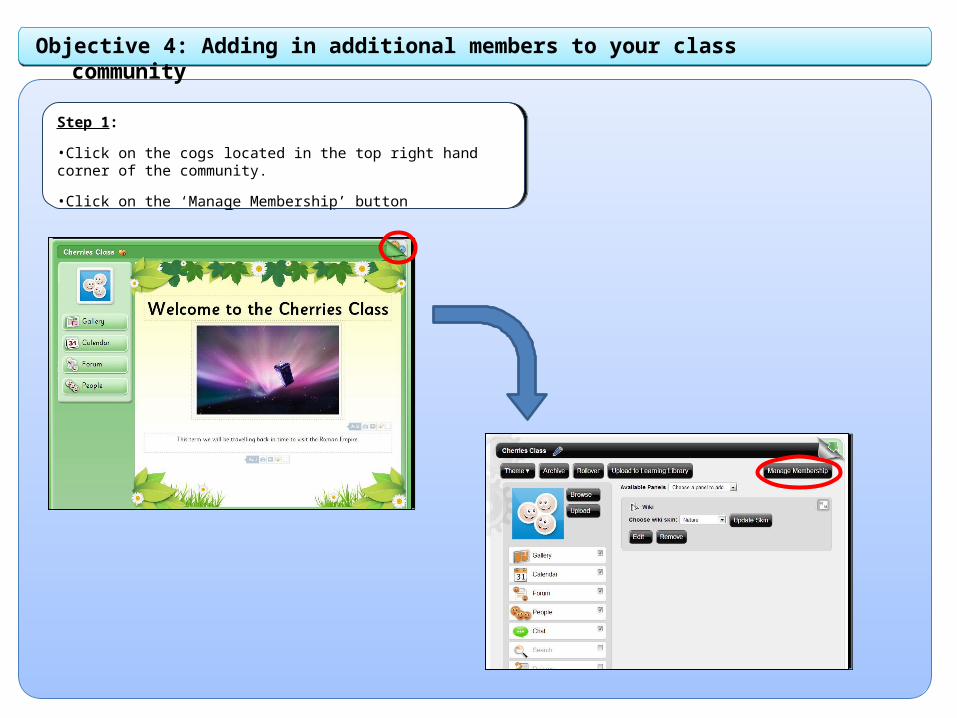
Objective 4: Adding in additional members to your class community
Step 1:
•Click on the cogs located in the top right hand corner of the community.
•Click on the ‘Manage Membership’ button
Step 1:
•Click on the cogs located in the top right hand corner of the community.
•Click on the ‘Manage Membership’ button
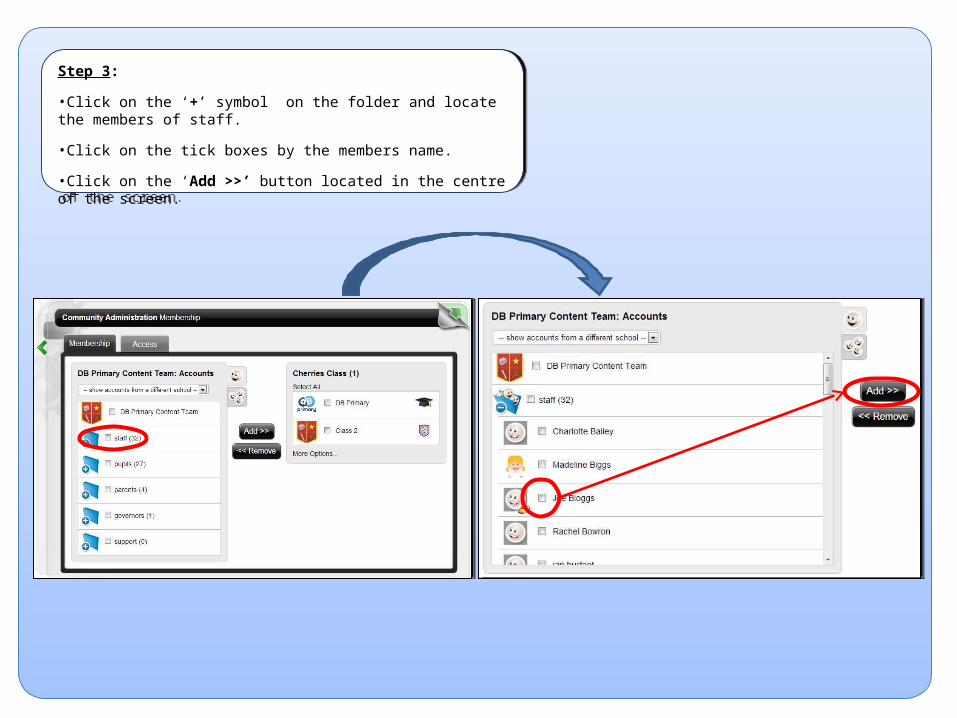
Step 3:
•Click on the ‘+’ symbol on the folder and locate the members of staff.
•Click on the tick boxes by the members name.
•Click on the ‘Add >>’ button located in the centre of the screen.
Step 3:
•Click on the ‘+’ symbol on the folder and locate the members of staff.
•Click on the tick boxes by the members name.
•Click on the ‘Add >>’ button located in the centre of the screen.
Objective 5: Changing the community to suit your Key Stage
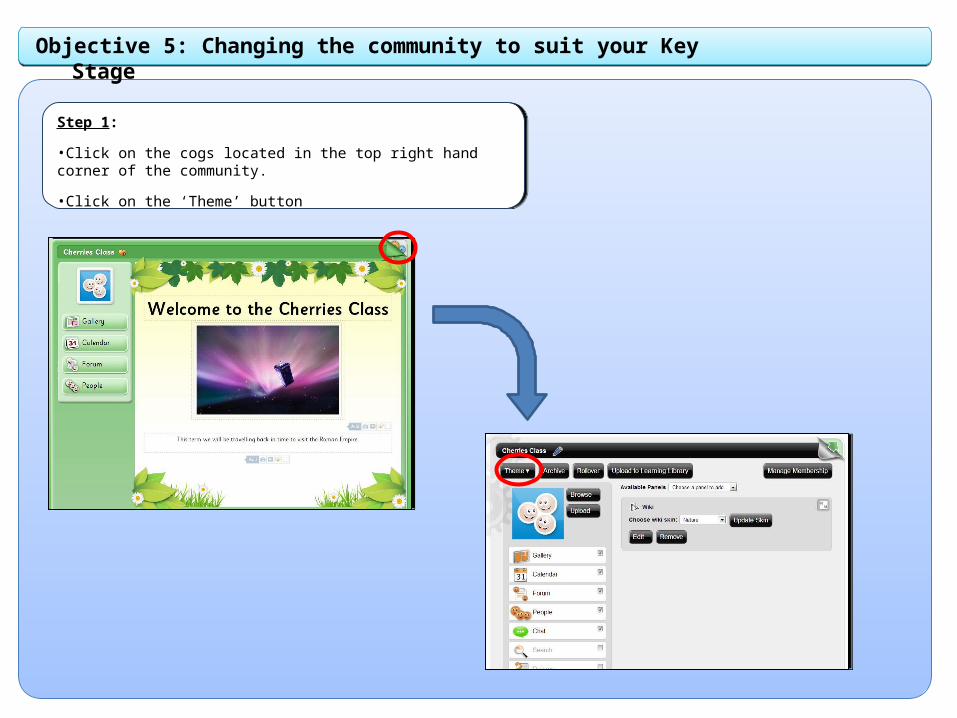
Step 1:
•Click on the cogs located in the top right hand corner of the community.
•Click on the ‘Theme’ button
Step 1:
•Click on the cogs located in the top right hand corner of the community.
•Click on the ‘Theme’ button
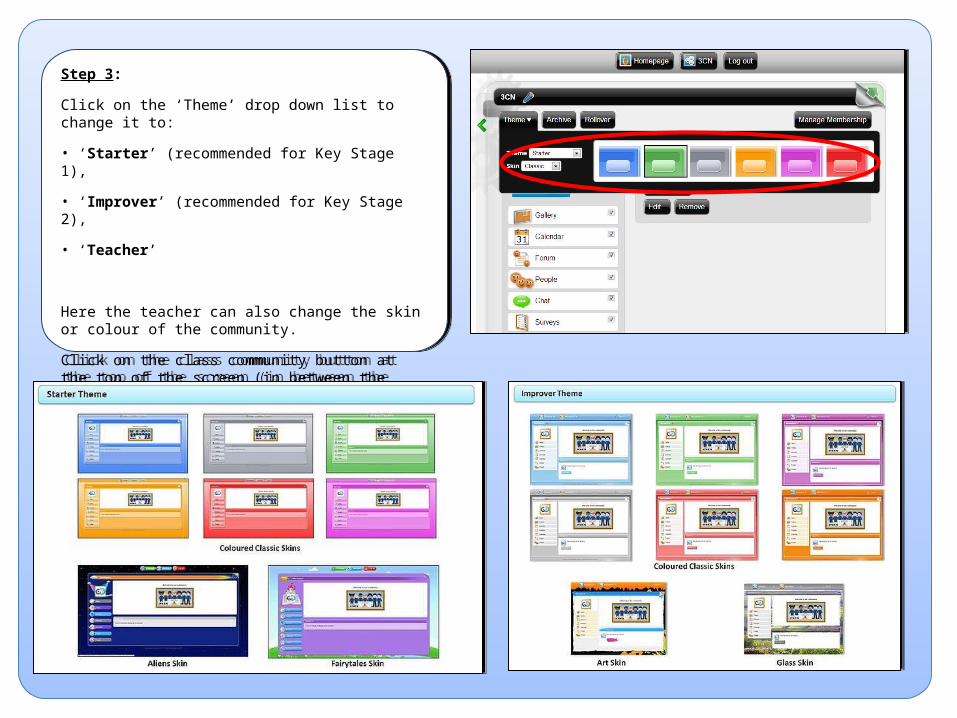
Step 3:
Click on the ‘Theme’ drop down list to change it to:
• ‘Starter’ (recommended for Key Stage 1),
• ‘Improver’ (recommended for Key Stage 2),
• ‘Teacher’
Here the teacher can also change the skin or colour of the community.
Click on the class community button at the top of the screen (in between the Homepage button and Log out button)
Objective 6: Why should I have a class community?
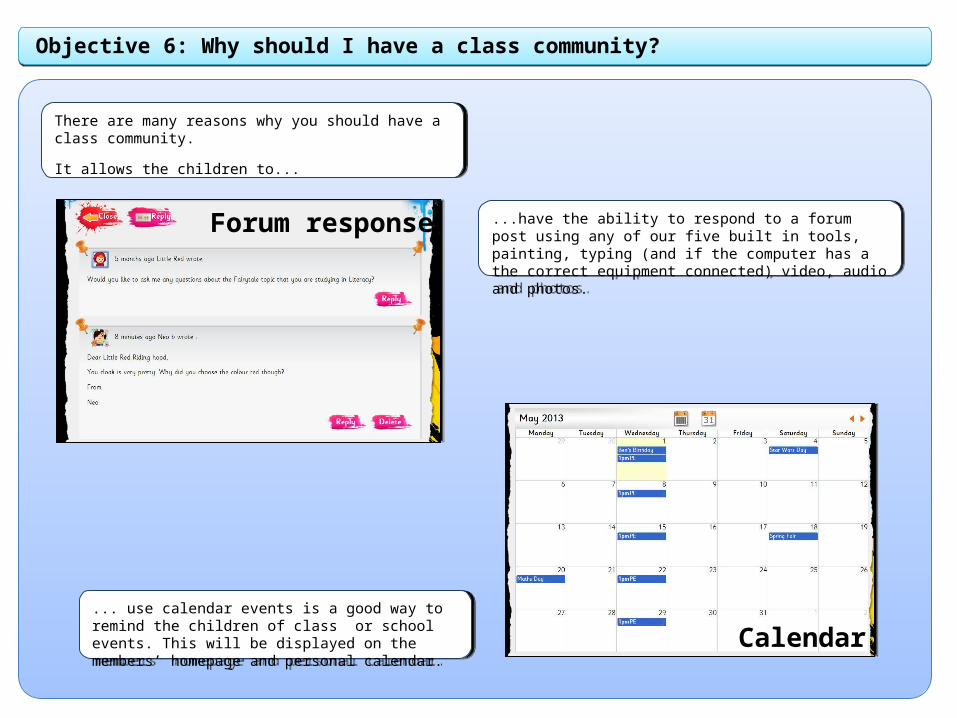
There are many reasons why you should have a class community.
It allows the children to...
There are many reasons why you should have a class community.
It allows the children to...
Forum response ...have the ability to respond to a forum post using any of our five built in tools, painting, typing (and if the computer has a the correct equipment connected) video, audio and photos.
...have the ability to respond to a forum post using any of our five built in tools, painting, typing (and if the computer has a the correct equipment connected) video, audio and photos.
... use calendar events is a good way to remind the children of class or school events. This will be displayed on the members’ homepage and personal calendar.
... use calendar events is a good way to remind the children of class or school events. This will be displayed on the members’ homepage and personal calendar. Calendar
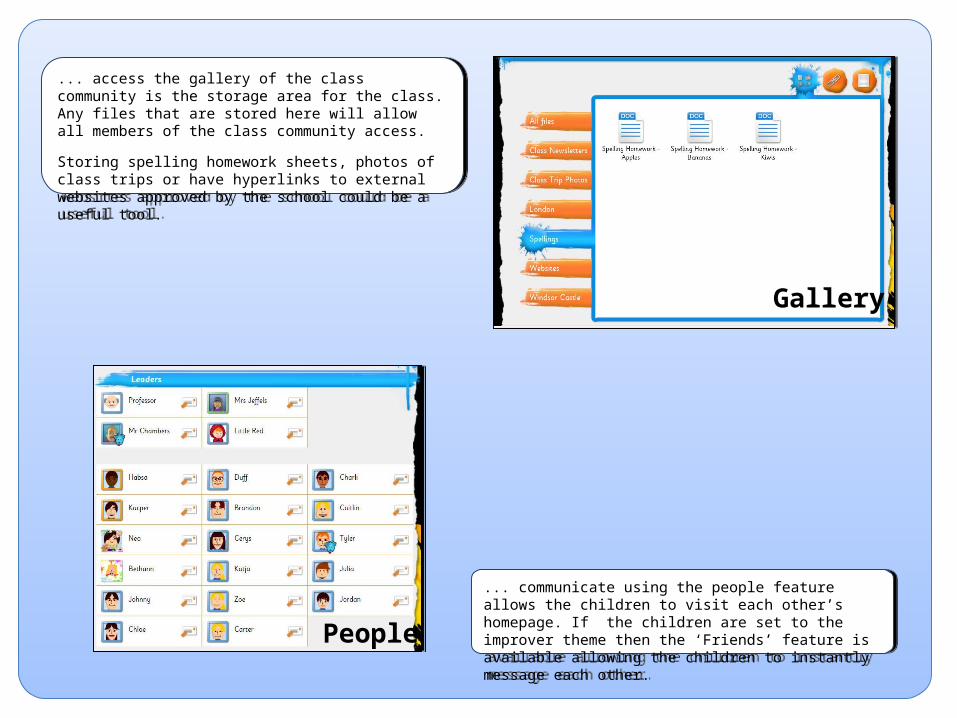
... access the gallery of the class community is the storage area for the class. Any files that are stored here will allow all members of the class community access.
Storing spelling homework sheets, photos of class trips or have hyperlinks to external websites approved by the school could be a useful tool.
Gallery
... communicate using the people feature allows the children to visit each other’s homepage. If the children are set to the improver theme then the ‘Friends’ feature is available allowing the children to instantly message each other.
... communicate using the people feature allows the children to visit each other’s homepage. If the children are set to the improver theme then the ‘Friends’ feature is available allowing the children to instantly message each other. People
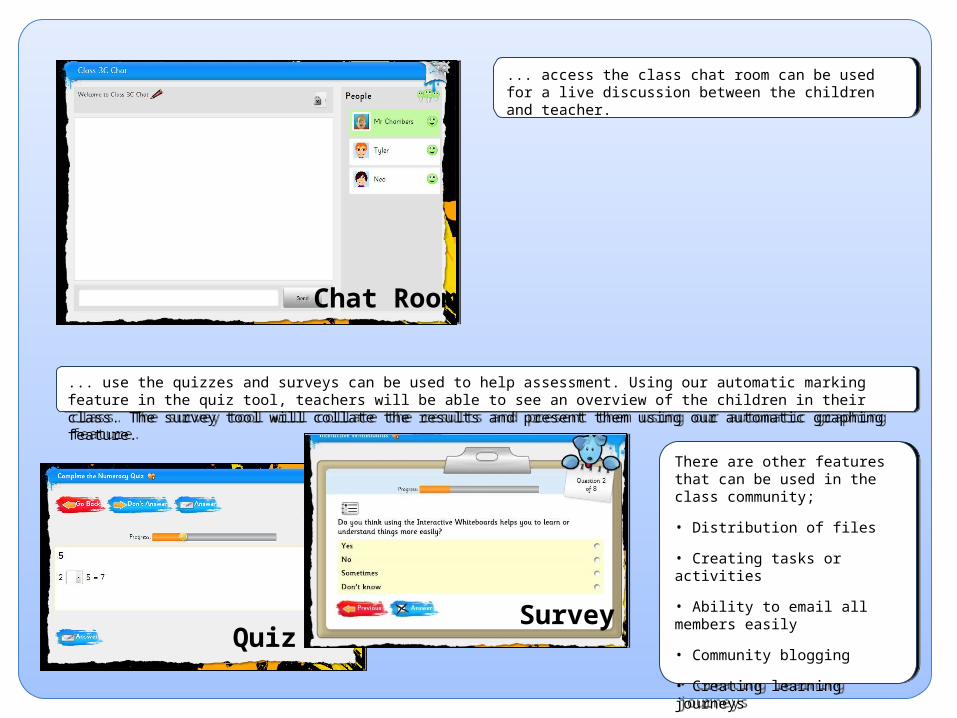
... access the class chat room can be used for a live discussion between the children and teacher.
... access the class chat room can be used for a live discussion between the children and teacher.
Chat Room
... use the quizzes and surveys can be used to help assessment. Using our automatic marking feature in the quiz tool, teachers will be able to see an overview of the children in their class. The survey tool will collate the results and present them using our automatic graphing feature.
... use the quizzes and surveys can be used to help assessment. Using our automatic marking feature in the quiz tool, teachers will be able to see an overview of the children in their class. The survey tool will collate the results and present them using our automatic graphing feature.
QuizSurvey
There are other features that can be used in the class community;
• Distribution of files
• Creating tasks or activities
• Ability to email all members easily
• Community blogging
• Creating learning journeys
And much more.
There are other features that can be used in the class community;
• Distribution of files
• Creating tasks or activities
• Ability to email all members easily
• Community blogging
• Creating learning journeys
And much more.
If you would like any more information then please click on your ‘Need help?’ button on your homepage.
Otherwise please contact our support team on;
Telephone – 01273 201 701Email – [email protected]