Embed Size (px)
Citation preview

Getting Started Guide2009
2009Getting Started Guide
00-7P-601-35001
Getting Started 1
Setting Up Your Company 6
Setting Up Customers and Vendors 18
Setting Up Items 22
Setting Up Payroll 24
Setting Up Projects 27
Essential Tasks 29
Reporting 35
System Administration 36
System Requirements 40
Business Services 42


Simply Accounting Chapter Title2
Getting Started | 1
1
getting started
Welcome
Welcome to Simply Accounting!
Use this guide to help you install Simply Accounting and set up your company so that you are up and running as quickly as possible.
In this guide, you’ll learn how to:
Set up your company•Set preferences to suit your business needs•Get help when you have questions•Secure your company data•Enter some common business transactions•
Note: Simply Accounting comes in a number of editions to suit the needs of all small businesses. This guide covers the following editions: Simply Accounting Pro, Simply Accounting Premium, and Simply Accounting Enterprise.
To learn more about the features available in other Simply Accounting editions, search for “Simply Accounting solutions” in the Help, or contact a Customer Sales representative at 1-866-797-8395.
To learn more about the features and highlights in Simply Accounting, read the What’s New section in the Help.
Simply Accounting Installation Information
My Company Name:
My Simply Accounting Client ID:
My Simply Accounting Serial Number:
My Installation Key Code:

If you are upgrading from Simply Accounting by Sage 2007 or prior versions, you can easily access the classic Home window that you are familiar with by clicking this link.
Click one of the navigation bar options for business workflow diagrams, lists, reports, and quick access to tasks. Add your own quick links to other tasks!
2 | Getting Started
Simply Accounting Chapter TitleThe Home Window
getting started
The Home window is designed for efficiency, ease of use, and quick access to the features you use most often. You can quickly get an overview of your business and then follow the workflow diagrams to find the specific tasks you want to perform.

3
2
1
Simply Accounting Chapter Title2
Getting Started | 3
Installing Simply Accounting
getting started
To install Simply Accounting, you will need the product serial number. You can find this number inside the Simply Accounting CD case.
Insert the CD and follow the steps in the wizard. Enter the product’s serial number, when prompted.
Select one of the installation options. The Full option is recommended for most installations.
Click the Learn More button on the installation screen to learn more about each installation option.
Be sure to read the following section regarding software firewalls as your firewall may prompt you to allow certain Simply Accounting components to run on your computer during installation and when you run Simply Accounting for the first time after installation.
Working With Software FirewallsIf you use a software firewall, such as Windows Firewall, you may receive prompts to allow or block certain Simply Accounting components from running on your computer. To ensure access to your Simply Accounting data and product updates, always allow these components to run on your computer. A list of all components and additional information is available in the Help. You can find configuration instructions for a number of software firewalls on the Simply Accounting Web site at www.simplyaccounting.com/install.
Simply Accounting Connection ManagerAfter you’ve installed Simply Accounting, you should see this icon in the Windows system tray. This icon provides status information for the
Simply Accounting Connection Manager service. This service manages all connections to your company data. For more information, search for “Connection Manager” in the Help.
2

1 2 3
1
Simply Accounting Chapter Title
4 | Getting Started
3
getting started
Getting Help
Finding answers to your questions is as easy as – –
Get Help as You WorkUse the in-product and online Help search to find answers to your questions. Ask a help question in a Simply Accounting window, or from the Search tab in the Help. Scan the list of search results, and then select a help topic to view.
Open the Learning Center to learn what’s new and access the latest training courses, frequently asked questions, and video tutorials. Use the integrated RSS Feed Reader to check on the status of forum posts and add your own feeds to other online resources.
Online Support ResourcesAt any time, you can search the Simply Accounting Knowledgebase and use other product support resources at www.simplyaccounting.com/us/support.
Connect with other small business professionals and access business resources and forums at www.sagespark.com.
Community content is delivered directly to the integrated Learning Center in Simply Accounting!
Sage University TrainingOpen the Learning Center to access feature videos and Anytime Learning courses offered through Sage University at www.sageu.com.

2
3
Getting Started | 5
Simply Accounting Chapter TitleGetting Help
getting started
CONTACT INFORMATION
CUSTOMER SALES: 1-866-797-8395
CUSTOMER SERVICE: 1-866-407-7146
CUSTOMER SUPPORT: 1-866-297-5318
ONLINE: www.simplyaccounting.com/us
Contact Sage for SupportIf you can’t find the answer to your question using the Help, the online Knowledgebase, or other self-help resources, then contact us for support.
Contact us Monday through Friday, 6 a.m. to 5 p.m. Pacific Time.
Note: All customers receive FREE customer support for one case within 30 days of product registration.1
Go online to chat live with a customer support specialist!
Work With a Simply Accounting Expert Get the help you need from accounting experts! Sage has an extensive network of Premier Advisors and Certified Consultants to support all phases of your accounting software installation and business development. To find an expert in your area, visit www.simplyaccounting.com/findconsultant/ .
1 Online chat or phone support for one case is provided without charge, to be used within 30 days of product registration. Additional support is available for a fee. Support Specialists reserve the right to limit calls or online chat sessions to one hour.

1
Simply Accounting Chapter Title
6 | Getting Started
Preparing to Create Your Company
setting up your company
4Unless you begin to use Simply Accounting when you start your business, you will need to know your account balances as of the date you start working with and recording transactions in Simply Accounting.
Steps to Take Before You Create Your Company FileDecide what your Earliest Transaction Date will be. This is the date you convert from your old accounting system (if you had one) to Simply Accounting.
This date is an important consideration, although you can modify this date after you have entered it in Simply Accounting. Two good choices are:
The first day of your fiscal year. For most small businesses, this will be the beginning of the calendar year. Selecting this date gives you the option of inputting all of your data from the beginning of the year so that you have all of the current year’s financial information in the system.
The first day of a fiscal period. Start from the beginning of a known accounting period. This will most likely be the beginning of a month or quarter. This is a good choice if you are partway through your current year and you do not want to re-enter all of your financial information in Simply Accounting. You will need to know the year-to-date balances of your accounts and you will have to enter one or more historical invoices for outstanding amounts customers owe you and unpaid amounts you owe to vendors. If you track inventory, you will also need to know the cost of goods sold to date, and the opening balance and value of each item you track.
What Date Do I Choose?

2
3
4
5
6
Getting Started | 7
Simply Accounting Chapter TitlePreparing to Create Your Company
setting up your company
Prepare a Trial Balance Report as of your start date.
Gather together all outstanding customer invoices, and all unpaid vendor bills.
If you have employees, gather together your employee records and payroll information.
Make a list of the items you sell. If you track physical inventory items, then for each item, determine the quantity on hand as of your start date, and the opening value.
If you work on projects, gather the following information for each project: start date, status, and opening revenue and expense balances.
If you’ve been in business for a while, you will need to refer to this report to update Simply Accounting after you create your company.
The Trial Balance lists all your account balances (assets, liabilities, equity, revenues, and expenses) as of a given date. Ask your accountant for this report as of the conversion date you choose.
If you are converting from another computerized accounting system such as QuickBooks, you should be able to print the report yourself. So, if you convert to Simply Accounting on January 1, 2009, you will need the trial balance report as of December 31, 2008.
What is a Trial Balance?

Enter your company name and address information.
1
2 Enter your fiscal year Start and End dates, and your Earliest Transaction date.
Converting from QuickBooks® 2007 or 2008? Select the QuickBooks conversion option, and the wizard will help you convert your existing QuickBooks database to Simply Accounting. All records and transaction data are quickly and easily imported!
Simply Accounting Chapter Title
8 | Getting Started
Creating a New Company5
setting up your company
The New Company Setup Wizard guides you through the process of creating a new company in a few simple steps.
As you move through the wizard, it prompts you to enter details about your company, such as company name, address, phone numbers, and the type of business and industry in which you work. Click the Next button to move forward, or the Back button to go back and review the information you entered. If you get stuck, click the Help button for assistance.

If you’re just starting out, let Simply Accounting create a list of accounts for you.
3
4 Select your ownership structure, industry type, and company type.
5 Click View List of Accounts to view the complete list of accounts that will be created for your company.
Getting Started | 9
Simply Accounting Chapter Title
setting up your company
Creating a New Company
Let Simply Accounting create the list of accounts that you will use to track your business. Some accounts are industry-specific, so select your industry to get the list of accounts that best suits your business needs. If you do not know which type to pick, select Other. You can always modify your account list later.

6 Simply Accounting Premium and Simply Accounting Enterprise
Click the Account Ranges button to expand or change the range of your account groups. To learn more, search for “expand account numbers” in the Help.
Accept the suggested filename (your company name), or enter a different name.
7
Accept the suggested location, or Browse to navigate to a different folder.
8
10 | Getting Started
Simply Accounting Chapter Title
setting up your company
Creating a New Company
Click Finish, and Simply Accounting will create your company.
?
Simply Accounting Chapter Title2
Getting Started | 11
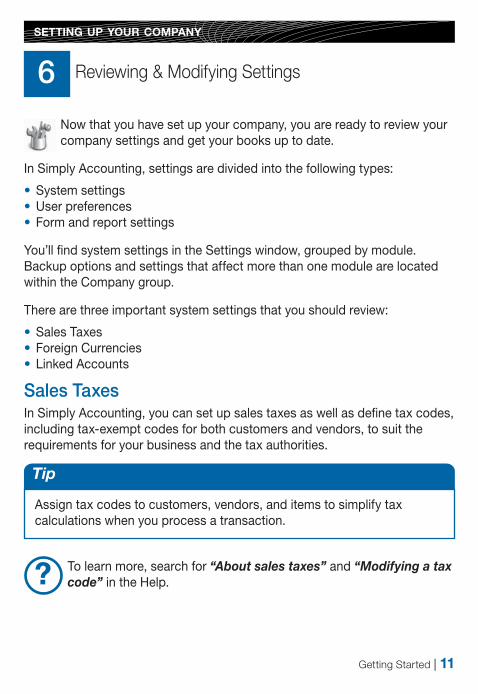
Reviewing & Modifying Settings6
setting up your company
Now that you have set up your company, you are ready to review your company settings and get your books up to date.
In Simply Accounting, settings are divided into the following types:
System settings•User preferences•Form and report settings•
You’ll find system settings in the Settings window, grouped by module. Backup options and settings that affect more than one module are located within the Company group.
There are three important system settings that you should review:
Sales Taxes•Foreign Currencies •Linked Accounts •
Sales TaxesIn Simply Accounting, you can set up sales taxes as well as define tax codes, including tax-exempt codes for both customers and vendors, to suit the requirements for your business and the tax authorities.
To learn more, search for “About sales taxes” and “Modifying a tax code” in the Help.
Assign tax codes to customers, vendors, and items to simplify tax calculations when you process a transaction.
Tip

?
?
12 | Getting Started
Simply Accounting Chapter TitleReviewing & Modifying Settings
setting up your company
Foreign Currencies
If you have customers or vendors that reside in another country, Simply Accounting can be set up to account for operations in a foreign currency. This allows you to create foreign currency bank accounts, add foreign prices to your inventory and service items, pay bills and receive payments without having to manually convert the amounts to or from another currency, and display reports with amounts in both the foreign currency and the equivalent in your home currency.
Simply Accounting Pro supports 2 currencies; Premium and higher support an unlimited number of foreign currencies.
To learn more, search for “Working with foreign currencies” in the Help.
Linked AccountsSimply Accounting uses linked accounts to update all related accounts automatically when you process a transaction. Linked accounts reduce the amount of time you spend assigning amounts to your accounts whenever you process a transaction. For example, whenever you make a sale, the amount your customer owes you increases, the quantities in inventory decrease, and Simply Accounting records any sales taxes, freight charges, and early-payment sales discounts in the proper accounts.
When Simply Accounting builds your account list, linked accounts are set up for you. If you want to make changes to your linked accounts, you can edit them one at a time, or you can use the Linked Accounts Wizard, if you need to add or edit several linked accounts.
To learn more, search for “About linked accounts” in the Help.

Set up Simply Accounting to remind you when to order new checks.
?
?
Getting Started | 13
Simply Accounting Chapter TitleReviewing & Modifying Settings
setting up your company
User PreferencesYou can customize Simply Accounting to suit the needs of individual users. For example, you can hide modules that the user doesn’t require access to, or change terminology from plain English to accounting terminology.
To learn more, search for “About user preferences” in the Help.
Form and Report OptionsReport options define the default print settings for reports. You can modify these settings on individual reports.
Select the form type for the business forms you use, such as checks and invoices. You can customize any Simply Accounting Form in the integrated Simply Accounting Form Designer to suit your business needs.
To learn more about customizing your business forms, search for “How do I customize a form” in the Help.

You can choose to hide account numbers in transactions and reports. These settings are found in the Settings window, in the General group, under Numbering.
Simply Accounting Chapter Title
14 | Getting Started
Adding or Modifying Accounts
setting up your company
7The New Company Setup Wizard creates a set of accounts for your business. You can now add more accounts, hide or remove accounts you don’t need, or edit the accounts in the list.
Account Basics
Naming and Numbering. Simply Accounting assigns numbers to accounts with the benefit being that you can identify the type of account by its account number alone. Most businesses follow the same standard account grouping:
Number Range Account Group
1000 - 1999 Asset
2000 - 2999 Liability
3000 - 3999 Equity
4000 - 4999 Revenue
5000 - 5999 Expense
Account Types. Simply Accounting uses Account Types to determine how accounts and totals are reported on financial reports.
Type Description
HA Group Heading. A subdivision of one of the 5 main account groups; for example, Current Assets. It is not used in transactions.
AA Subgroup Account. Part of larger group of accounts that has a subtotal. It is used in transactions.
SA Subtotal. Total of all subgroup accounts that precede it in the account list. It is not used in transactions.
GA Group Account. A standalone account whose balance is not part of a subtotal. This account is used in transactions.
TA Group Total. A roll-up of all the subtotals and group accounts that precede it in the account list. It is not used in transactions.

?
Getting Started | 15
Simply Accounting Chapter TitleAdding or Modifying Accounts
setting up your company
Account type X is reserved for the system-defined Current Earnings account. Simply Accounting calculates the account balance automatically— income minus expenses, as of the current session date.
Account Classes. These are subcategories of the main account groups. For example, Bank is a particular type of Asset account.
When the Account Class = Bank, additional fields are available for electronic banking:
To learn more, search for “Add or modify an account” in the Help.
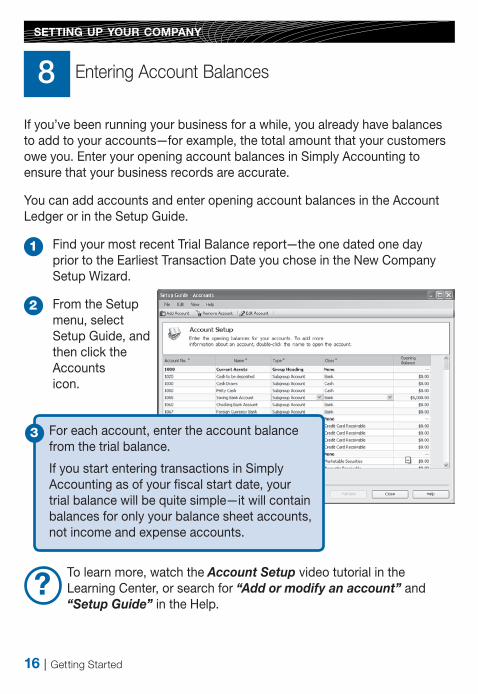
For each account, enter the account balance from the trial balance.
If you start entering transactions in Simply Accounting as of your fiscal start date, your trial balance will be quite simple—it will contain balances for only your balance sheet accounts, not income and expense accounts.
3
1
2
?
Simply Accounting Chapter Title
16 | Getting Started
setting up your company
Entering Account Balances8If you’ve been running your business for a while, you already have balances to add to your accounts—for example, the total amount that your customers owe you. Enter your opening account balances in Simply Accounting to ensure that your business records are accurate.
You can add accounts and enter opening account balances in the Account Ledger or in the Setup Guide.
Find your most recent Trial Balance report—the one dated one day prior to the Earliest Transaction Date you chose in the New Company Setup Wizard.
From the Setup menu, select Setup Guide, and then click the Accounts icon.
To learn more, watch the Account Setup video tutorial in the Learning Center, or search for “Add or modify an account” and “Setup Guide” in the Help.

1
2
3
4
Getting Started | 17
Simply Accounting Chapter TitleChecking Account Balances
setting up your company
To ensure that you have entered your accounts and balances correctly, print a trial balance in Simply Accounting and check it against your existing records.
To check your accounts:
Open the Company page in the Home window, and then select the Report Center icon from the Reports pane. Select Financials, Trial Balance, and then Historical Opening Balance.
Click Display to view the report.
To print the report, ensure that your printer is set up, and then choose Print from the File menu or toolbar.
Check the account numbers, names, and balances against your existing records.
If you don’t update all your account balances, the accounts may not balance, and so, you may receive a message asking you to assign the difference to a specific account. Accept the account that Simply Accounting suggests, or select a different account. Check the balance in this account after you have finished entering all opening account balances to ensure that the balance agrees with your records.
Why Did I Receive a Message About Assigning a Difference?

1 Enter the customer’s name or other unique identifier.
2 Add in other details about the customer.
?
Simply Accounting Chapter Title
18 | Getting Started
Entering Customer Information
setting up customers & vendors
9When you create a customer record, all you need is a name. Of course, you will probably want to add more contact information and default options when it is convenient for you to do so.
You can enter customers and opening balances in the Customer Ledger or in the Setup Guide.
To learn more, watch the Customer Setup video tutorial in the Learning Center, or search for “Add or modify a customer” and “Setup Guide” in the Help.
Are you converting from QuickBooks®, Quicken®, or MYOB®? Run the Import Wizard to import your current customer information. For more information search for “How do I import records” in the Help.
Tip

1 Click here to record unpaid invoices as of the earliest transaction date.
2 Enter invoice information.
Getting Started | 19
Simply Accounting Chapter Title
setting up customers & vendors
Entering Customer Balances
If you have been in business for a while, some customers may owe you money as of the earliest transaction date you entered during the company setup process. You need to bring each customer record up-to-date.
For each customer, determine the total outstanding amount owed as of the earliest transaction date, and then enter a historical invoice for this amount. If you want to record every transaction with this customer to date, enter individual historical invoices and payments.
Brown, Jerome B.$ 1,200.42
Fogarty Motors$4,352.12
Total: $ 5,552.54
The total of all unpaid historical invoices must equal the opening balance of the Accounts Receivable account in your account list.
=

?
2 Add in other details about the vendor.
1 Enter the vendor’s name or other unique identifier.
Simply Accounting Chapter Title
20 | Getting Started
Entering Vendor Information10
setting up customers & vendors
When you create a vendor record, all you need is a name. Of course, you will probably want to add more contact information and default options when it is convenient for you to do so.
You can enter vendors and opening balances in the Vendor Ledger or in the Setup Guide.
To learn more, watch the Vendor Setup video tutorial in the Learning Center, or search for “Add or modify a vendor” and “Setup Guide” in the Help.
Are you converting from QuickBooks®, Quicken®, or MYOB®? Run the Import Wizard to import your current vendor information. For more information search for “How do I import records” in the Help.
Tip

2 Enter invoice information.
1 Click here to record unpaid bills as of the earliest transaction date.
Getting Started | 21
Simply Accounting Chapter TitleEntering Vendor Balances
setting up customers & vendors
If you have been in business for a while, you may owe money to vendors as of the earliest transaction date you entered during the company setup process. You need to bring each vendor record up-to-date.
For each vendor, determine the total amount owed, and then enter a historical invoice for this amount. If you want to record every transaction with this vendor to date, enter individual historical invoices and payments.
Roxborough Paints$ 152.43
Streamline Couriers$ 212.32
Total: $ 364.75
The total of all outstanding historical vendor invoices must equal the opening balance of the Accounts Payable account in your account list.
=

When you create an item, define a revenue or expense account to simplify data entry.
Set a Variance account if you allow inventory levels to go below zero.
?
Simply Accounting Chapter Title
22 | Getting Started
setting up items
11 Entering Item Information
You can create two types of items in Simply Accounting:
Inventory.• These are physical or tangible items. Simply Accounting keeps track of the quantity on hand, the quantity on order for customers, and the quantity on order with suppliers. When you create an inventory item, you must define an Asset account to track the value of your inventory, and a Cost of Goods Sold (COGS) account to track your cost. In Simply Accounting Enterprise, you can enter and track serialized inventory items. For more information, search for “serialized inventory” in the Help.
Services.• These are either intangible items, such as a consulting fee, or items for which you do not track the quantity purchased or sold.
For more information, search for “How do I create an item record” in the Help.
If your business is based solely on selling services, or you do not need to track inventory in Simply Accounting, you should still set up service items for easier and more consistent data entry in the Sales window.
Tip

1
2
3
4
5
Getting Started | 23
Simply Accounting Chapter Title
Print a trial balance (Historical Opening Balances), and then print inventory summary reports for each asset account. If you have four asset accounts, then you will print four reports.
Compare the total of each inventory summary report with the appropriate asset account. If they are not the same, check your entries.
In Simply Accounting Enterprise, for each serialized item, enter serial numbers for all opening quantity on hand.
Entering Opening Quantity and Value
setting up items
To enter opening balances for your inventory items:
Open the Inventory & Services page in the Home window. In the Tasks pane, right-click the Inventory & Services icon and then select Add Inventory & Services from the menu.
For each inventory item and service, on the History tab, enter the opening quantity and value for this item. On the Statistics tab, you may also want to enter information about the item as of last year and up to the date when you started using Simply Accounting.
H1010$ 2200.00
H1020$ 350.00
Total: $ 2550.00
The total of the opening balances of a group of inventory items must equal the opening balance of the corresponding inventory asset linked account in the account list.
=

Simply Accounting Chapter Title
24 | Getting Started
Setting Up Payroll Defaults12
setting up payroll
When Simply Accounting builds your account list, all required payroll accounts are created for you. Before you add your employee records, set up:
the incomes and deductions you’ll use in your business•the entitlements you provide, and how they are calculated•the tax rates for unemployment, worker’s compensation, and other •employer expensesemployer-paid expenses specific to your business•starting balances for amounts you owe payroll authorities•
You should also review the accounts you will use to track payroll advances, payroll liabilities, wage expenses, and other payroll expenses.
All payroll settings are conveniently located within the Payroll group in the Settings window. To learn more, select an item in the Payroll group, and then click the Help button.

1
2
Simply Accounting Chapter Title2
Getting Started | 25
13 Entering Employee Information
setting up payroll
You can enter basic employee information (contact information, birth date, SSN, hire date) in:
Employee Ledger: Open the Employees & Payroll page in the Home window. In the Tasks pane, right-click the Employee’s icon and then select Add Employee from the menu.
Setup Guide: From the Setup menu, select Setup Guide, and then choose the Employee option.
For each employee enter the following additional information:
Taxes• . Add tax information, such as the state of employment, and the employee’s federal and state claim amounts.
Income• . Select the applicable incomes, enter pay rates and vacation calculations, and the number of pay periods per year.
Deductions• . Select the applicable source deductions and enter pay period amounts.
Other Expenses• . Enter pay period contributions for additional employer-paid expenses.
Entitlements• . Record how entitlements, such as sick days, are calculated.
Additional Information• . You can create up to 5 user-defined fields in which to store additional employee information. If you set up these fields in the Payroll group in the Settings window, then you can enter employee information here.
Memos• . Add reminders and notes.
Direct Deposit• . If you offer direct deposit, turn on the option on the employee’s record and then specify the bank accounts to which their pay is deposited.

To properly print W2 forms for your employees, enter the employee’s name in this format: Last, First or First <space> Last.
26 | Getting Started
Simply Accounting Chapter TitleEntering Employee Information
setting up payroll
If you have already processed payroll for the year, you will need to record historical information to print the correct amounts on employee W2 forms at the end of the year. For each employee, enter the following historical amounts for each previous quarter in the calendar year:
taxes paid •
advances paid•
taxable benefits •to date
vacation paid•
wages paid•
deductions taken•
user-defined employer •expenses to date
expense amounts•
On the other tabs, you can enter quarter to date amounts for the current quarter.
Check federal and state employment standards to learn more »about disability insurance, vacation pay requirements, and year-end reporting.
Make sure you update the opening balance in each linked payroll »account.
Open the Report and Form Options window from the Setup menu, »and then review your payroll form settings.
Tips

Enter the total revenue received and expenses incurred as of the earliest transaction date you entered when you set up your company.
Simply Accounting Chapter Title2
Getting Started | 27
14 Entering Project Information
setting up projects
Project records are used to keep track of costs and/or expenses incurred during a contract or job that your company performs for customers.
Projects enable you to keep detailed information about the revenues and expenses associated with the work your company does. You can then review this information in a number of project reports to ensure that work is being done on time and on budget.
To set up projects, open the Projects page in the Home window, and then in the Tasks pane, right-click the Projects icon and select Add Project from the menu.
You can rename the Projects module in the Settings window. In Simply Accounting Premium and Enterprise Editions, “Projects” may initially be named something else, depending on the industry type you selected when you created your company.
Tip

You record a project’s revenue and expenses by allocating transaction amounts to the project. These amounts can be viewed on various project reports. Click the Help button to learn more about allocation settings.
On the Names page, you can rename the projects module by entering a term that is more commonly used in your industry or business, and add up to 5 user-defined fields to store information about your projects.
If you create budgets for your projects, check this box and then select the budget period. When these options are turned on, a new Budget tab will appear in each project record so that you can budget individual projects.
28 | Getting Started
Simply Accounting Chapter Title
setting up projects
Reviewing and Modifying Project Settings

If you prepare sales orders and quotes for your customers, make sure these features are turned on in the Settings window.
Simply Accounting Chapter Title2
Getting Started | 29
15 Overview of Customer Transactions
essential tasks
Money In
Sales Quotes
Keep track of estimates that you’ve sent to a current or potential customer. No accounting entries are made when a quote is entered.
Sales Orders
Create an order for an item or service that you will provide at a later date.
Sales Invoices
Bill your customers for goods shipped or received at the time of sale, and for services provided.
Receipts
Enter payments you receive from your customers, and apply the payment to one or more unpaid invoices.
Change the transaction type in the Sales window to easily convert a quote to an order or invoice, or an order to an invoice.
Tip

1 Select a customer. Simply Accounting will auto-fill the Sold to, Ship to, Comments, and Terms fields with the data from the customer’s record.
3 Print or e-mail the invoice, or print your invoices in a batch at a later date.
2 Select items from your item list, or enter details about the items you are selling.
4 Click to record the transaction, and update account balances and the customer’s record.
Simply Accounting Chapter Title
30 | Getting Started
Invoicing Customers16
essential tasks
When you record a sale, Simply Accounting keeps track of the goods and services sold and updates the customer’s record.
To create an invoice: Open the Customers & Sales page in the Home window. In the Tasks pane, click the Sales Invoices icon, and then complete the following steps.

Ensure the date of receipt is correct. By default, the current session date is used.
1 Select a customer from the list.
2 Select the payment method, and the account to which you will deposit the payment. If the customer is paying by check, enter the check number.
4 Select the invoice to which the payment should be applied. Simply Accounting automatically calculates the eligible discount based on the payment terms you entered.
Click to record the transaction, and update account balances and the customer’s record.
3
5
Simply Accounting Chapter Title2
Getting Started | 31
essential tasks
Receiving Customer Payments17To record a payment from a customer: Open the Customers & Sales page in the Home window. In the Tasks pane, click the Receipts icon, and then complete the following steps.

If you place purchase orders with your vendors or submit requests for quotes, make sure these features are turned on in the Settings window.
Simply Accounting Chapter Title
32 | Getting Started
Overview of Vendor Transactions
essential tasks
18
Money Out
Purchase Quotes
Enter an estimate you received from a vendor for goods or services. No accounting entries are made when a quote is entered.
Purchase Orders
Record an order for an item that your vendor will supply at a later date, or for a service that the vendor will provide at a later date.
Purchase Invoices
Enter bills from vendors for items you have received or for services provided.
Payments
Pay Purchase Invoices: Enter a payment to a vendor and apply the payment to one or more unpaid bills.
Pay Credit Card Bills: Enter payments (for example, write a check) to your credit card company for business expenses.
Pay Expenses (also known as Make Other Payment): Record an expense and the method of payment.
Pay Remittances: Enter payments to payroll authorities for source deductions and other payroll-related expenses.
Change the transaction type in the Purchases window to easily convert a quote to an order or invoice, or an order to an invoice.
Tip
5
1 Select a vendor from the list.
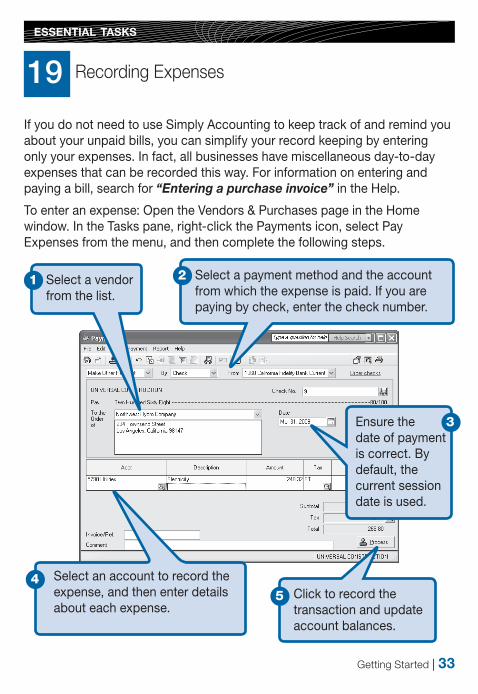
2 Select a payment method and the account from which the expense is paid. If you are paying by check, enter the check number.
4Click to record the transaction and update account balances.
Ensure the date of payment is correct. By default, the current session date is used.
3
Select an account to record the expense, and then enter details about each expense.
Simply Accounting Chapter Title2
Getting Started | 33
essential tasks
Recording Expenses19If you do not need to use Simply Accounting to keep track of and remind you about your unpaid bills, you can simplify your record keeping by entering only your expenses. In fact, all businesses have miscellaneous day-to-day expenses that can be recorded this way. For information on entering and paying a bill, search for “Entering a purchase invoice” in the Help.
To enter an expense: Open the Vendors & Purchases page in the Home window. In the Tasks pane, right-click the Payments icon, select Pay Expenses from the menu, and then complete the following steps.

2 Confirm the bank account and check number (or direct deposit number, if this employee is set up for direct deposit).
1 Select an employee from the list.
5 Preview, and then print the paycheck.
Confirm the payroll period start and end date.
3
4 Enter details, such as the hours worked if the employee is paid an hourly wage.
6 Click to record the transaction, and update account balances and the employee’s record.
?
Simply Accounting Chapter Title
34 | Getting Started
Paying Employees
essential tasks
20Simply Accounting can automatically calculate payroll taxes based on the employee’s tax table. Note that while you are in history mode, you must calculate and enter payroll taxes yourself.
To learn how to issue paychecks to several employees, search for “Processing a payroll check run” in the Help.

Preview, and then print the paycheck.
1 Select a report type to display a list of reports.
3 Click to open the Modify window for this report. You can customize Print and Font settings on every report.
Other modification options include: the number and the size of report columns, filters, and sort options.
2 Similar reports are grouped together. Double-click to open a group, and single click to select a particular report. A sample image of the printed report and a description is displayed on the right.
4 Click to display the report.
Simply Accounting Chapter Title2
Getting Started | 35
21 Reporting
reporting
Reports help you find out how your business is doing. In particular, you should pay attention to the main financial reports: the Balance Sheet, and the Income Statement. Simply Accounting includes over 100 pre-formatted reports, and you can customize them all to suit your needs!
The Report CenterYou can easily find the reports you need in the Report Center. The Report Center icon is available in every page in the Home window, so it is always at your fingertips.

Simply Accounting can remind you to back up your company data each time you close your company, or you can create a backup schedule to have Simply Accounting automatically back up your data when you close your company file on the scheduled day.
?
Simply Accounting Chapter Title
36 | Getting Started
Managing Your System Files22
system administration
Your Simply Accounting data is stored in a MySQL database. Each database consists of a file with an SAI extension that contains profile information about your company data, and a folder with an SAJ extension that contains your actual company data as well as user security information. Both the folder and the file are required to open your company in Simply Accounting.
Backup and RestoreYour company records are indispensable. They help you invoice your customers, pay your suppliers on time, and provide the information you need to plan for your business’ future. Because your company files do so much, you should take the time to ensure that your financial data is safe and secure. Creating a backup schedule is a great time-saver and will ensure consistent data backups.
By default, Simply Accounting is set to verify that the company and security data in your backup files are intact and can be restored. If you make a mistake that you want to undo, or your files are damaged or accidentally deleted, then restore your data from your most recent backup.
To learn more, search for “How do I back up my company” in the Help.

To set up additional users, you must first create a password for the Simply Accounting administrator, sysadmin. Click Modify User, and then enter a password. Your password should be “strong”—it should be a combination of 5 to 7 numbers and letters, and not be easy to guess.
?
Simply Accounting Chapter Title2
Getting Started | 37
23
system administration
Securing Your Company Data
When you create your company, Simply Accounting automatically creates a user profile called sysadmin. This administrator has full rights to your company data. This is the only user who can create new users, assign access rights and passwords to other users, and set Simply Accounting company-wide preferences. Even if you are the only user, you should password-protect the sysadmin user, and then create a new user profile for yourself.
If you intend to access Simply Accounting data from other programs, such as Microsoft Access, assign third-party access rights to Simply Accounting users and password-protect your data.
Set Up Additional UsersCreate additional users to:
Restrict access to only those areas of •the program that users need to do their job. For example, not every employee is entitled to know the current balance in your company bank accounts.
Protect yourself against theft •and embezzlement. If you give each user a name, you’ll always be able to identify who has modified your financial records.
Let several people work in •Simply Accounting Premium and Simply Accounting Enterprise at the same time.
To learn more, search for “Learning about security and access rights” in the Help.

Give the role a name and a description, and then select the access rights for this role. Click Advanced Reporting to restrict access to specific Banking and Company reports.
?38 | Getting Started
Simply Accounting Chapter TitleSecurity Roles in Simply Accounting Enterprise
system administration
In a multi-user environment, security roles can quickly give accounting users a predefined set of access rights to company data. Roles are based on all available user rights, except access rights to company data from third-party products (like Crystal Reports or Microsoft Access). Only the sysadmin user has permission to create, assign, and remove user security roles.
Once a role has been created, it can be assigned to any number of users. You can easily assign new roles to existing staff, or give new staff the same Simply Accounting user rights as existing or departing staff.
To learn more about setting up user roles, search for “Add a security role” in the Help.

Getting Started | 39
Simply Accounting Chapter TitleNext Steps
Finish Entering HistoryIf you have created a new company, you will see this icon in the Home window. It indicates that you are in history mode. In history mode, you can enter opening account and inventory balances, as well as enter
historical customer and vendor invoice and payment information, and payroll year-to-date information.
You must finish entering history for a module before you can start entering transactions for the module in a new fiscal year (calendar year for payroll).
Typically, you’ll close off history for all modules at once, but if you have not finished entering all your historical information for a module, hide that module before you select Finish Entering History from the History menu in the Home window. To hide a module, on the Setup menu, select User Preferences, then View. Clear the checkmark from the module you still need to update.
Thank you for choosing Simply Accounting!
You have now set up Simply Accounting and know how to enter basic transactions.

40 | Getting Started
Simply Accounting Chapter TitleSystem Requirements
system requirements
Simply Accounting Pro 2009 and Simply Accounting Premium 2009 Minimum System Requirements
Pentium® III (or equivalent), 1 GHz or higher (Pentium 4, 2 GHz •recommended)
512 MB of RAM (1 GB recommended)•
820 MB of hard disk space (additional 100 MB needed for installation)•
Internet Explorer 5.5 SP2•
Microsoft® Windows® 2000, XP, or Vista•
256-color or higher SVGA monitor, optimized for 1024 x 768; supports 800 •x 600 with small fonts
ACT! by Sage integration requires ACT! 2008 or ACT! 2009•
Mouse•
CD-ROM drive•
Forms that can be sent via e-mail require MAPI-compliant e-mail client, •Internet connection, e-mail service, and word processor
Word and Excel integration requires Microsoft Word and Microsoft Excel •2003 or 2007
Outlook synchronization requires Microsoft Outlook® 2003 or 2007 •(Premium and higher)
Multi-user (up to four users) optimized for Windows 2000, XP, and Vista •peer-to-peer networks and Windows 2000 and XP file server networks (Premium and higher)
Dedicated server recommended: Windows Server® 2003 R2, Windows Small Business Server 2003 R2, Windows Server 2008, Red Hat® Enterprise Linux® 5.0, or SUSE® Linux Enterprise Server 10 by Novell.
Note: The Connection Manager for Linux is available as a separate download.
Getting Started | 41
Simply Accounting Chapter TitleSystem Requirements
system requirements
Simply Accounting Mobile (Premium and higher) (Pocket PC synchronization):
Microsoft Windows 2000 or Windows XP•
Additional 200 MB hard disk space•
Internet Explorer 5.5 SP2•
Pocket PC 2002 or 2003•
Conversion: Simply Accounting transfers data from whichever accounting system you’re currently using – including Microsoft Excel®, Quicken®, and MYOB®. With our built-in conversion, you can copy your records and most transactions from QuickBooks® into Simply Accounting.1
Simply Accounting Enterprise 2009 and higherPentium® 4 (or equivalent), 2 GHz or higher (Pentium 4, 3 GHz •recommended)
1 GB of RAM (2 GB recommended)•
1 Only the journal entries for the payroll transactions will convert from QuickBooks to Simply Accounting, not the payroll transactions. Integrated conversion utility supports QuickBooks 2007 and 2008.

42 | Getting Started
Simply Accounting Chapter TitleBusiness Services
business services
After you get started on Simply Accounting, you may realize that you could benefit from other services for your business. Sage can help:
SimplyCARE ServicesGain efficiency, convenience and peace of mind with SimplyCARE Services. Each Care service plan includes automatic upgrades for your Simply Accounting software. During your subscription you will receive every new version of Simply Accounting as soon as it is released, ensuring your business is always running on the most up-to-date software available.
We offer:
SimplyCARE with Payroll•SimplyCARE with Support•SimplyCARE with Payroll and Support•SimplyCARE with Elite Support•
To learn more:
Visit • www.simplyaccounting.com/us/simplycare/
Call 1-866-797-8395•
Credit Card ServicesAutomate your credit card processing with an affordable online service from Sage Payment Solutions. When you sign up for a merchant account at Sage Payment Solutions, you can authorize credit card payments directly from Simply Accounting sales transactions, and then go online to manage your account and view payment reports.
To learn more:
Visit • www.sagepayments.com/simplyaccounting
Call 1-866-297-5441•

Getting Started | 43
Simply Accounting Chapter TitleBusiness Services
business services
Direct DepositDirect Deposit is a smart way to pay employees. It can save your company time and money, increase productivity, and improve your employees’ job satisfaction. Simply Accounting Direct Deposit completely integrates with your accounting software, so you know its easy to use and get started!
To learn more:
Visit • www.simplyaccounting.com/directdeposit
Call 1-866-297-5441•

44 | Getting Started
Simply Accounting Chapter TitleNotes

Getting Started | 45
Simply Accounting Chapter TitleNotes

Customer Sales: 1-866 -797-8395
Customer Service: 1- 866 - 407-7146
Customer Support: 1-866 -297-5318
www.simplyaccounting.com/us
© 2009 Sage Software, Inc. All rights reserved. Sage, the Sage logo, Simply Accounting, the Simply Accounting logo and the Sage products and service names mentioned herein are trademarks or registered trademarks of Sage Software, Inc. or its affiliated entities. All other trademarks are the property of their respective owners.