Embed Size (px)
Citation preview
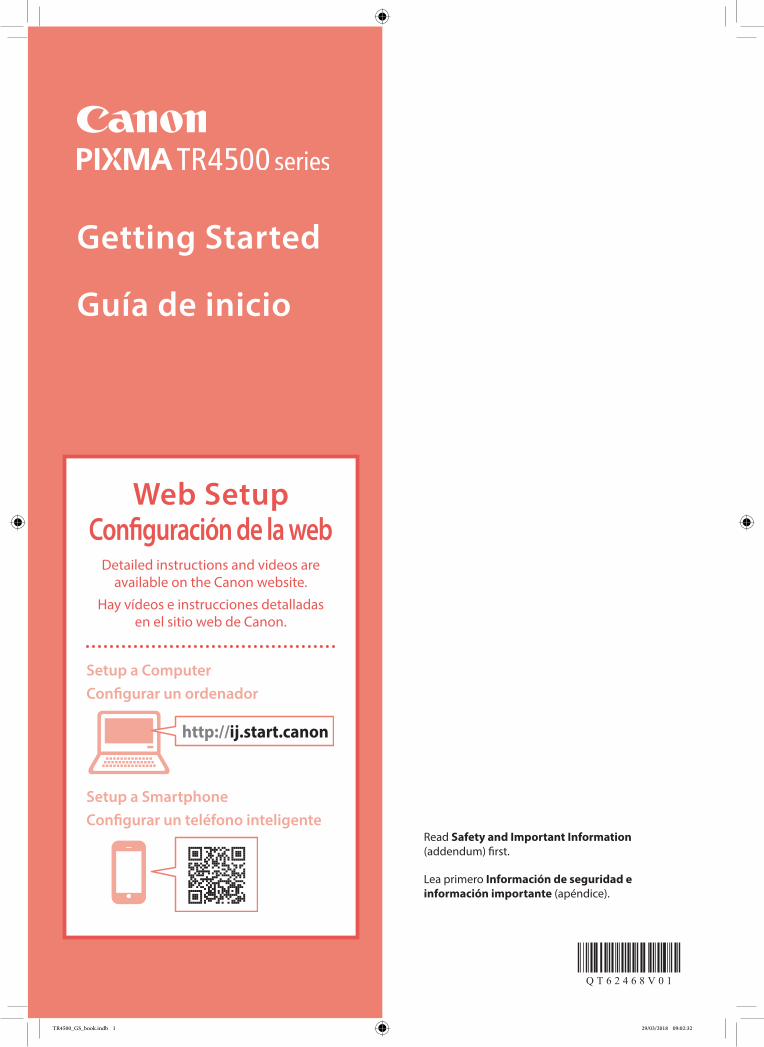
Guía de inicio
Lea primero Información de seguridad e información importante (apéndice).
Configuración de la web
Hay vídeos e instrucciones detalladas en el sitio web de Canon.
Configurar un ordenador
Configurar un teléfono inteligente
Getting Started
Read Safety and Important Information (addendum) first.
Web Setup
Detailed instructions and videos are available on the Canon website.
Setup a Computer
Setup a Smartphone
TR4500_GS_book.indb 1 29/03/2018 09:02:32
Go
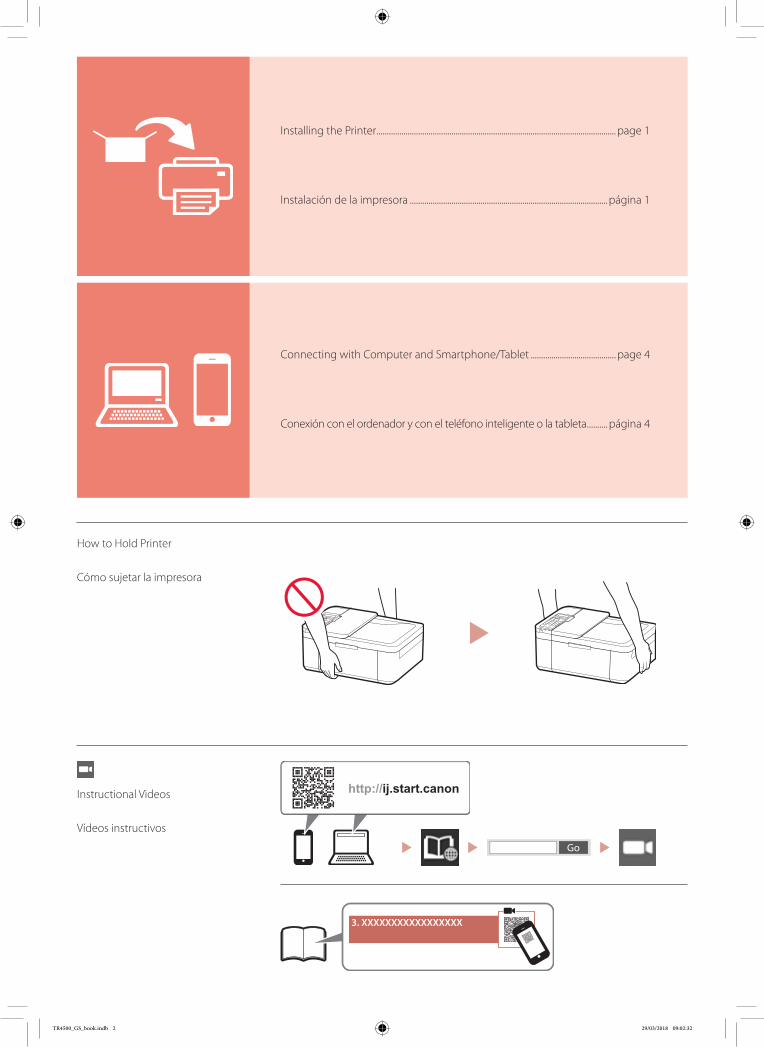
Instalación de la impresora ...............................................................................................página 1
Conexión con el ordenador y con el teléfono inteligente o la tableta ..........página 4
Vídeos instructivos
Cómo sujetar la impresora
Installing the Printer ................................................................................................................... page 1
Connecting with Computer and Smartphone/Tablet ......................................... page 4
How to Hold Printer
Instructional Videos
TR4500_GS_book.indb 2 29/03/2018 09:02:32

1
ENGLISH1. Box Contents
• Power cord • FINE cartridges
• Setup CD-ROM • Modular cable
• Safety and Important Information
• Getting Started (this manual)
2. Removing Packing Materials
1 Remove and dispose of the packing materials from the device.• Be sure to remove any orange tape.
2 Open the front cover and paper output cover.
a b
3 Remove and dispose of the protective materials.• Pull the orange tape to remove the protective
material.
ab
4 Close the paper output cover and front cover.
a
b
3. Turning on the Printer
1 Connect the power cord.
Back
Important
• Place the printer so it is at least 2 inches (5 cm) away from the wall.• At this time, do not connect any other cables.
2 Press the ON button.
ImportantIf the following screen appears, press the ON button to turn off the power, and redo the procedure from step 2 in "2. Removing Packing Materials".
3 When the following screen appears, use the [ and ] buttons to select a language, and then press the OK button.
Setting up the printer Web Setup
TR4500_GS_book.indb 1 29/03/2018 09:02:33
2
Setting up the printer
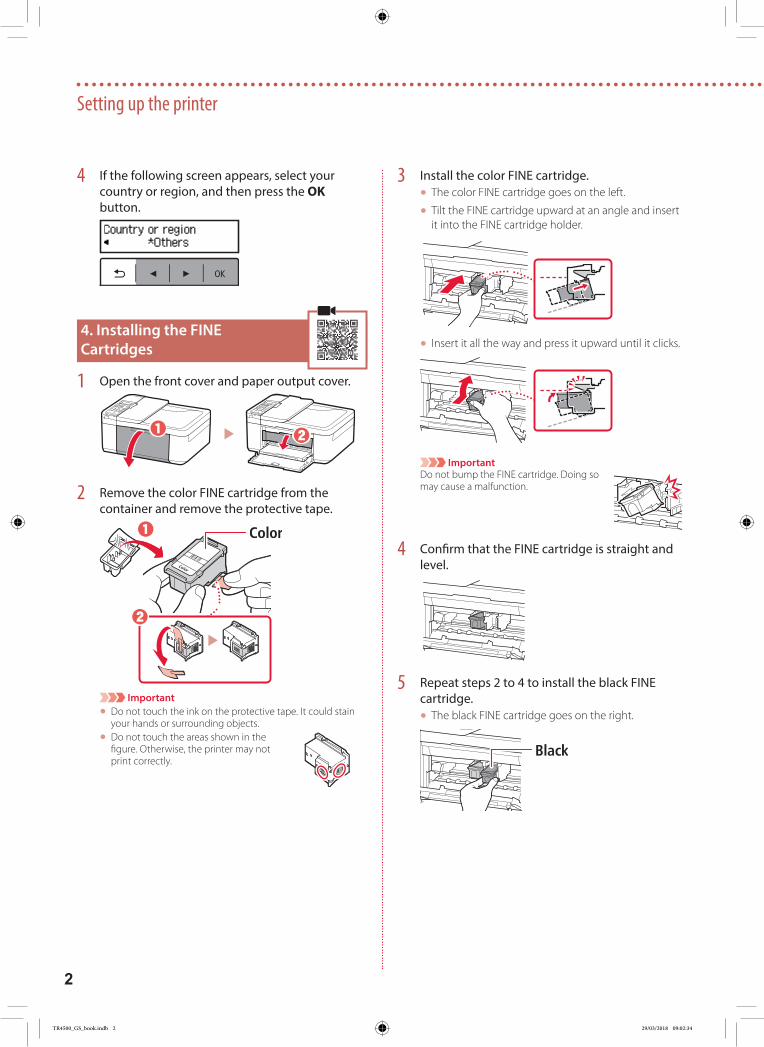
4 If the following screen appears, select your country or region, and then press the OK button.
4. Installing the FINE Cartridges
1 Open the front cover and paper output cover.
a b
2 Remove the color FINE cartridge from the container and remove the protective tape.
a
b
Important
• Do not touch the ink on the protective tape. It could stain your hands or surrounding objects.
• Do not touch the areas shown in the figure. Otherwise, the printer may not print correctly.
3 Install the color FINE cartridge.• The color FINE cartridge goes on the left.
• Tilt the FINE cartridge upward at an angle and insert it into the FINE cartridge holder.
• Insert it all the way and press it upward until it clicks.
ImportantDo not bump the FINE cartridge. Doing so may cause a malfunction.
4 Confirm that the FINE cartridge is straight and level.
5 Repeat steps 2 to 4 to install the black FINE cartridge.• The black FINE cartridge goes on the right.
TR4500_GS_book.indb 2 29/03/2018 09:02:34
3
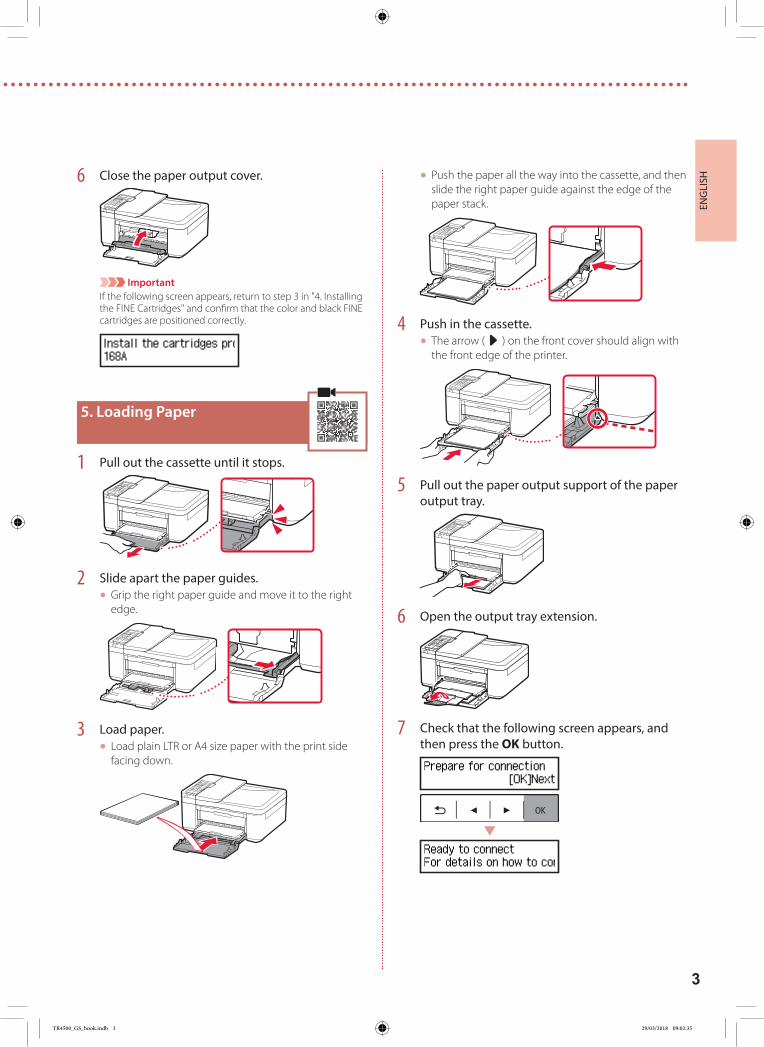
ENGLISH6 Close the paper output cover.
ImportantIf the following screen appears, return to step 3 in "4. Installing the FINE Cartridges" and confirm that the color and black FINE cartridges are positioned correctly.
5. Loading Paper
1 Pull out the cassette until it stops.
2 Slide apart the paper guides.• Grip the right paper guide and move it to the right
edge.
3 Load paper.• Load plain LTR or A4 size paper with the print side
facing down.
• Push the paper all the way into the cassette, and then slide the right paper guide against the edge of the paper stack.
4 Push in the cassette.• The arrow ( ] ) on the front cover should align with
the front edge of the printer.
5 Pull out the paper output support of the paper output tray.
6 Open the output tray extension.
7 Check that the following screen appears, and then press the OK button.
TR4500_GS_book.indb 3 29/03/2018 09:02:35
6-a
6-bpage 6
4
Setting up the printer
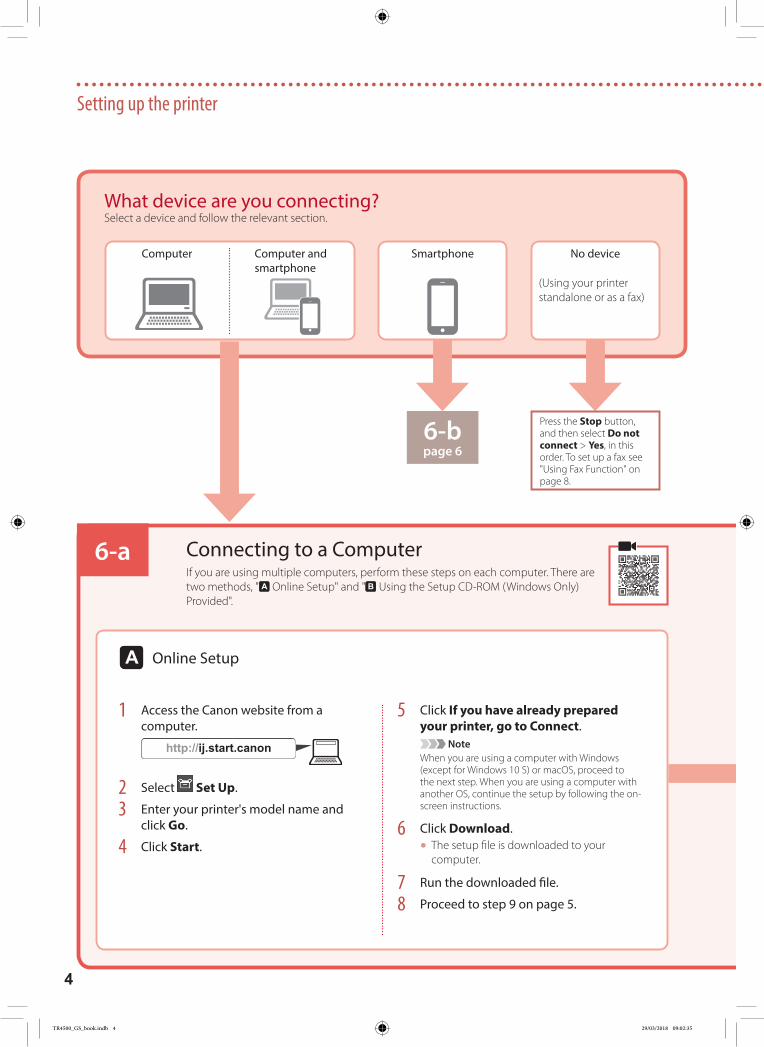
Press the Stop button, and then select Do not connect > Yes, in this order. To set up a fax see "Using Fax Function" on page 8.
Computer Computer and smartphone
Smartphone No device
(Using your printer standalone or as a fax)
Connecting to a ComputerIf you are using multiple computers, perform these steps on each computer. There are two methods, " Online Setup" and " Using the Setup CD-ROM (Windows Only) Provided".
1 Access the Canon website from a computer.
2 Select Set Up.
3 Enter your printer's model name and click Go.
4 Click Start.
5 Click If you have already prepared your printer, go to Connect.
NoteWhen you are using a computer with Windows (except for Windows 10 S) or macOS, proceed to the next step. When you are using a computer with another OS, continue the setup by following the on-screen instructions.
6 Click Download.• The setup file is downloaded to your
computer.
7 Run the downloaded file.
8 Proceed to step 9 on page 5.
Online Setup
What device are you connecting?Select a device and follow the relevant section.
TR4500_GS_book.indb 4 29/03/2018 09:02:35
5
ENGLISH
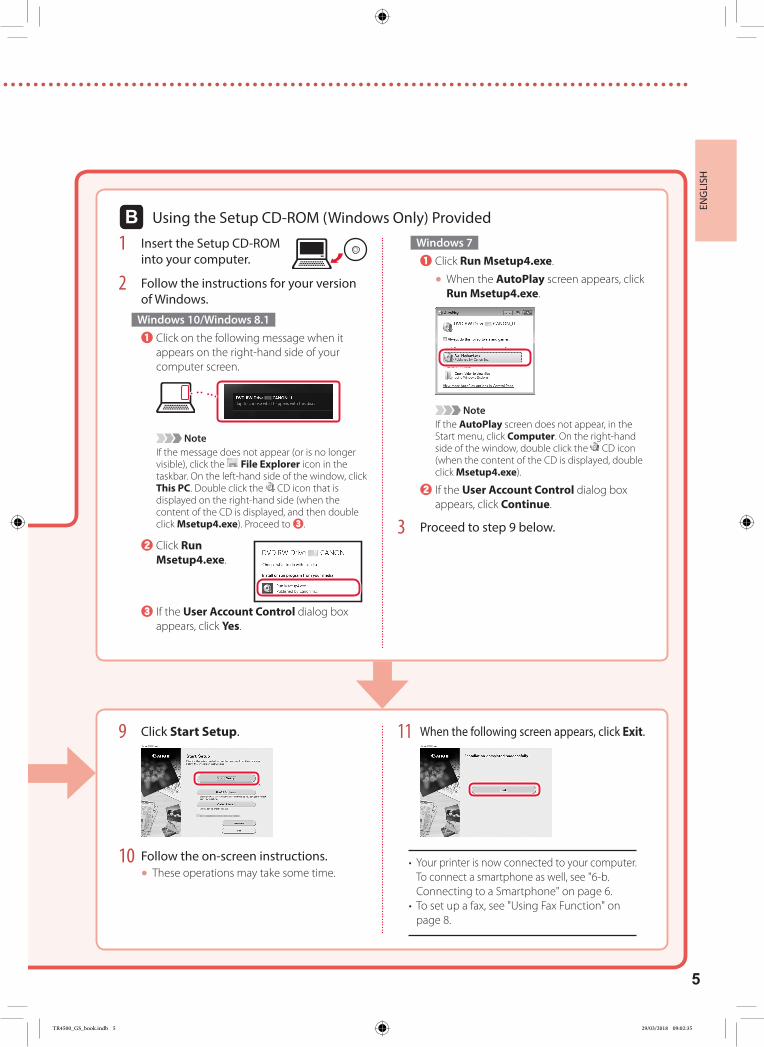
1 Insert the Setup CD-ROM into your computer.
2 Follow the instructions for your version of Windows.
Windows 10/Windows 8.1aClick on the following message when it
appears on the right-hand side of your computer screen.
NoteIf the message does not appear (or is no longer visible), click the File Explorer icon in the taskbar. On the left-hand side of the window, click This PC. Double click the CD icon that is displayed on the right-hand side (when the content of the CD is displayed, and then double click Msetup4.exe). Proceed to c.
bClick Run Msetup4.exe.
cIf the User Account Control dialog box appears, click Yes.
Windows 7aClick Run Msetup4.exe.
• When the AutoPlay screen appears, click Run Msetup4.exe.
NoteIf the AutoPlay screen does not appear, in the Start menu, click Computer. On the right-hand side of the window, double click the CD icon (when the content of the CD is displayed, double click Msetup4.exe).
bIf the User Account Control dialog box appears, click Continue.
3 Proceed to step 9 below.
Using the Setup CD-ROM (Windows Only) Provided
9 Click Start Setup.
10 Follow the on-screen instructions.• These operations may take some time.
11 When the following screen appears, click Exit.
• Your printer is now connected to your computer. To connect a smartphone as well, see "6-b. Connecting to a Smartphone" on page 6.
• To set up a fax, see "Using Fax Function" on page 8.
TR4500_GS_book.indb 5 29/03/2018 09:02:35
6-b
6
Setting up the printer
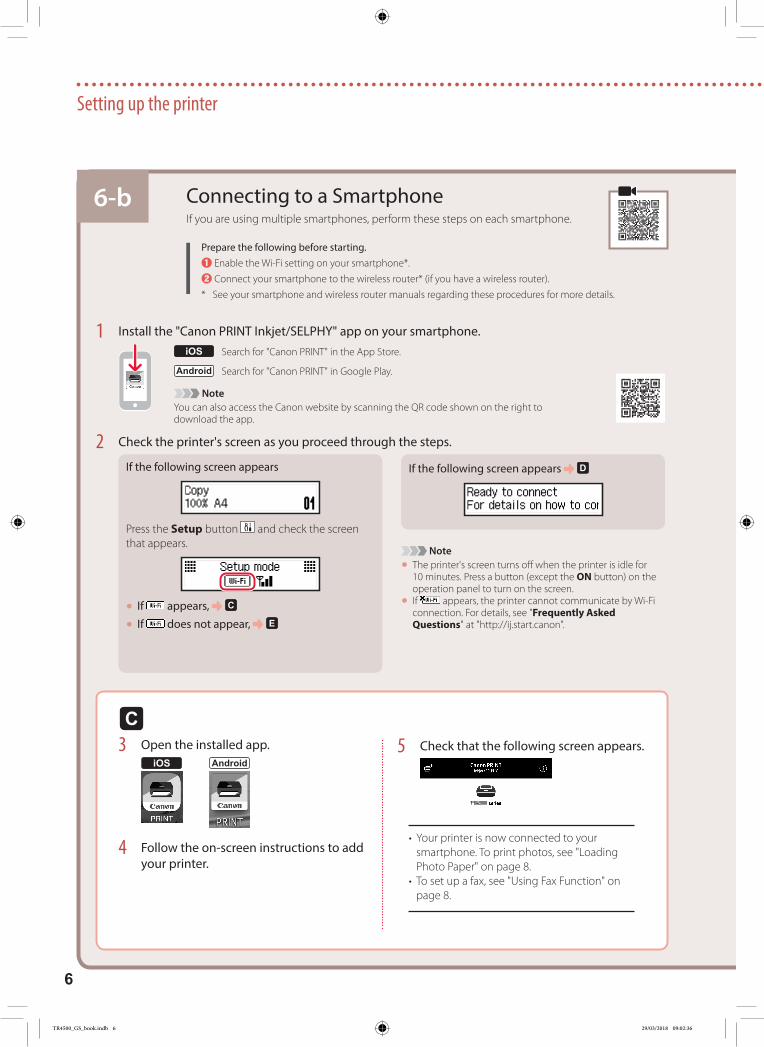
1 Install the "Canon PRINT Inkjet/SELPHY" app on your smartphone.
NoteYou can also access the Canon website by scanning the QR code shown on the right to download the app.
Search for "Canon PRINT" in the App Store.
Search for "Canon PRINT" in Google Play.
2 Check the printer's screen as you proceed through the steps.
If the following screen appears If the following screen appears
Press the Setup button and check the screen that appears.
• If appears,
• If does not appear,
Note
• The printer's screen turns off when the printer is idle for 10 minutes. Press a button (except the ON button) on the operation panel to turn on the screen.• If appears, the printer cannot communicate by Wi-Fi connection. For details, see "Frequently Asked Questions" at "http://ij.start.canon".
Connecting to a SmartphoneIf you are using multiple smartphones, perform these steps on each smartphone.
Prepare the following before starting.a Enable the Wi-Fi setting on your smartphone*.b Connect your smartphone to the wireless router* (if you have a wireless router).* See your smartphone and wireless router manuals regarding these procedures for more details.
3 Open the installed app.
4 Follow the on-screen instructions to add your printer.
5 Check that the following screen appears.
• Your printer is now connected to your smartphone. To print photos, see "Loading Photo Paper" on page 8.
• To set up a fax, see "Using Fax Function" on page 8.
TR4500_GS_book.indb 6 29/03/2018 09:02:36
7
ENGLISH
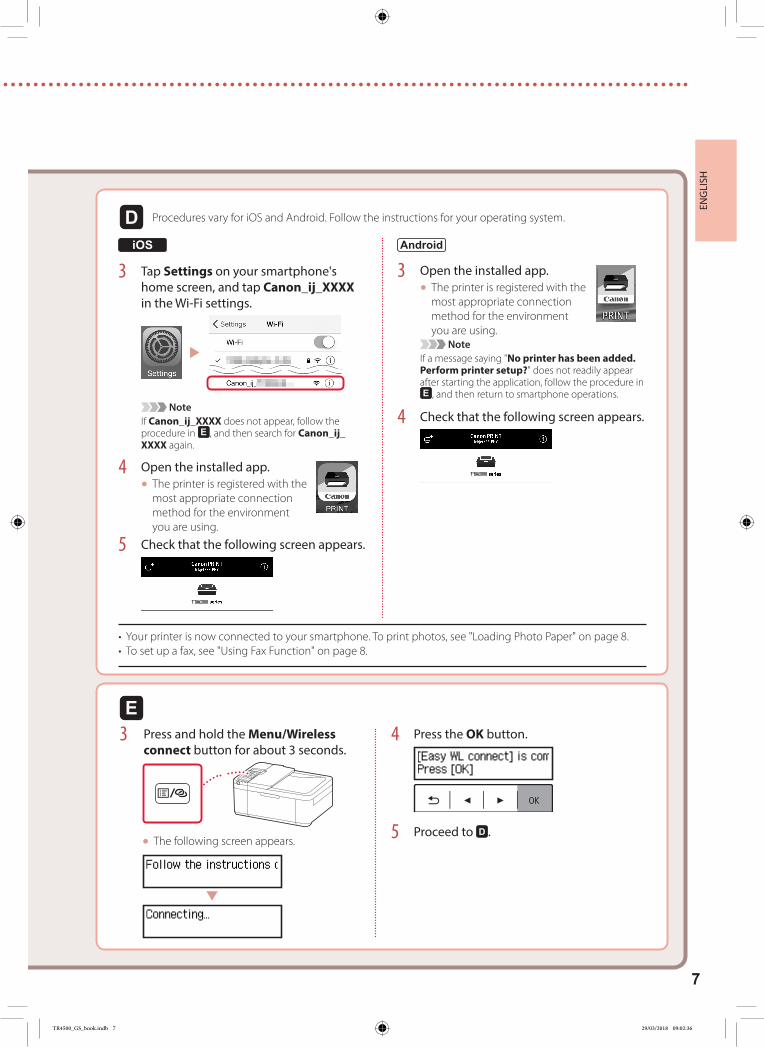
3 Tap Settings on your smartphone's home screen, and tap Canon_ij_XXXX in the Wi-Fi settings.
NoteIf Canon_ij_XXXX does not appear, follow the procedure in , and then search for Canon_ij_XXXX again.
4 Open the installed app.• The printer is registered with the
most appropriate connection method for the environment you are using.
5 Check that the following screen appears.
3 Open the installed app.• The printer is registered with the
most appropriate connection method for the environment you are using.
NoteIf a message saying "No printer has been added. Perform printer setup?" does not readily appear after starting the application, follow the procedure in
, and then return to smartphone operations.
4 Check that the following screen appears.
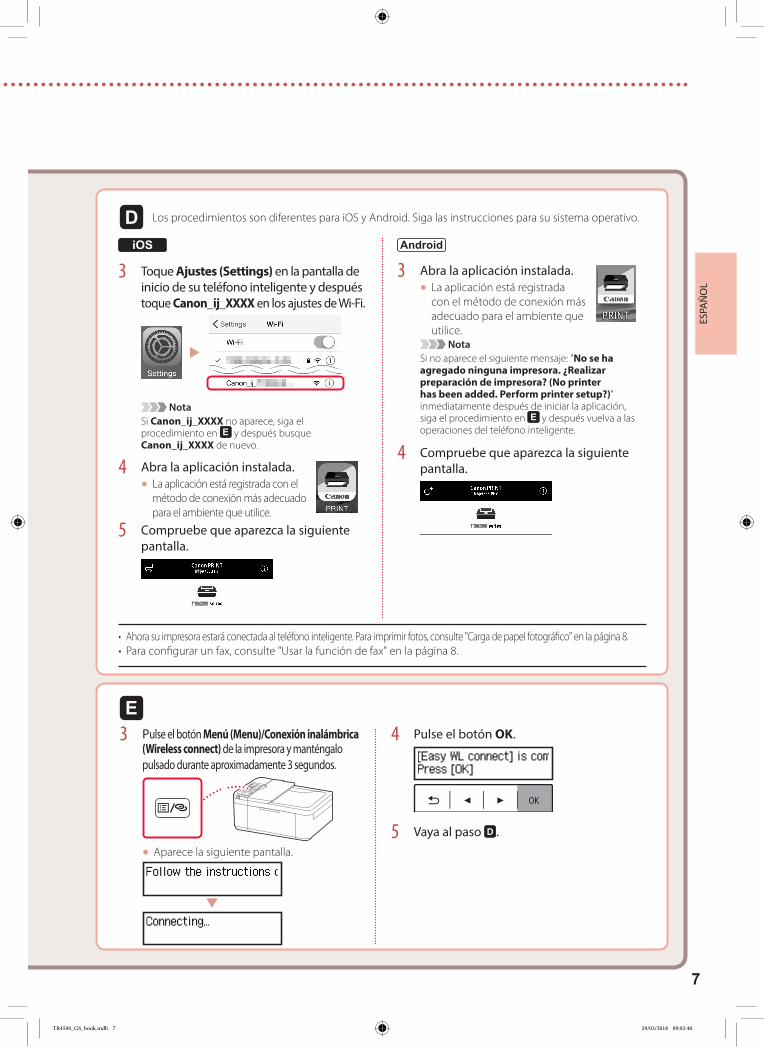
Procedures vary for iOS and Android. Follow the instructions for your operating system.
3 Press and hold the Menu/Wireless connect button for about 3 seconds.
• The following screen appears.
4 Press the OK button.
5 Proceed to .
• Your printer is now connected to your smartphone. To print photos, see "Loading Photo Paper" on page 8.• To set up a fax, see "Using Fax Function" on page 8.
TR4500_GS_book.indb 7 29/03/2018 09:02:36
8
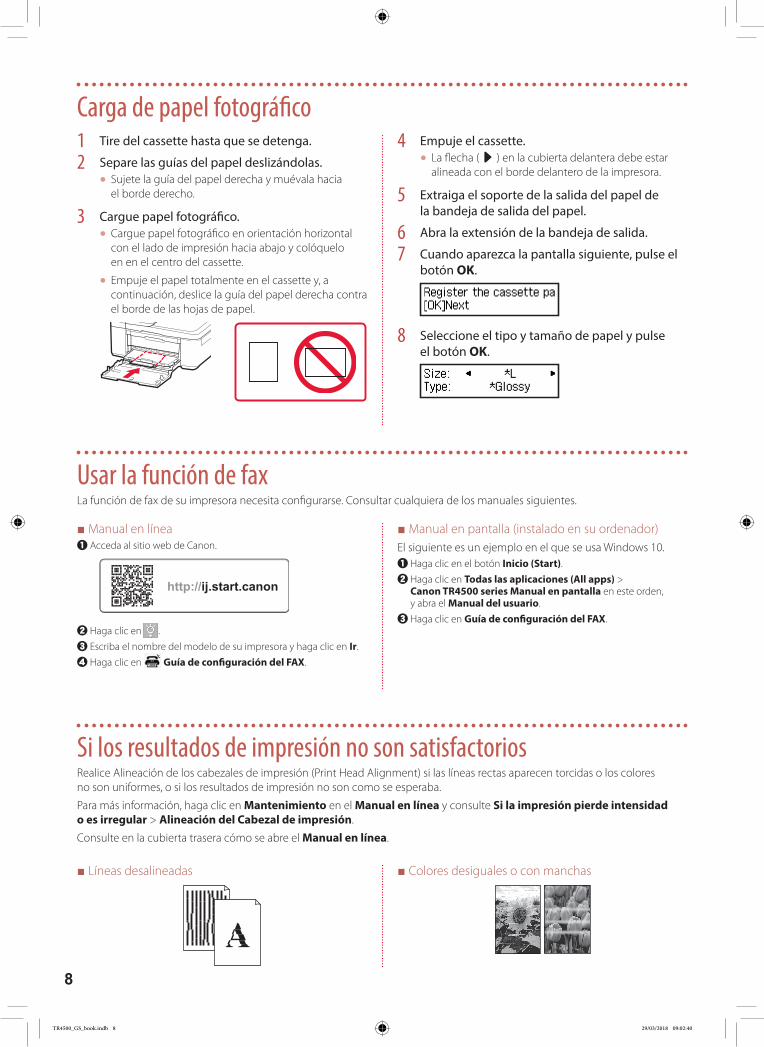
Loading Photo Paper1 Pull out the cassette until it stops.
2 Slide apart the paper guides.• Grip the right paper guide and move it to the right
edge.
3 Load photo paper.• Load photo paper in portrait orientation with the
print side facing down, and place it in the center of the cassette.
• Push the paper all the way into the cassette, and then slide the right paper guide against the edge of the paper stack.
4 Push in the cassette.• The arrow ( ] ) on the front cover should align with
the front edge of the printer.
5 Pull out the paper output support of the paper output tray.
6 Open the output tray extension.
7 When the following screen appears, press the OK button.
8 Select the paper size and type, and press the OK button.
Using Fax FunctionThe fax function of your printer requires setup. Refer to either of the following manuals.
■ Online Manuala Access the Canon website.
b Click .c Enter your printer's model name and click Go.d Click FAX Setup Guide.
■ On-screen Manual (installed on your computer)The following is an example using Windows 10.a Click the Start button.b Click All apps > Canon TR4500 series On-screen Manual in
this order, and then open the User's Manual.c Click FAX Setup Guide.
If Print Results Are UnsatisfactoryPerform Print Head Alignment if straight lines are crooked or colors are inconsistent, or print results are otherwise not what you expected.
For details, click the Maintenance on the Online Manual and refer to If Printing Is Faint or Uneven > Aligning the Print Head.
Refer to the back cover for how to open the Online Manual.
■ Lines Are Misaligned ■ Uneven or Streaked Colors
TR4500_GS_book.indb 8 29/03/2018 09:02:36
1
ESPA
ÑOL
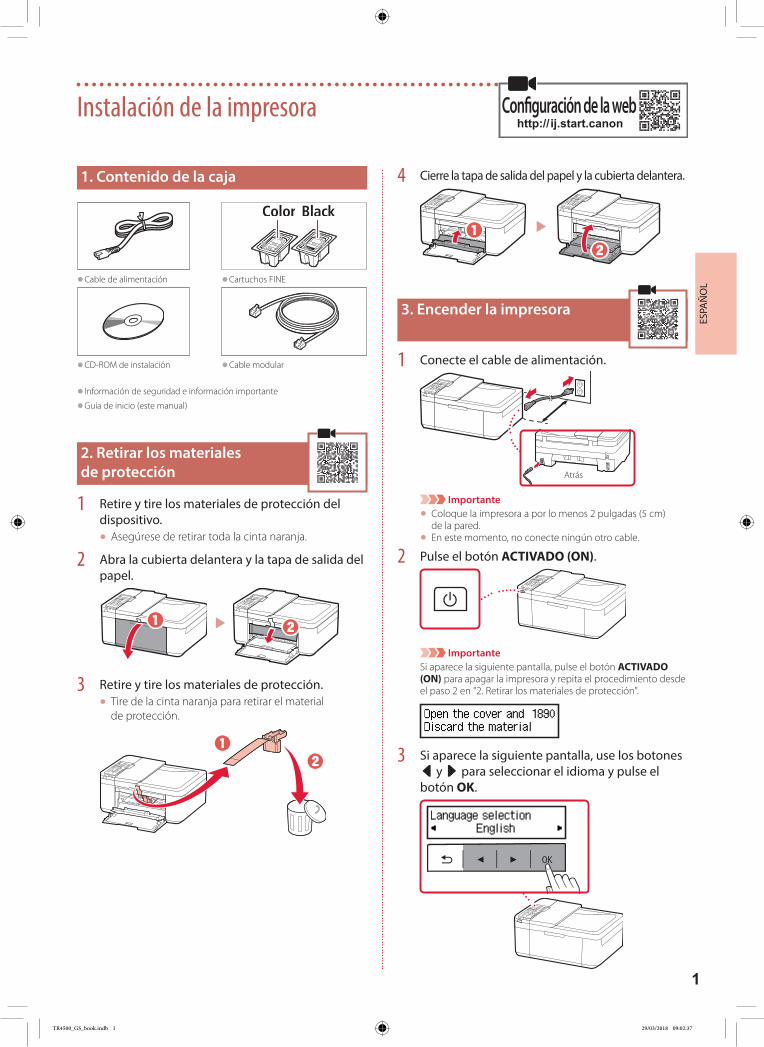
1. Contenido de la caja
• Cable de alimentación • Cartuchos FINE
• CD-ROM de instalación • Cable modular
• Información de seguridad e información importante
• Guía de inicio (este manual)
2. Retirar los materiales de protección
1 Retire y tire los materiales de protección del dispositivo.• Asegúrese de retirar toda la cinta naranja.
2 Abra la cubierta delantera y la tapa de salida del papel.
a b
3 Retire y tire los materiales de protección.• Tire de la cinta naranja para retirar el material
de protección.
ab
4 Cierre la tapa de salida del papel y la cubierta delantera.
a
b
3. Encender la impresora
1 Conecte el cable de alimentación.
Atrás
Importante
• Coloque la impresora a por lo menos 2 pulgadas (5 cm) de la pared.• En este momento, no conecte ningún otro cable.
2 Pulse el botón ACTIVADO (ON).
ImportanteSi aparece la siguiente pantalla, pulse el botón ACTIVADO (ON) para apagar la impresora y repita el procedimiento desde el paso 2 en "2. Retirar los materiales de protección".
3 Si aparece la siguiente pantalla, use los botones [ y ] para seleccionar el idioma y pulse el botón OK.
Instalación de la impresora Con�guración de la web
TR4500_GS_book.indb 1 29/03/2018 09:02:37
2
Instalación de la impresora
4 Si aparece la siguiente pantalla, seleccione su país o región y, a continuación, pulse el botón OK.
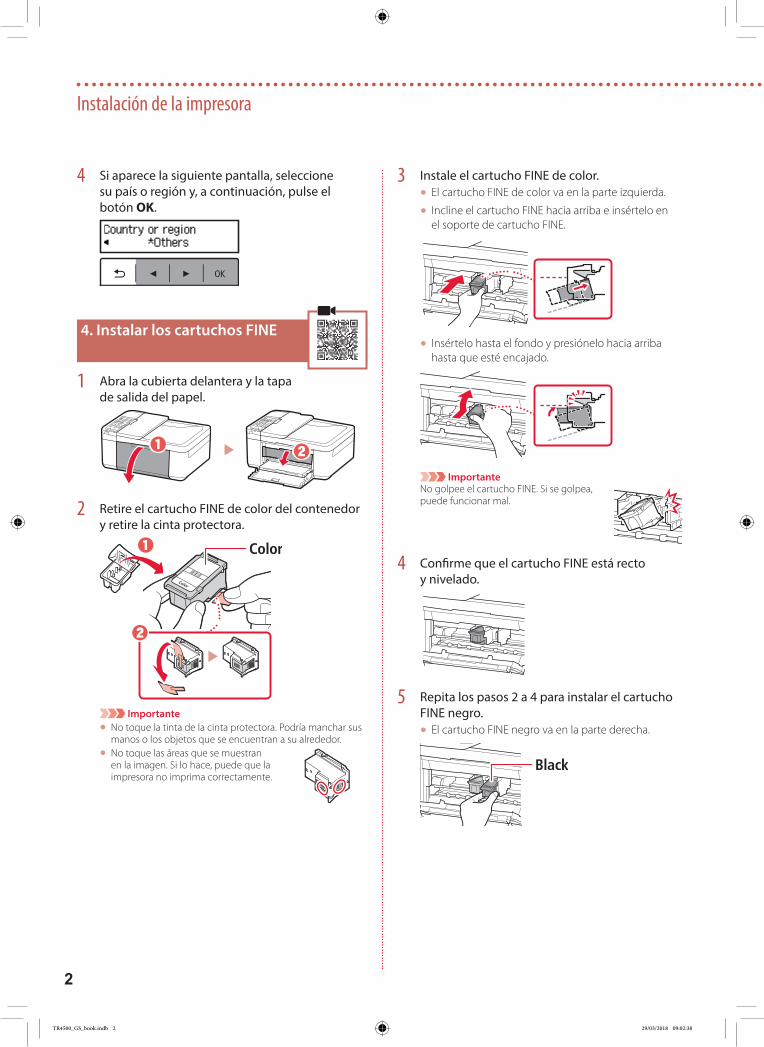
4. Instalar los cartuchos FINE
1 Abra la cubierta delantera y la tapa de salida del papel.
a b
2 Retire el cartucho FINE de color del contenedor y retire la cinta protectora.
a
b
Importante
• No toque la tinta de la cinta protectora. Podría manchar sus manos o los objetos que se encuentran a su alrededor.
• No toque las áreas que se muestran en la imagen. Si lo hace, puede que la impresora no imprima correctamente.
3 Instale el cartucho FINE de color.• El cartucho FINE de color va en la parte izquierda.
• Incline el cartucho FINE hacia arriba e insértelo en el soporte de cartucho FINE.
• Insértelo hasta el fondo y presiónelo hacia arriba hasta que esté encajado.
ImportanteNo golpee el cartucho FINE. Si se golpea, puede funcionar mal.
4 Confirme que el cartucho FINE está recto y nivelado.
5 Repita los pasos 2 a 4 para instalar el cartucho FINE negro.• El cartucho FINE negro va en la parte derecha.
TR4500_GS_book.indb 2 29/03/2018 09:02:38
3
ESPA
ÑOL
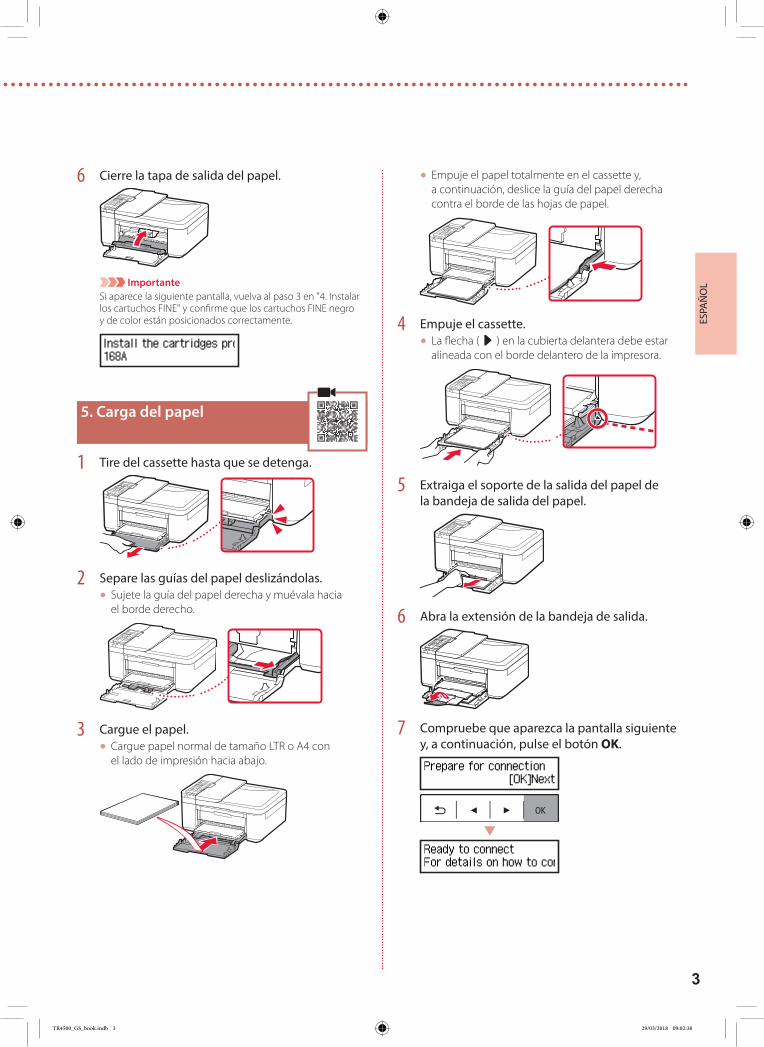
6 Cierre la tapa de salida del papel.
ImportanteSi aparece la siguiente pantalla, vuelva al paso 3 en "4. Instalar los cartuchos FINE" y confirme que los cartuchos FINE negro y de color están posicionados correctamente.
5. Carga del papel
1 Tire del cassette hasta que se detenga.
2 Separe las guías del papel deslizándolas.• Sujete la guía del papel derecha y muévala hacia
el borde derecho.
3 Cargue el papel.• Cargue papel normal de tamaño LTR o A4 con
el lado de impresión hacia abajo.
• Empuje el papel totalmente en el cassette y, a continuación, deslice la guía del papel derecha contra el borde de las hojas de papel.
4 Empuje el cassette.• La flecha ( ] ) en la cubierta delantera debe estar
alineada con el borde delantero de la impresora.
5 Extraiga el soporte de la salida del papel de la bandeja de salida del papel.
6 Abra la extensión de la bandeja de salida.
7 Compruebe que aparezca la pantalla siguiente y, a continuación, pulse el botón OK.
TR4500_GS_book.indb 3 29/03/2018 09:02:38

6-a
6-bpágina 6
4
Instalación de la impresora
Pulse el botón Parar (Stop) y, a continuación, seleccione No conectar (Do not connect) > Sí (Yes), en este orden. Para configurar un fax, consulte "Usar la función de fax" en la página 8.
Ordenador Ordenador y teléfono inteligente
Teléfono inteligente
Sin dispositivo
(Utilizando la impresora de modo independiente o como fax)
Conectar al ordenadorSi utiliza varios ordenadores, realice estos pasos en cada ordenador. Hay dos métodos, " Configuración en línea" y " Uso del CD-ROM de instalación (solo Windows) proporcionado".
1 Acceda al sitio web de Canon desde un ordenador.
2 Seleccione Configurar.
3 Escriba el nombre del modelo de su impresora y haga clic en Ir.
4 Haga clic en Iniciar.
5 Haga clic en Si ya ha preparado la impresora, vaya a Conectar.
NotaCuando utilice un ordenador con Windows (excepto Windows 10 S) o macOS, vaya al siguiente paso. Si utiliza otro sistema operativo en su ordenador, continúe con la configuración siguiendo las instrucciones en pantalla.
6 Haga clic en Descargar.• El archivo de configuración se descarga
en su ordenador.
7 Ejecute el archivo descargado.
8 Continúe en el paso 9 en página 5.
Configuración en línea
¿Qué dispositivo va a conectar?Seleccione un dispositivo y siga la sección relevante.
TR4500_GS_book.indb 4 29/03/2018 09:02:39
5
ESPA
ÑOL
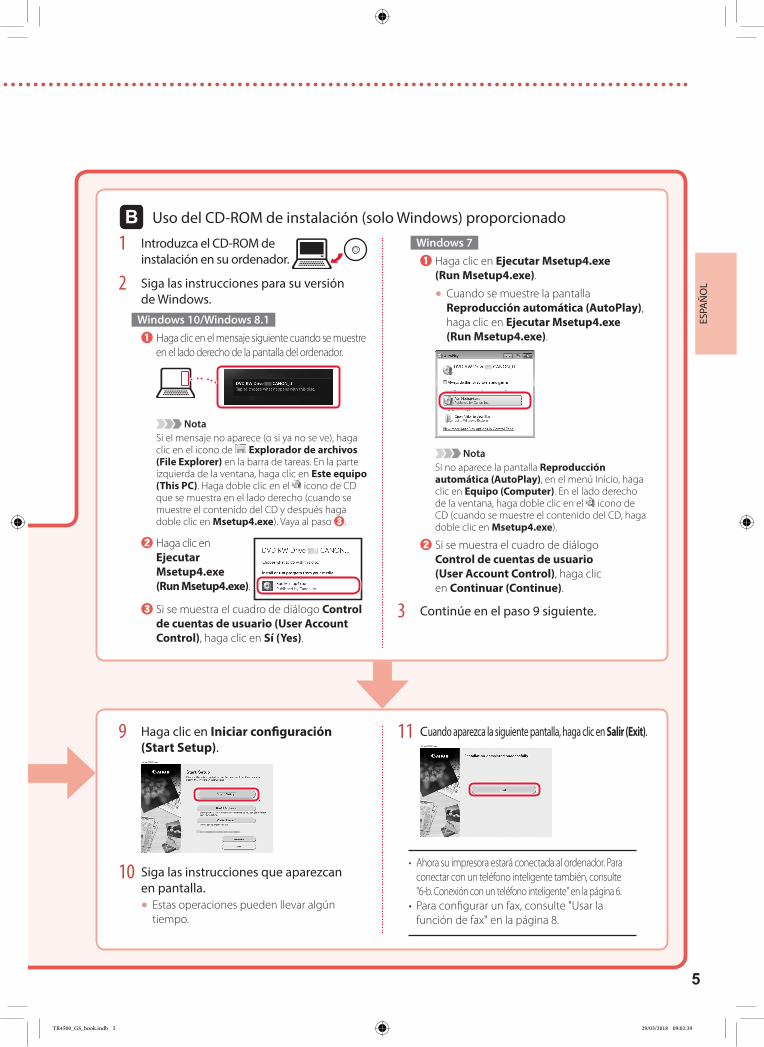
1 Introduzca el CD-ROM de instalación en su ordenador.
2 Siga las instrucciones para su versión de Windows.
Windows 10/Windows 8.1aHaga clic en el mensaje siguiente cuando se muestre
en el lado derecho de la pantalla del ordenador.
NotaSi el mensaje no aparece (o si ya no se ve), haga clic en el icono de Explorador de archivos (File Explorer) en la barra de tareas. En la parte izquierda de la ventana, haga clic en Este equipo (This PC). Haga doble clic en el icono de CD que se muestra en el lado derecho (cuando se muestre el contenido del CD y después haga doble clic en Msetup4.exe). Vaya al paso c.
bHaga clic en Ejecutar Msetup4.exe (Run Msetup4.exe).
cSi se muestra el cuadro de diálogo Control de cuentas de usuario (User Account Control), haga clic en Sí (Yes).
Windows 7aHaga clic en Ejecutar Msetup4.exe
(Run Msetup4.exe).
• Cuando se muestre la pantalla Reproducción automática (AutoPlay), haga clic en Ejecutar Msetup4.exe (Run Msetup4.exe).
NotaSi no aparece la pantalla Reproducción automática (AutoPlay), en el menú Inicio, haga clic en Equipo (Computer). En el lado derecho de la ventana, haga doble clic en el icono de CD (cuando se muestre el contenido del CD, haga doble clic en Msetup4.exe).
bSi se muestra el cuadro de diálogo Control de cuentas de usuario (User Account Control), haga clic en Continuar (Continue).
3 Continúe en el paso 9 siguiente.
Uso del CD-ROM de instalación (solo Windows) proporcionado
9 Haga clic en Iniciar configuración (Start Setup).
10 Siga las instrucciones que aparezcan en pantalla.• Estas operaciones pueden llevar algún
tiempo.
11 Cuando aparezca la siguiente pantalla, haga clic en Salir (Exit).
• Ahora su impresora estará conectada al ordenador. Para conectar con un teléfono inteligente también, consulte "6-b. Conexión con un teléfono inteligente" en la página 6.
• Para configurar un fax, consulte "Usar la función de fax" en la página 8.
TR4500_GS_book.indb 5 29/03/2018 09:02:39
6-b
6
Instalación de la impresora
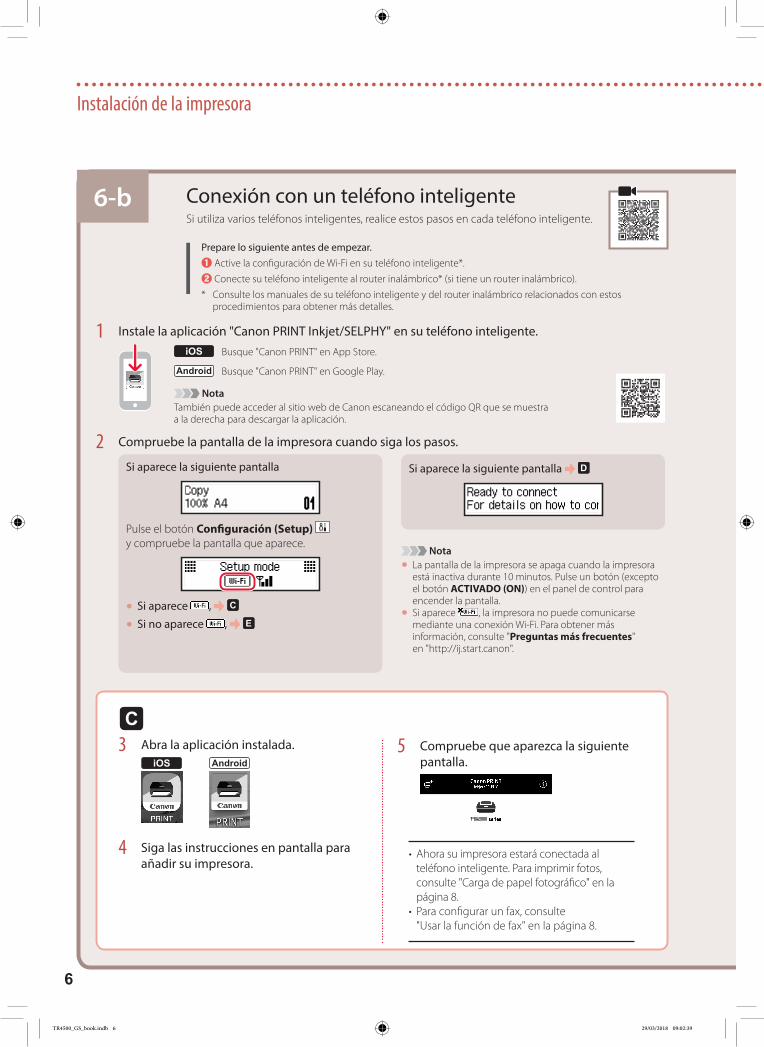
1 Instale la aplicación "Canon PRINT Inkjet/SELPHY" en su teléfono inteligente.
NotaTambién puede acceder al sitio web de Canon escaneando el código QR que se muestra a la derecha para descargar la aplicación.
Busque "Canon PRINT" en App Store.
Busque "Canon PRINT" en Google Play.
2 Compruebe la pantalla de la impresora cuando siga los pasos.
Si aparece la siguiente pantalla Si aparece la siguiente pantalla
Pulse el botón Configuración (Setup) y compruebe la pantalla que aparece.
• Si aparece ,
• Si no aparece ,
Nota
• La pantalla de la impresora se apaga cuando la impresora está inactiva durante 10 minutos. Pulse un botón (excepto el botón ACTIVADO (ON)) en el panel de control para encender la pantalla.• Si aparece , la impresora no puede comunicarse mediante una conexión Wi-Fi. Para obtener más información, consulte "Preguntas más frecuentes" en "http://ij.start.canon".
Conexión con un teléfono inteligenteSi utiliza varios teléfonos inteligentes, realice estos pasos en cada teléfono inteligente.
Prepare lo siguiente antes de empezar.a Active la configuración de Wi-Fi en su teléfono inteligente*.b Conecte su teléfono inteligente al router inalámbrico* (si tiene un router inalámbrico).* Consulte los manuales de su teléfono inteligente y del router inalámbrico relacionados con estos
procedimientos para obtener más detalles.
3 Abra la aplicación instalada.
4 Siga las instrucciones en pantalla para añadir su impresora.
5 Compruebe que aparezca la siguiente pantalla.
• Ahora su impresora estará conectada al teléfono inteligente. Para imprimir fotos, consulte "Carga de papel fotográfico" en la página 8.
• Para configurar un fax, consulte "Usar la función de fax" en la página 8.
TR4500_GS_book.indb 6 29/03/2018 09:02:39
7
ESPA
ÑOL
3 Toque Ajustes (Settings) en la pantalla de inicio de su teléfono inteligente y después toque Canon_ij_XXXX en los ajustes de Wi-Fi.
NotaSi Canon_ij_XXXX no aparece, siga el procedimiento en y después busque Canon_ij_XXXX de nuevo.
4 Abra la aplicación instalada.• La aplicación está registrada con el
método de conexión más adecuado para el ambiente que utilice.
5 Compruebe que aparezca la siguiente pantalla.
3 Abra la aplicación instalada.• La aplicación está registrada
con el método de conexión más adecuado para el ambiente que utilice.
NotaSi no aparece el siguiente mensaje: "No se ha agregado ninguna impresora. ¿Realizar preparación de impresora? (No printer has been added. Perform printer setup?)" inmediatamente después de iniciar la aplicación, siga el procedimiento en y después vuelva a las operaciones del teléfono inteligente.
4 Compruebe que aparezca la siguiente pantalla.
Los procedimientos son diferentes para iOS y Android. Siga las instrucciones para su sistema operativo.
3 Pulse el botón Menú (Menu)/Conexión inalámbrica (Wireless connect) de la impresora y manténgalo pulsado durante aproximadamente 3 segundos.
• Aparece la siguiente pantalla.
4 Pulse el botón OK.
5 Vaya al paso .
• Ahora su impresora estará conectada al teléfono inteligente. Para imprimir fotos, consulte "Carga de papel fotográfico" en la página 8.• Para configurar un fax, consulte "Usar la función de fax" en la página 8.
TR4500_GS_book.indb 7 29/03/2018 09:02:40
8
Carga de papel fotográfico1 Tire del cassette hasta que se detenga.
2 Separe las guías del papel deslizándolas.• Sujete la guía del papel derecha y muévala hacia
el borde derecho.
3 Cargue papel fotográfico.• Cargue papel fotográfico en orientación horizontal
con el lado de impresión hacia abajo y colóquelo en en el centro del cassette.
• Empuje el papel totalmente en el cassette y, a continuación, deslice la guía del papel derecha contra el borde de las hojas de papel.
4 Empuje el cassette.• La flecha ( ] ) en la cubierta delantera debe estar
alineada con el borde delantero de la impresora.
5 Extraiga el soporte de la salida del papel de la bandeja de salida del papel.
6 Abra la extensión de la bandeja de salida.
7 Cuando aparezca la pantalla siguiente, pulse el botón OK.
8 Seleccione el tipo y tamaño de papel y pulse el botón OK.
Usar la función de faxLa función de fax de su impresora necesita configurarse. Consultar cualquiera de los manuales siguientes.
■ Manual en líneaa Acceda al sitio web de Canon.
b Haga clic en .c Escriba el nombre del modelo de su impresora y haga clic en Ir.d Haga clic en Guía de configuración del FAX.
■ Manual en pantalla (instalado en su ordenador)El siguiente es un ejemplo en el que se usa Windows 10.a Haga clic en el botón Inicio (Start).b Haga clic en Todas las aplicaciones (All apps) >
Canon TR4500 series Manual en pantalla en este orden, y abra el Manual del usuario.
c Haga clic en Guía de configuración del FAX.
Si los resultados de impresión no son satisfactoriosRealice Alineación de los cabezales de impresión (Print Head Alignment) si las líneas rectas aparecen torcidas o los colores no son uniformes, o si los resultados de impresión no son como se esperaba.
Para más información, haga clic en Mantenimiento en el Manual en línea y consulte Si la impresión pierde intensidad o es irregular > Alineación del Cabezal de impresión.
Consulte en la cubierta trasera cómo se abre el Manual en línea.
■ Líneas desalineadas ■ Colores desiguales o con manchas
TR4500_GS_book.indb 8 29/03/2018 09:02:40
Videoteca sobre procedimientosHow-To Video Library
RMC (Regulatory Model Code): K10483
TR4500_GS_book.indb 3 29/03/2018 09:02:32
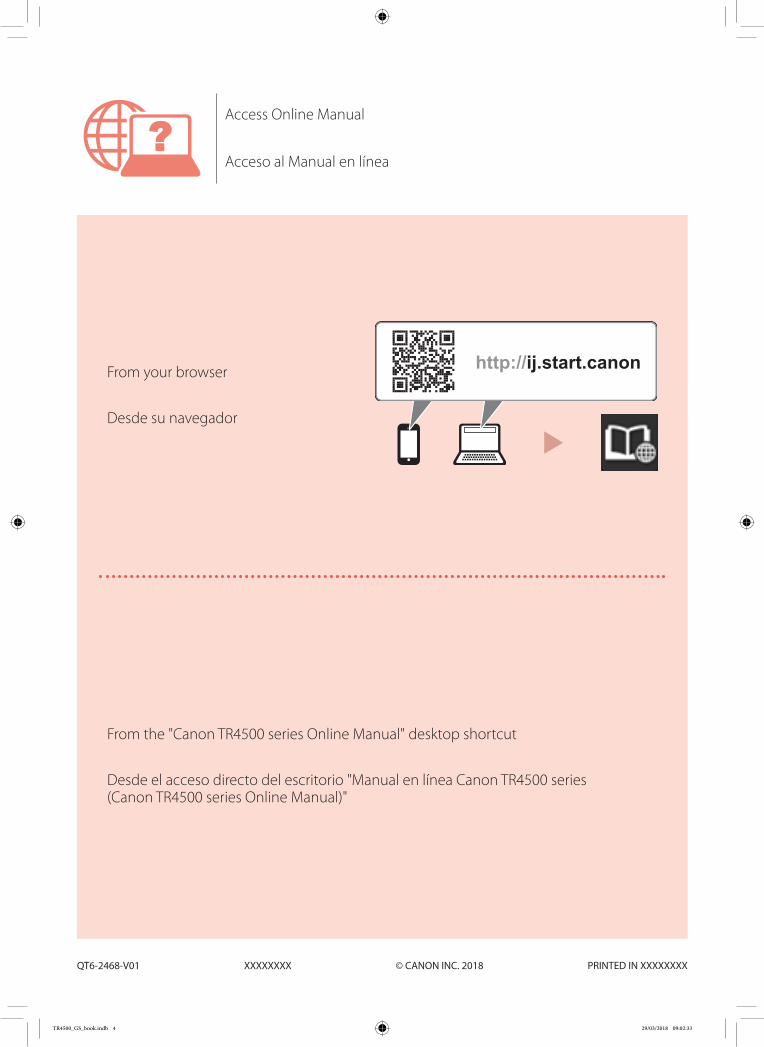
Acceso al Manual en línea
Desde el acceso directo del escritorio "Manual en línea Canon TR4500 series (Canon TR4500 series Online Manual)"
Desde su navegador
Access Online Manual
From the "Canon TR4500 series Online Manual" desktop shortcut
From your browser
PRINTED IN XXXXXXXXQT6-2468-V01 © CANON INC. 2018XXXXXXXX
TR4500_GS_book.indb 4 29/03/2018 09:02:33